How-To Geek
How to link or embed an excel worksheet in a powerpoint presentation.
Sometimes, you want to include the data on an Excel spreadsheet in a Microsoft PowerPoint presentation.

Quick Links
What's the difference between linking and embedding, how to link or embed an excel worksheet in microsoft powerpoint.
Sometimes, you want to include the data on an Excel spreadsheet in a Microsoft PowerPoint presentation. There are a couple of ways to do this, depending on whether or not you want to maintain a connection with the source Excel sheet. Let's take a look.
You actually have three options for including a spreadsheet in a PowerPoint presentation. The first is by simply copying that data from the spreadsheet, and then pasting it into the target document. This works okay, but all it really does is convert the data to a simple table in PowerPoint. You can use PowerPoint's basic table formatting tools on it, but you can't use any of Excel's features after the conversion.
While that can be useful sometimes, your other two options---linking and embedding---are much more powerful, and are what we're going to show you how to do in this article. Both are pretty similar, in that you end up inserting an actual Excel spreadsheet in your target presentation. It will look like an Excel sheet, and you can use Excel's tools to manipulate it. The difference comes in how these two options treat their connection to that original Excel spreadsheet:
- If you link an Excel worksheet in a presentation, the target presentation and the original Excel sheet maintain a connection. If you update the Excel file, those updates get automatically reflected in the target presentation.
- If you embed an Excel worksheet in a presentation, that connection is broken. Updating the original Excel sheet does not automatically update the data in the target presentation.
There are advantages to both methods, of course. One advantage of linking a document (other than maintaining the connection) is that it keeps your PowerPoint presentation's file size down, because the data is mostly still stored in the Excel sheet and only displayed in PowerPoint. One disadvantage is that the original spreadsheet file needs to stay in the same location. If it doesn't, you'll have to link it again. And since it relies on the link to the original spreadsheet, it's not so useful if you need to distribute the presentation to people who don't have access to that location.
Embedding that data, on the other hand, increases the size of presentation, because all that Excel data is actually embedded into the PowerPoint file. There are some distinct advantages to embedding, though. For example, if you're distributing that presentation to people who might not have access to the original Excel sheet, or if the presentation needs to show that Excel sheet at a specific point in time (rather than getting updated), embedding (and breaking the connection to the original sheet) makes more sense.
So, with all that in mind, let's take a look at how to link and embed an Excel Sheet in Microsoft PowerPoint.
Linking or embedding an Excel worksheet into a PowerPoint presentation is actually pretty straightforward, and the process for doing either is almost identical. Start by opening both the Excel worksheet and the PowerPoint presentation you want to edit at the same time.
In Excel, select the cells you want to link or embed. If you would like to link or embed the entire worksheet, click on the box at the juncture of the rows and columns in the top left-hand corner to select the whole sheet.
Copy those cells by pressing CTRL+C in Windows or Command+C in macOS. You can also right-click any selected cell, and then choose the "Copy" option on the context menu.
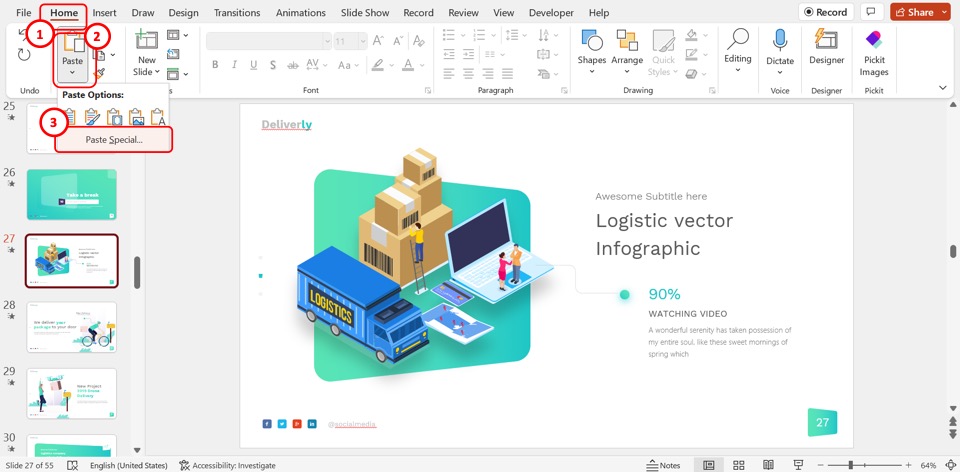
Now, switch to your PowerPoint presentation and click to place the insertion point where you would like the linked or embedded material to go. On Home tab of the Ribbon, click the down arrow beneath the "Paste" button, and then choose the "Paste Special" command from the dropdown menu.
This opens the Paste Special window. And it's here where you'll find the only functional different in the processes of linking or embedding a file.
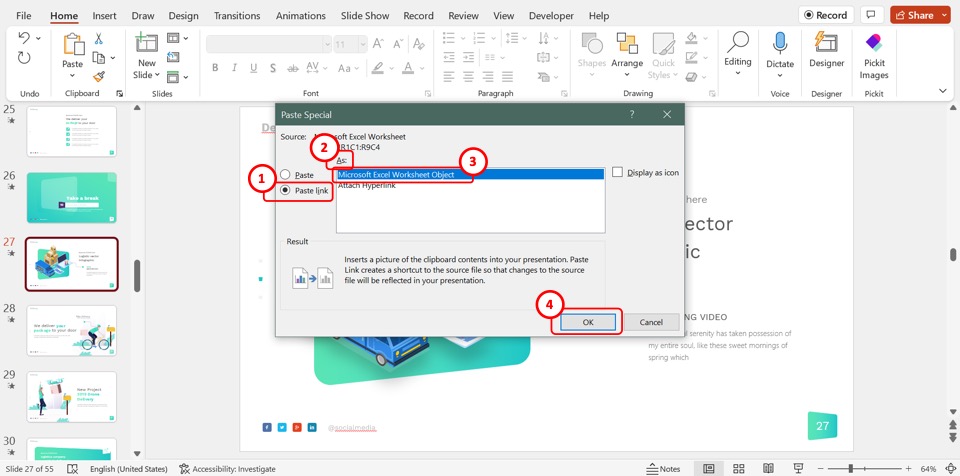
If you want to embed your spreadsheet, choose the "Paste" option over on the left. If you want to link your spreadsheet, choose the "Paste Link" option instead. Seriously, that's it. This process is otherwise identical.
Whichever option you choose, you'll next select the "Microsoft Excel Worksheet Object" in the box to the right, and then click the "OK" button.
And you'll see your Excel sheet (or the cells you selected) in your PowerPoint presentation.
If you linked the Excel data, you can't edit it directly in PowerPoint, but you can double-click anywhere on it to open the original spreadsheet file. And any updates you make to that original spreadsheet are then reflected in your PowerPoint presentation.
If you embedded the Excel data, you can edit it directly in PowerPoint. Double-click anywhere in the spreadsheet and you'll stay in the same PowerPoint window, but the PowerPoint Ribbon gets replaced by the Excel Ribbon and you can access all the Excel functionality. It's kind of cool.
And when you want to stop editing the spreadsheet and go back to your PowerPoint controls, just click anywhere outside the spreadsheet.
How to Insert an Excel Spreadsheet Into Powerpoint: A Step-by-Step Guide
Inserting an Excel spreadsheet into PowerPoint is a straightforward process. All you need to do is open your PowerPoint presentation, click on the slide where you want the spreadsheet to appear, and then use the Insert Object function to add the Excel file. Once you’ve completed these steps, your Excel spreadsheet will be embedded into your PowerPoint slide, ready for you to present.
Step by Step Tutorial: How to Insert an Excel Spreadsheet Into PowerPoint
Before we dive into the steps, let’s understand what we’re aiming to achieve. By inserting an Excel spreadsheet into PowerPoint, we’re looking to display data in a more visual and interactive manner during a presentation. It could be a sales report, a project timeline, or any kind of data that you’ve crunched in Excel and now want to share with your audience in PowerPoint.
Step 1: Open Your PowerPoint Presentation
Open the PowerPoint presentation where you want to insert the Excel spreadsheet.
Make sure you’re on the right slide where you want to insert the Excel spreadsheet. If you haven’t created a slide yet, you can easily add a new one by clicking on “New Slide” in the Home tab.
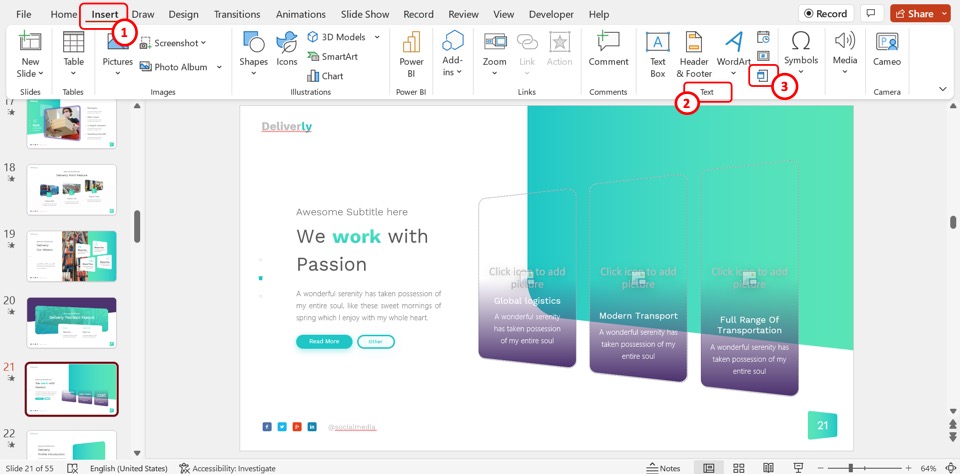
Step 2: Click the Insert Tab
Navigate to the Insert tab on PowerPoint’s ribbon.
The Insert tab is where all the magic happens when it comes to adding different types of content to your PowerPoint slides, including tables, images, and, of course, Excel spreadsheets.
Step 3: Click on Object in the Text Group
In the Text group, click on Object.
When you click on Object, a dialog box will appear, giving you the option to insert various types of content. For our purposes, we’re interested in inserting an object from a file—specifically, an Excel file.
Step 4: Choose ‘Create from file’ and Browse for Your Excel File
Select ‘Create from file’ and then click on ‘Browse’ to find the Excel file you want to insert.
Navigating to your Excel file might take a bit of digging, especially if you’ve got a lot of folders and files to sift through. But once you find the file, select it, and click ‘OK’, you’re almost done.
Step 5: Click OK to Insert the Spreadsheet
After selecting the file, click OK, and your Excel spreadsheet will be inserted into your PowerPoint slide.
Your spreadsheet won’t just be a static image; it’ll be a fully functional Excel sheet. This means you can double-click on it to make changes, and those changes will be reflected in the PowerPoint presentation.
After completing these steps, your Excel spreadsheet will be part of your PowerPoint slide. You can resize it and move it around to fit your layout. The beauty of this is that you can interact with the spreadsheet right from PowerPoint, which can be really useful if you need to make last-minute changes or highlight certain data during your presentation.
Tips: How to Insert an Excel Spreadsheet Into PowerPoint
- Always save your Excel file before inserting it into PowerPoint to ensure all changes are up-to-date.
- If your Excel file is large, consider linking to it instead of embedding it to avoid making your PowerPoint file too heavy.
- Resize the Excel object in PowerPoint to ensure that the text is readable and the data is visible.
- Use the ‘Format Object’ options in PowerPoint to add a border or shadow to your Excel spreadsheet, making it stand out on the slide.
- Remember that if you update the original Excel file, you will need to reinsert it into PowerPoint for the changes to take effect unless you’ve linked to the file.
Frequently Asked Questions
How do i edit an excel spreadsheet after inserting it into powerpoint.
You can double-click on the inserted Excel spreadsheet, and it will open in Excel for editing. Once you save the changes in Excel, they will be updated in PowerPoint.
Can I link to an Excel spreadsheet instead of embedding it?
Yes, when inserting the Excel file, choose ‘Link’ instead of ‘Insert’, which will create a link to the file instead of embedding it. This way, any updates to the Excel file will automatically reflect in PowerPoint.
What if I only want to insert a part of the Excel spreadsheet?
You can copy the specific range of cells in Excel that you want to display and then paste it into PowerPoint as an embedded object.
Can I insert multiple Excel spreadsheets into one PowerPoint slide?
You can, but it might make the slide look cluttered. It’s best to insert one spreadsheet per slide for clarity.
Will my Excel formulas work in PowerPoint?
The formulas in your Excel spreadsheet will remain functional when you embed the spreadsheet into PowerPoint. However, if you paste the cells as an image, the formulas will not be active.
- Open your PowerPoint presentation and select the slide for insertion.
- Click the Insert tab on PowerPoint’s ribbon.
- Click on Object in the Text group.
- Choose ‘Create from file’ and Browse for your Excel file.
- Click OK to insert the spreadsheet.
Inserting an Excel spreadsheet into a PowerPoint presentation can add a whole new level of detail and professionalism to your work. Whether you’re presenting financial results, project timelines, or any other data-heavy information, having the ability to display and interact with Excel data directly in PowerPoint is a game-changer. It ensures that your audience can see the exact figures and calculations that you’re discussing, which can help to clarify points and answer questions on the spot.
Just remember to keep your slides uncluttered, make sure any inserted data is relevant to your presentation, and always double-check that the data you’re showing is accurate and up-to-date. With these tips in mind, you’ll be well on your way to delivering a powerful and informative presentation that leverages the best of both Excel and PowerPoint.

Matt Jacobs has been working as an IT consultant for small businesses since receiving his Master’s degree in 2003. While he still does some consulting work, his primary focus now is on creating technology support content for SupportYourTech.com.
His work can be found on many websites and focuses on topics such as Microsoft Office, Apple devices, Android devices, Photoshop, and more.
Share this:
- Click to share on Twitter (Opens in new window)
- Click to share on Facebook (Opens in new window)
Related Posts
- How to Rotate a Powerpoint Slide Presentation
- How to Download a Google Slides Presentation as a Powerpoint File
- How to End Powerpoint on Last Slide in Powerpoint 2010: A Step-by-Step Guide
- How to Delete a Slide in Powerpoint 2010: Step-by-Step Guide
- How to Mirror Image in PPT Files (An Easy 6 Step Guide)
- How to Hide a Slide in Powerpoint 2010: A Step-by-Step Guide
- Can You Save a Powerpoint as a Video in Powerpoint 2013? Find Out Here!
- How to Duplicate a Slide in Powerpoint: A Step-by-Step Guide
- How to Create a Hyperlink in Powerpoint 2010: A Step-by-Step Guide
- How to Insert a File Into a Word 2013 Document: A Step-by-Step Guide
- How to Insert as Text in Microsoft Outlook for Office 365: A Step-by-Step Guide
- How to Remove Slide Numbers in Powerpoint 2019: Easy Steps
- How to Change Slide Size in Powerpoint 2016
- How to Insert Slides from Another Presentation: Powerpoint 2024 Guide
- How to Put Embedded Youtube Video in Powerpoint 2010: A Step-by-Step Guide
- Utilizing Motion Paths in PowerPoint on Windows 11: A Step-by-Step Guide
- Keeping Track of Word Counts in PowerPoint: Tips and Tricks
- How to Do a Powerpoint Google Slides Presentation Conversion
- How to Save Powerpoint as PDF with Notes: A Step-by-Step Guide
- How to Add a New Slide in Google Slides: A Step-by-Step Guide
Get Our Free Newsletter
How-to guides and tech deals
You may opt out at any time. Read our Privacy Policy
How to Link Excel Data to Your PowerPoint Presentation
You can easily update your PowerPoint file by linking your Excel spreadsheet data to your presentation. Here's how to do it.
You always want to have the latest data available if you're making a presentation. That way, you can ensure that your slides are accurate and reflect the realities on the ground.
However, there are times when you have to create a presentation as your colleagues are still compiling data. How can you ensure that any change they make in your Excel database reflects in your PowerPoint slide?
This is where the Paste link function comes in. Here's how to use it to ensure you always have the latest database and chart info on your presentation.
Linking Your Excel Data to PowerPoint
To link your Excel table to your presentation, it first must exist. If your colleagues haven't created it yet, you can create a placeholder table you can select and copy and then have your teammates update its content. Once you've made the initial data, follow the steps outlined below.
- Select the table you want to copy over to your presentation.
- Click on Copy or press Ctrl + C ( Command + C for Mac users).
- Open Microsoft Powerpoint .
- Open the file presentation you're working on if you already have one; otherwise, click on Blank Presentation .
- On a blank slide, go to the Home menu ribbon .
- Click on the down arrow under the paste icon .
- Choose Paste Special…
- In the Paste Special window, choose the Paste link radio button.
- Choose Microsoft Excel Worksheet Object .
Once done, you'll see the table you copied from Excel appear on your PowerPoint presentation.
However, you need to access the source Excel file to edit the content or formatting of the table you added. To do so, you can open the file where you saved it; or, you could double-click the table, and it will automatically open the source file.
Related: How to Organize Your Spreadsheets in Excel
Creating a Dynamic Chart
One of the easiest ways to visualize, compare, and analyze data and trends is to use charts. However, if you want to create a chart from the linked Excel table you just created, you must do it from its source file first. Once you've made the chart, you can copy and link it to your PowerPoint file. Here's how to do it.
- Select the chart you create in Excel.
- Go to the slide where you want to place the chart you just copied.
- On the Home menu ribbon , click on the down arrow under the paste icon .
- In the Paste Options , you can either choose Use Destination Theme & Link Data (L) or Keep Source Formatting & Link Data (F) . These are the third and fourth icons, respectively. The first option lets you use the theme you're using for your presentation, while the second one retains the look and feel of your source Excel file.
- Once you've pasted your chart, you can move it around to suit your needs.
Related: How to Create Powerful Graphs and Charts in Microsoft Excel
Updating Your Chart
Unfortunately, if you need to make changes to your chart, you'll have to open its source data in Excel. If you have access to the Excel file, you can just make changes directly, and it should automatically reflect on the PowerPoint chart.
If you don't have the Excel file open, you can right-click on the PowerPoint chart, then choose Edit Data > Edit Data in Excel in the context menu. You can also select Edit Data > Edit Data to open a small window if you only need to make minor changes.
In case the changes you make don't automatically reflect on the PowerPoint chart, you can manually update it. To do so, click on your chart, go to the Chart Design menu ribbon , then click on Refresh Data . This will pull in the latest information from the linked Excel file and update the information displayed on your PowerPoint chart.
Formatting Your Excel-Linked PowerPoint Chart
Unlike your Excel data table, any changes you make to the chart design in Excel will not affect your chart in PowerPoint. For this reason, you have to finalize the design and feel of the chart you're copying from in Excel before copying it over to your presentation.
Alternatively, you can make design changes to your PowerPoint chart independently. That means you can change how your presentation chart looks without affecting the chart you copied from Excel.
To make those changes, click on your chart, then go to the Chart Design menu ribbon . You can choose how the chart feels under Chart Styles . If you think that the current chart type doesn't fit well with your presentation, you can even change it.
Click on Change Chart Type to open a new window. From there, you can pick out any chart type you like in the left column.
Related: How to Make a Line Graph in Excel
Finding Linked Files
Sometimes, you cannot remember if the tables and charts in your presentation are linked to an Excel file. Or it might be the case that you linked your PowerPoint data to a spreadsheet but can't remember where you saved it.
You can check the PowerPoint file directly if it's linked to any file and where these files are. To do so, click on File in the menu ribbon . In the full-screen menu that opens, go to Info on the left-hand column .
Under the Info window, on the right-hand column, go to Related Documents . Click on Open File Location to see where the linked files are saved.
If you moved the linked Excel files, click on Edit Links to Files . A Links window will appear showing each linked object and the file's location attached to it. The window gives you four choices:
- Update now : Update the object's data to the latest changes in the linked file.
- Open Source : Opens the linked Excel file.
- Change Source… : Opens a File Explorer window to change the linked file.
- Break Link : Removes the link from your presentation.
Always Stay Updated
This nifty feature first appeared in Microsoft Office 2010 and has since been available to all Office users. So, whenever you're making a presentation based on incomplete data, you no longer have to worry about updating it manually in the future.
By copying the Excel information and then pasting it into your presentation as a linked item, you're guaranteed to have the latest data updated into your PowerPoint file automatically.
Insert Excel File into PowerPoint? [Here’s How to Do It!]
By: Author Shrot Katewa
![Insert Excel File into PowerPoint? [Here’s How to Do It!]](https://artofpresentations.com/wp-content/uploads/2023/01/ezgif.com-gif-maker-5.webp "presentation excel powerpoint")
There may be a time when you have data in an Excel file which you want to represent in your PowerPoint presentation. It is also good to make it dynamic so that when the data changes in the Excel file the same changes in the PowerPoint as well.
But, how do you insert data from excel in PowerPoint?
To embed an “Excel” file in PowerPoint, click on the “Insert” tab, and click on the “Objects” option in the “Text” group. Then, click on “Select from File” in the dialog box, and click on the “Browse” button. Select the excel file, and click “OK”. Enable the “Link” option and click “OK”.
In this article, I’m not only going to show you how to insert data from Excel into PowerPoint, but also show you the steps to embed an Excel sheet directly in your PowerPoint, either in part or full. Then, we shall also understand how to insert a chart from Excel into PowerPoint.
So, let’s get started!
1. How to Insert an Excel Worksheet into PowerPoint?
To insert an Excel worksheet into Microsoft PowerPoint, you can simply paste the Excel data in the presentation slide. All you have to do is follow the 3 quick steps.
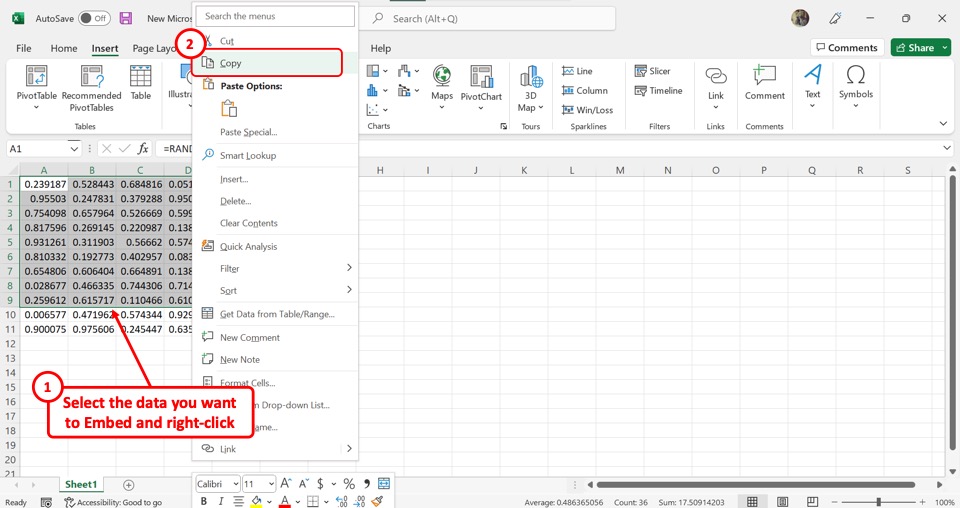
Step-1: Copy the Excel Data
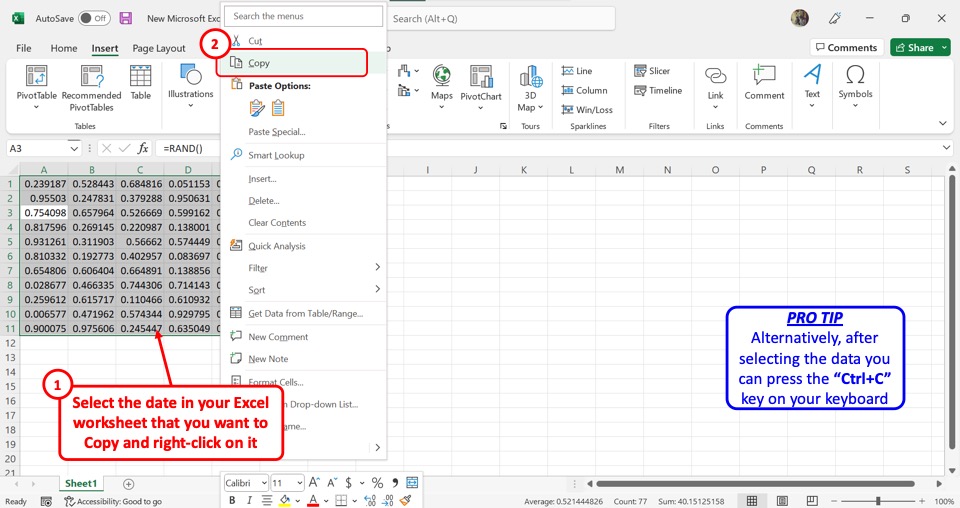
To copy Excel data, you have to first open the Excel worksheet. In the worksheet, select the cells you want to incorporate in Excel. “Right Click” on the Excel data and select the “Copy” option from the right-click menu. Alternatively, you can press the “Ctrl+C” keys on your keyboard to copy the data.
Step-2: Click on the “Copy” option
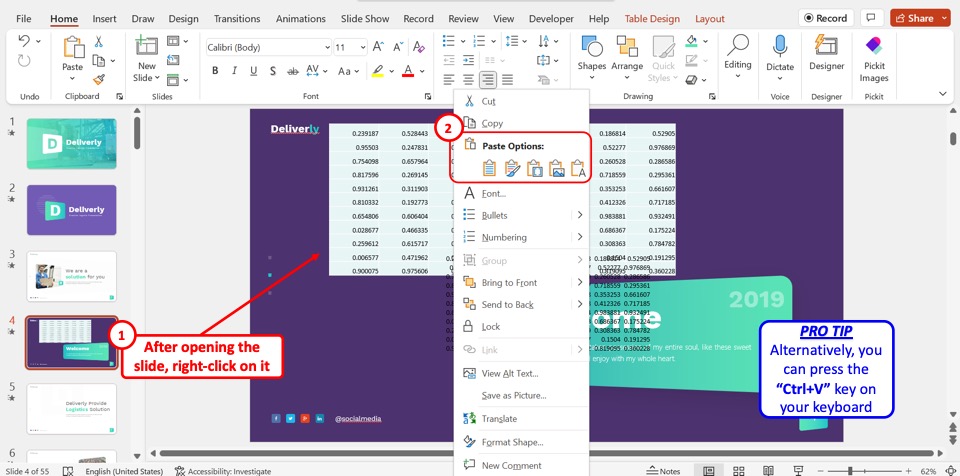
The next step is to open the PowerPoint slide where you want to insert the Excel data. “Right Click” anywhere on the slide and click on the “Paste” option in the right-click menu. Alternatively, you can press the “Ctrl+V” keys on your keyboard to paste the copied data.
Step-3: Click on the “Table Design” tab
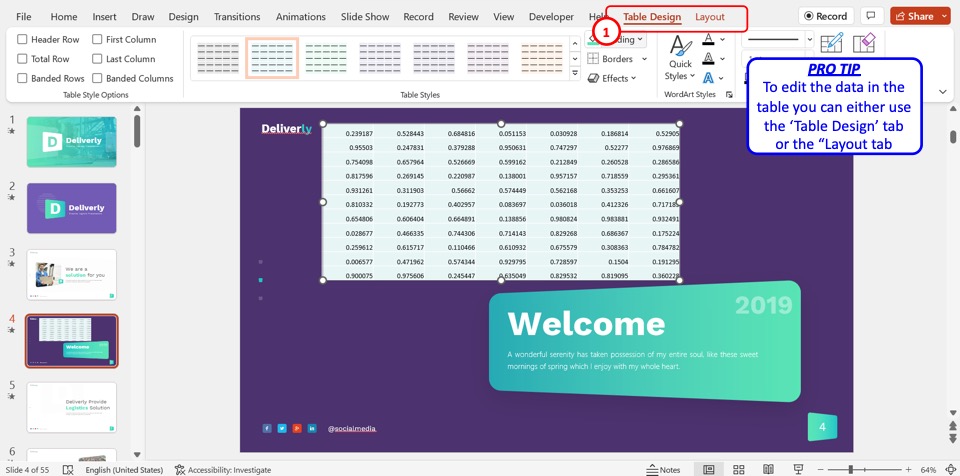
Finally, you can edit the Excel data inserted as a table in Microsoft PowerPoint. To do so, click on the “ Table Design ” tab in the menu bar located at the top of the screen. You can also click on the “Layout” tab by the “Table Design” tab for more editing features.
1.1 How to Embed an Excel Worksheet in PowerPoint?
By embedding an Excel worksheet in PowerPoint, you can automatically update the worksheet in a slide when editing data in Microsoft Excel. To embed an Excel worksheet, follow the 6 simple steps.
Step-1: Click on the “Insert” tab
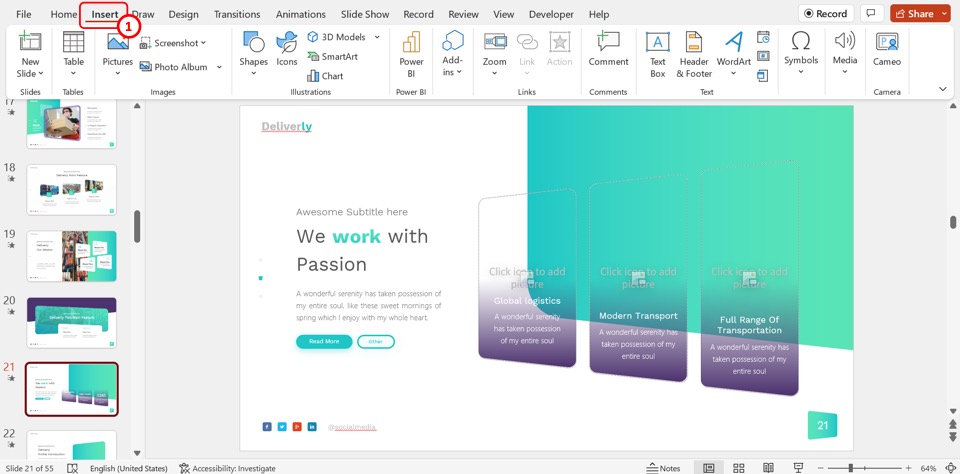
The first step is to open the “Insert” menu. In the menu bar at the top of the screen, click on the “Insert” tab .
Step-2: Click on the “Object” button
In the “Text” group of the “Insert” menu, click on the “Object” button. The “Object” icon is at the bottom of the right column in the “Text” group. This will open the “Insert Object” dialog box.
Step-3: Click on the “Create from file” option
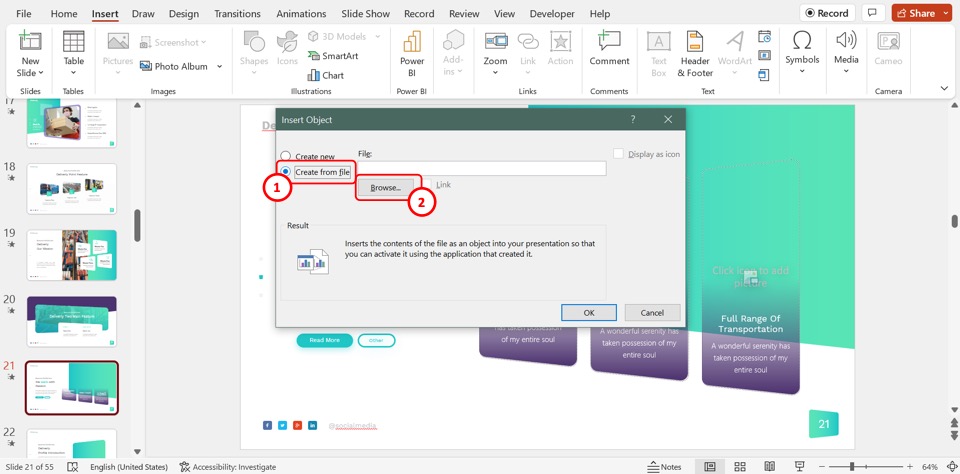
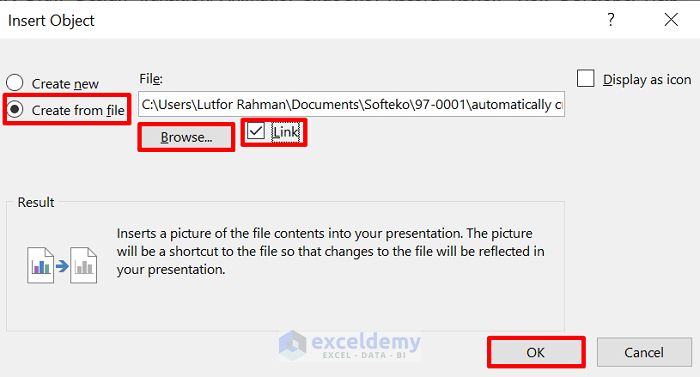
In the left column of the “Insert Object” dialog box, click on the “Create from file” option. Then click on the “Browse” button in the middle of the dialog box. It will open the file browser window.
Step-4: Select the Excel file

In the file explorer pop-up window, select the Excel file that you want to embed into the PowerPoint slide. Then click on the “OK” button at the bottom of the window to add the Excel file.
Step-5: Click on the “Link” option
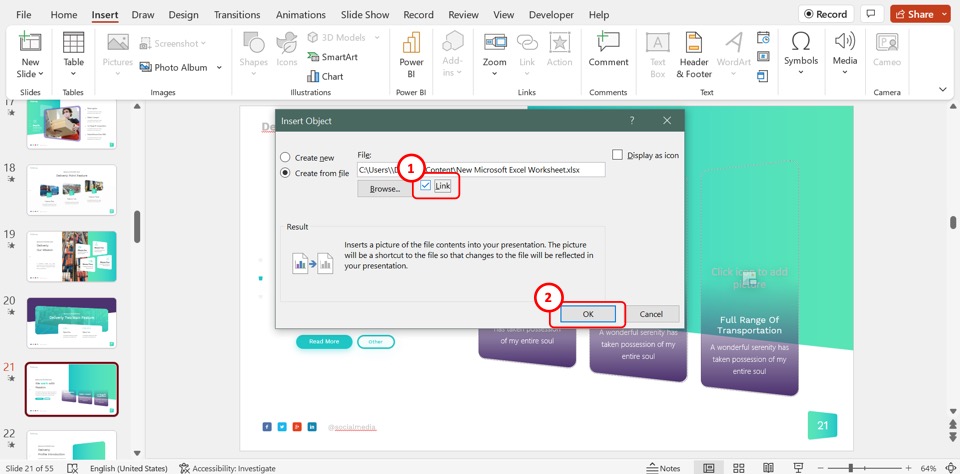
In the “Insert Object” dialog box, click on the “Link” option by the “Browse” button to embed the inserted Excel worksheet. A checkmark will appear indicating the link has been added.
Step-6: Click on the “OK” button
Now all you have to do is click on the “OK” button at the bottom of the “Insert Object” dialog box to embed the Excel worksheet into the PowerPoint slide (as shown in the image above).
1.2 How to Embed a Section of Excel Data in PowerPoint?
The “ Paste Special ” feature in PowerPoint allows you to embed a section of an Excel worksheet into a slide. To do so, follow the 4 simple steps.
Step 1: Copy the section of Excel worksheet
The first step is to copy the section of the Excel worksheet that you want to embed into PowerPoint. In the Excel file, select the section and “Right Click” on it. Click on the “Copy” option in the right-click menu to copy the section.
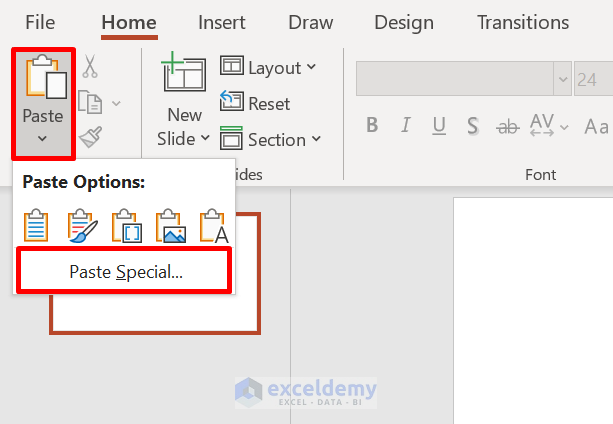
Step-2: Click on the “Paste Special” option
The next step is to open the PowerPoint slide. In the “Clipboard” group of the “Home” menu, click on the “Paste” button. Then click on the “Paste Special” option in the dropdown menu under the “Paste” option.
Step-3: Click on the “Microsoft Excel Worksheet Object” option
In the “Paste Special” dialog box, click on the “Paste link” option from the left column. Then click on the “Microsoft Excel Worksheet Object” option in the “As” box.
Step-4: Click on the “OK” button
Now all you have to do is click on the “OK” button at the bottom of the “Paste Special” dialog box to embed the copied section of the Excel worksheet into the slide (as shown in the above image).
2. How to Insert an Excel Chart into PowerPoint?
In Microsoft PowerPoint, you can insert an editable chart from Excel. All you have to do is follow the 2 easy steps.
Step 1: Click on the “Copy” option
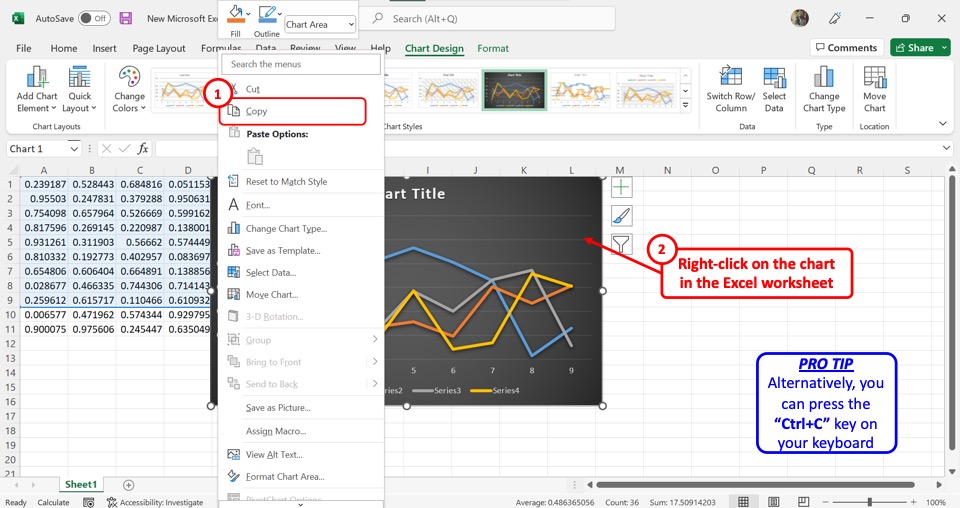
In the Microsoft Excel file, “Right Click” on the chart that you want to insert into PowerPoint. Then click on the “Copy” option from the right-click menu. You can alternatively press the “Ctrl+C” keys on your keyboard to copy the chart.
Step-2: Click on the “Keep Source Formatting & Embed Workbook” option
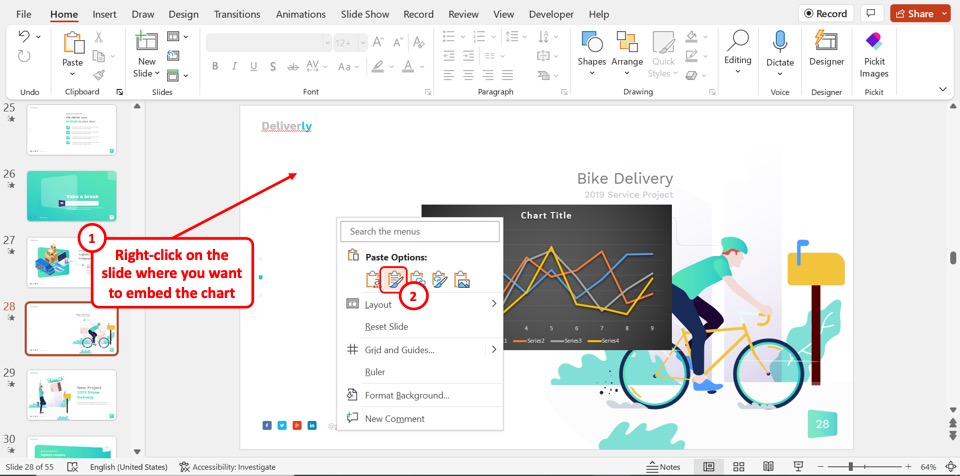
The next step is to open the PowerPoint slide where you want to insert the Excel chart. “Right Click” on the slide. Click on the “Keep Source Formatting & Embed Workbook” option under the “Paste Options” section in the right-click menu to paste the editable Excel chart.
3. How to Insert an Excel File as an Icon into PowerPoint?
To insert an Excel file into Microsoft PowerPoint as an icon, you can use the “Insert Object” feature. Follow the 7 quick steps.
In the menu ribbon located at the top of the screen, click on the “Insert” tab to open the “Insert” menu.
Step-2: Click on the “Object” option
At the bottom of the right column in the “Text” group of the “Insert” menu, click on the “Object” option. This will open the “Insert Object” dialog box.
Step-3: Click on the “Browse” button
In the “Insert Object” dialog box, click on the “Create from File” option. Then click on the “Browse” button to open the “Browse” pop-up window.
In the “Browse” window, select the Excel file that you want to insert. Then click on the “OK” button at the bottom of the window.
Step-5: Click on the “Display as Icon” option
Now you can click on the “Display as Icon” box on the right side of the “Insert Object” dialog box to add the Excel file as an icon.
Step-6: Click on the “Change Icon” button
If you want to change the icon for the Excel worksheet, click on the “Change Icon” button. This will open the “Change Icon” dialog box where you can select an icon to add to the presentation slide.
Step-7: Click on the “OK” button
Finally, click on the “OK” button at the bottom of the “Insert Object” dialog box to insert the Excel file as an icon.
Credit to cookie_studio (on Freepik) for the featured image of this article (further edited).
How to embed excel into PowerPoint
Enhance your presentations by seamlessly integrating Excel spreadsheets into PowerPoint with this comprehensive guide.
Sanskar Tiwari
Open PowerPoint and Excel:

Navigate to the slide:

Insert the Excel spreadsheet:

Adjust the display options:

Customize the embedded spreadsheet:

Interact with the embedded Excel spreadsheet:

Conclusion:
Frequently asked questions:, what is the benefit of embedding excel into powerpoint, can i edit the embedded excel spreadsheet within powerpoint, how do i ensure the data in the embedded spreadsheet stays up-to-date, is it possible to embed multiple excel spreadsheets into one powerpoint presentation, related blogs, how to redo changes in powerpoint.
How to mirror an object in PowerPoint
How to undo changes in powerpoint, how to bend text in powerpoint, how to remove footer in powerpoint, how to change opacity in powerpoint, how to duplicate a powerpoint slides, how to insert ppt in new powerpoint, how to crop a picture into a square in powerpoint, stunning presentations in seconds with ai.
Install MagicSlides app now and start creating beautiful presentations. It's free!

~1M Installs, rated 4.5/5 ⭐️ by 424 reviews

Excel Tips Powerpoint: Essential Tips to Create Impactful Spreadsheets for Your Presentations
Microsoft Office programs are essential for any professional, and familiarity with Excel is particularly valuable. With its many functions and features, Excel can help you organize, analyze, and present data in a clear and concise manner. This article will provide you with essential tips and tricks for mastering Excel in PowerPoint presentations.
Whether you're an experienced Excel user or just starting, you'll find helpful information in the following sections. We'll cover everything from the basics of Excel to more advanced features like macros and pivot tables.
Table of Contents
Key Takeaways:
- Excel proficiency is essential for creating impactful PowerPoint presentations.
- Mastering the basics of Excel is crucial for more advanced techniques.
- Formatting and validation techniques improve data visualization and accuracy.
- Advanced data analysis tools like sorting and filtering provide deeper insights.
- Collaboration tools and macros can improve efficiency and productivity.
Understanding Excel Basics
Before we jump into advanced Excel tips, it's essential to have a solid grasp of Excel basics . Understanding the foundational features and functions will help you get the most out of this powerful tool.
Excel is a spreadsheet program used to organize, analyze and manipulate data. Learning Excel can be a game-changer, whether you are a student, researcher or business professional.
The Excel Interface
The Excel interface consists of a workbook containing sheets that let you enter and store data. Each sheet has a grid of rows and columns called cells that hold information. The ribbon at the top provides access to different tabs containing various commands and functions.
Basic Functions
Excel has several basic functions, including:
- AutoSum: a function used to add up a series of numbers automatically.
- Average: calculates the average of a range or cell selection.
- Max/Min: returns the maximum or minimum value in a range or cell selection.
These basic functions lay the foundation for more advanced formulas and functions that can help streamline your workflow and boost productivity.
Data Types and Formatting
Excel has several data types, including dates, currency, percentage, and more. Applying formatting to data can help make it more visually appealing and understandable. You can adjust font styles, color, size and borders.
Keyboard Shortcuts
If you want to work more quickly, using keyboard shortcuts is a great way to save time. Here are some useful shortcuts:
- Ctrl+C: Copy
- Ctrl+V: Paste
- Ctrl+Z: Undo
- Ctrl+Y: Redo
Navigating Excel
To navigate your spreadsheet, you can use the mouse or the arrow keys. If you have a large spreadsheet, you can use the Ctrl and arrow keys to navigate to the end of the data. Using the Home and End keys can help you move to the start or end of the current row or column.
Formatting Tips and Tricks
Formatting is a crucial aspect of Excel that can make your tables and cells stand out. Applying formatting techniques can make your data visually appealing and more accessible to readers.
Let's explore some of the tips and tricks for formatting your Excel tables and cells:
Adjust Font Styles and Colors
Excel offers a wide range of font styles and colors to choose from, making it easy to customize your data and emphasize important information. Choose a font style that is easy to read and use colors that complement each other.
Tip: Avoid using too many different font styles and colors, as it may distract readers and make your data look cluttered.
Insert Borders and Lines
You can use borders and lines to separate different sections of your data or highlight specific cells. Excel offers a variety of border and line styles that can be adjusted to fit your needs.
Tip: Use borders and lines sparingly and consistently to maintain a professional look and make your data more readable.
Apply Conditional Formatting
Conditional formatting is a powerful tool that allows you to highlight cells based on their values or formulas. You can use it to create color scales, data bars, and icon sets to visualize your data more effectively.
Tip: Use conditional formatting to draw attention to the most critical data points in your spreadsheet.
Use Cell Styles
Cell styles are formatting templates that you can apply to your data to save time and maintain consistency across your spreadsheet. Excel offers a variety of built-in cell styles that you can use or customize to fit your needs.
Tip: Create your cell styles to match your branding or presentation theme and use them consistently throughout your spreadsheet.
By applying these formatting tips and tricks to your Excel tables and cells, you can create visually appealing and easy-to-read spreadsheets that help you communicate your data more effectively.
Data Entry and Validation
When working with Excel, entering and validating data accurately is crucial. In this section, we'll explore some efficient techniques for data entry and validation.
Auto-filling
Auto-filling is a smart Excel feature that enables you to quickly and easily fill values into a series of cells. Simply enter the starting value and drag the fill handle (the small square at the bottom right corner of the cell) in the direction you want to fill the values. Excel will automatically fill in the rest of the series, saving you time and effort.
Data Validation Rules
Data Validation is another useful tool in Excel that allows you to control what data can be entered in a cell. You can set rules such as "numbers only" or "maximum characters", ensuring data accuracy and consistency. To set up data validation, select the cell or range of cells that you want to restrict, go to the "Data" tab, and click "Data Validation". From there, you can choose from a variety of validation criteria to fit your needs.
Ensuring Data Accuracy
Ensuring data accuracy is crucial in Excel. One way to do this is through conditional formatting, which highlights cells that meet specific conditions. For example, you can use conditional formatting to highlight cells with data that don't fit a specific format or range. To set up conditional formatting, select the range of cells you want to apply it to, and go to the "Home" tab. Click "Conditional Formatting", and choose from the various options available to suit your needs.
With these techniques, you can maintain data accuracy and consistency, making sure your Excel spreadsheets are reliable and efficient.
Formula Magic
Excel formulas are an essential tool for automating calculations and saving time. Whether you're creating a simple spreadsheet or a complex financial model, mastering formula basics is crucial.
Basic Formulas
There are many built-in formulas in Excel that can help you perform basic arithmetic operations, such as addition, subtraction, multiplication, and division. To create a formula in a cell, start by typing "=" followed by the formula you want to perform. For example, if you want to add the values in cells A1 and A2, type "=A1+A2".
Excel also offers a range of built-in functions that can help you perform more complex calculations. Functions are predefined formulas that take specific inputs and return a result. The most commonly used functions include SUM, AVERAGE, MAX, and MIN.
Advanced Techniques
To perform more complex calculations, you can combine basic formulas and functions with advanced techniques such as absolute and relative referencing, named ranges, and array formulas. These techniques can help you create dynamic and flexible spreadsheets that can handle complex data and calculations.
"Formulas are the lifeblood of Excel. By mastering the art of formulas, you can automate calculations and save time, giving you the power to make informed decisions faster."
Pivot Tables and Charts
Excel pivot tables and charts are powerful tools that enable you to analyze and present complex data in an easy-to-understand visual format. With pivot tables, you can quickly summarize and aggregate large data sets and customize the view of your data by rearranging rows and columns. In addition, Excel charts allow you to create eye-catching visuals that further enhance your data presentation.
To create a pivot table in Excel, start by selecting your data range and clicking on the "Insert" tab. Then, click on the "PivotTable" button and choose your desired location for the pivot table. Once you have created your pivot table, you can start organizing your data by dragging and dropping fields into the appropriate areas. You can also use filters and slicers to refine your pivot table view by selecting subsets of data.
Excel charts offer many customization options, including chart types, styles, and layouts. You can easily create a chart by selecting your data range and clicking on the "Insert" tab, then selecting the chart type that best suits your data. You can also add chart elements, such as titles and legends, and format individual chart elements to enhance the visual appeal of your chart.
When presenting your data in PowerPoint, you can easily copy and paste your pivot tables and charts from Excel into your presentation slides. To ensure that your pivot tables and charts update dynamically in your PowerPoint presentation, use the "Paste Special" option and select "Link" to create a dynamic connection between your Excel and PowerPoint files.
Advanced Data Analysis
If you're looking to take your data analysis skills in Excel to the next level, there are a few advanced techniques you can use to gain valuable insights. Let's explore some of these features in more detail:
Sorting data in Excel can help you quickly identify patterns and trends. To sort data, select the column you want to sort by and click on the "Sort & Filter" button. From there, you can choose to sort A to Z, Z to A, or by custom order.
Filtering allows you to narrow down your data based on specific criteria. For example, you can filter by date range, numerical range, or even text values. Simply click on the "Filter" button and choose the criteria you want to filter by.
Conditional Formatting
Conditional formatting lets you apply formatting to cells based on specific conditions. This can be useful for highlighting important data points or identifying outliers. To apply conditional formatting, select the cells you want to format and choose "Conditional Formatting" from the Home tab.
Creating Custom Formulas
Excel's built-in formulas can be powerful, but sometimes you need to create your own custom formulas to analyze data in the way you want. Use the "Insert Function" button to create your own custom formulas.
"Effective data analysis requires being able to quickly sift through large amounts of data to find important information."
Collaboration and Sharing
Excel is a powerful tool for productivity and data analysis, but it can be even more effective when shared with others. Collaboration and sharing features allow multiple users to work on the same document, making it a great tool for team projects and group analysis.
Sharing and Co-Authoring
When working on a project with others, it's essential to ensure everyone has access to the same document. Excel offers several ways to share files, including OneDrive and SharePoint. With these services, collaborators can access and edit the document directly from the web, using any device without needing to download it. As a result, working remotely and despite different time zones and physical locations becomes incredibly easy, boosting collaboration among peers and colleagues.
Another valuable sharing feature is Co-Authoring. Co-Authoring allows multiple users to edit the same document simultaneously, ensuring everyone is up-to-date on any changes that have been made. This feature is incredibly useful for projects that require input from multiple team members or data sources.
Tracking Changes
When working with others, it can be challenging to keep track of who made what changes or when. Excel's tracking changes feature makes that much easier. It records every edit made to the document, providing a history view of any changes made. The feature also allows document owners or managers to review or accept or reject made changes that were submitted by other team members.
Excel Comments
Comments are a helpful way to add notes and additional information within an Excel spreadsheet. They allow team members to add context, instructions, and warnings about specific data cells or elements in the document. Comments provide general transparency and make it easier to communicate effectively when working on the same data set. It is also essential to add comments between the cells for data validation or any calculation disputes between users when there are inconsistencies or mistakes in the spreadsheet.
Automation with Macros
Excel macros can help you save time and avoid repetitive tasks by automating functions and processes. Macro is a series of commands and instructions which can be recorded and performed repeatedly with a click of a button. Here's how you can create and customize macros in Excel:
- Record a Macro: To record a macro, go to the Developer tab, click on Record Macro, and then perform the task you want to automate. For instance, you could record a macro that adds a formula to a row of cells.
- Run a Macro: Once you have created a macro, you can run it by clicking the button associated with the macro or by using the keyboard shortcut you assigned. This will automatically repeat the task you recorded in the macro.
- Customize a Macro: You can customize macros by editing the Visual Basic code that Excel generates. This way, you can add more commands and functions to your macros to make them even more powerful.
To summarize, Excel macros can help you automate repetitive tasks and increase your productivity when working with spreadsheets. Use the Developer tab to record and run a macro, and edit the Visual Basic code to customize it.
Tips for Presenting Excel in PowerPoint
When creating a PowerPoint presentation, Excel data and charts can be an effective way to convey complex information to your audience. Here are some tips for incorporating Excel objects seamlessly in PowerPoint:
Linking Excel Objects
One way to add Excel data to your presentation is by linking the spreadsheet to a slide. This allows you to update the data in real-time, without having to recreate the chart or table in PowerPoint. To do this:
- Open both Excel and PowerPoint, and navigate to the slide where you want to insert the object.
- In Excel, select the chart or table you want to use, and press CTRL+C to copy it.
- In PowerPoint, go to the Home tab, click on the dropdown arrow next to Paste, and select Paste Special.
- Choose the Paste Link option from the dialog box, and select Microsoft Office Excel Chart Object. Click OK.
- This will insert the chart into your slide, and any updates you make to the original chart in Excel will be reflected in the PowerPoint slide.
Embedding Excel Objects
Another way to incorporate Excel data into your presentation is by embedding the object directly into a slide. This method is useful if you want to edit the chart or table within PowerPoint, or if you need to share the presentation with others who may not have access to the original Excel file. To embed an Excel object:
- In PowerPoint, go to the Insert tab, click on the Object dropdown, and select Microsoft Office Excel Chart or Worksheet Object.
- Select the Create from File tab, and click Browse to locate the Excel file you want to embed.
- Choose the chart or table you want to embed, and click OK.
- The chart or table will now be embedded in your PowerPoint slide, and you can edit it as needed.'
Formatting Excel Objects
Before inserting Excel objects into a PowerPoint slide, it's important to make sure they are formatted correctly. This includes adjusting fonts, colors, and sizes to match the overall design of your presentation. To format an Excel object:
- Select the chart or table you want to format, right-click on it, and choose Format Object.
- From here, you can customize the fill color, font, and other design elements of the object to match your presentation.
- Be sure to preview the slide to ensure the formatting looks good in the context of the overall presentation.
With these tips, you can confidently integrate Excel data and charts into your PowerPoint presentations, ensuring a compelling and informative visual experience for your audience.
In conclusion, mastering Excel in PowerPoint presentations opens a whole new world of possibilities for professionals. With the tips and tricks we've provided in this article, you can take your skills to the next level. By understanding the basics of Excel, formatting tables and cells effectively, entering and validating data, using formulas, pivot tables, and charts, advanced data analysis, collaborating with others, automating repetitive tasks with macros, and presenting Excel data in PowerPoint, you can achieve impressive results.
Remember, Excel is not just about numbers and formulas. It's a powerful tool that can help you make informed decisions, communicate data effectively, and save time. Start practicing these techniques, and you'll soon become a proficient user of Excel. We hope this article has been helpful. Thank you for reading!
What are the basic features of Excel?
Excel is a powerful spreadsheet software that allows users to create, manipulate, and analyze data. Some of its basic features include creating tables, performing calculations, creating charts, and data validation.
How can I apply formatting to my Excel tables and cells?
To apply formatting to your Excel tables and cells, you can use the formatting toolbar or the Format Cells dialog box. You can adjust font styles, colors, borders, and other visual elements to make your data more visually appealing and easier to read.
What techniques can I use for efficient data entry in Excel?
Excel offers various techniques for efficient data entry. You can use the drag-fill handle to auto-fill data based on a pattern, use data validation rules to validate input, and use shortcuts like Ctrl+Enter to quickly enter data in multiple cells.
How can I automate calculations in Excel?
Excel offers a wide range of formulas and functions that can help automate calculations. You can use basic formulas like SUM and AVERAGE, as well as more advanced functions like VLOOKUP and IF-ELSE statements. These formulas can save you time and ensure accuracy in your calculations.
How can I analyze and visualize data in Excel?
Excel provides pivot tables and charts to help you analyze and visualize data effectively. Pivot tables allow you to summarize, filter, and manipulate data to gain insights, while charts help you present data visually through various chart types like bar graphs, pie charts, and line graphs.
Are there any advanced techniques for data analysis in Excel?
Yes, Excel offers advanced features for data analysis. You can sort and filter data, apply conditional formatting to highlight specific data patterns, and create custom formulas to perform complex calculations. These techniques can help you gain valuable insights from your data.
How can I collaborate with others on Excel spreadsheets?
Excel provides tools for collaborating with others on spreadsheets. You can share files with colleagues, track changes made by different users, and use comments to communicate and provide feedback. These collaboration features help streamline teamwork and increase productivity.
Is it possible to automate repetitive tasks in Excel?
Yes, you can automate repetitive tasks in Excel using macros. Macros are recorded actions that can be replayed to perform multiple tasks. You can customize and assign macros to buttons or keyboard shortcuts to automate tasks and save time.
How can I incorporate Excel data into PowerPoint presentations?
To incorporate Excel data into PowerPoint presentations, you can link or embed Excel objects in your slides. Linking allows you to update the data in PowerPoint automatically when changes are made in Excel, while embedding allows you to have a copy of the Excel file within the PowerPoint presentation.
How can I become proficient in Excel and PowerPoint?
To become proficient in Excel and PowerPoint, practice is key. Familiarize yourself with the software's features and experiment with different techniques. Take advantage of online tutorials, courses, and resources available. With dedication and practice, you can master these tools and enhance your productivity and presentation skills.
- PRO Courses Guides New Tech Help Pro Expert Videos About wikiHow Pro Upgrade Sign In
- EXPLORE Tech Help Pro About Us Random Article Quizzes Request a New Article Community Dashboard This Or That Game Popular Categories Arts and Entertainment Artwork Books Movies Computers and Electronics Computers Phone Skills Technology Hacks Health Men's Health Mental Health Women's Health Relationships Dating Love Relationship Issues Hobbies and Crafts Crafts Drawing Games Education & Communication Communication Skills Personal Development Studying Personal Care and Style Fashion Hair Care Personal Hygiene Youth Personal Care School Stuff Dating All Categories Arts and Entertainment Finance and Business Home and Garden Relationship Quizzes Cars & Other Vehicles Food and Entertaining Personal Care and Style Sports and Fitness Computers and Electronics Health Pets and Animals Travel Education & Communication Hobbies and Crafts Philosophy and Religion Work World Family Life Holidays and Traditions Relationships Youth
- Browse Articles
- Learn Something New
- Quizzes Hot
- This Or That Game New
- Train Your Brain
- Explore More
- Support wikiHow
- About wikiHow
- Log in / Sign up
- Computers and Electronics
- Presentation Software
How to Convert Excel to PowerPoint
Last Updated: June 9, 2023
This article was co-authored by wikiHow Staff . Our trained team of editors and researchers validate articles for accuracy and comprehensiveness. wikiHow's Content Management Team carefully monitors the work from our editorial staff to ensure that each article is backed by trusted research and meets our high quality standards. This article has been viewed 232,507 times. Learn more...
If you want to take data from an Excel spreadsheet and put it into a PowerPoint presentation, you can do so with built-in controls available in both programs. This wikiHow shows you how to put Excel data into PowerPoint slides using these features.
Copying and Pasting Excel Data into PowerPoint

Inserting an Excel Object into PowerPoint

Expert Q&A
You Might Also Like

About This Article

- Send fan mail to authors
Is this article up to date?

Featured Articles

Trending Articles

Watch Articles

- Terms of Use
- Privacy Policy
- Do Not Sell or Share My Info
- Not Selling Info
Keep up with the latest tech with wikiHow's free Tech Help Newsletter
- DynamicPowerPoint.com
- SignageTube.com
- SplitFlapTV.com

Create PowerPoint Slides from Excel Data
Oct 5, 2019 | Articles
Undoubtedly Microsoft Excel is amongst the best tools for increased productivity in our workplace today. Microsoft Excel helps workers perform their assigned tasks easily. The use of Microsoft Excel has greatly improved productivity in organizations. It offers a quicker way to complete your task effortlessly. Many organizations now sort after Men and Women with good skill in Microsoft Excel.
PowerPoint is another outstanding program that enhances business excellence. PowerPoint offers a clear understanding and interpretation of data. It has a unique display setting that makes the audience appreciate the program, but it is static.
Some persons believe PowerPoint to be superior to Excel and vice versa. But recently, people create PowerPoint from Excel data. Excel is used for computations because it has a lot of data needed for the report. PowerPoint will help enhance the appearance of these reports. So, simply present your result in PowerPoint after all calculations from your Excel.

classic slide
Submit a Comment
Your email address will not be published. Required fields are marked *
Pin It on Pinterest
- StumbleUpon
- Print Friendly
Microsoft Excel
11 minute read
11 Best Excel Presentation Tips in 2024

Brandon Pfaff
Facebook Twitter LinkedIn WhatsApp Email

Join the Excel conversation on Slack
Ask a question or join the conversation for all things Excel on our Slack channel.
There’s more to a spreadsheet than just the numbers on the page. It is equally important to make your spreadsheets look professional, easy to read, and visually appealing to your viewers.
The same way a lawyer with a crooked tie and disorganized papers might raise an eyebrow in court, your Excel presentation won’t hit the right marks with your audience if it looks clumsy and bland, no matter how many hours of research goes into making it or how important the information contained within it is.
Whether you are creating a spreadsheet for personal use, to pass information to your team or share with your project manager, the secrets locked away in this post will be of immense use to you. Let’s take a look at the best Excel presentation tips to help you create standout spreadsheets .
Free Excel crash course
Learn Excel essentials fast with this FREE course. Get your certificate today!
1. Get a template online
If you are a busy person, and you cannot fit an Excel presentation design into your schedule, enter the ex machina: pre-made Excel templates. You can choose from an array of purpose-specific templates with beautiful designs, fonts, and colors. Simply enter your values to customize it, and you are ready to go.
Of course, using a template means you will not get better at designing things yourself. If getting things done is your priority instead of getting better at designing presentations, then, by all means, use a template and be done with it. On the other hand, if you want to know how to make your Excel presentation better on your own, then find someone to teach you or stick around until the end of this post.
Check out our 50 best Excel templates to make your life easier and our 33 Excel business templates for workplace productivity .
2. Name your worksheets correctly
Excel presentation is all about clarity. For this single reason, the importance of a correct and reliable project or worksheet name cannot be overemphasized. It could be a sentence, a phrase or just a word. Just make sure it is easy to understand by you or by anyone you will be sharing the file with.

You also must make sure it is distinct from the names of other worksheets stored on your computer. After all, what is the use of all the tips you will learn here today if you will not be able to find the worksheet you applied them on?
3. Define your header/title
Your header and title can be anything but it needs to stand out. Your header must be able to speak to the reader and make the reader know at first glance what the header is.

To do this, try a larger font for your header, underline and embolden it. You should center align it and use a different font color. It has to stand out but also blend with the template color scheme and overall aesthetic look. You can also use a different readable for your header. Just remember, we want to make it distinct, not isolated.
Step up your Excel game
Download our print-ready shortcut cheatsheet for Excel.
4. Dos and don'ts of fonts
Full transparency: Fonts make or break your spreadsheet. Always use a uniform font for your data, you can use the same font for your header or you can change that of the header. You can use three fonts in a single presentation and that is the recommended maximum, else you would be pushing it. In this case, less is infinitely better.
These are the guidelines to follow in selecting the right format for your font.
Here is a quick tip, fonts of the sans-serif group are the best for your Excel spreadsheet if readability is your goal. Calibri, Helvetica, Arial or Playfair are few examples. If used with the right alignment, spacing, and color, they can bring out the best in your Excel presentation.

This ultimately depends on your presentation but officially, font 12 is often advised with double spacing to improve readability. As stated earlier, the header font can be larger. The headers should be larger than sub-headers which in turn should be larger than data fonts.

You want to create a sharp contrast between the text color and the background colors e.g. a light color text on a dark background and vice versa. This is where the "zebra stripes" rule comes in, which will be discussed later in the post.
People don’t often use the alignment tool in Excel. If you want to make your presentation look beautiful and business-like , you will need to maximize the alignment feature.

5. Create space for breathing room
When you see tightly packed, clumsy or wordy text or spreadsheet, your brain automatically gets tired of reading it before you even start. But when there is breathing space and the spreadsheet is divided up into categories, it becomes more pleasant to the eyes and ripe for interpretation by the brain.
This brings us to the B2 rule. Try to start your presentation on column B, row 2. Leaving the A column and the first row blank. It works like magic. You should also make sure that the column and row dimensions are the same.

Additionally, don't autofit the height and width of your document. You need to have flexibility and creative control of your workspace. Instead, manually adjust the height and width so that they have just enough white space but not too much to give your presentation some breathing room and improve readability.
6. Add an image
Whether it’s a photograph, an artistic sketch or your logo, images go a long way in making your spreadsheet better. Images make your presentation look official and possess the professional feel in many of the beautiful presentations you have seen. Pictures speak a thousand words. While Excel is not designed to accomplish the kind of presentation you can make in PowerPoint, a picture will help you to drive the point home and make your presentation memorable.

7. Go off the grid
Do you know that erasing all grid lines apart from those of your result will have people asking how you did it and if you used the same Excel software they use? Try it today. In your spreadsheet
Go to the View tab on the ribbon.
- Under the Show section, uncheck the box next to Gridlines .

8. Zebra stripes: Excel jungle law
Zebra stripes are alternating dark and light colors on rows lying on top of each other. This helps in a number of ways. First, it has this aesthetic feel that makes your work seem orderly, especially if you are displaying hundreds of rows of data. Second, it helps correlation and readability. A reader can track a row from the right-hand side to the far left and not lose track of what row his or her eyes are set upon.

You can zebra stripe using many methods. When you create a table in Excel, by default this will be zebra striped (Tip- select your data and use the shortcut Ctrl + T on a PC or ^ + T on a Mac to quickly create a table). On the Design tab, under Table Styles, you can change the color and style of your zebra stripes.
It can also be done using a formula in conditional formatting if desired. Conditional formatting is done by highlighting values that satisfy certain requirements (e.g. all odd-numbered rows). It can be copied from cell to cell using the painter tool in the Home toolbar.
9. Use charts, tables , and graphs
Most presentations are incomplete without some form of visual representation. Whether table, graph or chart, you need to visually represent your raw data in mediums that would be understood in a single glance. Charts, graphs, and tables should not be underestimated, especially if you have cumbersome data spanning many columns and rows.
In the Excel ecosystem, the chart, graph, and table features are like symbiotic siblings. You need them to bring out the beauty in the brevity of your work.

10. Create cell styles
Excel has many preset cell styles but you can create your own custom styles that will be more customized, and easier to use and edit because you created it. This is actually an alternative to getting a template if graphics consistency is your goal. After creating a beautiful spreadsheet with the above information, you can save the style so that you can apply it to future presentations.

Now your presentation is perfect with the right feel and style. Simply highlight the cells with your design for saving, then go to the Home toolbar, click on "more" at the base of the style gallery, then select "new cell style". A style dialog box will open, name the style, edit its properties and save.
If it isn't broken and it works efficiently, why change it? You can, however, add a touch of variability by changing the color palette from time to time.
11. Show restraint
You have learned all of these tips and you are ready to start your presentation - be careful of overdoing it. Use color sparingly and don't combine too many tips at once. You need to tread the fine line between underwhelming and too much to find the "just enough" middle ground. Make sure your presentation is perfectly balanced, as all things should be.
Ultimately, the way your Excel presentation turns out depends on how well you communicate your data to your audience. Although, it does help to know the psychology of colors, good fonts. Browse beautiful spreadsheet presentations online to figure out what the "best" looks like. But at the end of the day, the ball is in your court and we hope that your dedication to practicing, sharpening and perfecting your presentation skills in Excel will be rewarded with cheers.
Ready to design your own Excel presentations?
If you would like to sum up the data on your Excel spreadsheet so that its insights are conveyed in a straight-forward manner, then follow this step-by-step guide. You’ll end up with a presentation that summarizes your data in a way that’s painless to analyze.
If you’re eager to brush up on your Excel skills, check out our Excel course and master the fundamentals to boost your productivity.
Loved this? Subscribe, and join 443,313 others.
Get our latest content before everyone else. Unsubscribe whenever.

Brandon is a full time CPA specializing in all things tax. When he is not serving clients, he enjoys spending time with his wife and son, real estate investing, and sipping fine bourbon.

Recommended
Excel Challenge 39: Generate Unique Random Values
What is the best way to generate random values in Excel? Better yet, can you make them unique? Put your skills to the test with this Excel challenge.

Excel Challenge 38: Data Lookup From Multiple Sources
Take this Excel challenge by showing us what to do when XLOOKUP or VLOOKUP alone isn't enough to extract the values you want.

How to Use Excel to Manage Your Travel Budget
You'll probably want to avoid surprises like going over budget when you travel. Take charge with these expert tips for managing your travel expenses in Excel.
© 2024 GoSkills Ltd. Skills for career advancement
Automatically Create PowerPoint Slides from Excel (3 Easy Ways)
Microsoft Excel is indeed an extremely effective software. We may perform countless operations on a given dataset using Excel’s tools and features. We frequently need to make PowerPoint slides from Excel files. When we have to do it repeatedly, copying information from Excel and making PowerPoint slides is very time-consuming. This article will discuss three unique and easy ways to create PowerPoint slides from Excel files automatically. Therefore, you should go through these 3 easy ways to Automatically Create PowerPoint Slides from Excel.
How to Automatically Create PowerPoint Slides from Excel: 3 Easy Ways
As an illustration, we will explore a sample dataset. The following dataset, for example, has sales representative Names and Areas. We are going to show the Excel data in PowerPoint slides using all 3 of the approaches. Moreover, I will go through the benefits and drawbacks of using these strategies. In addition, I have yet to mention that I have been using the Microsoft Excel 365 version for this article; You are free to choose any other edition that you find most convenient.

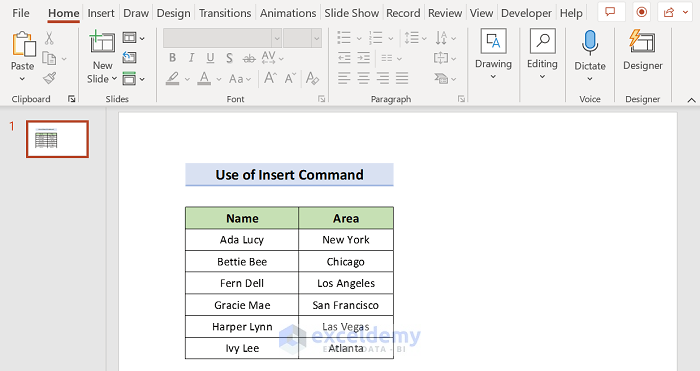
1. Automatically Create Slides Using Insert Command in PowerPoint
The Insert command is the simplest method. Using this Insert Command, slides are kept up to date immediately after any modifications are made to the Excel file. The issue is that we need to utilize the insert command for each slide. We will insert the Excel object using PowerPoint’s Insert command to automate the procedure. To complete the work, please follow the instructions below.
- First, launch PowerPoint.
- Then, select the Insert tab.
- Next, click Text , and later on the Object option.

- As a result, a new dialog box will pop up at this time, and you must click on Create from file .
- After that, click on Browse to find the Excel document you want to add to your slides.
- Consequently, the Insert Object dialog box pops up again, allowing you to check the Link box and click OK .
- Hence, as demonstrated below, it will yield the desired output in MS PowerPoint.
Read More: How to Insert an Excel File into PowerPoint as an Icon
2. Apply Paste Special Feature to Generate Slides from Excel
Another interesting way is to use the Paste Special feature. We can make slides in PowerPoint with the specified and selected data from Excel through the paste feature. Here, as the data in the Excel file is updated, the PowerPoint slide is also updated. To do the procedure, follow these instructions.
- First, open Excel’s saved worksheet to insert data.

- Secondly, move the mouse over the portion of the data you wish to link to PowerPoint. Then click on Copy .
- Now, open PowerPoint and click on the slide where you wish to connect the Excel data. Later on, click Paste and Paste Special feature.
- And a new dialog box appears. Choose the Paste link After that, click As Microsoft Excel Worksheet Object and hit OK .

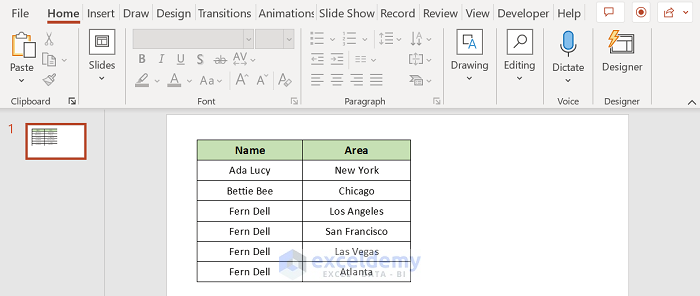
- As a result, it will return the required output in the PowerPoint slides, as shown below.
Read More: How to Copy Chart from Excel to PowerPoint Without Link
3. Create PowerPoint Slides from Excel Through VBA
There is a unique way of creating PowerPoint Slides automatically using Excel VBA. The only difference between previous methods is that slides are not updated as we change the Excel file. To use the Excel VBA Code, we must add the Microsoft PowerPoint 16.0 Object Library. However, since we are using this approach, we don’t need to create a VBA code for each presentation. Through modification of the code, we can generate dozens of slides.
- First of all, select the active sheet of the workbook to begin.

- Secondly, navigate to Developer and then Visual Basic .
- Later on, select Insert and now click on Module .

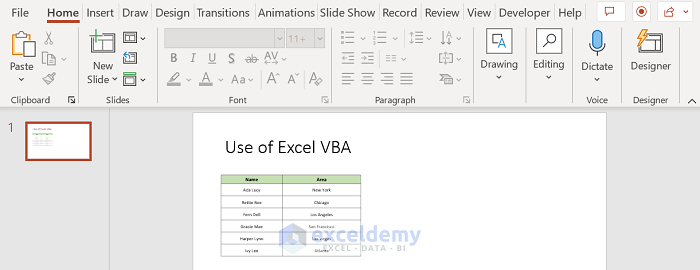
- Next, put the following code into the Module box. Remember to change the cell’s range.
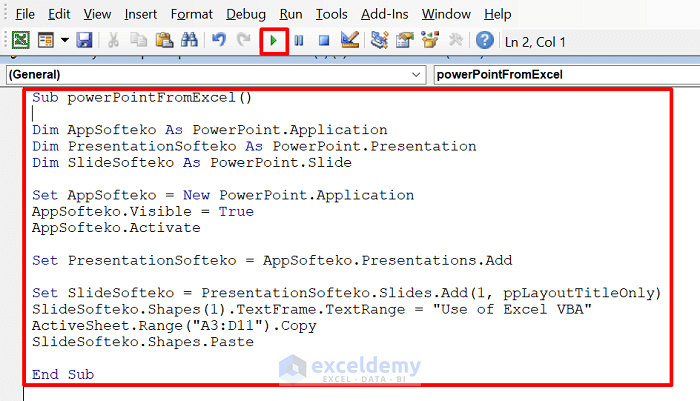
- Finally, click the Run button or press F5 .
- So, this is where the output will go.
To overcome the error, follow these:
Step 1 : Hover over Tools => You will see the References option => Click on References .

As a result, the References – VBAProject window will open.
Step 2 : Check Microsoft PowerPoint 16.0 Object Library => You will see the OK button in the top right corner => Hit OK to resolve the error.

Download Practice Workbook
You can get a free copy of the example workbook that was used during the discussion which was just below here.
You can automatically create PowerPoint slides from Excel from this point forward by using the procedures that we just discussed. Keep using them, and let us know if you come up with any other strategies to get the work done or if you have any new ideas. Remember to post questions, comments, or recommendations in the section below.
Related Articles
- How to Perform Excel to PowerPoint Automation
- How to Link Excel Sheets to PowerPoint
- How to Update Charts in PowerPoint from Excel Automatically
- How to Link Excel Data to PowerPoint Chart
- How to Embed an Excel File in PowerPoint
- [Fixed!] Problems with Embedded Excel Files in PowerPoint
- [Solved] Embedded Excel in PowerPoint Not Showing All Data
- How to Link Powerpoint to Excel for Dynamic Data Updates
- How to Insert Excel Chart into PowerPoint
- How to Copy Table from Excel to Powerpoint with Formatting
<< Go Back to Excel to PowerPoint | Export Data from Excel | Learn Excel
What is ExcelDemy?
Tags: Excel to PowerPoint

Lutfor Rahman Shimanto, BSc, Information Technology, Jahangirnagar University, Bangladesh, has worked with the ExcelDemy project for over a year. He has written 50+ articles and provided solutions of 100+ comments for ExcelDemy. Currently, he works as an Excel & VBA Developer and provides support and solutions in the ExcelDemy Forum. He has solved 100+ ExcelDemy Forum problems. His work and learning interests are in developing various Excel & VBA and Desktop applications. Outside of work, he enjoys Chess... Read Full Bio

Hi and thanks for your post data;
When I use your VBA code I got this error:”user defined type not defined” How can I fix it?
Best Regards

Thanks for reaching out and posting your comment. You are right about the raised error. If you do not add the Microsoft PowerPoint 16.0 Object Library , you must see the User-Defined Type not defined error.
To solve the issue, follow these: Step 1 : Hover over Tools => You will see the References option.
Step 2 : Click on References => In the References – VBAProject window, check Microsoft PowerPoint 16.0 Object Library , and you will see the OK button in the top right corner.
Step 3 : After clicking OK , you will be able to run the code like the following GIF .
Hopefully, the solution will help you overcome your situation. Good luck.
Regards Lutfor Rahman Shimanto
Leave a reply Cancel reply
ExcelDemy is a place where you can learn Excel, and get solutions to your Excel & Excel VBA-related problems, Data Analysis with Excel, etc. We provide tips, how to guide, provide online training, and also provide Excel solutions to your business problems.
Contact | Privacy Policy | TOS
- User Reviews
- List of Services
- Service Pricing

- Create Basic Excel Pivot Tables
- Excel Formulas and Functions
- Excel Charts and SmartArt Graphics
- Advanced Excel Training
- Data Analysis Excel for Beginners

Advanced Excel Exercises with Solutions PDF

Microsoft 365 Basic now includes ransomware protection for your files and photos at no extra cost.

Use Word, Excel, PowerPoint and more for free on the web
Office is now Microsoft 365
Get the free Microsoft 365 mobile app*
Start using Microsoft 365 today

Anywhere access
Whether you’re at work or on the go, create your best work on your favorite browser.
Familiar experience
The familiar Microsoft 365 experience you know and trust, so there’s nothing new to learn.
Work with anyone
Share your documents with anyone and work together in real-time.

Word for the web
Craft great-looking resumes, newsletters, and documents while inviting others to review and coauthor in real time. Plus, access free Word templates, formatting tools for APA, MLA, and Chicago style, and add functionality with free add-ins.
Excel for the web
Organize your data in familiar spreadsheets and workbooks, with all changes saved automatically. Create modern visuals that turn numbers into valuable insights. Work together in real time knowing that everyone is on the same page.

PowerPoint for the web
Turn your ideas into compelling presentations using professional-looking templates. Use animations, transitions, photos, and videos to tell one-of-a-kind stories. Co-author team presentations at the same time, from anywhere.
Start now at Microsoft365.com
No installation required. It's free.
* Availability of mobile apps varies by country/region.
Follow Microsoft 365
- Chat with sales
- Contact sales
Available M-F 9 AM to 6 PM.

Excel Formulas and Functions
Mar 26, 2019
1.26k likes | 2.89k Views
Excel Formulas and Functions. What is a formula in Excel?. A formula is statement written by the user to be calculated. Formulas can be as simple or as complex as the user wants. A formula can contain values, references to cells, defined names, and functions. What is a Formula?.
Share Presentation
- function name
- count functions
- a1 a2 a3 a4
- excel formulas

Presentation Transcript
What is a formula in Excel?
A formula is statement written by the user to be calculated. Formulas can be as simple or as complex as the user wants. A formula can contain values, references to cells, defined names, and functions.
What is a Formula? • It is a mathematical equation used to caluculate a value. • In Excel formulas must begin with an equal ( = ) sign.
Examples of Mathematical Operators • Operator Performs • + (plus sign) = Addition • - (minus sign) = Subtraction • * (asterisk) = Multiplication • / = (slash) Division
Examples of Mathematical Operators • ( ) (parentheses) = Controls the order of mathematical operations; calculations within parentheses are performed first • % (percent) = Converts a number into a percentage; for example, when you type 10%, Excel reads the value as .10 • ^ (caret) Exponentiation; for example, when you type 2^3, Excel reads the value as 2*2*2
Enter Formulas • 1. Select the cell into which you want to enter the formula. • 2. Type an equal sign (=) to begin the formula. • 3. Enter the first cell referenced in the formula. • 4. Enter the first mathematical operator. • 5. Enter the next cell referenced in the formula. • 6. Continue entering cell references and mathematical operators as needed. • 7. When you have finished creating the formula, press [Enter].
Examples of Formulas • = A1+A2+A3+A4 – will add all the values in the four cells • = (8*7)+2 is 58 • = 8*(7+2) is 72 • = 2^2 is 8
What is a Function in Excel ?
What is a function? • A function is a preset formula in Excel. Like formulas, functions begin with the equal sign ( = ) followed by the function's name and its arguments. The function name tells Excel what calculation to perform. The arguments are contained inside round brackets.
What is a Function in Excel? • A function is a piece of code designed to calculate specific values and are used inside formulas.
What are Functions? • Functions are typed alongside parenthesizes, where in the arguments if any are listed in between. To use functions in a formula, for example :=COS(3.14) will return the calculated cosine. =NOW() returns the current time. =SUM(1+2+3) *2 will multiply the sum by 2
Some Functions • TheSUM, AVERAGE, MAX, MIN, and COUNT functions are entered with the same syntax, including beginning the function with an equal sign (=) and then typing the name of the function and an open parenthesis. You then enter the cell range by dragging to select the cells or by typing the first and last cells in the range. These functions are defined in the following table:
Most common used Functions • The SUM function in Excel is specifically designed to add values from different ranges. The SUM Function can be typed into a cell in Excel, or inserted via the Insert Function tool (fx) to the left of your Formula bar. The syntax of the SUM Function is SUM(number1,number2, ...). SUM is the function name, and contained within the brackets are "arguments", or the pieces of information that Excel requires to complete the Function. The SUM function allows from 1 to 30 arguments (number 1, number ....) for which you require the total value or SUM.
Using Ctrl to Mark Cells • If you wish to add cells that are non-contiguous (not joined together), type in your function =SUM( click in the first cell you wish to add. Hold down your Ctrl key and click in all other cells you wish to add up, then type in a ). Typing in a comma instead of selecting with your Ctrl key also works just as efficiently as well.
Using SUM to Add a Range from a Different Worksheet • You can easily use SUM to add up the same range in different worksheets. Click in the cell you want the result of your addition in, then holding down the Shift key, click on the next worksheet that you wish to include in your calculation and highlight the range to be used, then click Enter.
Excel’s AutoSum Function • Because adding numbers is probably the most common function that Excel is used for, Excel has a built-in Feature called AutoSum located on the Standard toolbar. AutoSum is represented as the Greek Capital letter Sigma Σ found under the home tab editing group. You can use AutoSum to sum a range of cells. A Range can be one single cell, or many cells. You can sum cells in a contiguous (no gaps) range of cells, or a non-contiguous (cells not joined together) range.
AutoSum • To use AutoSum you must click in the cell that you wish your result, or addition to appear in. As a default, AutoSum looks up a column for figures immediately above it to add together. • This works great, unless it encounters a blank row or text. If it does, then it stops at the last cell with a number in it. If there are no numbers above it, AutoSum will automatically go to the left looking for numbers to add up, but will again stop at a blank column or text.
- More by User

FORMULAS AND FUNCTIONS IN EXCEL
FORMULAS AND FUNCTIONS IN EXCEL. Mrs. Brownfield Smith-Cotton High School Sedalia, MO. FORMULAS. A mathematical operation performed in a spreadsheet Can be entered directly in the cell Can be entered in the formula bar. FORMULAS. All formulas must start with the equal sign =
499 views • 13 slides

02. Excel Formulas
02. Excel Formulas. File -> Open -> 02b-datastart.xlsx. Find and Replace. Click Find & Select -> Replace. Find What: N.A. Click Replace All. Click OK. Click Close. All instances of N.A. have been replaced . Delete Rows. Click on Cell A2. Click Delete -> Delete Sheet Rows.
835 views • 67 slides

Excel Formulas
Excel Formulas. File -> Open -> 02b-datastart.xlsx. Delete Rows. Select cell A2. Click Delete -> Delete Sheet Rows. Find and Replace. Click on any blank cell then Click Find & Select -> Replace. Find what: N.A. Click Replace All. Click OK. Select Cell I1. Type Number of Shares.
791 views • 48 slides

Excel Tutorial 3 Calculating Data with Formulas and Functions
Excel Tutorial 3 Calculating Data with Formulas and Functions. Objectives. Make a workbook user friendly Translate an equation into an Excel formula Understand function syntax Enter formulas and functions with the Quick Analysis tool
800 views • 47 slides

Formulas and Functions 1
Formulas and Functions 1. Microsof t Office 2010 Excel Seminar Xander Jackson. Getting Familiar with Microsoft Office 2010: Excel. The Ribbon Laid out with multiple Tabs File, Home, Insert, Page Layout, Formulas, Data, Review, View Each tab has multiple Groups of Functions
236 views • 10 slides

Using Formulas and Functions in Excel 2010
Using Formulas and Functions in Excel 2010. www.ptraining.com. Formulas. Start with an equals sign (=) Operators. The Order of Operations. What is the right answer? =2+3*4 =2+3*4 = 2 + 12 = 14. Parentheses Exponent Multiplication Division Addition Subtraction. Please Excuse My
366 views • 6 slides

Excel Core Objective 5: Applying Formulas and Functions
Excel Core Objective 5: Applying Formulas and Functions. Microsoft Office 2010 Certification Prep: Microsoft Office Specialist 2010 Exam Practice. Story/Walls. Create Formulas. Mouse and Keyboard Methods: Use basic operators Revise formulas. 2. Enforce Precedence. Ribbon Methods:
212 views • 8 slides

Formulas and Functions
Formulas and Functions. An Introduction. Formula Basics. All formulas begin with “=“ Simple/common formulas use: * for multiplication / for division + for addiction - for subtraction. Order of Operations. Parenthesis or brackets
350 views • 17 slides

Excel Using Formulas and Functions
Excel Using Formulas and Functions. Microsoft Office 2010 Fundamentals. Introduction. The real power of a spreadsheet program such as Excel is its ability to perform simple and complex calculations on worksheet data.
679 views • 15 slides

Excel – Chapter 2 Formulas and Functions
Excel – Chapter 2 Formulas and Functions. ISA-B. A djust cell height and width. Open chap2_ho1_payroll.xlsx and save it as chap2_ho1_payroll_solution.xlsx Drag the border between two column headings. Double-click on the border between two column headings ( two row numbers). Wrap Text.
497 views • 16 slides

Excel Tutorial 3: Working with Formulas and Functions
Excel Tutorial 3: Working with Formulas and Functions. Understanding Cell References. To record and analyze data Enter data in cells in a worksheet Reference the cells with data in formulas that perform calculations on that data Types of cell references Relative Absolute Mixed.
439 views • 27 slides

Excel Functions
Excel Functions. Part 1. Introduction. An Excel function is a formula or a procedure that is performed in the Visual Basic environment, outside the Excel spreadsheet. For example, the sum of two variables can be evaluated in an Excel spreadsheet as follows :.
680 views • 36 slides

3.7 Formulas and Functions
3.7 Formulas and Functions. Goal 1: Solving Formulas. Goal 2: Rewrite an equation in function form. Formula – an algebraic equation that relates two or more real-life quantities. Use this given formula to solve the first example: A = lw Example 1: Find a formula for w, in terms of A and l.
274 views • 9 slides

Excel Tutorial 3: Working with Formulas and Functions. What You Will Do In Tutorial 3. Copy formulas Build formulas containing relative, absolute, and mixed references Review function syntax Insert a function with the Insert Function dialog box Search for a function
376 views • 20 slides

Excel Functions and Formulas
Excel Functions and Formulas. Marty Williams Training Specialist. Fundamentals. All formulas start with the equal sign = All functions must have parenthesis Parentheses must match ( ) Separate function arguments by a comma, with no space
947 views • 28 slides

Excel 2010 Formulas and Functions
483 views • 29 slides

Excel Tutorial 3: Working with Formulas and Functions. Objectives. Copy formulas Build formulas containing relative, absolute, and mixed references Review function syntax Insert a function with the Insert Function dialog box Search for a function Type a function directly in a cell.
611 views • 40 slides

Formulas, Ranges, and Functions
Formulas, Ranges, and Functions. Formulas. Formulas perform operations such as addition, multiplication, and comparison on worksheet values. Formulas can refer to other cells on the same worksheet, cells on other worksheets in the same workbook, or even cells on worksheets in other workbooks.
450 views • 40 slides

Excel: Formulas and Functions
Excel: Formulas and Functions. Objectives. Name a cell or range Locate and use Excel’s predefined functions Debug formulas that contain errors Record and run a macro. Referencing Cells. Absolute, relative & mixed Cell Ranges A2:A10 (row) A2:D10 (column) A2:B6 (range)
203 views • 7 slides

Microsoft Excel Tutorial For Beginners-1 | Excel Formulas & Functions | Excel Training | Simplilearn
This presentation on Excel Tutorial for beginners part-1 will help you get started with Excel and explore the features it offers. You will take a tour to understand Excel basics and look at how to write functions, sort, and filter data. You will understand how to import data and split data into multiple columns. You will learn about sumif and countif functions. Finally, you will get to know all about conditional formatting in Excel. Let's begin. This Data Analyst Masteru2019s Program in collaboration with IBM will make you an expert in data analytics. In this Data Analytics course, you'll learn analytics tools and techniques, how to work with SQL databases, the languages of R and Python, how to create data visualizations, and how to apply statistics and predictive analytics in a business environment. Why become Data Analyst? By 2020, the World Economic Forum forecasts that data analysts will be in demand due to increasing data collection and usage. Organizations view data analysis as one of the most crucial future specialties due to the value that can be derived from data. Data is more abundant and accessible than ever in todayu2019s business environment. In fact, 2.5 quintillion bytes of data are created each day. With an ever-increasing skill gap in data analytics, the value of data analysts is continuing to grow, creating a new job and career advancement opportunities. The facts are that professionals who enter the Data Science field will have their pick of jobs and enjoy lucrative salaries. According to an IBM report, data and analytics jobs are predicted to increase by 15 percent to 2.72 million jobs by 2020, with the most significant demand for data analysts in finance, insurance, and information technology. Data analysts earn an average pay of $67,377 in 2019 according to Glassdoor. Who should take up this course? Aspiring professionals of any educational background with an analytical frame of mind are best suited to pursue the Data Analyst Masteru2019s Program, including: 1. IT professionals 2. Banking and finance professionals 3. Marketing managers 4. Sales professionals 5. Supply chain network managers 6. Beginners in the data analytics domain 7. Students in UG/ PG programs ud83dudc49Learn more at: https://bit.ly/2SECA5r
353 views • 27 slides

- SUGGESTED TOPICS
- The Magazine
- Newsletters
- Managing Yourself
- Managing Teams
- Work-life Balance
- The Big Idea
- Data & Visuals
- Reading Lists
- Case Selections
- HBR Learning
- Topic Feeds
- Account Settings
- Email Preferences
How to Make a “Good” Presentation “Great”
- Guy Kawasaki

Remember: Less is more.
A strong presentation is so much more than information pasted onto a series of slides with fancy backgrounds. Whether you’re pitching an idea, reporting market research, or sharing something else, a great presentation can give you a competitive advantage, and be a powerful tool when aiming to persuade, educate, or inspire others. Here are some unique elements that make a presentation stand out.
- Fonts: Sans Serif fonts such as Helvetica or Arial are preferred for their clean lines, which make them easy to digest at various sizes and distances. Limit the number of font styles to two: one for headings and another for body text, to avoid visual confusion or distractions.
- Colors: Colors can evoke emotions and highlight critical points, but their overuse can lead to a cluttered and confusing presentation. A limited palette of two to three main colors, complemented by a simple background, can help you draw attention to key elements without overwhelming the audience.
- Pictures: Pictures can communicate complex ideas quickly and memorably but choosing the right images is key. Images or pictures should be big (perhaps 20-25% of the page), bold, and have a clear purpose that complements the slide’s text.
- Layout: Don’t overcrowd your slides with too much information. When in doubt, adhere to the principle of simplicity, and aim for a clean and uncluttered layout with plenty of white space around text and images. Think phrases and bullets, not sentences.
As an intern or early career professional, chances are that you’ll be tasked with making or giving a presentation in the near future. Whether you’re pitching an idea, reporting market research, or sharing something else, a great presentation can give you a competitive advantage, and be a powerful tool when aiming to persuade, educate, or inspire others.
- Guy Kawasaki is the chief evangelist at Canva and was the former chief evangelist at Apple. Guy is the author of 16 books including Think Remarkable : 9 Paths to Transform Your Life and Make a Difference.
Partner Center

How To Get Free Access To Microsoft PowerPoint
E very time you need to present an overview of a plan or a report to a whole room of people, chances are you turn to Microsoft PowerPoint. And who doesn't? It's popular for its wide array of features that make creating effective presentations a walk in the park. PowerPoint comes with a host of keyboard shortcuts for easy navigation, subtitles and video recordings for your audience's benefit, and a variety of transitions, animations, and designs for better engagement.
But with these nifty features comes a hefty price tag. At the moment, the personal plan — which includes other Office apps — is at $69.99 a year. This might be the most budget-friendly option, especially if you plan to use the other Microsoft Office apps, too. Unfortunately, you can't buy PowerPoint alone, but there are a few workarounds you can use to get access to PowerPoint at no cost to you at all.
Read more: The 20 Best Mac Apps That Will Improve Your Apple Experience
Method #1: Sign Up For A Free Microsoft Account On The Office Website
Microsoft offers a web-based version of PowerPoint completely free of charge to all users. Here's how you can access it:
- Visit the Microsoft 365 page .
- If you already have a free account with Microsoft, click Sign in. Otherwise, press "Sign up for the free version of Microsoft 365" to create a new account at no cost.
- On the Office home page, select PowerPoint from the side panel on the left.
- Click on "Blank presentation" to create your presentation from scratch, or pick your preferred free PowerPoint template from the options at the top (there's also a host of editable templates you can find on the Microsoft 365 Create site ).
- Create your presentation as normal. Your edits will be saved automatically to your Microsoft OneDrive as long as you're connected to the internet.
It's important to keep in mind, though, that while you're free to use this web version of PowerPoint to create your slides and edit templates, there are certain features it doesn't have that you can find on the paid version. For instance, you can access only a handful of font styles and stock elements like images, videos, icons, and stickers. Designer is also available for use on up to three presentations per month only (it's unlimited for premium subscribers). When presenting, you won't find the Present Live and Always Use Subtitles options present in the paid plans. The biggest caveat of the free version is that it won't get any newly released features, unlike its premium counterparts.
Method #2: Install Microsoft 365 (Office) To Your Windows
Don't fancy working on your presentation in a browser? If you have a Windows computer with the Office 365 apps pre-installed or downloaded from a previous Office 365 trial, you can use the Microsoft 365 (Office) app instead. Unlike the individual Microsoft apps that you need to buy from the Microsoft Store, this one is free to download and use. Here's how to get free PowerPoint on the Microsoft 365 (Office) app:
- Search for Microsoft 365 (Office) on the Microsoft Store app.
- Install and open it.
- Sign in with your Microsoft account. Alternatively, press "Create free account" if you don't have one yet.
- Click on Create on the left side panel.
- Select Presentation.
- In the PowerPoint window that opens, log in using your account.
- Press Accept on the "Free 5-day pass" section. This lets you use PowerPoint (and Word and Excel) for five days — free of charge and without having to input any payment information.
- Create your presentation as usual. As you're using the desktop version, you can access the full features of PowerPoint, including the ability to present in Teams, export the presentation as a video file, translate the slides' content to a different language, and even work offline.
The only downside of this method is the time limit. Once the five days are up, you can no longer open the PowerPoint desktop app. However, all your files will still be accessible to you. If you saved them to OneDrive, you can continue editing them on the web app. If you saved them to your computer, you can upload them to OneDrive and edit them from there.
Method #3: Download The Microsoft PowerPoint App On Your Android Or iOS Device
If you're always on the move and need the flexibility of creating and editing presentations on your Android or iOS device, you'll be glad to know that PowerPoint is free and available for offline use on your mobile phones. But — of course, there's a but — you can only access the free version if your device is under 10.1 inches. Anything bigger than that requires a premium subscription. If your phone fits the bill, then follow these steps to get free PowerPoint on your device:
- Install Microsoft PowerPoint from the App Store or Google Play Store .
- Log in using your existing Microsoft email or enter a new email address to create one if you don't already have an account.
- On the "Get Microsoft 365 Personal Plan" screen, press Skip For Now.
- If you're offered a free trial, select Try later (or enjoy the free 30-day trial if you're interested).
- To make a new presentation, tap the plus sign in the upper right corner.
- Change the "Create in" option from OneDrive - Personal to a folder on your device. This allows you to save the presentation to your local storage and make offline edits.
- Press "Set as default" to set your local folder as the default file storage location.
- Choose your template from the selection or use a blank presentation.
- Edit your presentation as needed.
Do note that PowerPoint mobile comes with some restrictions. There's no option to insert stock elements, change the slide size to a custom size, use the Designer feature, or display the presentation in Immersive Reader mode. However, you can use font styles considered premium on the web app.
Method #4: Use Your School Email Address
Office 365 Education is free for students and teachers, provided they have an email address from an eligible school. To check for your eligibility, here's what you need to do:
- Go to the Office 365 Education page .
- Type in your school email address in the empty text field.
- Press "Get Started."
- On the next screen, verify your eligibility. If you're eligible, you'll be asked to select whether you're a student or a teacher. If your school isn't recognized, however, you'll get a message telling you so.
- For those who are eligible, proceed with creating your Office 365 Education account. Make sure your school email can receive external mail, as Microsoft will send you a verification code for your account.
- Once you're done filling out the form, press "Start." This will open your Office 365 account page.
You can then start making your PowerPoint presentation using the web app. If your school's plan supports it, you can also install the Office 365 apps to your computer by clicking the "Install Office" button on your Office 365 account page and running the downloaded installation file. What sets the Office 365 Education account apart from the regular free account is that you have unlimited personal cloud storage and access to other Office apps like Word, Excel, and Outlook.
Read the original article on SlashGear .

View, manage, and install add-ins for Excel, PowerPoint, and Word
When you install and use an add-in, it adds custom commands and extends the features of your Microsoft 365 programs to help increase your productivity.
Note: This article only applies to add-ins in Excel, PowerPoint, and Word. For guidance on how to view, install, and manage add-ins in Outlook, see Use add-ins in Outlook .
View installed add-ins

You can directly install add-ins from this page or select More Add-ins to explore.
In the Office Add-ins dialog, select the My Add-ins tab.
Select an add-in you want to view the details for and right-click to select Add-in details option.
Install an add-in
Tip: If you selected Home > Add-ins , directly install popular add-ins from the menu that appears, or select More Add-ins to view more options.
Select Add from the add-in you want to install.
Manage installed add-ins
To manage and view information about your installed add-ins, perform the following:
Select File > Get Add-ins . Alternatively, select Home > Add-ins > More add-ins .
In the Office Add-ins dialog, select the My Add-ins tab.
Select Manage My Add-ins . This opens the Office Store page in your preferred browser with a list of your installed add-ins.
Remove an add-in
To remove an add-in you installed, follow these steps.
Select File > Get Add-ins . Alternatively, select Home > Add-ins .
In the Office Add-ins dialog, select My Add-ins tab.
Select an add-in you want to remove and right click to select Remove option.
Note: Add-ins that appear in the Admin Managed section of the Office Add-ins dialog can only be removed by your organization's administrator.
Cancel an add-in subscription
To discontinue your subscription to an add-in, do the following:
Open the Microsoft 365 application and select the Home tab.
Select Add-ins from the ribbon, then select More Add-ins .
Select the My Add-ins tab to view your existing add-ins.
Select Manage My Add-ins .
Under the Payment and Billing section, choose Cancel Subscription .
Select OK , then Continue .
Once you've cancelled your subscription, you should see a message that says "You have cancelled your app subscription" in the comments field of your add-in list.
Manage an add-in's access to your devices
Note: The information in this section only applies to Excel on the web, Outlook on the web, PowerPoint on the web, and Word on the web running in Chromium-based browsers, such as Microsoft Edge and Google Chrome.
When an installed add-in requires access to your devices, such as your camera or microphone, you will be shown a dialog with the option to allow, allow once, or deny permission.

If you select Allow , the add-in will have access to the requested devices. The permission you grant persists until you uninstall the add-in or until you clear the cache of the browser where the add-in is running.
If you select Allow Once , the add-in will have access to the requested devices until it's relaunched in the browser.
If you select Deny , the add-in won't be able to access the requested devices. This persists until you uninstall the add-in or until you clear the cache of the browser where the add-in is running.
If you want to change an add-in's access to your devices after selecting Allow or Deny , you must first uninstall the add-in or clear your browser cache.
Add or load a PowerPoint add-in
Add or remove add-ins in Excel
Get a Microsoft 365 Add-in for Excel
Get a Microsoft 365 Add-in for Outlook
Help for Excel for Windows add-ins

Need more help?
Want more options.
Explore subscription benefits, browse training courses, learn how to secure your device, and more.

Microsoft 365 subscription benefits

Microsoft 365 training

Microsoft security

Accessibility center
Communities help you ask and answer questions, give feedback, and hear from experts with rich knowledge.

Ask the Microsoft Community

Microsoft Tech Community

Windows Insiders
Microsoft 365 Insiders
Find solutions to common problems or get help from a support agent.

Online support
Was this information helpful?
Thank you for your feedback.
Arizona GOP strategy document implores party to show 'Republicans have a plan' on abortion

PHOENIX — Republican legislators in Arizona are considering pushing alternative ballot measures to compete with a proposed constitutional amendment to expand abortion rights in the state, according to a PowerPoint presentation obtained by NBC News , as the GOP faces the fallout from a state Supreme Court ruling upholding a near-total abortion ban.
The strategy document includes a slide titled: “PHASE 2: SEND VOTERS TWO OTHER OPTIONS THAT CONFLICT WITH AAA INITIATIVE,” referring to the Arizona for Abortion Access ballot measure , which aims to enshrine abortion rights into the state’s constitution through fetal viability and vastly expand the scope for exceptions.
The document outlines a plan to give the voters alternatives to the Arizona for Abortion Access ballot measure, presenting options for other constitutional amendments like the “15-week Reproductive Care and Abortion Act and Heartbeat Protection Act.”
And the document also discusses presenting voters with an option for a limit on abortions after 15 weeks that would actually be a stricter ban.
“Could scale back 15-week law to 14-week law,” the presentation reads. “In reality, a 14-week law disguised as a 15-week law because it would only allow abortion until the beginning of the 15th week,” it goes on.
The document also acknowledges that both of those time frames represent an "arbitrary number of weeks" of a pregnancy and that it would be considered a disadvantage to move a measure that "solidifies" that number in the state constitution.
The Legislature is scheduled to reconvene Wednesday as pressure mounts from Republicans, including former President Donald Trump, to repeal Arizona’s 1864 abortion ban.
State House Speaker Ben Toma said in a statement responding to the presentation: “The document presents ideas drafted for internal discussion and consideration within the caucus. I’ve publicly stated that we are looking at options to address this subject, and this is simply part of that.”
Dawn Penich, a spokesperson for Arizona for Abortion Access, the coalition of reproductive rights organizations including the ACLU of Arizona and Planned Parenthood Advocates of Arizona, said the document “shows yet again why Arizonans can’t leave our most basic and personal rights in the hands of politicians in the state Legislature.”
The Republican PowerPoint also outlines a plan to “constitutionalize existing laws” on the books in Arizona in response to the debate over abortion policy. That includes “forbidding anyone who is not a licensed physician from performing an abortion,” outlawing “discriminatory abortions” or “prohibiting physicians from performing an abortion when a physician knows the purpose is based on genetic abnormality or race or gender.”
The purpose of putting those proposals forward, according to the document: “Changes narrative — Republicans have a plan!” It says the GOP needs to give voters “something other than the extreme abortion-on-demand AAA Initiative” to choose in November. The 24-week ballot measure has gotten a surge of attention in the last week after the state Supreme Court ruled that Arizona’s near-total 1864 ban was enforceable.
The PowerPoint presentation ends with a slide that includes a meme of late-night television host Seth Meyers and the text “BOOM. EASY AS THAT.”
In Arizona, a proposed constitutional amendment can make its way onto the ballot through a citizen-initiated process that relies on collecting signatures or through a referral by the Legislature.
The measure seeking to enshrine abortion access is going the petition signature route, while the proposals discussed in the Republican strategy document would be referred to the ballot by the GOP-controlled Legislature.
The document appears to lay out several contingencies.
For example, the "Phase 1" options appear to describe a situation in which Republican lawmakers would refer a proposed amendment to protect legislators' authority to "enact laws rationally related to promoting and preserving life and to protecting the health and safety of pregnant women."
The document describes that approach as "complimentary (not conflicting)" to the proposed abortion-rights amendment — and it says that if both appeared and passed in November, "courts would" be forced to "consider both when interpreting the constitutional right to abortion."
The document also advises Republican lawmakers to choose titles for their "Phase 1" measures along the lines of “Protecting Pregnant Women and Safe Abortions Act,” the “Arizona Abortion and Reproductive Care Act" and the “Arizona Abortion Protection Act."
Meanwhile, the document lays out an "ALTERNATIVE TO PHASE 2," under which lawmakers would refer a "conditional enactment" of the "Phase 2 proposal." Under that approach, the "Phase 2" proposal "does not become effective unless the Arizona Abortion Access Act is adopted" during the 2024 general election.
It was not immediately clear from the document whether the “Phase 2” approach, to refer ballot measures that “conflict” with the abortion-rights proposal, would be considered concurrently or alternatively to “Phase 1.”
However, the document features a proposed timeline that states there are “REASONS TO PROCEED WITH PHASE 1, THEN CONSIDER PHASE 2 OR CONDITIONAL ENACTMENT," arguing that doing so "puts Democrats in a defensive position."
Alex Tabet is a 2024 NBC News campaign embed.
Adam Edelman is a political reporter for NBC News.
IMAGES
VIDEO
COMMENTS
In PowerPoint, on the Insert tab, click or tap Object. In the Insert Object dialog box, select Create from file. Click or tap Browse, and in the Browse box, find the Excel workbook with the data you want to insert and link to. Before you close the Insert Object box, select Link, and click OK. Important: The linked object in your presentation ...
In Excel, select the cells you want to link or embed. If you would like to link or embed the entire worksheet, click on the box at the juncture of the rows and columns in the top left-hand corner to select the whole sheet. Copy those cells by pressing CTRL+C in Windows or Command+C in macOS.
Open your PowerPoint presentation and select the slide for insertion. Click the Insert tab on PowerPoint's ribbon. Click on Object in the Text group. Choose 'Create from file' and Browse for your Excel file. Click OK to insert the spreadsheet. Conclusion. Inserting an Excel spreadsheet into a PowerPoint presentation can add a whole new ...
PowerPoint for the web. Turn your ideas into compelling presentations using professional-looking templates. Use animations, transitions, photos, and videos to tell one-of-a-kind stories. Co-author team presentations at the same time, from anywhere. Start using PowerPoint for free Learn more about PowerPoint.
In Excel, click and drag to highlight the cells you want to copy. Right-click the copied cells and select Copy. In your PowerPoint presentation, right-click and select the Paste Options you want: Use Destination Styles - Choose to edit your copied cells like a PowerPoint table, but with PowerPoint's color scheme and fonts.
1. Choose where you want to insert the Excel file. On the PowerPoint presentation, click on the text field you want to insert an Excel file then click on the Insert tab on the upper-left section of the window to view the Insert toolbar. 2. Click on the Object button.
First, build your table in Excel. Save the file on your computer. Select your table and press "Ctrl + C." Go to your PowerPoint file. Right-click on the slide to see different "Paste Options" (this is another way to paste information from Excel to PowerPoint). Choose the middle option: "Embed," and that's it!
Learn how to embed a link directly to Excel data from within a PowerPoint (PPT) presentation. If you are using PowerPoint 2013 or a newer version, you can li...
In the Paste Special window, choose the Paste link radio button. Choose Microsoft Excel Worksheet Object . Press OK . Once done, you'll see the table you copied from Excel appear on your PowerPoint presentation. However, you need to access the source Excel file to edit the content or formatting of the table you added.
Learn how to create high-impact, data-rich presentations using PowerPoint and Excel together. Follow along with Gini von Courter as she shows how to create presentations that are easy to use, easy ...
Open the Excel file, then select the range of data (e.g. C4:E14) you want to embed. After that, press CTRL + C on your keyboard to copy this range. Open your PowerPoint slide and navigate to the Home tab if it does not appear. Click on the Paste drop-down option and then click on Paste Special.
Step-4: Select the Excel file. In the file explorer pop-up window, select the Excel file that you want to embed into the PowerPoint slide. Then click on the "OK" button at the bottom of the window to add the Excel file. Step-5: Click on the "Link" option. In the "Insert Object" dialog box, click on the "Link" option by the ...
Insert the Excel spreadsheet: In PowerPoint, go to the "Insert" tab. Click on "Object" in the Text group. Choose "Create from file" and then click on "Browse" to locate your Excel file. Select the Excel file and click "OK."
In Excel, select the chart or table you want to use, and press CTRL+C to copy it. In PowerPoint, go to the Home tab, click on the dropdown arrow next to Paste, and select Paste Special. Choose the Paste Link option from the dialog box, and select Microsoft Office Excel Chart Object. Click OK.
Click on the box in the top left to select data. You can select all of the data or only the data you want. 3. Click Edit and select Copy to copy the data. 4. Open Microsoft PowerPoint. You can minimize the Excel file's window or exit Excel and navigate to PowerPoint. 5. Click File in the top left.
One person. Sharing and real-time collaboration. PowerPoint for the web and PowerPoint desktop app for offline use. Premium templates, fonts, icons, and stickers with thousands of options to choose from. Dictation, voice commands, and transcription. Advanced spelling and grammar, in-app learning tips, use in 20+ languages, and more.
In Excel, click and drag to highlight the cells you want to copy. Right-click the copied cells and select Copy. In your PowerPoint presentation, right-click and select the Paste Options you want: Use Destination Styles - Choose to edit your copied cells like a PowerPoint table, but with PowerPoint's color scheme and fonts.
First, copy the column names to the first rows of the table from your options. The Start filling Data automatically will set to 2. Then click OK to close. The data file automatically copies to the table. Then select all cells that have numeric data, and click on DataPoint and Table again.
Images make your presentation look official and possess the professional feel in many of the beautiful presentations you have seen. Pictures speak a thousand words. While Excel is not designed to accomplish the kind of presentation you can make in PowerPoint, a picture will help you to drive the point home and make your presentation memorable. 7.
STEPS: First, launch PowerPoint. Then, select the Insert tab. Next, click Text, and later on the Object option. As a result, a new dialog box will pop up at this time, and you must click on Create from file. After that, click on Browse to find the Excel document you want to add to your slides. Consequently, the Insert Object dialog box pops up ...
Turn your ideas into compelling presentations using professional-looking templates. Use animations, transitions, photos, and videos to tell one-of-a-kind stories. Co-author team presentations at the same time, from anywhere.
Select the cell into which you want to enter the formula. • 2. Type an equal sign (=) to begin the formula. • 3. Enter the first cell referenced in the formula. • 4. Enter the first mathematical operator. • 5. Enter the next cell referenced in the formula.
9. FORMATTING TEXT TO FORMAT TEXT IN BOLD, TO CHANGE THE FONT STYLE: ITALICS OR UNDERLINE: Select the cell or cells you want to Left-click a cell to select it or drag format. your cursor over the text in the Left-click the drop-down arrow next to formula bar to select it. the Font Style box on the Home tab. Click the Bold, Italics or underline Select a font style from the list. command.
When in doubt, adhere to the principle of simplicity, and aim for a clean and uncluttered layout with plenty of white space around text and images. Think phrases and bullets, not sentences. As an ...
Select Presentation. In the PowerPoint window that opens, log in using your account. Press Accept on the "Free 5-day pass" section. This lets you use PowerPoint (and Word and Excel) for five days ...
Note: This article only applies to add-ins in Excel, PowerPoint, and Word.For guidance on how to view, install, and manage add-ins in Outlook, see Use add-ins in Outlook.
Open a new Microsoft PowerPoint. Click the Copilot button from the top bar. This will open a Copilot section from the left pane. Now, you can start creating a presentation by asking Copilot to ...
The PowerPoint presentation ends with a slide that includes a meme of late-night television host Seth Meyers and the text "BOOM. EASY AS THAT." In Arizona, a proposed constitutional amendment ...