
Contribute to the Microsoft 365 and Office forum! Click HERE to learn more 💡
March 14, 2024

Contribute to the Microsoft 365 and Office forum!
Click HERE to learn more 💡
Top Contributors in PowerPoint: Steve Rindsberg - Jim_ Gordon - John Korchok ✅
March 11, 2024
Top Contributors in PowerPoint:
Steve Rindsberg - Jim_ Gordon - John Korchok ✅
- Search the community and support articles
- Microsoft 365 and Office
- Search Community member
Ask a new question
How can I share a PowerPoint so that it opens automatically in presentation mode?
Report abuse.
- Microsoft Agent |
Hi A teacher in Wa,
Thank you for querying in this forum.
According to your description, it seems that you want to share a presentation with students via Microsoft Teams and you also want your students to immediately watch your presentation as a slide show instead of seeing the slides in edit mode.
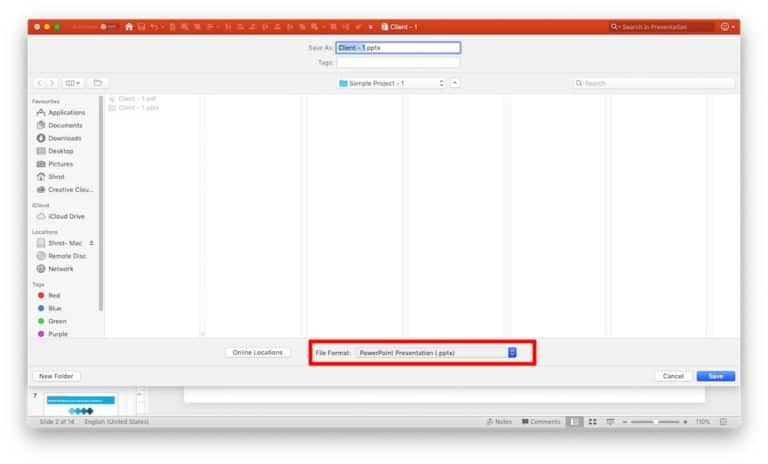
May I know if my understanding is right? If so, we’d suggest you save presentation file as .ppsx type file, if you are using PowerPoint in Windows, we’d suggest you go to PowerPoint File > Save as > Click More Options > select PowerPoint Show under Save as type, the file is saved as a .ppsx file. When the file is double-clicked, it opens as a slide show.
For more details, you can refer to this article: Start a presentation automatically with a PowerPoint Show .
Then you can go to Microsoft Teams and find the team > click Files tab > upload this file. And we have tested it on our side, if we saved it as .ppsx file and uploaded to Teams, when we clicked it, it will show as a slide show, as shown below:

If the scenario above is not consistent with yours, you can also post back and provide more details about your requirement.
Best Regards,
1 person found this reply helpful
Was this reply helpful? Yes No
Sorry this didn't help.
Great! Thanks for your feedback.
How satisfied are you with this reply?
Thanks for your feedback, it helps us improve the site.
Thanks for your feedback.
Replies (1)
Question info.
- Norsk Bokmål
- Ελληνικά
- Русский
- עברית
- العربية
- ไทย
- 한국어
- 中文(简体)
- 中文(繁體)
- 日本語
Home Blog PowerPoint Tutorials How to Work with Presenter View in PowerPoint
How to Work with Presenter View in PowerPoint

Not all presenters have excellent memory recall or the ability to speak flawlessly to the audience without any cues. However, many of them are good at hiding it by using Presenter View in PowerPoint. It is a presentation mode that enables the presenter to hide speaker notes and presentation controls from the audience while leveraging the various handy features offered by PowerPoint.
How to Use Presenter View in PowerPoint
To start using Presenter View, ensure it’s enabled before you begin your slideshow. If you are new to this feature, we recommend using this option to familiarize yourself with the various navigation options for this presentation mode. This might also be helpful if the PowerPoint templates you are accustomed to using might have animations that you might want to preview in this mode to understand when to give the next visual cue.
How to Enable Presenter View in PowerPoint
To enable PowerPoint presenter view, go to the SlideShow tab and make sure the Use Presenter View option is enabled. This will ensure that you can access Presenter View when you switch your slides to SlideShow mode.

Adjust Display Settings
You can swap between the presenter view and slideshow mode or duplicate the slideshow to exit the Presenter View from the Display Settings menu from the top toolbar.

Navigate Slides in Presenter View
Like any standard PowerPoint presentation in SlideShow mode, you can navigate between slides by using the arrow keys or with a presentation remote. Presenter View also provides slide navigation buttons to move the slides back and forth.

View Taskbar in Presenter View
The Show Taskbar option at the top enables viewing the taskbar. This can be helpful if you require using the taskbar, such as to view your battery charge, see the time, enable or disable another app from the taskbar menu, etc.

Reset or Pause the Timer
Once you start your presentation in Presenter View, a timer starts showing how much time you have spent in slideshow mode. This is an excellent way to understand how much time you have consumed for your session and to keep an eye out for good timekeeping. You can also hit Pause or reset the timer anytime.

Change the Size of the Speaker Notes
How to view notes in PowerPoint while presenting? If you have any speaker notes added to your slides, they will appear in Presenter View on your screen. You can increase or reduce the size of the text via the two options at the bottom of the speaker notes pane.

Using Annotation Tools in Presenter View
PowerPoint annotation tools can be accessed from the bottom toolbar in Presenter View. The Pen and Laser Pointer Tools button gives you access to the pen, ink colors, laser pointer, and eraser and also allows you to show or hide the mouse pointer via Arrow Options .

View All Slides in Presenter View
If you need to go back and forth to find a relevant slide for an ongoing discussion or query during your presentation, you can view all slides in Presenter View via the See all slides option.

Zoom Slides using Presenter View
PowerPoint’s Zoom feature lets presenters quickly pick a portion of the slide to zoom into. Presenter View allows you to leverage this feature by instantly selecting a portion of the slide to enlarge it after selecting Zoom into the slide option. To exit the Zoom mode or hit the Esc key.

Black or Unblack SlideShow
Sometimes, you might want to turn the screen blank for a while, such as during a mid-presentation break. The Black or Unblack SlideShow option blanks the slides for your audience while continuing to show you all navigation options via Presenter View.

Toggle Subtitles in Presenter View
One of the most revolutionary features introduced by Microsoft for PowerPoint over the past decade has been Live captions. This feature enables subtitles by converting speech to text as you present. You can toggle Live subtitles on or off while in presenter view to help your audience read what you speak.

Toggle Camera in Presenter View
Like subtitles, you can also toggle the camera on or off in Presenter View.

End Slideshow in Presenter View
There are different ways to end or exit a SlideShow from Presenter View. You can hit the Esc key or click End Slide Show . Similarly, you can click the three dots at the bottom and select End Show .

More Slideshow Options
Other than the various visibility prominent menus available to navigate, annotate, and present your slides, you can also find a few additional options via More slideshow options , which are accessible via the three dots at the bottom toolbar. These include adjusting the position of the subtitles, turning your screen white or black, ending the slideshow, etc.

How to Use Presenter View on a Single Screen
While Presenter View can be enabled to work with dual monitors, you can also use Presenter View on a single monitor with remote meeting apps like Zoom. A simple method for switching to Presenter View on a single monitor is to click the three dots ( More slideshow options ) at the bottom in SlideShow mode and select Show Presenter View .

You can also switch to Presenter View on a single monitor anytime using the ALT+F5 hotkey.

The presenter can easily manage a PPT in presentation mode, with the utility to view speaker notes, annotate or zoom slides, toggle subtitles or camera on or off, and keep your audience engaged via better slideshow management. However, if you’re new to this presentation mode, a bit of practice might help you avoid confusion when presenting before an audience in Presenter View for the first few times.

Like this article? Please share
PowerPoint Tools, Presentation Skills Filed under PowerPoint Tutorials
Related Articles

Filed under PowerPoint Tutorials • March 15th, 2024
How to Group in PowerPoint
Organize your slides’ content efficiently by mastering how to group in PowerPoint. 3 different approaches to grouping and ungrouping elements.

Filed under PowerPoint Tutorials • March 5th, 2024
How to Add Bullet Points in PowerPoint
Become a master of summarizing presentation’s key points by learning how to add bullet points in PowerPoint

Filed under PowerPoint Tutorials • March 1st, 2024
How to Insert a Video into PowerPoint
Make your presentations more engaging by inserting a video into PowerPoint. Step-by-step tutorial using different video sources.
Leave a Reply
Jump Start Series: Learn How to Run a PowerPoint Slide Show
About this lesson, how do i run powerpoint slideshows in presenter mode.
This tutorial will walk you through the steps of getting your presentation on the screen.
You will not just see how it works, but get coaching of some subtle techniques that we have learned from our decades of experience.
What Will I Learn?
- How to launch Slideshow Presenter Mode (including shortcut keys)
- How to manage multiple monitors or a laptop and a big screen projector/TV
- Navigating your slides with both the mouse, keyboard, or even a Bluetooth remote
- How to use the big screen laser pointer and magnifier
Watch and learn in under 11 minutes.
BONUS: Room Projector Test File
See below for PDF files which is a four-slide PowerPoint room tester slide deck used in this training tutorial.
Topics include (with video timestamps):
- Intro: 0:00
- Windows Shortcut Extend Screen: 1:16
- Swap Presenter View Monitors: 2:28
- Slide Show Navigating Techniques: 2:53
- Bluetooth Remote Control: 3:58
- Blanking the Screen: 4:58
- Tour of Presenter View: 5:38
- Pen & Laser Pointer: 7:02
- Magnifier: 7:50
- Jump to Slide: 8:14
- On-Screen Controls: 8:50
- Wrap Up: 9:08
Subject Microsoft PowerPoint
Software Compatibility All versions of PowerPoint from Office 2013 to current Office 365
Level Foundation
Course Completed Complete
PDF Files There are not any files associated with this lesson.
TRAINING SERIES VIEW ALL
Remember to subscribe to our YouTube channel by clicking the AUTO SUBSCRIBE! button below
Subscriptions help us create more free video training for YOU!
Rough Training Video Transcript for “Learn How to Run a PowerPoint Slide Show”
You have created your presentation and you’re about to go on stage and you need help knowing how to run the presentation within PowerPoint.
Don’t worry. I’ve got you covered
This is Les from Power UP Training where my years of experience can become your expertise for free.
In this particular series, we’re gonna walk you through a variety of topics.
I’m gonna explain how to work with a monitor and a projector screen
We’ll also go through how to navigate to the presentation. I’ll talk about some of the keystrokes Mount strokes. And other techniques to keep things under control will also go through a hands-on demonstration of all the aspects of the presentation tools so as you feel comfortable before you go on stage and they’ll be some tricks and some tips along the way so let’s power up to running presentation mode.
Just so you know, this particular training series is being run, guess what in PowerPoint, I do every green screen but we are live going forward, so how do you go from a regular PowerPoint mode into presentation mode, well the trick is to get it up on the projector you hook your laptop or your computer to the projector and then you need to be able to turn on the projection piece and if it’s not automatically being extended out to that presentation monitor, you can use a Windows keyboard trick of the Windows key in the control and the P.
And it’s going to pop up this screen to give you some choices of how to extend your presentation out to the second monitor or the big screen presentation video system, you’re going to want to choose extend you don’t want to duplicate you don’t want to do any of the choices extends gonna create a second screen for your work from.
Once you’ve got that turned on the next trick you need to do before you start your presentation is to figure out where the heck your mouse is because you’re going to have to move from one side to the other in your giant upstream video projection system, maybe on the right side or the left side, it’s helpful to know upfront where that is.
The second thing you may need to do is swap your display once in a while PowerPoint gets confused and what it will do is it’s going to put your presentation on your little laptop screen, when you want it on the big presentation screen for other room simple enough at the very top with the screen you’re going to see that there’s something called a display setting that should then going to be able to swap presenter views and flies show.
I’ll show you that in a moment but before we go too far, let’s get down some of the basics of how to control your presentation, there are some different ways to manage your presentation one. Is. Moving backwards and forwards with the keyboard or with your mouse You’re going to see on the screen and we’ll see this in just a moment that there’s going to be a VCR like I know a VCR like control the little triangles to maybe afford or backwards that you find often in YouTube or other types of video systems there.
You’re going to be able to use that but I find I like using the keyboard the reason I like using a keyboard is I don’t have to look around where things are. I can just move things forward by using the space bar to advance to the next slide. You can also use your arrow keys or up and down.
Lots of different ways to move forward and backwards including the end and home key the home getting to the very beginning your presentation and the end key getting to the very last slide your presentation. And then you can use the letter P to go your previous slide. So lots of techniques, you just need to find ones that you’re comfortable with using up on the stage.
Hey the quick interruption here because I know people are going to ask on the comments below. That’s not how you’re running your presentation and that’s true when I get my classes. I’d like to stick to the tools that are in PowerPoint, but There are other techniques including some Bluetooth tools that’ll actually advance the slide with a click of a button.
These are great because you can then walk around on the stage and not have to be tied to your keyboard your mouse and you can move forward on your slides one by one. Personally, I use the Logitech presentation remote control tool, which I love but I need to warn you this extremely expensive.
It is cool and easy to use and it has looked little tricks like my spotlight mode here and you can see here. I’m using just my little remote to change. The spotlight on the screen. With that let’s go back to our ongoing training video on using Microsoft PowerPoint presenter mode.
A couple keys that I really prefer is the black and white key. If I hit B in here we go, look what it just did. It blank the screen in black. If I hit the W key, it does the same thing it blanks the screen to white. Why would we use these?
If I’m doing a presentation and it turns out a discussion pops up on a completely different topic and I don’t want them to be distracted with what they see. On the screen. I can easily blank the screen out by toggling on and off with you the W or the B key.
So enough talk, let’s go in and see how this is going to work. And switch on over to the presenter view which would typically be displayed on the laptop in front of you. You can see here that we have a giant slide the top left corner. This represents what you’re going to see up on the big screen.
On the right side is a smaller thumbnail which is showing what the next slide will look like so you have a preview of what’s about to show up. If I click the advantage to slide I’m not really advancing the slide. I’m actually advancing to the next bullet point because I have these as they structured bullet points one by one by one but they click.
You can see here this is how I actually swap back and forth between my presentation view and my ash will presented you so if you have a confusion with the way is showing up let’s go down advance the slide and we’ll see the bullet points going forward we’ll see on the right side on the bottom right is where the script would be on the right the preview of the next slide the main screen and then these are some advanced tools for us to be able to use and then down here is the slide controls with the mouse or as we said before you can use your keyboard to move forward you could actually click inside the big slide.
The area to advance or the little slide to advance all of those are hot spots but you cannot click in the other black areas on the screen nothing happens there, so you need to use the advanced at those three different locations, so let’s move on and take a look at some of our extra tools of how to best present we look over on the left side here the first set that I want to point out is the later pointer tool if you really have to highlight because you did not design your slides to be as clear as you wish you could turn this on as you move your mouse only in this hospital.
One area it would show up on the screen once you leave that hot spot it disappears you can switch to the pen view which is not a favorite of mine is one. I can’t draw very clearly and it’s not as bright once again that’s a choice one that I hate worse is the highlighter because the highlighter just doesn’t demonstrate things any fair fashion, it makes things look messy but it’s there note that you can’t move forward until you turn the tool off by going back and clicking on again now you use your mouse to move forward through your slots a tool that I do love is the magnifying tool now at the moment.
This is not showing on the big screen until I get to the spot that I want and but once I click that blows up on this screen and the big screen so everyone’s seen the same thing and then you can drag around the spy to show a variety pieces once again, you’re not going to be able to advance the slides until you turn the magnifier off one of the tools that I want to show you that I do enjoy using is the ability to jump back to the presentation to a different slide spot.
I go down here. I will see all the slides of my presentation at the moment where I’m flight 18. I had to go back to an earlier slide because someone asked something I could just click on it and then run through go back to the giant slide list and go back to my slide 18, so it’s a great way to navigate through your presentation without going left and right with your arrows to bring them back up.
When you’re done you could hit the escape key to go out but I’m going to swatch back and now we’re back in our presentation on the bottom left hand corner. I’m going to show you just a single view you can still control some of those magic tools, they’re just highlighted on the very bond it’s very very faint which you see you can do your slide advances and your other advanced tools such as laser pointer and slide jumper so you should now feel very comfortable using the presentation mode of powerpoint you do want to practice before you get up on the stage.
If you like this video give me thumbs up as it encourages me to make more free videos for you also subscribe to our channel subscriptions help tremendously build the community that we are continuing to work on you got questions about this video or about other PowerPoint leave them in the comments below and you can even ask for future training videos on topics that I may not have already covered that you can find in our channel.
Share this with others if you thought it was hopeful and that they would benefit from it and this particular class was just a subset of our master class series is a six-part training series that teach you from the beginning to becoming a PowerPoint power user in under three hours take a look for that playlist showing up here on our screen.
And with that power up.
PowerPoint: How to Launch a Presentation Automatically as a Slide Show

What is a PowerPoint Show?
By default, PowerPoint saves your slide presentation as a PowerPoint presentation file with the .pptx file extension which, when double-clicked, launches PowerPoint. The presentation opens in whatever view was open when you saved it, such as the Normal view or Slide Sorter view. If you want your slide show to immediately launch in the Slide Show view, however, you need to save your file as a PowerPoint Show. In this article, find out how to create a PowerPoint slide show file and learn 2 bonus tips .
To Save a PowerPoint Presentation as a PowerPoint Show:
- Choose the File tab.
- Select Save As .
- Pick the Save as type as PowerPoint Show .
- Type a name for your slide show in the File name text box (you can use the same name and location as your .pptx/presentation file) and click Save . Your PowerPoint slide show file is saved with a .ppsx extension.
Now, the next time you or anyone else opens your presentation from outside of PowerPoint, your slide show immediately launches in Slide Show view. When you navigate past the last slide, the file automatically closes. To open the file for editing, launch PowerPoint first and open it as you would a standard presentation. If you have access to the original presentation, you may prefer to open the .pptx file to edit and save it again as a slide show file. Most importantly, make sure to manage your files, so you are working with the most current version.
PowerPoint Presentation Tips
BONUS TIP: When I save my presentations as a PowerPoint Show, I save the file to my desktop for easy access during speaking and training engagements. If needed, I can also quickly close and re-open the file without launching PowerPoint and without showing everyone all of my slides. Working with a PowerPoint Show also saves a number of steps because it automatically launches with a simple double-click of the mouse.
To move to a specific slide in a presentation while in the slide show view (as either a presentation or show format), just type the slide number and press [Enter] . To make these moves easier, print out a handout of your presentation, which includes slide numbers of each slide for quick navigation. Or, create a simple manual cheat sheet to reference when you want to jump to different slides.
BONUS TIP #2: In addition to saving PowerPoint shows to my desktop, I also add a generic slide to the beginning. For instance, a slide with your organization logo or simply a black slide. Although this may not apply to your presentations, I often navigate in and out of my slide show as I am also demonstrating software features and facilitating discussions within my training classes and conference sessions. With a generic or simple slide at the start, I can launch the slide show with a neutral, blank slide and then use the keyboard shortcut to type the slide number and press [Enter] to move to a specific slide within the presentation.
Were these PowerPoint tips helpful? Grab your handout of other quick and easy PowerPoint shortcuts and discover more PowerPoint techniques here .
© Dawn Bjork, MCT, MOSM, CSP®, The Software Pro® Microsoft Certified Trainer, Productivity Speaker, Certified Speaking Professional

Related Posts
PowerPoint Presentations: Engage Your Audience with the PEER Method June 20, 2022
Adding Interest with the PowerPoint Morph Transition November 3, 2023
Presentations: Choosing a Presentation Remote Control July 16, 2022
Join Our Tips Newsletter
Receive 477+ shortcuts & more!
- Slidesgo School
- PowerPoint Tutorials
How to Use the Presentation Modes and the Screen Recording Features in PowerPoint

After designing all the slides for your presentation, the next and last step is presenting in front of your audience. In this new Slidesgo School tutorial, you’ll see how the presenter view works and how you can record your presentation .
Presentation Modes
Presentation modes — set up slide show, presentation modes — record slide show.
- There are different presentation modes in PowerPoint, besides the one you can find at the bottom of the screen.
- To access the presentation modes, go to the Slide Show tab.
- The first two options allow you to start the presentation from the beginning or from the currently selected slide.

- If you choose Present Online, an URL will be generated, which you can then share with your potential online viewers. After clicking this button, a new window will open, displaying info about the Microsoft Office online presentation service and a checkbox to enable remote download for your online audience. To enjoy this service, you need an Office 365 account. When you’re ready, click Connect to generate the URL.
- If you choose Custom Slide Show, you can select which slides to display in your presentation. First, create a new custom slide show and select the slides that you want to display. Then, click Add, enter the name of the presentation and click OK. This new custom presentation will appear on the list. Select it and click Show to begin the presentation.
- In the Set Up group you’ll find options to set up the presentation, hide slides, rehearse your presentation and even record it.
- Click Set Up Slide Show to adjust several settings regarding your presentation. You’ll find more information in the next section of this tutorial .
- If you click Hide Slide, the selected slide won’t show up during your presentation. Hidden slides will appear faded out on the list and their numbers will be crossed out.
- If you click Record Slide Show, you’ll be able to record your presentation from the beginning or from the current slide. We’ll go into detail in the last section of this tutorial.
- There are several checkboxes regarding whether to play narrations, use timings and show media controls.

- In the Monitors group you can choose which screen to display your presentation.
- The last group, Captions & Subtitles, is only available in Office 365. You’ll find options to enable subtitles, which will be generated out of your speech (so you’ll need to have a mic). There are settings to change the language and the position of the subtitles.
- Open your presentation in PowerPoint.
- Go to the Slide Show tab.
- In the Set Up group, click Set Up Slide Show. A new window will open, where you’ll find several options.
- In the top-left corner, under “Show type”, you can choose whether the presentation will be in fullscreen with speaker notes, windowed, or in fullscreen without speaker notes or the menu bar.

- Under “Show options” you can choose whether to show the presentation without narration or animations, or disable the hardware graphics acceleration (for better performance). You can also set the pen and laser pointer color.

- Under “Show slides”, you can choose which slides to show in your presentation. You can select all of them, a specific range or a custom slideshow.
- There are other settings to determine how to advance slides (manually or using timings), what the resolution will be and whether to use the presenter view.
- Click Record Slide Show. From the drop-down menu, select From the Current Slide or From the Beginning.
- A new window will open, along with the presentation in fullscreen mode. At the top-left you’ll find a button to start recording.
Do you find this article useful?
Related tutorials.

How to Use the Presenter View in Google Slides
Google Slides, like PowerPoint, has different presentation modes that can come in handy when you’re presenting and you want your slideshow to look smooth. Whether you’re looking for slides only, speaker notes or the Q&A feature, in this new Google Slides tutorial, you’ll learn about these and their respective settings. Ready? Then let’s explore the presenter view!

How to Download Google Slides Templates
When preparing a presentation, many people start panicking because they realize how much time it will take to edit each and every slide. Creating them from scratch, filling them in, looking for pictures, moving the elements...How stressful! But there is a solution that saves you a lot of time. We're sure that you've browsed the internet for templates, or basically, pre-established designs and elements, that can be downloaded for free and can be edited to your liking. Are we right? Then, we have some good news for you!

Discover our collection of printable templates
With the advance of technology, printing has become something that is no longer a necessity. Smartphones have made the paper format less and less frequent, but there are still certain cases in which having physical resources is much more convenient. Whether it's for taking notes, handing out assignments, making worksheets or handing out business cards or invitations, it's necessary to print your customized designs.From now on, in every Slidesgo printable presentation that you download, you will find the instructions for printing on the third slide. Depending on the style, colors or format of each presentation, we will tell you if you can...

How to Add Superscript and Subscript in Google Slides
Let’s take the most famous formula: E=mc^2, Einstein’s relativity equation. It wouldn’t be the same if it was E=mc2, right? Okay, yes, some people write it like that because it’s very famous and it won’t be misunderstood. But technically… It can! This is where the sophistication of superscript or subscript enters the room! Do you know how to write them in equations, copyright brands or even footnotes in your presentations? Let’s figure out how.

5 PowerPoint Keyboard Shortcuts to Start a Slide Show

Try These Useful PowerPoint Shortcuts to Start a Slide Show
by Avantix Learning Team | October 16, 2021
Applies to: Microsoft ® PowerPoint ® 2013, 2016, 2019 and 365 (Windows)
You can start a slide show in PowerPoint using several keyboard shortcuts. In this article, we'll review shortcuts to start a show using function keys or by using key tips.
Recommended article: How to Strikethrough or Cross Out Text in PowerPoint (4 Ways with Shortcuts)
If the function key shortcuts don't work, you may need to press the Fn key on your keyboard at the same time.
Typically, you would start a slide show from Normal View or Slide Sorter View. To exit a slide show, press ESC.
If Presenter View is selected on the Slide Show tab in the Ribbon, the show will start in Presenter View. If you have two monitors and Automatic is selected as the Monitor setting on the Slide Show tab, the show will display as a standard slide show on the second monitor and will display Presenter View on the presenter's screen by default.
1. Start a presentation from the beginning using a function key
2. start a presentation from the current slide using a function key.
Press Shift+F5.
3. Start the presentation in Presenter View using a function key
Press Alt + F5.
4. Start a presentation from the beginning using key tips
Press Alt > S > B (press Alt, then S, then B).
5. Start a presentation from the current slide using key tips
Press Alt > S > C (Alt, then S, then C).
There are many shortcuts you can use during a PowerPoint slide show as well. Check out the article PowerPoint Slide Show Shortcuts (50+ Keyboard Shortcuts).
Subscribe to get more articles like this one
Did you find this article helpful? If you would like to receive new articles, JOIN our email list.
More resources
How to Insert Slide Numbers in PowerPoint
How to Crop a Picture in PowerPoint (4 Ways)
How to Change the Background of Your PowerPoint Slides
How to Remove the Background of a Picture in PowerPoint (2 Ways)
How to Add Animation in PowerPoint (Animate Images, Text or Other Objects)
Related courses
Microsoft PowerPoint: Intermediate / Advanced
Microsoft PowerPoint: Design for Non-Designers
Microsoft PowerPoint: Animations Bootcamp
Microsoft Excel: Intermediate / Advanced
VIEW MORE COURSES >
Our instructor-led courses are delivered in virtual classroom format or at our downtown Toronto location at 18 King Street East, Suite 1400, Toronto, Ontario, Canada (some in-person classroom courses may also be delivered at an alternate downtown Toronto location). Contact us at [email protected] if you'd like to arrange custom instructor-led virtual classroom or onsite training on a date that's convenient for you.
Copyright 2024 Avantix ® Learning
You may also like

How to Insert or Type E with an Accent Mark in PowerPoint (È, É, Ê, Ë, è, é, ê, or ë)
You can insert or type e with an accent mark in PowerPoint using built-in tools or keyboard shortcuts (including Alt code shortcuts). The letter e can be inserted with an accent in both upper or lower case in text boxes or placeholders on slides, the slide master or layouts. The following are common accents in upper or lower case – È, É, Ê, Ë, è, é, ê, or ë.

How to Fade a Picture or Part of a Picture in PowerPoint (Using a Gradient)
You can fade a picture in PowerPoint by drawing a rectangle shape on top of the picture and then filling the rectangle with a gradient from opaque to transparent. This technique is often used to fade an image into the background of a slide. Since the rectangle is placed on top of the image and then text may be placed on top of the rectangle, you may need to reorder the objects.

How to Lock an Image, Shape or Other Object in PowerPoint
You can now lock an image, shape or other object in PowerPoint. Objects can be locked in Normal View or Slide Master View. Only PowerPoint 365 users can lock objects to prevent moving and resizing. This is helpful if you want to select and move other objects on the slide or prevent others from moving or resizing an object. You can lock items using the context menu or the Selection Pane.
Microsoft, the Microsoft logo, Microsoft Office and related Microsoft applications and logos are registered trademarks of Microsoft Corporation in Canada, US and other countries. All other trademarks are the property of the registered owners.
Avantix Learning |18 King Street East, Suite 1400, Toronto, Ontario, Canada M5C 1C4 | Contact us at [email protected]

Our Courses
Avantix Learning courses are offered online in virtual classroom format or as in-person classroom training. Our hands-on, instructor-led courses are available both as public scheduled courses or on demand as a custom training solution.
All Avantix Learning courses include a comprehensive course manual including tips, tricks and shortcuts as well as sample and exercise files.
VIEW COURSES >
Contact us at [email protected] for more information about any of our courses or to arrange custom training.
Privacy Overview
Pin it on pinterest.
- Print Friendly

- Get started with computers
- Learn Microsoft Office
- Apply for a job
- Improve my work skills
- Design nice-looking docs
- Getting Started
- Smartphones & Tablets
- Typing Tutorial
- Online Learning
- Basic Internet Skills
- Online Safety
- Social Media
- Zoom Basics
- Google Docs
- Google Sheets
- Career Planning
- Resume Writing
- Cover Letters
- Job Search and Networking
- Business Communication
- Entrepreneurship 101
- Careers without College
- Job Hunt for Today
- 3D Printing
- Freelancing 101
- Personal Finance
- Sharing Economy
- Decision-Making
- Graphic Design
- Photography
- Image Editing
- Learning WordPress
- Language Learning
- Critical Thinking
- For Educators
- Translations
- Staff Picks
- English expand_more expand_less
PowerPoint Tips - Open a File in Slide Show Mode
Powerpoint tips -, open a file in slide show mode, powerpoint tips open a file in slide show mode.

PowerPoint Tips: Open a File in Slide Show Mode
Lesson 4: open a file in slide show mode.
/en/powerpoint-tips/quick-zoom-with-the-scroll-wheel/content/
Open a file in Slide Show mode
When going from your desktop to your presentation, you normally have to open the file, wait for PowerPoint to load, then click a button to open the file. If you’re about to start a presentation, this can be a waste of time.
Instead of waiting and clicking, you can make your PowerPoint files open directly in Slide Show mode , taking you from desktop to presentation in a flash.
From the desktop, right-click your PowerPoint file, then select Show from the drop-down menu. Your file will open in Slide Show mode, where you can present it. To leave your presentation, just press Escape to return to the desktop.
Watch the video below to see how quickly you can open a file in Slide Show mode.
- Navigate to the location of your PowerPoint file on your desktop.
- Right-click on the file and select Show from the drop-down menu.
- The PowerPoint file will open directly in slideshow mode.
- Begin your presentation by clicking through the slides as usual.
- To exit the slideshow mode, press the Esc key on your keyboard. This will bring you straight back to your desktop.
This is another helpful tip for getting right down to business and starting your presentation in a jiffy!
Next up, we’ll show you a shortcut for jumping to a specific slide.
/en/powerpoint-tips/jump-to-a-specific-slide/content/
Can I start a PPT or PPSX automatically as a slideshow presentation?
By: Author Shrot Katewa
Ever wonder if you can create a file that directly runs in slide show mode? Today, we are going to learn a few things about how this can be done. Plus, we look at this one simple hack that will save you a ton of trouble if you wish to create non-editable files.
So, in case you are still wondering, can you start a presentation automatically as a slide show? Yes, you can definitely set your PPT file to directly open as a presentation in a slide show mode automatically. This can be done by saving your presentation as a PPSX file.
I know what you must be thinking, “What the heck is this PPSX file? I’ve never heard of it!”. Don’t worry, you are not alone. This is because we usually use a more common file format to save a presentation such as a PPT, PPTX or a PDF format.
What is a PPSX file format?
A PPSX file (also known as PPS file) stands for PowerPoint Show file. It is a type of PowerPoint file that is created to directly run as a presentation or a slide show automatically . A PPSX file format, by design, doesn’t allow for editing as it opens up directly as a slide show.
So, what is the difference between a PPS and a PPSX file format? Both PPS and PPSX file format are meant for a PowerPoint Show file. While PPSX is a more modern format, in case you are using Office 2007 or older, you won’t be able to open a PPSX file. In such a situation, the best way to save a PowerPoint Show file would be to use a PPS format. A point to note here is that a PPS file can be opened using not only the older versions of Microsoft Office, but also in the newer Office versions.
A PowerPoint Show file format is great when you don’t want the end user to make changes to the design or the content when you share the presentation with him or her.
How to Save a presentation in PPSX format?
Any PowerPoint presentation can be saved as a PPSX file. The good part is that this process is very straightforward. So, let’s just dive right in to know how we can save any PPT as a PPSX file.
There seems to be only two possible methods to achieve this desired result. Let’s have a look at it.
Step 1 – Open the PPT

Open the PowerPoint presentation that you want to save in the PPSX file format.
Step 2 – Go to the File option

Click on the “File” option for your PowerPoint. On the dropdown, select “Save as..”
Step 3 – Click on the “File Format” option
Upon clicking the “File Format”, you will notice a dropdown quite a few options to save your presentation.
Step 4 – Choose the PPSX or PPS file format

On the dropdown, scroll all the way until you see an option for “PowerPoint Show” with either PPSX or PPS file format. Select one of the two file formats that you wish to save the file in.
Step 5 – Save the file

You can choose to rename the file. Once that is done, simply click on “Save” as illustrated in the picture above.
Step 6 – Verify
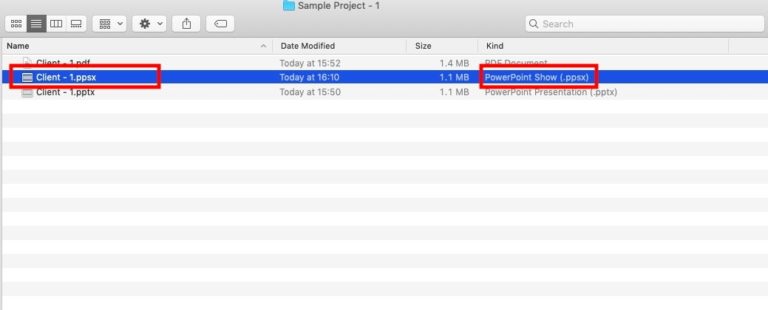
Go back to the folder in which you have saved the file and verify that the file has indeed been saved in a PowerPoint Show file.
Advantages of a PowerPoint Show (PPSX) file format?
While both PPT & PPSX file are a PowerPoint file, there are a few advantages that a PPSX file format has over a PPT file format –
- Retain Animations & Transitions – a PowerPoint Show file functions just like a typical PowerPoint file would when running it in a slideshow mode. This means all your animations and transitions that you have built in your presentation are retained!
- Share a non-editable file – There are times when we simply want to share a presentation with its full bells & whistles. At the same time, we don’t want the intended receiver of a PPT file to be able to access/edit the content of the file. Converting a PPT file in a PowerPoint Show file and then sending it can solve this problem to a great extent.
- Impress your clients – Most clients today receive a partnership proposal or a business presentation in a pdf format. This is done so to lock the design format and , at times, to restrict the client from editing the content. But, a pdf format removes all animations and transitions. Thus, sending a PowerPoint Show file can make you stand out from the crowd. We have seen many of our clients completely impressed and perplexed when they receive a file that not just contains slide transitions but also restricts them from editing the file!
Can I open a PPSX file without Microsoft PowerPoint?
A PPSX file is still a PowerPoint file. Thus, in order to open a PPSX file, you definitely need to have a presentation software installed on the computer of the recipient. However, it is not necessary to have PowerPoint installed. Nevertheless, in order to best retain all the effects and to open it directly in a slide show mode, Microsoft PowerPoint is the most suited presentation software to open a PPSX file .
There are quite a few options available in case you wish to open the PPSX file using another software. Open Source Softwares such as OpenOffice and LibreOffice are great alternative options. If you are using a MacBook, Apple’s default presentation software i.e. Keynote can be used to open a PowerPoint Show file. All these options are completely free and can easily be downloaded for the official website of these softwares.
To open a PowerPoint Show file using any one of these above softwares, simply select the file, right click on it, click on “Open with” from the menu that pops up and choose the software (choose LibreOffice or Keynote based on what you have installed).
A few things to keep in mind when opening a PowerPoint Show file using another software –
- You may lose animations and transitions – this is not because of the PPSX file format but because of the compatibility issues with some of the PowerPoint features with other OpenSource softwares.
- Files may become editable – Opening a PowerPoint Show file using a software apart from Microsoft PowerPoint can mean that the recipient will be able to access the slides and its content. Thus, the PPSX file may no longer be non-editable.
What if I want to open a PowerPoint Show (PPSX) file in edit mode?
Okay, so a PPSX file by default comes as a non-editable file as it directly opens up in a slideshow mode. At the end of the presentation, when you press “Esc” or the escape button, the presentation closes. Thus, you may think that you cannot access the slides and it’s content for editing purposes.
However, there is a way to open a PowerPoint Show file in edit mode. To be able to do that, simply follow the steps mentioned below –
- Step 0 – DO NOT double click on the PPSX file directly. This will open the file.
- Step 1 – Open Microsoft PowerPoint on your computer.
- Step 2 – Click on “File”, and then select “Open”.
- Step 3 – PowerPoint will ask you to choose the destination of the PPSX file. Simply navigate to the folder in which the file has been saved.
- Step 4 – Select the file and click “Open” at the bottom of the window.
The above steps will open a PPS file in edit mode. You can now make the required changes and edit the file. You can also now save the file as a PPT. To do that, simply navigate to the “File” tab, click on “Save as”, select the “PPT” file format and click “Save” (similar to the process described above, however, choose PPT file instead of PPS file).
COOL HACK to truly create a non-editable PowerPoint file
So here’s a cool little ninja trick that you can follow if you truly want your presentation to be in a non-editable file format. There are multiple ways you can do this, but THE MOST SIMPLE and quickest way would be to convert your PPSX or PPT file into a MP4 video format.
Now, you might be wondering “can I really convert a PPSX file to an MP4 video format?”. The short answer is – Yes, you can definitely convert a PPSX file to an MP4 video format in a few quick steps. To do that, we will first need to open the PowerPoint Show file in the edit mode and then save it as an MP4 file format.
First, simply open the PowerPoint Show file in edit mode using the steps defined in the point above. Next, once we have managed to open the PowerPoint Show file in edit mode, all we have to do is save it as a video file format.
To do that, navigate to the “File” tab, click on “Save as”, select the “MP4” file format from the dropdown and click “Save”. Now, PowerPoint will automatically convert the presentation into a video format.
For Mac users, the process is slightly different. Follow the steps mentioned below –

First, open the PowerPoint Show file in the edit mode as described earlier in the post. Next, navigate to the “File” tab, click on “Export”. In the window that opens up, click on the dropdown next to “File Format”, and choose the “MP4” option. Next, simply click “Export”
To sum it up, PPSX files have a great WOW factor and can be very helpful if we want to start a presentation directly in a slide show mode. However, contrary to what most people may believe, PowerPoint Show files can be opened in an edit mode to access and change the content of the presentation. Thus, a cool little hack to create a completely non-editable presentation would to convert your PPT to a MP4 video.
I hope the tips mentioned in the article were helpful to you, and that it saves you time in the future as well to create effective presentations going forward.
Our goal on this blog is to create content that helps YOU create fantastic presentations; especially if you have never been a designer. We’ve started our blog with non-designers in mind, and we have got some amazing content on our site to help you design better.
If you have any topics in mind that you would want us to write about, be sure to drop us a comment below. In case you need us to work with you and improve the design of your presentation, write to us on [email protected] . Our team will be happy to help you with your requirements.
Lastly, your contribution can make this world a better place for presentations! All you have to do is simply share this blog in your network and help other fellow non-designers with their designs!
How to view your notes in the presentation mode
Usually, there are two different screens for the presentation. For example, one screen is your laptop and the second is the provided monitor, TV, projector, web application screen, etc.
Today is popular to give a presentation via the Internet. E.g., you can use a Web meeting application such as WebEx or GoToMeeting or present your PowerPoint presentation online using the Office Presentation Service , to show your presentation to the audience on the additional screen.
For this purpose, PowerPoint provides the Presenter view , a special view of the presentation that is available on systems with more than one monitor (presentation screen):

To start your presentation with the Presenter view , see some features of the Presenter view .
In the Presenter View screen, there are the following elements:
On the left side:
The timer can help you keep track of how long your presentation has dragged on. You can click on the pause button for some cases or even restart the timer.

On the right side:
- On the top, the next slide is shown (see how to create your own slide show ),
- On the bottom, the notes of the current slide.
You can reorganize the Presenter view by moving the divider lines to see more notes, or make the slide bigger:

The text should wrap automatically, and a vertical scroll bar appears if necessary. You can also change the size of the text on the Notes pane by using the two buttons at the lower left corner of the Notes pane:
See more about different features of Presenter view in how to make slide show easier and more informative using Presenter view .
See also this tip in French: Comment afficher vos notes dans le mode de présentation .
Please, disable AdBlock and reload the page to continue
Today, 30% of our visitors use Ad-Block to block ads.We understand your pain with ads, but without ads, we won't be able to provide you with free content soon. If you need our content for work or study, please support our efforts and disable AdBlock for our site. As you will see, we have a lot of helpful information to share.

Some features of the Presenter view

How to make the presentation easier and more informative using Presenter view

How to create speakers notes for the PowerPoint presentation
Stack Exchange Network
Stack Exchange network consists of 183 Q&A communities including Stack Overflow , the largest, most trusted online community for developers to learn, share their knowledge, and build their careers.
Q&A for work
Connect and share knowledge within a single location that is structured and easy to search.
How do I launch a Power Point slide show on startup?
I want to launch a Power Point presentation on startup - in slide show mode (I don't want to simply open the file).
This is to run on a kiosk.
- microsoft-powerpoint
- microsoft-powerpoint-2007
2 Answers 2
From Microsoft's list of command line switches , you can use the /S switch to start a presentation:
To get the slideshow to start on boot-up create a shortcut to the path given above and put it in the Startup folder in the Start menu.
you can also rename the file to pps or ppsx. this should make the presentation go immediately in presentation mode.
You must log in to answer this question.
- The Overflow Blog
- Your whole repo fits in the context window
- Exploring what inspired folks to start coding
- Featured on Meta
- Our partnership with Google and commitment to socially responsible AI
- Shifting the data dump schedule: A proposal
Hot Network Questions
- Why can you omit "is" at the end of "no matter how foul their mood"?
- Teacher telling 4th grade student "I hate you"
- What controls the output format from the command line date /t
- Expected value of decreasing function of random variable versus expected value of random variable
- Which expression is larger?
- What was the economic incentive for "redlining"?
- Why aren’t flaperons seen on many aircraft?
- How do I avoid repeating a sequence of events that occurs multiple times?
- Subgroup of p-adic units
- Is there a "quick and dirty" method to approximate how many calories should be added to a dish from oils used in cooking?
- Paul Klee's Notebooks: Loops Around Control Points
- Should it be "IS" or "ARE"? --- "The only thing we haven't seen ARE locusts."
- What does a voltage or current source actually output?
- Help me understand how transformers work
- Everyone knows not to look at the sun. What about a gas giant?
- Has MissingNo ever been acknowledged by the Pokemon company or Nintendo in any form?
- Vinyl or laminate in large basement?
- 1990s/80s movie about a some kind of a law enforcement group from the future of that goes back into past to "reverse" their targets
- Proving Kepler's second law of planetary motion using conservation of angular momentum: What about gravity from other planets?
- Why are microprocessors made using silicon and not germanium?
- Has any vehicle prior to Starship's IFT3 "taken a selfie" during reentry?
- Will an observer see the light hit the same spot as the ones in a spaceship? Why?
- Why does this Roman numeral chord have a ♯ prefix?
- Trade-off between writing neatly vs scribbling (scribbling aims to maximise working memory)
Critical PowerPoint Shortcuts – Claim Your FREE Training Module and Get Your Time Back!
How to Make a PowerPoint Presentation (Step-by-Step)
- PowerPoint Tutorials
- Presentation Design
- January 22, 2024
In this beginner’s guide, you will learn step-by-step how to make a PowerPoint presentation from scratch.
While PowerPoint is designed to be intuitive and accessible, it can be overwhelming if you’ve never gotten any training on it before. As you progress through this guide, you’ll will learn how to move from blank slides to PowerPoint slides that look like these.

Table of Contents
Additionally, as you create your presentation, you’ll also learn tricks for working more efficiently in PowerPoint, including how to:
- Change the slide order
- Reset your layout
- Change the slide dimensions
- Use PowerPoint Designer
- Format text
- Format objects
- Play a presentation (slide show)
With this knowledge under your belt, you’ll be ready to start creating PowerPoint presentations. Moreover, you’ll have taken your skills from beginner to proficient in no time at all. I will also include links to more advanced PowerPoint topics.
Ready to start learning how to make a PowerPoint presentation?
Take your PPT skills to the next level
Start with a blank presentation.
Note: Before you open PowerPoint and start creating your presentation, make sure you’ve collected your thoughts. If you’re going to make your slides compelling, you need to spend some time brainstorming.
For help with this, see our article with tips for nailing your business presentation here .
The first thing you’ll need to do is to open PowerPoint. When you do, you are shown the Start Menu , with the Home tab open.
This is where you can choose either a blank theme (1) or a pre-built theme (2). You can also choose to open an existing presentation (3).
For now, go ahead and click on the Blank Presentation (1) thumbnail.

Doing so launches a brand new and blank presentation for you to work with. Before you start adding content to your presentation, let’s first familiarize ourselves with the PowerPoint interface.
The PowerPoint interface

Here is how the program is laid out:
- The Application Header
- The Ribbon (including the Ribbon tabs)
- The Quick Access Toolbar (either above or below the Ribbon)
- The Slides Pane (slide thumbnails)
The Slide Area
The notes pane.
- The Status Bar (including the View Buttons)
Each one of these areas has options for viewing certain parts of the PowerPoint environment and formatting your presentation.
Below are the important things to know about certain elements of the PowerPoint interface.
The PowerPoint Ribbon

The Ribbon is contextual. That means that it will adapt to what you’re doing in the program.
For example, the Font, Paragraph and Drawing options are greyed out until you select something that has text in it, as in the example below (A).

Furthermore, if you start manipulating certain objects, the Ribbon will display additional tabs, as seen above (B), with more commands and features to help you work with those objects. The following objects have their own additional tabs in the Ribbon which are hidden until you select them:
- Online Pictures
- Screenshots
- Screen Recording
The Slides Pane

This is where you can preview and rearrange all the slides in your presentation.
Right-clicking on a slide in the pane gives you additional options on the slide level that you won’t find on the Ribbon, such as Duplicate Slide , Delete Slide , and Hide Slide .

In addition, you can add sections to your presentation by right-clicking anywhere in this Pane and selecting Add Section . Sections are extremely helpful in large presentations, as they allow you to organize your slides into chunks that you can then rearrange, print or display differently from other slides.

The Slide Area (A) is where you will build out your slides. Anything within the bounds of this area will be visible when you present or print your presentation.
Anything outside of this area (B) will be hidden from view. This means that you can place things here, such as instructions for each slide, without worrying about them being shown to your audience.

The Notes Pane is the space beneath the Slide Area where you can type in the speaker notes for each slide. It’s designed as a fast way to add and edit your slides’ talking points.
To expand your knowledge and learn more about adding, printing, and exporting your PowerPoint speaker notes, read our guide here .
Your speaker notes are visible when you print your slides using the Notes Pages option and when you use the Presenter View . To expand your knowledge and learn the ins and outs of using the Presenter View , read our guide here .

You can resize the Notes Pane by clicking on its edge and dragging it up or down (A). You can also minimize or reopen it by clicking on the Notes button in the Status Bar (B).
Note: Not all text formatting displays in the Notes Pane, even though it will show up when printing your speaker notes. To learn more about printing PowerPoint with notes, read our guide here .
Now that you have a basic grasp of the PowerPoint interface at your disposal, it’s time to make your presentation.
Adding Content to Your PowerPoint Presentation
Notice that in the Slide Area , there are two rectangles with dotted outlines. These are called Placeholders and they’re set on the template in the Slide Master View .
To expand your knowledge and learn how to create a PowerPoint template of your own (which is no small task), read our guide here .

As the prompt text suggests, you can click into each placeholder and start typing text. These types of placeholder prompts are customizable too. That means that if you are using a company template, it might say something different, but the functionality is the same.

Note: For the purposes of this example, I will create a presentation based on the content in the Starbucks 2018 Global Social Impact Report, which is available to the public on their website.
If you type in more text than there is room for, PowerPoint will automatically reduce its font size. You can stop this behavior by clicking on the Autofit Options icon to the left of the placeholder and selecting Stop Fitting Text to this Placeholder .
Next, you can make formatting adjustments to your text by selecting the commands in the Font area and the Paragraph area of the Home tab of the Ribbon.

The Reset Command: If you make any changes to your title and decide you want to go back to how it was originally, you can use the Reset button up in the Home tab .

Insert More Slides into Your Presentation
Now that you have your title slide filled in, it’s time to add more slides. To do that, simply go up to the Home tab and click on New Slide . This inserts a new slide in your presentation right after the one you were on.

You can alternatively hit Ctrl+M on your keyboard to insert a new blank slide in PowerPoint. To learn more about this shortcut, see my guide on using Ctrl+M in PowerPoint .
Instead of clicking the New Slide command, you can also open the New Slide dropdown to see all the slide layouts in your PowerPoint template. Depending on who created your template, your layouts in this dropdown can be radically different.

If you insert a layout and later want to change it to a different layout, you can use the Layout dropdown instead of the New Slide dropdown.
After inserting a few different slide layouts, your presentation might look like the following picture. Don’t worry that it looks blank, next we will start adding content to your presentation.

If you want to follow along exactly with me, your five slides should be as follows:
- Title Slide
- Title and Content
- Section Header
- Two Content
- Picture with Caption
Adding Content to Your Slides
Now let’s go into each slide and start adding our content. You’ll notice some new types of placeholders.

On slide 2 we have a Content Placeholder , which allows you to add any kind of content. That includes:
- A SmartArt graphic,
- A 3D object,
- A picture from the web,
- Or an icon.
To insert text, simply type it in or hit Ctrl+C to Copy and Ctrl+V to Paste from elsewhere. To insert any of the other objects, click on the appropriate icon and follow the steps to insert it.
For my example, I’ll simply type in some text as you can see in the picture below.

Slides 3 and 4 only have text placeholders, so I’ll go ahead and add in my text into each one.

On slide 5 we have a Picture Placeholder . That means that the only elements that can go into it are:
- A picture from the web

To insert a picture into the picture placeholder, simply:
- Click on the Picture icon
- Find a picture on your computer and select it
- Click on Insert
Alternatively, if you already have a picture open somewhere else, you can select the placeholder and paste in (shortcut: Ctrl+V ) the picture. You can also drag the picture in from a file explorer window.

If you do not like the background of the picture you inserted onto your slide, you can remove the background here in PowerPoint. To see how to do this, read my guide here .
Placeholders aren’t the only way to add content to your slides. At any point, you can use the Insert tab to add elements to your slides.
You can use either the Title Only or the Blank slide layout to create slides for content that’s different. For example, a three-layout content slide, or a single picture divider slide, as shown below.

In the first example above, I’ve inserted 6 text boxes, 3 icons, and 3 circles to create this layout. In the second example, I’ve inserted a full-sized picture and then 2 shapes and 2 text boxes.
The Reset Command: Because these slides are built with shapes and text boxes (and not placeholders), hitting the Reset button up in the Home tab won’t do anything.
That is a good thing if you don’t want your layouts to adjust. However, it does mean that it falls on you to make sure everything is aligned and positioned correctly.
For more on how to add and manipulate the different objects in PowerPoint, check out our step-by-step articles here:
- Using graphics in PowerPoint
- Inserting icons onto slides
- Adding pictures to your PowerPoint
- How to embed a video in PowerPoint
- How to add music to your presentation
Using Designer to generate more layouts ideas
If you have Office 365, your version of PowerPoint comes with a new feature called Designer (or Design Ideas). This is a feature that generates slide layout ideas for you. The coolest thing about this feature is that it uses the content you already have.
To use Designer , simply navigate to the Design tab in your Ribbon, and click on Design Ideas .

NOTE: If the PowerPoint Designer is not working for you (it is grey out), see my troubleshooting guide for Designer .
Change the Overall Design (optional)
When you make a PowerPoint presentation, you’ll want to think about the overall design. Now that you have some content in your presentation, you can use the Design tab to change the look and feel of your slides.
For additional help thinking through the design of your presentation, read my guide here .
A. Picking your PowerPoint slide size
If you have PowerPoint 2013 or later, when you create a blank document in PowerPoint, you automatically start with a widescreen layout with a 16:9 ratio. These dimensions are suitable for most presentations as they match the screens of most computers and projectors.
However, you do have the option to change the dimensions.
For example, your presentation might not be presented, but instead converted into a PDF or printed and distributed. In that case, you can easily switch to the standard dimensions with a 4:3 ratio by selecting from the dropdown (A).
You can also choose a custom slide size or change the slide orientation from landscape to portrait in the Custom Slide Size dialog box (B).

To learn all about the different PowerPoint slide sizes, and some of the issues you will face when changing the slide size of a non-blank presentation, read my guide here .
B. Selecting a PowerPoint theme
The next thing you can do is change the theme of your presentation to a pre-built one. For a detailed explanation of what a PowerPoint theme is, and how to best use it, read my article here .
In the beginning of this tutorial, we started with a blank presentation, which uses the default Office theme as you can see in the picture below.

That gives you the most flexibility because it has a blank background and quite simple layouts that work for most presentations. However, it also means that it’s your responsibility to enhance the design.
If you’re comfortable with this, you can stay with the default theme or create your own custom theme ( read my guide here ). But if you would rather not have to think about design, then you can choose a pre-designed theme.
Microsoft provides 46 other pre-built themes, which include slide layouts, color variants and palettes, and fonts. Each one varies quite significantly, so make sure you look through them carefully.
To select a different theme, go to the Design tab in the Ribbon, and click on the dropdown arrow in the Themes section .

For this tutorial, let’s select the Frame theme and then choose the third Variant in the theme. Doing so changes the layout, colors, and fonts of your presentation.

Note: The theme dropdown area is also where you can import or save custom themes. To see my favorite places to find professional PowerPoint templates and themes (and recommendations for why I like them), read my guide here .
C. How to change a slide background in PowerPoint
The next thing to decide is how you want your background to look for the entire presentation. In the Variants area, you can see four background options.

For this example, we want our presentation to have a dark background, so let’s select Style 3. When you do so, you’ll notice that:
- The background color automatically changes across all slides
- The color of the text on most of the slides automatically changes to white so that it’s visible on the dark background
- The colors of the objects on slides #6 and #7 also adjust, in a way we may not want (we’ll likely have to make some manual adjustments to these slides)

Note: If you want to change the slide background for just that one slide, don’t left-click the style. Instead, right-click it and select Apply to Selected Slides .
After you change the background for your entire presentation, you can easily adjust the background for an individual slide.

Inside the Format Background pane, you can see you have the following options:
- Gradient fill
- Picture or texture fill
- Pattern fill
- Hide background
You can explore these options to find the PowerPoint background that best fits your presentation.
D. How to change your color palette in PowerPoint
Another thing you may want to adjust in your presentation, is the color scheme. In the picture below you can see the Theme Colors we are currently using for this presentation.

Each PowerPoint theme comes with its own color palette. By default, the Office theme includes the Office color palette. This affects the colors you are presented with when you format any element within your presentation (text, shapes, SmartArt, etc.).

The good news is that the colors here are easy to change. To switch color palettes, simply:
- Go to the Design tab in the Ribbon
- In the Variants area, click on the dropdown arrow and select Colors
- Select the color palette (or theme colors) you want
You can choose among the pre-built color palettes from Office, or you can customize them to create your own.
As you build your presentation, make sure you use the colors from your theme to format objects. That way, changing the color palette adjusts all the colors in your presentation automatically.
E. How to change your fonts in PowerPoint
Just as we changed the color palette, you can do the same for the fonts.

Each PowerPoint theme comes with its own font combination. By default, the Office theme includes the Office font pairing. This affects the fonts that are automatically assigned to all text in your presentation.

The good news is that the font pairings are easy to change. To switch your Theme Fonts, simply:
- Go to the Design tab in the Ribbon
- Click on the dropdown arrow in the Variants area
- Select Fonts
- Select the font pairing you want
You can choose among the pre-built fonts from Office, or you can customize them to create your own.
If you are working with PowerPoint presentations on both Mac and PC computers, make sure you choose a safe PowerPoint font. To see a list of the safest PowerPoint fonts, read our guide here .
If you receive a PowerPoint presentation and the wrong fonts were used, you can use the Replace Fonts dialog box to change the fonts across your entire presentation. For details, read our guide here .
Adding Animations & Transitions (optional)
The final step to make a PowerPoint presentation compelling, is to consider using animations and transitions. These are by no means necessary to a good presentation, but they may be helpful in your situation.
A. Adding PowerPoint animations
PowerPoint has an incredibly robust animations engine designed to power your creativity. That being said, it’s also easy to get started with basic animations.
Animations are movements that you can apply to individual objects on your slide.

To add a PowerPoint animation to an element of your slide, simply:
- Select the element
- Go to the Animations tab in the Ribbon
- Click on the dropdown arrow to view your options
- Select the animation you want
You can add animations to multiple objects at one time by selecting them all first and then applying the animation.
B. How to preview a PowerPoint animation

There are three ways to preview a PowerPoint animation:
- Click on the Preview button in the Animations tab
- Click on the little star next to the slide
- Play the slide in Slide Show Mode
To learn other ways to run your slide show, see our guide on presenting a PowerPoint slide show with shortcuts .
To adjust the settings of your animations, explore the options in the Effect Options , Advanced Animation and the Timing areas of the Animation tab .

Note: To see how to make objects appear and disappear in your slides by clicking a button, read our guide here .
C. How to manage your animations in PowerPoint

The best way to manage lots of animations on your slide is with the Animation Pane . To open it, simply:
- Navigate to the Animations tab
- Select the Animation Pane
Inside the Animation Pane, you’ll see all of the different animations that have been applied to objects on your slide, with their numbers marked as pictured above.
Note: To see examples of PowerPoint animations that can use in PowerPoint, see our list of PowerPoint animation tutorials here .
D. How to add transitions to your PowerPoint presentation
PowerPoint has an incredibly robust transition engine so that you can dictate how your slides change from one to the other. It is also extremely easy to add transitions to your slides.
In PowerPoint, transitions are the movements (or effects) you see as you move between two slides.

To add a transition to a PowerPoint slide, simply:
- Select the slide
- Go to the Transitions tab in the Ribbon
- In the Transitions to This Slide area, click on the dropdown arrow to view your options
- Select the transition you want
To adjust the settings of the transition, explore the options in the Timing area of the Transitions tab.
You can also add the same transition to multiple slides. To do that, select them in the Slides Pane and apply the transition.
E. How to preview a transition in PowerPoint

There are three ways to preview your PowerPoint transitions (just like your animations):
- Click on the Preview button in the Transitions tab
- Click on the little star beneath the slide number in the thumbnail view
Note: In 2016, PowerPoint added a cool new transition, called Morph. It operates a bit differently from other transitions. For a detailed tutorial on how to use the cool Morph transition, see our step-by-step article here .
Save Your PowerPoint Presentation
After you’ve built your presentation and made all the adjustments to your slides, you’ll want to save your presentation. YOu can do this several different ways.

To save a PowerPoint presentation using your Ribbon, simply:
- Navigate to the File tab
- Select Save As on the left
- Choose where you want to save your presentation
- Name your presentation and/or adjust your file type settings
- Click Save
You can alternatively use the Ctrl+S keyboard shortcut to save your presentation. I recommend using this shortcut frequently as you build your presentation to make sure you don’t lose any of your work.

This is the standard way to save a presentation. However, there may be a situation where you want to save your presentation as a different file type.
To learn how to save your presentation as a PDF, see our guide on converting PowerPoint to a PDF .
How to save your PowerPoint presentation as a template
Once you’ve created a presentation that you like, you may want to turn it into a template. The easiest – but not technically correct – way, is to simply create a copy of your current presentation and then change the content.
But be careful! A PowerPoint template is a special type of document and it has its own parameters and behaviors.
If you’re interested in learning about how to create your own PowerPoint template from scratch, see our guide on how to create a PowerPoint template .
Printing Your PowerPoint Presentation
After finishing your PowerPoint presentation, you may want to print it out on paper. Printing your slides is relatively easy.

To open the Print dialog box, you can either:
- Hit Ctrl+P on your keyboard
- Or go to the Ribbon and click on File and then Print

Inside the Print dialog box, you can choose from the various printing settings:
- Printer: Select a printer to use (or print to PDF or OneNote)
- Slides: Choose which slides you want to print
- Layout: Determine how many slides you want per page (this is where you can print the notes, outline, and handouts)
- Collated or uncollated (learn what collated printing means here )
- Color: Choose to print in color, grayscale or black & white
There are many more options for printing your PowerPoint presentations. Here are links to more in-depth articles:
- How to print multiple slides per page
- How to print your speaker notes in PowerPoint
- How to save PowerPoint as a picture presentation
So that’s how to create a PowerPoint presentation if you are brand new to it. We’ve also included a ton of links to helpful resources to boost your PowerPoint skills further.
When you are creating your presentation, it is critical to first focus on the content (what you are trying to say) before getting lost inserting and playing with elements. The clearer you are on what you want to present, the easier it will be to build it out in PowerPoint.
If you enjoyed this article, you can learn more about our PowerPoint training courses and other presentation resources by visiting us here .
🔒 Unlock the PowerPoint Shortcuts Trusted by Industry Leaders KKR, American Express, HSBC, and More!
Join over 114,880 professionals from diverse fields including consulting, investment banking, advertising, marketing, sales, and business development who have supercharged their PowerPoint game with our proven methods.
✅ Customize compelling presentations effortlessly.
✅ Master time-saving techniques for faster deck creation.
✅ Boost your career prospects with top-notch PowerPoint skills.
Get FREE access to the Critical PowerPoint Shortcuts module of our premium training course by entering your name and email below.
DISCLAIMER: PC Users Only!
We respect your privacy and will keep your info safe and confidential.
About The Author

Popular Tutorials
- How to Strikethrough Text (l̶i̶k̶e̶ ̶t̶h̶i̶s̶) in Word, Excel & PowerPoint
- How to Make Animated Fireworks in PowerPoint (Step-by-Step)
- Strikethrough Shortcut (l̶i̶k̶e̶ ̶t̶h̶i̶s̶) for Word, Excel & PowerPoint
- How to Create a Flash Card Memory Game in PowerPoint (Like Jeopardy)
- Keyboard Shortcuts Not Working: Solved
PowerPoint Tutorial Categories
- Strategies & Opinions
- Shortcuts & Hacks
- Pictures, Icons, Videos, Etc.
- New Features
- Miscellaneous
- Charts & Data Viz
We help busy professionals save hours and gain peace of mind, with corporate workshops, self-paced courses and tutorials for PowerPoint and Word.
Work With Us
- Corporate Training
- Presentation & Template Design
- Courses & Downloads
- PowerPoint Articles
- Word Articles
- Productivity Resources
Find a Tutorial
- Free Training
- For Businesses
We help busy office workers save hours and gain peace of mind, with tips, training and tutorials for Microsoft PowerPoint and Word.
Master Critical PowerPoint Shortcuts – Secure Your FREE Training Module and Save Valuable Time!
⌛ Master time-saving expert techniques.
🔥 Create powerful presentations.
🚀 Propel your career to new heights.
We value your privacy – we keep your info safe.
Discover PowerPoint Hacks Loved by Industry Giants - KKR, AmEx, HSBC!
Over 114,880 professionals in finance, marketing and sales have revolutionized their PPT skills with our proven methods.
Gain FREE access to a full module of our premium PowerPoint training program – Get started today!
We hate spam too and promise to keep your information safe.
Use keyboard shortcuts to deliver PowerPoint presentations
Many users find that using an external keyboard with keyboard shortcuts for PowerPoint helps them work more efficiently. For users with mobility or vision disabilities, keyboard shortcuts can be easier than using the touchscreen and are an essential alternative to using a mouse.
For a separate list of shortcuts to use while creating your presentation, go to Use keyboard shortcuts to create PowerPoint presentations .
The shortcuts in this topic refer to the US keyboard layout. Keys for other layouts might not correspond exactly to the keys on a US keyboard.
A plus sign (+) in a shortcut means that you need to press multiple keys at the same time.
A comma sign (,) in a shortcut means that you need to press multiple keys in order.
This article describes the keyboard shortcuts and some other common shortcut keys that apply while you're delivering your presentation with PowerPoint for Windows.
To quickly find a shortcut in this article, you can use Search. Press Ctrl+F, and then type your search words.
If an action that you use often does not have a shortcut key, you can record a macro. For step-by-step instructions to record a macro, refer to the section “Record a macro” in Automate tasks with the Macro Recorder to create one.
During the presentation, to open a list of shortcuts, press F1. Use the arrow keys to move between the tabs in the Slide Show Help dialog box.
Get the PowerPoint 2016 keyboard shortcuts in a Word document at this link: PowerPoint 2016 for Windows keyboard shortcuts .
In this topic
Frequently used shortcuts, control the slide show, control media in the slide show, pointer and annotations in the slide show, rehearse the presentation, maneuver in presenter view.
This table lists the most frequently used shortcuts in PowerPoint for Windows.
Top of Page
You can use the following keyboard shortcuts while you’re delivering your presentation in Slide Show (full-screen) mode, with or without Presenter View .
Control media in the slide show
These keyboard shortcuts work with video files imported from your computer or other device. They don't work with online video files.
Use the following keyboard shortcuts to control the pointer and to use it to create annotations during your presentation.
You can use these keyboard shortcuts when you are rehearsing your presentation.
You can use the following keyboard shortcuts while you’re delivering your presentation using Presenter View in PowerPoint 2013 and newer. Presenter View lets you look at your presentation with your speaker notes on one screen (your laptop, for example), while the audience views the notes-free presentation on a different screen.
When you are connected to a second display, Presenter View is shown automatically when you start the slide show. To start a presentation in Presenter View even if you have only a single display, press Alt+F5.
Tip: If Presenter View does not start automatically with two displays, go the Slide Show tab, select the Use Presenter View checkbox, and select the preferred monitor.
PowerPoint help & learning
Screen reader support for PowerPoint
Use keyboard shortcuts to create PowerPoint presentations
Basic tasks to create a presentation in PowerPoint with a screen reader
Use a screen reader to explore and navigate PowerPoint
This article describes the keyboard shortcuts and some other common shortcut keys that apply while you're delivering your presentation with PowerPoint for macOS.
The settings in some versions of the Mac operating system (OS) and some utility applications might conflict with keyboard shortcuts in Microsoft 365 for Mac. For information about changing the key assignment for a keyboard shortcut, refer to Mac Help for your version of macOS or your utility application.
If you don't find a keyboard shortcut here that meets your needs, you can create a custom keyboard shortcut. For instructions, go to Create a custom keyboard shortcut for Office for Mac .
Many of the shortcuts that use the Ctrl key on a Windows keyboard also work with the Control key in PowerPoint for macOS. However, not all do.
To quickly find a shortcut in this article, you can use the Search. Press Command+F, and then type your search words.
During the presentation, to open a list of shortcuts, press forward slash (/).
Pointer and annotations in the slide show
Navigate the presenter view on macos 10.15 (catalina) and later.
This table lists the most frequently used shortcuts in PowerPoint for macOS.
You can use the following keyboard shortcuts while you’re delivering your presentation in Slide Show (full-screen) mode, with or without the Presenter View .
Use the following keyboard shortcuts to control media during a presentation.
You can use the following keyboard shortcuts while you’re delivering your presentation using the Presenter View on macOS 10.15 (Catalina) and later, and when the keyboard control navigation is turned on. For instructions, refer to Turn on the keyboard control navigation .
Use the shortcuts in the table below to move in the Presenter View in PowerPoint for macOS.
Skip ahead in your presentation
You can use your keyboard to skip ahead several slides without the audience seeing the slides as you transition to the new slide.
Press the Tab key until you reach the Slide Navigator control (filmstrip).
Press and hold down the Option key and press the Left or Right arrow key repeatedly until you find the slide you want to skip to.
Release the Option key to move to the slide you want to skip to.
Turn on the keyboard control navigation
To use your keyboard to move between and activate controls on your Mac, turn on the keyboard control navigation.
If you're not using VoiceOver, on your computer, select System Preferences > Keyboard > Shortcuts , and select the Use keyboard navigation to move focus between controls checkbox.
If you're using VoiceOver, the control navigation should be on by default. To check the setting, do the following:
On your computer, press Control+Option+M to access the Apple menu bar item. To open the Apple menu, press Control+Option+Spacebar.
Press Control+Option+Down arrow key until you hear "System preferences ellipses," and then press Control+Option+Spacebar.
The System Preferences window opens. The focus is in the Search text box.
Type Keyboard , and then press Return. The Keyboard dialog box opens.
Press Control+Option+Right arrow key until you hear "Shortcuts tab," and then press Control+Option+Spacebar.
Press Control+Option+Right arrow key until you hear: "Use keyboard navigation to move focus between controls." VoiceOver also announces if the option is selected or unselected. To toggle the option on or off, press Control+Option+Spacebar.
To close the Keyboard dialog box, press Command+W.
This article describes the keyboard shortcuts that apply while you're delivering your presentation with PowerPoint for the web.
If you use Narrator with the Windows 10 Fall Creators Update, you have to turn off scan mode in order to edit documents, spreadsheets, or presentations with Microsoft 365 for the web. For more information, refer to Turn off virtual or browse mode in screen readers in Windows 10 Fall Creators Update .
When you use PowerPoint for the web, we recommend that you use Microsoft Edge as your web browser. Because PowerPoint for the web runs in your web browser, the keyboard shortcuts are different from those in the desktop program. For example, you’ll use Ctrl+F6 instead of F6 for jumping in and out of the commands. Also, common shortcuts like F1 (Help) and Ctrl+O (Open) apply to the web browser – not PowerPoint for the web.
This table lists the keyboard shortcuts you can use to control the slide show.
Technical support for customers with disabilities
Microsoft wants to provide the best possible experience for all our customers. If you have a disability or questions related to accessibility, please contact the Microsoft Disability Answer Desk for technical assistance. The Disability Answer Desk support team is trained in using many popular assistive technologies and can offer assistance in English, Spanish, French, and American Sign Language. Please go to the Microsoft Disability Answer Desk site to find out the contact details for your region.
If you are a government, commercial, or enterprise user, please contact the enterprise Disability Answer Desk .

Need more help?
Want more options.
Explore subscription benefits, browse training courses, learn how to secure your device, and more.

Microsoft 365 subscription benefits

Microsoft 365 training

Microsoft security

Accessibility center
Communities help you ask and answer questions, give feedback, and hear from experts with rich knowledge.

Ask the Microsoft Community

Microsoft Tech Community

Windows Insiders
Microsoft 365 Insiders
Find solutions to common problems or get help from a support agent.

Online support
Was this information helpful?
Thank you for your feedback.
SharePoint Diary
Salaudeen Rajack's SharePoint Experiences!
SharePoint Online: How to Open PowerPoint in Presentation Mode?
Requirement: Open PowerPoint files in slideshow mode in SharePoint Online.
How to Open PowerPoint in Presentation mode from SharePoint Online?
Any link to PowerPoint presentations (PPT, PPTX, or PPSX files) takes users to the Edit mode of the file. Even if the users don’t have permission to edit, SharePoint opens it in edit mode with a banner saying you can’t edit the file. So, How to force slide show mode for PPT’s?
Well, here is the trick to open PowerPoint files in presentation mode: use the below URL format to have PowerPoint open in presentation mode:
https://crescent.sharepoint.com/sites/marketing /_layouts/16/Doc.aspx?sourcedoc= https://crescent.sharepoint.com/sites/Marketing/Branding/SharePoint-Training-Presentation.pptx &action=embedview

This link directly launches the PowerPoint presentation in the slideshow mode in full browser screen!
How about SharePoint On-Premises?
Similarly, in SharePoint On-premises, use the below format to open PowerPoint in presentation mode:
https://Your-Site-URL /_layouts/WopiFrame.aspx?sourcedoc= <path-to-your-ppsx> &action=embedview
Related Posts
- ← Microsoft 365: How to Set the Password to Never Expire?
- SharePoint Online: How to Enable Missing Apps (Picture Library, Announcements, Survey, Etc.) in Communication Sites? →
Salaudeen Rajack
Salaudeen Rajack - Information Technology Expert with Two-decades of hands-on experience, specializing in SharePoint, PowerShell, Microsoft 365, and related products. He has held various positions including SharePoint Architect, Administrator, Developer and consultant, has helped many organizations to implement and optimize SharePoint solutions. Known for his deep technical expertise, He's passionate about sharing the knowledge and insights to help others, through the real-world articles!

5 thoughts on “ SharePoint Online: How to Open PowerPoint in Presentation Mode? ”

It also appears if you have any GIFs the are displayed as static images – any advice?

Thanks for this great article. You are the best. I would like to know if there is a trick to start the presentation in full screen presentation mode so that slides run automatically?
Hey, thanks for that! Very helpful! Spend half a day to get that work and you provided finally the solution!

Too sad, if you have links in your PPT you can’t click these…

Hi Salaudeen,
Thanks for your post. We are experiencing the same problem with PowerPoint presentation links not opening up in slideshow mode – even if “view only”. I have used your URL format and this works to open the PowerPoint in presentation mode but ONLY for those that are logged into SharePoint Online.
We want to share the URL for anyone to view (outside of the organisation too) with the only necessary requirement being a web browser to open it. When the URL is clicked the presentation should open straight into slideshow mode without a need for any log in.
Do you think this is something that is possible? Any advice?
Thanks, Emily
Leave a Reply Cancel reply
Your email address will not be published. Required fields are marked *
Notify me of follow-up comments by email.
Notify me of new posts by email.
How-To Geek
How (and why) to start microsoft powerpoint from the command prompt.
You can run PowerPoint from the Command Line, and that gives you access to powerful options that control its launch behavior. Here's how to do it.
Quick Links
How to run powerpoint with a command, powerpoint command line switches and parameters.
You can open PowerPoint from the Windows Command Prompt. Using this method, you can add additional parameters that let you do things like start PowerPoint in Safe Mode for troubleshooting, or start with a specific template.
There are two ways to open PowerPoint from the Command Prompt---one of which you need to know to find out which directory the "powerpnt.exe" file is located in. You can do this manually by digging through File Explorer, or you can use Command Prompt to find it.
First, open a Command Prompt window . You can do this by typing "cmd" in the Windows Search bar (located on the taskbar next to the Windows icon). Press Enter or click the "Command Prompt" application in the search results.
When you first open the Command Prompt, you'll start in your user account folder. From here, you can simply type this command and press Enter to launch PowerPoint:
start powerpnt.exe
You can also open PowerPoint from the directory that holds the powerpnt.exe file, but you need to know which directory it's in.
To find the exact location of the powerpnt.exe file, we'll need to go to the Program Files directory by using the cd command. This command changes your current directory in Command Prompt.
Type this command, then press Enter:
cd\"program files"
You'll now be in the Program Files directory. The next step is to locate the directory where the powerpnt.exe file is located. Do so by typing the following command and pressing "Enter."
dir powerpnt.exe /s
Once you enter this command, the Command Prompt will locate the directory for you.
Now that you know which directory the powerpnt.exe file is located in, you can use the cd command to open the file path. In this example, you would need to enter the following command:
cd Microsoft Office\root\Office16
Now you should be in the directory where powerpnt.exe is located.
All that's left to do now is to type powerpnt , then press Enter. PowerPoint will open in its usual way.
However, the whole point of using the command is that you can use the different switches and parameters it offers.
Here's a list of the command switches you can use when launching PowerPoint, courtesy of the official Microsoft Office support site . Add these to the end of the "powerpnt" command on the command line as shown in the examples below:
Using these commands, you can open PowerPoint in any specific way you choose.
PowerPoint isn't the only Office product you can open this way---you can also open Word from the Command Prompt !
Related: How (and Why) to Start Microsoft Word from the Command Prompt

How to Record Customized Camera Feeds With Cameo in PowerPoint
T he widespread adoption of remote work and virtual meetings has led many people and organizations to realize they don't have to be physically present in the same conference room to make presentations. In fact, you don't even need to conduct them live.
However, recording your PowerPoint slides with your face on them requires technical know-how and third-party apps like OBS. This makes recording presentations a bit difficult and discourages people from doing it.
Thankfully, Microsoft has addressed this issue in PowerPoint 365 with the Cameo feature. Here's what it is and how to use it.
What Is Cameo in PowerPoint?
Cameo is a PowerPoint feature that lets you add your webcam or any other camera feed into your presentation. This makes it easier to present virtually, as your audience can see you from within your slides.
Previously, you needed a third-party app like OBS to overlay yourself on your presentation. You can also use a green screen overlay in Capcut or other similar apps to achieve the same effect. However, this takes a lot of effort and know-how.
But with this feature, you can do it from inside PowerPoint with just a few clicks. Here's how to insert a cameo into your slides.
- Go to Insert > Cameo .
- After clicking on Cameo, PowerPoint will insert a placeholder object on your current slide and open the Camera Format tab.
- You can edit the object as you wish, much like any other shape on PowerPoint. You can also click on the options in the Designer pane on the right side of the screen to help you work faster.
- Once you're happy with its placement on your slide, click on the Preview button to see your live video.
With that, you can start presenting your PowerPoint slides via screen sharing while still keeping yourself on the screen.
How to Record Your PowerPoint Presentation With Cameo
You can also insert a cameo from Record > Cameo . Clicking on this will bring you to the same menu tab and insert a placeholder object for your video. However, even if you didn't set up Cameo beforehand, you can insert it directly while recording your presentation. Here's how:
- Go to Record > From Beginning or Record > From Current Slide .
- In the recording screen, click on the Camera icon at the top. This will insert a round object containing your video in your slides' lower-right-hand section.
- Click on the Red icon to start recording your presentation.
- Go through your presentation as usual. For more information, check out our guide on turning your presentations into videos .
- Once you've finished, click the Red icon again to stop recording.
- Click Export to go to the Export to video screen .
- Change the File Name as needed, then click Browse to select the location where you will save your recorded video.
- Once done, click Export Video .
With that, you don't have to spend much effort to add your video feed to your PowerPoint presentation recording. However, the app only places your video at one location across every slide; it might cover some of your content. That's why it's better to use the Cameo feature when you're building or editing your PowerPoint presentation.
If you're unhappy with your recording, press the Retake Video on the left of the record icon. You can pick between On Current Slide or On All Slides .
What You Need to Record Customized Camera Feeds
You need a webcam and a Microsoft 365 account to record your customized camera feed. Furthermore, you cannot use Cameo or record presentations in the PowerPoint web app. You need to download and install it on your computer to use these features.
The Cameo feature is already available on Microsoft PowerPoint 365 in Windows and Mac. However, recording your presentation with Cameo is only available on Windows. As of the time of writing, this feature isn't available for the main PowerPoint 365 for Mac version.
If you're running macOS, you must be a Microsoft 365 Insider to get this feature. However, since the Cameo recording feature is already announced in the Microsoft 365 Insider blog , we hope it will be available in the mainstream PowerPoint for Mac version in a few months.
Recording Your Presentations Is Now Much Easier
The Cameo feature has made presenting PowerPoint slides in video calls easier. And with the recording function, you no longer need a third-party app to put your video over your presentation.
You can integrate it into each slide, allowing you to control where you are on your screen. And you also save a lot of time and effort, as you can record and save your presentation as a video from within Microsoft PowerPoint.

IMAGES
VIDEO
COMMENTS
Start presenting. On the Slide Show tab, in the Start Slide Show group, select From Beginning. Now, if you are working with PowerPoint on a single monitor and you want to display Presenter view, in Slide Show view, on the control bar at the bottom left, select , and then Show Presenter View.
Make a slide show that starts automatically when opened. Select File > Save as (or Save a Copy ). Click More options. Browse to the folder where you want to save your presentation. In the File name box, type a name for your presentation. Under Save as type, select PowerPoint Show. The file is saved as a .ppsx file.
If so, we'd suggest you save presentation file as .ppsx type file, if you are using PowerPoint in Windows, we'd suggest you go to PowerPoint File > Save as > Click More Options > select PowerPoint Show under Save as type, the file is saved as a .ppsx file. When the file is double-clicked, it opens as a slide show.
Select the Use Presenter View checkbox. Select which monitor to display Presenter View on. Select From Beginning or press F5. In Presenter View, you can: See your current slide, next slide, and speaker notes. Select the arrows next to the slide number to go between slides. Select the pause button or reset button to pause or reset the slide ...
A presentation that always opens in Slide Show view rather than in Normal view. Tip: To open this file format in Normal view so that you can edit the presentation, open PowerPoint. On the File menu, click Open, and then choose the file. Note: If you need macros enabled save as a .ppsm. If you're in PowerPoint 2003 the older format you need is .pps.
Turn On PowerPoint Presenter View. In PowerPoint for macOS, simply click on Presenter View on the Slide Show tab to kick off the presentation in Presenter view. Turn on Presenter View by clicking on Presenter View on the Slide Show tab. You'll see the Presenter View interface on one screen.
Click From Beginning. Holding down the Alt key and clicking From Beginning, the Presenter View will launch from the very first (non-hidden) slide in your presentation. You can also launch the presenter view from the beginning of your presentation at any time by clicking Alt + F5 on your keyboard.
A simple method for switching to Presenter View on a single monitor is to click the three dots ( More slideshow options) at the bottom in SlideShow mode and select Show Presenter View. You can also switch to Presenter View on a single monitor anytime using the ALT+F5 hotkey. The presenter can easily manage a PPT in presentation mode, with the ...
With that let's go back to our ongoing training video on using Microsoft PowerPoint presenter mode. A couple keys that I really prefer is the black and white key. If I hit B in here we go, look what it just did. It blank the screen in black. If I hit the W key, it does the same thing it blanks the screen to white.
Choose the File tab. Select Save As. Pick the Save as type as PowerPoint Show. Type a name for your slide show in the File name text box (you can use the same name and location as your .pptx/presentation file) and click Save. Your PowerPoint slide show file is saved with a .ppsx extension. Now, the next time you or anyone else opens your ...
Open your presentation in PowerPoint. Go to the Slide Show tab. Slide Show tab. Click Record Slide Show. From the drop-down menu, select From the Current Slide or From the Beginning. Record Slide Show button. A new window will open, along with the presentation in fullscreen mode. At the top-left you'll find a button to start recording. Record ...
Press Shift+F5. 3. Start the presentation in Presenter View using a function key. Press Alt + F5. 4. Start a presentation from the beginning using key tips. Press Alt > S > B (press Alt, then S, then B). 5. Start a presentation from the current slide using key tips.
Steps. Navigate to the location of your PowerPoint file on your desktop. Right-click on the file and select Show from the drop-down menu. The PowerPoint file will open directly in slideshow mode. Begin your presentation by clicking through the slides as usual. To exit the slideshow mode, press the Esc key on your keyboard.
Step 1 - Open Microsoft PowerPoint on your computer. Step 2 - Click on "File", and then select "Open". Step 3 - PowerPoint will ask you to choose the destination of the PPSX file. Simply navigate to the folder in which the file has been saved. Step 4 - Select the file and click "Open" at the bottom of the window.
Select the slide that you want to start the slide show from. On the Slide Show tab, click Play. On the Slide Show tab, click the arrow next to the Custom Show button, and then click Custom Slide Show on the menu. In the Custom Shows screen, click the custom slide show you want to present. Note: If no custom shows are listed, click Edit Custom ...
Start a Slideshow in PowerPoint's Web App. To play a slideshow on the web, launch your preferred web browser and access PowerPoint on the web. Then, open your presentation. From PowerPoint's ribbon at the top, select the "Slide Show" tab. In the "Slide Show" tab, start your slideshow from the first slide by clicking the "From Beginning" option.
On the right side: On the top, the next slide is shown (see how to create your own slide show ), On the bottom, the notes of the current slide. You can reorganize the Presenter view by moving the divider lines to see more notes, or make the slide bigger: The text should wrap automatically, and a vertical scroll bar appears if necessary.
From Microsoft's list of command line switches, you can use the /S switch to start a presentation: C:\path\to\POWERPNT.exe" /S "Presentation.pptx". To get the slideshow to start on boot-up create a shortcut to the path given above and put it in the Startup folder in the Start menu. Share. Improve this answer.
PowerPoint Shortcut Keys to Use During a Presentation. There are other PowerPoint keyboard shortcuts that only work in the slide show mode. We'll go from my favorite basic commands to some advanced keyboard shortcuts to help you manage your presentation like a pro. Basic PowerPoint Commands 1) Use F5 to start a Slideshow
To do that, simply go up to the Home tab and click on New Slide. This inserts a new slide in your presentation right after the one you were on. You can alternatively hit Ctrl+M on your keyboard to insert a new blank slide in PowerPoint. To learn more about this shortcut, see my guide on using Ctrl+M in PowerPoint.
Start a presentation from the beginning. ⌘+Shift+Return. Start a presentation from the current slide. ⌘+Return. Start the presentation in Presenter View. Option+Return. Perform the next animation or advance to the next slide. N. Page down. Right arrow key. Down arrow key. Spacebar. Perform the previous animation or return to the previous ...
How to Open PowerPoint in Presentation mode from SharePoint Online? Any link to PowerPoint presentations (PPT, PPTX, or PPSX files) takes users to the Edit mode of the file. Even if the users don't have permission to edit, SharePoint opens it in edit mode with a banner saying you can't edit the file. So, How to force slide show mode for PPT ...
First, open a Command Prompt window. You can do this by typing "cmd" in the Windows Search bar (located on the taskbar next to the Windows icon). Press Enter or click the "Command Prompt" application in the search results. When you first open the Command Prompt, you'll start in your user account folder.
Once you've finished, click the Red icon again to stop recording.; Click Export to go to the Export to video screen.; Change the File Name as needed, then click Browse to select the location where ...