- Tactical Project Management

Resource Management Using Microsoft Project
by Andrew Makar · March 31, 2024

I always enjoy reading emails from project managers who implement Microsoft Project techniques. I received an email from an employee at the United States Central Command asking about using Microsoft Project to track personnel on a military base and monitor resource levels as units deactivate during a base closing. The goal was to measure the total personnel at any given time and track the resources as the base downsized.
Table of Contents
To produce this information, I developed a quick resource management model in Microsoft Project. Since Microsoft Project supports resource assignments and resource pools, developing an ongoing model was relatively easy. This example creates a work breakdown structure (WBS) that comprises teams or units allocated to different tasks.
Develop the WBS
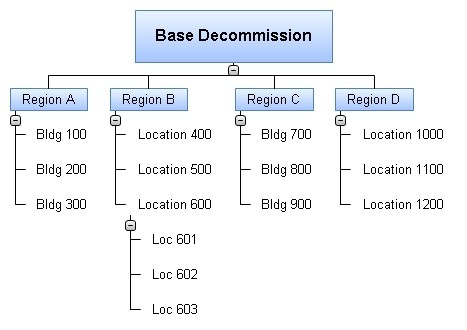
The first step is to develop a WBS that resembles the location hierarchy. I like to think visually before detailing the work in Microsoft Project, so I used Matchware MindView to create a hierarchical WBS (Figure 1).
The base (the top-level WBS deliverable) was divided into regions. Each region was composed of specific buildings, further defined into particular floors. The term “location” could also be used if resources were not assigned to a specific building but to another ambiguous sub-region. The level of detail can be extended to individual offices or cube locations.
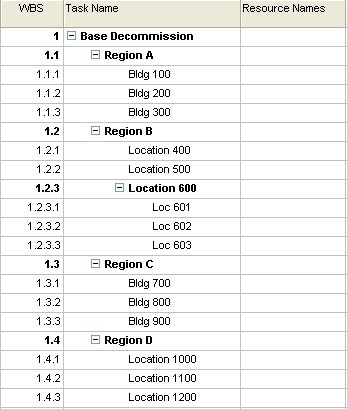
Once I had a visual breakdown of the base locations, I exported the model into Microsoft Project. I could have used MindView to assign resources and dates, but I chose to detail the WBS further in Microsoft Project (Figure 2) due to the number of resources that would be added to each location or building.
Set the project start date
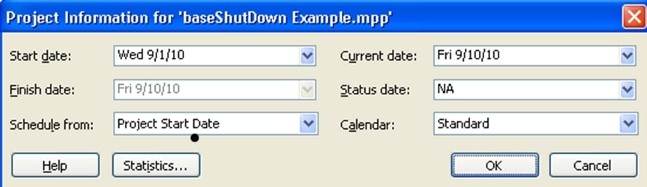
As each location is assigned a decommission date, you’ll want to have the correct project start date in Microsoft Project. To set the project start date, go to Project | Project Information (Figure 3) and select the desired Start Date from the drop-down menu.
Define the resource pool
The next step is defining all the resources currently occupying the base. Since this could extend to several hundred or thousand resources, you may want to import them from an Excel extract of a resource management system. Follow these steps to customize the resource sheet:
- Go to View | Resource Sheet.
- Right-click these columns and select Hide: Type, Material Label, Max Units, Standard Rate, Ovt. Rate, Accrue At, and Code.
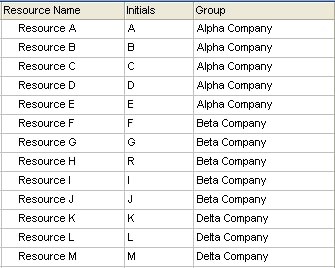
- Enter a name and a team name in the Resource Name and Group column (Figure 4).
Assign resources to locations
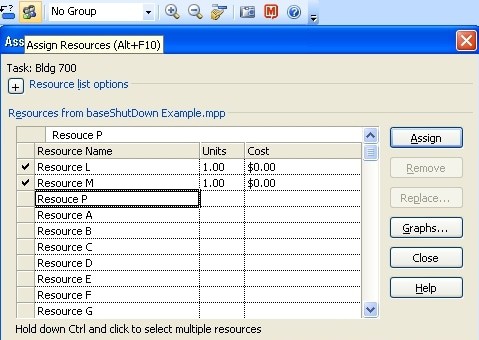
Now, you should switch back to the Gantt Chart view and assign resource names to the specific buildings in the WBS. You can assign resources by selecting the names from the Resource Name column or using the Assign Resource dialog box. Click the task and press [Alt][F10] to display the resource box (Figure 5).
Assign location to decommission dates
With your resources assigned, the next step is to enter the duration of evacuation of the building or select a target finish date. If this is a simple planning scenario where a specific building will be decommissioned, then a Finish date would be chosen. If each building has building dependencies, task predecessors may be used.
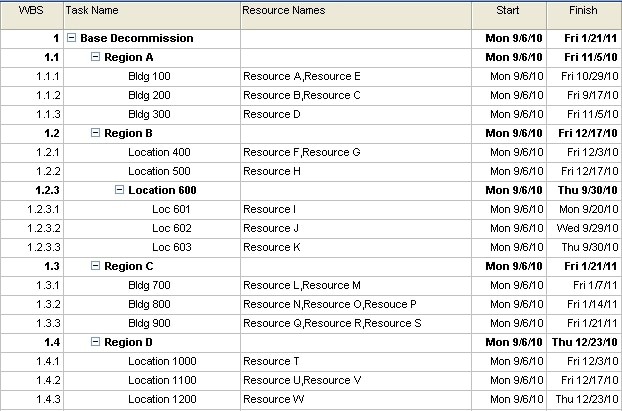
It is assumed that all the resources are assigned to the building at the start of the project, so all tasks should have the same Start date. By selecting the decommission date, the Finish date will be populated. Figure 6 depicts the completed schedule with target dates.
Set up the resource graph
The final step in setting up the model is to change the resource graph.
- Go to Window | Split.
- Click the lower window pane and select View | Resource Chart.
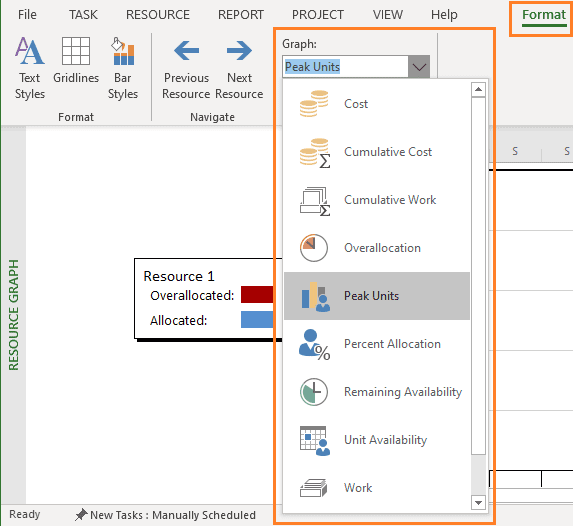
- Right-click the Resource Graph and select the Peak Units graph.
- Right-click the Resource Graph and select Bar Styles.
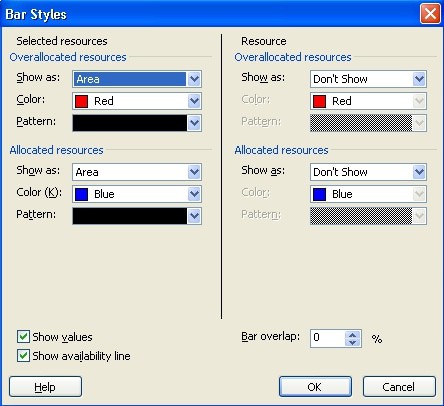
- Under the Selected Resources section (left side), change the Overallocated and Allocated Resources Show As options to Area.
- Under the Resource section (right side), change the Overallocated and Allocated Resources Show As options to Don’t Show.
- Confirm the options are the same as in Figure 7 and click OK.
View the resource management model
You can view the resource ramp-down curve over time with the resources selected and assigned to specific buildings. You can view the resource allocation over time by clicking the magnifying glass in the lower resource graph pane. Selecting multiple resources in the upper pane resource sheet allows you to view the specific resource curve for each resource in the model (Figure 8).
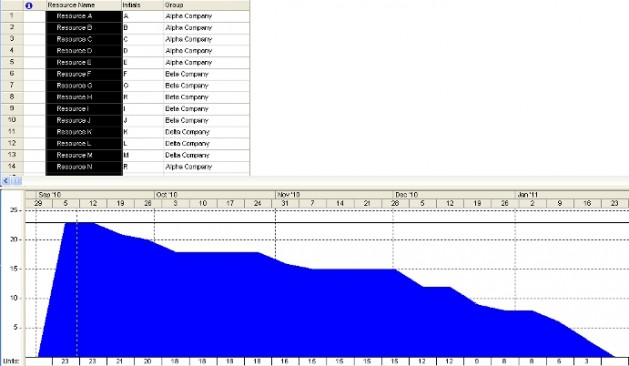
The horizontal axis of the resource curve provides the resource count over time. Over the five months, the graph starts with 23 resources and gradually reduces to zero when the base closes. The horizontal line at the top of the graph represents the original resource level at the start of the project. By adding more resources and filtering on specific team names, project managers can view individual, team, and entire resource pool curves.
Recommended articles: Microsoft Project Tutorial: How to Track Percent Complete | Finding Late Tasks with Microsoft Project Custom Filters | How to Calculate Earned Value in Microsoft Project

Andrew Makar
Andrew Makar, DMIT, PMP, CSM is an IT director with delivery experience across projects, programs and portfolios in Digital Marketing, Automotive, Software and Financial Management industries. He is an enthusiastic leader who effectively translates project management theory into practical application. His area of interest and practice is in implementing Agile processes and SCRUM techniques to deliver better software to his customers. Find out more about Andrew on andymakar.com and please reach out and connect with Andrew on LinkedIn.
- Next story Build the Right Microsoft Project WBS Levels
- Previous story Confluence Tutorial: Build a Project Portfolio Dashboard
Leave a Reply Cancel reply
Your email address will not be published. Required fields are marked *
Save my name, email, and website in this browser for the next time I comment.

Create Resource Assignments
Locked lesson.
- Lesson resources Resources
- Quick reference Reference
About this lesson
Learn to add resources to a task and identify how much time each resource will require for that task.
Lesson versions
Multiple versions of this lesson are available, choose the appropriate version for you:
2013 , 2019/365 .
Exercise files
Download this lesson’s related exercise files.
Quick reference
There are two ways to refer to resources in a project schedule. If you are talking about resources , you are referring to the people, generic, or things in the resource sheet . If you are talking about resource assignments , you are referring to assigned resources on a task.
In this lesson, you add resources to a task and identify how much time each resource will require for that task.
Further Discussion
It is very simple to assign resources to tasks by simply selecting the resource names picklist and select the resource(s). Assuming you are using the standard calendar , a resource assignment for a 10-day task will calculate as 80 hours (8 hours a day * 10 days).
Very often, people do not work as many hours as they estimate for the duration. For example, if I ask you to meet with your manager to make an important decision, that meeting might take 2 hours. However, you know your manager is very busy and might even be on vacation for a week, so you will ask the project manager for a total of 10 days in duration . The project manager will create a task in their project schedule for 10 days to make the decision, and then assign you for a total of 2 hours of work.
To assign resources to your project, follow these steps:
- Go to the Gantt chart view.
- Click the View tab, and then select the Details checkbox.
- The task form split view will appear at the bottom of the window.
- Click a task in the Gantt chart view, and then assign one or more resources in the task form .
- Click the OK button and then adjust the Work column for each resource.
- Click the Next button to go to the next task and continue assigning resources.
Note: Rather than click the OK and Next buttons, you can use the Enter (return) key on your keyboard.
- 00:04 Now that we've built a resource pool, we can now assign resources.
- 00:09 These resource assignments can be done in a number of different ways.
- 00:14 One way to do it is to come over here to the resource names column,
- 00:18 locate the resource, and choose the resource.
- 00:21 In this case, acquire land can be done by the home owner and we check that box.
- 00:26 You can see over here on the right hand side of the screen,
- 00:30 home owner shows up in the Gantt chart as well.
- 00:33 Now, this is one approach to adding the resource.
- 00:37 But there's a few other approaches that I'm going to cover.
- 00:40 So I'm going to do Ctrl Z, and undo the addition of that resource.
- 00:46 Another method for assigning resources to a task is to locate
- 00:50 the resource tab, and then click the assign resources icon,
- 00:55 which is located in the assignment section.
- 00:59 So click the assign resources button, now a dialog appears, and
- 01:04 you can move this out of the way.
- 01:06 So you can see the resource names column, and
- 01:09 then select a resource, and click the assign button.
- 01:13 You can see I've just assigned this resource to a task.
- 01:17 Now I'm not going to recommend you use this approach either.
- 01:21 So click the close button, and
- 01:24 perform an undo Ctrl Z to remove that resource from the task.
- 01:29 The recommended method for assigning resources to tasks
- 01:34 is to use the split view, also called the details view.
- 01:38 To get there, click the view tab at the top of the page,
- 01:43 locate the split view section, and then click the details checkbox.
- 01:50 Now you can see we have the Gantt chart at the top, and
- 01:54 we have the split view called the task form at the bottom.
- 01:59 So, you'll notice that I have acquire land selected up here, and so
- 02:03 you can see acquire land listed below.
- 02:06 If I click on create architectural design,
- 02:09 you can see the bottom part of the screen adjusts.
- 02:12 So I'll go back up here to acquire land, and
- 02:15 I'm going to choose the resource home owner, and click the OK button.
- 02:21 So what's happened now is I've assigned the home owner to this task.
- 02:25 Microsoft Project by default,
- 02:27 does what I like to refer to as peanut butter spreading.
- 02:32 The number of hours that someone needs to work on a project task,
- 02:36 by the number of days.
- 02:38 So since a home owner is 100% on this 30 day task,
- 02:42 it's saying the home owner is going to spend 240 hours.
- 02:46 Well, actually acquiring the land includes waiting for certain things to happen,
- 02:51 talking to banks, things of that nature.
- 02:54 So it's actually not a whole lot of that person's time, it's actually much less.
- 02:58 So what we're doing is a little bit of what we might call resource leveling,
- 03:04 so that we don't show someone as over extended on a particular task.
- 03:09 So the process that you follow when you're working with your resources
- 03:14 is to ask them, how much time are you going to need to spend on each task?
- 03:18 And so here for acquire lands, the home owner is probably only going to work maybe
- 03:24 over these 30 days, probably only spend three full days worth of their time.
- 03:29 So we just type 24 and that's hours, and that will equate to three days.
- 03:36 Now, we just click the next button, and we can go to the next task.
- 03:41 This create architectural design, well, that will be done by the architect.
- 03:46 The architect will do that task.
- 03:48 We'll click OK, and once again 20 days, full time.
- 03:53 Well, the architect may only need about a smaller portion of that,
- 03:59 so maybe about half, so we can type in 80 hours, 80h, and press Enter.
- 04:05 Pressing Enter is the same thing as pressing the OK button.
- 04:08 And then we can just press an Enter again and go to the next task.
- 04:14 And we'll just continue adding resources as needed.
- 04:19 Now, this acquiring loan piece is going to be done by home owner.
- 04:25 However, the home owner might want some help from the project manager.
- 04:29 I'll choose these two and click the OK button.
- 04:33 And now part of this acquiring the loan over 10 days.
- 04:37 Now, that will include let's say 16 hours, four days of the homeowner
- 04:42 meeting with the bank, going back and forth to offices, signing paperwork.
- 04:47 And then the project manager coordinate everything else, and
- 04:51 the project manager will have 24 hours.
- 04:53 And so I just keep pressing the Enter key until I move to the next one.
- 04:57 Now you'll see here up at the top of the screen under resource names,
- 05:02 we have both resources listed.
- 05:04 And if I stretch out the Gantt chart view, you can see home owner, project manager.
- 05:09 So you can add as many resources as you'd like to each task.
- 05:13 Now the duration for this task has not changed,
- 05:17 because we set this test to be a fixed duration and not effort driven.
- 05:22 And so what this is saying is, I don't care how many hours someone needs to work,
- 05:28 the duration should never change.
- 05:30 So now what we'll do is continue filling out the resources for
- 05:35 each one of these tasks.
- 05:37 After we've assigned all of our resources, you can see there might be these little
- 05:42 red people, and if you mouse over, they're showing as over-allocated.
- 05:47 We'll talk about that in future lessons.
- 05:49 The next step for us is to build what's called a work breakdown structure, and
- 05:54 that's what we'll do in the next lesson.
Lesson notes are only available for subscribers.
PMI, PMP, CAPM and PMBOK are registered marks of the Project Management Institute, Inc.
Twitter LinkedIn WhatsApp Email
How is your GoSkills experience?
Your feedback has been sent
© 2024 GoSkills Ltd. Skills for career advancement

The Project Managers Guide to Microsoft Project 2019 pp 207–264 Cite as
Managing Project Resources and Assignments
- Gus Cicala 2
- First Online: 30 April 2020
1337 Accesses
At the end of the chapter, the reader should be able to
This is a preview of subscription content, log in via an institution .
Buying options
- Available as PDF
- Read on any device
- Instant download
- Own it forever
- Available as EPUB and PDF
- Compact, lightweight edition
- Dispatched in 3 to 5 business days
- Free shipping worldwide - see info
Tax calculation will be finalised at checkout
Purchases are for personal use only
Author information
Authors and affiliations.
Wilmington, DE, USA
You can also search for this author in PubMed Google Scholar
Rights and permissions
Reprints and permissions
Copyright information
© 2020 Augustus Cicala Jr
About this chapter
Cite this chapter.
Cicala, G. (2020). Managing Project Resources and Assignments. In: The Project Managers Guide to Microsoft Project 2019 . Apress, Berkeley, CA. https://doi.org/10.1007/978-1-4842-5635-0_8
Download citation
DOI : https://doi.org/10.1007/978-1-4842-5635-0_8
Published : 30 April 2020
Publisher Name : Apress, Berkeley, CA
Print ISBN : 978-1-4842-5637-4
Online ISBN : 978-1-4842-5635-0
eBook Packages : Professional and Applied Computing Professional and Applied Computing (R0) Apress Access Books
Share this chapter
Anyone you share the following link with will be able to read this content:
Sorry, a shareable link is not currently available for this article.
Provided by the Springer Nature SharedIt content-sharing initiative
- Publish with us
Policies and ethics
- Find a journal
- Track your research
Understanding and Using Resource Graph View in MS Project
The Microsoft Project software tool comes with a number of view options, which, at a high level, can be thought of as Task Views and Resource Views. While views such as Gantt Chart, Team Planner, Resource or Task Sheet, Resource or Task Form, Resource or Task Usage are well used by project managers, many management practitioners often overlook the Resource Graph view or use it less frequently.
As I have ongoing opportunities to interact with MS Project practitioners, I’ve realized that this view is not all that well understood. As a result, its usage is limited; however, in practice, this can be a very useful view if one can learn a little about it. In this article, we will discuss various ways to launch it, formatting options, a plethora of data representations, and other usages of this view.
Let’s begin with the launching options of Resource Graph view.
Launching the Resource Graph
The Resource Graph view can be launched in many ways.
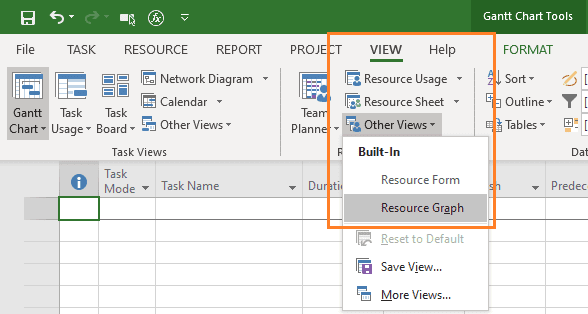
You can go to the Views tab à Resource Views group à Other Views, and, from there, choose Resource Graph view.
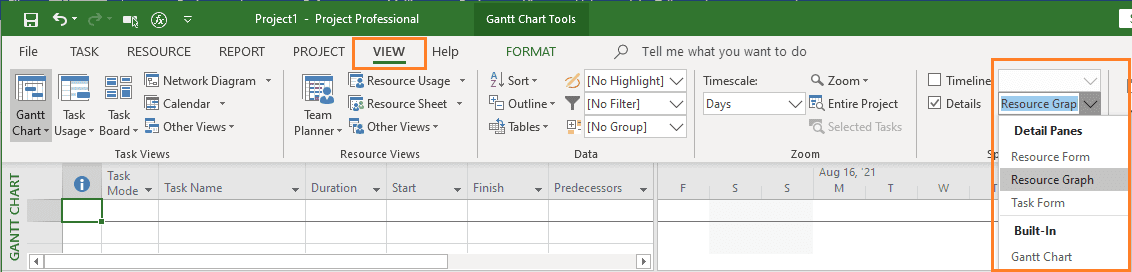
You can also launch this view by going to the Views tab > Split group, and enabling the Details checkbox . Then, from the available dropdown menu, select Resource Graph for the Details Pane.
A third way to launch the Resource Graph view is by going to the Assign Resources dialog box, and clicking on the Graph button.
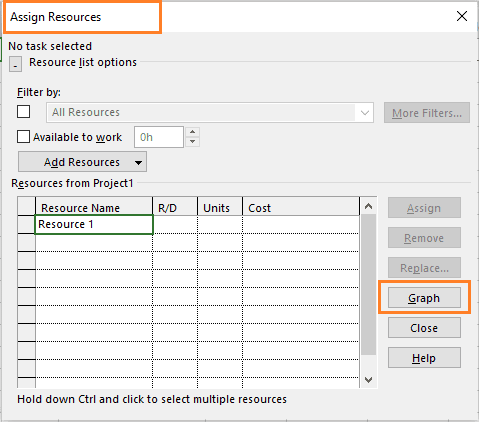
The Assign Resources dialog box can be opened by going to Resource Tab > Assignments group and using the Assign Resources command. Do note that for the Graph button to be activated, some work resources should be available in the project!
Formatting the Resource Graph
The Resource Graph view primarily pulls data and values from task assignments. In other words, you need to have both tasks and resources assigned for such to populate the Resource Graph view.
By default, when you launch the Resource Graph, the below comes up as shown.

As you can see in the screenshot, we have just one resource (Resource 1) assigned to one task (Task 1).
With the launch of this view, the Resource Graph Tools menu has been activated, as well as the Format tab enabled. In fact, this tab, has three groupings of tools: Format, Navigate, and Data. Do note that the graph, by default, uses Peak Units for graphical data representation. There can be others, as well, which we will see shortly.
An important functionality available under the Format grouping is the Bar Styles command , which you can use to unleash the power of this view. Bar styles can be opened by going to the Format tab > Format group, and clicking on Bar Styles.
Bar styles shown clearly indicate blue colored bars for the allocation and deep red colored bars for overallocation. Bar styles are important, so that you can visualize and interpret various possible usages of the Resource Graph.
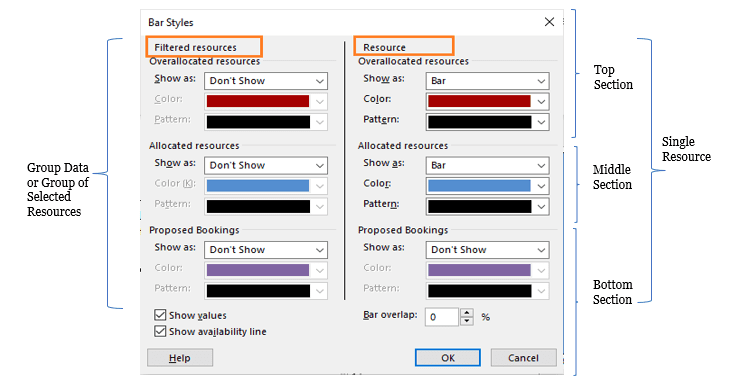
Let’s interpret the dialog box shown above:
- It’s divided into three parts or sections – top, middle, and bottom. The top part has styles for overallocation, the middle styles for allocation, and the bottom styles for proposed booking.
- The left side of this dialog box refers to the group data or the selected/filtered group of resources, whereas the right side defines one selected resource.
- In the bottom section, we also have three options to show value, show availability line, and define the desired bar overlap.
Do note that the bar style is contextually sensitive, and depending on the data selected under Data Group > Graph: …, some parts may be disabled. For example:
- If you select Graph: Cost under the Data group, the top section will show the resource cost, but the middle section will be disabled. This is because when considering the cost aspect, there is only allocation, no overallocation.
The style of the bar shown in the above figure is vertical. There can be others as well, such as Area, Step, Line, and Step Line . You may also choose not to display a bar style in any one of the aforementioned three sections for a single resource or a group of resources.
Key Points about Resource Graph
To operate within this view effectively and efficiently, you need to understand certain key points. They are explained in the video [duration: 5m 12s], which I’ve prepared in support of this article. For the best experience, you may want to go full-screen in HD mode and plug-in your earphones.
With these fundamentals in mind, let me explain a bit more about the graphical data representation of the Resource graph.
Resource Graph Data Representation
The Resource Graph view’s data representation is driven by measurement chosen under Graph: command within the Data group under the Format tab as shown below:
As we have seen earlier, by default, the Peak Units will be chosen, but you can switch among the data/measurements, as per your need. For example:
- Work is the amount of work assigned. The unit will be taken from the Global settings of MS Project.
- Cost is the cost of assignments. This unit also will be taken from the Global settings of MS Project.
- Peak Units are the largest percentage of effort (peak) assigned to a resource within a time period. Do note that Peak Units refer to the effort assigned, not the work assigned.
- Overallocation refers to the work overallocation of the resource.
- Cumulative Work is the total amount of work assigned till date.
- Remaining Availability is the effort remaining, i.e., still available for assignment. This unit will also be taken from the Global settings of MS Project.
Usages of Resource Graph
The Resource Graph can be used as a visual display and can really help you to solve a number of problems with regard to scheduling, costing, resource assignment, resource leveling, etc. I will cover five ways to use the Resource Graph view now.
Usage – 1: Checking Resource Availability
The availability of a resource can be checked before you assign a resource to a task. This is very useful as you launch the Resource Graph view from Assign Resources option (as we saw earlier) and see displayed the remaining availability of a particular resource.

As shown above, the availability of the resource is shown with vertical blue bars . If the resource is fully occupied, blue bars won’t be available for those respective days.
With this application, you will also easily see the current resource(s) working on a selected task above in the Gantt Chart view and can determine what others can be allocated.
Usage – 2: Viewing Proposed Booking
You might be wondering about the purple bars in the previous figure. As indicated in the graph, these show proposed booking.
Resources, when added to MS Project, can be either committed (this is the default) or proposed. Committed resources are ones which are definitely available, whereas proposed resources refer to those for which you unsure of availability.
Now, for the same resource (Satya Dash) in the previous figure, I can double-click on the resource and change it to proposed by going to the General tab of the opened Resource Information Dialog box.

The graph in the timescale portion of the view will change, as shown below.

As you can see, the vertical purple bars are now changed to blue , and the availability is also shown. This can be reconfirmed by changing the Remaining Availability in the bottom right part of the legend section to Work . You have to use the Graph: option under the Format tab to switch to work data in the Graph. It’s shown in the below figure.

Usage – 3: Checking Overallocated Resources
As you may have noticed in the previous figure, a red colored coding has appeared in the legend section of the Resource Graph. This, as informed by the indicator column, is for overallocation.
However, the current resource assigned to the task of “PRD Approval” is not overallocated. Rather, there is an overallocation indicator ( red person icon ) in the indicator column for the task, “PRD Preparation,” – the task just above with Task ID 4.
You may be wondering how will you know why, when, and which resource(s) is/are overallocated for the concerned task?
In this case, the concerned task is “PRD Preparation.” To know more, we will change the top panel of the split view to Resource Usage view, while keeping the bottom half as it is. The split Resource Usage view with the Resource Graph view is shown below.

The resource assigned to the PRD Preparation task (John Robinson) is clearly highlighted as red, which means this resource is overallocated. This is also reflected in the Resource Graph view in the bottom pane.
I’ve changed the data part of the Resource Graph to display Peak Units , which informs the highest assigned resource units (in terms of effort) within a time period. You can switch to other options, and corresponding values with indications for overallocations will display.
For example, in the below figure, instead of Peak Units, now we’re looking at Overallocation data for the Resource Graph in the bottom pane, and it’s showing the only overallocation in hours.

Usage – 4: Adjusting Critical Resources
There is another very useful scenario for which the Resource Graph can be used. To compress the schedule of the project, it’s natural for a project manager to look at the critical path and the critical tasks. There are many ways to look this data, such as using Tracking Gantt view or formatting options in Gantt chart . The problem lies in that with these views, you really won’t know which resources are free and if they can be employed in critical activities.
In such cases, it’s useful to bring up the Resource Graph view in the bottom half of the Gantt Chart view and see first if a resource is available for the concerned tasks. One such scenario is shown below.

While the resource (Mohan M R) is occupied with the “Design and Develop Backend – 1” task, he is actually also available for “PRD Preparation” and “PRD Approval” tasks. This is shown with the Remaining Availability data view of the Resource Graph and highlighted with the blue color in the bottom pane of the split view.
Note that both of these tasks are also critical tasks. This is shown with a light red color in the Gantt Chart view at the top of the split.
You may be wondering if the concerned resource can now be utilized in these critical tasks to compress the project schedule. The answer is yes! The PM can analyze this scenario and reduce the schedule from here.
Usage – 5: Knowing the Cost Distribution Over Project Life Cycle
With the Resource Graph view, you can see the total cost distribution of a project over its life cycle. This can be shown by enabling a group of resources and using the Cost data from the Graph: command under the Format tab.

As shown, we have the cost distribution of the project over its life cycle, which is low during the initial stages, goes-up in the middle. and tapers off towards the end of the project.
You can also show the cost of a specific resource along with the total project life cycle cost as shown below.

The Resource Graph view is a powerful feature in MS Project, and I hope with this article has given you a fair understanding about the usage of this view.
References:
[1] Online Course: MS Project Live Lessons , by Satya Narayan Dash
[ezcol_1third]
FREE MPUG Resources
- Microsoft Project Tutorial
- Tips from a Microsoft Project MVP
- Webinar: Microsoft Project Do’s and Dont’s
- The Project Communication Plan
- Creating an Agile Schedule
- 15 Tips for New Users
- MPUG Newsletter
- Want access to more? Join MPUG Today!
[/ezcol_1third] [ezcol_1third]
Microsoft Project Resources
- Microsoft Project User Group
- Online Training
- Microsoft’s Project Website
- Try Microsoft Project for FREE!
- Microsoft Project Certifications
[/ezcol_1third] [ezcol_1third_end]
Additional Resources
- Create a Monthly Cash Flow Report in Microsoft Project 2016
- What is Project Management?
[/ezcol_1third_end]

Leave a Reply Cancel Reply
You must be logged in to post a comment.
Remember Me
Lost Password
Please enter your username or email address. You will receive a link to create a new password via email.

Contribute to the Microsoft 365 and Office forum! Click HERE to learn more 💡
March 14, 2024
Contribute to the Microsoft 365 and Office forum!
Click HERE to learn more 💡
Top Contributors in Access: GroverParkGeorge - Scottgem - Tom van Stiphout - Ken Sheridan - Duane Hookom ✅
March 11, 2024
Top Contributors in Access:
GroverParkGeorge - Scottgem - Tom van Stiphout - Ken Sheridan - Duane Hookom ✅
- Search the community and support articles
- Microsoft 365 and Office
- Search Community member
Ask a new question
Importing multiple resource assignments and hours worked to tasks from Excel to Project Professional 2013
I have a very complex project with 5000 tasks. I have multiple resources (23) to be assigned to each task with varying hours worked within each task. I have all task and resouce data in Excel and would like to import into Project. My Excel document shows all tasks vertically in column A, with resources horizontally and each resources hours per task. I can easily transpose to make the resources vertically in column A with tasks horizontally spread out.
Assigning resources manually per task is time consuming. Not every resource is assigned to each task, and each resource has varying hours within a task. Example- task 1 may have R1 30 hours, R2 10 hours, R3 5 hours, with the resources working concurrently, for no more than the highest number of hours assigned for this task, (30 hours). Task 2 may have R1 15 hours, R2 10 hours, again concurrent, and total task 2 duration is 15 hours.
How can I import these resources as described from Excel? Or am I stuck with opening the Assign Resources window for each individual task and manually assigning resources and units?
Report abuse
Replies (5) .
- Microsoft Agent |
Hi Cvbanks,
You may check if articles below can achieve your requirement:
Import Excel data into Project
Importing Resources from Excel into MS PROJECT 2013
Import Excel Into Microsoft Project
Was this reply helpful? Yes No
Sorry this didn't help.
Great! Thanks for your feedback.
How satisfied are you with this reply?
Thanks for your feedback, it helps us improve the site.
Thanks for your feedback.
- Volunteer Moderator |
- Article Author
Yes unfortunately that's right, what you want to do can't be done with a single import using an import map. You could run multiple imports and merge the data each time but with 23 resources that's a lot of importing.
The best way to implement your process is with VBA. I have a macro for importing data from Excel to Project but as presently written it isn't set up to do multiple assignments per task, however, it could be modified to do that.
Okay, let me know if you want to try the VBA process.
1 person found this reply helpful
Question Info
- Norsk Bokmål
- Ελληνικά
- Русский
- עברית
- العربية
- ไทย
- 한국어
- 中文(简体)
- 中文(繁體)
- 日本語
Resource ID (assignment field)
Data Type Integer
Entry Type Calculated
Description The Resource ID field contains the identifier number that Project assigns to each resource. The Resource ID indicates the position of the resource in relation to other resources.
How Calculated As you add resources, Project automatically assigns the next number in the sequence of resources as listed. This becomes the Resource ID.
Best Uses The only view that the Resource ID field appears in is the Task Form. It also appears in the Assignment Mapping dialog box, which you can use when importing or exporting assignment dates.
Example You want to export assignment dates to a Microsoft Excel workbook. You use the Save As command to export your assignments as an Excel workbook, following the instructions in the Export Wizard.
Remarks To export the Resource ID field to another program, in the Save As dialog box select the name of the file format to which you are exporting (for example, Access Database or Excel Workbook). Then follow the instructions in the Export Wizard.

Need more help?
Want more options.
Explore subscription benefits, browse training courses, learn how to secure your device, and more.

Microsoft 365 subscription benefits

Microsoft 365 training

Microsoft security

Accessibility center
Communities help you ask and answer questions, give feedback, and hear from experts with rich knowledge.

Ask the Microsoft Community

Microsoft Tech Community

Windows Insiders
Microsoft 365 Insiders
Was this information helpful?
Thank you for your feedback.
This browser is no longer supported.
Upgrade to Microsoft Edge to take advantage of the latest features, security updates, and technical support.
Assignments object (Project)
- 5 contributors
Contains a collection of Assignment objects for a task or resource.
Using the Assignment Object
Use Assignments ( index ), where index is the assignment index number, to return a single Assignment object. The following example displays the name of the first resource assigned to the specified task.
Using the Assignments Collection
Use the Assignments property to return an Assignments collection. The following example displays all the resources assigned to the specified task.
Use the Add method to add an Assignment object to the Assignments collection. The following example adds a resource identified by the number 212 as a new assignment for the specified task.
Project Object Model
Support and feedback
Have questions or feedback about Office VBA or this documentation? Please see Office VBA support and feedback for guidance about the ways you can receive support and provide feedback.
Was this page helpful?
Coming soon: Throughout 2024 we will be phasing out GitHub Issues as the feedback mechanism for content and replacing it with a new feedback system. For more information see: https://aka.ms/ContentUserFeedback .
Submit and view feedback for
Additional resources
IMAGES
VIDEO
COMMENTS
Note: Along with resource assignments for tasks in the currently opened project, the Resource Usage view also displays summary resource assignments.Summary resource assignments indicate the total amount of work a resource is assigned to in all other projects. Summary resource assignments are only shown if you are connected to Microsoft Project Server and if you have an enterprise project open.
In the Resource Leveling dialog box, under Leveling calculations, select how you want leveling to occur.. Automatic If you choose automatic leveling, clear the Clear leveling values before leveling check box. When this check box is cleared, Project levels only new and unleveled assignments. This check box is selected by default, but when leveling automatically, leaving it selected can ...
To access the contour editing grid, the project manager first selects the Tasks tab on the project main page and then selects the Assignments tab. When the grid is initially rendered, it starts at the earliest assignment contour. If your schedule doesn't contain any assignments that have effort, the grid will be blank and won't render anything.
Add resources to your project. On the View tab, in the Resource Views group, choose Resource Sheet. (In Project 2007, choose View > Resource Sheet, and then choose View > Table > Entry .) In the Resource Name field, type a job title, material, or generic resource name. If you want to designate resource groups, then in the Group field for the ...
You can indicate the level of effort for a work resource on a specific assignment in two places: In the Resource tab, click on Assign Resources. Enter information in the Units field. In the Task tab, click Information and then click the Resources tab. Enter the information in the Units field. Assignment units indicate how much of the resource's ...
To produce this information, I developed a quick resource management model in Microsoft Project. Since Microsoft Project supports resource assignments and resource pools, developing an ongoing model was relatively easy. This example creates a work breakdown structure (WBS) that comprises teams or units allocated to different tasks. Develop the WBS
Option 1: Use the Task Information Window. To manage resource assignments for a specific task, double-click anywhere on that task. Here, we are double-clicking on the Resource Names cell, but any cell in that row will do: When the Microsoft Project Task Information window appears, click on the Resources tab:
Choose Replace. In the Replace Resource dialog box, select the resource that you want to replace, and then choose OK. To replace the selected resource with multiple resources, hold down CTRL, and then select the resource that you want to add. Note: Project will not remove the resource if actual work has been completed on the assignment.
In Project Online, on the Quick Launch, choose Projects. In the Project Center, choose the name of the project for which you want to build your team. On the Project tab, in the Navigate group, choose Build Team. The left side of the Build Team page lists the entire Project Online resource pool.
In a recent webinar, we delved into the various aspects of resource management and task assignment in Microsoft Project.This article aims to provide a concise summary of the key points discussed during the session. We will explore how to effectively use different views, such as the Gantt chart, and leverage the resource tab to quickly manage, assign, and replace resources.
8.2 Assigning Resources to Tasks Microsoft Project 2019 enables you to assign resources to tasks in a variety of ways. Resource assignments clarify responsibility for doing tasks and also help you to determine how long a task will take and how much it will cost. Microsoft Project 2019 uses two different fields to express the allocation of a work
Download this lesson's related exercise files. Create Resource Assignments.mpp.mpp. 281 KB Create Resource Assignments - Completed.mpp.mpp. 298 KB. Add Resources to the Project. Build a Work Breakdown Structure. Learn to add resources to a task and identify how much time each resource will require for that task.
To create a resource using the Resource Information dialog box, follow these steps: Click the bottom of the Gantt Chart button on the Task tab in the View group of the Ribbon, and click Resource Sheet. At that point the view changes to Resource Sheet View. Double-click a blank cell in the Resource Name column.
In this video viewers will learn how to create Work, Cost and Material resources within Microsoft Project. They will learn various methods of assigning reso...
Applies To: Project Operations for resource/non-stocked based scenarios, Lite deployment - deal to proforma invoicing. A resource assignment is the direct association of a project team member to a leaf node task. This article provides information about the different ways to assign resources. Create a generic team member through task assignment
Right-click in the gray area of the Task Details Form (lower pane) and click Cost from the dropdown list to view cost information. 5. Select Task ID 3, Obtain approval of Statement of Work, in the upper pane. 6. In the upper section of the pane, click the Assign Resources icon [] under Resource:Assignments.
Step 2: Open the Resource sheet. To add resources in Microsoft Project, open your project file. Head to the "View" tab on the Ribbon and select "Resource Sheet" from the "Resource Views ...
The Assign Resources dialog box can be opened by going to Resource Tab > Assignments group and using the Assign Resources command. Do note that for the Graph button to be activated, some work resources should be available in the project! ... Resources, when added to MS Project, can be either committed (this is the default) or proposed ...
Resource assignments are made up of three variables: duration, work, and resource availability. You can juggle these to meet schedule objectives or resolve scheduling issues. Learn what makes up ...
Level resources of the entire project. In MS project, a person can handle too many assignments at the same time. You can resolve assignments or resource conflicts by Resource > Level All. After Leveling, the solution will look like on the image below. Leveling solves the problem of overallocation of assignments.
In this video, viewers will learn how to assign Work resources to tasks in Microsoft Project Professional. Viewers will learn about generic resources and how...
Within Microsoft Project there are various ways to assign resources to tasks within a project schedule. In my opinion there is no right way to assign resources. However, using the right method will allow you to assign resources and plan the assignment correctly and efficiently. I am going to discuss three methods of assigning resources Read more about Assigning Resources in Microsoft Project[…]
Assigning resources manually per task is time consuming. Not every resource is assigned to each task, and each resource has varying hours within a task. Example- task 1 may have R1 30 hours, R2 10 hours, R3 5 hours, with the resources working concurrently, for no more than the highest number of hours assigned for this task, (30 hours). Task 2 ...
Data Type Integer. Entry Type Calculated. Description The Resource ID field contains the identifier number that Project assigns to each resource.The Resource ID indicates the position of the resource in relation to other resources. How Calculated As you add resources, Project automatically assigns the next number in the sequence of resources as listed.
Use the Assignments property to return an Assignments collection. The following example displays all the resources assigned to the specified task. Dim A As Assignment For Each A In ActiveProject.Tasks(1).Assignments MsgBox A.ResourceName Next A Use the Add method to add an Assignment object to the Assignments collection. The following example ...