

Turn your presentation into a video
When you make a recording of a presentation, all its elements (narration, animation, pointer movements, timings, and so on) are saved in the presentation itself. In essence, the presentation becomes a video that your audience can watch in PowerPoint.
So you have two options for turning your presentation into a video that's ready to view:
Save/export your presentation to a video file format (.mp4 or .wmv).
Save your presentation as a PowerPoint Show (.ppsx) file. (A PowerPoint Show appears full-screen in Slide Show, ready to view immediately.)
Save as a video file
After you've created your slides and recorded any timing and narrations and laser pointer gestures that you want to include, you're ready to create a video file.

On the File menu, select Save to ensure all your recent work has been saved in PowerPoint presentation format (.pptx).
Select File > Export > Create a Video . (Or, on the Recording tab of the ribbon, select Export to Video .)
In the first drop-down box under the Create a Video heading, select the video quality you want, which pertains to the resolution of the finished video. The higher the video quality, the larger the file size. (You may want to test them to determine which one meets your needs.)
* The Ultra HD (4K) option is only available if you're using Windows 10 or later.
The second drop-down box under the Create a Video heading tells whether your presentation includes narration and timings. (You may switch this setting if you like.)
If you haven't recorded timed narration, by default the value is Don't Use Recorded Timings and Narrations .
The default time spent on each slide is 5 seconds. You can change that timing in the Seconds to spend on each slide box. To the right of the box, select the up arrow to increase the duration, or select the down arrow to decrease the duration.
If you have recorded a timed narration, by default the value is Use Recorded Timings and Narrations .
Select Create Video .
In the File name box, enter a file name for the video, browse for the folder that will contain this file, and then select Save .
In the Save as type box, choose either MPEG-4 Video or Windows Media Video .
You can track the progress of the video creation by looking at the status bar at the bottom of your screen. The video creation process can take up to several hours depending on the length of the video and the complexity of the presentation.
Tip: For a long video, you can set it up to be created overnight. That way, it’ll be ready for you the following morning.
To play your newly-created video, go to the designated folder location, and then double-click the file.
Save as a PowerPoint Show
When someone opens a PowerPoint Show file, it appears full-screen in Slide Show, rather than in edit mode. The viewer begins watching the presentation immediately.
On the File menu, select Save As .
Choose the folder location where you want to store your PowerPoint Show file.
In the Save as type box, choose PowerPoint Show (*.ppsx) .

Select Save .
Why turn your presentation into a video?
When you want to give a high-fidelity version of your presentation to colleagues or customers (either as an e-mail attachment, published to the web, on a CD or DVD), save it and let it play as a video.
You can save your presentation as either an MPEG-4 video file (.mp4) or a .wmv file. Both formats are widely supported and can be streamed over the internet.
Some tips to remember when recording your presentation as a video:
You can record and time voice narration and laser pointer movements in your video.
You can control the size of the multimedia file and the quality of your video.
You can include animations and transitions in your movie.
Viewers do not need to have PowerPoint installed on their computers to watch it.
If your presentation contains an embedded video, the video will play correctly without your needing to control it.
Depending on the content of your presentation, creating a video may take some time. Lengthy presentations and presentations with animations, transitions, and media content will likely take longer to create. Fortunately, you can continue to use PowerPoint while the video is being created
What parts of a presentation won't be included in a video?
The following items won't be included in a video that you create using PowerPoint:
Media inserted in previous versions of PowerPoint. To include these, you can convert or upgrade the media object.
For example, if you inserted the media using PowerPoint 2007, it will be linked and it will play in the presentation. However, when you export the file as a video, the linked media will be dropped. You can convert the file to the new file format (select the File tab, and under Info , select Convert ), or you can right-click the media object and then select it to upgrade; it will embed the file and export it correctly.
QuickTime media (unless you have a third-party QuickTime codec named ffdShow installed and you have optimized for compatibility)
OLE/ActiveX controls
What to do with your video after creating it
After you create a video, you can share it with others by using the following methods:
Email your presentation to others
Save to a file share or other location
Upload it to your organization's Microsoft Stream video-sharing site , as described in the next section, "Save to a video-sharing site."
Save to the Microsoft video-sharing site
After you've created the video file, you can upload it to a video-sharing site. Microsoft Stream is an enterprise video service where people in an organization can upload, view, and share videos. Microsoft 365 business or education subscribers have access to this service from within PowerPoint for Microsoft 365.
Select File > Export , and then select Publish to Microsoft Stream .

Type a title and a description for the video.
Set other options, including whether you want others in your organization to have permission to see the video:

Select the Publish button.
The upload process can take several minutes, depending on the length of the video. A status bar at the bottom of the PowerPoint window tracks the progress, and PowerPoint shows a message when the upload is finished:

Select the message to go directly to the video playback page on Microsoft Stream.
For more information about this service, begin reading with What is Microsoft Stream? It includes information about Office 365 Video vs. Microsoft Stream.
1 The Ultra HD (4K) option is only available if you're using Windows 10 or later. 2 In PowerPoint 2016, the Ultra HD (4K) option isn't available in the Volume License edition.
When someone opens a PowerPoint Show file, it appears full-screen in Slide Show, rather than in edit mode. The viewer begins watching the presentation immediately.
Burn your presentation to a disc

Need more help?
Want more options.
Explore subscription benefits, browse training courses, learn how to secure your device, and more.

Microsoft 365 subscription benefits

Microsoft 365 training

Microsoft security

Accessibility center
Communities help you ask and answer questions, give feedback, and hear from experts with rich knowledge.

Ask the Microsoft Community

Microsoft Tech Community

Windows Insiders
Microsoft 365 Insiders
Find solutions to common problems or get help from a support agent.

Online support
Was this information helpful?
Thank you for your feedback.
Simon Sez IT
Online software training and video tutorials for Microsoft, Adobe & more
- Get Started
- Access 2021 Beginners
- Access 2021 Advanced
- Access 2019
- Access 2019 Advanced
- Access 2016
- Copilot Essentials in Microsoft Office
- Microsoft Excel 365 Advanced
- Microsoft Excel 365 Intermediate
- Excel 365 for Beginners
- The Accountants Excel Toolkit
- Data Analytics in Excel
- Microsoft 365
- PowerPoint 365 for Beginners
- Microsoft Word 365
- OneNote Desktop and Windows 10
- OneNote 2016
- Outlook 2021
- Outlook 2019
- Outlook 2016
- Outlook 2013
- Outlook 2010
- Introduction to Power Automate
- Power BI Essentials
- Power BI Training
- Power BI Intermediate
- PowerPoint 2021
- PowerPoint 2019
- PowerPoint 2016
- PowerPoint 2013
- Project 2021 Advanced
- Project 2021 Beginners
- Project for the Web
- Project 2019
- Project 2019 Advanced
- Microsoft Publisher 365
- Publisher 2013
- SharePoint Online: The Essential Guide (2023)
- SharePoint Online (2021)
- SharePoint Foundation 2013
- SharePoint Server 2013
- SharePoint Foundation 2010
- Microsoft Teams (2023 Update)
- Macros and VBA for Beginners
- VBA for Excel
- VBA Intermediate Training
- Microsoft Visio 2019
- Microsoft Visio 2010
- Windows 11 Advanced
- Windows 11 (2023 Update)
- Windows 10 (2020 Update)
- Word 2019 Advanced
- Dreamweaver CC
- Dreamweaver CS6
- Dreamweaver CS5
- Dreamweaver CS4
- Adobe Illustrator CC for Beginners
- Adobe InDesign CC for Beginners
- InDesign CS6
- InDesign CS5
- Adobe Photoshop CC Advanced
- Adobe Photoshop CC Intermediate
- Adobe Photoshop CC for Beginners
- Photoshop CS6
- Photoshop CS5
- Photoshop Elements 2022
- Photoshop Elements 2019
- Photoshop Elements 2018
- Photoshop Elements 15
- Photoshop Elements 14
- QuickBooks Online 2024
- QuickBooks Desktop 2024
- QuickBooks Desktop 2023
- QuickBooks Desktop Pro 2022
- QuickBooks Pro 2021
- AngularJS Crash Course
- Bootstrap Framework
- HTML/CSS Crash Course
- HTML5 Essentials
- Java for Beginners
- JavaScript for Beginners
- jQuery Crash Course
- MySQL for Beginners
- PHP for Beginners
- Advanced PHP Programming
- Matplotlib, Seaborn, and Plotly Python Libraries for Beginners
- Python Object-Oriented Programming
- Pandas for Beginners
- Introduction to Python
- SQL for Beginners
- SQL Server Integration Services for Beginners
- XML Crash Course
- Alteryx Advanced
- Introduction to Alteryx
- Introduction to Data Visualization and Business Intelligence Principles
- Analytical Methods for Effective Data Analysis
- Introduction to Analytics and Artificial Intelligence
- Financial Risk Management
- Financial Forecasting and Modeling
- Qlik Sense Advanced
- R Programming
- Tableau Desktop Advanced
- Tableau Desktop
- Advanced Agile Scrum
- Agile Scrum Training
- Using Generative AI for Images and Videos
- Generative AI and Cybersecurity
- Introduction to ChatGPT
- Artificial Intelligence Intermediate
- Introduction to Asana for Project Management
- Asana for Employees and Managers
- Introduction to Asana
- Effective Communication Tactics for the Modern Workplace
- Introduction to Confluence
- Introduction to Pipedrive
- HubSpot CRM for Beginners
- Introduction to Google Chrome
- Introduction to Google Calendar
- Introduction to Google Drive
- Gmail for Beginners and Pros
- Google Sheets for Beginners
- Getting Started in Jira
- Getting Started in Monday.com
- Cybersecurity Essentials: Stay Safe and Secure Online
- Cybersecurity Awareness Essentials
- Introduction to Wrike for Project Management
- Excel Efficiency and Data Management
- Excel Advanced Features and Customization
- Mastering PivotTables
- Microsoft Suite Productivity

How to Save PowerPoint as Video? A Step-by-Step Guide
(Note: This tutorial on how to save PowerPoint as Video is suitable for PowerPoint 2013 and later versions including Office 365 )
PowerPoint presentations are a powerful technique to showcase your ideas effectively. But, do you know what’s even more effective than a PowerPoint presentation? A video presentation.
Yes, videos help engage the audience and connect with them on a deeper level.
Furthermore, if your presentation has too many slides, it’d be hard to move the slides one after the other, especially when the slides are maximized. You can also make your presentation into a video if the presentation does not need a lot of explaining.
In this article, I will tell you how to effectively save your PowerPoint presentation as video.
You’ll Learn:
Why Convert PowerPoint to a Video?
How to save powerpoint as video, resolution of the video, recorded timings and narrations.
Watch this short video on How to Save PowerPoint as Video
There are a lot of times when converting your PowerPoint presentation to video proves to be useful.
For example, you might have successfully created an effective presentation and want to share it with your colleagues and teammates. But unfortunately, they don’t have PowerPoint to view the file. In such cases, converting your presentation to a video will be easy for the user to view. Viewing the video doesn’t need PowerPoint or any additional software and can be played on built-in media players or any third-party software.
When creating a video, you can emphasize certain areas and slides, include effects and transitions. What’s more is that, you can make voice narrations, use laser points to highlight important areas, and note important points on the slide itself. This will especially help you make an impact when you have to present online to several audiences.
You can easily attach the video to an e-mail and upload them to be streamed online. Also, converting Powerpoint presentations to videos is easy. You don’t need any additional software to convert and save Powerpoint as video.
Before you create a video from a presentation, make sure you have created and curated all the slides, transitions, and effects in your presentation.
- Navigate to File . Under Export , click on Create a Video .
- This opens the Create a Video pane on the right side of the window.
- Click on Create Video .

- This opens up a Save As dialog box. Rename the file, choose the destination and file format, and click on Save .

Note: There are two video formats when you save Powerpoint as video, namely .mp4 and .wmv formats. The difference between the two formats is that in MPEG-4 (.mp4) Video file format can be easily compressed when you want to reduce the file size, but the quality takes a hit. On the other hand, the Windows Media Video (.wmv) file format retains the same quality even when the file is compressed.
- After you click on Save, you can see the video being exported at the bottom of the Powerpoint window. If you want to make some additional changes or you don’t want to export the file, click on Cancel .

- Now, navigate to the storage location and play the video.

Related Reads:
How to Insert PDF into PowerPoint? 3 Easy Ways
How to Add Slide Numbers in PowerPoint the Easy Way?
How to Superscript in PowerPoint? (And Subscript) 3 Easy Ways
Customize the Video
You can save PowerPoint as video with the default settings. But, this will make the video look plain. Also, there is no emphasis on slides and each slide will be displayed for a set number of seconds.
There is so much more you can do before you export your presentation as a video. Let us see how.
When exporting the presentation to a video, you can choose the resolution of the video depending on your purpose.
Microsoft Powerpoint offers 4 types of resolution namely:
- Ultra HD (3840×2160)
- Full HD (1920×1080)
- HD (1280×720)
- Standard (852×480)

Choose the resolution depending on your preferences. The greater the resolution, the greater will be the size and the time taken to export. For optimal results, choose the Full HD(1080p) resolution as the quality is better and it works on all devices.
Did you know, you can narrate and explain each slide when you save Powerpoint as video?
By default, Don’t Use Recorded Timings and Narrations will be selected. This means that, when you save the video, the slides will just roll over one after the other for a set number of seconds. And, all the slides will have the same time spent on each slide.
You can change the time spent on each slide by using the text box below.

But, this has some drawbacks as there are no emphasis on certain slides. Also, there might be some information that you can deliver to make the audience understand the slides even better. In such cases, you can create narrations or just let the slides do the talking.
By default, the Use Recorded Timings and Narrations option will be grayed out. This means that you haven’t recorded any video or narrations in the presentation.
To enable this option, click on the Record a Video option from the same dropdown to create a narration.
If you don’t want to record the video at the last moment when you export, you can create your narrations beforehand.
- Navigate to Slideshow and click on Record .

- This opens up the Record window.
- Click on Record and start your narration as you speak.

- After you have made the recording, click on Close . This saves the recording.
- To preview the recording, click on Preview Timings and Narrations from the dropdown.
- Once you have checked and made corrections, click on Create Video .
Note: When you save a presentation as a video, all the inserted files and macros will not work.
Frequently Asked Questions
Why am i not able to save my presentation as video.
You might not be able to save your presentation as a video when some background apps are preventing PowerPoint from exporting the video. Applications such as antivirus or defenders might prevent you from recording and saving your presentation.
How to save recording and narration without audio or video?
When you click on Record, disable the microphone and video camera in the bottom right of the window. This way, you can use the laser pointer to point to the slide, and use pens to make any cues on the slides. You can also add notes to the recording without having to speak or show your face.
Can we increase the time spent on slides for a particular slide?
No. You cannot increase the time spent on one particular slide. However, you can record a video, mute the audio and video, and then show emphasis on particular slides.
Closing Thoughts
If you are looking to engage the audience with presentations, videos are an excellent way to achieve that.
In this article, we saw how to save PowerPoint as video in an easy way. There are two ways you can do that: You can either export the slides into a video with a set time on each slide. Or, create narration and add necessary cues to add additional leverage to your videos. You can choose the method depending on your preference and purpose.
If you need more high-quality PowerPoint guides, please check out our free resources center .
Ready to dive deep into Excel? Simon Sez IT has been teaching Excel for over ten years. For a low, monthly fee you can get access to 100+ IT training courses. Click here for advanced courses with in-depth training modules.

Simon Calder

Chris “Simon” Calder was working as a Project Manager in IT for one of Los Angeles’ most prestigious cultural institutions, LACMA.He taught himself to use Microsoft Project from a giant textbook and hated every moment of it. Online learning was in its infancy then, but he spotted an opportunity and made an online MS Project course - the rest, as they say, is history!
Similar Posts
Manual Mail Merge Setup in Word 2010
Excel Dynamic Array: 8 Must-Know Formulas
How to Add Data Bars in Excel? 2 Easy Ways
Recording Progress in Microsoft Project 2010
How to Password Protect a Word Document? – 2 Simple Ways
How to Create a Fillable Form in Word
- Privacy Policy

ADVANCE YOUR CAREER
Gain instant access to 200+ courses. Earn a CERTIFICATE each time you complete a course.
Home Blog PowerPoint Tutorials How To Convert a PowerPoint Presentation to a HD Video in 3 Steps
How To Convert a PowerPoint Presentation to a HD Video in 3 Steps
There are many reasons why you may consider converting a PowerPoint presentation to a High-Definition video ; for example if you want to share a presentation online through YouTube or Vimeo, create a self-running presentation or save the slide show video to a DVD.

In this article we will guide you on how to convert a PowerPoint presentations to a High Definition video (as an MP4 video file,Windows Media Video .wmv file or QuickTime Video File .mov) using Microsoft PowerPoint.
PowerPoint lets you save presentations as videos directly from the File > Save As dialog box; however if you need to choose the output video quality while saving the presentation then it is recommended to use the File > Export > Create a Video option.
High Definition (HD) or high-quality presentation uses a higher resolution (1280×720 or 1920×1080) to save the video information. It can improve the overall experience while watching a presentation online or playing a PowerPoint slideshow in a kiosk. It would be the preferred format if you plan to upload your video presentation to YouTube or Vimeo, and have higher quality. The main drawback is that the presentation video file size will be bigger and more bandwidth may be required.

Why You Should Convert a PowerPoint to a Video Format?
Converting a PowerPoint to a video format can have several advantages. From making intuitive videos to engaging your audience to address complex topics in just a few minutes.
Create a Video Slideshow
You can use the converted video file to create a video slideshow for display at an event or edit the content of the video to generate a video presentation.
Create Presentations and Tutorials
PowerPoint enables users to export their videos with voice-over narration and animations. This can help create extensive presentations for an audience
Use Professional Editing Software to Create Engaging Videos
Adding a voice-over, additional graphics, and some footage can help create a professional-looking presentation by using a video editing application. Similar to how you use Instagram tools to convert images into a stunning video, some famous video editing apps that can help you make the most out of your converted PowerPoint file to a video format include Adobe Premiere Pro, Camtasia Studio, iMovie, Final Cut Pro, etc. If you are a Windows user, you can look into alternatives to Final Cut Pro like Lightworks, Movavi Video Editor, and Shotcut.
Create a Video Instead of Using PowerPoint
You can convert PowerPoint to video by simply letting your slides play out, making the presentation easy to play for end users without the need to have PowerPoint installed. This approach can also be helpful if you intend to present your slides using a video player instead of PowerPoint, as the latter might not be available everywhere, whereas video players often come with all types of desktop and mobile operating systems.
Upload a Video Online
Many presenters also like to upload their presentations online for an audience. A teacher might be interested in making his/her presentation available for students, or an industry expert might wish to share a concept with others in the industry by uploading a video to a YouTube channel. Either way, converting your PowerPoint to a video can help make the content easily shareable via video streaming platforms like YouTube and Vimeo. Such a video can also be shared privately via file-sharing apps like Box, Dropbox, OneDrive, Google Drive, etc.
How To Convert PowerPoint to Video (Windows)
Step 1 – go to file > export.
The first step to save a PowerPoint presentation as a HD video go to File -> Export and then click Create a Video button.

Step 2 – Choose Video Resolution
Now, select a resolution to export your video. Other than the Standard (825×480) resolution, the high-definition resolution options include HD (Medium 1280×720), Full HD (Large 1920×1080), or Ultra HD 4K (Largest file size 1920×1080). If you are using an older version of PowerPoint, you might have limited options to select between HD resolutions, since versions older than PowerPoint 2013 only supported HD videos (1280×720).

Optional Step: Save Narrations, Laser Pointer Gestures & Recorded Timings in the Video Exported from PowerPoint
Aside from saving the PowerPoint presentation as an HD video, you can also save a video file that incorporates all the recorded timings during a rehearsal, narrations, and even laser pointer gestures.
In case you have recorded narrations for your slides, you can use them or select Record a Video option to instantly start narrating your slides. The Preview Timings and Narrations option in the same drop-down menu does what it says, it enables you to check and ensure that your narrations are correctly timed with your slides, so you can make necessary edits before finalizing your video.

Optional Step: Select Slide Duration
Choose the default time spent on each slide (in seconds) and whether to save the narrations, timings, and gestures. By default, 5.00 seconds are spent on each slide unless you have a different timing recorded for the presentation slideshow.

Step 3 – Select Video Format and Create a Video Presentation
Click Create Video button and choose the destination folder and output file name. For end users wondering how to convert ppt to MP4, this is the step where you can select MP4 as your output format. PowerPoint supports saving slide decks to MP4 or WMV video formats. Once you confirm, wait a few seconds in order for the file is being saved on your hard disk. Presentations with a lot of slides may require a longer wait time.

Something good about saving presentations as a video file is that all animations, transitions, and media are preserved.

How to Convert PowerPoint to Video (Mac)
How to Convert PPT to Video in Mac? If you’re wondering how to make a PowerPoint into a video on Mac, the steps are quite similar to how you would export PowerPoint to video on a PC, with a few minor differences.
To convert PowerPoint to video on Mac, go to File -> Export.
Step 2 – Choose Video Format
If you have been wondering how to save PowerPoint as MP4 on Mac, this is the step where you can pick a video file format to save your presentation as a video, including MP4 and MOV.
The difference between the PC and Mac during this step is the difference in the availability of video conversion options. The PC version, along with MP4, allows saving a video in the Windows Media Video (WMV) format, unlike Mac, which offers QuickTime video format (MOV) instead.
Step 3 – Select Video Resolution and Create Video
The new version of PowerPoint for Mac allows saving a presentation in HD (Medium 1280×720), Full HD (1920×1080), or Ultra HD 4K (1920×1080) format. The higher the resolution, the higher the file format, so make sure you have enough disk space to save a very heavy file, especially if you opt for Ultra HD 4K resolution.
Save Narrations, Laser Pointer Gestures & Recorded Timings (Optional)
To save narrations, recorded timings, and laser point gestures, select the Use Recorded Timings and Narrations option.
Select Slide Duration (Optional)
To precisely time how long each slide is presented in the video, select the time duration. The default duration is 5.00 seconds, unless you have specified time for each slide separately in the presentation.
Select Export to create your video. Depending on the resolution you have selected, it might take several minutes before the video is converted. Higher resolutions take more time to conversion.
Saving videos from PowerPoint can help you at the time you need to share a presentation slideshow online (for example, uploading it via YouTube or Vimeo, or any other online video platform ), but you can also use this technique to prepare a PowerPoint presentation for a kiosk, make interactive PowerPoint presentations or create a self-running presentation. PowerPoint presentations saved as videos can also be easily run from mobile devices without the need for PowerPoint to be installed on the device. If you wish to save your PowerPoint to video in a format easily accessible, you can opt for PowerPoint save as MP4 instead of using WMV or MOV file formats that are not supported by all types of video players.

Like this article? Please share
mp4, Presentation Ideas, Presentation Videos, Video, Windows Media Video, wmv Filed under PowerPoint Tutorials
Related Articles

Filed under Design , Presentation Ideas • May 1st, 2024
The Power of Mind Map Note Taking for Presenters
Add a new tool to your repertoire of presentation skills by mastering the art of mind map note taking. An ideal process to facilitate content retention.

Filed under Design • April 23rd, 2024
How to Create the Perfect Handouts for a Presentation
Learn how to create effective handouts for presentations and the recommended structure for handouts with this guide.

Filed under Presentation Ideas • February 15th, 2024
How to Create a 5 Minutes Presentation
Master the art of short-format speeches like the 5 minutes presentation with this article. Insights on content structure, audience engagement and more.
6 Responses to “How To Convert a PowerPoint Presentation to a HD Video in 3 Steps”
Can’t believe no one has commended you for this helpful tutorial! We want to mount several TVs in the lobby and exam rooms of our veterinary hospital to run informational presentations for our clients about pet care, our services, and helpful products. Recording a PowerPoint as a video and then putting it on a USB thumb drive to connect to the TV seems like it will be an effective, inexpensive way to get that accomplished. Thank you so much!
I second the above comment. Thank You
how to present a power point presentation on a smart tv..and having it loop over to continuous display..keep running.
This was very helpful. I had no clue that this could be done. I dedicated a PC to running the Power Point presentation for our lobby. Having it run on the TV via USB will free up that resource for us.
I haven’t dug into it yet, but is there a way to make it loop?
I keep getting this audio data not supported. Is there anyway to remove this?
Send us your issue to [email protected] we might be able to help you.
Leave a Reply
- I Tried Both: Apple Watch 9 vs Fitbit Charge 6
- Best Places to Print Photos Online
How to Convert PowerPoint to Video
Let your presentation speak for itself
:max_bytes(150000):strip_icc():format(webp)/ScottOrgera-f7aca23cc84a4ea9a3f9e2ebd93bd690.jpg "save powerpoint presentation with video")
What to Know
- Windows: Select File > Export > Create a Video . Choose video quality, timings/narrations, seconds per slide > Create Video . Select file type.
- Mac: Select File > Export . Choose file format, video quality, timings/narrations, and seconds per slide, then choose Export .
PowerPoint decks are great tools for showcasing and presenting a message, product, or data visualization, as viewers are more likely to digest content when it's in video format. Here's how to turn a PowerPoint into a video using PowerPoint for Microsoft 365, PowerPoint 2019, PowerPoint 2016, PowerPoint 2013, PowerPoint 2010, and PowerPoint for Mac.
How to Save PowerPoint as Video on Windows
After you create a presentation, convert your slides into attention-grabbing videos. The steps below show how to turn a PowerPoint file into a video. The result is a file that incorporates animation, narration, and other custom content included in the original PPT or PPTX file.
Follow these instructions to make a video from a PPT or PPTX file in PowerPoint on Windows operating systems:
Launch PowerPoint and open the presentation file you want to turn into a video. If that file is open, ensure that the latest version is saved by selecting File > Save or by selecting Save on the Quick Access Toolbar.
Select File > Export .
If you use PowerPoint 2010, select Save & Send .
Select Create a Video .
Choose the video quality you want to use for your video slideshow. A high-quality screen resolution results in a larger file size. A low-quality output results in a smaller file.
Specify whether or not to include recorded timings and narrations in the video. If the presentation contains timings or narrations, select Record Timings and Narrations . These narrations can include a thumbnail image of yourself, recorded on your webcam.
To specify the amount of time that each slide displays, enter the time in the Seconds spent on each slide text box.
After you make your choices, select Create Video .
In the Save As dialog box, choose a location to save your new video file and enter a filename.
Select the Save as type drop-down arrow and choose either MPEG-4 Video ( MP4 ) or Windows Media Video ( WMV ). Select Save to start the video creation process.
The progress of your video creation displays in the status bar. This may take a few minutes or up to several hours to complete, depending on the size and complexity of the video being created.
How to Save PowerPoint as Video on macOS
Follow these instructions to make a video from a PPT or PPTX file in PowerPoint for macOS.
This feature is available to Microsoft 365 subscribers who have the latest desktop version of PowerPoint.
Launch PowerPoint and open the presentation file that you want to turn into a video. If that file is open, ensure that the latest version is saved by selecting File > Save or by selecting Save from the Quick Access Toolbar.
A pop-out window appears that contains multiple options. In the File Format drop-down menu, select either MP4 or MOV .
Choose a video quality option. Those with the highest quality and screen resolutions (for example, Presentation Quality ) result in larger file sizes. A low-quality output creates a smaller file. This quality selection also dictates the video's width and height, shown below the Quality menu.
Choose whether or not to include recorded timings and narrations in the video. If available, select the Use Recorded Timings and Narrations check box to enable this content in your video.
To increase or decrease the timing for the slides, select the up or down arrow next to Seconds spent on each slide without a set timing . By default, a PowerPoint video spends five seconds on a slide before transitioning to the next slide.
Select Export .
Get the Latest Tech News Delivered Every Day
- What Is a PPTX File?
- What Is a PPTM File?
- How to Get PowerPoint on a Mac
- Create Pictures From PowerPoint Slides
- What Is a PPT File?
- How to Save Sounds From PowerPoint Slideshows
- The 8 Best Slideshow Apps of 2024
- What Is a PPSX File?
- How to Make a Slideshow on PowerPoint
- Change a PowerPoint Show File to a Work File
- What Is a PPSM File?
- How to Create Digital Photo Albums in PowerPoint
- Converting PowerPoint Slides to Word Documents
- Loop a PowerPoint Slide Show
- What Is a PPS File?
- How to Use Microsoft's Free PowerPoint Viewers
How-To Geek
How to add a video to a microsoft powerpoint presentation.
If a picture speaks a thousand words, a video speaks a million words!
Quick Links
Embedding videos versus linking to videos, supported video formats in powerpoint, how to insert a video into a powerpoint presentation, manage an embedded video's playback in powerpoint.
Videos can make presentations even more interesting or exciting. If you're looking to add a video to your Microsoft PowerPoint presentation, it's easy to do so. We'll show you how.
In PowerPoint, you can either embed a video or link to a video from your presentation. If you embed a video, your video becomes part of the presentation, which increases the overall size of the presentation file.
Related: How to Send PowerPoint Presentations With an Embedded Video
If you link to a video, PowerPoint only adds a reference to that video in your presentation. The downside of this method is that you need to send the video file separately if you share your presentation with someone. We have written a guide on how to send PowerPoint presentations with videos , so check that out.
In this guide, we'll focus on embedding a video in your presentation so you don't have to worry about sending separate files. And, if you're looking to add a YouTube video to your presentation , there's a way to do that, too.
Related: How to Embed a YouTube Video in PowerPoint
PowerPoint supports multiple video formats, including ASF, AVI, MP4, M4V, MOV, MPG, MPEG, and WMV. If your video is already in one of these formats, you can quickly add that to your presentation.
If your video is in another format, you can convert it to a supported format and then add it to your presentation.
Related: How to Use Handbrake to Convert Any Video File to Any Format
First, make sure the video you want to add to your presentation is saved on your Windows or Mac computer. Then, open your presentation with PowerPoint on your computer.
On the PowerPoint window, in the left sidebar, click the slide in which you want to add a video.
At the top of the PowerPoint window, click the "Insert" tab.
In the "Insert" tab, under the "Media" section (which is to the extreme right side of the interface), click "Video."
You'll now see an "Insert Video From" menu. Here, select "This Device."
Your computer's standard "open" window will open. In this window, access the folder that has your video file. Then double-click your video file to add it to your presentation.
You'll see your selected video in your presentation. To resize this video, click it and use the handles around the video to change its size. Then drag the video to place it at its desired location in your slide.
If you'd like to test the video, at the bottom-left corner of the video, click the play icon.
And you're all set.
Now that you have added a video to your presentation, you might want to change how it plays in your slides. In PowerPoint, you have multiple ways to change your video's playback.
To access these playback options, first, click your video in your presentation. Then, at the top of the PowerPoint window, click "Playback."
In the "Playback" tab, under the "Video Options" section, you will find various options to manage your video's playback.
For example, to change how your video starts to play in your presentation, click the "Start" drop-down menu and select one of these options:
- In Click Sequence : This plays your video in the click sequence. This means if you press the button for the next slide, your video will play.
- Automatically : This option automatically plays your video when the slide with your video opens.
- When Clicked On : Select this option to play your video only when you click it.
The other options are "Play Full Screen," which opens your video in full screen, and "Loop Until Stopped" that plays your video over and over again until you manually stop it.
Before you close PowerPoint, make sure you save your presentation so that your embedded video is saved with it. Do this by clicking File > Save in PowerPoint's menu bar.
And that's how you make your PowerPoint presentations even more engaging by including videos in them. Exciting!
If you don't want to add a video but you do want audio, you can add music to your presentations . This also helps enhance your presentation quality.
Related: How to Add Music to Your PowerPoint Presentation
How to Save a PowerPoint Presentation? [PPT & Other Formats!]
By: Author Shrot Katewa
![How to Save a PowerPoint Presentation? [PPT & Other Formats!]](https://artofpresentations.com/wp-content/uploads/2022/03/Featured-Image-How-to-Save-a-PowerPoint-Presentation.webp "save powerpoint presentation with video")
Saving a PowerPoint presentation is one of the most important things that you need to do when you are creating a presentation using PowerPoint. Unlike some of the modern web-based presentation applications, you need to make sure that you save a PowerPoint presentation when you are using an offline version!
To save a PowerPoint presentation, click on the “File” tab. Then, from the backstage view, click on the “Save” option from the left panel. Choose the location or the folder where you want to save the presentation on your computer, and click on “Save”.
In this article, we shall not only understand how to save a standard PPT or PPTx file, but we shall also take a look at how to save a PowerPoint presentation in different file formats such as a PDF, video or an image!
So, let’s get started!
1. How to Save a PowerPoint Presentation?
Once you have saved a PowerPoint presentation, you can easily save it again with just one click. Furthermore, you can also save a PowerPoint presentation in other formats. However, the process of saving a PowerPoint presentation is slightly different on Windows and on Mac.
Let’s understand the process in further detail.
1a. Saving a PowerPoint Presentation on Windows
To save a PowerPoint Presentation on Windows PC, you can follow either of the 2 simple methods.
Method-1: Using the “Save” button on Quick Access Toolbar
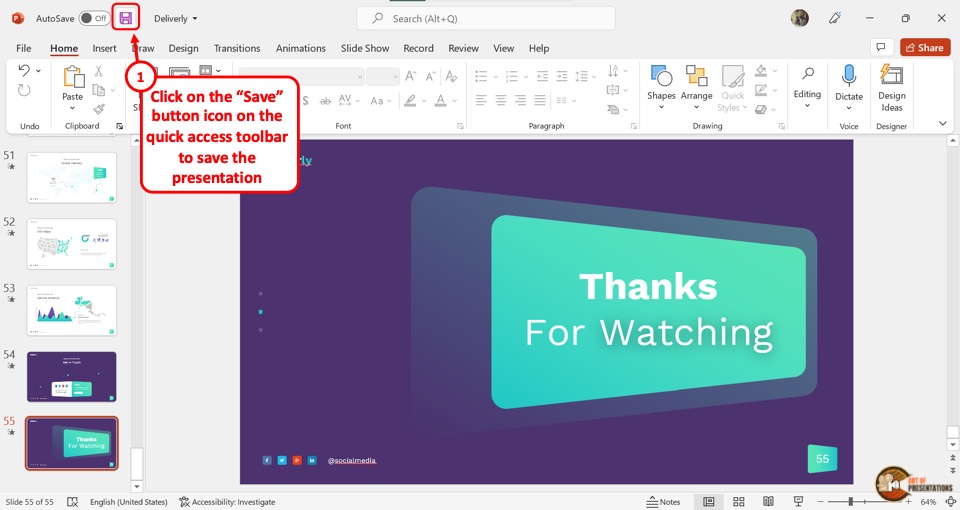
In the Quick Access Toolbar located at the very top of the screen, click on the “Save” icon.
The “Save” icon is located on the left side in the Quick Access Toolbar and looks like a floppy disk. Clicking on the “Save” button will immediately save the PowerPoint presentation in its current location as a “.pptx” file.
If you have opened a new presentation and you are saving it for the first time, clicking on the “Save” button will open a new explorer window. Simply navigate to the folder where you wish to save the new presentation on your computer, and click on “ Save “.
Method-2: Using the “File” tab
Another, more common method is to use the “File” tab in PowerPoint to save your PowerPoint presentation.
Here’s what you need to do –
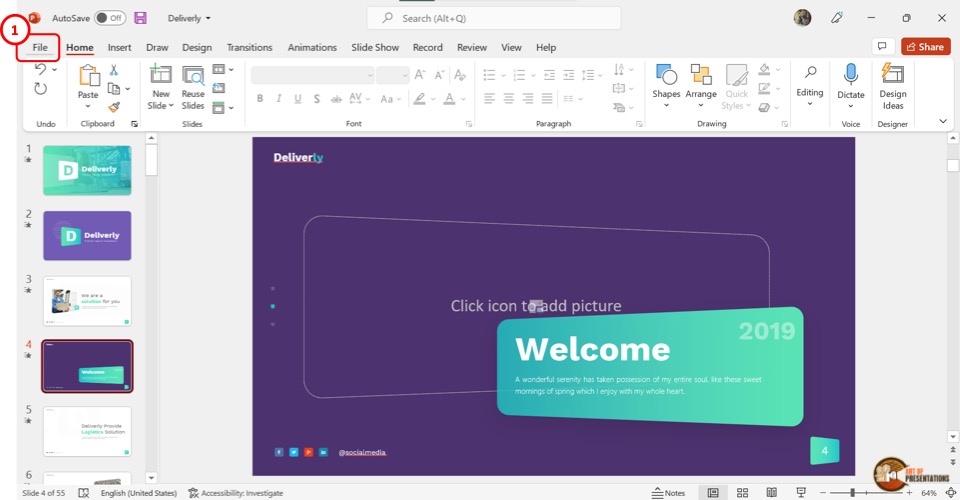
Step 1 – Click on the “File” Tab
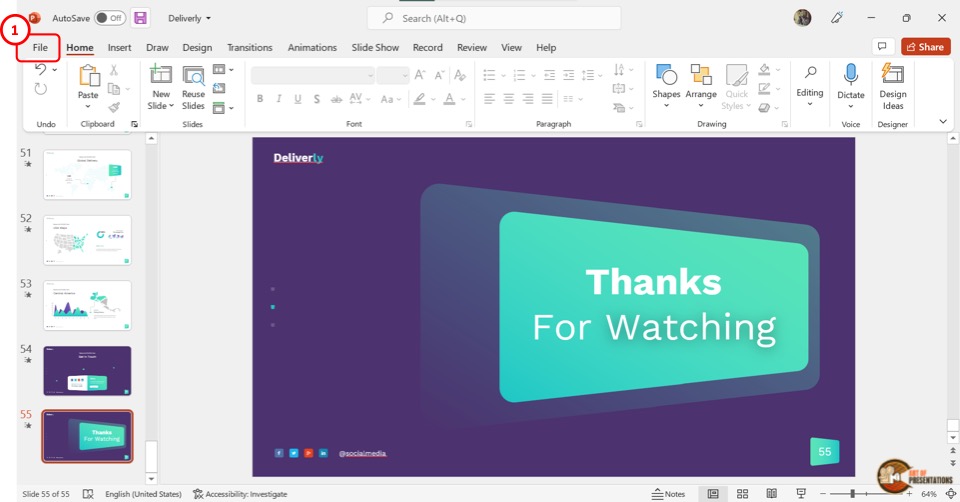
Another way to save a PowerPoint presentation is to use the “File” menu. You have to first click on the “File” tab located at the left corner of the menu ribbon at the top of the screen.
Step 2 – Click on the “Save” option
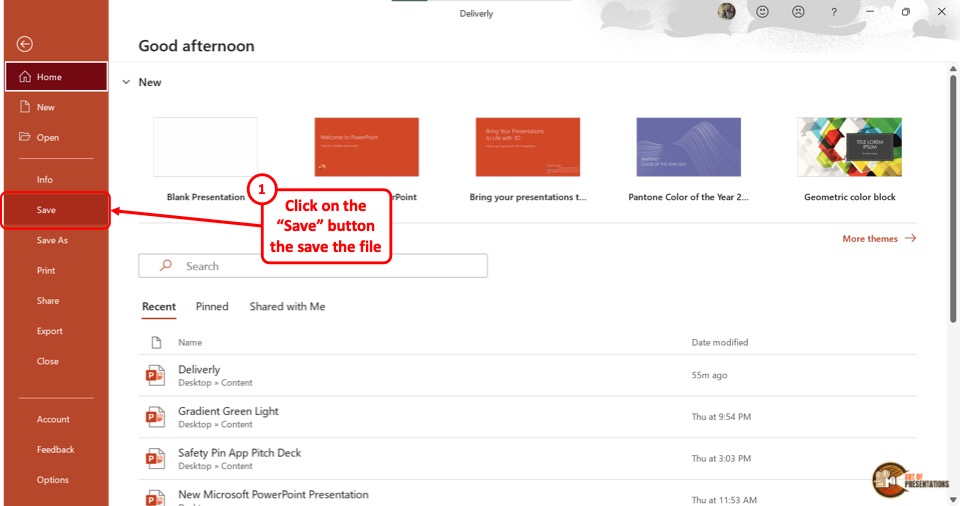
This will open the backstage view in PowerPoint. Now, click on the “Save” option from the sidebar on the left side of the screen. This will save the Microsoft PowerPoint as a “.pptx” file in the current location.
1b. Saving a PowerPoint Presentation on Mac
On a Mac computer, you can use the “File” menu as well to save the PowerPoint presentation.
The first step is to click on the “File” menu in the menu bar located at the top of the screen (above the PowerPoint window). This will open a dropdown menu. Click on the “Save” option from the dropdown menu to save the presentation as a “.pptx” file which is the standard format for presentations.
1c. Shortcut Keys to Save a PowerPoint Presentation
Microsoft PowerPoint also allows you to save a presentation with keyboard shortcuts. All you have to do is press the “Ctrl+S” keys on your keyboard in an open PowerPoint file. This will save the PowerPoint presentation.
1d. Best Format to Save a PowerPoint Presentation?
PowerPoint allows you to save a presentation in various different file formats! For instance, you can use the .ppt format if you wish to open the presentation file using PowerPoint 2007 or earlier. You can use .ppsx to open presentation directly as a PowerPoint Show file that opens it in the presentation mode.
In fact, there are several other formats you can save a presentation in. We shall explore how to save a PowerPoint presentation in several different formats later in the article.
However, the best format to save a PowerPoint Presentation is a “.pptx” file. This type can support all the latest as well as the older features of the PowerPoint presentation.
If you will be opening the presentation using a different software other than Microsoft PowerPoint, “.odp” is the best format. For printing, make sure to save the PowerPoint presentation as a PDF. That said, .pptx file format can help serve these purposes too.
2. How to Save a PowerPoint Presentation as PDF
Saving a PowerPoint presentation in PDF format is the suitable method for printing out your presentation. To save the PowerPoint presentation as a PDF file, follow the 4 easy steps.
Step-1: Click on the “File” Tab
First, click on the “ File ” tab in PowerPoint to open the back stage view of PowerPoint.
Step 2 – Click on the “Save As” option
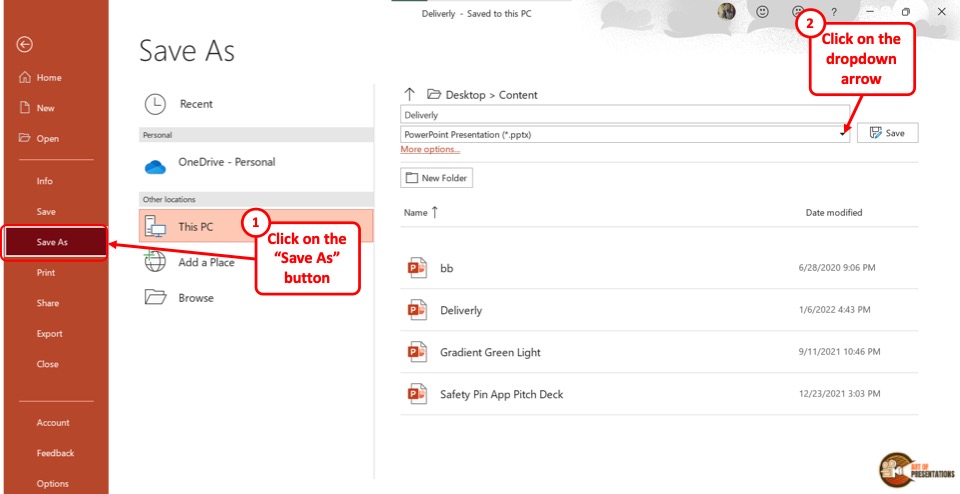
In the menu ribbon located at the top of the screen, click on the “File” tab. In the “File” menu, click on the “Save As” option from the sidebar on the left side of the screen.
Step-3: Click on the “PDF (*.pdf)” option
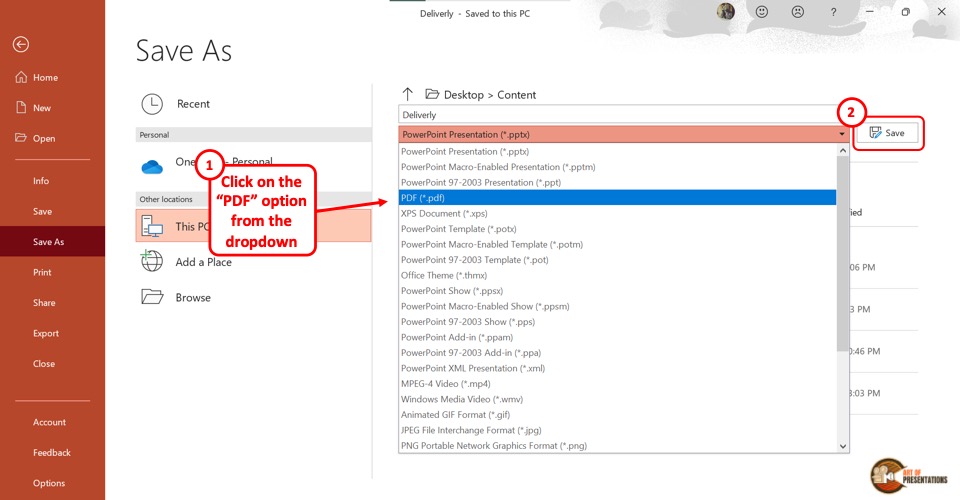
In the “Save As” screen, click on the box that shows “PowerPoint Presentation (*.pptx)” . This will open a dropdown menu. Click on the “PDF (*.pdf)” option from the dropdown menu.
Step-4: Click on the “Save” button
Now all you have to do is click on the “Save” button beside the box to save the PowerPoint presentation as a PDF file (as shown in the image in step 2).
3. How to Save a PowerPoint Presentation as a Video?
In Microsoft PowerPoint, you can also save a presentation as a video. This allows you to play the presentation slides as a video rather than a slide show.
3a. On Windows
To save a PowerPoint presentation as a video on a Windows PC, follow the 3 easy steps.
Step-1: Click on the “File” tab
The first step is to open the “Save As” screen. To do so, click on the “File” tab in the menu ribbon. In the “File” menu, click on the “Save As” option.
Step-2: Choose the “.mp4” file format from the “Save As” tab
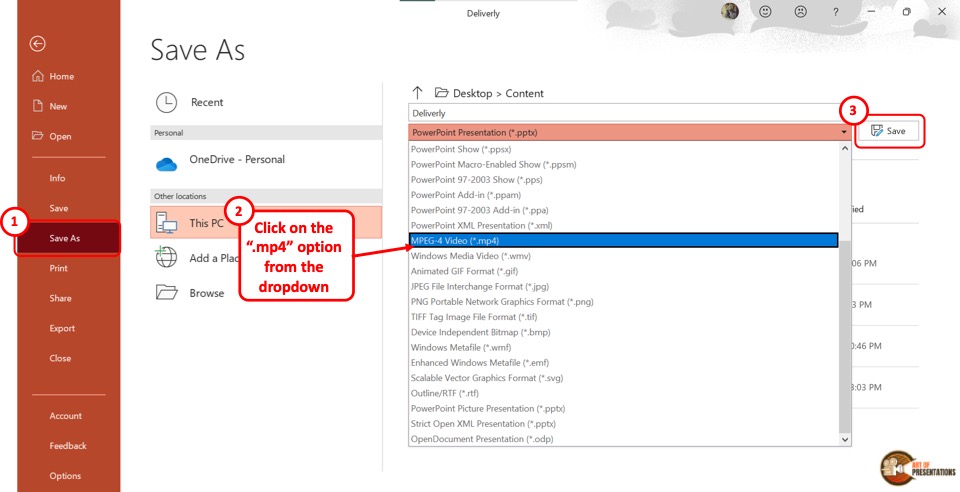
The next step is to click on the “Save As Options” box. It is the second box on the right side of the “Save As” screen. In the dropdown menu, click on either the “MPEG-4 Video (*.mp4)” option or the “Windows Media Video (*.wmv)” option.
Step-3: Click on the “Save” button
The final step is to click on the “Save” button (as indicated in step 2 above). It is located on the right side of the “Save As Options” box. This will save your PowerPoint presentation as a video.
To save a PowerPoint presentation as a video on a Mac device, follow the 3 simple steps.
Step-1: Click on the “Export” option
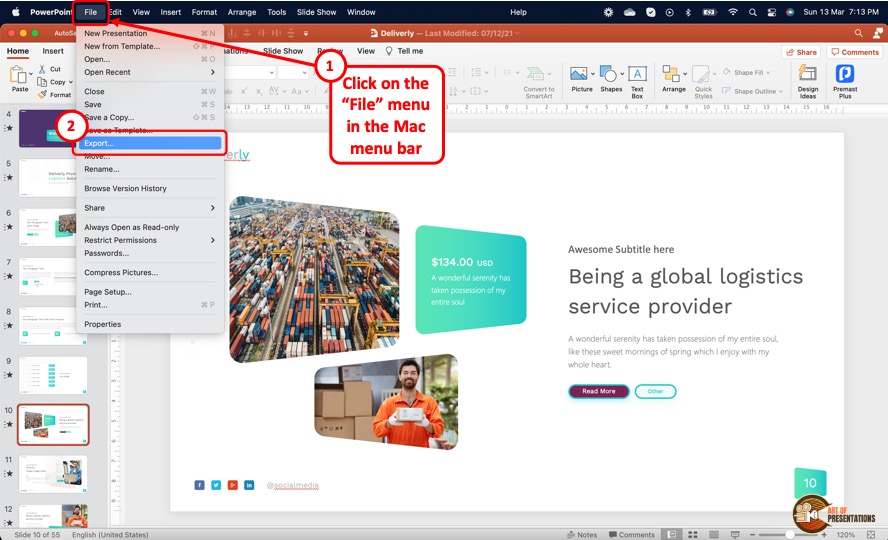
In the menu bar at the top of the screen, click on the “File” option. In the “File” dropdown menu, click on the “Export” option. This will open a dialog box.
Step-2: Click on the “File Format” box
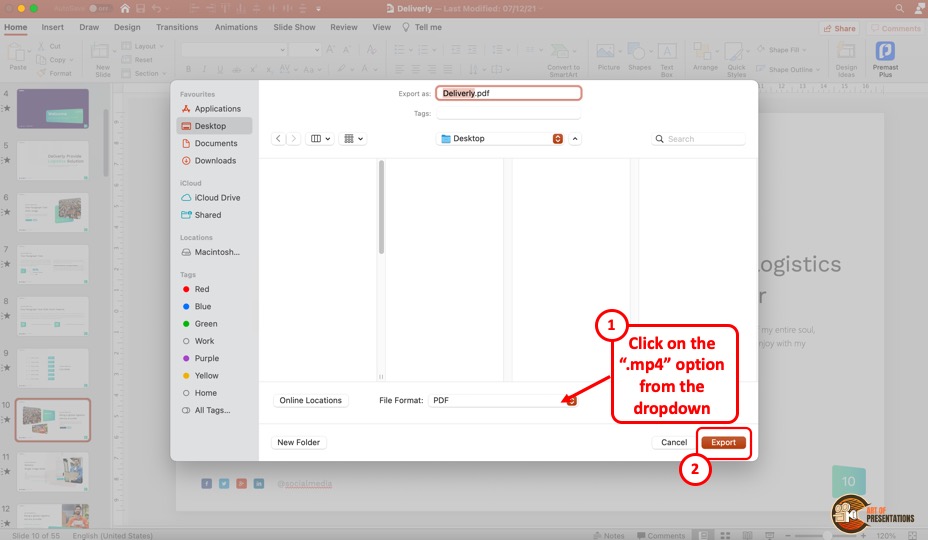
In the dialog box, click on the “File Format” box. This will open a dropdown menu. You can click on either the “MP4” option or the “MOV” option as you prefer.
Step-3: Click on the “Export” button
In the dialog box, you can also click on the “Quality” option to select the quality of the video. Once you are satisfied with the selections in the dialog box, click on the “Export” button at the bottom (as shown in the image in the previous step). This will save the presentation as a video.
4. How to Save a PowerPoint Presentation to Open in Slideshow Mode?
Microsoft PowerPoint allows you to save the PowerPoint presentation as a “PowerPoint Show” file. This opens directly as a slideshow. To save a PowerPoint presentation to open in slideshow mode, follow the 2 easy steps.
In the open PowerPoint file, click on the “File” tab from the menu ribbon which is located at the top of the screen. In the “File” menu, click on the “Save As” option.
Step-2: Click on the “PowerPoint Show (*.ppsx)” option
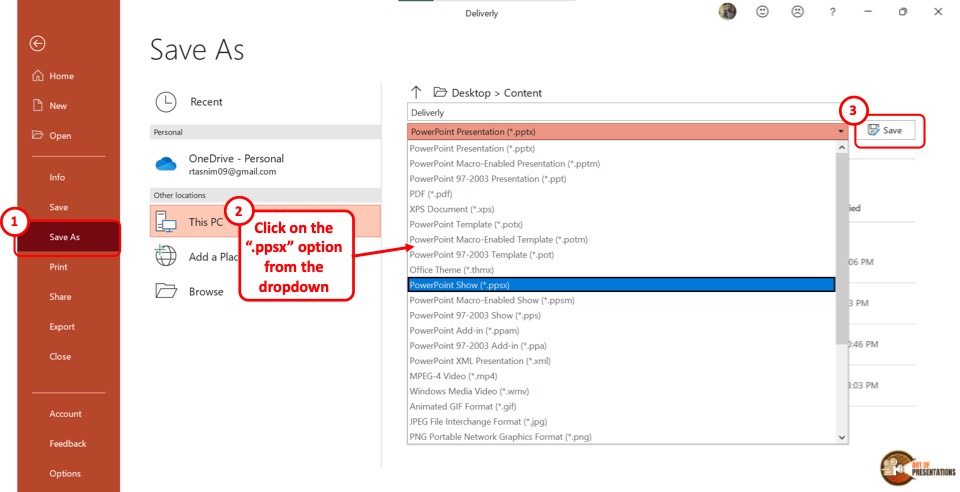
In the “Save As” screen, click on the “Save As Options” box which shows “PowerPoint Presentation (*.pptx)” . This will open a dropdown menu. Click on the “PowerPoint Show (*.ppsx)” option.
Now all you have to do is click on the “Save” button to save the PowerPoint presentation to open as a slideshow.
5. How to Save a PowerPoint Presentation as an Image?
In Microsoft PowerPoint, you can save the presentation as an image in five different formats: “Animated GIF Format (*.gif)” , “JPEG File Interchange Format (*.jpeg)” , “PNG Portable Network Graphics Format (*.png)” , “TIFF Tag Image File Format (*.tif)”, and “Scalable Vector Graphics Format (*.svg)” .
To save your presentation as an image, follow the 3 simple steps.
Step-1: Click on the “Save As” option from the “File” tab
The first step is to click on the “File” tab in the menu ribbon. Then click on the “Save As” option from the “File” menu.
Step-2: Select your preferred image format
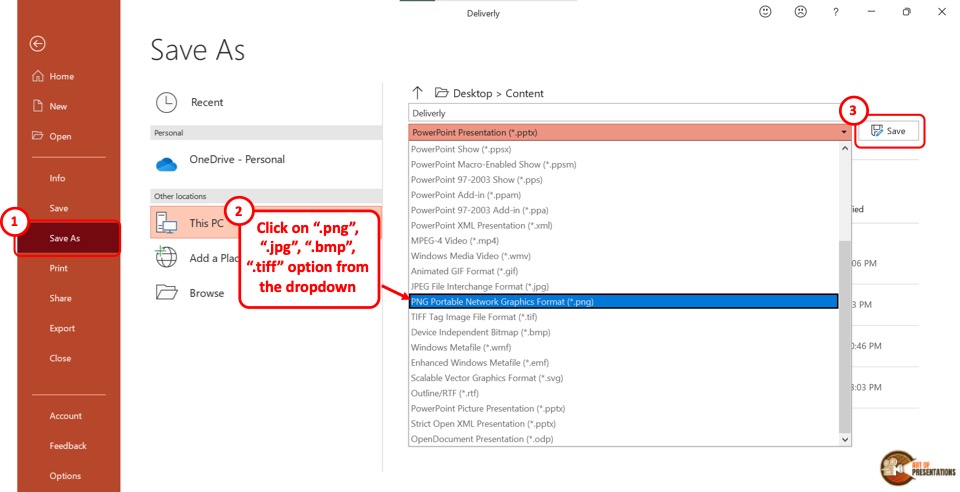
In the “Save As” screen, click on the “Save As Type” box which is the second box in the right column. From the dropdown menu, click on your preferred image format from the five available formats.
Now all you have to do is click on the “Save” button (as shown in the image in step 2) beside the “Save As Type” box. This will save your presentation in a folder containing each slide as a separate image file.
6. How to Save a PowerPoint Presentation as a Template?
A PowerPoint template is a predesigned presentation that you can edit to add your own content. To save a presentation as a template, follow the 3 easy steps.
The first step is to click on the “File” tab in the menu ribbon. Then click on the “Export” option from the sidebar in the “File” menu.
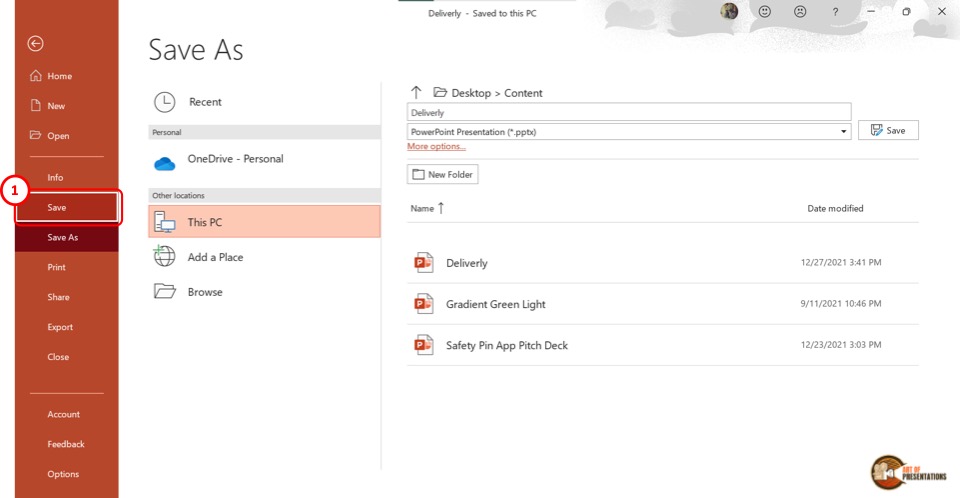
Step-2: Click on “Change File Type”
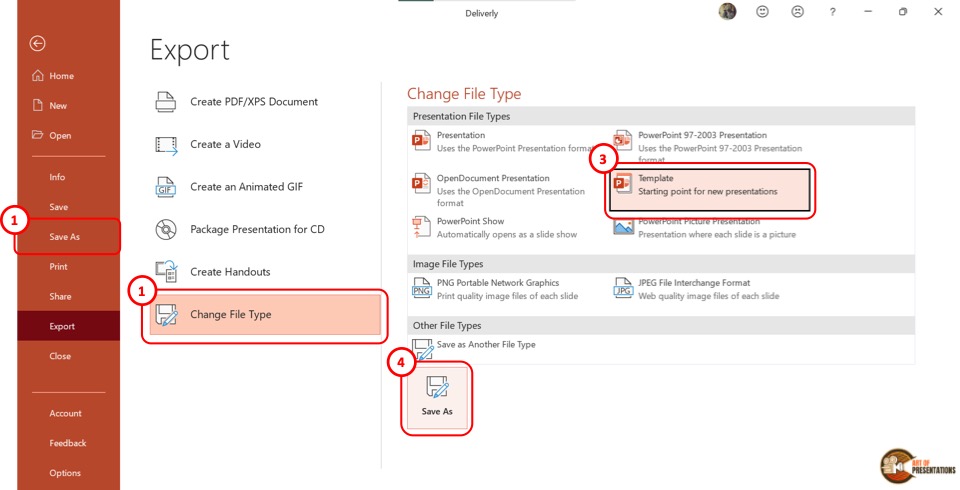
Now you have to click on the “Change File Type” option. Under the “Presentation File Types” group in the right column, click on the “Templates” option. Then click on the “Save As” button at the bottom of the screen.
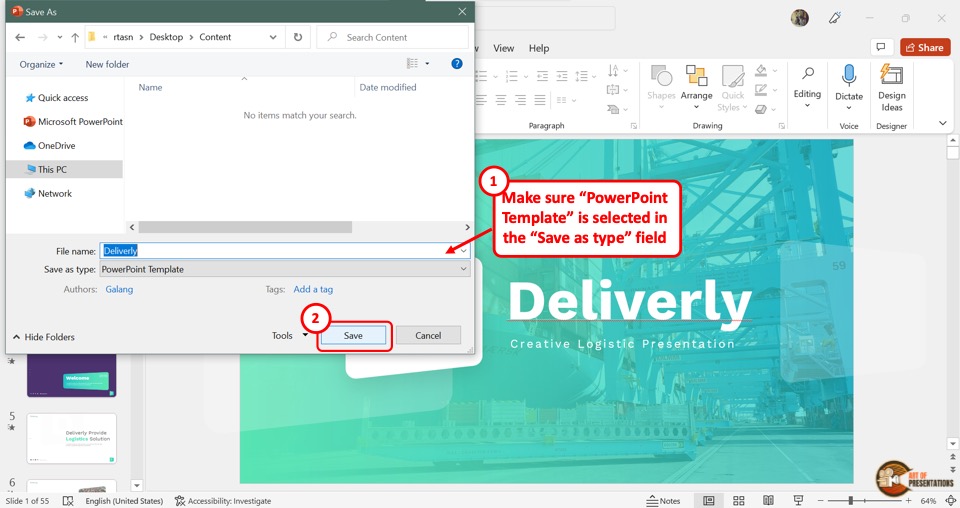
In the “Save As” dialog box, you will see that the “Save as type” box shows the “PowerPoint Template” format. Now all you have to do is click on the “Save” button.
7. How to Save PowerPoint Presentation as Google Slides?
Microsoft PowerPoint does not offer any feature to upload a presentation to Google Slides directly. However, Google Slides does offer you an option to upload your PowerPoint presentation and save it in Google Slides!
Step-1: Save Your PowerPoint Presentation
The first step is to save your PowerPoint presentation using any method described in the section 1 of this article.
Make sure that you note down the location of the folder in which you have save the PowerPoint file.
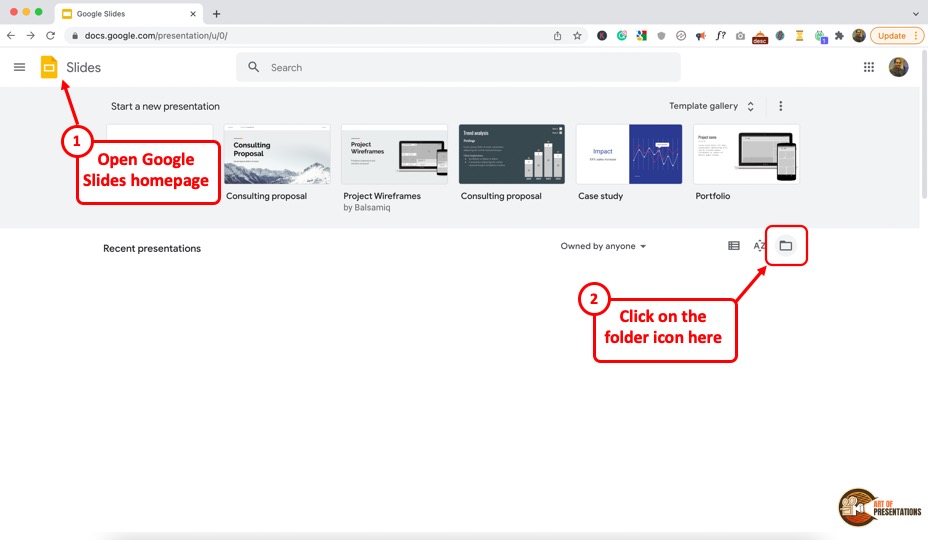
Step-2: Click on the “Open file picker” option in Google Slides
Now, the next thing you need to do is open your Google Slides account by visiting slides.google.com . If you aren’t logged in, make sure you sign in with your account credentials.
Next, you will be presented with Google Slides home screen (as shown in the image above). In Google Slides, click on the “Open file picker” icon which looks like a folder. This will open the “Open a file” dialog box.
Step-2: Click on “Upload”

In the “Open a file” dialog box, click on the “Upload” tab.
From your “File Explorer” window, drag and drop the PowerPoint presentation in the dialog box. Now the presentation will automatically open in Google Slides.
Also Read – How to “ Make a Copy of a Google Slides Presentation ” and how to “ Share a Google Slides Presentation Correctly ” with others!
You can also click on the “ Select a file from your device ” button (blue button in the center of the screen). This will open the file explorer window. Navigate to the folder in which you have saved your PowerPoint presentation, and click on “OK”. This will open and save the presentation file in Google Slides.
8. How to Save a PowerPoint Presentation to a Flash Drive?
To save a PowerPoint presentation on a flash drive or any external device, follow the 3 simple steps.
In the menu ribbon located at the top of the screen, click on the “File” tab. In the “File” menu, click on the “Save As” option.
Step-2: Click on “Browse”
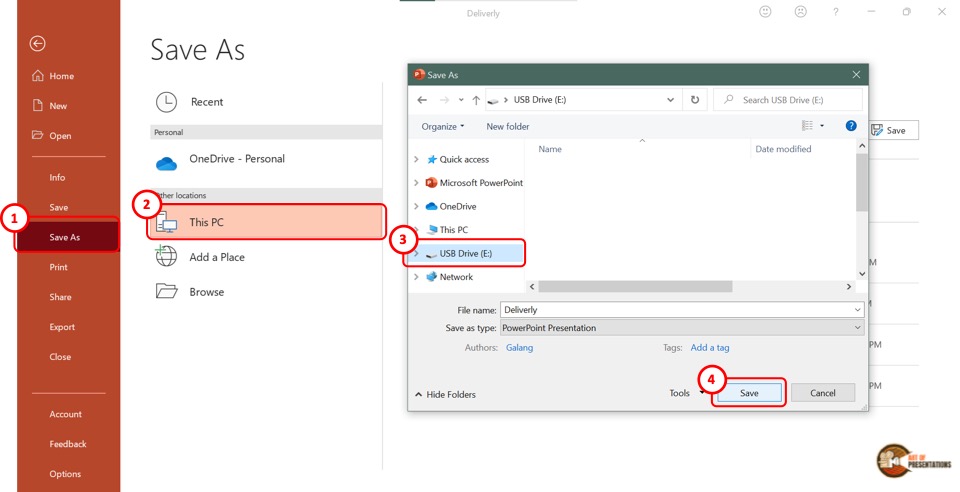
In the “Save As” screen, click on the “Browse” option which is the last option in the left column. This will open the “Save As” dialog box. In the sidebar on the left of the dialog box, click on the external disc.
Now all you have to do is click on the “Save” button at the bottom of the dialog box to save the PowerPoint presentation on the flash drive (as shown in the image in step 2).
9. How to Save a Copy of a PowerPoint Presentation?
The “Save A Copy” feature of Microsoft PowerPoint allows you to save changes in your presentation in a copied file without changing the original file.
Check out my article to learn detailed steps on how to save a copy of a PowerPoint presentation .
10. How to Save a Read-Only PowerPoint Presentation?
The “Read-Only” feature of Microsoft PowerPoint allows you to protect your PowerPoint presentation .
Using this feature, you can share your presentation with others without giving them the access to change your presentation. To save a read-only PowerPoint presentation, follow the steps mentioned below –
The first step is to click on the “File” tab in the menu ribbon. From the sidebar in the “File” menu, click on the “Info” option.
Step-2: Click on the “Protect Presentation” button

The next step is to click on the “Protect Presentation” option in the “Info” screen. This will open a dropdown menu. Click on the “Always Open Read-Only” option from the dropdown menu.
Step-3: Click on the “Save” option
Now all you have to do is save the presentation. To do so, click on the “Save” option in the sidebar right under the “Info” option. Alternatively, you can press the “Ctrl+S” keys on your keyboard.
If you have received a presentation that opens only in the read-only mode, but you don’t know how to work with it, check out my other article on “ How to Edit a Presentation in Read-Only Mode “.
11. How to Save a PowerPoint Presentation Without Notes?
When saving a PowerPoint presentation, you might want to remove the speaker notes. To do so, all you have to do is follow the 5 quick steps.
In the menu ribbon, click on the “File” tab. Then click on the “Info” option from the “File” menu.
Step-2: Click on “Check for Issues” on the “Info” tab
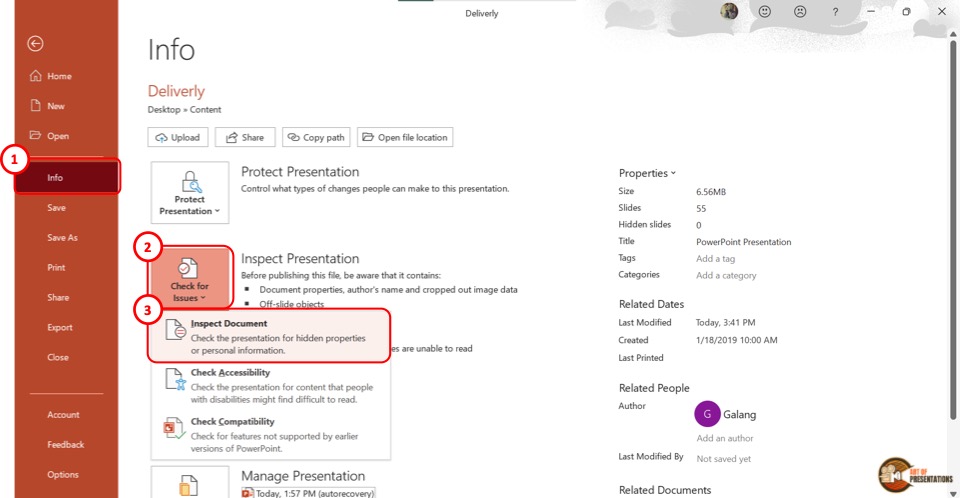
In the “Info” option, click on the “Check for Issues” button. Then click on the “Inspect Document” option from the dropdown menu. This will prompt a dialog box.
Step-3: Click on the “Inspect” option
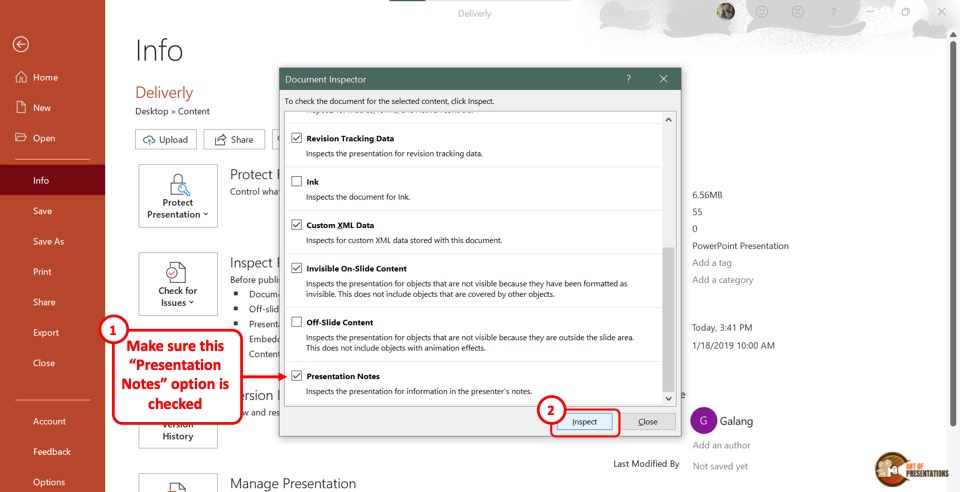
In the “Document Inspector” dialog box, scroll all the way to the bottom and make sure the “Presentation Notes” option is selected. Then click on the “Inspect” button at the bottom of the dialog box.
Step-4: Click on the “Remove All” option
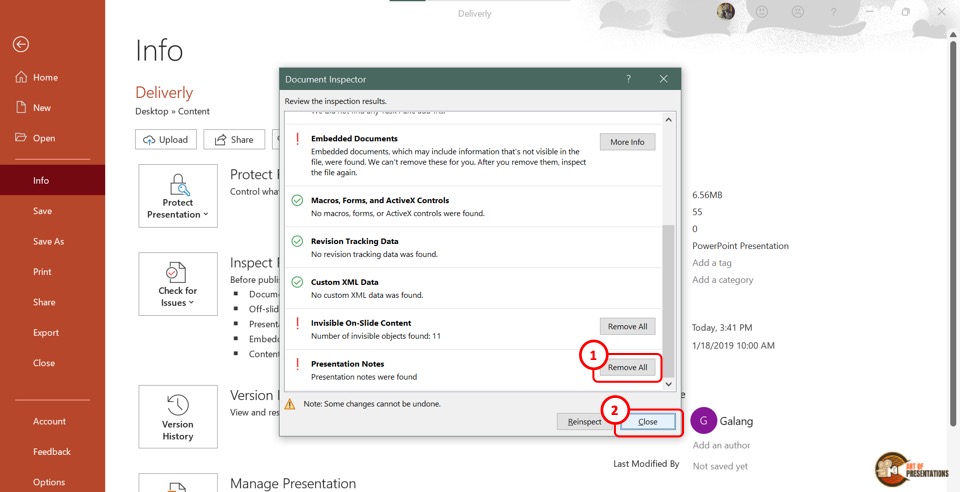
Once the inspection results are shown in the “Document Inspector” dialog, scroll to the bottom again to find the “Presentation Notes” option. Then click on the “Remove All” button at the right side of the “Presentation Notes” option.
Now all you have to do is click on the “Close” button at the bottom of the dialog box to finish the process.
Step-5: Click on the “Save” option
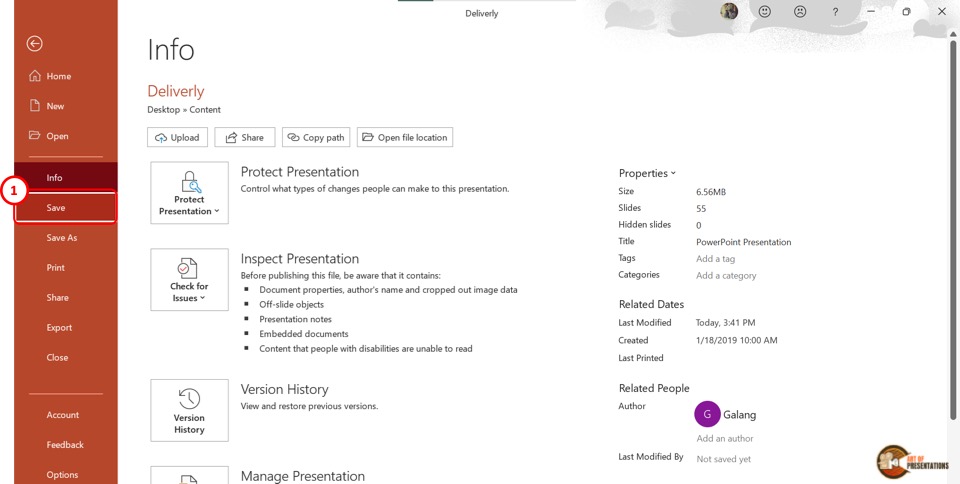
The final step is to click on the “ Save ” option in the sidebar of the “File” menu to save the presentation without notes. You can alternatively press the “Ctrl+S” keys on your keyboard.
12. How to Save PowerPoint Presentation Directly in Microsoft Teams?
If you are delivering a PowerPoint presentation to an audience using Microsoft teams, you can easily share a PowerPoint deck with your audience in the following steps –
- First, open the Microsoft Teams application and login to the meeting.
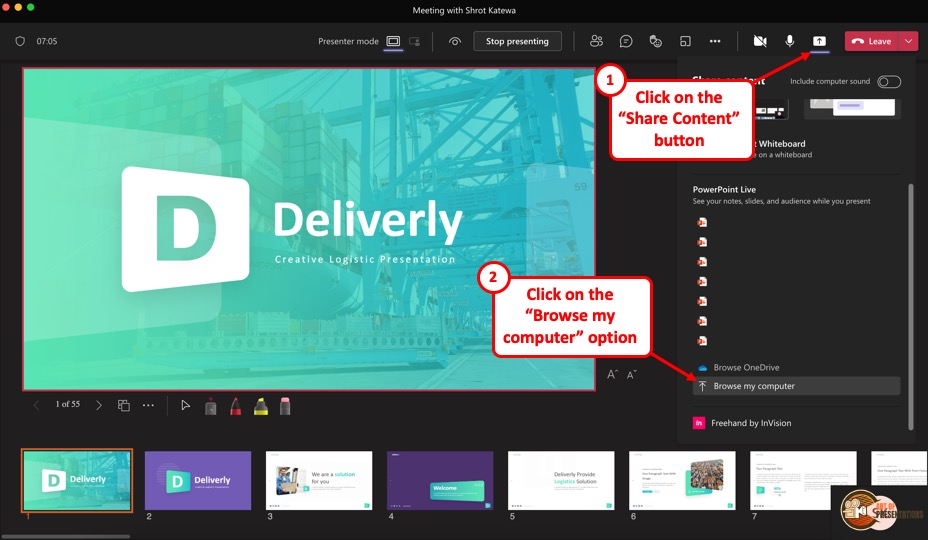
- On the “ Meeting Controls ” menu available in the top part of your meeting screen, locate the “ Share Content ” option.
- Click on the share content button. This will show the most recent PowerPoint files that you opened. You can either choose to click on one of the files visible. Alternatively, scroll down on the right panel and click on the “ Browse my computer ” option.
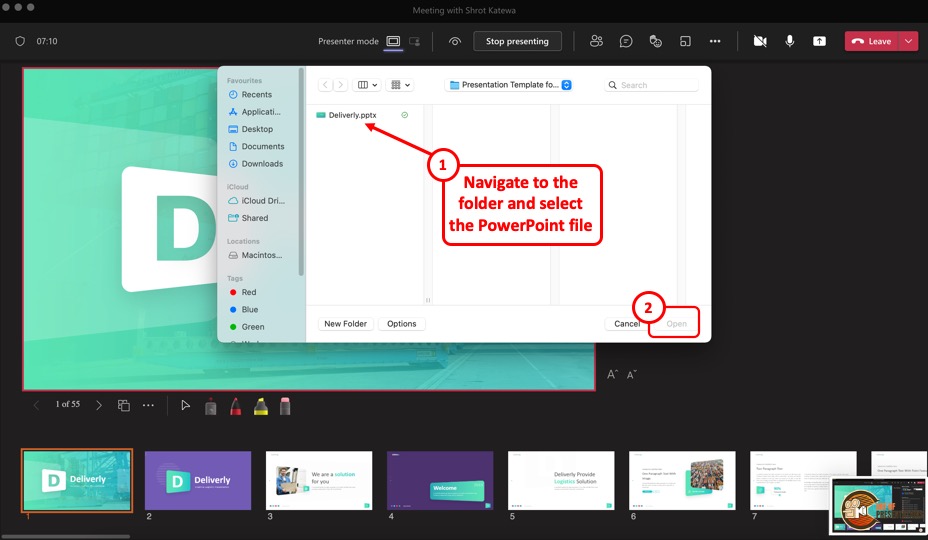
- This will open a new file browser window. Navigate to the respective location where your PowerPoint presentation is saved, click on it to select it. Then, click on “Open” to open the presentation in Microsoft Teams.
- The presentation will open by default in the presenter mode and shared with the audience of the meeting.
13. How to Enable Autosave in PowerPoint Presentation?
The autosave option is only available if you are using the Microsoft Office 365 version of PowerPoint . Other than that, you will have to manually save the PowerPoint file in all other versions.
You can autosave the PowerPoint presentation to the OneDrive cloud, and also autosave recovery files. To enable autosave in PowerPoint presentation, follow the 4 simple steps.
Step-1: Click on the “AutoSave” button
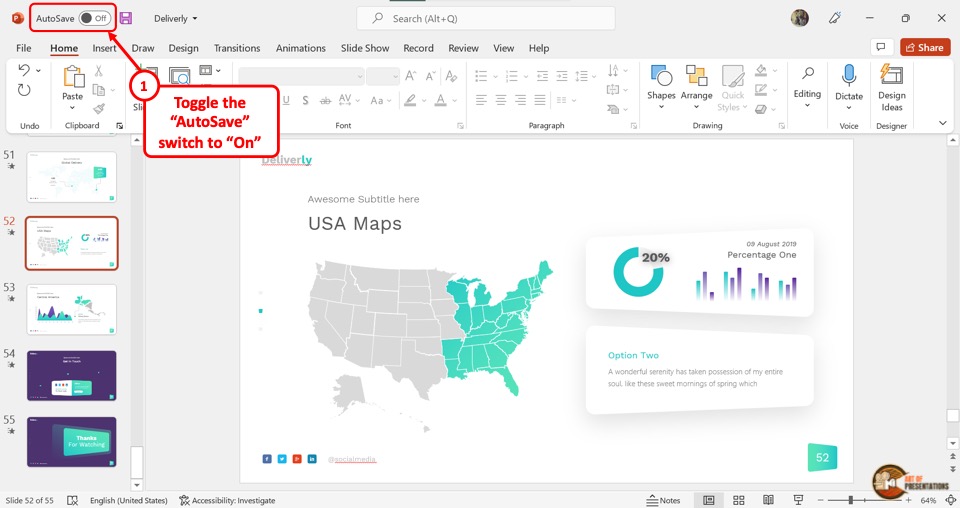
To simply turn on autosave in the OneDrive cloud for the PowerPoint presentation, all you have to do is click on the slider beside the “Autosave” option.
It is located in the left corner of the Quick Access Toolbar at the top of the screen.
Step-2: Click on “Options”
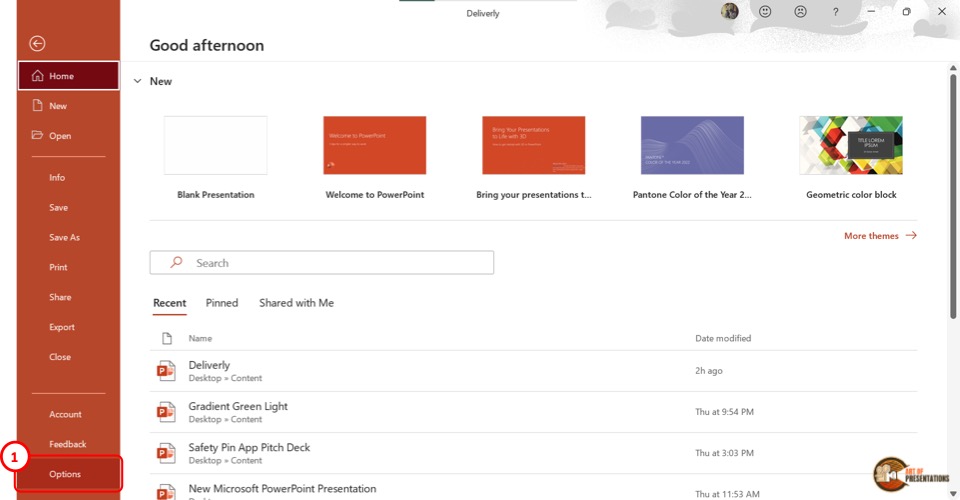
To access more autosave options, click on the “File” tab in the menu ribbon. Then click on the “Options” option which is the last option in the sidebar in the “File” menu. It will open a dialog box.
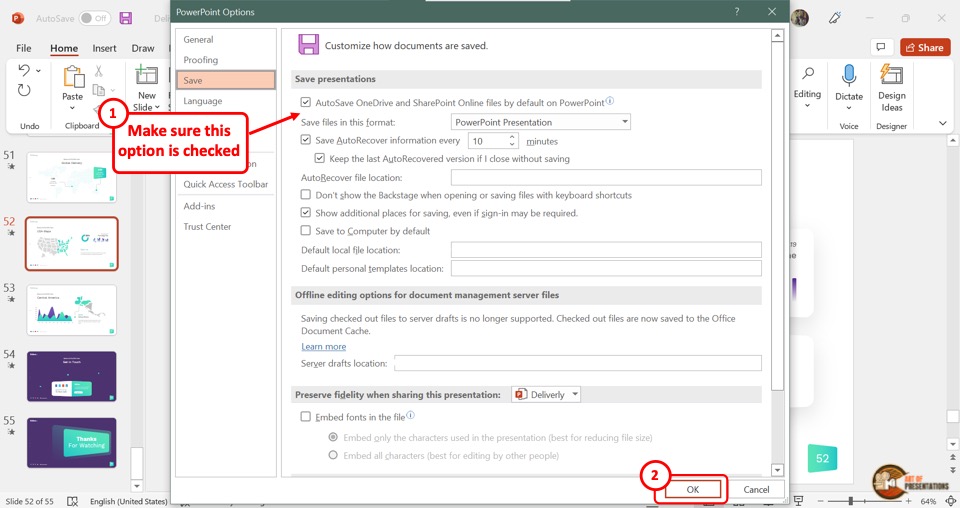
In the “PowerPoint Options” dialog, click on the “Save” option from the sidebar located on the left side. Now you can enable your preferred autosave options in the “Save presentations” section.
Click on the “Autosave OneDrive and SharePoint Online files by default on PowerPoint” for auto-saving on the cloud. You can also select how often the auto-recovery copy is saved by clicking on the box at the right side of the “Save Autorecover information” option.
Step-4: Click on the “OK” button
Now all you have to do is click on the “OK” button at the bottom of the “PowerPoint Options” dialog box to enable your autosave preference (as shown in the image in step 2).
Credit to Cookie_studio (on Freepik) for the featured image of this article (further edited).
IMAGES
VIDEO
COMMENTS
On the File menu, select Save to ensure all your recent work has been saved in PowerPoint presentation format (.pptx). Select File > Export > Create a Video. (Or, on the Recording tab of the ribbon, select Export to Video .) In the first drop-down box under the Create a Video heading, select the video quality you want, which pertains to the ...
Watch this video to learn how to convert your PowerPoint presentation into a video. When you make a recording of a presentation, all its elements (narration,...
In the top-left corner of PowerPoint, click the "File" option. From the sidebar that opens after clicking the "File" option, select "Export." In the "Export" menu, click "Create a Video." To the right of the "Export" menu, you will now see a "Create a Video" section. In this section, you will define the options for your video file.
Learn how to publish your own video using Microsoft PowerPoint with narration, annotations, animations, and timings. As full disclosure, I work at Microsoft ...
Browse to the location where you want to save the file and give it a name then press "Save.". While the video is being created, you will see the small progress bar at the bottom of your PowerPoint window. Wait till this is done and then go to your video. Now you can double-click your video file and it will automatically play with your video ...
Under the Save & Send menu, find and click on Create a Video. Click on the Computer & HD Displays option to customise the video size and quality (small, medium and large size & quality). Click the Don't Use Recorded Timings and Narrations to select if you're using timings and narrations. Click Create Video and another dialogue box opens.
📽️💻 How to Save a PowerPoint Presentation as a Video | MicrosoftIn this tutorial, learn how to easily convert your PowerPoint presentation into a video for...
Click on Create Video. Click on Create Video. This opens up a Save As dialog box. Rename the file, choose the destination and file format, and click on Save. Save the Video. Note: There are two video formats when you save Powerpoint as video, namely .mp4 and .wmv formats.
To begin the export, go to the File > Export > Create a Video menu option. Go to File > Export > Create a Video to choose the export settings for your PowerPoint presentation video. From this menu, there are several key settings to choose before you export your finished video.
The first step to save a PowerPoint presentation as a HD video go to File-> Export and then click Create a Video button. How to Convert PPT to Video Presentations Step 2 - Choose Video Resolution. Now, select a resolution to export your video. Other than the Standard (825×480) resolution, the high-definition resolution options include HD ...
Updated on February 9, 2021. What to Know. Windows: Select File > Export > Create a Video. Choose video quality, timings/narrations, seconds per slide > Create Video. Select file type. Mac: Select File > Export. Choose file format, video quality, timings/narrations, and seconds per slide, then choose Export. PowerPoint decks are great tools for ...
Join 400,000+ professionals in our courses here 👉 https://link.xelplus.com/yt-d-all-coursesLearn how to create a video using PowerPoint. I'll first show you...
In the Seconds spent on each slide box, select the default time you want to spend on each slide. Select Create Video. Enter a file name and then browse to the location you want to save your video. In the Save As type box, select if you want to save the video as a MPEG-4 Video or Windows Media Video. Tip: The MPEG-4 Video format is recommended ...
On the PowerPoint window, in the left sidebar, click the slide in which you want to add a video. At the top of the PowerPoint window, click the "Insert" tab. In the "Insert" tab, under the "Media" section (which is to the extreme right side of the interface), click "Video." You'll now see an "Insert Video From" menu.
In this video tutorial, I show you how to save PowerPoint presentations as a video. I walk you through the steps of setting up your slides and then how to e...
To save the PowerPoint presentation as a PDF file, follow the 4 easy steps. Step-1: Click on the "File" Tab. First, click on the " File " tab in PowerPoint to open the back stage view of PowerPoint. Step 2 - Click on the "Save As" option. In the menu ribbon located at the top of the screen, click on the "File" tab.
Want to know how to save/export your PowerPoint presentation as a video file in MP4 format? This video will show you how you can covert your standard Microso...