
Cloud Storage

Custom Business Email

Video and voice conferencing

Shared Calendars

Word Processing

Spreadsheets
Presentation Builder

Survey builder

Google Workspace
An integrated suit of secure, cloud-native collaboration and productivity apps powered by Google AI.

Tell impactful stories, with Google Slides
Create, present, and collaborate on online presentations in real-time and from any device.
- For my personal use
- For work or my business

Jeffery Clark
T h i s c h a r t h e l p s b r i d g i n g t h e s t o r y !

E s t i m a t e d b u d g e t

Make beautiful presentations, together
Stay in sync in your slides, with easy sharing and real-time editing. Use comments and assign action items to build your ideas together.

Present slideshows with confidence
With easy-to-use presenter view, speaker notes, and live captions, Slides makes presenting your ideas a breeze. You can even present to Google Meet video calls directly from Slides.

Seamlessly connect to your other Google apps
Slides is thoughtfully connected to other Google apps you love, saving you time. Embed charts from Google Sheets or reply to comments directly from Gmail. You can even search the web and Google Drive for relevant content and images directly from Slides.

Extend collaboration and intelligence to PowerPoint files
Easily edit Microsoft PowerPoint presentations online without converting them, and layer on Slides’ enhanced collaborative and assistive features like comments, action items, and Smart Compose.

Work on fresh content
With Slides, everyone’s working on the latest version of a presentation. And with edits automatically saved in version history, it’s easy to track or undo changes.

Make slides faster, with built-in intelligence
Assistive features like Smart Compose and autocorrect help you build slides faster with fewer errors.

Stay productive, even offline
You can access, create, and edit Slides even without an internet connection, helping you stay productive from anywhere.
Security, compliance, and privacy

Secure by default
We use industry-leading security measures to keep your data safe, including advanced malware protections. Slides is also cloud-native, eliminating the need for local files and minimizing risk to your devices.
Encryption in transit and at rest
All files uploaded to Google Drive or created in Slides are encrypted in transit and at rest.
Compliance to support regulatory requirements
Our products, including Slides, regularly undergo independent verification of their security, privacy, and compliance controls .
Private by design
Slides adheres to the same robust privacy commitments and data protections as the rest of Google Cloud’s enterprise services .

You control your data.
We never use your slides content for ad purposes., we never sell your personal information to third parties., find the plan that’s right for you, google slides is a part of google workspace.
Every plan includes

Collaborate from anywhere, on any device
Access, create, and edit your presentations wherever you are — from any mobile device, tablet, or computer — even when offline.

Get a head start with templates
Choose from a variety of presentations, reports, and other professionally-designed templates to kick things off quickly..

Photo Album

Book Report

Visit the Slides Template Gallery for more.
Ready to get started?
- Meta Quest 4
- Google Pixel 9
- Google Pixel 8a
- Apple Vision Pro 2
- Nintendo Switch 2
- Samsung Galaxy Ring
- Yellowstone Season 6
- Recall an Email in Outlook
- Stranger Things Season 5
How to use Google Slides
If you want to create a presentation for your company or a slideshow for your classroom, Google Slides is a solid option. The application is similar to Microsoft PowerPoint but is completely free and web-based for easy access.
Get started in Google Slides
Use views in google slides, add and format slides in a presentation, include speaker notes, insert and format text on a slide, insert and format images on a slide, insert other objects on a slide, view and present a slideshow.
Here, we’ll walk you through the basics of using Google Slides as a beginner. From adding slides to inserting text and images to presenting your slideshow, here’s how to use Google Slides.
What You Need
Web browser
Google account
To create a presentation, visit Google Slides and sign in with your Google account. You can then use a template for a quick start or create a blank slideshow.
Step 1: On the main Google Slides page, you’ll see a few templates across the top. To see them all, select Template gallery . If you see a template you want to use, select it.
Otherwise, pick the Blank option to create a slideshow from scratch.
Step 2: When the slideshow opens, head to the top-left corner and give it a name.
The default for a template is the template name, and for a blank slideshow, it’s “Untitled Presentation.” Simply replace that text with your own and press Enter or Return to save it.
- How to change your Google background in Chrome
- How to change margins in Google Docs
- How to draw on Google Docs to add doodles, sketches, and more
Step 3: As you create your presentation, Google Slides saves it automatically. At the top of the slideshow screen, you’ll see that it is saved to your Google Drive and when you made the last edit.
Step 4: You can return to the main Google Slides screen anytime by selecting the Google Slides logo on the top left, beside the name.
As you create your presentation, you can use different views depending on how you want to work.
Step 1: The main view, as shown below, puts your slide front and center without distractions.
Step 2: To open thumbnails of your slides on the left, select View > Show filmstrip . You can then use the Filmstrip to move to different slides in your presentation and take action on a slide with a right-click.
To close the Filmstrip, return to View > Show filmstrip to deselect the option.
Step 3: To see a full screen of slide thumbnails, go to View > Grid view to select the option. This gives you a larger picture of how your slides are set up and actions you can take using a right-click.
To close this view, go to View > Grid view to deselect the option.
To build a presentation, you’ll add slides. Each slide can contain text, images, videos, shapes, and other elements. To make structuring your slides a bit easier, you can use a pre-made layout. But you also have the option to use a blank slide to place items where you like.
Step 1: To add a slide, do one of the following:
- Go to the Insert tab and choose New slide near the bottom.
- Go to the Slide tab and choose New slide at the top.
- In the Filmstrip or Grid view, right-click a slide and pick New slide .
Step 2: By default, the new slide is placed after your selected slide and uses the same layout. You can change the layout for the new slide if you prefer.
Step 3: To change the layout, select the slide and do one of the following:
- Go to the Slide tab, move to Apply layout , and choose a layout in the pop-out menu.
- In the Filmstrip or Grid view, right-click a slide, move to Apply layout , and choose a layout in the pop-out menu.
When you present a slideshow that you plan to talk through, you can add notes to your slides that only you can see. This is similar to using physical index cards during a speech.
Step 1: To display the notes section on a slide, either drag up using the Three dots at the very bottom of the slide or select View > Show speaker notes .
Step 2: This expands the section below the slide. Place your cursor inside the Notes section and enter your text.
Step 3: To change the font style, size, color, or formatting, select the text in your note and use the Font buttons in the toolbar.
Step 4: To close the speaker notes area, either drag down until the notes section is out of sight or go to View > Show speaker notes to deselect the option.
You can add text to your slides using the pre-made text boxes that are included with the layout you select. Alternatively, you can add text boxes and move them where you want.
Step 1: To add text to an included text box, simply click inside the box and type. The text is automatically formatted per the text box type. For instance, if you enter text in a title box, it’s formatted in a larger font.
Step 2: To insert a text box of your own, either select Insert > Text box in the menu or choose the Text box button in the toolbar.
Step 3: Click a spot on your slide to add the text box, and then enter your text inside.
Step 4: You can move a text box by dragging it and resize one by dragging in or out from a corner or edge.
Step 5: To change the font style, size, color, or format for the text inside the box, select the text and then use the font options in the toolbar.
Slideshows are visual presentations, so along with text, you’ll likely want to include pictures or photos.
Step 1: Go to Insert and move to Image or select the arrow next to the Image button in the toolbar.
Step 2: Choose the location for your image. You can pick a picture from your computer, a web search, Google Drive, Google Photos, a URL, or your device camera.
Step 3: Once you locate and insert the image, drag to move it where you like. You can also drag a corner or edge to resize it.
Step 4: For additional formatting options such as rotation, position, shadow, reflection, and other adjustments, open the Format options sidebar.
You can do this by selecting the image and choosing Format options in the toolbar or by right-clicking the image and choosing Format options .
Along with text and images, you can include other types of visuals in your presentation. You can add videos, audio files, tables, charts, diagrams, word art, and lines.
Step 1: To see all of your options and add an element, go to the Insert tab and choose what you would like to add.
Step 2: Some items like shapes, charts, and lines display a pop-out menu for you to pick the type or style. Other elements like video and audio display a pop-up window for you to pick the location or enter a URL.
Step 3: Once you insert an object on your slide, drag to move it to the spot you want. You can also right-click the item to view additional actions like formatting, alignment, or arrangement with other slide elements.
You can view your presentation at any point in the creation process and can present it the same way to your audience.
Plus, you can take advantage of the Presenter view, which gives you controls and displays your notes. Or, simply watch the slideshow as your audience will.
Step 1: On the top right, select the arrow next to Slideshow and pick Presenter view or Start from beginning .
Step 2: In Presenter view, you’ll see your slideshow on one side of your display or second monitor, with a smaller control window floating on top.
Use the control window to move through the slides, pause the slideshow, and see your speaker notes.
Step 3: In regular slideshow view, you’ll see the presentation in full-screen mode, as mentioned.
Use the Floating toolbar on the bottom left to advance through the slides or pause the slideshow.
Step 4: In either of the above views, select the Three dots on the right side of the floating toolbar to do things like enter or exit full-screen mode, view your speaker notes, automatically play the presentation, or exit the show.
There you have it! These are the basics for how to use Google Slides if you’re new to the application. For more, look at how to use Google Sheets .
Editors' Recommendations
- How to edit a PDF in Google Drive
- How to change theme colors in Google Slides
- How to delete a file from Google Drive on desktop and mobile
- 5 web browsers you should use instead of Google Chrome or Edge
- How to do hanging indent on Google Docs
- How-To Guides

Google Chrome is a user-friendly web browser that is packed with useful features and intuitive controls. It’s also the default browser for pretty much any Chrome-branded product you purchase. Even if you prefer Safari or Firefox, we bet Chrome has one or two things you would dig. But what if you've added Google Chrome to your Windows or macOS machine, and you’ve decided you don’t like the dang thing?
Google Drive is an excellent cloud storage platform for individuals and teams. You can use Drive to upload, share, and collaborate on just about everything, from docs to spreadsheets, images, and videos. Best of all, every Google Account receives 15GB of free storage. So what’s the best way to start moving files around? You should probably start by creating some folders in Google Drive, and load them up with content.
Whether for personal preference or as a requirement for the APA or MLA writing style, we’ll show you how to double-space in Google Docs.
The nice part about this format in Google Docs is that you can apply it to the entire document or only selected blocks of text. Plus, you can double-space in Google Docs on the web and in the mobile app.

- Get started with computers
- Learn Microsoft Office
- Apply for a job
- Improve my work skills
- Design nice-looking docs
- Getting Started
- Smartphones & Tablets
- Typing Tutorial
- Online Learning
- Basic Internet Skills
- Online Safety
- Social Media
- Zoom Basics
- Google Docs
- Google Sheets
- Career Planning
- Resume Writing
- Cover Letters
- Job Search and Networking
- Business Communication
- Entrepreneurship 101
- Careers without College
- Job Hunt for Today
- 3D Printing
- Freelancing 101
- Personal Finance
- Sharing Economy
- Decision-Making
- Graphic Design
- Photography
- Image Editing
- Learning WordPress
- Language Learning
- Critical Thinking
- For Educators
- Translations
- Staff Picks
- English expand_more expand_less
Google Slides - Getting Started with Your Presentation
Google slides -, getting started with your presentation, google slides getting started with your presentation.

Google Slides: Getting Started with Your Presentation
Lesson 8: getting started with your presentation.
/en/googleslides/converting-and-printing-docs/content/
Getting started with your presentation
Google Slides allows you to create dynamic slide presentations. These presentations can include animation, narration, images, videos, and much more. In this lesson, you'll learn about the Google Slides interface and the basics of setting up your document, including the menu and shortcut toolbars , zoom settings , and choosing a theme .
Watch the video below to learn more about using Google Slides.
The Google Slides interface
When you create a new presentation in Google Slides, the interface for Slides will appear. This interface displays the toolbar , along with the main view of your presentation. It allows you to create and modify slides , choose a theme , and share the presentation with others.
Click the buttons in the interactive below to learn about the interface for Google Slides.

Presentation Title
Google Drive displays the title of your presentation here and in the View pane of your Google Drive homepage. By default, new presentations are named Untitled presentation . Click the title to change the name.
Google Slides Home Screen
This icon indicates that you are in the Google Slides interface. Click the icon to navigate back to your Google Slides home screen.
Menu Toolbar
Various menus for working with your presentation can be found on the menu toolbar . Click a menu to see available commands and options .
Collaboration Options
Click Share to share your spreadsheet, as well as to allow others to edit it and collaborate on it. Click Comments to add comments or change notification settings.
Shortcut Toolbar
This toolbar provides convenient shortcut buttons for formatting your presentation.
Slide Navigation Pane
The Slide Navigation pane allows you to view and organize the slides in your presentation.
Here, you can view and edit the selected slide.
Click here to add notes to your current slide. Often called speaker notes , they can help you deliver or prepare for your presentation.
Click this button to play your presentation.
Choosing a theme
When you first create a new presentation, Google Slides will prompt you to choose a theme . Themes give you a quick and easy way to change the overall design of your presentation. Each theme has a unique combination of colors , fonts , and slide layouts . Select a theme from the panel on the right side of the window, and it will be applied to your entire presentation.

You can choose from a variety of new themes at any time, giving your entire presentation a consistent, professional look. If you want to change your theme, you can open the Themes panel again by clicking the Theme command on the shortcut toolbar .

Working with the Google Slides environment
Here, we'll show you how to navigate the Google Slides environment. You'll learn how to use the menu and shortcut toolbars , zoom in and out, and play your presentation .
The menu and shortcut toolbars
The Google Slides interface uses a traditional menu system with a s hortcut toolbar . The menus contain commands grouped by function. The shortcut toolbar has buttons for some frequently used commands.

Showing and hiding the menus
You can choose to minimize the menu bar to free up more space to display your slides. Click the Hide the menus command to hide the menu bar, leaving only the shortcut toolbar at the top of the window. Click it again to show the menu bar again.

Zooming in and out
You can zoom in and out of your presentation with the Zoom shortcut. Click Zoom on the shortcut toolbar, then move the mouse cursor over your slide. The cursor will change to a magnifying class with a plus sign inside of it. Now you can left-click to zoom in or right-click to zoom out. Press Escape on your keyboard to return your cursor to normal.

Within the View drop-down menu, hover over Zoom and there you will see options to set the zoom more precisely.

Playing the presentation
When you are ready to show your presentation—or if you want to see what it will look like during a presentation—click the Present button to the right of the menus. You can also click the drop-down arrow for additional presentation options.

- Open Google Slides and create a blank presentation.
- Change the presentation title from Untitled Presentation to Practice Presentation .
- Choose a theme for your presentation.
- Use the View menu to set the zoom to 50%.

/en/googleslides/slide-basics/content/
The Ultimate Guide to Google Slides
Updated: March 09, 2022
Published: December 04, 2018
Slide decks are ubiquitous in the business world. To present new findings or strategies, train new employees, and even sell your product, you’ll often use a deck to easily convey information and visually engage an audience.

One of the best tools for creating slide decks is Google Slides, which is included with your free Gmail account and connected to the cloud, so you can access all your presentations from any computer.
![→ Free Download: 10 PowerPoint Presentation Templates [Access Now]](https://no-cache.hubspot.com/cta/default/53/2d0b5298-2daa-4812-b2d4-fa65cd354a8e.png "untitled presentation google slide")
To help you create a presentation with Google Slides, we’ve created a handy, bookmarkable guide that’ll show you how to turn a blank deck into a compelling one. Read on to learn how.
How to Use Google Slides
- Create or import a presentation.
- Title your presentation.
- Add text to your presentation.
- Insert media, shapes, tables, charts, diagrams, word art, lines, and animation to your presentation.
- Arrange your presentation’s slides.
- Add speaker notes to help you stay on script during your presentation.
- Pick your presentation’s theme and layout.
- Share your presentation to collaborate with others.
- Present your slideshow.
- Download your presentation in other formats.
Google Slides Tutorial
1. create or import a presentation..
To create a new presentation in Google Slides, go to your Google Drive, click new, and select “Google Slides”.

Don't forget to share this post!
Related articles.

Google Maps Marketing Strategy: The Ultimate Cheat Sheet

The Ultimate Guide to G Suite

The Super-Simple Way to Create Your Own Google Forms Templates

The Short & Sweet Guide to Google Keep
![24 Little-Known Google Drive Features That’ll Boost Your Productivity [Infographic]](https://blog.hubspot.com/hubfs/google-drive-features.jpg "untitled presentation google slide")
24 Little-Known Google Drive Features That’ll Boost Your Productivity [Infographic]

The Ultimate Guide to Google Forms

How to Create a Quiz in 5 Minutes With Google Forms
Download ten free PowerPoint templates for a better presentation.
Marketing software that helps you drive revenue, save time and resources, and measure and optimize your investments — all on one easy-to-use platform
- Generative AI
- Office Suites
- Collaboration Software
- Productivity Software
- Augmented Reality
- Emerging Technology
- Remote Work
- Artificial Intelligence
- Operating Systems
- IT Leadership
- IT Management
- IT Operations
- Cloud Computing
- Computers and Peripherals
- Data Center
- Enterprise Applications
- Vendors and Providers
- Enterprise Buyer’s Guides
- United States
- Netherlands
- United Kingdom
- New Zealand
- Newsletters
- Foundry Careers
- Terms of Service
- Privacy Policy
- Cookie Policy
- Copyright Notice
- Member Preferences
- About AdChoices
- E-commerce Affiliate Relationships
- Your California Privacy Rights
Our Network
- Network World
Google Slides cheat sheet: How to get started
How to use google slides to create, collaborate on, and lead business presentations..

Need to build a slide presentation for a meeting, training, or other event? Google Slides is an easy-to-use web app that comes with the essential tools and more. It stores your presentations in the cloud with Google Drive. Anyone with a Google account can use Slides and Drive for free, and they’re also included with a Google Workspace (formerly G Suite) subscription for business and enterprise customers. There are Google Sheets mobile apps for Android and iOS, too.
This guide will help you become familiar with the Google Slides web interface and show you how to start a new presentation, upload a Microsoft PowerPoint file to edit in Google Slides, collaborate with others on your presentation, and finally, present it to others.
Create or open a presentation
Log in to your Google or Workspace account. Then:
From Google Slides : At the top of the home page, you’ll see a “Start a new presentation” header, with a row of thumbnails underneath. To start a new, blank presentation, click the Blank thumbnail. To start a new presentation in a template, select one of the thumbnails to the right or click Template gallery toward the upper-right corner, then click any thumbnail on the page that appears.

The Google Slides home page. (Click image to enlarge it.)
Below the “Start a new presentation” area you’ll see a list of presentations that are stored in your Google Drive or shared with you. To open a presentation, click it in this list.
The list of your presentations appears in reverse chronological order starting with the presentation you most recently opened. Clicking the “AZ” icon at the upper right of this list changes the sort order to Last modified by me , Last modified , or in alphabetical order by presentation title. You can also browse to a specific folder by clicking the folder icon next to the “AZ” icon.
From Google Drive : Presentations stored in your Google Drive are listed in the main window of the Drive home page. To see a listing of presentations that others are sharing with you, click Shared with me in the left column. From either list, double-click a presentation to open it in Google Slides.
To start a new, blank presentation, click the New button at the upper-left of the screen and then click Google Slides .
If you want to use a template to start a new presentation, click the New button, then move the cursor over the right arrow next to Google Slides and select From a template . The template gallery for Google Slides will open; click a thumbnail to start a new presentation in that template.

Creating a new presentation from Google Drive.
From Google Slides or Drive: You also can use the search box at the top to find presentations in your Google Drive or shared with you. Enter words or numbers that may be in the presentation you’re looking for.
Upload a PowerPoint presentation to Slides
You can edit a Microsoft PowerPoint presentation in Google Slides, but first you must upload it to Google Drive.
From Google Slides: Click the folder icon ( Open file picker ) that’s above and toward the right corner of your presentations list. On the panel that opens, click the Upload tab. Drag-and-drop your PowerPoint file (.ppt or .pptx) onto this panel, or browse your PC’s drive to select it.
From Google Drive: Click the New button, then File upload , and select the PowerPoint file from your PC’s drive and click Open .
Traditionally, when you uploaded PowerPoint files to Google Drive, they were automatically converted to Slides format. That’s still the case when you upload PowerPoint files via the Google Slides home page .
However, Google now supports the ability to edit Microsoft Office files in their native format. By default, any .pptx files that you upload via Google Drive will remain formatted as PowerPoint documents. You can edit and collaborate on a PowerPoint file right in Slides, with all changes made by you or your collaborators saved directly to the PowerPoint file.
On the Google Slides and Drive home pages, native PowerPoint files will be denoted with an orange “P” icon, and when you open a native PowerPoint file in Sheets, you’ll see a “.PPTX” flag to the right of the document title.

Native PowerPoint files show the PowerPoint icon (top) instead of the Google Slides icon (bottom).
If you’d rather have Google convert PowerPoint files to Slides format automatically when you upload them via Google Drive, click the gear icon in the upper-right corner of the Drive home screen and select Settings from the drop-down menu. In the Settings box next to “Convert uploads,” check the checkbox marked Convert uploaded files to Google Docs editor format .
Work in a presentation
When you open a new or existing presentation, its first slide appears in the main window of Google Slides. Here’s a breakdown of the toolbars, menus, panes, and sidebars that appear around your presentation.
The left pane shows thumbnails of all the slides in your presentation. Click a thumbnail, and the slide it represents will appear in the main window, where you can edit it.

The Google Slides editing interface. (Click image to enlarge it.)
Your presentation’s title appears along the top of the screen. To change it, click anywhere inside the title and start typing.
The menu bar below your presentation’s title has a complete set of tools for working with presentations. These are the main submenus to know:
- File has commands for taking action on the whole presentation, including Print, Rename, and Share.
- Edit lists the standard editing commands such as copy, cut, paste, delete, duplicate, and find and replace.
- View lists several ways that you can view your slides as you design and edit them. This includes arranging them into a grid, previewing them as a slideshow, or zooming in on them. You can also watch the transition effect that takes place between slides when they’re played in a slideshow.
- Insert lets you add several objects to your slides, including charts, diagrams, pictures, tables, and text. You can also add links to YouTube videos or sound or video files that are stored in your Google Drive.
- Format lets you change the look of your slides. Certain functions on this submenu become clickable depending on whether you’ve selected an image or text on a slide, or selected the slide itself.
- Slide is where you can add, delete, or duplicate a slide that you’ve selected. You can also add a preset layout to a slide, change its background or theme color, or add and edit a transition effect that takes place between slides when your presentation is played as a slideshow.
- Arrange lists tools that let you group or reorder objects on a slide in relation to another. For example, you can place an image behind another image or group an image and a block of text together to make them easier to move at once.
- Tools leads to several miscellaneous functions. These include letting you record a voice clip to go with a slide, running a spell checker, and showing you a list of objects in your presentation that are linked to other files.
The toolbar directly above your presentation puts commonly used commands in easy reach. From this toolbar, you can click buttons to add to a slide or change its background, comments, layout, objects (images, lines, shapes, text), text style, theme colors for the whole presentation, transition effects during a slideshow, and more. The buttons on the toolbar change depending on whether you’ve selected image or text on a slide or the slide itself.
Notice that there’s no Save button in the toolbar — or anywhere in Google Slides. That’s because Slides automatically saves any changes you make to your presentation.
Speaker notes: Along the bottom of each slide you’ll see an area marked Click to add speaker notes . Here you can type in brief notes to remind yourself what to do or say when the slide is being shown. Only you will see these notes when you show your presentation to an audience.
Themes sidebar: When you start a new blank presentation, the Themes sidebar opens on the right side of the screen. (You can also open this sidebar at any time by clicking Theme on the toolbar above your presentation.) Themes apply the same fonts, colors, and other design elements to all the slides in a presentation, giving it a consistent look and feel. Click a thumbnail in this sidebar to change your presentation to that theme.
Create and manage slides
Here are the basic things to know about working with slides in a presentation.
Add a new, blank slide to your presentation: Click the + button at the left end of the toolbar above your presentation. Alternatively, if you click the down arrow next to the +, you can choose a layout to use as the basis for a new slide.

Click the down arrow next to the + button in the toolbar to choose a layout for a new slide.
Apply or change a slide’s background: Select the slide’s thumbnail in the left sidebar and click Background on the toolbar above your presentation. On the panel that opens, you can change the slide’s background color or use an image file from your Google Drive, Google Photos account, or PC as the background.
Apply or change a slide’s layout: Select the slide’s thumbnail in the left pane, then click Layout on the toolbar above your presentation. On the panel that opens, select the layout you want to apply to this slide.
Apply or change a slide’s transition: Select the slide’s thumbnail in the left sidebar and click Transition on the toolbar above your presentation. In the Motion sidebar that opens along the right side of the screen, you can apply or change the animated transition effect that is played before this slide.

Choosing a transition style in the Motion pane.
Move a slide to a different spot in the slideshow sequence: Click and hold its thumbnail in the left sidebar, drag it up or down to another place in the sequence, and release it.
Delete a slide: Right-click its thumbnail in the left sidebar and select Delete from the pop-up menu. Alternatively, select its thumbnail and select Edit > Delete from the menu bar or just press the Delete key.
Share and collaborate on a presentation
Presentations are often a group effort, with several team members contributing to and polishing a presentation. In Slides, it’s easy for multiple collaborators to work on a presentation together.
First, you need to share the presentation. When you’re viewing your presentation in Google Slides, click the Share button at the upper-right. Or, from your Google Drive homepage, click to highlight the presentation that you want to share. Then, in the toolbar toward the upper right, click the Share icon (a head-and-shoulders silhouette with a +).
Either way, the “Share” panel will open.

Setting permissions for a file being shared privately.
Share a presentation privately
In the entry box, enter the email addresses (or names of your Google Contacts) of the people with whom you want to share. By default, the people you invite to your presentation can edit it and reshare it with others.
To change access permissions for invitees: Click Editor to the right of the entry box and choose another option from the drop-down menu. Commenter means they can view your spreadsheet and add comments but can’t change it. Viewer means they can view your presentation but can’t edit it or add comments.
To prevent your presentation from being reshared, downloaded, or printed: Click the gear icon at the upper-right of this panel. On the smaller panel that opens, uncheck the boxes by Editors can change permissions and share and Viewers and commenters can see the option to download, print, and copy .
When you’re done setting permissions (and, optionally, typing in a message to your invitees), click Send , and everyone you’ve added will receive an email with a link they can click to access the document.
The shared presentation icon.
A presentation you’ve shared (or that others have shared with you) will have an icon of two silhouetted heads next to it in the presentations list on your Google Sheets and Google Drive home pages.
To limit or change a person’s access to your presentation: With the presentation open in Google Slides, click the Share button at the upper-right. Or, from Google Drive, highlight the presentation and click the Share icon.
The Share panel reopens showing a list of all the people you’ve invited, along with their permission status. Click the down arrow to the right of a person’s name, change their permission level or remove their access entirely, and click Save .

You can change permissions for people you’ve shared a presentation with on an individual basis.
If you have a Google Workspace subscription, another option is to select Give temporary access and, next to Access expires , select a date within one year of the current date. If you set an expiration date for a person that you’ve assigned as Editor, their access will be downgraded to Commenter on the expiration date.
Share a presentation publicly
Most business users will want to share presentations privately with select colleagues or clients, but you do have the option to share a presentation publicly. At the bottom of the Share panel is a “General access” area where you can copy a link to the document. By default, this link is restricted to those you invite to the document. To change it to a public link, click Restricted and select Anyone with the link from the menu that appears.
Click Copy link and the link to your presentation will be copied to your PC’s clipboard. You can share this link by pasting it into a chat message, document, email, forum post, or most other means of online written communication. Anyone who clicks this link will be able to view your presentation online. (Be aware that anyone can copy and reshare this link.)
To allow anyone in the public to comment on or edit your presentation: At the bottom right of the Share panel, click Viewer and select Commenter or Editor from the drop-down menu. Then click the Done button. Now the web link to your presentation will let anyone who clicks it add a comment or edit it.

Sharing a spreadsheet publicly.
To turn off public sharing for your presentation: Bring up the Share panel again. Near the bottom, click Anyone with the link and select Restricted from the menu, then click the Done button.
Note: You can apply both public and private sharing methods to your presentation. For example, you could allow the public to only view your presentation, but allow specific people that you’ve invited to comment on or edit it.
Collaborate on a presentation
The people you’ve shared a spreadsheet with can view or work on it at the same time as you or at other times. Remember that people who have Editor privileges to your presentation can change all aspects of it. Having multiple people making changes to a presentation can get confusing. In most cases, setting everyone to Commenter is the best way to collaborate in Slides: People can attach comments to a slide or to objects in a slide, but their comments won’t alter your presentation’s information or design.
To add a comment to a slide: Right-click its thumbnail in the left sidebar and select Comment from the menu that opens. Alternatively, you can select its thumbnail and select Insert > Comment from the menu bar or click the Add comment button (a speech balloon with a + sign).
A blank comment card with your name on it opens to the right of the slide in the main window. On this card’s entry line, type a brief comment, and when you’re finished, click the Comment button.

Typing in a new comment.
To add a comment to an object on a slide: Right-click the object (a block of text, chart, image, picture, etc.) and select Comment from the menu that opens. Alternatively, you can select the object and select Insert > Comment from the menu bar.
To draw someone’s attention to a comment: As you’re composing the comment, type the @ symbol and begin typing their name, then select the person from the list of suggested Google contacts that appears. They’ll receive an email notifying them of the comment and linking to it.
To read, reply to, or remove a comment: A slide that contains a comment is denoted in the left sidebar with a speech balloon by its thumbnail. Click the slide’s thumbnail to make the slide appear in the main window, and you’ll see all its comment cards on the right.
To reply to a comment, click its card. The card will expand to reveal an entry line where you can add a comment in response.

Replying to a comment.
Clicking the checkmark at the upper right marks the comment card as “resolved” and removes the card from the presentation. Clicking the card’s three-dot icon opens a menu that lets you edit or delete your comment.
To see a list of all comments: Click the Open comment history icon (the speech balloon) to the left of the Slideshow button. A sidebar will open along the right side of the screen; it lists all the comment cards in your presentation. When you click a comment on this list, the view of your presentation in the main window will jump to the cell where the comment is located and open its comment card.

The Comments pane lets you quickly review all comments and jump to specific ones.
For more details about collaborating on your presentation, including what it’s like to collaborate in real time, see “ How to collaborate on a document ” in our Google Drive guide. You can also collaborate on a presentation in Google Chat; that’s covered later in this story.
Recover older versions of a presentation
It’s easy to go too far when making tweaks to a presentation. Fortunately, it’s also easy to roll back to an earlier version of the presentation. Click File > Version history > See version history . This opens a panel on the right that shows a list of older versions of your presentation.

Using Version history to view an earlier version of a presentation. (Click image to enlarge it.)
To view an earlier version of your presentation: Click the date for it in the list. That version of the presentation will then appear in the main window.
To restore an earlier version so it replaces your current presentation: With the version you want to restore showing in the main window, click the yellow Restore this version button at the top of the screen. The restored version will then appear at the top of the version history list.
To give an older version a unique name: Click on its date. You’ll be prompted to type in words to replace the date. (The date and time will then appear in smaller size underneath the new name.)
Give a presentation
When it’s time to play your presentation to an audience, Google Slides has two modes: Slideshow and Presenter view. Slideshow mode essentially shows what your audience will see. Presenter view mode provides additional tools for your eyes only that run alongside Slideshow mode.
Slideshow mode: Click the Slideshow button at the upper-right corner of the screen. Google Slides will expand to full-screen view and show the slide that’s currently in the main window. (If you want to start the slideshow from the first slide in your presentation, click the down arrow to the right of the Slideshow button and select Start from beginning .)

The control bar in Slideshow mode lets you click through the slides, turn on auto-play, use a laser pointer effect, and more. (Click image to enlarge it.)
When you move the on-screen pointer to the lower-left corner of your presentation, a control bar appears. You use this to click forward and back through the slides. Clicking the three-dot icon on the control bar opens a menu with other controls, such as starting auto-play and adjusting how quickly it moves from slide to slide.
On this menu, Turn on the laser pointer turns the mouse pointer into a simulated red laser dot. Captions preferences — available only if you’re using a Chrome browser or Chromebook — lets you turn on real-time, automatic transcribing of your words as you say them (English only) and shows them to your audience as on-screen captions. Open speaker notes takes your presentation out of full screen and opens a separate “Presenter view” window, as described below.
Presenter view mode: Click the down arrow to the right of the Slideshow button and select Presenter view . This shows the presentation in your browser window and launches a separate window that assists you while you’re giving your presentation.

Presenter view lets you (but not your audience) see your speaker notes while presenting. (Click image to enlarge it.)
From the Presenter view window, you can jump to any slide in your presentation, read the speaker notes you wrote for a slide, and control the Q&A feature. There’s also a timer that you can set to remind yourself how much time you’re spending showing a slide — or the entire presentation — to your audience.
Click the AUDIENCE TOOLS tab to use the Q&A feature, which lets you take questions from your audience. To open questions for a slideshow, click the Start new button. A web link appears at the top of your presentation. An audience member watching your presentation on their computer, phone, or tablet can click/tap that link, which will take them to a page where they can type a question for you. You’ll see the question in your Presenter view window, and you can choose whether to show their question to the rest of your audience during the presentation. To close questions for a presentation, turn the switch from ON to OFF .

Audience members can submit questions from their devices, and the presenter can decide whether to display them as part of the slideshow. (Click image to enlarge it.)
Present in Google Meet
Need to give a presentation during a Google Meet video meeting? As long as you’re using a Chromium-based browser (Chrome, Microsoft Edge, Opera, etc.), it’s easy: Toward the upper right of the Google Slides page, click the Google Meet icon. From the panel that opens, select a meeting that’s scheduled on your Google calendar today, start a new meeting, or type/paste in the web link or code that you have for another meeting.

Click the Meet icon to get started presenting to a video meeting.
If you start a new meeting, a sidebar for the meeting will open on the right. At the bottom of the sidebar, click the Present now icon (a box with an up arrow). On the panel that appears, select your presentation and click the Share button, and you’ll be presenting to the meeting.

Choose which tab or window you want to share and click the Share button. (Click image to enlarge it.)
If you join a scheduled meeting, you have two choices: “Join the call” and “Just present this tab.” If you click Join the call , a sidebar for the meeting will open on the right. Follow the same steps as above to present to the meeting. If you click Just present this tab , you’ll go directly to the panel where you select your presentation and click Share , but you won’t have a sidebar where you can follow the main meeting.
To stop sharing your presentation to the meeting, click the Stop sharing button at the top left of your browser window.
For more details about using Google Meet, see our Google Meet cheat sheet .
Download and export a presentation
Google Slides lets you download presentations for use offline. On the top menu, select File > Download and choose a file format. You can save your presentation to your PC as a PowerPoint (.pptx) file or in other formats such as PDF, or as JPG or PNG for an individual slide.
5 tips for working with Google Slides
Now that you’re comfortable working in Google Slides, try these intermediate tips.
Use the Google Slides mobile app
With the exception of the “Version history” tool, the Google Slides app for Android , iPhone , and iPad has many of the same features described in this guide.
When you have a slideshow open, the toolbar at the top of the screen lets you take a variety of actions:
- To present your slides on your phone or tablet, on a Chromecast device, or in a Google Meet meeting, tap the triangle icon.
- To share your presentation with other people, the headshot silhouette. (See “How to share from the Google Drive, Docs, Sheets, and Slides mobile apps” in our Google Drive cheat sheet .)
- To view all the comments in the presentation, tap the Comments icon (a chat balloon) if you see it in the toolbar, or tap the three-dot icon and select View comments from the menu that appears.
- The three-dot menu also lets you see the presentation’s Q&A history, export it, make it available offline, and more.

The Google Slides Android app.
To edit or comment on a slide: Tap the slide, and a menu will appear that lets you add or view comments for that slide or edit it. Tap an element on a slide, such as text or an image, and tools to edit that element will appear.
Any changes you make to your presentation in the mobile app are automatically saved and will appear the next time you open it in the Google Slides web app.
Get suggested slide layouts and content
Click the Explore icon at the lower-right corner of the screen. The Explore sidebar will open along the right side. In most cases, you’ll be presented with thumbnails of suggested layouts that Google Slides has automatically customized for the slide that’s open in the main window. Click the one you want, and it will be applied to the slide.

Use the Explore tool to get suggested layouts (left) and search for images (right).
At the top of the Explore sidebar is a search box. You can type in a word or phrase to find related content on the web or in your Google Drive. Search results appear on separate Web, Images, and Drive tabs in the sidebar. Click a web or Drive result to open it in a new browser tab. On the Images tab, click the + icon on the upper-right corner of an image to insert it onto your slide.
Create custom slide layouts to use as templates
You can design your own slide layouts to use as templates in any future presentation. First, open a new, blank presentation as described above. Then:
- On the menu bar over the blank presentation, select View > Theme builder .
- The main window switches to a layout editor. Toward the left you’ll see a column with the heading THEME on top and LAYOUTS just below that. Click the thumbnail of any layout in the LAYOUTS list. It will appear in the main window.
- You can remove objects that are already in any layout. For example, click on a block of text. A frame appears around the text. Without selecting the text itself, move the pointer to ward an edge of the frame, right-click, and select Delete from the menu that opens.

Creating a custom slide layout. (Click image to enlarge it.)
- Using the formatting toolbar above the slide, you can add new objects to the slide, including images, image placeholders, shapes, lines, and blocks for text. (Tip: enter placeholder words inside the text blocks.) When you click on any object, a frame appears around it. Drag and drop the frame to relocate it on the slide, or drag its edges to change its shape or size. You can also add or change the border and background colors for any object on the slide and/or change the background color for the whole slide.
- When you’re finished designing your layout, click the Rename button above the slide and give the layout a unique name.
- If you want to create another custom layout, click on the thumbnail of another layout under the column LAYOUTS and repeat the above steps starting from #3.
- When you are finished custom-designing all your layouts, click the X toward the upper-right of the slide layout in the main window.
- Along the top of the screen, click anywhere inside Untitled presentation and start typing. Tip: Use a name that indicates this is a template (e.g., “Annual Budget Presentation – Template”).
In the future, you can make new presentations starting from this template, and your custom slide layouts will be available.
- Open the template presentation you created in the steps above. On the menu bar, click File > Make a copy > Entire presentation . On the panel that opens, type in a name for the new presentation you want to create and click the Make a copy button. Google Slides will open this new presentation in a new browser tab.
- On the toolbar above the first slide of your new presentation, click Layout . From the panel of thumbnails that opens, select one of the layouts that you created. It will then be applied to the slide in the main window.
Collaborate on a presentation in Google Chat
An alternative way to collaborate on a presentation is to share it in Google Chat. Other people in your chat can add comments and help make changes to your presentation.
Start in Google Chat . To the left of the box where you type in your chat messages, click the + icon and select Drive file from the menu that opens. A panel will open over the screen listing the files in your Google Drive. Find and click your presentation to highlight it, then click INSERT on the lower-right corner.
You’ll be taken back to the chat message box. Click the blue right-pointing arrow to the right of the box, and a panel will open over the screen designating permissions for the shared presentation. By default, permissions are set to Comment. To change this, click Comment and select View or Edit . You can also allow the people in the chat to share a web link to your presentation with others outside of the chat by selecting Turn link sharing on .

You can share a presentation to individual or group chats in Google Chats. (Click image to enlarge it.)
After you’ve set the permissions, click SEND , and your message will appear in the chat stream with a large thumbnail of your presentation. To open a presentation in the chat, click the thumbnail. The presentation will open inside a large window that’s laid out alongside the right of the chat stream.
This is actually Google Slides running inside the chat window with your presentation loaded in it. Thus, most of the Slides commenting and editing tools are available for you and others in the chat to use on your presentation (if you granted them permission to comment or edit). The user interface is the same, except there’s no menu bar.

Collaborating on a presentation from within a Google Chat. (Click image to enlarge it.)
Use keyboard shortcuts
Save time in Slides by using keyboard shortcuts for common tasks. Below are some of the most useful to know. For more, select Help > Keyboard shortcuts from the top menu when you have a spreadsheet open or press Ctrl + / (Windows, Chrome OS) or ⌘ + / (macOS).
Handy Google Slides keyboard shortcuts
This story was originally published in September 2019 and updated in August 2022.
Related content
Microsoft’s team copilot aims to help manage meetings, group chats, windows recall lets you rewind actions on a pc, windows 11 insider previews: what’s in the latest build, adobe express enterprise is where iwork could boldly go, from our editors straight to your inbox.
Howard Wen ( www.howardwen.com ) is a longtime contributor to Computerworld . He specializes in explainer guides, how-tos, and reviews of office applications and productivity tools.
More from this author
Google sheets power tips: how to use dropdown lists, google workspace power tips: tap into cross-app productivity, how to use google’s genai-powered note-taking app, how to use the new genai template tool in google sheets, most popular authors.

Show me more
Adobe lightroom gets first firefly feature — generative remove.

Microsoft launches AI-powered Copilot+ PCs

What happens when genAI vendors kill off their best sources?

Why are people still bad at video calls?

Will new AI tools create a better Siri or voice assistant?

Is AI crushing creativity, or creating mediocrity?

How-To Geek
The beginner's guide to google slides.
Want to learn the basics about Google Slides? This beginner's guide walks you through everything from importing your PowerPoint files to sharing presentations online.
Quick Links
What is google slides, how to sign up for an account, how to create a blank presentation, how to import a microsoft powerpoint presentation, how to check your spelling in google slides, how to collaborate on presentations, how to see all recent changes to a presentation, how to link to a specific slide, how to insert special characters into a slide, how to use google slides offline.
If you’re just getting started with Google Slides, its extensive features and add-ons can be a little overwhelming. Here are some tips to help you get going with this powerful alternative to Microsoft PowerPoint.
If you’ve heard of Google Slides before, feel free to skip ahead; if you haven't, here’s a crash course on what you need to know. We’ll go over the basics and get you brushed up on what Google Slides is and how you can get started right away.
Slides is a free, web-based presentation program designed to compete with Microsoft Office PowerPoint. It's part of G Suite---Google's complete office suite (though some people refer to it all as Google Docs). The other main services included in the cloud-based suite are Sheets (Excel) and Docs (Word).
Related: What is Google Workspace, Anyway?
Google Slides is available on all devices and platforms; all you need is an internet connection and a web browser (or, in the case of mobile, the Android and iOS apps ). Google does the rest and handles the brunt of the heavy lifting, while it runs the software in the cloud.
Slides supports several file types, including .ppt, .pptx , .odp, .jpg, .svg, and .pdf. This makes it easy to view or convert Microsoft Office files directly from Google Drive or insert images directly into a slide.
Related: What Is a PPTX File (and How Do I Open One)?
And since Slides is an online presentation program, you can share and collaborate with multiple people on the same file, and track revisions, changes, and suggestions, all in real-time.
Have you heard enough? Let’s get started.
Before you can use Google Slides, you have to sign up for a Google account (an @gmail account). If you already have one, feel free to move on to the next section. If not, we’ll go over the simplest way to create a Google account and get you set up with Slides.
Head over to accounts.google.com , click "Create Account," and then click "For Myself."
On the next page, you provide some information---first and last name, username, and password---to create your account.
Also, you have to verify your phone number, so Google can make sure you’re not a bot.
After you verify your phone number, the subsequent pages require you to provide a recovery email address and your date of birth and gender. You must also agree to the privacy statement and terms of service. After that, you’re the proud new owner of a Google account.
Now that you have a Google account, it’s time to create your first presentation. Head over to Google Slides and place the cursor on the multicolored "+" icon in the bottom-right corner.
The + turns into a black pencil icon; click it.
Pro Tip: Type
into the address bar from any browser and hit Enter to automatically create and open a new blank document.
Even if you’re new to Google Slides, you might already have a collection of Microsoft PowerPoint files you’d like to be able to use. If that’s the case, then you have to upload all your presentations before you can view them. While it might not support some of the more advanced features and effects of some PowerPoint presentations, it works pretty well.
When you import a PowerPoint presentation, you can use either Google Slides or Drive to upload your files. Both methods let you drag and drop a file from your computer directly into the web browser for easy uploads. Your Drive houses all of your uploaded files, but---for the sake of convenience---when you go to the Slides homepage, it only shows you presentation-type files.
From the Slides homepage, click the folder icon in the top right, and then click the "Upload" tab. Now, drag and drop any files you want to upload directly into this window.
Once the file uploads, Slides opens it automatically, and it's ready for you to edit, share, or collaborate.
To open a PowerPoint presentation that you want to edit, click the filename with the "P" next to it from your Google Slides homepage.
Click to either view the PowerPoint file or edit it in Slides.
After you’ve finished editing your file, you can download and export your presentation back into a Microsoft PowerPoint format. Just go to File > Download As, and then click the "Microsoft PowerPoint" option.
If you’d rather download your presentation as a PDF, ODP, JPEG, TXT, etc., you can do that here, as well.
Related: How to Import a PowerPoint Presentation into Google Slides
Now that you have a few presentations, it’s time to make sure your spelling and grammar are correct . Slides is equipped with a spellchecker. If you misspell something, it underlines the error with a squiggly line and prompts you to make a change.
This should be on by default, but you can make sure in Tools > Spelling > Underline Errors.
To see spelling corrections and suggestions, right-click the word with the line underneath. Alternatively, press Ctrl+Alt+X (Windows) or Command+Alt+X (Mac) to open the Spell Check and Grammar tool.
Along with a spellchecker, Google Slides comes loaded with a built-in dictionary and thesaurus. To use them, highlight a word, right-click it, and then click "Define [word]."
While this should get you started, we have a deeper dive into Google’s spelling and grammar checker if you want more info.
Related: How to Check Your Spelling in Google Docs
One of the best features of Google Slides is its ability to generate a shareable link. Anyone you share the link with can view, suggest edits to, or directly edit the presentation. This eliminates the hassle of sending a file back and forth between collaborators. Each person has her own text entry cursor to use on her computer.
To do this, click the orange "Share" button in the file you want to share. Next, choose how and with whom you want to send a link to the file. You can type email addresses or click "Get Shareable Link" in the top corner to hand out the invitation yourself.
From the drop-down menu, you can select one of these options for what other users can do:
- Off: Sharing is disabled. If you’ve previously shared a link with others, it will no longer work and revokes any permissions they once had.
- Anyone with the link can edit: Gives the shared users full read/write access. They still can’t delete it from your Drive, though---this is just for the contents of the file.
- Anyone with the link can comment: Allows shared users to leave comments which is handy for team projects.
- Anyone with the link can view : Shared users can view the file, but can’t edit it in any way. This is the default action when you share a file, and it's the best option if you’re trying to share a file for download.
You can do a lot more with these shareable links, as they also work with other Drive files and on mobile. For a deeper look at how links work and how to generate them, check out our post .
Related: How to Create Shareable Download Links for Files on Google Drive
When you share documents with others, it’s difficult to keep track of all the small changes that happen if you’re not present. For that, there’s revision history . Google keeps track of all the changes that occur in a document and groups them into periods to reduce clutter. You can even revert a file to any of the previous versions listed in the history with a click of your mouse.
You can view a list of all recent changes by clicking File > Version History > See Version History. Alternatively, you can press Ctrl+Alt+Shift+H (Command+Option+Shift+H on Mac).
Related: How to See Recent Changes to Your Google Docs, Sheets, or Slides File
You can also share a link to a specific slide in your presentation with a friend or coworker, without having to mention which one you're referencing. When someone clicks the link and the presentation loads, it jumps directly to the slide you're referencing. You do have to enable file sharing before you can link to a specific slide in your presentation, though.
Because each slide has a unique URL, all you have to do to link to one is click it in the left pane, and then copy the URL from the address bar.
Google Slides also has a character insertion tool. This allows you to insert special characters into your presentation without having to remember any Alt-codes. There are tons of symbols, characters, languages, and so much more. So, whether you want an arrow, different language scripts, or if you just want a few silly emojis to spruce up your presentation, Google Slides makes it easy to include them.
To open the character insertion tool, click "Insert," and then click "Special Characters."
From here, you can manually search for specific characters with the drop-down menus.
Use the search bar to find a specific character or emoji.
You can also use your drawing skills to search.
Related: How to Insert Symbols into Google Docs and Slides
What happens if you need to access Google Slides but don’t have an internet connection? Although Slides is a web-based product, that doesn’t mean you can’t use it offline . Any changes you make to the file offline will update the next time you connect to the internet. First, download the extension for Chrome.
To enable a presentation for offline use, go to the Google Slides’ homepage and, in the top-left corner, click the Hamburger menu > Settings. Once here, toggle "Offline" to the On position, and then click "OK."
To save storage space on your local machine, Google only downloads and makes the most recently accessed files available offline. To manually enable a file, click the three dots icon, and then toggle "Available Offline" to On.
Related: How to Use Google Docs Offline
Google Slides is a powerful, feature-rich alternative to Microsoft Office's PowerPoint. It's also completely free to use with an internet connection and a Google Account, making it a legitimate competitor for Microsoft.
- PRO Courses Guides New Tech Help Pro Expert Videos About wikiHow Pro Upgrade Sign In
- EDIT Edit this Article
- EXPLORE Tech Help Pro About Us Random Article Quizzes Request a New Article Community Dashboard This Or That Game Popular Categories Arts and Entertainment Artwork Books Movies Computers and Electronics Computers Phone Skills Technology Hacks Health Men's Health Mental Health Women's Health Relationships Dating Love Relationship Issues Hobbies and Crafts Crafts Drawing Games Education & Communication Communication Skills Personal Development Studying Personal Care and Style Fashion Hair Care Personal Hygiene Youth Personal Care School Stuff Dating All Categories Arts and Entertainment Finance and Business Home and Garden Relationship Quizzes Cars & Other Vehicles Food and Entertaining Personal Care and Style Sports and Fitness Computers and Electronics Health Pets and Animals Travel Education & Communication Hobbies and Crafts Philosophy and Religion Work World Family Life Holidays and Traditions Relationships Youth
- Browse Articles
- Learn Something New
- Quizzes Hot
- This Or That Game
- Train Your Brain
- Explore More
- Support wikiHow
- About wikiHow
- Log in / Sign up
- Computers and Electronics
- Website Application Instructions
- Google Applications
How to Create a Presentation Using Google Slides
Last Updated: November 30, 2023
wikiHow is a “wiki,” similar to Wikipedia, which means that many of our articles are co-written by multiple authors. To create this article, 17 people, some anonymous, worked to edit and improve it over time. This article has been viewed 238,807 times. Learn more...
This tutorial will show you how to make a PowerPoint-like presentation using Google Slides. Presentations can be used for school, business, and so much more.

- You can also just type in https://slides.google.com , log in if you haven't already, and will be taken to the Slides page.
- If you don't have a Google account, learn to create one now!

- For more options, hover over the arrow on the right edge of the Google Slides option, where a smaller drop-down menu will appear. From here you can select to create a presentation from a template or a blank slide.

- Be sure to add a title and subtitle by clicking where you are prompted to add text.

- You can also change a pre-existing slide's layout by clicking the layout option on the upper editing bar.

- As you add animations to each element by clicking the blue "+ Select an object to animate", they will begin to pile up. Click on each one to edit it.
- Change the transition from slide to slide by clicking the default "Slide: No transition" at the top of the sidebar. You can choose whether to apply to all slides or just one.
- Preview your animations by clicking Play at the bottom of the sidebar.
- Remove an animation by clicking the small x on its rectangle, and drag each animation up or down to change the order.

Community Q&A
wikiHow Video: How to Create a Presentation Using Google Slides
- If you have a pop-up blocker, make sure to disable it so Slides can work properly. Thanks Helpful 0 Not Helpful 0
- Hover over each tool to see its keyboard shortcut and function. Thanks Helpful 0 Not Helpful 0
- Remember, these are the basic functions- Google Slides contains many more tools that you can work with as you explore the creator. Thanks Helpful 0 Not Helpful 0

You Might Also Like

About This Article
To create a new Google Slides presentation, open a web browser and go to Slides.Google.com. If you want to start from a template, you can choose one from the template gallery. Otherwise, click "Blank" to create a new blank presentation. Your blank presentation starts with a single simple slide with space to enter a title and subtitle. You can personalize this slide, as well as other slides you add, by editing the placeholder text, as well as choosing a slide theme from the panel to the right. To insert another slide, click the "Insert" menu and select "New Slide," or press "Control M" for a quick keyboard shortcut. You'll also find other things you can add to your slide on the Insert menu, including the option to add an image, a text box for typing, videos, shapes, charts, and other features. After adding a new slide, click the "Layout" menu to choose a slide layout—you can give each slide its own layout or reuse the same layout as much as necessary. Edit the placeholder text, and then insert objects from the Insert menu. To move an object, click the arrow in the toolbar, hover the mouse cursor around the object's border line until it turns to a 4-point arrow, and then click and drag it. Each slide you add will have a thumbnail in the left panel—click a slide's thumbnail to open that slide for editing. To see your presentation as a viewer would, click your first slide in the left panel, and then click "Present" at the top corner. Click the Escape key to go back to editing. Google Slides also has some built-in effects you can access from the "Transition" menu—here you can animate a slide's transition into the next slide, as well as animate individual objects. To apply an effect, background, theme, layout, or any other setting to more than one slide at once, select the slides in the left panel by holding down the Control key as you click each thumbnail. Your presentation will automatically save to your Google Drive as you work—type a name for the presentation in the top-left corner so you can easily find the file when you need it. Did this summary help you? Yes No
- Send fan mail to authors
Is this article up to date?

Featured Articles

Trending Articles

Watch Articles

- Terms of Use
- Privacy Policy
- Do Not Sell or Share My Info
- Not Selling Info
wikiHow Tech Help Pro:
Level up your tech skills and stay ahead of the curve
A Beginner's Guide: Google Slides

Create a new Google Slides Presentation and Getting Started
Creating a new Google Slides deck is very similar to using Google Docs if you’ve used it before. First, you’ll have to sign into your Google account. (You will have to open a new account if you do not have one.) In order to access Google Slides, go into Google Drive and click New +. You should see Google Slides as an option beneath docs and sheets.
Google Slides Interface: Naming your blank presentation
Let’s get started on the first lesson of the beginner’s guide to Google slides! Start a new presentation file in no time! Again all these practices can be used for other services like Google Docs or Sheets. The first best practice is to name your Google Slides Presentation. In the top left of. your blank presentation, click on the text box that says “Untitled Presentation”. Enter the name of your Google Slides Presentation and press enter. As a recommendation, it may be helpful to put the date before the name or a number sequence if you are working with multiple Google Slides presentations. A standard naming convention is helpful especially if you are doing a training module, HR documentation, educational materials or multiple pitch decks. One of the most important lessons in designing many documents and decks is to keep organized and having a good naming system – it will go a long way. You can also consider naming your presentation after its version history to keep track. There are more ways to name your presentation but these are our starter tips.
Google Slides Interface: Saving your Presentation
You’ll see “Save to Drive” appear next to the name text box. A nice feature of using Google docs, slides and other services in G Suite is this auto-save feature. The document saves itself as you work, which makes sure you will never lose work! You can also click this cloud icon as a save button, so you have the option to save manually too. When you click this save button, make sure there is a checkmark on your cloud before you back out of Google Slides.

Google Slides Interface: Saving to a Folder and Creating New Folders

Google Slides Interface: Locating your Slides presentation in Google Drive
All these folders are inside Google Drive. If you’d like to locate your folders with your google slides, navigate to Google Drive. Within Drive, you can either search for the folders in the search bar or they should appear right in the list of your storage. The search bar is the easiest and probably the way you want to use it to go to file quickly.
Google Slides Interface: Renaming your Google Slides presentation
Google slides interface: starring a presentation so you can find your file easily.
A useful quick shortcut tool is you can also use the star icon to star your Google Slides presentations to make it easier to find in Google Drive. If you go to Google Drive and go under Starred, you will find your presentations there easily.

Google Slides Interface: Using or Changing a Theme / Templates
Google slides interface: add text.

Google Slides Interface: Formatting Text
Changing the font, changing the style and colour of your text, and other formatting options.
The formatting functions are similar to using Word.
Changing the Text Box’s background
You can also create a background for your selected text box by using the paint bucket tool to the left.
How to move your text box around the interface
You can also adjust the sides using the square points on the four corners and in the midpoint between the four corners. Google Slides also has smart guides to show you when things are centred or aligned relative to each other. If you see a red line appear between elements or in the centre, you know your text is aligned.
Google Slides Interface: Creating New Slides
Now that you have your title slide, you probably want more slides, like say a table of contents, a couple of content slides, and a thank you. In order to make a new slide, look to the left of the screen. Using the plus symbol, you can make a new slide by clicking on it. Depending on what theme you chose, the new slide will auto-design itself.

Google Slides Interface: Insert Images
Present your slideshow.
Once you are done designing, there are several ways to present your slideshow. The simplest way is to click Present on the top right. This will make your presentation go full-screen and you can present via your computer or screen share. In this mode, you’ll see the presenting navigation bar at the bottom left. You can navigate each slide by using the drop-down or the left/right arrows on the navbar or on your keyboard. To exit fullscreen, press ESC on your keyboard, use the exit on the navigation bar or if you see a windowed version of the presentation, hit the top window bar’s x button.

Google Slides Offline Slideshow or Convert to PowerPoint Presentation or PDF
You’re set, author: content team, related posts.

FREE PROFESSIONAL RESOURCES DELIVERED TO YOUR INBOX.
Subscribe for free tips, resources, templates, ideas and more from our professional team of presentation designers.
Module 15: Creating and Using Presentation Aids
Google slides basics, learning objectives.
Explain the basic steps of creating a presentation with Google Slides.
Googles Slides is free to use, but to do so requires a Google account. If you don’t already have a Google account (i.e., a gmail address, Google Drive or Google Calendar), you will need to create one in order to use Google Slides. To establish a Google account, search for “Google account” or go directly to the Google Account sign up page.
New Presentations
To start a new presentation, search for “Google slides” or go to https://www.google.com/slides/about/ .
See Figure 2 for a visual of the application’s opening view. You can start a new blank presentation or choose from a number of existing, editable presentations or templates. If you recently viewed a shared presentation or created a presentation, you would see it listed under Recent Presentations.
To start a new presentation, click on the plus (+) sign in the Blank Presentation box.

Within Google Slides, as in all Google applications, your work is saved automatically. Until you name your presentation, it will save as Untitled presentation.
To title your presentation, click in the [Untitled Presentation] box and type your desired title. By default, Google slides will insert the text from the title box as the title; you can accept that or delete and enter an alternate title (see Figure 3).

Practice Question
Organizing slides.
There are multiple options for adding slides:
- Select “+” (New slide) from the second menu line. To select a specific slide layout, use the dropdown menu to the right of the slide to add a slide that best matches the content for that slide
- Use the New slide shortcut: Ctrl+M
- From the Insert dropdown, select New slide (Ctrl+M) Select Insert > new slide
- Select Slide > Duplicate slide, which will copy the slide that’s currently highlighted in the thumbnail section in the left column of the screen
- Right click in a slide in the thumbnail sidebar and select New slide or Duplicate slide
To delete a slide, right click on the thumbnail image and press delete OR delete from the Slide dropdown: Slide > Delete slide. If you delete a slide in error, don’t panic! Click on the Undo arrow or use the Ctrl+Z shortcut.
To move a slide, click on the slide in the sidebar—this will highlight the thumbnail—and drag it to where you want it to appear. A second sorting option is to shift from the default (“Filmstrip”) view to Grid view—View > Grid view—and use a select, drag and drop method. You can toggle between the default and Grid view by selecting the icons at the bottom of the thumbnail window.

As with most actions in Google slides, there are multiple ways to add a text box:
- Select the Text box icon from the main menu (see Figure 1).
- Select Insert > Text Box.

Using either method, your cursor will become a crosshair; position your cursor where you want the text box to start and click to anchor. Drag the cursor the approximate width and length of your anticipated text entry and release the cursor. If you want to change the location of the text box, click within the text box to highlight it and use the arrow keys on your keyboard to reposition. To change the box dimensions, click within the text box (if it’s not already highlighted) and hover over one of the anchor points (tiny boxes). A directional arrow will appear; click to stretch or reduce the size; release when complete.
To delete a text box, select to highlight and press delete. If you change your mind, click on the Undo (Ctrl+Z) arrow.
Themes are one of the formatting options within Google Slides. To view theme options, click on Slide > Change theme. A column will appear on the right of the screen, showing various color, layout and font options. To see how a particular combination would work with your content, click on your chosen theme. You can continue test-driving themes; clicking on a new theme will replace the prior choice. There’s no risk of losing your original formatting; Undo (or Ctrl+Z) will return you to your original theme. You can also import a theme from outside Google Slides. Click on the Import theme button at the bottom of the themes column. Sites such as Slides Carnival allow you to copy slide formats directly into Google Slides.

Images and Clip Art

Using art and images adds impact and provides welcome relief to the challenge of processing information-intensive slides. To insert an image, select Insert > image or the image icon, to the right of the Text box icon. As shown in Figure 1, there are multiple options for accessing images; you can also access these options using the drop-down menu to the right of the Image icon. You can upload images from your computer, use the camera on your device to take a photo, link to an image using a URL, or Search Google Images. Selecting Search the Web will link you to Google Images, where you can use a keyword or keywords to search for images, including quote images based on your keyword(s).
When your results appear, you’ll see a small magnifying lens in the bottom right corner of the images. Clicking on the magnifying lens allows you to preview the image prior to selection/inserting. To exit preview (if you don’t want to choose this image), press the left (return) arrow to return to the search options.

To select an image, click on it and click on the INSERT button at the bottom of the window. The image will be inserted into your current (highlighted in the thumbnail) slide. If you change your mind, press the escape key (ESC), Undo, or Ctrl+Z to reverse the Insert operation.
To incorporate clip art, select Insert > Image to open the Google Image browser. In the Search area “Search for Google Images,” enter your keyword or desired image and clip art as your search terms. For example, “brain clip art” or “brain + clip art.” For more professional images, include “stock” – stock image or stock photo – in your search. For example, “brain stock image.”
Images shown are generally in the public domain or labeled for commercial use with modification, but as the disclaimer on the Google Image window notes, you are responsible for ensuring that your intended use is in accordance with the image creator’s license.
Adding video to your Google slides adds yet another level of visual interest and engagement. To incorporate video:
- Select Insert > Video from the main menu. A window will appear where you can search for a YouTube video, or you can select URL at the top of the window, and paste a URL for a specific YouTube video.
- Click on a video to select it and press the Select button to embed it in your current slide. Your video is now embedded in your slide.
![Screenshot of inserting video to Google slides. Image shows YouTube search bar with search term 'learning strategies'. Below are three video results for the search term. The video that is selected is titled "Highly Effective Learning Strategies [Animated Whiteboard Short]".](https://s3-us-west-2.amazonaws.com/courses-images/wp-content/uploads/sites/2785/2018/03/05192733/8.3.11-1024x637.png "untitled presentation google slide")
Arranging Objects
When you’re creating a slide with multiple elements—for example, layering text, imagery, lines, shapes or other objects—you may find a need to arrange the elements or objects.
To manage objects on a slide:
- Click Arrange from the main menu.
- Order: Put the object behind or in front of text, other objects, or images.
- Align horizontally or Align vertically: When you select multiple objects, you can align the edges of the objects.
- Center on page: Center objects vertically or horizontally on a slide.
- Rotate: Change the orientation of an object, by flipping or rotating it.
- Distribute: When you select three or more objects, you can evenly distribute the space between them.
- Group: Lock multiple objects together to make them easier to move around and format.
The Google Slides grid line feature, enabled by default, also provides a visual to help with alignment. When you click and drag an object, you will see colored lines appear that will help you align the object with other objects on the page. This setting (View > Snap to > Guides) is selected by default.

PRactice Question
You can view the transcript for “Google Slides: Getting Started” here (opens in new window) .
Click to visit Google’s Teacher Center, with detailed, walk-through videos on using Google Slides.
- Google Slides. Authored by : Nina Burokas. Provided by : Lumen Learning. Located at : https://courses.lumenlearning.com/wm-businesscommunicationmgrs/chapter/creating-and-organizing-presentations/ . Project : Business Communication Skills for Managers. License : CC BY: Attribution
- Google Slides: Getting Started. Authored by : GCFLearnFree.org. Located at : https://youtu.be/1ENtPjEp_5c . License : Other . License Terms : Standard YouTube License

Google Slides: The ULTIMATE guide
- Written by: Joey Dudley
- Categories: Google Slides , Presentation technology
- Comments: 55

Whether you’re a student, a professional, or a presentation aficionado, you’ve probably heard of Google Slides, the browser-based presentation tool from Google Workspace. Google Slides has been steadily gaining in popularity over the past few years, with more and more users keen to make use of its easy-to-use interface and collaboration features.
As presentation enthusiasts (which is, let’s be honest, a polite way of saying nerds), we at BrightCarbon know Google Slides inside out. We’ve created this extensive guide to cover absolutely everything you need to know about Google Slides — from the basics through to more advanced features — so you can take your presentation projects to the next level.
How to use this guide
Whether you’re an experienced presentation creator or a total beginner, this is the ultimate guide for you! If you’re new to Slides, you can work your way through the sections from start to finish. If there’s something in particular you need help with, navigate to the section that interests you most by clicking one of the topic links below. This is a really in-depth guide, so bookmark the link and add it to your favourites to come back to. If you want more hands-on help, we also offer paid-for Google Slides training with an expert trainer.
How Google Slides works
Is google slides free.
- Getting started
Adding, removing, and hiding slides
Understanding the menu bar, understanding the toolbar, using the theme builder, using and creating themes, using the explore tool.
- Using Extensions
Creating content in Google Slides: Text and fonts
Inserting and editing text boxes, advanced: text formatting, inserting tables, adding fonts to slides, creating content in google slides: shapes and images, inserting and editing shapes, inserting and editing images.
- Advanced: Making attractive slides
Creating charts
Inserting media, creating content in google slides: animation and interactivity, making movement, advanced: linking and hyperlinking, getting the most out of cloud and collaboration features, cloud working, offline working, saving your work, advanced: converting to and from google slides, presenting and printing.
- Presenting your work
Printing your work
Getting even more out of google slides, more google slides resources, resources for making better presentations, get involved with our google slides masterclasses.
Here we cover the basics of using Google Slides, from creating a brand-new presentation to setting up a slide theme.
Google Slides is free to use across web, mobile and desktop apps, as long as you have a free Google account. Businesses can upgrade to a paid-for version of Google Workspace, but within that, Google Slides is exactly the same product as in the free version of Google Workspace and offers all the tools individual users are likely to need. In fact, at the time of writing there are no differences between the paid version and the free version!
Getting Started
Creating a new Slides presentation
To use Google Slides you need to sign up for a free Google account. You can create one here .
From Google Drive , click New at the top of the left-hand dashboard, then choose Google Slides > Blank presentation . There’s also an option to build your Slides deck from a template – we’ll cover that later .
If you’re working from the Slides homepage , simply click the blank template with the plus sign which sits beneath the Start a new presentation header in the top left of the main page.
Once open, you can rename your new Slides deck any time by clicking the Untitled Presentation box in the top left. So can your collaborators – we’ll introduce them properly later .
Changes are saved automatically when working online. This is why there’s no Save button in Google Slides. We talk more about saving your work later on .
To add a new blank slide, right click one of the slide thumbnails in the left-hand panel and select New slide . This new slide will use the same layout as the one you right clicked on ( more on layouts later ). To create a slide that is identical to an existing slide (including content), right click the thumbnail and select Duplicate slide .
To remove a slide, click on the slide thumbnail that you wish to delete and hit the Delete key on your keyboard, or right click and select Delete .
If there’s a slide you want to keep in your deck but don’t want to show when presenting, you can hide it. Right click the slide thumbnail and select Skip slide . The slide thumbnail will fade back. When you are in slideshow mode this slide will no longer show. To unskip a slide, right click the thumbnail and click Unskip slide .
The menu bar covers all the key functionality you’ll need to get started building your presentation. You’re likely to have come across many of these options before in other software, so we’ll focus on some of the more Google Slides-specific functionality below.

The File tab has all the basics for sharing, editing, and toggling settings.
The Share button lets you share your presentation with others. To learn more about sharing and privacy settings, see Cloud working below .
Make a copy lets you create a copy of either your entire presentation or of a single slide. This is great if you want to play around with edits on a deck or slide without editing the original document.
Version history allows you to see past iterations of a document, which can be incredibly useful. We talk more about Version history in the Viewing and saving your work section below .

Publish to the web lets you publish a non-editable version of your presentation that can be viewed via a link or embedded on a web page. This is a great feature if you want a larger audience to see your final, finished piece of work. Click Share , then Publish to the web , select either Link or Embed , adjust any relevant settings, and hit Publish .
Language lets you change the language of the document so that spelling is checked correctly. Tip: If you change from US to UK English, your measurements will change from imperial to metric — useful to know!
Page setup lets you format your slides to suit your needs. You can find more info about setting up pages here and in our blog post, How to change slide size in Google Slides .

This handy feature allows you to send an approval request to anyone who needs to give your presentation the final once-over — for example, your manager. To use this feature, simply click Approvals and the Approvals pane will appear. Click Make a request to send the deck to your chosen reviewers. You can toggle editing privileges or add a message before clicking Send request. You can also add a due date. Your chosen approver will see a message that says Pending approval at the top of the presentation when they open it. They can click to open a sidebar that allows them to see other reviewers, read your message, and see the due date if one has been assigned. Once they’ve approved the deck, you’ll get a notification to let you know.

The Edit tab houses some of the simplest — but most useful — tools you’ll use in Slides. Here you can find the expected Undo and Redo buttons for taking edits a step forward or back and options for Cut , Copy , and Paste . A particularly handy tool is Find and replace . If you have a word or phrase running throughout your presentation that needs changing, type it into the Find dialogue box and type your alternative into the Replace box. Then hit Replace to go through each instance individually, or Replace all for a blanket change across slides.
Tip: A lot of these actions can also be controlled using keyboard shortcuts . We’ve compiled a list of the most useful keyboard shortcuts for Slides in a handy PDF. Click here to download it for free and check out our favourite Google Slides shortcuts for increased productivity.

The View tab is used to change screen setup, open side panels, and toggle grids and guides on and off. You can also toggle guides by right clicking your slide and selecting Guides from the drop down menu.
To edit animation and transitions in your presentation, click Motion. Here you can view all animated objects in your presentation. To animate an object, select it and click Select an object to animate in the Motion pane. Click here for more about using animations and transitions .
Click Theme builder to view the theme for your document. We’ve got a whole section about using theme builder later on.
Grid view shows your slides in grid formation so you can see an overview of your whole deck rather than looking at things one slide at a time. In Grid view , you can reorder slides by dragging and dropping them — a handy way of rearranging things in your deck. To toggle Grid view off, go back to the View tab and untick it. Alternatively, you can toggle between Grid view and Film strip view (default view) by clicking the icons at the bottom of the sidebar on the left.
Guides lets you add guide lines to your presentation by right clicking on the slide or by clicking the Add vertical/horizontal guide buttons. Once you’ve added guides you can click and drag to rearrange them. By selecting Show guides or Clear guides you can toggle them on and off.
Top tip: It’s best to add the guides through the theme builder to ensure that they’re locked on the slides and you can’t accidentally click and edit them.

The Insert tab is where you add text, shapes, videos, images, and more to your slides. We go into more detail about inserting and editing images later .
Click on the following links to get more information about how to use features including text boxes , audio , shapes , tables , and charts .
You can add Word art to your presentation by clicking Word art from the Insert tab and then entering your chosen text into the box that appears at the top of the screen. You can then edit the font or colour of text in the toolbar. Learn more about the toolbar here.
Tip: Word art can also be really useful for quickly resizing large numbers and statistics. If you have a break slide and want to have a large number on there, it’s quite difficult to adjust it to the correct position. Word art treats the number as an individual object, not text. That way you can resize it in the same way you would resize any other object.

Here you will find tools to help you customise your slide. You can format tables, images and other objects here, along with text. There are also some text formatting options that can ONLY be found through this menu, such as size, colour, and capitalization.
Go to Text to see a range of ways you can adapt the look and feel of text. Here you can change the Size , Colour , Capitalisation , and more. If you need to add numbered footnotes to your presentation, you can use the Superscript and Subscript options.
Below Text is Align and indent . Here you can choose whether your text aligns to the left , right , or centre margins of the text box it sits in. You can also choose Justified for text paragraphs, spacing the text out evenly to fall flush with both margins.
Tip: The easiest way to align your text is to select it and then use the Align button in the toolbar to make the alignments.
Under Borders & lines you can create and edit a border for your object, change its colour, style or increase/decrease its line thickness. To remove all formatting changes to your object, click Clear formatting . Under Borders & lines you can create and edit a border for your text box, change its colour or increase/decrease its line thickness. To remove all formatting changes to your text, click Clear formatting .
Slides has some more advanced tools for formatting text, we talk about these later on .

The Slide tab has more ways to add and remove slides from your deck. You can use it to apply a layout from your theme builder by clicking Apply Layout , or open the Motion pane to select a new transition by clicking Transition . Change background opens up a new window where you can choose a colour fill or image fill for your slide. Once selected, you can choose whether to apply it to a single slide, or click Add to theme and apply it to your overall theme.

The Arrange tab includes the alignment tools. You can use these to easily arrange and position objects in an ordered way. Tip: It’s worth noting that right clicking on objects and then using the alignment options on that menu is a lot more practical!

There’s a lot of easy-to-miss functionality hidden in the Tools tab.
The Spelling menu houses standard tools such as Spell check . Personal dictionary lets you add words and phrases that wouldn’t show up in a normal dictionary. This way, these words don’t get flagged as misspelt. This would be useful for a company name, for example.
You can also find the standard Dictionary feature in the Tools tab.
Unlike the Tools tab in Google Docs, Google Slides unfortunately doesn’t have an option for viewing word count. A way to see the word count for your presentation is to click File > Download as > Microsoft PowerPoint (.pptx) or Plain Text (.txt) , or copy and paste the text from your presentation into a Google Docs file.
From the Tools tab you can also open up the Preferences window. There are lots of features in this window, so it’s well worth exploring! Here you can toggle some standard Slides features on or off, such as Automatically detect links or Automatically capitalise words . This could be useful if you have a particular style you need to adhere to, such as all lowercase. You can also toggle Smart Compose and Smart Reply on and off to help you write sentences and comments using predictive text. Clicking on the Substitutions tab in the Preferences window, which allows you to set up autocorrect actions where you type one thing and it automatically replaces it with something else. This is great for copyright symbols, trademarks, superscript and subscript.
If you’ve previously presented your deck and allowed your audience to ask questions using the Q&A feature, you can view the history of this by clicking Q&A history – handy if you need to remind yourself of common questions asked!
The Tools tab is also home to the Voice type speaker notes feature, which we cover here .
You can click Linked objects to open up the Linked objects pane, which allows you to find and update charts, tables, or slides that are linked to other files, such as Google Sheets. This makes it easy to keep your data up to date across different Google Workspace documents.
The Tools tab also houses Accessibility options. Click on Accessibility to toggle useful accessibility features that help make Slides easy for everyone to use, such as screen reader, braille support and screen magnifiers.
Finally, the Tools tab is where you can find the Activity dashboard (as long as you’re part of the same organisation as the file owner).This useful feature allows you to track viewers, comments, and sharing history for your presentation. It also gives you the option to adjust privacy settings, helping you keep total control of your work while enabling easy collaboration.
There’s a lot to cover here, so see below for more on using Extensions in Google Slides.
The toolbar is home to all the helpful tools you need to create a dazzling presentation. We’ll guide you through some of Slides’ more unique tools so you’re ready to get stuck in with confidence. Note that the toolbar changes depending on what you click on — for example, if you click on an image, it will display options for formatting and replacing that image. These will be hidden when you click off the image.

Paint format: This handy tool allows you to copy and paste the formatting of one object and apply it to another. Select a shape and click the Paint format tool. Then select another shape and watch the formatting of the first shape (fill colour, line colour, line width) be applied. You can also double-click the paint format tool to continue applying the formatting across multiple objects! To turn the paint format tool off, simply press Esc .
Zoom: Google Slides’ zoom functionality is somewhat limited. Selecting the Zoom button in the toolbar only allows you to zoom to 50, 100 or 200 percent. One way to more accurately adjust your zoom increments is to use the keyboard shortcuts CTRL+ALT++ and CTRL+ALT+-. Tip: After clicking the Zoom button in the toolbar, you can select a particular area on your slide to zoom in on by drawing a box over it.
Image: You can use the Image button to insert images from Drive, the web, Google Slides, your webcam, from your computer, and more. However, Slides has a lot of functionality for inserting and editing images that isn’t confined to the toolbar. Learn more about inserting and editing images in Slides here .
Bullet points: While we don’t recommend presenting lots of bullet points and text-heavy content , the bullet tool is quite easy to miss in Slides, so we thought we’d call it out here for those of you wondering how to add bullet points to your presentations! The Bulleted list drop down sits towards the end of the toolbar . Simply highlight your text, select the drop down, and choose the type of bullet you wish to use. Next to the Bulleted list is the Numbered list , which you can use if you want to use numbers and letters to organise your text points instead. You can also use CTRL + SHIFT + 8 to transform your text into a bulleted list, while CTRL + SHIFT + 7 will give you a numbered list.
Align: The best way to align text is to select it and then click on the Align button in the toolbar . Click to show a drop down menu which will allow you to justify selected text , centre it, or align it left or right.
The Theme builder (known as the Slide Master in PowerPoint) controls the look and feel of your deck. Use it to set custom layouts, backgrounds, colour schemes and fonts for all your slides. It’s best to set up the theme builder at the very start of your project to create a consistent set of slides. Be mindful if you edit the theme slide; any changes to the theme will retroactively affect the slides you’ve already built, so be sure to check through the whole presentation afterwards!
Theme builder: To launch the theme builder go to the Slide tab in the menu ba r and click Edit theme . You can also access this by clicking View in the toolbar and selecting Theme builder . Down the left hand side you will see a number of different slides. At the top is the theme slide. This is like the control centre for the rest of your deck. Any changes you make to this slide will be applied to all other slides in the theme builder, and all slides within your presentation, too.
Slide layouts: If you want to make a specific type of slide, like a title slide or agenda slide, you’ll want to edit the different slide layouts which sit below the theme slide. You can make small tweaks, like adjusting background colours or adding images, or larger adjustments, like repositioning text boxes. Unlike with the theme slide, these changes will not be applied to all slides; only slides which use that specific layout will be affected.
To edit a layout, first locate it down the left hand side of the theme builder view. You can also create a new one by right clicking on any layout and choosing New layout . Once you have the right layout selected, you can begin editing it like any other slide. Add, move, alter, or delete objects to achieve your desired layout style. Right click on the layout in the left hand panel and select Rename layout . A new window will appear where you can give the layout a new name, like ‘Agenda slide’.
Applying layouts to slides: When you are done editing your layouts, have a thorough check over your presentation. Once checked, you can exit the theme builder by clicking X in the right hand corner. All changes will be automatically saved.
To apply a particular layout to a slide, right click the slide thumbnail in the left hand panel and click Apply layout . This will bring up all the layout options from the theme builder for you to choose from. Need a bit more info? Check out our article on editing the Google Slides theme builder and layouts .
Themes are a collection of slide layouts that you can apply to your presentation. Google Slides comes with a number of pre-made themes that you can use straight out of the box, or customise via the theme builder for a more personalised look and feel.
You can also create your own, personalised theme. To do this, open up a blank presentation and make the necessary edits to the theme slide and layouts, as explained above . Then go to the Slides home screen , select Template gallery in the top right. When the new window opens up you can submit a new template in the top right corner. In the next window you can choose a presentation to use as a template. You can also submit a copy of this file by checking the box at the bottom. Checking this box will duplicate your selected presentation and move it to your personal Drive. This means that nobody but you can edit it. This is very useful, as when you edit a deck that is saved in the template gallery, it automatically updates it in the gallery. It’s best practice to make sure nobody but you has access to the original file to help preserve it. Once you’ve set all that up you can create a new deck using that template by selecting New > From a template and navigating to it in the template gallery.
Choosing a theme: When you create a new Slides deck (by clicking + New and then Google Slides from your Google Drive homepage) you will be presented with a range of themes when your new deck first opens. You can also go to the Slide tab in the menu bar and select Change theme . You can click on any theme in the panel to preview it. Once chosen, simply close the panel by clicking the X in the right hand corner. To edit this theme, simply open the theme builder and follow the steps as explained above.

Changing the theme: If you are working from an existing Slides document and want to change the theme to one of Google’s preset options, go to the Slide tab in the menu bar and select Change theme to preview Google Slides’ pre-set options. If you choose a new theme, it will be applied to all of your existing slides, so check through all your slides once the change has been applied to ensure it looks how you want it to.
Tip: Once your content has been moved onto the correct template you can clean up other themes in the deck. First, navigate to View > Theme builder . By clicking the name of your theme, you can see the other themes in the deck in a drop down menu that appears. To delete them from the deck, simply click the name of the theme, then select the top panel labelled Theme and press delete . As long as no slides in the deck are using that theme, it will delete the theme (and all layouts connected to it) from your document.
Importing a theme from PowerPoint: Although you can import themes from one deck to another, it’s important to be careful when using the built-in Import theme function because it can merge with the existing one, causing irregularities. Also, your Theme builder can get cluttered with templates when slides are incorrectly copied and pasted from other sources. If you want to try this function out anyway, go to the Slide tab in the menu bar and select Change theme. At the bottom of the theme panel you can select Import theme . In the new window, navigate to the upload tab and click Select a file from your computer . Choose another Google Slides deck or PowerPoint file, and Google Slides will then extract the theme from it.
Because importing themes using the native function is so temperamental, we’ve discovered a workaround which works like a charm, and is especially useful if you have a PowerPoint theme that you’d like to import into your Slides deck. Find a deck on Drive that uses the theme you want to import into your Google Slides deck. Copy a slide that uses the correct template. Open up the deck that you’d like to import your theme into and paste your slide into it. Select Keep original styles . This will ensure that the entire theme is brought over (including fonts, colours, and guides) whilst keeping it separate from other themes in the deck. Now that your theme has been imported, you can create new slides within it by right clicking on the slide that has the correct theme and clicking New slide .
Changing and customising theme colours: To create a set of custom colours that appear in the colour palette for your theme, go to the theme builder , select colours just below the menu bar which opens up the colours tab on the right-hand side. You can change the colours for each theme from there.
Changing slide size: Google Slides defaults to 25.4 x 14.29cm, which is a 16:9 aspect ratio. Note that this is smaller than PPT, so if you’re copying objects or text from a PPT deck opened with Google Slides, they will paste into Google Slides much larger than the original.
There’s an easy way to toggle between set slide dimensions or create a custom size. Go to Page setup in the File tab. Use the drop down to choose a standard size (Standard 4:3 , Widescreen 16:9 , Widescreen 16:10 ) or choose Custom to input your own dimensions. Once chosen, click Apply .
If you do choose to use a custom size for your deck, make sure you do so with good reason. The standard 16:9 ratio is widely used because it fits perfectly on most widescreen screens and projectors. A custom size may not work so well, and may make inserting slides from other decks quite tricky! Learn more about how to change slide size in Google Slides .
Tip: It’s best to set a custom slide size before adding your content. Adjusting your slide size afterwards will stretch everything on the slide to fit!
The Explore tool has two key functionalities that we’ve found useful. Firstly, it generates suggestions for appropriate layouts based on what’s on your slide. Secondly, it allows you to search Google within your Slides document.
Opening the Explore panel
Accessing the Explore tool is simple. All you need to do is go to Tools in the menu bar and then click Explore in the drop down menu. After you’ve located, simply click — this will open the Explore panel sidebar.

Suggested layouts don’t only change when you update text. If you insert an image, graph, chart, or GIF, the layouts will also update to offer you more appropriate layout options for the specific type of visual you have included. For example, to insert an image, select Insert , choose Image , and choose one of the options provided to either upload an image from your computer, the web, drive, or another location.
Once you’ve selected a layout, any new slides you add from that slide will follow that same layout, helping you keep your presentation consistent. You can also use Explore to create different layouts for different slides depending on the content. However, be aware that your slide might need to follow a different layout to one you’ve used previously, and Explore won’t create any more layouts that are consistent with the first one. The individual layouts it suggests will be inconsistent with one another and so the more you use the Explore function, the more inconsistent the whole deck will be when it comes to things like title alignment and image positioning, etc.
Ultimately, this feature is good for giving you ideas for new layouts, but it’s important to be aware of potential inconsistencies across different slides.
Adding information from other documents or web sources
The Explore tool can do more than just create layouts — it also lets you quickly and easily locate something online or on Drive without opening a new tab on your web browser or exiting your presentation. All you need to do is navigate to Explore , type in a search term in the search bar, and your results will appear.

After searching for something, your search results will show in categories. There are three categories which will appear, Cloud search, Web, and Images.
Cloud search allows you to search through Google Drive, Gmail, and more. To filter by type, click the filter icon. It’s possible your administrator may have turned off this option, in which case it may not appear and you’ll need to search manually through Google Drive in another browser tab instead.
Web uses Google Search to help locate information from the web related to your presentation.
Images uses Google Image Search to aid in finding images from the web related to your presentation.
Let’s look at the Explore tool in action.
Let’s say you are giving a presentation on marine mammals, and you need to locate pictures of seals. Simply navigate to Explore , type ‘seal’ in the search bar, and press enter. Now, click Images from the three options just below the search bar.
To preview any images at a larger size, just click on them. If you decide you are happy with the image, simply click the blue I nsert button at the top of the preview window. If you’ve located an image you want to add to your presentation from the Explore panel and don’t need to preview it, all you need to do is click the + that appears on the top right corner of the image when you hover over it. The image will be added to the slide you have selected, with a link to the original source page attached.
Reminder: Consider usage rights when selecting an image. Be sure to consult guidelines on fair use and licensing when searching for images online. Site owners often use licences to indicate if and how others can reuse content on their sites. The licence details should provide guidance on whether or not an image can be used for your intended context, and whether to include appropriate attribution for the image if necessary.
Once you’ve selected your images, you can use Explore to place them in layouts by clicking the back arrow in the Explore panel until you get back to the layout options.
You’re not just limited to searching for images. Type a keyword into the search bar, click the Web tab, and you’ll be given Google search results related to your keyword. If you want to find out more, simply click on one of the links and a new tab opens in your browser taking you to that webpage. If you need to see more results, simply scroll down to the bottom of the Explore tab and select See all results on Google .
To locate files in Drive, simply search in the Explore tab using the process we’ve outlined above and click Cloud search in the three options below the search bar.
Using extensions
How to add an extension to Slides: Extensions (also known as add-ons) are independent apps you can add to Google Slides to increase its capabilities. You can find the full range of add-ons by clicking the Extensions tab in the menu bar and choosing Add-ons and then Get add-ons . This opens a new window with some featured add-ons, as well as a search bar that allows you to look for something specific. Once you’ve found one to try, click on it and then click Install . You may then be asked to verify your login details and allow permission settings. Once you’ve clicked Install , the add-on will be added to Slides. You can find all of your downloaded add-ons in Add-ons under the Extensions tab.
Our favourite add-ons and extensions: We’ve compiled a list of the handiest Google Slides add-ons that help us do our jobs better, so you can get some inspiration!
Back to top
Creating content: text and fonts
To insert a text box, click the Text box button in the toolbar , or Insert > text box from the menu bar . Then, drop the text box onto your slide by clicking with your cursor. You can now begin typing. The majority of text editing tools can be found in the toolbar . Here you can change the font, colour, and size of your text, add bullet points, or change its alignment. We’ve put together a list of the 10 best fonts to use in Google Slides . It’s worth noting that not all text needs to sit inside a textbox. You can also type directly into a shape by simply double clicking it and starting to type.
Slides has a handful of more advanced tools for text formatting. Access them by selecting the object or text box you want to format, and clicking Format options to the far right of the toolbar or by right clicking on the object. This opens up a number of different options. Here we will focus on Size & rotation and Position .
The Size & rotation options allow you to resize objects more precisely. You can adjust the Width and Height of objects,, by typing directly into the provided input fields. If you want to resize your object without it being warped or stretched, check the Lock aspect ratios box.
The alignment tools will suffice for most users, but if you need more precision the Position option provides a more accurate way of positioning an object or text box on the slide. The Rotate tool allows pinpoint accuracy when rotating an object by enabling you to enter a specific degree. Size & rotation and Position format options can be applied to all objects on slides, not just text boxes!
Text fitting: Text fitting tools give you more control over how your text sits within a shape or text box. The Indentation tool lets you fine-tune paragraphs of text without having to alter the shape they sit within. You can play around with this by typing in the size of your desired indentation, in inches or centimetres (depending on your document’s language settings), into the provided input fields. Within the Indentation menu there are some further options for controlling indentations. Click the drop down labelled Special and select one of the following:
- None: Select for text to follow the default indentation parameters
- First line: Select to adjust the indentations on the first line of a paragraph only
- Hanging: Select to adjust the indentation for all lines of text except the first one
You can use indentations to control the spaces between bullet points and the text that connects them, too.
To automatically adjust how a text box interacts with the text within it, use the Autfo-fit function. This is found directly below the Indentation tool. You can choose from Do not auto-fit , (makes the text box height fully adjustable regardless of how much text used), Shrink text on overflow (to make the text smaller if you make the text box smaller), or Resize shape to fit text (to make the text box get larger or smaller to fit your text as you add or remove content). If you choose Shrink text on overflow, be aware that Google Slides adjusts your line spacing, font size and gaps between letters to ensure it all fits. Using this setting across the deck will make your text boxes largely inconsistent!
While Indentation allows you to fine tune specific paragraphs of text, Padding is used to adjust the spaces between the edge of the shape and the text. By adjusting the four Padding values (top, bottom, left and right) you can control the margins of your text box. For example, if you wanted to perfectly left-align an object with some text, you can adjust the left-hand margin to 0.
At the time of publishing, there is no way to fully wrap text around an image or shape in Google Slides — these tools are your best options! Read more text formatting tips.
To insert a table onto your slide, go to the Insert tab in the menu bar and hover over Table . In the drop down menu you are given the option to select how many columns and rows you want (for example, 2 x 5 ). Once selected, your table will appear on your slide.
You can now move it around your slide or make it bigger or smaller. Each cell can have its individual indentations and margins adjusted in the same way as a normal text box. You can add or remove columns and rows by right clicking on a cell and selecting the appropriate command. You can format the lines in a table by highlighting the cells and selecting the small arrow in the top right corner of the selection. This allows you to select the appropriate line in that selection, which will allow you to quickly edit all the lines at once.
At the time of publishing, Google Slides does not support custom fonts. You cannot import them, and there are currently no add-ons for custom fonts in the add-ons store. However, there is a way to add a few new fonts to your existing Slides font library. In the toolbar , click the font drop down and select More fonts . This opens up a new dialogue box with a selection of Google fonts that you can add to the default list. Click on a font to install it. Installed fonts will turn blue, with a blue tick next to them. To remove a font, simply click on it again and the blue tick will disappear. Once you are happy with the fonts you have added, click OK .

Creating content: shapes and images
To insert a shape, click the Shape button in the toolbar, or Insert > Shape from the menu bar . Select the shape you want to use, then either:
- Click your slide to drop a perfectly proportioned shape at a default size
- Click and drag (whilst holding down the SHIFT key if you want to retain proportions) and drag your shape to an appropriate size
Adjusting the size of Slide objects: Whether you’re working with an image, shape or text box, there are some simple but effective ways you can edit them to achieve a more customised look and feel.
To adjust the dimensions of an object, click it to make the blue adjustment nodes appear. Click and drag any one of these nodes to alter the size of your object. If you want to make your object bigger or smaller whilst maintaining its proportions, hold down the SHIFT key whilst dragging the corner nodes. You can also rotate your shape by clicking and dragging the small circular node above the object. Holding the SHIFT key will lock those rotations in 15-degree increments.
Grouping and ungrouping objects: If you have objects on your slide that intersect with one another — like a text box layered on top of a shape, or a complex bar chart — you may wish to group them so that they stay together in a particular order when moved or resized. Grouping is also very useful for applying edits to multiple objects at the same time.
First, select the objects you want to group together (it can be as many as you like). Then right click the objects and select Group , or use keyboard shortcut CTRL + ALT + G .
Now, when you select one object, all other grouped objects will be selected as well. This makes them easier to move around your slide and edit.
To ungroup your objects, select the group and right click on Ungroup , or press keyboard shortcut CTRL + ALT + SHIFT + G .
Note: you can only group elements that are on the same slide as one another, though it is possible to group shapes even if they are outside the bounds of your slide template.
Grouping objects can be helpful if you want to format multiple shapes or text in the same way at once. For example, if you need to change the font style, colour and size of all of your slide text, you can group the textboxes together and edit them using the ribbon as normal. These changes will apply to all elements within your group.
Using the alignment tools: To ensure that your slides are slick and professional, you need to use Google Slides’ handy alignment tools. To show you how to make the most of these tools, we’ll demonstrate how you could use them to format an agenda slide.
Select all four agenda points and right click on your selected object (or click the Align drop down in the Arrange tab). Here you will see a range of alignment options. Click Left so that all points line up along the left hand side.

Next, with all four points still selected, right click again (or click the Arrange tab again), but this time choose Distribute and then Vertically . This spaces all of your points evenly between the top and bottom point.
Now you have a perfectly aligned and distributed agenda slide!

Another handy tool here is Center on page , again found by right clicking on the object (or in the Arrange tab). Choosing either Horizontally or Vertically positions your selected object in the centre of the slide on the horizontal or vertical axis.

To insert an image, click the Insert image button in the toolbar, or go to Insert > Image from the menu bar to upload from your computer, Drive, Google photos, or even directly from your camera. If you have a web link for a specific image, select By URL and paste the link into the dialogue box.
Slides even has an in-built Google Image Search feature. Simply select Image > Search the web.
Note: Images sourced through this method claim to be copyright-free, but to be safe, it might be best to use images that you are sure are free or that you have permission to use.
Images need to be under 50MB, less than 25 megapixels and in JPEG, GIF, or PNG format to upload correctly.
You don’t have to stop at simply uploading your image. There are lots of ways you can edit an image to achieve a more polished, on-brand look and feel. Click here to learn how to make your slides more visual with clever image editing .
Cropping images: If you only want to show a specific part of an image, you can simply double click the image to start cropping. You can also click on the image and then choose Mask image (next to crop image ) in the toolbar. This will allow you to crop the image into different shapes such as a circle or a triangle.
Once the cropping interface appears, pull the black handles to adjust the mask that will hide the it parts of the image that you don’t want to see. This tool can be a little fiddly, and if you accidentally select one of the blue image nodes instead of a black handle, you could end up distorting your image instead of cropping it. If this does happen, just hit CTRL + Z to undo or hit the Undo button in the toolbar and try again!
More image formatting: There are some other formatting options available when editing images. Simply right click on your image and then choose Format options . Recolour allows you to recolour an image with a colour filter that’s based on your theme colours. Adjustments lets you adjust your image further by changing the opacity, brightness, and contrast.
Adding and editing GIFs: Google Slides is very GIF-friendly, and you can insert and edit animated GIFs in the same way as static images. If you edit a GIF (by cropping or resizing, for example) it will still work, playing in both Slideshow mode and on your slide as you edit! See more cool stuff on Google Slides and GIFs .
Advanced: making attractive slides
It’s all well and good knowing how to add images and shapes to Google Slides, but we want to show you how to use them more effectively to help tell your story better, too. At BrightCarbon, we strongly believe that text-heavy slides won’t help you achieve much besides sending your audience straight to sleep. When audiences are forced to read slides like this, they naturally tune out everything that the presenter is saying because it’s impossible to read and listen at the same time! So instead of presenting distracting slides like this, try toning down the text and introducing more visuals. People respond much better to interesting visuals, and what’s more, are much more likely to listen to what you, the presenter, is trying to say.
So, here are our four simple tips for using more visuals to not only make your slides look more attractive, but to increase audience engagement and help get your message across!
Use charts, processes, and timelines to relay information: Charts and timelines are an excellent way to show information visually, and help audiences see results or trends straight away. What’s more, they are an easy visual for anyone to create. We talk a bit about how to use linked charts elsewhere , so here’s an example of a simple but effective timeline, using nothing but Google Slides shapes. Looks better than a list of bullet points, right?

Use visual metaphors to help tell stories: Combining simple but striking visuals with a little bit of text can be a great way to get your audience thinking. This kind of simple imagery is great for segue slides or section headers (to change the tone before heading into a new section).

Replace bullet points with simple iconography: Consider removing large chunks of text and replacing them with simple icons that speak to the larger themes of your slide. Icons are much more visually interesting — and less daunting — than long blocks of text! Here’s a great tutorial that shows you how to make a lovely two-toned icon directly in Google Slides in less than four minutes!
Use high quality photography- not stock photo clichés: Before we move on to choosing the right images, it’s important to source images that you have permission to use. Aim to use high quality imagery from free websites like unsplash.com , rather than pulling straight from Google Images, where the majority of content is copyright-protected. Don’t underestimate the power of photography. The image choice you make will have an impact on how your brand is perceived. The right photography can create a positive atmosphere and sense of finesse around you and your presentation; cheesy stock images will have the opposite effect!

This image uses unrealistic and cheesy imagery that the audience may struggle to relate to. They may, as a result, not take you or your brand seriously. There’s also a lot of text on the slide, which the audience will read instead of listening to what you are saying.

This image, on the other hand, shows a more realistic depiction of events that audiences may be able to better relate to. Using high quality, modern-looking stock-photography also helps to paint your brand and your presentation in a better light. Reduced text means your audience can focus instead on the imagery and on listening to what you are saying.
When it comes to graphs and charts, Google Slides doesn’t have the largest library to choose from, but it does cover the basics and is incredibly easy to use, customise, and update. There are four different types of built-in charts you can create; Bar , Column , Line and Pie . Each chart works in a similar way, so here we’ll show you how to add a simple pie chart.
Adding data to your chart:
Go to the Insert tab in the menu bar , click Chart and then Pie . A basic pie chart will appear on your slide. To edit the data in your pie chart, select the chart and click the small drop down arrow in the top right-hand corner that looks like a ‘v’, then click Open source .
This opens a new Sheets doc where you can start to edit the data for your pie chart. Once you have inputted all of your data, close the Sheets doc and click the UPDATE button that will appear next to the pie chart on your slide. The pie chart will now adjust to reflect your new data.
Be aware that when you create a new chart that’s linked to a Google Sheets doc, the source file will be added to your personal Drive. You may wish to store this in another folder on your Drive so that you don’t delete it by mistake!
Customising the look and feel of your chart:
You can recolour the individual segments of your pie chart by clicking the small drop down arrow in the right hand corner that looks like a ‘v’, then clicking Open source to open up the data in Google Sheets.
In Sheets, double click any segment of your chart to open up the Chart editor . Here, beneath Series , click the Colour drop down to choose a colour for the segment. Repeat on each segment until your pie chart is the desired colours. Once done, close the Sheets doc and click the UPDATE button. The new colour scheme will now be applied.
If you’re looking to totally recolour your chart, you can also use the recolour method discussed earlier in the images section .

Inserting a GIF: Adding an animated GIF to a slide works in exactly the same way as adding an image. In the menu bar go to Insert > Image > Upload from computer , then select the GIF from your computer. The GIF will appear on your slide and begin looping. You can edit it in the same way you would edit a static image such as a JPEG.
Inserting a video:
Go to the Insert tab in the menu bar and select Video to open up the Insert video window. At the top of the window you will see two tabs; YouTube and Google Drive . These are the two places you can get videos from.
The YouTube tab shows a search bar and the YouTube logo. Type into the search bar to search for any video on YouTube. As with any media you use in your presentations — make sure you have the rights to use the video you choose. Click on the video you want to use and then hit Select . The video will now appear on your slide. You can move it around or resize it like any other Slides object. To watch the video, click the play button in the centre of the video. This works in both normal and Slideshow mode. If you already have a link to a YouTube video you wish to use, paste it into the box labelled Paste YouTube URL here . Once entered, hit Select and the video will appear on your slide.
If you have a local copy of the video you want to show (in MP4 format, for example), you can upload it to Drive and then use the Google Drive tab to search and locate it. Once you have found your video, hit Select and it will be added to your slide.

If you need to set a specific start and end time for your video (so that it only plays a chosen section of the content) here’s how to do it. Once your video has been added to your slide, right click it and select Format options . In the new window that appears to the right, click the Video playback drop down. From there you can input the desired start and end times by typing into the boxes. Once completed, the video will start and end at the chosen times whenever it is played, in both Slideshow mode and normal view.
You can also choose when your video plays. On click will play when you click anywhere on the slide, Automatically will just start the video without any action from you, and Manually means that you’ll need to hover over the video and click Play to get it to start.
Inserting audio:
To add audio to your presentation, go to Insert in the menu bar and then click Audio . A pop-up window will appear allowing you to choose to upload audio from Drive or paste in a URL. An audio icon will appear on the slide. Be mindful that this icon will be visible — if you don’t want it to be visible when presenting, just move it off the slide. To adjust your playback options, right click on the audio icon mentioned above and go to Format options . The top drop down is Audio playback . From here you can choose when your audio starts playing, the volume, and whether you want it to loop. You can also choose whether or not you’d like your audio to stop when moving onto the next slide.
Creating content: animation and interactivity
Just like images, using animation can bring your presentation to life and make it much more engaging for your audience. Everyone prefers a fun animation to a boring block of text! Well-chosen animations can help your audience absorb more information and remember your key messages — and adding movement doesn’t have to be a chore. Read on to find out more about the power of motion in your Google Slides presentations.
Transitions: Google Slides has a number of transitions to help you segue from one slide to the next. Go to Transition in the toolbar to open up the motion pane. In this panel click the None drop down to see the different options.
Whilst it’s tempting to use a number of different transitions to jazz up your deck, we advise keeping things simple, so as not to distract from your story. Typically, we like to use Dissolve (fades between slides) for most slides in the deck, as this is the most subtle way to transition between slides without distracting the audience. At the end of each section, we like to use Fade (fade to black) to accentuate the break between sections in a more obvious way.
If you want to apply one transition to all slides, click Apply to all slides below the transition drop down.
The motion pane is nice and easy to access. Either click Transition in the toolbar, or select an object, go to the Insert drop down in the menu bar and select Animation . Here you can view all the animated objects in your presentation, and access the range of animation options that Google Slides has to offer. You’ll see that there aren’t as many options as some other presentation software, but the essentials are there.
To animate an object begin by selecting it, then click Add animation in the Motion pane. Using the animation drop down (which defaults to Appear before an animation has been selected) you can choose from a variety of animation options. Options such as Fly in and Fade in make your objects appear on the slide. Conversely, Fly out and Fade out make objects that are already on your slide disappear.
You can also choose when your animation will begin with the Start condition drop down. Your animations will happen in order from top to bottom as they appear in the Motion pane. Choose between On click ( animation starts when you click with mouse or keyboard), After previous (animation starts after the previous animation) or With previous (animation starts with the previous animation, or directly after the previous slide has ended).

Slides makes it easy to animate paragraphs of text individually by checking the By paragraph checkbox when creating your animation.
Adjust the Duration slider to set the time it takes for your animation to complete.
As a web-based program, Slides makes great use of hyperlinks, so you can easily navigate between Slides, web pages, and other documents whilst you present.
Hyperlinking text and objects
Long, complicated URLs can make slides look messy. If you want to provide a link to an external website in your presentation whilst keeping your slide looking slick and professional, you need to know how to hyperlink text!
Highlight the text that you want to turn into a hyperlink — one or two words is best. Right click the text and scroll down to Link. This will bring up a new dialog box, in which you can paste the link of your chosen website. Click Apply , and you’re done!
Now, whenever you click that link (even in Slideshow mode) a new browser tab will launch, directing you to the web page. You don’t have to link to just web pages; you can link to other Google Docs and Sheets too. This same method of linking works on shapes, images and any other kind of Slides object.
Linking to a slide within your presentation
You may need to link between different sections of a presentation, or easily navigate back to an agenda slide. To do this, highlight the text or select the object that you want to act as the hyperlink, right click it and scroll down to Link. Be aware not all objects have this option when right clicking! You can add a link to these objects by using the keyboard shortcut: CTRL + K. In the dialog box, you should see a drop down at the bottom with a button that says Slides in this presentation . Click this to reveal a choice of Slides in your deck. Select the one you wish to hyperlink to and hit Apply .

Linking to a slide in a different presentation
It may also be necessary to link to a particular slide in a different presentation. To do this, first open the deck that you want to link to , and click on the slide you want it to open on. Whilst on that particular slide, copy the hyperlink from the browser bar.
Now, in the deck you want to link from , right click the text or object that will act as the hyperlink, scroll down to Link , and in the dialogue box, paste the hyperlink next to where it says Link . Click Apply . Now when you click your hyperlinked text or object, a new browser window will launch your presentation, starting on the exact slide you want!
Google Slides has a wide range of collaboration features. It’s purpose-built for collaborating in real time, offering a number of different ways for interacting with colleagues or friends. No more version control problems, emailing files back and forth, or being pushed to download anything. Here’s how you can make the most of these features:
Sharing a presentation: Sharing means granting someone access to view, edit, or comment on your presentation. This is handy if you are collaborating on a project, would like a second opinion on your own work, or need multiple team members to work on the same document at the same time. Google’s sharing settings allow you to set restrictions, so you are always fully in control of the document you share.
To share a Slides presentation, click the blue Share button in the top right of your screen. Alternatively, head to the File tab and select the Share button. This will open a new window where you can input the email addresses of the people you want to share with. To the right of the email addresses you will see a drop down that lets you toggle whether recipients will be able to edit , comment , or simply view your presentation. You can adjust an individual’s access later by navigating to the share window and clicking the drop down next to their individual email addresses. Another really useful feature here is the Notify checkbox, which lets you share a presentation with someone without them getting an email about it — great if you want to avoid bombarding someone with emails or if you want to share something for later use without immediately drawing the recipient’s attention to it (perhaps while you finish working on it!)
Advanced sharing settings: Advanced sharing settings are found in the sharing window mentioned above, under General access . Below People with access you can see the sharing status of your presentation.
This may be set to Restricted , meaning only you have access, Shared with your organisation , or set so that Anyone with a link can view . Please note that setting your presentation so that Anyone with a link can view means that it is no longer private. Anybody with that link can access your presentation. To learn more about sharing your Google Slides deck, head here .

Working with multiple users: So, you’ve shared your presentation with a few people and given them editing privileges. But how does this kind of collaboration work in practice? Here are a few handy pointers to get your collaborative efforts off to a flying start.
There’s only one document
Sharing your presentation with somebody else does not mean you’ve shared a separate version of it. There is only one master version, and any edits you make will be made in your collaborators’ document, too. This is great for real-time collaboration, especially if you have a deadline or need something to be reviewed as you work on it. You can revert your document back to Private at any time in the Sharing settings , or make a private copy by going to File > Make a copy .
Working together is easy
Google have tried to make working with multiple collaborators as simple as possible. You can see which collaborators are in the presentation in the top right panel. Collaborators will appear as colourful circles with initials, or profile pictures if the user has one. You can hover over the circles to reveal the full details of the collaborator.

You can even see what your co-workers are editing. Whether they are typing, drawing a shape or adding an image, you can see them do this in real-time, and they can see you in turn. This visibility over other people’s work means you can ensure everybody is on the same page and complete work faster. You can also follow collaborators around by clicking their headshot, which can be useful if you’re on a call with somebody in the deck and need to keep up with what they’re looking at. Whilst these collaboration features can be a total game changer, they’re best used in moderation. We’d advise against lurking on slides your co-workers are editing for too long, as it could be a little off-putting for them to know that you’re watching their every move!
Using Comments: If you and your co-workers aren’t editing a presentation at exactly the same time, you may want to leave notes for them to pick up on later. To leave a comment, click the Add comment button in the toolbar , or go to the Insert tab in the menu bar and choose Comment . You can also just right click on a slide to add a comment, or press CTRL + ALT + M . A box will appear next to your slide where you can begin typing. To assign an action to a specific person, type the @ symbol and then type their email address. An option will appear for you to Assign to that person. When you @somebody in a comment, they will receive an email notification, so you can be sure they won’t accidentally miss it.
Using the chat feature: If you need to chat with collaborators in real-time, Slides has a built in chat feature, too. To use it, at least one other collaborator must be in the presentation at the same time as you. To Show chat , click the blue person with the speech bubble icon in the top right, next to the profile icons. This will open up a separate window where you can type to chat. Close the chat window by clicking the same button used to open it.
Email multiple collaborators
One final collaboration feature worth mentioning here is emailing collaborators from Slides. This is handy if you want to send a message to all collaborators. In the File tab click Email and then choose Email collaborators . Here you can write a message to be emailed to as many or as few collaborators as you want. Simply check the names of the people you want to send the message to in the right hand column and click Send.
Read more about getting the most out of online collaboration .
Using Google Slides doesn’t necessarily require an internet connection. If you use Chrome or Edge as your browser, you can use Slides offline. This is particularly handy if you want to make changes to a Slides deck on the go, or if you are due to present to an audience in a location without an internet connection. If you’re running low on storage, you can prioritise saving individual files by going to File and clicking Make available offline or by right clicking on the file in Drive and selecting it from there.
Setting up Google Slides for offline use: Firstly, make sure you’re connected to the internet and using Chrome or Edge as your browser. If you haven’t already done so, you’ll need to download the Google Docs Offline Chrome extension, which can be found here . In Google Drive , click the icon shaped like a gear in the top right, and select Settings . Under General, make sure that the Offline checkbox is ticked and click DONE . You may see a notification box appear in the bottom left of your screen that says Setting up offline .
Next, navigate to the Slides homepage and click the main menu button (represented by an icon with three horizontal lines) in the top left hand corner. Go to Settings and make sure that the Offline button is toggled on (to the right). You can now disconnect from the internet and begin working offline!
Google Drive should still load as normal via Chrome browser. You can open up a presentation as normal and begin making changes. Next to the title of your presentation you should see a small lightning bolt icon. This indicates that you are now working offline. You can make changes and even present your deck as you normally would when working online. When you’re done making changes, close your presentation as normal.
Syncing offline work when you reconnect to the internet: Changes made to an offline presentation will automatically sync when you go back online and open up that file in Google Drive. It’s worth noting that if a collaborator made changes to the online document whilst you were working on it offline, both sets of changes will sync up in the same file. If this happens and you are unhappy with conflicting changes, use the Version history functionality to revert back to an earlier version.
If you are using the online version of Slides, your presentation is constantly being updated and saved as you work. This is why the Slides browser version doesn’t have a save button — it’s done automatically, meaning you don’t have to worry about losing unsaved work if your computer crashes or you accidentally close your browser window.
Saving your work to desktop: If you really want to save a copy of your Slides file to your desktop or a flash drive, you will first have to convert it to a different file type, such as Microsoft PowerPoint. We talk you through how to do this step by step later on.
Duplicating your work: There are two easy ways to make a copy of a presentation. From Google Drive , you can simply right click on any presentation, and choose Make copy from the drop down menu. Alternatively, with a presentation open, go to File > Make a copy… .

Version control: If you’re used to working with desktop presentation software, you may be in the habit of emailing different versions of a presentation back and forth. This can get confusing, especially when it comes to consolidating changes across versions.
With Google Slides this isn’t an issue, because everybody is working from one single document. This means that if you make a change it will be visible to all collaborators who have access to the document. This is very handy, but what happens when you want to revert to an earlier version?
Version history: Slides makes it easy for you to see all previous iterations of your deck and revert back to an earlier version if necessary. Here you can view all past editing rounds, going right back to when the presentation document was first created.
Go to File and choose Version history , then click on See version history . Click on the different dates to see a preview of how the document looked at the time. If you are just looking for a particular slide, line of text, or image that was deleted, you can simply copy and paste it from the earlier version, close the Version History window, and paste it into the latest version.
If you want to completely revert your document back to an earlier state, click the Restore this version button at the top left. If you choose to do this, bear in mind that your current version will be completely overwritten by the version you are restoring.
Naming versions: If there are multiple collaborators working in your deck, the Version History window can sometimes be difficult to keep track of, especially if there are multiple iterations in the same day. To better track the different iterations that you work on, you can easily name different versions. To do this, in the Version History window, double click the date of the version you want to name. This opens up a dialog box in which you can type a new name.

For more help on using this feature, check out this YouTube tutorial on getting the most out of version control in Google Slides .
Google Slides has tried to make it easy to convert to and from other presentation software. Here we’ll cover the basics of how to convert using some popular programs. Keep in mind that different presentation software have different features, so certain slide elements like animations or colour palettes may not convert exactly. When converting any file type, always have a thorough check through your slides for any errors before presenting!
Converting Google Slides to and from Microsoft PowerPoint:
Converting to and from PowerPoint is, in theory, very straightforward with Slides – however, complications are very common. It’s worth noting that the animation functionality in particular is very different in each program, so it’s likely that some animations may be lost in the conversion process. This is definitely something worth checking before presenting!
To download your Slides document to your desktop as a PowerPoint file, simply click File in the menu bar and hover over Download . In the drop down menu, select Microsoft PowerPoint (.pptx) .
Converting from PowerPoint to Slides isn’t much trickier – though again, glitches are common. From your Google Drive homepage, click the + New button and select File upload , then choose the PowerPoint file to upload from your computer. Once your file has been uploaded, locate it in Drive and right click. Select Open with and choose Google Slides .
If you want to insert PowerPoint Slides into an existing Google Slides deck, click File > Import Slides and then choose a file you have already uploaded to Drive, or alternatively upload a new one from your desktop. Once uploaded, you will then be given the option to choose which specific PowerPoint slides you want to import into your Google Slides deck.
Learn more about the dos and don’ts of PowerPoint to Google Slides conversion .
Converting Google Slides to and from Apple Keynote: Converting Slides to Keynote and vice versa is slightly trickier as it involves the additional step of converting to PowerPoint. There’s currently no way to convert directly between Slides and Keynote.
To convert from Slides to Keynote, click on the File tab in the menu bar and select Download, then choose Microsoft PowerPoint (.pptx) , and save your presentation. In Keynote, click on File in the menu bar , click Open , then select your converted PowerPoint file in the new window. Your presentation should now import to Keynote. To save it as a Keynote file, click File in the menu bar , then Save .
To convert from Keynote to Slides, open your Keynote, go to File in the menu bar and select Export to > PowerPoint (.pptx) . In the new window, select Next > Export . From Google Drive, create a new Slides presentation, then select the File tab in the menu bar and Import Slides . You should then see a new window where you can upload your converted PowerPoint file. From here, you can select specific slides to import, or choose all of them by clicking All in the top right corner. When you are happy with your slide selection, select Import Slides .
Converting Google Slides to and from Prezi: At the time of publishing, there is no way to directly convert to and from Prezi and Google Slides. You could use PowerPoint as a vehicle to import your Prezi into Slides. A way to convert Prezi to PowerPoint is exporting it as a PDF, then copy and pasting each individual slide into PowerPoint. This is not a very efficient technique, though, and means that some of your colours or slide objects may be corrupted, and all animations would be lost in the PDF conversion process.
Presenting and printing in Google Slides
When creating and sharing your Google Slides presentation, you should keep in mind the accessibility needs of your audience. There are lots of tools available to increase the accessibility of your deck — check out this blog post for details .
Presenting your work in Google Slides
Using Slideshow mode: At some point you are likely to want to practise running through your deck and will want to see what it looks like from the audience’s perspective. At BrightCarbon, we recommend always clicking through your deck in Slideshow mode at least once before presenting! For a deep dive into Slideshow mode, head over to this article.
To see your presentation in Slideshow mode – whether working online or offline – click Slideshow in the top right corner to go straight into standard view. Alternatively, you can click the drop down to the side of the Slideshow button for a few different options.
- Presenter view: In this view you can see a separate window from which you can do things like time your presentation, see thumbnails of the previous and next slides, begin Audience Q&A and also read your speaker notes. For more information, see our guide on Presenter view in Google Slides . For more on audience Q&A and speaker notes, see below.
- Start from beginning: This opens up the standard presenting view, the same as what you would see if you simply clicked Slideshow. This view is what your audience will see when you present to them, so it’s great for practising.
- Present on another screen: This option is exclusively for people who have access to Chromecast. If you have a Chromecast device connected to a TV screen that you want to present from, you can click this button to cast your presentation to that screen. If you want to show your presentation on a large screen but don’t have Chromecast, you can always do things the old-fashioned way and connect a HDMI cable from your laptop to the TV screen, using normal Presenter view .
Present to a meeting: If you want to present your deck directly in Google Meet, you can do this without leaving Google Slides. Navigate to the top right-hand corner of your screen and click on the video camera icon next to the Slideshow button. You can then join an existing meeting or start your own using the options in the drop down menu. Once you’re in a meeting, click on the video camera icon again and click Present this tab to share. It’s worth noting that we’ve found it’s generally easier to just share your screen from whatever video calling software you’re using — but if you work exclusively in Google Workspace and use Google Meet a lot, this feature may be worth checking out.
Speaker notes: Speaker notes can be accessed by dragging up from the bottom of your Slides window. Hover your cursor over the horizontal line in the bar at the very bottom of your window, and it should turn into a hand icon. Click down and drag up to reveal the Speaker notes bar. Here you can type anything from the script of your presentation to additional notes about the content of your slides. Speaker notes won’t be visible when you present unless you use Presenter view .
Slides also has a nifty built-in tool for voice typing speaker notes. Access the Speaker notes bar, then go to Tools in the menu bar and select Voice type speaker notes . This will launch a new window to the left of your slide with a microphone icon. When you are ready, click this icon and begin speaking. You should see your words appear as text in the Speaker notes bar. We have tested this out and found that it works pretty well if speaking clearly into a good microphone, like the kind found on a headset.
Audience Q&A: Audience Q&A is a fantastic feature that makes your presentation more interactive and engaging for participants. Encouraging users to ask questions virtually can inspire confidence and, if timed correctly, can give you more time to think about the best answers, rather than being caught off guard with on-the-spot questions.
In Slideshow mode , hover your cursor towards the bottom left of the screen to reveal the Presenter bar. From here, click the three dots to reveal a pop-up menu, then click More > Q&A to launch a new window. Clicking Start new begins the Q&A and generates a link that participants can follow to ask their questions. Participants do not need a Google account to sign in, and can check a box to remain anonymous should they so wish. When a question is asked, it will appear in the window, ready for you to answer! This is particularly useful if you don’t like answering questions on the spot and would value the opportunity to review and prepare answers, perhaps in a short break during your presentation. Reviewing the questions before bringing them up in front of your audience is a good idea — there is no built-in moderation filter, meaning participants could ask almost anything and remain completely anonymous.
Pointer: In Slideshow mode , hover your cursor over the Presenter bar and select Turn on the laser pointer . Clicking this button turns your cursor into a red laser pointer with a tail, so that the audience can easily see any areas that you wish to highlight.
To view Slides’ basic print settings, go to File > Print (you may need to scroll down to find it). This opens up a new window with a print preview of your Slides, and a few options for customising your printout. Next to Pages you can choose whether to print All pages, or type in a Custom range. You can also toggle Colour options, Paper size and the Image quality that is printed.
Printing slides with speaker notes: To print slides with their speaker notes, go to File > Print preview . This opens a new window where you can preview what your slides will look like when new print options are applied. To the top right of the modified toolbar , click the button that says 1 slide without notes . In the drop down, choose 1 slide with notes instead. This doesn’t mean that only one slide will be printed — you can choose which slides are printed in the normal Print settings. Once selected, the speaker notes will appear in a box to the side of each slide. You can now click Close preview in the far left, and navigate to the Print settings in the File tab to print your document. Or, with the preview still open, click the Print tab in the modified toolbar .

Printing slides without skipped slides: If you have a number of skipped slides throughout your presentation that you don’t want to print, you can easily toggle this off. Go to File > Print preview . To the top right of the modified toolbar , click the Include skipped slides button to toggle it on and off. When the button is completely white it is toggled off; when it is yellow it is toggled on. You can now click Close preview in the far left.
Learn about other methods for sharing your Google Slides presentation .
Google Slides top keyboard shortcuts : We’ve compiled a list of the most used – and most useful – Google Slides keyboard shortcuts, so you can create amazing presentations that are quicker, smarter, and slicker than ever before!
Our pick of the best add-ons for Google Slides : Level up with improved productivity, performance and added functionality- all by using a few simple add-ons! We’ve rounded up our favourite Google Slides add-ons here.
Editing images in Google Slides : Make your presentation more compelling with these few short and simple image editing tips for Google Slides. Guaranteed to make your slides look slicker and your audience feel more engaged!
- How to create visual presentations and eLearning
- 50 presentation quotes to enhance your slides
- No place for bullet points in a presentation
- How to avoid stock photo cliches in your corporate presentations
- Using typography in your sales presentations: 10 tips and tricks
We’ve got some great Google Slides masterclasses that run regularly on our events page . We also offer live in-person or online Google Slides training for small groups — why not invite us to train your team?

Joey Dudley
Senior design consultant; google slides training lead, related articles, google slides’ new features: guides, text fitting, and more.
- Google Slides / Presentation technology
- Comments: 11
Google has recently introduced some long-anticipated upgrades to basic features, and some entirely new tools too. We’ve taken a look and written up a general overview of what’s new, so you can make the most of these new features and get the best out of Google Slides.

The best free Google Slides templates
- Google Slides
- Comments: 1
Google Slides templates are a great starting point to improve the look and feel of your presentation. They’re fab as they’re accessible and low cost, but it’s important to remember that even well-designed presentations can be ineffective if the content is text heavy.

How to extract text from an image
- Presentation technology
If you’re creating a presentation and someone has added images of slides or images of data, it makes it really hard to develop a deck that’s consistently on brand, animated and updatable! Transforming these images into editable slides will make your life so much easier!

Fantastic! Thank you!
it is the best thing ever thank you
Great explanation, I’m actually quite familiar with Google Slides, and I was looking for a specific question that wasn’t covered, may not even be possible within Slides…..
I was recently at a presentation where along the right side of EACH SLIDE, the presenter had a running list of the topics in the presentation. As she switched slides, the heading that that topic fell under was then highlighted…..sort of a running account of the index.
Is this possible wtihin Google Slides? If so, how? Thanks in advance for your help.
Hi Susie, it’d definitely be possible to do this manually in Slides.
1. Create a list of section titles along the side of one slide, using the Insert Text Box feature. You could make the list look visually separate from the rest of the content by putting a shape behind it. 2. Copy and paste this list onto every slide in your presentation, keeping it in the same position. 3. Adjust the formatting of the appropriate section title on each slide, for example by changing the colour of the text – or the text box – to highlight it.
This way, as you click through the slides, each section will be highlighted in turn.
We’re not aware of any automatic way to do this, but if you find one do let us know!
me to and i found this and it ansewrd all of my questions
no more than the same actully
How do I edit (by using suggest editing mode) the work that has been shared with me as a Google Slide? I know how to do this in Google Docs but I do not see this feature with Slides.
To our knowledge, Google Slides doesn’t currently have a suggest edits feature. One work around we like to use (though not the most seamless solution) is to leave your suggested edits as comments (right click highlighted text > add comment). This way your suggestions are saved for the content owner to read through, without actually having made any direct changes to the content itself.
Hope this helps!
I got all excited when I saw the same menu bar when working on speaker notes. WOW, I thought, I can finally put graphics in my speaker notes! But no, when you try that it just puts it in the presentation, and NOT in the speaker notes. Except for being free, Google slides is no better than Powerpoint in this area.
I am a teacher, and I often create powerpoint “jeopardy-style” games with a home screen and multiple point value buttons that lead to question slides. Students have the option to choose questions in any order, and I can easily hyperlink each button / shape / text option to a different question slide. However, once the students come back to the home screen, I must have a way to show a difference between the buttons that have already been chosen (and should not be chosen again) and the buttons that still go to new questions. In powerpoint, I use a trigger to make the shape disappear once the shape has been clicked. I cannot find a similar option in slides. When I’m imported the power point file, the animations show as a “disappear once clicked” option, but they don’t actually seem to work and now there’s no way to see which options in the game have been chosen already. Any ideas??
There’s no simple fix for this I’m afraid! The animation options in Google Slides aren’t as sophisticated as in PowerPoint, and there are currently no Google Slides equivalent animations for PowerPoint’s ‘disappear once clicked’ (until Google Slides introduces triggers, at least!)
You are likely to run into issues with animations when converting PPT files to Google Slides, as complex animation sequences may break. Slides just doesn’t have the same functionality as PowerPoint quite yet!
Thanks, Natty
Guys how do I make google slides so they can buy an item on it cause I’ve been needing to do it for six months now!
Great Job Guys. Amazing Creation.
I love this! You are my favorite source ever! Its very helpfl and organized so I won’t have to read the whole thing like I do to other articles!
How can I apply this blog post to becoming a world heritage site?
IN ALL SERIOUSNESS THOUGH, THANK YOU SO MUCH FOR THIS!!! ♥
Is it possible to autoplay a Google slide presentation when offline? Is so how? Or what other options are there??
The only way to create a looping Slides deck is to use the ‘Publish to Web’ feature. There are instructions on how to do this in the article above. Unfortunately, I don’t think you can view Google Slides decks that have been published to web offline!
There is a way of using Google Slides offline, it’s also mentioned in the article above, though I know this doesn’t solve your problem of wanting to create a looping deck!
If you find a solution I’d love to hear about it!
Hello my teacher wants me to present a power point presentation and she said to save it on a usb stick. Do I download the slide drag that into the Usb stick? Also how would i be able to get it up on the screen after i have plugged into her computer? Please help this is due tomorrow!
Sorry for the slow reply. For PowerPoint files, you can just drag the file from your desktop into the USB folder. For Google Slides presentations, these are saved online in your Drive. You can save them to your desktop, but only be converting them to a different file type (File > download > choose file type). I hope this helps!
Great article!
Does anyone know of a way to link text boxes from slide to slide in Google slides.
Lets say for example I’ve got a text box on slide 1 that has overrun text content…is there a way to link that overrun tex content onto a text box on slide2? This way, any extra content I add to slide 1 will just push over to slide 2?
This feature is super basic but I cant see it and cant find any info about how to do this.
Thanks Damien
Fantastic post…but Im not able to add animation to my master template…I ‘ve tests so many things but I can animate my presentation…but not include them in my master
This turn me crazy ! Any idea
Hi Roger – thanks for your comment! I think Google Slides has removed this functionality from the master unfortunately. I’m pretty sure it was possible to animate objects within the master at one point, but it doesn’t seem to be there any more, which is a real shame!
What a great resource. Thank you. Is there a way to name individual slides, instead of the assigned numbering? So when you are building hyperlinks the names of the slides appear in the selection pane vs. Slide 1, Slide 2…
Hi Daren – glad you found the article useful. There’s no way to directly name each slide, though if you’re using a master layout, the title that you type into the master title box for each slide will appear as the slide name when linking. Not as useful as being able to name each slide individually, but should make it easier to locate the slide you need.
Is there a way of inserting animation in the master slide so that the animation on all the slides is similar. I am not referring to transitions. For eg. I have a presentation with 10 slides. Each side has four or five bullet points. I would like each bullet point to appear one at a time. It seems the only way to do this is to select each point in each slide and apply an animation to it. It is quite cumbersome and time-consuming. Is there a smarter way of doing this? Thanks
Hi, Very interesting tutorial. Could you please guide me how can i run on a TV and remotely control to update the any slides on different location from my home?
Hi Prashant,
Happy to help. Most laptops and TVs have HDMI ports, so you can use a HDMI cable to connect your laptop to a TV monitor to view your laptop screen on the TV screen. Is this what you mean?
If you’re talking about accessing your Slides on a TV screen without the help of a laptop, the only solution I can think of is using something like Google Chrome cast to cast the Slides from your mobile phone to a larger TV screen.
Hey , I’m unable to present it on my device …. Whenever I do this my screen is splitting into two , where one shows the slide and the other shows the timer and no. Of slides… How can I present on my own device in full view …
It sounds like you’re presenting in ‘Presenter View’. Try clicking the drop down button next to the ‘Present’ button and clicking ‘Present from beginning’. This should work!
I love this resource, very informative. In particular, I was looking for a design feature within Google Slides. I teach 7th grade World Civ and I utilize PowerPoint (Onedrive) to create all of my visual presentations for kids. On Microsoft 365 it is super slick to choose images and it displays various design possibilities for the current slide. Does ‘Slides’ have a function like this?
There’s no similar feature in Google Slides unfortunately! The closest equivalent that Google Slides has is the option to choose a deck theme. You can see all the theme options by clicking ‘Theme’ in the tool bar.
Hope this help!
Do you know if it’s possible to create a centralised google slides theme that I can edit and see the changes rolled out to every presentation already using that theme?
Hi Peta, I don’t think there’s a way of applying a theme automatically to other decks, but you can save a theme and import in into other decks manually. When you create your theme, make sure to save your template. Then, when you want to apply that theme to other presentations, open up the theme bar and click ‘Import theme’ you will then be able to locate your saved template deck and apply it to your current presentation. Hope this helps!
Can I change th eposition of presenter box, it blocks my view?
Hi Nitin, unfortunately there’s no way to move the presentation bar once in present mode, it’s very frustrating! If you move your mouse away from the bar, it will disappear from view eventually. Another solution is to move any buttons / slide objects so that they aren’t on the bottom left of the slide. Hope this helps!
Hey Natty, Great info here. But I’m trying to edit the header in “Print Settings and Preview” when I include notes with the slide. I imported the presentation from PowerPoint and the header is incorrect. But I can’t figure out how to change it. Any advice?
Hi Ashley, we find that there are a lot of issues and glitches when importing a PowerPoint presentation into Google Slides. That said, have you tried editing the header via the master? Click View > Master. It may be possible to edit the master heading there. Hope this helps!
Great resource! I was wondering if there is a way to adjust the size of just ONE slide in the presentation. Thanks!
Hi Angela, this isn’t possible as far as I know. The functionality for changing Slide size will apply to all slides in the deck. Hope this helps!
this isn’t possible as far as I know. The functionality for changing Slide size will apply to all slides in the deck. Hope this helps!
Great article! What I am however wondering, is how to deal with shape overlap at the edge of a slide. Realistically, in our company, we don’t use the presentation mode all that often. Usually, we just open a presentation and go through it in group in the default modus. So in that case you can see the overlapping shapes that normally get cropped out in the presentation modus. Let me give an example: I used a shape with a rounded top and a straight bottom. I angle this, let’s say 45 degrees and place this in the bottom left, with part of the shape overlapping the edge of the slides (the straight bottom). In the presentation modus you can’t see this overlap, but the way we use Google Slide, you can. I have tried multiple things, but no luck yet. Anyone have an idea how to crop the overlap with the edges of the slides? That would really be the solution here.
Hi Anneleen,
As far as I know, there’s no way to crop the parts of the shape that are coming off the slide. But, there is a work around. If you view your presentation in ‘Print settings and preview’ mode (File > Print settings and preview) this opens up a version of your slides deck that you can still scroll through like you would in normal view, but anything that overlaps the edges of the slide are cropped. It’s not a perfect solution, but might work for your needs!
How do you title an existing Google slide deck? I don’t want to start over but I do want to add some navigation.
Hi there, I’m afraid I don’t fully understand your question. Are you looking for help changing the title of your deck, or adding some hyperlinked navigation to it? We have a post about creating a navigable, interactive deck at the link below. Thanks!
https://www.brightcarbon.com/blog/how-to-make-an-interactive-presentation-in-google-slides/
I love it. Ty!😁😁😁😁
I’m trying to create links in one slide to other slides in the same deck. When I do so, I can’t scroll down far enough in the drop-down window that comes up. It comes up at the bottom of the screen and I con only scroll down about 20 slides. I can’t seem to move the drop down box or find another avenue to create such links. Any help will be appreciated.
Does the drop down box appear close to the bottom of your screen because the object you are trying to turn into a hyperlink is close to the bottom of your slide? If this is the case, you could always move the object up to the top of your slide whilst you create the hyperlink (so more of the drop down box is visible) then move it back in to place. I hope this is helpful!
Is it possible to add an image to the speaker notes section of a Google Slide?
Hi Jacqueline, as far as I’m aware, this is not yet possible in Google Slides!
I’m wondering if anyone has figured out a way to set a default font and size for speaker notes. I’ve been digging for ages and haven’t found anything yet!
Hi Keith, as far as I’m aware, it’s not possible to set a default font and size across speaker notes in Google Slides!
Hi there, I’m just wondering if the following is possible: – a company has a ‘set of slides’ that can be used in different presentations – but there is only one central repository for the slides, if a slide get updated it updates automatically within all the presentations that it is used in (like a master-slide so to speak)
For example: a company sells different products and has for each product an individual presentation. Part of each presentation are some standard slides about the company, the information on those slides may vary from month to month but rather than updating those slides in every single presentation, the information gets updated only within the master-slide(s).
Hope the above makes sense, any feedback would be gratefully appreciated. Many thanks!
There is a way to ‘link’ slides across different presentations. First you need to create a master deck – this is the deck you will update if the slides need updating in the future. At any point you can copy slides from the master deck into another deck. When you paste the slides into the other deck, a pop up will appear in the right hand corner of the slides, giving you the option to ‘link’ slides. Once the slides are linked, when you update the master deck, the content will copy over to the other decks where the slides are linked. Just be sure to click ‘update’ on the link slides.
You can also toggle guides by right clicking your slide and selecting Guides from the drop down menu. To open the animation and transitions pane, click Animations. Here, you can view all animated objects in your presentation.
Join the BrightCarbon mailing list for monthly invites and resources
This is awesome! You guys are great to work with and we will absolutely recommend you to others. John Capuano Lone Beacon

How to Name Slides in Google Slides? [Quick Guide!]
By: Author Shrot Katewa
![How to Name Slides in Google Slides? [Quick Guide!]](https://artofpresentations.com/wp-content/uploads/2021/09/Featured-Image-How-to-Name-Slides-in-Google-Slides-optimized.jpg "untitled presentation google slide")
Naming a slide in your Google Slides presentation can be a great way to keep your presentation organized. It is one of those things that will not necessarily make or break your presentation, but can definitely streamline the process when designing a presentation. So you may wonder, how exactly should you name slides in Google Slides?
To name a slide in Google Slides, first, insert a new slide. Then, type in the name of the slide in the “Click to add title” text box. This will not only add the heading of the slide but also name the slide by default.
In this article, we will cover the topic of naming slides in Google Slides in complete detail. I’ll show you how you can name and rename the slides in Google Slides. Plus, I’ll also share with you two methods on how to name and rename your presentation itself!
So, let’s get started!
1. How does Naming a Slide Help in Google Slides?
Google Slides allows you to change the title of each individual slide for easier navigation.
Naming a slide in Google Slides makes it easy to find a specific slide when you want to hyperlink it on another slide with the “Link” feature in the toolbar or “Ctrl+K” on the keyboard.
By hyperlinking a slide in another slide, you can jump to different slides from a specific slide without scrolling through the entire list of slides. Naming slides will also help you sort them into a table of contents if necessary!
2. How to Name a Specific Slide in Google Slides?
In Google Slides, by default, the name of a slide is the same as the title written on that specific slide. The process of naming a specific slide in Google Slides is mostly automated.
You have to follow 2 simple steps:
Step-1: Click on the “Click to add title” box in the slide
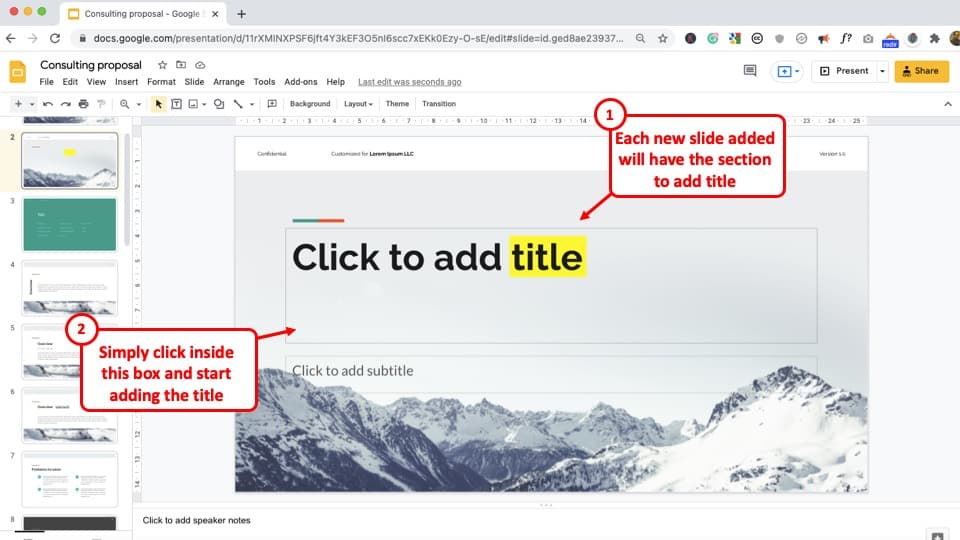
Google Slides automatically sets the name of a slide according to the text in the title box. To change it manually, click on the “Click to add title” box on the slide.
By clicking on it, you can start changing the name of that specific slide.
Step-2: Write the name of the slide in the box
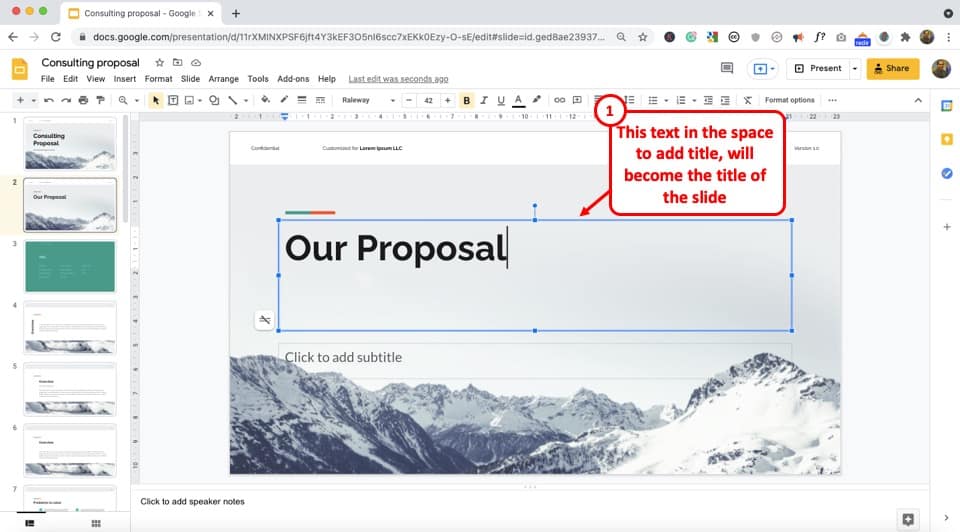
Once you click on the “Click to add title” box in the selected slide, the textbox will turn empty. Now you can write your preferred title for the slide. This title will also be the name of your slide.
3. How to View the Slide Name?
Unfortunately, there is no direct way to view the name of the slides in Google Slides currently. However, you can see the name of the slide when you try to insert a link on any one of the slides. (Check out my other article on how to insert a link in Google Slides if you are unsure about the steps.)
Here’s what you need to do –
Step 1 – Insert a hyperlink
You can insert a hyperlink by going to the “Insert” tab, and then clicking on the “Link” option. Make sure you select the text that needs to be linked to another source.
Step 2 – Choose the “Slides in this presentation” option
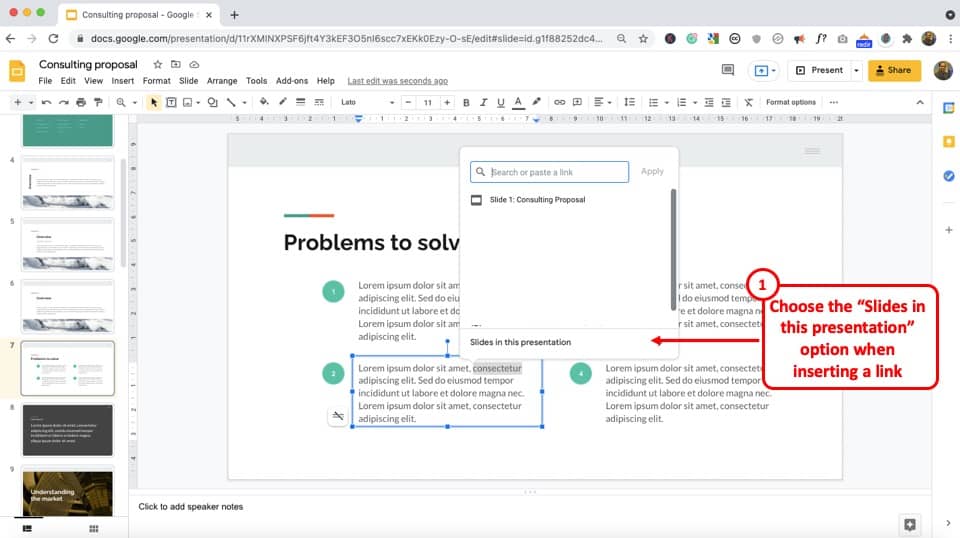
When inserting a link, Google Slides will present an option to add links to existing documents in your Google Drive as well as the slides on the presentation.
To view the name of the slides, we will need to link the text to existing slides. To do that, simply click on the “Slides in this presentation” option at the bottom.
Step 3 – View the Names of the Slides
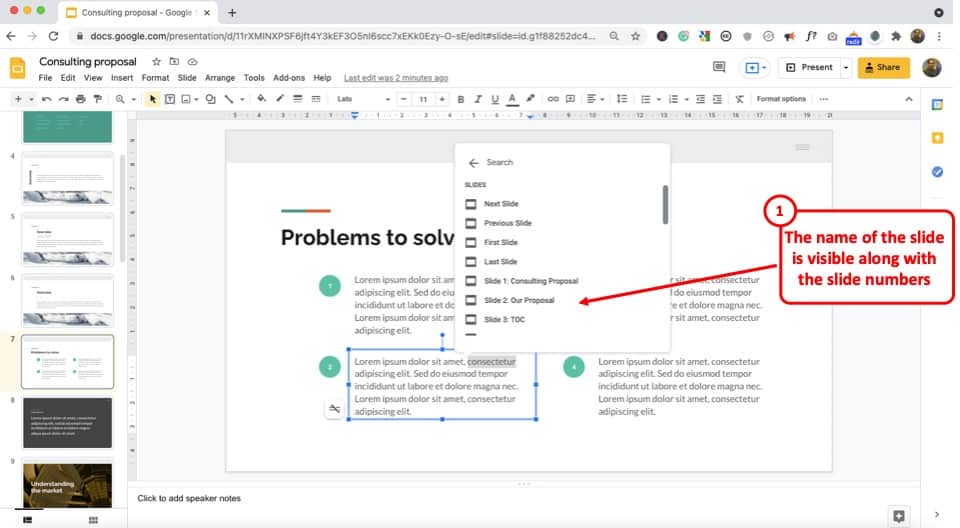
In the next pop-up, you will notice that the name of the slides is visible along with the respective slide numbers.
This is the only way to view the name or the title of the slides in Google Slides.
4. How to Rename a Slide Layout in Google Slides?
If you are not aware already, slides layouts in Google Slides are different from the slides themselves!
Slide layout in Google Slides contains various premade designs that can be used for the quick arrangement of the contents in the slide.
The layouts can be found in the “Apply layout” option under the “Slide” button in the menus.
You can follow the steps to change the name of a slide layout:
Step-1: Click on the “Theme builder” option under the “View” button
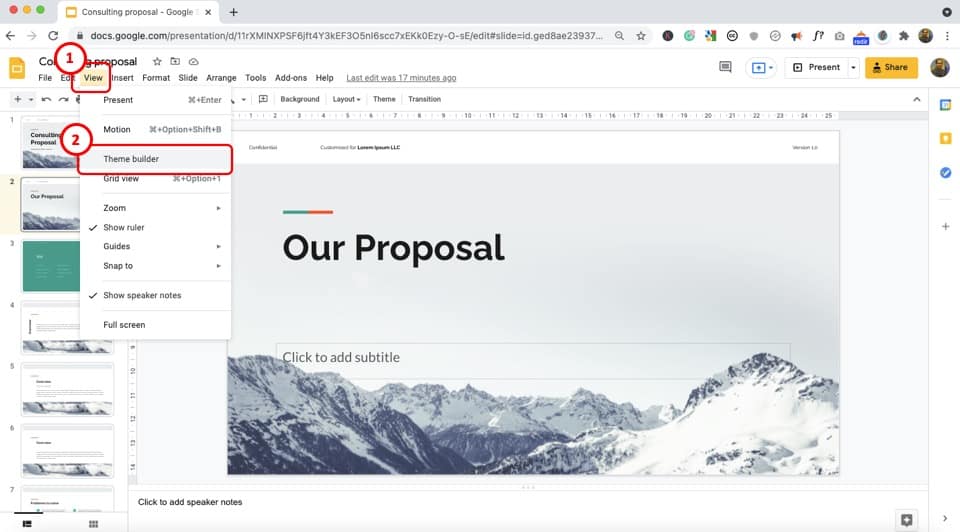
To find the option to rename a slide layout, at first you have to open the “Theme builder” which allows you to customize themes and layouts.
In the menubar, click on the “View” button, and from the drop-down menu, click on the “Theme builder” option.
In an older or not updated version of Google Slides, click on the “Master” option under the “View” button in the toolbar.
Step-2: Select the Slide Layout you want to rename
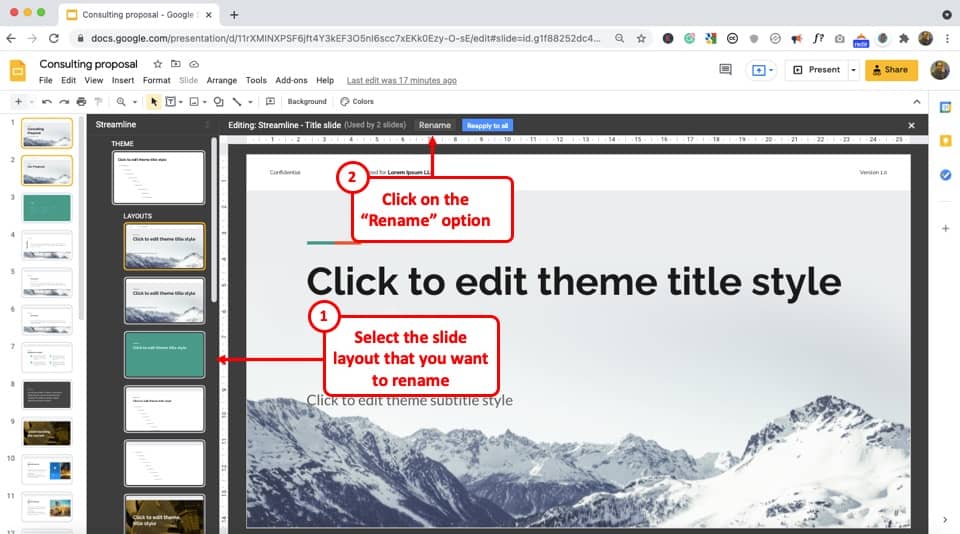
Once the “Theme builder” is open, you will notice a “Streamline” on the left side of the slide. The “Streamline” contains the list of the slide layouts available in Google Slides.
Select the layout you want to rename from the list of the layouts.
Step-3: Click on the “Rename” button
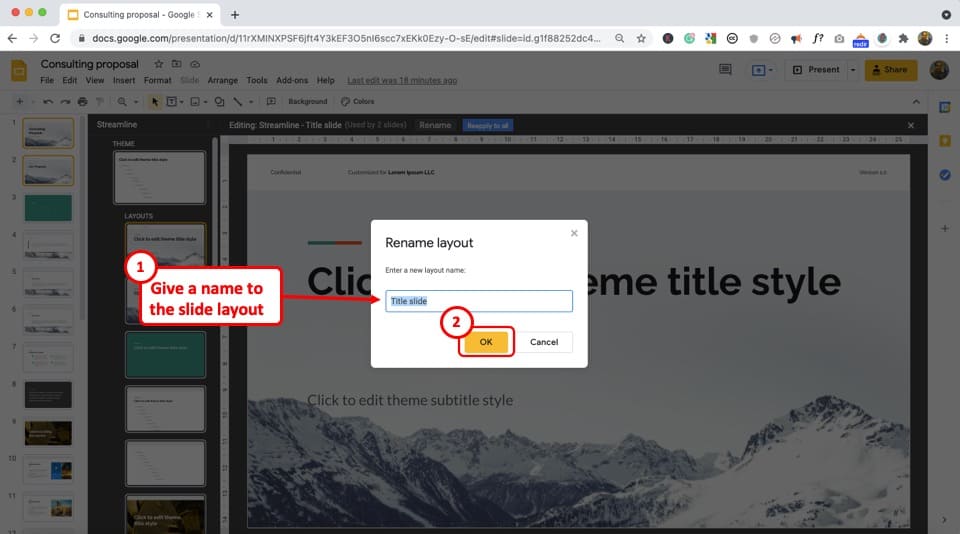
Once you have selected your preferred layout, click on the “Rename” button on top of the slide. It will open a pop-up where you can write a new name for the selected slide layout.
Click on the “OK” button to save the new name of the layout.
Step-4: View the Name of the Slide Layout
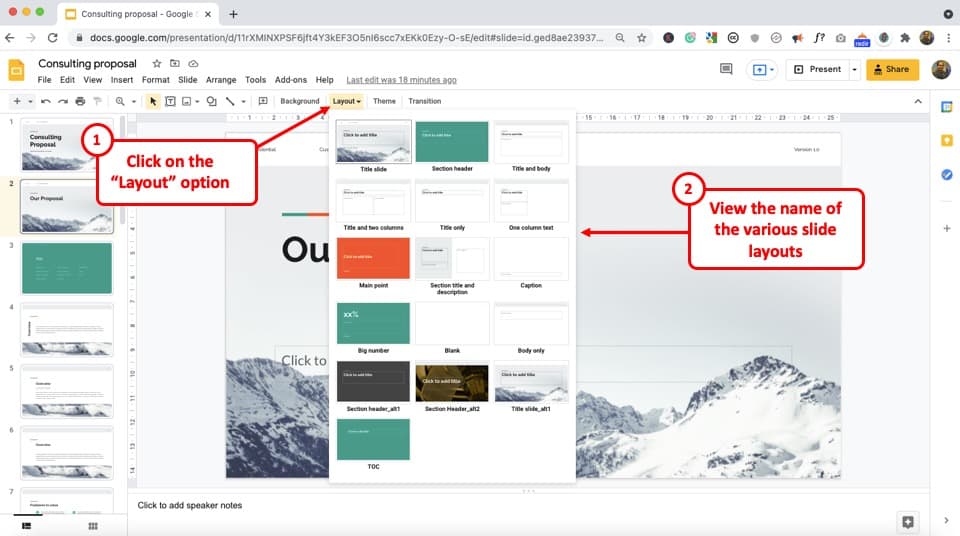
To view the name of the slide layout, click on the “Layout” option on the toolbar of your Google Slides presentation. Then, from the dropdown, you can see the name of the layout underneath the slide layout preview.
You can also choose a different layout by clicking on the one you like from this menu.
5. How to Name Your Google Slides Presentation?
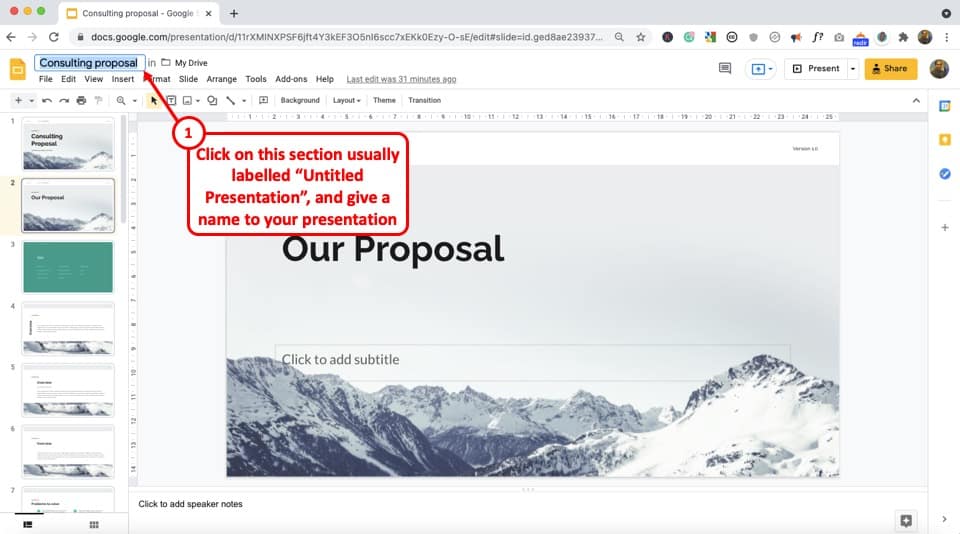
The name of your Google Slide presentation helps you sort the file or find it easily.
When you open a new Google Slides presentation, the name will be automatically set to “Untitled Presentation.”
To name the presentation, find the title on the top left corner of your screen and click on the “Untitled presentation” box. After that, type in what you want to name the presentation and the title will be saved automatically once you click anywhere outside the box.
6. How to Rename Your Google Slides Presentation?
If you already have the presentation open in front of you, you can use the “ Rename ” option in the film menu. Furthermore, you can also simply click on the name of the presentation and rename it like we did in the previous section.
Alternatively, you can also rename a Google Slides presentation just as you would rename a file from your Google Drive folder.
Let’s take a look at both the methods below –
Method 1 – Using “File” Menu
In Google Slides, you can rename your presentation by following three simple steps by using the “File” menu.
Step-1: Click on “Rename” under the “File” menu
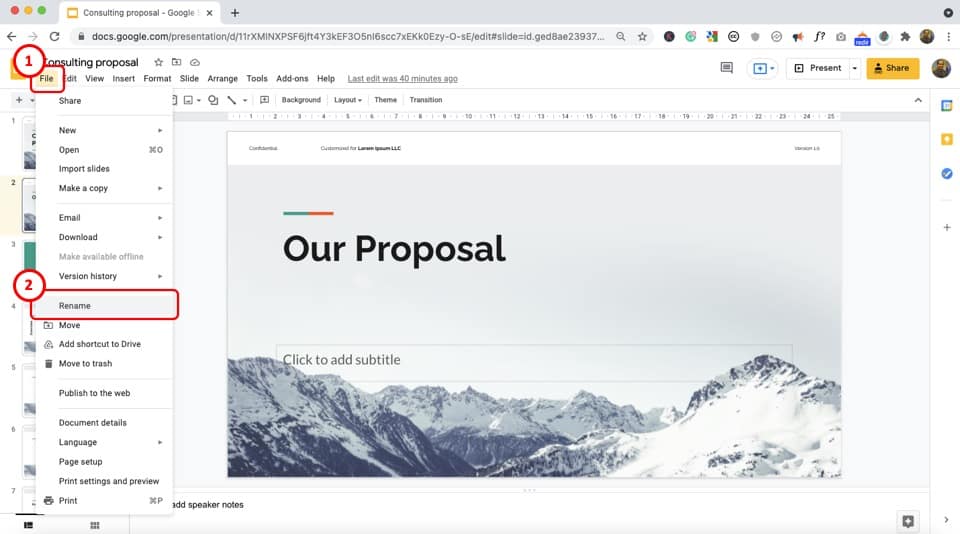
The first step is to click on the “File” menu and then click on the “Rename” option from the dropdown menu.
Step-2: Rename your presentation
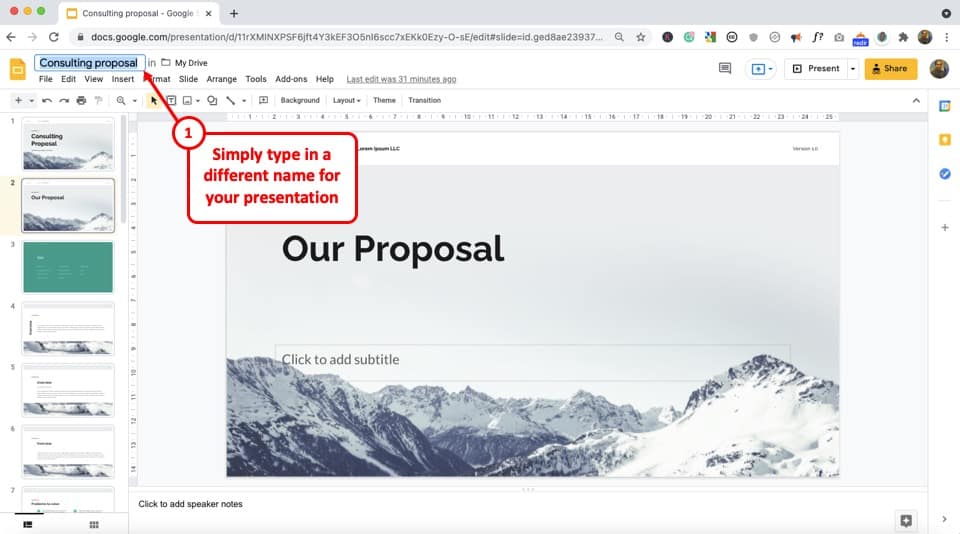
After you click on the “ Rename” option, you will see the text in the “Title Box” has been selected. Simply write the new name you want for the presentation.
The new name will be saved and the Google Slide presentation will be renamed automatically, once you click anywhere outside the box.
Method 2 – Using Google Drive Folder
In Google Drive, you can find your Google Slides presentation under the name it has been saved. If you do not remember the title it was saved as, you can scroll through the “Files” to find your presentation.
Once you spot the presentation you want to rename, follow the 2 easy steps:
Step-1: Right-click on file and choose the “Rename” option
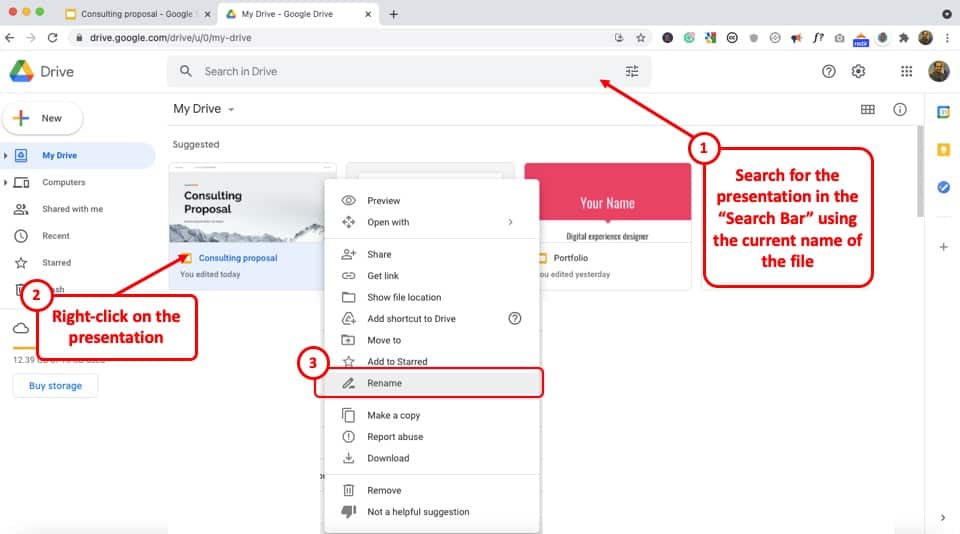
After you find the Google Slide presentation that you want to rename in Google Drive, “Right-click” on the presentation. It will open a drop-down menu.
Click on the “Rename” option from the menu. It will lead you to a pop-up for renaming the file.
Step-2: Rename the Presentation
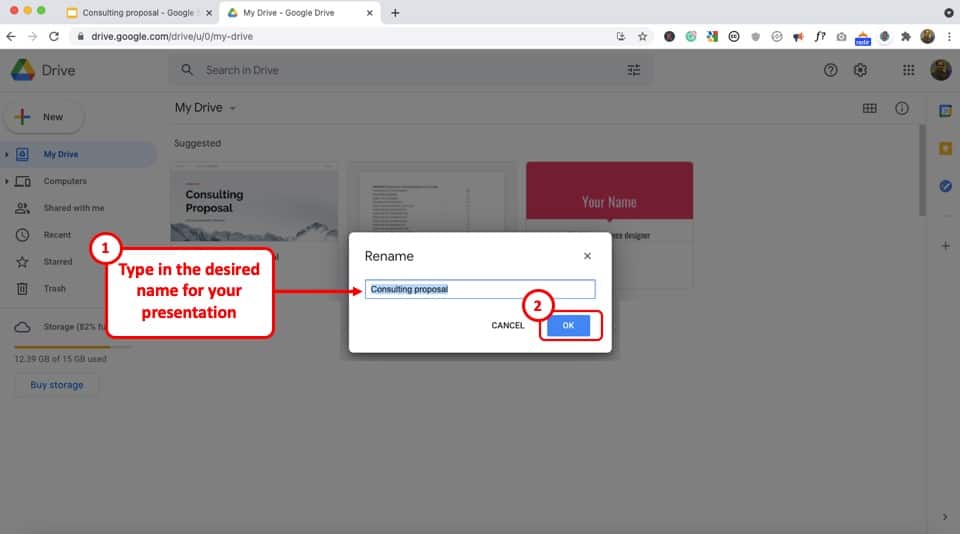
In the pop-up box in the middle of the screen, you will see a text box with the old title of the presentation.
Clear the previous name and type in the new title of the presentation. Click on the “OK” button to save the new title.
You will see that the Google Slides presentation has been renamed on both Google Drive and Google Slide.
More Related Articles
- How to Make Graphs and Charts in Google Slides? [Quick Tutorial!]
- How to Animate in Google Slides? [An EASY Guide!]
- How to Convert PDF to Google Slides?
- How to Edit Themes in Google Slides? [A Complete Guide!]
- How to Print Google Slides? [The ULTIMATE Solution!]
Credit to diana.grytsku (on Freepik) for the featured image of this article (further edited)
Top searches
Trending searches

memorial day
12 templates

holy spirit
36 templates

environmental science

21 templates

american history
74 templates

13 templates
Create engaging presentations, faster
Free templates for google slides and powerpoint, or kick off your next project with ai presentation maker, create your presentation, writing tone, number of slides.

Great presentations, faster
Slidesgo for Google Slides : The easy way to wow

127 templates

Slidesclass
294 templates

Editor’s Choice
3198 templates

Interactive
363 templates

226 templates

344 templates

1 templates

476 templates

966 templates

361 templates

Presentation Maker
1209 templates

66 templates

2993 templates
Latest themes

It seems that you like this template!
Premium template.
Unlock this template and gain unlimited access
Math Subject for Middle School - 7th Grade: Plane Geometry & Similarity Infographics
Download the Math Subject for Middle School - 7th Grade: Plane Geometry & Similarity Infographics template for PowerPoint or Google Slides and discover the power of infographics. An infographic resource gives you the ability to showcase your content in a more visual way, which will make it easier for your...

Diagnostic Medical Sonography Degree
Download the Diagnostic Medical Sonography Degree presentation for PowerPoint or Google Slides. As university curricula increasingly incorporate digital tools and platforms, this template has been designed to integrate with presentation software, online learning management systems, or referencing software, enhancing the overall efficiency and effectiveness of student work. Edit this Google...

Budget Planner
Download the Budget Planner presentation for PowerPoint or Google Slides. The world of business encompasses a lot of things! From reports to customer profiles, from brainstorming sessions to sales—there's always something to do or something to analyze. This customizable design, available for Google Slides and PowerPoint, is what you were...

Simple Interface Pitch Deck
Download the Simple Interface Pitch Deck presentation for PowerPoint or Google Slides. Whether you're an entrepreneur looking for funding or a sales professional trying to close a deal, a great pitch deck can be the difference-maker that sets you apart from the competition. Let your talent shine out thanks to...

Bridal Shoes Marketing Plan
Download the Bridal Shoes Marketing Plan presentation for PowerPoint or Google Slides. This incredible template is designed to help you create your own marketing plan that is sure to impress your entire team. Using this amazing tool, you'll be able to analyze your target audience, assess your competitors, map out...

HS Electives: Sociology Subject for High School - 9th Grade: Concepts in Probability and Statistics Infographics
Download the HS Electives: Sociology Subject for High School - 9th Grade: Concepts in Probability and Statistics Infographics template for PowerPoint or Google Slides and discover the power of infographics. An infographic resource gives you the ability to showcase your content in a more visual way, which will make it...
Popular themes

Minimalist Business Slides
Minimalism is an art style that frees the canvas and that lets the content stand out for itself. It’s a way of conveying modernism, simplicity and elegance and can be your best ally in your next presentation. With this new design from Slidesgo, your business presentations will be as professional...

Happy Pastel Summer
Soak up the sunny vibes of summer with the hottest Google Slides and PowerPoint template! This sunshine-infused masterpiece is your passport to organization and fun in the sun. Picture this: palm trees swaying, colorful cocktails clinking, and the soft sand beneath your feet as you effortlessly plan your days and...

Sunset Beach Agency
Do you imagine yourself surfing the waves under a beautiful sunset? Perhaps this cool image is what you'd like to project to your clients or audience. Present your agency with this editable template for Google Slides and PowerPoint! Maybe you operate in the field of travels and trips, or perhaps...
Elegant Workplan
Developing a successful business plan can be challenging, but with the right tools at your disposal, it becomes much simpler. This template is a comprehensive document that allows you to outline your business goals, strategies, and financial projections in a professional and aesthetically pleasing way. The full suite of resources...

Minimal Charm
Are you looking for a monochromatic theme that is interesting at the same time? How about using a simple and clean theme, along with black-and-white pictures, to convey business or corporate content in a professional way?

Papyrus History Lesson
History lessons tend to be boring for students, since they need to remember dates and a bunch of information. Make it entertaining by editing our free presentation template, whose backgrounds based on ancient papyrus rolls take it to the next level.
Infographics

Vision Board Workshop Infographics
Download the Vision Board Workshop Infographics template for PowerPoint or Google Slides and discover the power of infographics. An infographic resource gives you the ability to showcase your content in a more visual way, which will make it easier for your audience to understand your topic. Slidesgo infographics like this...

Priver Patient Care Breakthrough Infographics
Download the Priver Patient Care Breakthrough Infographics template for PowerPoint or Google Slides and discover the power of infographics. An infographic resource gives you the ability to showcase your content in a more visual way, which will make it easier for your audience to understand your topic. Slidesgo infographics like...

Criminal Justice Infographics
Download the Criminal Justice Infographics template for PowerPoint or Google Slides and discover the power of infographics. An infographic resource gives you the ability to showcase your content in a more visual way, which will make it easier for your audience to understand your topic. Slidesgo infographics like this set...
Education presentation templates

699 templates

519 templates

96 templates

701 templates

854 templates

2683 templates

Thesis Defense
742 templates

Teacher Toolkit
121 templates

355 templates

660 templates

52 templates
Interactive & Animated
Ice Breakers Bundle for Meetings
Download the Ice Breakers Bundle for Meetings presentation for PowerPoint or Google Slides. Gone are the days of dreary, unproductive meetings. Check out this sophisticated solution that offers you an innovative approach to planning and implementing meetings! Detailed yet simplified, this template ensures everyone is on the same page, contributing...

Full Black and White Planner
Download the Full Black and White Planner presentation for PowerPoint or Google Slides and start impressing your audience with a creative and original design. Slidesgo templates like this one here offer the possibility to convey a concept, idea or topic in a clear, concise and visual way, by using different...

Operations and Algebraic Thinking: Estimate Division
Download the Operations and Algebraic Thinking: Estimate Division presentation for PowerPoint or Google Slides and teach with confidence. Sometimes, teachers need a little bit of help, and there's nothing wrong with that. We're glad to lend you a hand! Since Slidesgo is committed to making education better for everyone, we've...
What's new on Slidesgo
See the latest website updates, new features and tools and make the most of your Slidesgo experience.
Make presentations with AI

Why do you need Slidesgo if you are a student?

Entrepreneurship and Personal Development Hackathon: The magic of learning by doing
Browse by tags.
- Kids 1604 templates
- Food 825 templates
- Technology 886 templates
- Travel 360 templates
- Animal 888 templates
- Art 658 templates
- Health 3417 templates
- History 1153 templates
- Environment 426 templates
- Galaxy 162 templates
- Fashion 213 templates
- Biology 398 templates
- Summer 166 templates
- Architecture 128 templates
- Music 354 templates
- Research 1422 templates
- Culture 1792 templates
- Background 8353 templates
- Back to School 170 templates
- Coloring Page 352 templates
What do our users say about us?

I just wanted to thank you! I learned more about slides in one day of quarantine than in my whole life
Gabriela Miranda

Your slides are so unique and gorgeous! They really help me with PowerPoint presentations for school and now even my mom uses them for work
Marie Dupuis

I would like to thank to you for these amazing templates. I have never seen such service, especially free! They are very useful for my presentation.
Ali Serdar Çelikezen

Thank you Slidesgo for creating amazing templates for us. It's made my presentation become much better.
Thiên Trang Nguyễn

Register for free and start editing online
- Help Center
- Google Docs Editors
- Privacy Policy
- Terms of Service
- Submit feedback
- Create, edit, and format
- Create a spreadsheet
Create, view, or download a file
Want advanced Google Workspace features for your business?
Try Google Workspace today!
You can create, find, and download files like:
- Spreadsheets
- Presentations
- Forms
Your files are available to edit, share, and work on with others. Learn how to find files in Google Drive .
Important: If you try to open a file suspected of phishing or malware, you may get a warning. Use caution when you open the file.
Create a file
- On your computer, open a Google Docs , Sheets , Slides , or Forms home screen.
You can also create a document from a template .
Save a file
- When you're online, Google automatically saves your changes as you type. You don't need a save button.
- If you aren't connected to the Internet, you can set up offline access to save your changes .
- Once offline access is turned on, changes will save to your device as you enter text, and will save to Drive once reconnected.
View a file
To view files that you’ve created or opened on any computer and other documents like Microsoft® Word, Excel, or PowerPoint files :
- On your computer, open a Google Docs , Sheets , or Slides home screen.
- Click the document, spreadsheet, or presentation you want to view.
Tip: If you shared your file with someone else, you’ll get their changes as they make them.
Rename a file
When you create a new document, spreadsheet, or presentation, it's automatically named “Untitled document,” “Untitled spreadsheet,” or “Untitled presentation.” To rename the file:
- Click the name at the top of the file.
- Type a new name.
- Press Enter .
Make a copy of a file
- Open the file you want to make a copy of.
- If you want to copy comments from a document, spreadsheet, or presentation, click Copy comments and suggestions . You can choose to include resolved comments and suggestions in your new copy.
Download a copy of a file
- Open a document, spreadsheet, or presentation.
- Choose a file type. The file will download onto your computer.
Tip: To download a large Google Docs file as a .pdf file on Chrome:
- On your computer, open a Google Doc .
- At the left, next to "Destination," select Save as PDF .
- At the top, click Save .
Need more help?
Try these next steps:.
Using Google products, like Google Docs, at work or school? Try powerful tips, tutorials, and templates. Learn to work on Office files without installing Office, create dynamic project plans and team calendars, auto-organize your inbox, and more.
IMAGES
VIDEO
COMMENTS
Use Google Slides to create online slideshows. Make beautiful presentations together with secure sharing in real-time and from any device.
But you also have the option to use a blank slide to place items where you like. Step 1: To add a slide, do one of the following: Go to the Insert tab and choose New slide near the bottom. Go to ...
The Google Slides interface. When you create a new presentation in Google Slides, the interface for Slides will appear. This interface displays the toolbar, along with the main view of your presentation. It allows you to create and modify slides, choose a theme, and share the presentation with others.. Click the buttons in the interactive below to learn about the interface for Google Slides.
Google Slides Tutorial. 1. Create or import a presentation. To create a new presentation in Google Slides, go to your Google Drive, click new, and select "Google Slides". If you want to import and convert an existing presentation from PowerPoint to Slides, go to your Google Drive, click new, and select "File Upload". 2.
Open the template presentation you created in the steps above. On the menu bar, click File > Make a copy > Entire presentation. On the panel that opens, type in a name for the new presentation you ...
How to Create a Blank Presentation. Now that you have a Google account, it's time to create your first presentation. Head over to Google Slides and place the cursor on the multicolored "+" icon in the bottom-right corner. The + turns into a black pencil icon; click it. Pro Tip: Type.
This Google Slides tutorial for beginners is a complete crash course, taking you by the hand and showing you step by step how to make some amazing and mesmer...
Community Answer. 1) Go to drive.google.com and log in. 2) Click the blue "New" button toward the top left corner of the page. 3) Select "Google Slides" next to the orange icon on the drop-down menu. 4) Drive will open your new presentation. Just start editing!
In order to access Google Slides, go into Google Drive and click New +. You should see Google Slides as an option beneath docs and sheets. When you click on Google Slides, it should open up a new window and take you to a new google slides presentation. You can also access Google Slides by going on to Google and querying via search with the term ...
Bring your presentations to life in Google Slides with enhancements like videos, animations, smooth transitions, and more. Get started with templates Choose from an array of high-quality pre-designed templates with different layouts, images, colors, and fonts.
Until you name your presentation, it will save as Untitled presentation. To title your presentation, click in the [Untitled Presentation] box and type your desired title. By default, Google slides will insert the text from the title box as the title; you can accept that or delete and enter an alternate title (see Figure 3).
From Google Drive, create a new Slides presentation, then select the File tab in the menu bar and Import Slides. You should then see a new window where you can upload your converted PowerPoint file. From here, you can select specific slides to import, or choose all of them by clicking All in the top right corner.
Step-1: Click on the "Click to add title" box in the slide. Google Slides automatically sets the name of a slide according to the text in the title box. To change it manually, click on the "Click to add title" box on the slide. By clicking on it, you can start changing the name of that specific slide. Step-2: Write the name of the slide ...
Slidesgo is a website that offers you hundreds of free Google Slides themes and PowerPoint templates for any purpose. You can browse by categories, themes, backgrounds, or colors to find the perfect design for your presentations. Whether you need to teach, pitch, or inspire, Slidesgo has you covered.
Click the title to change the name. Google Slides Home Screen. This icon indicates that you are in the Google Slides interface. Click the icon to navigate back to your Google Slides home screen. Menu Toolbar. Various menus for working with your presentation can be found on the menu toolbar. Click a menu to see available commands and options.
Click Ok. On your computer, open a Google Docs, Sheets, Slides, or Forms home screen. Open a document, spreadsheet, or presentation. At the top, click File Download. Choose a file type. The file will download onto your computer. Tip: To download a large Google Docs file as a .pdf file on Chrome:
Specifics of Evaluation Setup. take 100,000 random samples of hog descriptors from all the training videos. k-means cluster them into 4,000 words. map any new descriptor to those words. Classify using a non-linear SVM with a chi-squared kernel. Specific parameters the paper found best.