

How to Crop an Image into a Circle in Google Slides

Crop a Picture into a Circle in Google Slides Using Crop to Shape
by Avantix Learning Team | Updated August 1, 2021
Applies to: Google Slides ® (Windows or Mac)
You can achieve some interesting effects by cropping an image into a shape in Google Slides. However, if you want to crop an image into a circle, you'll need to use a few tricks.
To crop an image into a circle, you'll need to:
- Crop the image to a square
- Change the square to a circle
- Adjust if necessary
You can also adjust an oval into a circle as an alternative method.
Recommended article: How to Crop a Picture in PowerPoint (4 Ways)
When you crop an image, the image will appear in crop mode with two sets of handles (black crop handles and square blue sizing handles):

Step 1: Crop an image to a square
There are 4 ways to crop an image in Google Slides:
- Using the menu
- Using the Crop command on the Toolbar
- By right-clicking
- By double-clicking
To crop an image into a square in Google Slides using the menu:
- Select the image on the slide.
- Click Format in the menu, select Image and then Crop Image. The image appears in crop mode.
- Drag the black cropping handles to create a perfect square (it's usually best to use a corner cropping handle).
- Drag the square blue sizing handles to resize the image within the cropped area (it's usually best to use a corner sizing handle).
- Drag the image within the cropped area to the desired location.
- Click outside the image to exit crop mode.
The following menu appears with you select Format > Image > Crop Image:

To crop an image into a square in Google Slides using the Crop command on the Toolbar:
- Click Crop on the Toolbar. The image appears in crop mode.
The Crop command appears in the Toolbar when an image is selected:
To crop an image into a square in Google Slides by right-clicking:
- Right-click the image on the slide. A drop-down menu appears.
- Click Crop Image. The image appears in crop mode.
The following menu appears when you right-click an image:

To crop an image into a square in Google Slides by double-clicking:
- Double-click the image on the slide. The image appears in crop mode.
Step 2: Crop the image into a circle
The next step is to crop the image into a circle.
To crop an image into a circle in Google Slides using the Crop command on the Toolbar:
- Click the arrow beside Crop in the Toolbar. A drop-down menu appears.
- Select Shapes and then click the oval shape in the Shapes Gallery.
- If the cropped area does not appear to be a perfect circle, double-click the image and drag the crop handles until it appears as a circle.
You can create some really interesting effects in your presentation when you try cropping to a shape.
Subscribe to get more articles like this one
Did you find this article helpful? If you would like to receive new articles, join our email list.
More resources
How to Add Audio in Google Slides
How to Change Margins in Google Docs (2 Ways)
How to Do a Hanging Indent in Google Docs (3 Ways)
How to Superscript in Google Docs (Mac or Windows)
How to Strikethrough or Cross Out Text in Google Docs (with Shortcuts)
Related courses
Microsoft PowerPoint: Intermediate / Advanced
Microsoft PowerPoint: Design for Non-Designers
Microsoft PowerPoint: Accessible PowerPoint Presentations
Microsoft PowerPoint: Animations Bootcamp
VIEW MORE COURSES >
Our instructor-led courses are delivered in virtual classroom format or at our downtown Toronto location at 18 King Street East, Suite 1400, Toronto, Ontario, Canada (some in-person classroom courses may also be delivered at an alternate downtown Toronto location). Contact us at [email protected] if you'd like to arrange custom instructor-led virtual classroom or onsite training on a date that's convenient for you.
Copyright 2024 Avantix ® Learning
You may also like

How to Insert or Type A with an Accent Mark in Google Docs (À, Á, Â, Ä, à, á, â, or ä) – 6 Ways
You can insert or type a with an accent mark in Google Docs in several ways. You can use built-in tools, online tools, add-ons or keyboard shortcuts (including Alt code shortcuts). The letter a can be inserted with an accent in both upper or lower case. The following are common accents in upper or lower case – À, Á, Â, Ä, à, á, â, or ä.

How to Insert or Type U with an Accent Mark in Google Docs (Ù, Ú, Û, Ü, ù, ú, û, or ü) – 6 Ways
You can insert or type u with an accent mark in Google Docs in several ways. You can use built-in tools, online tools, add-ons or keyboard shortcuts (including Alt code shortcuts). The letter u can be inserted with an accent in both upper or lower case. The following are common accents in upper or lower case – Ù, Ú, Û, Ü, ù, ú, û, or ü

How to Insert or Type O with an Accent Mark in Google Docs (Ò, Ó, Ô, Õ, Ö, ò, ó, ô, õ or ö) – 6 Ways
You can insert or type o with an accent mark in Google Docs in several ways. You can use built-in tools, online tools, add-ons or keyboard shortcuts (including Alt code shortcuts). The letter o can be inserted with an accent in both upper or lower case. The following are common accents in upper or lower case – Ò, Ó, Ô, Õ, Ö, ò, ó, ô, õ or ö.
MORE GOOGLE TOOLS ARTICLES >
Google, the Google logo and related Google Drive applications and logos are registered trademarks of Google LLC in Canada, US and other countries.
Microsoft, the Microsoft logo, Microsoft Office and related Microsoft applications and logos are registered trademarks of Microsoft Corporation in Canada, US and other countries. All other trademarks are the property of the registered owners.
Avantix Learning |18 King Street East, Suite 1400, Toronto, Ontario, Canada M5C 1C4 | Contact us at [email protected]
Our Courses
Avantix Learning courses are offered online in virtual classroom format or as in-person classroom training. Our hands-on, instructor-led courses are available both as public scheduled courses or on demand as a custom training solution.
All Avantix Learning courses include a comprehensive course manual including tips, tricks and shortcuts as well as sample and exercise files.
VIEW COURSES >
Contact us at [email protected] for more information about any of our courses or to arrange custom training.
Privacy Overview
Pin it on pinterest.
- Print Friendly
We explain and teach technology, solve tech problems and help you make gadget buying decisions.
How to Make Images Circular in Google Slides

Mehvish Mushtaq is a computer engineer by degree. Her love for Android and gadgets led her to develop the first Android app for Kashmir. Known as Dial Kashmir, she won the prestigious Nari Shakti award from the President of India. She has been writing about technology for 6+ years and her favorite categories include how-to guides, explainers, tips and tricks for Android, iOS/iPadOS, social media, and web apps.
The beauty of a presentation lies in how well it is presented pictorially. Thankfully, Google Slides offer many native features to edit images . One of the interesting things you can do is crop an image into a circle, square, or any other shape in Google Slides, just like PowerPoint . That way each picture will get its true respect. But how to make images circular in Google Slides? Keep reading to find out.
In this post, you will learn how to make images circular in Google Slides on PC, Android, and iPhone. You can do it with the help of the Crop to Shape or Masking feature. Let’s get started.
Crop a Picture Into a Circle in Google Slides on a PC
You can make an image circular or with rounded corners by cropping it. There are two ways to crop a picture into a circle in Google Slides.
Method 1: Using Crop to Shape Directly
Step 1: Open the desired presentation in Google Slides.
Step 2: Click on Insert in the top bar and select Image from the menu. Add the picture that you want to crop into a circle from your PC or get it online.

Step 3: After adding the image, click the small down arrow next to the Crop icon in the toolbar at the top. Make sure your image is selected first before you click on that button.

Step 4: Select Shapes from the menu. The available shapes will show up. Select a Circle shape from the list.

Step 5 : Your image will be cropped into a circle or oval shape depending on the picture’s aspect ratio.

If you don’t like how the circular image looks, adjust its size by dragging it inwards using one of the tiny square boxes present on the longer sides of the image border. That way the entire image will be filled into the circle shape.

Step 6: If, however, you want to have only a part of a picture inside the circle, skip step 5, instead press anywhere outside the circular image. Then, double-click on the circular image.
Step 7: A black border will appear around the image. Drag the image inwards using the highlighted black bars to make a circular image. Press the Enter button.

Step 8 : Double-click again on the picture and move the image using your mouse to fit the desired portion inside the round area.

Step 9: Press the Enter button to have a cropped circular picture in Google Slides.
Tip : Learn how to add a border to a circle in Google Slides.

Method 2: By Changing Aspect Ratio First
Another way to crop an image into a perfect circle or round shape is by changing its aspect ratio first and then cropping it into a shape.
Step 1 : Insert the desired image in your slide in Google Slides.
Step 2 : Then, select the image and make your image square using the tiny blue boxes.

Step 3: Once you have a square-shaped image, click on the image to select it. Then, click on the down arrow next to the Crop icon in the toolbar.
Step 4: Select Shapes followed by Circle. Congratulations! You have successfully cropped an image into a circle in Google Slides.
Tip: You can also crop the picture in a square shape first and then use the circle shape to get a round picture.

Also Read : How to add links in Google Slides .
Crop an Image Into Circle in Google Slides on Android and iPhone
Follow these steps to make an image circular in Google Slides on an Android or iPhone:
Step 1: Launch the Google Slides app on your phone.
Step 2: Open the slide containing the picture that you want to make circular.
Step 3: Tap on the picture to select it. Then, press the Crop icon at the bottom followed by the Mask icon.

Step 4: Select a Circle shape from the list of shapes under the Basic tab.
Step 5: Using the black bars around the image, adjust the picture to get a circular image. Tap anywhere outside the picture to save it.

Step 6: To adjust what shows inside the circle, double-tap on the circle and move the image to keep the desired portion inside the circle. Your circular image is ready in Google Slides.

Tip: Know how to crop an image into a circle in Google Docs.
FAQs About Cropping an Image Into Circle Shape
Google Slides doesn’t offer a native way to fill a shape with an image. You can only fill it with a solid color or gradient. However, you can use a workaround to fit an image in shape .
You cannot crop multiple images in Google Slides.
Customize Google Slides
That’s it! We hope this guide helped you make images circular in Google Slides. They can come in handy to make your presentation more personalized without opting for third-party tools. Also, learn how to animate objects in them or add GIFs in Google Slides .
Was this helpful?
Last updated on 19 June, 2023
The above article may contain affiliate links which help support Guiding Tech. However, it does not affect our editorial integrity. The content remains unbiased and authentic.
Leave a Reply Cancel reply
Your email address will not be published. Required fields are marked *

The article above may contain affiliate links which help support Guiding Tech. The content remains unbiased and authentic and will never affect our editorial integrity.
DID YOU KNOW

More in Internet and Social

Microsoft Loop vs. Notion: Which Productivity Tool Is Better

How to Delete WhatsApp Photos from iPhone and Android
Join the newsletter.
Get Guiding Tech articles delivered to your inbox.
Got any suggestions?
We want to hear from you! Send us a message and help improve Slidesgo
Top searches
Trending searches

memorial day
12 templates

holy spirit
36 templates

environmental science

21 templates

american history
74 templates

13 templates
Circle Infographics
It seems that you like this template, free google slides theme, powerpoint template, and canva presentation template.
Representing information in a circular way can be a little bit difficult! The different points you want to show are somewhat connected to each other and they don’t follow any particular order, or rather they present a process that repeats. If you need to represent the principal components of a product, service or concepts, you will find that our circle infographics are pretty useful and versatile!
We have created a lot of circle infographic templates for you. They come in different styles and designs: some are intertwined, others are hand-drawn, some include arrows, others look like a pie chart or have a futuristic style. You’ll find the perfect circle diagram for your project! They contain different icons related to myriad topics, and we have used red, blue, green and yellow as our main colors.
Features of these infographics
- Infographic templates with plenty of circles
- 100% editable and easy to modify
- 30 different infographics to boost your presentations
- Include icons and Flaticon’s extension for further customization
- Designed to be used in Google Slides, Canva, and Microsoft PowerPoint and Keynote
- 16:9 widescreen format suitable for all types of screens
- Include information about how to edit and customize your infographics
How can I use the infographics?
Am I free to use the templates?
How to attribute the infographics?
Attribution required If you are a free user, you must attribute Slidesgo by keeping the slide where the credits appear. How to attribute?
Related posts on our blog.

How to Add, Duplicate, Move, Delete or Hide Slides in Google Slides

How to Change Layouts in PowerPoint

How to Change the Slide Size in Google Slides
Related presentations.

Premium template
Unlock this template and gain unlimited access

How to Crop a Picture into a Circle in PowerPoint with Crop to Shape
This is the easiest way to crop an image into a variety of shapes. Here’s how you can do it:
How to Crop a Picture into a Circle in PowerPoint by Filling a Shape with It
In the previous option, you imported the image, then changed its shape. Here, it’s the other way around. You create a circle first, then insert your image into it. It might sound a bit complicated, but it really isn’t. Let’s take a look:
Remember to press “Enter” or click outside the image, when you are done with all the editing.
How to Crop Several Images into a Circle in PowerPoint
What if you have more than one image on a slide and you want to crop all of them into a circle? This isn’t difficult, either. In fact, you’ll need to use the method that was already shown to you above. But there are a couple of changes. This is how you can do it:
While all of the images are selected, you’ll be able to reposition and resize them with your cursor as a group. If you want to make one image smaller and the other one bigger, you will need to deselect them. Next, select one of the images, edit it, then select the other image and edit it, too. All the tweaking should be done on each image separately.
A Faster Way to Crop Pictures into a Circle
Cropping a picture into a circle in PowerPoint is quite straightforward and uncomplicated; unlike, say, in Photoshop . This software is easy to comprehend and master, and at the same time it’s rather powerful. It doesn’t matter if you are a beginner or a pro, you’ll still be able to get good results within minutes. If all you need is to crop a single picture into a circle in PowerPoint, then there’s a high chance that you won’t really need any alternatives.
However, presentations usually consist of multiple slides. What if you need to crop pictures on every single slide? What if some slides have only one image, while others – several images, and all of them has to be cropped? In PowerPoint, you won’t be able to select all the images in your presentation, then crop them in one go. You’ll have to repeat the entire cropping process for each slide separately. This might be quite tedious and time-consuming.
Fortunately, there’s a quicker way to crop images into a circle. You can use Watermarkly for that!
Watermarkly is an app that works in a browser and supports batch-processing. You won’t have to download and install it, so it won’t take up any of your device’s memory space.
Unfortunately, Watermarkly doesn’t support the format of PowerPoint presentations. Therefore, you won’t be able to upload your presentation into the app and do all the necessary editing. However, there’s a solution to this problem. You can simply crop images into a circle before you import them into your presentation.
The biggest advantage that Watermarkly has over PowerPoint is batch processing. You can upload as many images into the app as you need and crop them into circles, rectangles and squares in one go. Another benefit of Watermarkly is that you will get a circle-shaped cropping area right away without changing any aspect ratios; no matter if you upload a square image or a rectangular one.
You can crop images in a single batch differently. For instance, you can crop some images into a circle and other images into a square. What’s more, you can duplicate an image while you are in the app, then crop it in a different way. To put it simply, you can crop one and the same image into a circle and a rectangle within a few clicks. Then you can see which version will look better in your presentation.
With Watermarkly, you can crop a batch of images, then simply insert them into the slides of your PowerPoint presentation. It will definitely take you less time and effort than if you had to crop images on each slide separately.
Watermarkly is a browser-based app, so you can use it on any internet-connected device and any operating system. There’s a mobile version of PowerPoint. Naturally, it’s much easier to create slides on a computer, a laptop or, at least, a tablet. Smartphone screens tend to be quite small for this task. However, it is perfectly possible to do some minor tweaks using the mobile version – for instance, edit some text or replace one image with another while you are on the go. Thus, you can crop your images in Watermarkly first, then insert them into your presentation in PowerPoint – no matter where you are or what device you’re using.
Free Circle Cropper
Watermarkly produces cropped images without any borders. It may be a drawback for you. But generally speaking, images without borders tend to look more neat and professional. Thus, if you need to create in PowerPoint a presentation for your work, it might be better for your round images not to have any borders.
There’s another benefit. What if you need to straighten the horizon? Or what if your image will look better if you tilt it just a bit? This cannot be done in PowerPoint. But that’s not the case for Watermarkly! There’s a slider with the help of which you can tilt your entire image to the left or to the right.
On Watermarkly’s website you will find a variety of tools for some basic image editing. For example, you can add a watermark to your image . This way, no one will be able to steal it from your PowerPoint presentation. Another free option is add text to photo .
If you want your audience to pay attention and remember the majority of information you tell them, including visual content in your PowerPoint presentation is a must. Also, it might be a good idea for your images to have different shapes. It will take you only a couple of minutes to crop a picture into a circle in PowerPoint. As this article showed you, it’s not a very challenging and complicated task to do. You also learnt about a third-party app. It can process batches of images quickly, so it can be extremely useful for you if you need to crop pictures into a circle in PowerPoint quite often. With Watermarkly, your workflow will be much quicker and easier!
More articles
How to Add a Watermark in PowerPoint
4 Ways to Crop a Picture into a Circle in PowerPoint

Adding circular images to your PowerPoint presentations can help make them more visually appealing. Cropped images draw the viewer’s eye and add a polished, professional look.
In this article, we’ll walk through four easy methods to crop pictures into circles in PowerPoint. By the end, you’ll have the skills to customize your presentation images with circular frames.
Method 1: Use the Crop Tool
The fastest way to crop an image into a circle in PowerPoint is by using the native crop tool. Here are the steps:
- Insert the image you want to crop onto a PowerPoint slide.
- Select the image and go to the Picture Format tab.
- Click Crop and choose Crop to Shape .
- Select the oval shape under the crop area.
- Click and drag the circular crop area to frame the part of the image you want to keep.
- Adjust the size as needed, then click the Crop button above the image.
The oval crop feature allows precise control to highlight the most important visual elements in your picture. And best of all, it only takes a few clicks.
Method 2: Insert Circular Picture Placeholders
Instead of cropping images after insertion, you can add circular picture placeholders to your slides first:
- Navigate to the Insert tab in the PowerPoint toolbar.
- Click Picture and select Picture Placeholder .
- Choose one of the circular picture frames from the placeholder options.
- With the placeholder inserted, head to the Insert tab again.
- Select Pictures and choose the image from your computer to fill the circular frame.
Following this process, your images will automatically conform to the circular placeholders without needing to crop manually. It’s a quick way to ensure all your pictures share the same consistent shape.
Method 3: Use the Oval Shape Tool
If you want boundless control over the exact size and layering of circular images, the oval shape tool is an excellent option:
- Insert your chosen graphic onto a PowerPoint slide.
- Select the oval shape tool from the Insert tab.
- Draw an oval shape that overlaps the image where you want the circular crop.
- Right click the oval and choose Send to Back to layer it behind the image.
- With the oval selected, go to Shape Format and change the shape fill to no fill.
- Then change the shape outline to no outline.
The oval will now function as a virtual circular photo cropper you can resize and layer however you like. Use this method when you need to crop multiple images to custom dimensions.
Method 4: Combine Shapes
The final technique uses PowerPoint’s shape combine feature. Here’s how to do it:
- Insert your image onto a slide.
- Add a circle shape from the Insert tab overlapping the part of the graphic you want to isolate.
- Make sure the circle is in front of the image in the layer order.
- With the circle selected, go to Shape Format and select Merge Shapes .
- Choose Subtract from the menu.
- Delete the leftover image fragments outside the circular shape.
This leaves you with a cleanly cropped graphic fitted precisely into the circular frame. Use shape combining when you want to trim images to irregular dimensions beyond standard shapes.
Achieve Visually Stunning Presentations with Circular Images
Adding circular cropped images makes presentations look clean and professional at a glance. With PowerPoint’s built-in tools, it’s simple to highlight the most vital visuals from your pictures.
The methods above provide options for every use case, whether you need speed, consistency across slides, precision control, or customizability.
About The Author
Vegaslide staff, related posts.

How to Recover an Unsaved PowerPoint

Method to Convert Word to PowerPoint

How to Make an Infographic in Microsoft PowerPoint

How to Reorder Animations in Microsoft PowerPoint

Browse our wide collection of slides with circles for Google Slides and PowerPoint. These charts, maps, timelines, and backgrounds will help you make your presentation go round.
Ring Arrow Zigzag Process
Google Slides , PPTX
Ring Arrow Bending Process
Ring Arrow Linear Process

8-Stage Cycle Arc

6-Stage Cycle Arc

4-Stage Cycle Arc

Step-up Circle Process for PowerPoint and Google Slides

Circle Wave Flow Process for PowerPoint and Google Slides

Radiant Overlapping Circles for PowerPoint and Google Slides

Concentric Circle Nested Diagram for PowerPoint and Google Slides

Radial Picture Vertical List for PowerPoint and Google Slides

Wavy Block Process for PowerPoint and Google Slides
Search templates by categories, search templates by colors.
Love our templates? Show your support with a coffee!
Thank you for fueling our creativity.
Charts & Diagrams
Text & Tables
Graphics & Metaphors
Timelines & Planning
Best-Ofs & Tips
Terms and Conditions
Privacy Statement
Cookie Policy
Digital Millennium Copyright Act (DMCA) Policy
© Copyright 2024 Ofeex | PRESENTATIONGO® is a registered trademark | All rights reserved.

To provide the best experiences, we and our partners use technologies like cookies to store and/or access device information. Consenting to these technologies will allow us and our partners to process personal data such as browsing behavior or unique IDs on this site and show (non-) personalized ads. Not consenting or withdrawing consent, may adversely affect certain features and functions.
Click below to consent to the above or make granular choices. Your choices will be applied to this site only. You can change your settings at any time, including withdrawing your consent, by using the toggles on the Cookie Policy, or by clicking on the manage consent button at the bottom of the screen.
Thank you for downloading this template!
Remember, you can use it for free but you have to attribute PresentationGO . For example, you can use the following text:
If you really like our free templates and want to thank/help us, you can:
Thank you for your support
How To Make a Picture a Circle in Google Slides [Easy Guide]
- Last updated July 3, 2023
Tired of the usual rectangular or square-shaped images in your presentations? Why not learn how to make a picture a circle in Google Slides instead?
To crop an image into a circle, simply select the image you wish to work with and click the “ mask image ” icon (in a downward arrow) next to the “ crop ” icon. Choose the oval shape from the drop-down menu, adjust it, and press “ Enter .”

Table of Contents
Easy Ways to Make a Picture a Circle in Google S lides
Making a “circle crop image” can add a visually appealing touch to your presentation and enhance its overall design. Here’s how to do it:
- Open your Google Slides presentation and navigate to the slide where you want to insert the picture.
- Select “Insert” > “Image” from the drop-down menu.
- Choose an image source from your computer, the web, your Google Drive, or your Google Photos account.

- Once inserted, click on the file. You should see a blue border around the image, indicating it’s selected.

- Select “Format” > “Image” > “Crop Image” from the drop-down menu. You can also click the “ Crop ” icon on the top toolbar.

- Alternatively, just double-click on the photo to display the cropping grips.
- Crop the image to a 1:1 ratio by adjusting the grips on the sides.

- Click outside the image to save your crop changes.
- Click the drop-down arrow (i.e., the “Mask image” option) beside the crop icon in the toolbar.
- From the “ Shapes ” menu, select the oval shape. When you click on it, your image will instantly transform into a perfect circle.

- Once you’re satisfied with the positioning, press “ Enter” to finalize the circular crop.

That’s it! You’ve successfully cropped an image into a circle. Repeat these steps for any other images you want to reshape in your presentation.
How To Download a Cropped Image in Google Slides
Now that you know how to make an image circular in Google Slides, it’s time to discuss saving cropped images for future use. Unfortunately, Google Slides doesn’t offer a direct way to download images — you have to take an alternative approach.
There are three easy ways to download cropped images in Google Slides. Choose the one that suits your needs and preferred workflow.
Related : How To Download an Image From Google Docs (3 Easy Ways)
Method 1: Downloading Individual Slides as an Image
Google Slides allows you to download the current slide in order to view your presentation offline. You can download it as either a JPEG or PNG file. This will download whatever content is available on that slide, including the image.
Here’s how you can download the current slide:
- Click on the “ File ” menu.
- In the submenu, click on “ Download .”
- You can choose to download the current slide as a JPEG or PNG file.

Tips to Keep in Mind
- Download your image as a JPEG file if you intend to use it on the web. JPEG files are lighter but also loss. This means they may gradually degrade in quality if you frequently modify or edit them.
- PNG files are lossless and support transparency, making them ideal for frequent modification (e.g., creating a logo). However, PNG files are larger in size and require more storage space.
Method 2: Save to Keep
Google Keep is a versatile note-keeping tool (similar to Microsoft OneNote) that also offers a mobile version. You can add images, create handwritten notes, and make to-do lists. In Google Slides, this feature is directly accessed by right-clicking on an image.
Note: This method is applicable only to normal and cropped images. It will not work for the circle crop image.
To save an image in Google Keep and download it to your computer:
- Select your image and right-click on it.
- Scroll down the context menu until you find “ Save to Keep .”

- The Google Keep panel will appear on the right side (as shown in the screenshot below).
- Right-click on the image within the Google Keep panel and choose “ Save Image as .”

- Save the image to your preferred location on your computer (e.g., desktop) and click “ Save .” This will save the image as a PNG file.

Method 3: Take a Screenshot

What you see above is a screenshot of a screenshot, also known as a “screenshot caption”!
A screenshot is the simplest way to save an image on your computer. To start, simply follow the steps below:
- Crop the image to the desired shape or size within Google Slides.
- For Windows, you can use the “ Print Screen ” button or press Win + Shift + S to capture a specific area.
- On Mac, use Command + Shift + 4 .
- Open an image editing software or any program that allows image insertion (e.g., Microsoft Paint, Microsoft Word, email compose window).
- Paste the screenshot into the program.
- Crop or adjust the image if needed.
- Save the image using the image editing software’s “ Save ” or “ Export ” function.
To ensure the best quality and compatibility, we recommend selecting either JPEG or PNG formats. Refer to the screenshot below for reference:

Final Thought s
Knowing how to make a picture a circle in Google Slides is just one way to make your presentation more remarkable. The next time you step up to present, unleash your creative skills and deliver the most memorable presentation your audience has ever witnessed.
Looking for spreadsheet templates to kickstart your work? Our premium templates are 50% OFF with the code “SSP.”
Get Premium Templates
- How to Convert Google Slides to PowerPoint: 3 Easy Methods
- Learn How to Draw on Google Slides in 2 Minutes (Too Easy)
- How To Use Google Slides Speaker Notes [Easy Guide]
- How To Group in Google Slides [Step-by-Step Guide]
- How To Save an Image from Google Slides [4 Easy Ways]
- How To Insert Google Slides Icons [4 Simple Methods]
Most Popular Posts

How To Highlight Duplicates in Google Sheets

How to Make Multiple Selection in Drop-down Lists in Google Sheets

Google Sheets Currency Conversion: The Easy Method
A 2024 guide to google sheets date picker, related posts.
- Sumit Bansal
- May 16, 2024
- May 2, 2024
How to Insert a Google Sheets Hyperlink in 5 Seconds
- Chris Daniel
- April 15, 2024
How to Import Stock Prices into Google Sheets
- April 2, 2024
Thanks for visiting! We’re happy to answer your spreadsheet questions. We specialize in formulas for Google Sheets, our own spreadsheet templates, and time-saving Excel tips.
Note that we’re supported by our audience. When you purchase through links on our site, we may earn commission at no extra cost to you.
Like what we do? Share this article!
How to Crop an Image to a Perfect Circle in PowerPoint
If you're looking to crop a picture in PowerPoint in the shape you want, these tips will help you do so with a few clicks.
The picture on the introductory slide of your presentation makes an excellent first impression. However, it shouldn't take up so much space as to block the entire slide. So, the best way to crop an image is to only show the face.
Using PowerPoint, you can crop an image perfectly without using any third-party tools or apps. With this article, you'll learn how to this quickly using PowerPoint and how to make it more engaging by adding borders.
Adding an Image to PowerPoint
- Open PowerPoint.
- Go to Insert > Pictures .
- Select the image you want to crop.
- Open it in PowerPoint.
When you insert an image, it will be in its original size and shape. Therefore, there is no need to preprocess the original image before adding it to PowerPoint.
Cropping the Image Manually
When you try to crop the image manually, you can only crop it horizontally and vertically. The edges, however, will be straight. As a result, you may not get a circular crop.
Cropping the Image in Circular Shape
In PowerPoint, selecting the image will automatically bring you to the format ribbon. PowerPoint automatically sets this preference. If it does not, ensure you're in the format ribbon and open the picture tools settings.
If you click crop directly, it will take you to the manual crop mode, where you can only crop by straight edges. So you should instead click on the arrow button to bring up the dropdown.
Here's how to create a perfect circle out of this oval shape:
- Click on the Crop icon from the format menu.
- Select crop by shape. (You can crop an image using hundreds of shapes here).
- Again, click on the crop option dropdown .
- Click on the aspect ratio to see it.
- Choose 1:1 from the available options.
The oval shape will be reduced to a perfect circle as shown below.
Simply drag the image to perfectly fit the cropped circle so the face is inside the circle.
In addition to moving images, you can also stretch or expand the cropped circle from its corners. By doing this, you can further reduce the cropped area.
However, resizing will disrupt the circular shape of the cropped image. You can make it a perfect circle by again setting the aspect ratio to 1:1.
Thus, go to crop dropdown and set the aspect ratio to be 1:1.
After making the desired change, click anywhere else on the slide to execute the changes.
Related: How to Crop a Video on Android
How to Add Borders to a Cropped Image
You can also add borders around the image to make it more attractive. Let's see how you can accomplish this.
- Click on the image.
- Select the format tab .
- Click on picture styles .
You will find a few picture effects that you can use to design your image here. To see the complete list of effects you can add to an image, click the dropdown arrow .
When you hover over these shapes, you'll see how the design of your selected image will change.
Choose compose frame (Black) from the list of available picture styles.
Above, you can see that the added border isn't circular as you would like. By following the same steps explained earlier, you can make this square-shaped border into a perfect circle.
- Select the image.
- Select the crop option from the dropdown.
- Choose an oval shape from the crop shapes menu.
- The aspect ratio should be set to 1:1 .
How to Change Color of a Picture Border in PowerPoint
It is possible to change the border color in PowerPoint without changing the original image's color palette. Here's how you can do it.
- Choose the image with a border.
- Go to the Format tab .
- Select your desired color from the picture border dropdown .
Related: How to Crop an Image in Adobe Illustrator
Crop Your Images Into a Circular Shape
Using the crop feature in PowerPoint, you can take a perfect circular crop from your image to use on the introduction slide. To make an image more attractive, you can also add a border and change its color.
Try this feature out while making your next presentation and see how it affects the look of your presentation slide.
We’re sorry, but Freepik doesn’t work properly without JavaScript enabled. FAQ Contact
- Notifications
- Go back Remove
- No notifications to show yet You’ll see useful information here soon. Stay tuned!
- Downloads 0/60 What is this?
- My collections
- My subscription
Find out what’s new on Freepik and get notified about the latest content updates and feature releases.
- Presentation
- Circle background
Circle Presentation Images

- Add to collection
- Save to Pinterest
- development process

- growth infographic

- gradient infographic
- circle infographic

- infographic template
- business infographic

- circular diagram
- circular infographic

- flat infographic
- infographic steps

- infographie
- data infographic

- infographic set

- infographic

- circle diagram
- circle graph

- infographic presentation

- flat geometric
- geometric shapes
- colorful geometric

- Party invitation
- celebration illustration

- chart template

- 3 infographic

- infographic shapes

- circle template

- 2 infographic
- finance infographic
- business chart

- infographic timeline

- circle graphic
- background label

- infographic layout

- circular economy
- illustrations
- flat illustration

- business graphic

- infographic numbers

- banner template
- Horizontal banner

How to Circle Something in PowerPoint? [Step-by-Step Guide!]
By: Author Shrot Katewa
![How to Circle Something in PowerPoint? [Step-by-Step Guide!]](https://artofpresentations.com/wp-content/uploads/2023/03/Featured-Image.jpg "circle image for presentation")
Circling something in PowerPoint is a useful tool to emphasize or highlight important content in a presentation. By using a circle shape or drawing a circle around an item, you can draw attention to it and help your audience better understand your message.
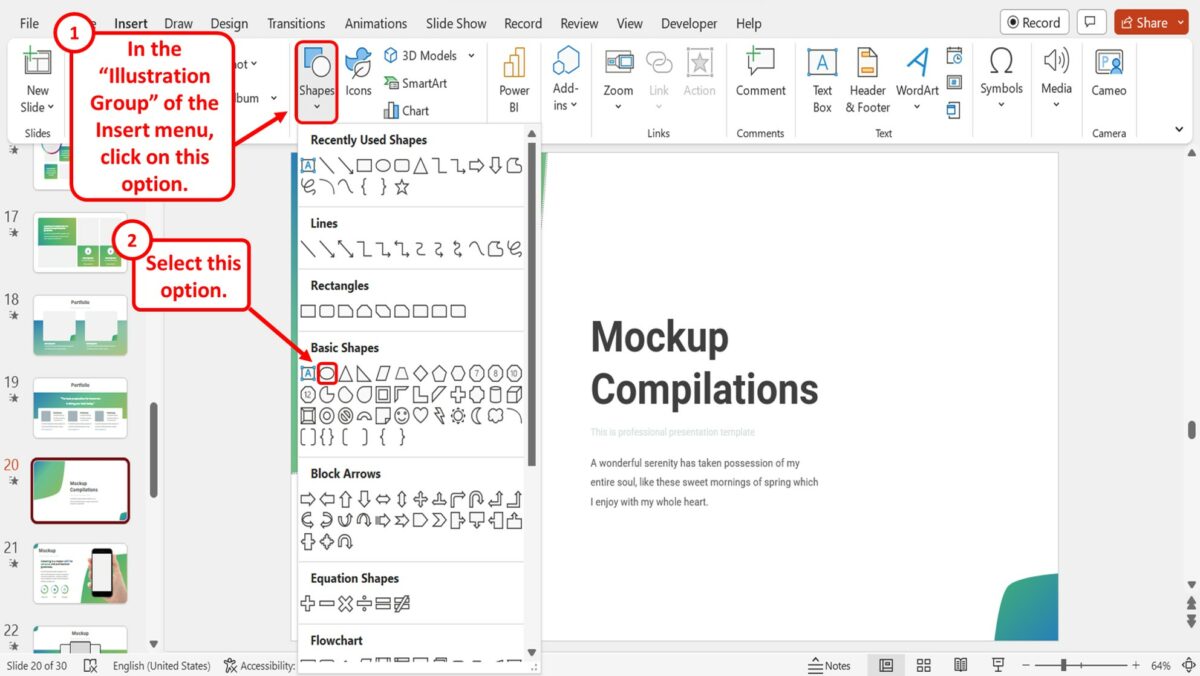
To circle something in PowerPoint, go to the “Illustrations” group of the “Insert” tab. Select the “oval” shape in the “Shapes” option and draw it over the required item. Then, click on “Shape Outline” to outline the shape and “Shape Fill” to select the “No Fill” option in the “Shape Format” menu.
This article will let you learn step-by-step how to circle something in PowerPoint, making it easier for you to create engaging and impactful presentations. Let’s get started!
1. How to Insert a Circle in PowerPoint?
In Microsoft PowerPoint, the “Shapes” feature allows you to insert any shape including a circle into your presentation slide. To insert a circle into the presentation slide, follow the 3 simple steps.
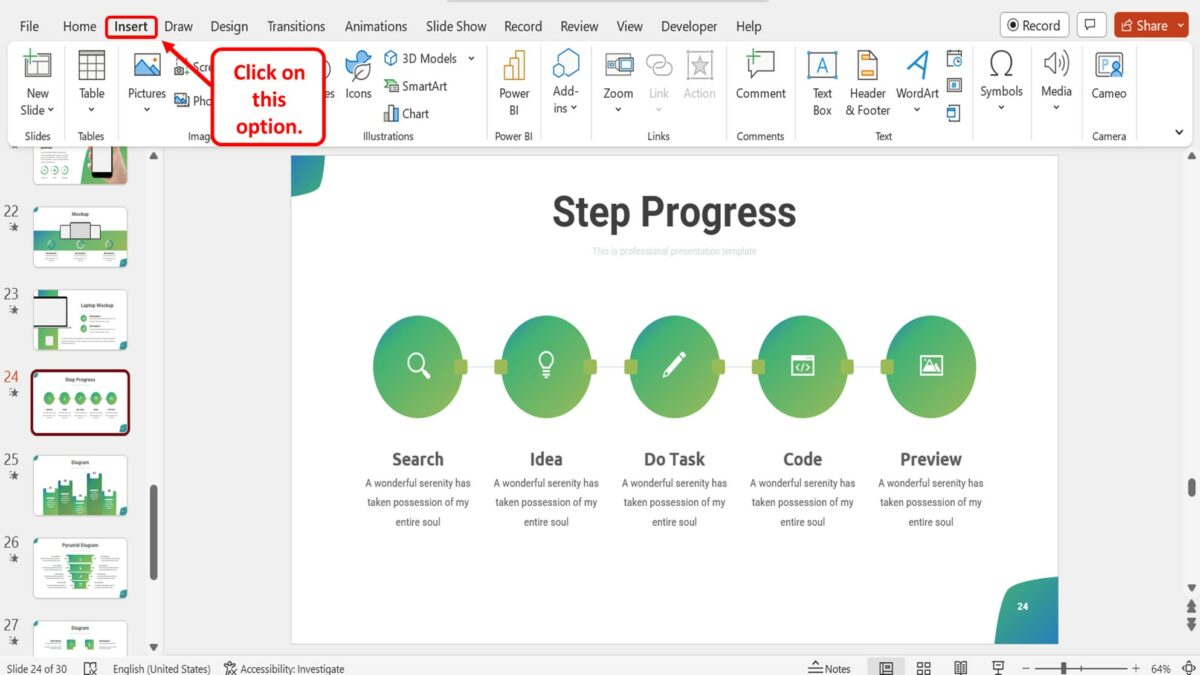
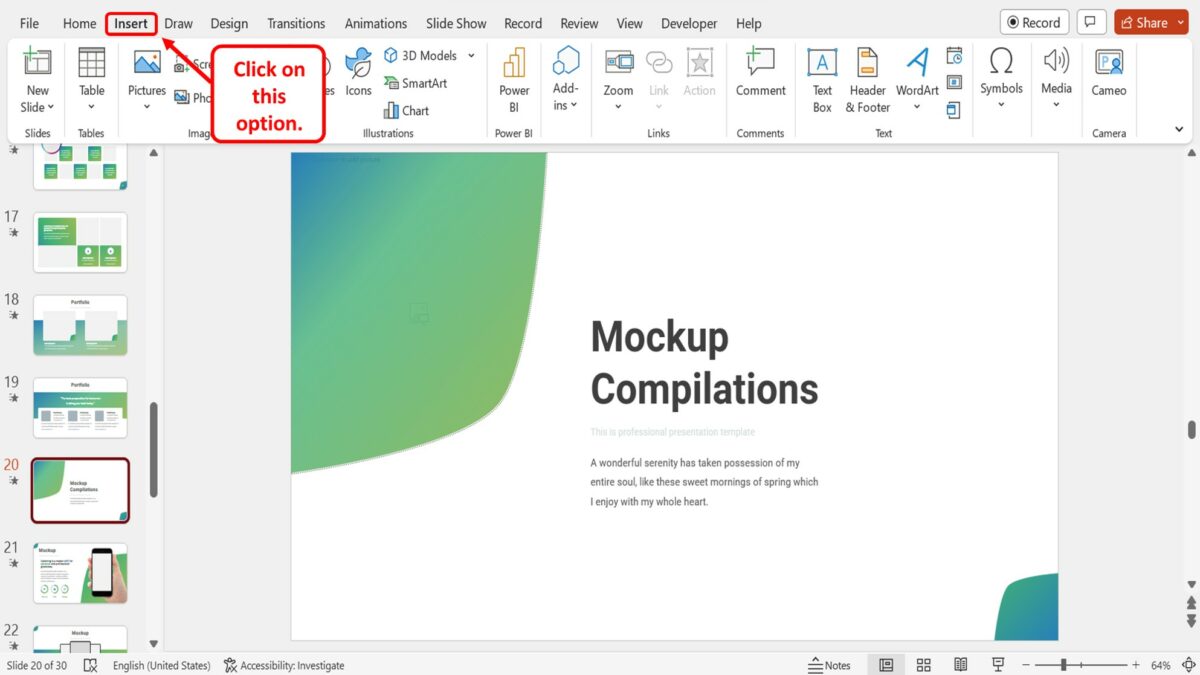
Step-1: Click on the “Insert” tab
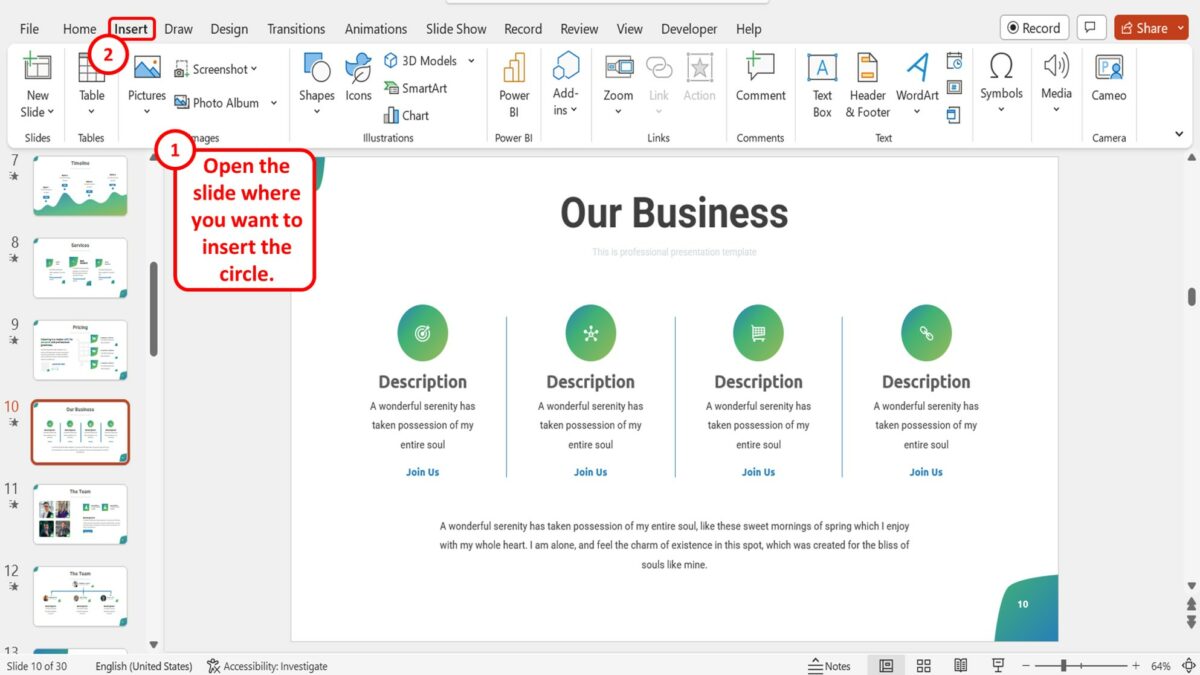
In the presentation file, open the slide where you want to insert the circle. Then click on the “Insert” tab in the menu ribbon located at the top of the screen.
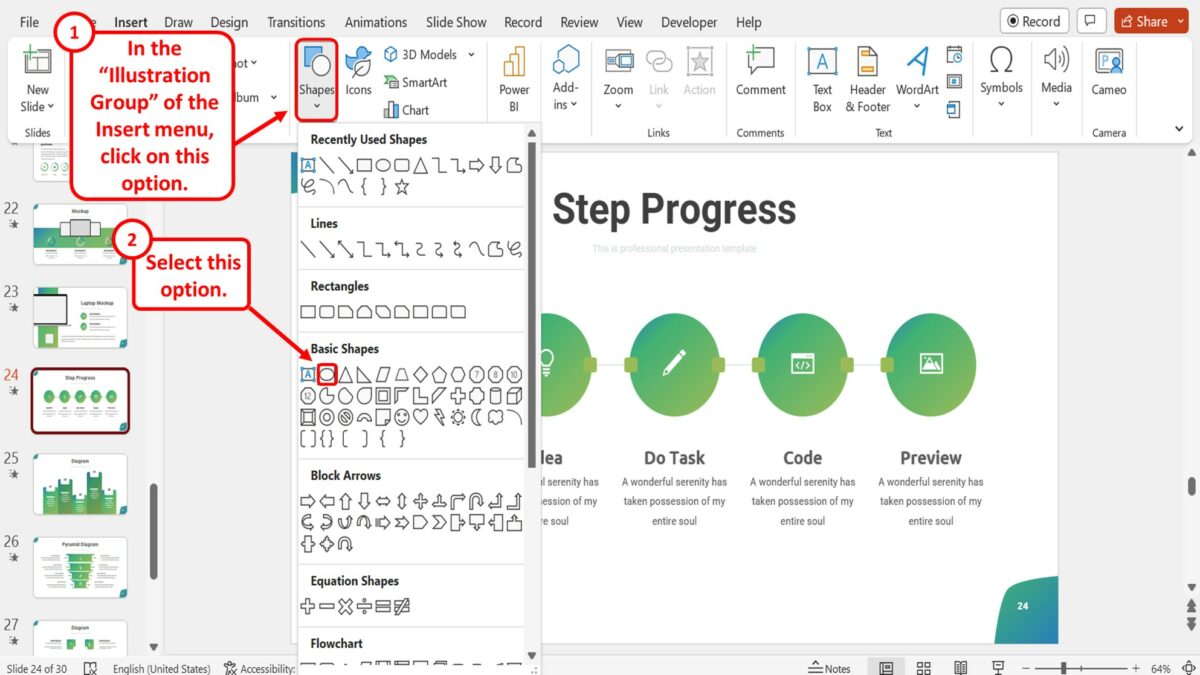
Step-2: Click on the “Shapes” option
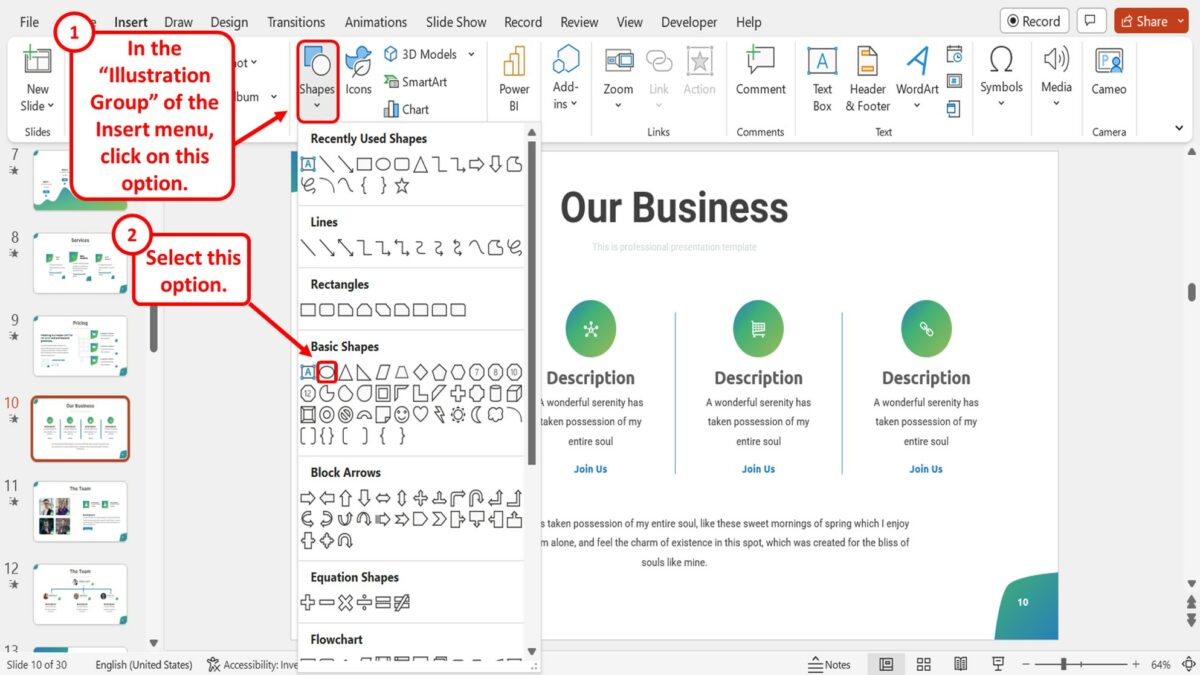
In the “Illustrations” group of the “Insert” menu, click on the “Shapes” option. Then click on the “Oval” option in the “Basic Shapes” section of the dropdown menu under the “Shapes” option.
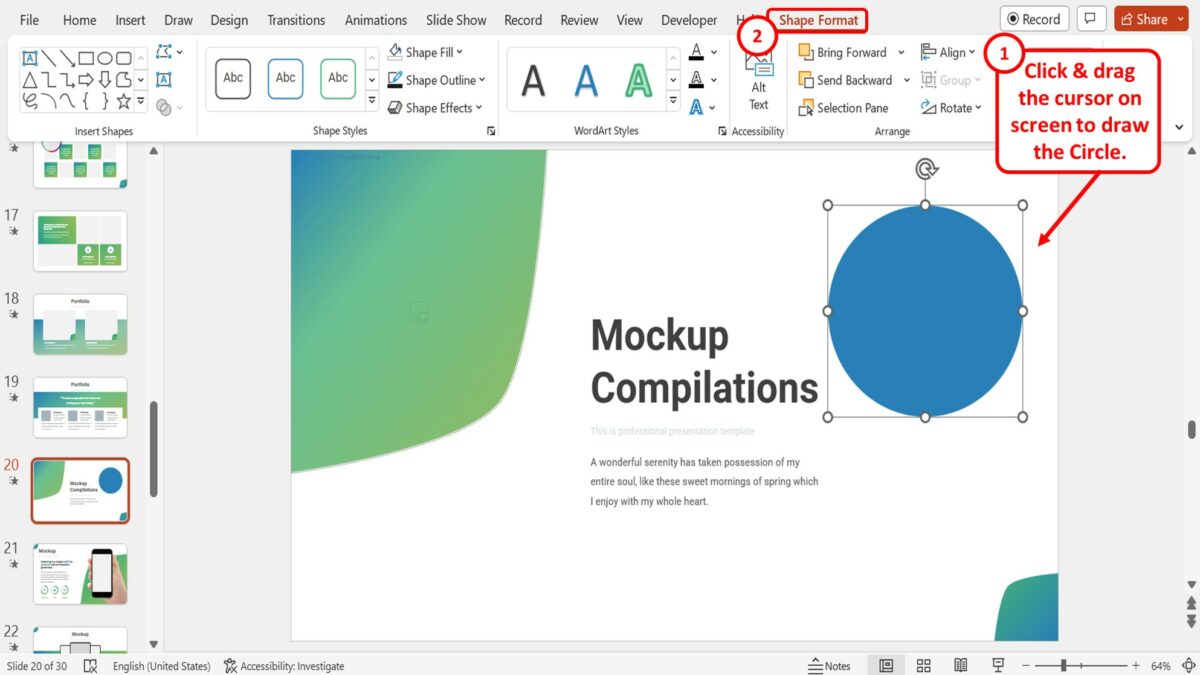
Step-3: Draw the circle
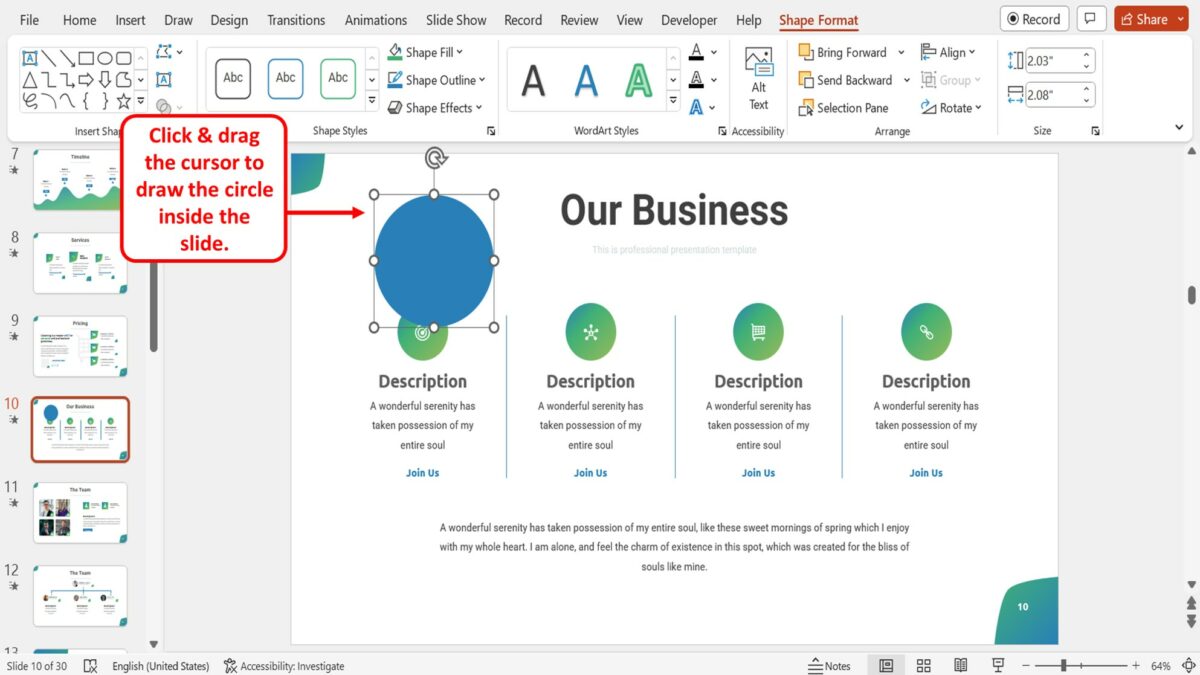
Now all you have to do is click and drag the cursor on the open slide to draw the circle inside the slide.
2. How to Draw a Circle in PowerPoint?
Using the “Draw” feature in Microsoft PowerPoint, you can draw a freeform circle. To do so, follow the 4 easy steps.
Step-1: Click on the “Draw” tab
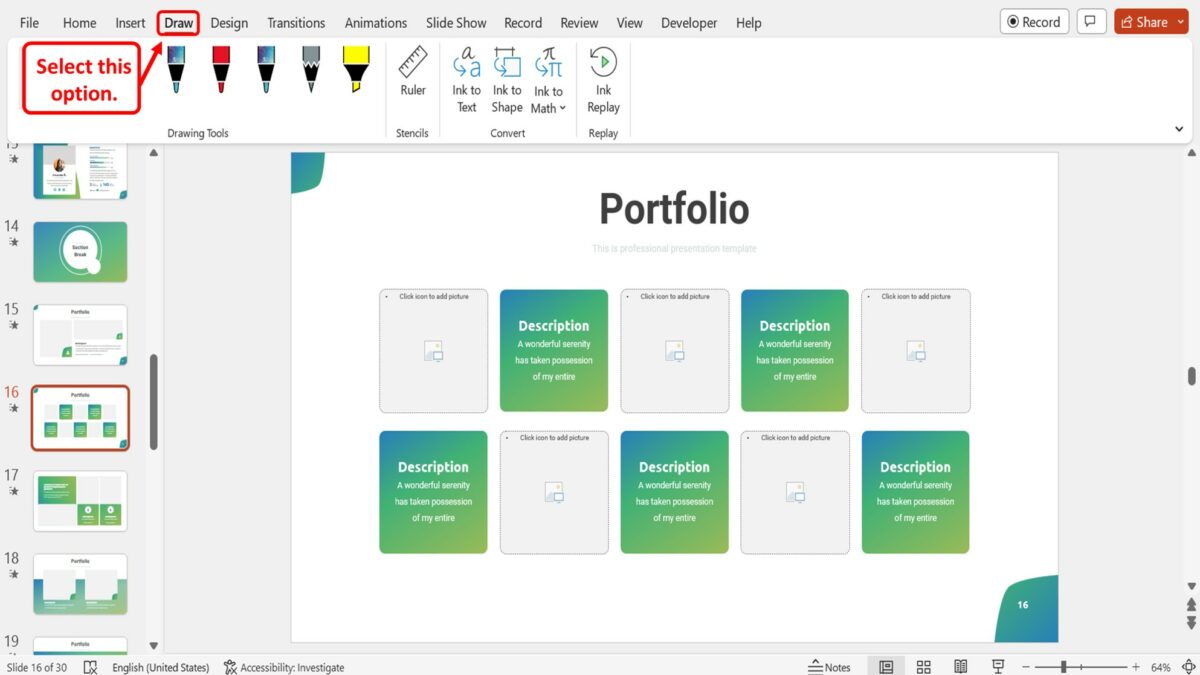
In the menu ribbon located at the top of the screen, you have to first click on the “Draw” tab to open the “Draw” menu.
Step-2: Draw the circle
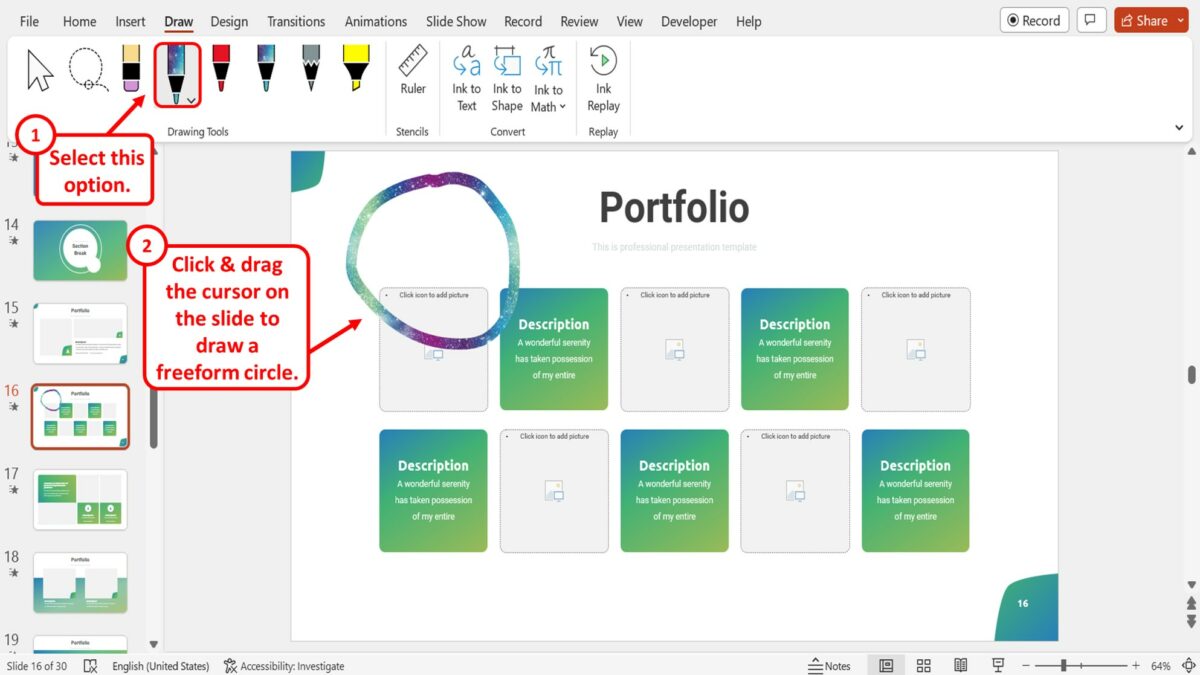
In the “Drawing Tools” group of the “Draw” menu, click on the “Pen” option. Then all you have to do is click and drag the cursor on the slide to draw a freeform circle.
Step-3: Click on the “Select” option
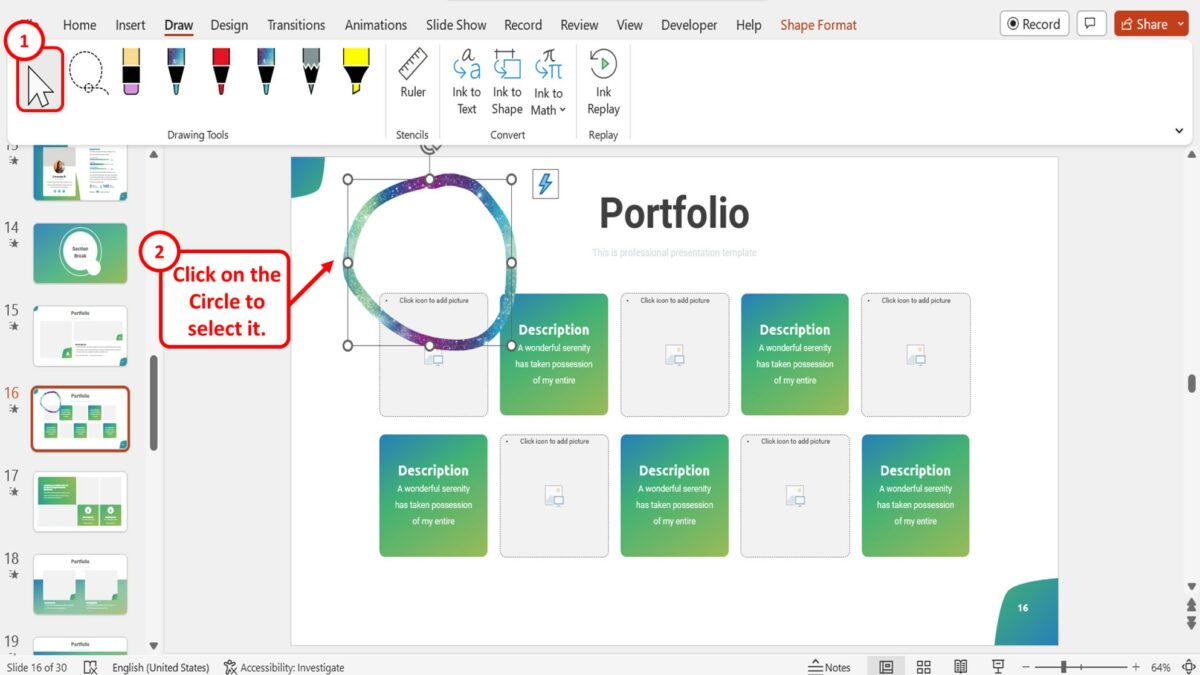
If you want to convert the freeform circle to a proper circle, you can do so by using the “Convert” feature. Click on the “Select” option in the “Drawing Tools” group of the “Draw” menu. Then click on the circle on the slide to select it.
Step-4: Click on the “Ink to Shape” option

The final step is to click on the “Ink to Shape” option in the “Convert” group of the “Draw” menu to convert the freeform circle into a proper circle shape.
2.1 How to Draw a Circle with Annotation Tools in PowerPoint?
During a presentation, you can use the “Annotation Tools” in Microsoft PowerPoint “Slide Show” view to draw a circle around a text or object to highlight it. All you have to do is follow the 3 easy steps.
Step-1: Click on the “Slide Show” tab
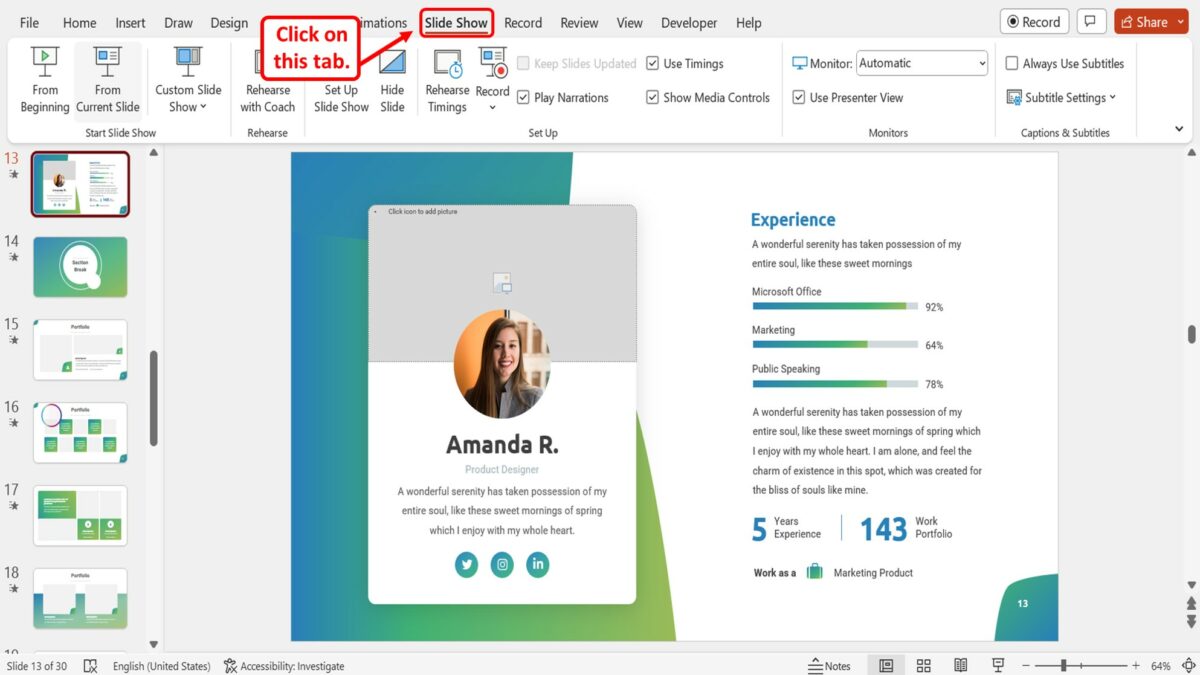
The first step is to open the “Slide Show” view. To do so, click on the “Slide Show” tab in the menu ribbon.
Step-2: Click on the “From Current Slide” option
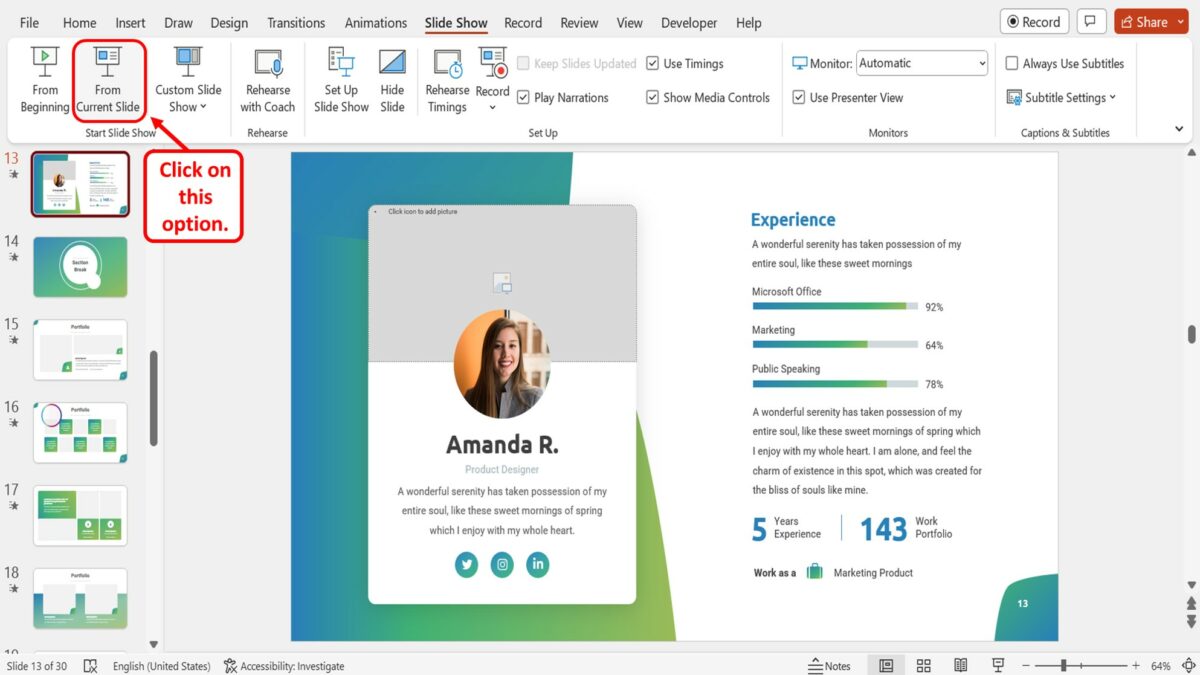
Click on the “From Current Slide” option in the “Start Slide Show” group of the “Slide Show” menu. You can alternatively press the “Shift+F5” keys on your keyboard to start the presentation.
Step-3: Click on the “Pen” option
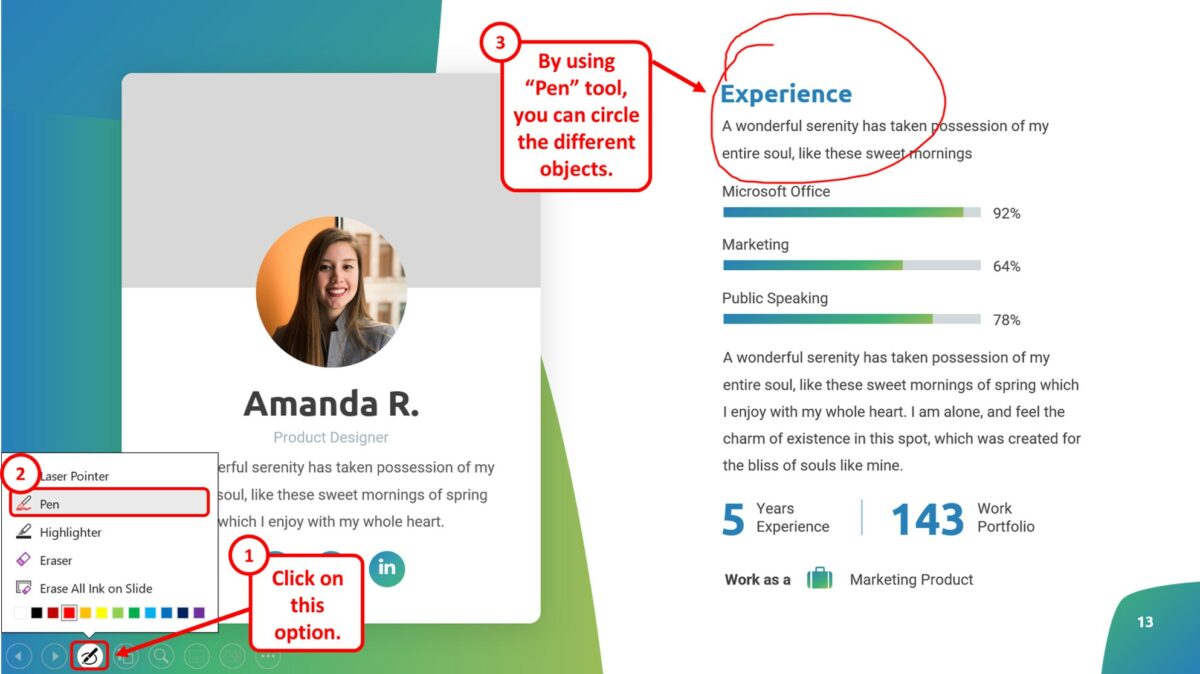
In the “Slide Show” view, click on the “Annotations” toolbar at the bottom of the screen. Then click on the “Pen” option from the pop-up menu. You can now use the “Pen” tool to circle different objects on the slide during the presentation.
3. How to Circle an Item in PowerPoint?
To circle an item in Microsoft PowerPoint, you have to use the “Shapes” feature available in the “Insert” menu. All you have to do is follow the 5 simple steps.
The first step is to open the “Insert” menu. Click on the “Insert” tab in the menu ribbon located at the top of the screen.
In the “Illustrations” group of the “Insert” menu, click on the “Shapes” option. In the “Basic Shapes” section of the dropdown menu under the “Shapes” option, click on the “Oval” option.
Step-3: Click on the “Shape Format” tab
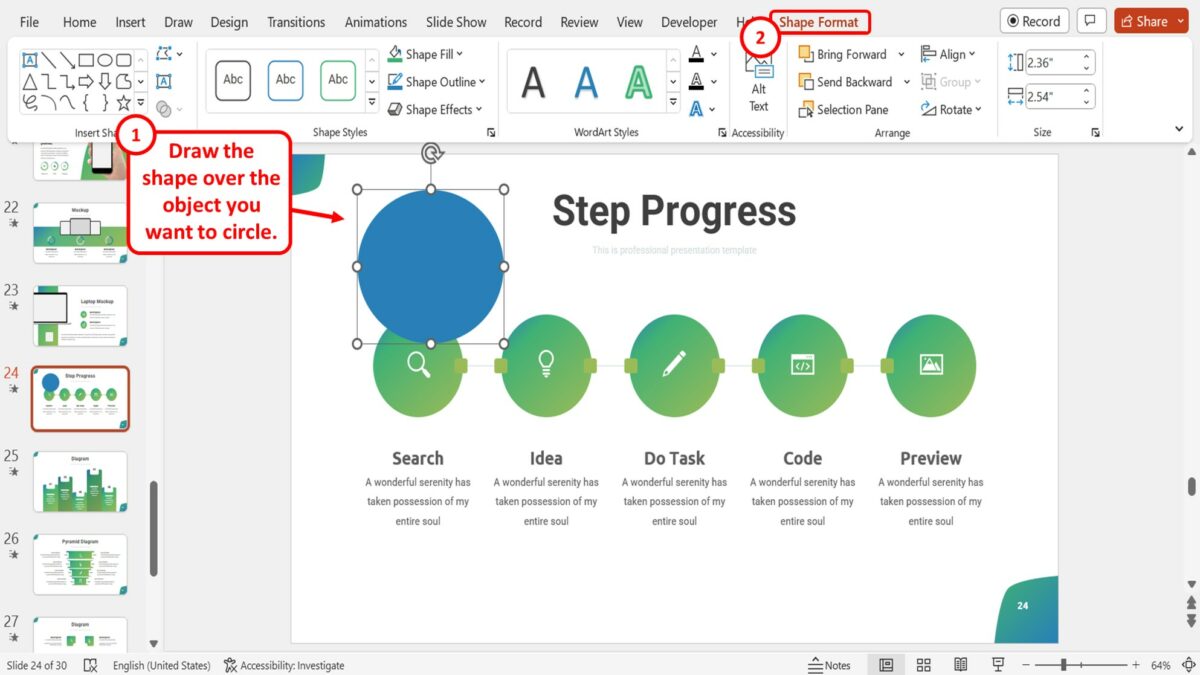
The next step is to draw the shape over the object that you want to circle on the slide. Then click on the “Shape Format” tab which is the last option in the menu ribbon at the top of the screen.
Step-4: Click on the “Shape Outline” option
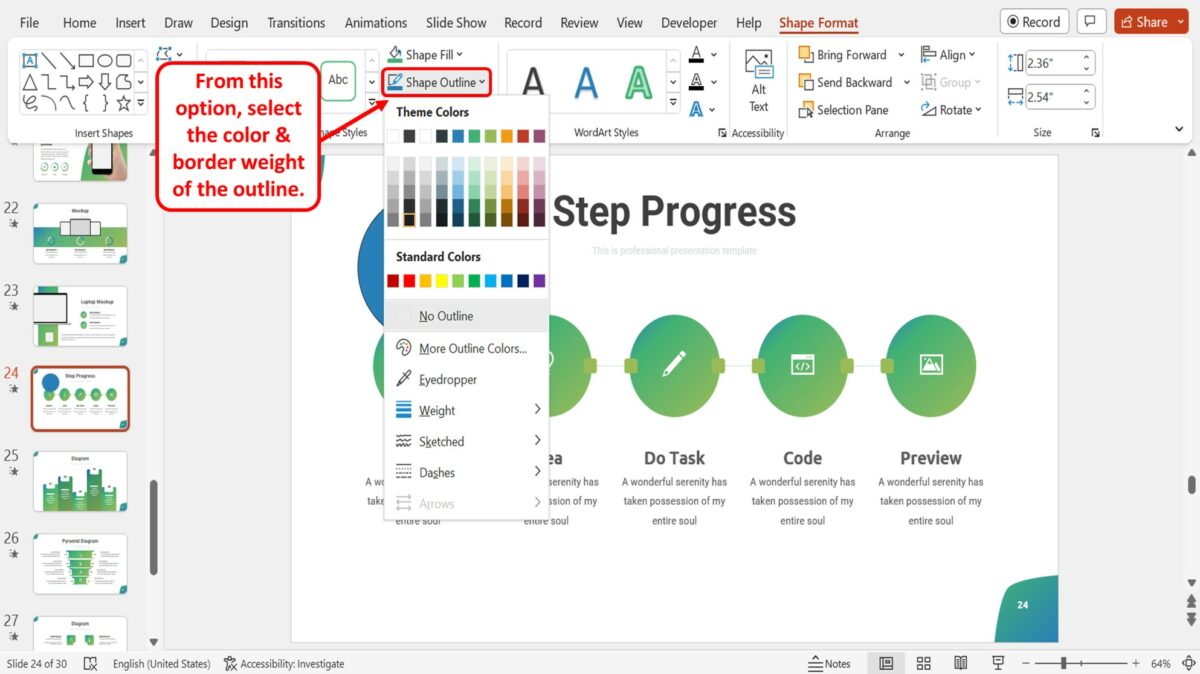
In the “Shape Styles” group of the “Shape Format” menu, click on the “Shape Outline” option. In the dropdown menu under the “Shape Outline” option, you can now select an outline color and customize the border weight of the outline. Add a dark and heavy outline to the shape.
Step-5: Click on the “Shape Fill” option
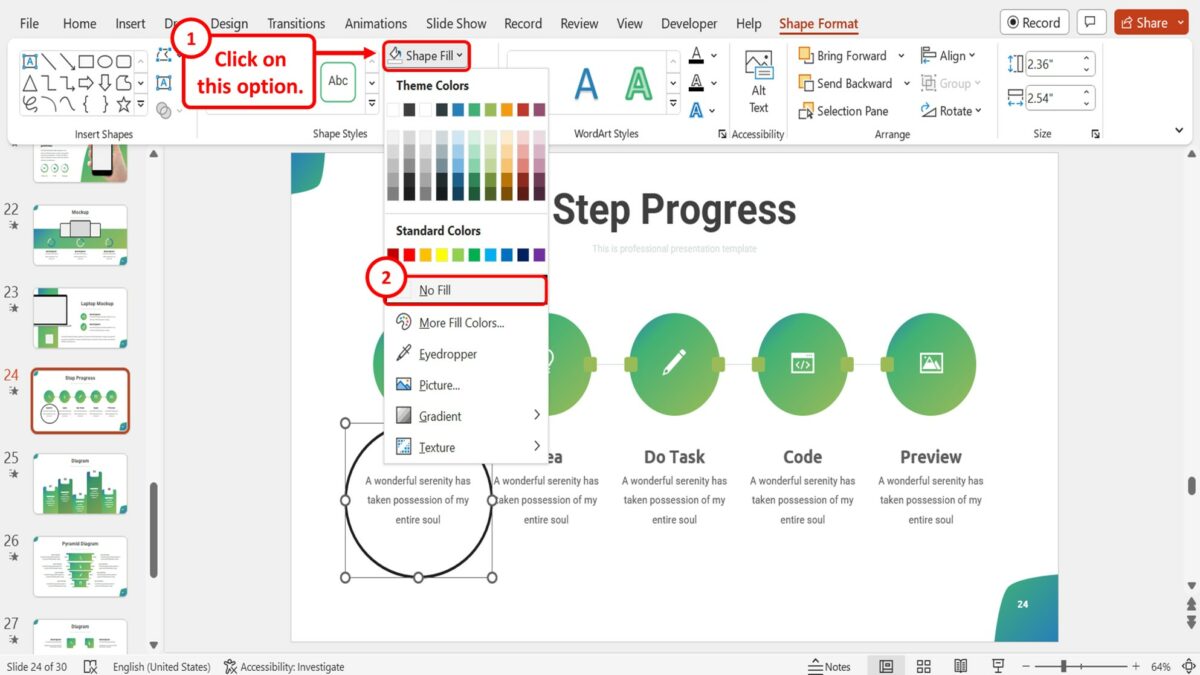
The final step is to make the shape transparent to show the item you have circled. Click on the “Shape Fill” option located above the “Shape Outline” option in the “Shape Format” menu. Then all you have to do is click on the “No Fill” option in the dropdown menu under the “Shape Fill” option.
4. How to Insert Text in a Circle in PowerPoint?
In Microsoft PowerPoint, you can type inside a shape to add text to it. To insert text inside a circle in PowerPoint, follow the 5 simple steps.
The first step is to click on the “Insert” tab in the menu ribbon located at the top of the screen to open the “Insert” menu.
Step-2: Click on the “Oval” option
The next step is to insert the circle into the slide. To do so, click on the “Shapes” option in the “Illustrations” group of the “Insert” menu. In the dropdown menu under the “Shapes” option, click on the “Oval” icon in the “Basic Shapes” section.
Now all you have to do is click and drag the cursor on the screen to draw the circle. Then click on the “Shape Format” tab in the menu ribbon located at the top of the screen.
Step-4: Click on the “Shape Styles” gallery
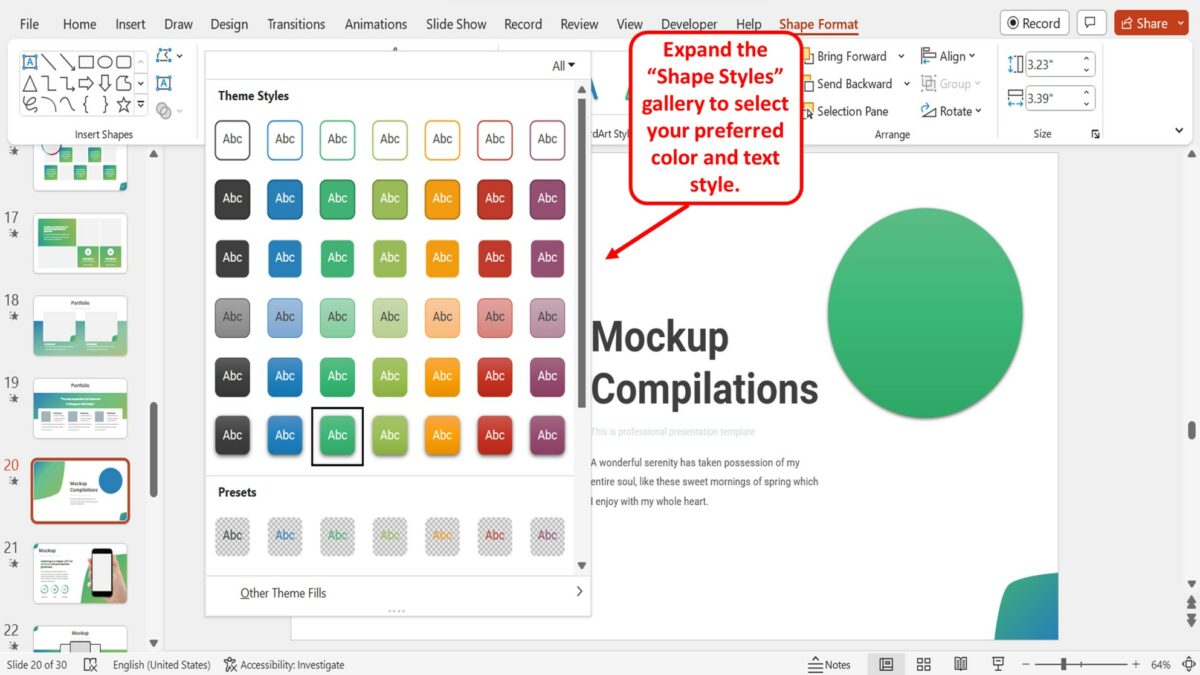
In the “Shape Format” menu, you have to now expand the “Shape Styles” gallery. Click on the “More” option which is the down arrow at the bottom right corner of the “Shape Styles” gallery. Then click on your preferred color and text style for the circle.
Step-5: “Double Click” on the circle
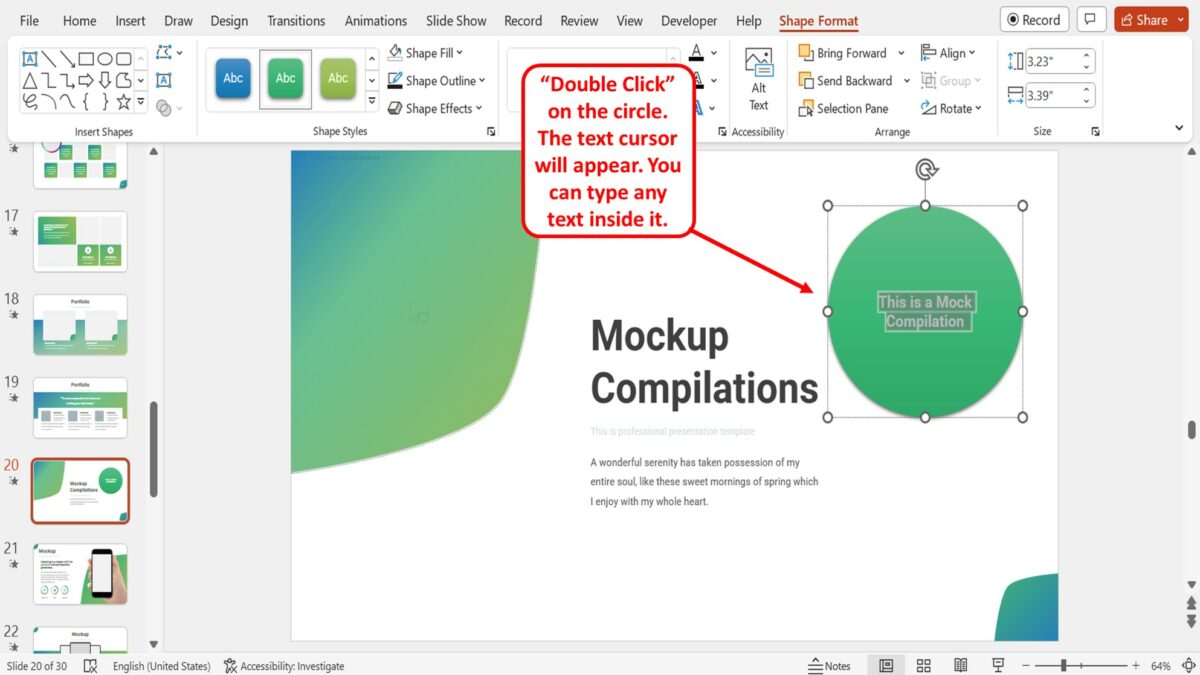
Now all you have to do is “Double Click” on the circle you have inserted into the slide. The text cursor will appear. You can now type in any text that you want to add inside the circle.
How to Make Picture Circle in PowerPoint

If you’re looking for a creative way to showcase your photos or images in your PowerPoint presentation, creating a picture circle might just be the solution you need. Picture circles are not only visually appealing but also come in handy when you want to emphasize particular elements of your presentation. In this article, we’ll guide you through the necessary steps to create a picture circle in PowerPoint and share some tips on how to customize it to suit your needs and style.
Table of Contents
Step-by-Step Guide to Creating a Picture Circle in PowerPoint
Creating a picture circle in PowerPoint is relatively easy and requires only a few steps. First, you need to have an image or a set of images that you want to work with. Here’s how to do it:
- Open PowerPoint and start a new presentation or open the one you want to add the picture circle to.
- Insert the image by clicking on the “Insert” tab and selecting “Picture.”
- Crop the image to a desired aspect ratio and size by clicking on it and selecting “Crop” from the “Format Picture” tab.
- Select the image and click on the “Shape Format” tab.
- Select “Ellipse” from the “Shapes” dropdown menu.
- Position the image inside the ellipse and drag the corners of the image to fit the shape.
- Right-click on the image and select “Save as Picture” to save the image as a PNG file.
- Insert the saved PNG file back into your presentation.
- Resize and position the PNG image as desired, and there you have it; a picture circle in PowerPoint.
It’s important to note that you can customize the picture circle further by adding a border or changing the color of the ellipse shape. To do this, select the ellipse shape and click on the “Shape Format” tab. From there, you can choose a border color and thickness, or change the fill color of the shape.
Another useful tip is to use the picture circle as a design element in your presentation. You can create multiple picture circles and arrange them in a visually appealing way to showcase a collection of images or to highlight specific content. Experiment with different sizes and shapes to create a unique and engaging presentation.
Choosing the Right Picture for Your Circle
Choosing the right picture to use in your picture circle is crucial in creating an effective and visually appealing presentation. A high-quality image with clear contrasts and colors is ideal. Whenever possible, use images with similar dimensions to the circle you want to create. Likewise, the picture’s content should be relevant to the presentation topic and properly positioned within the circle to capture the viewer’s attention.
Another important factor to consider when choosing a picture for your circle is the emotional impact it will have on your audience. The picture should evoke the desired emotions and feelings that align with your presentation’s message. For example, if you are presenting on the importance of environmental conservation, a picture of a polluted beach may evoke a sense of urgency and motivate your audience to take action. Additionally, consider the cultural and social context of your audience to ensure that the picture is appropriate and relatable to them.
Tips for Cropping Images to Fit Perfectly in a Circle
Ensure you use high-quality images when creating a picture circle. To ensure the best crop, use the “Crop to Shape” tool to convert your image to the ellipse shape. You may need to zoom in on the image to get a better view of the Crop tool. Use the corner handles to resize the image to fit the circle, ensuring the relevant parts are within the shape. If you need more accuracy, you can use pixel measurements instead.
It’s important to keep in mind the composition of the image when cropping it to fit in a circle. Consider the placement of the subject or focal point and how it will look within the circular frame. You may need to adjust the crop slightly to ensure the image is balanced and visually appealing. Additionally, try experimenting with different sizes and positions of the circle within the image to create unique and interesting compositions.
Exploring the Different Methods for Creating a Picture Circle in PowerPoint
Aside from the method we’ve shown earlier, you can create a picture circle in PowerPoint using other techniques such as using the Mask feature and using image editing tools like Adobe Photoshop or GIMP. These methods offer more flexibility and control, but can be more time-consuming depending on your level of skill.
Another method for creating a picture circle in PowerPoint is by using the Shape Fill option. You can insert a circle shape and then fill it with an image of your choice. This method is quick and easy, but may not offer as much customization as the other methods mentioned.
Adding Unique Effects and Styles to Your Picture Circle
You can add a touch of style to your picture circle by applying different effects, such as drop shadows and reflections, and experimenting with the shape fill color to give it a different look. You can also explore different border styles and color combinations that complement your presentation’s overall theme.
Customizing the Size, Color, and Position of Your Picture Circle
Once you’ve created your picture circle, it’s essential to customize it to fit your needs fully. You can adjust the size of the circle by resizing the PNG image or change its color by selecting it and navigating to the “Shape Format” tab. You can also customize the position of the picture circle by dragging it to the desired location. Ensure the circle is not obstructing important elements in your slide and that it’s proportionate to other elements on your slide.
Another way to customize your picture circle is by adding effects to it. You can add a shadow effect to make it stand out or a reflection effect to give it a more polished look. To add effects, select the picture circle and navigate to the “Picture Format” tab. From there, you can choose from a variety of effects to enhance the appearance of your picture circle. Just be sure not to overdo it with too many effects, as it can make your slide look cluttered and distracting.
Troubleshooting Common Issues When Making a Picture Circle in PowerPoint
Despite the relative ease of creating a picture circle in PowerPoint, you may occasionally run into issues. Common problems include difficulty in cropping the image to the ellipse shape, poor quality images, and misplaced or poorly positioned circles. If you encounter such issues, refer to the previous sections for troubleshooting tips, or seek assistance from online forums or PowerPoint tutorials.
Another common issue that may arise when making a picture circle in PowerPoint is the image appearing distorted or stretched. This can happen if the original image is not of high enough quality or if it is not properly resized before being cropped to the ellipse shape. To avoid this issue, ensure that the image you are using is of high resolution and adjust its size before cropping it to the circle shape. Additionally, make sure that the aspect ratio of the image is maintained to prevent distortion.
Using Advanced Techniques to Create Complex Picture Circles
If you’re looking for a challenge and want to create more complex and intricate picture circles, advanced techniques such as using the “Merge Shape” tool or creating a gradient fill can be beneficial. These methods require more skill and patience to execute, but they offer more control and can result in more elaborate and impressive picture circles.
The “Merge Shape” tool allows you to combine multiple shapes into one, creating unique and complex designs for your picture circles. By selecting two or more shapes and using the “Merge Shape” tool, you can create a new shape that incorporates the properties of the original shapes. This technique can be used to create intricate patterns and designs that would be difficult to achieve with a single shape.
Another advanced technique for creating picture circles is to use a gradient fill. A gradient fill is a gradual transition from one color to another, and it can be applied to shapes to create a more dynamic and visually interesting effect. By experimenting with different colors and gradients, you can create picture circles that are both complex and aesthetically pleasing.
Tips for Sharing and Presenting Your Picture Circle in PowerPoint Presentations
Once you’ve created your picture circle, it’s vital to ensure it’s presented correctly and effectively in your PowerPoint presentation. Here are some tips:
- Ensure the picture circle fits the slide and is not too small or too large.
- Consider the presentation’s color scheme and design aesthetics when customizing the circle’s color and effects.
- Position the circle in a way that it guides the audience’s attention to relevant elements on the slide.
- Ensure the circle is not cluttering the slide and is well placed to avoid any distracting elements.
- If using multiple picture circles, ensure they complement each other and maintain visual consistency across the slides.
In conclusion, creating a picture circle in PowerPoint is a relatively easy yet effective way to showcase your visual elements in your presentations. With our step-by-step guide and tips on customization and troubleshooting, you can create picture circles that are visually appealing and effective in conveying your message.
Another important tip to keep in mind when sharing and presenting your picture circle in PowerPoint presentations is to ensure that the images used in the circle are of high quality and resolution. Blurry or pixelated images can detract from the overall impact of the picture circle and make it difficult for the audience to fully appreciate the visual elements. Therefore, it’s essential to use high-quality images that are clear and crisp, even when enlarged to fit the circle.
By humans, for humans - Best rated articles:
Excel report templates: build better reports faster, top 9 power bi dashboard examples, excel waterfall charts: how to create one that doesn't suck, beyond ai - discover our handpicked bi resources.
Explore Zebra BI's expert-selected resources combining technology and insight for practical, in-depth BI strategies.

We’ve been experimenting with AI-generated content, and sometimes it gets carried away. Give us a feedback and help us learn and improve! 🤍
Note: This is an experimental AI-generated article. Your help is welcome. Share your feedback with us and help us improve.

- Images home
- Editorial home
- Editorial video
- Premium collections
- Entertainment
- Premium images
- AI generated images
- Curated collections
- Animals/Wildlife
- Backgrounds/Textures
- Beauty/Fashion
- Buildings/Landmarks
- Business/Finance
- Celebrities
- Food and Drink
- Healthcare/Medical
- Illustrations/Clip-Art
- Miscellaneous
- Parks/Outdoor
- Signs/Symbols
- Sports/Recreation
- Transportation
- All categories
- Shutterstock Select
- Shutterstock Elements
- Health Care
- Sound effects
PremiumBeat
- PixelSquid 3D objects
- Templates Home
- Instagram all
- Highlight covers
- Facebook all
- Carousel ads
- Cover photos
- Event covers
- Youtube all
- Channel Art
- Etsy big banner
- Etsy mini banner
- Etsy shop icon
- Pinterest all
- Pinterest pins
- Twitter All
- Twitter Banner
- Infographics
- Zoom backgrounds
- Announcements
- Certificates
- Gift Certificates
- Real Estate Flyer
- Travel Brochures
- Anniversary
- Baby Shower
- Mother's Day
- Thanksgiving
- All Invitations
- Party invitations
- Wedding invitations
- Book Covers
- About Creative Flow
- Start a design
AI image generator
- Photo editor
- Background remover
- Collage maker
- Resize image
- Color palettes
Color palette generator
- Image converter
- Creative AI
- Design tips
- Custom plans
- Request quote
- Shutterstock Studios
- Data licensing
You currently have 0 credits
See all plans

Image plans
With access to 400M+ photos, vectors, illustrations, and more. Includes AI generated images!

Video plans
A library of 28 million high quality video clips. Choose between packs and subscription.

Music plans
Download tracks one at a time, or get a subscription with unlimited downloads.
Editorial plans
Instant access to over 50 million images and videos for news, sports, and entertainment.
Includes templates, design tools, AI-powered recommendations, and much more.
Presentation Circle royalty-free images
1,163,607 presentation circle stock photos, vectors, and illustrations are available royalty-free for download..

Our company
Press/Media
Investor relations
Shutterstock Blog
Popular searches
Stock Photos and Videos
Stock photos
Stock videos
Stock vectors
Editorial images
Featured photo collections
Sell your content
Affiliate/Reseller
International reseller
Live assignments
Rights and clearance
Website Terms of Use
Terms of Service
Privacy policy
Modern Slavery Statement
Cookie Preferences
Shutterstock.AI
AI style types
Shutterstock mobile app
Android app
© 2003-2024 Shutterstock, Inc.

Crop a picture to fit in a shape

You can crop an image to a shape or start with a shape and add an image to it.
Crop an image to a shape
You can easily change the shape of a picture by cropping it to a specific shape. When you do this, the picture is automatically trimmed to fill the geometry of the selected shape while maintaining its proportions.
Tip: If you want to crop the same picture to more than one shape, make copies of the picture then crop each to the desired shape individually.

Use Insert > Picture to add the image to a Microsoft 365 file (such as a Word document, PowerPoint presentation, or an Outlook email message).
Select the picture(s). You can multi-select and crop multiple pictures at once, but you must crop them all to the same shape.
Caution: Multi-cropping in Word can be difficult, because you cannot multi-select pictures that have the default In Line with Text layout option.
In the ribbon, go to Picture Tools > Format. Then, in the Size group, select the arrow under Crop to open the menu of options.

Select Crop to Shape , then select the intended crop shape.
The shape is immediately applied to the image.
To change how much of the picture fits within the shape, use either Crop > Fill or Crop > Fit.
Fill Fills the entire shape with the picture. Some outer edges of the picture may be cropped away. There won't be any empty space at the margins of the shape.
Fit Makes the entire picture fit within the shape while maintaining the picture's original aspect ratio. There may be some empty space at the margins of the shape.
When you select either of these options, black crop handles appear on the edges and corners of the picture.
To adjust the position of the picture within the frame, selecting the picture and drag it as needed. If needed, this can help you center the most important part of the picture within the shape.
To crop the margins of the image, drag a black crop handle as follows:
When done, click the Crop button.
Start with a shape and add an image to it
You can add a picture as fill for a shape and then optionally edit or crop the shape.
Add a picture to a shape
Add a shape to your document (see Add shapes for instructions)
Click/select the shape.
In the ribbon, go to Drawing Tools > Format . In the Shape Styles group, select Shape Fill > Picture .

Select the type of picture you want (e.g., From a File or Online Pictures ).
Navigate to the picture you want and insert it.
Resize the shape
To change the filled shape's dimensions while maintaining its basic format, select it and drag any of the sizing handles.
Choose how the picture fits in the shape
Perhaps your picture is skewed, cut off, or doesn't fill the shape the way you want. You fine-tune the picture with the Fit and Fill tools on the Crop menu.
Click a shape created using Shape Fill > Picture .
Click Picture Tools > Format , and in the Size group, click the arrow under Crop . A menu appears showing cropping options.
Choose Fit if you want as much of the picture as possible to fit within the shape; the original picture aspect ratio will be maintained, but you may have empty space inside your shape.
Choose Fill to have the shape fit within the bounds of the picture, cropping away everything outside the shape. You can drag the picture to change what part of it shows within the shape.
If you want, you can adjust the crop area by using the cropping handles, as described under Crop a picture .
When you're finished, press Esc or click anywhere outside the picture within the document.
Use edit points to edit or crop the shape
Although cropping tools are not available for shapes, you can use the Edit Points tool to customize a shape.
Select the shape that you want to edit.
Drag the shape's vertex points (which appear as black dots around the shape's perimeter) until the shape looks the way you want.
To delete a vertex point, hold Ctrl and click it. To add a vertex point, hold Ctrl while clicking anywhere on the shape's perimeter that does not already have a vertex point.
Crop a picture in Microsoft 365
Cut out or cover part of a picture
You can crop to a shape in Word, PowerPoint, or Excel.
Crop to a specific shape
Quickly change the shape of a picture by cropping it to a specific shape. The picture is automatically trimmed to fill the geometry of the selected shape while maintaining its proportions.
If you want to crop the same picture to more than one shape, make copies of the picture and crop each to the desired shape individually.
Use Insert > Picture to add the image to an Office file (such as a Word document, PowerPoint presentation, or an Excel workbook).
In your file, select the picture that you want to crop.
On the Picture Format tab, click the arrow next to Crop .

(If you don't see the Picture Format tab, make sure that you've selected a picture (not a shape).)
Point to Crop to Shape and then click the shape you want to crop to.

The shape is immediately applied to the image.
If you want to adjust the shape, click the Crop button again on the ribbon.
Black crop handles appear on the edges and corners of the picture.

Crop the image by dragging any crop handle inward. If you drag one of the corner handles, it crops two adjacent sides at the same time.
Crop to fit or fill a shape
After you have added a picture to a shape, you can choose how the picture fits in the shape by using the Fit and Fill tools for fine tuning.
In your file, select the picture that you want within the shape.
If you don't see the Picture Format tab, make sure that you've selected a picture (and not a shape).
Click Fill or Fit , and then click outside the picture.
Which app are you using? Word | PowerPoint
Word: Fit a picture inside a shape
Word for the web doesn't have the "crop-to-shape" feature that the desktop app has. However, you can still use quick Picture Styles to apply some basic shapes to a picture.
Insert the image in your document. (Select Insert > Picture , then navigate to the picture you want to use.)
With the image selected on the canvas, select the Picture tab on the ribbon, then go to the Picture Styles gallery.

Select a shape to apply it to your picture.
Once the shape is applied, you can resize it as needed.
PowerPoint: Crop a picture to a shape
Select a picture on a slide to crop to a shape.
On the Picture tab, on the right end, select the arrow next to Crop .

Tip: If you don't see the Picture tab, make sure you have selected a picture.
Select Crop to Shape , then choose a shape to apply to the border of the picture.

To save your changes, select the Crop button again, or press Esc .

Need more help?
Want more options.
Explore subscription benefits, browse training courses, learn how to secure your device, and more.

Microsoft 365 subscription benefits

Microsoft 365 training

Microsoft security

Accessibility center
Communities help you ask and answer questions, give feedback, and hear from experts with rich knowledge.

Ask the Microsoft Community

Microsoft Tech Community

Windows Insiders
Microsoft 365 Insiders
Was this information helpful?
Thank you for your feedback.
IMAGES
VIDEO
COMMENTS
Step 2. Now you'll want to select the image you want PowerPoint to crop to the circle shape. From the ribbon, click Picture Format. You'll see Crop as one of the options. Instead of clicking the Crop option, click the arrow next to it. From this menu, you'll want to choose PowerPoint Crop to Shape.
Ensure the picture is selected. Click the Picture Format or Picture Tools Format tab in the Ribbon. In the Size group, click the arrow below Crop. A drop-down menu will appear. Choose Aspect Ratio. A sub-menu will appear. Select 1:1 to crop the image into a circle (this changes the oval into a circle).
Step 2: Crop the image into a circle. The next step is to crop the image into a circle. To crop an image into a circle in Google Slides using the Crop command on the Toolbar: Select the image on the slide. Click the arrow beside Crop in the Toolbar. A drop-down menu appears.
Follow these steps to convert the picture to a circle using shapes: Step 1: In your PowerPoint presentation, click on the Insert option in the top bar. Step 2: Click on Shapes and choose a circle ...
Crop an Image Into Circle in Google Slides on Android and iPhone. Follow these steps to make an image circular in Google Slides on an Android or iPhone: Step 1: Launch the Google Slides app on ...
We have created a lot of circle infographic templates for you. They come in different styles and designs: some are intertwined, others are hand-drawn, some include arrows, others look like a pie chart or have a futuristic style. You'll find the perfect circle diagram for your project! They contain different icons related to myriad topics, and ...
Learn how to make profile images for your PowerPoint presentations that are visually appealing! Convert images (even those with different dimensions) into a ...
Step 2. Select the image you want to change shape and click the Mask Image drop-down arrow next to the Crop icon. Crop Picture to Shape in Google Slides. Step 3. Then, you will see various options—shapes, arrows, callouts, and the basic ones; just choose your preferred shape, like a circle and more, and it will automatically mask the image ...
Open PowerPoint and create a new slide. Then, follow these simple steps: Insert the image you want to turn into a circle onto the slide. With the image selected, click on the "Format" tab in the top menu bar. Click on the "Crop" button and select "Crop to Shape.". Select the circle shape from the menu.
To create a circular photo in PowerPoint, follow these simple steps: Open PowerPoint and insert the desired photo into the slide. Select the photo by clicking on it once. Go to the "Format" tab in the PowerPoint ribbon. Click on the "Crop" dropdown menu. Select "Crop to Shape". Select the "oval" shape from the dropdown menu.
Follow these steps to create a circle-shaped image in PowerPoint: Open PowerPoint and insert the image you want to turn into a circle by clicking on the 'Insert' tab and choosing 'Pictures' from the 'Images' group. Select the image by clicking on it and then click on the 'Format' tab. Click on the 'Crop' button in the ...
Select the first image, then go to Crop > Aspect Ratio > 1:1. Repeat this with all the images that you want to crop into a circle in PowerPoint. Now that all of the necessary images have the shape of a square, it's time to select them. Click on the empty space on your slide, then drag the cursor.
The following steps can be used to create a circular image in PowerPoint: Select the image you want to use and insert it into your PowerPoint slide. Click on the image to select it. You should see a new tab appear in the menu bar called "Format.". Click on the "Format" tab and select "Crop" from the options.
Method 1: Use the Crop Tool. The fastest way to crop an image into a circle in PowerPoint is by using the native crop tool. Here are the steps: Insert the image you want to crop onto a PowerPoint slide. Select the image and go to the Picture Format tab. Click Crop and choose Crop to Shape.
Circles. Browse our wide collection of slides with circles for Google Slides and PowerPoint. These charts, maps, timelines, and backgrounds will help you make your presentation go round. Charts & Diagrams Processes Stairs.
Table of Contents. Easy Ways to Make a Picture a Circle in Google Slides. How To Download a Cropped Image in Google Slides. Method 1: Downloading Individual Slides as an Image. Method 2: Save to Keep. Method 3: Take a Screenshot. Final Thoughts.
Click on the Crop icon from the format menu. Select crop by shape. (You can crop an image using hundreds of shapes here). Again, click on the crop option dropdown . Click on the aspect ratio to see it. Choose 1:1 from the available options. The oval shape will be reduced to a perfect circle as shown below.
Circle Presentation Images. Images 100k Collections 39. ADS. ADS. ADS. Page 1 of 100. Find & Download Free Graphic Resources for Circle Presentation. 99,000+ Vectors, Stock Photos & PSD files. Free for commercial use High Quality Images.
To insert text inside a circle in PowerPoint, follow the 5 simple steps. Step-1: Click on the "Insert" tab. The first step is to click on the "Insert" tab in the menu ribbon located at the top of the screen to open the "Insert" menu. Step-2: Click on the "Oval" option.
Ensure you use high-quality images when creating a picture circle. To ensure the best crop, use the "Crop to Shape" tool to convert your image to the ellipse shape. You may need to zoom in on the image to get a better view of the Crop tool. Use the corner handles to resize the image to fit the circle, ensuring the relevant parts are within ...
Find Presentation Circle stock images in HD and millions of other royalty-free stock photos, 3D objects, illustrations and vectors in the Shutterstock collection. Thousands of new, high-quality pictures added every day. Images. ... 863,278 presentation circle vectors, graphics and graphic art are available royalty-free. ...
Find Presentation Circle stock images in HD and millions of other royalty-free stock photos, 3D objects, illustrations and vectors in the Shutterstock collection. Thousands of new, high-quality pictures added every day.
In the ribbon, go to Picture Tools > Format. Then, in the Size group, select the arrow under Crop to open the menu of options. Select Crop to Shape, then select the intended crop shape. The shape is immediately applied to the image. To change how much of the picture fits within the shape, use either Crop>Fill or Crop>Fit.
Simply click the "Circle Crop Images Now" button, then click "Open Image" to upload your image. Click on "Crop" and select the circle crop frame to make image circle. Drag and drop to adjust the circle size and position. Also, you can add text, remove the background, and fine-tune the image even further using the built-in editing tools.