Simon Sez IT
Online software training and video tutorials for Microsoft, Adobe & more
- Get Started
- Access 2021 Beginners
- Access 2021 Advanced
- Access 2019
- Access 2019 Advanced
- Access 2016
- Microsoft Excel 365 Intermediate
- Excel 365 for Beginners
- The Accountants Excel Toolkit
- Data Analytics in Excel
- Excel 2021 Advanced
- Microsoft 365
- PowerPoint 365 for Beginners
- Microsoft Word 365
- OneNote Desktop and Windows 10
- OneNote 2016
- Outlook 2021
- Outlook 2019
- Outlook 2016
- Outlook 2013
- Outlook 2010
- Introduction to Power Automate
- Power BI Essentials
- Power BI Training
- Power BI Intermediate
- PowerPoint 2021
- PowerPoint 2019
- PowerPoint 2016
- PowerPoint 2013
- Project 2021 Advanced
- Project 2021 Beginners
- Project for the Web
- Project 2019
- Project 2019 Advanced
- Microsoft Publisher 365
- Publisher 2013
- SharePoint Online: The Essential Guide (2023)
- SharePoint Online (2021)
- SharePoint Foundation 2013
- SharePoint Server 2013
- SharePoint Foundation 2010
- Microsoft Teams (2023 Update)
- Macros and VBA for Beginners
- VBA for Excel
- VBA Intermediate Training
- Microsoft Visio 2019
- Microsoft Visio 2010
- Windows 11 Advanced
- Windows 11 (2023 Update)
- Windows 10 (2020 Update)
- Word 2019 Advanced
- Dreamweaver CC
- Dreamweaver CS6
- Dreamweaver CS5
- Dreamweaver CS4
- Adobe Illustrator CC for Beginners
- Adobe InDesign CC for Beginners
- InDesign CS6
- InDesign CS5
- Adobe Photoshop CC Advanced
- Adobe Photoshop CC Intermediate
- Adobe Photoshop CC for Beginners
- Photoshop CS6
- Photoshop CS5
- Photoshop Elements 2022
- Photoshop Elements 2019
- Photoshop Elements 2018
- Photoshop Elements 15
- Photoshop Elements 14
- QuickBooks Desktop 2023
- QuickBooks Desktop Pro 2022
- QuickBooks Pro 2021
- QuickBooks Online Advanced
- QuickBooks Online
- AngularJS Crash Course
- Bootstrap Framework
- HTML/CSS Crash Course
- HTML5 Essentials
- Java for Beginners
- JavaScript for Beginners
- jQuery Crash Course
- MySQL for Beginners
- PHP for Beginners
- Advanced PHP Programming
- Matplotlib, Seaborn, and Plotly Python Libraries for Beginners
- Python Object-Oriented Programming
- Pandas for Beginners
- Introduction to Python
- SQL for Beginners
- SQL Server Integration Services for Beginners
- XML Crash Course
- Alteryx Advanced
- Introduction to Alteryx
- Introduction to Data Visualization and Business Intelligence Principles
- Analytical Methods for Effective Data Analysis
- Introduction to Analytics and Artificial Intelligence
- Financial Risk Management
- Financial Forecasting and Modeling
- Qlik Sense Advanced
- R Programming
- Tableau Desktop Advanced
- Tableau Desktop
- Advanced Agile Scrum
- Agile Scrum Training
- Generative AI and Cybersecurity
- Introduction to ChatGPT
- Artificial Intelligence Intermediate
- Asana for Employees and Managers
- Introduction to Asana
- Effective Communication Tactics for the Modern Workplace
- Introduction to Confluence
- HubSpot CRM for Beginners
- Introduction to Google Drive
- Gmail for Beginners and Pros
- Google Sheets for Beginners
- Getting Started in Jira
- Getting Started in Monday.com
- Cybersecurity Essentials: Stay Safe and Secure Online
- Cybersecurity Awareness Essentials
- Excel Efficiency and Data Management
- Excel Advanced Features and Customization
- Mastering PivotTables
- Microsoft Suite Productivity


How to Save PowerPoint as Video? A Step-by-Step Guide
(Note: This tutorial on how to save PowerPoint as Video is suitable for PowerPoint 2013 and later versions including Office 365 )
PowerPoint presentations are a powerful technique to showcase your ideas effectively. But, do you know what’s even more effective than a PowerPoint presentation? A video presentation.
Yes, videos help engage the audience and connect with them on a deeper level.
Furthermore, if your presentation has too many slides, it’d be hard to move the slides one after the other, especially when the slides are maximized. You can also make your presentation into a video if the presentation does not need a lot of explaining.
In this article, I will tell you how to effectively save your PowerPoint presentation as video.
You’ll Learn:
Why Convert PowerPoint to a Video?
How to save powerpoint as video, resolution of the video, recorded timings and narrations.
Watch this short video on How to Save PowerPoint as Video
There are a lot of times when converting your PowerPoint presentation to video proves to be useful.
For example, you might have successfully created an effective presentation and want to share it with your colleagues and teammates. But unfortunately, they don’t have PowerPoint to view the file. In such cases, converting your presentation to a video will be easy for the user to view. Viewing the video doesn’t need PowerPoint or any additional software and can be played on built-in media players or any third-party software.
When creating a video, you can emphasize certain areas and slides, include effects and transitions. What’s more is that, you can make voice narrations, use laser points to highlight important areas, and note important points on the slide itself. This will especially help you make an impact when you have to present online to several audiences.
You can easily attach the video to an e-mail and upload them to be streamed online. Also, converting Powerpoint presentations to videos is easy. You don’t need any additional software to convert and save Powerpoint as video.
Before you create a video from a presentation, make sure you have created and curated all the slides, transitions, and effects in your presentation.
- Navigate to File . Under Export , click on Create a Video .
- This opens the Create a Video pane on the right side of the window.
- Click on Create Video .

- This opens up a Save As dialog box. Rename the file, choose the destination and file format, and click on Save .

Note: There are two video formats when you save Powerpoint as video, namely .mp4 and .wmv formats. The difference between the two formats is that in MPEG-4 (.mp4) Video file format can be easily compressed when you want to reduce the file size, but the quality takes a hit. On the other hand, the Windows Media Video (.wmv) file format retains the same quality even when the file is compressed.
- After you click on Save, you can see the video being exported at the bottom of the Powerpoint window. If you want to make some additional changes or you don’t want to export the file, click on Cancel .

- Now, navigate to the storage location and play the video.

Related Reads:
How to Insert PDF into PowerPoint? 3 Easy Ways
How to Add Slide Numbers in PowerPoint the Easy Way?
How to Superscript in PowerPoint? (And Subscript) 3 Easy Ways
Customize the Video
You can save PowerPoint as video with the default settings. But, this will make the video look plain. Also, there is no emphasis on slides and each slide will be displayed for a set number of seconds.
There is so much more you can do before you export your presentation as a video. Let us see how.
When exporting the presentation to a video, you can choose the resolution of the video depending on your purpose.
Microsoft Powerpoint offers 4 types of resolution namely:
- Ultra HD (3840×2160)
- Full HD (1920×1080)
- HD (1280×720)
- Standard (852×480)

Choose the resolution depending on your preferences. The greater the resolution, the greater will be the size and the time taken to export. For optimal results, choose the Full HD(1080p) resolution as the quality is better and it works on all devices.
Did you know, you can narrate and explain each slide when you save Powerpoint as video?
By default, Don’t Use Recorded Timings and Narrations will be selected. This means that, when you save the video, the slides will just roll over one after the other for a set number of seconds. And, all the slides will have the same time spent on each slide.
You can change the time spent on each slide by using the text box below.

But, this has some drawbacks as there are no emphasis on certain slides. Also, there might be some information that you can deliver to make the audience understand the slides even better. In such cases, you can create narrations or just let the slides do the talking.
By default, the Use Recorded Timings and Narrations option will be grayed out. This means that you haven’t recorded any video or narrations in the presentation.
To enable this option, click on the Record a Video option from the same dropdown to create a narration.
If you don’t want to record the video at the last moment when you export, you can create your narrations beforehand.
- Navigate to Slideshow and click on Record .

- This opens up the Record window.
- Click on Record and start your narration as you speak.

- After you have made the recording, click on Close . This saves the recording.
- To preview the recording, click on Preview Timings and Narrations from the dropdown.
- Once you have checked and made corrections, click on Create Video .
Note: When you save a presentation as a video, all the inserted files and macros will not work.
Frequently Asked Questions
Why am i not able to save my presentation as video.
You might not be able to save your presentation as a video when some background apps are preventing PowerPoint from exporting the video. Applications such as antivirus or defenders might prevent you from recording and saving your presentation.
How to save recording and narration without audio or video?
When you click on Record, disable the microphone and video camera in the bottom right of the window. This way, you can use the laser pointer to point to the slide, and use pens to make any cues on the slides. You can also add notes to the recording without having to speak or show your face.
Can we increase the time spent on slides for a particular slide?
No. You cannot increase the time spent on one particular slide. However, you can record a video, mute the audio and video, and then show emphasis on particular slides.
Closing Thoughts
If you are looking to engage the audience with presentations, videos are an excellent way to achieve that.
In this article, we saw how to save PowerPoint as video in an easy way. There are two ways you can do that: You can either export the slides into a video with a set time on each slide. Or, create narration and add necessary cues to add additional leverage to your videos. You can choose the method depending on your preference and purpose.
If you need more high-quality PowerPoint guides, please check out our free resources center .
Ready to dive deep into Excel? Simon Sez IT has been teaching Excel for over ten years. For a low, monthly fee you can get access to 100+ IT training courses. Click here for advanced courses with in-depth training modules.

Simon Calder

Chris “Simon” Calder was working as a Project Manager in IT for one of Los Angeles’ most prestigious cultural institutions, LACMA.He taught himself to use Microsoft Project from a giant textbook and hated every moment of it. Online learning was in its infancy then, but he spotted an opportunity and made an online MS Project course - the rest, as they say, is history!
Similar Posts
Trello vs Jira: 8 Major Differences You Should Know
How To Use Microsoft To Do: Microsoft To Do Tutorial
NetSuite vs QuickBooks: Ultimate Guide
How to Import Task Lists in Microsoft Project
How to Shade Every Other Row in Excel? (5 Best Methods)
Using Organization Data, Pictures, and More on Layouts in Visio 2010
- Privacy Policy

ADVANCE YOUR CAREER
Gain instant access to 200+ courses. Earn a CERTIFICATE each time you complete a course.
Critical PowerPoint Shortcuts – Claim Your FREE Training Module and Get Your Time Back!
How to Convert PowerPoint to Video (Step-by-Step)
- PowerPoint Tutorials
- Shortcuts & Hacks
- October 22, 2019
In this article you’ll learn how to convert PowerPoint to video, and the different options you have.

While most people know how to use PowerPoint to present their products and services live, few people know how to turn a PowerPoint into a video that runs on its own.
And while that might sound complicated, it’s in fact pretty easy, as you will see below.
There are two different ways to turn your PowerPoint presentations into video, the first of which gives you the most options, as discussed below.
But before you start the conversion process, here are some thoughts about why you should consider doing it in the first place.
Why Convert PowerPoint to Video?
It keeps your presentation the way it was intended.
Exporting your presentation as a video keeps all elements safely locked in place. That way you can email it to your colleagues or clients without worrying that something will shift, or that timings be messed up.
Video is more accessible and shareable
While most people have PowerPoint on their computer, we shouldn’t assume that they do. Convert your PowerPoint to video and the receiver can open it even if they don’t have a Microsoft subscription. They will have to have a media player though!
It’s also easier to view videos on a mobile device, so busy clients can check out your presentation while on the move.
Furthermore, it’s also easier to share videos on multiple platforms. They can be posted to YouTube, on your company blog, and on social media and video sharing networks.
People love videos!
With more than 75 million people watching online videos every day across the United States alone, you know you’re onto a good thing. According to marketing gurus, just mentioning the word ‘video’ in the subject line of an email increases the click-through rate by 19%.
We human beings naturally love a good story because it conveys a message on an emotional level; and videos are very effective for storytelling, especially in contrast to written text or even images.
Since people’s decision-making process is often based on emotions, turning your presentation into a video can be very convincing.
What is an MP4?
MP4 is short for MPEG-4 Video, and is a universal video format that plays on any device.
When converting PowerPoint to video, you can choose between the MPEG-4 Video file format (MP4) or the Windows Media Video file format (WMV), as discussed below.
The two main advantages of MP4 for your videos are:
- It’s a pre-compressed and compact file type format (so it’s small)
- It plays on just about any device
When converting PowerPoint to video, I highly recommend using the MP4 format unless you have a specific reason not to.
To learn more of the advantages of the MP4 format, see this Quora thread here .
Option #1. Convert PowerPoint to video

To convert your PowerPoint presentation into a video, simply:
- Click the File tab
- Select Export
- Select Create Video
- Choose your Video Quality and Recorded Timings and Narrations (see details below)
- Click Create Video
Choose where to save the video on your computer and click Save .

As a result, your PowerPoint presentation is converted into video, based on the Recorded Timings and Narrations you selected, or the preset seconds per slide you set (all discussed below).
You can even add music and loop it throughout your video if you want to. To learn how to add music to PowerPoint, read our guide here .
Video quality
Video quality determines not only the quality of your video output, but also how large the video file will be, as you can see in the image below.

For most situations, the Full HD (1080p) is a great choice.
That said, if you are showing your video on a large overhead projector and size isn’t an issue, you can improve the quality of your video by using the Ultra HD (4K) format.
Below you can see the different video quality options you have in the Create a Video dialog box.

If file size is an issue or you are just showing your video on a smaller laptop screen, you can save a lot of space with the HD (720p) or HD (480p) formats.
HD (720p) is supported on most websites and video platforms such as YouTube and Facebook. The HD (480p ) option is the best option for mobile devices.
Setting recorded timings and narrations

Recorded Timings and Narrations are important when converting PowerPoint to video as they not only dictate how long your video will be, but determine when things happen in your presentation.
There are a variety of ways you can set yourRecorded Timings or Narrations (all detailed below), but in short, your options are:
- Automatically set how many seconds you want per slide
- Set your own Rehearsal Timings (no audio or video) by clicking through your presentation
- Narrate your PowerPoint with voice and/or video, which automatically sets the slide timings for you
If you use the Record Slide Show dialog box to narrate your entire presentation, you can simply use the Save As dialog box (discussed next) to save your PowerPoint as a video, as your narrations will take care of everything in your video.
To learn everything you need to know about narrating a PowerPoint presentation, read our guide here .
Properly using PowerPoint animations
If you have animated sequences in your presentation and are going to use a pre-set number of seconds per slide, I recommend setting all your animations to After Previous.

To set an animation to trigger automatically as your slide changes, simply:
- Select your animated object
- Open the Animations tab
- Open the Start drop down
- Select After Previous
This ensures that your animations will trigger after the previous action, whether that is an animation or advancing to the next slide.
If you leave your animations set to On Click , they can add a delay of as much as 10 seconds to your video. This is especially if you are using the second conversion method (see the section below here on saving PowerPoint as a video).
Option #2. Save PowerPoint as Video
The fastest way to convert your PowerPoint presentations into a video format, is to use the Save As dialog box.
This works best when you have narrated your PowerPoint presentation using the Record Slide Show dialog box, and just want the Full HD (1080p) quality for your video.

That’s because all of your slide timings, actions and animated sequences are saved within your narration, so all PowerPoint then has to do is save itself as a video using the default settings.
If you are not narrating your presentation, then I recommend using the first method discussed above.

To save your presentation as a video from inside PowerPoint, simply:
- Hit F12 or Ctrl + Shift + S to open the Save As dialog box
- Choose a location to save your video
- Change the file type to either MPEG-4 Video (recommended) or Windows Media Video
- Click Save
Depending on the size of your presentation, it might take a minute or two to save your presentation as a video, so just hang tight.
When it is finished, your PowerPoint will be saved as a video in the Full HD (1080p) format. If you want a different video quality, you will need to use the Create a Video dialog box (see the first method discussed above).
After you save your presentation as a video, you can then embed it in other presentation if you want to. To learn how to embed a video in PowerPoint, read our guide here .
Note: I highly recommend saving your presentation in the MPEG-4 (MP4) file format as it is more universally accepted than the Windows Media Video (WMV) file format.
How to Record and Set Timings for Your Video
When converting PowerPoint to video, the timings not only determine the length of your video, they also determine the timing in which your animated sequences are triggered.
If you have a lot of animated sequences in your presentation, I don’t recommend using a set number of seconds per slide.
That’s because you can’t control the lag between the animated sequences and your content. Instead, I recommend using the Rehearse Timings command.
Here are the 4 different ways you can set and adjust slide timings for your presentation, from easiest to slowest.
1. Set a default number of seconds per slide

To use a standard number of seconds per slide for your slide timings, simply:
- Navigate to the File tab
- Click Export
- Select Create Video
- Set the number of seconds
The more seconds you set per slide, the longer your video will be in total.
2. Set transition timings to advance your slides
PowerPoint transitions are another great way to not only make flipping between your slides less abrupt, but also to automatically advance your slides.
Using the Transitions tab, you can both set a default number of seconds for all of your slides, as well as adjust the time spent on individual slides.

For example, to set a Fade transition and slide timings of 3 seconds per slide, simply:
- Navigate to the Transitions tab
- Click the Fade transition
- Under the Effect Options , choose Through Black
- Deselect On Mouse Click
- For After , input 3 seconds (and make sure there is a check mark next to After )
- Click Apply to All
As a result, all the slides in your presentation will now have a Fade transition and will automatically advance after 3 seconds.
You can also adjust the duration of the transitions between your slides if you want to get specific, but I think the default is usually fine.
3. Use the Rehearse Timings command
If you want to control the flow of your timings by manually clicking through your presentation, you can use the Rehearse Timings command.
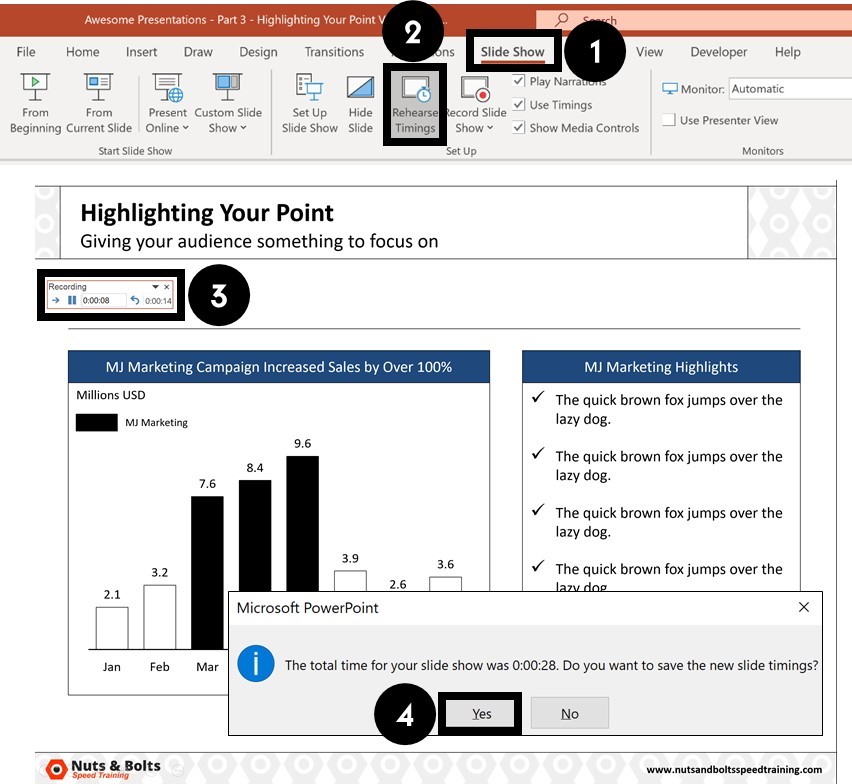
To set your slide timings with the Rehearse Timings command, simply:
- Navigate to the Slide Show tab
- Click the Rehearse Timings command
- Use the Rehearse Timings dialog box to click through your presentation
- When you are finished, click Yes to save the slide timings
Here is a quick run through of the commands on the Rehearse Timings dialog box.

Clicking Repeat starts the rehearsal timing over for the current slide you are on. That means you can restart the timing without having to start the presentation over from scratch.
4. Use the Record Slide Show command
The Record Slide Show command is the NEWEST and best way to add audio and video narrations to your presentations.
The advantage of using this tool to narrate your PowerPoint presentation, is that all of your slide timings, animations and actions are recorded for each slide.
That means you can simply use the Save As dialog box to quickly convert your narrated PowerPoint into a video.

To use the Record Slide Show command to narrate your presentation from the beginning, simply:
- Navigate to Slide Show tab
- Open the Record Slide Show drop down
- Select Record from Beginning
To learn how to use the Record Slide Show command to narrate your PowerPoint (and all the options you have), read our guide here.
Note: If you just click the Record Slide Show button (instead of opening the drop down), you will begin recording your narration from your current slide.
So that’s how to turn PowerPoint into a video, either by exporting your video using the Create a Video command, or by saving your PowerPoint presentation as a video using the Save As dialog box.
If you narrate you presentation using the Record Slide Show command, the Save As dialog box is the fastest way to turn your presentation into a video.
And while PowerPoint gives you two different video file types to choose from, I recommend using the universal MP4 video file format. That’s because it ensures that your video will play on any device (computer, tablet, or phone) that people may have.
If you enjoyed this article, you can learn more about our PowerPoint training courses and other presentation resources by visiting us here .
What’s Next?
Related articles, about the author.

This Post Has One Comment

Very useful tips. Many thanks!
Comments are closed.
Popular Tutorials
- How to Strikethrough Text (l̶i̶k̶e̶ ̶t̶h̶i̶s̶) in Word, Excel & PowerPoint
- How to Make Animated Fireworks in PowerPoint (Step-by-Step)
- Strikethrough Shortcut (l̶i̶k̶e̶ ̶t̶h̶i̶s̶) for Word, Excel & PowerPoint
- How to Create a Flash Card Memory Game in PowerPoint (Like Jeopardy)
- Keyboard Shortcuts Not Working: Solved
PowerPoint Tutorial Categories
- Strategies & Opinions
- Presentation Design
- Pictures, Icons, Videos, Etc.
- New Features
- Miscellaneous
- Charts & Data Viz
We help busy professionals save hours and gain peace of mind, with corporate workshops, self-paced courses and tutorials for PowerPoint and Word.
Work With Us
- Corporate Training
- Presentation & Template Design
- Courses & Downloads
- PowerPoint Articles
- Word Articles
- Productivity Resources
Find a Tutorial
- Free Training
- For Businesses
We help busy office workers save hours and gain peace of mind, with tips, training and tutorials for Microsoft PowerPoint and Word.
Master Critical PowerPoint Shortcuts – Secure Your FREE Training Module and Save Valuable Time!
⌛ Master time-saving expert techniques.
🔥 Create powerful presentations.
🚀 Propel your career to new heights.
We value your privacy – we keep your info safe.
Discover PowerPoint Hacks Loved by Industry Giants - KKR, AmEx, HSBC!
Over 114,880 professionals in finance, marketing and sales have revolutionized their PPT skills with our proven methods.
Gain FREE access to a full module of our premium PowerPoint training program – Get started today!
We hate spam too and promise to keep your information safe.
You are currently viewing a placeholder content from Facebook . To access the actual content, click the button below. Please note that doing so will share data with third-party providers.
- Ad Creative Eye-catching designs that perform
- Social Media Creative Engaging assets for all platforms
- Email Design Templates & designs to grab attention
- Web Design Growth-driving designs for web
- Presentation Design Custom slide decks that stand out
- Packaging & Merch Design Head-turning apparel & merch
- eBook & Digital Report Design Your digital content supercharged
- Print Design Beautiful designs for all things printed
- Illustration Design Visual storytelling for your brand
- Brand Identity Design Expertise & custom design services
- Concept Creation Ideas that will captivate your audience
- Video Production Effortless video production at scale
- AR/3D Design New creative dimensions that perform
- AI-Enhanced Creative Human expertise at AI scale

How to Save a PowerPoint Presentation? [PPT & Other Formats!]
By: Author Shrot Katewa
![How to Save a PowerPoint Presentation? [PPT & Other Formats!]](https://artofpresentations.com/wp-content/uploads/2022/03/Featured-Image-How-to-Save-a-PowerPoint-Presentation.webp "save powerpoint presentation with video")
Saving a PowerPoint presentation is one of the most important things that you need to do when you are creating a presentation using PowerPoint. Unlike some of the modern web-based presentation applications, you need to make sure that you save a PowerPoint presentation when you are using an offline version!
To save a PowerPoint presentation, click on the “File” tab. Then, from the backstage view, click on the “Save” option from the left panel. Choose the location or the folder where you want to save the presentation on your computer, and click on “Save”.
In this article, we shall not only understand how to save a standard PPT or PPTx file, but we shall also take a look at how to save a PowerPoint presentation in different file formats such as a PDF, video or an image!
So, let’s get started!
1. How to Save a PowerPoint Presentation?
Once you have saved a PowerPoint presentation, you can easily save it again with just one click. Furthermore, you can also save a PowerPoint presentation in other formats. However, the process of saving a PowerPoint presentation is slightly different on Windows and on Mac.
Let’s understand the process in further detail.
1a. Saving a PowerPoint Presentation on Windows
To save a PowerPoint Presentation on Windows PC, you can follow either of the 2 simple methods.
Method-1: Using the “Save” button on Quick Access Toolbar
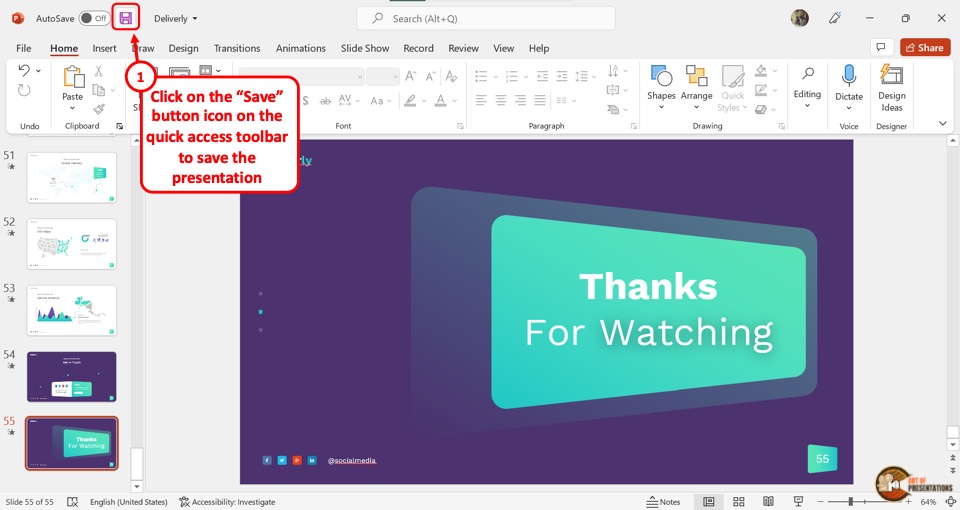
In the Quick Access Toolbar located at the very top of the screen, click on the “Save” icon.
The “Save” icon is located on the left side in the Quick Access Toolbar and looks like a floppy disk. Clicking on the “Save” button will immediately save the PowerPoint presentation in its current location as a “.pptx” file.
If you have opened a new presentation and you are saving it for the first time, clicking on the “Save” button will open a new explorer window. Simply navigate to the folder where you wish to save the new presentation on your computer, and click on “ Save “.
Method-2: Using the “File” tab
Another, more common method is to use the “File” tab in PowerPoint to save your PowerPoint presentation.
Here’s what you need to do –
Step 1 – Click on the “File” Tab
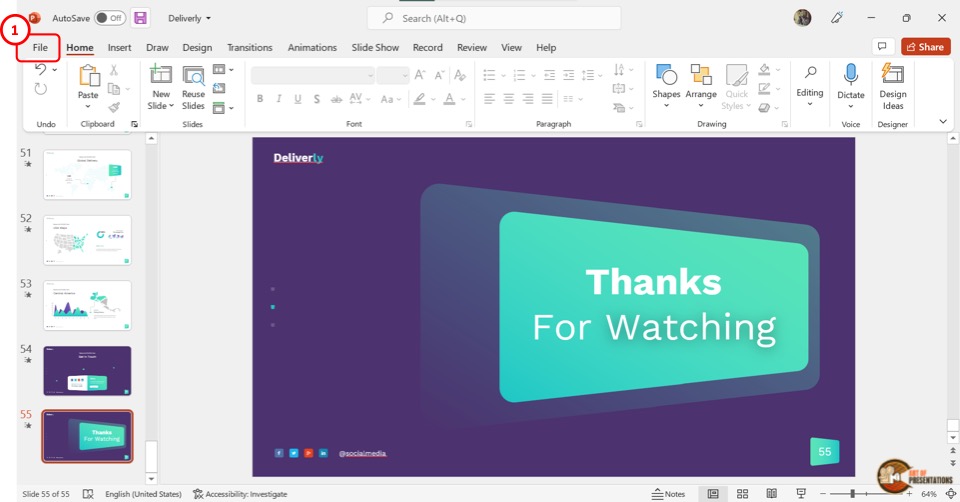
Another way to save a PowerPoint presentation is to use the “File” menu. You have to first click on the “File” tab located at the left corner of the menu ribbon at the top of the screen.
Step 2 – Click on the “Save” option
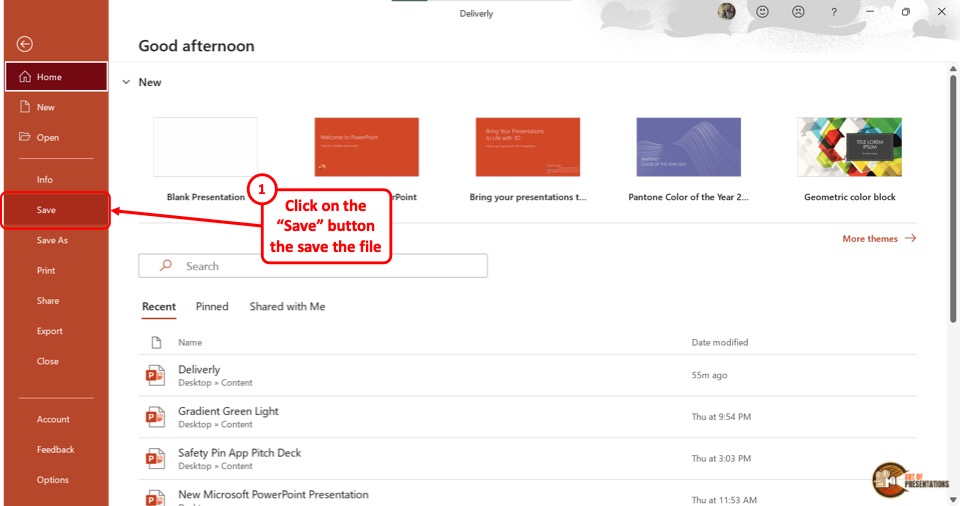
This will open the backstage view in PowerPoint. Now, click on the “Save” option from the sidebar on the left side of the screen. This will save the Microsoft PowerPoint as a “.pptx” file in the current location.
1b. Saving a PowerPoint Presentation on Mac
On a Mac computer, you can use the “File” menu as well to save the PowerPoint presentation.
The first step is to click on the “File” menu in the menu bar located at the top of the screen (above the PowerPoint window). This will open a dropdown menu. Click on the “Save” option from the dropdown menu to save the presentation as a “.pptx” file which is the standard format for presentations.
1c. Shortcut Keys to Save a PowerPoint Presentation
Microsoft PowerPoint also allows you to save a presentation with keyboard shortcuts. All you have to do is press the “Ctrl+S” keys on your keyboard in an open PowerPoint file. This will save the PowerPoint presentation.
1d. Best Format to Save a PowerPoint Presentation?
PowerPoint allows you to save a presentation in various different file formats! For instance, you can use the .ppt format if you wish to open the presentation file using PowerPoint 2007 or earlier. You can use .ppsx to open presentation directly as a PowerPoint Show file that opens it in the presentation mode.
In fact, there are several other formats you can save a presentation in. We shall explore how to save a PowerPoint presentation in several different formats later in the article.
However, the best format to save a PowerPoint Presentation is a “.pptx” file. This type can support all the latest as well as the older features of the PowerPoint presentation.
If you will be opening the presentation using a different software other than Microsoft PowerPoint, “.odp” is the best format. For printing, make sure to save the PowerPoint presentation as a PDF. That said, .pptx file format can help serve these purposes too.
2. How to Save a PowerPoint Presentation as PDF
Saving a PowerPoint presentation in PDF format is the suitable method for printing out your presentation. To save the PowerPoint presentation as a PDF file, follow the 4 easy steps.
Step-1: Click on the “File” Tab
First, click on the “ File ” tab in PowerPoint to open the back stage view of PowerPoint.
Step 2 – Click on the “Save As” option
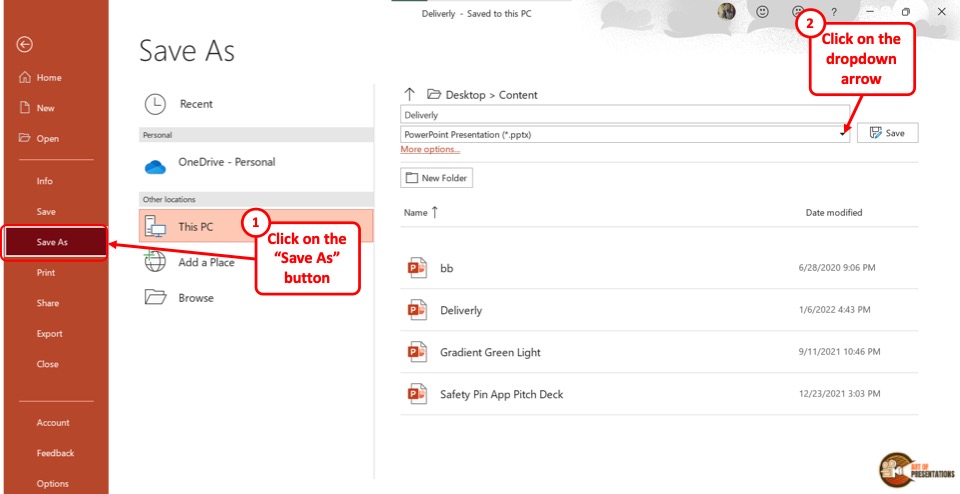
In the menu ribbon located at the top of the screen, click on the “File” tab. In the “File” menu, click on the “Save As” option from the sidebar on the left side of the screen.
Step-3: Click on the “PDF (*.pdf)” option
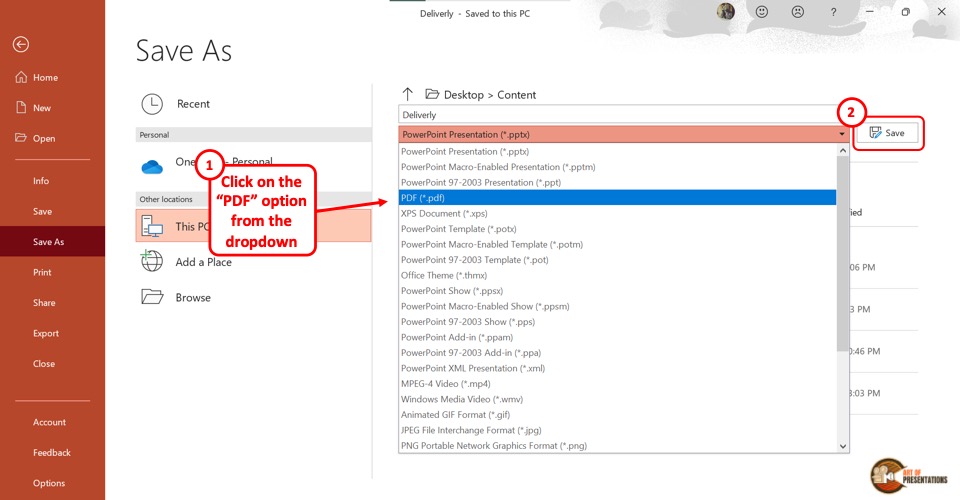
In the “Save As” screen, click on the box that shows “PowerPoint Presentation (*.pptx)” . This will open a dropdown menu. Click on the “PDF (*.pdf)” option from the dropdown menu.
Step-4: Click on the “Save” button
Now all you have to do is click on the “Save” button beside the box to save the PowerPoint presentation as a PDF file (as shown in the image in step 2).
3. How to Save a PowerPoint Presentation as a Video?
In Microsoft PowerPoint, you can also save a presentation as a video. This allows you to play the presentation slides as a video rather than a slide show.
3a. On Windows
To save a PowerPoint presentation as a video on a Windows PC, follow the 3 easy steps.
Step-1: Click on the “File” tab
The first step is to open the “Save As” screen. To do so, click on the “File” tab in the menu ribbon. In the “File” menu, click on the “Save As” option.
Step-2: Choose the “.mp4” file format from the “Save As” tab
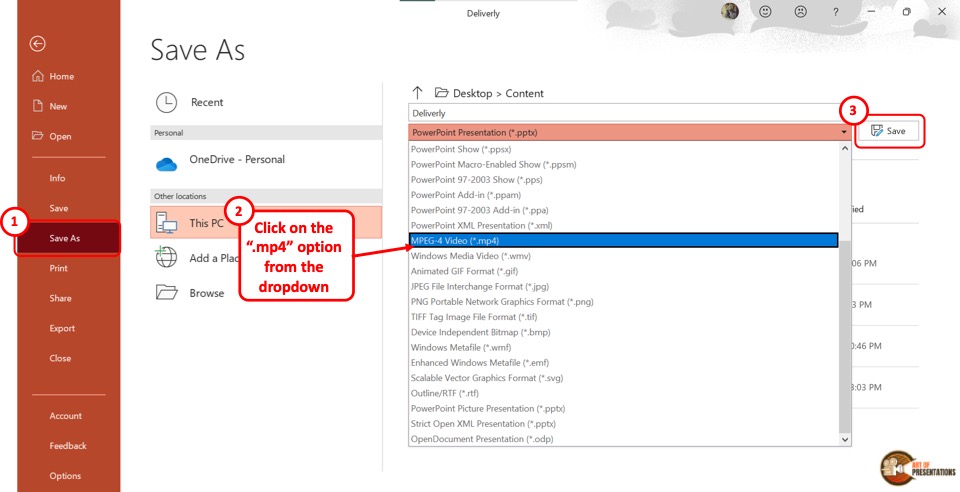
The next step is to click on the “Save As Options” box. It is the second box on the right side of the “Save As” screen. In the dropdown menu, click on either the “MPEG-4 Video (*.mp4)” option or the “Windows Media Video (*.wmv)” option.
Step-3: Click on the “Save” button
The final step is to click on the “Save” button (as indicated in step 2 above). It is located on the right side of the “Save As Options” box. This will save your PowerPoint presentation as a video.
To save a PowerPoint presentation as a video on a Mac device, follow the 3 simple steps.
Step-1: Click on the “Export” option
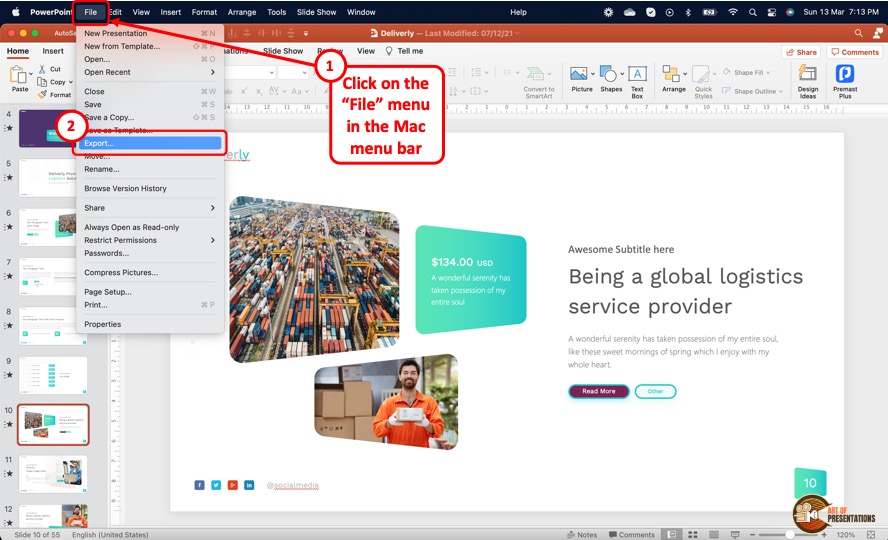
In the menu bar at the top of the screen, click on the “File” option. In the “File” dropdown menu, click on the “Export” option. This will open a dialog box.
Step-2: Click on the “File Format” box
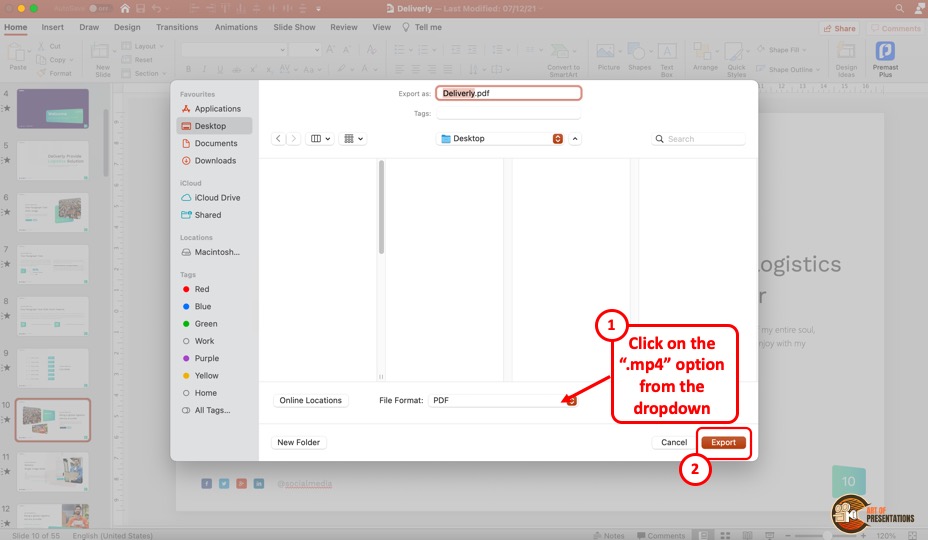
In the dialog box, click on the “File Format” box. This will open a dropdown menu. You can click on either the “MP4” option or the “MOV” option as you prefer.
Step-3: Click on the “Export” button
In the dialog box, you can also click on the “Quality” option to select the quality of the video. Once you are satisfied with the selections in the dialog box, click on the “Export” button at the bottom (as shown in the image in the previous step). This will save the presentation as a video.
4. How to Save a PowerPoint Presentation to Open in Slideshow Mode?
Microsoft PowerPoint allows you to save the PowerPoint presentation as a “PowerPoint Show” file. This opens directly as a slideshow. To save a PowerPoint presentation to open in slideshow mode, follow the 2 easy steps.
In the open PowerPoint file, click on the “File” tab from the menu ribbon which is located at the top of the screen. In the “File” menu, click on the “Save As” option.
Step-2: Click on the “PowerPoint Show (*.ppsx)” option
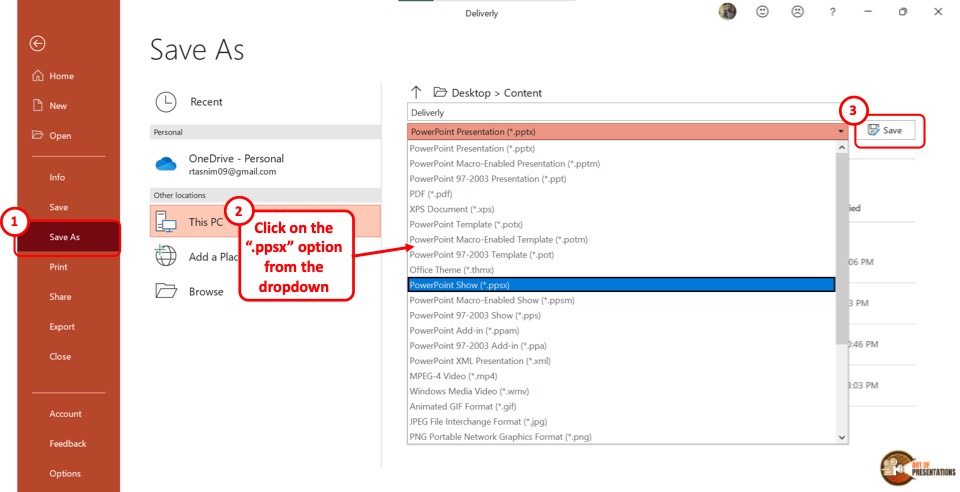
In the “Save As” screen, click on the “Save As Options” box which shows “PowerPoint Presentation (*.pptx)” . This will open a dropdown menu. Click on the “PowerPoint Show (*.ppsx)” option.
Now all you have to do is click on the “Save” button to save the PowerPoint presentation to open as a slideshow.
5. How to Save a PowerPoint Presentation as an Image?
In Microsoft PowerPoint, you can save the presentation as an image in five different formats: “Animated GIF Format (*.gif)” , “JPEG File Interchange Format (*.jpeg)” , “PNG Portable Network Graphics Format (*.png)” , “TIFF Tag Image File Format (*.tif)”, and “Scalable Vector Graphics Format (*.svg)” .
To save your presentation as an image, follow the 3 simple steps.
Step-1: Click on the “Save As” option from the “File” tab
The first step is to click on the “File” tab in the menu ribbon. Then click on the “Save As” option from the “File” menu.
Step-2: Select your preferred image format
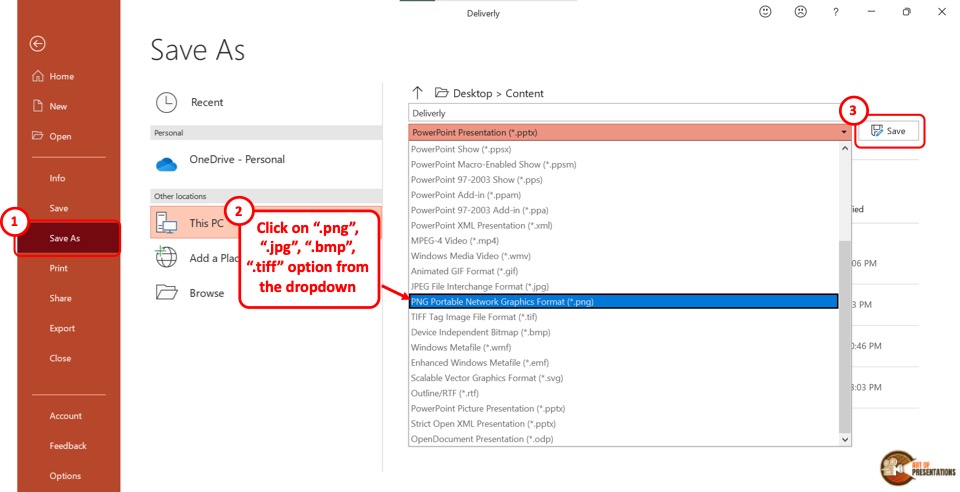
In the “Save As” screen, click on the “Save As Type” box which is the second box in the right column. From the dropdown menu, click on your preferred image format from the five available formats.
Now all you have to do is click on the “Save” button (as shown in the image in step 2) beside the “Save As Type” box. This will save your presentation in a folder containing each slide as a separate image file.
6. How to Save a PowerPoint Presentation as a Template?
A PowerPoint template is a predesigned presentation that you can edit to add your own content. To save a presentation as a template, follow the 3 easy steps.
The first step is to click on the “File” tab in the menu ribbon. Then click on the “Export” option from the sidebar in the “File” menu.
Step-2: Click on “Change File Type”
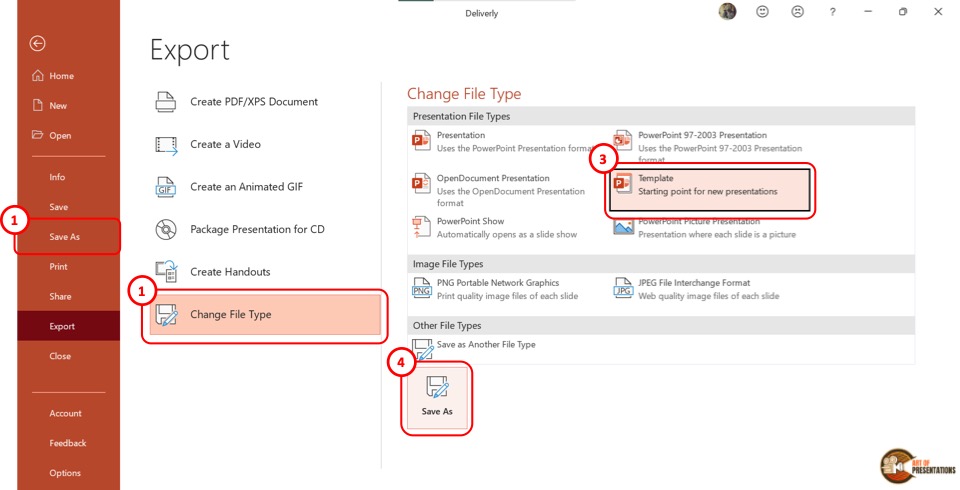
Now you have to click on the “Change File Type” option. Under the “Presentation File Types” group in the right column, click on the “Templates” option. Then click on the “Save As” button at the bottom of the screen.
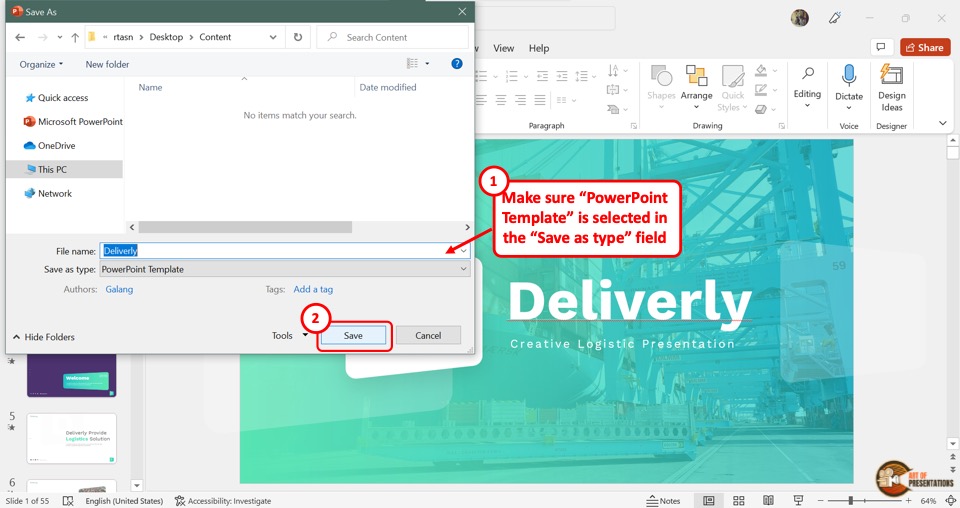
In the “Save As” dialog box, you will see that the “Save as type” box shows the “PowerPoint Template” format. Now all you have to do is click on the “Save” button.
7. How to Save PowerPoint Presentation as Google Slides?
Microsoft PowerPoint does not offer any feature to upload a presentation to Google Slides directly. However, Google Slides does offer you an option to upload your PowerPoint presentation and save it in Google Slides!
Step-1: Save Your PowerPoint Presentation
The first step is to save your PowerPoint presentation using any method described in the section 1 of this article.
Make sure that you note down the location of the folder in which you have save the PowerPoint file.
Step-2: Click on the “Open file picker” option in Google Slides
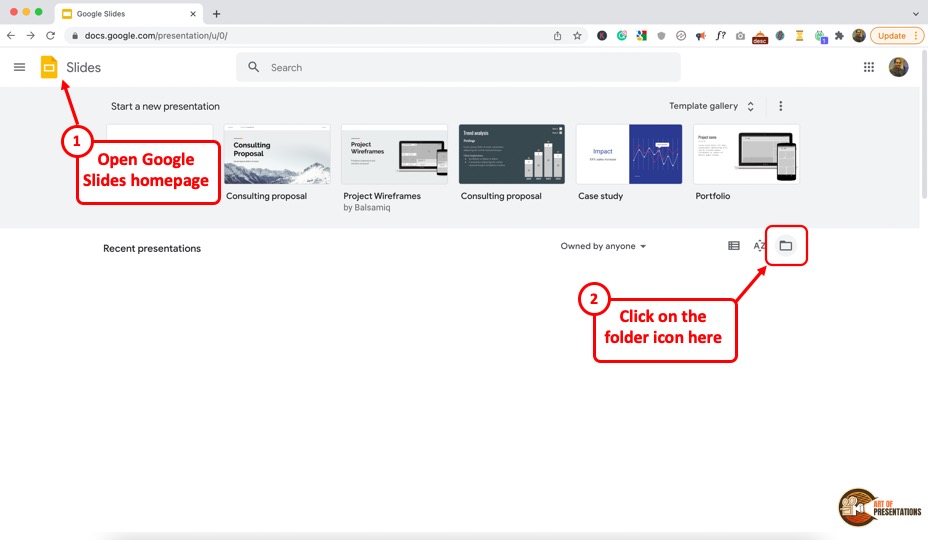
Now, the next thing you need to do is open your Google Slides account by visiting slides.google.com . If you aren’t logged in, make sure you sign in with your account credentials.
Next, you will be presented with Google Slides home screen (as shown in the image above). In Google Slides, click on the “Open file picker” icon which looks like a folder. This will open the “Open a file” dialog box.
Step-2: Click on “Upload”

In the “Open a file” dialog box, click on the “Upload” tab.
From your “File Explorer” window, drag and drop the PowerPoint presentation in the dialog box. Now the presentation will automatically open in Google Slides.
Also Read – How to “ Make a Copy of a Google Slides Presentation ” and how to “ Share a Google Slides Presentation Correctly ” with others!
You can also click on the “ Select a file from your device ” button (blue button in the center of the screen). This will open the file explorer window. Navigate to the folder in which you have saved your PowerPoint presentation, and click on “OK”. This will open and save the presentation file in Google Slides.
8. How to Save a PowerPoint Presentation to a Flash Drive?
To save a PowerPoint presentation on a flash drive or any external device, follow the 3 simple steps.
In the menu ribbon located at the top of the screen, click on the “File” tab. In the “File” menu, click on the “Save As” option.
Step-2: Click on “Browse”
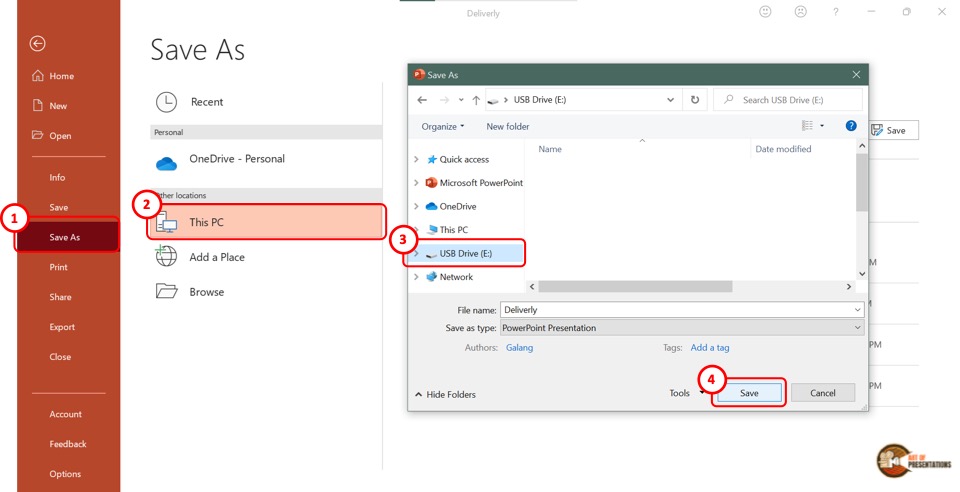
In the “Save As” screen, click on the “Browse” option which is the last option in the left column. This will open the “Save As” dialog box. In the sidebar on the left of the dialog box, click on the external disc.
Now all you have to do is click on the “Save” button at the bottom of the dialog box to save the PowerPoint presentation on the flash drive (as shown in the image in step 2).
9. How to Save a Copy of a PowerPoint Presentation?
The “Save A Copy” feature of Microsoft PowerPoint allows you to save changes in your presentation in a copied file without changing the original file.
Check out my article to learn detailed steps on how to save a copy of a PowerPoint presentation .
10. How to Save a Read-Only PowerPoint Presentation?
The “Read-Only” feature of Microsoft PowerPoint allows you to protect your PowerPoint presentation .
Using this feature, you can share your presentation with others without giving them the access to change your presentation. To save a read-only PowerPoint presentation, follow the steps mentioned below –
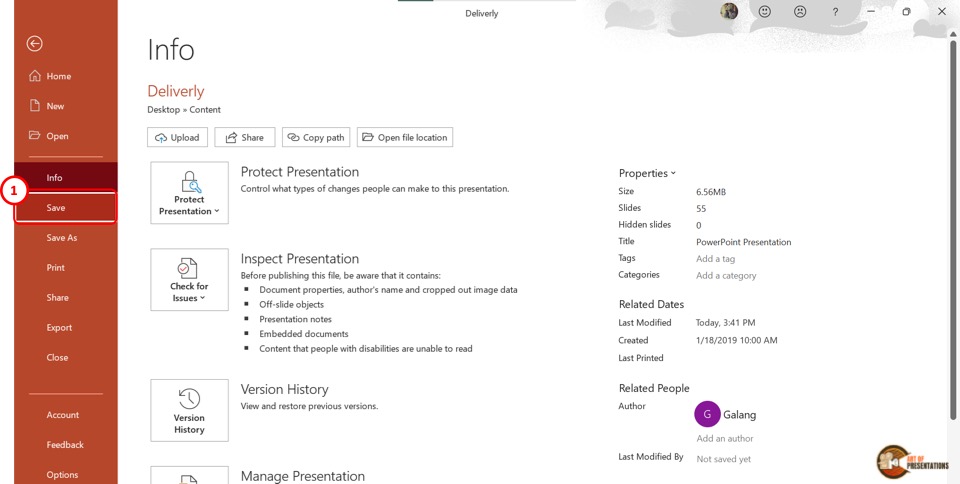
The first step is to click on the “File” tab in the menu ribbon. From the sidebar in the “File” menu, click on the “Info” option.
Step-2: Click on the “Protect Presentation” button

The next step is to click on the “Protect Presentation” option in the “Info” screen. This will open a dropdown menu. Click on the “Always Open Read-Only” option from the dropdown menu.
Step-3: Click on the “Save” option
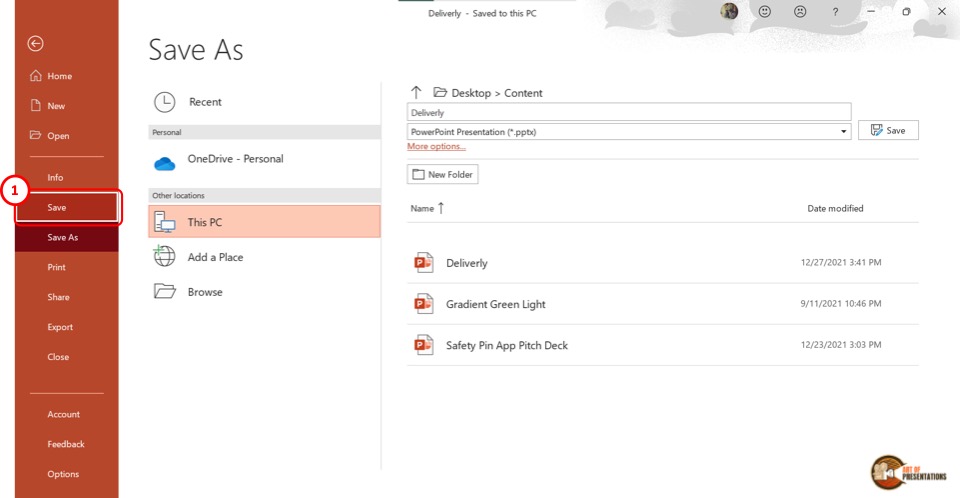
Now all you have to do is save the presentation. To do so, click on the “Save” option in the sidebar right under the “Info” option. Alternatively, you can press the “Ctrl+S” keys on your keyboard.
If you have received a presentation that opens only in the read-only mode, but you don’t know how to work with it, check out my other article on “ How to Edit a Presentation in Read-Only Mode “.
11. How to Save a PowerPoint Presentation Without Notes?
When saving a PowerPoint presentation, you might want to remove the speaker notes. To do so, all you have to do is follow the 5 quick steps.
In the menu ribbon, click on the “File” tab. Then click on the “Info” option from the “File” menu.
Step-2: Click on “Check for Issues” on the “Info” tab
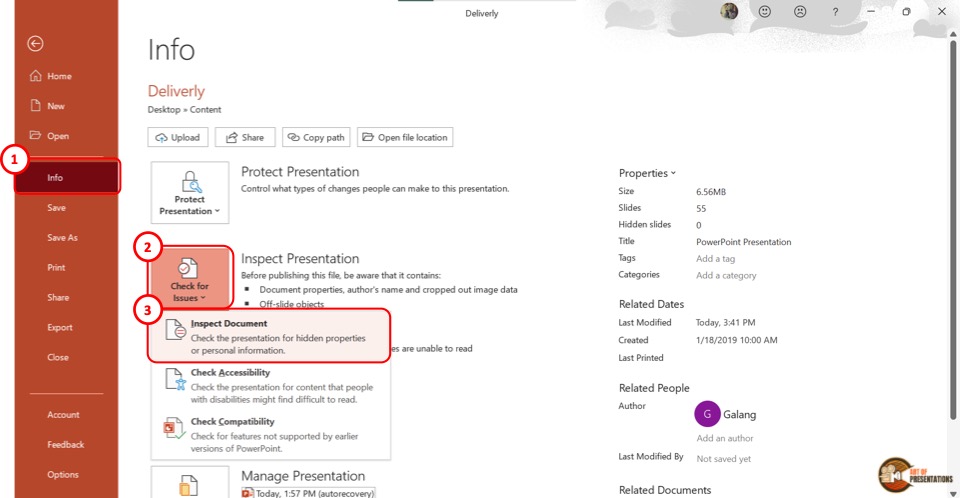
In the “Info” option, click on the “Check for Issues” button. Then click on the “Inspect Document” option from the dropdown menu. This will prompt a dialog box.
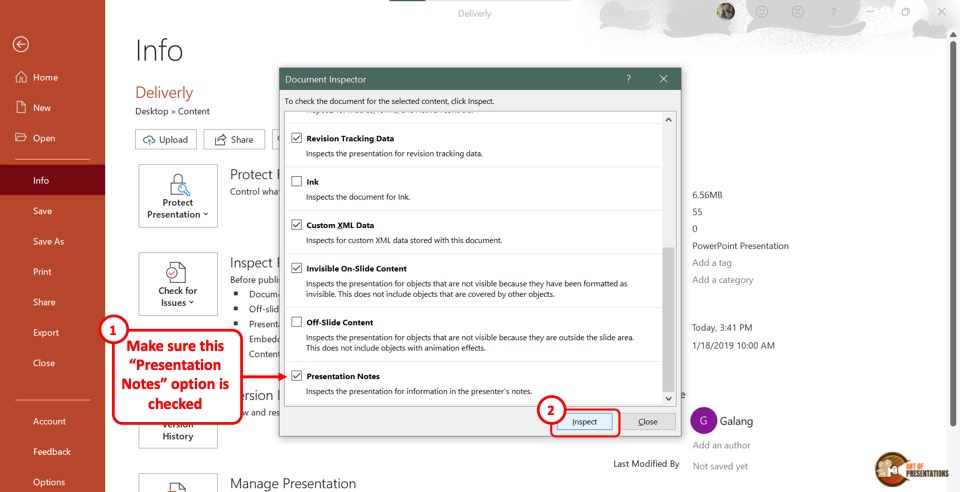
Step-3: Click on the “Inspect” option
In the “Document Inspector” dialog box, scroll all the way to the bottom and make sure the “Presentation Notes” option is selected. Then click on the “Inspect” button at the bottom of the dialog box.
Step-4: Click on the “Remove All” option
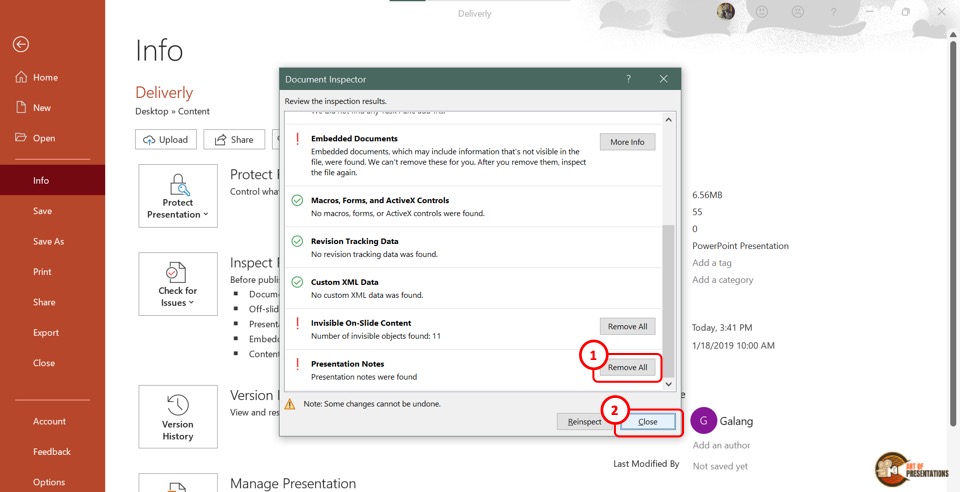
Once the inspection results are shown in the “Document Inspector” dialog, scroll to the bottom again to find the “Presentation Notes” option. Then click on the “Remove All” button at the right side of the “Presentation Notes” option.
Now all you have to do is click on the “Close” button at the bottom of the dialog box to finish the process.
Step-5: Click on the “Save” option
The final step is to click on the “ Save ” option in the sidebar of the “File” menu to save the presentation without notes. You can alternatively press the “Ctrl+S” keys on your keyboard.
12. How to Save PowerPoint Presentation Directly in Microsoft Teams?
If you are delivering a PowerPoint presentation to an audience using Microsoft teams, you can easily share a PowerPoint deck with your audience in the following steps –
- First, open the Microsoft Teams application and login to the meeting.
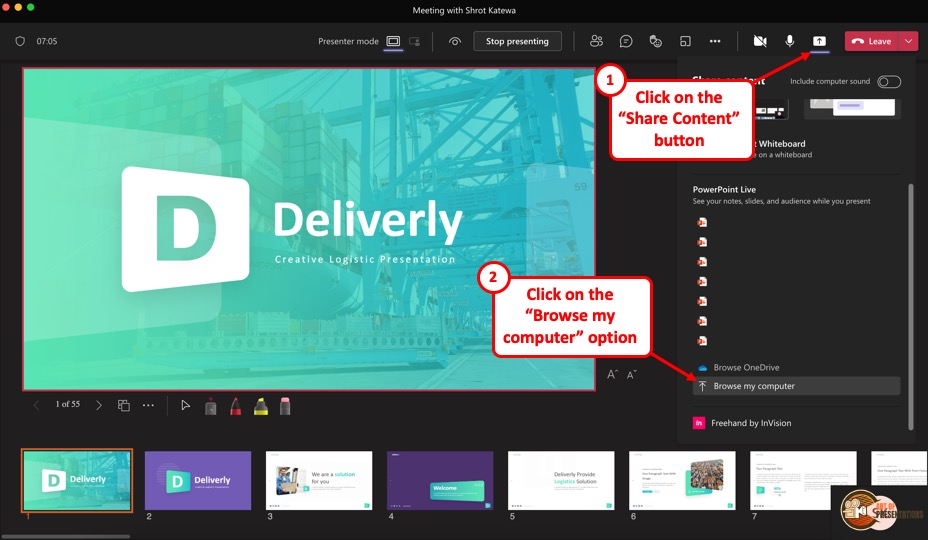
- On the “ Meeting Controls ” menu available in the top part of your meeting screen, locate the “ Share Content ” option.
- Click on the share content button. This will show the most recent PowerPoint files that you opened. You can either choose to click on one of the files visible. Alternatively, scroll down on the right panel and click on the “ Browse my computer ” option.
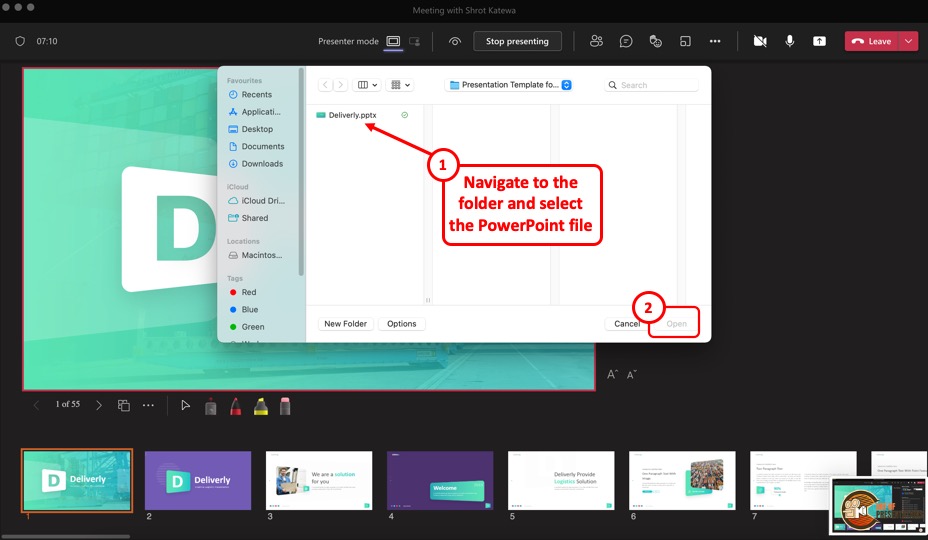
- This will open a new file browser window. Navigate to the respective location where your PowerPoint presentation is saved, click on it to select it. Then, click on “Open” to open the presentation in Microsoft Teams.
- The presentation will open by default in the presenter mode and shared with the audience of the meeting.
13. How to Enable Autosave in PowerPoint Presentation?
The autosave option is only available if you are using the Microsoft Office 365 version of PowerPoint . Other than that, you will have to manually save the PowerPoint file in all other versions.
You can autosave the PowerPoint presentation to the OneDrive cloud, and also autosave recovery files. To enable autosave in PowerPoint presentation, follow the 4 simple steps.
Step-1: Click on the “AutoSave” button
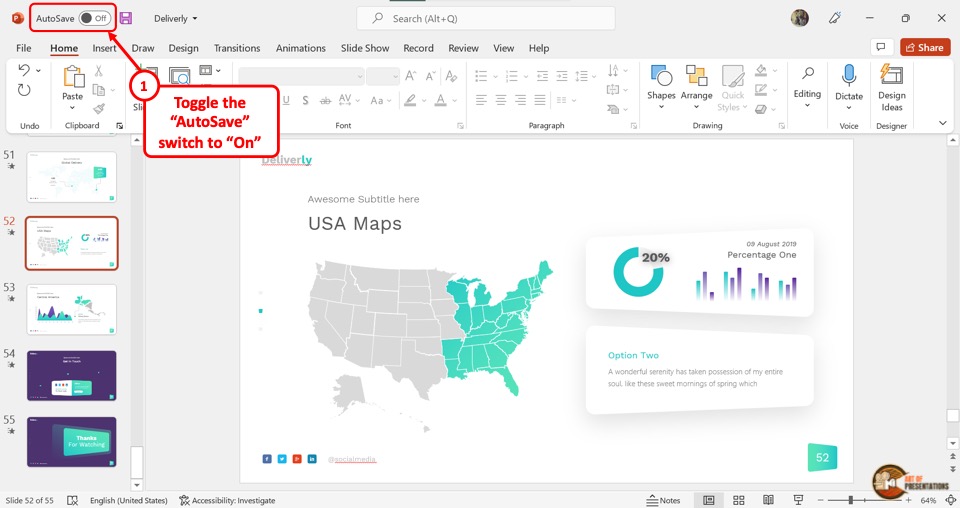
To simply turn on autosave in the OneDrive cloud for the PowerPoint presentation, all you have to do is click on the slider beside the “Autosave” option.
It is located in the left corner of the Quick Access Toolbar at the top of the screen.
Step-2: Click on “Options”
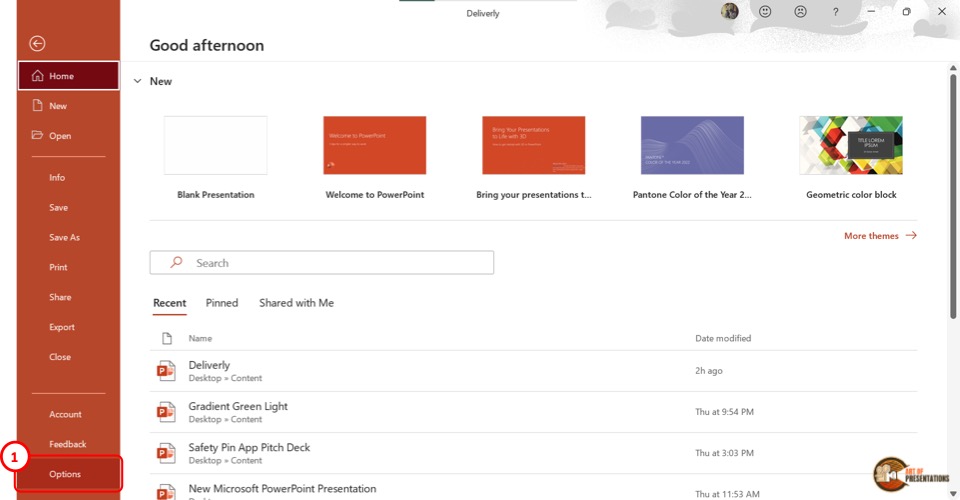
To access more autosave options, click on the “File” tab in the menu ribbon. Then click on the “Options” option which is the last option in the sidebar in the “File” menu. It will open a dialog box.
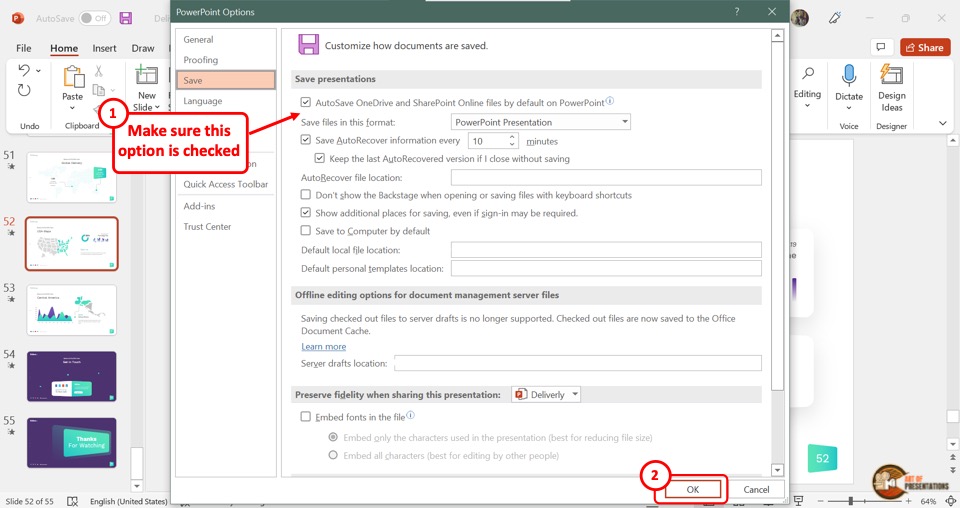
In the “PowerPoint Options” dialog, click on the “Save” option from the sidebar located on the left side. Now you can enable your preferred autosave options in the “Save presentations” section.
Click on the “Autosave OneDrive and SharePoint Online files by default on PowerPoint” for auto-saving on the cloud. You can also select how often the auto-recovery copy is saved by clicking on the box at the right side of the “Save Autorecover information” option.
Step-4: Click on the “OK” button
Now all you have to do is click on the “OK” button at the bottom of the “PowerPoint Options” dialog box to enable your autosave preference (as shown in the image in step 2).
Credit to Cookie_studio (on Freepik) for the featured image of this article (further edited).
How-To Geek
How to send powerpoint presentations with an embedded video.
Need to send out a PowerPoint that has an embedded video? Here's how to send a presentation without breaking it.
Quick Links
Create a folder, embed a video in powerpoint, compress the folder.
PowerPoint allows you to embed videos directly in your presentation. However, if you share the presentation, you might discover the embedded video no longer works. Here’s how to send your presentation with the embedded video still intact.
The issue here is that the embedded video doesn’t actually become a part of your slideshow. When you embed a video in PowerPoint, you’re simply telling PowerPoint the location of the media on your computer. PowerPoint then references that video on the designated slide.
If you want to send the presentation with the embedded video, you’ll need to package them together.
First things first, you’ll create a folder to store both the PowerPoint and video file. Note that you need to do this before embedding the video in your presentation. If you change the location of the video file after you embed it, the video will no longer work.
To create a new folder in Windows, right-click on the location where you want to place it, select “New” from the drop-down menu, and then select “Folder” from the submenu.
If you're using a Mac, you'll simply right-click and select "New Folder."
You’ll be prompted to name the folder. Name it something memorable, and then store your presentation and video file in this folder.
Now that both files are in the same location, open the PowerPoint file and embed the video . To do this, navigate to the slide where you want to embed the video; then go to the “Media” group of the “Insert” tab and select “Video." From the drop-down menu that appears, select “Video on My PC" if you're using a Windows machine or "Movie from File" if you're on a Mac.
A dialog box will then open. Navigate to the location of the video, select it, and click “Insert."
With the video now embedded in your presentation, save and then close PowerPoint.
Now it’s time to package the files together by zipping the containing folder.
Related: Everything You Need to Know About Zip Files
To do this on Windows, right-click the folder, select “Send To” from the menu, and choose “Compressed (Zipped) Folder” from the submenu.
Mac users will right-click the folder and select "Compress 'Folder Name'."
You’ll now have a zipped file containing both the PowerPoint presentation and the video file.
When you want to send the presentation, give the zipped file instead of just the individual PowerPoint file. Once the recipient receives, unzips, and opens the presentation, the embedded video will be playable.

Apr 4, 2024
Trim videos in PowerPoint for the web
Aparna Jethani
Rishabh Singh
- Add our blog to your RSS feed reader" href="/rss/blog.xml" data-bi-name="RSS Subscription" data-bi-id="rss_feed" data-bi-bhvr="120" data-bi-socchn="RSSSubscription" title="Microsoft 365 Insider Blog RSS" target="blank" class="d-inline-block">
Hey there, Microsoft 365 Insiders! We are Aparna Jethani, a Product Manager, and Rishabh Singh, a Product Designer, on the PowerPoint team. We are excited to let you know that you can now trim videos you inserted in your presentations in PowerPoint for the web.
Trim video in PowerPoint for the web
Using the new Trim Video command, you can edit the videos you inserted in your presentation to show only the most important and engaging parts, and keep your audience focused on what is relevant. You can trim videos using frame or timestamp level accuracy, and preview them and fine-tune them until you achieve the perfect and precise outcome.
To make it easier to access the feature, we have also added a dedicated Video tab in the ribbon. Th e tab contains all the commands related to adjusting and formatting your videos, such as changing the video style, arrangement and more.
How it works
- Open an existing presentation or create a new one, and then insert a video.
- To begin trimming, select the video, and then either select Video > Trim Video on the new Video tab or right-click the video and select Trim Video .

3. To trim a video, drag and slide the end markers to set the start and end point for trimmed video segment marked by colored frames.
4. To preview the trimmed video, click the Play button.

5. When you’re done, click the Trim button to apply the trim selections.
Tips and Tricks
- Use a mouse cursor or keyboard shortcuts, to easily set the trim start and end points within the video frame timeline.
- Once you have dragged the markers to the desired frame, use the arrow keys to adjust timestamps (with standard HH:MM:SS:FF format) to trim and fine tune at precise points. Trimmed range duration is also displayed on the dialog for assistance.
- Use Play, Pause and Seek Bar time stamps to preview while you iterate. Additionally, use the Forward and Backward buttons for playback and forward.
Availability
The Trim Video feature is available to all PowerPoint for the web users.
NOTE: The Trim Video feature is only available for local and stock videos.
Feedback
We want to hear from you! Please click Help > Feedback to submit your thoughts about this feature.
Sorry, JavaScript must be enabled to use this app.
- All about AI
- Google Bard
- Inflection AI Pi Chatbot
- Anthropic Claude
- Generative AI
- AI Image Generation
- AI Regulation
- AI Research
- Large Language Models (LLM)
- Surface Pro
- Surface Laptop
- Surface Book
- Surface Duo
- Surface Neo
- Surface Studio
- Surface Hub
- Surface Pen
- Surface Headphones
- Surface Earbuds
- About WinBuzzer
- Follow Us: PUSH, Feeds, Social
- Write for Us
- Cookie Policy and Privacy Policy
- Terms of Service
How to Embed a YouTube Video in PowerPoint
We show you how to embed a YouTube video in PowerPoint so that you can spice up your presentations and impress colleagues.

Table of Contents:
It can be difficult to keep an audience’s attention during a lengthy presentation. In fact, 4 out of 5 professionals admit to shifting their focus away from the presenter during the last presentation they attended. One way to combat this is interactive elements. You can embed a YouTube video in PowerPoint to break up long stints of talking and create a more fun environment. Though you can add a plain hyperlink to your presentation to open in the browser, that doesn’t look particularly professional. Instead, it makes sense to embed your video in PowerPoint so you can play it directly from the application. As an added benefit, the video’s thumbnail will appear for a more beautiful design. In this guide we show you how to embed a YouTube video in PowerPoint using two methods: its embed code and a URL. Both will give more or less the same results, so we recommend the latter unless you have a specific reason.
How to Embed a YouTube Video in PowerPoint Using Code
Embedding a YouTube video using its embed code is slightly more technical but offers additional customization options. This method is especially useful for those working with older versions of PowerPoint.
How to Insert a YouTube Video in PowerPoint Using a URL
You can speed up the process to embed video in PowerPoint from YouTube by using just its URL rather than the embed code. This should work so long as you have a modern version of PowerPoint.
FAQ – Frequently Asked Questions About Videos in PowerPoint
Will embedded youtube videos in powerpoint work without an internet connection.
Embedded YouTube videos require an active internet connection to stream content from YouTube’s servers. If you plan to present in a location without internet, consider downloading the video (if permitted by copyright) and embedding the file directly into your PowerPoint presentation.
Can I embed a private YouTube video into my PowerPoint presentation?
Private YouTube videos cannot be embedded directly. For a video to be embeddable in PowerPoint, it must be either public or unlisted. If you are the owner of the video, you can change its privacy settings on YouTube to ‘Unlisted’ , which allows embedding while not making the video publicly searchable.
How can I make an embedded video autoplay when its slide comes up during the presentation?
To make an embedded YouTube video autoplay in PowerPoint, first embed the video into your slide. Then, right-click on the video, select ‘Playback’ , and then choose ‘Automatically’ under ‘Start’ . This setting ensures the video begins playing as soon as the slide is displayed without requiring a manual play action.
Is there a way to loop an embedded YouTube video in PowerPoint?
Direct looping of embedded YouTube videos within PowerPoint is not supported. An alternative would be to set the video to loop on YouTube’s platform before embedding, but this requires the loop setting to be available and set on YouTube. Another approach is to edit your video to include the repeat content and upload it as a new video for embedding.
What versions of PowerPoint support embedding YouTube videos?
Embedding YouTube videos is supported from PowerPoint 2010 onwards. Newer versions, such as PowerPoint 2019 and PowerPoint for Microsoft 365, provide enhanced support and a more user-friendly experience for embedding videos from YouTube using both the URL and embed code methods.
How can I embed videos from Vimeo or other services into PowerPoint?
For services like Vimeo, you can use the embed code provided by the video platform. Go to ‘Insert’ > ‘Video’ > ‘Online Video…’ in PowerPoint and paste the embed code. Compatibility and support can vary, so it’s recommended to test the embedded video before the presentation.
Can I insert videos from sources other than YouTube using these methods?
The URL method described in the tutorial is tailored for YouTube. However, PowerPoint allows embedding videos from other services through their embed codes. Always check the specific platform’s guidelines for embedding content and test the video in PowerPoint to ensure compatibility.
If I embed a YouTube video, will viewers of the presentation need a YouTube account to watch it?
Viewers do not need a YouTube account to watch an embedded YouTube video within PowerPoint. The requirement is for the video to be publicly accessible or unlisted. Private videos cannot be viewed without logging into the account that has access.
Can I control the playback volume of an embedded YouTube video in PowerPoint?
The embedded YouTube video’s volume controls are managed through YouTube’s built-in player controls during playback. PowerPoint does not offer separate volume control for embedded YouTube videos, so adjustments must be made using the video player’s volume slider or the computer’s volume settings.
What should I do if the ‘Online Video’ option is not available in my PowerPoint?
If the ‘Online Video’ option is missing, it’s likely that you are using an older version of PowerPoint that doesn’t support this feature. Consider updating to a newer version. As an alternative, you can download the video and insert it into your presentation as a local file through ‘Insert’ > ‘Media’ > ‘Video’ > ‘This Device’ .
Is it possible to embed a YouTube video so it plays in fullscreen automatically in PowerPoint?
PowerPoint doesn’t support automatic fullscreen playback for embedded videos. You would have to set the video to fullscreen manually during presentation mode or adjust the video frame size to fill the slide as a workaround.
Can I customize the playback quality of an embedded YouTube video?
The playback quality of an embedded YouTube video in PowerPoint is determined automatically by YouTube based on factors like internet speed. It’s not possible to preset a specific playback quality within PowerPoint. Viewers can manually adjust the quality during playback using the YouTube player controls if needed.
What happens if the YouTube video I embedded is removed from YouTube?
If an embedded YouTube video is removed from the platform or if the video’s URL changes, it will no longer be accessible in your PowerPoint presentation. You’ll see a blank frame or an error message in place of the video. It’s advised to regularly check embedded videos for availability, especially before important presentations.
How can I add annotations or comments to an embedded video in PowerPoint?
PowerPoint doesn’t support adding annotations directly to embedded online videos. As a workaround, you can overlay shapes, text boxes, or comments on or around the video frame on your slide. These can serve as annotations and are helpful for providing additional context or notes related to the video content.
Can an embedded video in PowerPoint be used as a clickable link to open a webpage?
While the video itself cannot be directly used as a hyperlink in PowerPoint, you can overlay a transparent shape or icon over the video frame and add a hyperlink to that shape. This setup can then direct users to a webpage or another slide within the presentation when clicked, effectively making the video or its part act as a clickable link.
Related: How to Insert an Animated GIF in PowerPoint

Related: How to Add Music / Audio to PowerPoint Slides

Related: How to Add Speaker Notes in PowerPoint

- Embed YouTube video
- Microsoft PowerPoint
- Video in PowerPoint
Recent News

Google’s Find My Device Now Locates Powered-Off Phones and Bluetooth-Tagged Items
Naver Unveils HyperCLOVA X: A Leap Forward in Multilingual AI Capabilities
Subscribe to WinBuzzer on Google News

PowerPoint: How to Add Audio to Powerpoint on Windows 10 and Mac
Last Updated Thursday, August 31, 2023, at 5:00 am
Known Issue (August 14, 2023):
Some Windows 11 users are experiencing issues with PowerPoint exports when they are turned into .mp4 files. Visuals within the exported PowerPoint are appearing as flipped, or upside down. We are working with Microsoft to find a solution.
As a workaround, please convert the file as a .WMV file option and save it in My Media. The following are directions on how to convert a PowerPoint Presentation with audio to a .WMV file . For more support or to help troubleshoot issues, please reach out to the LTS Help Desk at [email protected] .
Microsoft PowerPoint offers features to record audio narration and export it as a video. PowerPoint records audio slide-by-slide rather than in one continuous file, allowing creators to easily re-record a slide if they make a mistake or need to change something later. Exporting as a video and uploading to Kaltura or Canvas for streaming is advantageous since it standardizes file types, doesn't require a download to view, is in a format that can be captioned, and allows viewers to navigate more efficiently.
A recent update has made the process comparable on a Mac, but the specifics vary. Windows 10 instructions follow; Mac users can click the link below to jump to the appropriate instructions.
- Instructions for Mac users
Windows 10 Instructions:
The following instructions explain how to add audio to your PowerPoint presentation on Windows 10 and export that PowerPoint as an MP4. The text instructions cover the same information as the embedded video below.
NOTE: If you have an older version of PowerPoint, you may need to update it to access the features described below. If you do not have PowerPoint, you can download it and other Microsoft Office products for free by going to office365.uwec.edu. If you have questions about updating or installing PowerPoint, contact the LTS Help Desk at [email protected] or 715-836-5711.
- Design your PowerPoint TIP: Use images and limit text to better engage viewers/listeners.
- Click Record Slide Show NOTE: Audio may start recording automatically if you have an older version of PowerPoint. It will still work, but this version offers reduced functionality.
- Record narration and avoid reading text on the slide out loud to viewers. Click the blue Replay button to listen to the recorded audio and ensure it was recording.
- Press [Escape] or the ‘X’ button located in the top right of the screen when the audio recordings are finished. You will see a speaker icon on slides that have audio.
- Select Export (steps 10-14 are shown in screenshot below).
- Select Create a Video .
- Optional: Select Full HD (1080p) for the video quality; it is unlikely a higher quality is needed.
- Select Use Recorded Timings and Narrations.
- Follow prompt/pop-up window to save the video in a memorable location.
- How to upload and share with Kaltura (Instructors should use Kaltura. Students will need to use it if the file is over 500 MB, which a PowerPoint probably won't be and they can use Canvas.)
- How to upload and share in a Canvas assignment (students)
- How to upload and share in a Canvas discussion (students) - the instructions refer to the "rich content editor" which is just the features in the top of the discussion post reply.
Elaboration on the Recording Features:
- Timing Feature – there is a rolling time feature for the individual slide and the overall presentation. Allows the speaker/presenter to monitor how long they are talking.
- Microphone Feature - Click on Settings and select Microphone and then the specific device to set up before recording.
- Replay Feature - Use to check that the audio is recording properly before starting additional slides.
- Clear Feature - Select Clear to delete/re-record audio.
- Don’t set the camera to record - Make sure this button has a diagonal slash through it to avoid the problem.
Mac Instructions:
The following instructions will teach you how to add audio to your PowerPoint presentation on a Mac and export that PowerPoint as an MP4. The text instructions cover the same information as the video embedded below.
NOTE: It is essential to have the Office 365 version of PowerPoint or you will not be able to save your PowerPoint as a video. If necessary, you can download it and other Microsoft Office products for free by going to office365.uwec.edu. If you have questions about updating or installing PowerPoint, contact the LTS Help Desk at [email protected] or 715-836-5711.
- TIP: Use images and limit text to better engage viewers/listeners.
- Click Record Slide Show
- TIP: Before you begin recording your full presentation, do a practice recording to verify your microphone and other settings are correct.
- NOTE: Avoid reading the text written directly on the slide; use the slide to elaborate on the material being presented.
- Stop speaking for a second to prevent the audio from cutting out as slides change. Resume speaking when the time starts moving again under the Current slide timing feature to the left of the recording button.
- Click Stop or Pause at the top of the screen and then End Show in the top left corner when all the audio recordings have been finished.
- Check the audio by clicking on Play from Start under the Slide Show tab or the presenter mode icon at the bottom of the screen.
- Edit the name of the file and where you would like to save the video following PowerPoint's prompts.
- Click Export
- Upload your mp4 video to Kaltura or Canvas to share it:
- How to upload and share to My Media (Instructors should use My Media. Students will need to use it if the file is over 500 MB, which a PowerPoint probably won't be and they can use Canvas.)
- How to upload and share in a Canvas discussion (students) - the instructions refer to the "rich content editor" which is the tool at the top of the discussion post reply.
Additional Video Tool Options
For more information about recording options available, click here to view a comparison of each tool's features.
IMAGES
VIDEO
COMMENTS
In the Seconds spent on each slide box, select the default time you want to spend on each slide. Select Create Video. Enter a file name and then browse to the location you want to save your video. In the Save As type box, select if you want to save the video as a MPEG-4 Video or Windows Media Video. Tip: The MPEG-4 Video format is recommended ...
Watch this video to learn how to convert your PowerPoint presentation into a video. When you make a recording of a presentation, all its elements (narration,...
In the top-left corner of PowerPoint, click the "File" option. From the sidebar that opens after clicking the "File" option, select "Export." In the "Export" menu, click "Create a Video." To the right of the "Export" menu, you will now see a "Create a Video" section. In this section, you will define the options for your video file.
📽️💻 How to Save a PowerPoint Presentation as a Video | MicrosoftIn this tutorial, learn how to easily convert your PowerPoint presentation into a video for...
Click on Create Video. Click on Create Video. This opens up a Save As dialog box. Rename the file, choose the destination and file format, and click on Save. Save the Video. Note: There are two video formats when you save Powerpoint as video, namely .mp4 and .wmv formats.
Browse to the location where you want to save the file and give it a name then press "Save.". While the video is being created, you will see the small progress bar at the bottom of your PowerPoint window. Wait till this is done and then go to your video. Now you can double-click your video file and it will automatically play with your video ...
Training: After you create your PowerPoint presentation, you can save it as a video to share with others. Watch this video to learn how. Related topics. ×. Share and co-author Add, reply to, or delete comments Video; Share a presentation Video; Save a presentation as a video ...
Learn how to publish your own video using Microsoft PowerPoint with narration, annotations, animations, and timings. As full disclosure, I work at Microsoft ...
Under the Save & Send menu, find and click on Create a Video. Click on the Computer & HD Displays option to customise the video size and quality (small, medium and large size & quality). Click the Don't Use Recorded Timings and Narrations to select if you're using timings and narrations. Click Create Video and another dialogue box opens.
To convert your PowerPoint presentation into a video, simply: Click the File tab. Select Export. . Select Create Video . Choose your Video Quality and Recorded Timings and Narrations (see details below) Click Create Video. Choose where to save the video on your computer and click Save.
Mac. Click on the File menu. Click Export. Under the File Format dropdown menu, select MP4 or MOV. Select your video quality and timing. Note: There are limitations on Mac for saving your presentation as a video. You will lose saved recorded timings, narrations and animations. Click Export.
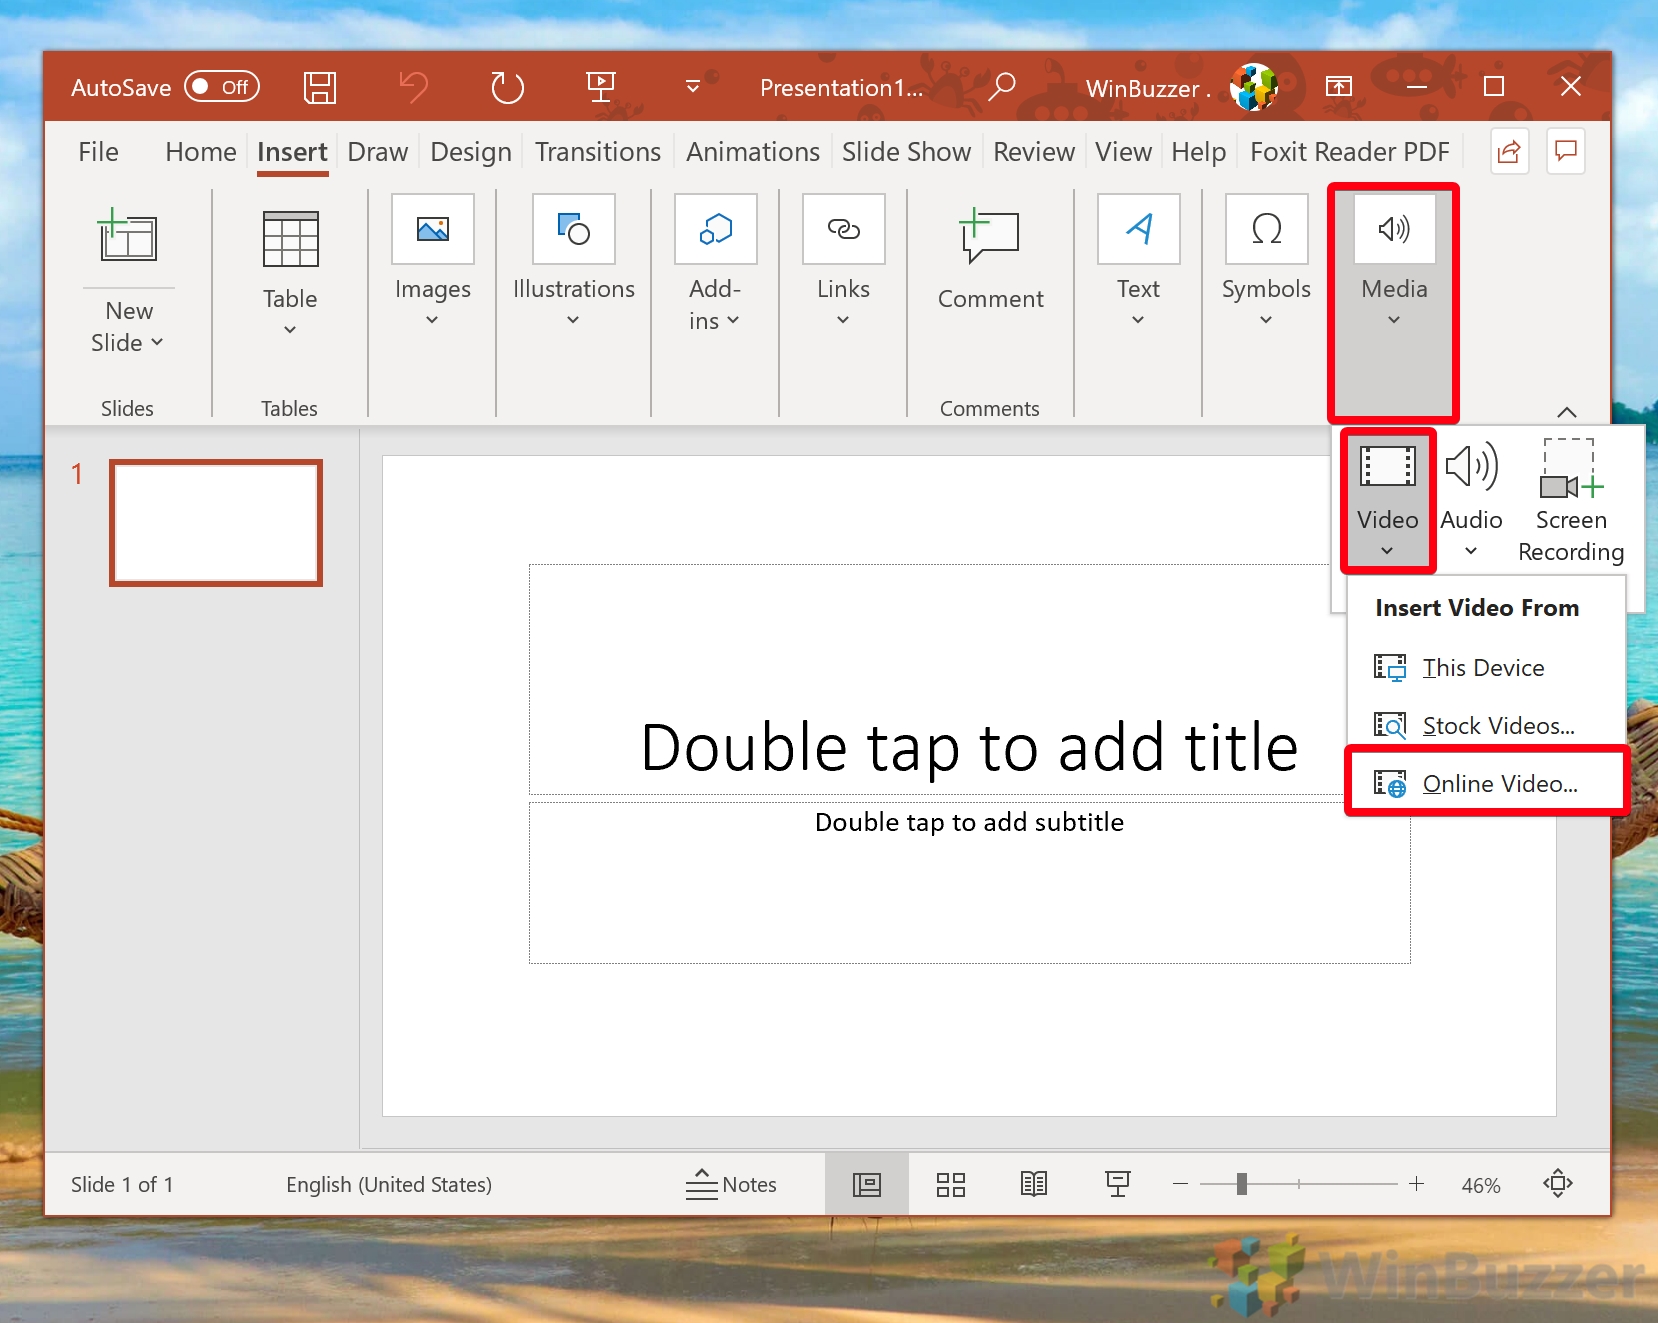
On the PowerPoint window, in the left sidebar, click the slide in which you want to add a video. At the top of the PowerPoint window, click the "Insert" tab. In the "Insert" tab, under the "Media" section (which is to the extreme right side of the interface), click "Video." You'll now see an "Insert Video From" menu.
In this video tutorial, I show you how to save PowerPoint presentations as a video. I walk you through the steps of setting up your slides and then how to e...
In the Seconds spent on each slide box, select the default time you want to spend on each slide. Select Create Video. Enter a file name and then browse to the location you want to save your video. In the Save As type box, select if you want to save the video as a MPEG-4 Video or Windows Media Video. Tip: The MPEG-4 Video format is recommended ...
To save the PowerPoint presentation as a PDF file, follow the 4 easy steps. Step-1: Click on the "File" Tab. First, click on the " File " tab in PowerPoint to open the back stage view of PowerPoint. Step 2 - Click on the "Save As" option. In the menu ribbon located at the top of the screen, click on the "File" tab.
From the drop-down menu that appears, select "Video on My PC" if you're using a Windows machine or "Movie from File" if you're on a Mac. A dialog box will then open. Navigate to the location of the video, select it, and click "Insert." With the video now embedded in your presentation, save and then close PowerPoint.
Join 400,000+ professionals in our courses here 👉 https://link.xelplus.com/yt-d-all-coursesLearn how to create a video using PowerPoint. I'll first show you...
How it works. Open an existing presentation or create a new one, and then insert a video. To begin trimming, select the video, and then either select Video > Trim Video on the new Video tab or right-click the video and select Trim Video. 3. To trim a video, drag and slide the end markers to set the start and end point for trimmed video segment ...
Navigate to the YouTube video you wish to embed in your PowerPoint presentation and click on the " Share " button below the video. This is the initial step to access the embed code. Select ...
Want to know how to save/export your PowerPoint presentation as a video file in MP4 format? This video will show you how you can covert your standard Microso...
To save the PowerPoint as a video, click File and then select Export. We also recommend saving your file as a regular PowerPoint before following the next steps for exporting your PowerPoint. Edit the name of the file and where you would like to save the video following PowerPoint's prompts. Select MP4 from the File Format options list.