
How to Add Fonts to Google Slides? [Step-by-Step Guide!]
By: Author Shrot Katewa
![How to Add Fonts to Google Slides? [Step-by-Step Guide!]](https://artofpresentations.com/wp-content/uploads/2021/09/Featured-Image-How-to-Add-Fonts-in-Google-Slides-optimized.jpg "google slide presentation fonts")
Using Google Slides comes with its own benefits. One of the benefits is that you get to use the most modern fonts provided by Google (through Google Fonts) like Montserrat, Lato, and many others directly in your Google Slides presentation.
By default, you get about 26 different font options within Google Slides. But, what if you want to add more fonts to Google Slides? How do you do that?
To add fonts to Google Slides, select a text box and click on the “Fonts” option in the toolbar. Then, from the dropdown, click on “More Fonts”. Search for the font using the search bar or scroll through the list and choose a font. Click on it to select it and click on “OK”.
In this article, we will understand the process of adding fonts in Google Slides in further detail! Plus, we shall also take a look at whether we can install custom fonts in Google Slides!
So, without further adieu, let’s get started!
1. How to Change Fonts in Google Slides?
In Google Slides, you can easily add text to your slides . You can also change the way your text looks by adding text effects to the text in Google Slides .
But, what if you want to change the font itself? Well, there is a way to do that as well!
All you have to do is follow the 2 quick steps mentioned below –
Step-1: Highlight the text
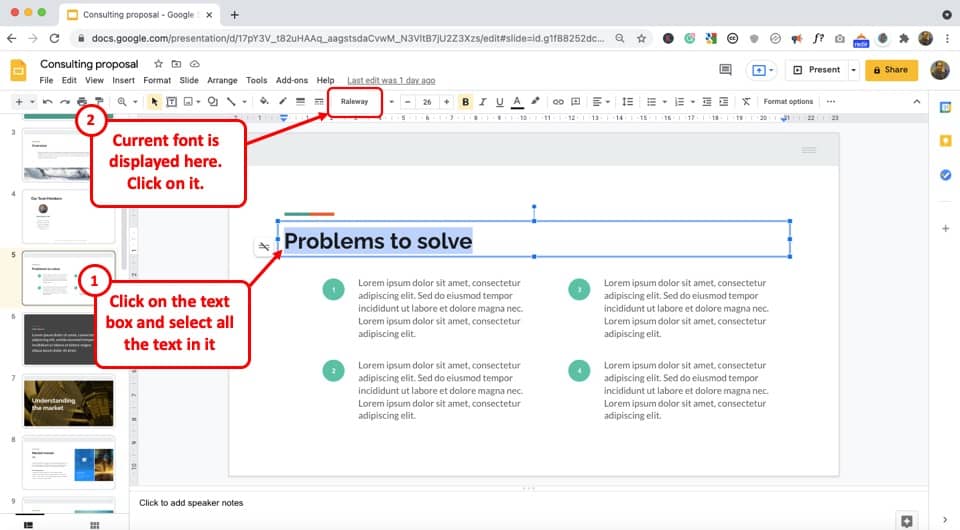
The first step of the process is to click on the text box and select the entire text.
Then click on the “Font” box from the toolbar located at the top of the screen right below the menu bar. This will open a dropdown menu containing numerous font style options.
Step-2: Select your preferred font
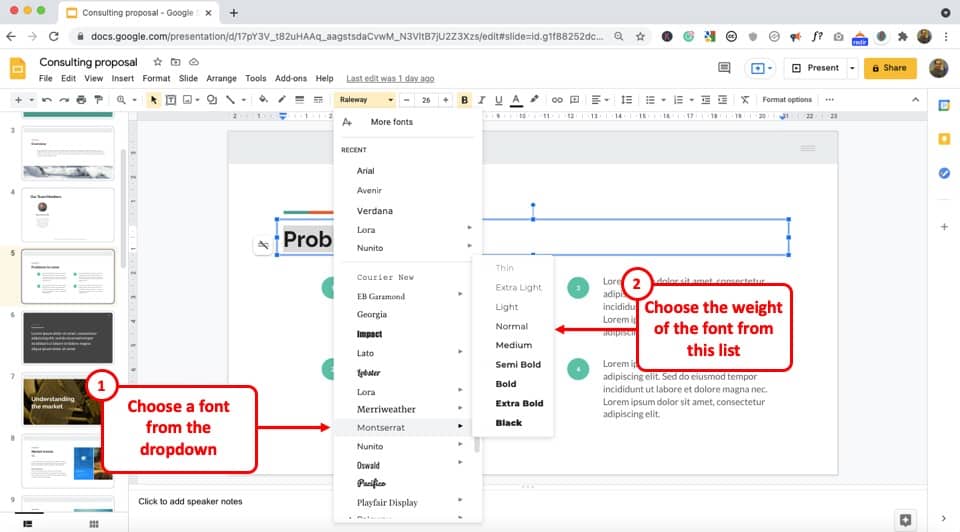
Scroll down the dropdown menu within the “Font” box to find your preferred font style. Now all you have to do is click on the new font style and it will be automatically saved.
2. How to Add More Fonts to Google Slides?
Google Slides has a variety of font styles to match any slide design. The application also offers an additional collection of fonts that you can use in a text box.
You can get these fonts either through the “More Fonts” option or an external source like the Extensis Fonts through “Add-ons” .
2a. Method 1 – Using the “More Fonts'” option
To add more fonts to Google Slides with the help of its “More Fonts” option, all you have to do is follow the 2 easy steps below.
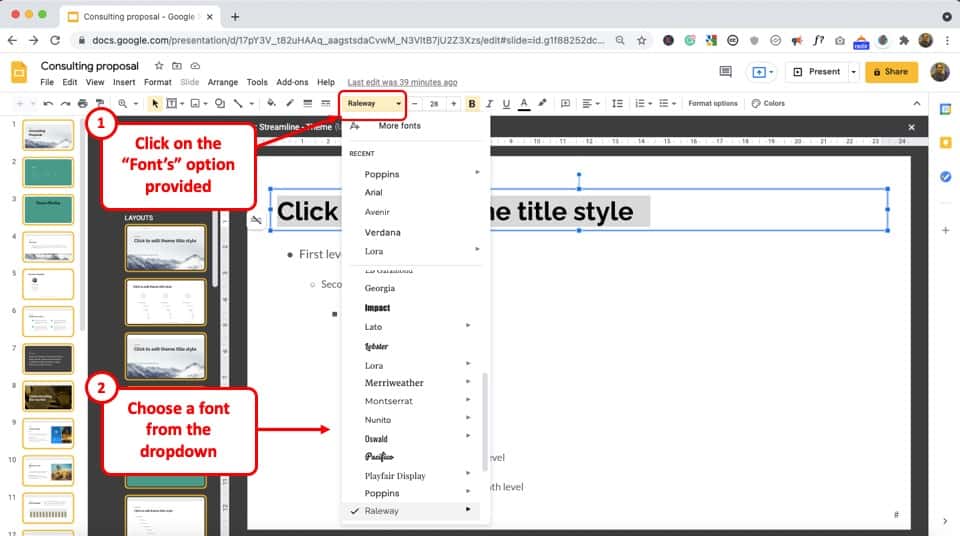
Step-1: Click on “More fonts”
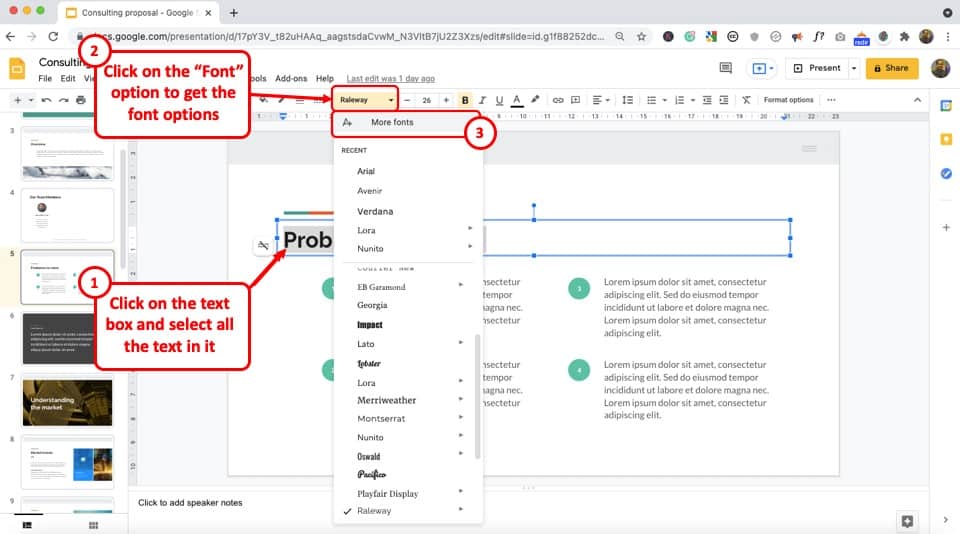
At first, you have to select the text in a text box to access the font style editing tools.
Click on the “Font” box in the toolbar to open a dropdown menu and click on the “More fonts” option. This will open a dialogue box containing additional fonts.
Step-2: Search for a font
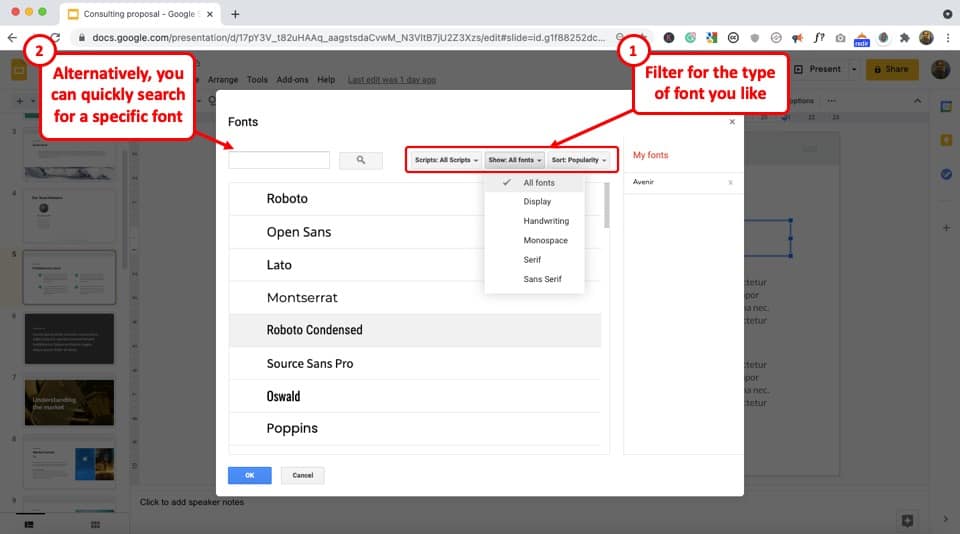
In the “Fonts” dialogue box, scroll through the font styles to find your preferred one.
You can also use the “Search box” to find a specific font. Besides, you can click on the “Scripts” button and select a specific language for the font styles.
The “Show” button allows you to filter only selected styles of font and the “Sort” button helps you to access the most popular or the latest font styles easily.
Step-3: Select your preferred font
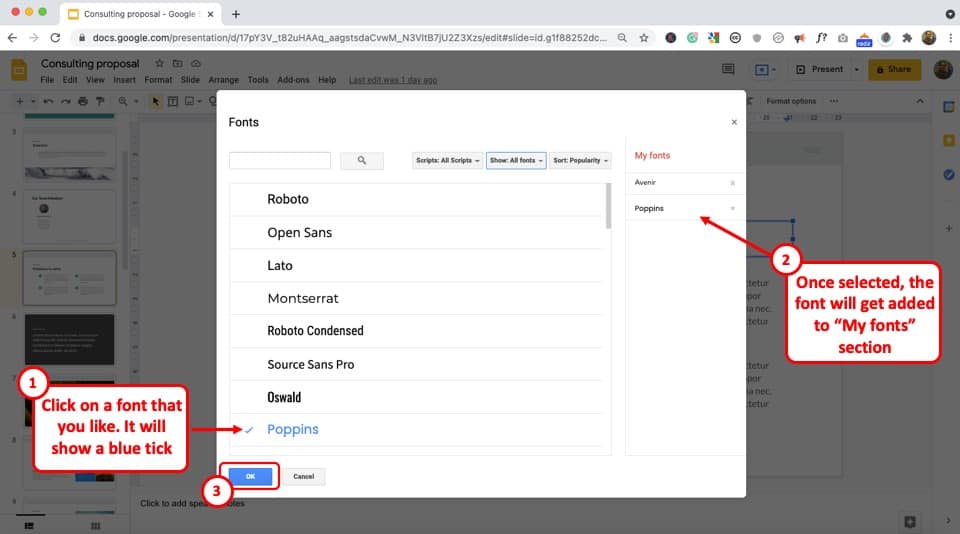
After clicking on your preferred font, all you have to do is click on the “OK” button located at the bottom left corner of the “Fonts” dialogue box.
Step-4: Verify that the font has been added
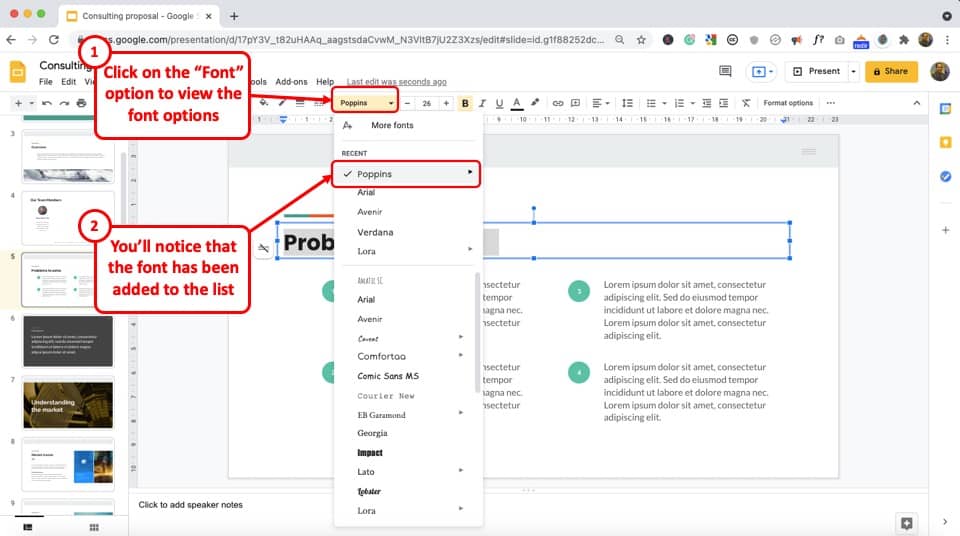
Now, once again select the text and click on the more fonts option. You will notice that the font that you recently added is now visible from the list of fonts available in the dropdown.
Remember! Fonts visible under the “More Fonts” option are Google Fonts. You can also check out Google Fonts for more options and font pairings, and add a specific Google Font using the search function under the “More Fonts” option in Google Slides! You get about 1284 font options in Google Fonts currently!
2b. Method 2 – Using Extensis Fonts Add-on in Google Slides
If you are migrating from Microsoft Office, or if you simply like the feeling of having “near-unlimited” font options in your presentation application, you should be using the “Extensis Fonts” add-on!
The Extensis Fonts add-on provides a ton of different options and font styles that you can choose from! The best part is – just like Google Fonts, it is completely editable and free!
Step-1: Click on “Get add-ons”
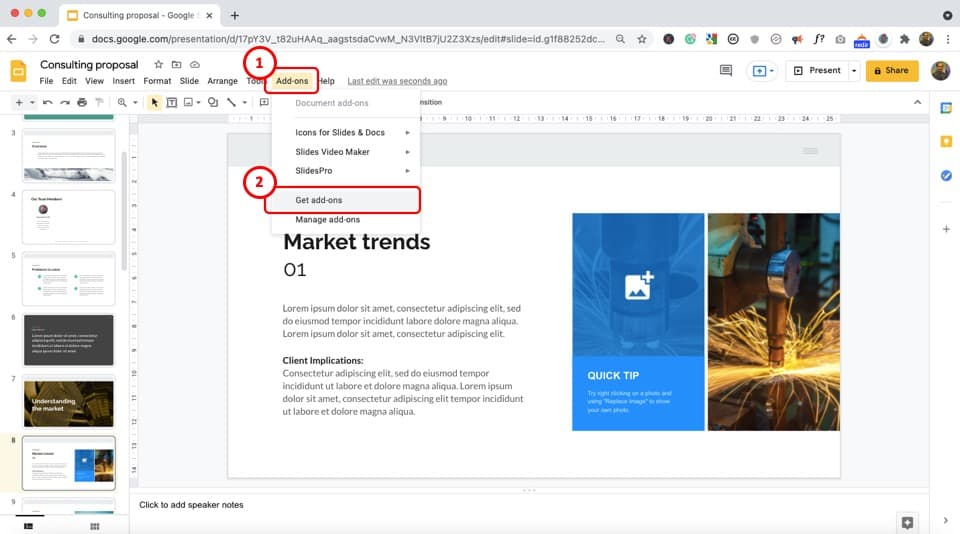
The first step is to click on the “Add-ons” button in the menu bar located at the top of the screen. In the “Add-ons” dropdown menu, click on the “Get add-ons” option. This will prompt a pop-up window.
Step-2: Search for “Extensis Fonts”
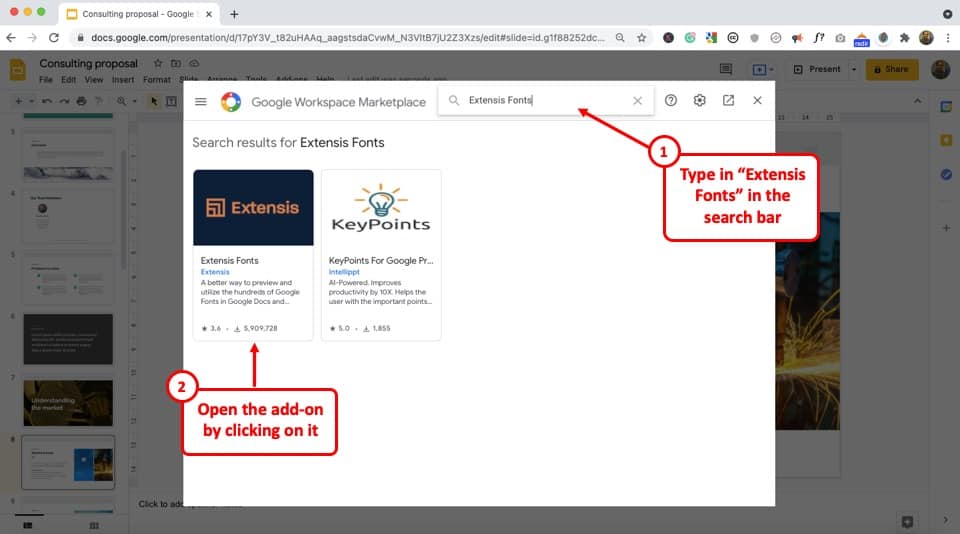
In the “Google Workspace Marketplace” window prompted by the “Get add-ons” option, click on the search bar. Then type in “Extensis Fonts” to find the specific add-on.
Now you have to click on the “Extensis Fonts” add-on to access it.
Step-3: Click on the “Install” button
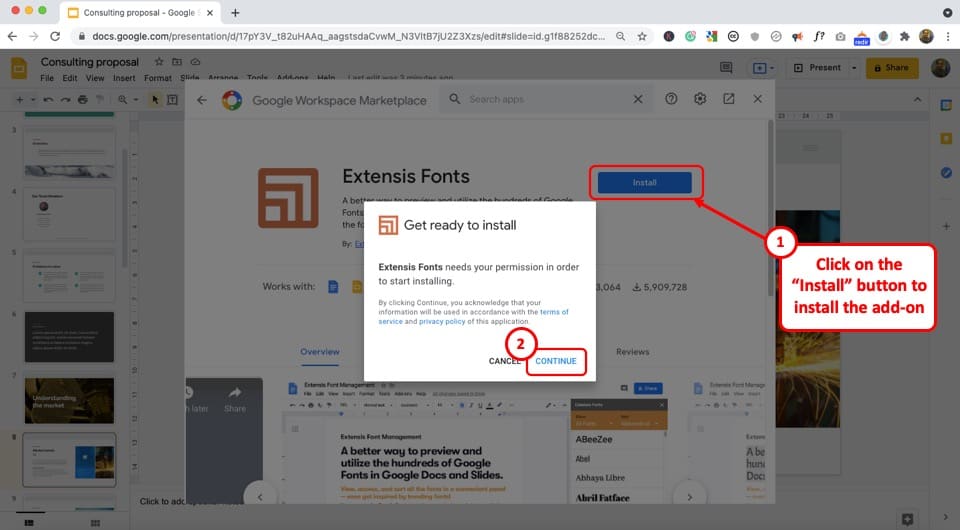
After that, click on the “Install” button on the right side of your screen and then select the “Continue” option from the prompted dialogue box. This will start the installation.
Step-4: Sign in to the Extensis Font add-on
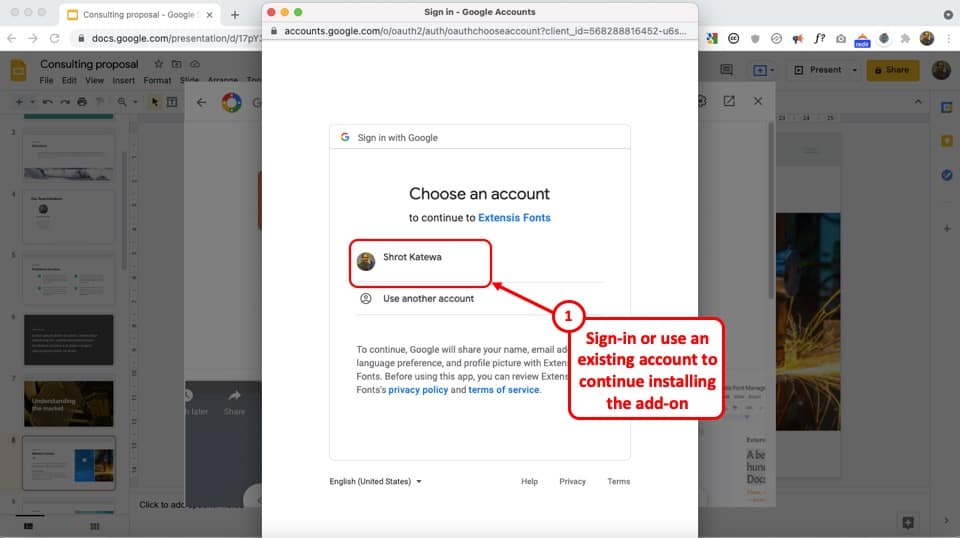
After the Extensis Fonts add-on is installed, it will open a new browser window.
You can use your google account to sign in to the add-on. Once you have completed signing in, click on the “Allow” button to allow Extensis Fonts access to Google Slides.
Step-5: Click on the “Next” button
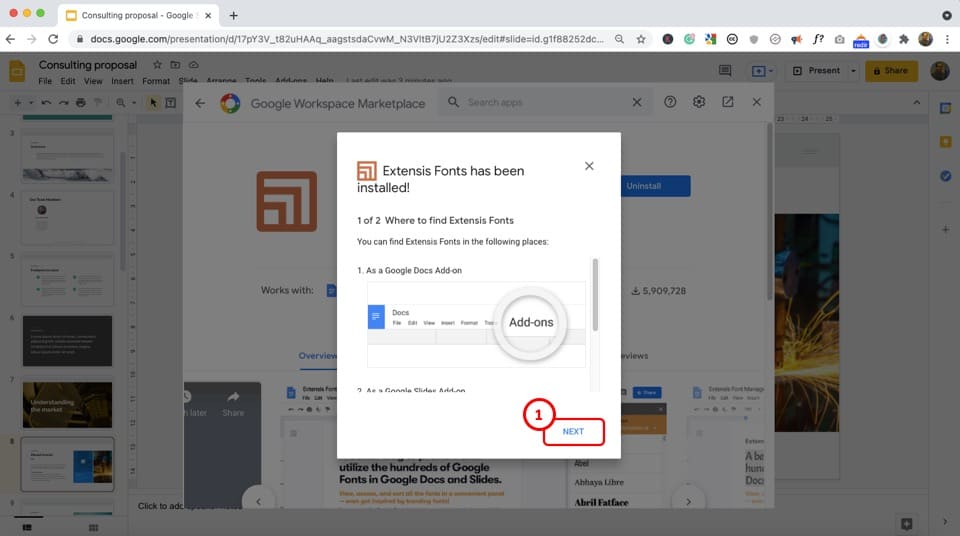
After finalizing the installation process, you will see another dialogue box prompted by Extensis Fonts. Click on the “Next” option located at the bottom right corner to continue.
Then click on the “Done” button to return to Google Slides.
Step-6: Click on the “Start” option
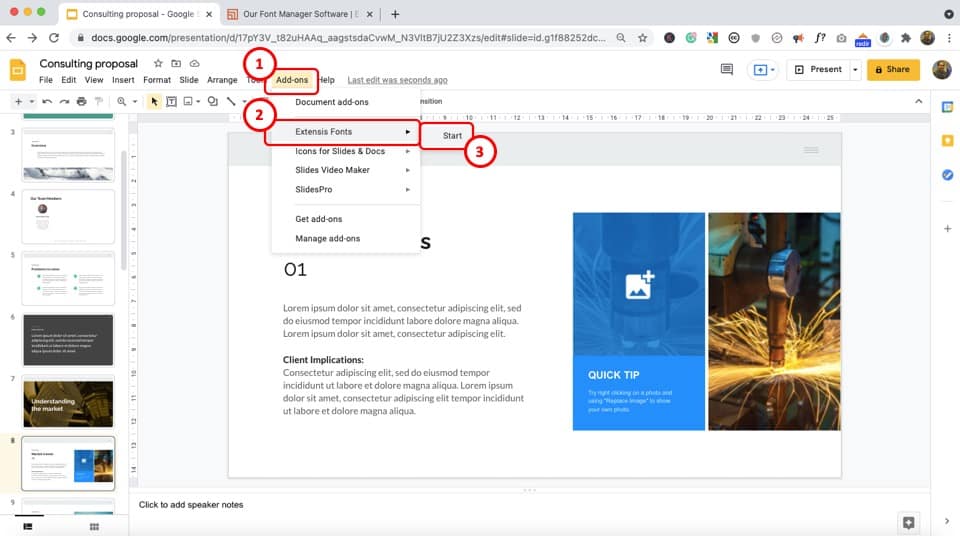
Once you are done with the installation process, you can access the Extensis Fonts add-on in Google Slides.
All you have to do is click on the “Add-ons” option in the menu bar. Then hover the cursor over the “Extensis Fonts” option to access the “Start” option beside “Extensis Fonts” . Click on the “Start” option.
This will open an “Extensis Fonts” sidebar with multiple font styles. You can click on any of the font styles to select it.
Step-7: Choose a font using the “Extensis Fonts” add-on
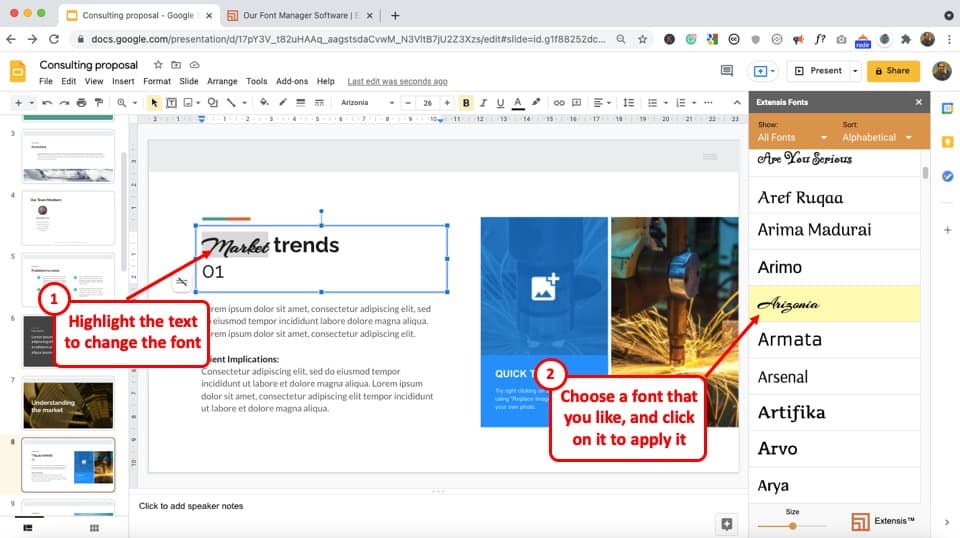
To choose a font, first select the text where you want to change the font.
Then, from the “Extensis Fonts” panel on the right, you can either scroll down and look for a font that you like or use the “Show” and “Sort” filter to search for a font quickly.
Unfortunately, this add-on doesn’t provide a search function so you will have to scroll through the fonts manually from the list.
Once you like a particular font, simply click on it and the font will be applied to the select text! Now, you can change the font size, and apply other font styles just as you would to any default font in Google Slides!
3. Can You Add Custom Fonts in Google Slides?
A custom font is usually designed or purchased by the user.
Currently, Google Slides does not allow you to add, upload, or embed custom fonts in your presentation. However, you can choose any Google Font from over one thousand options provided from the “More Fonts” option in Google Slides.
This is because Google Slides is a web-based application and uploading fonts on a presentation using your account doesn’t guarantee the visibility of the text in that font when someone else accesses this presentation.
Although this problem can be fixed easily if Google uses its might, currently there seems to be no option for this.
That said, there is a partial workaround to this problem! You can use font sites such as Font Squirrel to add a custom font, especially for heading text.
Here’s how to use custom fonts in Google Slides –
Step-1: Go to a third-party font site
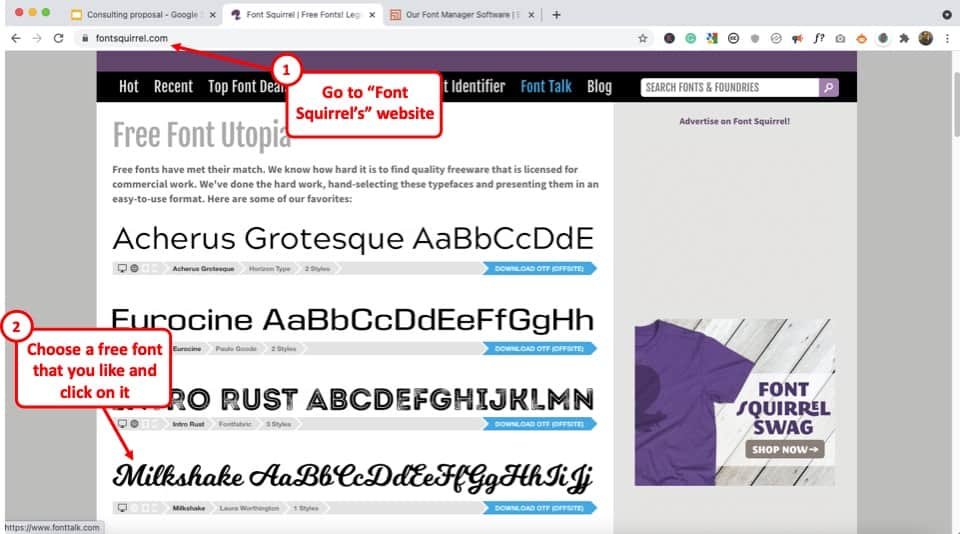
You can open a third-party site like Font Squirrel in your web browser. I would recommend using a chrome browser to follow this tutorial although you can still implement this on other browsers as well. Just that the steps might be a bit different.
Once you are on the font website, simply browse through and choose a font that you like.
Then, simply click on the font. It will open on a new page.
Step-2: Open the “Test Drive” option
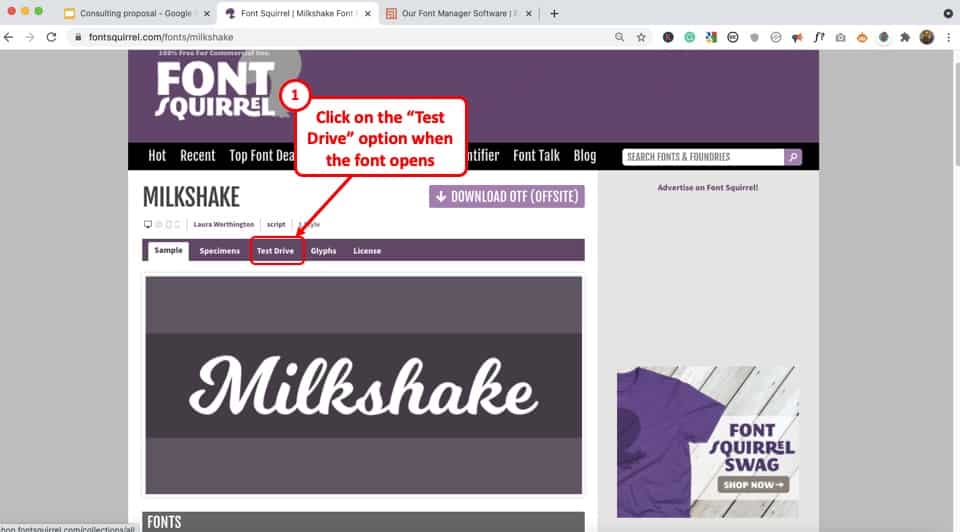
Next, when the page for the font that you chose opens up, click on the “ Test Drive ” tab from the options provided on the top.
Step-3: Add the custom heading
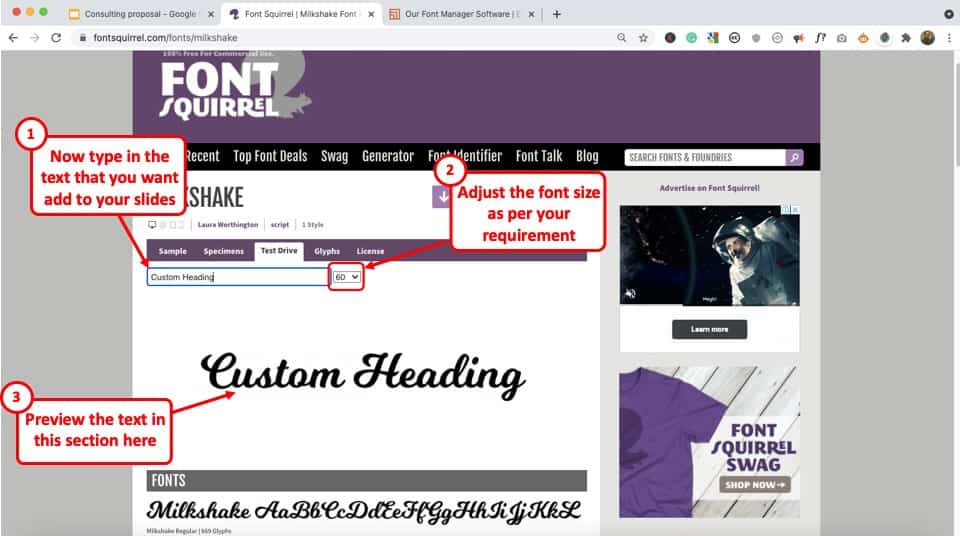
Next, simply type in the custom text or the text that you want using a custom font on your Google Slides presentation.
Feel free to adjust the font size. As you type the text, you can see the preview of the way the text will look using this font. The preview is visible in the section below.
Step-4: Copy the “Preview” image
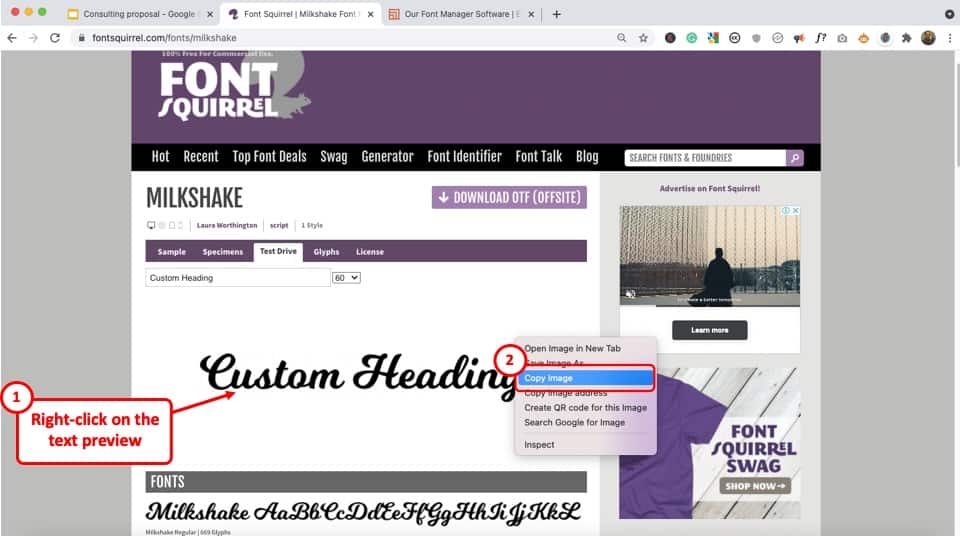
Simply right-click on the preview that appears on the page, and select the “ Copy Image ” option.
Step-5: Paste the Image in Google Slides
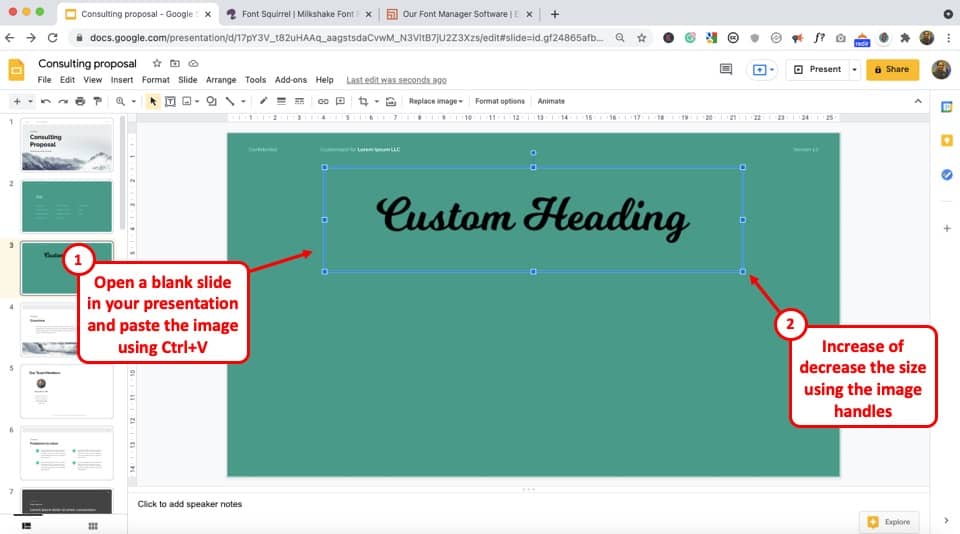
The last step of the process requires you to paste the preview image that you just copied on the slide in your presentation.
You can use the “ Ctrl+V ” option to paste the image or simply right-click on the slide and select “ Paste ” from the options.
The only drawback with font squirrel is that you don’t get too many customization options for the text. For instance, you can’t get a white font on the slide using font squirrel.
To overcome that issue you can use other third-party font sites such as Font Meme as they provide several different customization options before you copy the text to paste it on your slides!
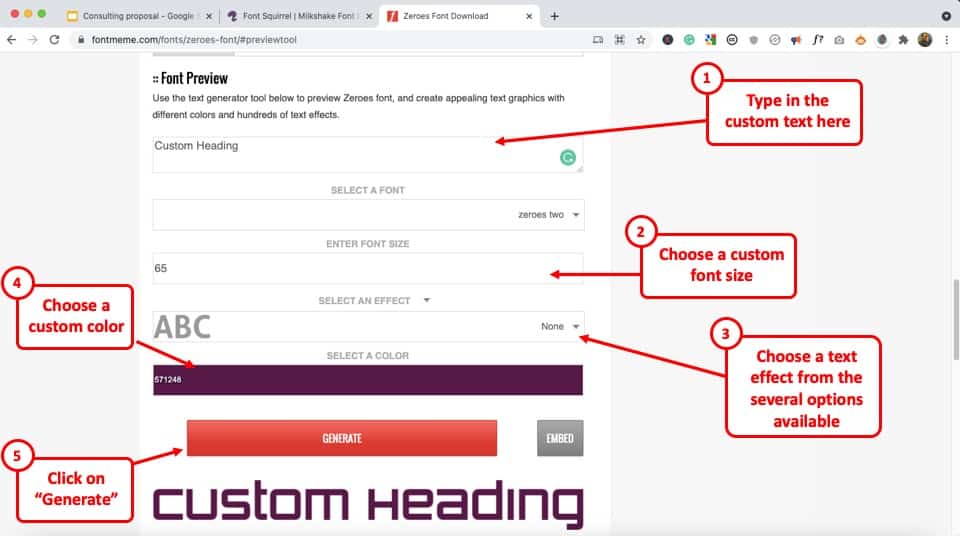
For instance, you can apply custom font effects, change color, or the font size even before you generate the preview.
Do keep in mind that not all fonts on font meme are free. So, you will have to be a bit selective about your options.
Once you are done with the customizations, simply right-click on the preview, copy the image, and paste it on your slide as described in the steps above.
4. How to Change Fonts on All Slides in Google Slides?
Google Slides allows you to change the design and theme of the entire presentation at once through the “Theme builder” option. You can change the fonts on all the slides in a presentation by following the 4 easy steps.
Step-1: Click on the “Theme builder” option
In the menu bar located at the top of the screen, click on the “View” button and select the “Theme builder” option from the dropdown menu. This will open the slide master view.
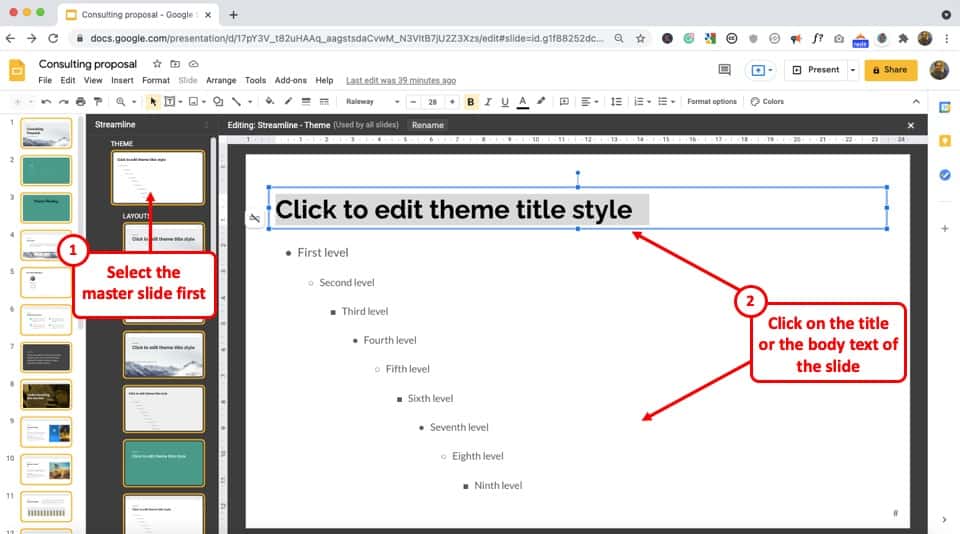
Step-2: Open the master slide
In the slide master view, click on the master slide from the slide layout pane on the left side of the screen. The master slide is located right under the “THEME” option.
Step-3: Click on the “Font” box
Now all you have to do is select the text placeholder in the master slide and click on the “Font” box in the toolbar.
This will prompt a dropdown menu containing various fonts. Click on your preferred font to change the font style of the text placeholder.
Step-4: Close the “Theme builder”
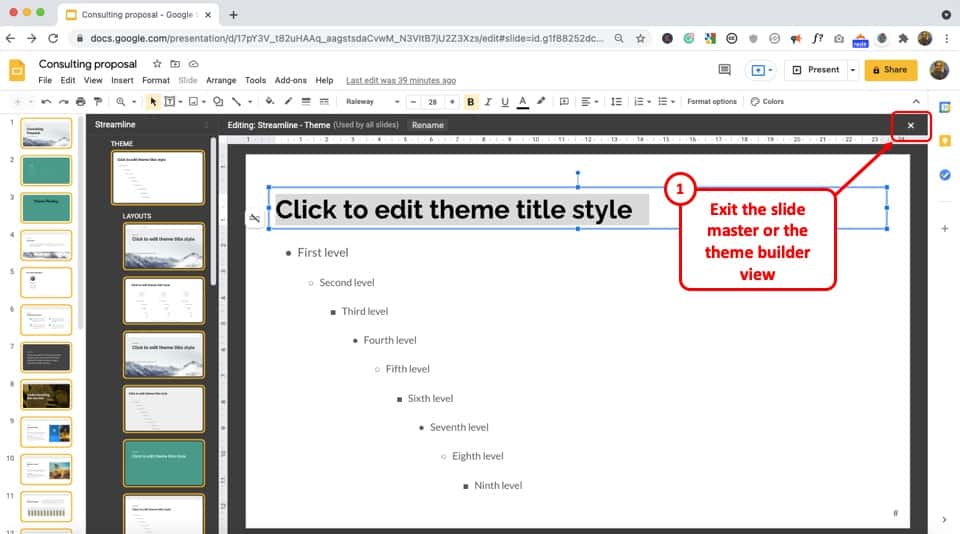
The last step is to close the “Theme builder” or the slide master view to save the changes to the font. To do so, click on the “X” button located at the top and right corner of the slide master view.
Credit to drobotdean (on Freepik) for the featured image of this article (further edited)
How to Add Fonts to Google Slides? [Quick Guide]
- Share on Facebook
- Share on Twitter
By Nikolay Kaloyanov
in How-To Tutorials
2 years ago
Viewed 1,694 times
Spread the word about this article:

What is a presentation? A combination of texts and images. While visuals should always be a priority in your presentation design, you don’t have to forget about how your text looks . Google Slides has given us 25 default fonts + some variations of their boldness . Bear in mind that not every font could be made lighter or bolder. But we’ll touch base on this later.
First of all, why should you bother about which font you use? Let’s find out.
Article overview: 1. When is a good idea to change fonts? 2. How to use fonts appropriately? 3. How to change fonts in Google Slides? 4. How to add fonts to Google Slides?
1. When is a good idea to change the fonts?
Fonts influence trust, credibility, and even the route people take to their destination. In the same way that music evokes certain emotions, font types can affect your state of mind as well. The choice of font is a crucial part of setting audience expectations and determining professional versus informal settings. It’s important to consider the subconscious effects fonts can have before you make a final decision for presentation text.
Fonts tell your customers a lot about your brand. Every font has its own personality, and that personality is associated with the brand that uses it. For example, a professional, corporate-looking font would go well with a formal business, just like a hand-written font would fit well with a unique restaurant.
But what are the most common cases when people change fonts? Let’s see:
- Branding fonts – using specific fonts is part of the branding strategy for many companies. Most corporate presentations use fonts that the company has approved.
- Standing out with the presentation – as we have already written, the font does play an important role in setting the tone of the presentation.
- Topic-relevant fonts – if you have a presentation on a specific topic (like a horror story), you might create a better visual effect if you add a specific font.
2. How to use fonts appropriately?
It goes without saying that choosing the right fonts matter. It is a defining part of your success. Knowing how to use fonts in a presentation will separate you from bad presenters and boost your confidence. Let’s see some good practices.
✅ Be consistent with fonts – while it may look cool initially to pose with different fonts, it’s typically considered a mistake to mix fonts from different font categories . Using Helvetica fonts mixed with Comic Sans is not a good idea, since they are not from the same family. If you’re using different fonts, it will be best if they are all Serif, all Sans Serif, etc. ReallyGoodDesigns has an article dedicated to font combinations .
✅ Don’t use more than 2-3 fonts – even if you are using fonts from the same category, it’s still a good idea to stick to two, a maximum of three fonts. Otherwise, you risk getting your audience distracted by the variety of fonts. Keep it simple – you want to impress with content.
✅ Use fonts according to your presentation – while some fonts might look great, they might not be relevant to your presentation. Typically, decorative fonts don’t look okay when shown in Google Slides so you’d better avoid that from happening. If you don’t know what to use for your next Google Slides presentation, stick to Open Sans and Lato – you won’t get it wrong this way.
3. How to change fonts in Google Slides?
Before we show you how to add fonts in Google Slides, let’s see how to change the existing ones. There are more than 25 options + and so many sub-variants, that in most cases you would never need to add fonts different than the established ones.
Step 1. Open your Google Slides presentation
Step 2. select a text.
Now, it’s time to select the text you desire to change the font of. So, click on the text box to mark the text and select every letter you want to modify.
Step 3. Change the font
When you have selected the text, it’s time to change the font by selecting another font and picking font weight (if possible). In order to find if your desired font can be further modified, it should have a dropdown option. Once you hover over the triangle, you can see how many options you have at your disposal. Merriweather has only four options available, while Montserrat has nine.

Step 4. Fix font size and the other font components
Your task is not done, once you change the font. The different fonts might take up more space, thus becoming unusable. Ensure you have fixed the text weight, font size, and colors before moving on.

4. How to add fonts to Google Slides?
Sometimes, the fonts available in Google Slides are simply not enough. But worry no more – there are hundreds of fonts (more than 900) that you can add to your presentation. You can find fonts dedicated to specific language groups or stylings like Serifs, Sans Serifs, Handwriting, etc.
Step 2. Highlight the text you wish to edit
Step 3. click on “more fonts”.
Instead of picking a font from the list, click on the top option which will display you much more fonts.

Step 4. Select a font to add
Now, you have the option to add new fonts. You can pick them up either from the search box (if you know the name of your desired font) or via the different filters: Scripts/Show/Popularity.

Step 5. Start typing/replacing
You can start using your recently added font straight away.
As we could see, there are plenty of fonts to choose from in Google Slides and it is not hard to change or add new fonts to your presentation. However, finding the balance between fonts and combining them is one of the most crucial things you need to do.
If our guide about adding and changing fonts has been helpful to you, why don’t you check some other similar articles that you might find useful:
- How to Add Audio to Google Slides and Make Your Presentation Awesome
- 20 Google Slides Tips to spice up your Presentations
- How to Calm Down Before a Presentation: 10 Practical Tips and Techniques
- 39 Free Google Slides Templates For Your Next Presentation

Add some character to your visuals
Cartoon Characters, Design Bundles, Illustrations, Backgrounds and more...
Like us on Facebook
Subscribe to our newsletter
Be the first to know what’s new in the world of graphic design and illustrations.
- [email protected]
Browse High Quality Vector Graphics
E.g.: businessman, lion, girl…
Related Articles
How to create a simple vector monster in adobe illustrator, how to add, duplicate, move, hide, and delete slides in google slides, color theory basics for non-designers: everything you should know, how to create a radial chart in google slides and visualize data, 20 google slides tutorials to master your presentation skills, 500+ free and paid infographic templates compatible with google slides:, enjoyed this article.
Don’t forget to share!
- Comments (0)
Nikolay Kaloyanov
Nikolay is a copywriter with vast experience in Technology, Marketing, and Design. When he isn't playing with words and crafting texts, he watches sports and asks questions. He is a funny person...until you put him on a diet.

Thousands of vector graphics for your projects.
Hey! You made it all the way to the bottom!
Here are some other articles we think you may like:

Free Vectors
Simple vector robot character in illustrator (tutorial + freebie).
by Bilyana Nikolaeva

How-To Tutorials
How to add and show speaker notes on google slides.
by Nikolay Kaloyanov

How to Design Graphics for Social Media Like a Guru: Tutorials & Tips
by Lyudmil Enchev
Looking for Design Bundles or Cartoon Characters?
A source of high-quality vector graphics offering a huge variety of premade character designs, graphic design bundles, Adobe Character Animator puppets, and more.
IMAGES
VIDEO
COMMENTS
2a. Method 1 – Using the “More Fonts'” option. To add more fonts to Google Slides with the help of its “More Fonts” option, all you have to do is follow the 2 easy steps below. Step-1: Click on “More fonts”. At first, you have to select the text in a text box to access the font style editing tools.
Open your Google Slides presentation. Step 2. Highlight the text you wish to edit. Step 3. Click on “More Fonts”. Instead of picking a font from the list, click on the top option which will display you much more fonts. Step 4. Select a font to add. Now, you have the option to add new fonts.
To find a font add-on for Google Slides, click on the Extensions tab on the menu. From the dropdown, choose Add-Ons > Get Add-Ons. Then, search for font extensions. One of the best is Extensis Fonts. Let’s find it and download it by clicking on Install . When you do, launch the Add-ons menu and open the add-on.