
How To Create and Assign Custom Intune Roles With PowerShell
- Post author: Daniel Bradley
- Post category: Microsoft Intune / Tutorials
- Post last modified: August 7, 2023
- Reading time: 11 mins read
Custom Intune roles are a great way to provide delegated and restricted access to resources in Intune. For example, you can prevent helpdesk users from wiping managed devices or provide reporting access to members of sales.
In this tutorial, I am going to show you how to create custom Intune roles using the Azure Portal and Microsoft Graph PowerShell.
To be able to run the scripts in this tutorial, you must ensure you have the Microsoft Graph PowerShell module installed. Check out my guide here to learn how.
Page Contents
What are Intune roles?
How to create custom intune roles using the intune portal, how to create custom intune roles using powershell, assign members and scopes to intune roles with powershell.
Roles in Microsoft Intune are groups of specific permissions that can be assigned to users or user groups. The role defines what actions a user can perform in Microsoft Intune and to what devices.
There are many types of roles available, as well as the option to create custom roles containing fine-grained permissions which I am going to cover in this tutorial.
Intune comes with the following in-built roles:
- Application Manager
- Endpoint Security Manager
- Organizational Messages Manager
- School Administrator
- Read Only Operator
- Intune Role Administrator
- Help Desk Operator
- Policy and Profile manager
For a detailed breakdown of each role you can view the role properties from the Microsoft Intune portal:
1. Login to https://intune.microsoft.com/
2. Select Tenant administration from the left-hand menu.

3. Select Roles .

4. Click on the role name of the role permission you wish to view.

5. Select Properties and on the right-hand side, you will see a list of all permissions grouped with this role.

Let’s take a look at how to create custom roles using the Intune portal. It is convenient to create roles this way if you are creating the role as a one-off and do not need to duplicate the configuration to other tenants.
Start by following steps 1 > 3 in the above section. This will take you to the Intune role page in the admin portal.
- Now you are on the Intune role page, select Create .

2. Enter a name for your custom Intune role.

4. Scroll down the list and enable your desired Intune role actions.

5. Click Next and script the scope tabs page, then click Create .
6. You will now see your custom Intune role on the roles page. Select the Role to open up the properties.

7. From the left-hand menu, select Assignments .

8. Click Assign .

9. Enter a name for the role assignment.

10. Click Add groups and include any groups of users for which you want this role to be assigned.

11. On the scope groups tab I have selected All Devices . In the case of this setting, this defines the objects you want the assigned users to have control over. In this example, I am giving Approval Admins read-only access to all devices.

12. Now click Next , the Next again and Create . You custom role has now been created and assigned.
You can also follow along the steps in my YouTube video.
To create your custom role using Microsoft Graph PowerShell, use the below script. Here are the steps to deploy the script:
- Complete the fields next to $DisplayName and $RoleDescription to match your desired settings.
- There are 4 areas in the script which include the value Microsoft.Intune_Organization_Read , you should replace this to include your desired permissions.
- Use the Microsoft Docs permission reference when choosing your desired permissions here .
You can apply multiple permissions in your custom Intune role, for example if you wanted include Manage Device Read and Managed Device Update permissions, you would update the Json payload as follows:
Now you have created the Role, you may notice that there are no assigned admin members or assignment scopes defined. Use the below script to define the role members and an assignment scope.
Update the script as follows:
- Update the $DisplayName field to the desired name of your role assignment
- Update the $AdminGroupName field to the exact name of the group that contains your target members
- Update the $RoleName field with the exact name of the role the assignment is for

Daniel Bradley
Leave a reply cancel reply.
Save my name, email, and website in this browser for the next time I comment.
Use code: MGP15 for 15% off the Microsoft Graph PowerShell for Administrators book. Available until March 31st

systunation
Talks about Intune-Automation-Scripting-PowerShell-Azure
Intune – RBAC Custom roles
In this post we will discuss how to create custom RBAC roles in Intune and assign them to specific groups.
Table of Contents
Intune RBAC (Role-Based Access Control) roles refer to the predefined roles in Microsoft Intune that determine the permissions and actions that users can perform within the Intune service. RBAC allows administrators to grant appropriate levels of access and control to different users or groups based on their roles and responsibilities. In Microsoft Intune, there are several built-in RBAC roles that can be assigned to users or groups. Each role has different levels of permissions and access rights, allowing administrators to assign appropriate roles to users based on their responsibilities and requirements within the Intune environment. Additionally, Intune also provides the flexibility to create custom RBAC roles with specific permissions tailored to unique organizational needs.
Intune Built-In Roles
Let’s suppose that we want to give specific permissions on Intune to a user or a user group. That could mean to allow users to view device info, perform specific actions such as wipe or delete or import Autopilot hashes. Although, Intune, as mentioned above, provides us with specific built-in roles, we can create our own to meet specific requirements that may arise.

As we can see there are many built-in roles, such as Intune Role Administrator (Intune admin -> very powerful role) and Help Desk Operator. To see the specific actions allowed for each role we can click the desired role and explore its properties.

Custom Role Creation
Let’s suppose that we want to create a new custom role to allow a specific user group to be able to perform specific actions related to Windows devices on Intune platform.
The actions that we want to be allowed are:
- Read device information
- Upload device hardware hash
- Perform sync actions
The below Microsoft articles provide us with useful information:
- Role-based access control (RBAC) with Microsoft Intune
- Custom role permissions
Let’s create the role. First navigate to Intune portal and the Tenant Admin blade. Click Roles and create.

Give a name and a description to your custom role and proceed further.
Now we can see all the available permissions. Scroll through them to familiarize yourself with them.

By looking at the permissions the first one that interest us is the Device compliance policies one. We would like to allow the members of Device support group to read (! only read, not edit) the compliance policies of a device. Select Yes at the Read permission.

The autopilot part of the RBAC custom role requires the enablement of several permissions as shown below. Just to mention here that the process of creating a custom role is a trial and error process since several tries are required before achieving the desired result.

The next action that we want to allow is reading the managed devices information and state. To do this we have to allow Read permission in the Managed devices section.

Finally the sync action can be allowed by enabling the remote tasks sync devices task.

After selecting the desired permissions, select a scope tag if needed, and create the role.

Now that the role is created we have to assign it to a user group. Open the role and click Assign.

Give a name and a description to the role.

In the next step select the user group that you want to assign the role to. It is imperative to mention here that the users in the selected group should have an Intune license assigned. I created a user group named “Intune – Device Support Group” for this role.

At the next stage we have to select the Scope Groups, which essentially corresponds to the items that this role will be able to manage. The scope group can be:
- Specific device or user group (we choose device or user group depending on the permissions type)
- All devices
In this case we choose all devices, since we want our users to have visibility and the ability to manage all of our devices. A more strict approach would be to limit the devices by selecting a specific device group such as a group containing only Windows devices etc.

The assignment is now ready.

In this post we created a custom role that allows specific user group to view device information, perform sync actions and upload Autopilot hardware hash.
References and documentation:
- Create a custom role in Intune
- Assign a role to an Intune user
Leave a Reply Cancel reply
Your email address will not be published. Required fields are marked *
Save my name, email, and website in this browser for the next time I comment.
Intune scope tags and role-based access control explained
For larger Intune environments a solid role-based access implementation becomes crucial to ensure a secure administration. But how does Intune role-based access control (RBAC) work in combination with scope tags and how to get started? This post gets you covered with explanations and practical examples.
Role-based access control within the Microsoft 365 ecosystem #
Within the Microsoft 365 ecosystem, Microsoft provides Azure AD administrative roles to administrate services like Exchange (Exchange administrator), SharePoint (SharePoint administrator), Intune (Intune administrator) and so on.
As you can see Azure AD provides (usually) only one role which grants full administrative access over a service. You can configure more fine-grained controls within the service itself - that’s where the RBAC controls of the respective service kick in.
To give you another example: You might have a 1 st or 2 nd level support department which needs permissions to perform remote actions on Intune managed devices. Instead of assigning them the Azure AD Intune Administrator role, it’s more convenient to assign them a fine-grained Intune RBAC role which delegates exactly the permissions needed.
As the name already indicates Intune related roles only live within the Intune tenant and cannot be managed from AAD and vice-versa:

Azure AD administrative roles with Intune permissions #
Along with the “Intune Administrator” the “Global Administrator” role is as of today the only role which grants write access to the Intune service. You can find an exhaustive list which covers also roles with read access within this Microsoft docs article: Azure Active Directory roles with Intune access .
Intune roles #
The Intune service comes with a predefined set of built-in roles . These role definitions are immutable which means that you cannot edit permissions, display-names or descriptions.
If you want to customize a role you can duplicate your desired built-in role which then becomes a “custom role”.
You can manage all Intune roles and RBAC settings under the “Tenant administration” -> “Roles” blade:

Example use cases #
Imagine a small to medium company with a central IT which provides all services.
If you have use cases like:
- Members of the 1 st level support should be able to perform device actions (reset, retire, lost-mode) and assign mobile apps
- Members of the 2 nd level support should be able to modify device configurations and create mobile apps
that’s where an Intune role assignment to the repective groups (1 st and 2 nd level support) will be sufficient.
Advanced use cases #
Larger companies or companies with decentralized IT departments organized by business regions like EMEA, APAC… could have advanced use cases like:
- The support team of EMEA should be able to perform device actions only on EMEA devices
- The support team of EMEA should only be able to modify EMEA device configurations and not global configurations
We need more fine-grained controls to identify which resources belong to EMEA. And these controls are called “Scope tags”.
Intune scope tags #
What’s an Intune scope tag?
A scope tag assigns an Intune configuration (e.g. device configuration, compliance policy, mobile app or managed device) to one or more specific management scope(s). {: .notice}
You can imagine a scope tag like a “virtual Active Directory organizational unit (OU)” - to each Intune object you assign a scope tag it would reside within that OU. In Active Directory terminology we would then “Delegate permissions” to a specific group which can manage objects within that OU - that’s exactly what Intune role assignments and scope tags do (hypothetically).

Default tag #
By default, all Intune entities which are created from a user without an Intune role (which means it was either an Intune Administrator or Global Admin) get automatically assigned this built-in scope tag. Every object in Intune needs to have at least one scope tag assigned.
What about accounts without an Intune role? #
Azure AD administrative roles with Intune permissions which don’t have an Intune role assigned always preserve permissions based on the AAD role on all resources no matter to which scope they belong.
Scope tag inheritance #
- An admin which got an Intune role with scope tag(s) assigned will inherit the scope tag(s) to all resources he creates
- Apple VPP tokens will inherit all scope tags from the VPP-token level to the mobile apps
Configurations supporting scope tags #
All except the following resources in Intune currently support scope tags:
- Windows ESP profiles
- Corp Device Identifiers
- Autopilot Devices
- Device compliance locations
- Jamf devices
List from microsoft docs .
Assignment of Intune roles and scope tags #
To assign a role you can customize the following options:
- Azure AD Group which will have the role assigned
- Here you can add specific groups which can be managed by this role
- Selected groups ->
- All users -> Admins can create “All user” assignments but cannot perform any device-related tasks
- All devices -> Admins can manage all device properties and tasks including assignments but cannot perform user-related tasks
- All users and all devices -> Admins can can can manage and target all devices, users and AAD groups
- controls over which scope the role is valid
- if you don’t specify a scope it’s valid across all scopes (whole Intune tenant)
Real-world example #
To come back to our advanced role assignment example about EMEA - we need to do the following steps to implement Intune RBAC for the EMEA team:

- Make sure to include the “EMEA” scope tag within the role assignment
Members of the “gs-aad-apac-intuneoperators” AAD group have now permissions according to the custom Intune role “EMEA operators” role over all Intune objects which have the “EMEA” scope tag assigned.
An EMEA user which owns the custom Intune role will only see the devices and configuration profiles with the EMEA scope tag assigned:

- If APAC needs the same permissions like EMEA on APAC resources we can just add a new role assignment and use the APAC scope tag and AAD group
- Peter van der Woude wrote a great post about this
- disable the “assign” permissions in the custom role
- specify the Azure AD groups where they should be able to target in the role assignment under the “Scope (Groups)” setting
Additional notes #
License requirements #.
Using Intune roles did require an active Intune license assigned to the admin. This changed with the 2006 release which was rolled-out in Juni 2020. You can disable the license requirement in your tenant:

But keep in mind that for MFA / Conditional Access an Azure AD Premium P1 plan is still required.
Verify assigned Intune permissions #
You can easily verify Intune permissions assigned to your account by visiting Tenant Administration -> Roles -> My permissions:

Conclusion #
Intune offers very fine-grained control to administrate a tenant with Intune (custom) roles and scope tags. For smaller environments and especially companies with a central IT working with scope tags might overdo the cake but for larger decentralized tenants these are welcome features to reduce the load on the central IT team. Whereas Intune Intune roles can be very helpful to assign the right permissions to 1 st and 1 nd level support teams.
Happy Intune RBAC-ing.
This browser is no longer supported.
Upgrade to Microsoft Edge to take advantage of the latest features, security updates, and technical support.
Step 10: Create and assign a custom role
- 5 contributors
In this Intune topic, you'll create a custom role with specific permissions for a security operations department. Then you'll assign the role to a group of such operators. There are several default roles that you can use right away. But by creating custom roles like this one, you have precise access control to all parts of your mobile device management system.
Use the information provided in this series of topics to try and evaluate Microsoft Intune. When you're ready, follow the complete process to set up Intune. For more information, see Set up Microsoft Intune .
If you don't have an Intune subscription, sign up for a free trial account .
Prerequisites
- To complete this evaluation step, you must create a group .
Sign in to Intune
Sign in to Intune as a Global Administrator or an Intune Service Administrator. If you have created an Intune Trial subscription, the account you created the subscription with is the Global administrator.
Create a custom role
When you create a custom role, you can set permissions for a wide range of actions. For the security operations role, we'll set a few Read permissions so that the operator can review a device's configurations and policies.

- Under Add custom role , in the Name box, enter Security operations .
- In the Description box, enter This role lets a security operator monitor device configuration and compliance information.

- Choose Device compliance policies > Yes next to Read > OK .
- Choose Device configurations > Yes next to Read > OK .
- Choose Organization > Yes next to Read > OK .
- Choose OK > Create .
Assign the role to a group
Before your security operator can use the new permissions, you must assign the role to a group that contains the security user.
- In Intune, choose Roles > All roles > Security operations .
- Under Intune roles , choose Assignments > Assign .
- In the Assignment name box, enter Sec ops .
- Choose Member (Groups) > Add .
- Choose the Contoso Testers group.
- Choose Select > OK .
- Choose Scope (Groups) > Select groups to include > Contoso Testers .
- Choose Select > OK > OK .
Now everyone in the group is a member of the Security operations role and can review the following information about a device: corporate device identifiers, device compliance policies, device configurations, and organization information.
Clean up resources
If you don't want to use the new custom role anymore, you can delete it. Choose Roles > All roles > choose the ellipses next to the role > Delete .
In this quickstart, you created a custom security operations role and assigned it to a group. For more information about roles in Intune, see Role-based administration control (RBAC) with Microsoft Intune
To continue to evaluate Microsoft Intune, go to the next step:
Step 11: Create an email device profile for iOS/iPadOS
Was this page helpful?
Coming soon: Throughout 2024 we will be phasing out GitHub Issues as the feedback mechanism for content and replacing it with a new feedback system. For more information see: https://aka.ms/ContentUserFeedback .
Submit and view feedback for
Additional resources
Implementing RBAC in Intune
By implementing RBAC in Intune you can configure who can see what and perform which actions in Intune. This can be achieved by using RBAC in Intune. For example you can use it to configure the following situations:
- Help desk employees can only view devices, but are not allowed to remove devices from Intune.
- The system engineer from the London office is only able to view and edit configuretions and devices for the London office and not the office in Amsterdam or New York.
In the roles, you configure what permissions a user has within Intune. These roles can be applied on two levels. First you have the Azure Active Directory roles with Intune access. Examples of these roles are the Global and Intune administrator. These roles are assigned in Azure and provide rights in Intune. Roles which have been assigned in Azure cannot be limited by Intune RBAC rules. Second there are the roles which are assigned in Intune. Using these roles you can assign rights to specific parts in Intune for situations described above. In Intune you can use the Built-in roles, but you can also create custom roles where you can control which permissions a user will get in Intune.
In addition to roles, a key component in RBAC is the application of scopes. A role only defines what a member of that role is allowed to do within Intune, but you may also want to limit the policies or devices that the user is allowed to see or change. You can do this by assigning scope tags and scope groups. By applying scope tags you can specify which resources can be seen by a member. For example, if you only want to show the device profiles of the London office you can add a tag to these profiles. By using scope groups, you can define which users or devices are allowed to be managed by a member. For example, if a member is only allowed to assign policies to a particular group, then you can assign this group as the scope group.
Implementing RBAC
Assigning a role consists of several steps. It begins with selecting a role or creating a custom role. Next, an assignment of the role is made. The third step is to assign the admin group. Once that is done a scope can be assigned ranging from a single group to all users/devices. The last step is to select the resource tags that should be visible to the members.

In this demonstration I will show how to create a custom role and assigning it to a member group. I will create a role based on the “Help Desk Operator” role for the 2nd line support. This role will then be assigned to scope for a specific office location (Amsterdam Office). This ensures that support staff will only be able to manage policies and devices for this location.
Creating a custom role
1. Login to the MEM admin center and select Tenant administration -> Roles -> All roles or click here. Either select an existing role and press “Duplicate” or press “+ Create”. I will select the “Help Desk Operator” role and press “Duplicate”

2. Enter the name for the new role and an (optional) description. Press “Next” to continue.

3. Edit the permissions for example allow the assigning of Device configurations. This will allow members of the role to add or remove device configuration assignments to (scope) groups. Press “Next” to continue.

4. Assign an additional Scope tag or change the default Scope tag to the new role. By default, the “default” scope tag is added to all untagged objects that support scope tags. Press “Next” to continue.

5. Create the new role by pressing the “Create” button.

Tagging resources
By default, role members see all intune resources. As indicated under “Scopes” you can modify this by tagging resources. To do this, a Tag must first be created and then added to the resources that are allowed to be seen by members.
6. Select Tenant administration -> Roles -> Scope (Tags) or click here . Press “+ Create” to create a new Scope tag.

7. Enter a name for the new scope tag and press “Next”

8. Select the group(s) containing the devices you want to assign the new scope tag.

9.Press “Create” to add the new Scope tag to Intune.

10. Now we need to assign the Scope tags to the resources. Because I’ve created a scope tag for the Amsterdam Office, I will associate the tag to the resources associated to the Amsterdam Office. In this demo there are only two device configuration profiles associated to the Amsterdam Office.

11. Edit the both device configuration profiles and add the scope tag. Press “Review + save” to save the added tag.

Assign a role
In this step we are going to assign the the new “2nd Line Support” role to members of the 2nd Line support. I have already created a security group “2nd Line Support Amsterdam” containing all second line support employees for the Amsterdam Office. These employees will only be able to manage devices and resources with the “Amsterdam Office” tag. You can use the same role for multiple assignments with different tags and admin members. In this way, for example, you could support multiple locations.
12. Go to the newly created “2nd Line Support” role and select “Assignments”. Press “+ Assign” to create a new assignment.

13. Enter a name for the assignment and add a (optional) Description. Press “Next” to continue.

14. Select the admin groups these are the groups containing the administrators you want to assign the role to. Press “Next” to continue.

15. Select the Scope Groups for the role assignment. You can also select all devices/users if you don’t want to use scope groups. The Scope Groups are the groups which can be managed by the members of the Admin group(s) in the previous step. Press “Next” to continue.

16. Add the scope tag(s) of the resources that should be allowed to be seen by the admin group. Press “Next” to continue.

17. Review your settings and press “Create” to create the role assignment.

Test RBAC in Intune
Now let’s see what happens when you try to log in with a member of the admin group. For this test I will use the user Hank who is a member of the security group “2nd Line Support Amsterdam”.
18. Whoops an error… If you try to log in with a user immediately after creating the role assignment, you may get an error. It takes about 5 minutes for the role assignment to be processed. Grab a coffee and be patient.

19. After some extra time, we try again. The error message disappeared. When we look at “All devices” you can see that Hank only sees the 2 devices which are member of the security group “Devices Amsterdam Office”.

20. Now let’s have a look at the Compliance policies. Because no compliance policies are tagged, Hank does not see any of the 9 configured compliance policies.

21. Let’s take a final look at the Configuration profiles. Hank only sees the two profiles which have been tagged (step 11). The Intune administrator sees all configured Configuration profiles.

22. Let’s test the scope groups and see what happens when Hank tries to assign a configuration profile to a group that is not configured as a scope group (step 15). Hank can select the group, but as soon as he tries to save the change he gets an error message. When he tries the same thing with a scope group it goes well.

Using RBAC in Intune, you can solve most security challenges. However, there still remain certain resources that you cannot provide a scope tag such as:
– Devices -> Compliance policies -> Locations – Devices -> Windows -> Windows Enrollment -> Enrollment status page – Devices -> Windows -> Windows Enrollment -> Devices (Autopilot) – Devices -> Enroll devices -> Corporate device identifiers – Jamf devices in Intune
In addition, it is not currently possible to scope the uploading of Autopilot devices. This is only possible if you are a Global or Intune administrator. But except for these exceptions, RBAC in Intune will be sufficient for most organizations.
1 thought on “ Implementing RBAC in Intune ”
thanks. tried your guide and it is working great. however it is not working for app configuration when navigate to an android device. the app configuration section of an android device will keep showing loading. however it is working ok when navigate to app > app configuration. not sure if it is a bug or my configuration issue.
Leave a Reply Cancel reply
Your email address will not be published. Required fields are marked *
- More Networks
How to Create Custom RBAC Role in Intune for LAPS Password Administrator
Windows Local Administrator Password Solution (LAPS) from Microsoft allows you to manage and rotate local administrator passwords on Windows devices. A custom RBAC role in Intune is required if you want to delegate password administration to help desk members. The password administration for Windows LAPS includes retrieving the password for a Windows device from the Microsoft Intune console and rotating the password for a device based on requirements.
Let’s go through the below post to understand the steps required to delegate LAPS password administration to IT help desk by creating a custom Role Based Access Control (RBAC) role.
Create Azure AD Group
Create azure rbac custom role to view password, assign azure ad custom role, create custom rbac role in intune for laps password administration, laps password administrators – experience, related posts.
An Azure AD group is required to simplify the Intune RBAC roles. The user who needs to work on Windows LAPS password administration can be simply added to this AAD group to get all necessary access. Follow the below steps to create an Azure Active Directory group.
- On the Azure portal, go to Azure Active Directory > Groups and click on New Group

- Group Type : Security
- Group Name : Provide group name as per your organization naming standards
- Azure AD roles can be assigned to the group : Select Yes.
- Membership Type: Assigned
- Members : Add the user if you want to add any at this point of time.
Click on Create to create AAD group.

- Click Yes on the message box.

The next step is to create a custom AAD role to view Windows LAPS password. As of now Windows LAPS is in preview and no built-in role available in Azure AD for this. To view password details, your account must have one of the following Azure Active Directory permissions:
- microsoft.directory/deviceLocalCredentials/password/read
- microsoft.directory/deviceLocalCredentials/standard/read
Follow the below steps to create a custom RBAC role in Azure AD.
- On the Azure portal , navigates to Azure Active Directory > Roles and administrators , and click on “ New custom role “

- On the next page, provide role name, description and click on Next .

- On the Permission page, search for microsoft.directory/deviceLocalCredentials and select the permissions from the result.

- On the Review + create page, review the details and click on Create .

We have created an Azure AD custom role in the last step. Now this role needs to be assigned to Azure AD Group which we created earlier.
- On the Role and Administrator page, search for AD group you created for LAPS and click on the group.

- Click on Add Assignments .

- Scope type : Directory
- Select members : Select the AAD group you created for LAPS password administrators.
- Click on Next

- On the Add assignments > Settings page, select Active in Assignment type, provide the justification, and click on the Assign button.

- The role is now assigned to the AAD group. You can see the details in the Assignment blade.

We will now create a custom RBAC Intune role for LAPS password administration. This role allows user to access “Local Admin Password” blade for a device, view and rotate local admin password.
- On the Microsoft Intune admin center, navigate to Tenant administration > All roles and click on Create

- On the Basic page, provide the profile name and description for Intune rbac roles. click on Next .

- Manage Device: Read
- Organization: Read
- Remote tasks: Rotate Local Admin Password

- On the Review + create page, review the details and click on Create.

- The Intune rbac custom role is now created and you can see the same in All roles . Click on the newly created role to assign the role to Azure AD group.

- On the Assignments page, click on Assign link.

- On the Add Role Assignment > Basics page, provide the name and description for role assignment and click on Next .

- On the Admin Groups page, click on Add groups and select the AAD group you created for LAPS administrators.

- On the Scope Groups, select All Devices and click on Next.

- On the Review + create page, review the settings and click on Create.

The Intune rbac roles assignment steps are now completed. Users who are part of the Azure AD group can now able to view local admin password for a device. They can also rotate/change the password if required.
When LAPS Administrator logon to Intune console, they can access Local admin password blade and view local admin password.

They can also access Rotate local admin password option by clicking on 3 dots at top right. The other options are grayed out in the below screen as we have granted only LAPS password administration privilege to Azure AD group. If the same user is part of other roles, they would be able to perform other actions as well based on the permissions they have.

- Manage Edge Chromium favorites with Endpoint Manager | Intune
- Configure Edge Chromium Homepage & Startup Page
- Configure Microsoft Edge Sleeping Tabs using Intune
- Configure Google Chrome settings using Administrative templates | Intune | Endpoint Manager
- Block USB Device with Exception
- Deny Write Access to USB Devices Using Intune Catalog Settings
- Manage Windows 10 /11 Desktop Wallpaper with Microsoft Intune
- Manage Local Admin Password with Intune & Windows LAPS
- How to Create a Custom RBAC Role in Intune for LAPS Password Administrator
Subscribe to Techuisitive Newsletter
Be the first to know about our new blog posts. Get our newsletters directly in your inbox and stay up to date about Modern Desktop Management technologies & news.
Recent Posts
Create ade enrollment profile in intune.
The corporate-owned devices purchased through Apple Business Manager or Apple School Manager can be enrolled in Microsoft Intune via Apple automated device enrollment. An ADE…
Read More »
Manage iOS Updates on Supervised Devices through Intune
Microsoft Intune has built-in policies that can manage software updates on iOS/iPadOS supervised devices. It’s recommended to use these policies to manage software updates through…
How to Show or Hide Native Apps on iOS via Intune
Microsoft Intune includes some built-in settings to configure different Apple features on iOS/iPadOS devices. One of such setting is to show or hide built-in (native) apps.…
Configure Home Screen Layout on iOS using Intune
Microsoft Intune includes some built-in settings to configure different Apple features on iOS/iPadOS devices. One of such setting is to customize dock and home screen…
Fix Something went wrong – 2002 error on iOS | Intune
When you try to sign-in to any M365 apps on Microsoft Intune managed iOS / iPadOS devices ( iPads / iPhones ), the messages something…
Dynamic Group Based on Enrollment Profile in Intune
A dynamic group membership updates automatically based on defined rules. You can create attribute-based rules to update the group membership. You can create a dynamic…

Bring Azure AD PIM and Intune Roles together
Microsoft Intune comes with a set of roles for role based access controls. The issue has been that these roles could only be assigned as permanent roles on a users or a group. Now with a new feature in Azure AD that gives us management capabilities for privileged access Azure AD Groups we can mitigate on this missing capability with Intune roles. In this post we will go through the steps needed to have Azure AD PIM control on any of the built-in or custom roles in Intune.
Requirement for this setup up is that you have Azure AD Premium P2 license and you have onboarded to Azure AD Privileged Identity Management.
The steps we need to get this working is as follows:
Role Assignable Group
Why do we need to have a special group type for this you ask. This group type is meant to be used for assigning users to Azure AD Roles, and only Global Admins and Privileged role admins can manage these groups. It can be delegated with assigning group owners if needed. The caveat is that a single Azure AD Tenant can have a maximum of 200 role assignable groups. The other reason is that we are only able to bring role assignable groups into PIM.
Go into AzureAD and create a new group and select Yes Azure AD roles can be assigned to the group. (This can not be changed later)

Do not add any members or roles to the group at this stage.
Bring the group into Privileged Identity Management (PIM)
Now that we have our group we need to bring this group into PIM. We do that by open up the group we created in Azure AD and go to Activity -> Privileged access (preview)

You will be redirected to this step after onboarding is completed.

Assign the group to the role in Intune
Now we have the group ready for our Intune built-in role. This can not be assigned from Azure AD so go to https://endpoint.microsoft.com and select Tenant Administration – Roles
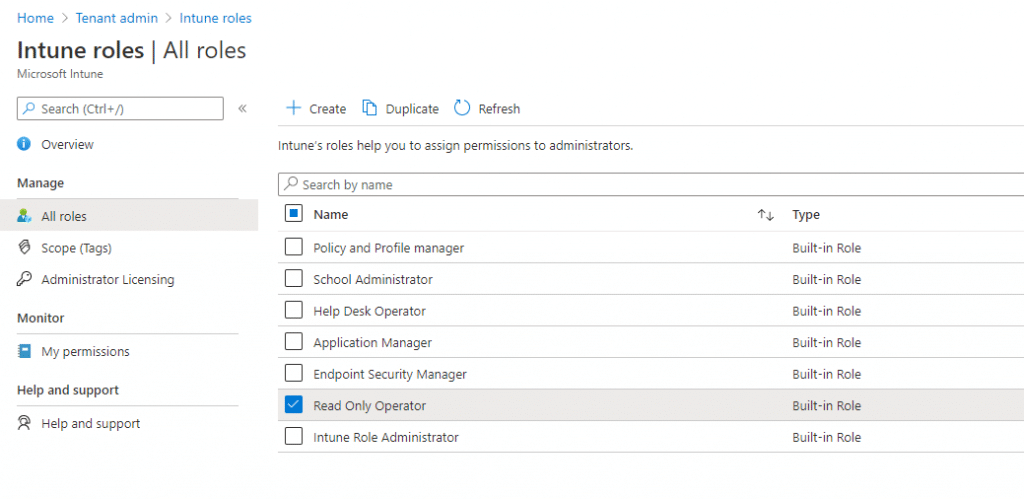
Now we select the corresponding role to the group we created. I am using Read Only Operator as an example. Select the role and click on Assignments – Assign.

Select the corresponding pim enabled group under the Admin Groups tab.

We do want this role to be Read Only for all of Intune, so lets select All Users and Devices under Scope Groups.
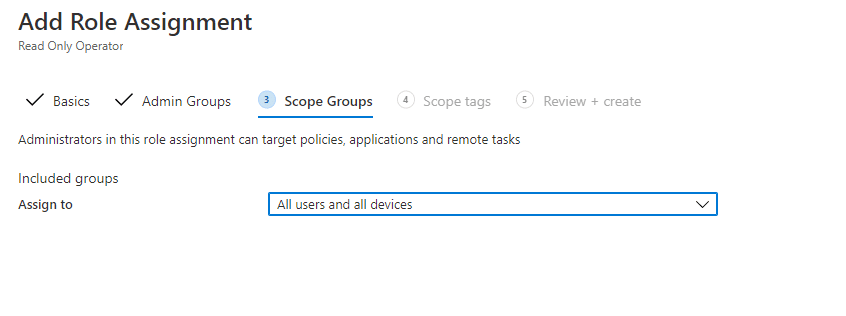
I don’t use scope groups, but that could also be used here. For now click Next on the Scope tags tab. On the review and create tab you can verify your settings.
Add your users as Eligible members of the group
Our group now includes this role and we can assign users to the and they will automatically get the role applied. We are using PIM to assign users as eligible to this group. Go to privileged identity management in the portal. https://endpoint.microsoft.com/#blade/Microsoft_Azure_PIMCommon/CommonMenuBlade/aadgroup This should now show our group that we created earlier.
Click on the group to go and go to Assignments.

Click on Add assignments and select members you want to add. Check settings to verify it is set to Eligible and not Active. Maximum allowed eligible duration is 1 year.

Now the configuration is completed. Lets test this out. Log on to endpoint.microsoft.com with a user you added to the group. The user interface should show that you don’t have access.

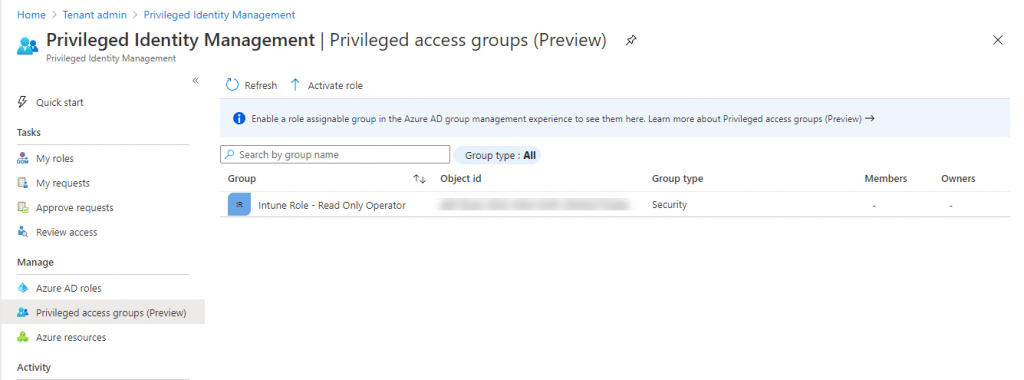
Now go to Tenant Administrator and select Azure AD Privileged Identity Management and click on My roles.

Here you will find Privileged access groups where the user will see what groups is eligible. Click on activate.

Give a reason for your activation (if configured by your PIM admin) and click on Activate. The activation might take some time to complete and the browser windows will refresh when it is done.
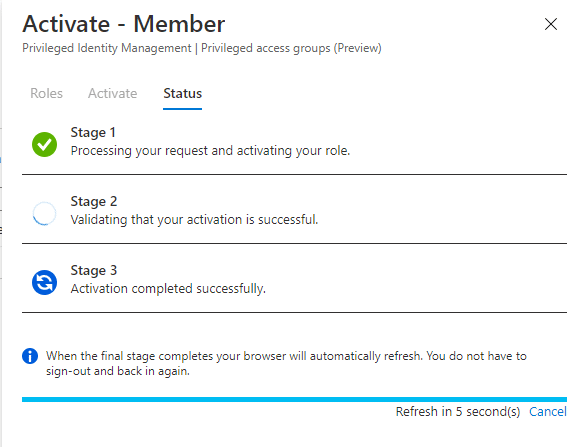
When the process completes the user should be in the group. The user will probably have to log out and log in again to have the role activated in the portal. After logging back in the interface looks like this.

To verify further, go to Tenant Admin – Roles – My Permissions

With this we have PIM capability for the built-in Intune roles. After the current timeslot times out, the user will automatically leave the group and lose the permission/role given. To reactivate, repeat the process.
References on docs
- Management capabilities for privileged access Azure AD groups
- Use cloud groups to manage role assignments in Azure Active Directory
- Role-based access control (RBAC) with Microsoft Intune

Jan Ketil Skanke
Jan Ketil is an Enterprise Mobility MVP since 2016 and are working as a COO and Principal Cloud Architect at CloudWay in Norway. He has been in the industry for more than 20 years working for both Microsoft Partners and Microsoft. He loves to speak about anything around Enterprise Mobility and Secure Productivity. He is also the lead for the community conference Experts Live Norway. Jan Ketil has presented at large industry conferences like Microsoft Ignite, Microsoft Ignite The Tour, Microsoft Inspire, Experts Live Europe, Techmentor HQ (3rd best session 2019) and NIC Conference in Oslo.
Cancel reply
Save my name, email, and website in this browser for the next time I comment.
Great post, thanks. One issue I have is doing it this way does not the display the optiont o make the activation/eligibility permeant. Doing PIM role assignments through PIM directly allows for this, doing it through Intune does not.
Is it possible to use PIM with the Intune role assignment directly through PIM so I can get the permanent option?
The reason for doing it like this is that Intune Roles does not directly support PIM.
You may also like

Intune App Factory – Fix Could not fetch access token for Azure
Intune App Factory was originally developed and instructions for how to set it up were written when Azure DevOps didn’t support Managed Identities or Workload identity federation. However, recently, users of...
Autopilot & The Perceived Tenant Security Risk
Recently there have been concerns raised around Autopilot methods being used to side step security measures, and even leave organisations vulnerable to rogue onboarding of devices with no security sanity check measures...
2 for 1 – Mail enable unlicensed admin mail accounts – 2024 edition
Are you looking to cut mailbox licensing costs for your Office 365 tenants admin mail accounts? Well, look no further, and I will share a few ways for you to save money on Exchange Online licensing fees for your admin...
Copyright © 2024. Created by MSEndpointMgr. Powered by WordPress
- YouTube – Jungling the Cloud
- Intune App Factory
- Intune Debug Toolkit
- CloudLAPS Community Edition
- Modern Driver Management
- Modern BIOS Management
- ConfigMgr OSD FrontEnd
- ConfigMgr WebService
- ConfigMgr Prerequisites Tool
- Driver Automation Tool
- Console Extension
- Active Directory (5)
- AdminService (1)
- Android (11)
- App Protection Policies (8)
- App Registration (2)
- Application Management (32)
- Automation (33)
- Autopilot (15)
- Azure Active Directory (10)
- Azure AD (33)
- Azure AD Application Proxy (3)
- Azure AD Connect (7)
- Azure Automation (14)
- Azure MFA (4)
- Azure Monitor (4)
- Azure Services (5)
- AzureAD (7)
- AzureAD Identity (10)
- Boot Image (4)
- Certificate Distribution (11)
- Cloud Attach (1)
- Cloud Management Gateway (9)
- Co-management (6)
- Compliance Settings (9)
- Conditional Accesss (4)
- ConfigMgr (322)
- ConfigMgr Current Branch (4)
- Console Extension (5)
- Deployment (3)
- Desktop Analytics (1)
- Discovery Methods (2)
- Endpoint Analytics (7)
- Endpoint Protection (4)
- Exchange (1)
- Featured Posts (6)
- Graph API (13)
- Group Policy (2)
- Hybrid Azure AD Join (7)
- Hybrid Exchange (1)
- Hyper-V (2)
- Identity (18)
- Intune (132)
- Intune App Wrapper Tool (2)
- Intune Graph API (10)
- Jamf Pro (2)
- Log Analytics (12)
- Mac Enrollment (1)
- Microsoft Defender (4)
- Microsoft Defender ATP (2)
- Microsoft Endpoint Manager (25)
- Microsoft Graph (4)
- Microsoft Planner (1)
- Microsoft Teams (3)
- Modern Driver Management (10)
- Modern Management (17)
- Office 365 (11)
- Office 365 Pro Plus (3)
- Offline Image Servicing (7)
- Operating System Deployment (74)
- PowerBI (3)
- PowerShell (164)
- Proactive Remediations (9)
- QuickTip (2)
- Remote Access (1)
- Remote Desktop (2)
- Reporting (24)
- Role Based Administration (3)
- Security (19)
- Software Center (4)
- Software Updates (23)
- Solutions (1)
- Sponsored Post (8)
- SQL Server (11)
- Status Message Query (1)
- Task Sequence (15)
- Third-Party Software Updates (1)
- Troubleshooting (1)
- Uncategorized (14)
- Updates and Servicing (1)
- Win32 Apps (9)
- Windows (9)
- Windows 10 (82)
- Windows 11 (2)
- Windows 365 (1)
- Windows ADK (1)
- Windows as a Service (5)
- Windows Server (3)
MSEndpointMgr.com use cookies to ensure that we give you the best experience on our website.
Stefanos Cloud
How to manage Microsoft 365 user role assignments and administrative units
- Role assignments
- Administrative Units
This article provides guidance on how to manage Microsoft 365 user role assignments and administrative units. The article is also available on my podcast and Youtube channel .
View this article as a how-to video on Youtube.
You need to manage existing user roles, create new custom user roles and assign users and groups to existing roles in Microsoft 365 . You need to also manage Microsoft 365 administrative units.
In this how-to article, we will show you how to manage Microsoft 365 user role assignments and administrative units.
Role assignments #
From within the Microsoft 365 Admin Center portal, you can assign Azure AD built-in roles to users who need access to other admin centers and resources in Azure Active Directory, such as users, groups, and apps which use Microsoft Graph API. The following groups of user role assignments can be made from the Admin Center portal.
- Azure AD role assignments
- Exchange Online role assignments
- Intune role assignments

In the next steps, we will show you how to assign the Global Administrator Azure AD role to a user and group. Follow the steps below to assign the Global Administrator role to a user or group.
- Navigate to https://admin.microsoft.com and authenticate as a global admin user.
- On the left pane, expand the "Roles" section and click on "Role assignments". On the main section click on the "Global Administrator" role. On the popup form on the right, you should be able to review the general properties of the role in question. On the permissions tab, the system lists details of the permissions which are assigned with the role in question.
- On the "Assigned" tab, you can assign users or groups to the role in question. Click on "Add Users" and then "Add Groups" to add a user and group respectively to the specific role.
- To run the Azure portal as a specific Azure AD user role, tick on the checkbox next to the role and click "Run As". This will show you the view of the Azure portal as if you had logged in via a user with the role in question.
- To compare permissions of user roles, tick on two or more roles and then click on "Compare Roles". In the next screen, you should see a tabular comparison of the permissions assigned to each of the compared roles. You can also click on "Export comparison" to export the comparison matrix of the selected roles.
In the next steps, we will show you how to assign the Organization Management Exchange Online role to a user and group, as well as how to create a new custom Exchange Online role. Follow the steps below.
- Navigate to the "Exchange" tab under the "Role Assignments" section.
- Click on the "Organization Management" role. On the popup form on the right, you can review the general settings of the role under the "general" tab. Under the "Permissions" tab, you can review in detail the available permissions of the role in question.
- Under the "Assigned" tab, you can assign a user or group to the role in question. Click "Add" and choose the user or group to assign to the role.
- You can also create a custom Exchange Online role by ticking the checkbox next to the role which will be used as the template for the new role. Then click on "Copy role group". This will take you to a wizard to create your new custom role. On the "Set up the basics" page, fill-in the name, description and write scope of the new role and click Next.
- Select the roles to add to the new custom role group. Roles define the scope of the tasks that the members assigned to this role group have permission to manage.
- Select the users to assign to this role group. They'll have permissions to manage the roles that you assigned in the previous step.
- Review your selections and click Finish.
In the next steps, we will show you how to assign Intune roles. Assign Intune roles to specialists who need to view or manage Intune data, devices, or services. These roles can only be assigned to users who have a license that includes Intune. Follow the steps below.
- Under the "Role assignments" section, navigate to the "Intune" tab. If you need to export existing assignments, click on the "Export assignments" button.
- Click on the Intune role you wish to edit assignments of. On the "General tab" you can review the general settings of the role in question. On the "Permissions" tab you can see in detail all permissions of the role in question.
- To assign users to the Intune role, under the "Assigned" tab click on "Add". This will take you to the "Set up the basics" wizard. Fill-in a name and description and click Next.
- Select the security groups that contain the users you want to become admins for the role. Click Next.
- Select a built-in security group like 'All users', or search for and select security groups which contain the users and devices that the Intune role can manage.
- You can optionally add tabs which limit the specific Intune policies, apps and devices that the admins can see. Click "Next".
- Review all your assignment settings and click "Finish".
Administrative Units #
Now we will move on to show you how to create and manage Microsoft 365 Administrative Units. Units let you sub-divide your organization into any unit that you want, and then assign specific administrators that can only manage that unit. For example, you can assign the Helpdesk Administrator role to a regional support specialist, so they can manage users only in that region.

Carry out the following steps:
- Under the "Roles" section, click on "Administrative Units". Click on "Add Unit" to add a new administrative unit.
- Provide a name and Description of the new administrative unit and click "Next". Administrative units let you limit admins to manage users for a specific department, region, or any segment that your organization defines. Start by giving the administrative unit a name and description that will let other admins know its purpose.
- Choose "Add up to 20 users and groups" or "Upload users" if you need to bulk upload a large number of users to be linked to the new administrative unit. If you choose "Add up to 20 users and groups", then click on "Add Users" or "Add Groups" to add the desired users to the administrative unit and click Next. The administrators assigned to this unit will manage the settings for these users and groups. Adding groups doesn't add users to the unit, it lets the assigned admins manage group settings. You can only add up to 20 members individually or you can bulk upload up to 200 users. If you need to add more, you can edit this unit to add them.
- Assign admins to scoped roles. The following roles are the only roles that support administrative units. Authentication Administrator Cloud Device Administrator Groups Administrator Helpdesk Administrator License Administrator Password Administrator SharePoint Administrator Teams Administrator Teams Device Administrator User Administrator.
Select a role and then assign admins to it. The admins that you assign to roles in this step will manage the members of this administrative unit.
- Review your selections and click "Finish". The new administrative unit has been created. You can always edit its properties by clicking on the Administrative Unit name. From that page you can edit the administrative unit's members and role assignments.
- You can also edit the name and description of an administrative unit by ticking the checkbox next to the administrative unit name and clicking on "Edit name and description".
What are your Feelings
Share this article :, how can we help.
Powered by BetterDocs
IMAGES
VIDEO
COMMENTS
To create a custom role. In the Microsoft Intune admin center, choose Tenant administration > Roles > All roles > Create. On the Basics page, enter a name and description for the new role, then choose Next. On the Permissions page, choose the permissions you want to use with this role. On the Scope (Tags) page, choose the tags for this role.
Sign in to the Microsoft Intune admin centre. Select Tenant Administration > Roles. Select Custom Role for assignments. Create Custom Roles (Role Base Access Control) in Intune Fig: 10. Assigning custom roles to the admins is a bit different than regular assignments of apps or policies. Now click on Assignments.
4. Scroll down the list and enable your desired Intune role actions. Select your custom Intune role actions. 5. Click Next and script the scope tabs page, then click Create. 6. You will now see your custom Intune role on the roles page. Select the Role to open up the properties. View your custom Intune role.
Start by clicking "+ Assign" in the Assignments for the Helpdesk Operator role. Then, we'll give it a name (1), click Members (2), Add (3) and pick the Contoso Helpdesk for Engineers user group. Save the members with OK. Remember, the members represent your IT staff who have the helpdesk permissions.
Learn how to create custom role assignments in Microsoft Intune and assign them to specific users, so your users can only perform specific admin actions in t...
They can use either one of the built-in roles, or create a custom role as follows: Role Name - Region Admin; Permissions - As per requirements, using the long set of toggles; Assignments - One assignment per region can be created: Assignment Name - Region 1 assignment; Members - Region 1 admin group; Scope (Groups) - Region 1 user group
The assignment is now ready. In this post we created a custom role that allows specific user group to view device information, perform sync actions and upload Autopilot hardware hash. References and documentation: Role-based access control (RBAC) with Microsoft Intune; Create a custom role in Intune; Assign a role to an Intune user
that's where an Intune role assignment to the repective groups (1 st and 2 nd level support) will be sufficient. ... Members of the "gs-aad-apac-intuneoperators" AAD group have now permissions according to the custom Intune role "EMEA operators" role over all Intune objects which have the "EMEA" scope tag assigned.
Assign the role to a group. Before your security operator can use the new permissions, you must assign the role to a group that contains the security user. In Intune, choose Roles > All roles > Security operations. Under Intune roles, choose Assignments > Assign. In the Assignment name box, enter Sec ops. Choose Member (Groups) > Add.
Navigate to Tenant administration > Roles > All roles. Click on Create and select Intune role from the appeared options. Configure Intune RBAC for Windows Autopilot Role Fig.1. On the Basics page, enter a name and description for the custom role, then choose Next. Configure Intune RBAC for Windows Autopilot Role Fig.2.
How to Create Intune Roles and Assign Permissions to the Roles@alientechchampion #intune #intunetraining #microsoft #microsoft365 #intune #samsung #apple #an...
In addition to roles, a key component in RBAC is the application of scopes. A role only defines what a member of that role is allowed to do within Intune, but you may also want to limit the policies or devices that the user is allowed to see or change. ... It begins with selecting a role or creating a custom role. Next, an assignment of the ...
On the Admin Groups page, click on Add groups and select the AAD group you created for LAPS administrators. On the Scope Groups, select All Devices and click on Next. On the Review + create page, review the settings and click on Create. The Intune rbac roles assignment steps are now completed.
Requirement for this setup up is that you have Azure AD Premium P2 license and you have onboarded to Azure AD Privileged Identity Management. The steps we need to get this working is as follows: Create a role assignable group for the role in question. Bring the group into Privileged Identity Management (PIM) Assign the group to the role in Intune.
Follow the steps below to assign the Global Administrator role to a user or group. Navigate to https://admin.microsoft.com and authenticate as a global admin user. On the left pane, expand the "Roles" section and click on "Role assignments". On the main section click on the "Global Administrator" role.
How to create an Intune RBAC role assignment in PowerShell with the Scopetag? I would like to find a way to automate creating Intune role assignments using PowerShell. New-IntuneRoleAssignment in Microsoft.Graph.Intune seems to be able to do this, but there is no parameter for specifying a scopeTag.
Custom Role 1: Devices-Read (Permissions to read devices, read config profiles etc.) Role Assignment added with members "IT-Techs", scoped to "HR-Windows" and HR scope tag. Custom Role 2: Devices-Update (Same as above but some additional update permissions) Role Assignment added with members "IT-Techs", scoped to "Finance-Windows" and Finance ...