How to Record a Presentation with Webcam, Narration, and More

Everyone has, at some point, put a load of time and effort into creating the perfect PowerPoint presentation, only to use it once or twice. But isn’t it a shame for all that hard work to be discarded so quickly? Is every slide deck destined for deletion after just a couple of uses?
Isn’t there a better way to make the most out of your presentations? Well, yes. Yes, there is.
Rather than simply creating and presenting your work once or twice, recording your presentations can give them a new lease of life. Whether it’s a data report or a self-recorded PowerPoint, you can record a presentation in real-time, or in advance to make it available on-demand.
In this guide, we’ll explore two distinct ways of recording your presentation. First, we’ll discuss how to record a presentation from PowerPoint with audio and webcam, and then we’ll look at how to turn your .ppt slides into a video.

Benefits of Recording a Presentation
As well as there being many different ways to record a presentation, there are also many benefits of recording them. So, before we show you the ‘how,’ let’s talk about the ‘why.’
- Encouraging asynchronous communication : One key benefit is fostering asynchronous communication . By recording presentations, you’re letting your audience engage with the content in their own time, breaking the constraints of time zones and scheduling conflicts. This also ensures your viewers can absorb information at their own pace, and revisit it as needed.
- Boosting SEO : You can use your presentation to create a YouTube video and share it on your website to increase your online visibility and attract prospective customers. This can be a great way to expand your audience, increase web traffic, and establish yourself as an expert in your field.
- Perfecting your presentation : Whether it’s in-person or over Zoom, you don’t get second chances with live presentations. However, a pre-recorded keynote lets you perfect the content and the narration before anyone sees it. This is a great way to combat stage fright while honing your presentation skills and building confidence.
With this in mind, turning your slides into a video is a no-brainer. It’s an easy way to grow your audience and make the information you’re sharing more accessible and easier to digest.
Record your presentation today!
Download a free trial of Snagit to quickly and easily record your presentation.
How to record your presentation (with Snagit)
Depending on your audience and the type of presentation you need to deliver, TechSmith’s Snagit could just be the perfect tool for recording your PowerPoint. With its user-friendly interface and advanced features, Snagit is ideal for capturing top-notch presentation videos, in just a few clicks.
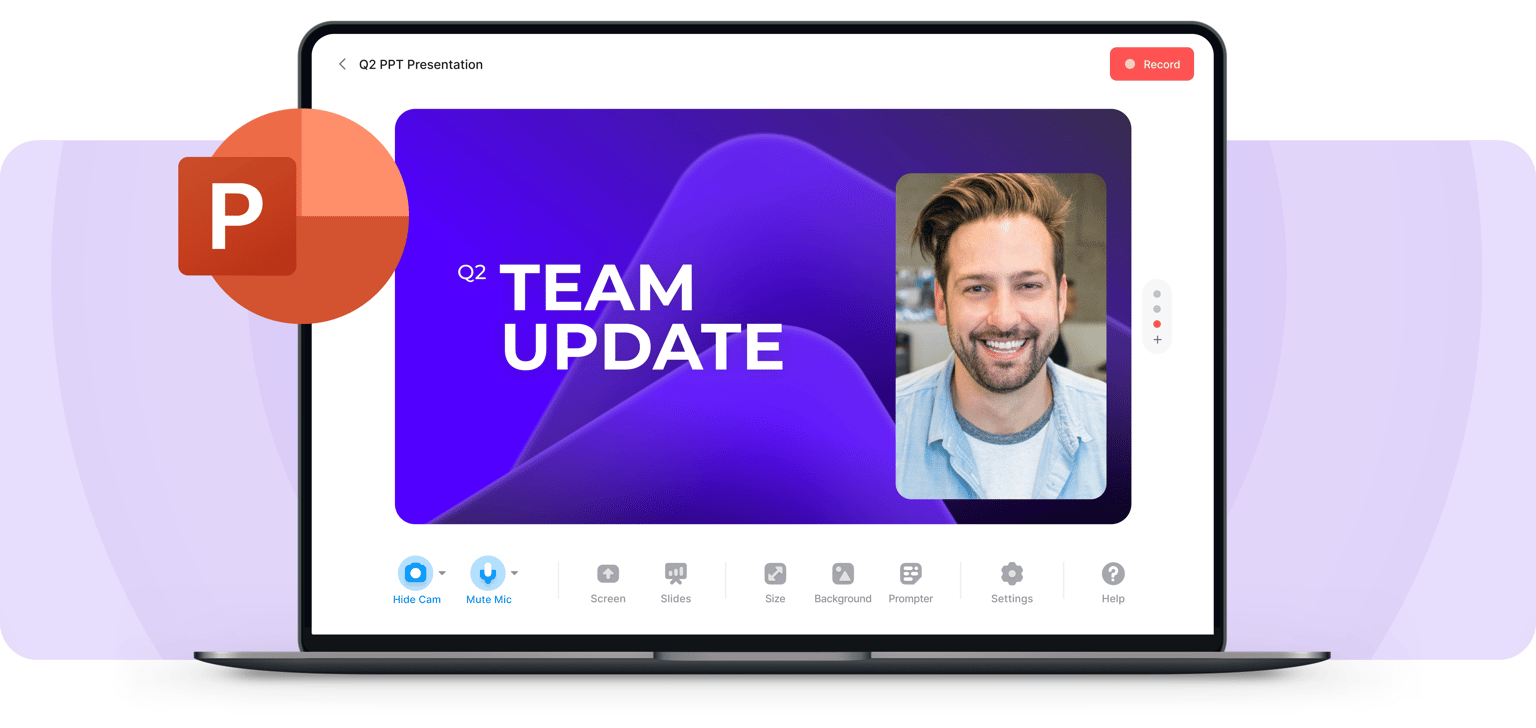
Now, there’s no denying that presentations are better when you can see the presenter… Fortunately, Snagit lets you capture your screen and webcam at the same time to create a Picture-in-Picture video.
In this section, we’ll guide you through the steps to record your presentation and webcam with Snagit.
Step 1: Open video capture
First, open Snagit and navigate to the Capture window. Select the Video tab, and start by clicking the big red Capture button.
Step 2: Select a recording area
Next, you’ll be prompted to choose which parts of your screen you want to record. Use Snagit’s orange crosshairs to select a specific region, window, or your entire screen.
Step 3: Configure recording settings
With the Video Recording toolbar, you can set options like Cursor Capture and Effects, System Audio, and Webcam.
If your webcam isn’t showing, click on the webcam icon. If you have an external webcam, select the one you want to use by clicking the dropdown arrow next to the webcam icon.
Step 4: Adjust your webcam
Next, adjust your webcam options to ensure your Picture-in-Picture recording looks how you want it. Here you can change the Picture-in-Picture placement as well as the shape and size of your webcam recording. You can even toggle between Picture-in-Picture and fullscreen webcam modes as you like.
The best part? You can make these adjustments even while recording.
Step 5: Manage recording
When you’re ready to roll, hit the Record button and click the Stop button when you’re finished. It’s that simple!
And remember, if there’s an interruption (like an unexpected visit from the mailman), just hit Pause. It’s okay to take a break — your video won’t be ruined by a little interruption.
Step 6: Edit your video
Once you’ve finished recording, Snagit will automatically open your video in the Snagit Editor, which is super easy to use. From here, you can make light edits to the footage as needed.
For example, if you need to cut or trim your footage , you can! Here’s how:
- Set Start Point : Drag the Start handle (green) on the timeline to your desired starting point.
- Set End Point : Similarly, drag the End handle (red) to where you want to end the cut.
- Review the Segment : Before making any cuts, you can review the segment by dragging the Playhead (white) left and right across the timeline. This ensures you’re only cutting the footage you intend to.
- Make the Cut : Once you’re satisfied with the selection, click the Cut button, which will pop up once you’ve made a selection.
And that’s all there is to it! If you want to go the extra mile, you can also use Snagit to save individual frames of your video as images , which can be used to create a thumbnail for your video .
How to record a presentation from PowerPoint with audio and webcam
Now, Snagit is great for recording less formal videos in a flash, but if your presentation is intended for a particularly large or important audience, you might be looking to create something more polished. This is where TechSmith’s Camtasia comes in.
Camtasia is one of the smartest and most intuitive pieces of editing software out there, but it also makes for a pretty nifty screen recorder too. Camtasia is great for recording presentations when you need more control and editing powers over the final product.
But best of all, Camtasia streamlines the process by letting you record your presentation and voice over directly within PowerPoint.
Step 1: Set up your presentation video recording
If you’re a Windows user, you’ll have the option to include a PowerPoint Add-in Toolbar when you install Camtasia. While this feature isn’t currently available on MacOS, the Camtasia Add-in Toolbar allows you to start, stop, and control your recordings from within PowerPoint — so you don’t need to switch between applications.

Just open the presentation you want to record and locate the Add-in toolbar under the Add-ins tab.
Don’t see the add-in toolbar? Go to File > Options > Add-ins, to enable it. Click on the Manage drop-down, select Disabled Items, then click Go. If the Camtasia Add-in is listed, select it, and click Enable.
If you’re an Apple user, don’t panic! You can still record your screen (with audio) on a Mac using Camtasia, and it’s just as easy. Alternatively, you can skip ahead to the next section and import your slides directly into Camtasia.
Step 2: Customize your recording options
Now let’s walk through each of the options on the toolbar before we begin recording.

Record audio
The microphone button controls whether or not audio is recorded as part of your presentation. When you enable it, you’ll be able to record your narration using a microphone.
If you are planning to record audio, this is where you’ll select your microphone. If you want to record great audio , we suggest using an external microphone, rather than the one that’s built into your laptop.
Some of the best microphones for recording video are likely to be less expensive than you think. But, if you’re on a shoestring budget, even the mic that’s built into your headphones could produce better audio than your laptop.
Once you’re set up, be sure to test the mic and adjust the volume slider as needed. You’ll also need to decide whether or not to record your system audio, which is any sound that comes out of your speakers, such as email notifications.
Record webcam
If you have a webcam, you can also record your camera during the presentation to create a Picture-in-Picture clip — just as you can with Snagit!

To customize even more of the recording settings, click the Recording Options button. Here you’ll find settings that let you record with a watermark and adjust your video frame rate . There are a few more options too, but the default settings should work just fine.
When you’re ready, click OK to close this window and save any changes made.
Step 3: Record your presentation
The final step is as simple as clicking the Record button in the toolbar. This will launch your slides into the Presentation Mode and start recording.
When you exit Presentation Mode or reach the end of your slideshow, you can either continue recording your screen, or stop recording and save your file. Pretty easy right?
Before you get started, let us show you another way to turn your presentation into a video, without recording your desktop .
How to turn your PowerPoint presentation slides into a video
Another way to create a video from your presentation is to import your PowerPoint slides into Camtasia. This way you can adjust how long each slide appears on screen, as well as add Behaviors and Annotations to personalize your presentation and highlight important information.
By importing your slides into Camtasia, and recording your voice over separately, you get a lot more flexibility with the editing process, which means you have more control over the finished article.
If you do decide to record your audio separately, you might want to take a look at TechSmith’s Audiate . This advanced audio recorder will transcribe your voice over in real-time and let you edit the audio file as if it were a text-based document. We don’t want to brag, but it’s probably the best way to add a voice over to a PowerPoint .
Regardless of how you decide to narrate your PowerPoint, here’s how to turn your presentation into a video:
1. Import your PowerPoint slides
First, start by importing your PowerPoint slides directly into Camtasia. Once your media is imported, you can edit it by dragging your slides into the Editing Toolbar.

You can now add the images to the Timeline, and edit them like any other media in a Project.

If you drag your slides to the Timeline, the slides will be placed in the order of the presentation, each with a default 5-second duration.

With your presentation on the timeline, use Ripple Move to create space in between slides to adjust the timing of each one. To do this, hold shift, then click and drag.

Once you’ve imported your slides and adjusted the duration of each one to correlate with your voice over, it’s time to start editing.
How to edit a presentation video (in Camtasia)
Add behaviors.
Firstly, add some visual interest with Camtasia Behaviors . A Behavior is an animation that brings movement to your slides, making them stand out on screen. This is a great way to bring parts of your presentation to life and take it from ordinary to extraordinary — because nobody likes a boring presentation .
To add a Behavior, click and drag the Behavior you wish to use onto the slide you want to animate. Once added, you can adjust the Behavior using the Properties tab.
Add annotations
Another good way to grab and direct your audience’s attention is to add some Annotations, which are great for highlighting important information.
To insert an Annotation, click the Annotation tab on the left side of the screen and drag it into the designated slide. You can then re-position and edit the Annotation in the Properties tab as needed.
Recording a PowerPoint Presentation, the FAQs
Absolutely! Both Snagit and Camtasia are excellent choices for recording a professional and polished presentation. Snagit is perfect for no-fuss recording and editing. If you require more sophisticated editing capabilities, Camtasia is the ideal choice, offering the added convenience of recording your slideshow and voice over directly within PowerPoint.
Click the Record button in the toolbar to launch your slides into the Presentation Mode and start recording. When you exit Presentation Mode or reach the end of your slideshow, you can either continue recording your screen or stop and save your file.
If you’re planning to record audio, select your microphone in the recording options. The microphone button controls whether or not audio is recorded as part of your presentation. If you have a webcam attached to your computer, you can also record your camera to create a Picture-in-Picture clip, perfect for showing the presenter during the presentation.
With Snagit, you can conveniently record your voice over as you go through your presentation, capturing both the audio and visuals in one go. If you’re looking for more advanced recording and editing options, you might also consider using Camtasia, which allows you to record your voice over while presenting. For even more control, use Audiate to record your audio separately and then import it into Camtasia for fine-tuning.

Justin Simon
Global Content Strategy Manager at TechSmith. I play a lot of golf and watch a lot of football.
- How To Rotate a Video
- How to Write A Shot List That Will Transform Your Video
- YouTube vs. Vimeo: What’s the Difference?
Subscribe to TechSmith’s Newsletter
Join over 200,000 people who get actionable tips and expert advice every month in the TechSmith Newsletter.
TechRepublic
Account information.

Share with Your Friends
How to Record a Video Presentation With Google Slides
Your email has been sent

Google Slides now lets you record a presentation with inset video from your webcam. Each recording may be a maximum of 30 minutes long. No longer do you need to turn to a third-party tool or web meeting app, such as Google Meet , to record a presentation. Instead, you can start and finish the task with nothing more than Google Slides on a laptop.
As of March 2024, slide recordings may be made by customers who use Google Workspace Business Standard or Plus; Enterprise Starter, Essentials, Essentials Plus, Standard or Plus; and Education Plus editions.
How to make a basic slide recording in Google Slides
To create a slide recording, you’ll need to use Google Chrome on a computer that has a camera and microphone.
- Go to Google Slides and open your presentation.
- Select the Rec button in the upper right area, then select the Record new video button ( Figure A ).
The system will switch to the screen recording interface, with recording controls displayed below your slides. By default, the system will display your inset (picture-in-picture) video in medium size in the lower right corner of a slide, since this portion of a slide is often empty.

- Optionally, before you start recording, you might adjust three settings:

- Modify the size of the inset video frame. Select the size icon, found to the right of the video inset location icon, then choose either a small, medium or large video frame size.
- Open speaker notes with the button found to the immediate left of the back slide (<) icon. This will display speaker notes for your reference while recording. (Ideally, you would not need to refer to speaker notes, so that you could instead look directly at the camera as you record.)
- When you are ready to record, select the large red button at the bottom of the screen.
- If prompted, you may need to allow access ( Figure C ) to the tab, along with the camera and microphone. For example, when recording on a Chromebook, you may be prompted to “Allow docs.google.com to see this tab?” and “Also allow tab audio.” Select Allow, if prompted.

In a few cases, you may need to visit the following links in Chrome to adjust permissions for:
- Camera: chrome://settings/content/camera.
- Microphone: chrome://settings/content/microphone.
- A brief countdown should display (i.e., 3, 2, 1), then your recording will begin. Record your video, advancing your slides as desired.
- To pause recording, press the large red button at the bottom of the screen.
- Once paused, you may select from two options ( Figure D ):

After you select Save to Drive, wait a bit until the system indicates the file has been saved. If you leave or close the tab too soon, you may lose your recording.
How to select inset video shapes and sizes
On any slide, you may use the Insert | Speaker spotlight option ( Figure E ), then select a shaped video frame. This inserts a frame where the speaker video will display on that slide. You may reposition or resize the frame: Select the shape, and then drag-and-drop it to move it to a different place on your slide, or select a corner and drag it to resize it.

When you insert a speaker spotlight shape, that supplants the position and size you might have selected on a basic recording. In other words, the speaker’s video will display in one of the corners or the center, and in the small, medium or large shape chosen with the settings — unless you’ve inserted a speaker spotlight shape on a page ( Figure F ). Use the speaker spotlight option to convey the most polished professional effect, since it allows precise control over the shape, size and location of a video frame.

How to play, share and manage slide recordings
You may access slide recordings within Google Slides on a computer. However, unlike recording, which requires you to use Google Chrome, you may access and play existing recordings within Google Slides on a variety of modern browsers. For example, the following steps all work when you use Google Slides within either Google Chrome or Apple’s Safari browser.
To access recordings associated with a Google Slides presentation, follow these steps.
- Select the Rec button in the upper right area. The recordings you’ve made of the presentations will display. Importantly, the system shows both the date and duration of each recording.
- To view, share or download a recording, click anywhere on the playback icon or title of the recording ( Figure G ). It should open in a new tab. Within this tab, you might:
- Select the Play icon in the center of the video image to play the recording.
- Select the Share button in the upper right corner of the screen to modify access settings and give other people access to the file.
- Select the Download icon in the down arrow above a tray icon in the upper right area of the screen to download the file.

- Select the three dot menu to the right of a listed recording to:
- Rename a file something other than the default recording title.
- Remove a previously made recording you no longer need.
- Copy link and obtain the Google Drive URL for the recorded file.
All Google Slides recordings are stored in a Slides recordings folder on Google Drive. The recordings are saved as .webm files, which is a widely supported web video format. You may easily open and play .webm files on both Apple and Android mobile phones. Any recordings you make using Google Slides should be easy to view on almost any device.
Does the ability to record a presentation within Google Slides streamline your workflow? What sorts of video presentations will you create with this new capability? Mention or message me on X ( @awolber ) to let me know how you use screen recording within Google Slides.
Subscribe to the Google Weekly Newsletter
Learn how to get the most out of Google Docs, Google Cloud Platform, Google Apps, Chrome OS, and all the other Google products used in business environments. Delivered Fridays
- How to share video with Google Sites
- How to present Google Slides in Google Meet
- Prezi announces Google Slides integration
- Google Meet: A cheat sheet to the app and platform features
- Google Meet: 3 presenter controls for smoother presentations
- Best software for businesses and end users

Create a TechRepublic Account
Get the web's best business technology news, tutorials, reviews, trends, and analysis—in your inbox. Let's start with the basics.
* - indicates required fields
Sign in to TechRepublic
Lost your password? Request a new password
Reset Password
Please enter your email adress. You will receive an email message with instructions on how to reset your password.
Check your email for a password reset link. If you didn't receive an email don't forgot to check your spam folder, otherwise contact support .
Welcome. Tell us a little bit about you.
This will help us provide you with customized content.
Want to receive more TechRepublic news?
You're all set.
Thanks for signing up! Keep an eye out for a confirmation email from our team. To ensure any newsletters you subscribed to hit your inbox, make sure to add [email protected] to your contacts list.
Home Blog PowerPoint Tutorials How to Record a Presentation in PowerPoint
How to Record a Presentation in PowerPoint

Recording PowerPoint presentations can have several benefits. They can serve as recordings of a session that can be uploaded online, shared with participants who might not be able to attend a presentation session, or used as tutorials for passing on instructions.
How to Record a PowerPoint Presentation
PowerPoint provides multiple options for initiating recording for a presentation. You can also choose to record audio and yourself presenting the slides using your camera. When recording your presentations, you can choose PowerPoint templates or something minimalist made by you to record the session. Just be mindful of the graphics to ensure the video does not appear overpowering to the viewer.
How do I Record a PowerPoint Presentation as a Video?
You can start recording your presentation using the following method.
- Record Tab: To record a PowerPoint presentation, go to the Record tab and select whether you wish to record from the beginning, from the current slide, a specific area on the screen, or record audio.
- Slide Show Tab: you can also initiate recording a PPT via Slide Show -> Record to initiate recording from the current slide or the beginning of your presentation.
Record Button: If you’re using the latest version of PowerPoint, you can start Recording your presentation from the current slide via the Record button in the top right corner.

Record from the Current Slide or Beginning of the Presentation
Starting your recording from the beginning of the current slide will open your presentation in recording mode. Hit Record to start the recording.

Screen Recording in PowerPoint
If you initiate screen recording in PowerPoint, you can start recording a screencast by selecting the area you wish to record. This is similar to recording a PowerPoint presentation as a video, with the added advantage of recording other parts of your desktop. This method can also be used for recording a screencast, even if you’re not using a PowerPoint presentation in your video recording.
To start the recording, click Record or use the Windows+SHIFT+R hotkey. To stop the screen recording, click Pause to temporarily halt the recording to resume later or Stop or the Windows+SHIFT+Q hotkey to end the recording session.

The recorded video will be instantly added to your slide once you click Stop .

Record Audio
Another option in the Record tab in PowerPoint is to record audio narrations for your PowerPoint presentation. Simply click Record to start, Pause to temporarily halt, and Stop to stop the recording process.

Once the recording stops, the audio will be added to your PowerPoint presentation.

How can I Annotate Slides in PowerPoint During a Recording?
Once you enter recording mode, you can start annotating your slides using the Pen or Highlighter tool. Other tools in the menu include a Laser pointer and Eraser.

How can I Record a PowerPoint Presentation with Audio?
To enable audio for your Powerpoint recording, unmute the mic from the audio icon on top, CTRL+M hotkey, or click the three dots ( More options for recording menu), followed by the Microphone to select the audio device for recording. You can only record audio if an audio device is connected to your computer. This is a fairly simple process, unlike other presentation platforms. For example, in an earlier article, we showed you how to do a voiceover on Google Slides , which entails a slightly more elaborate process.

How to Record Yourself Presenting a PowerPoint?
Enable the camera during a recording session.
Like turning on audio, you can toggle the camera on or off using the icon on top. The camera input device can also be selected via the Camera option or CTRL+K hotkey, which can be revealed via the three dots from the top menu.

Insert Video Recording in a Slide using Cameo
PowerPoint’s Cameo feature enables recording a video to insert in a slide. You can use the feature to quickly insert a video message in your slides that can be played during a presentation session. This option might also be relevant if you intend to convert PowerPoint to video . If you are looking how to video record yourself presenting a PowerPoint, then follow the steps below.

Once Cameo is turned on, you can also choose to stylize the camera shape, style, border, and add effects. Cameo is quite a unique feature in PowerPoint that currently does not have alternatives in rival presentation apps. For example, you cannot use a similar feature if you wish to convert Google Slides to video .

How to Save Recording for a PowerPoint Presentation?
After you have completed your recording, click Export to save the presentation recording.

You can customize your recording settings via Customize Export or continue the process via Export Video .

Using the Customize Export option, you can choose between a desired output quality for your video, including Ultra HD (4K), Full HD (1080p), HD (720p), and Standard (480p).

Other options in the menu include the ability to choose and preview timings and narrations.

After you are satisfied with your recording settings, you can export your presentation to video.

The video recording of your PowerPoint presentation can be played using any standard video player. The video can also be embedded in PowerPoint slides, uploaded online, such as to a YouTube channel, or shared via cloud storage apps like Dropbox, Box, OneDrive, etc.

Final Words
Recording a PowerPoint presentation can provide a record of a session that might be required for further sharing. The best way to record a presentation is to ensure that your slides aren’t visually overpowering, your audio is clear and audible, and if using a camera, the cam input isn’t hazy, grainy, or too dark.
Once you are familiar with how to record a presentation on PowerPoint, it might take a bit of practice to make your video recording look professional and crisp. It’s best to practice your sessions before recording them until you can seamlessly record presentation decks.

Like this article? Please share
PowerPoint Addins, PowerPoint Tips, Presentation Tips, Presentations, Screencasts Filed under PowerPoint Tutorials
Related Articles

Filed under Google Slides Tutorials • March 22nd, 2024
How to Share a Google Slides Presentation
Optimize your presentation delivery as we explore how to share a Google Slides presentation. A must-read for traveling presenters.

Filed under PowerPoint Tutorials • March 19th, 2024
How to Change Line Spacing in PowerPoint
Adjust text formatting by learning how to change line spacing in PowerPoint. Instructions for paragraph indenting included.

Filed under PowerPoint Tutorials • March 12th, 2024
How to Create an Action Button in PowerPoint
Create engaging presentation slides by learning how to make an action button in PowerPoint. Add CTAs to your slides in just minutes.
One Response to “How to Record a Presentation in PowerPoint”
How do I generate webcam option in PowerPoint 2016 ?
Leave a Reply
How-To Geek
How to record your screen with microsoft powerpoint.
You don't need expensive software to record your screen--do it with PowerPoint!
Quick Links
Using powerpoint’s screen recorder, customizing your recording.
If you need to record your screen to demonstrate a process as part of your PowerPoint presentation, you can use the built-in tools to do so. Here’s how to record your screen using PowerPoint.
PowerPoint comes with a built-in, no-nonsense screen recorder. There are a lot of things that PowerPoint’s screen recorder can’t do that more full-featured screen recording software can, but that’s the beauty of it—it’s great for a quick, no-fuss recording.
Related: How to Embed a YouTube Video in PowerPoint
First, open PowerPoint, head to the “Insert” tab, and then click “Screen Recording.”
PowerPoint will minimize, and the screen recording dock will appear at the top of your screen. Here’s where the “simplicity” of PowerPoint’s screen recording feature comes in—you only have five options. By default, PowerPoint will record audio and your cursor. Toggle these options to disable them if you want. When you’re ready to move on, click “Select Area.”
Your pointer will turn into a crosshair. Click and drag to select the area of your screen you want to record.
Next, click the “Record” button in the screen recorder dock.
A three-second countdown will begin. Once it reaches zero, your recording will begin. When you’ve finished recording everything, move your cursor back to the top of the screen where the dock was, and the dock will reappear. Click “Stop.”
Your screen recording will now appear in your PowerPoint slide.
Now that you’ve successfully embedded the recording in your presentation, you might want to adjust a few of the settings. There are a few things you can do here, including trimming the video, setting how the video plays during the presentation, or applying a style to the video’s frame.
Trimming Your Video
There may be a few seconds of your video that you’d like to remove. You can trim these parts out directly in PowerPoint. Right-click the video and select “Trim.”
The “Trim Video” window will appear. Here, click and drag the green and red bars to adjust the start and stop time, respectively. Once you’ve set this up, click “OK.”
Your video will now be trimmed.
Setting Video Playback Rules
You can tell PowerPoint how to play your video during the presentation. To do this, right-click the video and select “Start” from the menu.
A sub-menu will appear, presenting three different playback options:
- In Click Sequence: The video will play in the appropriate order you’ve set in terms of actionable sequences (such as animations).
- Automatically: The video will automatically play when it appears.
- When Clicked On: The video will play when you click on it.
Select the one that works best for you.
Applying Frame Styles
If you want to make your video more visually appealing, you can apply a frame to it. To do so, right-click the video and select “Style” from the menu.
A sub-menu will appear, presenting a large library of frames for your video. Hovering over each one will show a live preview of how the frame will look.
Select the one you like, and it will be applied to your video.
That’s all there is to it!
How to Create Pro-level PowerPoint Videos with Audio
Senior Marketing Manager at Loom

The power of a presentation lies in its ability to educate and inspire.
But why limit access to inspiring ideas because of the time slot in which they were presented? Microsoft PowerPoint, Google Slides, and Keynote slides have become the go-to formats for delivering supporting content to help audiences from classrooms to boardrooms engage with ideas. But once the content is complete, what happens to it?
Getting used to the sound of your own voice can take some time, but the benefits of using Loom to record PowerPoint presentations are worth it.
Depending on the content and intended audience, a few will be published, stored, or made available on a marketplace. However, many will be lost, all your hard work never to be seen again. PowerPoint slides that aren't accompanied by a presentation are incomplete and don't do a sufficient job of expressing the author's ideas.
If you want to get ahead of the curve and preserve the integrity of your hard work, learn how to record a presentation by recording your screen .
Loom is one of the most popular choices for recording a video presentation—and for a good reason. The user interface is straightforward and easy to use. Mastering it requires little effort.
The benefits of presenting a PowerPoint in video
There are several reasons someone would want to learn how to record a PowerPoint presentation. Whether they’re explaining the quarterly statistics in a sales meeting , creating a webinar as a marketing tool , or recording training sessions for onboarding new hires, communicating ideas clearly and succinctly via video becomes more crucial every day.
With Loom, you can engage directly with your audience, allowing you to interact with a large group of people in a small, intimate environment. Let's look at some advantages of knowing how to record slide show presentations and the procedure for doing so.
Scheduled attendance is not guaranteed
Unless your presentation is a mandatory work meeting or you're teaching a paid course, many individuals will drop out before or during the presentation. However, by providing a presentation recording for them, you can still interact with those people, and they’ll feel supported by your accessibility.
Provides on-demand access to your presentation
Using Loom's video recording capabilities, you provide access to your material long after you've presented it. Giving your audience access to resources is one of the best ways to build trust and support.
Enhances your search engine optimization (SEO)
If you don't want to make your recorded presentations available on-demand but want to reap the benefits of SEO-driven traffic, you may post all or part of it on YouTube as a free resource in the future to attract new prospects.
Practice makes perfect
Another reason to learn how to record a presentation is that you can review your work before showing it to a live audience. By recording yourself before a meeting or lecture, you can review the footage to ensure you cover every aspect of the topic, make improvements, and eliminate those pre-performance jitters.
Tips for video recording yourself presenting a PowerPoint
While technology and practice are your two best allies in confidently presenting PowerPoint video presentations, a few extra tips can make yours even more effective and professional. Consider following these best practices:
Choose the right equipment
Video communications technology has flourished in the last few years. There are more options than ever to record presentations and deliver them digitally to a worldwide audience. A tool like Loom makes it easy to record webcam videos, screen captures, and recorded narration quickly and easily. This lets you present your PowerPoint or any other content to a digital audience without extensive and time-consuming video editing.
Include direct-to-camera (DTC) content
Personalization is the heart of every good video—nothing builds a personalized experience like a friendly face. Use a simultaneous webcam and screen capture to record yourself explaining the slides and information on the screen. Adding picture-in-picture DTC elements creates rapport and trust with your audience and ensures they stay engaged with your presentation.
Slide text: Less is more
Text is great for outlining the major themes of a presentation and adding context to discussions, but with a PowerPoint presentation, treat text as the seasoning in a recipe. Use what you need to enhance the experience, but don’t overwhelm.
Build your slides as an outline for each discussion topic and a home for visual elements like charts, infographics, and embedded video clips. But you, as the presenter, should do most of the talking. Building your presentation this way keeps viewers focused and engaged instead of hurrying to keep up with the reading.
Structure your presentation
Well-structured content is vital to the flow and digestibility of your presentation. When building your slides and video script, organize your information similarly to a blog post or an ebook. Start with an introduction to share your personal info and a general topical overview. Create segments that logically lay out each point or step in the process. Wrap things up with a conclusion and (if needed) a call to action that invites the viewer to take the next step—booking a call, downloading a resource, or signing up for a service.
Keep videos concise and skimmable
Digital fatigue is real. With so many videos and messages competing for our attention, creating a streamlined presentation results in longer view duration . The average view duration of a YouTube video may be as short as 40 seconds, with the median watch time averaging just over a minute and a half .
Another trick to increase viewability is to make it easy for viewers to skim. A well-structured presentation offers natural segments to help viewers zero in on the information they need. YouTube offers a Chapters feature that lets you insert a linkable outline so viewers can easily skip to specific timestamps.
Basic recording in PowerPoint
Microsoft offers basic tools to start recording your PowerPoint presentation. Here’s a quick step-by-step guide to recording a simple presentation:
Step 1: From PowerPoint, open the slide with which you want to start your presentation.
Step 2: Select Record from the upper right hand corner of the PowerPoint window.
Step 3: Make sure your recording and voice settings are set properly, then click the round Record button. Begin your presentation.
Step 4: Click through your slide presentation and record your audio. Be sure to pause during slide transitions, as PowerPoint will not record audio during slide changes.
Step 5: Save your finished PowerPoint video to your local device and share it through email or upload it to sharing platforms like Vimeo, YouTube, etc.
An important note: PowerPoint’s native recording features offer some editing and highlight features. You’ll need a screen recorder app like Loom to film direct-to-camera or make substantial edits.
How to use Loom’s presentation recording software
It's simple to record yourself and your screen presentation side-by-side using only your laptop, a built-in camera, a mic, and Loom. Using Loom to record presentations on a computer is a fantastic way to save time and guarantee that your presentation goes precisely as planned. Loom's basic version is free to use and provides users with different options to meet their unique needs best. You may record the material on your screen and even take a video of yourself presenting alongside your screen capture.
Loom is available as a PC screen recorder , Mac screen recorder , iOS screen recorder , and Android screen recorder . The two primary methods are through the Desktop Client or the Chrome Screen Recorder . The desktop versions offer a higher recording resolution (4k compared to 1080p in the Chrome extension) and additional features like camera frames and backgrounds.
In either case, learning to record a presentation is simple with Loom’s easy-to-use presentation recorder. Here’s some information to help you get started.
You can create a Loom account using a variety of methods. Users may log in with their Google account information, or connect their Slack account information, email address, password, and name. You must first complete the registration process to have access to the program.
What is the Loom desktop client, and how can I use it?
Search for Loom in the Windows search box or click the red pinwheel Loom logo to launch the Loom Desktop Client. After you've opened it, choose the type of video recording you wish to make. Cam Only, Screen Only, and Screen + Cam are the three possibilities for the basic Loom version. As their names suggest, Cam Only and Screen Only allow you to record the material on your screen or yourself through a camera. Screen + Cam will enable you to make a presentation recording with both yourself and the information in real time, allowing others to watch your reactions to the material and connect with you as the presenter.
If you wish to record your screen, the presentation recorder has three options for defining the parameters of your video: Full Screen, Window, and Custom Size.
Full Screen captures everything on your monitor or display, allowing others to watch and follow along.
You may use the Window option to record a single computer application if you want to construct a more restricted lesson without interruptions.
Custom Size is exclusively available to Pro account holders, allowing users to build custom windows to capture particular areas of their screen.
To record your Loom videos, use the built-in webcam and microphone on your smartphone or computer or additional devices as needed. Loom recommends using high-quality microphones for better audio.
Using the Loom Google Chrome Extension to capture videos
First, download and install the Loom Google Chrome Extension from the Chrome Web Store. Then launch the extension's user interface by clicking on the red pinwheel Loom logo in the browser's top right corner. You can choose Cam Only, Screen Only, and Screen + Cam, the same as the desktop client. Unfortunately, users of the Google Chrome Extension can only record their entire screen or the contents of a single tab.
The Video Control menu differs from the desktop extension, appearing in the bottom left corner of the browser window. Users may only utilize three buttons: Start/End Recording, Pause Recording, and Delete Recording.
Using the Loom desktop client to record videos
Each option lets you use Loom's camera bubble , which allows you to see and record yourself as well as a video. There is no set limit on the duration of the video, but Loom will provide you alerts to ensure you don't keep recording by accident. Once you've decided on your selections, go to the four-button Video Control menu on the left side of your screen. To start your video, press the Recording button at the top of the menu. This button has two purposes: When the button is red, it indicates that you’re currently recording, and it stops the recording when clicked a second time.
The Pause button is located beneath the Recording button and is used to pause your video. However, depending on your computer, you may alternatively use Alt + Shift + P or Option + Shift + P . The Delete option is represented by a garbage can icon, which pauses the recording and completely deletes the video once you confirm your decision via a dialog box.
How to use the speaker notes feature
Loom makes presentations easier with speaker notes , an on-screen cue card feature visible only to you. Speaker notes are bullet points or full scripts written by you and activated during recording. These prompts allow you to deliver your message with confidence, without the need to remember your whole script or utilize physical note cards.
From the desktop app, open Loom and click Speaker Notes. Use the pop-up window to type in your notes, then resize the notes window to suit your needs before recording. Speaker notes are always presented on top, so there’s no need to switch windows during your presentation.
How AI-generated chapters work
Want your viewers to be able to skip to the most useful portion of a presentation? The AI-generated chapter feature allows viewers to select important topics within your presentation and navigate to them easily. These time-stamped chapters also allow users to link and respond to content.
How to use the drawing tool
Finally, the drawing tool , symbolized by a pen icon and available with the Pro subscription, can assist you in focusing on certain facts and numbers. Using this button, which includes picking a preset color, lets you make graphics that will draw your viewer's attention to key information.
Preserve your ideas with Loom’s Presentation Recorder
If you’re just starting out, learning to record a presentation with Loom is an excellent tool for creating quality content. As the world continues to move towards remote work environments, the ability to give an online presentation (and record it for posterity) becomes more essential every day.
Loom is free, so don’t wait to see how you can enhance your video presentation with video capture software.
Jan 8, 2024
Featured In:
Share this article:.
Jeong Lee works in Marketing at Loom.
- Help Center
- Google Docs Editors
- Privacy Policy
- Terms of Service
- Submit feedback
- Google Slides
Use slides recording in Google Slides
You can only record your presentations in Google Chrome Browsers. However, you can view, share, and delete recordings from any browser.
Record a slideshow
- There's a 30-minute limit to every recording.
- Information about Slides recordings isn't available in Revision History.
- If you exceed your Drive Storage quota, you can’t create more recordings.
- You must have edit access to the slides in order to create a new recording.
- To open your presentation, go to Google Slides .
- To start over, pause and click Re-record .
- To save your recording, pause and click Save to Drive .
Find your recording
- On your computer, go to Google Slides .
- Open the presentation where you created the recording.
- Select your recording from the list that appears.
Tip: Recordings are saved into a My Drive folder called Slides recordings.
Share your recording
Recordings can be shared to collaborators on the document immediately after creation.
- To share your recording, click the title of the recording from the list.
- The video in the full-screen player layout appears.
- Select the user, audience, or URL visibility rules.
Tip : Alternatively, you can share a recording like you would share any file in Drive. Learn how to share files from Google Drive .
Remove a recording
- If you created the recording, you also have the option to move the recording file in Drive to Trash. If the recording in Drive isn't moved to Trash, the recording stays visible in Drive to anyone with access.
- If you didn't create the recording, it's still visible in the creator's Drive and anyone to with access.
Use external device
You can use a microphone or camera that isn't built into your computer, such as a USB-based external camera or wireless earbuds.
To get started, set up your camera or microphone device like you would normally use it with your computer.
- Open your presentation.
- When the recording studio opens, at the bottom toolbar, click Settings .
- If your external microphone or camera is available, it's listed in the dropdown of devices available to use while recording.
Troubleshoot camera & microphone
When you create a Slides recording for the first time, it asks for a series of permissions to use the camera and microphone of your computer.
Tip: Camera and microphone access isn't required to start recording.
If you decide not to grant access to your camera or microphone, you can change it later.
- On your computer, open Chrome.
- chrome://settings/content/microphone
- chrome://settings/content/camera
- Adjust the settings to grant access.
Need more help?
Try these next steps:.
Using Google products, like Google Docs, at work or school? Try powerful tips, tutorials, and templates. Learn to work on Office files without installing Office, create dynamic project plans and team calendars, auto-organize your inbox, and more.
PowerPoint Recorder
Record your PowerPoint presentations online
Powerful Online PowerPoint Recorder
Make your presentations look professional using VEED’s online PowerPoint recorder. It’s fast, easy to use, and gives you access to video editing tools to make your presentation stand out. You can upload your slides or record your screen while you are presenting. Add yourself to the scene by recording your webcam and audio as well.
No need to install software. Open your browser and start recording! Choose from different layouts and customize your video after you record. You can also edit your recording using our professional video editor.
How to Record Your PowerPoint Presentation:
1 upload slides and select a layout.
Select from our list of layouts (you may need to click to ‘Allow’ permission to access your screen, camera, or microphone). You can record just your screen, your webcam, or both at the same time! You can either upload your slides or record while you’re presenting.
2 Start recording
Click the red button to start recording! You'll see a countdown before the recording starts. Don't worry if you mess up. You have unlimited time and unlimited retakes. You can navigate to other pages, and don't worry, you are still recording.
3 Review, edit, and export
You can playback your recording to review it, click ‘Share’ to share with friends and colleagues, or ‘Edit’ to edit your video (perfect for adding text, subtitles, and professional touches to your screen recording)

‘PowerPoint Recorder’ Tutorial

Highly customizable PPT recording software
VEED lets you easily customize your Microsoft PowerPoint presentation recordings. Select from different layouts and backgrounds. You can record your screen, webcam, audio, and upload your PowerPoint slides to present while recording. If you choose to record your entire desktop, you can easily switch the view between your presentation slides and other windows. When you’re finished, edit your video using our free video editor, where you can also add royalty-free music from our Stock Library.
All the things you need in a screen recorder
Our video capture software is packed with features that will help you create professional-looking recordings. When you press record, the countdown timer will appear to prompt you when your recording starts. To make sure that your audio is being picked up, check the little microphone icon on the bottom of your screen. It should be animated to indicate that your audio is being recorded. It only takes a few clicks. It’s the best app to record your Microsoft PowerPoint presentations.
Fast, free, and easy-to-use screen recorder software
Our screen recorder and video editor are free to use and beginner-friendly. However, if you need to record longer videos, you may need to subscribe to our premium plans. Check out our Pricing Page to see which plan suits your needs. It is super easy to use. It only takes a few clicks!
Frequently Asked Questions
Microsoft does allow you to record your presentation as well as your voice or audio. But you might be limited because you can’t switch screens. Use VEED to record your entire desktop and switch between windows.
With VEED, you can record your audio, webcam, screen, and presentation slides all at the same time!
To add yourself or your camera to the recording, select the layout that includes “webcam.” Choose the size and positioning of your camera feed and start recording!
Although there are many screen recorders out there, VEED is your best choice when it comes to recording your PC screen! It’s free and online. No need to install software. Plus you can use our free video editor to enhance your recording even more.
What they say about VEED
Veed is a great piece of browser software with the best team I've ever seen. Veed allows for subtitling, editing, effect/text encoding, and many more advanced features that other editors just can't compete with. The free version is wonderful, but the Pro version is beyond perfect. Keep in mind that this a browser editor we're talking about and the level of quality that Veed allows is stunning and a complete game changer at worst.
I love using VEED as the speech to subtitles transcription is the most accurate I've seen on the market. It has enabled me to edit my videos in just a few minutes and bring my video content to the next level
Laura Haleydt - Brand Marketing Manager, Carlsberg Importers
The Best & Most Easy to Use Simple Video Editing Software! I had tried tons of other online editors on the market and been disappointed. With VEED I haven't experienced any issues with the videos I create on there. It has everything I need in one place such as the progress bar for my 1-minute clips, auto transcriptions for all my video content, and custom fonts for consistency in my visual branding.
Diana B - Social Media Strategist, Self Employed
More than a PowerPoint recorder
VEED is a complete browser-based tool that lets you do so much more than just record and share your Microsoft PowerPoint presentations. You can annotate your videos to make your presentation more informative. Edit your recording to add images, subtitles, and more. It is a professional all-in-one video-creation and editing software that’s great for beginners and pros alike. Create professional-looking videos in just a few clicks. You don’t need any video editing experience. Create stunning videos that you can share on social media in just minutes. Try VEED to create professional PowerPoint recordings today!

- Screen Recording
How to Record A Presentation
Table of contents.
Presentations are a staple in the professional and academic world. They allow us to share our ideas, findings, and insights with others in a structured and engaging way. However, recording a presentation can be a daunting task, especially if you’re new to it. This article will guide you through the process step-by-step, using tools like PowerPoint, Google Slides, and the best AI text-to-speech voice reader, Speechify.
Looking to Record a Presentation? 5 Tools You’ll Need
Before you start recording, you’ll need a few tools:
- Screen Recorder : This is software that captures what’s happening on your screen. It’s essential for recording your slide show and any live demonstrations during your presentation.
- Presentation Deck : This is the collection of slides that you’ll be presenting. You can create this using software like PowerPoint or Google Slides.
- Speechify : This is an AI text-to-speech voice reader that can create high-quality voiceovers for your presentation.
- Webcam : If you want to record yourself presenting, you’ll need a webcam. Most modern laptops come with one built-in.
- Microphone : To record audio, you’ll need a microphone. Again, most modern laptops have one built-in, but you might want to consider a standalone microphone for better audio quality.
Step 1: Picking A Software
The first step in recording a presentation is choosing your software. The three most popular options are PowerPoint, Google Slides, and Zoom. Both are excellent choices, but they each have their pros and cons.
PowerPoint is a Microsoft product and is part of the Office suite. It’s been around for a long time and is very feature-rich. No matter the version of Powerpoint, You can create complex PowerPoint Presentations presentations with a variety of transitions, animations, and multimedia elements. PowerPoint slides also have a built-in feature for recording presentations.
Google Slides , on the other hand, is a free, web-based tool. It’s not as feature-rich as PowerPoint, but it’s straightforward to use and great for collaboration. You can share your slide deck with others and work on it together in real-time.
Zoom is another excellent tool you can use to record a presentation. It’s particularly useful if you’re delivering a live presentation to an audience and want to record it for later use. Their screen capture and presentation recording features are easy to use and doesn’t require any additional software. Plus, you can record both your presentation and yourself presenting, which can help to create a more engaging video.
Step 2: Recording Options
Once you’ve chosen your software and created your presentation, it’s time to start thinking about how you’re going to record it.
What To Use To Record Audio
For recording audio, you have a couple of options. You can record narration live as you present, or you can create a voiceover using Speechify.
Use Speechify
Speechify is the leading AI text-to-speech app, with millions of downloads on Chrome, iOS, Android, and Mac. It can turn your text into a natural-sounding voice, making it perfect for creating voiceovers for your presentation. You can customize the speed, accent, and character of the voice to suit your needs. Here’s how you can use Speechify to create voiceovers for your presentation:
- Input Your Script into Speechify : Once your script is ready, input it into Speechify. You can do this by copying and pasting your script into the Speechify app or by uploading a document with your script.
- Customize Your Voiceover : Speechify allows you to customize your voiceover to suit your needs. You can choose from a variety of voices, adjust the speed and pitch, and even add pauses for effect.
- Generate Your Voiceover : Once you’re happy with your settings, click on the “Generate” button. Speechify will then turn your text into speech, creating a high-quality voiceover for your presentation.
- Add Your Voiceover to Your Presentation : The final step is to add your voiceover to your presentation. You can do this by importing the audio file into your presentation software and syncing it with your slides.
What To Use To Record Video
If you want to record yourself presenting, you’ll need a webcam. Make sure your webcam is set up correctly and that you’re in a well-lit area. You can record yourself in full screen or use a picture-in-picture format to keep the viewer’s attention on your slides.
How To Record Your Screen
To record your screen, you’ll need a screen recorder. There are many free and paid screen recorders available for both Windows and Mac. These tools can capture your entire screen, a specific window, or a custom area. They can also record audio and webcam footage, making them perfect for recording presentations.
Step 3: Recording & Tips for Succeeding
Now that you’ve got everything set up, it’s time to start recording. Here are some tips to help you succeed:
- Practice : Before you hit the record button, practice your presentation a few times. This will help you feel more comfortable and ensure that your presentation flows smoothly.
- Clear Audio : Make sure your microphone is set up correctly and that there’s no background noise. If you’re using Speechify for voiceovers, ensure that the text is correctly inputted.
- Good Lighting : If you’re recording yourself, make sure you’re well-lit. This will make you more visible and create a more professional-looking video.
- Screen Settings : Check your screen settings before you start recording. Make sure you’re recording the correct screen or window and that any notifications are turned off.
- Take Your Time : Don’t rush through your presentation. Speak clearly and take your time with each slide. Remember, you can always edit the video later.
- Engage Your Audience : Use your voice and body language to engage your audience. Ask rhetorical questions, use gestures, and vary your tone and pace to keep your audience interested.
Tips To Improve Engagement
- Use Visuals : Visuals can help to illustrate your points and keep your audience engaged. Use images, graphs, and diagrams where appropriate.
- Keep It Simple : Don’t overload your slides with information. Keep your slides simple and use them to support your speech, not replace it.
- Use Transitions : Transitions can help to guide your audience through your presentation. Use them to signal when you’re moving on to a new point or topic.
- Interact with Your Slides : If you’re recording your screen, you can use your mouse to highlight important points on your slides.
- Use Speechify : Speechify’s high-quality AI voices can make your presentation more engaging and professional. You can even customize the voice to suit your presentation style.
Recording a presentation can seem like a daunting task, but with the right tools and a little practice, anyone can do it. Whether you’re using PowerPoint or Google Slides, a screen recorder or a webcam, or creating voiceovers with Speechify, the key is to plan ahead, practice, and keep your audience in mind. With these tips, you’ll be well on your way to creating engaging, high-quality presentations that you can share with the world.
Remember, the goal is not just to record a presentation but to create a video presentation that captures your audience’s attention and communicates your message effectively. So, don’t be afraid to experiment with different recording features, customization options, and presentation styles until you find what works best for you.
Whether you’re recording a how-to video, a YouTube video, or a professional presentation, the most important thing is to be clear, engaging, and authentic. So, hit that record button and start sharing your ideas with the world!
How do I record my screen and voice for a presentation?
You can use a screen recorder to capture your screen and a microphone to record your voice. Some screen recorders also have built-in webcam recording features, allowing you to record your screen, voice, and video all at once.
How do I record a PowerPoint presentation as a video?
PowerPoint has a built-in feature that allows you to record your presentation as a video. Simply go to the “Slide Show” tab, click on “Record Slide Show”, and then start recording. Once you’re done, you can save your presentation as a video file.
What is the best way to record a presentation?
The best way to record a presentation depends on your needs and resources. However, a combination of PowerPoint or Google Slides for creating your slide deck, a screen recorder for capturing your screen, and Speechify for creating high-quality voiceovers is a great place to start.
- Previous Is Voices.com Legit?
- Next Voices.com Pricing, Rates, and Plans

Cliff Weitzman
Cliff Weitzman is a dyslexia advocate and the CEO and founder of Speechify, the #1 text-to-speech app in the world, totaling over 100,000 5-star reviews and ranking first place in the App Store for the News & Magazines category. In 2017, Weitzman was named to the Forbes 30 under 30 list for his work making the internet more accessible to people with learning disabilities. Cliff Weitzman has been featured in EdSurge, Inc., PC Mag, Entrepreneur, Mashable, among other leading outlets.
Recent Blogs

Ultimate guide to ElevenLabs

Voice changer for Discord

How to download YouTube audio

Speechify 3.0 is the Best Text to Speech App Yet.

Voice API: Everything You Need to Know

Best text to speech generator apps

The best AI tools other than ChatGPT
Top voice over marketplaces reviewed
Speechify Studio vs. Descript

Everything to Know About Google Cloud Text to Speech API

Source of Joe Biden deepfake revealed after election interference

How to listen to scientific papers
How to add music to CapCut
What is CapCut?
VEED vs. InVideo
Speechify Studio vs. Kapwing
Voices.com vs. Voice123

Voices.com vs. Fiverr Voice Over
Fiverr voice overs vs. Speechify Voice Over Studio

Voices.com vs. Speechify Voice Over Studio
Voice123 vs. Speechify Voice Over Studio
Voice123 vs. Fiverr voice overs
HeyGen vs. Synthesia
Hour One vs. Synthesia
HeyGen vs. Hour One
Speechify makes Google’s Favorite Chrome Extensions of 2023 list
How to Add a Voice Over to Vimeo Video: A Comprehensive Guide

How to Add a Voice Over to Canva Video: A Comprehensive Guide
What is Speech AI: Explained
How to Add a Voice Over to Canva Video
Speechify text to speech helps you save time
Popular blogs.
The Best Celebrity Voice Generators in 2024
YouTube Text to Speech: Elevating Your Video Content with Speechify
The 7 best alternatives to Synthesia.io
Everything you need to know about text to speech on tiktok.
The 10 best text-to-speech apps for Android
How to convert a PDF to speech
The top girl voice changers
How to use Siri text to speech
Obama text to speech, robot voice generators: the futuristic frontier of audio creation.

PDF Read Aloud: Free & Paid Options
Alternatives to fakeyou text to speech, all about deepfake voices, tiktok voice generator, text to speech goanimate, the best celebrity text to speech voice generators, pdf audio reader, how to get text to speech indian voices, elevating your anime experience with anime voice generators, best text to speech online, top 50 movies based on books you should read.
Only available on iPhone and iPad
To access our catalog of 100,000+ audiobooks, you need to use an iOS device.
Coming to Android soon...
Join the waitlist
Enter your email and we will notify you as soon as Speechify Audiobooks is available for you.
You’ve been added to the waitlist. We will notify you as soon as Speechify Audiobooks is available for you.
How to record a Zoom presentation and present in a virtual meeting?
- Share on Facebook
- Share on Twitter
By Nikolay Kaloyanov
in How-To Tutorials
2 years ago
Viewed 572 times
Spread the word about this article:
Many big companies had to establish home office practices in 2020 and Zoom became the most popular tool for virtual meetings . Virtual meetings are now crucial for business and education and they are here to stay.
If you’re a teacher and have difficulty maintaining class control, recording your lessons is a great way to save time . Instead of spending hours rehearsing your lessons and guiding students every step of the way, you can record a professional presentation for your students to watch at home. They’ll be able to watch it in their own time, over and over again – so you no longer have to answer questions on the spot!
Also, if you’re a business person, your audience can listen to the presentation afterward , thus they can learn more about your subject, and not embarrass themselves in front of other business people if they dare to ask questions.
And this is where Zoom came in. It successfully replaced physical meetings with digital ones. So, if you haven’t worked with Zoom yet, you will sooner or later get more familiar with it. In this guide, we will teach you how to record a Zoom presentation, so you can share with other people in the meeting your recent work or study progress.
Article overview: 1. Should you use Zoom for presentation recordings? 2. What is the difference between video conferencing and video recording tools? 3. How to record a Zoom presentation? 4. Bonus: How to Make a Transparent Camera Background When Presenting?
1. Should you use Zoom for presentation recordings?
Before we get into the essence of the topic, we need to mention a couple of reasons why Zoom is a good choice for recording presentations.
- It’s secure – popularity plays a huge role. Famous apps receive more updates and are more secure since they want to keep their customers behind them.
- The free version is more than decent – the free version allows you to have a video conference with other people for up to 40 minutes and have up to 100 call participants.
- It’s popular – Maybe you already tried Zoom and you are familiar with the software. Also, it is used by many companies and you can ask a colleague or friend for help.
2. What is the difference between video conferencing and video recording tools?
In one of our previous articles, we showed you how to record a presentation using different tools – like Loom, Panopto, QuickTime, and Game Bar. We highly recommend that you dedicate some time for practice at home before presenting to other people. Stuttering and mispronunciation of words are not good signs for how well you are presenting. On the other hand, video conferencing tools like Zoom and Google Meet are made for people who are recording in real-time.
3. How to record a Zoom presentation?
Zoom is a great application for delivering high-quality presentations with ease. The tool enables you to record your screen, camera, and voice with just a few clicks of a button. You need to follow some steps that we’ll show below.
Step 1. Create a Zoom account
The first step is to create a Zoom account . You are assigned to a free plan by default but you can also explore the paid options if you need to. If you’re assigned to present in Zoom but you’re a guest, it’s often the admin who holds a premium account.
Step 2. Download the desktop app
Once you have opened your Zoom account, you have to download the desktop app on your computer and install it.
Step 3. Create a meeting / join a meeting
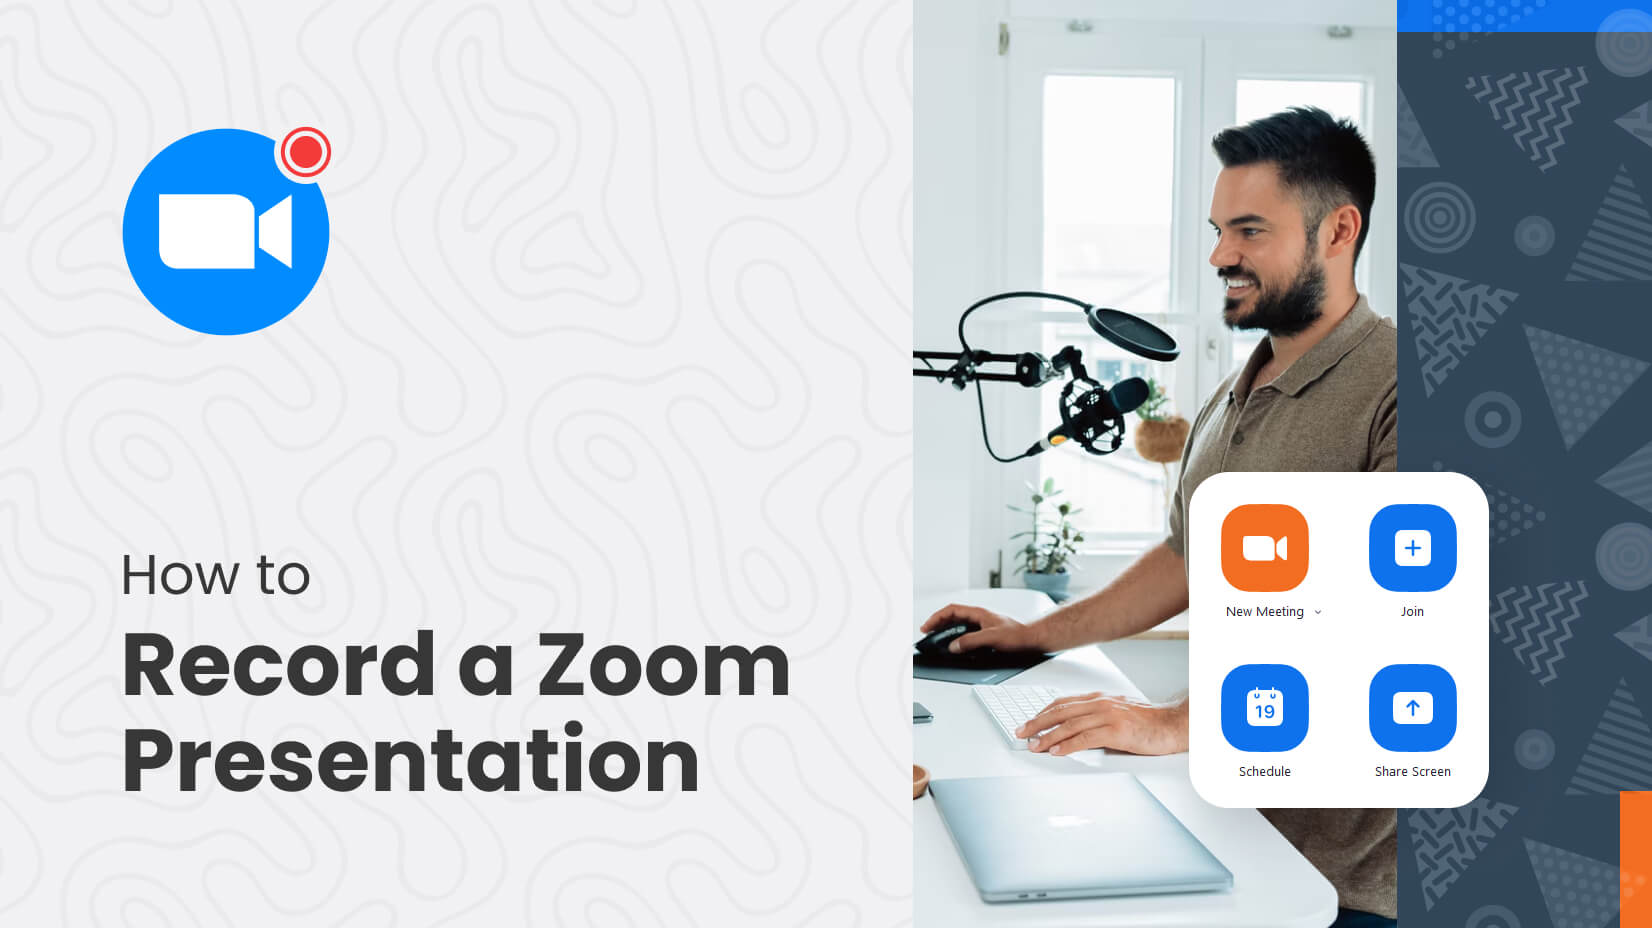
When you are all set, you are now able to host your meeting. You have two options to start a meeting: New Meeting is the option used for immediate meetings, or Schedule – to plan your next meeting ahead of time. You can also join a meeting if someone shared a meeting link with you. There is a Meeting Id required for some meetings, so the host should provide you with that in advance. It’s a combination of numbers.

Step 4. Select how to join the meeting
Zoom will ask you to confirm which audio and video settings you are going to use. Many people prefer to present only the slides, while others want a more realistic experience – with the camera on. Start without video and Start with video are self-explanatory, so we won’t dig into details.
Step 5. Click on “Share Screen”
The next step is to select Share Screen from the Zoom control bar. You have to also press Record at the beginning of your meeting (or presentation), and just click Pause/Stop recording. Pausing the recording is reasonable when the others are discussing topics nonessential to the presentation (off topics), stopping the recording is the moment you want to end it.

Step 6. Pick the screen you want to share
You can share your screen (you will have two options if you have two monitors). When you have a Keynote or PowerPoint tab open, you will find them as available options. This is when you should click on them. If your presentation is made in Google Slides, or you have it in iCloud or OneDrive, then you have to find the relevant tab and pick a Slideshow mode for the applicable program. We advise you to remove any unrelated tabs beforehand, as they will be visible to your audience and could distract you to find the presentation file fast enough.

A quick tip : If you hold a lot of valuable info on many tabs, you can create a new Google Chrome window to click on it easily.
Step 7. End the recording
If you have presented everything, you can now end the Zoom recording. If there is nothing else to add, you have two options – Leave Meeting if you are invited or you are admin but you want the meeting to remain, or End the Meeting for all in case you want to end the Zoom meeting and kick other participants.
Step 8. Export the recording
When you are ready with the recording, you will have access to it. In order to download (or export) your recording, you should log into your Zoom account, then select My Account , and from the menu on the left click on Recordings . You will now have access to all recordings that you have made. To download them, you have to checkmark the ones you wish to download and click on Export .
4. Bonus: How to Make a Transparent Camera Background When Presenting?

Who wants to clean the entire room, in order to stream their camera? Nobody. Luckily, there is an option in Zoom where you can present with a webcam without any background. It is working with Microsoft PowerPoint, and it is really simple. (Please, have in mind that this works best with clean color backgrounds such as green or white).
- Start a new meeting.
- Then click on the “ Advanced ” tab.
- Select “ Slides as Virtual Background “.
- Pick your PowerPoint presentation.
- Finish the task by clicking on “ Share “
Recording a presentation requires different skills today. While several years ago, you could get away with a decent presentation design and compensate for it with great speaking abilities, nowadays programs give you plenty of options to add creative visuals and impress the audience. Zoom is an amazing app that enables you to present to up to 500 people at the same time. However, knowing how to record a presentation in Zoom is just one part of being successful.
If you find the guide useful, why don’t you check some of our other presentation-related tutorials:
- How to Calm Down Before a Presentation: 10 Practical Tips and Techniques
- How to Start and End a Presentation: 10 Practical Tips to Grab Attention and Make an Impact
- How to Make an Engaging Infographic: The Full Guide

Add some character to your visuals
Cartoon Characters, Design Bundles, Illustrations, Backgrounds and more...
Like us on Facebook
Subscribe to our newsletter
Be the first to know what’s new in the world of graphic design and illustrations.
- [email protected]
Browse High Quality Vector Graphics
E.g.: businessman, lion, girl…
Related Articles
How to make a logo: video tutorials & tips for the perfect logo, how to draw on google slides and make a great impression, how to turn yourself into animated cartoon in zoom.us, how to craft a cartoon facebook cover in photoshop, 30 amazing adobe photoshop tutorials for beginners [2022], enjoyed this article.
Don’t forget to share!
- Comments (0)
Nikolay Kaloyanov
Nikolay is a copywriter with vast experience in Technology, Marketing, and Design. When he isn't playing with words and crafting texts, he watches sports and asks questions. He is a funny person...until you put him on a diet.

Thousands of vector graphics for your projects.
Hey! You made it all the way to the bottom!
Here are some other articles we think you may like:

How-To Tutorials
How to create a cartoon flyer template for your business.
by Momchil Karamitev

How to Create a Poster: The Best Beginner Tutorials + Useful Tips
by Lyudmil Enchev
20+ Secrets to Taking Amazing Photos For Blogs and Social Media
by Bilyana Nikolaeva
Looking for Design Bundles or Cartoon Characters?
A source of high-quality vector graphics offering a huge variety of premade character designs, graphic design bundles, Adobe Character Animator puppets, and more.
- Start the presentation and see your notes in Presenter view Article
- Add speaker notes to your slides Article
- Rehearse and time the delivery of a presentation Article
- Record a slide show with narration and slide timings Article
- Print your PowerPoint slides, handouts, or notes Article
- Create a self-running presentation Article

Record a slide show with narration and slide timings
You can record your PowerPoint presentation—or a single slide—and capture voice, ink gestures, and your video presence. When completed, it’s like any other presentation. You can play it for your audience in a Slide Show or you can save the presentation as a video file. So, instead of just “handing the deck” to someone, people can see your presentation with the passion and personality intact.
A new feature for Microsoft 365 was rolled out in early 2022. Exactly when your business has this feature is also based on when your admin distributes new features in Microsoft 365.
This article contains procedures for both the new experience and the classic experience:
New experience
Classic experience

All recording tools are in the Record tab in the ribbon, but you can start by selecting the Record button.

You can also record by selecting one of the options in the Record section of the Record tab.

If you have notes in your presentation, they’re turned into text at the top of the screen so you can use them like a teleprompter as you record.
Tip: Use the auto-scroll feature in teleprompter and set it to scroll at your preferred speed.

There are several options you can use when you record a presentation. You can turn your camera and microphone on or off by selecting the icons at the top. There are several options you can use when you record a presentation. You can turn your camera and microphone on or off by selecting the icons at the top. To change your camera or microphone, choose the Select more options <···> icon. You can even add a customizable camera that can be resized, repositioned, and formatted to go with your slide content. Select Edit , then select Cameo . Adjust the formatting for the camera, then select Record again to return to the recording environment.
In the Select the camera mode menu, you can select Show Background or Blur Background .

You can also change the layout in the Views menu to switch between Teleprompter , Presenter View , or Slide View .

When you’re ready, select Start recording and a countdown will begin.
Use the onscreen laser, colored pens, or highlighters in the tray below markup slides and it’ll record as well.
To record narration for a specific slide, use the previous or next arrows.
Note: Narration won’t record during slide transitions so let those play first before you start speaking.
Pause the recording as needed or select Stop if you’re done.
To review the video, select the Play button.
To quickly delete and re-record your video on current slide or on all slides, select Delete . While Clear will delete the recorded narration, Reset to Cameo additionally replaces the recorded narration with the camera feed for an easy retake.

When you’re done, select Export > Export Video .
After you successfully export the video, you can view the video by selecting View and share video .

At any time, you can return to your document by selecting the Edit button.
Want more?
About Record in PowerPoint
Create a self-running presentation
Export or turn your presentation into a video
Classic experience
Turn on the Recording tab of the ribbon: On the File tab of the ribbon, click Options . In the Options dialog box, click the Customize Ribbon tab on the left. Then, in the right-hand box that lists the available ribbon tabs, select the Recording check box. Click OK .

To get ready to record, select Record on either the Recording tab or the Slide Show tab of the ribbon.
Clicking the upper half of the button starts you on the current slide.
Clicking the lower half of the button gives you the option to start from the beginning or from the current slide.

(The Clear command deletes narrations or timings, so be careful when you use it. Clear is grayed out unless you have previously recorded some slides.)
The slide show opens in the Recording window (which looks similar to Presenter view), with buttons at the top left for starting, pausing, and stopping the recording. Click the round, red button (or press R on your keyboard) when you are ready to start the recording. A three-second countdown ensues, then the recording begins.

The current slide is shown in the main pane of the Recording window.
You can stop the recording any time by pressing Alt + S on your keyboard.
Navigation arrows on either side of the current slide allow you to move to the previous and next slides.
PowerPoint for Microsoft 365 automatically records the time you spend on each slide, including any Animate text or objects steps that occur, and the use of any triggers on each slide.
You can record audio or video narration as you run through your presentation. The buttons at the lower-right corner of the window allow you to toggle on or off the microphone, camera, and camera preview:

If you use the pen, highlighter, or eraser, PowerPoint records those actions for playback also.

If you re-record your narration (including audio and ink), PowerPoint erases your previously recorded narration (including audio and ink) before you start recording again on the same slide.
You can also re-record by going to Slide Show > Record .
You can pick a pointer tool (pen, eraser, or highlighter) from the array of tools just below the current slide. There are also color selection boxes for changing the color of the ink. ( Eraser is grayed out unless you have previously added ink to some slides.)
To end your recording, select the square Stop button (or press S on your keyboard).
When you finish recording your narration, a small picture appears in the lower-right corner of the recorded slides. The picture is an audio icon, or, if the web camera was on during the recording, a still image from the webcam.

The recorded slide show timing is automatically saved. (In Slide Sorter view, the timings are listed beneath each slide.)
In this process, what you record is embedded in each slide, and the recording can be played back in Slide Show. A video file is not created by this recording process. However, if you need one, you can save your presentation as a video with a few extra steps.
Preview the recorded slide show
On the Slide Show tab, click From Beginning or From Current Slide .
During playback, your animations, inking actions, audio and video will play in sync.

Preview the recorded sound
In the Recording window, the triangular Play button near the top left corner lets you preview the recording of the slide that currently has the focus in that window.

In Normal view, click the sound icon or picture in the lower-right corner of the slide, and then click Play . (When you preview individual audio in this way, you won't see recorded animation or inking.)

You can pause playback while previewing the audio.
Set the slide timings manually
PowerPoint for Microsoft 365 automatically records your slide timings when you add narrations, or you can manually set the slide timings to accompany your narrations.
In Normal view, click the slide that you want to set the timing for.
On the Transitions tab, in the Timing group, under Advance Slide , select the After check box, and then enter the number of seconds that you want the slide to appear on the screen. Repeat the process for each slide that you want to set the timing for.
If you want the next slide to appear either when you click the mouse or automatically after the number of seconds that you enter—whichever comes first—select both the On Mouse Click and the After check boxes.
You can use manual slide timings to the trim the end of a recorded slide segment. For example, if the end of a slide segment concludes with two seconds of unnecessary audio, simply set the timing for advancing to the next slide so that it happens before the unnecessary audio. That way you don't have to re-record the audio for that slide.
Delete timings or narration
The Clear command is for deleting timings or narration from your recording that you don't want or that you want to replace.
In the Recording window, the Clear command in the top margin of the window allows you to:
Clear recordings on the current slide
Clear recordings on all slides
In Normal view, there are four different Clear commands that allow you to:
Delete the timings on the currently selected slide
Delete the timings on all slides at once
Delete the narration on the currently selected slide
Delete the narration on all slides at once
If you do not want to delete all the timings or narration in your presentation, open a specific slide that has a timing or narration that you do want to delete.
On the Recording tab of the PowerPoint for Microsoft 365 ribbon, on the Record Slide Show button, click the down arrow, point to Clear , and then choose the appropriate Clear command for your situation.

Turn off timings or turn off narrations, and ink
After you've recorded your PowerPoint for Microsoft 365 presentation, any timings, gestures, and audio you performed are saved on the individual slides. But you can turn them all off if you want to view the slide show without them:
To turn off recorded slide timings: On the Slide Show tab, clear the Use Timings box.
To turn off recorded narrations and ink: On the Slide Show tab, clear the Play Narrations box.
Publish the recording to share it with others
Once you've edited the recording to your satisfaction, you can make it available to others by publishing to Microsoft Stream.
With the presentation open, on the Recording tab, select Publish to Stream .
Type a title and a description for the video.
Set other options, including whether you want others in your organization to have permission to see the video.
Select the Publish button.
The upload process can take several minutes, depending on the length of the video. A status bar at the bottom of the PowerPoint window tracks the progress, and PowerPoint shows a message when the upload is finished:

Click the message to go directly to the video playback page on Microsoft Stream.
Create closed captions
To make your video more accessible by including closed captions, choose from these options, which are described in separate Help articles:
Manually write a closed caption file yourself
Get a closed-caption file automatically generated by Microsoft Stream
Once you have a closed-caption file, you can add it to your video file by using PowerPoint .
Record a slide show
With your presentation open, on the Slide Show tab, click Record Slide Show .
(The Clear command deletes narrations or timings, so be careful when you use it. Clear is grayed out unless you have previously recorded some slides.)
In the Record Slide Show box, check or clear the boxes for your recording, and click Start Recording .

More about these options:
Slide and animation timings : PowerPoint automatically records the time you spend on each slide, including any animation steps that occur, and the use of any triggers on each slide.
Narrations, ink, and laser pointer: Record your voice as you run through your presentation. If you use the pen, highlighter, eraser, or laser pointer, PowerPoint records those for playback as well.
Important: Pen, highlighter, and eraser recording are available only if you have the February 16, 2015 update for PowerPoint 2013 or a later version of PowerPoint installed. In earlier versions of PowerPoint, pen and highlighter strokes are saved as ink annotation shapes.
At the top left corner of the window is the Recording toolbar, which you can use to:

If you re-record your narration (including audio, ink, and laser pointer), PowerPoint erases your previously recorded narration (including audio, ink, and laser pointer) when you start recording again on the same slide.
You can also re-record by going to Slide Show > Record Slide Show .
To use ink, eraser, or the laser pointer in your recording, right-click the slide, click Pointer options , and pick your tool:
Laser Pointer
Highlighter
Eraser (This option is grayed out unless you have previously added ink to some slides.)
To change the color of the ink, click Ink Color .
To end your recording, right-click the final slide, and click End Show .
Tip: When you finish recording your narration, a sound icon appears in the lower-right corner of each slide that has narration.
The recorded slide show timings are automatically saved. Timings are shown in Slide Sorter view just beneath each slide.
In this process, what you record is embedded in each slide, and the recording can be played back in Slide Show. A video file is not created by this recording process. However, if you want a video file, you can save your presentation as a video with a few extra steps.
On the Slide Show tab, click From Beginning or From Current Slide.
During playback, your animations, inking actions, laser pointer, audio and video play in sync.
Preview the recorded audio
In Normal view, click the sound icon in the lower-right corner of the slide, and then click Play.
PowerPoint automatically records your slide timings when you add narrations, or you can manually set the slide timings to accompany your narrations.
On the Transitions tab, in the Timing group, under Advance Slide , select the After check box, and then enter the number of seconds indicating how long the slide should appear on the screen. Repeat the process for each slide that you want to set the timing for.
Tip: If you want the next slide to appear either when you click the mouse or automatically after the number of seconds that you enter—whichever comes first—select both the On Mouse Click and the After check boxes.
The Clear command is for deleting timings or narration from your recording that you don't want or that you want to replace. There are four different Clear commands that allow you to:
On the Slide Show tab of the PowerPoint ribbon, on the Record Slide Show button, click the down arrow, point to Clear, and then choose the appropriate Clear command for your situation.
Turn off timings or turn off narrations, ink, and laser pointer
After you've recorded your PowerPoint presentation, any timings, gestures, and audio you performed are saved on the individual slides. But you can turn them all off if you want to view the slide show without them:
To turn off recorded narrations, ink, and the laser pointer: On the Slide Show tab, clear the Play Narrations box.
Turn your mouse into a laser pointer
Animate text or objects
Turn your presentation into a video
Create a self-running presentation
Record your presentation

Toggle video and audio options in the options dropdowns in the recording toolbar.

Note: Your video will be re-recorded just as you had styled.
After you exit Recording Studio with the Esc key (or by clicking End show ) you will see narration (audio/video) applied to your slide along with the proper slide timings and ink animations.
Tip: Audio, video, and inking elements can all be resized and moved in edit view after recording.

Reset to Cameo
To delete your recording and retain your camera style, do the following:
On the Record tab, select Reset to Cameo .

Clear timings or narration
On the Record tab, select Clear Recording

Keyboard shortcuts during the recording process
Related information.
Present with Cameo
Save a presentation as a movie file or MP4
Record audio in PowerPoint for Mac
Add or delete audio in your presentation
Prepare to record
To begin, open the presentation you want and click the Slide Show tab.
Tip: If your presentation has a lot of slides, you might find it more convenient to work in Slide Sorter view. Click View > Slide Sorter to try it out.
Here are some things to check before you begin recording:
If you want to record only part of your slide deck, do one of the following before you begin:
Select the slides you don't want to include, and click Hide Slide .
Click Custom Show > Custom Slide Show > + (add).

Use the Rehearse button to change the timing between slides without affecting the narration or gestures you've already recorded.

Make sure your microphone is set up correctly. On the Mac, go to System Preferences > Sound .
Record your slide show
If you want to add narration or commentary to the slide show, make sure your microphone is set up and working.
To start recording:
Click the Slide Show tab, select the slide where you want the recording to begin, and then click Record Slide Show .

During recording, use Ctrl+click to access the recording commands that let you navigate through the slides, change cursors, or trigger screen blackouts or whiteouts.

Click End Show to stop recording.
A Save dialog box appears. Click Yes to save your recording, or No if you want to record it again.
Saving overwrites anything you've previously recorded. If you want to record another slide show with the same set of slides, save your presentation file with a different name.
Click Play from Start to preview your recording.
You may want to print this list of keyboard shortcuts to refer to while you're recording:
Set playback options
When you've finished recording and are ready to distribute the presentation, click Set up Slide Show and choose the options that are right for your audience.

Show type Show full screen or windowed.
Show options Turn off narration or animations.
Slides Choose a subset of slides, or a Custom show if you've set one up.
Advance slides Set up this version of the slide show so someone can page through it manually.
Add, change, or remove transitions between slides
Start the presentation and see your notes in Presenter view
We're sorry. PowerPoint for the web doesn't support recording a slide show.

Need more help?
Want more options.
Explore subscription benefits, browse training courses, learn how to secure your device, and more.

Microsoft 365 subscription benefits

Microsoft 365 training

Microsoft security

Accessibility center
Communities help you ask and answer questions, give feedback, and hear from experts with rich knowledge.

Ask the Microsoft Community

Microsoft Tech Community

Windows Insiders
Microsoft 365 Insiders
Was this information helpful?
Thank you for your feedback.

How to Record Customized Camera Feeds With Cameo in PowerPoint
T he widespread adoption of remote work and virtual meetings has led many people and organizations to realize they don't have to be physically present in the same conference room to make presentations. In fact, you don't even need to conduct them live.
However, recording your PowerPoint slides with your face on them requires technical know-how and third-party apps like OBS. This makes recording presentations a bit difficult and discourages people from doing it.
Thankfully, Microsoft has addressed this issue in PowerPoint 365 with the Cameo feature. Here's what it is and how to use it.
What Is Cameo in PowerPoint?
Cameo is a PowerPoint feature that lets you add your webcam or any other camera feed into your presentation. This makes it easier to present virtually, as your audience can see you from within your slides.
Previously, you needed a third-party app like OBS to overlay yourself on your presentation. You can also use a green screen overlay in Capcut or other similar apps to achieve the same effect. However, this takes a lot of effort and know-how.
But with this feature, you can do it from inside PowerPoint with just a few clicks. Here's how to insert a cameo into your slides.
- Go to Insert > Cameo .
- After clicking on Cameo, PowerPoint will insert a placeholder object on your current slide and open the Camera Format tab.
- You can edit the object as you wish, much like any other shape on PowerPoint. You can also click on the options in the Designer pane on the right side of the screen to help you work faster.
- Once you're happy with its placement on your slide, click on the Preview button to see your live video.
With that, you can start presenting your PowerPoint slides via screen sharing while still keeping yourself on the screen.
How to Record Your PowerPoint Presentation With Cameo
You can also insert a cameo from Record > Cameo . Clicking on this will bring you to the same menu tab and insert a placeholder object for your video. However, even if you didn't set up Cameo beforehand, you can insert it directly while recording your presentation. Here's how:
- Go to Record > From Beginning or Record > From Current Slide .
- In the recording screen, click on the Camera icon at the top. This will insert a round object containing your video in your slides' lower-right-hand section.
- Click on the Red icon to start recording your presentation.
- Go through your presentation as usual. For more information, check out our guide on turning your presentations into videos .
- Once you've finished, click the Red icon again to stop recording.
- Click Export to go to the Export to video screen .
- Change the File Name as needed, then click Browse to select the location where you will save your recorded video.
- Once done, click Export Video .
With that, you don't have to spend much effort to add your video feed to your PowerPoint presentation recording. However, the app only places your video at one location across every slide; it might cover some of your content. That's why it's better to use the Cameo feature when you're building or editing your PowerPoint presentation.
If you're unhappy with your recording, press the Retake Video on the left of the record icon. You can pick between On Current Slide or On All Slides .
What You Need to Record Customized Camera Feeds
You need a webcam and a Microsoft 365 account to record your customized camera feed. Furthermore, you cannot use Cameo or record presentations in the PowerPoint web app. You need to download and install it on your computer to use these features.
The Cameo feature is already available on Microsoft PowerPoint 365 in Windows and Mac. However, recording your presentation with Cameo is only available on Windows. As of the time of writing, this feature isn't available for the main PowerPoint 365 for Mac version.
If you're running macOS, you must be a Microsoft 365 Insider to get this feature. However, since the Cameo recording feature is already announced in the Microsoft 365 Insider blog , we hope it will be available in the mainstream PowerPoint for Mac version in a few months.
Recording Your Presentations Is Now Much Easier
The Cameo feature has made presenting PowerPoint slides in video calls easier. And with the recording function, you no longer need a third-party app to put your video over your presentation.
You can integrate it into each slide, allowing you to control where you are on your screen. And you also save a lot of time and effort, as you can record and save your presentation as a video from within Microsoft PowerPoint.

Record meetings or webinars for people who can't attend or for those who want to refer back to what was discussed. Your recordings can either be saved to the cloud or your computer as a local recording.

If you use Webex Training sessions, you can recording your training sessions .
Play, share, and edit recordings
After you record a meeting or webinar, find your recording so you can edit it, view and edit transcripts, and share it with others. The following list includes things you can do with recorded meetings as the host, cohost, or a viewer:
- Find your recording —Access your recordings from User Hub so you can share, download, and edit them.
- Play a recording —View or download recordings.
- Share a recording —Send recordings to people who couldn't attend or who want to review what happened during the meeting or webinar.
- Create recording transcripts —Make it easier for people to find specific parts of a meeting or webinar.
- View, search, and edit recording transcripts —If you created transcripts, view them in the recording playback, search for specific text, or edit them to correct errors.
- Add chapters to recordings —Organize recordings into chapters so viewers can easily find parts of the meeting or webinar they want to view.
- Delete or restore recordings —Delete one or more recordings, remove recordings from the trash, or delete them permanently.
Frequently asked questions
Why can't I record?
You may not be the host of the meeting. If you were invited to the meeting, ask the host to record.
Your site may be out of storage space. Download recordings to back them up, then delete them in User Hub to make space.
Recording may not be enabled. Contact your Webex administrator .
For free users, recording is only available from the desktop app. You can't record if you start a meeting from the web app using a Chromebook.
- If visual watermarks are added to shared content in a meeting , your organization may prevent recording the meeting.
Can I save a recording in MP4 format?
Recordings that you save either to the cloud or to your computer save in the MP4 format.
Panels, such as the chat panel and participants panel, aren't included in the recording if you record to your computer. Any video files you share using Share File aren't included.
Where can I find my recording?
Webex stores all your recorded meetings either locally on your computer or on User Hub. You can find your recordings and share or download them from User Hub.
If you were invited to a meeting as an attendee or cohost, ask the host of your meeting to get the recording.
How long does it take to get a recording?
Depending on file size and bandwidth, it can take up to 24 hours to receive your recording.
When the recording is ready, we'll send you an email with the recording and all the details you need to play and share it with others.
How can I tell if my meeting was recorded?

How do I play a recording?
Webex recordings in the cloud are stored in the MP4 format, and play on most computers without having to install any new software.
Ask the host to share the recording link and password.
If you're the host, you can play or download the recording from User Hub.
Can I convert a recording to MP4?
Recordings save to the MP4 format. If you have recordings in the previously used Advanced Recording Format (ARF), convert the recordings to the MPEG-4 format (.MP4) using a Windows computer.
How do I get a recording transcript?
Site Administrators can enable the automatic transcription of audio for MP4 meeting recordings before you record your meeting or webinar. They can turn on the functionality for everyone, for specific users, or allow users to turn it on for themselves. Check out Recording Transcripts for more details.
Known issues and limitations
If you start a meeting by phone, you can't record it.
Recording on your computer is currently only available from the desktop app. You can't record if you start a meeting from a device using the web app, such as a Chromebook.
If you show your camera in front of the presentation when you share content, your camera video doesn't appear in the recording.
- If you sync your stage with everyone , the first person that you add to the stage appears in meeting or webinar recordings instead of the active speaker.
Recording playback doesn't fully support Windows Media Player. You can't see Q&A, polling, chat, transcripts, and chapter functionality when viewing the recording.
- You can't choose a recording layout for recordings to your computer.
- If you share content using Share file , that shared content doesn't appear in recordings to your computer.
- Recordings to your computer only include audio when you choose Computer audio . If you choose Call me or Call in , the audio doesn't record.
- Recordings to your computer don't capture transcriptions, chat records, participant lists, or files shared during the meeting.
- Find your Webex Meetings version number
- Find your Webex recordings
Microsoft Surface and AI event: 5 biggest announcements you might've missed this week

Microsoft is arguably the leader in the AI space right now, constantly releasing new offerings and updates to stay ahead of the curve. Therefore, it is no surprise that the company took to its March Surface and Windows AI event this week to unveil a handful of new AI features and hardware.
Also: Microsoft unveils Surface Pro 10 and Laptop 6 with AI features. Here's what's new
As Microsoft's event description, "Advancing the new era of work with Copilot," implied, the event focused on the company's AI offerings specifically for its enterprise customers. Instead, Microsoft Build, taking place in May, will have announcements better suited for general consumers. Until then, here's everything the company unveiled at its Surface event.
1. Copilot in Microsoft 365 is now on Windows
The headlining AI news at the event is that Copilot capabilities in Microsoft 365 are finally coming to Windows. This is a major win for working professionals because now within the Copilot in Windows interface, they can select a "Work" option to enable Copilot in Microsoft 365, as seen in the photo above.
Also: Microsoft Copilot vs. Copilot Pro: Is the subscription fee worth it?
Copilot in Microsoft 365 is a workflow game changer because it infuses Copilot assistance across all of the 365 applications, including Word, Excel, PowerPoint, Outlook, and more, to assist with tasks such as creating PowerPoint presentations, writing assistance, and interpreting spreadsheet data. Basically, Copilot can understand the user's entire universe of work data to provide even deeper assistance.
2. New Copilot accessibility features in Windows 11
At the end of the month, there will be a new release of Windows 11 preview which will feature a host of new Copilot skills for accessibility. For example, users will be able to ask Copilot to turn on the narrator and screen magnifier, change text size, or start live captions.
Also: Windows 11's big new update is full of AI and rolling out now - here's what's in it
Asking Copilot to help adjust PC settings enables users to have more control of their device, making it easier to access crucial settings instead of having to navigate through a series of different tabs and struggle to find what they're specifically looking for.
3. The first AI-powered Surface PCs for business
After launching the Surface Pro 9 or Surface Laptop 5 two years ago, Microsoft finally unveiled the succeeding models -- the Surface Pro 10 and Surface Laptop 6. Because this was Microsoft's first hardware launch in the era of the AI PC, the business devices got under-the-hood upgrades, including a new processor, to better support AI and productivity tasks.
Also: Surface vs. MacBook: Can Microsoft's new Arm-based AI PCs compete with Apple?
Both models sport a new Intel Core Ultra (5 or 7) processor which features a dedicated Neural Processing Unit (NPU) for better device performance and battery efficiency, especially when performing AI-related tasks. As seen in the photo above, the appearance of the Surface devices remains relatively unchanged.
For a full rundown of what the new products feature, you can read ZDNET's Senior Reviews Editor Kerry Wan's roundup .
4. Windows 365 GPU support
Although this feature doesn't use AI, it can certainly be helpful for tasks related to it. Windows 365 GPU has the potential to improve many professionals' workflows by allowing users access to GPU-empowered cloud PCs. The improved graphics performance of these machines will be essential for tasks that require more power such as in graphics design, image and video editing (and rendering), and more.
Microsoft says Windows 365 GPU support, currently available in preview, was highly requested by customers who wanted access to a GPU in a Software-as-a-Service solution.
5. The first Copilot key on a Microsoft device
It wouldn't be the launch of an AI PC without the mention of a Copilot key. Both the new Surface devices and the new Surface Pro Keyboard, pictured above, include a dedicated Copilot key to make it easier for users to get direct access to AI assistance. It certainly helps that Windows users without the latest PC or Surface device can still access the feature by clicking the Copilot icon from the Windows 11 taskbar.
Artificial Intelligence
How to watch microsoft's surface and windows ai event today (and what to expect), microsoft unveils surface pro 10 and laptop 6 with ai features. here's what's new, microsoft's most underrated surface accessories are coming to business users.
IMAGES
VIDEO
COMMENTS
Open the slide you want to start recording from. Near the upper right corner of the PowerPoint window, select Record. When you're ready, select the round, red Record button, wait for the countdown, then start speaking. To record from a specific slide, go to it, and then select Record. Note: Narration isn't recorded while the transition between ...
You can record your PowerPoint presentation—or just a single slide—and capture voice, ink gestures, and your video presence. The completed recording is like any other presentation. You can play it for your audience in Slide Show or you can export it as a video file. So instead of just handing the deck to someone, people can see your ...
Learn how to record a PowerPoint Presentation with audio and video simply by using the build-in PowerPoint functionalities and tools. You will learn how to...
Record narration and timings for your presentation in Microsoft PowerPoint to give it a professional and polished feel. Record narration and timings:1. Selec...
Step 3: Configure recording settings. With the Video Recording toolbar, you can set options like Cursor Capture and Effects, System Audio, and Webcam. If your webcam isn't showing, click on the webcam icon. If you have an external webcam, select the one you want to use by clicking the dropdown arrow next to the webcam icon.
To view, share or download a recording, click anywhere on the playback icon or title of the recording (Figure G). It should open in a new tab. It should open in a new tab. Within this tab, you might:
Record narration and timings for your presentation to give it a professional and polished feel.Record narration and timings:1. Select Slide Show -- Record Sl...
Let's see how to record a PowerPoint presentation in front of live audiences. Step 1 - save your PowerPoint presentation in OneDrive. Step 2 - open your PowerPoint slides from PowerPoint online. Step 3 - go to Present Live from the Slideshow Ribbon tab. Step 4 - share a live link with your audience.
You can start recording your presentation using the following method. Record Tab: To record a PowerPoint presentation, go to the Record tab and select whether you wish to record from the beginning, from the current slide, a specific area on the screen, or record audio. Slide Show Tab: you can also initiate recording a PPT via Slide Show ...
Step 3: Open Your PowerPoint Slides and Capture the Screen. Open your PowerPoint presentation and put it in "Slide Show" mode. With Panopto Express, you'll have two options for recording your slides: You can either record your slides by recording your screen or by recording the slides within the PowerPoint application.
Click and drag to select the area of your screen you want to record. Next, click the "Record" button in the screen recorder dock. A three-second countdown will begin. Once it reaches zero, your recording will begin. When you've finished recording everything, move your cursor back to the top of the screen where the dock was, and the dock ...
When you are finished recording, save your presentation: File > Save.The recording is now embedded on the slide you selected in step 1. To save the recording itself as a separate file on your computer, right-click the picture on the slide that represents the recording, and select Save Media as.In the Save Media As dialog box, specify a file name and folder location, then click Save.
Step 2: Select Record from the upper right hand corner of the PowerPoint window. Step 3: Make sure your recording and voice settings are set properly, then click the round Record button. Begin your presentation. Step 4: Click through your slide presentation and record your audio.
Enter the recording settings. In order to start recording, click on New Video, and then from the dropdown menu select Record a video. Step 4. Start the recording. Once you have selected whether or not you will use your Screen, Camera (or both), you can add some specific options and start recording.
To begin a recording of a PowerPoint presentation, move your cursor over the menu bar in Zoom. It's the series of options and buttons at the bottom of the app's screen. First, make sure that your microphone isn't muted. This setting is controlled by the Mute button, found on the left side of the menu bar.
You must have edit access to the slides in order to create a new recording. To open your presentation, go to Google Slides. To record your slideshow, in the top right, click Rec Record new video. To start recording, in the middle, click the red record button. To start over, pause and click Re-record. To save your recording, pause and click Save ...
Canva's free video presentation maker lets you record your voice and face as you present your slides online. You can also share your recordings with others, edit them with Canva's design tools, and access features like remote control and screen recording. Learn how to create engaging video presentations with Canva.
VEED is a complete browser-based tool that lets you do so much more than just record and share your Microsoft PowerPoint presentations. You can annotate your videos to make your presentation more informative. Edit your recording to add images, subtitles, and more. It is a professional all-in-one video-creation and editing software that's ...
In this video tutorial from Microsoft, you will learn how to record your PowerPoint presentation.You can record your PowerPoint presentation—or a single slid...
Step 1: Picking A Software. The first step in recording a presentation is choosing your software. The three most popular options are PowerPoint, Google Slides, and Zoom. Both are excellent choices, but they each have their pros and cons. PowerPoint is a Microsoft product and is part of the Office suite.
Start without video and Start with video are self-explanatory, so we won't dig into details. Step 5. Click on "Share Screen". The next step is to select Share Screen from the Zoom control bar. You have to also press Record at the beginning of your meeting (or presentation), and just click Pause/Stop recording.
To finish, click End recording on the top corner of the presentation screen. Wait for your recording to upload. On the next screen, you can do the following: Share a link to your recording: Click Copy link. Download your recording: Click Download. Delete your recording: Click Discard. Save your recording and go back to the editor: Click Save ...
In the Options dialog box, click the Customize Ribbon tab on the left. Then, in the right-hand box that lists the available ribbon tabs, select the Recording check box. Click OK. To get ready to record, select Record on either the Recording tab or the Slide Show tab of the ribbon.
Go to Record > From Beginning or Record > From Current Slide. In the recording screen, click on the Camera icon at the top. This will insert a round object containing your video in your slides ...
Open your Presentation (PowerPoint, Google Slides) Change to Slideshow or Presenter view In Webex Click Share Share your Screen or Application (PowerPoint) On the Share toolbar click Recorder On the Dropdown menu, Select Record in Cloud Click Record Present your content, moving from Slide to Slide as needed
Recording on your computer is currently only available from the desktop app. You can't record if you start a meeting from a device using the web app, such as a Chromebook. If you show your camera in front of the presentation when you share content, your camera video doesn't appear in the recording.
Copilot in Microsoft 365 is a workflow game changer because it infuses Copilot assistance across all of the 365 applications, including Word, Excel, PowerPoint, Outlook, and more, to assist with ...
Recent presentations, awards and publications include the following: Presentations Farley Grubb , professor of economics, presented his research on "The Origins of the Continental Dollar, 1775-1777: Explaining the Choices That Congress Had to Make When Creating a New Money," at the 61st Annual Meeting of the Public Choice Society in Plano ...
Auto-suggest helps you quickly narrow down your search results by suggesting possible matches as you type.
Technology tutorial, simple and quick video that walks you through step-by-step how to Record a Virtual Presentation with Zoom - One or More Presenters Power...