
Cloud Storage

Custom Business Email

Video and voice conferencing

Shared Calendars

Word Processing

Spreadsheets
Presentation Builder

Survey builder

Google Workspace
An integrated suit of secure, cloud-native collaboration and productivity apps powered by Google AI.

Tell impactful stories, with Google Slides
Create, present, and collaborate on online presentations in real-time and from any device.
- For my personal use
- For work or my business

Jeffery Clark
T h i s c h a r t h e l p s b r i d g i n g t h e s t o r y !

E s t i m a t e d b u d g e t

Make beautiful presentations, together
Stay in sync in your slides, with easy sharing and real-time editing. Use comments and assign action items to build your ideas together.

Present slideshows with confidence
With easy-to-use presenter view, speaker notes, and live captions, Slides makes presenting your ideas a breeze. You can even present to Google Meet video calls directly from Slides.

Seamlessly connect to your other Google apps
Slides is thoughtfully connected to other Google apps you love, saving you time. Embed charts from Google Sheets or reply to comments directly from Gmail. You can even search the web and Google Drive for relevant content and images directly from Slides.

Extend collaboration and intelligence to PowerPoint files
Easily edit Microsoft PowerPoint presentations online without converting them, and layer on Slides’ enhanced collaborative and assistive features like comments, action items, and Smart Compose.

Work on fresh content
With Slides, everyone’s working on the latest version of a presentation. And with edits automatically saved in version history, it’s easy to track or undo changes.

Make slides faster, with built-in intelligence
Assistive features like Smart Compose and autocorrect help you build slides faster with fewer errors.

Stay productive, even offline
You can access, create, and edit Slides even without an internet connection, helping you stay productive from anywhere.
Security, compliance, and privacy

Secure by default
We use industry-leading security measures to keep your data safe, including advanced malware protections. Slides is also cloud-native, eliminating the need for local files and minimizing risk to your devices.
Encryption in transit and at rest
All files uploaded to Google Drive or created in Slides are encrypted in transit and at rest.
Compliance to support regulatory requirements
Our products, including Slides, regularly undergo independent verification of their security, privacy, and compliance controls .
Private by design
Slides adheres to the same robust privacy commitments and data protections as the rest of Google Cloud’s enterprise services .

You control your data.
We never use your slides content for ad purposes., we never sell your personal information to third parties., find the plan that’s right for you, google slides is a part of google workspace.
Every plan includes

Collaborate from anywhere, on any device
Access, create, and edit your presentations wherever you are — from any mobile device, tablet, or computer — even when offline.

Get a head start with templates
Choose from a variety of presentations, reports, and other professionally-designed templates to kick things off quickly..

Photo Album

Book Report

Visit the Slides Template Gallery for more.
Ready to get started?
- PRO Courses Guides New Tech Help Pro Expert Videos About wikiHow Pro Upgrade Sign In
- EDIT Edit this Article
- EXPLORE Tech Help Pro About Us Random Article Quizzes Request a New Article Community Dashboard This Or That Game Popular Categories Arts and Entertainment Artwork Books Movies Computers and Electronics Computers Phone Skills Technology Hacks Health Men's Health Mental Health Women's Health Relationships Dating Love Relationship Issues Hobbies and Crafts Crafts Drawing Games Education & Communication Communication Skills Personal Development Studying Personal Care and Style Fashion Hair Care Personal Hygiene Youth Personal Care School Stuff Dating All Categories Arts and Entertainment Finance and Business Home and Garden Relationship Quizzes Cars & Other Vehicles Food and Entertaining Personal Care and Style Sports and Fitness Computers and Electronics Health Pets and Animals Travel Education & Communication Hobbies and Crafts Philosophy and Religion Work World Family Life Holidays and Traditions Relationships Youth
- Browse Articles
- Learn Something New
- Quizzes Hot
- This Or That Game New
- Train Your Brain
- Explore More
- Support wikiHow
- About wikiHow
- Log in / Sign up
- Computers and Electronics
- Website Application Instructions
- Google Applications
How to Create a Presentation Using Google Slides
Last Updated: November 30, 2023
wikiHow is a “wiki,” similar to Wikipedia, which means that many of our articles are co-written by multiple authors. To create this article, 17 people, some anonymous, worked to edit and improve it over time. This article has been viewed 235,515 times. Learn more...
This tutorial will show you how to make a PowerPoint-like presentation using Google Slides. Presentations can be used for school, business, and so much more.

- You can also just type in https://slides.google.com , log in if you haven't already, and will be taken to the Slides page.
- If you don't have a Google account, learn to create one now!

- For more options, hover over the arrow on the right edge of the Google Slides option, where a smaller drop-down menu will appear. From here you can select to create a presentation from a template or a blank slide.

- Be sure to add a title and subtitle by clicking where you are prompted to add text.

- You can also change a pre-existing slide's layout by clicking the layout option on the upper editing bar.

- As you add animations to each element by clicking the blue "+ Select an object to animate", they will begin to pile up. Click on each one to edit it.
- Change the transition from slide to slide by clicking the default "Slide: No transition" at the top of the sidebar. You can choose whether to apply to all slides or just one.
- Preview your animations by clicking Play at the bottom of the sidebar.
- Remove an animation by clicking the small x on its rectangle, and drag each animation up or down to change the order.

Community Q&A
wikiHow Video: How to Create a Presentation Using Google Slides
- If you have a pop-up blocker, make sure to disable it so Slides can work properly. Thanks Helpful 0 Not Helpful 0
- Hover over each tool to see its keyboard shortcut and function. Thanks Helpful 0 Not Helpful 0
- Remember, these are the basic functions- Google Slides contains many more tools that you can work with as you explore the creator. Thanks Helpful 0 Not Helpful 0

You Might Also Like

About This Article
To create a new Google Slides presentation, open a web browser and go to Slides.Google.com. If you want to start from a template, you can choose one from the template gallery. Otherwise, click "Blank" to create a new blank presentation. Your blank presentation starts with a single simple slide with space to enter a title and subtitle. You can personalize this slide, as well as other slides you add, by editing the placeholder text, as well as choosing a slide theme from the panel to the right. To insert another slide, click the "Insert" menu and select "New Slide," or press "Control M" for a quick keyboard shortcut. You'll also find other things you can add to your slide on the Insert menu, including the option to add an image, a text box for typing, videos, shapes, charts, and other features. After adding a new slide, click the "Layout" menu to choose a slide layout—you can give each slide its own layout or reuse the same layout as much as necessary. Edit the placeholder text, and then insert objects from the Insert menu. To move an object, click the arrow in the toolbar, hover the mouse cursor around the object's border line until it turns to a 4-point arrow, and then click and drag it. Each slide you add will have a thumbnail in the left panel—click a slide's thumbnail to open that slide for editing. To see your presentation as a viewer would, click your first slide in the left panel, and then click "Present" at the top corner. Click the Escape key to go back to editing. Google Slides also has some built-in effects you can access from the "Transition" menu—here you can animate a slide's transition into the next slide, as well as animate individual objects. To apply an effect, background, theme, layout, or any other setting to more than one slide at once, select the slides in the left panel by holding down the Control key as you click each thumbnail. Your presentation will automatically save to your Google Drive as you work—type a name for the presentation in the top-left corner so you can easily find the file when you need it. Did this summary help you? Yes No
- Send fan mail to authors
Is this article up to date?

Featured Articles

Trending Articles

Watch Articles

- Terms of Use
- Privacy Policy
- Do Not Sell or Share My Info
- Not Selling Info
Keep up with tech in just 5 minutes a week!
How to Create a Presentation in Google Slides
Still unfamiliar with Google Slides? Here's how you can create a basic presentation from start to finish.
About a year ago I was informed by an acquaintance that Google Slides---the free-to-use, online, collaborative presentation app---was the poor man's version of PowerPoint.
This observation took me back a bit because I couldn't understand where the animosity was coming from. I also found the critique unfair. Google Slides is a great program that allows you to create everything from workplace presentations to cookbooks. The only requirement is that you have a Google account.
However, this critique got me wondering about how many people are unfamiliar with Google Slides. To clear up some of these misconceptions, here's how you can create a basic presentation from start to finish.
Step 1: Set Up Your Document
The first thing you'll want to do is open up the Google Slides application. If you don't have an account or you're an infrequent user, here's our beginner's guide to Gmail , which will explain how Gmail is useful when controlling the associated app.
If you're in Google Drive, click New > Google Slides > From a template .
You can use a blank presentation if you want, but for this tutorial, we're just going to tweak a pre-existing design. There are fewer steps involved and it will be quicker for you.
Once you click on From a template , you'll be taken to the template gallery.
Like Canva, Google groups templates according to the purpose. One of the most common uses for a slideshow is a work presentation, so for this tutorial lets go with a General presentation .
When you open up your template, you'll see a screen that looks very similar to this one.
Along the top, you'll see your navigation bar. To the left side of your workspace you'll see your template pages in the order they are currently laid out.
In the center of your workspace, you will see a larger version of the page you currently have active. To the right side of your workspace, you should see another dropdown menu called Themes .
Step 2: Know Your Navigation Bar
Google Slides is expansive, but one of the most important things you'll need to know is the navigation bar at the top of your workspace, and what each dropdown menu contains.
Under File , you'll see the basic options for controlling your Google Slides presentation. This includes sharing, importing slides, downloading slides, basic page setup, print settings, and language.
Under Edit , you'll find the basic tools to control each individual page. This will include options to undo an action, redo an action, cut, copy, and paste.
Under View , you'll see the different ways that you can view your presentation. You can also see the option to go to Animations .
If you want to include animations in your presentation, check out our tutorial on how to add animated GIFs to Google Slides .
Continuing on: if you click on the Insert menu, you'll see different options for content that you can include in your presentation.
Under Format , you'll find all the tools that you will need to adjust your text, from font styles and alignment to bullets and numbering.
The Slide menu allows you to make large changes to your overall presentation. The Arrange menu allows you to organize the elements on each individual page.
The Tools menu lets you fix your spelling, look up words in the dictionary, and add accessibility options to your presentation.
The Add-ons menu is a shortcut to special features you can add to your Google Slides.
Lastly, there's the Help menu. By clicking here you can receive additional training or search for updates.
Related: How to Add Audio to Google Slides
Step 3: Change Your Theme
Once you finish browsing through the menus and get a general idea of what each one does, you'll want to look at your Themes . As mentioned earlier, Google Slides groups presentations according to a purpose. Inside each group, you will find visual themes you can apply to your slideshow.
Themes can include specific fonts, colors, and styles. When you click on one, it's a quick and easy way to make sure everything looks uniform.
To change your theme, simply scroll the options available on the right-hand side of your workspace. Click on the one that suits your needs.
Step 4: Change Your Font
After you pick your theme, you'll want to start inputting your own information into your slideshow.
To change the placeholder text, simply click on each box and start typing. You can also change the font and font color, too.
To change the color, make sure the font you want to change is selected. Then click on the font color option, seen here in red.
When you click on it, a dropdown menu with swatches will emerge. From here, you can choose the colors that are already available to you in your color palette, or you can create a brand new color by clicking on Custom .
If you want to change the font style, once again make sure your text is selected. Then click on the font dropdown menu. Choose the style you want.
A word of warning: make sure the font you choose is easy to see. Most presentations are viewed from a distance.
Step 5: Change Your Background
When you're putting together this presentation, you might decide that the background is boring or that you don't like the way that it looks.
To change the background, right-click on a slide's page. When you do, make sure the text on that page is not selected. Then choose Change Background .
Once the new dialogue box pops up, you can change your background color, put an image in the background, or reset the background a previous default state.
Under Color , you can also choose a solid color or a gradient for your background. You can create custom colors and gradients too.
Once your background is finalized, you can either choose Done or Add to theme .
If you add this background to your theme, any pages in your presentation that have a matching background will mirror these new changes you've made.
Once it's applied, click Done .
Step 6: Replace an Image
What if there's a placeholder image in your template, and you want to swap it out?
To do this, click on the image to want to replace so its blue bounding box appears. Next, click Replace Image , seen here in red. You can then choose to upload an image from your computer, search the web for an image, or insert an image via URL.
A word of warning: make sure you have permission to use the photos you're inserting. If you're struggling to find images, here's a list of sites where you can find royalty-free stock photos .
Step 7: Delete a Slide
While you're working through these slides, you may notice that there's a page or two in the template that you don't need.
To get rid of these pages, go to the left-hand side of your workspace. Right-click on the page you want to remove.
Click Delete .
Step 8: Move a Slide
Sometimes you'll see a slide that you really like the layout for, but it's in the wrong place for your presentation.
To move a slide to the end---for example---right-click on the page you want to move, then choose Move slide to end . It's that simple.
Step 9: Add Transitions
Once you're done setting up your presentation, you can start thinking about how you'll "present" this slideshow. How do you want it to progress? Do you want a little animation between each of the pages?
To add a "transition" between two of your slides, right-click on the page you want to adjust, then click Change Transition .
When you do, your toolbar on the right-hand side of your workspace will show you new options that you can use. Choose the option you want from the dropdown menu. You can also choose to apply this transition to the whole presentation or just an individual slide.
And that's it. You're done your basic presentation.
Good Luck on Your Google Slides Presentation
Google Slides is an expansive application, and while we didn't cover all the bells and whistles we did run through the basics. With this application on your side, you'll never need to worry about your work looking unprofessional, whether you have access to other slideshow programs or not.
Want to learn more about Google Slides? Here are tips you should know before your next presentation .
15 Tips to Make an Amazing Google Slides Presentation Design!
By: Author Shrot Katewa

There are many reasons that people like to use Google Slides. It could be for a school project, work presentation or just to share information with friends and family.
Whatever the reason, one thing is certain: you want your design to look amazing! If you want an easy way to create a great-looking design for your next presentation then this blog post is for you.
In this article, we will go over 15 tips on how to make an amazing design using Google Slides. Whether it’s your first time creating a presentation on Google Slides or if you’re an experienced professional, these tips are sure to help guide you in the right direction!
So, let’s get started!
Note – if you are strapped for time , simply considering outsourcing the presentation design process to a professional! I’d recommend using Fiverr . It is completely hassle-free to set up and start using. Plus, you don’t need to pay anything to hire a professional. You only pay for the slide design! And, you can start with as little as $5 to $10 per slide!
Tips to Make an Amazing Google Slide Presentation Design!
Since this is going to be an action-packed article with a ton of suggestions, let’s just dive right in with the tips!
1. Create a Compeling Narrative Through a Story Arc
A presentation is only as good as the narrative it holds!
If your presentation doesn’t leave “ food for thought ” for your audience, they are less likely to remember your presentation, and even less likely to take any action afterward (which is mostly bad news especially if you are trying to convince your investors to give you more money!)
Presentation design goes hand-in-hand with the content that is going to be used for the presentation. Thus, start with a compelling story.
The best way to create a convincing story for your presentation is to use the “ Story Arc “.
A “ Story Arc ” or a “Narrative Arc” is something that has been successfully used by storytellers and writers for ages. The keyword here is “successfully”!
A powerful narrative can not only help your audience understand the intricacies of the subject of the presentation, but it also makes the presentation engaging and entertaining.
The best way to start working on a story arc is to either look at what is the most important aspect of your presentation and how can it be emphasized in a manner that takes the role of a protagonist?
Another way that I’ve used the story arc in my presentations successfully is to work backward. Think of what is the end outcome that you expect, and try to track things backward in order to achieve the end outcome.
No matter what approach you take, if you are able to fit a story arc in your presentation, you’d be golden!
Finally use stories from your life, or what you experienced while working on a project! I’ve seen this works really well and resonates with the audience. Here’s a quick video on tips for using storytelling in your presentation.
2. One Topic Per Slide
Now that you’ve identified the larger part of what you going to cover in your presentation – in other words, the content, you now need to lay it out on your presentation such that it can be consumed by your audience comfortably!
One of the simplest tips to design a better presentation is to make sure that you don’t cramp all the information in a single slide or 4-5 slides! Make sure that you spread out the presentation on multiple slides so that the audience can absorb all the information, but in short bursts, and then move on to the next topic!
A good rule of thumb for a good design is to try and cover just 1 topic on a slide.
I’ve seen this work plenty of times, and I personally also use this technique for my presentations. Simply divide the content of your presentations first into multiple key sections. Then, divide the sections further into key topics that should be covered within that section.
You can do this activity on a sheet of paper or just on the first slide of the presentation. Once you’re done with this activity, you’ll realize that the outline that you’ve just created also serves as the “Agenda” or the “Table of Contents” slide.
Now, all you’re left to do is fill in the information that needs to go under each topic.
You may be wondering how is this a design tip. Well, when you have just one concept present on a slide, it is not only easier for your audience to consume, but also easier to design. You’ll realize this when designing the presentation and thank me later!
Remember, there will be times when you will not have much to say about a particular topic, your slide will look empty, and you will be tempted to add another topic on the same slide. Don’t fall for that. Instead, use images that accentuate the text or the topic of the slide.
3. Start with a Template (Don’t Design from Scratch!)
This next tip might seem a bit obvious to some.
But, the reality is that quite a lot of people tend to miss out on the fact that you can use presentations that already look good, and just customize the slides for your content!
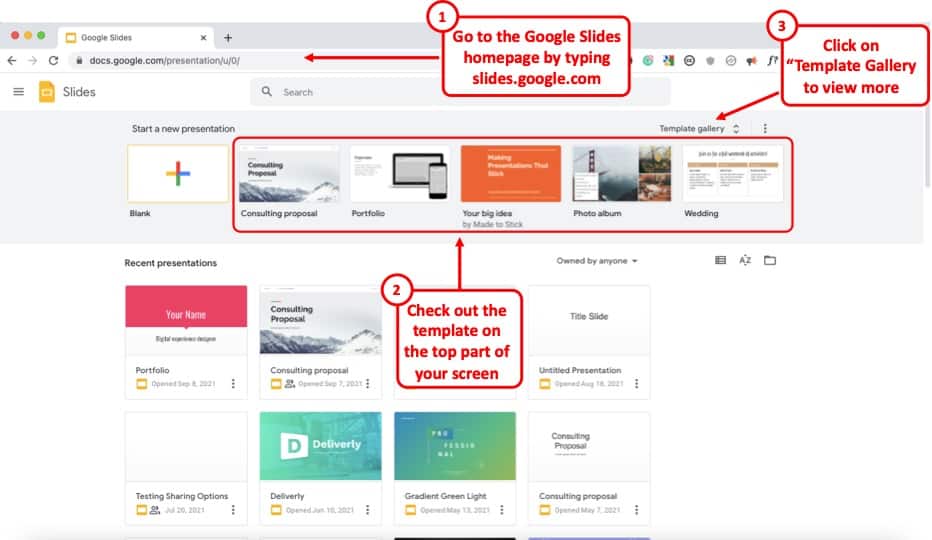
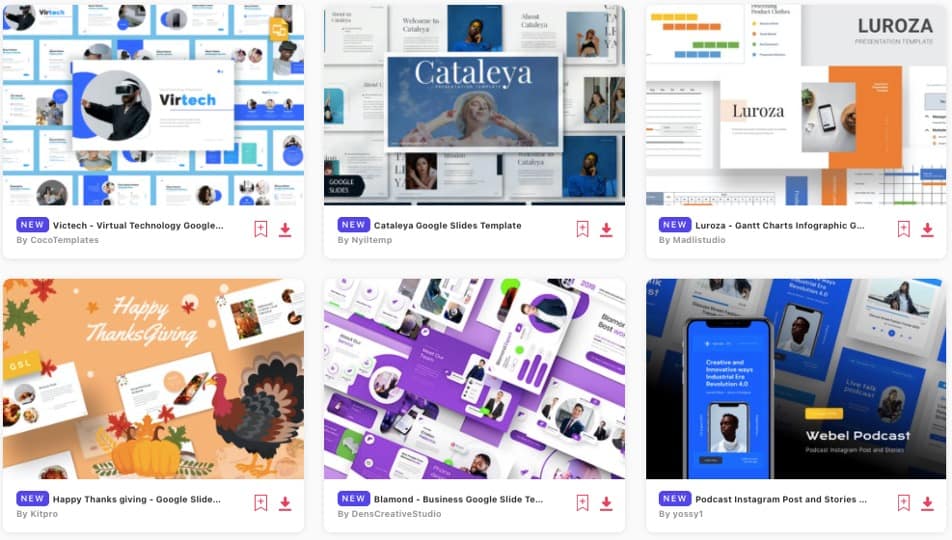
Google Slides already provides you with a number of free templates. Here’s how you can access them –
- First, visit your Google Slides dashboard page.
- Login to your Google Account (if prompted)
- Choose a template from “Start a new presentation” section
- You can also click on “Template Gallery” to view more templates.
The one template that I end up using over and over again is the file name “ Consulting Proposal “. It has got a sleek modern design, a good mix of image slides as well as different text placeholder slide layouts for you to easily edit your presentation.
But, feel free to check out other templates and see which one fits your need the best.
The point here is that if you are not great at designing a presentation, you’d perhaps be better off using a template rather than starting from scratch!
4. Use Fonts the Right Way
When it comes to designing a good presentation on Google Slides (or any application for that matter), fonts do play a key role in how your presentation looks!
Thus, it is important to make sure that you use the fonts correctly when creating your presentation.
Here’s what you need to remember when using fonts for your presentation –
- Use Just One or Two Fonts – Don’t use too many fonts in your presentation. Your presentation design will not look good. Plus, using too many fonts in a presentation shows lack of consistency and professionalism in design.
- Combine Fonts – Ideally, just use one font if you are unsure of which fonts work great together. But, you can also combine fonts to make the content of your presentation standout!
If you do want to go with a two-font option, use the Google Fonts tool to identify the font combination.
Here’s how you can find a good font combination for your presentation –
Step 1 – Visit Googe Fonts and Search for a Font
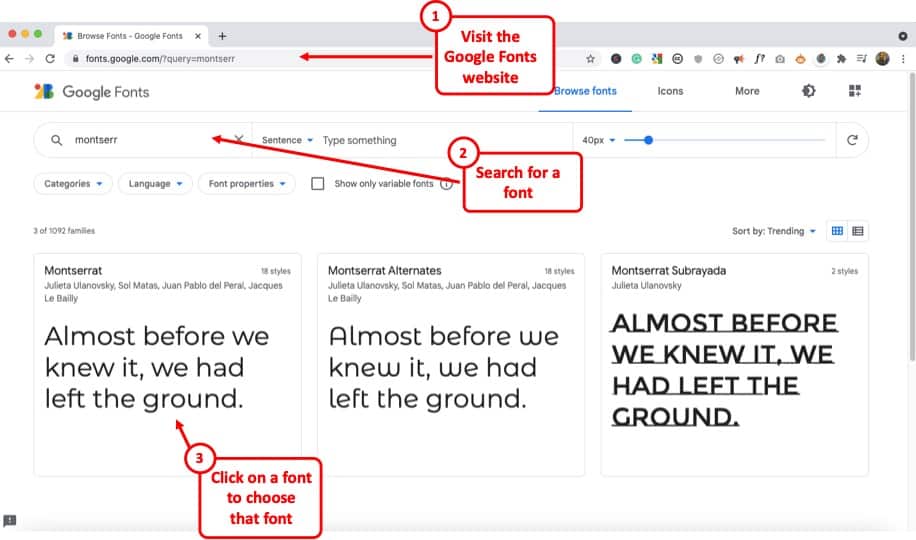
Google Fonts site provides free fonts that are compatible with most modern internet sites and web browsers. Google Fonts are considered the gold standard for sites as these look very modern and are light.
The best thing is – most of them are already available in your Google Slides presentation by default.
So, the first step is to visit the Google Fonts website . Then, search for a font, to begin with. My favorite font is Montserrat . But, you can also go with Lato, Roboto, or Source Sans Pro if you are looking for a Sans Serif Font .
If you are looking for a Serif font , I would recommend using Merriweather .
Step 2 – Choose the Font and click “Pairings”
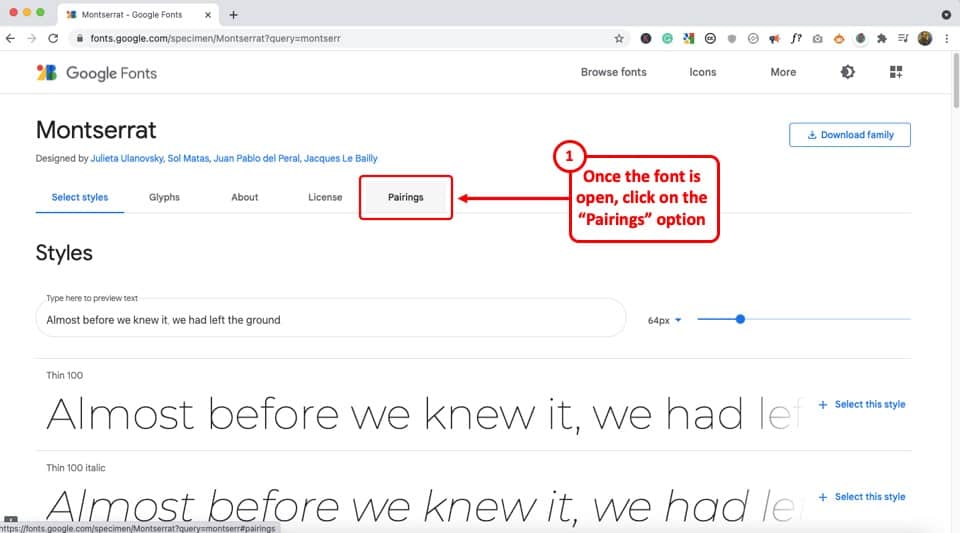
The next step is to choose a font. You can either type one of the fonts that I mentioned in the search bar and click on it once it appears OR you can also simply choose from the list provided below.
Just make sure that you click on the font that you like to open it.
Once the font is open, click on the “Pairings” tab on the top (as shown in the image).
Step 3 – Choose a Font Pair
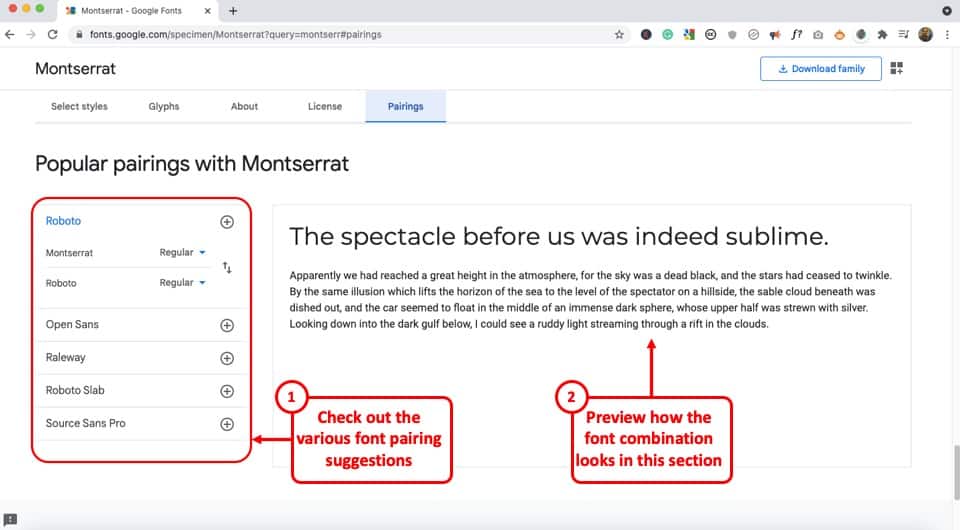
Now simply choose one of the font pairs provided by Google Fonts. You can also click on a font pair to see how it looks on the section on the right.
Play with the options provided and choose the font combination that you like.
Now, simply go back to your Google Slides presentation and change the fonts according to your selection.
5. Choose the Right Color Combination
Just the way fonts are an important part of your Google Slides presentation design, choosing a good color combination can make your presentation look visually appealing, consistent, and professional.
Unfortunately, a lot of struggle with choosing a good color combination. Thus, I highly advise going with a monochromatic color scheme.
A monochromatic color scheme in a presentation provides a variety of color combinations of the same color. This makes your presentation look consistent and professional.
Moreover, using a monochromatic color scheme is a perfect way option for a beginner as it requires the least amount of time and effort to set up!
Check out my other article on using a monochromatic color scheme for presentations to understand the topic in-depth.
Then, also check out how to use the eyedropper tool in Google Slides to implement the color scheme that you end up choosing.
Make sure that you change the color at the theme level in Google Slides instead of changing it on every single slide. This will save you quite a bit of time!
6. Use the Expore Tool to Generate Slide Designs
Once you’ve decided the fonts, color scheme, and theme, and you have the content structured out, you’ve done most of the hard work!
All you are now left to do is create the slide designs. And, to help you with that, make sure that you use the “ Explore Tool ” in Google Slides.
The “Explore” feature in Google Slides generates slide designs based on the content that is already present on the slide. It is a great way to get a slide designed almost instantaneously!
The “Explore” feature in Google Slides works much as the design ideas feature in PowerPoint.
Based on the content on the slide, it will throw a few suggestions on how the content can be laid out on the slide. You can choose the design you like. If not, you can still design your own slide. But, it is definitely worth trying out first. Pretty cool, isn’t it!
I wrote a detailed article on the Explore Feature in Google Slides . Make sure you check out that article to learn where to find this tool and know how to use it!
That said, one thing to keep in mind is that this feature is still an experimental tool . And, while it is getting better with time, I wouldn’t recommend using it with every single slide.
In my experience, I’ve noticed that using the “Explore” feature in Google Slides works best when you want to create a title slide, a section break slide, or just want to get a few ideas on how the slide can be designed.
7. Apply the 3 by 3 Design Rule
The 3 by 3 design rule, otherwise also known as “ the rule of thirds “, is a principle that has been borrowed from photography. But, it is every bit applicable even for slide designs and other design elements!
As per the 3 by 3 design principle, you basically need to divide the visual canvas into 3 equal-sized vertical and horizontal grids with the help of 2 vertical grid lines and 2 horizontal grid lines.
Here’s a video that explains the concept of the rule of thirds for presentations –
Using these grids helps place the content correctly in the grids such that the key message usually aligns with the way our eyes like to see them visually!
The 3 by 3 design principle may seem confusing at first, but once you’ve understood how to use it, you can literally take your presentation design skills a few notches above the rest!
Using 3X3 Grids to Properly Layout Content on your Slides
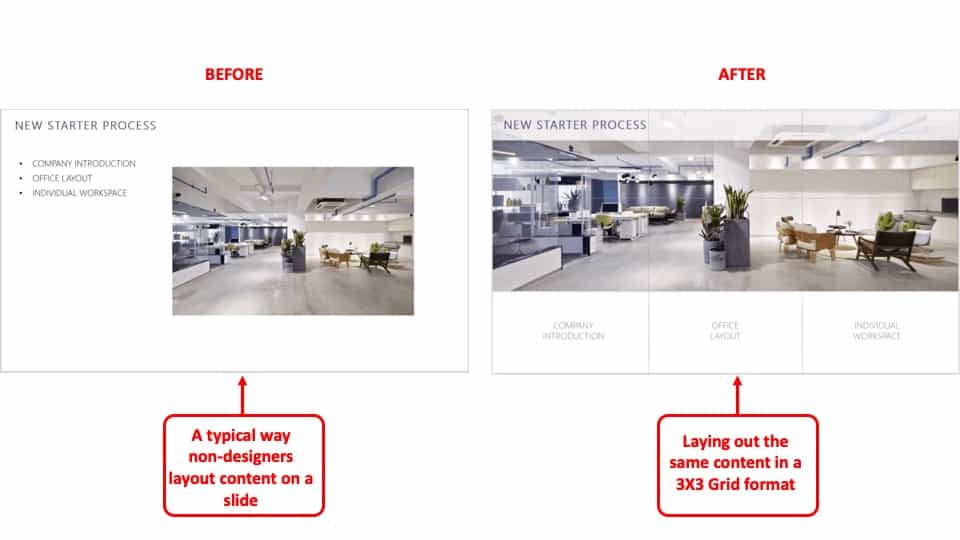
The interesting thing is, you can take the same principle to make it work with elements apart from the images that are present on your slide. And, the results are just amazing!
The picture above shows how most people design their slides (on the left). However, you can literally transform the way your slides look by applying the concept of 3×3 grids to any existing content on the slides! (as shown on the right part of the picture above)
Here’s another video that explains how this concept of 3 by 3 grids can be used to take any existing slides and make them better (if they aren’t properly organized).
8. Use Powerful Images
They say – “An image speaks a thousand words!”. This absolutely holds true when it comes to big impact presentation!
If you recollect any one of the top presentations from Steve Jobs. His presentation was almost always using powerful images with very few words on them.
Using images, as opposed to a lot of text, on your presentation has a few advantages of its own –
- Visual Appeal – Using images makes the slide visually appealing. Think about it – if there aren’t too many objects placed on the slide, the chances of making design related mistakes are also far lower!
- Emotional Connect – Using images creates a subtle emotional connect in the minds of the audience with the topic of the presentation and/or the presenter.
- Audience Focus – When you use text on a presentation, often the audience just reads the text and doens’t want to listen to the presenter. Instead, when using the images, you control the focus of the attention of your audience. Once you have their attention, making a presentation impactful is a lot easier!
- Faster Design Process – In most cases, it is faster to find an image and add it to the presentation rather than think of a way to design a slide to communicate a concept. This is especially true if you have only basic design skills.
If you watch some of the most famous TED or TEDx presentations ( know the difference between TED and TEDx presentations here ), it is quite common to see presenters using high-impact images with text. Ever wonder why is it so?
Well, one of the most important reasons is that you are able to control the attention of the audience!
Now, if you are wondering how to find images for your presentation, keep reading as I’ve got some great recommendations for add-ons later in the article!
9. Keep the Text on the Slide Readable
If using images for most slides is not the way for you, then this section is going to be quite important!
In fact, even if you do plan to use just images on your slides, there may still be a few slides where you will need to have some text. If so, make sure that the text on the slide is readable!
Make sure that you don’t use text that is too small to read.
As a general rule – the further the audience is going to be away from the screen, the larger the size of the text!
Here’s what to remember for the size of the text on the slides –
- Presentation seen on a computer screen – If the presentation that you are designing is going to be seen on a computer screen (either over an email or a zoom call), then make sure that the font size used for the presentation is not less than 16 points .
- Presentation seen on a large screen – If the presentation is going to be delivered in an auditorium, then it is recommended to use a font size no less than 30 points . For the rest of the situations, anything in between should be fine!
Also, make sure that you don’t use too much text on the same slide. Remember – you only need to cover one key topic on one slide.
It is totally okay to just use one word in the middle of the slide, and talk about that topic rather than using text from a complete word document on a slide!
If your audience will have to squint to read what is written, it just creates a bad user experience and they quickly lose interest.
Also, for the above reason, don’t include everything on the slide that you plan to say! If you do so, you may come across as a person who is just reading from the slide! Most importantly, the audience is going to end up reading the text from the slide faster than you speak, and end up losing interest in the presentation!
10. Ditch the Bullet Points (Use Infographics Instead!)
Using bullet points on a presentation is so 1990s! It’s just not the way good presentations are given anymore!
If you want your presentation design to look good, make sure that you get rid of bullet points. Instead, you can either use images, icons, or even infographics!
I’ve written an entire article on how to use infographics in Google Slides where I also talk about SmartArt and charts in Google Slides. Make sure you check out that article!
There are a ton of different ways in which you get infographics for Google Slides. I’ve talked about that also in the same article that I’ve linked above.
Likewise, you can also use icons instead of bullet points. Although adding icons to Google Slides is not an option that is available by default, there are a few ways you can work around this problem. For instance, you can use an add-on like “Flaticon” that provides free icons for Google Slides!
If you are wondering how to create a slide with bullet points and use icons or other methods, here’s a good example of an actual client slide that I redesigned –
As you can see on the image, simply using icons and structuring the text to give proper hierarchy to the information can make all the difference to the design of the slide!
In case you don’t want to use icons, you can also use numbers with circles, and use a similar design instead of just adding bullets to your presentation. If you do so, your presentation will still look good!
11. Avoid Using Just Table or a Graph
The next tip to remember is to avoid using just a table or a graph on a slide. Make sure that you also include a few points that act as key takeaways from the information that you provide.
Using just a table will present a lot of information on a single slide. This will definitely cause an information overload. And, even though your audience may be able to assess what is being presented to them, it is important to either highlight key pieces of information in the table or a graph.
Alternatively, you can also add a couple of lines of text indicating the key learnings from the data set.
Don’t get me wrong, it is important to have data sets on a presentation if you have one! But, just make sure that you also highlight key pieces of information that your audience should pay attention to.
12. Keep Animations and Transitions Subtle
Another design tip that you should keep in mind is the use of animations and transitions in Google Slides.
You want to make sure when using animations in Google Slides , you don’t add any funny movements. Think old school when using animations and transitions in your presentation.
Any additional movement or sudden transitions can distract the attention of the audience from the core topic and the messaging of the presentation.
So, make sure that you keep the use of such animations or transitions to the minimal!
13. Use Professional Google Slides Templates
If you find that the free template doesn’t have enough slide layouts for your presentation or doesn’t really fit the topic of your presentation, you may want to consider using professional templates!
There are a ton of different ways you can get templates for Google Slides. Unfortunately, most of the free options (and even most paid options) have outdated designs!
My personal favorite method for getting amazing Google Slides presentation templates is using Envato Elements .
The best part about using Envato Elements is that not only does it provide you with the best-in-class designs for your templates, but it also provides you with an option to download an unlimited number of presentations! (yes, you hear that right!)
Moreover, the pricing of Envato Elements is also really affordable! All you need to do is click on Envato Elements to visit the website, view the templates, and click on the “ Get Unlimited Downloads ” button on the top.
You will be prompted to sign up and pay a subscription. Just go for a monthly subscription and pay for one month (You can easily remove the payment method and cancel your subscription anytime).
Once you’ve logged in, simply cancel your subscription. Your subscription will be valid until the next date of renewal even if you cancel it.
Now, for the one month that you’ve paid, feel free to download all the templates that you like including templates for Google Slides, and PowerPoint!
14. Use Add-ons for Faster and Better Designs
One of the challenges with Google Slides, as opposed to some of the most reliable presentation design software, is the limited number of features it offers.
I suppose we should not really be complaining about it given that we do get a great presentation design application for free along with several additional advantages with Google Slides ! That said, you do feel the need for a few pro-features that PowerPoint has to offer.
However, one way to fix this problem is to use add-ons with Google Slides!
Using add-ons allows you to use third-party tools and bring additional functionalities to your Google Slides presentation!
Add-ons on Google Slides are easy to add. Simply go to the Google Marketplace, and search for the add-on that you would like to add. Install it, and you are done!
Check out my complete guide on using Add-ons on Google Slides where I not only talk about how to use add-ons in Google Slides, but I also provide you with my personal favorite top 5 recommendations of add-ons that you should be using in Google Slides!
15. Hire a Professional
Well, the last tip is not so much as a tool that you can use on Google Slides. But, it is a great hack to ensure that you create great presentation designs!
Simply hire a professional to do the design work for you! You may be wondering that hiring a presentation professional might be difficult. However, that is not the case.
You can easily find some really good presentation designers on Fiverr , and you can start at as little as $5 to $10 dollars per slide! I’ve personally used freelancers from the site, and although finding a good freelancer may take you 15-20 minutes, you can easily outsource your work and let the designer worry about the rest!
The best part is – you don’t have to pay a single penny to hire a professional. You only pay to get the work done!
There are a ton of other platforms to hire professionals that can design a good presentation for you. However, I have found Fiverr (especially for presentation design work) and Upwork to be the most effective.
A Few Things to Remember When Delivering the Presentation
Once you have created an amazing Google Slides presentation, you are perhaps ready to deliver the presentation. However, I’d like to also share a couple of tips that can be helpful when you plan to give the presentation!
So, here they are –
1. Use a Presentation Remote
It doesn’t matter whether you are giving a presentation in an auditorium or online through Zoom or Microsoft Teams.
Using a presentation remote helps you keep your hands free and allows for free movement and hand gestures. This does help engage with your audience.
Check out my other article on using presentation clickers with Google Slides where I provide you with a few tips and recommendations on which remote you should go with.
2. Use the Q&A Tool in Google Slides
A unique feature that Google Slides provides is the Q&A tool. This is great especially if you are delivering a webinar-style presentation or if you are simply addressing a large gathering.
This tool allows your audience to send questions during the course of your presentation. Then, at the end, you can simply view the questions in the Q&A session and answer them one by one!
It is a great way to deliver an engaging presentation using Google Slides!
Credit to cookie_studio (on Freepik) for the featured image of this article (further edited).

- SUGGESTED TOPICS
- The Magazine
- Newsletters
- Managing Yourself
- Managing Teams
- Work-life Balance
- The Big Idea
- Data & Visuals
- Reading Lists
- Case Selections
- HBR Learning
- Topic Feeds
- Account Settings
- Email Preferences
How to Make a “Good” Presentation “Great”
- Guy Kawasaki

Remember: Less is more.
A strong presentation is so much more than information pasted onto a series of slides with fancy backgrounds. Whether you’re pitching an idea, reporting market research, or sharing something else, a great presentation can give you a competitive advantage, and be a powerful tool when aiming to persuade, educate, or inspire others. Here are some unique elements that make a presentation stand out.
- Fonts: Sans Serif fonts such as Helvetica or Arial are preferred for their clean lines, which make them easy to digest at various sizes and distances. Limit the number of font styles to two: one for headings and another for body text, to avoid visual confusion or distractions.
- Colors: Colors can evoke emotions and highlight critical points, but their overuse can lead to a cluttered and confusing presentation. A limited palette of two to three main colors, complemented by a simple background, can help you draw attention to key elements without overwhelming the audience.
- Pictures: Pictures can communicate complex ideas quickly and memorably but choosing the right images is key. Images or pictures should be big (perhaps 20-25% of the page), bold, and have a clear purpose that complements the slide’s text.
- Layout: Don’t overcrowd your slides with too much information. When in doubt, adhere to the principle of simplicity, and aim for a clean and uncluttered layout with plenty of white space around text and images. Think phrases and bullets, not sentences.
As an intern or early career professional, chances are that you’ll be tasked with making or giving a presentation in the near future. Whether you’re pitching an idea, reporting market research, or sharing something else, a great presentation can give you a competitive advantage, and be a powerful tool when aiming to persuade, educate, or inspire others.
- Guy Kawasaki is the chief evangelist at Canva and was the former chief evangelist at Apple. Guy is the author of 16 books including Think Remarkable : 9 Paths to Transform Your Life and Make a Difference.
Partner Center
How-To Geek
How to autoplay and loop a google slides presentation.
Play your presentation without touching a thing.
Quick Links
Set up autoplay and loop when presenting, set up autoplay and loop when publishing to the web.
If you don't want to worry about clicking through your slideshow, you can set up Google Slides to play your presentation automatically. Plus, you can have the slideshow loop, so it starts over at the beginning when it ends.
You might be playing your slideshow at a kiosk, during a conference, or publishing it to the web. These are the ideal times to use AutoPlay and Loop in Google Slides . You can automatically present the show and choose the timing between slides. Then, restart the presentation at the beginning each time it ends.
If you plan to start the slideshow and then let it play, you can set up AutoPlay and Loop , or simply one or the other.
Related: How to Loop a PowerPoint Presentation
Start the presentation by clicking "Slideshow" at the top of Google Slides. You can also use the arrow to pick either "Presenter View" or "Start From Beginning" per your preference.
When the slideshow opens, display the Presenter Toolbar by hovering your cursor over the bottom left corner of the presentation.
Click the three dots on the right of the Presenter Toolbar, then move to AutoPlay. You'll see a pop-out menu that lets you select the advance timing for the slides. You can pick from every second up to every minute.
If you also want to loop the slideshow, select "Loop" at the bottom of the pop-out menu.
When you finish, click "Play" to automatically play your presentation.
To stop the slideshow, simply click on a slide. You can then resume AutoPlay from the Presenter Toolbar by selecting "Play" again.
Maybe you plan to publish your slideshow to the web or embed it on a website rather than play it locally. You can set up AutoPlay and Loop as part of the publish settings.
Related: How to Share a Google Docs, Sheets, or Slides File as a Web Page
Go to File > Publish to the Web in the menu.
Choose either "Link" or "Embed" per your intent. Then use the Auto-Advance Slides drop-down box to choose the timing for the slides. Here again, you can pick from every second up to every minute.
To loop the slideshow, check the box for Restart the Slideshow After the Last Slide.
You can then mark the checkbox for Start Slideshow as Soon as the Player loads if you like, so that the viewer doesn't have to take any action to begin the presentation.
When you finish, click "Publish" and confirm to obtain the link or embed code for the slideshow.
To share a Google Slides presentation that doesn't require you to walk viewers through it, remember these steps to automatically play and loop the slideshow.
- Data, AI, & Machine Learning
- Managing Technology
- Social Responsibility
- Workplace, Teams, & Culture
- AI & Machine Learning
- Diversity & Inclusion
- Big ideas Research Projects
- Artificial Intelligence and Business Strategy
- Responsible AI
- Future of the Workforce
- Future of Leadership
- All Research Projects
- AI in Action
- Most Popular
- The Truth Behind the Nursing Crisis
- Work/23: The Big Shift
- Coaching for the Future-Forward Leader
- Measuring Culture

The spring 2024 issue’s special report looks at how to take advantage of market opportunities in the digital space, and provides advice on building culture and friendships at work; maximizing the benefits of LLMs, corporate venture capital initiatives, and innovation contests; and scaling automation and digital health platform.
- Past Issues
- Upcoming Events
- Video Archive
- Me, Myself, and AI
- Three Big Points
How to Create Slides That Suit Your Superiors: 11 Tips
When you’re pitching ideas or budgets to execs in your organization, you need to deliver slides that fit those particular people just right. This checklist identifies the key considerations.

- Workplace, Teams, & Culture
- Leadership Skills

Carolyn Geason-Beissel/MIT SMR | Getty Images
I recently interviewed 20 of my customers, all in senior roles at Fortune 100 companies, and asked them their biggest pain point in presenting to higher-ups and even colleagues. What I heard consistently was that it can feel like Goldilocks bouncing from one option to the next, testing to figure out what’s “just right.” Does the audience want deep reports? Sparse slides? Something in between? Like … what?
Teams often come to presentation meetings with vast amounts of backup content just in case an exec wants to take a deep dive on any given point. There’s often a struggle to anticipate every direction attendees might want to go. It’s frustrating, and it’s not efficient.
Get Updates on Transformative Leadership
Evidence-based resources that can help you lead your team more effectively, delivered to your inbox monthly.
Please enter a valid email address
Thank you for signing up
Privacy Policy
There are many ways to build slides. I’m not just talking about crafting them well versus poorly. I’m talking about all of the important decisions regarding how to organize them, how much text to use, when to lean into a chart, the best ways to use bullets and color, and whether to include an appendix with additional information. Before you make your next proposal or request of the executive team, use this list of 11 tips for your next set of slides as a guide.
Four Things You Must Have in Every Exec’s Slides
Before we drill down into the harder aspects, the ones where your executives’ tastes may vary widely, let’s quickly cover four aspects that you can consider the building blocks — the basics you should never proceed without.
Start with an executive summary. Begin the slide deck with a tight executive summary that follows a three-act structure. First, start with stating the current realities. Second, clearly state the problem or opportunity your idea addresses and its potential impact. Third, explain how your recommendation solves the problem or exploits the opportunity and the next steps you’re proposing.
Have a logical organization. The arc of the deck — the package from beginning to end — should make sense. If your audience reads only the headline of every slide, the order should be coherent and make most of the case for you. The content below each slide’s headline must support the statement made in the title. Remove everything that doesn’t support your point; as writers will tell you, you sometimes need to “kill your darlings” when you’re editing.
Begin the slide deck with a tight executive summary that follows a three-act structure.
Make it skimmable. Help your audience to quickly grasp the point without getting bogged down in details. Create a clear visual hierarchy. Guide the reader’s eye through the content: Use bold headings, bullet points, and numbered lists to break down information into digestible pieces. Highlight key takeaways or conclusions in a different color or font size to draw attention to these critical points.
Focus on concise insights. Succinct statements with clear insights are everyone’s jam. Every slide should serve a purpose and contribute directly to the decision-making process. Distill complex information. Don’t use 100 words when 20 words will nail it. If you’re having difficulty trimming, consider using company-approved AI tools to help you take out the fluff.
Five Preferences to Confirm With the Person You Want to Reach
Now we’ll delve into what your particular audience does and does not want. If you haven’t yet, start by asking the person you’re presenting to what they generally prefer. They probably know themselves well but have not been asked to articulate how they like to receive information.
Ask how dense is too dense. Some executives prefer detailed slides with comprehensive data. Others favor a more high-level approach. You’re weighing how to balance informative content with readability, ensuring that slides are not overloaded yet are sufficiently detailed to support decision-making.
Confirm the delivery format and timing. Some execs like information presented to them. Others prefer a pre-read of the material followed by a discussion. I always recommend our tool Slidedocs (I’ve written a free e-book on them), which are visual documents using both words and images. The templates help presenters organize their thoughts into a document for a pre-read or a read-along. They are designed to be skimmable and able to travel through your organization without the help of a presenter.
I’m a huge fan of pre-reads and prefer to use my time in meetings to ask questions and build alignment. If your audience didn’t review your material in advance, ask at the top of the meeting whether they would like you to present it or would prefer to read through it and then discuss it.
Find out how much data visualization they prefer. Charts, graphs, photos, and illustrations often communicate complex data more clearly than words alone. When execs can see what you’re saying, they often can better understand the impact of your idea. Does the exec want to understand exact numbers? Bar charts allow them to move their eyes across a series of specifics. Does the exec want to know the shape of a trend over time? Line charts can show the pattern. (See “Classic Charts Communicate Data Quickly.”) Some prefer charts with annotations that draw attention to what you think is the most important point. Others want to make their own conclusions from the data.
One of my clients, the CEO of a massive commercial real estate company, doesn’t want anything visualized. He prefers numbers, only in a table, and only in two colors — black and red. You might think this is archaic. But the fact that he’s clear to his teams about what he wants takes all the mystery out of how to communicate with him.
When the stakes are high, have a conceptual thinker help with diagrams and concepts. If you don’t have one on your team, and when it’s high stakes, find an internal designer to help you or hire one. You can’t afford to have the baby (your idea) thrown out with the bathwater (terrible slides).
Identify which details need spelling out. How well do the people you’re presenting to know the landscape and function of the company and products you’re talking about? For example, if your engineering team threw a slide into a deck about an issue that requires executive approval, do the execs all speak geek? Or do you need to explain the technology so that they will really understand the ask? Either eliminate internal jargon and acronyms or unpack those bits, especially if your proposal deeply involves expertise outside of the executives’ domain.
Ask whether appendices will be useful. When you’re organizing a presentation, you often troll data, read through complicated reports, and even hire external experts to figure out what’s best for the company. Do your execs want access to that supporting data? You can add a document to the end of the presentation as an appendix to show all of the data and source material. This allows the main content of the slides to remain focused and accessible while still providing comprehensive background information for those who want more.
Two Tips to Improve Your Presentation Skills
Getting materials in place is the biggest step. They will be your best tools for selling your ideas. But there are two extra areas to pay attention to as a presenter: how you handle questions and how you use every experience to improve.
Anticipate questions, and practice your answers. Before you have your meeting, gather a small team to challenge every point you make. Invite colleagues you trust to role-play as “a rapidly inquisitive exec” or “the doubting naysayer exec” so you are prepared to present your idea well. They’re gonna grill you, and practicing will help you remain unruffled when it happens.
Related Articles
Ask for feedback after the presentation. Establish a feedback loop with those you presented to. Ask what worked well and how you can improve. If attendees don’t have the time, find people who have had their ideas funded and talk to them about what they did that worked. Advice and some perspective will help you nail your performance even better next time.
Empathetically understanding your audience members and how they process information, whether it’s executives or peers, sets up your ideas for success. Clarity creates efficiency. When a presentation fits just right, you’ve given your great thinking the best chance of moving through your organization and having maximum impact.
About the Author
Nancy Duarte is CEO of Duarte Inc. , a communication company in the Silicon Valley. She’s the author of six books, including DataStory: Explain Data and Inspire Action Through Story (Ideapress Publishing, 2019).
More Like This
Add a comment cancel reply.
You must sign in to post a comment. First time here? Sign up for a free account : Comment on articles and get access to many more articles.

Google Slides: How to draw on your presentations
Google Slides has features like a digital pen, speaker notes, and autoplay that help you create impressive presentations. It works flawlessly on any device, including Android phones, iPhones, laptops, Macs, PCs, and affordable Chromebooks . One feature that's often overlooked is the drawing option. If you like to sketch, add a unique twist to your slides. It's a fun way to create a visually pleasing presentation. This tutorial shows you how to draw on Google Slides and spruce up your presentations.
When should you use the drawing feature in Google Slides?
There are no rules for drawing on Google Slides if it's an informal presentation for friends or classmates. But exercise restraint if you're making a slideshow for the office or school. You can add annotations, diagrams, and handwritten notes for workplace presentations.
How to add a hanging indent in your Google Slides presentation
How to draw on google slides using the scribble tool.
Google Slides has several shapes and lines in the Insert menu, but that might not be enough for the image you want to create. You can use the Scribble tool to make freehand drawings.
The Scribble feature is unavailable on the mobile app. You can only access basic shapes and lines. Your only option is to create the presentation on the desktop version of Google Slides.
Here's how to draw on Google Slides with the Scribble option:
- Open Google Slides and log in to your account.
- Choose a new slide.
- Click Insert from the toolbar.
- Choose Line .
- Select Scribble from the drop-down menu.
- You'll see a plus sign as your cursor.
- Hold the left mouse button until you finish drawing.
The drawing is selected after you let go of the left mouse button. The toolbar displays customization options, allowing you to modify the line color and weight. You can also change the start and end points.
Go to Format > Format options to change the size and position. You can also add drop shadows and reflections to your drawings. Google Slides doesn't offer a fill option. However, you can fill shapes with color.
How to insert Google Drawings in Slides
Google Drawings is a simple drawing tool for creating illustrations. It gives you a checkered drawing board to doodle on. You can import the final image to other apps like Google Slides after you finish drawing.
Here's how to make a drawing:
- Open Google Drive and click New in the upper-left corner of the screen.
- Select More from the drop-down menu and choose Google Drawings .
- Click Insert and select Shape . Choose any shape you want.
- Other options include Table , Chart , Diagram , and Word Art .
- You can add your drawing by navigating to Insert > Line > Scribble .
- After you complete your drawing, click File and choose Share .
- Click Publish to the web .
- Select your image size and click Publish .
- Copy the link.
Here's how to use the drawing in Google Slides:
- Open Google Slides .
- Click Insert .
- Choose Image and select By URL .
- Paste the link and click Insert Image .
Google Drawing is only available on the web. It doesn't have Android or iOS app versions.
How to draw on Google Slides with the Annotate extension
You can use the Annotate Chrome extension to draw on Google Slides. Here's how to add and pin the extension:
- Open Google Chrome and visit the Chrome Web Store .
- Type Annotate in the search bar.
- Select Find Annotate: Web Annotations with Screen Sharing .
- Click the Add to Chrome button.
- Click Add extension .
- After installation is complete, pin the extension so that it's easily accessible.
- Click the puzzle piece button at the top of the screen.
- Click Pin next to the extension name.
Here's how to use the Annotate extension:
- Go to your Google Slides tab and click the Annotate extension in the upper-right corner.
- Register for a free Annotate account and click Show annotation toolbar in Google Slides.
- Click the Pen button and choose a color.
- Press and hold the left mouse button until you finish drawing.
- The drawing remains on the original slide even if you go to a new one.
- Save your drawing. Go to the Annotate toolbar and click the save icon (shown as a floppy disk).
- Click Save .
What's the difference between Google Slides templates and themes?
Your annotations appear in your Annotate account under Web Annotations . Don't be alarmed when your drawing disappears if you navigate away from your slide and return. Click Load previous annotations to view your drawings. Although you can't see it in the left sidebar, the drawing appears when you present your slideshow.
Add some quirkiness to make your Google Slides presentations stand out
The tips in the guide should help you include your drawings in your Google Slides presentations and make them unique. Add more flair to your slideshows by adding sound effects, voiceovers, and other audio clips . If you're short on time yet want to impress your audience, try these beautiful Google Slides templates to create professional-looking slideshows in a jiffy.


- Search Search Search …
Marketing Campaign free Powerpoint template and Google Slides theme.

Unleash the power of your marketing vision with this free presentation template for both, Google Slides and Powerpoint.
Eye-catching colors and a dynamic blend of photos and illustrations will grab your audience’s attention and leave a lasting impression.
This template is perfect for anyone who wants to create a bold and impactful presentation that gets their message across loud and clear.
You may also like

Toy claw machine free template for brain breaks.
Free fun template for Google Slides and PowerPoint. When I started working on this template, I thought it was kind of silly, […]

Jefferson Free Template for Google Slides or PowerPoint
Free Template for PowerPoint and Google Slides Jefferson Jefferson is a template to present your services, activities, or even to send as a […]

Digital Notebook with tabs and free stickers.
Free PowerPoint template and Google Slides theme. Colorful Digital Notebook with tabs. Free for Google Slides or PowerPoint. Plus more than 200 […]

My iPad presentation, free interactive template.
Free PowerPoint template and Google Slides theme. Free interactive iPad mock-up template. Choice Board template. Weekly planner slides. You can use this […]
Top searches
Trending searches

24 templates

10 templates

20 templates

education technology
181 templates

23 templates

biochemistry
37 templates
Create your presentation
Writing tone, number of slides.

AI presentation maker
When lack of inspiration or time constraints are something you’re worried about, it’s a good idea to seek help. Slidesgo comes to the rescue with its latest functionality—the AI presentation maker! With a few clicks, you’ll have wonderful slideshows that suit your own needs . And it’s totally free!

Generate presentations in minutes
We humans make the world move, but we need to sleep, rest and so on. What if there were someone available 24/7 for you? It’s time to get out of your comfort zone and ask the AI presentation maker to give you a hand. The possibilities are endless : you choose the topic, the tone and the style, and the AI will do the rest. Now we’re talking!
Customize your AI-generated presentation online
Alright, your robotic pal has generated a presentation for you. But, for the time being, AIs can’t read minds, so it’s likely that you’ll want to modify the slides. Please do! We didn’t forget about those time constraints you’re facing, so thanks to the editing tools provided by one of our sister projects —shoutouts to Wepik — you can make changes on the fly without resorting to other programs or software. Add text, choose your own colors, rearrange elements, it’s up to you! Oh, and since we are a big family, you’ll be able to access many resources from big names, that is, Freepik and Flaticon . That means having a lot of images and icons at your disposal!

How does it work?
Think of your topic.
First things first, you’ll be talking about something in particular, right? A business meeting, a new medical breakthrough, the weather, your favorite songs, a basketball game, a pink elephant you saw last Sunday—you name it. Just type it out and let the AI know what the topic is.
Choose your preferred style and tone
They say that variety is the spice of life. That’s why we let you choose between different design styles, including doodle, simple, abstract, geometric, and elegant . What about the tone? Several of them: fun, creative, casual, professional, and formal. Each one will give you something unique, so which way of impressing your audience will it be this time? Mix and match!
Make any desired changes
You’ve got freshly generated slides. Oh, you wish they were in a different color? That text box would look better if it were placed on the right side? Run the online editor and use the tools to have the slides exactly your way.
Download the final result for free
Yes, just as envisioned those slides deserve to be on your storage device at once! You can export the presentation in .pdf format and download it for free . Can’t wait to show it to your best friend because you think they will love it? Generate a shareable link!
What is an AI-generated presentation?
It’s exactly “what it says on the cover”. AIs, or artificial intelligences, are in constant evolution, and they are now able to generate presentations in a short time, based on inputs from the user. This technology allows you to get a satisfactory presentation much faster by doing a big chunk of the work.
Can I customize the presentation generated by the AI?
Of course! That’s the point! Slidesgo is all for customization since day one, so you’ll be able to make any changes to presentations generated by the AI. We humans are irreplaceable, after all! Thanks to the online editor, you can do whatever modifications you may need, without having to install any software. Colors, text, images, icons, placement, the final decision concerning all of the elements is up to you.
Can I add my own images?
Absolutely. That’s a basic function, and we made sure to have it available. Would it make sense to have a portfolio template generated by an AI without a single picture of your own work? In any case, we also offer the possibility of asking the AI to generate images for you via prompts. Additionally, you can also check out the integrated gallery of images from Freepik and use them. If making an impression is your goal, you’ll have an easy time!
Is this new functionality free? As in “free of charge”? Do you mean it?
Yes, it is, and we mean it. We even asked our buddies at Wepik, who are the ones hosting this AI presentation maker, and they told us “yup, it’s on the house”.
Are there more presentation designs available?
From time to time, we’ll be adding more designs. The cool thing is that you’ll have at your disposal a lot of content from Freepik and Flaticon when using the AI presentation maker. Oh, and just as a reminder, if you feel like you want to do things yourself and don’t want to rely on an AI, you’re on Slidesgo, the leading website when it comes to presentation templates. We have thousands of them, and counting!.
How can I download my presentation?
The easiest way is to click on “Download” to get your presentation in .pdf format. But there are other options! You can click on “Present” to enter the presenter view and start presenting right away! There’s also the “Share” option, which gives you a shareable link. This way, any friend, relative, colleague—anyone, really—will be able to access your presentation in a moment.
Discover more content
This is just the beginning! Slidesgo has thousands of customizable templates for Google Slides and PowerPoint. Our designers have created them with much care and love, and the variety of topics, themes and styles is, how to put it, immense! We also have a blog, in which we post articles for those who want to find inspiration or need to learn a bit more about Google Slides or PowerPoint. Do you have kids? We’ve got a section dedicated to printable coloring pages! Have a look around and make the most of our site!

Your review, profile name and photo will appear publicly in Google’s services. Your review must comply with the Google Workspace Marketplace Comment Guidelines and Review Policies. Learn More

- Report review

IMAGES
VIDEO
COMMENTS
Use Google Slides to create online slideshows. Make beautiful presentations together with secure sharing in real-time and from any device.
This Google Slides tutorial for beginners is a complete crash course, taking you by the hand and showing you step by step how to make some amazing and mesmer...
To create a new Google Slides presentation, open a web browser and go to Slides.Google.com. If you want to start from a template, you can choose one from the template gallery. Otherwise, click "Blank" to create a new blank presentation. Your blank presentation starts with a single simple slide with space to enter a title and subtitle.
You'll learn all the core Google Slides presentation tools, discover how to make great presentations using Google Slides, and an efficient presentation design workflow. Jump into one of these comprehensive beginner tutorials. Or bookmark this Google Slides guide to start working through each tutorial at your own pace. Posts in this series.
How to Use Google SlidesGoogle Slide is a powerful presentation tool from Google to help you create slideshows and presentations.It's part of Google Drive an...
Learn all of the basics of using Google Slides. This tutorial covers everything you need to know to create professional presentations.🕒 Timestamps- 0:00 Cre...
How to Create a Blank Presentation. Now that you have a Google account, it's time to create your first presentation. Head over to Google Slides and place the cursor on the multicolored "+" icon in the bottom-right corner. The + turns into a black pencil icon; click it. Pro Tip: Type.
The Slide menu allows you to make large changes to your overall presentation. The Arrange menu allows you to organize the elements on each individual page. The Tools menu lets you fix your spelling, look up words in the dictionary, and add accessibility options to your presentation. The Add-ons menu is a shortcut to special features you can add to your Google Slides.
Google Slides already provides you with a number of free templates. Here's how you can access them -. First, visit your Google Slides dashboard page. Login to your Google Account (if prompted) Choose a template from "Start a new presentation" section. You can also click on "Template Gallery" to view more templates.
Use the dropdown menu in the General Access section to control these settings. Tip 10. Make Your Google Slides Look Good - Quickly. You've already seen it earlier in this tutorial, but I can't say it enough: to learn how to make your Google Slides look professional, use a template.
Free online presentation maker. Try our new tool to edit this selection of templates for people that want to let their creativity run free. Create interactive resources easily, quickly and without the need for any software. A really useful tool for teachers and students. Move the content, add images, change colors and fonts or, if you prefer ...
Discover the best Google Slides themes and PowerPoint templates you can use in your presentations - 100% Free for any use. Create ... Download the World Water Day presentation for PowerPoint or Google Slides and start impressing your audience with a creative and original design. Slidesgo templates like this one here offer the possibility to ...
Bring your presentations to life in Google Slides with enhancements like videos, animations, smooth transitions and more. Get started with templates Choose from an array of high-quality pre-designed templates with different layouts, images, colours and fonts.
Summary. A strong presentation is so much more than information pasted onto a series of slides with fancy backgrounds. Whether you're pitching an idea, reporting market research, or sharing ...
Go to File > Publish to the Web in the menu. Choose either "Link" or "Embed" per your intent. Then use the Auto-Advance Slides drop-down box to choose the timing for the slides. Here again, you can pick from every second up to every minute. To loop the slideshow, check the box for Restart the Slideshow After the Last Slide.
You can use Google Slides to make stunning presentations. And one of the easiest ways to create slides is using templates or themes.Google Slides templates ...
Make it skimmable. Help your audience to quickly grasp the point without getting bogged down in details. Create a clear visual hierarchy. Guide the reader's eye through the content: Use bold headings, bullet points, and numbered lists to break down information into digestible pieces.
Download the Labor Day presentation for PowerPoint or Google Slides. The world of business encompasses a lot of things! From reports to customer profiles, from brainstorming sessions to sales—there's always something to do or something to analyze. This customizable design, available for Google Slides and PowerPoint, is what you were...
Google Slides has features like a digital pen, speaker notes, and autoplay that help you create impressive presentations. It works flawlessly on any device, including Android phones, iPhones ...
Today, I want to show you guys how I make my presentations on Google Slides! I didn't use a template for this video but there are template resources that I'v...
Unleash the power of your marketing vision with this free presentation template for both, Google Slides and Powerpoint. Eye-catching colors and a dynamic blend of photos and illustrations will grab your audience's attention and leave a lasting impression.
AI presentation maker. When lack of inspiration or time constraints are something you're worried about, it's a good idea to seek help. Slidesgo comes to the rescue with its latest functionality—the AI presentation maker! With a few clicks, you'll have wonderful slideshows that suit your own needs. And it's totally free!
Choose from a variety of presentation types, including general, educational, sales, and conference, pick total number of slides and let our AI-powered tool do all the heavy lifting. SlidesAI.io is the ultimate time-saver, automating the slide creation process so you can focus on what really matters: delivering a killer presentation.