

The Methodology of Tree Planting

A footnote on the progress of the Southern Beaches Community Garden at Tugun in south east Queensland, Australia.

Our last planting of the food forest was held on the 4th August 2010. Since then we have had a very wet winter and spring this year in the lead up to the wet season in Queensland. So our food forest in now on its own and thriving.
I’m putting the success down to the planting methodology shared by a good friend and college of mine, Matt Kilby from www.globallandrepair.com.au . Matt has been researching and refining this methodology over many years.
It’s not what you plant but how you plant it. And in my own experience over the years in the Landscape industry, where we must have planted hundreds of thousands of tube stock trees over 12 years, we could only manage an 85% strike rate on mass plant outs.

The approach that Matt Kilby has been mastering looks at preparation as one of the keys to mastering tree planting and the high survival rates, as well as biological planting methods used.
At the community garden we didn’t have the chance to get much preparation done, like deep ripping on contour with a Yeomans Keyline Plow 12 months before planting. Instead we had to look and really concentrating on the soil (or sand in our case) and what we could do to improve it and what biological methods could we look at.
Below I have listed the steps that Southern Beaches Community Garden adapted from Matt’s methodology to produce these successful results:
Step 1: Compost was sourced from a local permaculturist and added to the tree hole that was dug 3x the size of the tree’s pot that was going in the hole — wide and deep to allow good root penetration and development.
Step 2: We then added Tree Starter. Tree Starter uses a three-pronged support system for soil biology. Firstly, it supplies a wide range of food sources for soil life including humates, kelp (seaweed) and compost. Secondly, it retains moisture and provides a home-base for beneficial organisms through the inclusion of zeolite and rock minerals. Finally, highly paramagnetic materials are included into the formula to stimulate microbial proliferation. In addition to this trio of benefits, the compost component also inoculates a new workforce of beneficial microbes into the soil to get the trees jumping out of the ground.
Step 3: We flood-irrigated the tubes and fruit trees to remove all the hot air from the roots. In the water we added Tree Tonic. During transplanting trees often suffer from transplant shock. This is due to root damage and a change of environment during the transplanting process. Tree Tonic lessens the impact of transplant shock by providing essential nutrients and to reverse the negative effects of transplanting and helps the plant to recover and increase growth rates. One thing I must say is that these plants started their life the conventional chemical way, so this biological treat must have seemed like paradise to them.
Step 4: We added something which I think is very special. Tree specific mycorrhiza fungi. Mycorrhizas are fungi that live in a beneficial relationship with most tree roots. Mycorrhiza increase the tree roots’ access to water and nutrients and therefore increases tree growth, especially in poor soil conditions which are often found in tree planting areas. And that was more the case in our sand pit of a garden.

Just as we apply starter fertiliser when young trees are planted we also need to consider inoculating with mycorrhiza to enhance survival rates. Most soils in Australia are becoming more and more devoid of mycorrhiza due to tillage, chemicals, compaction and loss of organic matter, making small trees very susceptible to drought and nutrients shortages. If we can inoculate the tube stock with mycorrhiza we can limit these stresses and survival/growth rates will increase — as demonstrated now in our food forest trees.
Step 5: Back to the hole preparation and the finishing off or landscaping the earth around the tree. A bull horn swale, a technique that Matt always uses, places the tree in a dish below ground level with small swales to focus the water into the tree. This is another of the keys to this methodology, giving the tree every chance it can to thrive rather that just survive.
Step 6: We used recycled paper Eco Mulch Mats, specially designed for this type of work, and the thing for our gardeners was that the Eco Mulch Mats would last for 12 – 18 months and is the equivalent to 100mm of mulch. Also, they are organic certified and contain organic fertiliser. The mats deliver sustained nutrient release including essential trace elements as the mat naturally biodegrades. We also placed 300mm deep of mulch around the outside of the tree guard 1m around the tree.
Step 7: Our Garden members all laughed at me when we got to step seven: pink tree guards. That right folks, pink . Now I have been working and trialing these tree guards for some time now, and I’m a believer. The theory is that visible light can be split into a spectrum of colours. Green leaves absorb light from the red fraction to drive photosynthesis. Research has demonstrated that the colour pink reflects and focuses the red fraction, concentrating this photosynthetic energy to enhance plant growth.
The guards at our community garden location have also provided wind protection against strong salt-laden wind, which can cause severe dehydration of young trees and can result in high losses and salt burn. The Plant Pink Tree Guards have given our food forest ideal protection from strong winds in this early stage of growth and also creating an environment of increased humidity and sun protection.
The guards have also stopped predation from hares, rabbits and wallabies.
Step 8: 10 – 20 liters of water per tree with Tree Tonic.
And then we left it to Gaia to look after….
So, three months on and the tube stock have bounded out of the ground. Some have a vertical growth of more than half a meter with good lateral growth. In the past 12 months I have been planting trees in some extreme climates around Australia and still this method wins hands down.
Matt is an open source and would be more than happy to share this information with you. See his website for more details or print outs of the methodology.
As for the community garden. We are in maintenance mode and have just planted more support species and ground covers like sweet potato and pinto peanut. If you have the chance to test this tree planting methodology, please keep us updated on how it goes.

Further Reading:
- A Man of a Thousand Trees

Nick Huggins
Just say no to gmo, biochar - potential or pitfall carbon storage vs. soil quality, 12 comments.
viva la manzana… VIVA!
Great work and excellant research. Im slowly coming around to the colour pink.
Won’t leaving that load of apples on stunt such a small tree?
That’s tree planting on steroids! Seems like a very successful protocol for tree planting all over the world!
Thats an amazing survival rate! I’ll try it myself. Although I agree with JBOB. It’s better to remove any fruit in the younger years. its like a 12 year old having children, although physically possible but not an ideal outcome.
The method of intensive soil amendment in the planting holes will work fine in sand or loam soil, but beware of doing this on a site with heavy clay or a compacted subsoil. When the planting hole ends up with more pore space than the surrounding soil, this space can fill up with water in wet weather, and only very slowly be absorbed into the surrounding soil. Tree death from waterlogging results. In these type of soils it’s becoming consensus wisdom to plant in unamended native soil, and apply any organic matter, manure, compost, etc. as a heavy surface mulch. When I have wanted desperately to bury amendments (such as humanure, dead animals, etc.) I have had success placing these in holes near, but not under, the new plants. Feeder roots can then access the amendments at need, and be sacrificed to waterlogging without killing the plant. In a badly hardpan, perched water-table situation I have also planted trees in shallow mounds of enriched soil. It is easier to supply water than to drain away excess. As the nound settles the tree settles with it, and surface and deeper roots spread out…
I really like those pink tree guards, could have used about 30 or so for our recent plantings.
Eventually the trees will be a windbreak, but until then, it’s not easy for new plants to survive.
And it’s nice to SEE the new plantings. I’m having a tough time finding all those little trees and it’s easy to forget to water some of them.
Looked at Matt’s site https://www.globallandrepair.com.au/contact/ and apparently they’re not available in the US. Too bad really, I’d like to order several products. There’s a business opportunity …
Bob: Good advice. Generally deep rip twice, 12 months before planting on contour with a Yeomans. Matt has worked on every soil that Australia has. And while some situations are different, the methodology is the same. Deep ripping with a Yeomans even in Clay (assuming the moisture is right, not to wet for the rip to glaze or to dry for the rip to shatter and turn the soil over)this will encourage root development of grass and or weed to penetrate. The weeds will accumulate minerals from the clay, and then you can slash them down to start the process of soil creation. This all comes back to design. (Permaculture design) you can’t just throw trees into a situation that you describe where there is a potential to get water logged. Good design through secession, Weeds, Grass then pioneer trees then your forests trees. Following succession will allow time, roots to de-compact ground, create soil and also for the plants to cycle water and regulate the grounds water holding capacity even in peak rain events.
I can be contacted at nick at globallandrepair.com.au if you have any questions.
Thanks for the Comments Christine, See a Post by Eco Films: https://www.permaculturenews.org/2009/10/02/man-of-a-thousand-trees/ I would be happy to talk with you on Matt’s behalf via Skype about opportunities of the sales, marketing and licensed production of the Guards in the USA. Matt currently sends small batches of guards around the world and we could do the same for you. Last week he sent a pallet to the UK of the biggest guards he makes. Matt main focus is getting trees in the ground, having the highest survival rates and sharing his passion for it. And having people around the world using this system would be his dream coming true. Matt has been planting trees in some of the most extreme places in Australia with little or no rain fall. See the comments by Geoff Lawton’s on the post above. My email is [email protected] Skype nick.huggins
JBob, as always thanks for the advice.
Sad to pluck off your first little fruits, I know, but everything I’ve read says to prevent fruit for the first 2-3 years. Listen to old Leviticus 19:23 himself:
“And when ye shall come into the land, and shall have planted all manner of trees for food, then ye shall count the fruit thereof as uncircumcised: three years shall it be as uncircumcised unto you: it shall not be eaten of.”
A very late comment, but here it goes;
Ditto what Adam T said. Those trees will be living in the native soil for decades. A bit of compost at planting will encourage the root to stay in the original hole, instead of spreading out in search of nutrients. Nature puts organic matter on the surface, not below the roots. Mulch, mulch, mulch.
What are you guarding the plants from? I have deer here in the U.S., ready to nibble all of my seedlings. What is the problem in Southern Beaches?
Leave a Reply Cancel reply
Your email address will not be published. Required fields are marked *
Related Articles

Wild Mint: An Exploration of the Varieties and Culinary Applications of the Mints

Okinawa Spinach

A Quick Guide To Tree Climbing Gear For Arborists

Edible Flowers of the Tropics

Flowers in the Vegetable Garden – 7 Best Flowers Which Will Protect Your Plants

Farm Update: In the Garden

Ginger in a RealFood Garden

Growing Trees From Seed

Byron Shire Permaculture starts it’s first food forest

Growing a fig tree up a wall
The Vital Role of Tree Planting in Climate, Communities, and Biodiversity
- October 25, 2023
- Biodiversity , Climate

Climate change is one of the most pressing challenges of our time, with far-reaching consequences for the planet, its inhabitants, and ecosystems. While there is no one-size-fits-all solution to combat this global crisis, tree planting has emerged as a powerful and versatile tool in the fight against climate change. Beyond its climate benefits, tree planting also plays a crucial role in supporting local communities and protecting biodiversity .
1. Climate Mitigation and Adaptation
Trees are often referred to as “the lungs of the Earth” for a good reason. They absorb carbon dioxide , a major greenhouse gas responsible for global warming , and release oxygen into the atmosphere. The more trees we plant, the more carbon dioxide they can sequester, helping to reduce the concentration of this harmful gas in the atmosphere. Forests act as carbon sinks, capturing and storing vast amounts of carbon, making them a natural solution to combat climate change.
Tree planting also contributes to climate adaptation. As global temperatures rise, trees provide shade, reducing the urban heat island effect in cities. They help regulate local temperatures, making urban areas more livable. Additionally, trees help to mitigate the impacts of extreme weather events by reducing erosion, preventing floods, and stabilizing soil.
2. Enhancing Biodiversity
Biodiversity is essential for the health and resilience of ecosystems. Trees provide habitat and food for a wide variety of plant and animal species. In a diverse forest ecosystem , numerous plant and animal species coexist, forming complex relationships that contribute to the overall health of the ecosystem.
Moreover, trees act as a protective barrier against habitat fragmentation. They can connect isolated patches of wilderness, allowing wildlife to move freely and ensuring genetic diversity among populations. This is crucial for the long-term survival of many species, particularly in the face of climate change.
3. Economic Benefits for Communities
Tree planting initiatives have a significant impact on local communities. These initiatives provide employment opportunities, from the initial planting to ongoing maintenance. In many regions, agroforestry practices, which combine tree planting with agricultural activities, offer sustainable livelihoods to rural communities.
Beyond employment, trees also provide valuable resources such as fruits, nuts, and timber. These resources can be harvested sustainably, offering a source of income and nutrition to communities. Additionally, by increasing the resilience of landscapes and reducing the risk of natural disasters, trees indirectly protect the livelihoods of people who depend on the land for their well-being.
4. Air and Water Quality
Trees play a vital role in improving air and water quality. They filter and purify the air by trapping pollutants and absorbing harmful gases. Trees also help to mitigate the effects of urban pollution, making the air safer to breathe for people in urban areas. Improved air quality leads to better public health outcomes, reducing the prevalence of respiratory diseases.
When it comes to water, trees help maintain healthy watersheds. Their roots prevent soil erosion and filter contaminants, ensuring that rainwater percolates into aquifers and contributes to a sustainable supply of fresh, clean water. Healthy watersheds are vital for both ecological and human well-being.
5. Psychological and Recreational Benefits
The presence of trees has a positive impact on human mental health. Studies have shown that spending time in green spaces, whether urban parks or natural forests, can reduce stress, anxiety, and depression. Trees provide a sense of calm and connection to nature, offering a respite from the fast-paced urban environment .
Recreationally, trees and forests offer opportunities for hiking, camping, birdwatching, and a host of other outdoor activities. These activities not only promote physical health but also strengthen the bond between communities and their natural surroundings.
Key Takeaways
Tree planting is not a one-dimensional solution; it’s a multi-faceted tool with a broad spectrum of benefits. From mitigating climate change to supporting biodiversity, improving local economies, and enhancing human well-being, the vital role of tree planting in climate, communities, and biodiversity cannot be overstated. It’s a practical, scalable, and sustainable way to address some of the most pressing challenges of our time, making it an indispensable part of our collective efforts to build a more resilient and sustainable future.
Tree planting is crucial for climate change mitigation because trees act as carbon sinks, absorbing carbon dioxide (CO2) from the atmosphere. They help reduce the concentration of this greenhouse gas, which is a major driver of global warming.
Trees provide habitat and food for a wide variety of plant and animal species. Their presence in diverse ecosystems promotes species coexistence and complex ecological relationships that are essential for biodiversity.
Tree planting initiatives create job opportunities, promote sustainable livelihoods, and offer valuable resources like fruits, nuts, and timber. Additionally, trees enhance the resilience of landscapes, protecting the well-being of people who rely on the land.
Trees help improve air quality by filtering pollutants and absorbing harmful gases. They also prevent soil erosion and filter contaminants from water, ensuring clean, fresh water supplies in watersheds.
Yes, spending time in green spaces with trees has positive effects on mental health, reducing stress and anxiety. Trees also provide opportunities for recreational activities like hiking, camping, and birdwatching, promoting physical and psychological well-being.
Share this:

Wetlands: Nature’s Hidden Carbon Sink Against Climate Change
- January 16, 2024

Navigating Climate Transition Through Strategic Financing: All You Need To Know
- January 5, 2024
A Beginner’s Guide to Miyawaki Method of Tree Plantation
Published by forestcreators on june 30, 2020 june 30, 2020.
Innovated and pioneered by Japanese botanist Akira Miyawaki, the Miyawaki technique is an effective, smart, and a sustainable way to build native, dense forests. What makes this renowned method so efficacious is its ability to ensure 10x faster plant growth and a plantation that is 30x denser than the traditional methods of growing forests.
The secret to achieving these incredible results lies in planting dozens of native species close to each other. This leads to the growth of a forest that can become maintenance-free after the first two years!
Let us dive deeper and look at the basic steps to create such forests in small urban areas.
Step 1: Know the Texture of Your Soil
Understanding the texture of your soil helps determine its capacity for holding water, the capacity of root perforation, water infiltration, and retention of nutrients. Carry out a ribbon test to find out what type of particles your soil contains. Notice if the soil texture is clayey, sandy, or loamy.
Loamy soils are preferable as it contains a mixture of sand, clay, silt, and organic matter. They also provide the right balance of oxygen, water, nutrients, and drainage for the forest to blossom.
Ingredients for the Soil
● Adding perforator materials such as wheat, groundnut shells, corn husk, rice husk will significantly improve perforation and help the roots to grow.
● Next, add water retainers to help the soil retain water and moisture. Materials such as sugarcane stalk and cocopeat are great options.
● For the soil to receive nutrition, organic fertilizers such as vermicompost, cow manure can be used.
● The final step would be to add a layer of mulch as it protects and insulates the soil. It also prevents sun rays to fall directly on the soil and ensures that the water in the soil does not evaporate. Some excellent options are dried grass, dried leaves, barley stalk, wheat stalk, rice straw, and corn stalk.
Step 2: Choose Different Species of Trees for Plantation
Aim for planting a variety of native species to promote biodiversity. Native species also require less long-term maintenance and are more likely to survive and thrive in the local environmental conditions. What’s more, they provide an ideal home for endangered species.
● Identify the type of native species, its advantages, and the maximum height they reach. Check the availability of the species in the nursery and their age. An ideal height to consider is around 60-80 cms. Opt for a mix of flowering, medicinal, timber, and fruiting species.
● Choose 5 types of species to be the major species in the forest. They will constitute around 50% of the forest.
● Choose supporting native species that will constitute 25-40% of the forest. Minor native species will make up for the remaining parts of the forest.
Step 3: Time to Design Your Afforestation Area
● Identify an appropriate area for afforestation and procure the materials to start executing the project.
● Design a water pipeline layout with the help of an architect. Ensure that it is backed by overhead tanks and borewells. This is because the forest needs to watered daily for the first 3 years.
● Identify spaces for the site office, storing equipment, saplings, and a laborer’s resting area. If your project is large, your afforestation area must have access to trucks, vehicles, and earthmovers.
Step 4: Start Planting the Trees
● Outline the area you want to plant with chalk powder.
● Within the area of planting, draw out the plantation bed area and sperate the service area.
● Excavate the soil for about 3-4 feet and keep the excavated soil on the side.
● Mix the perforators, organic fertilizers, and water retainers, without any clumps. Ensure that they are mixed in the same ratios for each mound.
● Push back the mixed soil to fill the land. Ensure that the land is not compressed or walked upon. The idea is to leave the soil aerated and loose. ● Level the soil with hand tools.
● Mark the leveled soil with chalked powder for creating pits every 1.5-2 feet, in a triangular formation.
● Dig pits that are 12 inches wide and 12 inches deep.
● Place the saplings depending on the number of varieties you have and how your grid is created. For instance, if you have 30 species of trees, then mark the grid based on 30 pits.
● Before removing the saplings from their bags, dip the bags in a bucket that is filled with 20 part water, and 1 part Jeeva Amrut, or gaumutra, or coffee mix. Ensure that all the bubbles are settled before removing the sapling bags.
● Remove the sapling from the bag, place it in the pit, and loosely cover it with soil.
● Try not to plant two similar species next to each other and don’t follow any pattern while planting. Maintain a 60cm distance between each sapling.
● After planting the saplings, insert 4-5 feet of bamboo sticks into the soil, close to the plant. These support sticks will ensure the saplings don’t bend or droop during the first few months.
● Add a 5-7 inch layer of mulch in the soil. Consider at least half a kilo of mulch per tree. Tie it down with jute ropes to ensure the mulch doesn’t fly around during strong winds. Tie the ropes on bamboo pegs that are nailed at the forest periphery. This will ensure that the rope is pressed down on the mulch.
● For the first time, the trees must be watered for an hour to make sure the mulching and the soil settle.
Step 5: How to Care for the Forest
● Level the soil with hand tools.
Conclusion:
After following all the above-mentioned steps, you should have a dense and thriving forest in your hands in a few years. We hope this article has inspired you to grow your forest. Please feel free to share this information with others so that the biodiversity can be restored and our ecological footprint is reduced.
If you are looking for experts to help you with your forest planting initiative, then get in touch with us. We at Forest Creators , specialize in developing forests using the renowned Miyawaki method. With this smart and effective technique, we initiate the development of fast-growing, self-sustaining, and 100% organic forests, irrespective of factors such as climate and soil.
Related Posts

Uncategorized
Forest planting: 3 things to consider before choosing the right planting site.
In an effort to make the world a greener place with forest tree plantation, many people spend a lot of time selecting the ideal batch of trees and digging the perfect hole for plantation. However, Read more…

Forest Creators Launch Eco-Friendly Masks that are Reusable & Offer 7x Protection
Forest Creators, India’s leading afforestation not for profit organization, launch ‘Earth Face Masks’ that offers 7X protection, is reusable, stylish and environment-friendly. Mumbai, India July 11th, 2020: The Founder of Forest Creators, Dipen Jain said, Read more…
Why Afforestation is Vital To Combat Climate Change
Climate change has started to make huge impacts around the world and has fueled strong hurricanes, dried up water resources, led to forest fires, and even dismissed food security, leaving some populations in dismay and Read more…
JavaScript seems to be disabled in your browser. For the best experience on our site, be sure to turn on Javascript in your browser.
Forest Landowners Guide to Tree Planting Success

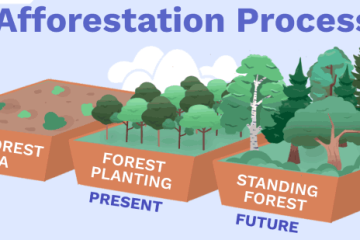
Planting trees can speed up the natural succession from field to forest
Planting trees is visionary
Imagine a forest where there was once pasture, or woodland where there were once crops. Imagine a healthy, diverse forest, resistant to insects, fire, and disease, that will contribute to the property for generations. Planting trees has many benefits: improved wildlife habitat, high-quality trees for timber or specialty wood products, revegetated buffers along streams to protect water quality, increased species diversity and resiliency, enhanced attractiveness, and a more valuable estate for your family or heirs. Many view tree planting as an opportunity to leave behind a legacy--one that may benefit future generations, wildlife, and the environment. Whatever your purpose for planting trees, following the guidelines outlined in this publication can help you transform your land.
Most often, forests regenerate and old fields grow up in trees without our intervention. Sometimes the best plan is simply to monitor and support the natural growth of new trees. Some information in this publication can help you protect emerging and desired seedlings that have naturally occurred. However, planting trees can accelerate the natural progression or succession from field to forest or enrich a newly regenerating forest with an uncommon species.
Desired results are often evident in as little as 5 years following planting; the planted area will begin to transform into a forest. The most immediate benefits are food and cover for wildlife, soil erosion control, and improved water quality. Harvesting trees in a first thinning could begin as early as 15 to 20 years. It takes a dedicated landowner to plan decades ahead. Thankfully, many of us are, and our grandchildren and great grandchildren will benefit.
This publication focuses on the values and methods of establishing wooded areas on rural property. We'll begin with suggestions to help analyze the planting site and select appropriate tree species, then provide guidelines for preparing the site and the planting process, and finally, offer advice on maintaining and supporting the seedlings as they mature. Appendix A provides a calendar outlining steps for tree planting reforestation projects. Use this helpful calendar as a guide to the tasks you should consider before you start your project and how to follow up for success.

Determining Planting Objective(s)
Determining objectives for planting is important because it will often dictate the species and number of seedlings needed. Objectives for planting are numerous and varied and include:
- Improving wildlife habitat-food and/or cover
- Producing future timber/investment
- Providing a privacy screen or windbreak
- Restoring a woodland
- Reintroducing a tree species
- Controlling erosion/improving water quality
- Reforesting an old field
- Special uses such as Christmas trees, sugarbush, nuts, or energy crops
Try answering the following questions to help you determine your objectives: What purpose(s) do you want the planting to serve? Why do you want to plant trees? With some thoughtful planning and decision making, the trees you plant will meet your objectives and provide numerous environmental benefits as well.
Assessing the Planting Site
Not all tree species are suited to all sites. Observing and learning about the planting site a year or more before planting will provide useful insights. Consider the following:
- Soil type (drainage, fertility, and texture)
- Periodic flooding
- Amount of available sunlight
- Existing plant competition
- Exposure/aspect/orientation of the terrain (north and east slopes generally have better growing conditions, while south and west slopes are generally hotter and drier)
These site factors influence species selection. Some site conditions such as soil moisture, soil texture, and exposure are inherent to the site and not easily changed. It is important to select tree species that can thrive under given conditions. For example, aspen, black cherry, larch, red pine, and black walnut are shade-intolerant species. These trees will not tolerate even moderate levels of shade. If the site already has tree cover, shade-tolerant trees such as eastern hemlock, blackgum, red spruce, or sugar maple would be better choices.

Soil acidity or alkalinity (pH) is another key factor in determining which trees will grow best on a given site. Most tree species prefer neutral or slightly acidic soils. Also important is soil structure. Soils that are too tightly compacted will resist root penetration, slow the passage of water and nutrients, and inhibit the free movement of oxygen and carbon dioxide. Hardwood (broadleaf deciduous) trees tend to grow best in loamy soils, a mixture of sand, silt, and clay. Many conifers do just fine in heavy clay or well-drained sandy soils and can tolerate dry southern exposures better than most hardwoods. As a rule, conifers can withstand adverse conditions better than hardwoods.
If a nearby but similar site already has trees, those trees may be a good indicator of existing site and soil conditions and what species may do well on your site. For example, speckled alder does well on moist, heavy clay; sugar maple prefers fertile, moderately well-drained soils; and American sycamore prospers in periodically flooded soils along stream banks and in bottom lands.
Another way to determine the soil type on your site is to consult the U.S. Department of Agriculture's Soil Survey Maps , which are available at your local conservation district office or online. Soil samples can also be brought to your local Penn State Extension office where, for a nominal fee, they are sent out to assess soil fertility and pH. Contact your county extension office for details.
Primary factors that limit tree planting success
- Soil drainage: excessively drained or poorly drained
- Existing competing vegetation: grasses, weeds, and invasive plants
- Exposure/aspect: wind, sun, and shade
- Wildlife: deer, bear, voles, and other small mammals

Selecting Tree Species
The likelihood of project success greatly improves with clearly identified planting objectives and a selection of tree species that meet objectives and are compatible with site conditions. The goal is to plant the right trees in the right location. In other words, plant tree species that will meet objectives and grow well under the given site conditions.
The choice of tree species for planting in the northeastern hardwood region is extensive. There are dozens of species to choose from. Since tree planting is somewhat permanent, carefully consider your choices. Selecting a diversity of native species that have no major pest problems and are adapted to the site is important. The use of exotic species is discouraged today because many have become invasive and now cause damage to native plant and animal communities. Because choosing the best tree species for a particular site is so important, consider seeking advice from a knowledgeable natural resource professional or forester before ordering.
*Nonnative species. G = good; F = fair; P = poor.
Source: Revised from "Northeastern Tree Planting and reforestation" (Cornell University Cooperative extension)
Planting Density and Arrangement
Determining an appropriate spacing between trees is necessary when developing a planting design. In general, plant trees at a closer spacing for quality hardwood production. This encourages straight boles and small lower branches that self-prune at an earlier age. Plantings for wildlife use wider spacings, up to 20 feet, to encourage crown development and earlier seed production. When determining spacing, consider the tree's crown width when it reaches a useful size. For example, when growing trees for timber, allocate space so individual trees are just beginning to crowd one another when they are large enough to support a commercial firewood or pulpwood thinning, generally an 8- to 10-foot spacing. Higher densities will require thinning at an earlier age to remove excess trees and reduce competition.
Planting arrangement refers to the pattern or distribution of tree and shrub species across a planting site. For example, a mixed hardwood plantation may concentrate black walnut seedlings on the deeper soils of the lower slope and plant red and white oak seedlings on hill tops and convex-shaped slopes.
Sycamore and red maple will do better on the wetter sites. Planting a diversity of species will ensure the site is less prone to attack by insects and diseases. The planting will also provide a diverse habitat for wildlife. Mixing conifers (e.g., white pine) and hardwoods on a site is recommended. The benefits of these mixtures include earlier crown closure, reduced cost over pure hardwood plantings, wind protection, and improved hardwood quality as conifers force hardwoods to grow straight and self-prune lower branches earlier.
To calculate numbers of trees per acre, multiply the planned spacing (in feet) within rows by the spacing (in feet) between rows and divide that number into 43,560, the number of square feet in an acre.
Source: revised from 4-H project book The Wildlife Manager (Penn State extension)
Ordering Seedlings
After gathering information about the site, the best tree species, the number of seedlings needed, and the planned layout, it is time to order seedlings. Plan to order trees in the fall or winter so they can be shipped or picked up in the spring. Ordering trees grown from seeds collected from the region where you will be planting is preferred. These trees are better adapted to local soil and weather conditions and will likely have a higher survival rate. State forestry and wildlife agency nurseries, county conservation districts, and private nurseries are possible sources of tree seedlings. A rule of thumb is to avoid ordering from nurseries more than 100 miles south and west of the state line.
Essentially, two types of seedlings are used in large planting projects, bare-root and containerized. Bare-root seedlings are the most common since they are economical and easy to handle. Nurseries grow bare-root seedlings in nursery beds, lift them during the dormant season, and bundle them without soil. They are stored in refrigeration units so they remain dormant until shipped. They are described using two numbers, such as 1-0, 2-0, or 2-1 stock. The first number refers to how many years the seedlings grew in the original nursery seedbed, and the second refers to how many years they grew in a transplant bed. Transplants generally cost more, but they may be more resilient to transplanting stress. Seedlings should have a balanced 1:1 shoot-to-root ratio. Those with large shoots in comparison to roots may be prone to dieback.
Containerized seedlings, or tublings, are usually grown in a greenhouse in containers between 1 and 2 inches in diameter. These containers are either plastic or biodegradable; with plastic containers, it is necessary to remove the container prior to planting. Containerized seedlings offer the advantage of less transplant shock and are useful for planting on dry sites or for planting later into the growing season. A third alternative is to purchase potted or balled and burlapped trees. These are quite expensive, difficult to handle, and not recommended for large-scale plantings.

Preparing the Site
Proper site preparation is essential for planting success. It is especially critical when planting hardwoods. Lack of site preparation is a leading cause of seedling mortality. Controlling weeds, grasses, undesirable brush, and invasive plants prior to planting is necessary. Soil conditions will make little difference if the young tree receives little water or sunlight and has no room to grow. Ideal conditions for seedlings are often ideal for weeds and other plants that compete for sunlight and water. Site preparation often involves mechanical or chemical treatments or a combination of the two. Most site preparation is done the season prior to planting. Therefore, planning ahead is essential.
Preparing Old Field Sites
For old field sites, a combination of mowing and herbicide or herbicide and disking treatments are most effective. Herbicide treatments can include broadcast, spot, or row applications in the late summer or fall prior to planting. Sites are most commonly mowed in mid-August and then treated with a broad-spectrum herbicide such as glyphosate (e.g., Rodeo and Roundup) and/or a preemergent herbicide such as sulfometuron-methyl (e.g., Oust XP and Spyder) a few weeks later. Mowing encourages a flush of new growth, thus increasing herbicide effectiveness. If making spot herbicide applications, it is a good idea to mark your planting spots with flags or stakes as they may not be obvious in the early spring, when most grasses and weeds are brown.
In most cases, mowing or disking alone is insufficient for controlling severe weed competition, except in recently row-cropped sites. These sites generally need little or no site preparation, especially if the crop was harvested the fall prior to planting. If soil is compacted, light disking prior to planting may be necessary and can increase seedling survival. Allow time for soil to settle before planting.

Preparing Existing Timber Stands
Generally, carefully designed and implemented silvicultural prescriptions will lead to naturally regenerated hardwood stands in Pennsylvania and across the Northeast. However, there are instances when enrichment plantings are necessary and desirable. Enrichment plantings may be used to introduce genetically improved varieties, such as American chestnut, or species that are difficult to regenerate, such as oak. Landowners may also wish to introduce native tree species that provide food and cover for wildlife.
Tree planting in existing timber stands is generally more successful when it occurs in openings created by timber harvests or natural tree mortality rather than under an existing canopy. Planting success in these "regeneration openings" can be improved by cutting and using an herbicide to control any undesirable herbaceous vegetation, trees, and shrubs prior to planting. Herbicide applications are effective at controlling competing grasses and ferns as well as sprouting from freshly cut stumps of undesirable trees and brush.

Properly applied, herbicides provide a safe and effective way to eliminate weeds, grasses, and brush that compete with seedlings for sunlight and water. Fall herbicide applications are a common site preparation treatment prior to planting. Summer herbicide applications are recommended annually following planting until trees are well established, possibly for up to 5 years (see Postplanting Maintenance section).
When choosing an herbicide, consider the targeted weed(s) and application method that best protects desirable plants, the user, and the environment. Apply preemergent herbicides before weeds appear. Use post-emergent herbicides to control already established weeds and other vegetation.
When mixing and applying herbicides, wear appropriate protective clothing (see product label) such as rubber gloves, rubber boots, long-sleeved shirt, and eye protection. Apply herbicides to dry foliage so spray will adhere well. Wind speeds of less than 10 mph reduce chemical drift onto desirable seedlings or nearby plants.

Seedling Care and Handling
Plant seedlings soon after they arrive, preferably within 24 hours and no more than one week. Store them in a cool, damp environment in the original packaging, protected from freezing. Stack bundles loosely to provide ventilation. Keep roots moist by adding a small amount of water to the open end of the bundles, and do not handle seedlings until you are ready to plant.
When transporting, take care to protect seedlings from exposure to wind and direct sunlight. Do not transport seedlings in the bed of a truck unless it is a cool, cloudy day or they are covered with a tarp. Be careful not to damage stems and buds. Buds are the source of new growth, which the tree will need to get established. At the planting site, keep extra seedlings wrapped tightly in their original packaging, covered with a reflective tarp, and stored in the shade. Only remove from storage what can be planted that day.
When to Plant
In Pennsylvania, the best time to plant is between early March and early May. Plant once frost leaves the ground and prior to bud break, when seedlings are dormant. It is essential to plant bare-root seedlings before buds begin to swell and new growth starts to emerge. Plant as early in the spring as possible, when there is high soil moisture and cool temperatures. This will help ensure root establishment before the hotter, drier summer months. Trees planted after mid-May might not survive summer's intense heat and water stress. Planting in the fall may expose trees to severe winds and cold temperatures, which can desiccate seedlings, as well as frost heaving when the ground freezes and thaws. Calm, cool, and overcast days are best for tree planting. Under these conditions, roots are less likely to dry out before getting them in the ground.

Planting Seedlings
- Seedling roots should be kept moist and cool at all times by carrying them in a bucket of muddy water or planting bag with wet towels, peat moss, or burlap. Roots may also be covered with one of the hydrophilic gels or moisture enhancers. Never carry bundles of seedlings in your hand exposed to the air or completely immersed in a bucket of water for extended periods of time.
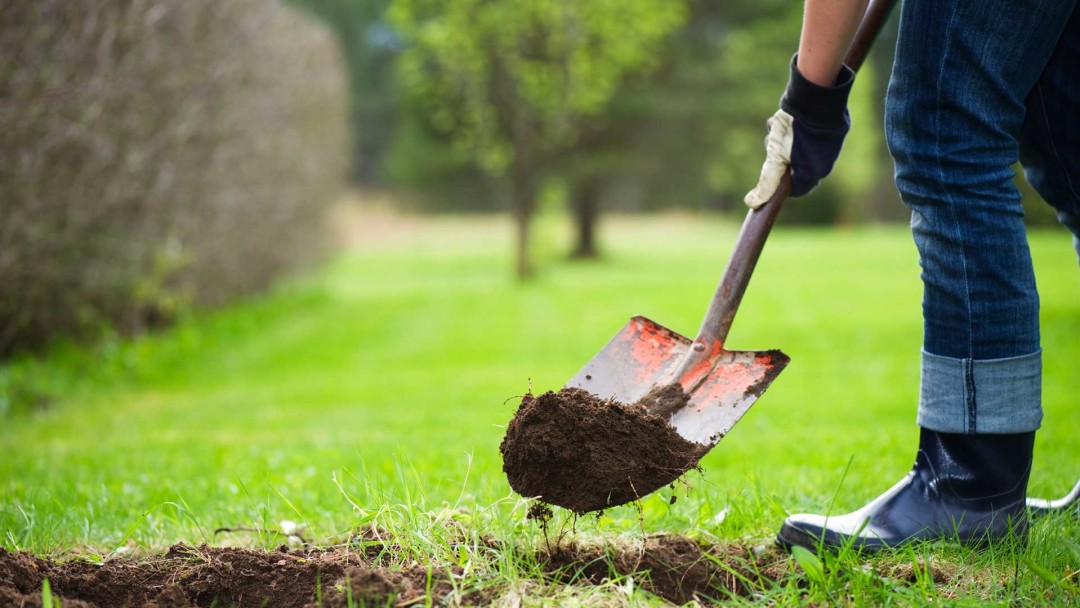
- Dig a hole with a planting shovel, mattock, or auger. If using a planting bar (see Fig. 15), work the blade vertically into soil, first pushing the handle away and then pulling it toward you to open a planting hole. It needs to be deep enough to accommodate roots vertically.
- Set the seedling at the same depth it grew in nursery, only as deep as the root collar. Roots should be straight, not balled or twisted. Long lateral roots can be pruned to aid in planting.
- Hold the tree straight while the planting hole is backfilled. If using a planting bar, push the blade into the soil just behind the planting hole; pull the handle toward you to close the bottom of the hole, root collar and push it forward toward the seedling to close the top.
- Gently pack soil around roots using your hands or the heel of your boot. This will eliminate air pockets, which can desiccate roots. To test whether a seedling is planted properly, give it a firm but gentle tug. It should remain firmly planted.

Augers are another useful tool for planting trees. They can be mounted on a tractor or skid steer or handheld and powered by two-cycle engines and are used on steep, rocky soil and where logging debris may be present. There are a couple of pitfalls when using this type of equipment. In clay soils, the sides of the hole can become "glazed," preventing tree roots from growing beyond the loose soil in the backfill. Another common problem is losing backfill material in debris that surrounds the planting hole. Prevent this by first scalping grass, leaves, and other debris away from the hole before augering. Be sure to properly pack soil back into the planting hole to prevent later settling. Settling can also be minimized by augering the hole only as deep as necessary to accommodate the tree roots.

Machine Planting
Machine planting expedites large-scale operations, such as establishing a plantation in a large, open field. Machine planting is not suited for planting in woods or on rocky or steep terrain. Two people are necessary for this job: one to drive the tractor and one to ride on the planter. The planting machine creates an opening or slit in the soil, and the person riding in the tree planter places a seedling in the soil at regular intervals. The angled rear wheels of the planting machine finish the job by closing the hole and packing soil. When conditions are right, planting thousands of seedlings in a single day is possible.

Protecting seedlings once they're in the ground is one of the most important aspects of any successful planting project. A common recommendation to protect your investment is to use tree shelters, also called tree protectors or tree tubes. Shelters shield seedlings from harsh weather, animal predation, mowers, and herbicide spray. They provide increased protection from deer and rodents, provide a better growing site by reducing wind and increasing humidity, and make follow-up herbicide applications faster and easier by shielding seedlings from spray. Tree shelters are designed for hardwood seedlings. Most conifer species do not thrive in tree shelters. Tree shelters are expensive and may not be economical for large projects. If deer browsing is a problem, an 8-foot woven-wire fence erected around the entire project area may be more cost effective. The cost of tree shelters should include a support stake and bird netting to cover the top of shelters. Without netting, birds may enter the tubes in search of nesting sites and become trapped. Most tree shelter manufacturers provide instructions for assembly and installation. Stakes are generally purchased separately. Use something durable, such as oak, locust, or treated pine, that will last for a number of years.

In areas with high deer impact, browsing on newly planted tree seedlings is a real concern. Deer can devastate a planting project, causing tree mortality and deformed seedlings. As seedlings grow into sapling size (1-5 inches in diameter at breast height), bucks rubbing their antlers can also be an issue. Tree shelters at least 4.5 feet tall will minimize deer browsing impact. To deter buck rubbing, keep shelters in place as long as possible, until tree is nearly the diameter of the tube. Another alternative is to cage trees with woven-wire or plastic mesh fencing.

Voles are small mouse-like rodents, and they can be quite numerous in old fields and pastures. Voles can damage and kill trees as large as 3-4 inches in diameter by gnawing on roots and girdling stems. They are a leading cause of failures in tree planting projects. To protect seedlings from voles, use a shelter at least 12-18 inches in height secured tightly to the ground with a stake. Periodically inspect shelters, tapping them tight to ground. This is particularly important in spring, following winter frost heaving soil that lifts shelters and stakes. Weed control around seedlings using herbicides is another key to avoiding vole damage. Controlling weeds and grasses around seedlings discourages voles by removing their protective cover. Mowing the entire planting area in old fields with severe vole problems is also an option.

Sometimes bears will destroy your planting investment. Bears are curious animals. Some people speculate that bears view tree shelters as toys. Others have suggested that bears destroy tree shelters in search of wasp larvae, as wasps often build nests inside the tube. Short shelters, 18-24 inches in height, may attract fewer wasps than traditional 4-foot shelters and therefore may help avoid bear damage. However, these short tubes do not protect seedling from deer browsing. In areas where seedlings require protection from deer, consider using woven-wire fence or plastic mesh. Cut fencing or mesh to length and form it into 1- to 2-foot-diameter circles to place around seedlings.

Postplanting Maintenance
Do not expect to walk away from seedlings once they are in the ground. Periodic inspections are necessary several times each year for the first 4-5 years to discover and address problems and ensure seedlings are holding their own against the environment. Maintenance includes controlling weed competition using either mulch or herbicides, repairing or replacing damaged tree shelters and broken stakes, and pruning trees to maintain proper tree form. During inspection, be sure to bring extra shelters, ties, stakes, a hammer, and pruning shears.
Checking and maintaining tree shelters is essential; you may find shelters damaged or destroyed by curious bears, wind, snow, or ice, or leaning as a result of broken ties or rotted stakes. Broken stakes can topple trees, pinning and killing them. This also allows rodents easy access to the seedling. As trees approach the top of the tube, remove bird netting. If not removed, growing shoots can become intertwined in netting, causing new growth to curl or "pigtail." As the tree diameter reaches that of the shelter, remove the shelter to protect the young trunk from possible girdling. Many shelters claim to "break down" or biodegrade from sun exposure over a period of years. However, it is always important to check and make sure the shelter is not restricting tree diameter growth.

Weed Control
Controlling weed competition around individual seedlings is one of the most important maintenance practices performed during the first 3-5 years. Controlling weed competition will reduce vole damage, provide greater air circulation, and increase the amount of sunlight, nutrients, and water available for newly planted trees. Many old field plantings require the application of a broad-spectrum herbicide such as glyphosate (e.g., Rodeo and Roundup) at least twice annually to control competing vegetation around shelters. When using an herbicide, apply it to a 3- to 4-foot-diameter spot around each tree, being careful not to get spray onto seedling foliage. Tree shelters work well at protecting seedlings from herbicide spray. If significant grass and weed growth is trapped inside the shelter, simply slide the shelter up and pull or carefully spray this vegetation.

Unless there is a severe small rodent problem, mowing the entire planting area is not recommended and should be avoided whenever possible. Mowing does not eliminate the roots of vegetation competing for water and nutrients. Mowing may damage seedlings, cause soil compaction, and favor the establishment of grasses that are severe competitors to tree seedlings.
By avoiding such mowing, some natural tree seedling regeneration may occur between planted trees, giving the site a more natural appearance. Also, mowing destroys beneficial wildlife habitat and prevents natural succession of the site from occurring, thus slowing the reforestation process. However, you may find it necessary to control undesirable and invasive tree and brush species that commonly invade old field sites and disturbed woodlands by mowing, pulling, or spraying.

Even when planned carefully and all necessary precautions are taken, 10-20 percent seedling mortality is not unusual. Replacement planting in successive years can help recoup losses. A successful planting comes from a combination of good timing, good luck, hard work, and knowledge of the planting site and tree species. This publication provides an overview of options, but it can't cover detailed advice about specific situations. For that, consult a natural resource professional. With proper planning and implementation, your tree planting project will be successful.
Publications
Jacobson, M., and D. Jackson, Forest Finance 7: Tree Shelters--A Multipurpose Forest Management Tool (University Park: Penn State Extension, 2004).
Ochterski, J., P. Smallidge, and J. Ward, " Northeastern Tree Planting and Reforestation " (Ithaca: Cornell University Cooperative Extension, 2009).
Pijut, Paula M., " Planting and Care of Fine Hardwood Seedlings: in the Central Hardwood Region " (West Lafayette: Purdue University Hardwood Tree Improvement and Regeneration Center, 2008).
Wise, D., et al., Landowner Guide to Buffer Success (Harrisburg: Chesapeake Bay Foundation, 2007).
Jackson, D., " Landowner Guide to Tree Planting Success ," Webinar Recording, Penn State Extension Forest Resources, September 13, 2011.
Pennsylvania Native Plant Society
Pennsylvania (PA) DCNR
Appendix A: Tree Planting Project Calendar--Steps to Tree Planting Success
Year prior to planting, april and may.
- Review and identify planting objectives.
- Investigate whether government cost-share programs are available.
- Request tree seedling flyers from nurseries.
May through June
- Walk site with natural resource professional.
- Assess soil moisture and competing vegetation.
August through December
- Prepare site--treat competing vegetation.
- Calculate acres, lay out spacing, determine number of seedlings needed for each species.
Year of Planting
January through march.
- Place tree seedling order; note delivery date.
- Schedule time and planting assistance.
March through April
- Receive trees and plant immediately.
- Install tree seedling protection/shelters.
June through October
- Inspect seedlings monthly; maintain protectors.
- Monitor competing vegetation and treat with herbicide as necessary.
Year Following Planting
February through march.
- Check tree seedling protectors/shelters.
- Fix or replace any downed, damaged, or leaning protectors.
- Replace broken or rotten stakes.
- Remove any wasp nests.
- Assess survival and mark any missing or dead trees.
April through May
- Replant if necessary.
May through June and August through September
- Herbicide competing vegetation as necessary (two applications may be necessary each year).
Years 2 through 5 Following Planting
- Maintain tree protectors/shelters and stakes.
- Prune as necessary to promote correct form.
- Remove any double leaders.
- Slowly prune lower branches to promote clear stems.
- Herbicide competing vegetation as necessary.
- Remove protectors/shelters once tree begins to reach shelter diameter; consider the risks when removing shelters.
Prepared by David Jackson, forest resources educator, and Ruth Lunt, Pennsylvania forest steward. Photos by David Jackson unless otherwise noted.
You may also be interested in ...

Spotted Lanternfly Permit Training for Businesses: Pennsylvania

Spotted Lanternfly Permit Training for Businesses: New Jersey

Woodlot Tour

What Exactly Are Growth Rings?

Forest Stewardship: Wildlife

Herbicides and Forest Vegetation Management

Maintaining Forest Property Lines

Tips for Measuring Impact in Environmental Education and Outreach

Planting Bare-root Tree Seedlings in Spring
Personalize your experience with penn state extension and stay informed of the latest in agriculture..
Trees In Communities
- Community Tree Recovery
- Alliance for Community Trees
- Energy-Saving Trees
- Tree Campus Higher Education
- Tree Campus K–12
- Tree Campus Healthcare
- Tree City USA
- Tree Line USA
- Tree Cities of the World
- Inflation Reduction Act Funding
Trees In Forests
- Reforestation
- Arbor Day Carbon
- Rain Forest Rescue
Special Projects
- Phytoremediation
- Hybrid Hazelnuts
View all of our work
Planting the Right Tree in the Right Place
The why , the where , and the what of successful tree planting
Trees offer many benefits to homeowners and the communities in which they live, from shade and beauty to privacy, windbreak, and lower energy bills. But these benefits are only enjoyed when you plant the right tree in the right place . That’s because the space we have available for new trees often dictates how well that tree will grow and how it will be managed over time. Matching the attributes of a species to the limitations of your site will ultimately determine how well your new tree delivers the benefits you wanted from your tree at the beginning—your ‘why’ for planting in the first place.
So, why do you want to plant a tree?
Planting trees is a noble endeavor, no matter what the reason. One of the great features of trees is that they aren’t selfish with their outputs; they give away their benefits beyond their location! They produce oxygen we all get to breathe. They pull carbon dioxide from the atmosphere that may have been produced on the other side of the globe. They filter the water that ends up downstream, perhaps ending up coming out of someone else’s faucet. So, by all means, go forth and plant trees!
But when it comes to our home landscapes, or the community spaces we share with our neighbors, we probably have more specific reasons in mind. Often, adding beauty to our landscape is our primary motivation — the form of the tree. Other times, it’s the tree’s function that drives us: we want to create a screen from the neighbors, we want to create shade that lowers our energy bills, or we want to block winter winds. The great news is that with a little planning, we can maximize both form and function when picking a new tree and choosing a planting site.
Where will you plant?
Before you get visions of sugar (maples and wild) plums dancing in your head, let’s back up a bit. While the good news is that there are many tree species that can fulfill your desires, the place you are digging the hole will likely have some limitations. This is the moment where you start sketching out the constraints of your property, preferably using paper, pencil (with eraser), and a measuring tape.
Homes and businesses are surrounded by utilities on all sides. There are likely power, phone, internet, and cable lines either overhead or underground. Certainly, we have water, sewer, gas, and irrigation lines underground. When urban foresters think of the “wrong tree in the wrong place,” the first image that often comes to mind is a shade tree planted directly beneath power distribution lines, a tree that has been pruned repeatedly by the power company so your lights stay on! Avoiding planting locations that will eventually conflict with utility lines is the number one way to ensure your tree can reach its full potential and live a long, productive life.
Overhead lines
There’s no doubt that electric service is critical to life in our modern world. And the number one reason power is disrupted in communities is due to trees and branches impacting overhead wires — mostly during storms but sometimes due to neglected maintenance or poor planting locations.
So here are some guidelines to minimize future conflicts between trees and overhead powerlines. A good rule-of-thumb is to plant your tree as many feet from the pole-to-pole center line as the anticipated mature height the tree will grow. For example, a trident maple ( Acer buergerianum ) that can grow 35 feet tall should be planted 35 feet from the pole-to-pole center line. There is some flexibility to this rule, except for the following: never plant any tree that reaches a mature height greater than 25 feet in the zone directly under lines or within 20 feet of the pole-to-pole center line.
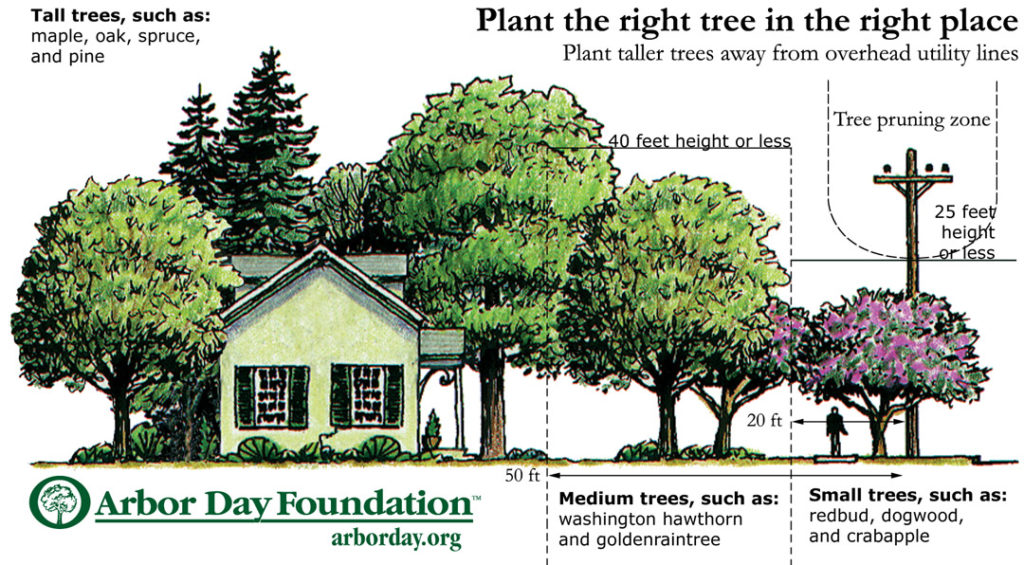
Your utility company may have guidelines specific to your town or city, but they often assign planting recommendations in three zones adjacent to power line easements:
- Low zone: only small-statured trees (25 feet mature height) under or within 20 feet of the pole-to-pole center line.
- Medium zone: this is the corridor between 20 and 50 feet adjacent to the pole-to-pole center line. Here, you can plant both small- and medium-sized trees (any tree that will reach a mature height of 40 feet or less).
- Tall zone: 50 feet or more from the utility easement. Beyond 50 feet from overhead lines, you can plant any tree you want—but keep in mind the rule-of-thumb noted above.
Underground Lines
The biggest risk to interfering with underground lines is when you dig the hole to plant your new tree. Never assume that your underground utilities are buried deep enough that you won’t hit them by digging. Always dial the national Call Before You Dig number—811—prior to planting. It usually takes one week or less for a locator service to mark the locations of all underground utilities. Remember that these services don’t know where your irrigation lines might be located. You’ll have to mark those yourself, and these are often the closest to the surface.
The rule of thumb for avoiding conflicts with underground utilities are as follows:
- Stay a minimum of 5 feet away from any buried utility line.
- Increase that distance to 10 feet or more over sewer lines.
Tree roots grow in all directions from the trunk, but the vast majority can be found in the top 24 inches of soil. Roots are also opportunistic, meaning that they will grow in any direction where there is both water and oxygen. That means that broken water or sewer lines are prime spots for root penetration. (Tree roots don’t break pipes, but they do find the cracks!) Maintaining your home’s infrastructure can save you both money and headaches when it comes to tree roots.
We often place trees in our landscape to accent our home. Even though the tree is small when we plant it, we know it will grow and fill a space — growth that can achieve our plans or not, depending on where we place it relative to our home, other buildings on the property, or other permanent infrastructure like walkways and driveways.
Just like with utilities, there are some distance guidelines for planting trees near structures that can reduce root and branch conflicts:
- Plant small trees (25 feet tall or less, at maturity) at least 8 to 10 feet from a wall, or 6 to 8 feet from a corner of your home.
- Plant medium trees (up to 40 feet at maturity) at least 15 feet from walls, and at least 12 feet from a corner.
- Plant large trees (greater than 40 feet tall, at maturity) at least 20 feet from a wall, and at least 15 feet from any corner.
- These distances are also good guidelines for planting near walkways and driveways.
Now that you have identified all the physical constraints of your desired planting location, pick up your pencil and draw each one you encountered on your property, mapping the buildings, walkways, utilities, and the minimum distances from each. This will help you identify locations where you can plant a tree.
Soil Quality
Trees aren’t like people; they can’t get up and move once they’ve been planted. Trees are simply stuck with the soil in which you place them. You’ve probably read plant labels that describe the soil conditions for a species, usually something along the lines of: prefers a deep, well-drained loamy soil, with a pH between 6.0 and 7.0. I call this the “Goldilocks soil profile.” What tree wouldn’t like these perfect growing conditions? If you own such a site, congratulations on your geographic good fortune! But the truth is, those sites are rare; most of our urban and suburban homesites are built on highly disturbed and compacted soils, dosed with salt in the winter and perhaps lawn chemicals in the summer, subject to both overwatering and underwatering (depending on irrigation systems), possessing low organic matter and often a high pH — the list can go on! And no matter what you read on the internet or hear at the local garden center, it’s very hard to adjust soil conditions to match ideal conditions. So, what’s a tree planter to do? What you’re really seeking is a tree that can tolerate the conditions you have in your yard, and the first step toward identifying such a species involves doing a little digging (literally) to discover the key properties of your soil. You can always take soil samples and send them to your county extension office to have an analysis completed, but here are some of the key soil properties and how to understand — and even correct — the problems you find.

Soil Texture and Structure
You may know these soil particles — clay, silt, and sand — and how they combine to form soils of different textures. There’s almost nothing you can do to change this basic soil type; once a silty clay loam, always a silty clay loam. Structure, though, is how these soil combinations combine with air pockets to form the soil we dig with our shovel. It’s essentially how tight those tiny soil structures are packed together, and many of our urban soils are simply packed too tightly — they’re compacted . The act of digging, under the right moisture conditions, will help rearrange that structure, breaking up compacted soil and increasing the water-and-oxygen-holding capacity of the soil. Sometimes there is no substitute for physically breaking up soil to unlock its potential.
Here’s another soil property that’s extremely difficult to change. pH is a measure of acidity (or alkalinity), on a logarithmic scale (a soil with a pH of 5.0 is ten times more acidic than a pH of 6.0). Most trees grow well in soils with a pH between 5.6 and 7.4 (7.0 is neutral). Higher pH values can make it hard for some plants to take in key macronutrients, like iron. Very low values can make toxic metals available to plants. You can discover your soil pH with a simple soil test kit or by sending samples to a local lab for analysis.
Trees need water to survive and thrive, but they also want water to drain away from their root zone. We all know drought is hard on trees, but more urban trees suffer from too much water than too little — at least once they are established. That excess water fills up all the air spaces in the soil and the trees can’t breathe (that’s right, trees breathe through their roots, mostly). Growth slows, less food is produced during photosynthesis, and trees are more subject to insect and disease attacks.
One easy way to find out about the drainage of your soil is a percolation test, and here’s one way to do it:
- Dig a hole 12 inches deep, by 12 inches in diameter, with straight sides.
- Fill the hole with water. The next day, fill the hole with water again.
- Lay a stick across the opening of the hole and measure the depth of the water with a ruler.
- Measure the water level every hour until the water has drained completely.
- Results: good drainage equates to 2 inches per hour (range is 1 to 3 inches per hour); poor drainage equals 1 inch per hour or less, and excessive drainage is 4 inches per hour or more.
Organic Matter
This is a “good news/bad news” story. The bad news is that many of our urban soils are deficient in organic matter — those decaying bits of plants and animals that fall on, or live in, the soil. The ideal amount of organic matter is about 5%, by soil volume. That doesn’t sound like much, but between management practices like raking and disposing of leaves in autumn and the needs of our grass and plants during the growing season, there is often just 3% or less organic matter in a typical urban yard soil.
Here’s the good news: all of the soil problems I mentioned above — poor drainage, excessive drainage, high pH, low pH , soil compaction — can be improved by applying organic matter to the soil. That’s because it’s usually the combinations of negative soil factors that get our trees in trouble: compaction impacts drainage, soil texture and overwatering lead to compaction, and low oxygen levels in high-pH soils keep trees from getting the nutrients they need. When we consistently apply organic matter — crushed leaves, wood chip mulch, pine straw, etc.—under the dripline of our landscape trees and shrubs, we begin to recreate the biome of soil bacteria and animals that trees evolved with. This is their true environment! Remember that “Goldilocks soil profile” I mentioned earlier? Well, we can get a lot closer to that ideal soil when we consistently apply layers of organic matter to the root zones of our landscape trees.
One more factor that will affect which tree species you choose for your landscape is your hardiness zone . This climate zone is an indication of your average annual minimum temperature, since cold temperatures in winter are a limiting factor for tree survival. Knowing your zone will help you select a tree that can survive winter where you live.
If you are concerned about our changing climate, considering adding species from a more southerly hardiness zone, do so with this caveat: while the average maximum and minimum temperatures may be shifting, climate variability is also increasing. Many parts of the country will see more record temperatures — both highs and lows — which can be lethal to plants not adapted to these extremes.
Also Watch: Ask an Arborist: How do I Choose a Nursery Tree?
What will you plant?
At this point, you know why you are planting and you’ve thought through the constraints of where to plant. So you are ready to sort through your tree species options! It’s always exciting to consider one or more of the latest plant introductions being sold at your local nursery, but let’s consider a few guiding principles. Then we’ll highlight the attributes of different trees and varieties that match your why and your where .

It’s important to consider overall species diversity when choosing a tree to plant — especially when you have a new home with a “blank slate” landscape. Diversity of species (actually, genus is more important than species ) can make urban and suburban landscapes more resilient in the aftermath of any new pathogen or insect that comes our way. Diversity of size, seasonal color, and shape also add visual interest to home landscapes.
A common nursery industry practice is the development of cultivars : a version of a species with special attributes that is propagated vegetatively (cloned) so that every individual sold is exactly like its parent. These plants will have names such as ‘October Glory’ Red Maple (Acer rubrum ‘October Glory’ ) . A word of caution about adding new cultivars to an existing landscape: you may be adding risk as well as beauty. Planting multiple specimens of a single cultivar — or adding different cultivars of the same species — may not insulate your trees against a new devastating insect or disease. Increasing diversity is best accomplished by adding a new tree from a completely different genus than the existing trees on your site or in your city. And that may even mean adding a non-native tree.
Native vs. Non-native
There’s no simple answer to whether it’s better to add a native or non-native tree to your home landscape. It’s all about context . There is no abstract “native plant,” since all plants are native to somewhere on this planet. There are, however, plants that are native to a particular place on this planet — a region, a state, a zip code, a hilltop. When you use the word “native” in the context of plant selection, ask yourself, “native to where?”
That said, so-called “native trees” have successfully survived where you live and are proven examples of what to plant, having evolved with the other plants and animals of the region. They are well-adapted to your environment. But our home sites are rarely native habitats anymore; they are greatly altered. It’s also true that many non-native species seem even more adapted to their new environment than native ones. In fact, that’s what makes invasive plants so damaging. They out-compete native plants for growing space in local habitats. We definitely do not want to add more invasive plants to North America!
How, then, to make a choice? According to recent studies , a good rule-of-thumb is to have at least 70% of the trees, shrubs, and other perennial plants in your home landscape native to your region. As for non-natives, there are many well-behaved tree species (that don’t escape into surrounding habitats) that have been introduced to the U.S., and they may have features you want in your landscape. Just add them sparingly and agree to consider a native alternative.
Form is the combination of innate characteristics of a particular species, and the combination of these features should match your why and your where for planting:
- Size: Consider the typical growth expectation (height and spread) for a mature specimen. This should match your site constraints.
- Shape: Each species has a natural shape as it grows, so matching a species to your expectations will minimize disappointment — and difficult management choices in the future.
- Deciduous vs. evergreen: This choice impacts both form and function, since evergreen trees provide year-round foliage for screening unsightly views or for adding wind protection, and deciduous trees provide that brilliant fall color we enjoy across the temperate climates of the continent.
- Flowers & fruits: We know spring has sprung each year when our yards and cities are filled with the sights and smells of flowering trees. In most cases, those flowers foretell abundant berries, seeds, nuts or pods, so consider tree placement where these fruits won’t be a nuisance or a hazard to passers-by.
Visit our online Tree Wizard for help finding trees that meet your needs and your site characteristics, on the way to planting your perfect tree!
Need additional guidance?
- Your state urban forester’s office will often have tree selection guides available.
- Your state cooperative extension office is a great local resource that can advise you on what trees to plant on your property.
- Local utilities often have publications that highlight trees that are recommended for planting near powerlines.
- Visit Choosing the Right Tree for additional resources when planting.

Urban Forestry Program Manager, Certified Arborist
You Might Also Like

How to Recycle Shade Tree Materials

Saying Goodbye: When it’s Time to Remove Your Tree
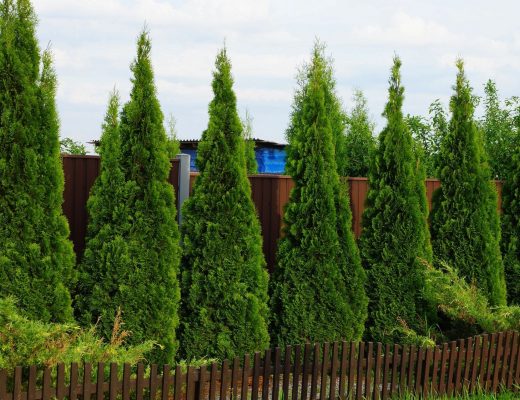
How to Plant a Privacy Hedge
Tree Planting Guide: 3 Methods of Planting Trees
- Residential Blog
- Plant Any Tree Step by Step (Burlap Wrapped, Potted and Seedlings)
You’re ready. You asked yourself all the right questions about what tree is best for you. You ventured out and hand-selected the perfect tree and found just the right place to plant it.
Now, you just need to know how to plant a tree. Let’s do this! Whether you’re planting a balled and burlap tree, a container-grown tree or a tree sapling, find step-by-step planting instructions below.
How to Plant a Potted Tree, Tree Seedling or Tree Wrapped in Burlap (Steps)
Before you begin, read these tree planting tips..
Plant your new tree as soon as you can to set your tree up for its best chance of survival. Otherwise, place it in a cool, dark place that’s away from wind and direct sunlight, and keep the soil damp.
Before you begin digging, contact your utility or gas company to make sure there are no pipes or wires there. In many states, this is required by law.
Pay extra-close attention when positioning the tree depth around the root flare . Planting the root flare too deep is the biggest tree planting mistake ! Sometimes, you may have to partially remove the soil from the top of the container or root ball to even find the flare.
How long does it take to plant a tree?
Generally, a sapling can be planted in 15 to 30 minutes while container-grown or burlap trees take an hour to plant.
How do you plant a tree wrapped in burlap?

To move your tree, roll it or hold it by the root ball– never the trunk or branches.
Dig a saucer-shaped hole as deep as the root ball and at least twice as wide.
Position your tree, so the area where the roots meet the trunk is at or slightly above the ground. That’s called the root flare. The biggest mistake we see is people planting new trees too deep. Also, make sure the ground beneath the root ball is solid beneath the root ball so that the tree doesn’t settle lower because of its own weight.
Cut the twine and remove the burlap around the base of the trunk and the top of the root ball. It’s hard to tell the difference between synthetic and organic, and sometimes even organic burlap doesn’t decompose properly.
Then, if there's a wire cage, remove at least the upper third of it.
Hold the tree upright and refill the hole with the soil you just removed. If the soil is lumpy, break it up a little before placing back in the hole. Then, pack it down to get rid of any air pockets. Add water as you backfill.
Add 2 to 3 inches of organic mulch to the edge of the tree's canopy. Then, water again.
If your tree has a small root ball and seems to be top-heavy, stake it to provide enough support. Remove it after a year.
How to Plant a Potted Tree and Tips for Planting Trees in Pots in the Ground
An hour before you plant, water the tree to reduce transplant shock and make it easier to remove from the container.
When moving the tree, grab and hold by the container–never the trunk or branches.
Dig a saucer-shaped hole as deep as the container and 2 to 3 times as wide.
To remove the tree from its planter, place it on its side. Because you just watered it, the tree should easily slide out when you tap the bottom of the container. If needed, tilt. Just be sure to support the trunk!
Cut off any roots that are squishy or dead. If the roots look tangled, make several vertical cuts in the sides of the root ball and an X-shape cut in the bottom to loosen the roots. Straighten any roots that are circling the margins of the container as best you can. If the roots are much larger than when you first measured, see if you need to make the planting hole bigger.
Position your tree, so the area where the roots meet the trunk is at or slightly above the ground. That’s called the root flare.
Hold the tree upright, and refill the hole with the soil you just removed. Pack the soil to get rid of any air pockets.
Add 2 to 3 inches of organic mulch , and water.
How to Plant Tree Seedlings Outside (Process of Planting a Sapling)
Handle the sapling very carefully. It's very easy to cause root damage or accidentally break the sapling.
Dig a saucer-shaped hole as deep as the tree's roots system and 3 to 4 times as wide.
Remove any organic matter, like leaves or twigs, from the hole.
Hold the sapling upright, and refill the hole with the soil you just removed. Pack to get rid of any air pockets.
Add 2 to 3 inches of organic mulch , and water.
Your new tree is planted! Now, learn new tree care tips to help establish it.
Related blog posts.

Best Trees For Fence Lines

Newly Planted Shrub Care & Maintenance

Sign Up For Free Tree & Landscaping Tips!
Subscribe to the "The Sapling," the Davey Blog's email newsletter, for the latest tips to keep your outdoor space in tip-top shape throughout the year.
Plus, receive a free instant download of our landscape seasonal checklists when you sign up!

Get In Touch With Us!
We pride ourselves at Davey Tree on providing prompt, professional and personalized service from certified arborists that live, work and engage in your community. Contact one of our Davey Tree specialists for your residential, commercial, utility, or environmental needs.
- Find Your Local Davey Office
- Search Current Job Opportunities
- Residential Trimming & Pruning
- Commercial Grounds Maintenance
- Utility Line Clearance
- Urban & Community Forestry
- Stormwater Management
- Learn More About Davey
Planting Instruction
General Summary of Planting Rules
- Plant trees upright, not at an angle.
- Plant trees in mineral soil, not loose debris.
- Pack the soil around tree roots to reduce air pockets.
- Keep tree roots cool and moist.
- Do not plant in excessively wet or sticky soil.
- Plant tree roots in natural uncurled position.
- Make the planting hole deep enough to fit roots, but NOT TOO DEEP!
- Remove or suppress competing vegetation on the planting site.
- Remove trees one at a time from the planting container.
- Never handle large trees by their stem, except for Bare Root Trees.
- Do not remove trees from planting container until the hole is prepared.
Tree planting is more than just putting a tree into the ground. There are a number of options and items to consider prior to any tree planting. Before you have a shovel in your hands, you need to consider the purpose of this tree plant. Trees may be planted for: Aesthetics – for the shape of the tree, foliage colour in autumn, or showy blossoms and fruit. Shelterbelts or visual screens – along fields, on property lines Shade – to provide much need shade to yard sites Energy Conservation – evergreen windbreaks to shield homes against wind and snow, deciduous trees to provide shade in the summer and allow sunshine in the winter months Wildlife enhancement – to attract wildlife to your property by providing food source and shelter Once you’ve determined what the purpose of the tree plant is, then you need to determine a suitable location for the tree(s). Things to keep in mind when selecting the location of the tree planting site(s): How much room does the tree need to grow? Is it too close to other trees or a building that will cause damage to the siding or roof? Is there anything that will limit the height the tree can grow, such as power lines? Is the tree too close to an intersection where it may block visibility? What is the light levels at this location – full sunlight or shaded? In the planning stages, call your local utilities. They can come out and mark any services lines or pipes present. To avoid any problems in the future, do not plant directly over these lines and pipes or directly under power lines. It is recommended not to plant trees within five meters of overhead power lines, however, if it is unavoidable, plant shrubs or low growing trees in this area. Now that you’ve got an idea of where you want to plant the tree(s), you need to determine the soil type and drainage conditions of the planting site. This information will help you with tree selection. Tree selection is very important. The best planting techniques will not ensure the tree health or survival if the tree is poorly suited for that site. Proper tree selection is probably the single most important factor influencing the success of the tree. When selecting trees from a nursery, inquire about the plant’s cold hardiness, as this will help determine whether the tree will withstand our cold winters. Please refer to the cold hardiness map for Manitoba Click here to see a list of Native Trees of Manitoba and a list of Non-Native trees which have a cold hardiness of 2. Once you determined the type of tree and the location of planting and obtained your tree(s), you are ready for planting. The size of tree(s) and how the tree(s) are packaged will determine the method of planting. It is best to plant or transplant trees in their dormant state, in the fall after leaf drop or in the spring prior to bud break.
There are generally 3 types of seedling types: bare root, container grown and cuttings.
Bare Root Seedlings
Bare rooted seedlings must be planted during the dormant season for the best survival. Weather and soil conditions conductive to planting occur in both late spring and early fall. The spring is generally the best time to plant bare-root seedlings, especially if planting in heavy loam or clay soils. Trees planted in heavy soils in the fall are more susceptible to frost heaving and winterkill from dry winter winds. Winter damage from rodents and other wildlife is also greater in fall planted seedlings. Keep the tree roots moist and protected from the sun and wind while handling. It is not recommended to soak the tree roots in water before planting because this will wash away protective soil particles from the roots, making the roots more susceptible to drying. Keep seedlings in containers with moss, wet shredded newspaper, wet burlap or similar material, as this prevents the tree roots from drying out while planting.
Container Grown Seedlings
Container grown seedlings experience less shock then bare-root stock at planting time because the seedling roots are not distributed when planted. Carefully separate the seedlings from their bundles, minimizing the number of stripped or broken roots.
Planting Bare Root and Container Grown Seedlings
There are two methods for hand planting bare root or container grown seedlings: the hole method and the slit method.
- The hole method consists of digging a small hole in the soil to hold the roots of the tree. The hole is made large enough for the planter to spread the roots out in a natural un-crowded or twisted position. Soil is then added around the roots and packed to remove any air pockets.
- The slit method consists of placing the shovel in the ground and making a vertical slit in the soil. Insert the shovel at a 45 degree angle and push forward to the upright position. Remove the shovel and place the seedling at the correct depth. Remember you want the root flare to be at ground level. Hold the seedling at the correct depth and insert the shovel approximately 3 inches behind the seedling and pull the shovel towards yourself to close the hole at the bottom of the roots. With this method, bare rooted seedlings require some extra care to ensure the roots fall down the hole to avoid the deformity called J –rooting. Seedlings with J- roots are more susceptible to drought, disease, and insect attacks because the root system does not develop properly. Root systems with a characteristic J shape are typically caused by not making the planting hole deep enough or twisting the tree into the hole.
Cuttings are another alternative for regenerating certain tree species. Cuttings are usually 8 to 12 inch lengths of tree stems about ¼ to ¾ inch in diameter. They are cut during the dormant season from the previous year’s growth of vigorous seedlings or stump sprouts. Cuttings generally have no visible roots, but when buried vertically with only one inch of the stick above ground, they will form roots.
Cuttings produce exact genetic replica of the parent tree. Cuttings are generally used to regenerate poplars, but can also be used to regenerate willow and green ash.
Planting cuttings requires that the planting area is worked so the soil is loose, making it easier to push the cuttings vertically to their full depth. Cuttings seem to take root quicker if they are soaked in water for one day prior to planting in the soil. Do not leave cuttings in the water for more than one day or small roots will form but will be ripped off when the cutting is pushed into the soil.
When soaking the cuttings, be sure they are fully immersed in the water and not floating on the top. The best way to do this is wrap a bundle of cuttings with an elastic band and putting a weight on the top of the bundle.
When planting, be sure to push the cutting in straight down and not at an angle. Ensure that most of the cutting is below ground so that the top bud is flush with the soil level. Be sure to plant the cuttings with the buds facing upward. Once the cuttings have been pushed into the soil, pack the soil firmly around the cuttings and water them immediately. The cutting require watering whenever the soil gets dry, but do not over water them.
Larger trees
Trees are generally available from nurseries in one of three forms: bare-root, balled and burlapped (B & B), or containerized. Each form has advantages and disadvantages
Bare Root Trees
Bare-root trees are usually small and easy to transplant. Because there is no soil on the root system, these trees are lightweight. This stock type is commonly sold with peat moss covering the roots. It is vital that the roots be kept moist. For best results bare-root trees are typically planted during the dormant season before roots and buds begin to grow. If not planted immediately, bare-root trees should be stored cold, with moist packing around roots. Usually only deciduous trees and small conifer seedlings are sold as bare-root stock.
Dig a planting hole wider than the root width and slightly deeper then the length of the roots. Build a small mound of soil in the center of the hole. Roots should be spread and distributed over the mound. Backfill about three-quarters of the hole and lightly pack the soil to remove any air pockets. Water the tree to promote good contact between roots and soil. Finish filling the hole and pack the soil slightly. Water thoroughly. Soil that is highly compacted decreases the roots ability to exchange oxygen and carbon dioxide.
Containerized or Potted Trees
Containerized or potted trees are sold in plastic or peat pots. This container-grown stock offers better protection against transplant shock and drying of roots during transport and storage. This stock type can be planted at any time during the growing season; however the spring and fall are best for the trees. Always handle the tree by the container or root ball, never by the stem.
All pots must be removed prior to planting. To aid in the removal tap the container on the sides and bottom. Never force the tree out of the container – it may be necessary to cut the sides of the pot to remove the tree. Sometimes roots will have grown in circles within the container. To ensure root growth, score the root ball by making several vertical cuts down the root ball with a knife. Another acceptable method is to use a shovel blade and make a cut through the soil ball at the bottom two-thirds, this is known as butterflying.
Dig a hole at least twice the width of the root ball and to the same depth as the root ball. Plant these trees so the root flare is just below the soil surface to allow the root flare to settle. Backfill approximately two-thirds of the planting hole with the same soil removed when the hole was dug. Lightly pack the soil and water. Finish filling the remainder of the hole, and with the soil create a saucer–shaped cup and embankment around the tree. Lightly pack and water.
The most important factor in successfully planting container grown trees is maintaining adequate soil moisture to encourage the roots to grow into the surrounding soil.
Balled and Burlapped (B & B) Trees
Balled and burlapped trees are sold with burlap surrounding the root ball. As much as 95% of the absorbing roots can be lost in digging, but some of these roots are preserved in the root ball. The burlap is used to wrap the root ball for support and helps keep roots from drying out from exposure to air. All burlap, twine, wire, tags and labels should be removed prior to planting to avoid girdling of the tree. Be sure to handle this stock by lifting the root ball carefully. Never move a B & B tree by lifting the stem.
Some larger balled and burlapped trees come in wire baskets to maintain the integrity of the ball during handling. Baskets can sometimes last decades in the soil, and they can partially girdle roots, restricting vascular transport. Although it may be impractical to remove the entire basket, it is preferable to cut away as much as possible once the tree is in the planting pit and the ball is stabilized. Basket removal eliminates interference with roots and allows them to grow and spread freely.
Once the tree has been selected, the planting hole can be dug. The planting hole for a tree should be two to three times the width of the of the root ball at the soil surface, sloping down about the width of the root ball at the base. The hole should never be deeper than the root ball. One of the most common planting problems is planting too deeply. Deep planting can even be a problem when professionals plant trees because containerized and balled and burlap trees often arrive with soil too high up the trunk due to production techniques.
It is imperative that the natural root flare be located before planting. The top of the root ball should be even with or slightly higher than soil grade at planting. Soft fill should not be added to the bottom of the hole because the root ball will settle and result in it being planted too deeply. Do not put gravel in the bottom of the planting hole; it does not aid drainage. Water will accumulate in the finer textured soil above the course gravel level until the soil is completely saturated.
Backfill the hole with the soil removed when the hole was dug. Work the soil around the root ball so that no air pockets remain. Firm the soil around the bottom of the root ball so that the tree is vertical and adequately supported. Water thoroughly and slowly. The remaining soil is sometimes mounded into a dike or berm beyond the outer edge of the root ball to collect water over the root zone, especially on sloped sites.
Apply mulch around newly planted trees. Mulch is important for several reasons:
- keeps the soil moist by decreasing evaporation
- decreases competition from weeds
- creates a buffer between the tree and weed trimmers or mowers
- increases the effectiveness and longevity of fertilizer applications
- moderates soil temperature
Inorganic mulches include various types of stone, lava rock, pulverized rubber, geotextile fabrics, and other materials. While organic mulches include wood chips, pine needles, hardwood and softwood bark, cocoa hulls, leaves, compost mixes, and a variety of other products usually derived from plants. Because the decomposition of organic mulch improves soil quality and fertility, many consider these characteristic a positive one and the preferred choice, despite the added maintenance.
Do not cover the area immediately surrounding the stem, rather measure 5 cm out and begin there. Spread the mulch around the tree to a distance of approximately 50 cm from the stem. The mulch layer should be approximately 7 cm deep. Do not make mulch layer much deeper than the recommended 7 cm, otherwise small rodents may overwinter in the mulch.
- Planting Instructions
- Tree Care and Maintenance
- Pests and Diseases
Get Involved
The MFA as a member
with THE MFA
- K-State home
- Research and Extension
- News and Events
Ten rules for planting trees this spring

Selecting the right tree for the site is the first rule for successfully planting a tree in your yard, says K-State horticulture expert Cynthia Domenghini.
K-State horticulture expert shares tips to set you up for success
At a glance: K-State horticulture expert Cynthia Domenghini shares tips for planting trees this spring.
More information: Cynthia Domenghini, [email protected]
Related: K-State Horticulture Newsletter
March 26, 2024
K-State Research and Extension news service
MANHATTAN, Kan. – If you’re planning to plant a tree in your yard this spring, there are some steps you can take to make sure your new landscape has its best chance of success.
Kansas State University horticulture expert Cynthia Domenghini shares the following 10 rules for planting trees:
Select the right tree for the site.
To avoid serious problems, choose trees that are adapted to your location. Consider whether the tree produces nuisance fruit or if there are disease-resistant varieties available. For example, there are a number of crabapple varieties that are resistant to apple scab and rust diseases. Also consider the mature size of a tree to be sure you have enough room. Ask a local nurseryman for suggestions for trees adapted to your area.
Keep the tree well watered and in a shady location until planting.
When moving the tree, lift it by the root ball or pot and not by the trunk.
Before planting, remove all wires, labels, cords or anything else tied to the plant.
If left on, they may eventually girdle the branch to which they are attached. The root flare (point where trunk and roots meet) should be visible when planted. If it isn't, remove enough soil or media before planting so that it is.
Dig a proper hole.
Make the hole deep enough so that the tree sits slightly above soil level. Plant the tree on solid ground, not fill dirt. In other words, don't dig the hole too deep and then add soil back to the hole before placing the tree.
The width of the planting hole is very important. It should be three times the width of the root ball. Loosening the soil outside the hole so it is five times the diameter of the root ball will allow the tree to spread its roots faster.
Remove all containers from the root ball
Cut away plastic and peat pots; roll burlap and wire baskets back into the hole, cutting as much of the excess away as possible. If you can remove the wire basket without disturbing the root ball, do it. If roots have been circling around in the container, cut them and fluff them out so they do not continue growing in a circle inside the hole becoming girdling roots later in the life of the tree.
Backfill the hole with the same soil that was removed.
Amendments such as peat moss likely do more harm than good. Make sure the soil that goes back is loosened - no clods or clumps. Add water as you fill to ensure good root to soil contact and prevent air pockets. There is no need to fertilize at planting.
Don't cut back the branches of a tree after planting except those that are rubbing or damaged.
The leaf buds release a hormone that encourages root growth. If the tree is cut back, the reduced number of leaf buds results in less hormone released and therefore fewer roots being formed.
Water the tree thoroughly.
Then, water once a week for the first season if there is insufficient rainfall.
Mulch around the tree.
Mulch should be 2-4 inches deep and cover an area 2 to 3 times the diameter of the root ball. Avoid mulching right up to the trunk of the tree. Leave a 3 to 6-inch gap between the mulch and the trunk to prevent damaging the tree. Mulching reduces competition from other plants, conserves moisture and keeps soil temperature closer to what the plants' roots prefer.
Stake only when necessary.
Trees will establish more quickly and grow faster if they are not staked. However, larger trees or those in windy locations may need to be staked the first year. Movement is necessary for the trunk to become strong. Staking should be designed to limit movement of the root ball rather than immobilize the trunk.
Domenghini and her colleagues in K-State's Department of Horticulture and Natural Resources produce a weekly Horticulture Newsletter with tips for maintaining home landscapes and gardens. The newsletter is available to view online or can be delivered by email each week.
Interested persons can also send their garden and yard-related questions to Domenghini at [email protected], or contact your local K-State Research and Extension office .

- Updated: 3/26/24
- Open access
- Published: 12 April 2024
Different profiles of soil phosphorous compounds depending on tree species and availability of soil phosphorus in a tropical rainforest in French Guiana
- Albert Gargallo-Garriga 1 , 2 ,
- Jordi Sardans 3 , 4 ,
- Joan Llusià 3 , 4 ,
- Guille Peguero 3 , 4 ,
- Marta Ayala-Roque 2 ,
- Elodie A. Courtois 5 , 6 ,
- Clément Stahl 7 ,
- Otmar Urban 3 ,
- Karel Klem 3 ,
- Pau Nolis 8 ,
- Miriam Pérez-Trujillo 8 ,
- Teodor Parella 8 ,
- Andreas Richter 9 ,
- Ivan A. Janssens 5 &
- Josep Peñuelas 3 , 4
BMC Plant Biology volume 24 , Article number: 278 ( 2024 ) Cite this article
229 Accesses
6 Altmetric
Metrics details
The availability of soil phosphorus (P) often limits the productivities of wet tropical lowland forests. Little is known, however, about the metabolomic profile of different chemical P compounds with potentially different uses and about the cycling of P and their variability across space under different tree species in highly diverse tropical rainforests.
We hypothesised that the different strategies of the competing tree species to retranslocate, mineralise, mobilise, and take up P from the soil would promote distinct soil 31 P profiles. We tested this hypothesis by performing a metabolomic analysis of the soils in two rainforests in French Guiana using 31 P nuclear magnetic resonance (NMR). We analysed 31 P NMR chemical shifts in soil solutions of model P compounds, including inorganic phosphates, orthophosphate mono- and diesters, phosphonates, and organic polyphosphates. The identity of the tree species (growing above the soil samples) explained > 53% of the total variance of the 31 P NMR metabolomic profiles of the soils, suggesting species-specific ecological niches and/or species-specific interactions with the soil microbiome and soil trophic web structure and functionality determining the use and production of P compounds. Differences at regional and topographic levels also explained some part of the the total variance of the 31 P NMR profiles, although less than the influence of the tree species. Multivariate analyses of soil 31 P NMR metabolomics data indicated higher soil concentrations of P biomolecules involved in the active use of P (nucleic acids and molecules involved with energy and anabolism) in soils with lower concentrations of total soil P and higher concentrations of P-storing biomolecules in soils with higher concentrations of total P.
Conclusions
The results strongly suggest “niches” of soil P profiles associated with physical gradients, mostly topographic position, and with the specific distribution of species along this gradient, which is associated with species-specific strategies of soil P mineralisation, mobilisation, use, and uptake.
Peer Review reports
Tropical forests are characterised by high biodiversity and biomass despite growing in strongly weathered soils. All tropical rainforests tend to have high productivity, rapid nutrient turnover, highly weathered soil, and low soil pH [ 1 ]. Tropical regions, such as those in Africa, Asia, and South America, have distinct geological histories that underlie the high biodiversity [ 2 ]. The distribution of plant species and soils are highly variable at local scales within tropical regions [ 3 ]. Several mechanisms have been proposed to explain the coexistence of many plant species in small areas in tropical forest i.e. the high biodiversity observed in tropical forests [ 4 , 5 ]. Many of these mechanisms include heterogeneous disturbances and systems of regeneration [ 6 ]. A diverse topography [ 7 ], species-specific defenses against herbivores [ 8 ], soil traits heterogeneity [ 9 , 10 , 11 ], and differences in nutrient availability [ 10 , 12 , 13 , 14 ] are the other most frequently discussed mechanisms.
The amount of P and its availability limits the productivity of many terrestrial and aquatic ecosystems [ 15 ]. Stocks of total soil P, the chemical forms of P, and P availability in the soil change as ecosystems age and develop, and these transformations can strongly influence ecosystem properties [ 16 , 17 , 18 ]. In particular, biological productivity in wet tropical forests is frequently limited by the availability of soil P [ 19 , 20 ]. Soil taxonomic studies (Soil Survey Staff 2006) classify most tropical forest soils as Oxisols, Ultisols, Alfisols, Inceptisols, or Entisols [ 21 ]. P in these soils usually occurs as organic P and as occluded inorganic forms as part of pedogenic minerals. Occluded forms of P are especially common in older soils (Oxisols, Ultisols, and Alfisols), which frequently have very low or negligible amounts of primary minerals in their profiles and low concentrations of orthophosphate, which is the chemical form of P directly available to plants [ 17 , 22 ]. In contrast, organic P can account for a considerable proportion of total P in tropical mineral soils, accounting for an average of 29 ± 3% of the total P in equatorial forests and in Panama (soil organic P in lowland tropical forests) [ 23 , 24 ].
The turnover of organic P is the primary source of P for microbes and plants (soluble inorganic phosphate ions) in tropical soils [ 25 , 26 ], even though several plant-soil processes can make organic and inorganic/occluded P available to plants, such as mobilisation by roots [ 27 ] or the chemical reduction of iron-phosphate complexes under anaerobic conditions [ 28 ]. Organic P in forest soils is derived from fresh organic matter (leaf litter), microbial biomass, and non-microbial biomass. In general there is evidence suggesting rapid decomposition of leaf litter in the humid tropics (< 1 year; [ 29 ], despite other studies have observed slower rates of leaf litter decomposition (> 1 year) [ 30 ]. Litter nonetheless provides most of the P that supports growth in strongly weathered tropical soils. This phenomenon of “ direct nutrient cycling ” in tropical forests is characterised by the fast release of biologically available phosphate to roots and mycorrhizae by the decomposition of leaf litter and the consequent fast absorption of P by microbes and plants, which is so rapid that the plant-soil P cycle closes, nearly preventing P from being lost via leaching or sorption to iron and aluminium oxides [ 31 ].
Knowledge of the various chemical types of soil organic P and of how plants and microbes use these forms of P is essential to better understand the global cycling and use of P in the plant-soil systems of tropical rainforests. 31 P nuclear magnetic resonance (NMR) is an excellent tool for studying soil organic P because it provides quantitative data and allows the comparison of the various chemical forms of P [ 32 , 33 , 34 , 35 ]. In fact, 31 P NMR allows to discern different molecules where P is present, molecules with different metabolic function such as phosphate mono- and di-esters such as nucleic acids, ATP or acilglyrates involved directly in metabolism pathways, metabolism control and energy transfer from molecules such as orthophosphate, pyrophosphates and polyphosphates, which are involved in P storage. For example, 31 P NMR in soil studies provides data on the proportion of diester P associated with changes in microbial P compounds [ 36 , 37 ] and the ratio of monoester P to diester P, information needed to characterise the lability and rate of turnover of soil organic P.
In these conditions of high species diversity under strong P limitation, we hypothesised, as suggested in previous reports [ 38 ], a long-term adaptation of sympatric species to maximise the capacity of taking up P while avoiding competition. We tested this hypothesis using 31 P NMR spectroscopy in a P metabolomics study to determine the allocation of P to different biological functions in the soil. Our objective was to investigate the variation in soil P profiles along topographic gradients in two tropical forests with highly diverse compositions of tree species for determining whether changes in the profiles of soil organic P were correlated with changes in the composition of tree species and/or with distinct topographic environments and sites. We hypothesised that tree species would use P in specific ways, because the species occupy different functional [ 39 ] and biogeochemical [ 40 ] niches. Biogeochemical niche hypothesis captures niche parameters through species-specific elemental composition and stoichiometry [ 40 , 41 , 42 , 43 ]. The assumptions underlying it are based on the idea that each species is a unique genetic pool of individuals, a product of long-term evolutionary processes, so each species should have a specific structure and functionality (from gene expression to physiological processes). Since the fundamental biological processes (e.g. growth, secondary metabolism, reproduction and storage) have distinct rates in different species, depending on what selection has shaped, the different species have to allocate elements to various traits of tissues and organs differentially. The different use of bio-elements has proved to be even more different in sympatric species as a trait that could avoid direct competition [ 40 ]. Thus, as phosphorus is frequently limiting in tropical rainforests, we should expect that each species tends to have its own P-use strategy (P-metabolome niche) and that this should be underlying the higher species diversity of this high diverse ecosystem. We hypothesized that the tree species would use P in specific ways because each species occupies different functional [ 39 ] and biogeochemical [ 40 ] niches, thus providing species-specific litter that would accordingly modify the 31 P-NMR profile of the underlying soil. Our specific expectations were: (1) species composition would influence the proportions of different P compounds in the underlying soil, and (2) the 31 P NMR profiles would differ amongst and within sites (due to factors such as topography), indicative of differences in P use.
1D 31 P NMR
The spectra of acid-insoluble compounds indicated three main P resonances: monoesters, phospholipids (orthophosphate diester), and DNA. With NMR we were able to determine the family of P-compounds (Fig. 1 ), but we could not determine the exact compounds. Signals from nucleic acids (DNA: −0.37 ppm) and phospholipids were differentiated in the orthophosphate diester region and were readily identified in the soil samples. Inorganic and organic polyphosphates were differentiated by the presence of a signal at − 9 ppm from the α phosphate of organic polyphosphates. Some orthophosphate monoesters, such as mononucleotides derived from RNA and phosphatidyl choline, degraded rapidly to orthophosphate diesters in NaOH-EDTA, although DNA and phospholipids were more stable. The 31 P NMR spectra of NaOH-EDTA extracts from all soil samples generally presented monoesters ( ∼ 25%) at 3.4 to 5.4 ppm, unhydrolysed diesters ( ∼ 20%) at − 1 to 2.3 ppm, and DNA ( ∼ 20%) at − 0.3 ppm. The less abundant forms were polyphosphate ( ∼ 10%) at − 5.6 to − 3.8 ppm, inorganic orthophosphate (hereafter ‘phosphate’; ∼ 10%) at 5.7 to 6.5 ppm, and the pyrophosphate inorganic form of P ( ∼ 5%) at 0.5 to 0.6 ppm. Glucose-6 phosphates had low resonance intensities, at 5.3 to 5.4 ppm.

31 P NMR chromatogram with the different molecules shown in the chromatogram
Soil P compounds and nutrients
In the PCA of organic P compounds; nutrients N, P, and K; enzymatic activity, and ecophysiological variables PC1 axis correlated best with site whereas PC2 correlates with samples of different topographic positions within each site (PC2) (Fig. 2 ). We examined the PCA results to identify the components that correlated best with site for better understanding the relationships of site with organic P compounds and the concentrations of C, N, P, and K. The PC2 axes correlated with topographic position and separated samples from the top, slope, and bottom positions, in Nourague and those of top and slope with respect to those of bottom in Paracou site.

Principal component analyses of soil organic P compounds (green), nutrients (red), d 13 C, d 15 N, enzymatic activities, and ecophysiological variables (black) indicating significant effects of topographic position and site, with corresponding standard deviations Polyphos (polyphosphate); pyrophos (pyrophosphate) polyphosphos (polyphosphonate); orthophos (orthophosphate), orthophosmono (orthophosphate monosester), orthophosphate-diester (orthophosdiester); glucose6phos (glucose-6phosphates); SPAD—chlorophyll content; C—carbon; N—nitrogen; K—potassium; P—phosphorus. The abbreviations in the legend refer to the site (Paracou and Nouragues) and topographic position: T, top; S, slope; and B, bottom
The PCA results also indicated that soil with higher total P concentrations had higher concentrations of organic P compounds involved in storage (polyphosphates and polyphophos) and of C-free forms of P (orthophosphates and pyrophosphates). In contrast, soils with the lowest total P concentrations had higher concentrations of P compounds involved with genetic information, energy transfer, and protein anabolism such as orthophosphate monosester and orthophosphate-diester. Soils at the upper topographic positions had more total P (Table 1 ), which strongly correlated with the activities of acid and alkaline phosphatase, suggesting a greater “investment” of microbes and plants to allocation in P acquisition from soil when the level of total P is high. Tree characteristics also differed amongst the plots at the three topographic positions with wood density tending to be higher in the top plots whereas growth rate, and tree height tending to be higher in the bottom plots (Margalef et al. 2018). Each species occupied a different position in the 2D-plot of the PCA analysis as reinforced by the results of the PERMANOVAS (Table S3 ). The profiles of organic P compounds in the 31 P NMR did not significantly vary between sites (Paracou vs. Nouragues; pseudo-F = 1.93; R 2 = 0.015, P = 0.08), nor in function of topographic positions (top, slope, and bottom; pseudo-F = 1.73; R 2 = 0.027, P = 0.568)) (Table S2 ). The interaction between topographic position and site was neither significant (pseudo-F = 5.68; R 2 = 0.089, P = 0.195) (Table S2 ). Species had a significant effect on 31 P NMR profile (pseudo-F = 3.09; R 2 = 0.53, P < 0.001) (Table S3 ).
The concentrations of the most abundant fractions of P (residual P, total P extractable by NaOH-EDTA, organic P, and inorganic P) varied amongst the soil samples, without any clear trends (Fig. 2 ). The total P concentration was 58–299 mg kg − 1 ; 56–88% was extracted by NaOH-EDTA, and the nonextracted fraction represented ‘residual P’. For the P extracted with NaOH-EDTA, 59–74% was organic and 26–41% was inorganic. Thus, most P was present in organic compounds than in inorganic forms suggesting a high biological use of P. Moreover, among these organic forms the highest proportion of P was found in molecules involved in active functions, such as growth, cellular control, or energy transfer. This is the case of the di-ester forms present in nucleic acid chains or storing energy molecules such as ATP.
The ratio of monoester to diester P was near 1, and diester-2 P was more abundant than diester-1 P, except for soils at the upper topographic position (in which the ratios of monoesters to diesters and diester-1 [phospholipids] to diester-2 [DNA and acid-unstable compounds] in the NaOH-EDTA extracts were similar).
Species-specific utilization of phosphorus
Our findings support the hypothesis that soil phosphorus (P) profiles differ among samples collected beneath different tree species. The soil samples associated with each tree species occupy distinct positions in a 2D plot representing the main functional groups of metabolic P molecules and nutrient concentrations in the soils (Fig. 3 ; Table 2 , and table S4 ). Species accounted for over half of the total variance in 31P NMR data. These consistent results indicate a species-specific pattern of P uptake and utilization, as well as species-specific interactions between trees and microbes (including mycorrhiza) and P transformations specific to the microbes associated with each tree species. Additionally, we observed a clear gradient in P compounds from high anabolic energy to storage, with the highest concentrations of P compounds associated with anabolic energy in soils with the lowest total P concentrations.

Principal component analyses of soil organic P compounds (green), nutrients (red), d 13 C, d 15 N, enzymatic activities, and ecophysiological variables (black) with species scores mean position, with corresponding confidence intervals (95%). Polyphos (polyphosphate); pyrophos (pyrophosphate) polyphosphos (polyphosphonate); orthophos (orthophosphate), orthophosmono (orthophosphate monosester), orthophosphate-diester (orthophosdiester); glucose6phos (glucose-6phosphates); SPAD—chlorophyll content; C—carbon; N—nitrogen; K—potassium; P—phosphorus. The abbreviations in the legend refer to the tree species: Aro, Aniba rosaeodora ; Bpr, Bocoa prouacensis ; Car, Chrysophyllum argenteum ; Cde, Capiro decorticans ; Cfr, Catostemma fragrans ; Cgl, Caryocar glabrum ; Csa, Chrysophyllum sanguinolentum ; Csu, Carapa surimensis ; Ctu, Chimarrhis turbita ; Dgu, Dicorynia guianensis ; Dod, Dipteryx odorata ; Dva, Drypetes variabilis ; Eco, Eschweilera coriacea ; Ede, Eschweilera decolorans ; Efa, Eperua falcata ; Egr, Eperua grandiflora ; Emy, Eugenia ; Hbi, Hirtella bicornis ; hco, Hymanea courbaril ; Lal, Licania alba ; Mco, Moronobea coccinea ; Mve, Micropholis venulosa ; Oas, Oxandra asbeckii ; Peu, Pouteria eugeniifolia ; Pgu, Paloue guianensis ; Pop, Protium opacum ; Ppt, Pradosia ptychandra ; Sel, Sloanea ; Sgr, Sapotaceae grandiflora ; Spr, Sterculia pruriens ; Ssp, Sterculia speciose ; TCl, Tovomita clusiaceae ; Tmy, Tetragastris ; Tpr, Talisia praealta ; Vam Vouacapoua america ; and Vsa, Vochysia sabatieri
Polyphosphates and polyphosphonates are chains of orthophosphates that serve as stored phosphate compounds. Our results revealed higher concentrations of orthophosphate, pyrophosphates, polyphosphonates, and polyphosphates in soils with higher total P concentrations and lower P availability at our study sites. Proportionally, more P was allocated to active metabolic molecules (e.g., DNA) and energy transfer (poly P, pyro P) in soils with lower total P concentrations and higher P availability. Higher concentrations of P storage compounds in the soil can be associated with low P availability, ensuring a controlled source of P for microbes when accessing soil P is challenging [ 44 ]. Moreover, the investment of microbes in building phosphatases was significantly lower in conditions of low carbon (C) and high poly P concentrations. This suggests that high polyphosphate concentrations may be associated with C conservation, particularly in sites where the soil has a high capacity to retain P. In these cases, higher polyphosphate reserves can serve as a P conservation trait, preserving C and providing a biological mechanism for accessing P from P reserves in microbial cells when necessary. Similarly, under conditions of very low C availability, higher PolyP levels may act as a compound for storing energy to conserve C [ 42 ].
Another study in the same ecosystem reported clear species-specific signatures in general foliar metabolomics profiles, indicating functional niches for dominant tree species in the region [ 43 , 44 ]. Our results align with our initial hypothesis that the quantities of different P compounds would differ among soil samples due to interspecific differences in P utilization strategies and cycling. This finding is consistent with previous observations [ 45 , 46 ]. For example, in a Panama rainforest, Condit et al. (2013) found that dry-season intensity and soil phosphorus were the strongest predictors, affecting the distribution of over half of a set of 550 tree species.
Our findings are also in line with previous studies that have identified associations between sets of species and specific habitats in tropical rainforests. The distribution of tree species is influenced by spatial variability in soil properties, such as nutrient availability and topography [ 47 , 48 , 49 , 50 ]. An extension of classical ecological niche theory, known as the “biogeochemical niche hypothesis“ [ 45 ], suggests that each species tends to reach an optimal chemical composition linked to a specific function that allows it to survive in its niche [ 39 , 51 , 52 ]. Our study provides evidence that organic P measurements can be used to characterize soil niches. The measurement and identification of different organic P molecules can serve as a powerful tool for characterizing most P-limited rainforests [ 23 , 53 ]. In these cases, “P-metabolome niches” arise due to soil niche differentiation along natural spatial gradients of biotic and abiotic factors that influence P availability, total concentrations, and chemical forms of P, which, in turn, are associated with P utilization and cycling. Tropical trees may exhibit finely subdivided niches [ 54 ], although direct evidence for measurable variables of overall functional differences among sympatric species and geological processes is currently limited. However, our results clearly indicate that soil beneath each tree species possesses a specific soil P-metabolome. The distinct strategies of individual tree species for P uptake, litter quality, retranslocation, allocation, soil exudates, and biotic interactions with soil microorganisms and other tree species contribute to a micro-scale soil space with a unique P-metabolome profile.
Topography and regional factors
In addition to the differences in P-metabolome profiles in soils associated with different tree species, we also observed relationships between P-metabolome profiles and other factors such as site and topographic position (Fig. 2 ). These relationships suggest that microsite variations in P-metabolome profiles are influenced by biotic conditions and associated with distinct soil traits, including texture, that vary across different topographic situations. Topography creates diverse soil P conditions, with higher total P concentrations and lower P availability at higher elevations, and vice versa at lower elevations. This finding is consistent with more conservative resource-use traits observed at higher elevations, such as the higher wood density of trees, and the opposite pattern at lower elevations. Furthermore, the spread of species along the 2D space generated by the two principal component axes was also associated with these findings. Thus, each species has developed a specific niche for highly efficient P utilization along the gradient, resulting in a distinctive distribution profile of P compounds that maximizes their use efficiency. These results also suggest that a “niche” of P profiles is associated with a physical gradient, primarily determined by topographic positions, and reflects species-specific strategies for mineralizing, mobilizing, utilizing, and acquiring soil P.
The abundance of organic P compounds, such as diesters and phosphonates, varied according to site and topographic position. Specifically, DNA and polyphosphate concentrations increased from the bottom to the top. DNA, polyphosphate, and phosphonates are abundant in soils with high microbial activity [ 31 ]. Site and topographic position explained some of the variance in the P profiles, likely due to clay content, which can form organomineral complexes and better retain organic material, including organic P. Variations in P profiles may also be influenced by metal oxides, as they can strongly occlude P, including organic P molecules. The occasional flooding of the bottom plots may have influenced the redox states of metal oxides (specifically iron and manganese oxides; aluminum oxides are less affected), which, in turn, could have affected the adsorption/desorption dynamics of P fractions in the soil.
Furthermore, the higher presence of mono- and diesters observed in bottom soils with higher sand content aligns with previous findings. A greater presence of monoester phosphorous compounds has been linked to the decomposition of organic matter rich in P metabolites, such as phosphatidylcholine and phospholipids [ 31 , 55 ]. Similarly, higher soil concentrations of diester phosphates have been positively associated with higher concentrations of sand-sized fractions compared to silt and clay fractions [ 56 , 57 ].
Significant variations were observed in the ratios of monoesters to diesters and the ratios of different diesters (diester-1 and diester-2; Table 1 ) across different parts of the 31P NMR spectra. Gressel et al. (1996) suggested that the correlation between monoester P and alkyl C in the organic horizons of a tropical forest soil indicates that the mineralization of monoester P fractions is linked to the decomposition of plant structural components, and that a significant portion of the monoester P in NaOH extracts may originate from hydrolyzed phospholipids derived from plants. The alkaline hydrolysis of phosphatidylcholine to monoesters is well-documented [ 31 , 55 , 58 ]. Soils in semi-arid northern Tanzania [ 59 ], enriched with diesters in sand-sized fractions relative to silt and clay fractions, likely derive these diesters from plants. Labile organic P compounds (e.g., phosphonates and diesters) and phosphate diesters (e.g., DNA and other diesters) often exhibit inverse relationships. For instance, diester P may increase while phosphonates decrease when comparing soils from a native savanna to Oxisol soil of an improved pasture in Colombia [ 36 , 53 ]. Similarly, in a Spodosol soil of a spruce-fir forest, diester P (0 ppm) increased while unidentified diester compounds (1.5 to 2.5 ppm) decreased with increasing decomposition levels [ 46 ].
The top plots had higher concentrations of total P but lower levels of available P due to adsorption onto fine-grained particles, particularly highly reactive P oxides. This occlusion mechanism of P requires greater investments in microbial and root activities to acquire P, which is consistent with the higher activities of acid and alkaline phosphatases observed. However, the higher presence of molecules associated with P storage (orthophosphate, pyrophosphates, and polyphosphate inorganic chains) in these top soils is consistent with a more conservative strategy [ 47 , 48 , 49 , 50 , 51 ], where more P is stored within cells to support biological functions that require P, independent of P uptake from the soil. Furthermore, in top soils, the limited availability of soil P was associated with tree species characterized by higher wood density, typically exhibiting more conservative traits. These findings provide further evidence of the links between soil P status, species distribution, and their life strategies in this tropical rainforest [ 52 , 53 , 54 ].
In conclusion, our study reveals that variations in P-metabolome profiles in soils are not only influenced by different tree species but also by other factors such as site and topographic position. Topography creates distinct soil P conditions, which, combined with the spread of species along the gradient, leads to species-specific strategies for P utilization and uptake. Additionally, the abundance of organic P compounds varies with site and topographic position, influenced by factors such as clay content and metal oxides. The presence of mono- and diesters in soils correlates with organic matter decomposition and sand content. The ratios of different P compounds further highlight the complex dynamics of P cycling in the soil. Our findings contribute to a better understanding of the interactions between vegetation, soil, and P dynamics in tropical rainforest ecosystems.
The P metabolomic profiles of soil samples collected at different sites under trees in French Guianese rainforests differed greatly, with very significant differences amongst soils collected beneath different tree species. This result is consistent with the ecological niche theory and the biogeochemical niche hypothesis (a correspondence of species with specific environmental conditions) in this highly diverse tropical ecosystem. Using 31 P-metabolomic profiles to analyse the functions of different plant species in a community thus allowed us to identify different soil 31 P NMR profiles associated with each tree species.
Our multivariate analyses of the soil 31 P NMR metabolomics data notably indicated a trend to find higher soil concentrations of P biomolecules associated with low P use and high P storage under higher total P concentrations at the top sites, coinciding with tree species with more conservative strategies associated with denser wood and with a soil texture and mineral composition providing high P immobilization capacity. The bottom sites tended, instead, to have higher soil concentrations of P biomolecules associated with biological activity under lower total P concentrations, but higher P-availability, coinciding with tree species with less dense wood and a soil coarser texture.
Our combined analysis of soil elemental composition and P metabolomics provides an improved understanding of environmentally linked shifts in soil P concentrations and availability with different allocations of P for growth and other functions, such as storage, defense, reproduction, or resistance that stress the key role of this element in tropical rainforest functioning. As more P is available, more P is invested in active metabolism and functional activity and less in storage.
French Guiana is on the northeastern coast of South America between 2°10′ and 5°45′N and 51°40′ and 54°30′W. 97% of the region is covered by lowland wet tropical forest [ 55 ]. A pronounced dry season, characterised by < 100 mm precipitation per month, extends from September to November and is associated with the displacement of the intertropical convergence zone. Mean daily temperature is 25.8 °C and varies by only 2 °C throughout the year; daily temperatures vary by 7 °C during the rainy season and by 10 °C in the dry season [ 56 , 57 ].
Field work was conducted at two sites of mature lowland tropical rainforest: the Paracou Research Station (5°18′N, 52°53′W) and the Nouragues Research Station (4°05′N, 52°40′W). Mean annual rainfall is 2990 mm at Nouragues and 3160 mm at Paracou [ 58 ], although the dry season is more severe at Paracou [ 58 ]. Three topographical locations were selected at each site: top of hills (top), middle of slopes at an intermediate elevation (slope), and bottom of slopes at a low elevation, immediately above a creek [ 59 ].
Study plots
We established 12 plots of 0.25 ha at each site stratified by three topographic positions to account for the heterogeneous soil texture: top of the hills, slope and bottom of the valleys, thus with 4 plots in each topographic position. In each plot, we delimited a central 20 × 20 m quadrat where we marked five evenly spaced sampling points around which we focused all our measurements. This design thus contained a total of 120 sampling points (2 sites × 3 topographic positions × 4 replicate plots per topographic position × 5 sampling points in each plot). In each sampling point we annotated the nearest tree in function of the linear distance to the trunk base. The bottom plots at both sites had higher sand contents and lower clay contents than the top and slope plots [ 57 ]. All trees (diameter at breast height ≥ 10 cm) within the 0.25-ha plots were mapped, tagged, and identified to species or genus using herbarium vouchers for determining the richness of the tree species for each plot.
Sample collection
Thus, we collected five soil samples per plot to a depth of 15 cm (Topsoil) in June (wet season) 2015. Each sample was collected using an auger/corer and was a composite of three borings near (< 2 m apart) each other. All voucher specimens were deposited in the Herbarium of International Center for Tropical Botany in Miami, FL 33,199 USA. A total of 120 samples were collected around the trees. We aliquoted 5 g of each sample for 31 P NMR analyses that were immediately placed into a paper bag and frozen in liquid nitrogen before transporting the samples to the laboratory. The rest of soil sample was transported to the lab and stored in plastic zip bags at 4ºC until all the other analyses (within 4 weeks). Soil storage at 4ºC has been shown to keep enzymatic activity of tropical soils better than frozen samples. Fresh soil was sieved to 2 mm; for each sample one part was used for enzymatic activity analyses and the other part was dried 24 h at 105ºC for gravimetric water content. The other soil variables were analyzed from the same soil samples as those used in the 31 P NMR analyses to determine the effect of the tree species.
Environmental biotic and abiotic data
We compiled data for 28 variables describing the pools of soil nutrients, activities of extracellular enzymes, and aboveground tree-community data for each site to characterise the potential micro-environmental and biotic drivers. Nutrient concentrations and ratios, d 13 C, d 15 N, enzymatic activities, and ecophysiological variables are abbreviated as: C, N, P, C:N, C:P, N:P, K, d 13 C, d 15 N, leu (enzymes leucine), gly (enzymes glycine aminopeptidases), alkp (enzymes alkaline phosphatases), acidp (enzymes acid phosphatases), bgluc (enzymes β- glucosidase), p_olsen (amount of soil phosphorus available by Olsen test), p_bray (amount of soil phosphorus available by Bray test), scw_lab (laboratory surface water content), swc_field (field surface water content), surf_temp (soil surface temperature), EC (soil electric conductivity, mS/cm), MBP (microbial biomass P, µg P / g soil DW), MBP_Ke-P (microbial biomass P, µg P / g soil DW with factor KeP = 0.40), MBP_P recov (microbial biomass P, µg P / g soil DW with P-recovery factor), MBP_Ke-P + P recov (microbial biomass P, ug P / g soil DW with P-recovery factor and KeP), TEP (Total extractable P, µg P / g soil DW), TEP_recov P (Total extractable P, µg P / g soil DW with recovery factor P applied ), OEP (Organic extractable P, µg P / g soil DW), and PmgkgLOQ (P concentration in soil, mg/kg Limit of Quantification). All the acronyms used throughout the text are described in Table S1 .
Nutrient pools
We collected soil cores from the topsoil of each sampling point using a soil auger (4 cm in diameter and 15 cm in length; Van Walt, Haslemere, UK) to analyse the nutrient status. The samples were sieved to 2 mm and then freeze-dried (Alpha 1–2 LDplus, Martin Chirst Freeze Dryers, Osterode, Germany). Subsamples were pulverised in a ball mill (MM400, Retsch, Haan, Germany) for the analysis of elemental composition. We weighed 0.15–0.2 g of soil using an MX5 microbalance (Mettler Toledo, Columbus, USA) for determining the concentrations of total carbon (C) and nitrogen (N) by combustion coupled to an isotopic ratio mass spectrometer at the Stable Isotopes Facility (UC Davis, USA). Concentrations of total P and potassium (K) were determined by diluting 0.25 g of soil with an acid mixture of HNO 3 (60%) and H 2 O 2 (30% w/v) and digested in a MARS Xpress microwave oven (CEM Corporation, Matthews, USA). The digested solutions were then diluted to final volumes of 50 mL with ultrapure water and 1% HNO 3 . Blank solutions (5 mL of HNO 3 with 2 mL of H 2 O 2 but no sample biomass) were regularly analysed. The content of each element was determined using inductively coupled plasma/optical emission spectrometry (ICP-OES Optima 4300DV, PerkinElmer, Wellesley, USA). We used the standard certified biomass NIST 1573a to assess the accuracy of the biomass digestion and analytical procedures.
Determination of activities of extracellular enzymes
We determined the activities of the extracellular enzymes β-glucosidase, leucine and glycine aminopeptidases, and acid and alkaline phosphatases (βgluc, leu, gly, acidP, and alkP, respectively) in all the 120 topsoil samples. The activities of these enzymes can serve as proximal variables of microbial nutritional metabolism and depend mostly on the interaction of the relationship between supply and demand with environmental kinetics [ 60 ]. Fresh subsamples of 2-mm sieved soil were stored in ziplock plastic bags and stored at 4 °C until analysis. We quantified the maximum potential activities of each enzyme by colorimetric assays using p -nitrophenylphosphate and p -nitroaniline derivative chromogenic substances. These enzymes are involved in the mineralization of C, N and P (Sinsabaugh and Shah, 2012). β -glucosidase participates in the decomposition of plant tissues, catalyzing the hydrolysis of 1–4 glucosidic bonds of labile cellulose (cellobiose and cellodextrins) to yield glucose. Leucine and glycine amino-peptidases cleave N-terminal residues from proteins and peptides. Acid and alkaline phosphatases release orthophosphate from organic P compounds like labile nucleic acids, phospholipids and inositol phosphates by the hydrolyzation of oxygen-P bonds.
Soil microbial biomass P and soil extractable P
Phosphorus in the microbial biomass (MBP) was measured using the chloroform fumigation extraction method according to Brookes et al. (1982) and Brookes et al. (1985). Two subsamples (10 g fresh weight) of sieved soil were taken for each topsoil sample. One subsample was fumigated for 24 h with chloroform and extracted with 0.5 M of NaHCO 3 (10:1 v:w) after 30 min shaking. The other subsample was directly extracted following the same protocol. The extracts were then filtered with Whatman 42 equivalent paper. Total P content in the extracts was determined after digestion of 2.5 g of aliquot with HNO 3 in a microwave oven (MARS Xpress, CEM Corporation, Matthews, USA). The digested solutions were then diluted to a final volume of 50 mL with ultrapure water and 1% HNO 3 . Blank solutions were regularly analysed in parallel. P concentration in the digested samples and blanks was determined using inductively coupled plasma/optical emission spectrometry (ICP-OES Optima 4300DV, Perkin-Elmer, Wellesley, USA). The microbial biomass P content was calculated from the difference between fumigated and non-fumigated samples and expressed per unit of soil dry mass. Given that inorganic P molecules can absorb onto soil surfaces (organic matter and minerals) it is necessary to account for this effect during the extraction of P from soil, this is done through the application of an empirically determined “P-recovery factor”. Thus, a known amount of inorganic P (12.5 µg of inorganic P added as KH 2 PO 4 ) was added to some of the controls to calculate the P-recovery factor in our soils. Microbial biomass was then calculated using the fumigated and non-fumigated samples corrected with the P-recovery coefficient (MBP_P.recov). Microbial biomass P was also corrected to take into account the efficiency of the fumigation (MBP_Ke.P), using the conversion factor KeP = 0.40 (Jenkinson et al. 2004). The factor KeP is an empirical coefficient used to relate the quantity of material solubilized by chloroform to the size of the original biomass, in this case it indicates that with fumigation 40% of the biomass-P is extracted as inorganic P. We have used all the microbial biomass P variables with and without corrections (MBP, MBP_P.recov, MBP_Ke.P and MBP_Ke.P…P.recov) in the analyses to give an overview of the methodological issues related to the quantification of extractable P in soils and microbes and to provide additional information for those readers with a background in soil biogeochemistry.
The total P concentration measured in non-fumigated bicarbonate-extracts was referred as the total extractable P (TEP) fraction. One aliquot of the non-fumigated extracts was used to determine the inorganic extractable P (P_Olsen) by Olsen’s method (Watanabe and Olsen, 1965). The organic extractable P (OEP) in the non-fumigated extracts was calculated as the difference between TEP and P_Olsen. All bicarbonate-extractable P fractions were expressed as µg of P per gram dry soil. Soil extractable P was also determined with Bray-P (P_Bray) acid fluoride extraction (Bray and Kurtz 1945) in oven-dried soil subsamples.
Sample processing for 31 P NMR analysis
The soils were frozen in liquid nitrogen, lyophilised, and stored in paper bags at -80 °C. The samples were ground with a ball mill at 1500 rpm for 3 min, and the fine powder was stored at -80 °C until extraction of the metabolites.
One-dimensional 31 P NMR
Conventional one-dimensional (1D) 31 P NMR (Box 1) was used to quantify the main organic and inorganic forms of extractable P using NaOH-EDTA, including DNA, total diesters and monoesters, phosphonates, pyrophosphate, and polyphosphate. All the identification of the target P classes was based on chemical shifts and previous reported data (Turner et al. 2003; Vestergren et al. 2012). P was extracted by shaking 1.5 g of dry ground soil from each composite sample for 4 h in 30 mL of a solution containing 250 mM NaOH and 50 mM Na 2 EDTA (Cade-Menun and Preston 1996). The extracts were centrifuged at 14 000 g for 30 min, and the supernatant (23 mL) was frozen at − 80 °C overnight and then lyophilised. Lyophilisation yielded 750 ± 50 mg of material, 80 mg of which was redissolved in 640 µL (1:8 w/v) of a solution containing 530 µL of D 2 O, 10 µL of 14.2 M NaOD, and 50 µL of 16 mM methylene diphosphonic acid trisodium salt (MDPA, Sigma-Aldrich product number M1886). The MDPA served as a P reference for quantifying individual compounds, and each 50-µL spike contained 50 µg of P. The redissolved solution was vortexed for 2 min and centrifuged at 10 000 g for 5 min, and 560 µL was then transferred to a 5-mm NMR tube for 1D 31 P NMR.
NMR spectra for 31 P were obtained using an Avance III 600 MHz spectrometer (Bruker, Ettlingen, Germany) operating at 161.76 MHz. NaOH-EDTA extracts were analysed using a 3.9-µs pulse (90°), a relaxation delay time of 2.0 s, an acquisition time of 0.9 s, and broadband proton decoupling. We recorded 15 000 scans per sample, and the experimental time was 12.5 h. Spectra were processed with a line broadening of 2 Hz, and chemical shifts of signals were determined in parts per million (ppm) relative to an external standard (85% orthophosphoric acid, H 3 PO 4 ). The main chemical types of P compounds were identified based on previously reported chemical shifts [ 32 , 61 ]. Peaks were first identified using an automatic procedure for fitting peaks; peaks that were clearly visible were manually selected using TopSpin 2.0 NMR software (Bruker, Germany). Signal areas were calculated by the deconvolution and integration of individual peaks. Concentrations of P compounds (mg P kg –1 soil) were calculated using the known P concentration of MDPA spiked in the sample, and concentrations per weight of air-dried soil were given. All NMR spectra were processed using TopSpin 2.0.
Signal intensity in the 31 P spectra was assigned to the different types of P by first integrating across the following regions of broad chemical shifts: -21.5 to -18.5 ppm for nonterminal polyphosphate (poly P), -5.3 to -4.8 ppm for pyrophosphate (pyro P), -4.8 to -4.0 for terminal poly P, -1.5 to 2.5 for diester-P, and 2.5 to 7 ppm for orthophosphate (ortho-P and monoester-P). Deconvolution was then used to determine the intensity of up to 16 resonances in the ortho-P and monoester-P regions. Deconvolution analysis began by manually identifying chemical shifts of peaks and shoulders. Peak chemical shifts varied only slightly amongst the samples. The orthophosphate signal shifted the most (range: 5.56–5.74 ppm), which shifted amongst soil samples, sites, species, and topographic positions. This variation was most likely due to slight differences in pH amongst the samples, because the orthophosphate peak is highly sensitive to variation in pH [ 62 ]. Thus, 31 P NMR allows the determination of the family of P-compounds (Fig. 3 ), but not of the exact compounds.
31 P nuclear magnetic resonance ( 31 P-NMR) is an analytical NMR technique that allows the detection of both the concentration and the chemical form of the most abundant phosphorus isotope, 31 P, in the analytical sample. In the concrete case of 31 P this analytical tool allows to separately detect the intensity of the signal (proportional to concentration in the analyzed sample) of each molecular structure where the 31 P is located. In this way, we can detect the most abundant types of compounds containing 31 P in biological samples. We explored different aqueous/organic solvent methods to extract as many groups of compounds as possible and the preliminary results showed that using an aqueous solution allowed extracting most of groups compounds. Standard 1D 31 P NMR was used to quantify concentrations of the main organic and inorganic P classes, including DNA, total orthophosphate diesters and monoesters, phosphonates, pyrophosphate and polyphosphate. Phosphorus was extracted by shaking 1.5 g of dry and ground soil from each composite soil sample in 30 mL of a solution containing 250 mM NaOH and 50 mM Na2EDTA (ethylenediaminetetraacetate) for 4 h (Cade-Menun and Preston 1996). Identification of the target P classes was based on chemical shifts and previous reported data [ 32 , 63 ].
Statistical analyses
The relationships of the P compounds with species, site and topographic position were identified by a PERMANOVA [ 64 ] of the NMR data for each soil sample. Euclidean distance, species identity, site, and topographic position were the fixed factors, and plot was a random effect, with 2000 permutations. Differences amongst species, site, and topographic position and amongst the P compounds most responsible for these differences were determined by comparing the areas of the different metabolite peaks normalized relatively to internal standards. Principal component analyses (PCAs) were used for processing the “omic” data sets together with the other potential influencing soil parameters, to detect the part of the variance explained by species [ 65 ]. Pearson’s correlation was used to identify the relationships of the 1D NMR measurements and the relationships between the concentrations of nutrients and organic P compounds. Error estimates are standard errors of the mean unless otherwise stated.
All statistical procedures were performed using R v 3.5 ( www.r-project.org ) with the SEQKNN, VEGAN, FACTOEXTRA, FACTOMINER, DPLYR, RANDOMFOREST, and MIXOMICS packages.
Data availability
All data generated or analysed during this study are included in this published article [and its supplementary information files].
Baraloto C, Rabaud S, Molto Q, Blanc L, Fortunel C, Harault B, et al. Disentangling stand and environmental correlates of aboveground biomass in amazonian forests. Glob Chang Biol. 2011;17:2677–88.
Article Google Scholar
Corlett RT, Primack RB. Tropical rainforests and the need for cross-continental comparisons. Trends Ecol Evol. 2006;21:105–7.
Vitousek PM, Sanford RL Jr. Nutrient cycling in moist tropical forest. Ann Rev Ecol Syst. 1986;17:137–67.
Rothstein DE, Vitousek PM, Simmons BL. An exotic Tree alters Decomposition and Nutrient Cycling in a hawaiian montane forest. Ecosystems. 2004;7:805–14.
Article CAS Google Scholar
Allison SD, Vitousek PM. Rapid nutrient cycling in leaf litter from invasive plants in Hawai. Oecologia. 2004;141:612–9.
Article PubMed Google Scholar
Connell JH. Diversity in tropical rain forests and coral reefs. Science (1979). 1978;199:1302–10.
Mandl NA, Kessler M, Robbert Gradstein S. Effects of environmental heterogeneity on species diversity and composition of terrestrial bryophyte assemblages in tropical montane forests of southern Ecuador. Plant Ecol Divers. 2009;2:313–21.
Becerra JX. On the factors that promote the diversity of herbivorous insects and plants in tropical forests. Proc Natl Acad Sci. 2015;112:6098–103.
Article CAS PubMed PubMed Central Google Scholar
Aiba SI, Sawada Y, Takyu M, Eino T, Kitayama K, Repin R. Structure, floristics and diversity of tropical montane rain forests over ultramafic soils on Mount Kinabalu (Borneo) compared with those on non-ultramafic soils. Aust J Bot. 2015;63:191–203.
John R, Dalling JW, Harms KE, Yavitt JB, Stallard RF, Mirabello M, et al. Soil nutrients influence spatial distributions of tropical tree species. Proc Natl Acad Sci U S A. 2007;104:864–9.
Martins KG, Marques MCM, dos Santos E, Marques R. Effects of soil conditions on the diversity of tropical forests across a successional gradient. Ecol Manage. 2015;349:4–11.
LeBauer DS, Treseder KK. Nitrogen limitation of net primary productivity in terrestrial ecosystems is globally distributed. Ecology. 2008;89:371–9.
Fujii K, Shibata M, Kitajima K, Ichie T, Kitayama K, Turner BL. Plant–soil interactions maintain biodiversity and functions of tropical forest ecosystems. Ecol Res. 2017;33:1–12.
Google Scholar
Xu W, Ci X, Song C, He T, Zhang W, Li Q, et al. Soil phosphorus heterogeneity promotes tree species diversity and phylogenetic clustering in a tropical seasonal rainforest. Ecol Evol. 2016;6:8719–26.
Article PubMed PubMed Central Google Scholar
Elser JJ, Bracken MES, Cleland EE, Gruner DS, Harpole WS, Hillebrand H, et al. Global analysis of nitrogen and phosphorus limitation of primary producers in freshwater, marine and terrestrial ecosystems. Ecol Lett. 2007;10:1135–42.
Wardle DA, Walker LR, Bardgett RD. Ecosystem Properties and Forest decline in contrasting long-term. Sci (1979). 2004;305:509–14.
Walker TW, Syers JK. The fate of phosphorus during pedogenesis. Geoderma. 1976;15:1–19.
Kichenin E, Wardle DA, Peltzer DA, Morse CW, Freschet GT. Contrasting effects of plant inter- and intraspecific variation on community-level trait measures along an environmental gradient. Funct Ecol. 2013;27:1254–61.
Tanner EVJ, Vitousek PM, Cuevas E. Experimental investigation of nutrient limitation of Forest Growth on Wet Tropical mountains. Ecology. 1998;79:10–22.
Vitousek PM. Nutrient cycling and limitation: Hawai ‘i as a model system. Princeton. Princeton, New Jersey, USA.; 2004.
Sanchez PA, Logan TJ. Myths and science about the Chemistry and Fertility of soils in the tropics. SSSA Special Publication. 1992;29:35–35.
CAS Google Scholar
Tiessen H, Stewart JWB, Cole CV. Pathways of Phosphorus transformations in Soils of Differing Pedogenesis 1. Soil Sci Soc Am J. 1984;48:853–8.
Harrison AF. Soil organic phosphorus: a review of world literature. Commonweal. 1987.
Turner BL, Engelbrecht BMJ. Soil organic phosphorus in lowland tropical rain forests. Biogeochemistry. 2011;103:297–315.
Tiessen H, Salcedo IH, Sampaio EVSB. Nutrient and soil organic matter dynamics under shifting cultivation in semi-arid northeastern. Agric Ecosyst Environ. 1992;38:139–51.
Johnson AH, Frizano J, Vann DR. Biogeochemical implications of labile phosphorus in forest soils determined by the Hedley fractionation procedure. Oecologia. 2003;135:487–99.
Cade-Menun BJ. Characterizing phosphorus in environmental and agricultural samples by 31P nuclear magnetic resonance spectroscopy. Talanta. 2005;66:359–71.
Article CAS PubMed Google Scholar
Chacon N, Silver WL, Dubinsky EA, Cusack DF. Iron reduction and soil phosphorus solubilization in humid tropical forests soils: the roles of labile carbon pools and an electron shuttle compound. Biogeochemistry. 2006;78:67–84.
Sampaio EVDSB, Dall’Olio A, Nunes KS, de Lemos EEP. A model of litterfall, litter layer losses and mass transfer in a humid tropical forest at Pernambuco, Brazil. J Trop Ecol. 1993;9:291–301.
HaTtenschwiler S, Coq S, Barantal S, Handa IT. Leaf traits and decomposition in tropical rainforests: revisiting some commonly held views and towards a new hypothesis. New Phytol. 2011;189:950–65.
Stark NM, Jordan CF. Nutrient Retention by the Root Mat of an amazonian rain forest author (s): Nellie M. Stark and Carl F. Jordan published by : Ecological Society of America NUTRIENT RETENTION BY THE ROOT MAT OF AN. Ecology. 1978;59:434–7.
Turner BL, Mahieu N, Condron LM. Phosphorus-31 nuclear magnetic resonance spectral assignments of Phosphorus compounds in Soil NaOH–EDTA extracts. Soil Sci Soc Am J. 2003;67:497–510.
Cade-Menun BJ, Liu CW, Nunlist R, McColl JG. Soil and litter Phosphorus-31 nuclear magnetic resonance spectroscopy. J Environ Qual. 2002;31:457–65.
CAS PubMed Google Scholar
Vincent AG, Turner BL, Tanner EVJ. Soil organic phosphorus dynamics following perturbation of litter cycling in a tropical moist forest. Eur J Soil Sci. 2010;61:48–57.
Vestergren J, Vincent AG, Jansson M, Persson P, Ilstedt U, Giesler R. High-resolution characterization of Organic Phosphorus in Soil extracts using 2D 1 H – 31 P NMR correlation spectroscopy. Environ Sci Technol. 2012;46:3950–6.
Sumann M, Amelung W, Haumaier L, Zech W. Climatic effects on Soil Organic Phosphorus in the North American Great Plains identified by Phosphorus-31 nuclear magnetic resonance. Soil Sci Soc Am J. 1998;62:1580–6.
Guggenberger G, Christensen BT, Rubaek G, Zech W. Land-use and fertilization effects on P forms in two EuroPean soils: resin extraction and 31P-NMR analysis. Eur J Soil Sci. 1996;47:605–14.
Turner BL. Soil organic phosphorus in tropical forests: an assessment of the NaOH-EDTA extraction procedure for quantitative analysis by solution 31P NMR spectroscopy. Eur J Soil Sci. 2008;59:453–66.
Díaz S, Kattge J, Cornelissen JHC, Wright IJ, Lavorel S, Dray S, et al. The global spectrum of plant form and function. Nature. 2016;529:167–71.
Peñuelas J, Fernández-Martinez M, Ciais P, Jou D, Piao S, Obersteiner M, et al. The bioelements, the elementome, and the biogeochemical niche. Ecology. 2019;100:e02652.
Peñuelas J, Sardans J, Ogaya R, Estiarte M. Nutrient stoichiometric relations and biogeochemical niche in coexisting plant species: Effect of simulated climate change. Pol J Ecol. 2008;56:613–22.
Penuelas J, Sardans J, Llusià J, Owen SM, Carnicer J, Giambelluca TW, et al. Faster returns on ‘leaf economics’ and different biogeochemical niche in invasive compared with native plant species. Glob Chang Biol. 2010;16:2171–85.
Sardans J, Peñuelas J. Climate and taxonomy underlie different elemental concentrations and stoichiometries of forest species: the optimum biogeochemical niche. Plant Ecol. 2014;215:441–55.
Turner BL, Haygarth PM. Phosphatase activity in temperate pasture soils: potential regulation of labile organic phosphorus turnover by phosphodiesterase activity. Sci Total Environ. 2005;344:27–36.
Ecological Niches: Linking Classical and Contemporary Approaches - Jonathan M. Chase,Mathew A. Leibold - Google Libros. University of Chica….
Turner BL, Brenes-Arguedas T, Condit R. Pervasive phosphorus limitation of tree species but not communities in tropical forests. Nature. 2018;555:367–70.
Sabatier D, Grimaldi M, Prévost MF, Guillaume J, Godron M, Dosso M, et al. The influence of soil cover organization on the floristic and structural heterogeneity of a guianan rain forest. Plant Ecol. 1997;131:81–108.
Pélissier R, Dray S, Sabatier D. Within-plot relationships between tree species occurrences and hydrological soil constraints: an example in French Guiana investigated through canonical correlation analysis. Plant Ecol. 2002;162:143–56.
Moulatlet GM, Rennó CD, Figueiredo FOG, Ruokolainen K, Banon L, Emilio T, et al. The role of topographic-derived hydrological variables in explaining plant species distributions in Amazonia. Acta Amazon. 2022;52:218–28.
Lopez OR, Kursar TA. Does flood tolerance explain tree species distribution in tropical seasonally flooded habitats? Oecologia. 2003;136:193–204.
Lescure J-P, Boulet R. Relationships between Soil and Vegetation in a tropical rain forest in French Guiana. Biotropica. 1985;17:155.
Fritsch E, Herbillon AJ, Do Nascimento NR, Grimaldi M, Melfi AJ. From Plinthic Acrisols to Plinthosols and Gleysols: iron and groundwater dynamics in the tertiary sediments of the upper Amazon basin. Eur J Soil Sci. 2007;58:989–1006.
Chacon N, Flores S, Gonzalez A. Implications of iron solubilization on soil phosphorus release in seasonally flooded forests of the lower Orinoco River, Venezuela. Soil Biol Biochem. 2006;38:1494–9.
Allié E, Pélissier R, Engel J, Petronelli P, Freycon V, Deblauwe V, et al. Pervasive Local-Scale Tree-Soil Habitat Association in a Tropical Forest Community. PLoS ONE. 2015;10:e0141488.
Me Chave JR, Ra BR, Dubois M-A. Estimation of biomass in a neotropical forest of French Guiana: spatial and temporal variability. J Trop Ecol. 2001;17:79–96.
Gourlet-Fleury S, Guehl J-M, Laroussinie O. Ecology and management of a neotropical rainforest: lessons drawn from Paracou, a long-term experimental research site in French Guiana. Elseiver. 2004.
Courtois EA, Stahl C, Van den Berge J, Bréchet L, Van Langenhove L, Richter A, et al. Spatial variation of Soil CO2, CH4 and N2O Fluxes across Topographical Positions in Tropical Forests of the Guiana Shield. Ecosystems. 2018. https://doi.org/10.1007/s10021-018-0232-6 .
Aguilos M, Hérault B, Burban B, Wagner F, Bonal D. Agricultural and Forest Meteorology what drives long-term variations in carbon fl ux and balance in a tropical rainforest in French Guiana ? Agric Meteorol. 2018;253–4 February:114–23.
Soong JL, Janssens IA, Grau O, Margalef O, Stahl C, Van Langenhove L, et al. Soil properties explain tree growth and mortality, but not biomass, across phosphorus-depleted tropical forests. Sci Rep 2020. 2020;10:1.
Sinsabaugh RL, Follstad Shah JJ. Ecoenzymatic Stoichiometry and Ecological Theory. Annu Rev Ecol Evol Syst. 2012;43:313–43.
Vestergren J, Vincent AG, Jansson M, Persson P, Ilstedt U, Gröbner G, et al. High-resolution characterization of Organic Phosphorus in Soil extracts using 2D 1 H– 31 P NMR correlation spectroscopy. Environ Sci Technol. 2012;46:3950–6.
Smernik RJ, Doolette AL, Marschner P, Bu EK, Stonor R, Wakelin SA et al. Soil Biology & Biochemistry Forms of phosphorus in bacteria and fungi isolated from two Australian soils. 2008;40:1908–15.
Vestergren J, Vincent AG, Jansson M, Persson P, Ilstedt U, Gröbner G, et al. High-resolution characterization of organic phosphorus in soil extracts using 2D 1H-31P NMR correlation spectroscopy. Environ Sci Technol. 2012;46:3950–6.
Anderson MJ, Gorley RN, Clarke KR, PERMANOVA + for. PRI-MER: Guide to Software and Statistical Methods. Primer-E. Plymouth,UK.; 2008.
Smith CA, Want EJ, ’maille O, Abagyan G, Siuzdak R. XCMS: Processing Mass Spectrometry Data for Metabolite Profiling using nonlinear peak alignment, matching, and identification. Anal Chem. 2006;78:779–87.
Download references
Acknowledgements
We appreciate the cooperation of all the people that help in anything related with this research.
This research was supported by the European Research Council Synergy grant ERC-2013-SyG-610028 IMBALANCE-P, the European FP7 S-Clima project PIEF-GA-2013-626234, the Spanish Government grant PID2019-110521GB-I00, the Fundacion Ramon Areces grant ELEMENTAL-CLIMATE, and the Catalan Government grant SGR 2017 − 1005. We thank the staff of the Nouragues station managed by USR mixte LEEISA (CNRS; Cayenne) and the Paracou station managed by UMR Ecofog (CIRAD, INRA; Kourou). Both research stations benefit from “Investissement d’Avenir” grants managed by Agence Nationale de la Recherche (CEBA: ANR-10-LABX-25-01; ANAEE-France: ANR-11-INBS-0001). A.G.G. was supported by the Ministry of Education, Youth and Sports of CR within the project Mobility CzechGlobe, CZ.02.2.69/0.0/0.0/16_027/0008137. A.G.G. and O.U. were also supported by the project SustES (CZ.02.1.01/0.0/0.0/16_019/0000797).
Author information
Authors and affiliations.
Global Change Research Institute, The Czech Academy of Sciences, Belidla 986/4a, Brno, CZ-60300, Czech Republic
Albert Gargallo-Garriga
Universitat Autònoma de Barcelona, Bellaterra, 08193, Spain
Albert Gargallo-Garriga & Marta Ayala-Roque
Global Ecology Unit, CSIC, CREAF-CSIC-UAB, Bellaterra, 08193, Catalonia, Spain
Jordi Sardans, Joan Llusià, Guille Peguero, Otmar Urban, Karel Klem & Josep Peñuelas
CREAF, Cerdanyola del vallès, Barcelona, Catalonia, 08193, Spain
Jordi Sardans, Joan Llusià, Guille Peguero & Josep Peñuelas
Centre of Excellence PLECO (Plants and Ecosystems), Department of Biology, University of Antwerp, Wilrijk, Belgium
Elodie A. Courtois & Ivan A. Janssens
Laboratoire écologie, évolution, Interactions des Systèmes Amazoniens (LEEISA), Université de Guyane, CNRS, IFREMER, Cayenne, France
Elodie A. Courtois
UMR ECOFOG - Ecologie des forêts de Guyane, Kourou cedex, 97379, France
Clément Stahl
Servei de Ressonància Magnètica Nuclear, Universitat Autònoma de Barcelona, Bellaterra, 08193, Spain
Pau Nolis, Miriam Pérez-Trujillo & Teodor Parella
Centre for Microbiology and Environmental Systems Science, University of Vienna, Althanstr. 14, Vienna, 1090, Austria
Andreas Richter
You can also search for this author in PubMed Google Scholar
Contributions
A.G.G., J.S. and J.P. designed the study with the help of all co-authors. A.G.G., J.L., G.P., M.A.R, E.C., C.S., O.U., K.K., P.N., M.P., T.P., A.R., I.J., J.S. and J.P. authors participated in the field measurements or chemical and statistical analyses. All authors contributed to the writing of the manuscript and the drafting of the figures. All authors read and approved the final version of the manuscript.
Corresponding author
Correspondence to Albert Gargallo-Garriga .
Ethics declarations
Ethical approval and consent to participate.
The owner gave permission for sampling.
Consent for publication
Not applicable.
Competing interests
The authors declare no competing interests.
Additional information
Publisher’s note.
Springer Nature remains neutral with regard to jurisdictional claims in published maps and institutional affiliations.
Electronic supplementary material
Below is the link to the electronic supplementary material.
Supplementary Material 1
Rights and permissions.
Open Access This article is licensed under a Creative Commons Attribution 4.0 International License, which permits use, sharing, adaptation, distribution and reproduction in any medium or format, as long as you give appropriate credit to the original author(s) and the source, provide a link to the Creative Commons licence, and indicate if changes were made. The images or other third party material in this article are included in the article’s Creative Commons licence, unless indicated otherwise in a credit line to the material. If material is not included in the article’s Creative Commons licence and your intended use is not permitted by statutory regulation or exceeds the permitted use, you will need to obtain permission directly from the copyright holder. To view a copy of this licence, visit http://creativecommons.org/licenses/by/4.0/ . The Creative Commons Public Domain Dedication waiver ( http://creativecommons.org/publicdomain/zero/1.0/ ) applies to the data made available in this article, unless otherwise stated in a credit line to the data.
Reprints and permissions
About this article
Cite this article.
Gargallo-Garriga, A., Sardans, J., Llusià, J. et al. Different profiles of soil phosphorous compounds depending on tree species and availability of soil phosphorus in a tropical rainforest in French Guiana. BMC Plant Biol 24 , 278 (2024). https://doi.org/10.1186/s12870-024-04907-x
Download citation
Received : 20 January 2023
Accepted : 13 March 2024
Published : 12 April 2024
DOI : https://doi.org/10.1186/s12870-024-04907-x
Share this article
Anyone you share the following link with will be able to read this content:
Sorry, a shareable link is not currently available for this article.
Provided by the Springer Nature SharedIt content-sharing initiative
- P metabolomic niche
- Metabolomics
BMC Plant Biology
ISSN: 1471-2229
- General enquiries: [email protected]

The Best Method For Planting Bare Root Trees In Your Yard
B are root trees — trees sans soil around their root system — are ideal for gardeners seeking economical landscaping choices. The lack of soil makes excavating, transporting, and storing easier, significantly reducing the cost for putting up a windbreak or a privacy hedge. Plus, they cut down on the growth time required for starting from seeds while making girdled roots unlikely — a scenario more common in potted trees. But the bareness also means that the roots are exposed to several environmental stressors, such as heat, drying winds, and cold. So, ensuring the roots establish themselves fully is pivotal for the bare root tree to thrive. To do so, dig out a hole wider than the root system's current reach so the roots can spread out unhindered.
Place the bare root tree no deeper than its root flare — the point where the tree's trunk begins opening out to roots. Don't mistake it for the scar from a graft union (joining of the scion and the root), usually found 1 to 3 inches atop the root flare. This will allow the roots to breathe and ease poor drainage issues. It's best to plant dormant trees, without buds and leaves. In evergreens, signs of dormancy include the top foliage turning tan.
Read more: How To Help Your Trees That Aren't Supplying Fruit?
Planting Considerations
The successful establishment of bare root trees depends heavily on their condition. While they don't come balled and burlapped, their roots are covered in sphagnum moss or hydrogel for protection. But the material shouldn't be too wet or drippy, or it'll cause premature rotting. Ideally, the roots should be thick, dense, and firm, with no signs of frost or mold damage — although you should prune dead or damaged roots before planting. The point is not to overdo it, as trees need a good root system to flourish.
If the trees do have buds, ensure they're green and sturdy. Also make sure the tree has a straight, well-established leader (stem) and dense branch structure covering at least two thirds of the tree, especially at the ground end. This is because the lower branches provide the food necessary to grow the stem and the roots. Favor trees that aren't too tall — ranging between 4 and 7 feet with an inch-wide stem taper — as their roots are easier to accommodate. Avoid ones that smell foul, as they're most likely diseased.
If they're in good condition, plant bare root trees immediately if possible. If rain's coming or you want to wait out for a while, store the trees with their damp packing in frost-free areas, like a cellar or a garage, where mercury hovers at about 40 degrees Fahrenheit. Cover the trees in slightly wet newspapers if you purchased them without protection.
How To Plant Bare Root Trees
For the best results, plant bare root trees early in spring when they're yet to leaf out; otherwise, heat or winds might damage them before they're deeply rooted. However, winter planting is okay if the ground remains unfrozen. Choose your planting location after factoring in the tree's eventual size and how it will fit in the yard's layout. The soil in your selected spot should drain well. If it has grass, remove the grass and till the soil to break down any leftover roots. Next, unpack the tree and soak its roots in water for one to four hours.
Prune dead roots and dig a hole at least large enough for the roots to fit in easily -- leaving an additional 2 feet is better so the roots have ample space to spread. Dig deep enough for the tree's root flare to be at ground level; you can check this by laying your shovel across the hole to mark where ground level will be and line the root flare up with its handle. To avoid compressing the roots, build a conical soil mound for support before placing the tree in the hole. Fill the previously dug out soil back into the hole and lightly tamp it. Water the tree deeply (and repeat the process every week or 10 days). Spread 2- to 3-inch-thick mulch around your tree's base to keep weeds out and improve moisture retention. Stake longer trees in the first year of planting and remove the stakes the following spring.
Read the original article on House Digest .

IMAGES
VIDEO
COMMENTS
Step 2: We then added Tree Starter. Tree Starter uses a three-pronged support system for soil biology. Firstly, it supplies a wide range of food sources for soil life including humates, kelp (seaweed) and compost. Secondly, it retains moisture and provides a home-base for beneficial organisms through the inclusion of zeolite and rock minerals.
Tree planting is commonly promoted to provide a range of social benefits, such as increasing shade and encouraging physical activity in urban areas (Mullaney et al., 2015) and providing income to landowners from selective harvesting of timber and non-timber products in rural areas (Baral, Guariguata, & Keenan, 2016).
Tree Placement: Right Plant, Right Place . Outline: Tree placement in landscape design, page 1 . Trees and energy conservation, page 3 . Maximizing winter solar heating, page 3 . Maximizing summer cooling, page 3 . Noise abatement with trees and shrubs, page 6 . Other environmental benefits of trees, page 6 . Growing space, page 7 . Rooting ...
Actual planting techniques in this step vary with the type of container and extent of root development. Generic steps include: Lay the tree on its side in or near the planting hole. Wiggle off or cut off the container. Shave off the outer 1-11⁄2 inches of the root ball with a pruning saw or pruners.
Tree planting 1 is widely seen as an important option to address the profound negative impacts of global environmental change and ensure sustainable development. ... Methods. Systematic reviews are a powerful technique to gather existing knowledge and synthesize all available research methods (De la De la Mora-De la Mora, ...
Tree planting, along with other strategies to increase tree cover in appropriate locations and contexts, can make a valuable contribution to ensuring the ecological and social well-being of our planet in coming decades, but only if these efforts are considered as one component of multifaceted solutions to complex environmental problems and are ...
Successful Tree-Planting Projects and Events Careful and early planning of a tree-planting project is the key to success. Plan the Project The first step in planning a successful tree-planting project is putting together a team with leaders who can focus on the planting. Make sure your team includes: • Site partners, including those ...
TREE PROPAGATION METHOD. 9.7 Tree-planting techniques . Time of planting . Tree seedlings are best planted out at the onset of the long rains, i.e. by the beginning of April in most parts of Kenya. In some areas, e.g. in Meru and in north-eastern Kenya, the short rains are preferred, and in those areas the best planting season is November or ...
Beyond its climate benefits, tree planting also plays a crucial role in supporting local communities and protecting biodiversity. 1. Climate Mitigation and Adaptation. Trees are often referred to as "the lungs of the Earth" for a good reason. They absorb carbon dioxide, a major greenhouse gas responsible for global warming, and release ...
Try not to plant two similar species next to each other and don't follow any pattern while planting. Maintain a 60cm distance between each sapling. After planting the saplings, insert 4-5 feet of bamboo sticks into the soil, close to the plant. These support sticks will ensure the saplings don't bend or droop during the first few months.
hoedad, planting bar, or shovel, are effective, but require more effort and time. Absent any site limitations, estimating the time required for hand planting and considering the prevailing hourly wage may make the choice of planting method obvious. Recent work has shown that seedling survival is highest on sites that have been mechanically planted
Tree planting projects vary greatly in their size, methods and type of produce that will be grown. Since there is no substitute for local experience, this small booklet can only provide general information which has to be adapted to local conditions. The present manual: draws attention to all the aspects that need to be considered in tree ...
Although the existing methods in i-Tree Landscape contribute greatly to the science and practice of urban tree planning and management, this case study has shown how the methodology in i-Tree Landscape could benefit from the improvements recommended by Nyelele et al. (2019) and Nyelele and Kroll (2021). For example, i-Tree Landscape developers ...
Harvesting trees in a first thinning could begin as early as 15 to 20 years. It takes a dedicated landowner to plan decades ahead. Thankfully, many of us are, and our grandchildren and great grandchildren will benefit. This publication focuses on the values and methods of establishing wooded areas on rural property.
Tree planting efforts that aim to restore forest habitat need to ex-plicitly recognize that forests are not comprised of trees alone, and to set and evaluate goals accordingly. Tree planting in some cases facilitates forest recovery, but tree planting and forest restoration are not synonyms (Table 2).
Planting action: Planting trees - but properly! One of Plant-for-the-Planets main targets is to plant one trillion new trees worldwide - 150 trees per human. We can only reach this goal with your help! Organizing a planting action is a great thing to do; together you can actively fight the climate crisis! In addition, a planting action is a ...
Set the Tree in the Hole. With container-grown trees, slide the root ball out of its pot or cut it away if necessary. Loosen and spread out the roots on the outside of the rootball before setting it in the planting hole. With a B & B root ball, trim away the burlap and remove any twine.
Focusing on sapling root moisture and physical protection during planting improved sapling survival by at least 10% (>91% versus 81%) at 4 months. Survival rates of saplings under different planting treatments were reflected in longer-term survival of trees at 18-20 months, differing from a low of 52% up to 76-88%.
Plant medium trees (up to 40 feet at maturity) at least 15 feet from walls, and at least 12 feet from a corner. Plant large trees (greater than 40 feet tall, at maturity) at least 20 feet from a wall, and at least 15 feet from any corner. These distances are also good guidelines for planting near walkways and driveways.
Hold the tree upright and refill the hole with the soil you just removed. If the soil is lumpy, break it up a little before placing back in the hole. Then, pack it down to get rid of any air pockets. Add water as you backfill. Add 2 to 3 inches of organic mulch to the edge of the tree's canopy. Then, water again.
Tree planting is more than just putting a tree into the ground. There are a number of options and items to consider prior to any tree planting. ... The size of tree(s) and how the tree(s) are packaged will determine the method of planting. It is best to plant or transplant trees in their dormant state, in the fall after leaf drop or in the ...
PDF | On Dec 1, 2020, Ma. Lyka M. Balanac and others published Students' Participation in Tree Planting Activity: Promoting the 21st Century Environmental Education | Find, read and cite all the ...
By subscribing, you will receive stories illustrating the power of trees, the latest news and updates, and how we can make a positive impact together. Guide for planting bare root trees, containerized trees, and balled & burlapped trees.
Dig a proper hole. Make the hole deep enough so that the tree sits slightly above soil level. Plant the tree on solid ground, not fill dirt. In other words, don't dig the hole too deep and then add soil back to the hole before placing the tree. The width of the planting hole is very important.
The identity of the tree species (growing above the soil samples) explained > 53% of the total variance of the 31P NMR metabolomic profiles of the soils, suggesting species-specific ecological niches and/or species-specific interactions with the soil microbiome and soil trophic web structure and functionality determining the use and production ...
This research focuses on developing a comprehensive understanding of plant dust retention resilience in older residential neighborhoods, emphasizing protection, recovery, and sustainability. Plant dust retention resilience encompasses the ability of plant combinations to respond to emergencies, cooperate with emergency service systems, adapt effectively, recover swiftly from disasters, and ...
If they're in good condition, plant bare root trees immediately if possible. If rain's coming or you want to wait out for a while, store the trees with their damp packing in frost-free areas, like ...