Home Blog PowerPoint Tutorials How to Work with Presenter View in PowerPoint

How to Work with Presenter View in PowerPoint

Not all presenters have excellent memory recall or the ability to speak flawlessly to the audience without any cues. However, many of them are good at hiding it by using Presenter View in PowerPoint. It is a presentation mode that enables the presenter to hide speaker notes and presentation controls from the audience while leveraging the various handy features offered by PowerPoint.
How to Use Presenter View in PowerPoint
To start using Presenter View, ensure it’s enabled before you begin your slideshow. If you are new to this feature, we recommend using this option to familiarize yourself with the various navigation options for this presentation mode. This might also be helpful if the PowerPoint templates you are accustomed to using might have animations that you might want to preview in this mode to understand when to give the next visual cue.
How to Enable Presenter View in PowerPoint
To enable PowerPoint presenter view, go to the SlideShow tab and make sure the Use Presenter View option is enabled. This will ensure that you can access Presenter View when you switch your slides to SlideShow mode.

Adjust Display Settings
You can swap between the presenter view and slideshow mode or duplicate the slideshow to exit the Presenter View from the Display Settings menu from the top toolbar.

Navigate Slides in Presenter View
Like any standard PowerPoint presentation in SlideShow mode, you can navigate between slides by using the arrow keys or with a presentation remote. Presenter View also provides slide navigation buttons to move the slides back and forth.

View Taskbar in Presenter View
The Show Taskbar option at the top enables viewing the taskbar. This can be helpful if you require using the taskbar, such as to view your battery charge, see the time, enable or disable another app from the taskbar menu, etc.

Reset or Pause the Timer
Once you start your presentation in Presenter View, a timer starts showing how much time you have spent in slideshow mode. This is an excellent way to understand how much time you have consumed for your session and to keep an eye out for good timekeeping. You can also hit Pause or reset the timer anytime.

Change the Size of the Speaker Notes
How to view notes in PowerPoint while presenting? If you have any speaker notes added to your slides, they will appear in Presenter View on your screen. You can increase or reduce the size of the text via the two options at the bottom of the speaker notes pane.

Using Annotation Tools in Presenter View
PowerPoint annotation tools can be accessed from the bottom toolbar in Presenter View. The Pen and Laser Pointer Tools button gives you access to the pen, ink colors, laser pointer, and eraser and also allows you to show or hide the mouse pointer via Arrow Options .

View All Slides in Presenter View
If you need to go back and forth to find a relevant slide for an ongoing discussion or query during your presentation, you can view all slides in Presenter View via the See all slides option.

Zoom Slides using Presenter View
PowerPoint’s Zoom feature lets presenters quickly pick a portion of the slide to zoom into. Presenter View allows you to leverage this feature by instantly selecting a portion of the slide to enlarge it after selecting Zoom into the slide option. To exit the Zoom mode or hit the Esc key.

Black or Unblack SlideShow
Sometimes, you might want to turn the screen blank for a while, such as during a mid-presentation break. The Black or Unblack SlideShow option blanks the slides for your audience while continuing to show you all navigation options via Presenter View.

Toggle Subtitles in Presenter View
One of the most revolutionary features introduced by Microsoft for PowerPoint over the past decade has been Live captions. This feature enables subtitles by converting speech to text as you present. You can toggle Live subtitles on or off while in presenter view to help your audience read what you speak.

Toggle Camera in Presenter View
Like subtitles, you can also toggle the camera on or off in Presenter View.

End Slideshow in Presenter View
There are different ways to end or exit a SlideShow from Presenter View. You can hit the Esc key or click End Slide Show . Similarly, you can click the three dots at the bottom and select End Show .

More Slideshow Options
Other than the various visibility prominent menus available to navigate, annotate, and present your slides, you can also find a few additional options via More slideshow options , which are accessible via the three dots at the bottom toolbar. These include adjusting the position of the subtitles, turning your screen white or black, ending the slideshow, etc.

How to Use Presenter View on a Single Screen
While Presenter View can be enabled to work with dual monitors, you can also use Presenter View on a single monitor with remote meeting apps like Zoom. A simple method for switching to Presenter View on a single monitor is to click the three dots ( More slideshow options ) at the bottom in SlideShow mode and select Show Presenter View .

You can also switch to Presenter View on a single monitor anytime using the ALT+F5 hotkey.

The presenter can easily manage a PPT in presentation mode, with the utility to view speaker notes, annotate or zoom slides, toggle subtitles or camera on or off, and keep your audience engaged via better slideshow management. However, if you’re new to this presentation mode, a bit of practice might help you avoid confusion when presenting before an audience in Presenter View for the first few times.

Like this article? Please share
PowerPoint Tools, Presentation Skills Filed under PowerPoint Tutorials
Related Articles

Filed under PowerPoint Tutorials • April 16th, 2024
How to Insert an Equation in PowerPoint
Learn how to create easy-to-understand science slides by mastering how to insert an equation in PowerPoint. Step-by-step guide.

Filed under PowerPoint Tutorials • April 9th, 2024
How to Remove Notes from PowerPoint
Make alternative versions of your presentation files by learning how to remove notes from PowerPoint. Step-by-step guide with screeshots.

Filed under PowerPoint Tutorials • April 2nd, 2024
How to Round Corners in PowerPoint
Learn how to add rounded corners to shapes and images in PowerPoint. Elevate your presentations with sleek designs. Expert tips and step-by-step guides.
Leave a Reply
Critical PowerPoint Shortcuts – Claim Your FREE Training Module and Get Your Time Back!
How to Present a PowerPoint Slideshow (w/ Shortcuts)
- PowerPoint Tutorials
- Shortcuts & Hacks
- May 11, 2019
There are a variety of ways to start a PowerPoint presention, depending on:
- Where you start your presentation (from beginning or from current)
- Which PowerPoint view you prefer to present in (Slide Show view or Presenter view)
- How comfortable you are with keyboard shortcuts
Why would Microsoft include so many ways to present a presentation? My guess is that everyone learns PowerPoint differently, and has personal presentation styles. The more options you have, the easier your life will be as there will always be a way to start your presentation the way you want to (or jump back into it when you need to).
See all the options below and find the method that works best for you and let the slide show begin !
NOTE: If you are running two presentations side-by-side, each presentation needs to be started as it’s own slide show. To see how to set up two PowerPoint presentations to run side-by-side like this before you start your slide show, read my guide here .
Table of Contents
Start slide show from beginning.

To start a slideshow from the beginning of your presentation using the ribbon, simply.
- Navigate to the Slide Show tab
- Select From Beginning
Selecting From Beginning starts your presentation from the very first non-hidden slide in your presentation, regardless of which slide you are currently inside of your deck.

You can also start your slide from the beginning of your presentation by hitting the Slideshow From Beginning keyboard shortcut, F5 .
Regardless of which method you use, this is the classic way to start your presentation in full screen from your first title slide (regardless of where you are in your slide deck).
Let the slide show begin!
NOTE: To expand your knowledge and learn how to use PowerPoint’s FREE and HIDDEN built-in laser pointer to point things out during your presentation, read my guide here .
Take your PPT skills to the next level
Start slide show from current.

To begin your slide show from the slide you are currently on using the ribbon, simply
- Navigate to the Slide Show tab
- Select From Current Slide
Selecting From Current Slide starts your slide show from whatever slide you are currently on, even if the slide is hidden.

You can also start your slide from the current slide you are on by hitting the Shift+F5 keyboard shortcut.
Because it’s often easiest to catch errors when building your slides in this full screen mode, I highly recommend learning the Shift+F5 shortcut and using it frequently as you build your slides to spot them for errors.
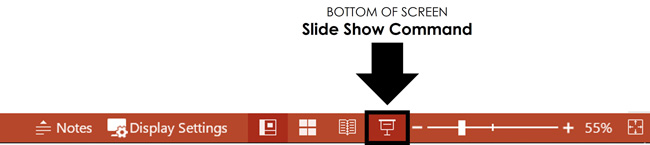
If you don’t want to bother learning the From Current Slide shortcut, you can also start your slideshow by clicking the Slide Show icon at the bottom of your screen.
This is a fantastic way to spot check your slides as you are building them. On top of that, it’s a fast and uncomplicated way to re-start your presentation from where you left off after demoing something on screen.
Start a mini-slide show in PowerPoint
You can also use the following hidden PowerPoint shortcut to run a mini slide show over the top of your current deck.

To run a mini slide show, simply:
- Hold down the Alt key on your keyboard
- With your mouse, click the Slide Show icon
Doing so starts a small slide show of your presentation that you can see below, from the current slide you are on.

Presenter View
The Presenter View is an alternate way to run your presentation in PowerPoint. In this view, your slides are projected on screen, and the details of your presentation are displayed on your computer as pictured below.

The presenter view includes your next (non-hidden) slides that is coming up, your current slide projected on screen, how long you’ve been talking and your speaker notes.

To launch the Presenter View from the beginning of your presentation using your Ribbon, simply:
- Navigate to the Slide Show tab
- Hold down the Alt key on your keyboard
- Click From Beginning
Holding down the Alt key and clicking From Beginning , the Presenter View will launch from the very first (non-hidden) slide in your presentation.

You can also launch the presenter view from the beginning of your presentation at any time by clicking Alt + F5 on your keyboard.
Start Presenter View in PowerPoint From Current Slide

Did you know that you can access different views in PowerPoint by adding keys as you click commands in the PowerPoint ribbon?
To start the Presenter view from your current slide using your Ribbon, simply:
- Hold down the Alt key on your keyboard
- Click From Current Slide
Holding the Alt key and clicking From Current Slide launches the Presenter View from your current slide. So, this is another way you can quickly practice your presentation, see your speaker notes and see what’s coming up next.

You can also launch the Presenter View from the beginning of your presentation at any time by hitting Alt+F5 on your keyboard.
Showing and Hiding Presenter View
Regardless of which view you start your PowerPoint slide show; you can switch between the two different slide show views without exiting presentation.

To switch between the two slideshow views (while giving your presentation), simply:
- Right-click your slide in whichever presentation view you are currently in
- Select either Show Presenter View or Hide Presenter View
When would you use a feature like this during a presentation? One example is if you want to view your notes without leaving the slide show mode.
NOTE: The letter r for both Show Presenter View and Hide Presenter View is underlined. This means that it is a keyboard shortcut. So, if you want to quickly flip between these two presentation views, you can simply right-click your slide and hit the letter r on your keyboard. Doing so automatically switches the view you are in.
Controlling how your presentation runs
Another way to control how your presentation runs (including the default laser pointer and pen color), is the Set Up Slide Show dialog box.

To open the Set Up Slide Show dialog box, simply:
- Select the Set Up Slide Show command
Doing so, opens all your PowerPoint slide show settings and options as pictured below.
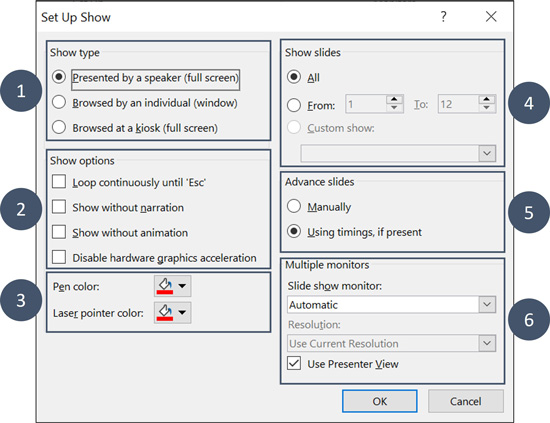
Inside the slide show settings dialog box, you can select:
- How your presentation runs (full screen, window or in kiosk mode).
- Your default pen and laser pointer color options ( see our laser pointer article here ).
- Which slide you want start from, or which slides you want to show. You can also setup a custom show here.
- How your slides progress (manually or using slide timings).
- Which of your computer monitors (or screens) your slide show runs on.
The Set Up Slide Show dialog box is also the secret to running multiple presentations at the same time in PowerPoint. To expand your knowledge and learn how to set this up, read our guide here .
Setup Slide Show SECRET Shortcut

To use the SECRET shortcut to open the Set Up Slide Show dialog box, simply:
- Hold down the Shift key on your keyboard
- With your mouse, click the Reading View icon at the bottom of your screen
This is useful when you need to quickly cycle through lots of PowerPoint presentations and change how those presentations run. Instead of wasting time clicking through the Ribbon, simply hold the Shift key and click the Reading View icon. This is also a friendly conversation starter with a fellow PowerPoint enthusiast at Happy Hour.
NOTE: The color of your Reading View icon might be different than in the picture above, as it is dependent on the Office Theme you selected for PowerPoint.
How to exit a PowerPoint presentation early?

Regardless of how you start your full screen presentation, you can end your presentation at any time by hitting the Esc key on your keyboard.
Hitting Esc immediately takes you out of the PowerPoint presentation mode and back to the normal editing view of your slides, on whatever slide you were last presenting.
Here is how you can use a combination of all the different keyboard shortcuts to spot check and practice your presentation in full screen before you finalize your presentation.
- Hit F5 on your keyboard to start your presentation in full screen from the very first slide in your presentation. You can then use your arrow keys to advance, spot checking your slides for errors.
- When you find an error, simply hit Esc key to return to the normal PowerPoint editing view to fix your slide.
- When you are done, hit Shift + F5 to return the full screen presentation mode from the slide you just updated. You can then continue spot checking your presentation (without having to start over from the beginning).
In this way you can quickly work your way through your slides and practice your presentation, fixing and adjusting your content as you go.
Understanding how to run your presentations is CRITICAL to the success of your presentation. Not only in presenting them live, but also in knowing how to spot check your slides as you build them.
I personally find it easiest to spot check your slides and quickly fix errors by running your presentation in slide show mode (or full screen). The last place you want to discover an error is during your presentation.
Using the commands and shortcuts above, you can quickly start, exit and step back into your slide show. Once you have these commands and features down, you will also look like a whiz during your presentations.
If you enjoyed the depth of this article, you will love our other PowerPoint training courses and free resources. To learn more, visit us here .
🔒 Unlock the PowerPoint Shortcuts Trusted by Industry Leaders KKR, American Express, HSBC, and More!
Join over 114,880 professionals from diverse fields including consulting, investment banking, advertising, marketing, sales, and business development who have supercharged their PowerPoint game with our proven methods.
✅ Customize compelling presentations effortlessly.
✅ Master time-saving techniques for faster deck creation.
✅ Boost your career prospects with top-notch PowerPoint skills.
Get FREE access to the Critical PowerPoint Shortcuts module of our premium training course by entering your name and email below.
DISCLAIMER: PC Users Only!
We respect your privacy and will keep your info safe and confidential.
Related Articles
About the author.

Popular Tutorials
- How to Strikethrough Text (l̶i̶k̶e̶ ̶t̶h̶i̶s̶) in Word, Excel & PowerPoint
- How to Make Animated Fireworks in PowerPoint (Step-by-Step)
- Strikethrough Shortcut (l̶i̶k̶e̶ ̶t̶h̶i̶s̶) for Word, Excel & PowerPoint
- How to Create a Flash Card Memory Game in PowerPoint (Like Jeopardy)
- Keyboard Shortcuts Not Working: Solved
PowerPoint Tutorial Categories
- Strategies & Opinions
- Presentation Design
- Pictures, Icons, Videos, Etc.
- New Features
- Miscellaneous
- Charts & Data Viz
We help busy professionals save hours and gain peace of mind, with corporate workshops, self-paced courses and tutorials for PowerPoint and Word.
Work With Us
- Corporate Training
- Presentation & Template Design
- Courses & Downloads
- PowerPoint Articles
- Word Articles
- Productivity Resources
Find a Tutorial
- Free Training
- For Businesses
We help busy office workers save hours and gain peace of mind, with tips, training and tutorials for Microsoft PowerPoint and Word.
Master Critical PowerPoint Shortcuts – Secure Your FREE Training Module and Save Valuable Time!
⌛ Master time-saving expert techniques.
🔥 Create powerful presentations.
🚀 Propel your career to new heights.
We value your privacy – we keep your info safe.
Discover PowerPoint Hacks Loved by Industry Giants - KKR, AmEx, HSBC!
Over 114,880 professionals in finance, marketing and sales have revolutionized their PPT skills with our proven methods.
Gain FREE access to a full module of our premium PowerPoint training program – Get started today!
We hate spam too and promise to keep your information safe.
You are currently viewing a placeholder content from Facebook . To access the actual content, click the button below. Please note that doing so will share data with third-party providers.
Understanding Presenter View in PowerPoint: A Deep Dive Guide

Origin and Evolution of Presenter View
Why presenter view is a game-changer for professionals, activating and customizing presenter view in powerpoint, in-depth features of the presenter view, common mistakes and how to avoid them, advanced tips for a power presentation, final tips for enhancing your presentation game, introduction to presenter view.
Have you ever found yourself awkwardly toggling between slides and speaker notes during a presentation? Or wished you could preview the next slide without your audience seeing? Enter Presenter View in PowerPoint, a feature designed to make presenting smoother and more professional.
In essence, Presenter View is a special mode in PowerPoint that allows the presenter to see their speaker notes on one screen, while the audience views the note-free presentation on another screen. This dual-screen setup means you can have your notes, upcoming slides, and timer conveniently on one screen while your audience remains blissfully unaware.
“Presenter View is the unseen ally behind many successful PowerPoint presentations.”
Microsoft’s PowerPoint, with its roots tracing back to the late 1980s, has undergone several metamorphoses. Over the years, as technology improved and presentation dynamics changed, Microsoft introduced new features to make the software more user-friendly and versatile. One such innovation is the Presenter View.
Back in the early days of PowerPoint, presenters had to rely on printouts or separate documents for their speaker notes. The advent of Presenter View in the early 2000s was a game-changer. It allowed presenters to merge their slides and speaker notes into one cohesive presentation experience.
The beauty of Presenter View lies not just in its conception but in its evolution. Over different versions of PowerPoint:
- 2003 : Introduction of a basic Presenter View with slides and notes.
- 2007 : Enhanced screen setup with better dual-monitor support.
- 2010 : Introduction of slide zoom and laser pointer features.
- 2013 & Beyond : Integration with touch features, improved UI, and annotations.
Each version brought refinements, making it more intuitive and packed with features, tailoring to the evolving needs of presenters globally.
Fun Fact : Presenter View wasn’t initially as popular as it is today. It took a few iterations and user feedback loops for Microsoft to perfect the balance between utility and user experience.
The Core Components of Presenter View
Presenter View in PowerPoint is like the cockpit for pilots: it’s where all the essential controls and information are at the presenter’s fingertips. Whether you’re a newbie to PowerPoint or a seasoned professional, understanding these components can transform your presentation experience.
- This provides a glance at your current, previous, and upcoming slides. It ensures you’re always prepared for what’s coming next and can seamlessly transition between points.
- The soul of your presentation, speaker notes, are discreetly placed at the bottom or side, only visible to you. These notes can be elaborate explanations, quick pointers, or even personal reminders. They’re like your secret cheat sheet!
- Ever worried about running over time? This feature shows the elapsed time since you began the presentation and, in some versions, allows you to set a countdown. Stay on track and manage your pace efficiently.
- Interactive features that allow you to draw on slides or use a virtual laser pointer. These are especially helpful when you want to emphasize or explain specific points visually.
- Navigate between slides effortlessly and zoom into specific parts of a slide to draw attention or elaborate on details.
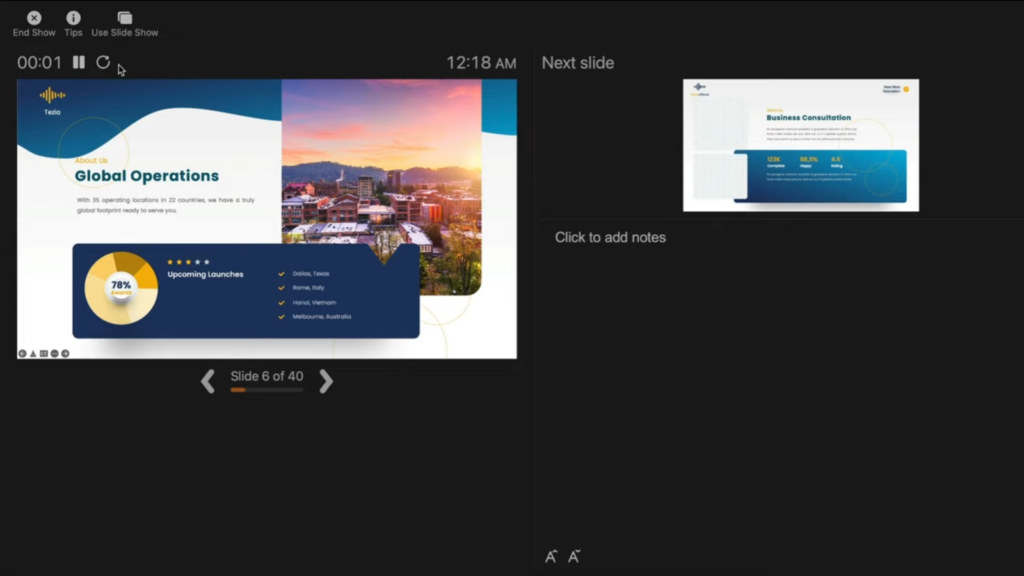
Table: Core Components Overview
Quote : “Presenter View is to a presenter what a dashboard is to a driver. It empowers, directs, and enhances the journey of your narrative.” – Jane Harris, Lead PowerPoint Expert – Powerbacks team
Understanding these components is one thing, but leveraging them effectively during a presentation can make a significant difference. Let’s delve into the ‘why’ behind the significance of Presenter View.
Stepping onto the stage or presenting in a boardroom can often be an overwhelming experience. The constant juggle between capturing the audience’s attention and keeping track of your slides can lead to nervousness. But what if there was a way to have everything you need right in front of you, ensuring smooth sailing through your presentation? Enter Presenter View.
- Having a preview of the upcoming slides and personal notes right in front of you can be a massive boost to confidence. You’re always one step ahead, knowing exactly what’s coming next.
- Instead of turning back to view the screen repeatedly, Presenter View lets you face your audience directly. This creates a more engaging and personal interaction.
- Gone are the days when you’d hold a bunch of cue cards or sheets of paper. With digital speaker notes, you have a cleaner, more organized setup.
- Using the annotation tools and laser pointer, you can make your presentation more interactive, leading to better retention and engagement from your audience.
- There’s no denying that seamlessly transitioning between slides, using interactive tools, and having no physical notes gives a more polished and professional look.
Table: Benefits of Using Presenter View
Quote : “Embracing the Presenter View is not just about leveraging a tool; it’s about amplifying your message and connecting more profoundly with your audience.”
It’s evident that the Presenter View has undeniable advantages for professionals. But how do you activate it and customize it to suit your needs? Let’s walk through the steps.
Starting with PowerPoint 2013, Microsoft enhanced the Presenter View to ensure that it’s both intuitive and user-friendly. Activating it and making it work for you is simple, as outlined in the following steps:
Step-by-Step Guide to Activate Presenter View :
- Start by opening your PowerPoint presentation. This will be the one you intend to deliver.
- At the top, you’ll notice several tabs. Click on the one labeled ‘Slide Show’.
- Within the Slide Show tab, you’ll spot a checkbox labeled ‘Use Presenter View’. Ensure that it’s ticked. If it’s not, simply click on it.
- If you’re using an external projector or display, make sure it’s connected. PowerPoint will automatically detect it and use the Presenter View on your primary display, showing the main presentation on the external one.
- Start your presentation by either pressing F5 on your keyboard or clicking on ‘From Beginning’ in the Slide Show tab.
- Next Slide Preview : Gives a preview of what’s coming next.
- Speaker Notes : Displays your notes for the current slide.
- Slide Navigation : Use this to jump to a specific slide.
- Annotation Tools : Highlight or draw on your slides in real-time.
- Timer : Keeps track of how long you’ve been presenting.
- You can move around the different elements, increase font size of your notes for better readability, or even hide specific components if they’re not required.
Table: Quick Access Tools in Presenter View
Quote : “The beauty of PowerPoint’s Presenter View is the control and flexibility it offers. It’s like having a personal assistant during your presentations.” – Linda Green, Presentation Expert
Now that we know how to activate and customize the Presenter View let’s delve deeper into its features and tools for maximum efficiency during presentations. Shall we proceed?
PowerPoint’s Presenter View is not just a simple “next slide” preview; it’s a hub of tools and functionalities designed to make the presenter’s job easier and the presentation more engaging.
H3: Slide Preview This is arguably the most straightforward feature but also the most helpful. At a glance, you can see what’s coming up, ensuring that you’re always prepared for the next topic or section.
- Smooth Transitions : Eliminates awkward pauses between slides.
- Improved Pacing : Know when to speed up or slow down based on upcoming content.
- Reduced Anxiety : No unpleasant surprises during your presentation.
H3: Speaker Notes For those who don’t rely on pure memory, speaker notes are a lifesaver. They’re your secret weapon, visible only to you, that provides additional context or reminders about what to say.
- Bold the crucial points to ensure they stand out.
- Use concise bullet points for easier and quicker reading.
- Add time cues if you’re aiming to cover specific points within certain timeframes.
H3: Slide Navigation While it’s always best to move sequentially through your slides, there might be instances when you need to skip ahead or return to a previous point. With the slide navigation tool, you can effortlessly hop around your presentation.
- Case Study : During a corporate presentation, John, a sales manager, was posed with a sudden question about Q2 performance. Thanks to slide navigation, he quickly reverted to the relevant slide, addressed the query, and resumed without any hiccups.
H3: Annotation Tools Engage your audience by turning your presentation into an interactive canvas. Whether you’re highlighting an essential statistic or drawing a quick graph, these tools can make a significant impact.
- Use contrasting colors to ensure visibility.
- Don’t overdo it; the aim is to emphasize, not to overwhelm.
- Practice beforehand to ensure you’re comfortable with these tools during the presentation.
H3: Timer It’s easy to lose track of time during a presentation. With Presenter View’s timer, you can keep tabs on the elapsed time, helping you manage the pace and duration of your talk.
- Tip : Always allocate a buffer period. If you’re presenting for 30 minutes, aim to finish in 25. This allows for Q&A or any unexpected delays.
Quote : “PowerPoint’s Presenter View is like a dashboard for presenters. It provides every tool one might need, all within arm’s reach, ensuring a seamless and interactive presentation experience.” – Michael Roberts, Tech Analyst
Understanding the features of the Presenter View is the key to unlocking its potential. With practice and familiarity, it becomes an extension of the presenter, leading to more confident and impactful presentations.
Making the Most of Presenter View
If you’ve ever wanted to feel like a presentation Jedi, mastering the Presenter View is your path to the force. But having the tool isn’t enough – it’s about leveraging its features optimally. Here’s a detailed guide on maximizing the benefits of the Presenter View:
H3: Setup and Access Before harnessing its power, you need to ensure you can access Presenter View without hitches.
- Connect your computer to the projector or external display.
- Launch PowerPoint and open your presentation.
- Go to the Slide Show tab and select Set Up Slide Show .
- In the pop-up, ensure Browsed by an individual (window) is selected.
- Start the slide show. Presenter View should appear on your computer, while the audience sees only the slides.
H3: Customize the Display Remember, it’s your dashboard; make it as comfortable and efficient for you as possible.
- Within Presenter View, hover over the bottom to reveal the toolbar.
- Click on the gear icon to adjust settings.
- Reorder tools based on your preference or hide those you don’t need.
H3: Practice, Practice, Practice The tool’s efficiency relies heavily on your familiarity with it. Do dry runs to ensure you know where everything is and how each feature works.
- Pro Tip : Mimic the presentation environment during practice. If you’re presenting in a large hall, practice with the same setup.
H3: Seamlessly Integrate Other Media If your presentation includes videos, animations, or other media, ensure they play seamlessly in Presenter View.
- Deep Dive : Always embed media within the presentation. Relying on external links or files can disrupt the Presenter View experience.
H3: Engage the Audience Use the tools not just to aid your presentation but to engage your audience. Pose questions, use the pen tool to sketch quick diagrams based on audience inputs, and make it interactive.
- Table of Engagement Techniques :
H3: Master the Art of Transitions Smooth transitions are key to maintaining audience attention. With a preview of the next slide, prepare your narrative to flow seamlessly.
Even with the most powerful tools, human error can play a spoilsport. The Presenter View, as intuitive as it may be, has its quirks. Here’s a list of common pitfalls users face and ways to steer clear of them:
H3: Not Checking Hardware Setup Before you even start the presentation, ensure your hardware is correctly set up. This includes checking the display connection, ensuring the projector or external monitor is detected, and setting up the correct display settings.
- Pro Tip : Always keep a spare HDMI or VGA cable. Technical glitches often come from the most unexpected sources.
H3: Overlooking Speaker Notes Having made the effort of adding speaker notes to your slides, it would be a shame not to use them. They serve as a discreet prompt, ensuring you don’t miss any critical points.
- Fact : According to a study, presenters who actively used speaker notes were 25% more consistent in delivering their core messages.
H3: Ignoring the Timer Time management is crucial. If you have a fixed time slot, exceeding it can inconvenience others and may appear unprofessional. Conversely, finishing too early can leave your audience unsatisfied.
- Actionable Advice : Always have a buffer. If your slot is 30 minutes, aim for a 25-minute presentation, leaving room for Q&A or unexpected delays.
H3: Relying Exclusively on Presenter View Despite its usefulness, never be wholly dependent on Presenter View. Technical glitches happen, and the ability to continue smoothly without it showcases professionalism.
- Case Study : At a major tech conference in 2018, a renowned speaker’s Presenter View malfunctioned. Instead of panicking, he smoothly transitioned to the standard view, using his printed notes as a backup. The audience lauded his adaptability, and his message wasn’t overshadowed by the hiccup.
H3: Not Adapting to Audience Feedback The tools in Presenter View, like slide navigation, are meant to enhance adaptability. If you sense your audience resonating more with a particular topic, don’t be afraid to dwell on it a bit longer or even revisit slides.
By sidestepping these common mistakes, you not only harness the full potential of Presenter View but also project confidence and control. Next, we’ll explore some advanced features to elevate your presentation game even further.
Mastering Presenter View basics can tremendously improve your presentation skills. But if you’re looking to elevate your game and leave a lasting impression, dive into these advanced features:
H3: Seamless Transition Between Slides The art of a great presentation lies not just in the content but also in the delivery. A choppy slide transition can disrupt the flow. PowerPoint offers a plethora of transition effects — from subtle fades to dynamic 3D effects.
- Go to the Transitions tab.
- Browse and select your preferred effect.
- Adjust the transition duration if needed.
- Click Apply To All to maintain uniformity.
H3: Use Zoom to Focus on Details Occasionally, you might want to draw attention to specific details on a slide. Instead of making your audience squint, use the in-built Zoom feature.
- Tip : Combine zoom with a laser pointer or pen tool for emphasis.
H3: Ink Annotations Annotating directly on your slides can be beneficial for interactive sessions or workshops. PowerPoint’s “Ink” feature allows you to do just that.
- Did You Know? : Ink annotations made during a presentation can be saved for future reference!
H3: Embed Multimedia for a Rich Experience Modern presentations often go beyond static slides. Consider embedding videos, audio clips, or even live web content to keep your audience engaged.
- Navigate to the Insert tab.
- Choose Video or Audio and select your file.
- Adjust playback settings under the Playback tab.
H3: Custom Slide Show Sometimes, different segments of your audience require varied content. Instead of having multiple PPT files, create a custom slideshow within the same presentation.
PowerPoint’s Presenter View is akin to a secret weapon, waiting in the wings, ready to empower speakers, educators, and presenters globally. Whether you’re a novice taking your first steps into the world of presentations or a seasoned speaker aiming to refine your skills, the Presenter View, along with the myriad features PowerPoint offers, ensures your content shines in the best light.
Remember, a successful presentation doesn’t merely rely on flashy slides or multimedia elements. It’s the seamless blend of content, delivery, and engagement. And with tools like Presenter View, you’re equipped to handle the technical aspects, allowing you to focus on what truly matters – connecting with your audience.
As Bill Gates once said:
“If you think the PowerPoint presentation is there for you as the presenter, you’re wrong. It’s there for the audience.”
So, the next time you’re gearing up for that crucial pitch, workshop, or lecture, take a moment to familiarize yourself with Presenter View. Your audience — and your confidence — will thank you for it.
Happy presenting!
Save my name, email, and website in this browser for the next time I comment.

May 9, 2022
Edit your notes in Presenter view in PowerPoint
Victoria Tran
- Add our blog to your RSS feed reader" href="/rss/blog.xml" data-bi-name="RSS Subscription" data-bi-id="rss_feed" data-bi-bhvr="120" data-bi-socchn="RSSSubscription" title="Microsoft 365 Insider Blog RSS" target="blank" class="d-inline-block">
Hey, Officer Insiders! My name is Victoria Tran, and I’m a Program Manager on the PowerPoint team. I’m thrilled to share that you can now edit notes in Presenter view in PowerPoint for Windows. No more switching to Editor view to type or change your notes, even during a presentation!
Edit notes in Presenter view
Accessing and editing your slide content whenever the need arises is a key part of the PowerPoint workflow. Whether you’re making an important edit to your speaker notes during a presentation rehearsal or jotting down feedback during your presentation, the ability to edit notes in Presenter view increases your productivity and eliminates the need to toggle between views.
We are excited to add this highly requested feature and expand the use of PowerPoint notes. In the future, we’ll continue to add support for editing notes in other views, such as Teleprompter view.
How it works
Ready to edit notes in Presenter view?

NOTE: You can also press the F6 key to select the Notes pane in Presenter view. When a white outline appears around the pane, press Enter and start typing to make any updates you want.
Known issues
Presenter view currently only allows basic formatting of notes, such as bold, italics, and underlining (via keyboard shortcuts). Formatting such as text color, highlighting, and other options aren’t yet available.
Tips and tricks
- If you are using keyboard commands to navigate through your slides during a presentation, make sure the text insertion point is not showing in the Notes pane. If it is, the arrow keys will move the insertion point around in the pane instead of navigating the slides.
- If you have two monitors, a full-screen slide will show on one monitor and Presenter view on the other monitor, featuring a view of the next slide, your speaker notes, a timer, and more. If you have just one monitor, you can press Alt + F5 to try out Presenter view.
Availability
We will be rolling the edit notes in Presenter view feature out to Office Insiders running Beta Channel Version 2204 (Build 15225.20000) or later.
Don’t have it yet? It’s probably us, not you.
Features are released over some time to ensure things are working smoothly. We highlight features that you may not have because they’re slowly releasing to larger numbers of Insiders. Sometimes we remove elements to further improve them based on your feedback. Though this is rare, we also reserve the option to pull a feature entirely out of the product, even if you, as an Insider, have had the opportunity to try it.
We want to hear from you! Please click Help > Feedback to submit your feedback about this feature.
Learn what other information you should include in your feedback to ensure it’s actionable and reaches the right people. We’re excited to hear from you!
Sign up for the Office Insider newsletter and get the latest information about Insider features in your inbox once a month!
Sorry, JavaScript must be enabled to use this app.
How to See Your Notes When Presenting in PowerPoint

As a presenter, delivering a seamless and confident presentation is key to making a lasting impression. However, it can be challenging to remember every detail of your presentation, especially if you have a lot of content to cover. Fortunately, with PowerPoint’s Presenter View, you can easily access your notes and confidently deliver your presentation. In this article, we will cover all aspects of using PowerPoint’s Presenter View to enhance your presentation.
Table of Contents
Why You Need to See Your Notes When Presenting in PowerPoint
Presenting without having your notes at hand can be daunting and can affect the quality of your presentation. Whether you are presenting in front of a small group or a large audience, you will need to have access to your notes. This will help you deliver your presentation confidently, as you will have a clear idea of what to say or do next. In addition, having your notes visible can help you stay focused on the topics you want to cover and avoid straying off-topic.
Another reason why it is important to see your notes when presenting in PowerPoint is that it can help you manage your time effectively. By having your notes visible, you can keep track of the time and ensure that you are covering all the important points within the allocated time frame. This can help you avoid rushing through the presentation or running out of time before you have covered all the key points.
Furthermore, having your notes visible can also help you engage with your audience better. When you are confident and well-prepared, you are more likely to make eye contact with your audience and use body language effectively. This can help you build a connection with your audience and keep them engaged throughout the presentation.
How to Access Presenter View in PowerPoint
Before you can access Presenter View, you need to have a PowerPoint presentation open in Slide Show mode. Once your presentation is open, simply click on the ‘Slide Show’ tab and check the box beside ‘Use Presenter View.’ Your screen will then automatically switch to Presenter View, allowing you to see your notes and other helpful controls.
Presenter View is a great tool for giving presentations, as it allows you to see your notes and upcoming slides while your audience only sees the current slide. You can also use Presenter View to zoom in on specific parts of your slide, draw on your slides, and even use a virtual laser pointer to highlight important information. To exit Presenter View, simply press the ‘Esc’ key on your keyboard.
Understanding the Presenter View in PowerPoint
Presenter View is a powerful tool that enables you to manage your presentation effectively. It comprises several elements, including:
- The slide display area, which shows the slide that your audience sees.
- The notes section, which displays any text that you have added as notes or comments.
- The timer, which can help you stay within your allotted time.
- The navigation controls, which let you move forward and backward in your presentation easily.
- The zoom slider, which enables you to zoom in and out of your slides for added detail.
- The laser pointer and highlighter tools, which allow you to emphasize important points on your slides.
Presenter View also allows you to preview upcoming slides, giving you a chance to prepare for the next section of your presentation. This feature can be especially helpful if you need to refer to specific information on a later slide.
In addition, Presenter View provides a way to keep your audience engaged by allowing you to add annotations to your slides. You can draw attention to specific areas of your slide, highlight key points, or even add additional information that may not be included in the slide itself.
Setting Up Presenter View: Step-by-Step Guide
If you want to customize your Presenter View experience, follow these steps:
- On the ‘Slide Show’ tab, click ‘Set Up Slide Show.’
- Under ‘Multiple Monitors,’ select the ‘Use Presenter View’ checkbox.
- If you’re using a single monitor, select the ‘Display slide show on’ option and choose your primary monitor.
- If you’re using dual monitors, select the ‘Display slide show on’ option and choose the monitor that you want to display Presenter View on.
- Customize the Presenter View by selecting the options that you want to use, such as speaker notes, the timer, and the navigation controls.
- Click ‘OK.’ Your Presenter View should now be set up.
It’s important to note that not all versions of PowerPoint have the Presenter View feature. If you don’t see the ‘Use Presenter View’ checkbox under ‘Multiple Monitors,’ it’s likely that your version of PowerPoint doesn’t support this feature. In this case, you may need to upgrade to a newer version or use a different presentation software that offers Presenter View.
How to Customize Presenter View Settings in PowerPoint
If you have specific preferences for Presenter View, you can customize it by following these steps:
- Click the ‘Settings’ button in the Presenter View toolbar.
- Select the options that you want to use, such as the color scheme, font size, and slide size.
- Click ‘Save Changes’ to apply your changes.
Customizing your Presenter View settings can greatly enhance your presentation experience. For example, you can choose to display your notes on one screen while your audience sees only the slides on the other screen. Additionally, you can select the option to display a timer or a clock to help you keep track of time during your presentation. Experiment with different settings to find what works best for you and your audience.
Using Presenter View on Dual Monitor Setup
If you have a dual-monitor setup, you can use Presenter View to present your slides on one screen while managing your notes and tools on the other screen. To do this, simply select the ‘Use Presenter View’ checkbox under ‘Multiple Monitors’ in the ‘Set Up Slide Show’ dialog box. Once you start presenting, the Presenter View screen will appear on the secondary monitor, while the slides will appear on the primary screen.
Presenter View is a great tool for presenters who want to keep their notes and tools hidden from the audience. With Presenter View, you can see your notes, upcoming slides, and a timer, while your audience only sees the current slide. This feature is especially useful for longer presentations, where you may need to refer to your notes or keep track of time.
Another benefit of using Presenter View is that it allows you to easily navigate through your presentation. You can use the arrow keys on your keyboard to move forward or backward through your slides, or you can use the thumbnails on the Presenter View screen to jump to a specific slide. This makes it easy to adjust your presentation on the fly, without having to interrupt the flow of your presentation.
Troubleshooting Common Issues with Presenter View in PowerPoint
If you experience common issues with Presenter View, such as notes not displaying correctly, audio not working, or distorted visuals, try these troubleshooting tips:
- Make sure that your computer meets the minimum system requirements for using Presenter View.
- Check that the correct audio output is selected in the control panel.
- Review your slides and notes to ensure that there are no formatting errors.
- Try closing other open applications to free up system resources.
- Ensure that your computer is updated with all available updates.
- Try reinstalling or repairing PowerPoint to eliminate any software conflicts.
However, if these troubleshooting tips do not resolve your issues, there may be other factors at play. One possible cause of issues with Presenter View is outdated or incompatible drivers for your computer’s graphics card. Check with your computer manufacturer or graphics card manufacturer to see if there are any updates available.
Another potential issue could be related to your computer’s display settings. Make sure that your display settings are optimized for the resolution and aspect ratio of your presentation. You may also want to try adjusting the scaling settings to see if that improves the display of your slides and notes.
Tips and Tricks for Effective Note-taking During Presentation
To get the most out of Presenter View, try these effective note-taking tips:
- Organize your notes by slide or topic to stay on track during the presentation.
- Use bullet points and keywords to keep your notes concise and easy to read.
- Include cues or action words to remind you of any demonstrations, animations, or other interactive elements in your presentation.
- Use the highlighter tool to draw attention to the most critical points.
Enhancing Your Presentation with Presenter View
Presenter View can enhance your presentation in several ways, such as by allowing you to add visual aids and multimedia elements, manage your time effectively, and engage your audience. By using Presenter View, you can keep your presentation on track, highlight key information, and maintain your audience’s attention throughout.
The Importance of Rehearsing Your Presentation with Presenter View
Practicing your presentation with Presenter View can help you become familiar with the interface, identify any errors or issues, and ensure that your presentation will run seamlessly. Use Presenter View during your presentation rehearsal to simulate the actual presentation environment and get a feel for how it works.
Taking Advantage of the Laser Pointer and Highlighter Tools in Presenter View
The laser pointer and highlighter tools are handy for emphasizing key points on your slides and improving audience engagement. To use them, simply press and hold the ‘Ctrl’ key and click the mouse to activate the laser pointer or highlighter. Release the key to deactivate them.
How to Switch Between Slides and Notes during a Presentation
If you need to switch between slides and notes during your presentation, simply click the ‘Notes’ button in the Presenter View toolbar. This will display your notes and allow you to scroll through them as needed.
Utilizing the Timer and Countdown Features of Presenter View
The timer and countdown features are useful for keeping your presentation on track and ensuring that you do not exceed your allotted time. To use them, simply enable the ‘Timer’ feature in the ‘Settings’ section of Presenter View. You can then set the countdown time and choose whether to display it during the presentation or keep it hidden.
Sharing Your Screen Using Presenter View in Microsoft Teams or Zoom Meetings
If you are using Microsoft Teams or Zoom Meetings to deliver your presentation remotely, you can still use Presenter View by sharing your screen. To do this, simply select the ‘Share Screen’ option and choose the ‘Presenter View’ screen. This will allow you to present your slides while keeping your notes and controls visible to you for an uninterrupted presentation experience.
By following the steps and tips outlined in this article, you can use PowerPoint’s Presenter View to deliver a polished and professional presentation that wows your audience. Always remember to rehearse your presentation before the actual day so that you’re comfortable with the tools and settings for Presenter View, and ready to tackle any issue that might arise.
By humans, for humans - Best rated articles:
Excel report templates: build better reports faster, top 9 power bi dashboard examples, excel waterfall charts: how to create one that doesn't suck, beyond ai - discover our handpicked bi resources.
Explore Zebra BI's expert-selected resources combining technology and insight for practical, in-depth BI strategies.

We’ve been experimenting with AI-generated content, and sometimes it gets carried away. Give us a feedback and help us learn and improve! 🤍
Note: This is an experimental AI-generated article. Your help is welcome. Share your feedback with us and help us improve.


Contribute to the Microsoft 365 and Office forum! Click here to learn more 💡
April 9, 2024
Contribute to the Microsoft 365 and Office forum!
Click here to learn more 💡
PowerPoint Top Forum Contributors: Steve Rindsberg - John Korchok 👍✅
April 17, 2024
PowerPoint Top Forum Contributors:
Steve Rindsberg - John Korchok 👍✅
- Search the community and support articles
- Microsoft 365 and Office
- Search Community member
Ask a new question
Control the size of the PowerPoint Presenter View window
How do I control the size of the PowerPoint Presenter View window. As is, it takes over the entire monitor, which I do not want it to always do. When I am home working on a 28" 1080p TV as my main monitor, I need the Presenter View in a window that I can control the size of.
"It's not a but; it's a feature."
Report abuse
Replies (9) .
- Microsoft Agent |
Thank you for posting your question in this community. From your description you would like to have a presenter view in window mode rather than taking over the enter monitor with full screen.
At this moment, I am afraid it is not feasible with PowerPoint for Mac to resize a Presenter View. Currently, we can only make set up slide show as a individual windows in Set Up Slide Show option, but it would disable presenter view with this settings.
I understand that it would be very convenient to you as Windows platform does. A lot of users also noticed this limitation with PowerPoint for Mac and raise an idea about Make presenter window in presenter view scalable in PowerPoint for Mac UserVoice. If it is convenient, I suggest you can vote and subscribe this idea at your convenience. Sorry for the inconvenience caused. Appreciate your understanding.
Best regards,
8 people found this reply helpful
Was this reply helpful? Yes No
Sorry this didn't help.
Great! Thanks for your feedback.
How satisfied are you with this reply?
Thanks for your feedback, it helps us improve the site.
Thanks for your feedback.
26 people found this reply helpful
Thank you for your reply. I fully understand that it should be a quite basic feature for PowerPoint, but this simple change can improve work efficiency for the users. Office UserVoice is a platform for all Microsoft users to share their ideas and feedbacks. It is also a channel to let the related team understand the limitations and improvements.
It is recommend you can vote and subscribe this idea at your convenience. As more and more users voted on the ideas, It can also let the product team be aware of this limitation in PowerPoint for Mac and improve it in the future. Your ideas and feedbacks are very important to Microsoft which it can help Microsoft products become more user friendly in the future. Thank you for your understanding.
1 person found this reply helpful
Thank you for your reply and updates. I also did a test from my side, which my set up is a MacBook build-in screen, a extend monitor, and a iPad. The iPad is using a third-party application to extend it as a third monitor.
When I tried to set up the Slide Show in Slide Show settings in Monitor 3 (iPad), the slide show will be presented in Monitor 3, but the Presenter view will be still on Primary screen (MacBook),

Although there is a Swap Presentation view and slide show screen button in Presenter view, but it results the slide show swap back to Primary screen and second screen. I am afraid the built-in feature of PowerPoint is not able to achieve your target in this scenario.
However, I found that there might be a workaround to help achieve it by setting up “Primary screen” in Mac Preference settings, if you would like to set Slide show on your laptop screen, and display Presenter view on your iPad screen.
Based on the pervious test, we know that the presenter view and slide show view will stay on Primary screen and screen. Hence, we can change the MacBook and iPad as Primary screen, the extend monitor will be the third screen.
In Mac Preferences > Display > Arrangement , set your iPad as Primary Screen ( You can click and hold the white bar at the top and drag to the screen you would like to set as Primary screen ) , MacBook as Second screen and extend monitor as the third screen.

When you need to start a slide show in PowerPoint, you can go to Set up Slide Show settings under Slide show tab , then set the slide show as Monitor 2 which is your MacBook

After that when you start the slide show, the Slide show will be on your MacBook, iPad will display Presenter view, and you can continue working on the third screen, like the screenshot below.

You can also switch the presenter view and slide show, which the option “Swap Display” in Presenter view

5 people found this reply helpful
Been there, done that. I tried your idea before I wrote my question. I am sorry you went to all that work capturing screenshots.
That is not a suitable solution because the Mac automatically throws every open app window onto the primary monitor and new windows are automatically opened on the primary monitor. The whole purpose of getting the Presenter's screen off the primary monitor is so I will have it for other apps.
I guess I am going to have to spring for the new version of Parallels which will allow me to run the Windoze version of PowerPoint that will supposedly do what I need. Bah! Hurry up Micro$oft and get the Mac version on par with the Windows version. Once again, we are your orphan step-children.
3 people found this reply helpful
- Volunteer Moderator
I do not have 3 monitors so I can not test this myself. If you want to give it a go, do the following:
From the Tools menu choose Macro > Visual Basic Editor
In the Editor, choose Insert > Module
Paste the following into the Module
With ActivePresentation.SlideShowSettings
.ShowType = ppShowTypeWindow2
With .Run
.Left = 0
.Top = 0
.Width = 1500
.Height = 1000
End With
Press Command-Q to exit the Visual Basic Editor
From the Tools menu choose Macro > Macros
Select the Test macro and click Run
Your presentation should now be running in a window that you might be able to move to any screen.
You can adjust the number of pixels by changing the Width and Height settings in the Macro.
Does this solve the problem for you?
4 people found this reply helpful
Since I have only one monitor, PowerPoint for Windows won't let me even choose Presenter View.
I am wondering if the Windows capability is due to the fact that Windows allows multiple instances of an application. If that is the case, it won't happen on a Mac because Mac OS allows only one instance of an application at a time.
Still, it is worth following Dihao's original reply suggestion to vote for this feature and discuss it on the feature suggestion forum.
Question Info
- Norsk Bokmål
- Ελληνικά
- Русский
- עברית
- العربية
- ไทย
- 한국어
- 中文(简体)
- 中文(繁體)
- 日本語
How-To Geek
How to practice your presentations with powerpoint's presenter coach.
Rehearsing presentations gets easier with PowerPoint.
Quick Links
How the presenter coach helps you with your presentations, what you'll need, how to launch the presenter coach in powerpoint, reading your rehearsal report.
Microsoft PowerPoint now has a Presenter Coach to let you rehearse your presentations before going to the audience. This coach gives you a detailed report telling you how well you did and suggesting areas for improvement. Here's how to use it.
Consider the Presenter Coach in PowerPoint as a trusted friend who listens to you practice performing your presentations . This coach reviews your entire presentation and creates a report detailing your performance.
For example, it will grade you on how fast you speak and how much you use filler words like "um" and "ah." It will also inform you of words you might want to avoid and encourage you not to simply read the words on your slides aloud.
Basically, if you need a second opinion on your presenting style, this is a great way to get it.
Related: 8 Tips to Make the Best PowerPoint Presentations
To use the Presenter Coach in PowerPoint, you must have:
- a Microsoft account or a Microsoft 365 work or school account
- a working internet connection
- a microphone (so that PowerPoint can listen to what you're saying)
Also, the Presenter Coach only works if you use the English language in PowerPoint. Other languages are not yet supported as of April 2021.
PowerPoint's Presenter Coach works for any presentation. You can use it with your commercial, educational, and even family presentations.
To start using this feature, open your presentation with PowerPoint.
In the PowerPoint window, click the "Slide Show" tab on the ribbon at the top of the window.
If you don't see the Slide Show tab, you're probably in Slide Master View. Close this view by selecting "Slide Master" at the top and then clicking "Close Master View."
In the Slide Show tab, click "Rehearse with Coach" to open PowerPoint's Presenter Coach.
Your presentation will open in fullscreen mode. To activate the Presenter Coach, click "Start Rehearsing" in the bottom-right corner of your window. Optionally, enable "Show real-time feedback" if you want the coach to give you tips while you're still presenting.
Now, begin your presentation like you normally would. If you enabled the real-time feedback option, you'll see some tips appear in the bottom-right corner of your window.
Press "Esc" when you're done presenting to exit fullscreen mode. PowerPoint will now open your rehearsal report.
It's important to read and analyze the Presenter Coach's report properly. This will help you find areas for improvement and see whether you're doing well.
The report will vanish as soon as you close the report window. To save the report, take a screenshot of it.
Here's what each section in the report tells you about your presentation:
- Summary : Summary tells you the amount of time you spent practicing your presentation. It also shows the number of slides you rehearsed.
- Fillers : In the Fillers section, you'll see the filler words (umm, ah) that you used during your presentation. Using these filler words makes you sound less confident, and you should try to avoid using them.
- Sensitive Phrases : Sensitive Phrases highlights culturally sensitive phrases that you used in your presentation, which you might want to avoid. It considers the following areas sensitive: disability, age, gender, race, sexual orientation, mental health, geopolitical topics, and profanity.
- Pace : The Pace section tells you the pace of your presentation. If you were too fast or too slow, you'll find that information here.
- Originality : Microsoft suggests that you avoid reading out the text written in your presentation slides, as this makes your presentation boring. Instead, you should use original content in your speech. The Originality section informs you if you only read the text from your slides.
Now that you know where you need to improve, click the "Rehearse Again" button at the top of the report to re-present your presentation. When you're done, PowerPoint will make another report detailing your new presentation performance.
Related: How to Add Music to Your PowerPoint Presentation

- SUGGESTED TOPICS
- The Magazine
- Newsletters
- Managing Yourself
- Managing Teams
- Work-life Balance
- The Big Idea
- Data & Visuals
- Reading Lists
- Case Selections
- HBR Learning
- Topic Feeds
- Account Settings
- Email Preferences
How to Make a “Good” Presentation “Great”
- Guy Kawasaki

Remember: Less is more.
A strong presentation is so much more than information pasted onto a series of slides with fancy backgrounds. Whether you’re pitching an idea, reporting market research, or sharing something else, a great presentation can give you a competitive advantage, and be a powerful tool when aiming to persuade, educate, or inspire others. Here are some unique elements that make a presentation stand out.
- Fonts: Sans Serif fonts such as Helvetica or Arial are preferred for their clean lines, which make them easy to digest at various sizes and distances. Limit the number of font styles to two: one for headings and another for body text, to avoid visual confusion or distractions.
- Colors: Colors can evoke emotions and highlight critical points, but their overuse can lead to a cluttered and confusing presentation. A limited palette of two to three main colors, complemented by a simple background, can help you draw attention to key elements without overwhelming the audience.
- Pictures: Pictures can communicate complex ideas quickly and memorably but choosing the right images is key. Images or pictures should be big (perhaps 20-25% of the page), bold, and have a clear purpose that complements the slide’s text.
- Layout: Don’t overcrowd your slides with too much information. When in doubt, adhere to the principle of simplicity, and aim for a clean and uncluttered layout with plenty of white space around text and images. Think phrases and bullets, not sentences.
As an intern or early career professional, chances are that you’ll be tasked with making or giving a presentation in the near future. Whether you’re pitching an idea, reporting market research, or sharing something else, a great presentation can give you a competitive advantage, and be a powerful tool when aiming to persuade, educate, or inspire others.
- Guy Kawasaki is the chief evangelist at Canva and was the former chief evangelist at Apple. Guy is the author of 16 books including Think Remarkable : 9 Paths to Transform Your Life and Make a Difference.
Partner Center
View, manage, and install add-ins for Excel, PowerPoint, and Word
When you enable an add-in, it adds custom commands and new features to Microsoft 365 programs that help increase your productivity. Because add-ins can be used by attackers to do harm to your computer, you can use add-in security settings to help protect yourself.
Note: This article only applies to Microsoft 365 applications running on Windows.
View installed add-ins

You can directly install add-ins from this page or select More Add-ins to explore.
In the Office Add-ins dialog, select My Add-ins tab.
Select an add-in you want to view the details for and right-click to select Add-in details option.
Click a heading below for more information .
Add-in categories explained
Active Application Add-ins Add-ins registered and currently running on your Microsoft 365 program.
Inactive Application Add-ins These are present on your computer but not currently loaded. For example, XML schemas are active when the document that refers to them is open. Another example is the COM add-in: if a COM add-in is selected, the add-in is active. If the check box is cleared, the add-in is inactive.
Document Related Add-ins Template files referred to by open documents.
Disabled Application Add-ins These add-ins are automatically disabled because they are causing Microsoft 365 programs to crash.
Add-in The title of the add-in.
Publisher The software developer or organization responsible for creating the add-in.
Compatibility Look here for any compatibility issues.
Location This file path indicates where the add-in is installed on your computer.
Description This text explains the add-in function.
Note: Microsoft Outlook has one add-in option in the Trust Center: Apply macro security settings to installed add-ins . InfoPath has no security settings for add-ins.
Permanently disable or remove an add-in
To disable or remove an add-in follow these steps:
Select File > Get Add-ins . Alternatively, you can select Home > Add-ins .
In the Office Add-ins dialog, select My Add-ins tab.
Select an add-in you want to remove and right click to select Remove option.
View or change add-in settings
You can see and change add-in settings in the Trust Center, descriptions of which are in the following section. Add-in security settings may have been determined by your organization so not all options may be available to change.
Select File > Get Add-ins .
Select More Add-ins > Manage My Add-ins.
Select Trust Center > Trust Center Settings > Add-ins.
Check or uncheck the boxes you want.
Add-in settings explained
Require Application Add-ins to be signed by Trusted Publisher Check this box to have the Trust Center check that the add-in uses a publisher's trusted signature. If the publisher's signature hasn’t been trusted, the Microsoft 365 program doesn’t load the add-in, and the Trust Bar displays a notification that the add-in has been disabled.
Disable notification for unsigned add-ins (code will remain disabled) When you check the Require Application Extensions to be signed by Trusted Publisher box, this option is no longer grayed out. Add-ins signed by a trusted publisher are enabled, but unsigned add-ins are disabled.
Disable all Application Add-ins (may impair functionality) Check this box if you don't trust any add-ins. All add-ins are disabled without any notification, and the other add-in boxes are grayed out.
Note: This setting takes effect after you exit and restart your Microsoft 365 program.
While working with add-ins, you may need to learn more about digital signatures and certificates , which authenticate an add-in, and trusted publishers , the software developers who often create add-ins.
Manage and install add-ins
Use the following instruction to manage and install add-ins.
To install a new add-in:
You can directly install popular add-ins on the page or go to More Add-ins to explore.
Select the add-in and select Add . Or browse by selecting Store tab in the Office add-in dialog to find other add-ins to install and select Add for that add-in.
To manage your add-ins:
Select File > Get Add-ins and from the bottom, select More Add-ins. Or select Home > Add-ins > More add-ins.
In the Office dialog, select My Add-ins tab. If you are not able to see your add-ins, select Refresh to reload your add-ins.
Select Manage My Add-in to manage and select Upload to browse and add an add-in from your device.
How to cancel a purchased add-in
If you've subscribed to an add-in through the Microsoft 365 Store that you don't want to continue, you can cancel that subscription.
Open the Microsoft 365 application and go to the Home tab of the ribbon.
Select Add-ins and then select More Add-ins > My Add-ins tab to view your existing add-ins.
Select the app you want to cancel and select Manage My Add-ins .
Under the Payment and Billing section choose Cancel Subscription .
Select OK and then Continue .
Once that's complete you should see a message that says "You have cancelled your app subscription" in the comments field of your apps list.
Why is my add-in crashing?
Some add-ins might not be compatible with your organization's IT department policies. If that is the case with add-ins recently installed on your Microsoft 365 program, Data Execution Prevention (DEP) will disable the add-in and the program might crash.
Learn more about DEP
Get a Microsoft 365 Add-in for Outlook
Get a Microsoft 365 Add-in for Project
Taking linked notes
If you're looking for Help on linking notes in OneNote to a Word or PowerPoint document, see Take linked notes .
Excel Windows Add-ins
If you're looking for Help on specific Excel Add-ins, such as Solver or Inquire, see Help for Excel for Windows add-ins .
If you're looking for additional help with Excel add-ins using the COM Add-ins dialog box, see Add or remove add-ins in Excel .
Get a Microsoft 365 Add-in for Excel

Need more help?
Want more options.
Explore subscription benefits, browse training courses, learn how to secure your device, and more.

Microsoft 365 subscription benefits

Microsoft 365 training

Microsoft security

Accessibility center
Communities help you ask and answer questions, give feedback, and hear from experts with rich knowledge.

Ask the Microsoft Community

Microsoft Tech Community

Windows Insiders
Microsoft 365 Insiders
Find solutions to common problems or get help from a support agent.

Online support
Was this information helpful?
Thank you for your feedback.
IMAGES
VIDEO
COMMENTS
Select the Slide Show tab. Select the Use Presenter View checkbox. Select which monitor to display Presenter View on. Select From Beginning or press F5. In Presenter View, you can: See your current slide, next slide, and speaker notes. Select the arrows next to the slide number to go between slides. Select the pause button or reset button to ...
Start presenting. On the Slide Show tab, in the Start Slide Show group, select From Beginning. Now, if you are working with PowerPoint on a single monitor and you want to display Presenter view, in Slide Show view, on the control bar at the bottom left, select , and then Show Presenter View.
Deliver your presentation on two monitors. On the Slide Show tab, in the Set Up group, click Set Up Slide Show. In the Set Up Show dialog box, choose the options that you want, and then click OK. If you choose Automatic, PowerPoint will display speaker notes on the laptop monitor, if available. Otherwise, PowerPoint will display speaker notes ...
In Presenter View, you'll have your own private screen with tools like a next slide preview, timekeeper, and drawing tools.. This is a view that you'll see on your own screen while giving a presentation using PowerPoint. While the audience will see the presentation on the projector or big screen, you'll have your own private view on a second monitor.
Take advantage of the PowerPoint Presenter View to practice and present your PowerPoint speaker notes. This view also helps you as a presenter by showing you...
Check the box beside the "Use Presenter View." Select from the "Start Slide Show" section to start your presentation "From the Beginning." Click the three dots menu on your full-screen slideshow view and select "Show Presenter View." When your presentation displays "Presenter View," you can scroll and use it for your speech.
A simple method for switching to Presenter View on a single monitor is to click the three dots ( More slideshow options) at the bottom in SlideShow mode and select Show Presenter View. You can also switch to Presenter View on a single monitor anytime using the ALT+F5 hotkey. The presenter can easily manage a PPT in presentation mode, with the ...
Click From Beginning. Holding down the Alt key and clicking From Beginning, the Presenter View will launch from the very first (non-hidden) slide in your presentation. You can also launch the presenter view from the beginning of your presentation at any time by clicking Alt + F5 on your keyboard.
In this screencast, you'll learn how to present a PowerPoint slideshow with Presenter View. Download unlimited PPT templates with Envato Elements: https://...
To see the full course that this video came from, go here: ️https://www.simonsezit.com/courses/microsoft/powerpoint-2021-online-course/In this Microsoft Pow...
In-depth Features of the Presenter View. PowerPoint's Presenter View is not just a simple "next slide" preview; it's a hub of tools and functionalities designed to make the presenter's job easier and the presentation more engaging. H3: Slide Preview This is arguably the most straightforward feature but also the most helpful.
Overview of Presenter view. Presenter view lets you view your presentation with your speaker notes on one computer (your laptop, for example), while the audience views the notes-free presentation on a different monitor. Note: PowerPoint only supports the use of two monitors for a presentation. However, you can configure to run a presentation on ...
Look for Slide Show tab. When found, click it and select From Beginning visible under Start Slide Show group. If you are working with PowerPoint on a single monitor and still want to display ...
To open Presenter view in PowerPoint, click the Slide Show tab and select the Use Presenter View check box. 2. Start your slide show. 3. Click the Notes pane in the lower right corner of the PowerPoint window, then start typing. NOTE: You can also press the F6 key to select the Notes pane in Presenter view. When a white outline appears around ...
Training: PowerPoint Presenter View shows you the current slide, the next slide, and your speaker notes, to help you focus while presenting and connect with your audience. Watch this video to see how. Related topics. ×. Present slideshows Use Presenter View Video;
When most presentations were done in meeting rooms, PowerPoint's Presenter View was used to primarily to see your speaking notes while the audience saw just your slide. Now that most presentations have moved online in platforms such as Zoom or Microsoft Teams, Presenter View's other features are available since you are sitting at the ...
While PowerPoint Presenter View does not give you two windows, Google Slides Presenter View does. This web-based slide program opens another browser window to display your notes. This allows you to share the browser window with your slide show in the meeting so the attendees only see your slides while you see your slides and notes.
If you want to customize your Presenter View experience, follow these steps: On the 'Slide Show' tab, click 'Set Up Slide Show.'. Under 'Multiple Monitors,' select the 'Use Presenter View' checkbox. If you're using a single monitor, select the 'Display slide show on' option and choose your primary monitor.
Press Command-Q to exit the Visual Basic Editor. From the Tools menu choose Macro > Macros. Select the Test macro and click Run. Your presentation should now be running in a window that you might be able to move to any screen. You can adjust the number of pixels by changing the Width and Height settings in the Macro.
View your speaker notes as you deliver your slide show. Draw on or highlight slides during a presentation. Turn your mouse into a laser pointer. Add speaker notes to each slide in a presentation. Training: Presenter view is like a dashboard that contains in one window everything you need to run your slide show. You control the show on a ...
To activate the Presenter Coach, click "Start Rehearsing" in the bottom-right corner of your window. Optionally, enable "Show real-time feedback" if you want the coach to give you tips while you're still presenting. Now, begin your presentation like you normally would. If you enabled the real-time feedback option, you'll see some tips appear in ...
When in doubt, adhere to the principle of simplicity, and aim for a clean and uncluttered layout with plenty of white space around text and images. Think phrases and bullets, not sentences. As an ...
Slide Show view occupies the full computer screen, exactly the way your presentation will look on a big screen when your audience sees it. Presenter view. To get to Presenter view, in Slide Show view, in the lower left corner of the screen, click , and then click Show Presenter View (as shown below). Use Presenter view to view your notes while ...
Afei wɔde kɔmputa no screen kyerɛ "presenter view" a ɛwɔ slide a aduru so no , slide a edi hɔ, ɔkasafo nsɛm a ɔkyerɛw ma slide biara ho, ne nsɛm afoforo so. Wɔde video fi kɔmputa so kɔ abɔnten dijitaal projector anaa monitor biako anaa nea ɛboro saa so, na eyi slide aduru so no nkutoo kyerɛ atiefo, na ɔkasafoɔ a ɔwɔ ...
Note: This article only applies to add-ins in Excel, PowerPoint, and Word.For guidance on how to view, install, and manage add-ins in Outlook, see Use add-ins in Outlook.