Screen sharing a PowerPoint presentation
There are three methods you can use to screen share a PowerPoint presentation in a Zoom meeting. If you have dual monitors, you can share a slide show while viewing the presenter's notes on another monitor. If you have a single monitor, you can also start the slide show in a window so you have access to other meeting features while sharing your presentation.
If you have other participants presenting portions of the PowerPoint, you can give them slide control in Zoom, so that they can control the slideshow on their end, without needing to ask you to move the slides forward. Additionally, PowerPoint slides can be shared as a Virtual Background for a more immersive sharing experience.
This article covers:

Dual monitors with slide show and presenter's views
Single-monitor setup with slide show view in a window, single-monitor setup with slide show in full screen.
Follow these steps if you are using multiple monitors and want to present your PowerPoint in one monitor, while viewing the presenter's notes in another monitor.
- Open the PowerPoint file you want to present.
- Start or join a Zoom meeting.
- Select your primary monitor then click Share . If you are not sure which monitor is your primary, select the one that PowerPoint opens in.
- Switch back to Powerpoint and click the Slide Show tab.

Follow these steps if you have a single monitor and want to share your PowerPoint presentation in slide show view, but have it contained in a window rather than in full screen. This is useful if you need to access meeting features, such as in-meeting chat or managing participants, while sharing your PowerPoint presentation.
- Click the Slide Show tab and then select Set Up Slide Show .
- Under Show type , select Browsed by an individual (window) and then click OK .

- In Zoom, start or join a meeting .
- Select the PowerPoint window and then click Share .
Note : Be sure you select the PowerPoint window, not the entire screen. Sharing the PowerPoint window only will allow you to use other features without interrupting the view of the presentation.
- Select your monitor then click Share .
How to Present PowerPoint Slides in Zoom
Got a presentation coming up? Here's how to share your PowerPoint slides in Zoom and engage your audience.
Preparing to present PowerPoint slides in Zoom for the first time can feel overwhelming. It's a different experience than face-to-face presentations, and naturally, you want to get it right. But don't worry, we've all been there, and we're here to help.
In this article, we’ll guide you through the process step-by-step, so you can deliver your presentation with confidence and avoid awkward pitfalls. Let’s dive in.
Present PowerPoint Slides in Zoom by Sharing Your Entire Screen
One of the easiest ways to share your PowerPoint slide deck is by sharing your entire screen. Here’s how to go about it.
- Open your PowerPoint presentation.
- Start or Join a Zoom meeting . Knowing how to use Zoom like an expert makes this step easy.
When you hide the toolbar, it may appear as a minimized window in your taskbar. Click the window icon to reveal it when you’re ready to stop sharing.
- Press the Esc key on your keyboard to exit the slideshow after your presentation.
- Click Stop sharing .
Sharing your entire screen lets you seamlessly switch between your PowerPoint window and other windows while bringing your audience along. However, it has a downside—your audience will see sensitive details or notifications if they pop up.
Present PowerPoint Slides in Zoom by Sharing a Window
With this method, you share only your PowerPoint window, so your audience won't see other areas of your desktop, including popup notifications. Here’s how to get it done.
- Join the Zoom meeting.
Ensure your PowerPoint window is maximized and running in the background, or it won't appear under the Window tab.
- Click Stop sharing or Stop share when you’re done presenting.
This method is perfect for multi-tasking—that is, sharing your PowerPoint window while viewing your notes (in a separate document) or seeing what’s happening in Zoom.
Rock Your PowerPoint Presentation in Zoom Like a Pro
And that's a wrap! You now know all the key steps to present PowerPoint slides effectively in Zoom. Remember, you have two main options: share your entire screen when you need to switch between different windows during the presentation or share a specific PowerPoint window if you're multitasking and want to keep the rest of your desktop private.
Practice using these features before your next presentation, so you're comfortable and ready. Alongside this, using a whiteboard in Zoom can make your presentations more interesting.
- I Tried Both: Apple Watch 9 vs Fitbit Charge 6
- Best Places to Print Photos Online
How to Share a PowerPoint on Zoom
Share your screen, whether or not you're the presenter
:max_bytes(150000):strip_icc():format(webp)/DanSeitz-212239-b7461a6af1964919a88b89c04d193d8c.jpg "how to show powerpoint presentation on zoom")
- University of Vermont, Emerson College
:max_bytes(150000):strip_icc():format(webp)/headshot-00415ba557444a8a9b6bb139498b97c5.jpg "how to show powerpoint presentation on zoom")
- The Ultimate Guide to Shopping Online
- The Ultimate Guide to Online Learning at Home
- Two-Factor Authentication
- The Ultimate Guide to Skype
What to Know
- Anybody can share a PowerPoint on a Zoom call but may need permission from the call’s organizer.
- To see notes, you’ll need a second screen to divide the view or have your notes on a separate device.
In this article, we’ll discuss how to share a PowerPoint, or any presentation, on Zoom. You can do this in a few clicks for more straightforward presentations, but for more complex presentations, you may want some more tools.
How Do You Share a PowerPoint in a Zoom Meeting?
For a presentation where you don’t need to see your notes, sharing a PowerPoint is a quick process.
Open your presentation, and close any windows you won't need. This will limit clutter and distractions.
Log into your Zoom call and when you’re ready to present, click Share Screen at the bottom. Choose your presentation from the menu.
When using a single screen, you should always pick the specific program you want to share. Doing this will protect your data and prevent pop-ups and other interruptions.
Go to the Slide Show tab in PowerPoint and click From Beginning . For the smoothest presentation, do this before anyone else joins the call, where possible.
Use the controls in the lower left-hand corner or keyboard controls to move through your presentation as usual.
Be sure to click on the Presentation window if you’re going to use keyboard controls. PowerPoint won’t acknowledge inputs from the keyboard unless you’ve deliberately clicked on the window.
How Do You Share a PowerPoint With Zoom and Still See Notes?
The best way to see your notes is to use a second monitor and PowerPoint’s Presenter View tools. Then your notes and controls are on one screen, visible only to you, and your presentation is on the other.
Open your PowerPoint and go to Presenter View to see your notes . This mode opens two windows: The presentation and the control panel.
Drag the control panel to your primary screen and the presentation window to your second screen. You’ll be able to see and control your presentation while looking directly into your webcam if you’re using it, and you won’t have to hold your neck at an angle to use the controls.
Log into the Zoom call and click Share Screen at the bottom. Choose your presentation window.
If you’ll need to present other documents or materials in addition to your presentation, have them open and minimized on your screen and share your second monitor instead. Then you can quickly bring those materials up without disrupting your flow.
Tips for a Better Zoom Presentation
If you're not the call organizer, contact them and ask what permissions they've set up and whether you'll need permission to share your screen.
For meetings with multiple people sharing the same presentation, book a call a day before and practice "handing off" control of the slides in Zoom. Alternately, the person sharing their screen should prepare to move to the next slide when cued. Everyone should also have an up-to-date copy of the presentation, so it can continue if somebody drops out of the meeting.
Keeping Murphy's Law in mind, having your notes in one or two other places is a good idea. Consider using your phone and a printed copy to ensure that you can rely on one of the two additional sources for your notes if everything goes wrong.
To record yourself giving a PowerPoint presentation on Zoom, launch Zoom and PowerPoint; be sure to close all other applications. Create a new Zoom meeting, select Share Screen , select your PowerPoint presentation, and click Share . Launch your PowerPoint slideshow. In Zoom, choose Record > Record on This Computer . Your computer is now recording.
Join the Zoom meeting from your iPad using Zoom's mobile app for iOS. Open your PowerPoint presentation and tap Share Content from the meeting controls. You can use PowerPoint's annotation and drawing tools to make notations on your slides if you like.
Get the Latest Tech News Delivered Every Day
- Google Meet Screen Sharing Not Working? How to Fix the Problem
- How to Fix It When a Zoom Camera Is Not Working
- How to Share a Screen on Zoom
- How to Use Speaker Notes in PowerPoint
- How to Create a Microsoft Sway Presentation
- How to Share Audio on Zoom
- How to Share Screen on Zoom on an iPad
- How to Share a Screen on Google Meet
- How to Hide and Unhide a Slide in PowerPoint
- How to Screen Share on Discord
- How to Share Your Screen on Microsoft Teams
- How to Add Animation to PowerPoint
- How to Cast a Zoom Meeting to Your TV
- How to Make Someone a Presenter on Skype
- An Introduction to PowerPoint
- How to Screen Share on a Mac
How to video record yourself presenting a PowerPoint

What type of content do you primarily create?
Recording yourself presenting a PowerPoint can be challenging, especially getting the technical aspects right. You need to capture your screen, webcam, and audio seamlessly while delivering your content naturally and avoiding awkward transitions between slides.
Finding a tool that integrates all these components can seem daunting. However, recording yourself presenting a PowerPoint doesn't have to be reserved for the tech-savvy or professional speakers.
Whether you're a teacher creating online lessons, a marketer producing a product demo, or someone looking to improve their presentation skills, this guide will walk you through user-friendly tools and strategies that will teach you how to video record yourself presenting a PowerPoint.
- Recording yourself presenting a PowerPoint can be challenging, but it doesn't have to be reserved for experts.
- Video recording offers unlimited reach, repurposing opportunities, and a more engaging experience.
- Use PowerPoint's built-in recording feature or tools like Descript for a polished presentation.
- Other tools like Zoom, Loom, OBS Studio, Clipchamp, and Quick Time Player can also be used for recording.
- Tips include practicing your script, using slide notes, ensuring high-quality audio and lighting, and incorporating storytelling techniques.
Why video record yourself presenting a PowerPoint?
Video recording your PowerPoint presentations offers several advantages:
- Unlimited reach : Unlike in-person presentations confined to a specific time and location, recorded videos allow your message to reach audiences globally at their convenience.
- Repurposing opportunities: Recorded presentations can be repurposed as evergreen content across multiple platforms, such as social media, online courses, webinars, and internal training materials, maximizing their value.
- Personal and engaging : Recording yourself narrating a presentation adds a personal touch and dynamic element that static slides alone cannot replicate. Your viewers can see and hear you deliver the content, creating a more immersive and engaging experience.
How to record your presentation with the PowerPoint app
Built-in recording feature in powerpoint.
1. Open the PowerPoint slide you want to record.
2. Click on the Record tab of the top toolbar.
3. Click on the Record button and choose from any of the following options:
- From Current Slide
- From Beginning
4. You'll see the PowerPoint screen recording window.
5. Select the microphone and camera from the icon on the top-right.
6. Click the Stop and Replay buttons to end or replay your recording.
7. To export your presentation's recording, click Export to Video within the Recording tab.
Benefits : Easy to use, no external tools needed
Limitations : Limited editing capabilities.
How to make a more polished recording of your presentation with Descript
While PowerPoint's built-in recording features are helpful, they may not produce the refined result you want for your presentation. That's where Descript comes in handy.
It’s a whole production studio at your fingertips, with video recording, transcription, and editing capabilities, ready to transform dull PowerPoint slides into an engaging experience for your audience. Descript also has a built-in screen recorder.
You can use Descript on Windows, Mac, or even straight from your web browser.
Here's step-by-step guide to recording your PowerPoint presentation with Descript.
Set up your screen recording
1. Install and open Descript. At the top of the editor, click and open the Record panel.
2. Select Screen.
3. Set Recorder settings:
Adjust the default recording settings to your liking, including the transcription language, the maximum recording resolution, and more.
4. Set recording options. Choose which audio and video sources to record (e.g., microphone, computer audio, camera). Remember to turn the camera on to capture your talking head video alongside your PowerPoint presentation.
5. Click the Additional Settings icon for
- Studio Sound (Optional): Enhance audio quality with noise reduction and background removal
- Transcription (Optional): Enable automatic transcription for easier editing
- Recording separate audio tracks
6. Add (optional) Speaker labels for each audio track (e.g., "Narrator," "Expert") by typing them in the text box next to your audio inputs.
Capture your screen recording
1. Select the right recording option:
- Recording into script : Choose this if you haven’t recorded anything yet.
- Replace selection : Choose this if you already have a script and want to replace a specific section with a new recording.
- Record new layer : Pick this for recording your video as a new layer on top of an existing recording.
2. Click Record at the bottom of the Record panel.
3. Drag over the area of your screen you wish to record. Click Start Recording. Press Space to start recording the full screen.
4. Click Stop to finish recording
Bonus: Descript creates separate tracks for camera, microphone, and computer audio. You can edit each track individually for more precise control.
- Do a short test recording to ensure everything is set up correctly.
- Set your recording to transibe for easier editing.
Editing and polishing your PowerPoint recording in Descript
Descript's AI video editing tool makes it a breeze to trim, cut, and splice your video footage, ensuring a seamless flow from start to finish. You can add smooth transitions and other visual effects to make your presentation pop.
Here’s a glimpse of how to edit and polish your PowerPoint recording in Descript:
Edit your recording like a doc
Did you make a mistake during a slide transition? No problem. Just delete those sections in the text transcript (created automatically by Descript) and the video will adjust to match.
Remove filler words
Sound smoother and more confident by easily removing filler words like "um" and "uh" from the transcript.
Fix voiceover mistakes by typing
Didn't nail your delivery on a specific slide? No need to start from scratch! Descript's Overdub feature lets you simply type in the correct narration and replace the audio on that slide with AI voice cloning.
Boost video quality and engagement :
- Crisp up audio quality by reducing background noise and room reverb with the AI-powered Studio Sound feature.
- Replace your background completely with the Green Screen Video Editor —look like you're presenting in a sleek studio or broadcasting from a beach.
- Enable Eye Contact simulation with AI, so it appears you're making direct eye contact with viewers, even if you’re looking or reading something off-camera.
Other ways to video record yourself presenting a PowerPoint
Use Zoom’s meeting recording feature to record yourself giving a PowerPoint presentation. Start a Zoom meeting with yourself, share your PowerPoint window, and enable recording
Loom is a handy screen recording tool that also offers a webcam overlay. Launch the Loom app or Chrome extension and set it to record your screen and webcam. Expect high-quality recordings but no advanced editing features. The free plan offers only five minutes of recording at a stretch.
3. OBS Studio
OBS Studio is a free, open-source screen recorder/streaming software with a steeper learning curve. It’s popular among advanced or tech-savvy users who need granular customization and control.
To record your presentation, add a "Screen Capture" source to capture your PowerPoint window and a "Video Capture Device" source for your webcam.
4. Clipchamp: Recording natively in Windows
You can use Microsoft’s Clipchamp , the built-in screen recorder and video editor for Windows, to simultaneously capture your computer screen, webcam, and audio for recording your PowerPoint presentation. It’s also available as a browser-based app. You can record up to 30 minutes on screen and webcam recordings.
Users can also adjust the screen and webcam recordings in the editing timeline separately.
5. Quick Time Player Recording natively in Mac
Use Mac’s Quick Time Player to record your PowerPoint presentation. It’s not as straightforward as the other options on this list, so here’s a quick guide to help you out:
- Launch Quick Time Player.
- Select File and go to New Movie Recording.
- You'll be recording your entire screen in addition to recording your face, so adjust the size and location of the recording window so that it's in a nonintrusive corner of your PowerPoint.
- Go to View and select Float on Top .
- Next, go to File and select New Screen Recording.
- On the menu that appears, select Record Selected Portion and drag a border around your PowerPoint and the webcam recording window.
- Press Record and start presenting.
- You can adjust the video quality and the audio source in the webcam recording window.
How to turn your PowerPoint presentation slides into a video
Did you know PowerPoint lets you save your presentation as a video, too?
Here's a breakdown of the two ways you can do so—keeping all the presentation elements (narration, animation, pointer movements, timings, and so on) intact in the presentation itself.
Save your PowerPoint presentation as a video
This creates a separate video file (MP4 or WMV) that anyone can play, even without PowerPoint.
Follow these steps:
- Save your presentation
- Go to File > Export > Create a Video
- Ultra HD (4K): Best for large screens (if you have Windows 10+)
- Full HD (1080p): Great for computers and TVs
- HD (720p): Good for streaming online or on DVDs
- Standard (480p): Smallest size, good for phones
4. Decide on narration
- If you haven't recorded yourself talking, choose "Don't Use Recorded Timings and Narrations" from the dropdown menu
- If you have a recording, choose "Use Recorded Timings and Narrations." You can also set how long each slide shows for (default is 5 seconds)
5. Click Create Video
6. Name your video, pick a folder to save it in, and choose a file type (MPEG-4 or Windows Media Video)
Creating the video might take a while, especially for longer presentations. You can even leave it running overnight. Once done, find your video in the chosen folder and double-click to play it.
Save your PowerPoint presentation as a slideshow
This saves your presentation as a special file (PPSX) that starts playing automatically on full screen when opened. It only works with PowerPoint.
Here’s how it works:
- Make sure your presentation is saved (regular PowerPoint file)
- Go to File > Save As .
- Pick a folder to save the slideshow in.
- Under Save as type, choose PowerPoint Show (*.ppsx) .
- Click Save .
Now when someone opens the file, it will automatically play the slideshow.
Pro tips for making better video PowerPoint presentations
Practice your script.
Recording a flawless PowerPoint video rarely happens in one take. The key is practice.
Record practice run-throughs and watch them back. Make notes on areas that need improvement or parts lacking clarity. The more you drill your script, the more confident and natural you'll sound in the final recording.
Take advantage of PowerPoint's built-in Speaker Coach . The feature shows you whether your pace is too fast or slow, your use of filler words like "um," and suggestions to improve your voice modulation.
Use slide notes for coherent delivery
Wouldn’t a personal teleprompter make presentations so much easier? That’s what slide notes are for.
Having your thoughts and talking points organized within your PowerPoint file lets you have all crucial information and prompts readily available when recording.
Go ahead and add detailed notes or even a full script for each slide. This will help you stay on track and provide a handy transcript reference if you need to do any editing or voiceover work in post-production.
Use high-quality audio equipment or turn on Studio Sound
Poor audio recording quality is a surefire way to make even the most visually polished video feel amateurish. Do your presentation justice by investing in a decent external or Bluetooth microphone and audio interface to capture clear voiceover audio.
If you must use a built-in mic, record in a quiet environment to minimize background noise pickup. Or better yet, pair up with an AI-powered audio enhancement tool like Descript's Studio Sound , which reduces background noise , reverb, and other artifacts.
Ensure a clean background and even lighting
Ditch cluttered backgrounds. You want people to focus on the content of your PowerPoint and not be distracted by the funny shapes and colors in your video.
Your video lighting and framing matters, too. Position yourself facing a natural light source or bring supplemental video lighting to eliminate weird shadows and squinting-level glare.
Look directly into the camera or turn on Eye Contact
Looking directly into the camera is essential to create a sense of connection with the audience. Position your webcam or camera at eye level and imagine you're talking to a friend. If you're using Descript, enable the Eye Contact feature to auto-adjust your gaze towards the camera.
- Dress professionally and maintain a good posture to project confidence and authority.
- Use visuals, animations, and multimedia elements to enhance your presentation and keep your audience engaged.
- Consider adding closed captions or subtitles to your video for better accessibility and engagement, especially for those watching without sound.
- Speak clearly and at a moderate pace, using vocal variety to emphasize key points and maintain interest.
- Incorporate storytelling techniques, real-life examples, or personal anecdotes to make your video presentation more relatable and memorable .
Take your PowerPoint presentations from amateur to amazing
Recording yourself virtually presenting a PowerPoint allows you to distribute your message using the most engaging type of content: video. And there are many screen recording tools out there that can capture your screen and web camera footage with just a few clicks.
But how do you stand out?
By focusing on the presentation's depth, your delivery, and the video's quality. The first two are the bare minimum to communicate your message effectively.
But the right screen capture software and all-in-one video creation tool like Descript can help you with third. Use the tool to improve the quality of your recorded PPT presentations.
With Descript, it's easier than ever to record your screen, polish up the audio, and create stunning visuals all in one place. So why wait?
Sign up for Descript today and simplify your workflow while creating a PowerPoint presentation video that sticks with your audience in the long term.
How do you make a presentation video with your face?
To create a presentation video with your face, follow these steps:
- Open your presentation in PowerPoint.
- Go to the Slide Show tab.
- Click on Record and choose From Current Slide or From Beginning .
- Choose your microphone and camera by clicking on a sound icon on the top-right.
- Start recording by clicking on the record button.
- Speak into your microphone to narrate the presentation.
- Your webcam will capture your face during the recording.
- Click Stop when you finish recording.
- Export your recorded presentation by clicking on File> Export>Create a video.
How do you present yourself in PowerPoint?
To present yourself effectively in PowerPoint, follow these steps:
- Determine the key information to include in your presentation.
- Design and prepare your PowerPoint slides with a cohesive theme.
- Craft a compelling introduction to engage your audience.
- Tailor your presentation to different time constraints for flexibility.
- Capture the audience's attention before you begin speaking.
Related articles

Featured articles:
10 excellent Loom alternatives to record your screen
Looking for the best ways to record your screen without Loom? Find out 10 Loom alternatives, their features, and pricing.

How to record a YouTube video: A guide for all devices
If you want to record a YouTube video for personal use or fair-use repurposing, here are the steps to get started.

For Business
Social media video marketing: Everything you need to know
Learn how to win over potential customers (and the algorithms) with the right social media video marketing tools, strategy, and optimizations.

How to record a podcast on Zoom: A beginner’s guide
Follow this step-by-step guide on how to record a podcast on Zoom, then learn about why it may not be your best recording option.

How to record a Microsoft Teams meeting: 5 easy ways
Learn how to record a Microsoft Teams meeting on any device and get answers to common problems.

10 effective how-to videos to engage your audience
How-to videos are a great way to educate your audience. Whether you’re recording a software demo or training instructions, here’s how to create a how-to video.

Articles you might find interesting
10 proven ways to make money on TikTok in 2024
From built-in funds offered by the platform to other creative techniques, learn more about how to monetize TikTok and grow your following.

The 15 most popular podcasts right now
Explore the most popular podcasts of the moment. Discover trending topics and captivating hosts to find your next favorite podcast.

Product Updates
Descript now supports remote recording in 4K
Your podcast and video recordings are about to get stunningly, beautifully clear: SquadCast by Descript now supports 4K video recording. Paid Descript subscribers can now record in crystal-clear 4K quality.

Social media content creation: A 2024 guide
Want to build up your brand’s social media presence? Learn how to create a social media content creation strategy that will engage and entertain your audience.
New in Descript: Um detection, search, and more
Descript 3.1 is now available. Here’s what’s new:

42 million minutes: what millions of Descript creators did in 2023
What more than millions of Descript creators did in 2023.
Join millions of creators who already have a head start.
Get free recording and editing tips, and resources delivered to your inbox.
Related articles:
Share this article

Use zoom for PowerPoint to bring your presentation to life
If you would like to make your presentations more dynamic and exciting, try using zoom for PowerPoint .

To add a zoom, go to Insert > Zoom .
To summarize the entire presentation on one slide, choose Summary Zoom
To show selected slides only, choose Slide Zoom
To show a single section only, choose Section Zoom

When you create a zoom in PowerPoint, you can jump to and from specific slides, sections, and portions of your presentation in an order you decide while you're presenting.
Note: See the Requirements table below regarding which versions of PowerPoint support the features described in this article.
Summary zoom
A summary zoom is like a landing page where you can see the pieces of your presentation all at once. When you're presenting, you can use the zoom to go from one place in your presentation to another in any order you like. You can get creative, skip ahead, or revisit pieces of your slide show without interrupting the flow of your presentation.
Create a summary zoom
Go to Insert > Zoom .

Select Summary Zoom .
The Insert Summary Zoom dialog box opens.
Select slides you want to include in your summary zoom. These become the first slides of your summary zoom sections . To learn more about using sections in PowerPoint, see Organize your PowerPoint slides into sections .

If you already have sections in your presentation, the first slide of each section is preselected by default. If you don't want to include certain sections in your zoom, deselect them. Then, if you want PowerPoint to get rid of any sections you didn't include in your summary zoom, clear the check box next to Keep unused sections in your presentation . Don't worry—the slides in the sections you're discarding will still be part of your presentation.

Once you've selected all the slides you want to use for your summary zoom, select Insert . Your summary zoom is created, and it appears as a new slide just before the first slide you included in your summary zoom.

Add or remove sections from your summary zoom
Once you've created a summary zoom, you might still want to add or remove sections of your presentation. If you've made changes since first making your summary zoom that you want to capture, you don't have to start from scratch—just update your summary zoom.
Select your zoom, and then select the Format tab on the ribbon.

Select Edit Summary , choose the sections you want to have in your summary zoom, and then select Update .
Note: You won't be able to add or remove sections from your presentation in this view, just from your summary zoom.
A slide zoom can help you make your presentation more dynamic, allowing you to navigate freely between slides in any order you choose without interrupting the flow of your presentation. They're a good option for shorter presentations without lots of sections, but you can use slide zooms for lots of different presentation scenarios.
Slide zooms help you drill down into multiple pieces of information while feeling as though you're staying on the same canvas.
Create a slide zoom
Select Slide Zoom .
The Slide Zoom dialog box opens. Select the slides you want to use in your slide zoom.
Once you've selected all the slides you want to use, select Insert .
An item for each slide you selected in step 3 is added to the slide. Select each item in turn and drag to arrange them on the slide.
Tip: If you want to, you can create a slide zoom quickly by simply selecting the slide you want from the thumbnail pane and dragging it onto the slide you'd like to have your slide zoom on. This way, you can create slide zooms and change them quickly, and arrange them however you like simply by clicking and dragging.
Change the preview image of your slide zoom
Your slide zoom by default will be a preview thumbnail image of the slide, but you can choose a new image from your PC or the web to represent the section or slide you'll be going to.

Select Change Image to choose a new picture from the web or your PC to use instead of the thumbnail.

Choose or search the web for the image you want. When you've selected the image you want, select Insert .

You can also choose various looks for your zooms from Zoom Styles —you can change the border, add visual effects, or pick from any of the border and effect combinations in the gallery.

Section zoom
A section zoom is a link to a section already in your presentation. You can use them to go back to sections you want to really emphasize, or to highlight how certain pieces of your presentation connect. To learn more about using sections in PowerPoint, see Organize your PowerPoint slides into sections .
Create a section zoom
Select Section Zoom .
Select the section you want to use as a section zoom.
Select Insert . Your section zoom will be created.
Tip: If you want to, you can create a section zoom quickly by simply selecting the section name you want in the thumbnail pane and dragging it onto the slide you'd like to have a section zoom on.
Change the preview image of your section zoom
Your section zoom by default will be a preview thumbnail image of the slide, but you can choose a new image from your PC or the web to represent the section or slide you'll be going to.
More zoom options
Zoom for PowerPoint truly lights up when you make it your own. Select the Format tab of the ribbon to get to the Zoom Tools , which you can choose to create just the look and feel you're going for when you present.
Choose to return to the home page or continue through your presentation
If you want to return to the zoom slide after viewing sections or slides in your summary, slide, or section zoom, make sure the Return to Zoom check box is selected. If you want to move on to the next slide after viewing part of your zoom, uncheck it.
(If you're working with a summary zoom or a section zoom, you'll return to the zoom slide by default when you're presenting after going to the section. If you're using a slide zoom, you'll move on to the next slide by default after viewing your slide zoom.)
Make the background of your zoom transparent
Another way you can change the look of your zoom is by choosing to adopt the background of the slide where your zoom lives to make the zoom almost indistinguishable from the main canvas while you present. Select Zoom Background to make your summary, section, or slide zooms blend in to their home slide.
In the Zoom Styles group, select Zoom Background . The zoom will adopt the background of the home slide.
Change the transition options of your zoom
By default, your zooms will use the zoom transition when you present, which is what helps make the zooms feel so lively. However, if you don't want to use the zoom transition, or if you want to change the duration of the transition, you can do so.
In the Zoom Options group, make sure the box next to Zoom Transition is checked if you want to use the zoom transition when presenting your zoom.
If you don't want to use the zoom transition when presenting, uncheck the box next to Zoom Transition .
To change the timing of the zoom transition, use the up and down arrows next to the Duration indicator to change how long the zoom transition lasts.
Requirements
See the following table for details on the minimum version numbers required in PowerPoint to create or play zoom links.

Need more help?
Want more options.
Explore subscription benefits, browse training courses, learn how to secure your device, and more.

Microsoft 365 subscription benefits

Microsoft 365 training

Microsoft security

Accessibility center
Communities help you ask and answer questions, give feedback, and hear from experts with rich knowledge.

Ask the Microsoft Community

Microsoft Tech Community

Windows Insiders
Microsoft 365 Insiders
Was this information helpful?
Thank you for your feedback.
How-To Geek
How to zoom in and out on part of a powerpoint presentation.
Magnify parts of your presentation by taking advantage of PowerPoint's different zoom features.
Microsoft PowerPoint lets you zoom in and out on a specific part of your PowerPoint slideshow, which can be handy both while editing and for drawing attention to important objects or ideas during the presentation. Here’s how to do it.
Whether you’re in normal view or slideshow view, PowerPoint lets you zoom in and out as the need arises. There are a few ways you can do this, depending on which view you're in.
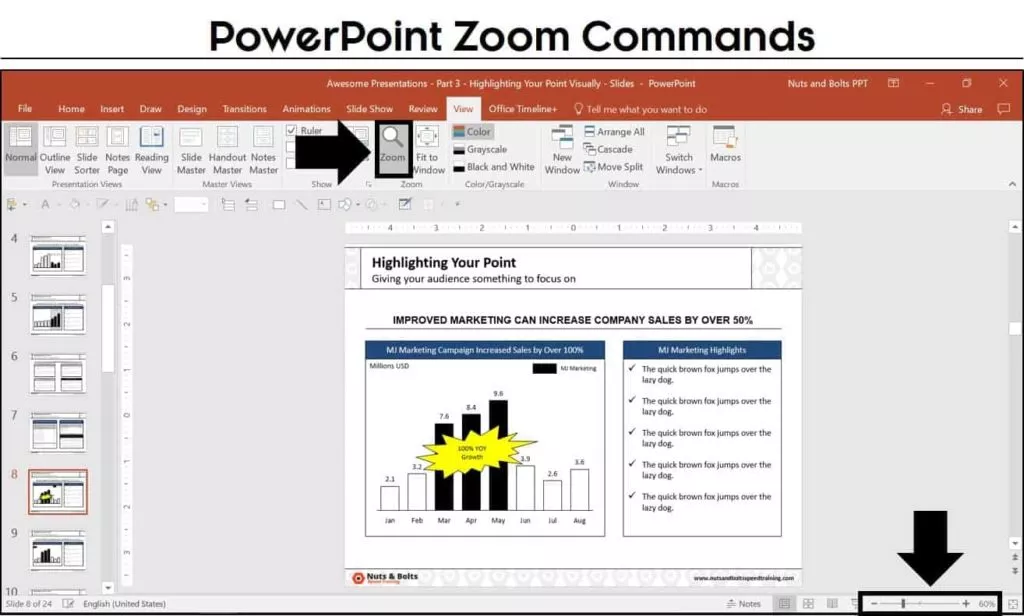
The first method is by using the zoom bar at the bottom-right of the window (which isn’t available in the slideshow view). This method is convenient as the zoom bar is immediately accessible. To use the zoom bar, click and drag the bar left or right to zoom out or in, respectively. You can also resize the slide to fit your current window by clicking the box to the right of the zoom bar.
Another method is using the “Zoom” tool, found on the “View” tab.
In the “Zoom” window, you can select a zoom percentage from the list of available options or enter a precise percentage into the “Percent” box. Once ready, click “OK,” and your slide will zoom to the selected amount.
Those two methods are great for when you're editing and need to take a closer look at something. But if you’re in the middle of giving your presentation and want to zoom in on a specific part for emphasis, you can do that too.
Select the magnifying glass from the presenter view and then click the part of the slide you want to zoom. Once zoomed in, you can click and drag to move the slide around. When you’re finished, click the magnifying glass again to zoom back out.
One last tip: In both normal and slideshow view, you can hold the Ctrl key while scrolling your mouse wheel to zoom in and out. This also works if you want to resize your slide thumbnails .
That’s all there is to it!
Critical PowerPoint Shortcuts – Claim Your FREE Training Module and Get Your Time Back!
How to zoom in on PowerPoint slides (3 different techniques)
- PowerPoint Tutorials
- Shortcuts & Hacks
- December 27, 2017
How do you zoom in on something in PowerPoint without PowerPoint first centering in on your slide?
This was a great question we got from subscriber Derek (thanks Derek!).
And it’s not so intuitive…
For example, let’s say you want to zoom in on a specific icon or two to edit them, like in the picture below. How do you do it without scrolling around, driving yourself crazy?

In this tutorial, you’ll learn 3 different ways to zoom in PowerPoint, plus a few sneaky places you might never have thought of zooming in PowerPoint before.
Looking for the NEW Zoom Transition?
If you want to learn all about the brand new Zoom Transition in PowerPoint that was added in 2016, see our other guide here .
The problem with the standard PowerPoint zoom
The problem with the standard PowerPoint zoom, is that PowerPoint automatically goes to the center of your slide as you zoom in.
The center zoom is great if the object that you want to edit is in the center of your slide, but if it’s not, that means you have to use the scroll bars to find what you are looking for.
The problem with the scroll bars is that they are hard to control, often jumping you over to the next slide as you try to find the object that you want to edit.
So instead of making your life easier (which is what they were designed to do), they make it harder.
3 Ways to Zoom in on an Object
There are three different ways you can zoom in on a PowerPoint slide:
- The View tab Zoom command (zoom dialog box)
- The Zoom slider at the bottom of the screen
- The CTRL + mouse spin wheel shortcut (my personal favorite because it’s universal, as you’ll see in a second)
If you are looking for the new zoom transition, you can learn more about what that is on the Microsoft blog here .
Pro Tip: Use the ‘Fit to Window’ tools
After zooming in on something in PowerPoint, you can quickly refit your PowerPoint window in one of two ways:
- ‘Fit slide to current window’ in the lower right-hand corner your screen
- ‘Fit to Window’ in the View tab

Zoom in on a Picture in PowerPoint
To zoom in a on a specific picture (or object) in PowerPoint, all you need to do is first select the object before you zoom. Once you select an object, any of the 3 zoom methods described above will zoom you specifically in on the object:
- The zoom dialog box
- The zoom slider
- Using CTRL plus your mouse spin wheel
This zoom trick works on anything that you can select in PowerPoint, including zooming in on a table, zooming in on a chart, zooming in on a text box, etc.
Note: If you are trying to zoom in on a picture to show a specific part of it, you can also just crop your picture down to the desired piece.
To learn all about how to crop pictures in PowerPoint, read our step-by-step guide here .
If you have multiple objects that you want to zoom into and edit in PowerPoint, the fastest way to do that is to:
- Select and zoom in on your first object
- Edit or format your first object
- Hit Fit Slide to Current Window
- Select and zoom in on your second object
- Edit or format your second object
If you have more than two objects, you can continue zooming in and out of your slide in this way to make all of your adjustments.
PowerPoint Thumbnail Zoom
Besides zooming in on a slide while editing it, you can also use the CTRL + mouse spin wheel shortcut to zoom in on the thumbnail images of your PowerPoint slides on the left.

Zooming in on the thumbnail images allows you to control how much of your presentation you see, and how much slide editing space you give yourself on the right.
Zooming in allows you to get a big thumbnail image of each of the preceding and following slides, while zooming out gives you an idea of how many slides are in your presentation.
Slide Sorter View Zoom
Another place you can zoom in PowerPoint to see the overall flow of your presentation, is Slide Sorter View. To open the Slide Sorter View, simply click the slide Sorter command at the bottom of your screen.

All three zoom methods work in the Slide Sorter View:
Zooming in and out of the Slide Sorter View is useful when you want to see the overall flow of your slides within your presentation at varying levels of detail.
Slide Show View zoom
Two other places you can zoom in PowerPoint are the Slide Show Mode (F5) and Presenter View (SHIFT + F5) of your presentation. To see these PowerPoint shortcuts in action, check out the video below.
Start Slide Show PowerPoint Shortcuts
There are four keyboard shortcuts for starting slide show in PowerPoint:
Once you are in one of the presentation views of your slides, you can zoom in or zoom out by either using the CTRL + mouse spin wheel shortcut (if you have a mouse), or you can use the keyboard shortcuts listed below.
- Zooming in allows you to focus on a specific section of your slide (focusing your audience’s attention on that section).
- Zooming out allows you to see all the slides in your presentation as thumbnails.

This is often an easier way to navigate the slides in your presentation if someone wants to go back and see something, rather than trying to remember where it was in your presentation.
Knowing how to properly zoom in and out of the objects you want to edit in PowerPoint will save you a ton of time.
The key to remember is that PowerPoint will use the object you have selected as the focal point of your zoom.
If you enjoyed this tutorial and want to learn more about our other PowerPoint tutorials and free resources, visit us here .
What’s next?
Related articles, about the author.

Popular Tutorials
- How to Strikethrough Text (l̶i̶k̶e̶ ̶t̶h̶i̶s̶) in Word, Excel & PowerPoint
- How to Make Animated Fireworks in PowerPoint (Step-by-Step)
- Strikethrough Shortcut (l̶i̶k̶e̶ ̶t̶h̶i̶s̶) for Word, Excel & PowerPoint
- How to Create a Flash Card Memory Game in PowerPoint (Like Jeopardy)
- Keyboard Shortcuts Not Working: Solved
PowerPoint Tutorial Categories
- Strategies & Opinions
- Presentation Design
- Pictures, Icons, Videos, Etc.
- New Features
- Miscellaneous
- Charts & Data Viz
We help busy professionals save hours and gain peace of mind, with corporate workshops, self-paced courses and tutorials for PowerPoint and Word.
Work With Us
- Corporate Training
- Presentation & Template Design
- Courses & Downloads
- PowerPoint Articles
- Word Articles
- Productivity Resources
Find a Tutorial
- Free Training
- For Businesses
We help busy office workers save hours and gain peace of mind, with tips, training and tutorials for Microsoft PowerPoint and Word.
Master Critical PowerPoint Shortcuts – Secure Your FREE Training Module and Save Valuable Time!
⌛ Master time-saving expert techniques.
🔥 Create powerful presentations.
🚀 Propel your career to new heights.
We value your privacy – we keep your info safe.
Discover PowerPoint Hacks Loved by Industry Giants - KKR, AmEx, HSBC!
Over 114,880 professionals in finance, marketing and sales have revolutionized their PPT skills with our proven methods.
Gain FREE access to a full module of our premium PowerPoint training program – Get started today!
We hate spam too and promise to keep your information safe.
You are currently viewing a placeholder content from Facebook . To access the actual content, click the button below. Please note that doing so will share data with third-party providers.
Zoom Feature in PowerPoint – How to Use it Correctly!
By: Author Shrot Katewa

It is hard to accept but even the most seasoned PowerPoint users find it hard to create a table of contents that is visually modern-looking and interactive! The “ Zoom ” feature can help not only with the table of contents but much more than that!
The zoom feature in PowerPoint helps create visual links between sections of your presentation. It makes the presentation interactive by adding a clickable thumbnail of a slide or a section in your presentation and allowing you to easily navigate within your presentation with cool effects!
Even if you use PowerPoint regularly, chances are you aren’t fully aware of the “Zoom” feature in PowerPoint.
And, by now if you are thinking about zooming in on the slides using the functions provided at the bottom-right corner of PowerPoint, then you really need to go through this article as you might not be aware of one of the most awesome features in PowerPoint called “ Zoom “.
1. What is Zoom in PowerPoint?
Imagine if you could just click on an image on your slide and it just zooms into that image, opening the section of your presentation that provides more information about that image! The “Zoom” feature in PowerPoint, does exactly that!
The zoom feature in Microsoft PowerPoint is a new feature that makes your presentations interactive and dynamic. Using the zoom feature in PowerPoint, you can create a zoom slide from which you can jump to and from specific slides or sections in any order you may need during the presentation.
Let’s explore this feature by checking out some of the different types of “zoom” that you can add to your presentation –
1a. Summary Zoom
The “Summary Zoom” in Microsoft PowerPoint is a landing page where you can see the summarized slides within a page.
In the summary zoom, you can select which slides to show. You can even create summary slides to show on the summary zoom. During the presentation, you can click on any slide on the summary to proceed according to the need of the audience rather than the preset slide progression.
1b. Section Zoom
In Microsoft PowerPoint, “Section Zoom” is a slide that contains the preview and the link to the sections within the presentation.
You can click on them to jump from one section to another to highlight the important parts of your presentation.
1c. Slide Zoom
The “Slide Zoom” feature in PowerPoint allows you to navigate freely through the slides in a presentation. In the slide zoom, you can add all the slides or a few selected slides.
From this section, you can move freely between slides, emphasize the important slides, and even cut the presentation short without seeming so to the audience.
2. How to Insert Slide Zoom in Microsoft PowerPoint?
To use the “Zoom” feature in PowerPoint, first, click on the “Insert” tab. Then, click on the “Zoom” button from the ribbon. Choose the type of zoom from “Summary”, “Section”, and “Slide” zoom. Next, select the slides from the window that pops up by holding the “Ctrl” key, and click on “Insert”.
Here’s a step-by-step process with visual aids on what you need to do –
Step-1: Click on the “Insert” tab
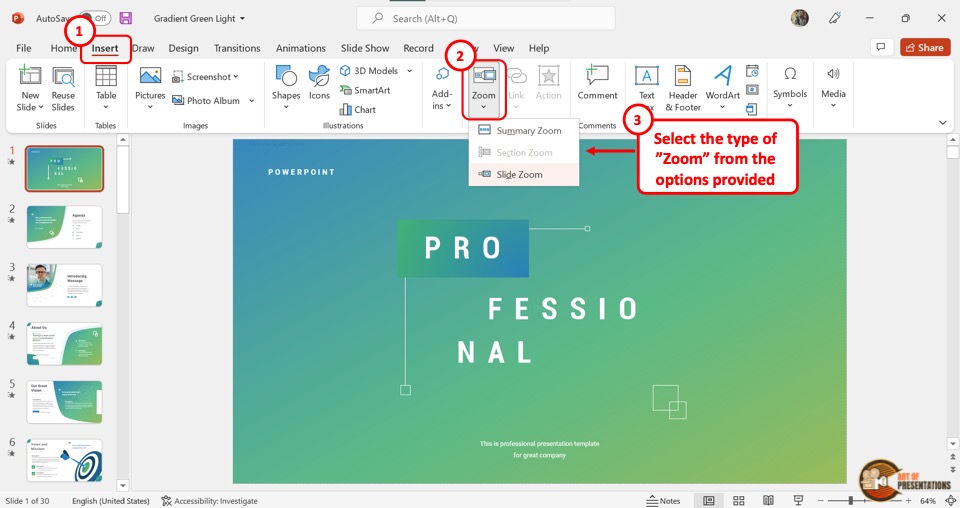
The first step is to open the “Insert” menu. Click on the “Insert” tab which is located in the menu ribbon at the top of the screen.
Step-2: Click on the “Zoom” button
In the “Links” section of the “Insert” menu, click on the “Zoom” button. This will open a dropdown menu. Click on the “Slide Zoom” option from the dropdown menu.
Step-3: Choose the Slide and Click on “Insert”
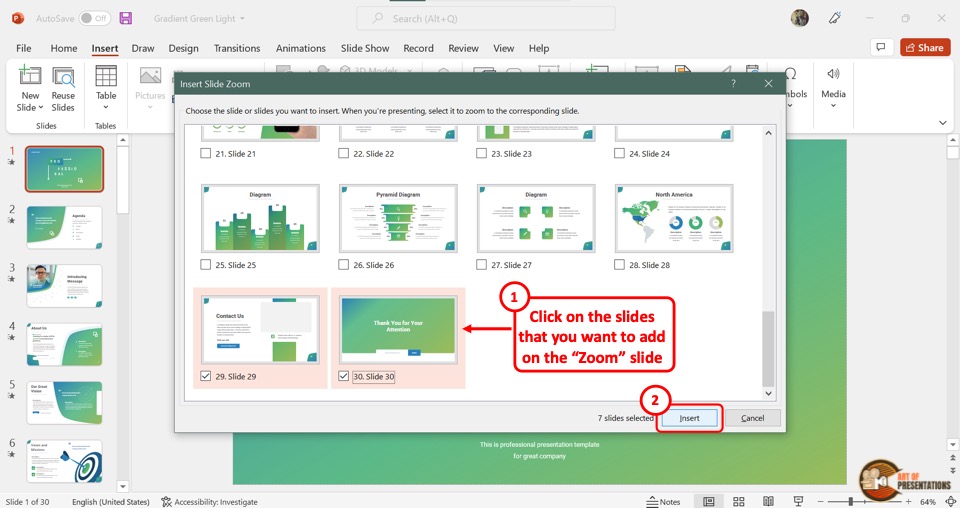
Clicking on the “Slide Zoom” option will open the “Insert Slide Zoom” dialog box.
Select the slides you want to include in the slide zoom and then click on the “Insert” button at the bottom of the dialog box. Now all you have to do is arrange the slides in the slide zoom according to your preference.
3. How to Edit Slide Zoom in PowerPoint?
Once you add the slide zoom to your presentation, you can easily edit it. To access the editing pane, all you have to do is click on the slide zoom. Then click on the “Zoom” tab in the menu ribbon.
3a. Change Borders in Slide Zoom
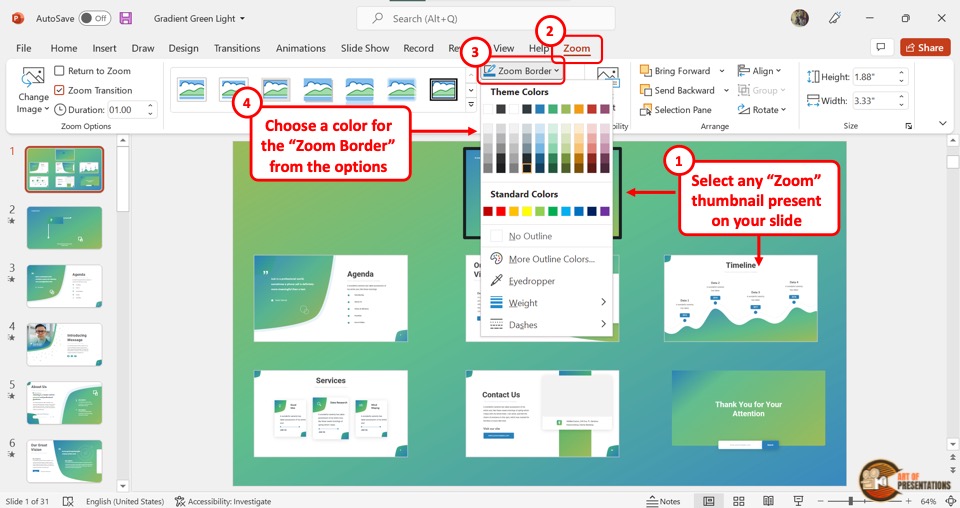
To add or change the border of the slides in slide zoom, click on the “Zoom Border” option. In the dropdown menu, you can click on your preferred color for the border.
You can also click on the “Weight” option and select the border width from the secondary menu. To change the border design, click on the “Dashes” option.
3b. Add Effects in Slide Zoom
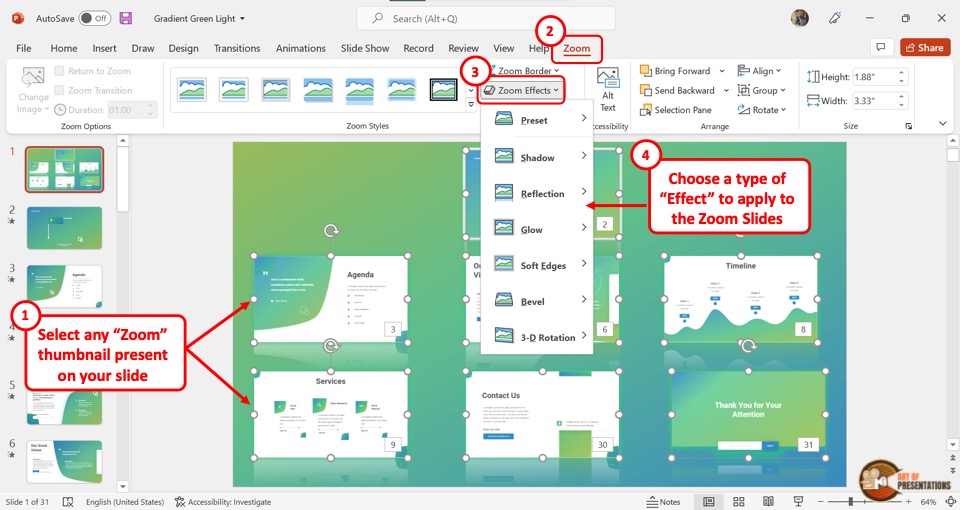
You can add various effects in the slide zoom. To do so, you have to first click on a single or multiple slides in the slide zooms where you want to add effects.
Then click on the “Zoom Effects” option. In the dropdown menu, you can click on any effect option to open a secondary pop-up menu. Click on your preferred effect. You can add multiple effects on a single zoom slide.
3c. Remove Background in Slide Zoom

In Microsoft PowerPoint slide zoom, you can remove the slide background of each slide in the slide zoom. Click on the “Zoom Background” option in the “Zoom Styles” section under the “Zoom” tab. This will remove the background of the selected slide.
4. How to Change Picture in Slide Zoom?
In Slide Zoom, the default thumbnail pictures are a screenshot of the slides. However, you can change the pictures if you want. All you have to do is follow the 4 easy steps.
Step-1: Click on the “Zoom” tab
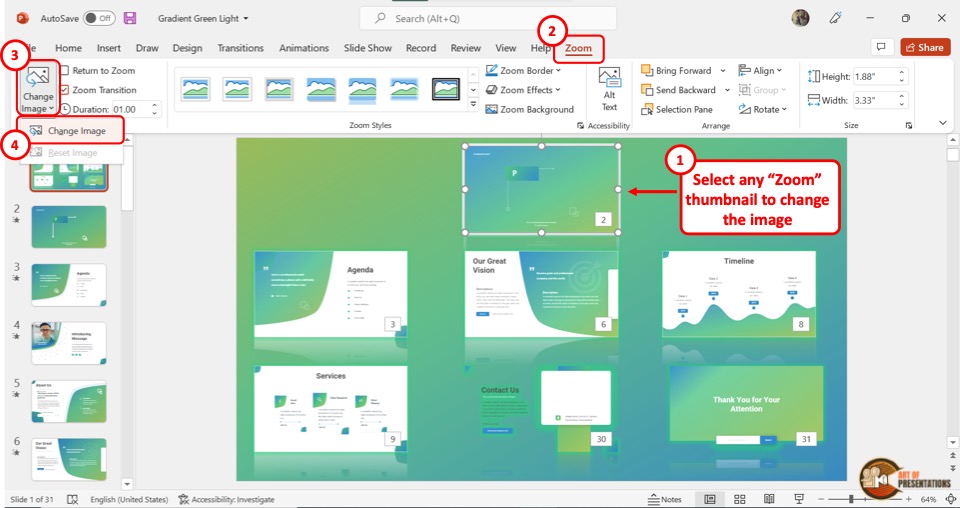
The first step is to click on the slide thumbnail that you want to change. Then click on the “Zoom” tab at which is the last tab in the menu ribbon.
Step-2: Click on the “Change Image” option
The second step is to click on the “Change Image” button which is the first option in the “Zoom Options” section of the “Zoom” menu (as shown in the image in step 1).
Then click on the “Change Image” option from the dropdown menu.
Step-3: Click on “From a File”
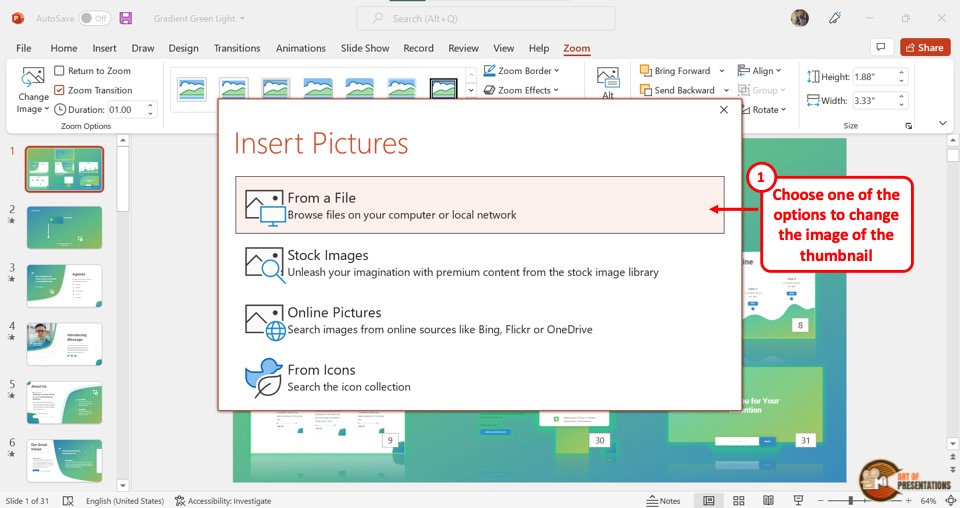
When you click on the “Change Image” option, it will open a dialog box. In the “Insert Pictures” dialog box, click on the “From a File” option. This will open another dialog box.
Step-4: Click on the “Insert” button
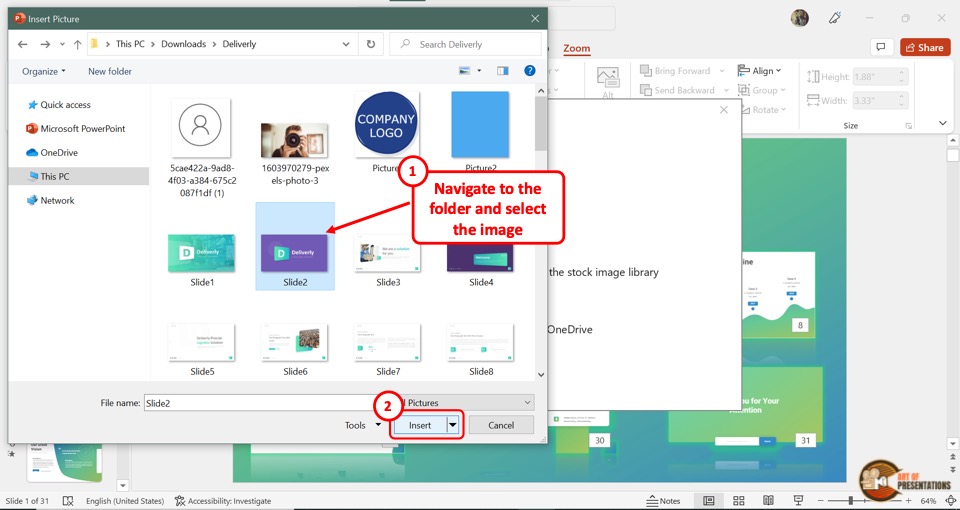
In the “Insert Picture” dialog box, click on the image which you want to add to the slide thumbnail in the slide zoom.
Then click on the “Insert” button at the bottom of the dialog box. In the slide zoom, the original thumbnail will be changed to the selected image.
4a. How to Reset Picture in Slide Zoom?
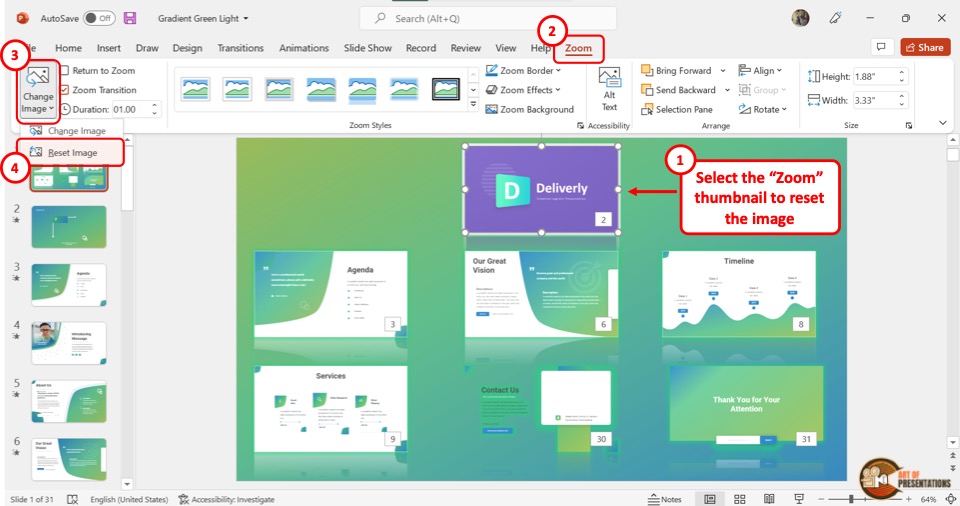
Once you change the picture of the slide thumbnail in the PowerPoint slide zoom, you can revert it to the original thumbnail.
All you have to do is click on the “Change Image” button in the “Zoom” menu. Then click on the “Reset Image” option from the dropdown menu.
5. How to Stop Slide Zoom?

In the Microsoft PowerPoint slide show, the presentation will return to the slide zoom, after each slide. To stop this, select the slide in the slide zoom and then click on the “Zoom” tab in the menu bar.
In the “Zoom” menu, click on the “Return to Zoom” option. The checkmark in the box next to it will disappear. This will stop the slides from returning to the slide zoom screen.
5a. How to Return to Slide Zoom?
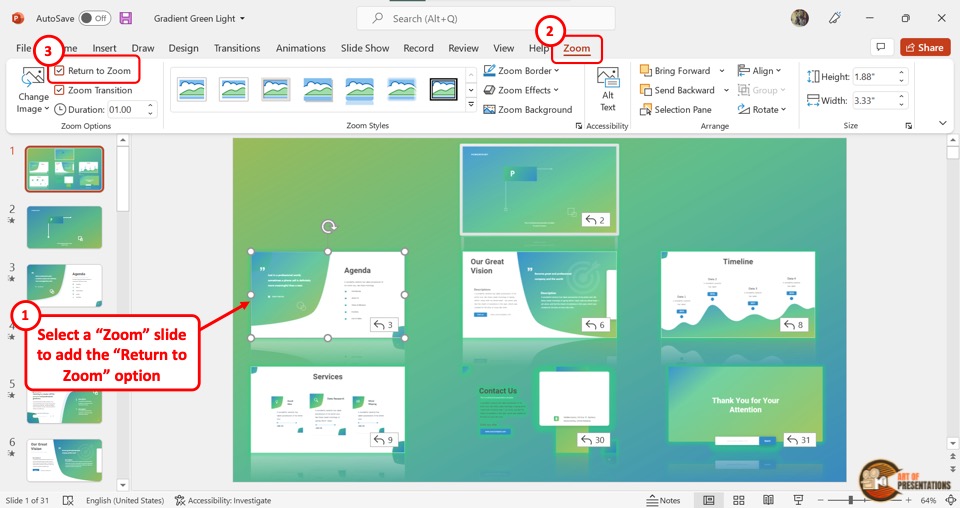
Once you stop the slide zoom on Microsoft PowerPoint, you can turn on the feature again. All you have to do is select the slide again and click on the “Zoom” tab. Then click on the box next to the “Return to Zoom” option.
The checkmark will appear again. Now the screen will return to the slide zoom after the selected slide during the presentation.
Credit to nakaridore (on Freepik) for the featured image of this article (further edited)
Now LIVE! Check out the NEW Zoom Feature Request space to browse, vote, or create an idea to enhance your Zoom experience.
Empowering you to increase productivity, improve team effectiveness, and enhance skills.
Communication
Productivity, apps & integration, employee engagement, business services, customer care, developer tools.
- Financial Services
- Manufacturing
- Small and Midsize businesses
- IT Professionals
- Customer Experience
- Sales and Revenue
- Marketing and Events
- Meeting SDK
- App Marketplace
- Developer Solutions
- Partner Solutions
- Find a Partner
- Become a Partner
- Partner Portal
- Partner Learning Center
- Resource Library
- Webinars & Events
- Customer Stories
- Zoom Trust Center
- Zoom Community
- Learning Center
- How-to Videos
- Global services
- Hardware options
- Customer Managed Key
- Customer Support
- Premier Support
- Developer Support
- Premier Developer Support
Download the Zoom app
Keep your Zoom app up to date to access the latest features.
Zoom Virtual Backgrounds
Download hi-res images and animations to elevate your next Zoom meeting.
- Plans & Pricing
- Join by Meeting ID
- Public Event List
- Screen Share Only
- With Video On
- With Video Off
AI Companion
- Phone System
- Mail & Calendar
- Marketplace
- Rooms and Workspaces
- Workspace Reservation
- Contact Center
- Virtual Agent
- Revenue Accelerator
- Events and Webinars
- Work Transformation Summit
- Customer Success Events
- Customer Success Forum
- Zoom Status
- Submit Feedback
- Community Terms and Guidelines
- Getting Started
- Community Center
- Happy Rewards
- Social Corner
- Community Champion Program
- Billing & Account Management
Power point share option missing
- Subscribe to RSS Feed
- Mark Topic as New
- Mark Topic as Read
- Float this Topic for Current User
- Printer Friendly Page
- Basic Screen Share Missing in Meetings 2024-05-23
- Share sound on an Android tablet in Meetings 2024-05-22
- Is there a way to conduct a whiteboard voting session anonymously? in Whiteboard 2024-05-22
- Recording meetings in Meetings 2024-05-22
- Mark as New
- Report Inappropriate Content
2024-05-27 07:01 PM
- Screen sharing
- screenshare
- All forum topics
- Previous Topic
IMAGES
VIDEO
COMMENTS
Switch back to Powerpoint and click the Slide Show tab. Begin the presentation by selecting the Play from Start or Play from Current Slide options. PowerPoint will display the slide show in a window. In Zoom, start or join a meeting. Click Share Screen in the meeting controls. Select the PowerPoint window and then click Share.
In this step-by-step tutorial, learn how to best present Microsoft PowerPoint slides in Zoom Video Conferencing.⌚ Timestamps0:00 Introduction1:19 Share entir...
At the bottom of the Zoom meeting window, click "Share Screen." If you're using a single monitor, you will immediately start sharing your screen. If you're using dual monitors, you'll need to click the screen that your presentation will be shared on. In our case, that will be "Screen 2." To begin sharing that screen, click "Share" at the bottom ...
In this article I am using the Zoom app in Windows 10. The six options are: Share your entire screen/desktop. Share the Slide Show window. Share the editing window with a clean look. Run the Slide Show in a window and share that window. Use Presenter View to show the audience your slides while you see Presenter View.
Join the Zoom meeting. When it's your turn to present, click the green Share Screen icon. Navigate to Window, select the PowerPoint window, and click Share . Ensure your PowerPoint window is maximized and running in the background, or it won't appear under the Window tab. Zoom automatically switches to the PowerPoint window with a mini ...
To record yourself giving a PowerPoint presentation on Zoom, launch Zoom and PowerPoint; be sure to close all other applications. Create a new Zoom meeting, select Share Screen, select your PowerPoint presentation, and click Share. Launch your PowerPoint slideshow. In Zoom, choose Record > Record on This Computer.
This video shows you how to share Powerpoint slides in Zoom, including dual-monitor scenarios and the new "Powerpoint as virtual background" feature. You can...
Start Presenter View Preview by pressing Alt+F5. In Zoom, share a portion of the screen from the Advanced sharing options. Make the current slide larger in Presenter View and adjust the sharing rectangle so you just share the current slide portion of the screen in Zoom. Deliver your presentation. Full detailed article.
The default when presenting a PowerPoint presentation on Zoom is to share your screen. But that is not your only option (and is often not the best option).Th...
Here's how to do that in Zoom. Note that these instructions are for folks wih just one screen. Zooming in Presenter View. To view in Presenter View while presenting in Zoom, you will need to: Click on Presenter View in the menu ribbon at the top of the screen. The presentation will look like this:
The methodology is split into two bits — one: PowerPoint and two: Zoom. First, open up Microsoft PowerPoint and pick the slide you want to share. Now, click on the 'Slide show' tab and hit 'Set Up Slide Show.'. Then, select 'Browsed by an individual (window)' under 'Show type.'. Hit 'Ok' to confirm.
In PowerPoint, select the Slide Show menu option. On the Slide Show ribbon, click on the Set Up Slide Show toolbar icon. In the upper left corner of the Set Up Show dialog box, click on the Presented by a speaker (full screen) radio button and then click on the OK button. Return to your Zoom meeting screen by clicking on the Zoom icon in either ...
This time, choose Desktop 1 or Desktop 2, depending on which screen you want to share on your Zoom presentation. In PowerPoint for macOS, start Presenter view from the Slide Show > Presenter View button. On Windows, make sure the Use Presenter View box is ticked on the Slide Show tab. Then start the presentation.
To begin a recording of a PowerPoint presentation, move your cursor over the menu bar in Zoom. It's the series of options and buttons at the bottom of the app's screen. First, make sure that your microphone isn't muted. This setting is controlled by the Mute button, found on the left side of the menu bar.
Step 2: Set up the PowerPoint Slide Show in a window. Set up your PowerPoint file to display the Slide Show in the window it is in instead of in full screen mode. PowerPoint refers to this as the "Browsed by an individual" mode or Reading View. To use this mode, on the Slide Show ribbon, click on the Set Up Slide Show button.
A presentation can really help you get your point across during a meeting, and thankfully, Zoom does offer support for displaying presentations while speakin...
Record new layer: Pick this for recording your video as a new layer on top of an existing recording. 2. Click Record at the bottom of the Record panel. 3. Drag over the area of your screen you wish to record. Click Start Recording. Press Space to start recording the full screen. 4. Click Stop to finish recording.
If you would like to make your presentations more dynamic and exciting, try using zoom for PowerPoint . To add a zoom, go to Insert > Zoom. To summarize the entire presentation on one slide, choose Summary Zoom. To show selected slides only, choose Slide Zoom. To show a single section only, choose Section Zoom.
Select the magnifying glass from the presenter view and then click the part of the slide you want to zoom. Once zoomed in, you can click and drag to move the slide around. When you're finished, click the magnifying glass again to zoom back out. One last tip: In both normal and slideshow view, you can hold the Ctrl key while scrolling your ...
Make sure the PowerPoint presentation is in Slide Show mode, which will show the slides only in the PowerPoint window. Then you can share your entire screen in Teams or Zoom. If you are sharing the screen in Zoom, make sure to check the option at the bottom of the sharing dialog box to Optimize Screen Sharing for Video Clip.
How to share your screen and media such as documents, images, web browsers, excel, pdf, word and PowerPoint presentations as part of a Zoom meeting.How do I ...
ALT + SHIFT + F5. Once you are in one of the presentation views of your slides, you can zoom in or zoom out by either using the CTRL + mouse spin wheel shortcut (if you have a mouse), or you can use the keyboard shortcuts listed below. Zoom in (Slide Show Mode) CTRL + =. Zoom out (Slide Show Mode) CTRL + -.
To use the "Zoom" feature in PowerPoint, first, click on the "Insert" tab. Then, click on the "Zoom" button from the ribbon. Choose the type of zoom from "Summary", "Section", and "Slide" zoom. Next, select the slides from the window that pops up by holding the "Ctrl" key, and click on "Insert". Here's a step ...
Darpan87. Observer. Options. 2024-05-27 07:01 PM. Whenever I switch my PowerPoint to presenter view, the share option disappears, leaving only the "entire screen" sharing option available. Topics: Screen sharing. PowerPoint. screenshare.
Zoom allows you to share different screens with your meeting participants. You can use PowerPoint to present slides in a clean visual format; however, how to...