
Slide Master in PowerPoint – A Complete Beginner’s Guide!
By: Author Shrot Katewa

When I first started using PowerPoint, I had no idea about the “Slide Master”. In fact, when I first learned about it, I was quite confused. I didn’t quite understand its purpose and how it worked. Furthermore, some of the changes I made to the slide master were scary at first simply because I didn’t understand how it worked!
Slide Master in PowerPoint allows you to have master control over all slides. It allows you to make changes to all slides at once. You can also use the slide master to create footers, add watermarks and slide numbers, generate custom presentation templates, edit placeholders, among other things.
Retrospectively thinking, having a “Slide Master” in PowerPoint is such an important feature! Knowing how to use the slide master properly can help you save a lot of time while creating a presentation!
So, in this article, I’ll share with you all the details you need to know about a Slide Master in PowerPoint. Without further adieu, let’s get started!
1. What is the Slide Master In PowerPoint and Why is it Used?
Slide Master is a Microsoft PowerPoint feature that allows you to easily edit all the slides at once or the individual slide layouts of a presentation.
1a. What is a Slide Master?
The slide master in Microsoft PowerPoint contains all the information on the slide layout as well as the theme of a presentation. This includes the fonts, color, effects, background, and the size and position of the placeholders.
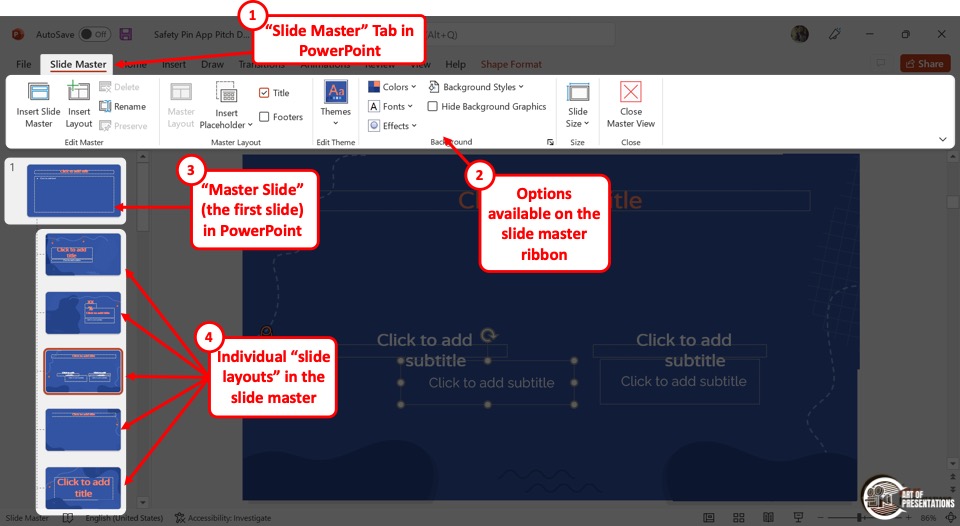
To access the slide master, first, click on the “View” tab in PowerPoint . Then, click on the “Slide Master” option. This will open the slide master view in PowerPoint.
The master slide is the top slide in a hierarchy of slides in a presentation (as shown in the image above). Changes that you make to the master slide impact all the slides in the slide master.
It is important to note that the actual design and content of the presentation must be added to the slides in the “Normal View”. Any images or content you add to the slide master will become uneditable in the normal view of the PowerPoint presentation.
The best way to use the slide master is by using “Placeholders”. I’ve written a detailed article on “Placeholders” in PowerPoint . Make sure to check out that article to learn more about them!
1b. Uses of Slide Master View in PowerPoint –
Since the slide master stores information about the theme and the layout of the slides in a PowerPoint presentation, you can use the “Slide Master” view to edit several elements in the presentation.
a. Change Slide Background
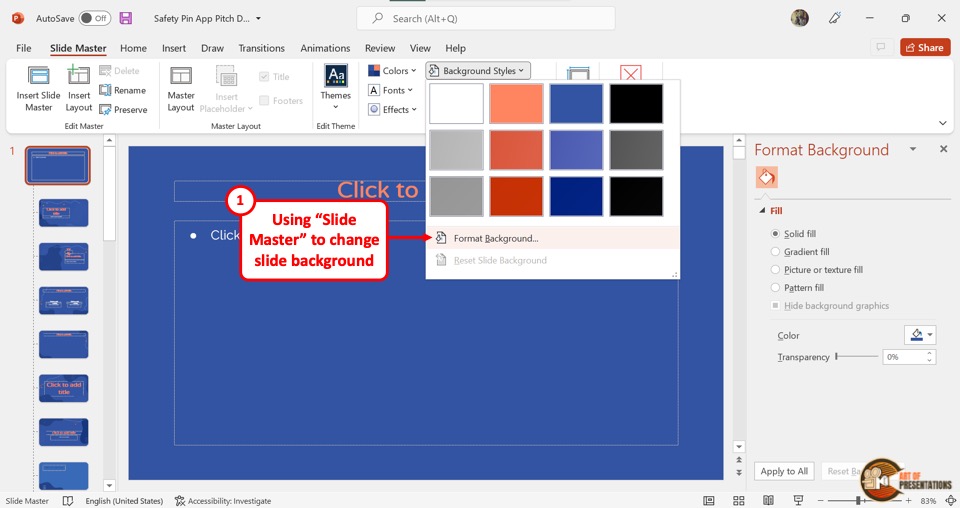
Using the “Slide Master” view, you can change the background of all the slides at once. The background editing features are available in the “Background” section of the “Slide Master” menu.
You can click on the “Colors” option to change the colors for the slides, the “Fonts” option to set a specific font for the presentation, and the “Effects” option for the background effects. Besides, you can click on the “Hide Background Graphics” option to remove all background graphics from the entire presentation.
Clicking on the “Format Background” option under the “Background Styles” button, you can access various customizable background colors and designs for the presentation.
b. Rearrange Placeholders in Slide Layout

In Microsoft PowerPoint “Slide Master” view, you can edit both the master slide and the slide layouts. By rearranging the placeholders in a slide layout, you will only create changes for the slides using that specific layout instead of the entire presentation.
To rearrange the placeholders, all you have to do is click on a placeholder and drag it to your preferred position on the slide.
c. Customize Overall Text Formatting
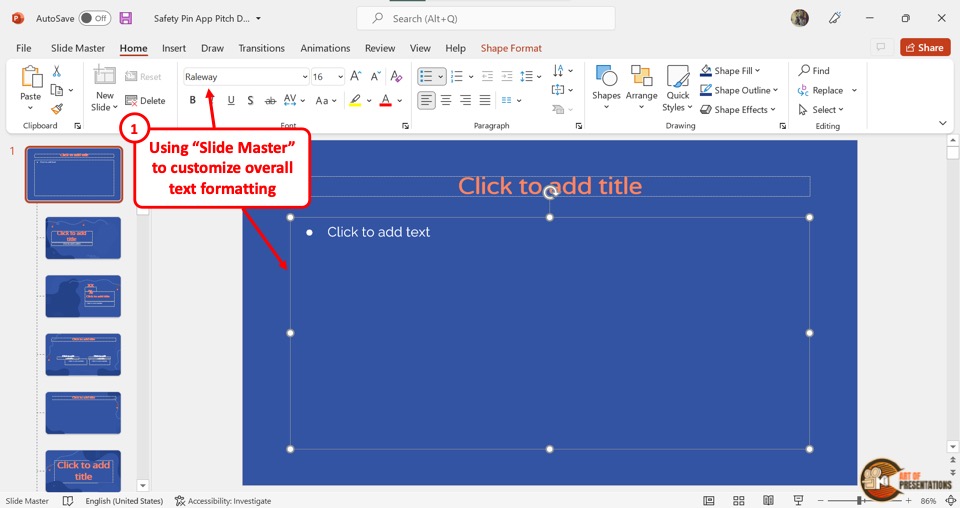
In the “Slide Master” view, you can easily change or customize the overall text formatting. You have to first click on the content placeholder in the master slide which is the top slide in the slide layout panel on the left side of the screen.
Then click on the “Home” tab from the menu ribbon. In the “Font” section of the “Home” menu, you can customize the fonts like the style, size, color, highlights, etc. This will customize the text of all the slides.
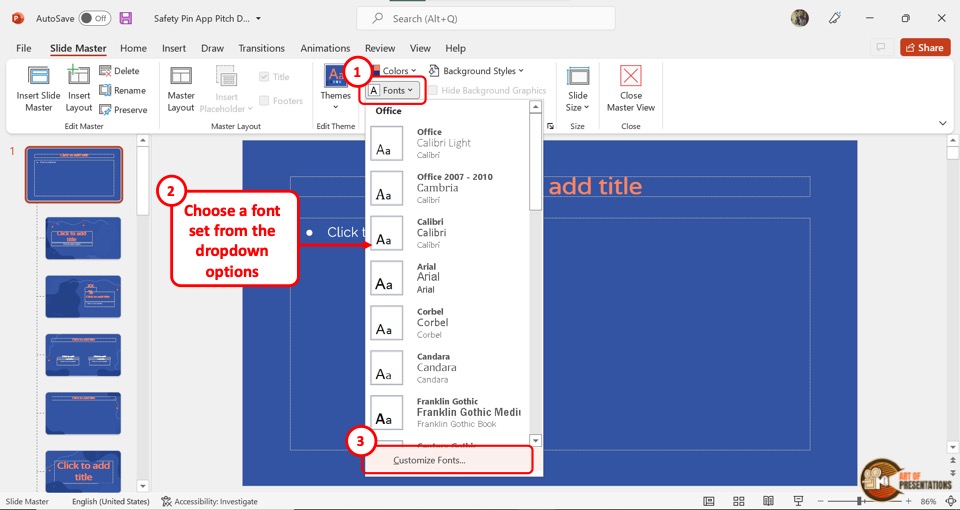
d. Customize Theme Fonts
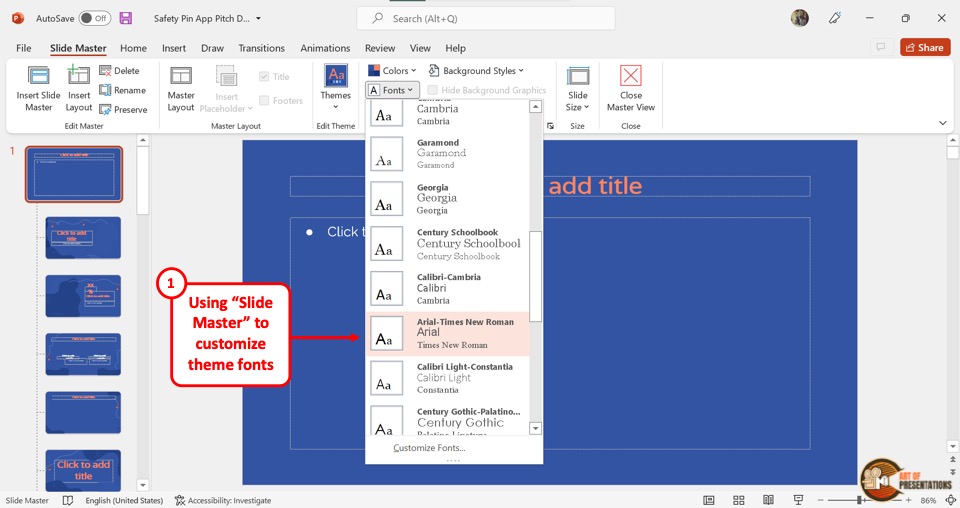
By customizing the theme fonts in the “Slide Master” , you can choose a set of fonts for various list levels of text in all the slides. To do so, click on the “Fonts” option in the “Background” section under the “Slide Master” tab. Then click on your preferred set of fonts from the dropdown menu.
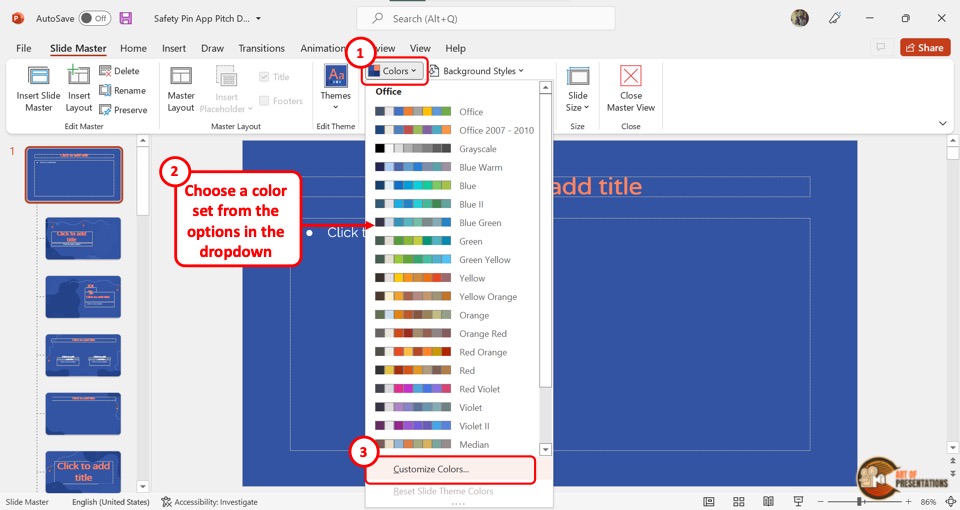
e. Customize Theme Colors
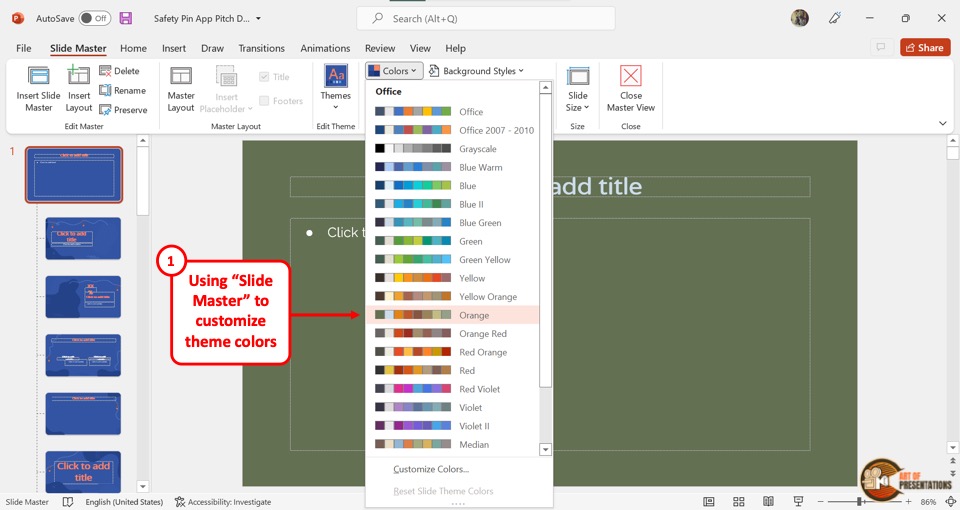
The theme color in a “Slide Master” contains a set of colors for various elements of the slides in a presentation like the background, heading, body text, etc. By customizing the theme color in “Slide Master” , you can customize the colors for the entire presentation.
All you have to do is click on the “Colors” option in the “Background” section of the “Slide Master” menu and select your preferred theme colors from the dropdown menu.
f. Create Unique Slide Layouts and Templates
Using the features in the “Slide Master” menu, you can edit any element and object in the presentation. You can change the color, font, arrangement, theme, etc. of the entire presentation.
You can also create and edit individual slide layouts. You can easily use the “Slide Master” view to create fully unique slide layouts and templates.
2. Difference Between Slide Master and a PowerPoint Template?
In Microsoft PowerPoint, a Slide Master contains information about the layout and the theme of the presentation.
A PowerPoint template, on the other hand, is a design or pattern of a slide or even a whole presentation. In short, a template is a copy of a presentation blueprint that can be edited to fit your needs, while the master slide stores the layout and theme of that template.
3. How to Access the Slide Master in PowerPoint?
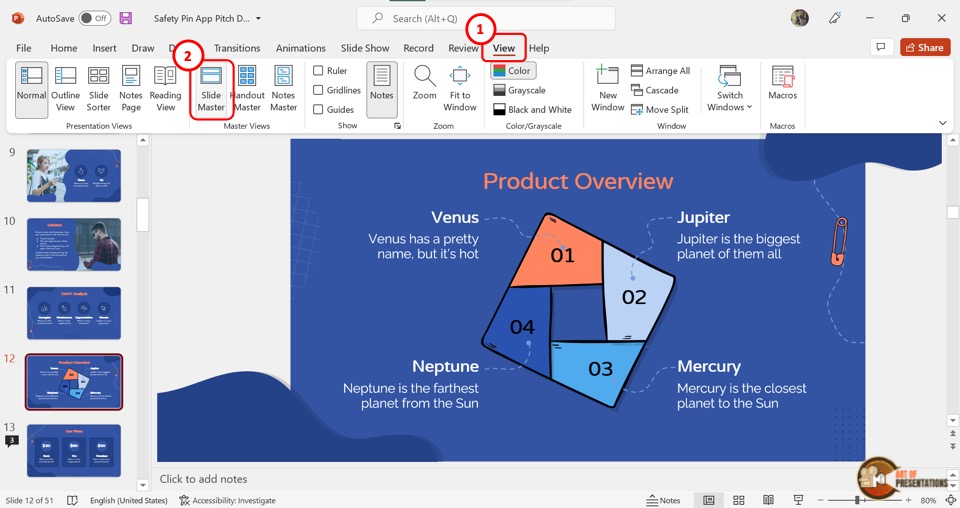
In Microsoft PowerPoint, you can access the slide master in the “View” menu. You have to first click on the “View” tab in the menu ribbon located at the top of the screen. Then click on the “Slide Master” option in the “Master Views” section of the “View” menu. This will open the “Slide Master” view where you can edit the master slide and the slide layouts.
4. How to Edit a Slide Master in PowerPoint?
Microsoft PowerPoint allows you to edit the slide master using the “Slide Master” view. You can edit the master slide itself, and also the slide layouts separately. You can even add or remove master slides and slide layouts.
4a. Using the Master Slide to Apply Changes to All Slide Layouts in PowerPoint
Since the master slide contains all the information on the theme and layouts of the entire presentation, any change in the master slide will be automatically applied to all the slide layouts under the master slide.
To apply changes in the master slide, all you have to do is click on the master slide from the slide layout panel and use the features available in all the tabs in the menu ribbon.
4b. How to Change Slide Background in the Slide Master?

In the “Slide Master” view, click on “Background Styles” and select the “Format Background” option from the dropdown menu. This will open a sidebar on the right side of the screen.
In the “Format Background” sidebar, you can change the color, gradient, or pattern of the background. You can also add an image as the background.
4c. How to Customize Fonts and Text Formatting in the Slide Master in PowerPoint?
To customize fonts and text formatting in the “Slide Master” view, you have to follow the 2 simple steps.
Step-1: Click on the “Customize Fonts” option
You have to first click on the master slide from the slide layout panel. Then click on the “Fonts” option from the “Background” section of the “Slide Master” menu. From the dropdown menu, click on the “Customize Fonts” option at the bottom.
Step-2: Click on the “Save” button

In the “Create New Theme Fonts” dialog box, click on the “Heading font” box to customize the heading and on the “Body font” box for the body text. Then click on the “Save” button at the bottom of the dialog box.
4d. How to Customize Theme Colors in Slide Master?
In the “Slide Master” view of Microsoft PowerPoint, you can customize the theme color by following the 2 easy steps.
Step-1: Click on “Customize Colors”
In the “Background” section of the “Slide Master” view, click on the “Colors” option. Then click on the “Customize Colors” option at the bottom of the dropdown menu.
Step-2: Click on “Save”
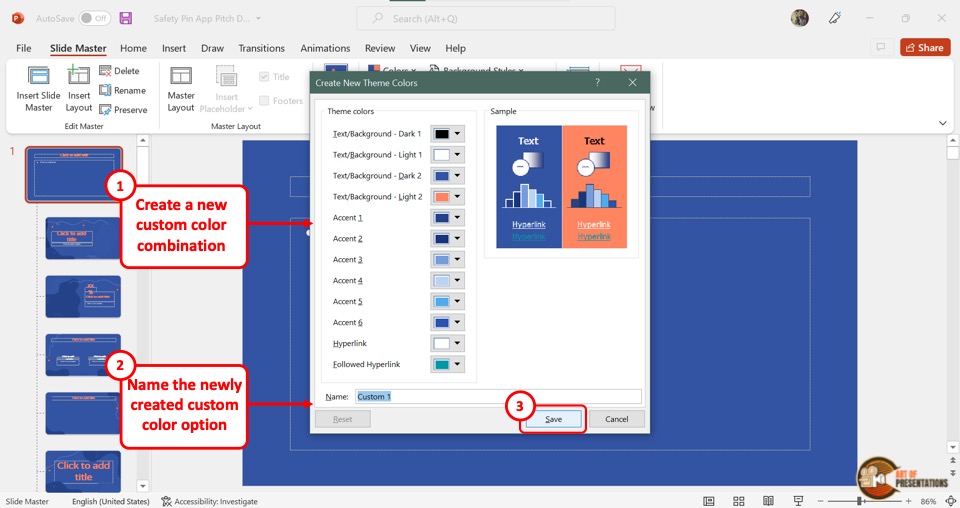
In the “Create New Theme Colors” dialog box, click on the box next to each option to select your preferred colors. Then all you have to do is click on the “Save” button at the bottom of the dialog box.
4e. How to Apply Effects in PowerPoint Slide Master?
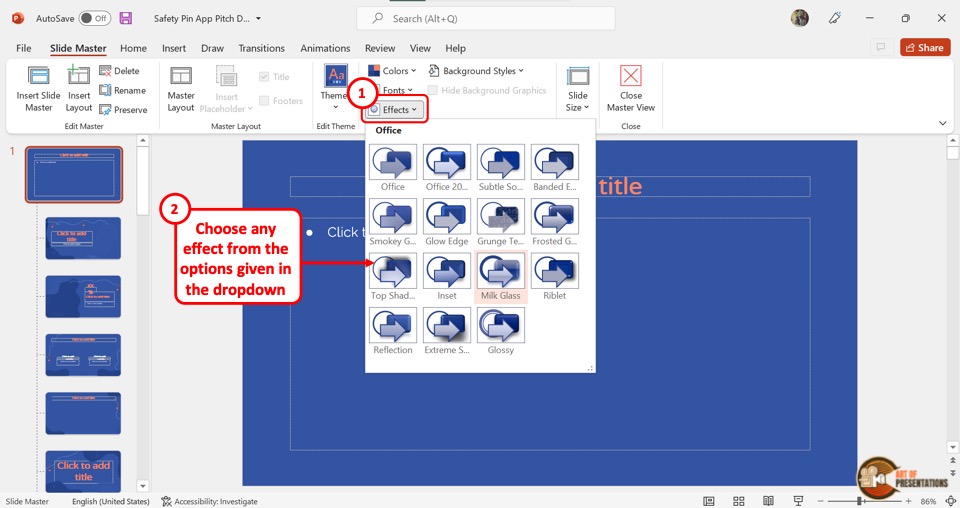
To apply effects in the “Slide Master” view of PowerPoint, click on the “Effects” option in the “Background” section. This will open a dropdown menu containing fifteen effect options to choose from. All you have to do is click on your preferred effect from the dropdown menu.
4f. How to Edit Footer in PowerPoint?
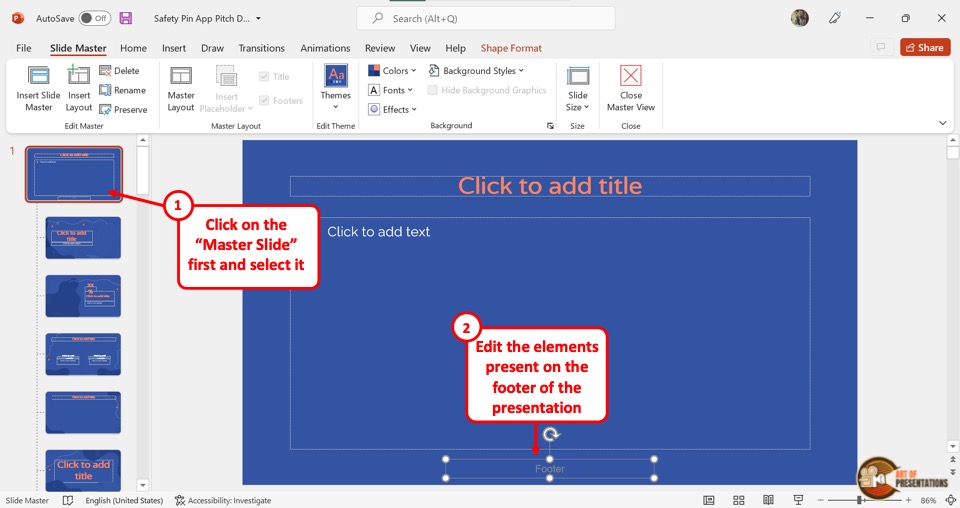
The footer in a PowerPoint presentation is a text that appears at the bottom of all slides. To edit the footer in the “Slide Master” view, all you have to do is click on the “Footer” box at the bottom of the master slide. Then type in the text you want in the footer.
Check out my other article on “How to Add a Footer in PowerPoint?” to learn more about editing, adding, and removing footers in PowerPoint.
4g. How to Add Logo to All Slides Using Slide Master in PowerPoint
Adding a logo to your Microsoft PowerPoint presentation can be a smart way of branding. It is quite easy if you know the correct steps.
In fact, I’ve written a detailed article on how to add a logo in PowerPoint . Do make sure to check out that article as well to get all the advanced tips and tricks and to know the correct way to do it!
Meanwhile, here are the key steps to add a logo to all slides using the “Slide Master” in PowerPoint –
Step-1: Click on the “Insert” tab
The first step is to click on the master slide from the slide layout panel on the left side of the screen in the “Slide Master” view. Then click on the “Insert” tab from the menu ribbon.
Step-2: Click on the “Pictures” button
The next step is to click on the “Pictures” button in the “Images” section of the “Insert” menu. Then click on the “This Device” option from the dropdown menu. This will open a dialog box.
Step-3: Click on the “Insert” option
In the “Insert Picture” dialog box, click on the logo you want to add to the presentation. Then click on the “Insert” button at the bottom of the dialog box to add the logo to the master slide. This will automatically add the logo to all the slides of the presentation.
4h. Use Slide Master to Add a Watermark in PowerPoint
A watermark is an identifying text or image that usually appears across a document and is semi-transparent. You can learn about how to add or remove watermarks in PowerPoint in my other article.
Meanwhile, I’ll share the key steps in a brief manner below –
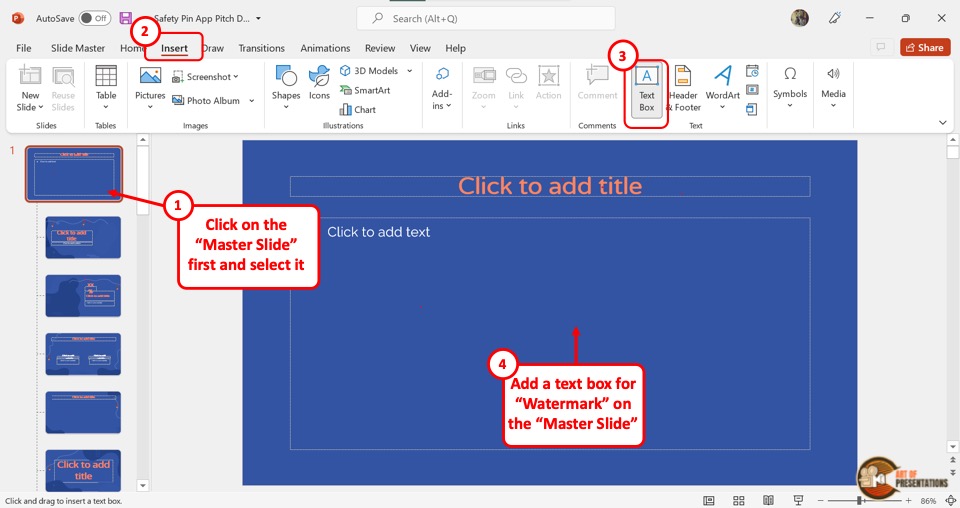
In the “Slide Master” view, click on the master slide which is the top slide in the slide layout panel. Then click on the “Insert” tab from the menu ribbon located at the top of the screen.
Step-2: Click on the “Text Box” option
In the “Insert” menu, click on the “Text Box” option from the “Text” section. Then draw the text box on the master slide. You can now type in the text you want as a watermark on all the slides.
Step-3: Click on the “Format Text Effects” option
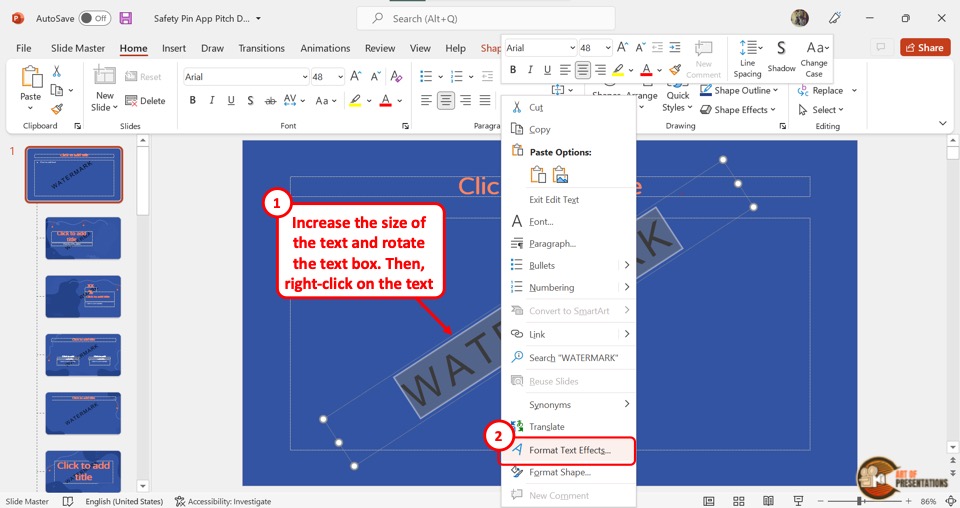
The next step is to select the text in the watermark text box. Then “Right Click” on the selected text and click on the “Format Text Effects” option. This will open the “Format Shape” sidebar on the right side of the screen.
Step-4: Increase the text transparency
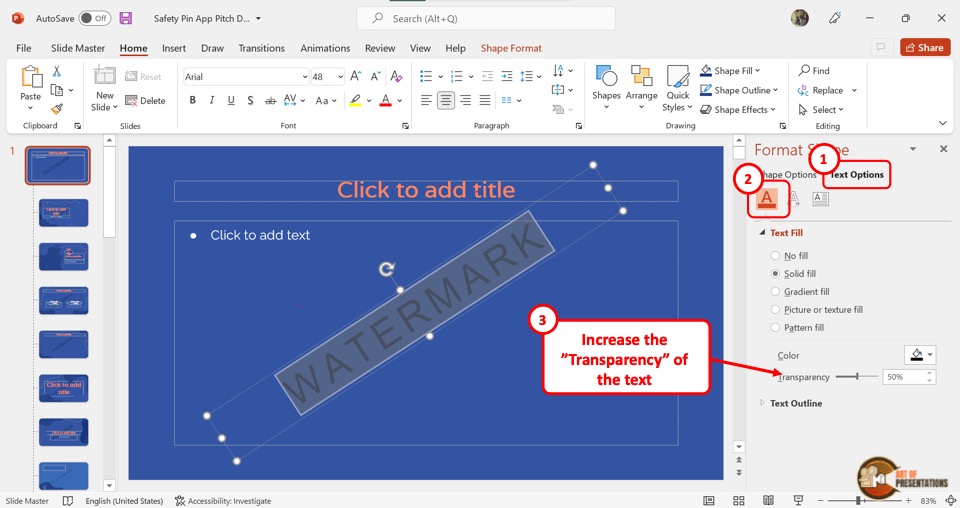
In the “Format Shape” sidebar, click on the “Text Fill and Outline” option which is the first icon. In the “Text Fill” section, click on the “Solid Fill” option. Then drag the slider next to the “Transparency” option to the right until the text reaches your preferred transparency.
5. Understanding Slide Layouts in PowerPoint Slide Master
Slide Layouts in Microsoft PowerPoint are slide designs that have pre-arranged placeholders that you can use to add your content quickly and easily. To understand the functions of slide layouts in PowerPoint and how to use them, you can read my article on slide layouts in PowerPoint .
5a. How to Know Which Slides Use What Slide Layouts
Using the “Normal” view in PowerPoint, you can see which slides are using what slide layouts. All you have to do is follow the 2 simple steps.
Step-1: Click on the “Normal View” option
In the menu ribbon located at the top of the screen, click on the “View” tab. In the “View” menu, click on the “Normal” option which is the first option in the “Presentation Views” section. This will return the screen to “Normal View” .
Step-2: Click on the “Layout” option
In the slide thumbnail panel at the left side of the screen, “Right Click” on a slide. Then click on the “Layout” option from the context menu. This will open a list of all the slide layouts available in the presentation. You will see the slide layout being used by the selected slide is highlighted in the list.
5b. How to Insert and Rename Slide Layouts
To insert or rename slide layouts, you have to first access the “Slide Master” menu from the “View” tab in the menu ribbon.
Inserting Slide Layouts
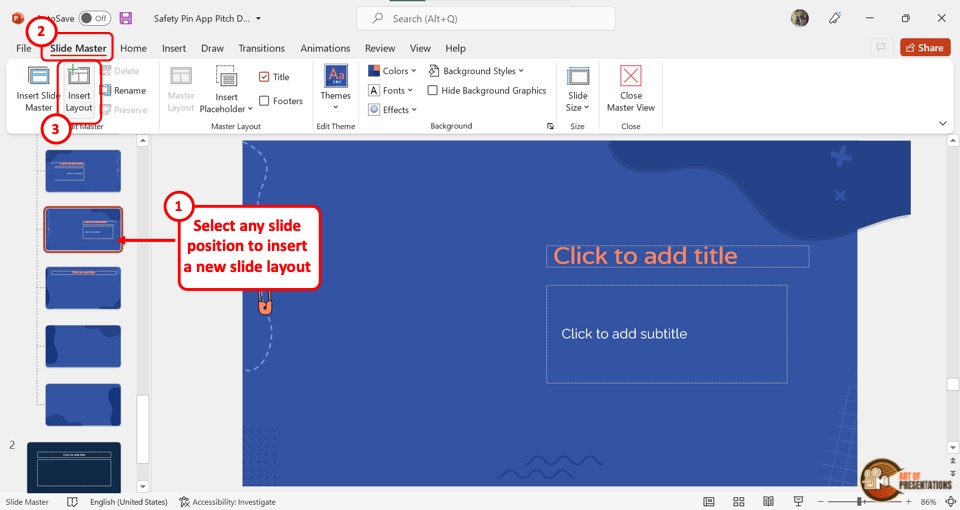
In the slide layout panel on the left side of the screen, you have to first click on the place where you want to insert a new slide layout. Then click on the “Insert Layout” button in the “Edit Master” section of the “Slide Master” menu.
Renaming Slide Layouts
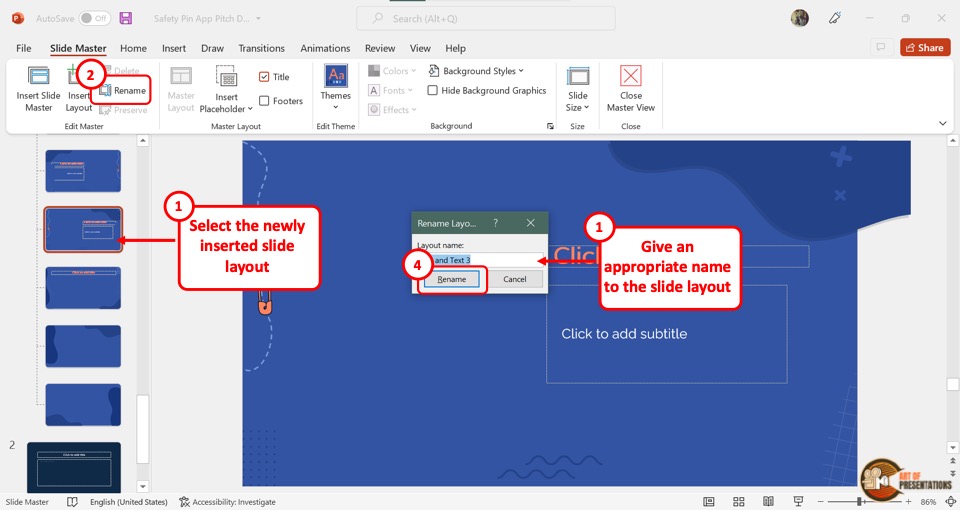
To rename a slide layout, you have to first click on the layout from the slide layout panel. Then click on the “Rename” option next to the “Insert Layout” button in the “Slide Master” menu. This will open the “Rename Layout” dialog box where you have to type in the new name for the slide layout.
Finally, you have to click on the “Rename” button in the dialog box to rename the slide layout.
6. Understanding Placeholders in Slide Master in PowerPoint
In Microsoft PowerPoint, a placeholder is a pre-formatted box on the slide where you can easily add content with a single click. You can learn more about placeholders in PowerPoint in my other article.
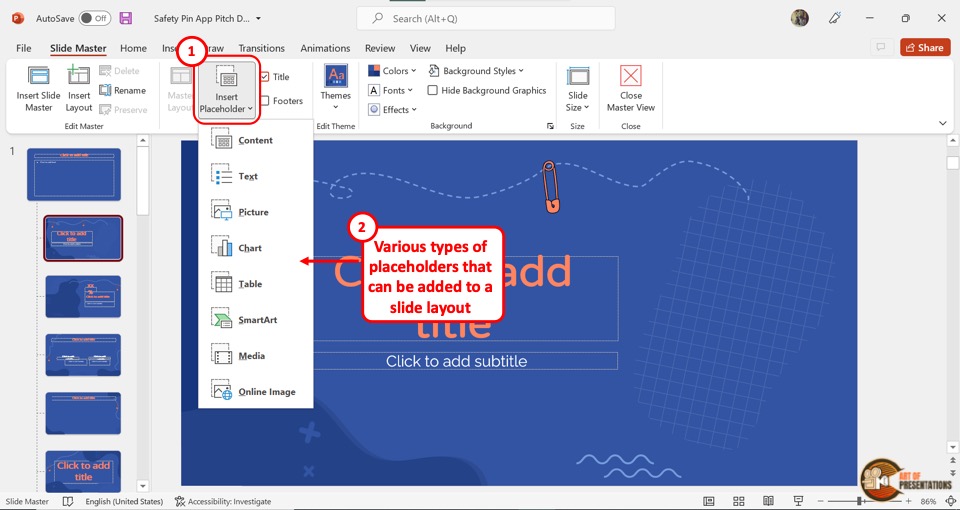
Using the “Slide Master” view, you can add, remove and edit the type and position of the placeholders in each slide layout. There are seven types of placeholders: “Text” , “Pictures” , “Chart” , “Table” , “SmartArt” , “Media” , and “Online Image” .
Besides, you can also use a “Content” placeholder which allows you to add any type of mentioned content.
7. How to Insert a Slide Master in PowerPoint?
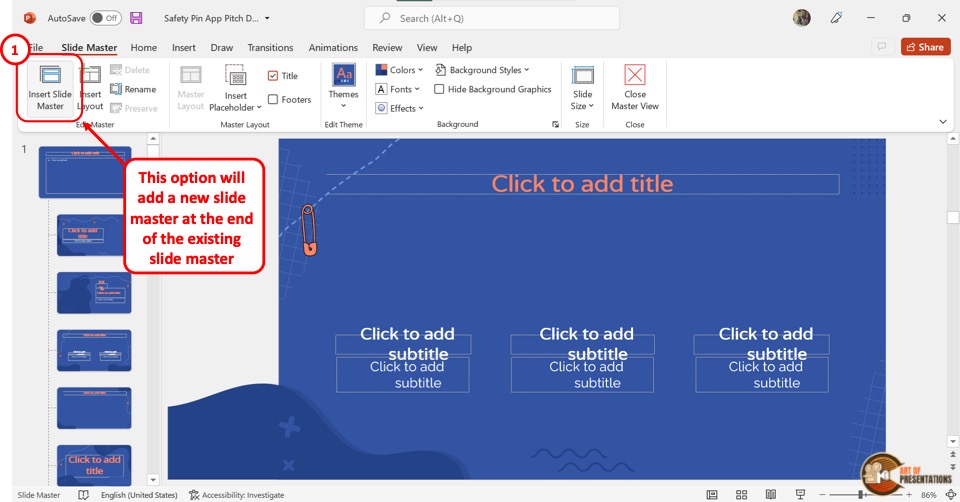
To insert a slide master in Microsoft PowerPoint, the first step is to open the “Slide Master” view from the “View” tab. In the “Slide Master” view, click on the “Insert Slide Master” button. It is the first button in the “Edit Master” section of the “Slide Master” menu.
Alternatively, you can press the “Ctrl+M” keys on your keyboard to insert a new slide master.
8. How to Delete a Slide Master in PowerPoint?
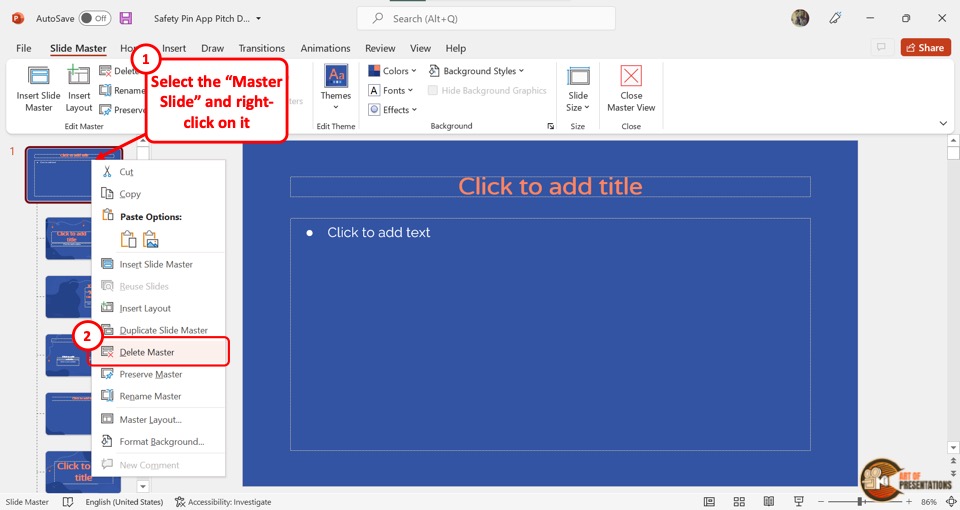
To delete an unused master slide in PowerPoint , you have to first “Right Click” on the master slide from the slide layout panel on the left side of the screen. Then click on the “Delete Master” option in the right-click menu. Alternatively, you can press the “delete” key on your keyboard.
9. How to Exit the Slide Master View in PowerPoint?
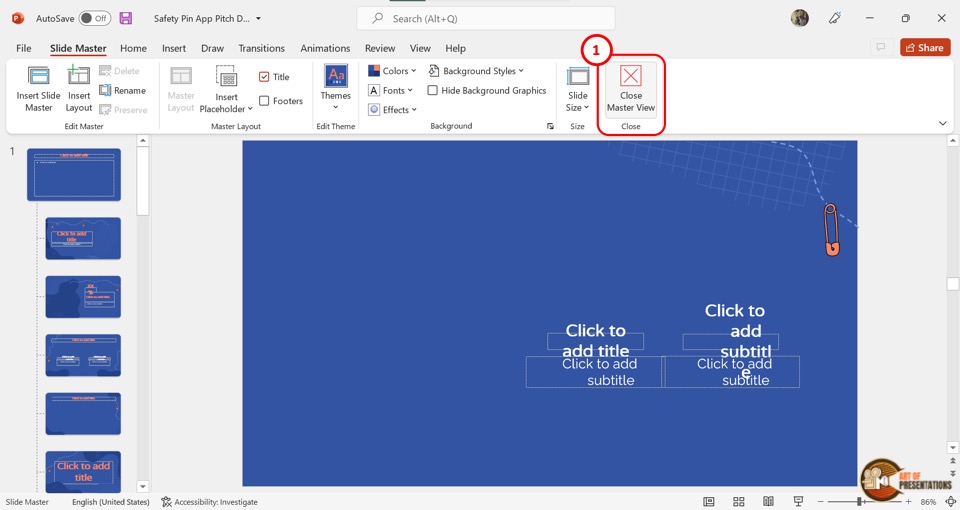
In Microsoft PowerPoint, you can exit the “Slide Master” view with one click. All you have to do is click on the “Close Master View” button. It is the last button under the “Slide Master” tab and is located in the “Close” section.
How to Use Slide Master in Microsoft PowerPoint to Create Impressive Presentations
With Slide Master, you can customize every aspect of your presentation, including colors, fonts, backgrounds, and effects. Here's how to use it!
No one enjoys a presentation with mismatched colors, missing logos, or unstructured content. Consistency is the key to creating an impressive slide deck. How do you ensure that the presentation is well-formatted and looks professional? You can quickly achieve this by creating a master theme and defining layouts for different types of content.
Microsoft PowerPoint is commonly used to create presentations. You can make a deck from a blank canvas or use predefined themes. Before creating a presentation, let's understand how you can set a theme and style using the Slide Master feature.
Applying a Predefined Theme to Your Presentation
There are many styles and options for creating a theme that aligns with your brand.
Having a uniform color combination, font style, or picture layout on each slide makes a presentation look professional. You can select the theme based on the company's style guide. If there is none available, you can try out different inbuilt themes by Microsoft PowerPoint.
To select a theme, follow these steps:
- Click Themes and choose the desired theme. It is immediately applied to the presentation.
- If you have downloaded a theme on your laptop from Microsoft Office, select the Browse for Themes option.
What Is the Slide Master Feature?
The Slide Master feature in Microsoft PowerPoint helps you create a template or layout for the presentation. You can select a theme, add backgrounds styles, add a company logo, or set the slide size.
Your choices on slide master define the look and feel of the presentation. One presentation can have many master slides, which means you can create one look for the first half of your presentation and another for the second half.
Each master slide can have multiple layouts, which can help you define templates for different slides. In a way, the slide master serves as a master template for the slide decks. Different teams within the company can reuse the slide master or slide layouts.
To access the slide master, open the presentation and select View > Slide Master . You can view the parent and child slides with different formatting options.
How to Use Slide Master in Microsoft PowerPoint
You can create the slide master with nested layout slides and apply a combination of texts, images, or videos on each slide. On the slide master, you can define the master layout for the presentation.
- After opening the presentation, click View > Slide Master .
- Select the master slide and click the Master Layout button on the top ribbon.
- You can select a placeholder for title, text, date, footer, or slide number. These options are automatically applied to all layouts and slides.
Related: Microsoft PowerPoint vs. Google Slides: Which One Should You Be Using?
Inserting Slide Master or Layout
The layout acts as a template for the slides. You can create different layouts for every slide type.
- To insert a new slide master or layout, click Insert Slide Master or Insert Layout on the top ribbon.
- Alternatively, you can right-click on the left panel and choose the appropriate option.
- To rename a layout, select a layout and click the Rename button on the top ribbon. Alternatively, you can right-click on a layout and select Rename . You can also delete a layout.
- Click Preserve so that the slide layout remains in the presentation even if it is not used.
Configuring the Size of the Slide
You can set up the presentation in the standard size (4:3) or widescreen (16:9), which works well for most modern projectors. If you are not happy with the default size of the slide, you can change it. The slides can also be viewed or printed in A4 size, banner, or letter paper format.
- Click Slide Size, and from the drop-down option, you can choose the Standard or Widescreen layouts.
- You can select the orientation of slides, the notes section, and the slides to which you want to apply the size.
RELATED: The Best Sites for Free Animated PowerPoint Presentation Templates
Setting the Background of the Slide
You can select the background colors, fonts and apply effects to the slides. To view the style and format options, click Slide Master in the top ribbon.
- Click the Colors option to view the color combinations. Select your preferred option, and it is applied to the deck.
- Click Fonts to apply the selected font to the text. The font is applied when you exit the Slide Master mode.
- Select the Effects option to apply a specific effect to objects such as charts or graphs.
- Select the Background Style to choose the background color for the slide.
- You can also right-click on a background style to apply the same background to all layouts in the master.
- You can get more options for background colors, including gradient fill, texture, pictures, by clicking the Background Styles > Format Background menu.
- Select the Hide Background Graphics option to remove background graphics on selected layouts.
Inserting a Placeholder on the Slide
Every slide can have text, a chart, or images. These can be added while designing the theme of the presentation. To add a placeholder, follow these steps:
- Select Insert Placeholder .
RELATED: How to Make Professional Slideshows With PowerPoint's Designer Feature
Enjoy Creating Interesting Themes for Your Presentation
Creating a presentation with different slide layouts is an excellent practice. Depending on the type of content they want to present, diverse teams can reuse these slide layouts.
At first, the layouts and slide styles can seem overwhelming. But you can access learning resources by Microsoft to gain in-depth knowledge about all the features. Don't forget to experiment and create your custom themes.
Even though Microsoft PowerPoint is commonly used to create slide decks, you can also teach skills by creating online learning modules.
- Video Tutorials
- Knowledge Base
- Group Licenses
- Why Choose Us?
- Certificates
- PowerPoint Tutorials
PowerPoint Slide Master: Full Tutorial, Video, and Sample Files
In this tutorial, you’ll learn how to use the Slide Master in PowerPoint, why it’s useful, and how to use it to create elements that appear on every slide in the presentation, such as company logos and slide numbers.
- Tutorial Summary
- Files & Resources
- Premium Course
The PowerPoint Slide Master is useful for creating templates in presentations and repeating specific elements on each slide .
For example, if you want to repeat your company logo, the date, or the client’s name in the bottom-left corner of each slide, you can do that with the Slide Master.
You can also use it to set the default colors, fonts, and other design elements and ensure that everything on your slides looks consistent.
In this tutorial (video above and written version below), you’ll learn why the Slide Master is useful, how to set it up, and how to use it to insert logos, headers, and footers in presentations.
Video Table of Contents:
0:52: Slide Master 101
11:24: Slide Master Setup
14:35: Exercise: Fix the First Layout Slide
24:31: Recap and Summary
[Click the “Files & Resources” tab to get all the PowerPoint files for this lesson.]
The PowerPoint Slide Master: Why It’s Useful
To understand the value of the Slide Master, consider several of the slides in the “Before” file here :

As shown above, these slides have common elements: the divider line next to the title at the top, the “Goldman Stanley” logo in the bottom left, and the “Project Jaguar” text in the top left.
However, we manually inserted these elements on each slide , which is not ideal.
For example, what happens if something changes in the design? What if we need to replace the logo everywhere? Or what if we swap the positions of the logo and the project name?
We would have to go through each slide and manually change the positions and formatting of these elements.
If there are only 5-10 slides, that’s not a big deal, but with 50 or 100 slides, it would be extremely time-consuming to do this.
A better solution is to open the Slide Master (Alt, W, M on PC or ⌘ + Opt + 1 on Mac) and insert these common elements on a “Layout ” (template) so they repeat across all the slides in the presentation that use this particular Layout:

When you insert a normal slide in the standard view of PowerPoint (Alt, H, I on PC), you can base the slide on one of these “Layouts”:

The PowerPoint Slide Master: Key Shortcuts
The key shortcuts are as follows:
Slide Master View: Alt, W, M (PC) / ⌘ + Opt + 1 (Mac)
Close Slide Master: Alt, M, C (PC) / ⌘ + 1 (Mac)
Normal Edit Mode: Alt, W, L (PC) / ⌘ + 1 (Mac)
Move to Next or Previous Layout: Arrow Keys (PC and Mac)
Change Slide Layout (outside of the Slide Master): Alt, H, L (PC) / N/A on Mac
Reset Slide Layout (outside of the Slide Master): Alt, H, Q (PC) / N/A on Mac
Header & Footer (outside of the Slide Master): Alt, N, H (PC) / N/A on Mac
NOTE: The “,” in these shortcuts means that you press and release each button sequentially. The “+” means that you press and hold down each button and then release them all at the end.
For example, with Alt, W, M, you press and release Alt, press and release W, and press and release M.
But with ⌘ + Opt + 1 (Mac), you press and hold ⌘, press and hold opt, and press and hold 1 and then release all 3 keys at once.
You will enter and exit the Slide Master all the time in longer presentations, so you should know at least the first few shortcuts above.
The PowerPoint Slide Master: Placeholders vs. Shapes
When you’re on a Layout in the Slide Master, you can insert shapes, lines, and textboxes .
However, if you insert these objects within the Slide Master, you will not be able to edit them on normal slides that use the Layout .
Let’s look at a simple example, where we add a rectangle shape to the default “Title and Content” Layout in the Slide Master:

If we now return to the normal slides with Alt, W, L (⌘ + 1 on Mac) and insert a new slide that uses this “Title and Content” layout, it’s impossible to select or edit the shape:

To edit this shape, we need to return to the Slide Master and insert a Placeholder on this layout, which is in the “Slide Master” tab under “Insert Placeholder”:

We can insert a “Content” Placeholder here and then format it with the same fill color, font color, and other attributes:

Then, when we return to the normal slide view and reset the Layout of the slide we just inserted, the blue shape is now editable:

In real life, you would not use Placeholders for something trivial like this – you would normally use them for slide titles or blocks of text that change on each slide:

You need to consider the Shape vs. Placeholder distinction before using the Slide Master, or your templates will not work correctly.
Finally, note that Placeholders are not allowed on “Layout #1” in the Slide Master – the one that looks like this:
")
This Layout determines the default font and paragraph styles for all the other slides and Layouts.
You can add normal shapes, lines, and textboxes to Layout #1, but not Placeholders; the option is greyed out:
")
In real life, you might add the company or client logo to Layout #1 – but it’s rare to repeat any other element in the same spot everywhere in the presentation .
A better approach is to create a few Layouts, such as 1-column and 2-column designs, and add “repeated elements” like the title/header/footer divider lines on each Layout.
The Problems with the PowerPoint Slide Master
The Slide Master is great for ensuring consistency, creating templates, and repeating common elements across the slides, but it does have some drawbacks.
First , not all formatting carries through to normal slides the way you necessarily want.
Similar to the copy/paste shape format commands, only the formats of the first line of text in a Placeholder are carried through to normal slides.
Second , many people do not know about the Slide Master or do not use it properly, and it is cumbersome to “convert” a long presentation with normal slides into one that uses Layouts consistently.
Third , an existing slide will not update even if you change the slide’s Layout within the Slide Master.
You can “reset” the slide to its base Layout using the Alt, H, Q shortcut, and this will update all the elements on the slide, including additions/deletions and edits you’ve made in the Slide Master.
However, you’ll also lose any additional formatting you have applied to the Placeholders on this normal slide.
Because of these downsides, it’s best to keep the Slide Master simple and use it for tasks like inserting logos, headers, footers, and slide numbers rather than complex layouts.
Setting Up the PowerPoint Slide Master Properly
If you’ve just created a new presentation and you want to use the Slide Master extensively, here’s what we recommend:
Step 1: First, go to the Slide Master with Alt, W, M (PC) or ⌘ + Opt + 1 (Mac) and delete the default Layouts you will not use.
We recommend keeping the “Title and Content” Layout – ignore the recommendation in the video – but everything else can go:

Step 2: We also recommend removing the Drawing Guides in the Slide Master because they’re separate from the Drawing Guides in the normal presentation, and you usually don’t need multiple sets of Guides.
To do this, enter the Slide Master and go to Layout #1 there (the “Office Theme Slide Master”).
Press Alt, W, S (PC) or ⌘ + Opt + Ctrl + G (Mac) to show the Drawing Guides, which should appear in red, and drag them off the slide to remove them.

Next, go to each Layout you plan to use and do the same thing.
These Drawing Guides will appear in orange , and by default, they’ll be single vertical and horizontal lines.
We recommend removing these unless you plan to customize them for a more complex Layout in which specific alignments would be helpful:

Step 3: Add the company logo, the slide number, and the header or footer elements that should appear on all slides on Layout #1.
The logo is straightforward: insert a normal shape or textbox, format it appropriately, and drag it to the bottom left or right corner:

To add the slide numbers, press Alt, N, H (Insert –> Header & Footer on Mac) and make sure “Slide Number” is checked:

If you want to add something else in the header or footer, such as the client’s name or the project name, you can also do that at this stage.
But in most cases, elements like lines for the header and footer areas should be added directly on the custom Layouts because you usually don’t want to show these on the title slide or “section divider” slides.
Step 4: Set the default themes, colors, fonts, and background styles.
Within the Slide Master view, click the “Slide Master” tab and go to “Edit Theme” and “Background” to set these:

If you go to the normal slides and set the fill/font color of a shape or textbox, you can access all these theme colors easily:

The main benefit of this feature is that it lets you change all the colors in the presentation from within the Slide Master .
You just need to ensure that each shape, textbox, and line uses one of the “Theme Colors” you’ve selected.
If it does, you can return to this area of the Slide Master and change the colors here, and everything that uses one of these colors will update automatically.
Many companies have their own themes and color schemes, so you should follow your internal standards when doing this.
Practice Exercise: Create a Custom Layout in the Slide Master
Your task in this practice exercise is to start with the “Before” version of the file and modify it to set up the Slide Master properly, which means:
1) Remove the unused layouts.
2) Delete the unnecessary Drawing Guides.
3) Add the “Goldman Stanley” logo and the slide numbers.
4) Set the text and bullet styles on the first Layout in the Slide Master.
To save time, remember that you can copy and paste shapes, lines, and textboxes from normal slides into Layouts within the Slide Master.
Start by pressing Alt, W, M to enter the Slide Master and delete the unnecessary Layouts:

Then, press Alt, W, S and remove the unnecessary red Drawing Guides by dragging them off the edges:

Next, go to one of the normal slides with the “Goldman Stanley” logo at the bottom, copy the logo from that normal slide, and paste it into the bottom left corner of Layout #1 in the Slide Master:

Once you’ve done this, the “Goldman Stanley” logo will repeat on each slide, but all the existing slides have “duplicate logos” – because each one also had this logo as a separate shape!
So, you should go to each slide individually and delete the logo in its bottom-left corner:

You can press Alt, N, H to add the slide numbers in the footer, and you can format them as you want.
Make sure the slide number textbox in the bottom right corner is aligned properly to the right edge of the “main content area” on each slide (demonstrated in the video using extra lines).
Finally, as we do in the sample video, you can adjust the font sizes, bullet styles, and indentations on Layout #1.
These are standard PowerPoint commands/shortcuts not specifically related to the Slide Master.
More Advanced Features in the PowerPoint Slide Master
In our full PowerPoint Pro course , you’ll set up many slides and Layouts within the Slide Master, including ones for company profiles and the Table of Contents.
You’ll also get practice “retrofitting” existing slides to use Layouts.
Finally, in the VBA and macro module of the course, you’ll learn how to use Drawing Guides in the Slide Master to align and distribute shapes, and you’ll learn how to automatically generate a Table of Contents based on Layouts for the section markers.
The PowerPoint Slide Master will not solve every problem, but it could help you create presentations more quickly with fewer errors if you use it properly.

About Brian DeChesare
Brian DeChesare is the Founder of Mergers & Inquisitions and Breaking Into Wall Street . In his spare time, he enjoys lifting weights, running, traveling, obsessively watching TV shows, and defeating Sauron.
Files And Resources
Premium Courses
Other biws courses include:.
Perfect Your PowerPoint Skills
The BIWS PowerPoint Pro course gives you everything you need to complete pitch books and presentations in half the time and move straight to the front of the "top tier bonus" line.
- I Tried Both: Apple Watch 9 vs Fitbit Charge 6
- Best Places to Print Photos Online
How to Use PowerPoint Slide Master Layouts
Use the Slide Master to effect a uniform appearance for your presentation
- Brock University
What to Know
- Go to View > Slide Master and select the top thumbnail in the Slide pane. Use the Slide Master tab to change colors, fonts, and more.
- Use the Slides pane to choose a slide layout thumbnail and make changes to the layout master.
- When you're done making changes, select Slide Master > Close Master View to return to your presentation.
To ensure that all the slides in your PowerPoint presentation have the same look, use the Slide Master. Apply fonts and styles, add multimedia, and insert footnotes. These instructions apply to PowerPoint 2019, 2016, and 2013; PowerPoint for Microsoft 365; and PowerPoint for Mac.
Access the PowerPoint Slide Master
The PowerPoint Slide Master is like a style sheet for your presentations. Changes made to the Slide Master apply to the slides that are created after you format the Slide Master.
To access the Slide Master in a PowerPoint presentation, select View > Slide Master .
Change the Layout in the Slide Master
The Slide Master view contains all the slide layouts used in PowerPoint. The Slides pane displays thumbnail images of the slide master (the top thumbnail image) and the related slide layouts (the smaller thumbnail images located below the slide master).
Changing the font on the slide master affects the text placeholders on all slides. However, not all placeholders are affected by changes made to the slide master. You may need to make additional changes to the different slide layouts.
Make changes to the Slide Master before you create a presentation. If you change the font style or color on a slide before you edit the slide master and slide layouts, the formatting is retained on those slides.
To make changes in the Slide Master:
Select the slide master. It's the top thumbnail in the Slide pane.
Go to the Slide Master tab to change the theme, theme colors, fonts, and background for the entire presentation.
In the Slides pane, select a slide layout thumbnail and make changes to the layout master, if needed.
Close the PowerPoint Slide Master
After you've made all your changes to the slide master, select Slide Master > Close Master View to return to the presentation slides.
Each new slide you add to the presentation takes on the changes you made. You'll save time by not having to make edits to every individual slide. Your presentation will have a uniform and professional look.
Get the Latest Tech News Delivered Every Day
- How to Copy a PowerPoint Design Template to Another Presentation
- What Is a PowerPoint Placeholder?
- How to Increase PowerPoint Slide Number Size
- PowerPoint Master Slide
- Use Multiple Design Themes in the Same Powerpoint Presentation
- Change the Default Font in PowerPoint Text Boxes
- Replacing All the Fonts in a Presentation at One Time
- Slide Layouts in PowerPoint
- Add, Delete or Change the Order of PowerPoint Slides
- How to Use the Slide Sorter View in PowerPoint
- The 10 Most Common PowerPoint Terms
- How to Use Speaker Notes in PowerPoint
- Use PowerPoint Slide Finder
- An Introduction to PowerPoint
- Change Font Colors and Styles on PowerPoint Slides
- Using Design Themes in PowerPoint
How-To Geek
How to change an entire presentation's formatting in powerpoint.
You don't need to change a PowerPoint presentation's formatting one slide at a time. You can do it all at once in the Master View. Here's how to use this time-saving feature.
If you’re wanting to reuse a PowerPoint presentation but would like to clear the slideshow's formatting, there’s no need to do it slide by slide---you can do it all at once. Here’s how.
First, open the PowerPoint presentation with the formatting you want to edit. To illustrate the before and after, here’s what we’ll be working with in this example.
Looking even closer, here are the formats our current slideshow is using:
- Colors: Gallery
- Headings: Gill Sans MT
- Body: Gill Sans MT
- Effects: Gallery
- Background Style: Style 10
- Background Graphics: Wooden Flooring
Once you’re ready to reformat, select the “ Slide Master ” option in the “Master Views” group of the “View” tab.
The first child slide is selected by default. Be sure to choose the parent slide above it, or the changes won’t take place for every slide.
If you want to assign a new theme to the presentation, you can do that here. Select “Themes” from the “Edit Theme” group and choose your desired theme from the drop-down menu.
Each theme comes with its own unique set of fonts, colors, effects, and so on---and there's certainly no shortage of items to choose from. If you want to stick with your current theme but change some of the individual formatting options, you can do so with the options available in the “Background” group.
Here are the different options available for reformatting:
- Colors: Changes all the colors used in your presentation, as well as the color options available in the color picker.
- Fonts: Changes all the headings and body fonts used in the presentation.
- Effects: Changes the appearance (shading, border, etc.) of objects in your presentation.
- Background Styles: Choose the background style for the selected theme.
- Hide Background Graphics: Hide (or unhide) background graphics that come with a theme. This can only be used on each slide type in the Master view.
To make changes, select the option from the menu and choose your desired change from the menu that opens. For example, if we wanted to change our colors from “Gallery” to “Green Yellow,” we’d select “Colors” from the “Background Group” and then choose “Green Yellow” from the drop-down menu.
Related: How to Change the Default Font in PowerPoint
Repeat these steps for whichever options you’d like to change. We’ll make the following changes to our slideshow in this example:
- Colors: Green Yellow
- Headings: Calibri
- Body: Calibri
- Effects: Glossy
- Background Styles: Style 10
- Hide Background Graphics: Title Slide only
Once you’ve made the desired changes, select the “Close Master View” button in the “Close” group.
Related: How to Create a Custom Template in PowerPoint
You’ll now see the changes applied throughout the entire presentation.
And a closer look shows all the finer details.
That’s all there is to it!

- Get started with computers
- Learn Microsoft Office
- Apply for a job
- Improve my work skills
- Design nice-looking docs
- Getting Started
- Smartphones & Tablets
- Typing Tutorial
- Online Learning
- Basic Internet Skills
- Online Safety
- Social Media
- Zoom Basics
- Google Docs
- Google Sheets
- Career Planning
- Resume Writing
- Cover Letters
- Job Search and Networking
- Business Communication
- Entrepreneurship 101
- Careers without College
- Job Hunt for Today
- 3D Printing
- Freelancing 101
- Personal Finance
- Sharing Economy
- Decision-Making
- Graphic Design
- Photography
- Image Editing
- Learning WordPress
- Language Learning
- Critical Thinking
- For Educators
- Translations
- Staff Picks
- English expand_more expand_less
PowerPoint 2007 - Using the Slide Master
Powerpoint 2007 -, using the slide master, powerpoint 2007 using the slide master.

PowerPoint 2007: Using the Slide Master
Lesson 16: using the slide master.
/en/powerpoint2007/using-transitions/content/
Introduction
Using the slide master.
Download the example to work along with the video.
The slide master
The easiest way to make the same change to all slides or slides that use a specific layout is to change the slide master , also called the master slide . For example, let's say you like a theme but want to change a specific design element of that theme. You may want a different bullet style, slide titles that are center-aligned instead of left-aligned, or an accent line under each slide title. You can quickly make these changes and more by modifying the slide master.
To view the slide master:
- Select the View tab.
- Click the Slide Master view command in the Presentation Views group.
- The Slide Master tab will appear as the active tab on the Ribbon, and the slide master task pane will appear on the left.
About Slide Master view
The Slide Master view appears similar to Normal view ; however, in Slide Master view master slides are displayed in the task pane rather than actual slides. The first thumbnail image in the task pane on the left is the slide master that controls all slides . If you want to make a change to all slides in a presentation, you can do so by changing this slide.
Each slide below the slide master is a master slide for a supporting layout . For example, if you want to make a change to all slides that use a Title and Content layout, you can do so using the Title and Content layout master slide in the task pane.
You can see which slides in the presentation use a specific layout. To see this information, hover over a layout and read the screen tip. The screen tip contains the slide numbers that use the layout.
Making changes to all slides
Any change you can make to a slide in Normal view can be made to the slide master so the change will be reflected on all slides in the presentation. The following examples will show how you can make these changes and move from the Slide Master tab to other tabs on the Ribbon while the presentation remains in Slide Master view .
To change the theme font on all slides:
- Click the Slide Master view command in the Presentation Views group. The Slide Master tab will appear active.
- Select the slide master for all slides, if it is not currently selected.
- Click the Fonts command in the Edit Theme group on the Slide Master tab.
- Hover over each option to display a live preview of the font option on the master slide.
- Click a menu option to select it.
- Click the Close Master View command to return to Normal view.
To change text color/alignment on all slides:
- Select the text you want to modify, and format it how you want. In this example, we'll change the title color and alignment.
- Select the Home tab. The slide master and supporting layouts will remain in the slide task pane on the left because Slide Master view is the current view.
- Click the Font Color command in the Font group.
- Hover over each font option to display a live preview on the master slide.
- Select a font color from the menu options. The font color change will appear on all the slides in the task pane on the left.
- Click an alignment command to change the alignment of the selected text.
- Click the Slide Show view or Normal view command at the bottom of the window to exit Slide Master view and see the changes in the presentation slides.
To insert a picture on all slides:
- Select the Insert tab.
- Click the Picture command in the Illustrations group. The Insert Picture dialog box will appear.
- Locate the picture file on the computer.
- Select the picture file.
- Click Insert . The picture will appear on the slide master.
- Click the picture and while holding down the mouse button, drag it to the desired location on the slide. Release the mouse button.
Pay attention to the tab that's active so you don't take unnecessary steps to accomplish a task. For example, if the Slide Master tab is active, click the Close Master View command to return to Normal view; however, if it isn't active, click the Normal view command at the bottom of the window.
Making changes to specific layouts
In addition to changing design elements on all slides, you can change design elements on slides that use a specific layout . For example, you can apply different formatting to the Title and Content or Section Header layouts. By customizing specific slide layouts, you have more control over the slides and the presentation as a whole.
To change font color/formatting on slides with a specific layout:
- Select the supporting layout you want to change. In this example, we'll select the Section Header Layout in the task pane on the left.
- Select the text you want to modify on the slide. Now you can format it how you want. In this example, we'll change the font color and add a text shadow.
- Select the Home tab.
- Hover over each option to display a live preview on the master slide.
- Select a font color from the menu options.
- Click the Text Shadow command to add a shadow to the selected text.
- Click Normal view to close the slide master view and see the section header slides that have been formatted.
To insert a line on slides with a specific layout:
- Select the supporting layout you want to change. In this example, we will select the Title and Content Layout in the task pane on the left.
- Click the Shape command.
- Select a line from the menu. The cursor will turn into a crosshair.
- Click and drag the mouse to insert a line where you want on the slide. Release the mouse button.
- Select the Format tab. Format the line if you want. In this example, we'll change the line color, weight, and style.
- Click the Shape Outline command.
- Choose a color, weight, or line style option.
- Click the Normal view command to close the Slide Master view and see the section header slides that have been formatted.
Press and hold the Shift key while inserting a straight line. This will make the line appear completely straight.
Use the Employee Orientation presentation or any other presentation you choose to complete this challenge.
- Open a presentation.
- Open Slide Master view.
- Insert a picture on all slides .
- Change the title color and alignment on all slides.
- Change text formatting on one layout .
- View the presentation in Slide Show view to see the changes.
/en/powerpoint2007/smartart-illustrations/content/
How can I apply the master to all slides in PowerPoint?
May 13, 2024 /
To apply the master to all slides in PowerPoint, follow these steps: 1. Open your PowerPoint presentation. 2. Go to the “View” tab in the top menu. 3. Click on “Slide Master” in the “Master Views” group. 4. The Slide Master view will open, displaying the master slide at the top. 5. Make any desired changes to the master slide, such as adding a logo or adjusting the font style. 6. Once you are done editing the master slide, go back to the “View” tab and click on “Normal” to return to the normal slide view. 7. The changes made to the master slide will now be applied to all slides in your presentation.
- How can I utilize artificial intelligence to create PowerPoint presentations efficiently?
- How can I use artificial intelligence to create PowerPoint presentations?
- Why do the lines in my PowerPoint presentation appear one at a time?
- How can I make objects in PowerPoint appear and disappear during my presentation?
- What are the alignment tools available in PowerPoint and how can they be used to enhance the design and layout of presentations?
Popular Posts

Common Challenges in Tailoring Presentations—and Solutions

Dos and Don’ts of Pre-Seed Pitch Deck Creation

How to Write a Teaser Pitch Deck that Captivates

Tips for a Persuasive How It Works Slide

What Not to Do When Presenting Funding History

Why Raising Funds Without a Pitch Deck Can Backfire

Contribute to the Microsoft 365 and Office forum! Click here to learn more 💡
April 9, 2024
Contribute to the Microsoft 365 and Office forum!
Click here to learn more 💡
PowerPoint Forum Top Contributors: Steve Rindsberg - John Korchok - Bob Jones AKA: CyberTaz ✅
May 10, 2024
PowerPoint Forum Top Contributors:
Steve Rindsberg - John Korchok - Bob Jones AKA: CyberTaz ✅
- Search the community and support articles
- Microsoft 365 and Office
- Search Community member
Ask a new question
How can I amend a PowerPoint Slide Master using .ppt for IOS? I know you couldn’t do this 10 years ago but surely it must have been fixed by now!!
How can I amend a PowerPoint Slide Master using .ppt for IOS? I know you couldn’t do this 10 years ago but surely it must have been fixed by now!!
- Subscribe to RSS feed
Report abuse
Reported content has been submitted
- Volunteer Moderator
You can only revise slide master in a desktop edition of PowerPoint (Windows or macOS). It's not possible in PowerPoint for the web or in any of the mobile versions.
Was this reply helpful? Yes No
Sorry this didn't help.
Great! Thanks for your feedback.
How satisfied are you with this reply?
Thanks for your feedback, it helps us improve the site.
Thanks for your feedback.
Replies (1)
Question info.
- iPhone or iPad
- Norsk Bokmål
- Ελληνικά
- Русский
- עברית
- العربية
- ไทย
- 한국어
- 中文(简体)
- 中文(繁體)
- 日本語

Universal Design Center
- Skip to Content
- Accessibility
- ATI Governance
- Laws and Policies
- Web Accessibility Criteria
- Mobile Accessibility
- ARIA Best Practices
- Best Practices for Accessible Images
- Best Practices for Accessible Forms
- Best Practices for Accessible Links
- Just One Thing - Descriptive Text
- ICT Procurement Form
- ICT Accessibility Review
- Plan for Alternate Access
- ICT & ATI FAQ's
- ICT Procurement - Canvas Course
- Information for ICT Vendors
- Pre-Approved ICT's
- Google Docs
- Google Slides
- Canvas Ally
- Canvas Accessibility
- Course Accessibility Checklist
- Academic Styles
- STEM Accessibility
- EquatIO for STEM
- Readability
- Email Accessibility
- Flyers & Infographics Accessibility
- Canva vs PowerPoint Design
- Social Media Accessibility
- Survey Accessibility
- Document Learning Tools
- ATI Captioning
- Faculty/Staff
- Request Captioning
- Zoom Captions
- Do-It-Yourself (DIY) Captions
- Audio Descriptions
- Video Accessibility
- Training and Events Calendar
- Training Videos and Resources
- Document Accessibility for Student Employees
- Request a Training
- Accessibility News
- Receive Training News
- Digital Handouts
- Universal Design Perspectives
- Eight-Point Accessibility Check
- Web Evaluations
- Document Evaluations
- Multimedia Evaluations
- Compliance Sheriff
- Compliance Deputy
- Software Download
universal-design-center
- ICT Procurement Main
- Digital Media and Documents Main
- Captioning Main
- Training Main
- Evaluation Tools Main
PowerPoint Accessibility
Tuesday, october 29, 2024 - 10:00am to 12:00pm, register for this event.
Description: This training demonstrates how to use the tools in Microsoft PowerPoint 2019 or 365 to add visual interest to presentations without creating accessibility barriers. How to convert your presentation to a tagged PDF or create an alternate format of Braille or large print. Participants will learn key structural elements for creating accessible documents.
Recommended Attendees: Staff, Faculty, IT Specialist, Web Developers, Web Content Creators, Graphic Designers, Instructional Support, Business Analysis, Financial Personnel, Marketing Specialist, and Admin Support.
Learning Objectives
- Identify the principals of accessibility and universal design
- Using slide master in PowerPoint to optimize the accessibility of slides.
- Explain key features of accessible PowerPoint documents
Note: The accessibility training is for CSUN faculty, staff, student employees, and alumni.
Events by type
- Professional Development
- Page Feedback
- Emergency Information
- University Policies & Procedures
- Terms and Conditions for Use
- Privacy Policy
- Document Reader
- California State University
Food Recipes Presentation Template

- Template Details
Are you looking for an easy way to showcase your recipes online or in print? The food recipe presentation template is a great option. This template provides a clean, professional layout to highlight all the key details of your recipes. It features recipe special offers, delicious recipes, a best chef, a recipes gallery, a recipes menu, popular recipes, recipe pricing, customer reviews, and many more. The simple yet attractive design allows your recipes to stand out. With this template, you can quickly and effectively share your favorite dishes with family and friends or build an online collection of recipes to share with others. The food recipe presentation template takes the guesswork out of recipe design so you can focus on what matters most - the taste and enjoyment of your creations. Download our food & recipe presentation template in PowerPoint & Google Slides.
Product Features:
- 20+ clean, creative, & modern slides.
- 16 x 9 Widescreen (No more broken slides)
- 1920 x 1080 px (Full HD & retina-ready)
- Based on Master Slides
- PPTX and PPT Files (For both the latest and old versions of PowerPoint)
- Editable Google Slides Theme
- 1500+ Icons (750+ vector icons & 750+ font icons)
- Image Placeholders (Drag-and-drop your photo)
- Elements are fully editable in PowerPoint and Google Slides
- Device mockups Included
- Data Charts Editable via Excel
- Interactive and Easily Editable Maps
- Easy Editable Colors
- Fast & Friendly Support
If you have any questions or need support regarding this product, please feel free to contact us through our contact page! We'll gladly help you out!
Product Specs
- Release: May 11, 2024
- Last Update: May 17, 2024
- Aspect Ratio: Widescreen (16:9)
- Compatibility: Google Slides, PPT, PPTX
Similar templates you may like
Home Blog PowerPoint Tutorials How To Insert Swimlane in PowerPoint
How To Insert Swimlane in PowerPoint

Flowcharts are commonly used for depicting processes and workflow. While a conventional flowchart can be a little complicated to explain in slides, you can create swimlanes in PowerPoint to make it easier for your audience to understand the diagram.
What is a Swimlane Diagram?
A swimlane diagram, also called a cross-functional flowchart, depicts a process from start to finish while categorizing it to visually distinguish departments and employees responsible for each set of actions. The difference between a regular flowchart and a swimlane diagram is that the latter makes it easier to identify responsibilities more clearly. This can help weed out inefficiencies and help improve processes.
What are the Benefits of Using Swimlane Diagrams in PowerPoint?
Enhanced clarity.
Swimlane diagrams make it easier to present complex processes by visually distinguishing responsibilities within different departments or teams. This clarity helps the audience understand who is responsible for each step of the process.
Improved Efficiency
By categorizing actions and responsibilities, swimlane diagrams can help identify inefficiencies and bottlenecks in a process. This makes it easier to streamline operations and enhance overall efficiency.
Effective Communication
Swimlane diagrams provide a structured way to communicate processes and workflows, making it simpler for team members to understand their roles and contributions.
Visual Appeal
PowerPoint allows you to format swimlane diagrams with colors, shapes, and labels, making them visually appealing and engaging for your audience.
How to Create a Swimlane Diagram in PowerPoint
Swimlanes can be arranged both vertically and horizontally. Below are a few simple steps that you can use to create a swimlane PowerPoint diagram.
Step 1: Create a Table to Distinguish Categories
Insert a table via Insert > Table . Alternatively, you can also start with Insert > SmartArt and pick a suitable diagram to create your swimlane diagram. You can also draw a table using PowerPoint Shapes.

Step 2: Label Categories in the Diagram
Label the categories in the table. This will help you segregate different parts of your flowchart into categories to identify functions and responsibilities efficiently.

Step 3: Start Showing the Process using PowerPoint Shapes
Go to Insert > Shape in PowerPoint and add flowchart shapes to build your diagram, such as a Terminal to show the start of your diagram or a Process to show a process. If you would like to learn about the various symbols used in flowcharts, see our post about how to make a flowchart .

Step 4: Format Your Swimlane Diagram
Format your flowchart elements to make them easier to differentiate. Using Ribbon menu options, you can add text, change the color of your diagram objects, resize, and drag to position them according to need.

Step 5: Insert Flowlines to Indicate Steps
Insert flowlines to connect your diagram elements and indicate the steps in the process. You can add them via Insert > Shapes by selecting the line and arrow shapes.

Below is an example of how you can build a swimlane diagram in PowerPoint using Shapes.

What Common Pitfalls Should I Avoid When Creating Swimlane Diagrams in PowerPoint?
- Overcomplicating: While swimlane diagrams can enhance clarity, they can also become overly complex if you try to include too much detail. Keep them focused on the key aspects of the process to prevent confusion.
- Inconsistent Formatting: Ensure that you maintain consistent formatting throughout your swimlane diagram. Inconsistent colors, shapes, or labeling can make the diagram harder to understand.
- Lack of Context: Always provide context and explanations for your swimlane diagrams. Don’t assume that your audience will immediately understand the diagram without some guidance.
- Ignoring Feedback: If you’re creating swimlane diagrams collaboratively, be open to feedback from team members. Ignoring valuable input can lead to inaccuracies or missed opportunities for improvement.
- Overlooking Templates: Creating swimlane diagrams from scratch can be time-consuming. Consider using pre-designed PowerPoint swimlane templates to save time and ensure a professional look.
PowerPoint Swimlane Templates
While building a swimlane diagram from scratch can be difficult, using PowerPoint Templates or Google Slides Templates can help you avoid spending too much time on your diagrams. Using a PowerPoint Swimlane Template by SlideModel, you can easily edit the professionally designed layouts to create presentations with swimlane diagrams.

Swimlane diagrams can help depict business processes that involve multiple departments. Making it easier to identify not only the process but delays, inefficiencies, and places where deceitful practices are likely to occur. Unlike conventional flowcharts, swimlane diagrams are easier to read and present. However, making a PowerPoint Swimlane Template can be just what you need to make the most out of your diagram without wasting hours perfecting it.
Frequently Asked Questions (FAQs) About Inserting Swimlanes in PowerPoint
Swimlane diagrams are versatile and can be used for various processes and workflows, especially those involving multiple departments or teams. However, it’s essential to ensure that using a swimlane diagram adds value and clarity to your specific presentation.
To ensure understanding, provide context by explaining the diagram’s purpose and the meaning of each category and shape. Use clear labeling and maintain consistent formatting throughout the diagram.
Yes, you can add animations to swimlane diagrams in PowerPoint to show the flow of the process step by step. This can be helpful for emphasizing specific points during your presentation.
The choice between vertical and horizontal swimlane diagrams depends on the layout that best suits your content and presentation style. Vertical swimlanes may work better for certain processes, while horizontal swimlanes may be more suitable for others. Consider your audience’s perspective and the flow of the process when making this choice.

Like this article? Please share
PowerPoint Shapes, PowerPoint Tips Filed under PowerPoint Tutorials
Related Articles

Filed under PowerPoint Tutorials • March 26th, 2024
How to Translate in PowerPoint
Unlock the experience of PowerPoint translation! Learn methods, tools, and expert tips for smooth Spanish conversions. Make your presentations global.

Filed under PowerPoint Tutorials • March 19th, 2024
How to Change Line Spacing in PowerPoint
Adjust text formatting by learning how to change line spacing in PowerPoint. Instructions for paragraph indenting included.

Filed under PowerPoint Tutorials • March 12th, 2024
How to Create an Action Button in PowerPoint
Create engaging presentation slides by learning how to make an action button in PowerPoint. Add CTAs to your slides in just minutes.
Leave a Reply
- What is a slide master? Article
- Add, rearrange, duplicate, and delete slides in PowerPoint Article
- Apply a slide layout Article
- Add color and design to your slides with Themes Article
- Start with a template Article
- Get design ideas for slides Article
- Customize a slide master Article
- Change the page orientation in PowerPoint between landscape and portrait Article
- Organize your PowerPoint slides into sections Article
- Add a DRAFT watermark to the background of slides Article
- Create, merge, and group objects on a slide Article
- Guides for arranging things on a slide in PowerPoint Article
- Change the order in which stacked objects, placeholders, or shapes appear on a slide Article
- Rotate or flip an object Article
Customize a slide master
Use a slide master to add consistency to your colors, fonts, headings, logos, and other styles, and to help unify the form of your presentation.
You can change a slide master's colors, fonts, or effects. You can move, hide, or show placeholders. You can also change the orientation of the page from portrait to landscape, or vice versa.

Create and customize one or more slide masters
On the View tab, select Slide Master .

When you open Slide Master view, a slide master is shown in the thumbnail pane with the default, associated layouts below it. If you want to add another slide master, do the following:
Click a location in the slide thumbnail pane where you want the new slide master to appear.
On the Slide Master tab, select Insert Slide Master .
Note: In the slide thumbnail pane, the slide master is the larger slide image at the top, and the associated layouts are positioned below the slide master.
Do any of the following:
To create one or more custom layouts or to modify existing layouts, see Apply or change a slide layout .
To remove any of the built-in slide layouts that accompany the default slide master, in the slide thumbnail pane, click each slide layout that you want to delete, and then on the Slide Master tab, click Delete .
To apply a design or theme-based colors, fonts, effects and backgrounds, see Create your own theme in PowerPoint .
To set the page orientation for all of the slides in your presentation, on the Slide Master tab, select Slide Size > Custom Slide Size . Under Orientation, select the orientation you want.

To control whether footers (the slide number, date, and footer-text placeholders) are visible on a particular type of slide: In the thumbnail pane, select a slide layout, then on the Slide Master tab, select or clear Footers . To assign specific text to any of the footers, on the ribbon, select Insert > Headers, then select the options you want. See Insert or change the slide numbers, date, or footer for on-screen slides for more details.
After you make your changes, on the Slide Master tab, select Close Master View .
If you want to save this as a template to reuse again, select File > Save as (or Save a Copy ), change the file type to template, enter a file name, and select Save .
What is a slide master?
Learn more about themes
Add a placeholder to a layout
Change text alignment, indentation, and spacing
Use multiple slide masters in one presentation
On the View tab, click Slide Master .

When you open Slide Master view, a blank slide-master with the default, associated layouts appears. If you want to add another slide master, do the following:
On the Slide Master tab, click Insert Slide Master .
Note: In the slide thumbnail pane, the slide master is the larger slide image, and the associated layouts are positioned beneath the slide master.
To set the page orientation for all of the slides in your presentation, on the Slide Master tab, click Slide Size > Page Setup . Under Orientation, click the orientation you want.

To add text that will appear as a footer at the bottom of all of the pages in your presentation, on the Slide Master tab, click Slide Size > Page Setup > Header/Footer .
After you make your changes, on the Slide Master tab, click Close Master .
If you want to save this as a template to reuse again, click File > Save as Template , type a file name, and click Save .
Background information
Learn more about slide masters
Create or change slide layouts in PowerPoint for Mac
Add a transparent picture (watermark) to your slides in PowerPoint for Mac
Add a logo, company name, or header or footer text to handouts
Add page numbers, the date and time, or footer text to all slides in PowerPoint for Mac
Change footer formatting on all slides in PowerPoint for Mac

Need more help?
Want more options.
Explore subscription benefits, browse training courses, learn how to secure your device, and more.

Microsoft 365 subscription benefits

Microsoft 365 training

Microsoft security

Accessibility center
Communities help you ask and answer questions, give feedback, and hear from experts with rich knowledge.

Ask the Microsoft Community

Microsoft Tech Community

Windows Insiders
Microsoft 365 Insiders
Was this information helpful?
Thank you for your feedback.
Google Slides
How to Hyperlink in Google Slides?

Table of Contents
A hyperlink is like a clickable link that takes you to another document, webpage, or even a specific part of a presentation. Adding hyperlinks to your Google Slides presentation can provide your audience with additional information on the topic.
Many presentation designers like using hyperlinks because it keeps the presentation clean and organized, without showing long URLs that might distract from the content. In this guide, you’ll learn how to easily insert hyperlinks into your Google Slides presentations. Without waiting further, let’s get started.
Types of Hyperlinks in Google Slides
Here are the different types of Hyperlinks users can create in Google Slides:
- External Websites: The most common type, you can link text, images, or shapes to any relevant web page, allowing viewers to explore more information online.
- Internal Navigation: Link to another slide within your presentation, either by number or by selecting the slide itself. This helps guide viewers to specific sections or create a non-linear flow.
- Google Drive Documents: Link directly to a relevant document stored in your Drive, giving viewers easy access to additional details or reference materials without leaving the presentation.
Create Hyperlinks in Google Slides: Different Methods
There are four different methods to add hyperlinks in your Google Slides presentation:
- From the Menu: This method involves using the “Insert” menu option.
- Right-Click Menu: You can also add hyperlinks by right-clicking on the element and selecting “Link”.
- Keyboard Shortcut: For a quicker approach, use the keyboard shortcut “Ctrl + K” (Windows) or “Cmd + K” (Mac).
- Toolbar Button: Look for the “Insert Link” button on the toolbar for another way to add hyperlinks.
Let’s take a closer look at how these methods function below.
Method 1: Add Hyperlinks in Google Slides Menu
Step 1: Select your slide and content : Open the Google Slides presentation and navigate to the slide where you want to add the hyperlink. Choose the text or object you want viewers to click on.
Step 2: Insert the hyperlin k: Go to the top menu bar and click “Insert,” then select “Link.” A dialog box will appear.
Step 3: Paste the link and apply : Paste the web address (URL) you want to link to in the provided field. Once done, click “Apply” to finalize the hyperlink.
Method 2: Add Hyperlinks with a Right-Click in Google Slides
Step 1: Select the Text: Start by highlighting the text you want to turn into a link.
Step 2: Right-Click and Link Up: Next, right-click on the selected text and choose “Link” from the menu.
Step 3: Paste and Apply: A dialog box will appear. Paste the web address (URL) you want to link to in the provided field, and then click “Apply” to create the hyperlink.
Method 3: Use Shortcut Keys for Hyperlinking in Google Slides
Step 1: Select Your Target: Begin by highlighting the text or object you want to turn into a link.
Step 2: Using the Keyboard Shortcut: Press “Ctrl+K” on Windows or “Cmd+K” on Mac to bring up the hyperlink dialog box.
Step 3: Paste and Apply: Paste the web address (URL) you want to link to in the designated field, and then click “Apply” to create the hyperlink.
Method 4: Add Hyperlinks by Using a Toolba r
Step 1: Choose Your Target: Begin by selecting the element (text, image, shape) you want to turn into a hyperlink.
Step 2: Click the Link Icon: Go to the toolbar and find the “Insert Link” icon (it might look like a chain). Click on it.
Step 3: Enter Your URL: A dialog box will appear with a blank field. Paste the web address (URL) you want to link to in this field.
Step 4: Apply the Link: Click the “Apply” button to create the hyperlink.
Create presentation slides with AI in Seconds in Google Slides
10M+ Installs
Works with Google Slides

How to Link a Specific Slide using Hyperlink?
Step 1: Choose Your Target: Select the object or text on the slide that you want to act as the hyperlink.
Step 2: Insert the Link: Click “Insert” in the toolbar and choose “Link.”
Step 3: Navigate to Your Slide: In the link menu, select “Slides in this presentation” and then choose the slide you want to link to.
Step 4: Apply the Hyperlink: Click “Apply” to finalize the hyperlink. Now, clicking the object or text will jump to the chosen slide during your presentation.
How to Edit a Hyperlink In Google Slides?
Step 1: Right-click on the hyperlink you want to change.
Step 2: Choose the option you want: “Edit Link” to modify the destination, or “Remove Link” to break the connection.
Closing Thoughts
Adding hyperlinks to your Google Slides presentations can significantly enhance the audience’s experience. By incorporating hyperlinks, you can provide viewers with additional resources, improve navigation within your presentation, and keep your slides clean and organized.
- No design skills required
- 3 presentations/month free
- Don’t need to learn a new software

Frequently Asked Questions
Why should i use hyperlinks in my google slides presentation.
Hyperlinks can significantly enhance your Google Slides presentation. They enable interactivity, making your presentation engaging and informative. You can use them to navigate lengthy presentations, cite sources, facilitate collaboration, and add visual appeal. In essence, hyperlinks make your presentation more interactive and dynamic, catering to various learning preferences.
How do I remove a hyperlink in Google Slides?
To remove a hyperlink, simply select the linked text or object, right-click, and choose “Remove link” from the context menu.
Are there any limitations to the types of URLs I can hyperlink in Google Slides?
Google Slides supports hyperlinks to various types of URLs, including webpages, Google Drive files, and email addresses.
How can I test if my hyperlinks are working correctly before a presentation?
You can test your hyperlinks by entering presentation mode and clicking on each hyperlink to verify that it directs you to the intended destination.
Can I use hyperlinks in Google Slides when presenting offline?
Hyperlinks in Google Slides require an internet connection to function properly. However, you can download your presentation for offline use, but the hyperlinks may not work until you reconnect to the internet.
Can I hyperlink images in Google Slides?
Absolutely! You can follow the same steps mentioned above to hyperlink images in your presentation.
Save Time and Effortlessly Create Presentations with SlidesAI

IMAGES
VIDEO
COMMENTS
Step-1: Click on the "Insert" tab. The first step is to click on the master slide from the slide layout panel on the left side of the screen in the "Slide Master" view. Then click on the "Insert" tab from the menu ribbon. Step-2: Click on the "Pictures" button.
PowerPoint 2013 training. Use slide masters to customize a presentation. Use slide masters. Overview Transcript. When you want to fully customize the design of a presentation, use the slide master to make global design changes and create exactly the look and layouts you need.
Select any of your layouts and click the option Insert Layout in the Edit Master group. It'll create a new type of slide you can edit and customize as you see fit. Use the option Insert Placeholder to add different kinds of elements to our new layout. #3. Adding a new Slide Master if necessary.
The master slide is the top slide in the thumbnail pane on the left side of the window. The related layout masters appear just below the slide master (as in this picture from PowerPoint for macOS): 1 Slide master. 2 Layout masters. When you edit the slide master, all slides that are based on that master will contain those changes.
Learn how to add slide masters to your presentation. To control whether footers (the slide number, date, and footer-text placeholders) are visible on a particular type of slide: In the thumbnail pane, select a slide layout, then on the Slide Master tab, select or clear Footers.To assign specific text to any of the footers, on the ribbon, select Insert > Headers, then select the options you want.
Learn how to use Slide Master in PowerPoint to control the look and feel of your whole presentation, including colors, fonts, background, effects, and just a...
On the slide master, you can define the master layout for the presentation. After opening the presentation, click View > Slide Master . Select the master slide and click the Master Layout button on the top ribbon. You can select a placeholder for title, text, date, footer, or slide number.
Open your presentation, head over to the "View" tab, and then click the "Slide Master" button. The Slide Master will appear in the left-hand pane. The Slide Master is the top thumbnail that appears in the pane, and each sub-thumbnail represents each slide layout available in your theme. Edits you make to the text of the Slide Master ...
Learn the secrets to using PowerPoint Slide Master effectively and save a ton of time and headache. This video covers basic as well as advanced Tips and Tric...
From the Master Slide tab, go to Theme -> Browse for Themes. Import an existing PowerPoint theme using Browse for Themes option. Select the theme with the Master Slides to import to your PowerPoint presentation. Once the changes are applied, click Close Master View. Choose and existing theme in PowerPoint.
Master the PowerPoint Slide Master with this deep dive tutorial. Learn how to create and customize master slides in any version of PowerPoint.
In the slide thumbnail pane start by clicking on each slide that you want to delete. Next, click on the Slide Master tab and then click on the Delete button. Hold down the Shift key on your keyboard to select multiple slides at once while using your mouse to select the slides. 3. Change the Slide Orientation.
Step 2: We also recommend removing the Drawing Guides in the Slide Master because they're separate from the Drawing Guides in the normal presentation, and you usually don't need multiple sets of Guides. To do this, enter the Slide Master and go to Layout #1 there (the "Office Theme Slide Master"). Press Alt, W, S (PC) or ⌘ + Opt + Ctrl + G (Mac) to show the Drawing Guides, which ...
What to Know. Go to View > Slide Master and select the top thumbnail in the Slide pane. Use the Slide Master tab to change colors, fonts, and more. Use the Slides pane to choose a slide layout thumbnail and make changes to the layout master. When you're done making changes, select Slide Master > Close Master View to return to your presentation.
If you're wanting to reuse a PowerPoint presentation but would like to clear the slideshow's formatting, there's no need to do it slide by slide---you can do it all at once. Here's how. First, open the PowerPoint presentation with the formatting you want to edit. To illustrate the before and after, here's what we'll be working with in this example.
Slide masters control the layout, master style and static slide elements of specific types of slides. This lesson will look more closely at the use of slide masters. To unlock this lesson you must ...
Slide Master view is a special feature in PowerPoint that allows you to quickly modify the slides and slide layouts in your presentation. From here, you can edit the slide master, which will affect every slide in the presentation. You can also modify individual slide layouts, which will change any slides using those layouts.
Click the Slide Show view or Normal view command at the bottom of the window to exit Slide Master view and see the changes in the presentation slides.; To insert a picture on all slides: Select the View tab.; Click the Slide Master view command in the Presentation Views group. The Slide Master tab will appear active. Select the slide master for all slides, if it is not currently selected.
This PowerPoint Master Slides beginners tutorial will teach you how to use master slide layouts in PowerPoint to quickly update the design of your slides. Us...
PowerPoint 2013 training. Use slide masters to customize a presentation. Use slide masters. Overview Transcript. When you want to fully customize the design of a presentation, use the slide master to make global design changes and create exactly the look and layouts you need.
To apply the master to all slides in PowerPoint, follow these steps: 1. Open your PowerPoint presentation. 2. Go to the "View" tab in the top menu. 3. Click on "Slide Master" in the "Master Views" group. 4. The Slide Master view will open, displaying the master slide at the top. 5.
Open the slide master for editing. On the View tab, select Slide Master. In Slide Master view, the slide master is at the very top of the thumbnail pane, with related layouts beneath it. Click to select that master slide, and then select Master Layout on the Slide Master tab. To show or hide the title, text, date, slide numbers, or footer ...
Harassment is any behavior intended to disturb or upset a person or group of people. Threats include any threat of suicide, violence, or harm to another.
Description: This training demonstrates how to use the tools in Microsoft PowerPoint 2019 or 365 to add visual interest to presentations without creating accessibility barriers.How to convert your presentation to a tagged PDF or create an alternate format of Braille or large print. Participants will learn key structural elements for creating accessible documents.
Download our food & recipe presentation template in PowerPoint & Google Slides. Product Features: 35+ clean, creative, & modern slides. 16 x 9 Widescreen (No more broken slides) 1920 x 1080 px (Full HD & retina-ready) Based on Master Slides; PPTX and PPT Files (For both the latest and old versions of PowerPoint) Editable Google Slides Theme
You can also draw a table using PowerPoint Shapes. Step 2: Label Categories in the Diagram. Label the categories in the table. This will help you segregate different parts of your flowchart into categories to identify functions and responsibilities efficiently. Step 3: Start Showing the Process using PowerPoint Shapes
In this video, I will show you how to update all of your PowerPoint slides at Once. Using Slide Master in PowerPoint lets you make quick changes like changi...
Click a location in the slide thumbnail pane where you want the new slide master to appear. On the Slide Master tab, select Insert Slide Master. Note: In the slide thumbnail pane, the slide master is the larger slide image at the top, and the associated layouts are positioned below the slide master. To create one or more custom layouts or to ...
How to Link a Specific Slide using Hyperlink? Step 1: Choose Your Target: Select the object or text on the slide that you want to act as the hyperlink. Step 2: Insert the Link: Click "Insert" in the toolbar and choose "Link." Step 3: Navigate to Your Slide: In the link menu, select "Slides in this presentation" and then choose the slide you want to link to.