
Configure Windows Service Accounts and Permissions exemplary on SQL Server 2019
Current windows operating systems provide a wide choice of accounts you can use to run local services. Today I want to pay attention to the individual accounts you can use as service accounts to run the different SQL Server 2019 services.
Detailed documentation about local user accounts in Windows you will also find in my post below.
Local user accounts in Windows
Configure Windows Service Accounts and Permissions https://docs.microsoft.com/en-us/sql/database-engine/configure-windows/configure-windows-service-accounts-and-permissions
You can choose between the following accounts that can be configured to start SQL Server services:
- domain user accounts
- local user accounts
- managed service accounts (group managed service accounts)
- virtual accounts
- built-in system accounts
Under https://docs.microsoft.com/en-us/sql/database-engine/configure-windows/configure-windows-service-accounts-and-permissions?view=sql-server-ver15#Default_Accts you will see the recommended accounts by Microsoft to use for.
When resources external to the SQL Server computer are needed, Microsoft recommends using a Managed Service Account (MSA) , configured with the minimum privileges necessary. When installed on a Domain Controller, a virtual account as the service account is not supported.
Changing Account Properties Always use SQL Server tools such as SQL Server Configuration Manager to change the account used by the SQL Server Database Engine or SQL Server Agent services , or to change the password for the account. In addition to changing the account name, SQL Server Configuration Manager performs additional configuration such as updating the Windows local security store which protects the service master key for the Database Engine . Other tools such as the Windows Services Control Manager can change the account name but do not change all the required settings. For Analysis Services instances that you deploy in a SharePoint farm, always use SharePoint Central Administration to change the server accounts for Power Pivot service applications and the Analysis Services service. Associated settings and permissions are updated to use the new account information when you use Central Administration. To change Reporting Services options, use the Reporting Services Configuration Tool.
Managed Service Accounts, Group Managed Service Accounts, and Virtual Accounts
https://docs.microsoft.com/en-us/sql/database-engine/configure-windows/configure-windows-service-accounts-and-permissions?view=sql-server-ver15#New_Accounts
Managed service accounts , group managed service accounts , and virtual accounts are designed to provide crucial applications such as SQL Server with the isolation of their own accounts, while eliminating the need for an administrator to manually administer the Service Principal Name (SPN) and credentials for these accounts. These make long term management of service account users, passwords and SPNs much easier.
- Managed Service Accounts A Managed Service Account (MSA) is a type of domain account created and managed by the domain controller. It is assigned to a single member computer for use running a service. The password is managed automatically by the domain controller. You cannot use a MSA to log into a computer, but a computer can use a MSA to start a Windows service. An MSA has the ability to register a Service Principal Name (SPN) within Active Directory when given read and write servicePrincipalName permissions. A MSA is named with a $ suffix, for example DOMAIN\ACCOUNTNAME$ . When specifying a MSA, leave the password blank. Because a MSA is assigned to a single computer, it cannot be used on different nodes of a Windows cluster.
- Group Managed Service Accounts A Group Managed Service Account (gMSA) is an MSA for multiple servers. Windows manages a service account for services running on a group of servers. Active Directory automatically updates the group managed service account password without restarting services. You can configure SQL Server services to use a group managed service account principal. Beginning with SQL Server 2014, SQL Server supports group managed service accounts for standalone instances, and SQL Server 2016 and later for failover cluster instances, and availability groups. To use a gMSA for SQL Server 2014 or later, the operating system must be Windows Server 2012 R2 or later. Servers with Windows Server 2012 R2 require KB 2998082 applied so that the services can log in without disruption immediately after a password change.
- Virtual Accounts Virtual accounts (beginning with Windows Server 2008 R2 and Windows 7) are managed local accounts that provide the following features to simplify service administration. The virtual account is auto-managed, and the virtual account can access the network in a domain environment . If the default value is used for the service accounts during SQL Server setup, a virtual account using the instance name as the service name is used, in the format NT SERVICE\ <SERVICENAME> . Services that run as virtual accounts access network resources by using the credentials of the computer account in the format <domain_name> \ <computer_name> $ . When specifying a virtual account to start SQL Server, leave the password blank. If the virtual account fails to register the Service Principal Name (SPN), register the SPN manually. For more information on registering a SPN manually, see Manual SPN Registration . Virtual accounts cannot be used for SQL Server Failover Cluster Instance , because the virtual account would not have the same SID on each node of the cluster.
Security Note: Always run SQL Server services by using the lowest possible user rights. Use a MSA , gMSA or virtual account when possible. When MSA, gMSA and virtual accounts are not possible, use a specific low-privilege user account or domain account instead of a shared account for SQL Server services. Use separate accounts for different SQL Server services. Do not grant additional permissions to the SQL Server service account or the service groups. Permissions will be granted through group membership or granted directly to a service SID, where a service SID is supported.
A detailed guide about setting up Managed Service Accounts (MSA) , you will find in my following post.
Set up Group Managed Service Accounts (gMSA) vs. Standalone Managed Service Accounts (sMSA)
Set up SQL Server 2019 and configure the service accounts
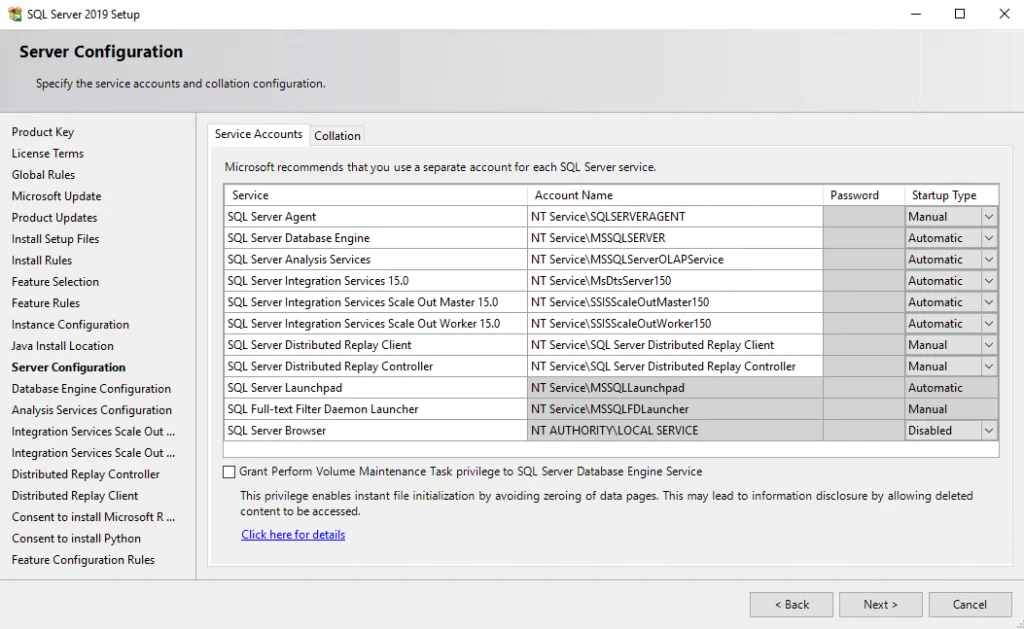
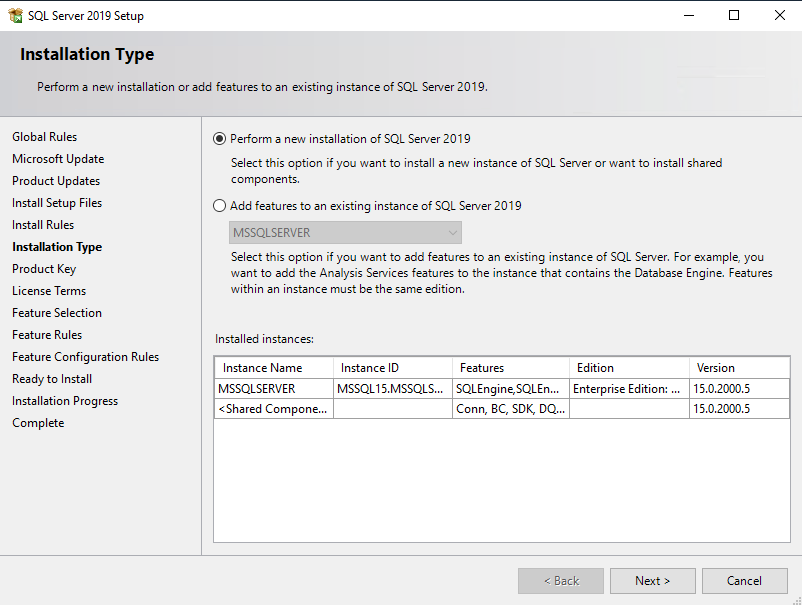
So now we will run the SQL Server 2019 setup and go through the steps with the service accounts configuration.
First we install a default instance , later we also add a named instance to see the difference regarding naming of the service accounts .
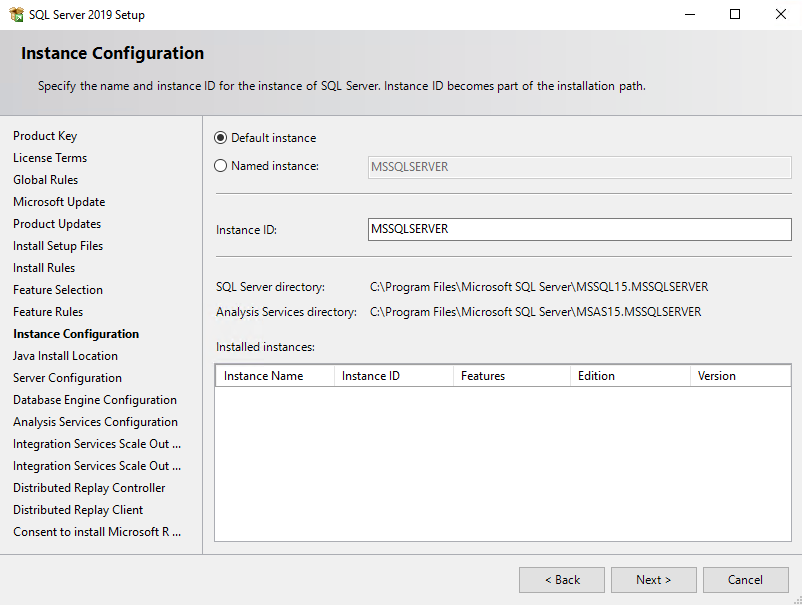
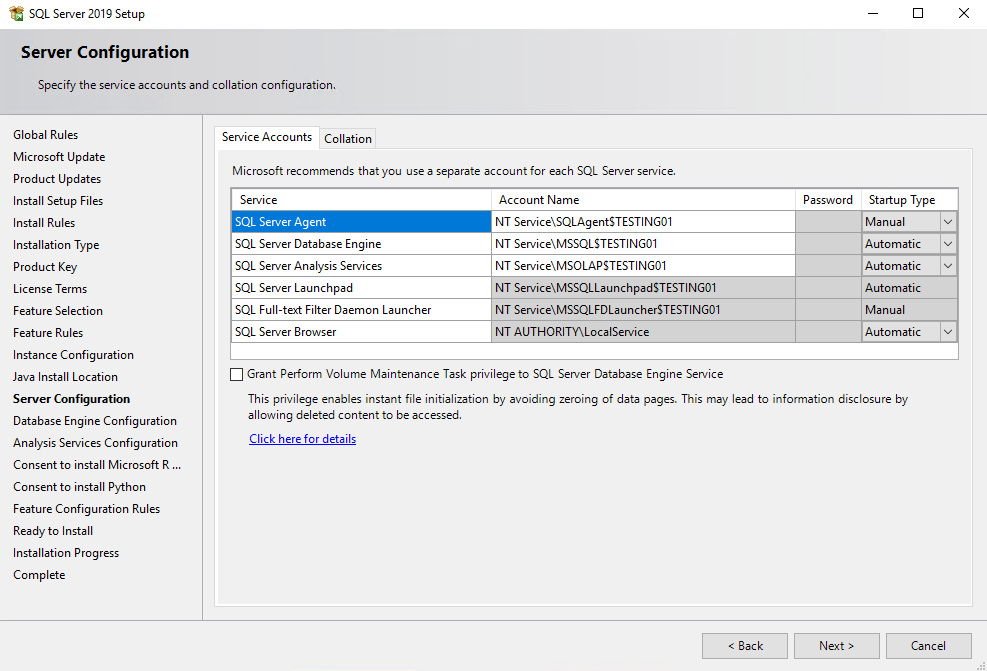
Here you can see as mentioned above with
If the default value is used for the service accounts during SQL Server setup, a virtual account using the instance name as the service name is used, in the format NT SERVICE\SERVICENAME .
Here you can see very nice, that the virtual account is using the instance name as the service name NT Service\MSSQLSERVER
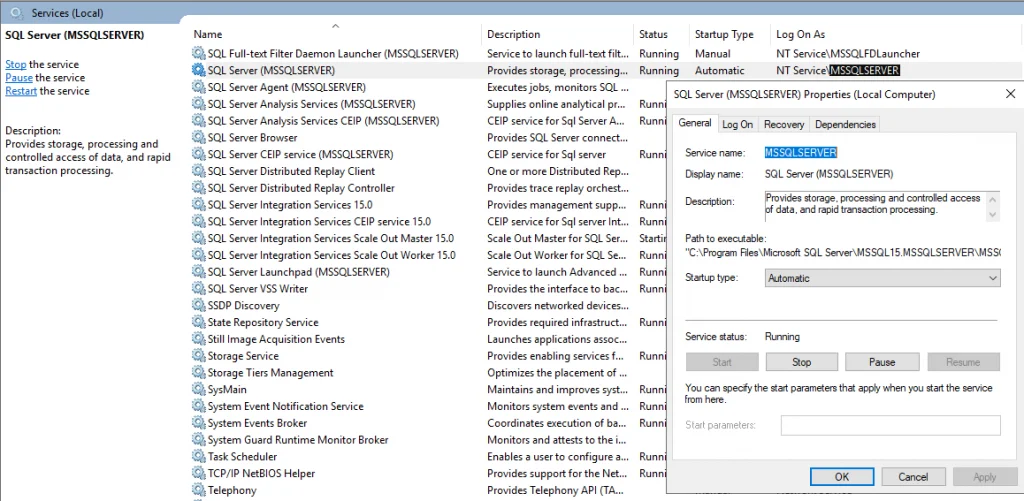
Important note Always use SQL Server tools such as SQL Server Configuration Manager to change the account used by the SQL Server Database Engine or SQL Server Agent services , or to change the password for the account . In addition to changing the account name, SQL Server Configuration Manager performs additional configuration such as updating the Windows local security store which protects the service master key for the Database Engine. Other tools such as the Windows Services Control Manager can change the account name but do not change all the required settings.f https://docs.microsoft.com/en-us/sql/database-engine/configure-windows/configure-windows-service-accounts-and-permissions?view=sql-server-ver15#Changing_Accounts
Service Configuration and Access Control
https://docs.microsoft.com/en-us/sql/database-engine/configure-windows/configure-windows-service-accounts-and-permissions?view=sql-server-ver15#Serv_SID
SQL Server 2019 (15.x) enables per-service SID for each of its services to provide service isolation and defense in depth. The per-service SID is derived from the service name and is unique to that service. For example, a service SID name for a named instance of the Database Engine service might be NT Service\MSSQL$ <InstanceName> . Service isolation enables access to specific objects without the need to run a high-privilege account or weaken the security protection of the object. By using an access control entry that contains a service SID, a SQL Server service can restrict access to its resources.
On Windows 7 and Windows Server 2008 R2 ( and later ) the per-service SID can be the virtual account used by the service .
For most components SQL Server configures the ACL for the per-service account directly, so changing the service account can be done without having to repeat the resource ACL process.
Windows Privileges and Rights
https://docs.microsoft.com/en-us/sql/database-engine/configure-windows/configure-windows-service-accounts-and-permissions?view=sql-server-ver15#Windows
The account assigned to start a service needs the Start, stop and pause permission for the service. The SQL Server Setup program automatically assigns this . First install Remote Server Administration Tools (RSAT). See Remote Server Administration Tools for Windows 10 .
File System Permissions Granted to SQL Server Per-service SIDs or Local Windows Groups
https://docs.microsoft.com/en-us/sql/database-engine/configure-windows/configure-windows-service-accounts-and-permissions?view=sql-server-ver15#Reviewing_ACLs
SQL Server service accounts must have access to resources. Access control lists are set for the per-service SID or the local Windows group.
For failover cluster installations , resources on shared disks must be set to an ACL for a local account.
Now as mentioned above, we will also install a named instance , to see the default naming of the virtual accounts , SQL Server Setup will create for us.
Here you can see as mentioned above
The per-service SID is derived from the service name and is unique to that service. For example, a service SID name for a named instance of the Database Engine service might be NT Service\MSSQL$<InstanceName> .
Related Posts
Set up windows autopilot – production environment from external – part 2, owncloud files not showing up in the browser, email authentication by using dmarc, dkim and spf, latest posts, set up a nfs server in windows server 2022, set up suse linux enterprise server 15, enable x11 forwarding with putty and the xming x server for windows, the best home for modern wordpress sites built on the google cloud platform.


Create a New User in SQL Server
Managing SQL Server security is a critical part of maintaining your SQL Server environment. In this article, let us take a step-by-step approach to create a new database User and grant permissions to the User.
In SQL Server, a Login is created for the server instance whereas a User is created for a database. A Login has to be mapped to a User to connect to a database. A login can be mapped to only one user for any database. The scope of a User is the database
There are two ways to create a new User or to grant user permissions:
- Using Microsoft SQL Server Management Studio
- Using T-SQL
Create New User using SSMS
Open SQL Server management studio. In the Object Explorer, expand the Databases node.
Here, we are going to create a new user for the HR database. So, expand the HR database.
Expand the Security folder of the database and right click on User and select New User, as shown below.

In the Database User - New dialog box, on the General tab page, User type drop down lists the following types:
- SQL user with login
- SQL user with password
- SQL user without login
- User mapped to a certificate
- User mapped to an asymmetric key
- Windows user
Select the User type as "SQL User with login" from the drop-down.
Under User name, enter a new user name. Here, we will enter ‘Steve' as a user name.
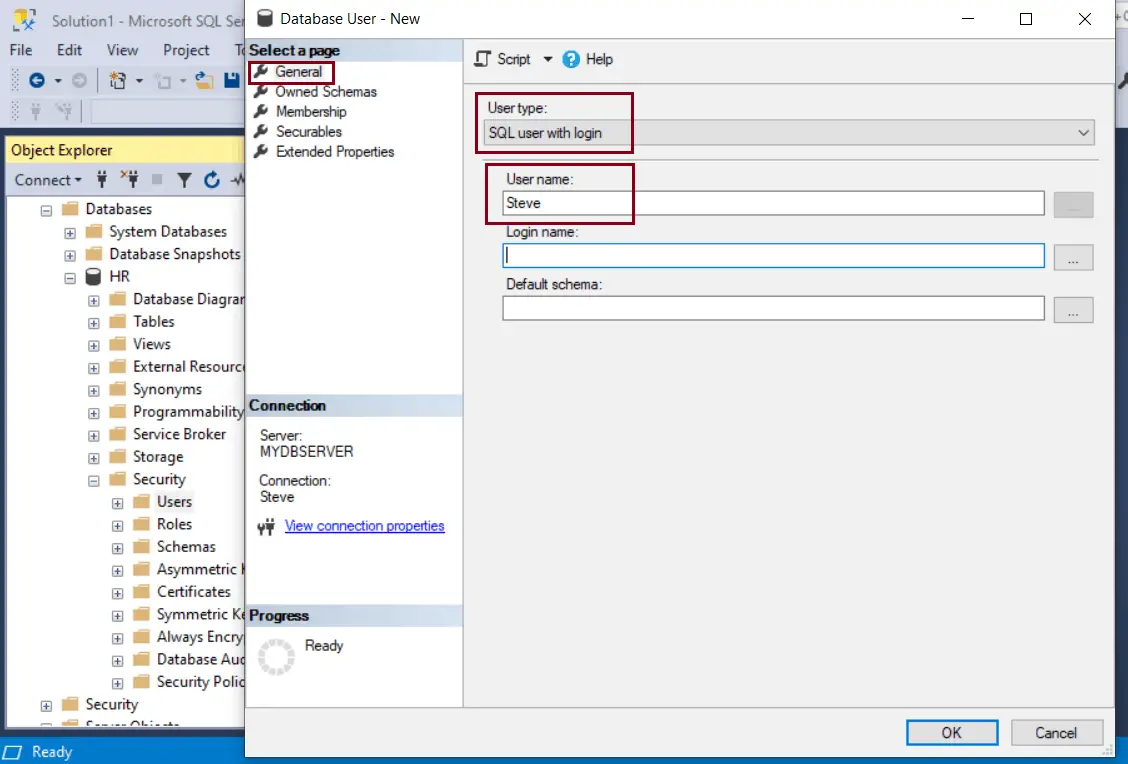
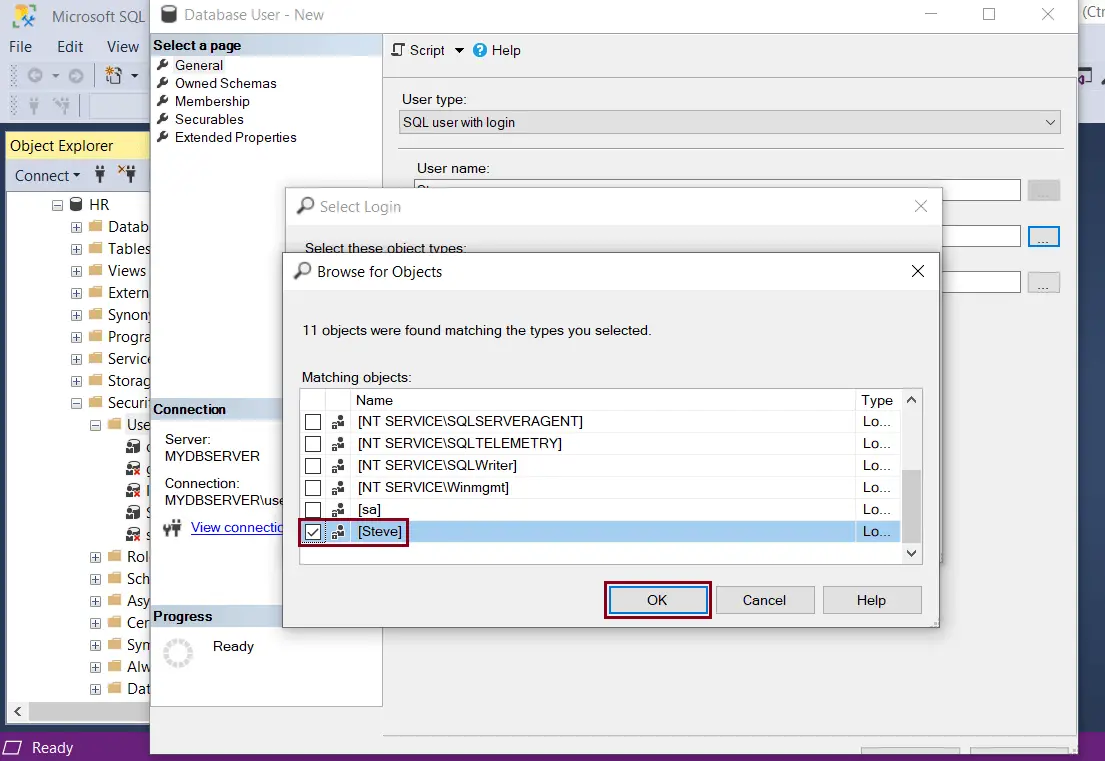
Under Login name, type the previously created login i.e., Steve. Alternately click on the ellipsis ... button to open the Select – Login dialog box.

Click on Browse button and select an existing login name to map with this user, as shown below. Select login ‘Steve'. Click the OK button to proceed.
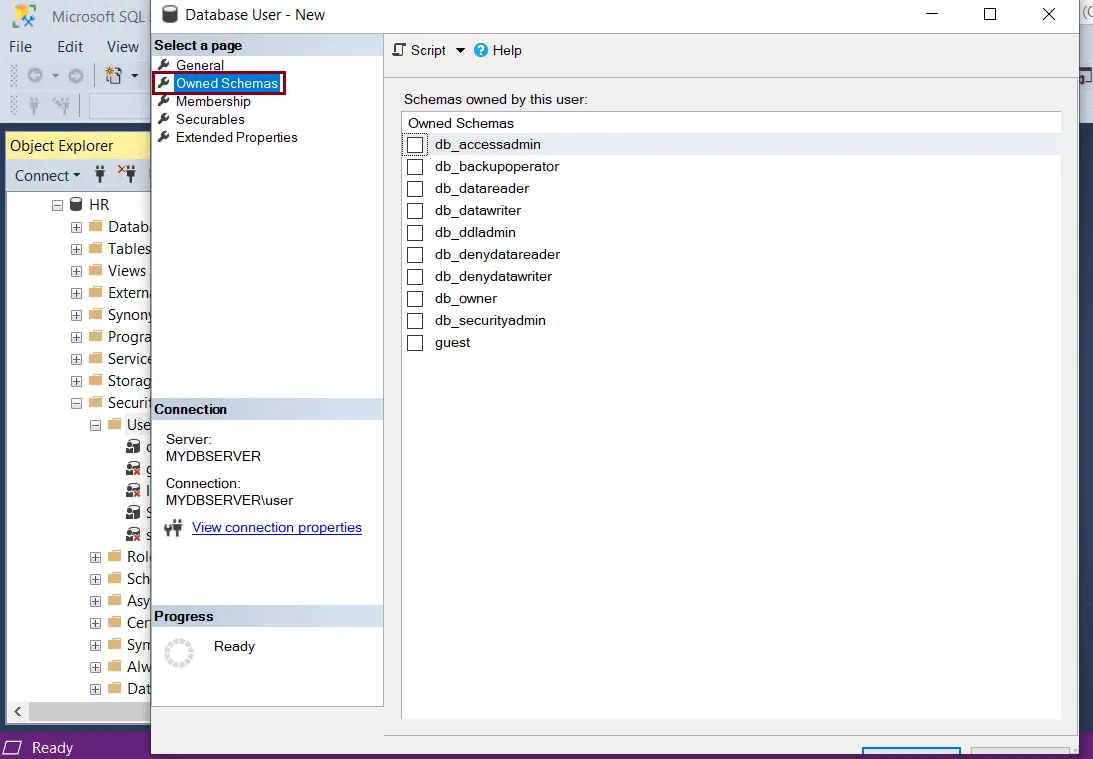
The Owned Schema page lists all the available schemas in the database. To add schemas to the user, select the check box next to the schema name.
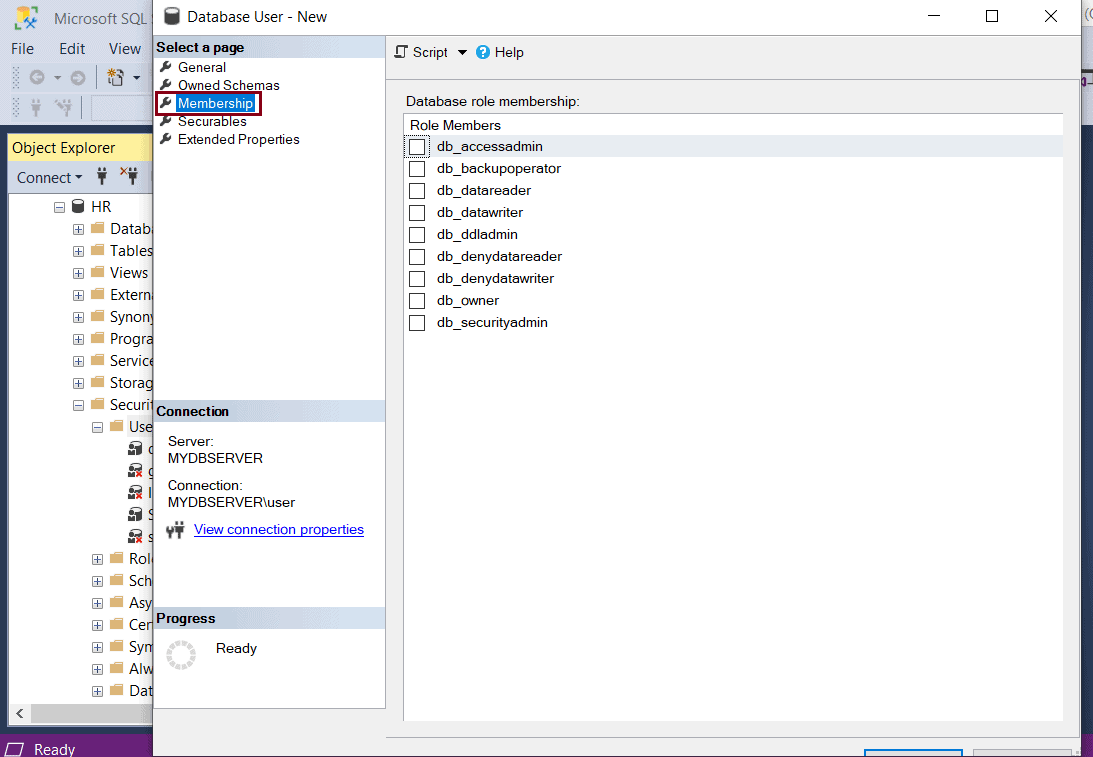
The Membership page lists all the possible membership roles that can be owned by the database user being created. To add membership roles, select the check-box next to the roles.
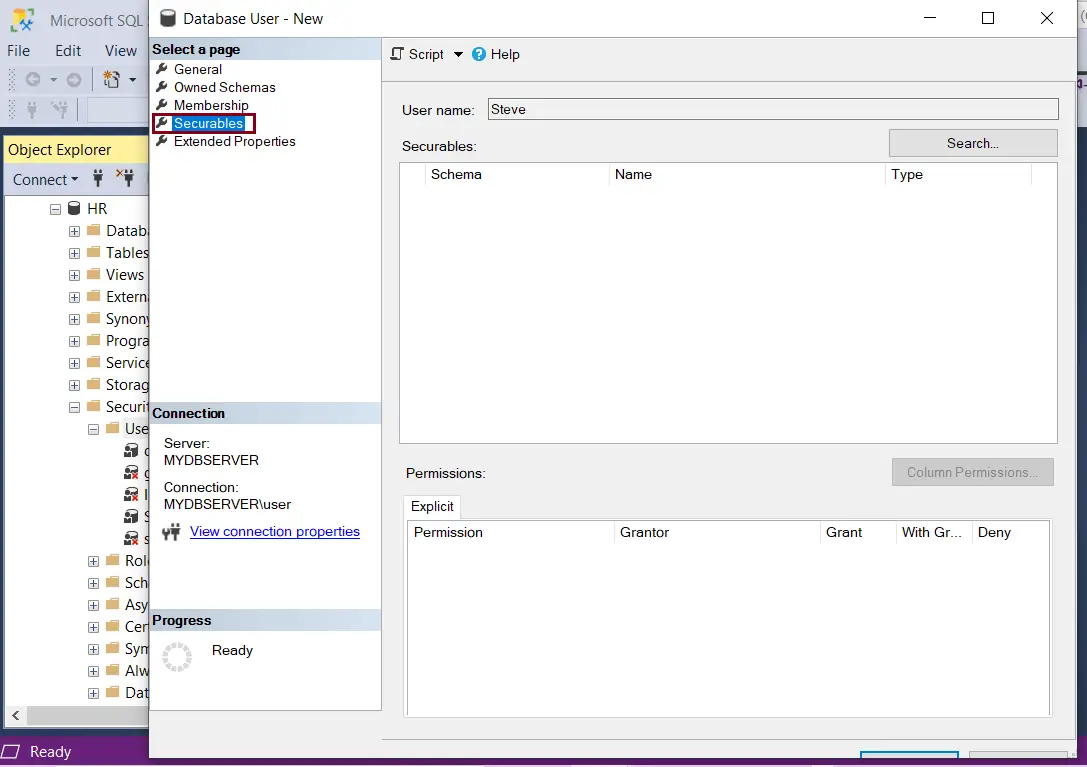
The Securables page lists all the securables and permissions that can be granted to the user. We will look at how to grant permissions to the User later in the article under User Permissions.
The Extended Properties page allows custom properties to be added to database users.
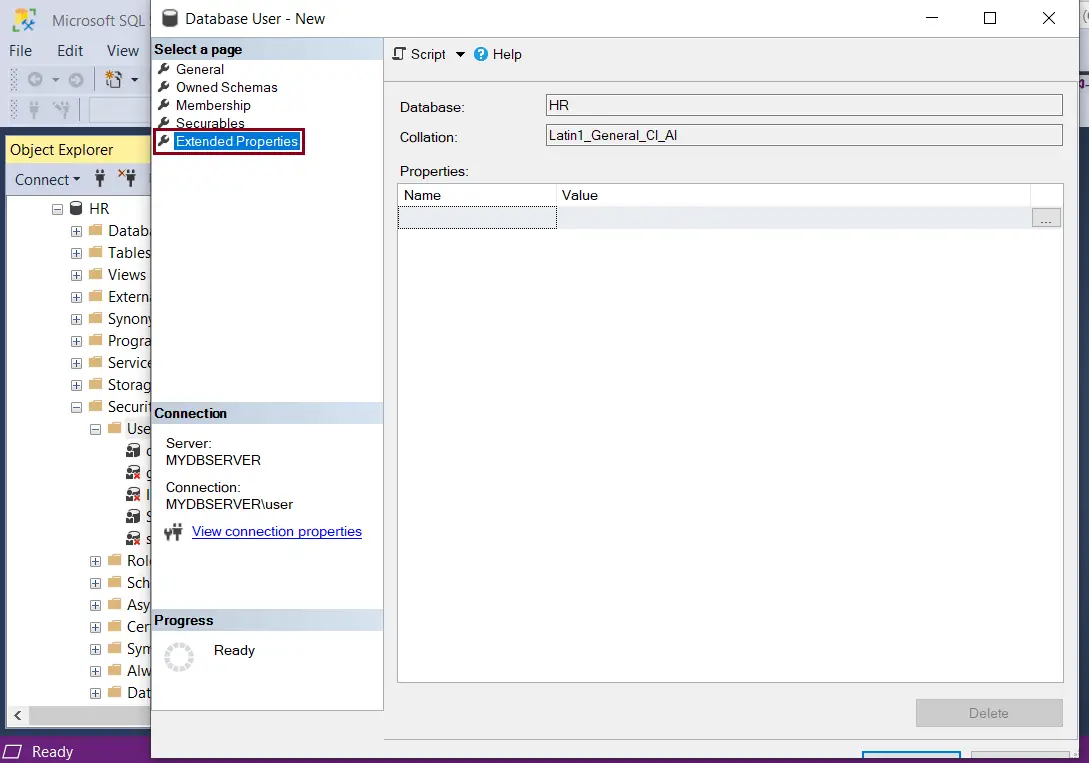
This page displays the name of the selected database and the collation used which are read-only fields. The page also has an option to view or specify the extended properties for the object.
Click OK to create this user.
Create a New User using T-SQL
The following creates a new user Steve in the HR database:
.NET Tutorials
Database tutorials, javascript tutorials, programming tutorials.
Lock Pages in Memory for SQL Server on Windows
By: Manvendra Singh | Updated: 2021-07-19 | Comments (6) | Related: > SQL Server Configurations
Lock Pages in Memory is one of the important settings to handle memory pressure on a Windows server when using SQL Server. In this tutorial, I will explain this setting along with the steps on how to enable or disable it on your servers.
Lock Pages in Memory (LPIM) is a Windows policy that prevents the system from not performing data paging to virtual memory on disk during memory pressure. LPIM locks your data in physical memory to improve the system performance and can be very helpful for SQL Server. To use this for SQL Server, you must enable this setting for your SQL Server instances. If you haven’t enabled it and you are seeing performance degradation or memory paging on your server then you should enable this setting by adding the SQL Server service account to this Windows policy. You will see error 17890 in the SQL Server error log file if your system is facing memory paging issues and this setting may help you reduce these errors in a significant manner.
Understanding Lock Pages in Memory Configuration
Lock Pages in Memory is a Windows policy that determines which accounts can use a process to keep data in physical memory, preventing the system from paging the data to virtual memory on disk. Locking pages in memory may keep the server responsive when paging memory to disk occurs. It means SQL Server will use memory as much as it requires, and it will not be released to the OS in normal circumstances. This behavior may increase the system and SQL Server performance if there is any memory pressure on the system.
Check Lock Pages in Memory Configuration
There are multiple ways to check whether this setting is enabled or not for your SQL Server instance running on a Windows server. I am going to explain 4 different ways to check whether lock pages in memory is enabled for your SQL Server instance.
The first way to check this setting is by executing the below T-SQL statement. If output of "locked_page_allocations_kb" shows 0 it means this setting is disabled and not being used for SQL Server.
We can see the output shows 0 which means this setting is not enabled for SQL Server.

The second option to check and verify whether LPIM is enabled or not for a SQL Server instance is by looking at the SQL Server error log file. As we know, when SQL Server starts it logs system related information in the error log file as informational messages. I checked my SQL Server instance and saw the below information that shows lock pages in memory is not enabled because the error log shows that SQL Server is "using conventional memory in the memory manager".

The third option is by looking at the property window for the Lock Pages in Memory Windows policy. You can see there are no accounts added here. Ideally if this setting is enabled, then the SQL Server service account must be added to this Windows policy for SQL Server to use this feature.

The fourth option to check lock pages in memory by using the DMV sys.dm_os_sys_info . This DMV shows information about the memory model configuration of SQL Server which lets us know about lock pages in memory for the instance of SQL Server. Run the below command to get the output of the memory model.
The below output shows that the memory model being used is conventional and not locked pages in memory.

You can see there are two columns in the above output.
- 1 means "Conventional Memory Model" is being used
- 2 means "Lock Pages in Memory" is being used and enabled
- 3 means "Large Pages in Memory" is configured
- Similarly, the column "sql_memory_model_desc" specifies the description of the first column that I just explained above. You can see, I got a value of 1 which is "CONVENTIONAL". Conventional is the default when the SQL Server service account is not configured for Lock Pages in Memory.
Enable or Disable Lock Pages in Memory Configuration
We have checked for locked pages in memory for a SQL Server instance running on Windows server and we can see it’s not enabled in the above sections. Here, I will show you how to enable lock pages in memory for a SQL Server instance on a Windows server.
Note: You must have system administrator privilege. Also get the SQL Server service account details before going ahead with the steps. You can get it from the SQL Server service logon tab in SQL Server Configuration Manager.
Go to start menu on the Windows server, click Run and type gpedit.msc and press enter to launch the Windows local group policy window. The below screen will appear after you press enter.

You can see there are various options given on the left side pane in the above screen.
You need to expand Computer Configuration node and then expand Windows Settings . Then expand Security Settings , here you can see the Local Policies folder. Expand Local Policies and click User Rights Assignment as shown below.

Once you click on the User Rights Assignment folder, you can see all the Windows policies on the right. Next, search for the Lock pages in memory policy on the right. You can see this setting is not enabled because there is no account added to this policy as shown in the below screenshot.

Double click the Lock pages in memory policy to open its properties window. There are two tabs in this window. Click the first tab Local Security Setting and then click Add User or Group to add the SQL Server service account.

Once you click the button, you will get the below screen to select the SQL Server service account. In the Select Users, Service Accounts, or Groups dialog box, select the SQL Server service account. I entered the SQL Server service account which is recognized by Windows and then clicked OK.

Once you will click OK, the account will display in Local Security Setting tab as shown below. Click Apply and OK to save and close this window.

Now, you can see the SQL Server service account has been added to the Windows policy for Lock pages in memory as shown below.

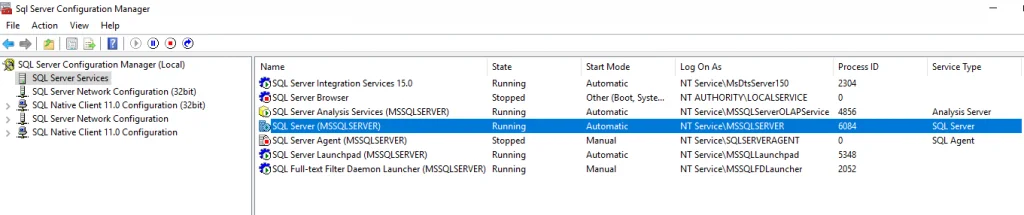
The final step is to restart the SQL Server service for this setting to take effect. Launch SQL Server Configuration Manager and restart the SQL Server service as shown below. Lock Pages in Memory should now be enabled after the SQL Server service is restarted.

Validate Lock Pages in Memory Enablement
Now we will validate this setting by doing the same steps we did above.
Below we can see the T-SQL script now shows a memory value for locked page allocation.

In the SQL Server error log, it now shows "Using locked pages in memory manager".

I also executed the below T-SQL script and it now shows the sql_memory_model value as 2 which is "LOCK_PAGES".

- I have shown you how to check whether lock pages in memory is enabled or not and if it is not enabled how to enable it. You can go ahead and apply these steps to check and enable lock pages in memory for your SQL Server instances.
- If you want to disable the Lock Pages in Memory option for SQL Server, then you just need to remove the SQL Server service account from the Windows policy Lock Pages in Memory.

About the author

Comments For This Article

Related Content
Setting a fixed amount of memory for SQL Server
SQL Server Perfmon Counters - Target vs Total Memory and Max Memory
Increasing Buffer Pool in SQL Server 2014
SQL Server Max Memory Setting with Lock Pages in Memory
Understanding SQL Server Lock Pages in Memory, AWE API and Windows Task Manager
Memory Allocation for SQL Server 2000 Enterprise Edition
PAE and 3GB and AWE oh my
Related Categories
Compression
Database Configurations
Database Mail
Full Text Search
In Memory OLTP
Linked Servers
Policy Based Management
Recovery Models
Resource Governor
SQL Server Configurations
Development
Date Functions
System Functions
JOIN Tables
SQL Server Management Studio
Database Administration
Performance
Performance Tuning
Locking and Blocking
Data Analytics \ ETL
Microsoft Fabric
Azure Data Factory
Integration Services
Popular Articles
SQL Date Format Options with SQL CONVERT Function
SQL Date Format examples using SQL FORMAT Function
SQL Server CROSS APPLY and OUTER APPLY
DROP TABLE IF EXISTS Examples for SQL Server
SQL Server Cursor Example
SQL CASE Statement in Where Clause to Filter Based on a Condition or Expression
Rolling up multiple rows into a single row and column for SQL Server data
SQL Convert Date to YYYYMMDD
SQL NOT IN Operator
Resolving could not open a connection to SQL Server errors
Format numbers in SQL Server
SQL Server PIVOT and UNPIVOT Examples
Script to retrieve SQL Server database backup history and no backups
How to install SQL Server 2022 step by step
An Introduction to SQL Triggers
Using MERGE in SQL Server to insert, update and delete at the same time
List SQL Server Login and User Permissions with fn_my_permissions
SQL Server Loop through Table Rows without Cursor
How to monitor backup and restore progress in SQL Server
SQL Server Database Stuck in Restoring State
This browser is no longer supported.
Upgrade to Microsoft Edge to take advantage of the latest features, security updates, and technical support.
User Rights Assignment
- 1 contributor
Provides an overview and links to information about the User Rights Assignment security policy settings user rights that are available in Windows. User rights govern the methods by which a user can log on to a system. User rights are applied at the local device level, and they allow users to perform tasks on a device or in a domain. User rights include logon rights and permissions. Logon rights control who is authorized to log on to a device and how they can log on. User rights permissions control access to computer and domain resources, and they can override permissions that have been set on specific objects. User rights are managed in Group Policy under the User Rights Assignment item.
Each user right has a constant name and a Group Policy name associated with it. The constant names are used when referring to the user right in log events. You can configure the user rights assignment settings in the following location within the Group Policy Management Console (GPMC) under Computer Configuration\Windows Settings\Security Settings\Local Policies\User Rights Assignment , or on the local device by using the Local Group Policy Editor (gpedit.msc).
For information about setting security policies, see Configure security policy settings .
The following table links to each security policy setting and provides the constant name for each. Setting descriptions contain reference information, best practices for configuring the policy setting, default values, differences between operating system versions, and considerations for policy management and security.
Related topics
- Security policy settings reference
Additional resources
IMAGES
VIDEO
COMMENTS
Service properties and configuration. Startup accounts used to start and run SQL Server can be domain user accounts, local user accounts, managed service accounts, virtual accounts, or built-in system accounts. To start and run, each service in SQL Server must have a startup account configured during installation.
Login to SQL Server Management Studio. In Object Explorer on the left pane, expand the Databases folder and select the concerned database and navigate to the by expanding Security and Users folders. Right-click the User to which you want to GRANT or REVOKE the permissions. Here, we will GRANT permissions to our new user 'Steve'.
SQL Server provides server-level roles to help you manage the permissions on a server. These roles are security principals that group other principals. Server-level roles are server-wide in their permissions scope. ( Roles are like groups in the Windows operating system.) SQL Server 2019 and previous versions provided nine fixed server roles.
The permissions of user-defined database roles can be customized by using the GRANT, DENY, and REVOKE statements. For more information, see Permissions (Database Engine).. For a list of all the permissions, see the Database Engine Permissions poster. Server-level permissions can't be granted to database roles.
We can also get all effective permissions for a server or database level principal (login or user) without switching the execution context using the EXECUTE AS command. Using the below commands. --List all effective permission for other users. SELECT * FROM fn_my_permissions('test', 'login'); GO.
A Group Managed Service Account (gMSA) is an MSA for multiple servers. Windows manages a service account for services running on a group of servers. Active Directory automatically updates the group managed service account password without restarting services. You can configure SQL Server services to use a group managed service account principal.
My question is, if you create a new domain user account for each of the SQL Server processes, what permissions should be set for each account? ... or whether using the SQL config manager should automatically set these permissions. SQL Server 2014, Domain Controller is on Windows Server 2008 R2. sql-server; configuration; sql-server-2014;
This privilege determines who can change the maximum memory that can be consumed by a process. This privilege is useful for system tuning on a group or user basis. This user right is defined in the Default Domain Controller Group Policy Object (GPO) and in the local security policy of workstations and servers. The SQL Server, SQL Server agent.
Expand the Security folder of the database and right click on User and select New User, as shown below. Create a New User and Grant Permissions in SQL Server 2019. In the Database User - New dialog box, on the General tab page, User type drop down lists the following types: SQL user with login. SQL user with password.
Create Logins: User needs to be part of the LoginManager Group to Create / Alter a Login. Also, they need to have ALTER ANY LOGIN Permission:. GRANT ALTER ANY LOGIN TO user1 Create Users in databases User needs to have ALTER ANY USER permission to create user.. GRANT ALTER ANY USER TO user1 Assign insert, update, select and delete permissions on certain tables within that database User needs ...
They include account policies, local policies, user rights assignment, the Windows firewall, software restrictions, and so on. There are several ways to configure security policy settings. The most common are: Group policy objects (GPO) - Used in Active Directory domains to configure and regularly reapply security settings to multiple computers.
A database is a securable contained by the server that is its parent in the permissions hierarchy. The most specific and limited permissions that can be granted on a database are listed in the following table, together with the more general permissions that include them by implication. Expand table. Database permission.
The first way to check this setting is by executing the below T-SQL statement. If output of "locked_page_allocations_kb" shows 0 it means this setting is disabled and not being used for SQL Server. --Check Lock Pages in Memory. SELECT a.memory_node_id, node_state_desc, a.locked_page_allocations_kb.
SQL Server Database Engine: The Default instance: NT SERVICE\MSSQLSERVER.Named instance: NT Service\MSSQL$<instance_name> is granted the permissions below during SQL Server setup. The local group policy permissions are visible under user rights assignment. · Log on as a service (SeServiceLogonRight)
In order for SQL Server setup to be able to assign appropriate permissions to SQL Service account, it requires SeSecurityPrivilege on the server where these folders are created. One of the pre-requisites for running SQL Server setup is that setup account should be an administrator on the server and by default in windows, administrators are ...
In this article. Applies to: SQL Server Azure SQL Database Azure SQL Managed Instance Azure Synapse Analytics Analytics Platform System (PDW) Every SQL Server securable has associated permissions that can be granted to a principal. Permissions in the Database Engine are managed at the server level assigned to logins and server roles, and at the database level assigned to database users and ...
1 Press the Win + R keys to open Run, type secpol.msc into Run, and click/tap on OK to open Local Security Policy. 2 Expand open Local Policies in the left pane of Local Security Policy, and click/tap on User Rights Assignment. (see screenshot below step 3) 3 In the right pane of User Rights Assignment, double click/tap on the policy (ex: "Shut down the system") you want to add users and/or ...
SSIS User Rights Assignment. Archived Forums 361-380 > SQL Server Integration Services. Question; 0. Sign in to vote. We are currently running SQL Server 2012 SP2 CU6 on Windows Server 2012 R2, and I am updating our security documentation based on what is currently running in our production environment following a successful migration from ...
That being said, you may want to use a combination of Audits with both Server level and Database level specifications. The groups of actions that can be audited are vast but this will allow you the most precision if you want to ignore particular action groups. As for the indicating the principal (user/login), you can indicate the login you want ...
Resolution. To add the rights to the setup account, follow these steps: Log on as an administrator. Select Start > Run, type Control admintools, and then select OK. Double-click Local Security Policy. In the Local Security Settings dialog box, select Local Policies, open User Rights Assignment, and then double-click Backup Files and Directories.
User rights are managed in Group Policy under the User Rights Assignment item. Each user right has a constant name and a Group Policy name associated with it. The constant names are used when referring to the user right in log events. You can configure the user rights assignment settings in the following location within the Group Policy ...