
Cloud Storage

Custom Business Email

Video and voice conferencing

Shared Calendars

Word Processing

Spreadsheets
Presentation Builder

Survey builder

Google Workspace
An integrated suit of secure, cloud-native collaboration and productivity apps powered by Google AI.

Tell impactful stories, with Google Slides
Create, present, and collaborate on online presentations in real-time and from any device.
- For my personal use
- For work or my business

Jeffery Clark
T h i s c h a r t h e l p s b r i d g i n g t h e s t o r y !

E s t i m a t e d b u d g e t

Make beautiful presentations, together
Stay in sync in your slides, with easy sharing and real-time editing. Use comments and assign action items to build your ideas together.

Present slideshows with confidence
With easy-to-use presenter view, speaker notes, and live captions, Slides makes presenting your ideas a breeze. You can even present to Google Meet video calls directly from Slides.

Seamlessly connect to your other Google apps
Slides is thoughtfully connected to other Google apps you love, saving you time. Embed charts from Google Sheets or reply to comments directly from Gmail. You can even search the web and Google Drive for relevant content and images directly from Slides.

Extend collaboration and intelligence to PowerPoint files
Easily edit Microsoft PowerPoint presentations online without converting them, and layer on Slides’ enhanced collaborative and assistive features like comments, action items, and Smart Compose.

Work on fresh content
With Slides, everyone’s working on the latest version of a presentation. And with edits automatically saved in version history, it’s easy to track or undo changes.

Make slides faster, with built-in intelligence
Assistive features like Smart Compose and autocorrect help you build slides faster with fewer errors.

Stay productive, even offline
You can access, create, and edit Slides even without an internet connection, helping you stay productive from anywhere.
Security, compliance, and privacy

Secure by default
We use industry-leading security measures to keep your data safe, including advanced malware protections. Slides is also cloud-native, eliminating the need for local files and minimizing risk to your devices.
Encryption in transit and at rest
All files uploaded to Google Drive or created in Slides are encrypted in transit and at rest.
Compliance to support regulatory requirements
Our products, including Slides, regularly undergo independent verification of their security, privacy, and compliance controls .
Private by design
Slides adheres to the same robust privacy commitments and data protections as the rest of Google Cloud’s enterprise services .

You control your data.
We never use your slides content for ad purposes., we never sell your personal information to third parties., find the plan that’s right for you, google slides is a part of google workspace.
Every plan includes

Collaborate from anywhere, on any device
Access, create, and edit your presentations wherever you are — from any mobile device, tablet, or computer — even when offline.

Get a head start with templates
Choose from a variety of presentations, reports, and other professionally-designed templates to kick things off quickly..

Photo Album

Book Report

Visit the Slides Template Gallery for more.
Ready to get started?
The HTML Presentation Framework
Created by Hakim El Hattab and contributors

Hello There
reveal.js enables you to create beautiful interactive slide decks using HTML. This presentation will show you examples of what it can do.
Vertical Slides
Slides can be nested inside of each other.
Use the Space key to navigate through all slides.
Basement Level 1
Nested slides are useful for adding additional detail underneath a high level horizontal slide.
Basement Level 2
That's it, time to go back up.
Not a coder? Not a problem. There's a fully-featured visual editor for authoring these, try it out at https://slides.com .
Pretty Code
Code syntax highlighting courtesy of highlight.js .
Even Prettier Animations
Point of view.
Press ESC to enter the slide overview.
Hold down the alt key ( ctrl in Linux) and click on any element to zoom towards it using zoom.js . Click again to zoom back out.
(NOTE: Use ctrl + click in Linux.)
Auto-Animate
Automatically animate matching elements across slides with Auto-Animate .
Touch Optimized
Presentations look great on touch devices, like mobile phones and tablets. Simply swipe through your slides.
Add the r-fit-text class to auto-size text
Hit the next arrow...
... to step through ...
... a fragmented slide.
Fragment Styles
There's different types of fragments, like:
fade-right, up, down, left
fade-in-then-out
fade-in-then-semi-out
Highlight red blue green
Transition Styles
You can select from different transitions, like: None - Fade - Slide - Convex - Concave - Zoom
Slide Backgrounds
Set data-background="#dddddd" on a slide to change the background color. All CSS color formats are supported.
Image Backgrounds
Tiled backgrounds, video backgrounds, ... and gifs, background transitions.
Different background transitions are available via the backgroundTransition option. This one's called "zoom".
You can override background transitions per-slide.
Iframe Backgrounds
Since reveal.js runs on the web, you can easily embed other web content. Try interacting with the page in the background.
Marvelous List
- No order here
Fantastic Ordered List
- One is smaller than...
- Two is smaller than...
Tabular Tables
Clever quotes.
These guys come in two forms, inline: The nice thing about standards is that there are so many to choose from and block:
“For years there has been a theory that millions of monkeys typing at random on millions of typewriters would reproduce the entire works of Shakespeare. The Internet has proven this theory to be untrue.”
Intergalactic Interconnections
You can link between slides internally, like this .
Speaker View
There's a speaker view . It includes a timer, preview of the upcoming slide as well as your speaker notes.
Press the S key to try it out.
Export to PDF
Presentations can be exported to PDF , here's an example:
Global State
Set data-state="something" on a slide and "something" will be added as a class to the document element when the slide is open. This lets you apply broader style changes, like switching the page background.
State Events
Additionally custom events can be triggered on a per slide basis by binding to the data-state name.
Take a Moment
Press B or . on your keyboard to pause the presentation. This is helpful when you're on stage and want to take distracting slides off the screen.
- Right-to-left support
- Extensive JavaScript API
- Auto-progression
- Parallax backgrounds
- Custom keyboard bindings
- Try the online editor - Source code & documentation
Create Stunning Presentations on the Web
reveal.js is an open source HTML presentation framework. It's a tool that enables anyone with a web browser to create fully-featured and beautiful presentations for free.
Presentations made with reveal.js are built on open web technologies. That means anything you can do on the web, you can do in your presentation. Change styles with CSS, include an external web page using an <iframe> or add your own custom behavior using our JavaScript API .
The framework comes with a broad range of features including nested slides , Markdown support , Auto-Animate , PDF export , speaker notes , LaTeX support and syntax highlighted code .
Ready to Get Started?
It only takes a minute to get set up. Learn how to create your first presentation in the installation instructions !
Online Editor
If you want the benefits of reveal.js without having to write HTML or Markdown try https://slides.com . It's a fully-featured visual editor and platform for reveal.js, by the same creator.
Supporting reveal.js
This project was started and is maintained by @hakimel with the help of many contributions from the community . The best way to support the project is to become a paying member of Slides.com —the reveal.js presentation platform that Hakim is building.

Slides.com — the reveal.js presentation editor.
Become a reveal.js pro in the official video course.

Integrations
Inspiration
Consideration

Go hybrid with Prezi
It’s a new world. Are you ready? Here’s how Prezi helps your team thrive in today’s hybrid workplace.

Prezi Video explained
We’ve compiled these quick, easy-to-follow tutorials to make you a Prezi Video master in no time.

The science
Learn to grab their attention and keep it with presentation advice from the pros.
Create moving, zooming presentations that grab attention and keep it.
Appear right alongside your content while presenting to your audience.
Make stunning interactive charts, reports, maps, infographics, and more.
Online presentation tools that help you stand out
Engage your audience no matter where you are. Prezi’s online presentation tools help you connect with your audience and create conversational presentations that come with you on-screen to any video call. With professionally-designed templates, branding solutions, immersive views, and more, it’s never been easier to create and present online.
1-844-773-9449 8:30 am–5 pm PST

Trusted by business both large and small

Do more than talk at your audience. Prezi makes every presentation a personal and engaging conversation. Use the open canvas of Prezi Present to view your whole presentation, then jump into topics in any order as your audience shows interest. No need to search through slides or bore your audience. Engage everyone even more with interactive elements like charts, maps, and tables made in Prezi Design.
Take your presentations online with Prezi Video . Display your presentations next to you on screen so you can stay face-to-face with your audience instead of being blocked by a shared screen. Get even more online presentation features like immersive views, branding solutions, and name tags with a Teams license. Create your presentation online with Prezi Present, then take it to a virtual meeting with Prezi Video for a truly personal and professional online presentation.
Find the perfect template for your presentation
Creating a presentation is simple with the right starting blocks. Use Prezi’s online presentation templates to make a winning sales pitch, product demo, or training session. With a Teams license, any presentation template can be branded with your own colors, fonts, and logo to make your message more memorable.

Check out more online presentation templates
- Create a Prezi account and open Prezi Video in your dashboard.
- Get started with quick record or choose any of our professionally-designed video templates .
- Upload your own images, GIFs, and videos, or select free visuals from our Unsplash and Giphy right in Prezi.
- Add your presenter notes to track your main ideas or speaking points.
- Practice your presentation and get ready to present in a video call or record your video for later.
- Share your video. You can trim the video, add a description, edit the transcript, choose the thumbnail, adjust privacy settings, and present your video right in Prezi Video .
Create an oline presentation with Prezi Video
Get inspired by the top presenters in the biz
Some of the best online presentations out there are available on Prezi. Look through our gallery of presentation examples, curated by Prezi’s editors, for some of our favorites. You can take notes, get inspired, and you can even re-use an existing presentation for your own purposes. Just look for the green symbol, then customize the presentation with your own content.

Explore online presentation examples
More features that make online presentations with Prezi great

You’re in the driver’s seat
License management Add or remove team members, and transfer licenses with ease.
Content ownership Keep control of your team’s content, even when someone leaves.
Privacy control Publishing settings and overviews let you manage who sees what.
MSI Installation Remote software deployment gets everyone the latest versions fast.

We’re your biggest supporters
Phone and chat support Our customer support experts are standing by to help.
Dedicated success manager Let your personal guide get your team up and running.
Branded templates Get your own template with your fonts, logo, and colors.
Advanced training* Get personalized trainings and webinars, plus the option to get Prezi-certified. *Available with software commitment minimum

Your security is our priority
SOC2 compliance We stay compliant and constantly up-to-date with SOC2 requirements.
Continuous monitoring We constantly scan and test our infrastructure and application.
Cross-team integration Our security, engineering, and product teams partner with each other closely. Learn more about our security measures
Discover resources for better presentations online

Frequently asked questions
Can i convert my google slides, powerpoint, or keynote presentations to prezi.
You sure can! Upload any existing sales deck from PowerPoint or Google Slides to Prezi to convert it to a Prezi presentation online. You can also use a Keynote presentation by exporting it as a PDF and importing that.
How do you present online with Prezi?
Use Prezi Video to take your presentation to a virtual meeting and present online. Your presentation will appear next to you on screen, so you can more easily interact with the content while maintaining a face-to-face connection with your audience.
What video conferencing tools does Prezi Video work with?
Prezi Video connects to the top video conferencing platforms out there. Select “Prezi Camera” from your camera settings to view your presentation in your virtual meeting.
Am I able to import my own branded assets into Prezi?
Setting up your brand kit in Prezi lets you upload your logo, fonts, colors, and any other asset, so they’re preloaded and ready to be used in any project you create.
What types of assets or images are available within Prezi?
You don’t need to prepare all your images before creating a presentation in Prezi. Get access to the huge Unsplash and Giphy libraries directly within the Prezi editor, perfect for finishing up presentations on the fly.
Your team creates better presentations online with Prezi
Prezi helps you create stunning and highly engaging presentations online that are perfect for sales, marketing, training, or internal communication, and there’s so much more you can do when you get your team on Prezi. Discover other cool features purpose-built to help hybrid and virtual teams succeed, such as the Prezi brand kit, enhanced collaboration tools, and more when you get a demo or sign up for a free trial.
Your browser doesn't support the features required by impress.js, so you are presented with a simplified version of this presentation.
For the best experience please use the latest Chrome , Safari or Firefox browser.
impress.js *
It’s a presentation tool inspired by the idea behind prezi.com and based on the power of CSS3 transforms and transitions in modern browsers.
visualize your big thoughts
and tiny ideas
by positioning , rotating and scaling them on an infinite canvas
the only limit is your imagination
want to know more?
one more thing...
have you noticed it’s in 3D * ?
Use a spacebar or arrow keys to navigate. Press 'P' to launch speaker console.
The best presentation software
These powerpoint alternatives go beyond the basics..

The latest presentation apps have made it easier than ever to format slides and create professional-looking slideshows without giving off a "this is a template" vibe. Even standard PowerPoint alternatives have updated key features to make it easier than ever to collaborate and create presentations quickly, so you can spend more time prepping for your actual presentation.
If, like me, you've been using Google Slides unquestioningly for years, it's a whole new world out there. The newest crop of online presentation tools go way beyond the classic slideshow experience, with new features to keep your audience's attention, streamline the creation process with AI, and turn slide decks into videos and interactive conversations.
I've been testing these apps for the past few years, and this time, I spent several days tinkering with the top presentation software solutions out there to bring you the best of the best.
Beautiful.ai for AI-powered design
Prezi for non-linear, conversational presentations
Powtoon for video presentations
Genially for interactive, presenter-less presentations
Pitch for collaborating with your team on presentations
Zoho Show for a simple presentation app
Gamma for generative AI features
What makes the best presentation app?
How we evaluate and test apps.
Our best apps roundups are written by humans who've spent much of their careers using, testing, and writing about software. Unless explicitly stated, we spend dozens of hours researching and testing apps, using each app as it's intended to be used and evaluating it against the criteria we set for the category. We're never paid for placement in our articles from any app or for links to any site—we value the trust readers put in us to offer authentic evaluations of the categories and apps we review. For more details on our process, read the full rundown of how we select apps to feature on the Zapier blog .
When looking for the best presentation apps, I wanted utility players. After all, slideshows are used for just about everything, from pitch decks and product launches to class lectures and church sermons. With that in mind, here's what I was looking for:
Pre-built templates. The best presentation tools should have attractive, professional-looking templates to build presentations in a hurry.
Sharing and collaboration options. Whether you plan to share your webinar slides later, or you just want to collaborate with a coworker on a presentation, it should be easy to share files and collaborate in real-time.
Flexibility and customization options. Templates are great, but top presentation apps should enable you to customize just about everything—giving you the flexibility to build exactly what you need.
Affordability. Creating compelling presentations is important, but you shouldn't have to bust your budget to make it happen. With capable free tools on the market, affordability is a top consideration.
Standalone functionality. There's no reason to use multiple tools when one can do it all, so I didn't test any apps that require and work on top of another presentation app like PowerPoint or Google Slides.
Familiar, deck-based UI. For our purposes here, I only tested software that uses slides, with the familiar deck-based editor you expect from a "presentation" tool (versus, for example, a video creation app).
While many apps now offer AI features in one way or another, I found many of these features to be lacking still—they're often slow, struggle to pull in relevant imagery, and yield wildly inconsistent designs. For that reason, I opted not to make AI features a strict requirement (for now!), and I've still included apps that don't offer AI. (Of course, if you opt for one of those, you can still easily get AI-generated images from a separate tool and copy them into your presentation app of choice.)
Beyond that, I also looked for presentation apps that brought something unique to the table—features above and beyond what you can get for free from a legacy solution like PowerPoint or Google Slides. (And I opted not to test any brand new apps that are still in beta, since there are so many established options out there.)
Here's what my testing workflow looked like:
I went through any onboarding or guided tutorials.
I created a new deck, scanning through all available templates, noting how well-designed they were (and which were free versus paid).
I added new slides, deleted slides, edited text and images, and played around with other content types.
I changed presentation design settings, like color schemes and background images.
I reviewed and tested the sharing and collaboration options.
I tested out presenter view (when available).
After my first round of testing, I went back into the top performers to test any unique or niche features like AI, brand settings, interactive content, and more. With that, these are the best presentation apps I found—each one really brings something different or radically easy to the table.
The best presentation software: at a glance
The best free presentation software, canva (web, windows, mac, android, ios).

Canva pros:
Excellent free plan
Tons of amazing templates for all use cases
Feature-rich
Canva cons:
The Magic Design AI tool is still inconsistent and not super impressive
Canva offers one of the most robust free plans of all the presentation apps I tested. The app delays account creation until after you've created your first design, so you can get started building your presentation in seconds. Choose from an almost overwhelming number of beautiful templates (nearly all available for free), including those designed specifically for education or business use cases.
Anyone who's accidentally scrolled too far and been bumped to the next slide will appreciate Canva's editor interface, which eliminates that problem altogether with a smooth scroll that doesn't jump around. Choose from a handful of preset animations to add life to your presentations, or browse the library of audio and video files available to add. And Canva also has a number of options for sharing your presentation, including adding collaborators to your team, sharing directly to social media, and even via QR code.
Present directly from Canva, and let audience members submit their questions via Canva Live. Once you share a link to invite audience members to your presentation, they can send questions for you to answer. As the presenter, you'll see them pop up in your presenter view window, so you can keep the audience engaged and your presentation clear. Alternatively, record a presentation with a talking head bubble—you can even use an AI presenter here—to share remotely.
Canvas has added a number of AI-powered tools , but I wasn't super impressed by them yet. When I asked the Magic Design tool to generate a presentation from scratch, for example, the result was a bunch of unrelated images, inconsistent design, and surface-level copy. These features will likely improve in time, but for now, you're better off starting from one of Canva's many great templates.
Canva pricing: Free plan available; paid plans start at $119.99/year for 1 user and include additional features like Brand Kit, premium templates and stock assets, and additional AI-powered design tools.
The best presentation app for AI-powered design
Beautiful.ai (web, mac, windows).
Beautiful.ai pros:
True AI design
No fussing around with alignment
Still allows for customization
Beautiful.ai cons:
No free plan
Generative AI features aren't great yet
If you're like me, editing granular spacing issues is the absolute worst part of building a presentation. Beautiful.ai uses artificial intelligence to take a lot of the hassle and granular design requirements out of the presentation process, so you can focus on the content of a presentation without sacrificing professional design. If I needed to make presentations on a regular basis, this is the app I'd use.
Many apps have recently added AI design features, but Beautiful.ai has been doing it for years—and they've perfected the UX of AI design, ensuring the tool's reign as the most streamlined and user-friendly option for AI design.
The editor is a little different from most presentation apps, but it's still intuitive—and you'll start off with a quick two-minute tutorial. When creating a new slide, scroll through "inspiration slides" to find a layout you like; once you choose, the app will pull the layout and automatically adapt it to match the design of the rest of your presentation.
With 10 themes, several templated slides, over 40 fully-designed templates, and 23 different color palettes to choose from, Beautiful.ai strikes a perfect balance between automation and customization.
While Beautiful.ai doesn't offer a free plan, paid plans are reasonably priced and offer sharing and collaboration options that rival collab-focused apps like Google Slides. And speaking of Google, you can connect Beautiful.ai with Google Drive to save all your presentations there.
Note: I did test the newly released generative AI feature (called DesignerBot) and felt it wasn't much to write home about. It's great for adding individual slides to an existing presentation—automatically choosing the best layout and matching the design to the rest of the deck—but as with most other apps, it struggled to generate a quality presentation from scratch.
Beautiful.ai pricing: Plans start at $12/month for unlimited slides, AI content generation, viewer analytics, and more. Upgrade to a Team plan for $40/user/month to get extra collaboration and workspace features and custom brand controls.
If you're a founder looking for an AI presentation tool for your pitch deck, Slidebean is a great Beautiful.ai alternative for startups. The app offers a number of templates; a unique, content-first outline editor; and AI design help that you can toggle on or off for each slide. I didn't include it on the list mainly because of the price: the free plan is quite limited, and the paid all-access plan starts at $228/year.
The best presentation app for conversational presentations
Prezi (web, mac, windows, ios, android).

Prezi pros:
Doesn't restrict you to standard presentation structure
Lots of customization options
Prezi Video lets you display a presentation right over your webcam video
Prezi cons:
Steep learning curve
Struggling to squeeze information into a basic, linear presentation? Give Prezi a try. Unlike nearly all other presentation apps on the market, Prezi Present doesn't restrict the structure of your presentation to a straight line. The editor focuses on topics and subtopics and allows you to arrange them any way you want, so you can create a more conversational flow of information.
With the structural flexibility, you still get all the same customization features you expect from top presentation software, including fully-editable templates. There's a learning curve if you're unfamiliar with non-linear presentations, but templates offer a great jumping-off point, and Prezi's editor does a good job of making the process more approachable.
Plus, Prezi comes with two other apps: Prezi Design and Prezi Video. Prezi Video helps you take remote presentations to a new level. You can record a video where the presentation elements are displayed right over your webcam feed. Record and save the video to share later, or connect with your video conferencing tool of choice (including Zoom, Microsoft Teams, and Google Meet) to present live.
Prezi pricing: Free 14-day trial and a free plan that includes up to 5 visual projects; paid plans start at $5/month and include additional features like private presentations and Prezi Present.
The best presentation app for video presentations
Powtoon (web, ios, android).
Powtoon pros:
Timing automatically changes based on the content on the slide
Can toggle between slideshow and video
Can orient presentation as horizontal, vertical, or square
Powtoon cons:
Limited free plan
Powtoon makes it easy to create engaging videos by orienting the editor around a slide deck. Editing a Powtoon feels just like editing a presentation, but by the time you finish, you have a professional video.
You can edit your slides at any time, and when you hit play, a video plays through your deck—the feel is almost like an animated explainer video. Each slide includes the animations you choose and takes up as much time as is needed based on the content on the slide. Powtoon figures the timing automatically, and you can see in the bottom-right of the editor how much time is used on your current slide versus the total presentation. If you ever want to present as a slide deck, just toggle between Slideshow and Movie.
You'll likely need to subscribe to a paid plan to get the most out of Powtoon—like creating videos longer than three minutes, downloading them as MP4 files, and white-labeling your presentations—but doing so won't break the bank. Plus, you'll unlock tons of templates complete with animations and soundtracks.
One of my favorite Powtoon features is the ability to orient your video: you can choose horizontal orientation (like a normal presentation) or opt for vertical (for mobile) or square (for social media). When your presentation is ready, you can publish straight to YouTube, Wistia, Facebook Ads, and any number of other locations.
Powtoon pricing: Limited free plan available; paid plans start at $20/month and include white-labeling, priority support, additional storage, and more.
The best presentation app for interactive presentations
Genially (web).

Genially pros:
Don't need a presenter (it's interactive)
You can set universal branding guidelines
Unlimited creations on the free plan
Genially cons:
Free plan has some limitations worth looking into (e.g., can only make public presentations)
While many presentation apps are built for presenter-led decks, Genially 's interactive features and animated templates make it easy to build a self-led presentation. A variety of interactive buttons allow you to show viewers additional context on hover, have them skip to any page of your deck, and let them navigate to external links.
This presentation program offers a bunch of searchable templates, including some for business proposals, reports, social media presentations, and more (though most of those are available on premium plans only). Genially also includes Smart blocks —templated blocks of content for elements like data visualizations and image galleries.
My favorite feature is the brand settings. Premium users can set universal branding guidelines that include your logo, color scheme, fonts, images, and backgrounds, among other options. Think of them like a custom template, created and customized by you, that the whole team can use. Once set, your team can easily create on-brand presentations that automatically apply your brand settings, without even thinking about it.
Plus, Genially supports additional content like training materials, infographics, and interactive images—all subject to your brand presets.
Genially pricing: Free plan available with unlimited creations and views and access to templates; paid plans start at $7.49/month and include additional download options, privacy controls, offline viewing, premium templates, and more.
The best presentation app for collaborating with your team
Pitch (web, mac, windows, ios, android).

Pitch pros:
Google levels of collaboration
Assign slides to specific team members
Start live video calls straight from decks
Pitch cons:
User interface is a little different than you're used to
Need to collaborate on presentations with your team? Pitch is a Google Slides alternative that gets the job done. As far as decks go, Pitch includes all the beautifully-designed templates, customizability, and ease of use you expect from a top-notch presentation tool. But the app really shines when you add your team.
The right-hand sidebar is all about project management and collaboration: you can set and update the status of your deck, assign entire presentations or individual slides to team members, plus comment, react, or add notes. Save custom templates to make future presentations even easier and faster.
You can also invite collaborators from outside your company to work with you on individual decks. And if you opt for a paid plan, Pitch introduces workspace roles, shared private folders, and version history.
The "Go live" feature is a personal favorite—with just a click on the camera icon in the top-right, you can start a live video call. Any team members who open the presentation can hop in and collaborate in real-time.
Pitch pricing: Free plan offers unlimited presentations, custom templates, and live video collaboration; paid plans start at $8/user/month for additional workspace features, presentation analytics, and more.
The best simple presentation app
Zoho show (web, ios, android, chrome).

Zoho Show pros:
Simple and easy to use
Version history and ability to lock slides
Completely free
Zoho Show cons:
Templates are pretty basic
If you're looking for a simple, yet capable presentation app that's a step up from Google Slides, Zoho Show is a great option. It's completely free to use, offers a clean, intuitive editor, and includes a number of great templates.
While the handful of "Themes" offered are on the basic side, Zoho templates boast a more modern and professional design than much of what Google Slides or PowerPoint offer. And I love that you can set the font and color scheme for the whole template, right from the start.
The app doesn't skimp on collaboration or shareability either. You can invite collaborators via email or shareable link, and comments and version history make it easy to work together on presentations. Once you're ready to share, you can even broadcast your presentation to a remote audience right from within Zoho. Plus, you can one-click lock slides to prevent any more editing or hide individual slides to customize your presentation for different audiences.
You can even connect Zoho Show to Zapier , so you can do things like automatically create a presentation when something happens in one of the other apps you use most.
Zapier is the leader in workflow automation—integrating with 6,000+ apps from partners like Google, Salesforce, and Microsoft. Use interfaces, data tables, and logic to build secure, automated systems for your business-critical workflows across your organization's technology stack. Learn more .
Zoho Show pricing: Free
The best presentation app for generative AI
Gamma (web).

Gamma pros:
Creates fully fleshed-out presentations from a prompt
Chatbot-like experience
Can still manually edit the presentation
Gamma cons:
Not as much granular customization
I tested a lot of apps claiming to use AI to up your presentation game, and Gamma 's generative features were head and shoulders above the crowd.
Simply give the app a topic—or upload an outline, notes, or any other document or article—approve the outline, and pick a theme. The app will take it from there and create a fully fleshed-out presentation. It's far from perfect, but Gamma produced the most useful jumping-off point of all the AI presentation apps I tested.
Here's the key: Gamma is much more geared toward the iterative, chatbot experience familiar to ChatGPT users. Click on the Edit with AI button at the top of the right-hand menu to open the chat, and you'll see suggested prompts—or you can type in your own requests for how Gamma should alter the presentation.
Once you've done all you can with prompts, simply close the chat box to manually add the finishing touches. While you do sacrifice some granular customizability in exchange for the AI features, you can still choose your visual theme, change slide layouts, format text, and add any images, videos, or even app and web content.
Gamma pricing: Free plan includes unlimited users, 1 custom theme, 400 AI deck credits, and basic view analytics; upgrade to the Pro plan ("coming soon," as of this writing) for $10/user/month to get additional AI credits, advanced view analytics, custom fonts, and more.
What about the old standbys?
You might notice a few major presentation players aren't on this list, including OGs Microsoft PowerPoint, Apple Keynote, and Google Slides. These apps are perfectly adequate for creating basic presentations, and they're free if you have a Windows or Mac device or a Google account.
I didn't include them on the list because the presentation space has really developed in the last several years, and after testing them out, I found these behemoths haven't kept pace. If they weren't made by Microsoft/Apple/Google, I might not even be mentioning them. They're pretty basic tools, they're behind the curve when it comes to templates (both quantity and design), and they don't offer any uniquely valuable features like robust team collaboration, branding controls, video, and so on.
Some of these companies (think: Microsoft and Google) are openly working on some pretty impressive-sounding AI features, but they haven't been widely released to the public yet. Rest assured, I'm watching this space, and the next time we update this article, I'll retest tools like PowerPoint and Google Slides to see what new features are available.
In any case, if you're reading this, you're probably looking for an alternative that allows you to move away from one of the big 3, and as the presentation platforms featured above show, there's a ton to gain—in terms of features, usability, and more—when you do.
Related reading:
8 Canva AI tools to improve your design workflow
The best online whiteboards for collaboration
How to share a presentation on Zoom without sharing your browser tabs and address bar
This post was originally published in October 2014 and has since been updated with contributions from Danny Schreiber, Matthew Guay, Andrew Kunesh, and Krystina Martinez. The most recent update was in May 2023.
Get productivity tips delivered straight to your inbox
We’ll email you 1-3 times per week—and never share your information.

Kiera Abbamonte
Kiera’s a content writer who helps SaaS and eCommerce companies connect with customers and reach new audiences. Located in Boston, MA, she loves cinnamon coffee and a good baseball game. Catch up with her on Twitter @Kieraabbamonte.
- Presentations
Related articles

The best email parsing software in 2024

The best CRMs for real estate in 2024

The 5 best construction management software options in 2024
The 5 best construction management software...

The 6 best predictive analytics software options in 2024
The 6 best predictive analytics software...
Improve your productivity automatically. Use Zapier to get your apps working together.

Best Free Online Presentation Software and Tools in 2023
Discover the best free and freemium online presentation tools that are changing the way we deliver presentations across business and education! From SlideDog and Canva to Google Slides and Beautiful.AI, you'll find the right fit for your needs (and budget) in our detailed review.
Dag Hendrik Lerdal
- Share this on WhatsApp
- Share this on FaceBook
- Share this on Twitter

Presentations are evolving, making desktop-based presentation software feel like it’s stuck in the last century. On the other hand, we’re seeing an uptick in free and freemium online presentation software that allows you to create presentations on your phone, build them out of different media formats, or turn them into fun, approachable cartoons.
There are a lot of options out there, so we reviewed them all to help you find the software that will make you look like a rockstar with your remote control device (without costing an arm and a leg).
Let’s dive in!
The Best 100% Free Online Presentation Software
1. the best online presentation tool for the google ecosystem: google slides.

Google Slides is a widely used free online presentation software that functions as part of the Google Workspace suite of productivity tools and can be accessed through a browser. It offers a range of features to craft professional-looking slideshows for various purposes, such as business presentations, academic projects, training materials, or personal slideshows.
It’s a good option – whether you’re lone-wolfing your prez or working with a team (the collaboration features are great).
Google Slides Features
- Converts PowerPoint Files to Google Slides and vice versa.
- Smart Compose AI feature for creating presentations faster.
- Real-time collaboration (including chatting, comments, and reviews).
- Templates, videos, gifs, images, graphic assets. Plus, add-ons to include audio and more.
- Beaming to a secondary screen using Chromecast and AirPlay.
- Presenter View with notes and upcoming slides enabled by a secondary browser window.
- Built-in audience interaction , allowing Q&A that will show up in Presenter View.
- Remote control via an iOS or Android device.
- Google Meet remote presentation.
Google Slides OS
Web-based app, mobile app.
Google Slides Pricing
Free. Paid Workspace plans at $12/user/month for meeting recordings, group policies, and online support.
2. The Best Free Online Presentation Software for the Apple Pickers: Keynote

If you want to stay within the iOS, i.e., iWork suite, you should check out Apple’s Keynote presentation tool. In addition to being 100% free, it offers pretty sleek templates and key presentation features. Even though it’s free, it can hold up its own against its paid competitors, making it an excellent choice for both personal and professional presentations.
Apple Keynote Presentation Features
- Templates, effects, animations, graphics, charts, support for YT and Vimeo videos, and Apple Pencil scribbles.
- Real-time collaboration.
- Remote control and presenter view.
Desktop + Mobile (iOS & Android) + Web (requires iCloud account).
Keynote Pricing
Keynote is free.
3. PowerPoint, but Online: Microsoft Sway

We’ll be honest: Microsoft Sway doesn’t have PowerPoint’s feature stack. However, you’ll like Sway if you need to create a simple presentation heavier on the visuals than the technical aspects. It offers cool interactive elements and automated layout and design suggestions.
You may not look like a pro graphic designer right away, but give it time. 😉
P.S. Did you know you could also use PowerPoint online ? It might be worth checking out if you just can’t part with it!
Microsoft Sway Core Features
- Templates, interactive and dynamic presentation elements, such as navigation buttons and embedded web content.
- Collaboration features.
- Automatic layout and design suggestions.
Microsoft Sway OS
Desktop and web.
Microsoft Sway Pricing
Microsoft Sway is available if you already have a Microsoft 365 subscription (starting from $6.99/month). You can also use it for free with limited features.
The Best Freemium Presentation Software in 2023
1. everyone’s sweetheart: canva has one of the fanciest freemium online presentation tools.

Canva , our beloved. No matter if you’re whipping up a quick graphic for your Instagram or creating a flyer, Canva’s library of thousands of templates has got your back. And if you need a presentation, guess what?
You’re covered, too!
Canva Presentation Features
- Templates, graphics, and design elements.
- Remote control & presenter view.
- More features with the Canva suite (logo design, social media graphics, flyers, proposals, etc.).
Web-based, Android app, and iOS app.
Canva Pricing
Canva offers a free plan that has 99% of your daily presentation needs covered. Paid plans start from $12.99/mo/user.
2. SlideDog: The Best Online Multimedia Freemium Presentation Software
If you want next-generation presentations, check out SlideDog . It allows you to combine media from multiple sources , including PowerPoint, videos, images, and even live web pages, and pack it all into one seamless presentation that will keep your audience more captivated than they’d be with a standard slideshow.
The biggest perk is the simplest: everything shows up in your presentation the way it looked to begin with, with no file type or compatibility issues. Then, add an extra dose of interactivity with polls, feedback, and more!
SlideDog Features
- Drag your various files into SlideDog, assemble them in your preferred order, and hit “Play”!
- Support for PPT, PDF, Prezi, and more.
- Remote control, live sharing & presenter view.
- Interactive elements: feedback, polls, and audience chat. [Paid feature.]
SlideDog OS
Slidedog pricing.
SlideDog is free to use, and the free plan supports brief trials of premium features. For the highest level of control and interactivity, the paid plans start from $19/month for two users .
3. Slides.com - Great for Devs (and Everyone Else)

Slides focuses on appearance more than storytelling, so if you’re the kind of person who normally uses three PowerPoint slides but gets annoyed at how dull they look, this presentation tool might just be ‘it’ for you.
If you upgrade to one of the paid plans, you’ll unlock more features, including AI-assisted presentation creation and the ability to upload videos.
Slides Free & Paid Features
- Templates, animations, media library, and integration with Unsplash and GIPHY.
- Remote control & presenter view.
- Use code blocks and Developer Mode for custom features. [Paid feature.]
- AI for slide generation, content, etc. [Paid feature.]
Slides works as a web-based app.
Slides.com Pricing
Slides has a free plan (up to 5 decks and 250MB of storage) – however, your presentations will appear in online searches. If you upgrade to one of the paid plans, starting from $5/mo, you’ll get AI, the ability to embed videos, and more.
4. Powtoon’s Explainer-Video Online Presentation Software

Powtoon is designed to create animated presentations and videos. It’s more focused on ‘explainer’ presentations and videos, which is a fresh approach compared to other online presentation tools.
If you’re interested in turning your presentations into short films with voiceovers and animations, check it out!
However, keep in mind that, on the free plan, you won’t be able to download your presentations – just export them to YouTube or share them via Twitter and Facebook.
Powtoon Features
- Basic video templates, animations, assets, images, and music. [Free.]
- Professional templates and assets. [Paid feature.]
- 3-minute videos on the free plan, up to 2hrs on the paid version ( depending on the plan ).
- Character lipsync. [Paid feature.]
- Text-to-speech AI. [Paid feature.]
- Commenting.
Powtoon is a web-based app.
Powtoon Pricing
Powtoon has a free plan, which is a pretty limited one. The paid plans start from $15/month for professional templates, scenes, and assets.
5. How Free Is Emaze’s Presentation Tool?

Emaze is a feature-rich presentation tool that offers a wide range of templates, customization options, animation effects, and collaboration features. However, many of the features won’t be available on the free plan, making it feel a little lackluster if you’ve been testing the likes of Google Slides and Keynote.
Emaze Features
- Templates, quizzes (up to 3 on the free plan), widgets, maps, graphs and charts, and more.
- Custom effects. [Paid feature.]
- Collaboration features. [Free, but improves significantly with paid plans.]
Emaze is web-based.
Emaze Pricing
Emaze has a freemium option, and the paid plans start from $5/mo for students.
6. The Prince Among Freemium Presentation Software: ZohoShow

ZohoShow is designed to be user-friendly and packed with features that’ll make your presentations stand out. And the best part? It’s both pretty and free!
After our very own SlideDog , ZohoShow is one of our favorite freemium online presentation tools.
ZohoShow Features
- Templates, themes, and design elements.
- Interactive elements, including charts, tables, and multimedia content.
- Remote control & beaming.
ZohoShow OS
Web app, Android, iOS.
ZohoShow Pricing
ZohoShow is free!

When it comes to freemium software that helps you build online presentations, Visme is a good choice. Even though its free version is limited, it still provides the core functionality to build seamless and beautiful presentations.
Visme Features
- Templates, images, graphics, multimedia, and other assets. [Free plan only includes some of the assets – not the full library.]
- Animations, transitions, and interactive elements. [Paid feature.]
- Collaboration.
- Presenter view & remote control.
Visme Presentation Software OS
Desktop, web, and mobile.
Visme Pricing
Visme’s free plan comes with limited templates and graphics, as well as limited collaboration features. Still, it has a generous cap of max 50 slides, and you get access to the easy-to-use editor, so you should be good!
Once you’re ready, you can upgrade to one of the paid plans, starting from $12.25/mo.
8. Pitch.com Free Version Review

Pitch is as simple as it gets without sacrificing the aesthetic of building an engaging presentation. Made primarily for startups, it now helps students, businesses, and everyone else who needs to create something stunning for the next time they’re on stage.
Pitch’s free plan is also very generous when compared to others. You’ll be able to build unlimited presentations, invite unlimited members, use voiceover recordings, and get custom templates and fonts.
Pitch.com’s Free Features
- Custom templates and fonts, integration with sites like Unsplash and GIPHY for your multimedia needs, and their own template gallery.
- Integration with Google Workspace, ChartMogul, YouTube, Vimeo, Loom, and others.
- Team collaboration.
- Offline access.
If you decide to upgrade, you’ll get more storage, the ability to upload and attach your own videos, remove watermarks, use custom links, and more.
Desktop and mobile apps, web-based.
Pitch Pricing
Pitch has a free plan, and the paid plans, which unlock more features, start from €8/user/mo.
9. Mentimeter for Fun Online Presentations

Mentimeter specializes in interactive online presentations, and the best part is that you’ll get plenty of those interactive elements in the free plan, as well.
While the colorful palette may make you think it’s best suited to schools, Mentimeter presentations do a good job of spicing up any garden variety meeting, so you might want to test them during your next all-hands.
Mentimeter Features
- 34 slide types on the free plan (unlimited on paid), Q&A feature, word clouds, quick layouts, and more.
- Paid plans also offer team collaboration, custom themes and colors, Excel exports, quick forms, Q&A moderation, and more.
Mentimeter OS
Mentimeter pricing.
Mentimeter has a great free version for online presentations, while the paid plans start from €11.99/presenter/month.
10. Adobe Express Presentation Maker for Online Presentations on the Go

Much like any other Adobe product, Express Presentations are beautiful and powerful under the hood. And even on the free plan, you’ll get plenty of features to spice up your next appearance in front of the team, class, or prospects.
If you’re in a rush, I’m a big fan of the “ Remix ” feature, where you take an existing template or presentation and put your own twist on it without having to start from scratch.
What Does Adobe Express Free Offer?
- Basic editing and photo effects, 2k+ fonts, free stock photo collection, templates, and graphic assets.
- Storage: 2GB.
- Web app and mobile app.
- Remix feature for quick template customization.
The paid plan, on the other hand, gives you a bit of an upgrade with more storage, shinier effects, and better access to Adobe Stock’s vast gallery.
Web app, Android, iOS.
Adobe Express Presentation Pricing
Adobe Express has a free plan, and the Adobe Premium plan is $9.99/month.
11. FlowVella

FlowVella ’s freemium plan is one of those “try it before you buy it” plans, meaning you can create up to 4 public presentations. If that’s enough, and you rarely create presentations, give it a go!
The presentations will be watermarked, and you’ll only be able to create up to 10 slides, but it’s still a good taste test for the interactive features.
FlowVella Features
- Interactive elements like navigation, buttons, galleries, and more.
- Multimedia support (images, PDFs, videos, etc.).
- Kiosk mode for digital display and signage.
FlowVella OS
Native mobile app for iOS, desktop, and web.
FlowVella Pricing
FlowVella has a limited free plan, and the paid plans start from $10/mo.
Wrapping It Up
Unfortunately, we can’t list just about any tool under the sky for this article. However, if you haven’t found a good fit among the eleven we mentioned above, you may want to check out:
- PicMaker – Free presentations for students, professionals, and more.
- Piktochart – Drag & drop presentations with a neat free plan.
- Renderforest – A much bigger suite of tools for videography and design, but plenty of support for (free) presentations.
Now – it’s over to you!
Did we miss your favorite online presentation software? Or do you want to give props to one of our selections? If you think we’ve hit the nail on the head, or you’ve got a bone to pick with us, get hold of us in the comments section below!
Previous post
Leave a reply cancel reply.
Your email address will not be published. Required fields are marked *
Download the Remote & Live Sharing App!
Remotely control your presentations, chat and answer polls.

What is Google Slides? The ULTIMATE Guide!
By: Author Shrot Katewa

With the onset of remote working and online education, collaboration tools have gained in popularity. Google Slides is a prime example of that. But, what exactly is Google Slides?
Google Slides is a FREE web-based presentation tool provided as part of the Google Suite. Google Slides allows you to create, modify, and deliver a presentation; all through a web browser. Google Slide is also known for its best-in-class real-time collaboration features.
If you are new to Google Slides or perhaps curious to know more about this tool, then this article is the perfect place for you to start as I will be discussing, in detail, about various key aspects of Google Slides and how to use them properly.
What is Google Slides? What is it used for?
As previously mentioned, Google Slides is an application developed by Google. It was released in 2006 as part of Google’s office applications and was previously known as “Google Presentation”. However, it was officially renamed as “Google Slides” in 2012.
Google Slides is a presentation tool that is used for creating presentations, editing an existing presentation, or delivering a presentation/debriefing your audience in an academic or professional setup. It is very useful in delivering lesson plans and works really well with Google Classroom .
There are several other use cases for Google Slides. More and more startups and corporate organizations are starting to use Google Slides and it is gaining in popularity.
Is PowerPoint the same as Google Slides?
Google Slides is akin to Microsoft PowerPoint or Keynote. It is similar in its objective as the goal of both the applications is to be the most helpful tool for its users in enabling them to create a presentation. However, PowerPoint and Google Slides is not the same as they are two different presentation applications .
While there are several differences between PowerPoint and Google Slides, one of the major differences is that Google Slides doesn’t require you to download a software.
Google Slides completely works on a web-based interface! This means, you don’t have to be using your own computer to access your presentation anymore!
Your Google Slides presentation can be accessed through web browsers such as Google Chrome, Safari, Mozilla Firefox, and Microsoft Edge. It can also be used on iOS and Android devices through its mobile application.
Is Google Slides FREE to Use?
Unlike many of its competitors, Google Slides has the upper hand when it comes to being accessible to people. Google Slides is completely FREE for use and packs most of the basic essential tools for creating presentations. Hence, it is a perfect option for people who are occasionally in need of making a presentation.
Students, small-scale entrepreneurs, teachers, non-profits, or other individuals who are looking for a presentation tool on a budget will definitely find Google Slides as a far more financially viable option as it is completely FREE.
The best part is that in addition to being free to use, Google Slides packs in most of the features and tools required to build an awesome presentation for which many of its competitors charge high prices.
While you surely get additional features when using other presentation applications, but, most users won’t need those features for making a simple presentation. Makers of Google Slides have truly understood the key requirements of the users of a presentation application.
What are the Key Features of Google Slides?
Google Slides comes packed with some unique and awesome features that literally sets it apart. Of course, it definitely has the basic tools that you would expect in any presentation application such as adding and editing text, working with shapes, formatting shapes and fonts, adding background color, etc.
I’ll just list down some of the key features that make Google Slides stand out!
1. Your Presentation is Always Accessible
Since Google Slides is a cloud-based presentation tool that is accessed through a web browser, you don’t have to necessarily be next to your computer to access your presentation.
It offers great flexibility in the ways you can open and edit a presentation. You can literally use any computer that has access to an internet connection and you’ll be good to go.
2. Your Presentation is Auto-saved
One of the best features of Google Slides is that your presentation is always saved.
In this modern technology era, you may be wondering why would any application be built without a feature to save the progress automatically? However, if you have ever used PowerPoint or Keynote before, you surely can relate to the agony of losing hours of hard work simply because you perhaps forgot to press Ctrl+S or save your presentation.
With Google Slides, you never have to worry about saving your files. They are always saved automatically.
3. Awesome Collaboration Tools
One the best features of Google Slides is its ability to allow users for a real-time collaboration on the same project.
This means, multiple users can work on the same presentation at the same time and Google Slides will sync it automatically in real-time!
This feature alone has been one of the key reasons for the rapid adoption of Google Slides among users. Although other presentation applications are now slowly catching up and also building this feature, but Google Slides is way ahead of the curve!
4. Adding YouTube videos to your Presentation
Another unique but useful feature that Google Slides provides is the ability to directly embed YouTube videos in your presentation.
This is a great value add especially for teachers who want to use YouTube video as an educational tool for its students. Likewise, even students can use to embed videos to showcase case studies and examples. Moreover, embedding YouTube videos allows your presentation to be relatively small in size while still showcasing a video.
I wrote a detailed post on how to embed videos (and other elements) in another article on this website. Make sure you check this out. You can click on this following link –
How to Embed in Google Slides? The ONLY Resource You Need!
5. Publishing your Presentation to the Web
This is an extremely powerful feature that currently only Google Slides has to offer.
In addition to sharing your presentation with your audience, team members or even your clients, you can also publish your presentation to the web.
You might wonder what is the difference between sharing a presentation and publishing it on the web. When you publish your Google Slides presentation to the web, Google essentially creates a lightweight webpage (which has its own unique URL) that can be accessed by anyone with the link . You don’t need to own a domain name to publish your presentation on the web.
With this feature, you can now have hundreds of people see a presentation without the need to even own a website. Moreover, it also allows you to make changes to the source file without making it visible to your audience.
This feature is great for giving conference presentations or education institutes that can restrict access to certain group of students.
One thing to note is that publishing your Google Slides to the web can only be done if you/your company has a GSuite account with Google. (which is not free and comes at a price)
6. Huge Font Library
One of the other features that set Google Slides apart is the huge font library.
Although other common presentation applications such as PowerPoint and Keynote also provide a fairly large font library, what sets Google Slides apart is that it uses Google Fonts as part of its fonts library.
This means, your presentation will always look the same even when the recipient doesn’t have the fonts installed on his computer that you have used for your presentation.
Google Fonts are a collection of fonts that are used by the web. This allows your presentation to not just look great and in line with the latest design trends, but also ensures that your presentation looks just the same when you share it with others.
How to Use Google Slides?
Now that you know that Google Slides is FREE and it comes with some awesome features, I’m assuming you may want to give it a try.
If you are new to Google Slides, I shall be sharing with you what you need to start using Google Slides, basic steps on how to get started, and few key customizations that you can make to your Google Slides presentation.
This section will surely be enough to help you get started, and once you get a hang of it, you will be able to explore additional features.
1. Pre-requisites for using Google Slides
If you want to use Google Slides, you don’t have to do much of preparation. In fact, you don’t need to pay for anything, and you don’t need to download any software.
All you need for using Google Slides is a Gmail account. If you don’t have a Gmail account, you can create one for free . Simply click on mail.google.com , and create a new account by providing some basic details. It will just take a couple of minutes.
You’ll also obviously need to have an internet connect. But, since you are reading this, I don’t think that should be a worry for you.
With that, you are all set and good to proceed ahead.
2. How to Open a New Google Slides Presentation?
Once you have created an account, type in slides.google.com in your address bar, and it will directly lead you to Google Slides Application. If you are not signed in already, you may be prompted to sign in using your Gmail account.
The first screen will be something similar to what has been showcased in the image below –
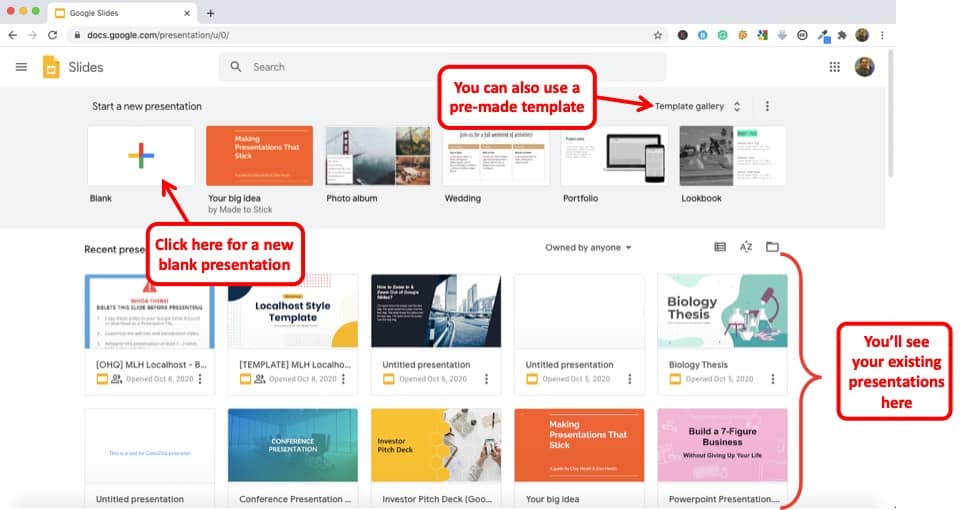
To create a new presentation, you will either need to click on “ Blank ” or choose a pre-existing template from the “Template Gallery”.
Clicking on blank will open up a new blank presentation on Google Slides.
All the presentation that you have created previously will be visible under the “Recent Presentation” section (as indicated in the image above).
The functionality of Google Slides and its contents are the same on both Windows PC and Mac OS . Likewise, you can also use all the functionalities of Google Slides on a mobile device. Thus, you don’t have to really worry about any device restrictions.
3. How to Work on a New Google Slides Presentation?
Google Slides usually houses all the basic tools you would expect yourself to need whenever you’re planning to make a presentation.
Thus, I’ll be showing you how to utilize the most basic functions and tools in Google Slides to get yourself started with making presentations using Google Slides.
Some of the very basic actions to do once you get started with Google Slides are as follows –
Start by simply opening a new Blank Presentation as mentioned above in the article.
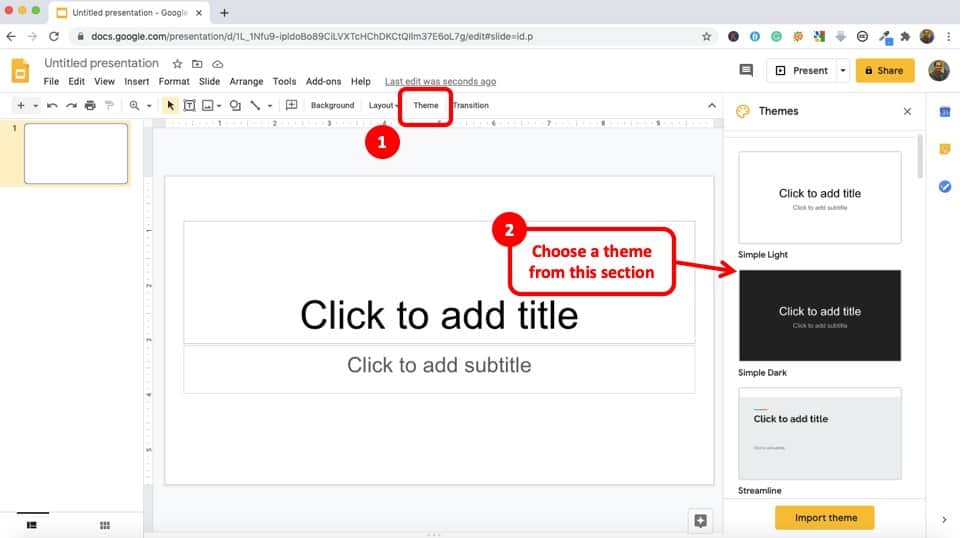
Next, choose a theme of your preference by scrolling through the side-bar on your right. You can also import themes from external sources if you wish by clicking on the ‘ Import Theme ’ icon.
It is up to your creative skills and organizing skills to use the basic functions to make your desired presentation. But, if you struggle with designing a presentation, don’t worry, I’ve covered this in the latter part of this article.
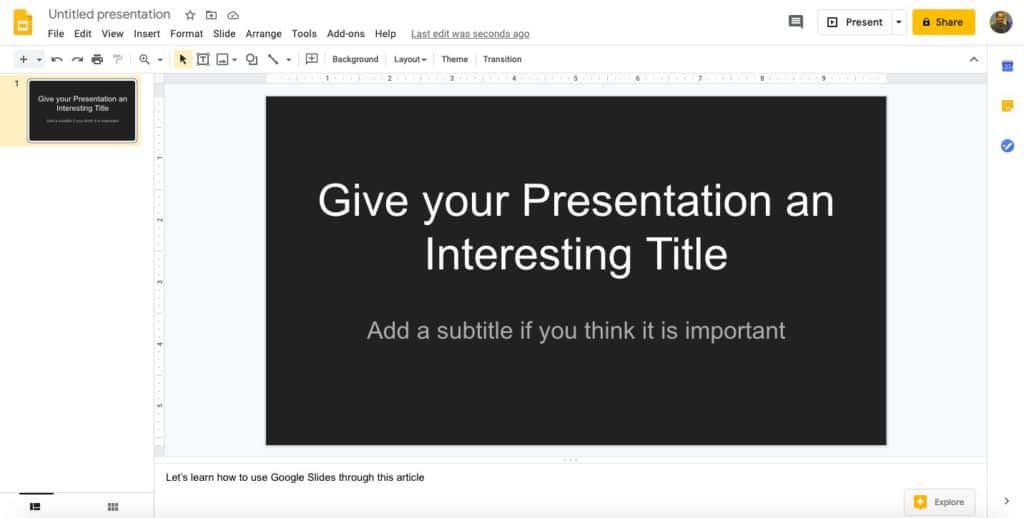
The very first slide can be used to come up with your title. You can also choose the font size, color style, etc. as they appear on the tool-bar above.
To change the font, simply select the text box in which you type the text, and then choose the fonts from the title bar.
To create a new slide simply click on the ‘+’ icon on the top left corner of your screen. You can also select the first slide from the filmstrip view on the left (slide preview on the left panel of the screen), and press “ Enter ” to add another slide.
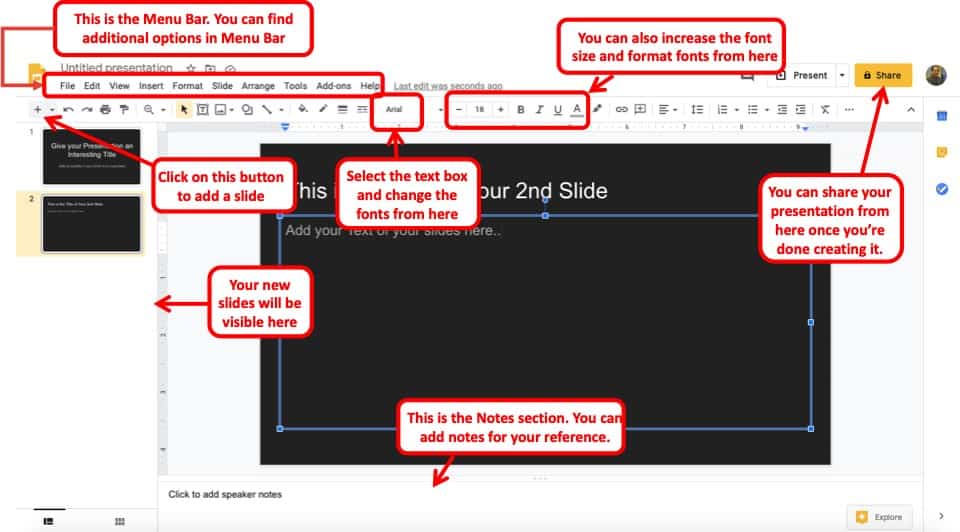
If you want to delete any of your slides, simply select it from the panel on the left by clicking on it and then press ‘delete’ from your keyboard.
These steps mentioned above will give you a basic overview of the interface and by now you should have a fair understanding of how to add and delete slides, how to change fonts and few other editing options.
You can play around a little bit until you get a hang of things.

You can also add media to your presentation such as images, videos, etc. For instance, if you want to add an image, simply click on “ Insert “, then from the dropdown, select “ Image ” and choose the source of your image file.
Likewise, you can also insert other elements such as Text Box, Video, Audio, Tables, Charts, etc.
Now, let us move onto understanding a few other features that will help you get the ball rolling.
4. How to Animate Objects in Google Slides?
Sometimes, you want to avoid a monotonous presentation which may otherwise bore your audience. In such a scenario, you may want to animate the objects on your presentation.
Animating objects like shape, images and other elements is pretty simple in Google Slides.

First, select the object that you would like to animate in Google Slides. Then, click on “ Insert “. A dropdown menu will appear. Scroll down and click on “ Animation “. (Note – if you have not selected the object or element, you will not be able to choose this option).
Then you will see an animation panel on the right side of the screen. This panel provides you with various options to animate objects in Google Slides.
From the Animation Panel, you can start by choosing the animation effect (as indicated in the image above). Then, choose how you want the animations to appear. This could be “ On click ” or “ With or After Previous “.
Choosing “On Click” will allow you to control the animation manually by a click of a button or a mouse click while presenting while the other two options will automatically make the animation appear with or after the previous/other animations.
You can also add multiple animations to your presentation or even to the same object. For instance, first animation can be an “Appear” animation, whereas the second animation on the same object can be set to “Disappear”. This will make the object appear and disappear either automatically or manually during the slideshow.
5. How to Add Transitions in Google Slides?
You can also add slide transitions in Google Slides. Transitions are basically animating or adding an effect between two slides.
Adding transitions in Google Slides is also quite easy.
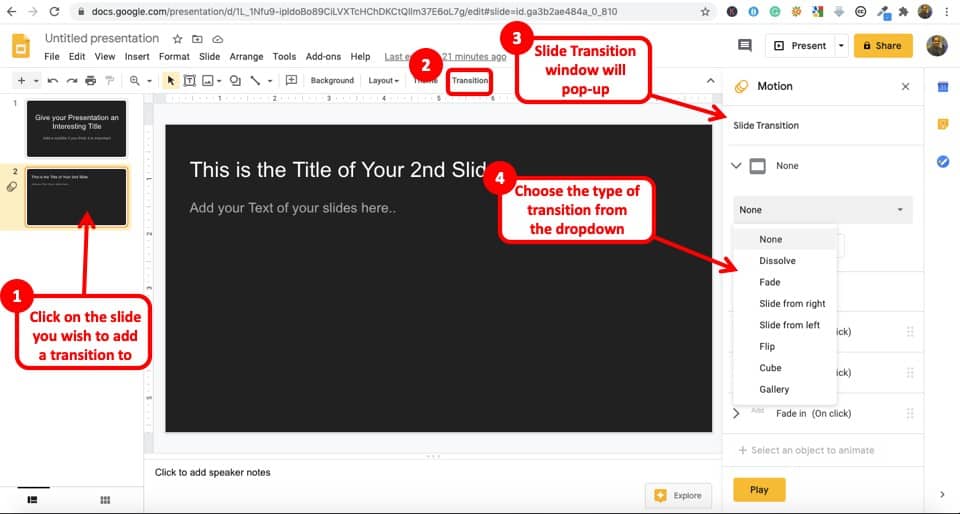
First, click on the slide that you want to add the transitions. Then, click on “ Transition “. You’ll notice the “ Animation Panel ” appear on the right side of your screen.
Then, under “ Slide Transition “, click on “ None “. A dropdown will appear. Choose any transition effect from the dropdown. That’s it!
You will now notice that the transition effect has been applied. You may also notice a small icon under the slide number tab on the left slide of the screen. This icon means you have some motion effect applied on the slide. (Check slide 2 and slide 1 in the image above for comparison).
6. How to Send (or Share) your Google Slides Presentation with Others?
Once you are done creating your presentation, you may need to share it with your boss or your clients. You may perhaps also want to share it with your colleagues in case you want to leverage the real-time collaboration feature of Google Slides. Either way, you need to know how to share your Google Slides presentation with others.
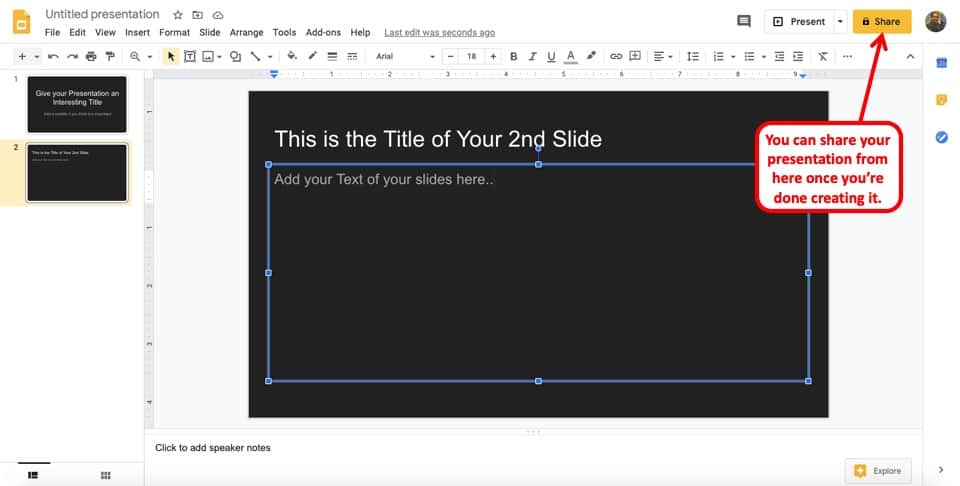
To share your Google Slides Presentation with others, simply open the presentation and click on “Share” on the top-right corner of your presentation screen. Then, simply add the email ID of the person you intend to share the presentation with or copy the link and share it with the person in a separate email.
TIP – When sharing the presentation with others, make sure you have assigned the appropriate permissions so that the recipients of your presentation do not face an “Access Denied” error.
While sharing the presentation, make sure you have provided appropriate permissions for the intended person to access the presentation file. Otherwise, they may get a “Access Denied” error.
I wrote a detailed article on the various reasons why people get this error and how you can avoid it too. Make sure to check it out!
[FIXED!] Access Denied/You Need Permission Error on Google Slides
I’ve also explained the correct process of sharing the file with others in the above link. So, do make sure to check it out!
7. How to Access your Saved Google Slides Presentation?
There are times when you need to refer back to your presentation that you had created a few weeks back.
Accessing your saved Google Slides presentation might seem confusing at first since it works a bit differently from the traditional methods of saving a file on your computer.
Nevertheless, the process is pretty straight-forward. If you remember the initial few steps of opening a new google slides presentation, then this will be quite easy for you to follow.
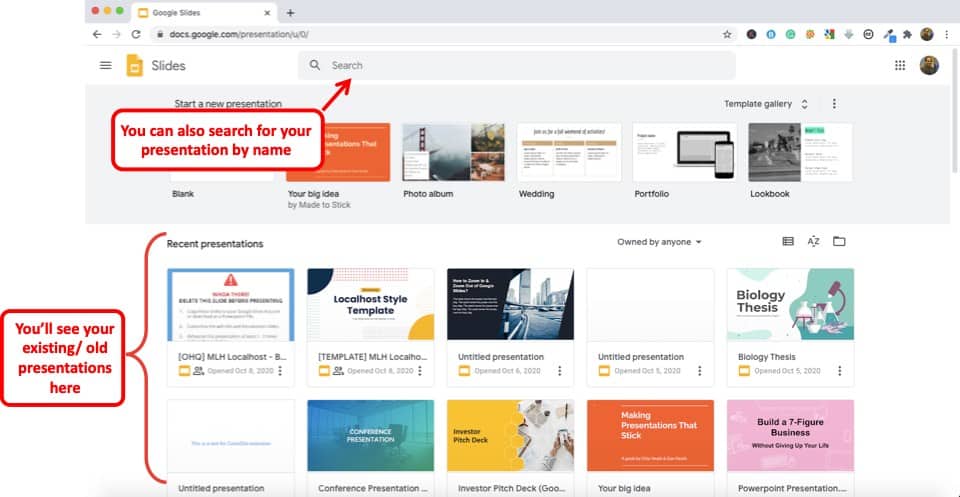
Simply type in your address bar slides.google.com (or click on this link). Make sure you are logged in to your Google Account.
You will be welcomed with a screen that may look similar to the image above.
You can easily access your previously saved Google Slides presentation under the “ Recent Presentations ” section. Alternatively, you can also directly search by the name of the presentation by entering it in the search bar.
You can also access your Google Slides presentation files from your Google Drive. The process will be similar to what I’ve just mentioned. However, instead of visiting the link mentioned above, you will need to go to your Google Drive page. Make sure you are logged in to your Google account when accessing your Google Drive.
Personalizing Your Google Slides (Themes, Add-ons, and Other Modifications)
The virtual aesthetic of your slides is also crucial to captivate your audience with your presentation. And, Google Slides does not leave any stones unturned when it comes to personalizing your slides according to your preference.
Themes/Templates
As mentioned previously in an earlier paragraph, you have access to both built-in themes and you even have the option to import templates from external sources to further amplify the visual aesthetics of your slideshow. There are a few third-party vendors from where you can get your Google Slides templates although most of them are paid.
This feature outshines Google Slides as you can further extend this program’s capacity of tools by installing easy-to-use plugins. There’s already a dedicated button for installing Add-ons on the navigation bar.
Thus, you can always get your hands on some cool add-ons. A lot of these add-ons you will come across will let your add icons, charts, diagrams, gifs, and various other things that you usually can’t do with the basic tools of Google Slides
Other Modifications
Depending on your Google Slides usage, there are a few other modifications that you may want to consider.
One of the most important modifications would be to install an offline extension service to run your Google Slides program on your browser even with no internet access. We’ll talk about this in detail later in the article.
You can also add new fonts from external sources in Google Slides. Adding fonts from Google Fonts library is a great place to start.
Can you Use Google Slides Offline?
Google Slides also provides you with the ability to not just work online but also continue working offline in case you internet gets disconnected.
Although using Google Slides offline eliminates the possibility to collaborate with others since that will require an internet connection, it still is a great feature especially if you are in a poor network zone or when you want to work while traveling on a flight.
However, you will need to activate Google Slides’ offline feature before you get disconnected. Fortunately, you don’t have to download any software for this either.
While the mobile application has a built-in feature to support offline, the browser version on laptops and computers has some prerequisites.
In order to run Google Slides offline, you need to go through the following steps –
Step 1 – Install Google Docs Offline extension on Chrome
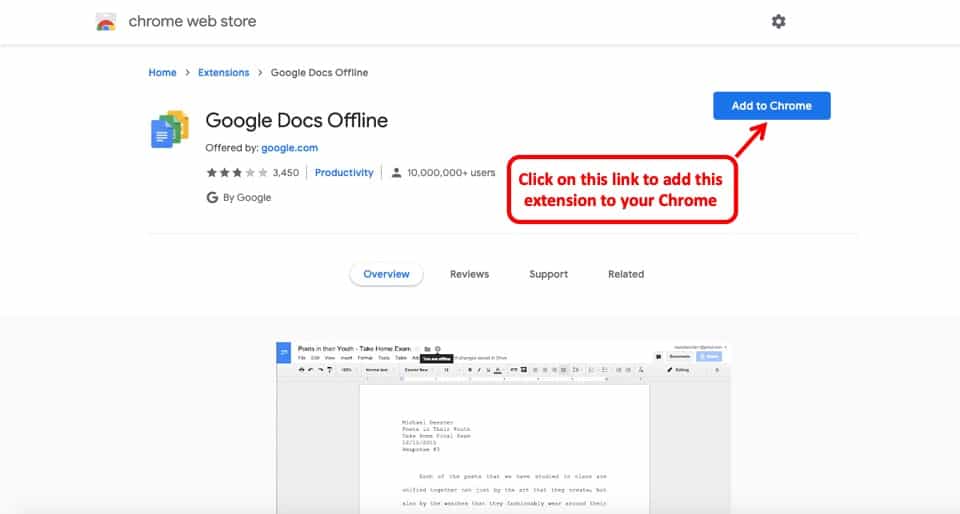
Install the “ Google Docs Offline extension ” on your Chrome browser by either going to the Chrome Web Store OR by clicking on this link which will lead you to the extension. (Make sure you are using a Chrome Browser)
When the page opens, click on “ Add to Chrome ” to add the extension to your Chrome Browser. Google Chrome will automatically add the extension and activate it for you.
Step 2 – Enable Offline Editing in Google Slides
You need to remember that the offline extension only works if you have the Google Chrome browser. Furthermore, make sure your browser is updated to the latest version for the extension to work correctly.
Now, go to your Google Slides page by visiting slides.google.com (make sure you are logged in to your correct Google Account).
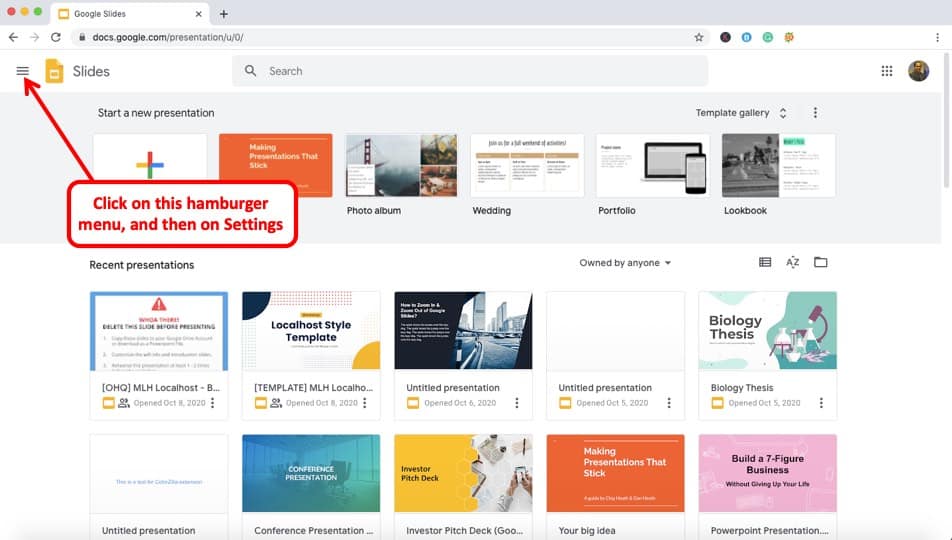
On the top left corner of your screen, click on the hamburger menu (as indicated in the image above).
You’ll then see a drop-down menu on the left side of your screen. Then click on “ Settings “.
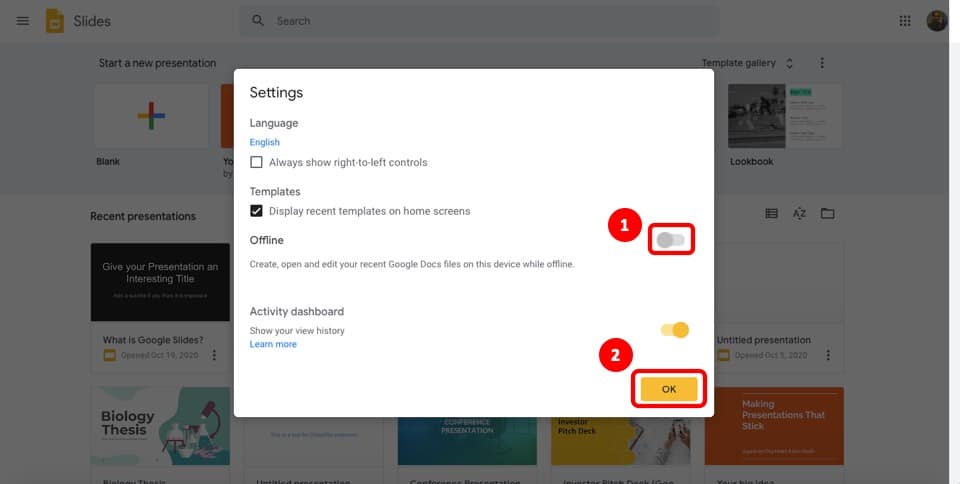
A new settings window will pop open. Make sure you toggle the “Offline” button to activate offline editing of Google Slides. Then, click “ OK “
A word of caution here – Working offline on Google Slides still lacks a few key features. Thus, it is best to always work online mode. However, use the offline version when you expect a lack of internet access. This is more of a stop-gap arrangement.
How to Download Google Slides on your Computer?
Downloading your slides on from Google Slides is a very easy task which I’ll be covering in this section.
PRO TIP! The best format to save your presentation file is in the .pptx as we can easily open it in Google Slides, Microsoft PowerPoint as well as other presentation applications.
Furthermore, a PPTX file format is usually compatible with most presentation applications. It is important to remember that most companies will still prefer that your presentation be delivered in PowerPoint rather than Google Slides.
You can also save your Google Slides presentation directly on a flash drive. Either way, you will need to first download your Google Slides presentation.
I wrote a detailed article explaining the various ways in which you can download your Google Slides presentation on a flash drive. I’ll leave a link to that article below –
How to Save Google Slides on a USB Flash Drive? [EASY WAY]
Here’s how to download your Google Slides presentation in a few simple steps –
- Click on the ‘File’ tab and then proceed to the ‘Download’ option on the drop-down menu.
- Another drop-down menu on the side will appear with a list of formats to choose from to save your file.

- As I have discussed above, the safest and clear option is to save the File as PowerPoint (.pptx) format as it is both compatible with slides and PowerPoint.
- The file will be automatically downloaded, and then you will have to open the file click on the Save As option.
- If you want to save the presentation to a flash drive, then navigate through your folders in the Flash drive dialog box and hit ‘save’ to successfully download your project with a title.
How to Open PowerPoint Presentations using Google Slides?
There are various ways to open PowerPoint files on Google Slides. Though some methods may seem more complicated than others, I’ll focus on the easier method of converting a PPTX into Google Slides Format and vice versa.
Here are the steps that you need to follow in order to open a PowerPoint file in Google Slides –
Step 1 – Open Google Slides, a Bank Slide for a presentation will show up.
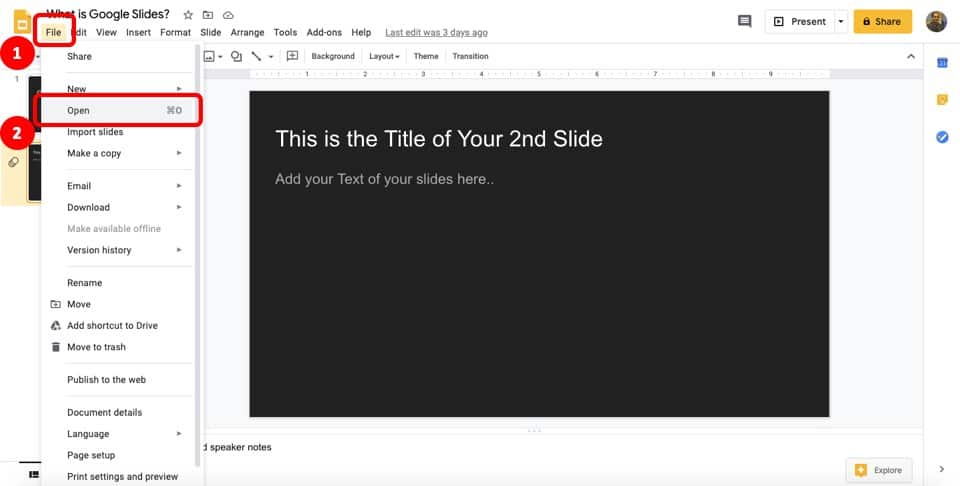
Step 2 – Click on the ‘ File ’ tab and then proceed to ‘ Open ’ on the drop-down menu.
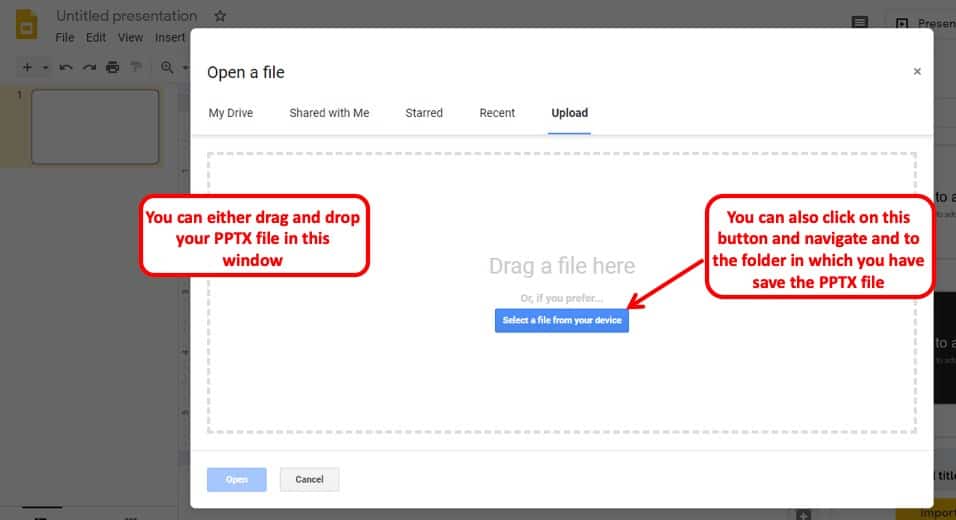
Step 3 – A dialog box will appear that will allocate several bars for you to choose your PowerPoint file from. If your (.ppt) slides are saved in your computer, choose ‘ Upload ’ and proceed to your folders to find the desired file and click ‘ Open ’.
If it is shared or uploaded to your drive, then resort to the ‘Shared with me’ or ‘My Drive’ section of the dialog box and open accordingly. Step 4 – Voila, now you can access your PowerPoint presentation in Google Slides with ease!
Is there an App to Use Google Slides on the Phone?
Google Slides not only can be accessed on a browser, but it also comes with an app.
Google Slides has an app for both Android and iPhone. It can easily be accessed from the play store on android and the app store on iPhone.
The Google Slides app is great for reviewing presentations. You can also use the app to deliver a presentation directly from your phone. However, the Google Slides app is limited in functionality. You can edit text on the app, but working with shapes is rather difficult.
The best use of the Google Slides app is really to view the presentation, download the presentation, make it available for offline use or even deliver a presentation using the phone directly!
That said, if you want to create a presentation, I wouldn’t recommend using the app. In fact, your time would be best served if you create a presentation on a computer.
Is Google Slides App FREE to Use?
The Google Slides app, just like the application itself, is completely FREE to download and use. It is FREE for both Android and iOS devices.
That said, as mentioned above, the app doesn’t have the full functionality of Google Slides that you can see on a browser. It only has limited use cases and works well for the purpose it is designed for.
Can You Use Google Slides on an iPad?
You can definitely use Google Slides on iPad too. You can download the Google Slides app for an iOS device to use it on an iPad. However, in my opinion, the best way to use Google Slides on an iPad is by installing a Chrome Browser!
By using Google Slides through a Chrome Browser on an iPad, you get many more functionalities than a traditional Google Slides app.
Simply open your Chrome Browser, and visit the Google Slides Home Page . Make sure you log in to your Google Account while using Google Slides. Then, on your chrome browser on your iPad, go to the settings tab, and enable the desktop version of the site.
Google Chrome will then convert your browser to a desktop version providing you with many more functionalities such as adding and removing transitions, working with shapes, and adding animations to your Google Slides presentation directly on your iPad!
Benefits and Limitations of Using Google Slides
If you are still unsure of using Google Slides, let me share with you some benefits as well as limitations of using Google Slides.
I hope these will help you make your decision.
In fact, I wrote a detailed article highlighting several benefits and limitations of using Google Slides. I would highly encourage you to check it out. I’ll leave a link below –
17 Pros and Cons of Google Slides! (Should You Use it?)
For your convenience, I’ll list a few key benefits and limitations below. However, I’d highly recommend that you check out the above article.
Benefits of using Google Slides
Here are a few key benefits of using Google Slides –
- Google Slides is FREE to use.
- Accessibility – Google Slides presentation is always accessible.
- Cross-platform availability.
- Google Slides is a web-based tool. It doesn’t require a software.
These are just a few of the benefits. For a full list and a comprehensive explanation, make sure you check out the other article by clicking on this link .
Limitations of using Google Slides
Here are some of the key limitations of using Google Slides –
- Limited number of built-in themes.
- Lack of Advanced features.
- Limited options for animations and transitions.
These are just a few of the limitations. For a full list and a comprehensive explanation, make sure you check out the other article (mentioned above) by clicking on this link .
Is Google Slides Safe to Use?
When it comes to safety concerns regarding Google Slides, one thing to consider is the fact that it’s developed by Google. Google’s security protocols include strict password protection.
They have also pledged to protect your privacy and data unless you’re willingly sharing your files.
All your data and files are protected on secure data servers where they stay protected and out of reach from others. Google refuses to discuss in-depth about their data protection protocols for security measures, however, rest assured, you don’t have much to worry about your data or files being hacked as Google’s servers are some of the most secure in the world!
According to Google’s copyright policies, Google claims no content from its users is exploited and all users hold their ownership rights. Thus your Google slides files will always be safe from exploitation. If you’re still concerned about safety measures, try changing your password once in a while and link your Google Account to a backup account. Make sure your Google Drive stays private at all times and only share your files with trusted contacts.
Lastly, when sharing presentations with others, share it by adding the email address of the concerned person rather than creating a shareable link. This will act as a deterrent and will serves as another way to avoid unwanted intruders from accessing your Google Drive files.
Google Slides vs PowerPoint vs Keynote – A Quick Comparison
You might be wondering; how does Google Slides compete with its more renowned competitors? Well, let’s understand this in a quick comparison.
PowerPoint is the earliest presentation program and has many dedicated users. This makes it the most reliable and popular presentation application in the market. Bigger and more professional companies will prefer a presentation made using PowerPoint due to its compatibility.
The number of ways you can use PowerPoint for design projects is also quite large. In that sense, it is a more complete program when it comes to presentation design. While it can be used by beginners, but it is most well-suited for pro-level presentation creators.
PowerPoint has a better reputation and many more features than any of its competitors. That said, it is also the most expensive of the three. However, PowerPoint houses the most number of animations and effects in its default library. It is also available on mobile devices, Windows, and Mac OS. You will also find a lot of help if you choose PowerPoint as your go-to presentation application.
Keynote, on the other hand, only works on Mac OS and is free on the latest ones but needs to be bought for previous versions of Mac. It has more features as compared to Google Slides but less than PowerPoint.
Using Keynote does give you a premium feel and also helps you bring out your creativity. But, it still lacks the charm of both Google Slides and PowerPoint when it comes to having unique features. Moreover, it is not really compatible enough as it is not available for Windows and can only be used with Apple devices. Keynote also lacks a huge community due to its lower number of users as compared to PowerPoint. That said, it is a robust presentation software. If you are a Mac user and do not want to spend money using PowerPoint, Keynote is a great alternative!
Google Slides is the only free option that comes with a full package filled with the basic tools to execute a perfect presentation option. It is even compatible with PowerPoint formats. You can further extend the tools in its inventory.
Google Slides has the strongest collaboration features out of all. You can share and backup your files with ease. However, being a web-based free app has its drawbacks. It lacks the more advanced features compared to its other full-featured desktop presentation competitors.
That said, in my opinion, it is THE BEST tool for beginners, students or even people who need to create presentations but are not comfortable spending money on a presentation software.
Final Thoughts
Starting from, “ What is Google Slides ?” to “How to use Google Slides?” I’ve discussed various basic aspects there is to know about Google Slides. I hope I’ve been able to cover all of your concerns and questions about Google Slides, and that this article has made it easier for you to make your decision.
Hopefully, the knowledge you attained throughout reading this article was helpful and productive.
Our goal of this site is to provide you with similar helpful content. Make sure that you bookmark this site, and if you have any questions or topics that are related to presentation, make sure you check it out on our website!

Get started with PowerPoint for the web
With PowerPoint for the web you create presentations right in your browser. Create and save your presentations in your OneDrive, and edit and share them online. You don’t need any additional software and you don’t have to install anything.
Here’s how to get started:
Go to Office.com .
Click PowerPoint.

Create a new, blank presentation, start with a template, or open an existing file.

When you start with a new, blank presentation, PowerPoint automatically saves it to OneDrive with a default name, such as Presentation 1. To rename your presentation, do the following:
On the File menu, select Rename .

You can do many things using PowerPoint for the web. See the following for more information about working with PowerPoint.
Create a basic presentation in PowerPoint for the web
Upload a PowerPoint presentation created elsewhere
Share and co-author a presentation by using PowerPoint for the web

Need more help?
Want more options.
Explore subscription benefits, browse training courses, learn how to secure your device, and more.

Microsoft 365 subscription benefits

Microsoft 365 training

Microsoft security

Accessibility center
Communities help you ask and answer questions, give feedback, and hear from experts with rich knowledge.

Ask the Microsoft Community

Microsoft Tech Community

Windows Insiders
Microsoft 365 Insiders
Was this information helpful?
Thank you for your feedback.

Review: Top 5 Web-based Presentation Tools Compared
Share this article
Google Slides
Bottom line, frequently asked questions about web presentation tools.

Recently we looked at a few alternatives that can help you translate your raw data into some delicious visual goodness. Today I thought we’d talk about ways you might present it.
Most of us — at some point in our careers — need to present our ideas to an audience.
Maybe it’s a client pitch? Sometimes it might be for colleagues or even potential employers. Other times it might be for a bigger audience at a meet-up night or conference.
While your data may be easy to read and understand, applying it to some slides and adding some text can actually benefit you. Now, not everyone has access to the established desktop presentation applications such as PowerPoint or Keynote.
Happily, there are now some great online alternatives out there. And being ‘web-native’, means they’re not only better suited to social sharing platforms than their desktop brethren, but can be launched from ANY computer with a web browser — a huge relief during rare but inevitable hardware disasters.
Today I’m sharing my first impressions on five online presentation services that will keep your audience engaged without tapping your wallet.

This is where the fun part comes in. After choosing to “create a deck” I was taken to the very sleek editor workspace. While Slides clearly wants to make things as self apparent as possible, it does offer a nifty walkthrough tutorial — a thorough guide that shows you where everything is and the function such as the “Top Level Options”.
Slides is friendly enough that you’ll most likely quickly figure this out through trial and error, but it is nice to have an option.
Creating your slides is really an easy task. With ten default slides designs to choose from, you can do everything from upload background images, tinker around with your type and even add speaker notes.
Speaking of type, there are 12 distinct type options to choose from. If that’s not enough variety, you also have multiple color style choices to choose from as well as transitions.
All in all, I think Slides is a winner. However, if I were to have one complaint, it’s the fact that you have to go Pro in order to export your deck to either PDF or sync it to your Dropbox. Until then you’re only options are to export as an HTML doc or to embed it (and pray your WiFi doesn’t fail at the wrong moment).
- View your slides either online or on the go via your mobile device
- Control your presentations through the power of any touch enabled mobile device
- The ability to present your slides live in real-time anywhere in the world
- Variety of themes and transitions at your disposal
- Teams can streamline their presentation workflow
- Share and fork your presentations
- Revisions are saved so you can always go back if you make a mistake
- HTML ability allows you to edit your markup and customize your decks

First Impression : To get started on your first presentation with Zoho Docs, you do have to register for an account. Thankfully, if the last thing you need is one more login to remember, you can sign in via your Google, Google Apps, Facebook or Yahoo accounts.
Once that’s done it’s time to start creating. The workspace is rather attractive and user-friendly, guiding you along without actually forcing you into a structured tutorial from the get go. Presentation formats are broken up into three options: document, spreadsheet or presentation. Take each one for a test-drive by clicking the “Create” button on the left hand screen.
Creating a fresh presentation opens up a new tab to pull up Zoho Show. While this may not be appreciated by everyone, it does allow you to switch back to your Zoho Doc’s workspace whenever you need it without having to press the back button.
Right away you’re prompted to choose one of the 17 available themes as well as selecting a preferred aspect ratio (16:9 or 4:3). This is a nice touch especially if you know you will be presenting on a wide-screen monitor or projection screen. I don’t believe any other tool offered this functionality
While choosing your theme, you can also decide your preferred color palette and font. From there you are taken through a thorough walkthrough of the creation process. There are tons of customization options plus you have four export options for your presentations.
- Unlimited users with the Free Forever plan
- Shared storage is more than generous even with a free account
- Share your work through email, embed it into your sites or even publish it publicly
- Word documents, spreadsheets and presentations can be easily created
- History of your changes in documents are there for you if revisions are needed
- Ability to sync right to your desktop
- Enabled document and user management
- Export your presentation as a PDF, PPTX, ODP or PPSX

First Impression : I must admit that I have used Google Slides once in my life, but that was for a film presentation during my last year of university. If you, like most people, have a Google account, you already have access to Google Slides ,so no registration is required.
To get started you only have to go to your Docs/Drive, open the hamburger menu to the left and click “slides”. Should you have no presentations already created, you only have to click the “+” in the bottom right corner to get started. As with Zoho, you’re immediately tasked to choosing your theme and aspect ratio.
While there are 20 available theme options, they are rather plain when compared to the templates offered by competing products .
While other apps do a good job at ‘prepping’ first time users, this is a case where Google won’t take your hand and walk you through you what Slides has to offer. This may not be a big issue for most, but is likely to discourage anyone who isn’t 100% confident with web apps.
That being said, the UX of Slides isn’t very different to the UX of other Google apps, so many users will feel a sense of familiarity from the start. Adding images and text or even aligning them, changing the type or color are all just a matter of a few button clicks. To add in a new slide you but only need to press the “+” button to the far left on the toolbox.
In order to change up your slide’s layout you need to click the “layout” button which is between “background” and “theme”. This will give you a few more options to choose from and add some dynamic to your final presentation.
As expected there are some transitions to make the slides run smoothly and a bit more options to get something you’re proud of before you share it.
- Similar Google Docs layout makes using Slides relatively easy
- 6 available download formats including SVG, PDF and PNG
- Edit and collaborate on your work in real-time
- Chat and comment right there in your window
- Changes are automatically saved as you work
- PowerPoint compatible
- Enabled offline editing for when you need it
- Absolutely free

First Impression : Emaze prides themselves on allowing you to easily create your own presentations so that you can “emaze” everyone.
Once you register with e-mail address and password, you’re ready to start building your first presentation.
Of course you have to decide which plan you want: Free, Pro or Emazing. Choose and you’ll be immediately presented with an excellent selection of good quality templates — from fun to professional-looking.
Unlike some of the other presentation creators, these templates are thoughtfully categorized to make it easier for you to find the best fit for your presentation. Even though some categories only have one available color choice for that particular theme, there are still 34 themes to choose from.
Like Zoho, creating a presentation in Emaze pulls up a new tab to bring you to the workspace. Instead of the typical walk-through, Emaze uses animated arrows to show exactly where things are and what they do, which is a nice take on the general tutorial.
Because the templates are pre-conceived each new slide template already has a built in layout that only requires you to insert your desired graphics, video and text. Emaze has some cool features as well which include adding sections to your presentations and even adding effects to create motion to your objects.
Creating and editing your presentation with Emaze is rather simple and can be done relatively quickly if you know what you’re trying to achieve. Clicking on text will automatically open a text editor tool to allow you to change text sizes, color, as well as add effects.
There are some limitations to Emaze however. The preset font for your chosen template is the one you’re stick with, plus you have limited color palette to apply to your text. Also, as is often the case, free accounts are always publicly accessible. Not a big deal for many, but a consideration for some.
- Automatic translation tool allows for your presentation to be seen by everyone
- Multi-device compatibility lets you view and edit your work no matter where you are
- 3D effects can be added to your elements
- Share and download your presentations
- Cloud based and HTML5 enabled to allow for seamless and efficient workflow
- A variety of pre-designed templates

First Impression : After getting yourself signed up with Visme you are thrown right into creating by first naming your project. Once you have your project named it’s time to decide whether you want to create a presentation, infographic, banner ad or a blank canvas.
The first thing you will notice is the comparitively low number of templates available to you when creating your presentation. There are 7 templates in total. Of course, you’re quite free to design your own layout by choosing a blank canvas, but it’s a little disappointing when Visme’s own marketing boasts about the ‘ tons of template and presets ‘ that are available to you.
The dashboard for your presentation is mapped out for you in your first go round, in a very similar method to Emaze’s approach.
The layout for creating is as simple as you can get so if you don’t need or want all the fancy effects and all that jazz Visme is definitely for you. While there isn’t anything amazingly new that Visme brings to the table, their presentation creator there are some nice touches.
The first thing worth noting is the thousands of free stock images that are available for you to use in order to make your presentation stand out. Simply search on a given topic and ninety percent of the time a viable result will seem to pop up. Photos aren’t the only visuals available — you’ll find hundreds of vector images too.
In my opinion, whatever Visme may lack in features, they certainly make up for with their easy-to-use editor and their large, free asset library. Visme also does allow you share, embed and download your presentation, but unfortunately you’re stuck with the branding and fewer options unless you upgrade.
- Free templates and presets available to you from the start
- Customizable assets
- One-click security settings to keep your work hidden from the public
- Pre-loaded fonts, images and vectors all for you to use
- Share via social networks or URL links
- Downloadable and embeddable for when you want to share offline or online
- The ability to create anything from presentations to banner ads
While everyone is going to have different needs, I can tell you that these five should be high on your list to visit when choosing a solution. Each presentation builder offers something different but most of all they are all user-friendly.
If you’re looking for top-notch slide builder with an impressive, free option, I’d currently recommend Emaze and Slides. But don’t let that stop you from trying out the other three as well. This is a competitive sector with new features and improvements being rolled out regularly.
What are the key features to look for in a web presentation tool?
When choosing a web presentation tool, consider features such as ease of use, customization options, collaboration capabilities, and the ability to share presentations easily. Some tools offer interactive features, analytics, and the ability to embed videos or other media. The best tool for you will depend on your specific needs and the audience you’re presenting to.
Are there free web presentation tools available?
Yes, there are several free web presentation tools available. Some of these include Google Slides, Prezi, and SlideShare. However, keep in mind that free versions may have limitations or include watermarks on your presentations. For more advanced features, you may need to consider a paid version.
How can I make my online presentation more engaging?
To make your online presentation more engaging, consider incorporating multimedia elements such as videos, images, and interactive quizzes. Use storytelling techniques to connect with your audience and keep your content concise and focused. Also, consider using a tool that allows for real-time audience interaction, such as live polls or Q&A sessions.
Can I collaborate with others on my presentation using these tools?
Yes, many web presentation tools offer collaboration features. This means you can work on a presentation with a team, even if you’re not in the same location. You can share the presentation, make edits in real-time, and leave comments or suggestions.
Can I use web presentation tools on different devices?
Most web presentation tools are compatible with various devices, including desktop computers, laptops, tablets, and smartphones. This allows you to create, edit, and present from anywhere. However, it’s always a good idea to check the specific device requirements for the tool you’re considering.
How can I share my online presentation with others?
Most web presentation tools allow you to share your presentation via a link, embed it on a website, or download it as a PDF or other file format. Some tools also offer the option to present live online, allowing your audience to join from anywhere.
Can I track the performance of my online presentation?
Yes, some web presentation tools offer analytics features. These can provide insights into how many people viewed your presentation, how long they stayed, and which slides they interacted with the most. This can be useful for understanding your audience’s engagement and improving future presentations.
Can I customize the design of my presentation?
Yes, most web presentation tools offer a range of customization options. You can usually choose from a variety of templates, change colors and fonts, and add your own images or logos. This allows you to create a presentation that aligns with your brand and captures your audience’s attention.
Are there any limitations to using web presentation tools?
While web presentation tools offer many benefits, there can be limitations. For example, some tools may require an internet connection to access and edit your presentations. Also, free versions of these tools may have limitations on features or the number of presentations you can create.
How can I improve my presentation skills?
Improving your presentation skills involves practice, feedback, and continual learning. Consider joining a public speaking group, taking a course, or reading books on the subject. Also, take advantage of the features offered by web presentation tools, such as rehearsal modes and presenter notes.
Gabrielle is a creative type who specializes in graphic design, animation and photography.

Google Slides: The ULTIMATE guide
- Written by: Joey Dudley
- Categories: Google Slides , Presentation technology
- Comments: 55

Whether you’re a student, a professional, or a presentation aficionado, you’ve probably heard of Google Slides, the browser-based presentation tool from Google Workspace. Google Slides has been steadily gaining in popularity over the past few years, with more and more users keen to make use of its easy-to-use interface and collaboration features.
As presentation enthusiasts (which is, let’s be honest, a polite way of saying nerds), we at BrightCarbon know Google Slides inside out. We’ve created this extensive guide to cover absolutely everything you need to know about Google Slides — from the basics through to more advanced features — so you can take your presentation projects to the next level.
How to use this guide
Whether you’re an experienced presentation creator or a total beginner, this is the ultimate guide for you! If you’re new to Slides, you can work your way through the sections from start to finish. If there’s something in particular you need help with, navigate to the section that interests you most by clicking one of the topic links below. This is a really in-depth guide, so bookmark the link and add it to your favourites to come back to. If you want more hands-on help, we also offer paid-for Google Slides training with an expert trainer.
How Google Slides works
Is google slides free.
- Getting started
Adding, removing, and hiding slides
Understanding the menu bar, understanding the toolbar, using the theme builder, using and creating themes, using the explore tool.
- Using Extensions
Creating content in Google Slides: Text and fonts
Inserting and editing text boxes, advanced: text formatting, inserting tables, adding fonts to slides, creating content in google slides: shapes and images, inserting and editing shapes, inserting and editing images.
- Advanced: Making attractive slides
Creating charts
Inserting media, creating content in google slides: animation and interactivity, making movement, advanced: linking and hyperlinking, getting the most out of cloud and collaboration features, cloud working, offline working, saving your work, advanced: converting to and from google slides, presenting and printing.
- Presenting your work
Printing your work
Getting even more out of google slides, more google slides resources, resources for making better presentations, get involved with our google slides masterclasses.
Here we cover the basics of using Google Slides, from creating a brand-new presentation to setting up a slide theme.
Google Slides is free to use across web, mobile and desktop apps, as long as you have a free Google account. Businesses can upgrade to a paid-for version of Google Workspace, but within that, Google Slides is exactly the same product as in the free version of Google Workspace and offers all the tools individual users are likely to need. In fact, at the time of writing there are no differences between the paid version and the free version!
Getting Started
Creating a new Slides presentation
To use Google Slides you need to sign up for a free Google account. You can create one here .
From Google Drive , click New at the top of the left-hand dashboard, then choose Google Slides > Blank presentation . There’s also an option to build your Slides deck from a template – we’ll cover that later .
If you’re working from the Slides homepage , simply click the blank template with the plus sign which sits beneath the Start a new presentation header in the top left of the main page.
Once open, you can rename your new Slides deck any time by clicking the Untitled Presentation box in the top left. So can your collaborators – we’ll introduce them properly later .
Changes are saved automatically when working online. This is why there’s no Save button in Google Slides. We talk more about saving your work later on .
To add a new blank slide, right click one of the slide thumbnails in the left-hand panel and select New slide . This new slide will use the same layout as the one you right clicked on ( more on layouts later ). To create a slide that is identical to an existing slide (including content), right click the thumbnail and select Duplicate slide .
To remove a slide, click on the slide thumbnail that you wish to delete and hit the Delete key on your keyboard, or right click and select Delete .
If there’s a slide you want to keep in your deck but don’t want to show when presenting, you can hide it. Right click the slide thumbnail and select Skip slide . The slide thumbnail will fade back. When you are in slideshow mode this slide will no longer show. To unskip a slide, right click the thumbnail and click Unskip slide .
The menu bar covers all the key functionality you’ll need to get started building your presentation. You’re likely to have come across many of these options before in other software, so we’ll focus on some of the more Google Slides-specific functionality below.

The File tab has all the basics for sharing, editing, and toggling settings.
The Share button lets you share your presentation with others. To learn more about sharing and privacy settings, see Cloud working below .
Make a copy lets you create a copy of either your entire presentation or of a single slide. This is great if you want to play around with edits on a deck or slide without editing the original document.
Version history allows you to see past iterations of a document, which can be incredibly useful. We talk more about Version history in the Viewing and saving your work section below .

Publish to the web lets you publish a non-editable version of your presentation that can be viewed via a link or embedded on a web page. This is a great feature if you want a larger audience to see your final, finished piece of work. Click Share , then Publish to the web , select either Link or Embed , adjust any relevant settings, and hit Publish .
Language lets you change the language of the document so that spelling is checked correctly. Tip: If you change from US to UK English, your measurements will change from imperial to metric — useful to know!
Page setup lets you format your slides to suit your needs. You can find more info about setting up pages here and in our blog post, How to change slide size in Google Slides .

This handy feature allows you to send an approval request to anyone who needs to give your presentation the final once-over — for example, your manager. To use this feature, simply click Approvals and the Approvals pane will appear. Click Make a request to send the deck to your chosen reviewers. You can toggle editing privileges or add a message before clicking Send request. You can also add a due date. Your chosen approver will see a message that says Pending approval at the top of the presentation when they open it. They can click to open a sidebar that allows them to see other reviewers, read your message, and see the due date if one has been assigned. Once they’ve approved the deck, you’ll get a notification to let you know.

The Edit tab houses some of the simplest — but most useful — tools you’ll use in Slides. Here you can find the expected Undo and Redo buttons for taking edits a step forward or back and options for Cut , Copy , and Paste . A particularly handy tool is Find and replace . If you have a word or phrase running throughout your presentation that needs changing, type it into the Find dialogue box and type your alternative into the Replace box. Then hit Replace to go through each instance individually, or Replace all for a blanket change across slides.
Tip: A lot of these actions can also be controlled using keyboard shortcuts . We’ve compiled a list of the most useful keyboard shortcuts for Slides in a handy PDF. Click here to download it for free and check out our favourite Google Slides shortcuts for increased productivity.

The View tab is used to change screen setup, open side panels, and toggle grids and guides on and off. You can also toggle guides by right clicking your slide and selecting Guides from the drop down menu.
To edit animation and transitions in your presentation, click Motion. Here you can view all animated objects in your presentation. To animate an object, select it and click Select an object to animate in the Motion pane. Click here for more about using animations and transitions .
Click Theme builder to view the theme for your document. We’ve got a whole section about using theme builder later on.
Grid view shows your slides in grid formation so you can see an overview of your whole deck rather than looking at things one slide at a time. In Grid view , you can reorder slides by dragging and dropping them — a handy way of rearranging things in your deck. To toggle Grid view off, go back to the View tab and untick it. Alternatively, you can toggle between Grid view and Film strip view (default view) by clicking the icons at the bottom of the sidebar on the left.
Guides lets you add guide lines to your presentation by right clicking on the slide or by clicking the Add vertical/horizontal guide buttons. Once you’ve added guides you can click and drag to rearrange them. By selecting Show guides or Clear guides you can toggle them on and off.
Top tip: It’s best to add the guides through the theme builder to ensure that they’re locked on the slides and you can’t accidentally click and edit them.

The Insert tab is where you add text, shapes, videos, images, and more to your slides. We go into more detail about inserting and editing images later .
Click on the following links to get more information about how to use features including text boxes , audio , shapes , tables , and charts .
You can add Word art to your presentation by clicking Word art from the Insert tab and then entering your chosen text into the box that appears at the top of the screen. You can then edit the font or colour of text in the toolbar. Learn more about the toolbar here.
Tip: Word art can also be really useful for quickly resizing large numbers and statistics. If you have a break slide and want to have a large number on there, it’s quite difficult to adjust it to the correct position. Word art treats the number as an individual object, not text. That way you can resize it in the same way you would resize any other object.

Here you will find tools to help you customise your slide. You can format tables, images and other objects here, along with text. There are also some text formatting options that can ONLY be found through this menu, such as size, colour, and capitalization.
Go to Text to see a range of ways you can adapt the look and feel of text. Here you can change the Size , Colour , Capitalisation , and more. If you need to add numbered footnotes to your presentation, you can use the Superscript and Subscript options.
Below Text is Align and indent . Here you can choose whether your text aligns to the left , right , or centre margins of the text box it sits in. You can also choose Justified for text paragraphs, spacing the text out evenly to fall flush with both margins.
Tip: The easiest way to align your text is to select it and then use the Align button in the toolbar to make the alignments.
Under Borders & lines you can create and edit a border for your object, change its colour, style or increase/decrease its line thickness. To remove all formatting changes to your object, click Clear formatting . Under Borders & lines you can create and edit a border for your text box, change its colour or increase/decrease its line thickness. To remove all formatting changes to your text, click Clear formatting .
Slides has some more advanced tools for formatting text, we talk about these later on .

The Slide tab has more ways to add and remove slides from your deck. You can use it to apply a layout from your theme builder by clicking Apply Layout , or open the Motion pane to select a new transition by clicking Transition . Change background opens up a new window where you can choose a colour fill or image fill for your slide. Once selected, you can choose whether to apply it to a single slide, or click Add to theme and apply it to your overall theme.

The Arrange tab includes the alignment tools. You can use these to easily arrange and position objects in an ordered way. Tip: It’s worth noting that right clicking on objects and then using the alignment options on that menu is a lot more practical!

There’s a lot of easy-to-miss functionality hidden in the Tools tab.
The Spelling menu houses standard tools such as Spell check . Personal dictionary lets you add words and phrases that wouldn’t show up in a normal dictionary. This way, these words don’t get flagged as misspelt. This would be useful for a company name, for example.
You can also find the standard Dictionary feature in the Tools tab.
Unlike the Tools tab in Google Docs, Google Slides unfortunately doesn’t have an option for viewing word count. A way to see the word count for your presentation is to click File > Download as > Microsoft PowerPoint (.pptx) or Plain Text (.txt) , or copy and paste the text from your presentation into a Google Docs file.
From the Tools tab you can also open up the Preferences window. There are lots of features in this window, so it’s well worth exploring! Here you can toggle some standard Slides features on or off, such as Automatically detect links or Automatically capitalise words . This could be useful if you have a particular style you need to adhere to, such as all lowercase. You can also toggle Smart Compose and Smart Reply on and off to help you write sentences and comments using predictive text. Clicking on the Substitutions tab in the Preferences window, which allows you to set up autocorrect actions where you type one thing and it automatically replaces it with something else. This is great for copyright symbols, trademarks, superscript and subscript.
If you’ve previously presented your deck and allowed your audience to ask questions using the Q&A feature, you can view the history of this by clicking Q&A history – handy if you need to remind yourself of common questions asked!
The Tools tab is also home to the Voice type speaker notes feature, which we cover here .
You can click Linked objects to open up the Linked objects pane, which allows you to find and update charts, tables, or slides that are linked to other files, such as Google Sheets. This makes it easy to keep your data up to date across different Google Workspace documents.
The Tools tab also houses Accessibility options. Click on Accessibility to toggle useful accessibility features that help make Slides easy for everyone to use, such as screen reader, braille support and screen magnifiers.
Finally, the Tools tab is where you can find the Activity dashboard (as long as you’re part of the same organisation as the file owner).This useful feature allows you to track viewers, comments, and sharing history for your presentation. It also gives you the option to adjust privacy settings, helping you keep total control of your work while enabling easy collaboration.
There’s a lot to cover here, so see below for more on using Extensions in Google Slides.
The toolbar is home to all the helpful tools you need to create a dazzling presentation. We’ll guide you through some of Slides’ more unique tools so you’re ready to get stuck in with confidence. Note that the toolbar changes depending on what you click on — for example, if you click on an image, it will display options for formatting and replacing that image. These will be hidden when you click off the image.

Paint format: This handy tool allows you to copy and paste the formatting of one object and apply it to another. Select a shape and click the Paint format tool. Then select another shape and watch the formatting of the first shape (fill colour, line colour, line width) be applied. You can also double-click the paint format tool to continue applying the formatting across multiple objects! To turn the paint format tool off, simply press Esc .
Zoom: Google Slides’ zoom functionality is somewhat limited. Selecting the Zoom button in the toolbar only allows you to zoom to 50, 100 or 200 percent. One way to more accurately adjust your zoom increments is to use the keyboard shortcuts CTRL+ALT++ and CTRL+ALT+-. Tip: After clicking the Zoom button in the toolbar, you can select a particular area on your slide to zoom in on by drawing a box over it.
Image: You can use the Image button to insert images from Drive, the web, Google Slides, your webcam, from your computer, and more. However, Slides has a lot of functionality for inserting and editing images that isn’t confined to the toolbar. Learn more about inserting and editing images in Slides here .
Bullet points: While we don’t recommend presenting lots of bullet points and text-heavy content , the bullet tool is quite easy to miss in Slides, so we thought we’d call it out here for those of you wondering how to add bullet points to your presentations! The Bulleted list drop down sits towards the end of the toolbar . Simply highlight your text, select the drop down, and choose the type of bullet you wish to use. Next to the Bulleted list is the Numbered list , which you can use if you want to use numbers and letters to organise your text points instead. You can also use CTRL + SHIFT + 8 to transform your text into a bulleted list, while CTRL + SHIFT + 7 will give you a numbered list.
Align: The best way to align text is to select it and then click on the Align button in the toolbar . Click to show a drop down menu which will allow you to justify selected text , centre it, or align it left or right.
The Theme builder (known as the Slide Master in PowerPoint) controls the look and feel of your deck. Use it to set custom layouts, backgrounds, colour schemes and fonts for all your slides. It’s best to set up the theme builder at the very start of your project to create a consistent set of slides. Be mindful if you edit the theme slide; any changes to the theme will retroactively affect the slides you’ve already built, so be sure to check through the whole presentation afterwards!
Theme builder: To launch the theme builder go to the Slide tab in the menu ba r and click Edit theme . You can also access this by clicking View in the toolbar and selecting Theme builder . Down the left hand side you will see a number of different slides. At the top is the theme slide. This is like the control centre for the rest of your deck. Any changes you make to this slide will be applied to all other slides in the theme builder, and all slides within your presentation, too.
Slide layouts: If you want to make a specific type of slide, like a title slide or agenda slide, you’ll want to edit the different slide layouts which sit below the theme slide. You can make small tweaks, like adjusting background colours or adding images, or larger adjustments, like repositioning text boxes. Unlike with the theme slide, these changes will not be applied to all slides; only slides which use that specific layout will be affected.
To edit a layout, first locate it down the left hand side of the theme builder view. You can also create a new one by right clicking on any layout and choosing New layout . Once you have the right layout selected, you can begin editing it like any other slide. Add, move, alter, or delete objects to achieve your desired layout style. Right click on the layout in the left hand panel and select Rename layout . A new window will appear where you can give the layout a new name, like ‘Agenda slide’.
Applying layouts to slides: When you are done editing your layouts, have a thorough check over your presentation. Once checked, you can exit the theme builder by clicking X in the right hand corner. All changes will be automatically saved.
To apply a particular layout to a slide, right click the slide thumbnail in the left hand panel and click Apply layout . This will bring up all the layout options from the theme builder for you to choose from. Need a bit more info? Check out our article on editing the Google Slides theme builder and layouts .
Themes are a collection of slide layouts that you can apply to your presentation. Google Slides comes with a number of pre-made themes that you can use straight out of the box, or customise via the theme builder for a more personalised look and feel.
You can also create your own, personalised theme. To do this, open up a blank presentation and make the necessary edits to the theme slide and layouts, as explained above . Then go to the Slides home screen , select Template gallery in the top right. When the new window opens up you can submit a new template in the top right corner. In the next window you can choose a presentation to use as a template. You can also submit a copy of this file by checking the box at the bottom. Checking this box will duplicate your selected presentation and move it to your personal Drive. This means that nobody but you can edit it. This is very useful, as when you edit a deck that is saved in the template gallery, it automatically updates it in the gallery. It’s best practice to make sure nobody but you has access to the original file to help preserve it. Once you’ve set all that up you can create a new deck using that template by selecting New > From a template and navigating to it in the template gallery.
Choosing a theme: When you create a new Slides deck (by clicking + New and then Google Slides from your Google Drive homepage) you will be presented with a range of themes when your new deck first opens. You can also go to the Slide tab in the menu bar and select Change theme . You can click on any theme in the panel to preview it. Once chosen, simply close the panel by clicking the X in the right hand corner. To edit this theme, simply open the theme builder and follow the steps as explained above.

Changing the theme: If you are working from an existing Slides document and want to change the theme to one of Google’s preset options, go to the Slide tab in the menu bar and select Change theme to preview Google Slides’ pre-set options. If you choose a new theme, it will be applied to all of your existing slides, so check through all your slides once the change has been applied to ensure it looks how you want it to.
Tip: Once your content has been moved onto the correct template you can clean up other themes in the deck. First, navigate to View > Theme builder . By clicking the name of your theme, you can see the other themes in the deck in a drop down menu that appears. To delete them from the deck, simply click the name of the theme, then select the top panel labelled Theme and press delete . As long as no slides in the deck are using that theme, it will delete the theme (and all layouts connected to it) from your document.
Importing a theme from PowerPoint: Although you can import themes from one deck to another, it’s important to be careful when using the built-in Import theme function because it can merge with the existing one, causing irregularities. Also, your Theme builder can get cluttered with templates when slides are incorrectly copied and pasted from other sources. If you want to try this function out anyway, go to the Slide tab in the menu bar and select Change theme. At the bottom of the theme panel you can select Import theme . In the new window, navigate to the upload tab and click Select a file from your computer . Choose another Google Slides deck or PowerPoint file, and Google Slides will then extract the theme from it.
Because importing themes using the native function is so temperamental, we’ve discovered a workaround which works like a charm, and is especially useful if you have a PowerPoint theme that you’d like to import into your Slides deck. Find a deck on Drive that uses the theme you want to import into your Google Slides deck. Copy a slide that uses the correct template. Open up the deck that you’d like to import your theme into and paste your slide into it. Select Keep original styles . This will ensure that the entire theme is brought over (including fonts, colours, and guides) whilst keeping it separate from other themes in the deck. Now that your theme has been imported, you can create new slides within it by right clicking on the slide that has the correct theme and clicking New slide .
Changing and customising theme colours: To create a set of custom colours that appear in the colour palette for your theme, go to the theme builder , select colours just below the menu bar which opens up the colours tab on the right-hand side. You can change the colours for each theme from there.
Changing slide size: Google Slides defaults to 25.4 x 14.29cm, which is a 16:9 aspect ratio. Note that this is smaller than PPT, so if you’re copying objects or text from a PPT deck opened with Google Slides, they will paste into Google Slides much larger than the original.
There’s an easy way to toggle between set slide dimensions or create a custom size. Go to Page setup in the File tab. Use the drop down to choose a standard size (Standard 4:3 , Widescreen 16:9 , Widescreen 16:10 ) or choose Custom to input your own dimensions. Once chosen, click Apply .
If you do choose to use a custom size for your deck, make sure you do so with good reason. The standard 16:9 ratio is widely used because it fits perfectly on most widescreen screens and projectors. A custom size may not work so well, and may make inserting slides from other decks quite tricky! Learn more about how to change slide size in Google Slides .
Tip: It’s best to set a custom slide size before adding your content. Adjusting your slide size afterwards will stretch everything on the slide to fit!
The Explore tool has two key functionalities that we’ve found useful. Firstly, it generates suggestions for appropriate layouts based on what’s on your slide. Secondly, it allows you to search Google within your Slides document.
Opening the Explore panel
Accessing the Explore tool is simple. All you need to do is go to Tools in the menu bar and then click Explore in the drop down menu. After you’ve located, simply click — this will open the Explore panel sidebar.

Suggested layouts don’t only change when you update text. If you insert an image, graph, chart, or GIF, the layouts will also update to offer you more appropriate layout options for the specific type of visual you have included. For example, to insert an image, select Insert , choose Image , and choose one of the options provided to either upload an image from your computer, the web, drive, or another location.
Once you’ve selected a layout, any new slides you add from that slide will follow that same layout, helping you keep your presentation consistent. You can also use Explore to create different layouts for different slides depending on the content. However, be aware that your slide might need to follow a different layout to one you’ve used previously, and Explore won’t create any more layouts that are consistent with the first one. The individual layouts it suggests will be inconsistent with one another and so the more you use the Explore function, the more inconsistent the whole deck will be when it comes to things like title alignment and image positioning, etc.
Ultimately, this feature is good for giving you ideas for new layouts, but it’s important to be aware of potential inconsistencies across different slides.
Adding information from other documents or web sources
The Explore tool can do more than just create layouts — it also lets you quickly and easily locate something online or on Drive without opening a new tab on your web browser or exiting your presentation. All you need to do is navigate to Explore , type in a search term in the search bar, and your results will appear.

After searching for something, your search results will show in categories. There are three categories which will appear, Cloud search, Web, and Images.
Cloud search allows you to search through Google Drive, Gmail, and more. To filter by type, click the filter icon. It’s possible your administrator may have turned off this option, in which case it may not appear and you’ll need to search manually through Google Drive in another browser tab instead.
Web uses Google Search to help locate information from the web related to your presentation.
Images uses Google Image Search to aid in finding images from the web related to your presentation.
Let’s look at the Explore tool in action.
Let’s say you are giving a presentation on marine mammals, and you need to locate pictures of seals. Simply navigate to Explore , type ‘seal’ in the search bar, and press enter. Now, click Images from the three options just below the search bar.
To preview any images at a larger size, just click on them. If you decide you are happy with the image, simply click the blue I nsert button at the top of the preview window. If you’ve located an image you want to add to your presentation from the Explore panel and don’t need to preview it, all you need to do is click the + that appears on the top right corner of the image when you hover over it. The image will be added to the slide you have selected, with a link to the original source page attached.
Reminder: Consider usage rights when selecting an image. Be sure to consult guidelines on fair use and licensing when searching for images online. Site owners often use licences to indicate if and how others can reuse content on their sites. The licence details should provide guidance on whether or not an image can be used for your intended context, and whether to include appropriate attribution for the image if necessary.
Once you’ve selected your images, you can use Explore to place them in layouts by clicking the back arrow in the Explore panel until you get back to the layout options.
You’re not just limited to searching for images. Type a keyword into the search bar, click the Web tab, and you’ll be given Google search results related to your keyword. If you want to find out more, simply click on one of the links and a new tab opens in your browser taking you to that webpage. If you need to see more results, simply scroll down to the bottom of the Explore tab and select See all results on Google .
To locate files in Drive, simply search in the Explore tab using the process we’ve outlined above and click Cloud search in the three options below the search bar.
Using extensions
How to add an extension to Slides: Extensions (also known as add-ons) are independent apps you can add to Google Slides to increase its capabilities. You can find the full range of add-ons by clicking the Extensions tab in the menu bar and choosing Add-ons and then Get add-ons . This opens a new window with some featured add-ons, as well as a search bar that allows you to look for something specific. Once you’ve found one to try, click on it and then click Install . You may then be asked to verify your login details and allow permission settings. Once you’ve clicked Install , the add-on will be added to Slides. You can find all of your downloaded add-ons in Add-ons under the Extensions tab.
Our favourite add-ons and extensions: We’ve compiled a list of the handiest Google Slides add-ons that help us do our jobs better, so you can get some inspiration!
Back to top
Creating content: text and fonts
To insert a text box, click the Text box button in the toolbar , or Insert > text box from the menu bar . Then, drop the text box onto your slide by clicking with your cursor. You can now begin typing. The majority of text editing tools can be found in the toolbar . Here you can change the font, colour, and size of your text, add bullet points, or change its alignment. We’ve put together a list of the 10 best fonts to use in Google Slides . It’s worth noting that not all text needs to sit inside a textbox. You can also type directly into a shape by simply double clicking it and starting to type.
Slides has a handful of more advanced tools for text formatting. Access them by selecting the object or text box you want to format, and clicking Format options to the far right of the toolbar or by right clicking on the object. This opens up a number of different options. Here we will focus on Size & rotation and Position .
The Size & rotation options allow you to resize objects more precisely. You can adjust the Width and Height of objects,, by typing directly into the provided input fields. If you want to resize your object without it being warped or stretched, check the Lock aspect ratios box.
The alignment tools will suffice for most users, but if you need more precision the Position option provides a more accurate way of positioning an object or text box on the slide. The Rotate tool allows pinpoint accuracy when rotating an object by enabling you to enter a specific degree. Size & rotation and Position format options can be applied to all objects on slides, not just text boxes!
Text fitting: Text fitting tools give you more control over how your text sits within a shape or text box. The Indentation tool lets you fine-tune paragraphs of text without having to alter the shape they sit within. You can play around with this by typing in the size of your desired indentation, in inches or centimetres (depending on your document’s language settings), into the provided input fields. Within the Indentation menu there are some further options for controlling indentations. Click the drop down labelled Special and select one of the following:
- None: Select for text to follow the default indentation parameters
- First line: Select to adjust the indentations on the first line of a paragraph only
- Hanging: Select to adjust the indentation for all lines of text except the first one
You can use indentations to control the spaces between bullet points and the text that connects them, too.
To automatically adjust how a text box interacts with the text within it, use the Autfo-fit function. This is found directly below the Indentation tool. You can choose from Do not auto-fit , (makes the text box height fully adjustable regardless of how much text used), Shrink text on overflow (to make the text smaller if you make the text box smaller), or Resize shape to fit text (to make the text box get larger or smaller to fit your text as you add or remove content). If you choose Shrink text on overflow, be aware that Google Slides adjusts your line spacing, font size and gaps between letters to ensure it all fits. Using this setting across the deck will make your text boxes largely inconsistent!
While Indentation allows you to fine tune specific paragraphs of text, Padding is used to adjust the spaces between the edge of the shape and the text. By adjusting the four Padding values (top, bottom, left and right) you can control the margins of your text box. For example, if you wanted to perfectly left-align an object with some text, you can adjust the left-hand margin to 0.
At the time of publishing, there is no way to fully wrap text around an image or shape in Google Slides — these tools are your best options! Read more text formatting tips.
To insert a table onto your slide, go to the Insert tab in the menu bar and hover over Table . In the drop down menu you are given the option to select how many columns and rows you want (for example, 2 x 5 ). Once selected, your table will appear on your slide.
You can now move it around your slide or make it bigger or smaller. Each cell can have its individual indentations and margins adjusted in the same way as a normal text box. You can add or remove columns and rows by right clicking on a cell and selecting the appropriate command. You can format the lines in a table by highlighting the cells and selecting the small arrow in the top right corner of the selection. This allows you to select the appropriate line in that selection, which will allow you to quickly edit all the lines at once.
At the time of publishing, Google Slides does not support custom fonts. You cannot import them, and there are currently no add-ons for custom fonts in the add-ons store. However, there is a way to add a few new fonts to your existing Slides font library. In the toolbar , click the font drop down and select More fonts . This opens up a new dialogue box with a selection of Google fonts that you can add to the default list. Click on a font to install it. Installed fonts will turn blue, with a blue tick next to them. To remove a font, simply click on it again and the blue tick will disappear. Once you are happy with the fonts you have added, click OK .

Creating content: shapes and images
To insert a shape, click the Shape button in the toolbar, or Insert > Shape from the menu bar . Select the shape you want to use, then either:
- Click your slide to drop a perfectly proportioned shape at a default size
- Click and drag (whilst holding down the SHIFT key if you want to retain proportions) and drag your shape to an appropriate size
Adjusting the size of Slide objects: Whether you’re working with an image, shape or text box, there are some simple but effective ways you can edit them to achieve a more customised look and feel.
To adjust the dimensions of an object, click it to make the blue adjustment nodes appear. Click and drag any one of these nodes to alter the size of your object. If you want to make your object bigger or smaller whilst maintaining its proportions, hold down the SHIFT key whilst dragging the corner nodes. You can also rotate your shape by clicking and dragging the small circular node above the object. Holding the SHIFT key will lock those rotations in 15-degree increments.
Grouping and ungrouping objects: If you have objects on your slide that intersect with one another — like a text box layered on top of a shape, or a complex bar chart — you may wish to group them so that they stay together in a particular order when moved or resized. Grouping is also very useful for applying edits to multiple objects at the same time.
First, select the objects you want to group together (it can be as many as you like). Then right click the objects and select Group , or use keyboard shortcut CTRL + ALT + G .
Now, when you select one object, all other grouped objects will be selected as well. This makes them easier to move around your slide and edit.
To ungroup your objects, select the group and right click on Ungroup , or press keyboard shortcut CTRL + ALT + SHIFT + G .
Note: you can only group elements that are on the same slide as one another, though it is possible to group shapes even if they are outside the bounds of your slide template.
Grouping objects can be helpful if you want to format multiple shapes or text in the same way at once. For example, if you need to change the font style, colour and size of all of your slide text, you can group the textboxes together and edit them using the ribbon as normal. These changes will apply to all elements within your group.
Using the alignment tools: To ensure that your slides are slick and professional, you need to use Google Slides’ handy alignment tools. To show you how to make the most of these tools, we’ll demonstrate how you could use them to format an agenda slide.
Select all four agenda points and right click on your selected object (or click the Align drop down in the Arrange tab). Here you will see a range of alignment options. Click Left so that all points line up along the left hand side.

Next, with all four points still selected, right click again (or click the Arrange tab again), but this time choose Distribute and then Vertically . This spaces all of your points evenly between the top and bottom point.
Now you have a perfectly aligned and distributed agenda slide!

Another handy tool here is Center on page , again found by right clicking on the object (or in the Arrange tab). Choosing either Horizontally or Vertically positions your selected object in the centre of the slide on the horizontal or vertical axis.

To insert an image, click the Insert image button in the toolbar, or go to Insert > Image from the menu bar to upload from your computer, Drive, Google photos, or even directly from your camera. If you have a web link for a specific image, select By URL and paste the link into the dialogue box.
Slides even has an in-built Google Image Search feature. Simply select Image > Search the web.
Note: Images sourced through this method claim to be copyright-free, but to be safe, it might be best to use images that you are sure are free or that you have permission to use.
Images need to be under 50MB, less than 25 megapixels and in JPEG, GIF, or PNG format to upload correctly.
You don’t have to stop at simply uploading your image. There are lots of ways you can edit an image to achieve a more polished, on-brand look and feel. Click here to learn how to make your slides more visual with clever image editing .
Cropping images: If you only want to show a specific part of an image, you can simply double click the image to start cropping. You can also click on the image and then choose Mask image (next to crop image ) in the toolbar. This will allow you to crop the image into different shapes such as a circle or a triangle.
Once the cropping interface appears, pull the black handles to adjust the mask that will hide the it parts of the image that you don’t want to see. This tool can be a little fiddly, and if you accidentally select one of the blue image nodes instead of a black handle, you could end up distorting your image instead of cropping it. If this does happen, just hit CTRL + Z to undo or hit the Undo button in the toolbar and try again!
More image formatting: There are some other formatting options available when editing images. Simply right click on your image and then choose Format options . Recolour allows you to recolour an image with a colour filter that’s based on your theme colours. Adjustments lets you adjust your image further by changing the opacity, brightness, and contrast.
Adding and editing GIFs: Google Slides is very GIF-friendly, and you can insert and edit animated GIFs in the same way as static images. If you edit a GIF (by cropping or resizing, for example) it will still work, playing in both Slideshow mode and on your slide as you edit! See more cool stuff on Google Slides and GIFs .
Advanced: making attractive slides
It’s all well and good knowing how to add images and shapes to Google Slides, but we want to show you how to use them more effectively to help tell your story better, too. At BrightCarbon, we strongly believe that text-heavy slides won’t help you achieve much besides sending your audience straight to sleep. When audiences are forced to read slides like this, they naturally tune out everything that the presenter is saying because it’s impossible to read and listen at the same time! So instead of presenting distracting slides like this, try toning down the text and introducing more visuals. People respond much better to interesting visuals, and what’s more, are much more likely to listen to what you, the presenter, is trying to say.
So, here are our four simple tips for using more visuals to not only make your slides look more attractive, but to increase audience engagement and help get your message across!
Use charts, processes, and timelines to relay information: Charts and timelines are an excellent way to show information visually, and help audiences see results or trends straight away. What’s more, they are an easy visual for anyone to create. We talk a bit about how to use linked charts elsewhere , so here’s an example of a simple but effective timeline, using nothing but Google Slides shapes. Looks better than a list of bullet points, right?

Use visual metaphors to help tell stories: Combining simple but striking visuals with a little bit of text can be a great way to get your audience thinking. This kind of simple imagery is great for segue slides or section headers (to change the tone before heading into a new section).

Replace bullet points with simple iconography: Consider removing large chunks of text and replacing them with simple icons that speak to the larger themes of your slide. Icons are much more visually interesting — and less daunting — than long blocks of text! Here’s a great tutorial that shows you how to make a lovely two-toned icon directly in Google Slides in less than four minutes!
Use high quality photography- not stock photo clichés: Before we move on to choosing the right images, it’s important to source images that you have permission to use. Aim to use high quality imagery from free websites like unsplash.com , rather than pulling straight from Google Images, where the majority of content is copyright-protected. Don’t underestimate the power of photography. The image choice you make will have an impact on how your brand is perceived. The right photography can create a positive atmosphere and sense of finesse around you and your presentation; cheesy stock images will have the opposite effect!

This image uses unrealistic and cheesy imagery that the audience may struggle to relate to. They may, as a result, not take you or your brand seriously. There’s also a lot of text on the slide, which the audience will read instead of listening to what you are saying.

This image, on the other hand, shows a more realistic depiction of events that audiences may be able to better relate to. Using high quality, modern-looking stock-photography also helps to paint your brand and your presentation in a better light. Reduced text means your audience can focus instead on the imagery and on listening to what you are saying.
When it comes to graphs and charts, Google Slides doesn’t have the largest library to choose from, but it does cover the basics and is incredibly easy to use, customise, and update. There are four different types of built-in charts you can create; Bar , Column , Line and Pie . Each chart works in a similar way, so here we’ll show you how to add a simple pie chart.
Adding data to your chart:
Go to the Insert tab in the menu bar , click Chart and then Pie . A basic pie chart will appear on your slide. To edit the data in your pie chart, select the chart and click the small drop down arrow in the top right-hand corner that looks like a ‘v’, then click Open source .
This opens a new Sheets doc where you can start to edit the data for your pie chart. Once you have inputted all of your data, close the Sheets doc and click the UPDATE button that will appear next to the pie chart on your slide. The pie chart will now adjust to reflect your new data.
Be aware that when you create a new chart that’s linked to a Google Sheets doc, the source file will be added to your personal Drive. You may wish to store this in another folder on your Drive so that you don’t delete it by mistake!
Customising the look and feel of your chart:
You can recolour the individual segments of your pie chart by clicking the small drop down arrow in the right hand corner that looks like a ‘v’, then clicking Open source to open up the data in Google Sheets.
In Sheets, double click any segment of your chart to open up the Chart editor . Here, beneath Series , click the Colour drop down to choose a colour for the segment. Repeat on each segment until your pie chart is the desired colours. Once done, close the Sheets doc and click the UPDATE button. The new colour scheme will now be applied.
If you’re looking to totally recolour your chart, you can also use the recolour method discussed earlier in the images section .

Inserting a GIF: Adding an animated GIF to a slide works in exactly the same way as adding an image. In the menu bar go to Insert > Image > Upload from computer , then select the GIF from your computer. The GIF will appear on your slide and begin looping. You can edit it in the same way you would edit a static image such as a JPEG.
Inserting a video:
Go to the Insert tab in the menu bar and select Video to open up the Insert video window. At the top of the window you will see two tabs; YouTube and Google Drive . These are the two places you can get videos from.
The YouTube tab shows a search bar and the YouTube logo. Type into the search bar to search for any video on YouTube. As with any media you use in your presentations — make sure you have the rights to use the video you choose. Click on the video you want to use and then hit Select . The video will now appear on your slide. You can move it around or resize it like any other Slides object. To watch the video, click the play button in the centre of the video. This works in both normal and Slideshow mode. If you already have a link to a YouTube video you wish to use, paste it into the box labelled Paste YouTube URL here . Once entered, hit Select and the video will appear on your slide.
If you have a local copy of the video you want to show (in MP4 format, for example), you can upload it to Drive and then use the Google Drive tab to search and locate it. Once you have found your video, hit Select and it will be added to your slide.

If you need to set a specific start and end time for your video (so that it only plays a chosen section of the content) here’s how to do it. Once your video has been added to your slide, right click it and select Format options . In the new window that appears to the right, click the Video playback drop down. From there you can input the desired start and end times by typing into the boxes. Once completed, the video will start and end at the chosen times whenever it is played, in both Slideshow mode and normal view.
You can also choose when your video plays. On click will play when you click anywhere on the slide, Automatically will just start the video without any action from you, and Manually means that you’ll need to hover over the video and click Play to get it to start.
Inserting audio:
To add audio to your presentation, go to Insert in the menu bar and then click Audio . A pop-up window will appear allowing you to choose to upload audio from Drive or paste in a URL. An audio icon will appear on the slide. Be mindful that this icon will be visible — if you don’t want it to be visible when presenting, just move it off the slide. To adjust your playback options, right click on the audio icon mentioned above and go to Format options . The top drop down is Audio playback . From here you can choose when your audio starts playing, the volume, and whether you want it to loop. You can also choose whether or not you’d like your audio to stop when moving onto the next slide.
Creating content: animation and interactivity
Just like images, using animation can bring your presentation to life and make it much more engaging for your audience. Everyone prefers a fun animation to a boring block of text! Well-chosen animations can help your audience absorb more information and remember your key messages — and adding movement doesn’t have to be a chore. Read on to find out more about the power of motion in your Google Slides presentations.
Transitions: Google Slides has a number of transitions to help you segue from one slide to the next. Go to Transition in the toolbar to open up the motion pane. In this panel click the None drop down to see the different options.
Whilst it’s tempting to use a number of different transitions to jazz up your deck, we advise keeping things simple, so as not to distract from your story. Typically, we like to use Dissolve (fades between slides) for most slides in the deck, as this is the most subtle way to transition between slides without distracting the audience. At the end of each section, we like to use Fade (fade to black) to accentuate the break between sections in a more obvious way.
If you want to apply one transition to all slides, click Apply to all slides below the transition drop down.
The motion pane is nice and easy to access. Either click Transition in the toolbar, or select an object, go to the Insert drop down in the menu bar and select Animation . Here you can view all the animated objects in your presentation, and access the range of animation options that Google Slides has to offer. You’ll see that there aren’t as many options as some other presentation software, but the essentials are there.
To animate an object begin by selecting it, then click Add animation in the Motion pane. Using the animation drop down (which defaults to Appear before an animation has been selected) you can choose from a variety of animation options. Options such as Fly in and Fade in make your objects appear on the slide. Conversely, Fly out and Fade out make objects that are already on your slide disappear.
You can also choose when your animation will begin with the Start condition drop down. Your animations will happen in order from top to bottom as they appear in the Motion pane. Choose between On click ( animation starts when you click with mouse or keyboard), After previous (animation starts after the previous animation) or With previous (animation starts with the previous animation, or directly after the previous slide has ended).

Slides makes it easy to animate paragraphs of text individually by checking the By paragraph checkbox when creating your animation.
Adjust the Duration slider to set the time it takes for your animation to complete.
As a web-based program, Slides makes great use of hyperlinks, so you can easily navigate between Slides, web pages, and other documents whilst you present.
Hyperlinking text and objects
Long, complicated URLs can make slides look messy. If you want to provide a link to an external website in your presentation whilst keeping your slide looking slick and professional, you need to know how to hyperlink text!
Highlight the text that you want to turn into a hyperlink — one or two words is best. Right click the text and scroll down to Link. This will bring up a new dialog box, in which you can paste the link of your chosen website. Click Apply , and you’re done!
Now, whenever you click that link (even in Slideshow mode) a new browser tab will launch, directing you to the web page. You don’t have to link to just web pages; you can link to other Google Docs and Sheets too. This same method of linking works on shapes, images and any other kind of Slides object.
Linking to a slide within your presentation
You may need to link between different sections of a presentation, or easily navigate back to an agenda slide. To do this, highlight the text or select the object that you want to act as the hyperlink, right click it and scroll down to Link. Be aware not all objects have this option when right clicking! You can add a link to these objects by using the keyboard shortcut: CTRL + K. In the dialog box, you should see a drop down at the bottom with a button that says Slides in this presentation . Click this to reveal a choice of Slides in your deck. Select the one you wish to hyperlink to and hit Apply .

Linking to a slide in a different presentation
It may also be necessary to link to a particular slide in a different presentation. To do this, first open the deck that you want to link to , and click on the slide you want it to open on. Whilst on that particular slide, copy the hyperlink from the browser bar.
Now, in the deck you want to link from , right click the text or object that will act as the hyperlink, scroll down to Link , and in the dialogue box, paste the hyperlink next to where it says Link . Click Apply . Now when you click your hyperlinked text or object, a new browser window will launch your presentation, starting on the exact slide you want!
Google Slides has a wide range of collaboration features. It’s purpose-built for collaborating in real time, offering a number of different ways for interacting with colleagues or friends. No more version control problems, emailing files back and forth, or being pushed to download anything. Here’s how you can make the most of these features:
Sharing a presentation: Sharing means granting someone access to view, edit, or comment on your presentation. This is handy if you are collaborating on a project, would like a second opinion on your own work, or need multiple team members to work on the same document at the same time. Google’s sharing settings allow you to set restrictions, so you are always fully in control of the document you share.
To share a Slides presentation, click the blue Share button in the top right of your screen. Alternatively, head to the File tab and select the Share button. This will open a new window where you can input the email addresses of the people you want to share with. To the right of the email addresses you will see a drop down that lets you toggle whether recipients will be able to edit , comment , or simply view your presentation. You can adjust an individual’s access later by navigating to the share window and clicking the drop down next to their individual email addresses. Another really useful feature here is the Notify checkbox, which lets you share a presentation with someone without them getting an email about it — great if you want to avoid bombarding someone with emails or if you want to share something for later use without immediately drawing the recipient’s attention to it (perhaps while you finish working on it!)
Advanced sharing settings: Advanced sharing settings are found in the sharing window mentioned above, under General access . Below People with access you can see the sharing status of your presentation.
This may be set to Restricted , meaning only you have access, Shared with your organisation , or set so that Anyone with a link can view . Please note that setting your presentation so that Anyone with a link can view means that it is no longer private. Anybody with that link can access your presentation. To learn more about sharing your Google Slides deck, head here .

Working with multiple users: So, you’ve shared your presentation with a few people and given them editing privileges. But how does this kind of collaboration work in practice? Here are a few handy pointers to get your collaborative efforts off to a flying start.
There’s only one document
Sharing your presentation with somebody else does not mean you’ve shared a separate version of it. There is only one master version, and any edits you make will be made in your collaborators’ document, too. This is great for real-time collaboration, especially if you have a deadline or need something to be reviewed as you work on it. You can revert your document back to Private at any time in the Sharing settings , or make a private copy by going to File > Make a copy .
Working together is easy
Google have tried to make working with multiple collaborators as simple as possible. You can see which collaborators are in the presentation in the top right panel. Collaborators will appear as colourful circles with initials, or profile pictures if the user has one. You can hover over the circles to reveal the full details of the collaborator.

You can even see what your co-workers are editing. Whether they are typing, drawing a shape or adding an image, you can see them do this in real-time, and they can see you in turn. This visibility over other people’s work means you can ensure everybody is on the same page and complete work faster. You can also follow collaborators around by clicking their headshot, which can be useful if you’re on a call with somebody in the deck and need to keep up with what they’re looking at. Whilst these collaboration features can be a total game changer, they’re best used in moderation. We’d advise against lurking on slides your co-workers are editing for too long, as it could be a little off-putting for them to know that you’re watching their every move!
Using Comments: If you and your co-workers aren’t editing a presentation at exactly the same time, you may want to leave notes for them to pick up on later. To leave a comment, click the Add comment button in the toolbar , or go to the Insert tab in the menu bar and choose Comment . You can also just right click on a slide to add a comment, or press CTRL + ALT + M . A box will appear next to your slide where you can begin typing. To assign an action to a specific person, type the @ symbol and then type their email address. An option will appear for you to Assign to that person. When you @somebody in a comment, they will receive an email notification, so you can be sure they won’t accidentally miss it.
Using the chat feature: If you need to chat with collaborators in real-time, Slides has a built in chat feature, too. To use it, at least one other collaborator must be in the presentation at the same time as you. To Show chat , click the blue person with the speech bubble icon in the top right, next to the profile icons. This will open up a separate window where you can type to chat. Close the chat window by clicking the same button used to open it.
Email multiple collaborators
One final collaboration feature worth mentioning here is emailing collaborators from Slides. This is handy if you want to send a message to all collaborators. In the File tab click Email and then choose Email collaborators . Here you can write a message to be emailed to as many or as few collaborators as you want. Simply check the names of the people you want to send the message to in the right hand column and click Send.
Read more about getting the most out of online collaboration .
Using Google Slides doesn’t necessarily require an internet connection. If you use Chrome or Edge as your browser, you can use Slides offline. This is particularly handy if you want to make changes to a Slides deck on the go, or if you are due to present to an audience in a location without an internet connection. If you’re running low on storage, you can prioritise saving individual files by going to File and clicking Make available offline or by right clicking on the file in Drive and selecting it from there.
Setting up Google Slides for offline use: Firstly, make sure you’re connected to the internet and using Chrome or Edge as your browser. If you haven’t already done so, you’ll need to download the Google Docs Offline Chrome extension, which can be found here . In Google Drive , click the icon shaped like a gear in the top right, and select Settings . Under General, make sure that the Offline checkbox is ticked and click DONE . You may see a notification box appear in the bottom left of your screen that says Setting up offline .
Next, navigate to the Slides homepage and click the main menu button (represented by an icon with three horizontal lines) in the top left hand corner. Go to Settings and make sure that the Offline button is toggled on (to the right). You can now disconnect from the internet and begin working offline!
Google Drive should still load as normal via Chrome browser. You can open up a presentation as normal and begin making changes. Next to the title of your presentation you should see a small lightning bolt icon. This indicates that you are now working offline. You can make changes and even present your deck as you normally would when working online. When you’re done making changes, close your presentation as normal.
Syncing offline work when you reconnect to the internet: Changes made to an offline presentation will automatically sync when you go back online and open up that file in Google Drive. It’s worth noting that if a collaborator made changes to the online document whilst you were working on it offline, both sets of changes will sync up in the same file. If this happens and you are unhappy with conflicting changes, use the Version history functionality to revert back to an earlier version.
If you are using the online version of Slides, your presentation is constantly being updated and saved as you work. This is why the Slides browser version doesn’t have a save button — it’s done automatically, meaning you don’t have to worry about losing unsaved work if your computer crashes or you accidentally close your browser window.
Saving your work to desktop: If you really want to save a copy of your Slides file to your desktop or a flash drive, you will first have to convert it to a different file type, such as Microsoft PowerPoint. We talk you through how to do this step by step later on.
Duplicating your work: There are two easy ways to make a copy of a presentation. From Google Drive , you can simply right click on any presentation, and choose Make copy from the drop down menu. Alternatively, with a presentation open, go to File > Make a copy… .

Version control: If you’re used to working with desktop presentation software, you may be in the habit of emailing different versions of a presentation back and forth. This can get confusing, especially when it comes to consolidating changes across versions.
With Google Slides this isn’t an issue, because everybody is working from one single document. This means that if you make a change it will be visible to all collaborators who have access to the document. This is very handy, but what happens when you want to revert to an earlier version?
Version history: Slides makes it easy for you to see all previous iterations of your deck and revert back to an earlier version if necessary. Here you can view all past editing rounds, going right back to when the presentation document was first created.
Go to File and choose Version history , then click on See version history . Click on the different dates to see a preview of how the document looked at the time. If you are just looking for a particular slide, line of text, or image that was deleted, you can simply copy and paste it from the earlier version, close the Version History window, and paste it into the latest version.
If you want to completely revert your document back to an earlier state, click the Restore this version button at the top left. If you choose to do this, bear in mind that your current version will be completely overwritten by the version you are restoring.
Naming versions: If there are multiple collaborators working in your deck, the Version History window can sometimes be difficult to keep track of, especially if there are multiple iterations in the same day. To better track the different iterations that you work on, you can easily name different versions. To do this, in the Version History window, double click the date of the version you want to name. This opens up a dialog box in which you can type a new name.

For more help on using this feature, check out this YouTube tutorial on getting the most out of version control in Google Slides .
Google Slides has tried to make it easy to convert to and from other presentation software. Here we’ll cover the basics of how to convert using some popular programs. Keep in mind that different presentation software have different features, so certain slide elements like animations or colour palettes may not convert exactly. When converting any file type, always have a thorough check through your slides for any errors before presenting!
Converting Google Slides to and from Microsoft PowerPoint:
Converting to and from PowerPoint is, in theory, very straightforward with Slides – however, complications are very common. It’s worth noting that the animation functionality in particular is very different in each program, so it’s likely that some animations may be lost in the conversion process. This is definitely something worth checking before presenting!
To download your Slides document to your desktop as a PowerPoint file, simply click File in the menu bar and hover over Download . In the drop down menu, select Microsoft PowerPoint (.pptx) .
Converting from PowerPoint to Slides isn’t much trickier – though again, glitches are common. From your Google Drive homepage, click the + New button and select File upload , then choose the PowerPoint file to upload from your computer. Once your file has been uploaded, locate it in Drive and right click. Select Open with and choose Google Slides .
If you want to insert PowerPoint Slides into an existing Google Slides deck, click File > Import Slides and then choose a file you have already uploaded to Drive, or alternatively upload a new one from your desktop. Once uploaded, you will then be given the option to choose which specific PowerPoint slides you want to import into your Google Slides deck.
Learn more about the dos and don’ts of PowerPoint to Google Slides conversion .
Converting Google Slides to and from Apple Keynote: Converting Slides to Keynote and vice versa is slightly trickier as it involves the additional step of converting to PowerPoint. There’s currently no way to convert directly between Slides and Keynote.
To convert from Slides to Keynote, click on the File tab in the menu bar and select Download, then choose Microsoft PowerPoint (.pptx) , and save your presentation. In Keynote, click on File in the menu bar , click Open , then select your converted PowerPoint file in the new window. Your presentation should now import to Keynote. To save it as a Keynote file, click File in the menu bar , then Save .
To convert from Keynote to Slides, open your Keynote, go to File in the menu bar and select Export to > PowerPoint (.pptx) . In the new window, select Next > Export . From Google Drive, create a new Slides presentation, then select the File tab in the menu bar and Import Slides . You should then see a new window where you can upload your converted PowerPoint file. From here, you can select specific slides to import, or choose all of them by clicking All in the top right corner. When you are happy with your slide selection, select Import Slides .
Converting Google Slides to and from Prezi: At the time of publishing, there is no way to directly convert to and from Prezi and Google Slides. You could use PowerPoint as a vehicle to import your Prezi into Slides. A way to convert Prezi to PowerPoint is exporting it as a PDF, then copy and pasting each individual slide into PowerPoint. This is not a very efficient technique, though, and means that some of your colours or slide objects may be corrupted, and all animations would be lost in the PDF conversion process.
Presenting and printing in Google Slides
When creating and sharing your Google Slides presentation, you should keep in mind the accessibility needs of your audience. There are lots of tools available to increase the accessibility of your deck — check out this blog post for details .
Presenting your work in Google Slides
Using Slideshow mode: At some point you are likely to want to practise running through your deck and will want to see what it looks like from the audience’s perspective. At BrightCarbon, we recommend always clicking through your deck in Slideshow mode at least once before presenting! For a deep dive into Slideshow mode, head over to this article.
To see your presentation in Slideshow mode – whether working online or offline – click Slideshow in the top right corner to go straight into standard view. Alternatively, you can click the drop down to the side of the Slideshow button for a few different options.
- Presenter view: In this view you can see a separate window from which you can do things like time your presentation, see thumbnails of the previous and next slides, begin Audience Q&A and also read your speaker notes. For more information, see our guide on Presenter view in Google Slides . For more on audience Q&A and speaker notes, see below.
- Start from beginning: This opens up the standard presenting view, the same as what you would see if you simply clicked Slideshow. This view is what your audience will see when you present to them, so it’s great for practising.
- Present on another screen: This option is exclusively for people who have access to Chromecast. If you have a Chromecast device connected to a TV screen that you want to present from, you can click this button to cast your presentation to that screen. If you want to show your presentation on a large screen but don’t have Chromecast, you can always do things the old-fashioned way and connect a HDMI cable from your laptop to the TV screen, using normal Presenter view .
Present to a meeting: If you want to present your deck directly in Google Meet, you can do this without leaving Google Slides. Navigate to the top right-hand corner of your screen and click on the video camera icon next to the Slideshow button. You can then join an existing meeting or start your own using the options in the drop down menu. Once you’re in a meeting, click on the video camera icon again and click Present this tab to share. It’s worth noting that we’ve found it’s generally easier to just share your screen from whatever video calling software you’re using — but if you work exclusively in Google Workspace and use Google Meet a lot, this feature may be worth checking out.
Speaker notes: Speaker notes can be accessed by dragging up from the bottom of your Slides window. Hover your cursor over the horizontal line in the bar at the very bottom of your window, and it should turn into a hand icon. Click down and drag up to reveal the Speaker notes bar. Here you can type anything from the script of your presentation to additional notes about the content of your slides. Speaker notes won’t be visible when you present unless you use Presenter view .
Slides also has a nifty built-in tool for voice typing speaker notes. Access the Speaker notes bar, then go to Tools in the menu bar and select Voice type speaker notes . This will launch a new window to the left of your slide with a microphone icon. When you are ready, click this icon and begin speaking. You should see your words appear as text in the Speaker notes bar. We have tested this out and found that it works pretty well if speaking clearly into a good microphone, like the kind found on a headset.
Audience Q&A: Audience Q&A is a fantastic feature that makes your presentation more interactive and engaging for participants. Encouraging users to ask questions virtually can inspire confidence and, if timed correctly, can give you more time to think about the best answers, rather than being caught off guard with on-the-spot questions.
In Slideshow mode , hover your cursor towards the bottom left of the screen to reveal the Presenter bar. From here, click the three dots to reveal a pop-up menu, then click More > Q&A to launch a new window. Clicking Start new begins the Q&A and generates a link that participants can follow to ask their questions. Participants do not need a Google account to sign in, and can check a box to remain anonymous should they so wish. When a question is asked, it will appear in the window, ready for you to answer! This is particularly useful if you don’t like answering questions on the spot and would value the opportunity to review and prepare answers, perhaps in a short break during your presentation. Reviewing the questions before bringing them up in front of your audience is a good idea — there is no built-in moderation filter, meaning participants could ask almost anything and remain completely anonymous.
Pointer: In Slideshow mode , hover your cursor over the Presenter bar and select Turn on the laser pointer . Clicking this button turns your cursor into a red laser pointer with a tail, so that the audience can easily see any areas that you wish to highlight.
To view Slides’ basic print settings, go to File > Print (you may need to scroll down to find it). This opens up a new window with a print preview of your Slides, and a few options for customising your printout. Next to Pages you can choose whether to print All pages, or type in a Custom range. You can also toggle Colour options, Paper size and the Image quality that is printed.
Printing slides with speaker notes: To print slides with their speaker notes, go to File > Print preview . This opens a new window where you can preview what your slides will look like when new print options are applied. To the top right of the modified toolbar , click the button that says 1 slide without notes . In the drop down, choose 1 slide with notes instead. This doesn’t mean that only one slide will be printed — you can choose which slides are printed in the normal Print settings. Once selected, the speaker notes will appear in a box to the side of each slide. You can now click Close preview in the far left, and navigate to the Print settings in the File tab to print your document. Or, with the preview still open, click the Print tab in the modified toolbar .

Printing slides without skipped slides: If you have a number of skipped slides throughout your presentation that you don’t want to print, you can easily toggle this off. Go to File > Print preview . To the top right of the modified toolbar , click the Include skipped slides button to toggle it on and off. When the button is completely white it is toggled off; when it is yellow it is toggled on. You can now click Close preview in the far left.
Learn about other methods for sharing your Google Slides presentation .
Google Slides top keyboard shortcuts : We’ve compiled a list of the most used – and most useful – Google Slides keyboard shortcuts, so you can create amazing presentations that are quicker, smarter, and slicker than ever before!
Our pick of the best add-ons for Google Slides : Level up with improved productivity, performance and added functionality- all by using a few simple add-ons! We’ve rounded up our favourite Google Slides add-ons here.
Editing images in Google Slides : Make your presentation more compelling with these few short and simple image editing tips for Google Slides. Guaranteed to make your slides look slicker and your audience feel more engaged!
- How to create visual presentations and eLearning
- 50 presentation quotes to enhance your slides
- No place for bullet points in a presentation
- How to avoid stock photo cliches in your corporate presentations
- Using typography in your sales presentations: 10 tips and tricks
We’ve got some great Google Slides masterclasses that run regularly on our events page . We also offer live in-person or online Google Slides training for small groups — why not invite us to train your team?

Joey Dudley
Senior design consultant; google slides training lead, related articles, google slides’ new features: guides, text fitting, and more.
- Google Slides / Presentation technology
- Comments: 11
Google has recently introduced some long-anticipated upgrades to basic features, and some entirely new tools too. We’ve taken a look and written up a general overview of what’s new, so you can make the most of these new features and get the best out of Google Slides.

The best free Google Slides templates
- Google Slides
Google Slides templates are a great starting point to improve the look and feel of your presentation. They’re fab as they’re accessible and low cost, but it’s important to remember that even well-designed presentations can be ineffective if the content is text heavy.

How to extract text from an image
- Presentation technology
If you’re creating a presentation and someone has added images of slides or images of data, it makes it really hard to develop a deck that’s consistently on brand, animated and updatable! Transforming these images into editable slides will make your life so much easier!

Fantastic! Thank you!
it is the best thing ever thank you
Great explanation, I’m actually quite familiar with Google Slides, and I was looking for a specific question that wasn’t covered, may not even be possible within Slides…..
I was recently at a presentation where along the right side of EACH SLIDE, the presenter had a running list of the topics in the presentation. As she switched slides, the heading that that topic fell under was then highlighted…..sort of a running account of the index.
Is this possible wtihin Google Slides? If so, how? Thanks in advance for your help.
Hi Susie, it’d definitely be possible to do this manually in Slides.
1. Create a list of section titles along the side of one slide, using the Insert Text Box feature. You could make the list look visually separate from the rest of the content by putting a shape behind it. 2. Copy and paste this list onto every slide in your presentation, keeping it in the same position. 3. Adjust the formatting of the appropriate section title on each slide, for example by changing the colour of the text – or the text box – to highlight it.
This way, as you click through the slides, each section will be highlighted in turn.
We’re not aware of any automatic way to do this, but if you find one do let us know!
me to and i found this and it ansewrd all of my questions
no more than the same actully
How do I edit (by using suggest editing mode) the work that has been shared with me as a Google Slide? I know how to do this in Google Docs but I do not see this feature with Slides.
To our knowledge, Google Slides doesn’t currently have a suggest edits feature. One work around we like to use (though not the most seamless solution) is to leave your suggested edits as comments (right click highlighted text > add comment). This way your suggestions are saved for the content owner to read through, without actually having made any direct changes to the content itself.
Hope this helps!
I got all excited when I saw the same menu bar when working on speaker notes. WOW, I thought, I can finally put graphics in my speaker notes! But no, when you try that it just puts it in the presentation, and NOT in the speaker notes. Except for being free, Google slides is no better than Powerpoint in this area.
I am a teacher, and I often create powerpoint “jeopardy-style” games with a home screen and multiple point value buttons that lead to question slides. Students have the option to choose questions in any order, and I can easily hyperlink each button / shape / text option to a different question slide. However, once the students come back to the home screen, I must have a way to show a difference between the buttons that have already been chosen (and should not be chosen again) and the buttons that still go to new questions. In powerpoint, I use a trigger to make the shape disappear once the shape has been clicked. I cannot find a similar option in slides. When I’m imported the power point file, the animations show as a “disappear once clicked” option, but they don’t actually seem to work and now there’s no way to see which options in the game have been chosen already. Any ideas??
There’s no simple fix for this I’m afraid! The animation options in Google Slides aren’t as sophisticated as in PowerPoint, and there are currently no Google Slides equivalent animations for PowerPoint’s ‘disappear once clicked’ (until Google Slides introduces triggers, at least!)
You are likely to run into issues with animations when converting PPT files to Google Slides, as complex animation sequences may break. Slides just doesn’t have the same functionality as PowerPoint quite yet!
Thanks, Natty
Guys how do I make google slides so they can buy an item on it cause I’ve been needing to do it for six months now!
Great Job Guys. Amazing Creation.
I love this! You are my favorite source ever! Its very helpfl and organized so I won’t have to read the whole thing like I do to other articles!
How can I apply this blog post to becoming a world heritage site?
IN ALL SERIOUSNESS THOUGH, THANK YOU SO MUCH FOR THIS!!! ♥
Is it possible to autoplay a Google slide presentation when offline? Is so how? Or what other options are there??
The only way to create a looping Slides deck is to use the ‘Publish to Web’ feature. There are instructions on how to do this in the article above. Unfortunately, I don’t think you can view Google Slides decks that have been published to web offline!
There is a way of using Google Slides offline, it’s also mentioned in the article above, though I know this doesn’t solve your problem of wanting to create a looping deck!
If you find a solution I’d love to hear about it!
Hello my teacher wants me to present a power point presentation and she said to save it on a usb stick. Do I download the slide drag that into the Usb stick? Also how would i be able to get it up on the screen after i have plugged into her computer? Please help this is due tomorrow!
Sorry for the slow reply. For PowerPoint files, you can just drag the file from your desktop into the USB folder. For Google Slides presentations, these are saved online in your Drive. You can save them to your desktop, but only be converting them to a different file type (File > download > choose file type). I hope this helps!
Great article!
Does anyone know of a way to link text boxes from slide to slide in Google slides.
Lets say for example I’ve got a text box on slide 1 that has overrun text content…is there a way to link that overrun tex content onto a text box on slide2? This way, any extra content I add to slide 1 will just push over to slide 2?
This feature is super basic but I cant see it and cant find any info about how to do this.
Thanks Damien
Fantastic post…but Im not able to add animation to my master template…I ‘ve tests so many things but I can animate my presentation…but not include them in my master
This turn me crazy ! Any idea
Hi Roger – thanks for your comment! I think Google Slides has removed this functionality from the master unfortunately. I’m pretty sure it was possible to animate objects within the master at one point, but it doesn’t seem to be there any more, which is a real shame!
What a great resource. Thank you. Is there a way to name individual slides, instead of the assigned numbering? So when you are building hyperlinks the names of the slides appear in the selection pane vs. Slide 1, Slide 2…
Hi Daren – glad you found the article useful. There’s no way to directly name each slide, though if you’re using a master layout, the title that you type into the master title box for each slide will appear as the slide name when linking. Not as useful as being able to name each slide individually, but should make it easier to locate the slide you need.
Is there a way of inserting animation in the master slide so that the animation on all the slides is similar. I am not referring to transitions. For eg. I have a presentation with 10 slides. Each side has four or five bullet points. I would like each bullet point to appear one at a time. It seems the only way to do this is to select each point in each slide and apply an animation to it. It is quite cumbersome and time-consuming. Is there a smarter way of doing this? Thanks
Hi, Very interesting tutorial. Could you please guide me how can i run on a TV and remotely control to update the any slides on different location from my home?
Hi Prashant,
Happy to help. Most laptops and TVs have HDMI ports, so you can use a HDMI cable to connect your laptop to a TV monitor to view your laptop screen on the TV screen. Is this what you mean?
If you’re talking about accessing your Slides on a TV screen without the help of a laptop, the only solution I can think of is using something like Google Chrome cast to cast the Slides from your mobile phone to a larger TV screen.
Hey , I’m unable to present it on my device …. Whenever I do this my screen is splitting into two , where one shows the slide and the other shows the timer and no. Of slides… How can I present on my own device in full view …
It sounds like you’re presenting in ‘Presenter View’. Try clicking the drop down button next to the ‘Present’ button and clicking ‘Present from beginning’. This should work!
I love this resource, very informative. In particular, I was looking for a design feature within Google Slides. I teach 7th grade World Civ and I utilize PowerPoint (Onedrive) to create all of my visual presentations for kids. On Microsoft 365 it is super slick to choose images and it displays various design possibilities for the current slide. Does ‘Slides’ have a function like this?
There’s no similar feature in Google Slides unfortunately! The closest equivalent that Google Slides has is the option to choose a deck theme. You can see all the theme options by clicking ‘Theme’ in the tool bar.
Hope this help!
Do you know if it’s possible to create a centralised google slides theme that I can edit and see the changes rolled out to every presentation already using that theme?
Hi Peta, I don’t think there’s a way of applying a theme automatically to other decks, but you can save a theme and import in into other decks manually. When you create your theme, make sure to save your template. Then, when you want to apply that theme to other presentations, open up the theme bar and click ‘Import theme’ you will then be able to locate your saved template deck and apply it to your current presentation. Hope this helps!
Can I change th eposition of presenter box, it blocks my view?
Hi Nitin, unfortunately there’s no way to move the presentation bar once in present mode, it’s very frustrating! If you move your mouse away from the bar, it will disappear from view eventually. Another solution is to move any buttons / slide objects so that they aren’t on the bottom left of the slide. Hope this helps!
Hey Natty, Great info here. But I’m trying to edit the header in “Print Settings and Preview” when I include notes with the slide. I imported the presentation from PowerPoint and the header is incorrect. But I can’t figure out how to change it. Any advice?
Hi Ashley, we find that there are a lot of issues and glitches when importing a PowerPoint presentation into Google Slides. That said, have you tried editing the header via the master? Click View > Master. It may be possible to edit the master heading there. Hope this helps!
Great resource! I was wondering if there is a way to adjust the size of just ONE slide in the presentation. Thanks!
Hi Angela, this isn’t possible as far as I know. The functionality for changing Slide size will apply to all slides in the deck. Hope this helps!
this isn’t possible as far as I know. The functionality for changing Slide size will apply to all slides in the deck. Hope this helps!
Great article! What I am however wondering, is how to deal with shape overlap at the edge of a slide. Realistically, in our company, we don’t use the presentation mode all that often. Usually, we just open a presentation and go through it in group in the default modus. So in that case you can see the overlapping shapes that normally get cropped out in the presentation modus. Let me give an example: I used a shape with a rounded top and a straight bottom. I angle this, let’s say 45 degrees and place this in the bottom left, with part of the shape overlapping the edge of the slides (the straight bottom). In the presentation modus you can’t see this overlap, but the way we use Google Slide, you can. I have tried multiple things, but no luck yet. Anyone have an idea how to crop the overlap with the edges of the slides? That would really be the solution here.
Hi Anneleen,
As far as I know, there’s no way to crop the parts of the shape that are coming off the slide. But, there is a work around. If you view your presentation in ‘Print settings and preview’ mode (File > Print settings and preview) this opens up a version of your slides deck that you can still scroll through like you would in normal view, but anything that overlaps the edges of the slide are cropped. It’s not a perfect solution, but might work for your needs!
How do you title an existing Google slide deck? I don’t want to start over but I do want to add some navigation.
Hi there, I’m afraid I don’t fully understand your question. Are you looking for help changing the title of your deck, or adding some hyperlinked navigation to it? We have a post about creating a navigable, interactive deck at the link below. Thanks!
https://www.brightcarbon.com/blog/how-to-make-an-interactive-presentation-in-google-slides/
I love it. Ty!😁😁😁😁
I’m trying to create links in one slide to other slides in the same deck. When I do so, I can’t scroll down far enough in the drop-down window that comes up. It comes up at the bottom of the screen and I con only scroll down about 20 slides. I can’t seem to move the drop down box or find another avenue to create such links. Any help will be appreciated.
Does the drop down box appear close to the bottom of your screen because the object you are trying to turn into a hyperlink is close to the bottom of your slide? If this is the case, you could always move the object up to the top of your slide whilst you create the hyperlink (so more of the drop down box is visible) then move it back in to place. I hope this is helpful!
Is it possible to add an image to the speaker notes section of a Google Slide?
Hi Jacqueline, as far as I’m aware, this is not yet possible in Google Slides!
I’m wondering if anyone has figured out a way to set a default font and size for speaker notes. I’ve been digging for ages and haven’t found anything yet!
Hi Keith, as far as I’m aware, it’s not possible to set a default font and size across speaker notes in Google Slides!
Hi there, I’m just wondering if the following is possible: – a company has a ‘set of slides’ that can be used in different presentations – but there is only one central repository for the slides, if a slide get updated it updates automatically within all the presentations that it is used in (like a master-slide so to speak)
For example: a company sells different products and has for each product an individual presentation. Part of each presentation are some standard slides about the company, the information on those slides may vary from month to month but rather than updating those slides in every single presentation, the information gets updated only within the master-slide(s).
Hope the above makes sense, any feedback would be gratefully appreciated. Many thanks!
There is a way to ‘link’ slides across different presentations. First you need to create a master deck – this is the deck you will update if the slides need updating in the future. At any point you can copy slides from the master deck into another deck. When you paste the slides into the other deck, a pop up will appear in the right hand corner of the slides, giving you the option to ‘link’ slides. Once the slides are linked, when you update the master deck, the content will copy over to the other decks where the slides are linked. Just be sure to click ‘update’ on the link slides.
You can also toggle guides by right clicking your slide and selecting Guides from the drop down menu. To open the animation and transitions pane, click Animations. Here, you can view all animated objects in your presentation.
Join the BrightCarbon mailing list for monthly invites and resources
BrightCarbon has created several animations for us. The result was always the same: a very clear “wow” effect. I highly recommend BrightCarbon for making complex topics come to life on screen! Isabel Figge Intergraph

Best presentation software of 2024
Make perfect slides for speeches and talks
Best overall
Best for branding, best for marketing, best for themes, best for media, best unique.
- How we test
The best presentation software makes it simple and easy to create, manage, and share slideshow presentations.

1. Best overall 2. Best for branding 3. Best for marketing 4. Best for themes 5. Best for media 6. Best unique 7. FAQs 8. How we test
Presentation software runs at the heart of business sales, management, and development, so it's important to ensure you have the best presentation software for your needs. This is especially when looking to share ideas, concepts, and workflows, and the ability to present these in a simple and understandable way is essential.
However, while presentation software has been traditionally limited to text and images, it has widened its ability to work with different media such as video and audio .
Therefore it's important for the best presentation software to not simply be easy and simple to use, but also be able to support additional media so that presentations can be more engaging, lively, and ultimately serve their purpose in educating and updating their intended audience.
Below we've listed the best presentation software currently on the market.
We've also listed the best free presentation software .

<a href="https://go.redirectingat.com/?id=92X363&xcust=hawk-custom-tracking&xs=1&url=https%3A%2F%2Fproducts.office.com%2Fen-us%2Fcompare-all-microsoft-office-products%3Ftab%3D2&sref" data-link-merchant="SkimLinks - office.com"" target="_blank" rel="nofollow"> The best office software in the world is: Microsoft 365 There are many different office software suites out there, but Microsoft Office remains the original and best, offering an unsurpassed range of features and functionality that rivals just can't match.
Even better, <a href="https://go.redirectingat.com/?id=92X363&xcust=hawk-custom-tracking&xs=1&url=https%3A%2F%2Fproducts.office.com%2Fen-us%2Fcompare-all-microsoft-office-products%3Ftab%3D2&sref" data-link-merchant="SkimLinks - office.com"" data-link-merchant="SkimLinks - office.com"" target="_blank" rel="nofollow">Microsoft 365 - previously branded as Office 365 - is a cloud-based solution which means you can use it on any computer, mobile device, or smartphone, without having to worry about compatibility. All your files are saved in the cloud and synced between devices, so you can begin work on a document at home or in the office, then continue working on it on the go.
<a href="https://go.redirectingat.com/?id=92X363&xcust=hawk-custom-tracking&xs=1&url=https%3A%2F%2Fproducts.office.com%2Fen-us%2Fcompare-all-microsoft-office-products%3Ftab%3D2&sref" data-link-merchant="SkimLinks - office.com"" data-link-merchant="SkimLinks - office.com"" data-link-merchant="SkimLinks - office.com"" target="_blank" rel="nofollow"> You can sign up to Microsoft 365 here .
The best presentation software of 2024 in full:
Why you can trust TechRadar We spend hours testing every product or service we review, so you can be sure you’re buying the best. Find out more about how we test.

1. PowerPoint
Our expert review:
Reasons to buy
For most people, Microsoft 's PowerPoint remains the original and best of all the presentation software platforms out there. While other companies have managed to catch up and offer rival products worthy of consideration, the fact is that PowerPoint's familiar interface and ubiquitous availability means it remains a favorite for the majority of people.
On the one hand, it's long been a staple of the hugely popular Microsoft Office suite, meaning that for most users this is going to be the first - and last - presentation software they are going to need to use.
Additionally, Microsoft has made PowerPoint, along with their other office products, available as free apps (with limited functionality) on both iOS and Android for mobile use, meaning it's even harder to avoid them. And this is before we even consider the inclusion of PowerPoint in Microsoft's cloud-based Microsoft 365.
It does everything necessary that you'd expect of presentation software, allowing you to add text and media to a series of slides, to accompany a talk and other presentations. There are easy-to-use templates included to help spice things up a little, but even a general user with little experience of it is likely to find themselves able to use PowerPoint without much trouble at all.
Overall, it's hard to go wrong with PowerPoint, and although Microsoft 365 has a nominal cost, the apps are free to use even if they do have more limited functionality.
Read our full Microsoft PowerPoint review .
- ^ Back to the top

2. CustomShow
Reasons to avoid.
Branding says a lot about a business, and it’s something firms need to get right from day one – from a good logo to a suitable font. CustomShow is business presentation software that puts all these elements of branding first.
Using the system, you can design and present customized, branded presentations that reflect your company and the products you offer, featuring the aforementioned logo and custom fonts. As well as this, you get a slide library and analytics to ensure your presentations are a success.
What’s more, you can import presentations into the software, and use it to tweak them further. There’s also integration with SalesForce , and because the platform is cloud-based, you can access your presentations on computers, tablets, and smartphones.
Considering the focus on branding, this offering could be good for marketing and sales teams, and it's used by major companies such as HBO and CBS Interactive.

3. ClearSlide
Just like CustomShow, ClearSlide has a niche focus for companies. The platform is targeted at firms looking to generate successful marketing campaigns, pushing sales via presentations (and more), not least through a range of analytics and metrics to work for sales and marketing.
With the product, you can upload a range of files, including PowerPoint, Keynote, PDF, and Excel. ClearSlide is integrated with other platforms, including Google Drive, Dropbox, and Salesforce.
This system is pretty complex and may offer too many irrelevant features for some businesses, but you can create customized content that reflects your company and the message you’re trying to get out to customers. There are also some good metrics and analysis features, and you can sign up for a free trial before making any decisions.
The real strength of ClearSlide comes from its focus on sales and marketing data, not least being able to track user engagement alongside other metrics.

4. Haiku Deck
Any presentation app will allow you to personalize your slides to at least some extent, but Haiku Deck goes one step further than the competition. It comes with a wide range of themes suited to different needs, and you also get access to 40 million free images from the Creative Commons collection.
When it comes to creating a presentation, you have the option to do so on the web, which means your presentation is accessible across a range of mobile devices as well as desktops. Regardless of the device used, you’re able to select from a variety of different fonts, layouts, and filters to make the perfect presentation.
The great thing about these various customization options is that they’re categorized into different industries and use cases. For instance, you’ll find themes for teaching, cooking, real estate, and startups. Most of the features require you to be online, but hopefully, you’ll have a sturdy net connection wherever you go.

5. SlideDog
It’s all too easy to end up creating a presentation that’s unappealing, and the last thing you want to do is make the audience fall asleep. SlideDog lets you combine almost any type of media to create a rich presentation that’s sure to keep the viewers’ peepers open, avoiding the ‘cookie cutter’ look that makes presentations seem dull.
Marketed as a web-based multimedia presentation tool, it gives you the ability to combine PowerPoint presentations, graphics, PDF files, Prezi presentations, web pages, pictures, videos, and movie clips. You can drag these into custom playlists and display them to your audience with ease.
You’re able to remotely control your presentations and playlists from your smartphone, the web, or a secondary computer, and there’s also the option to share slides in real-time. Audience members can even view your slide from their own devices by clicking a link. That’s a handy feature if you’re looking to create an immersive presentation experience.
SlideDog is probably the cheapest of the presentation software featured, with a free account that will cover the essential features. However, for live sharing and premium support, you need to upgrade.
Read our full SlideDog review .

Prezi is one of the more unique presentation tools. Instead of presenting your graphics and text in a slide-to-slide format, you can create highly visual and interactive presentation canvases with the goal of “emphasizing the relationship between the ideas”.
Presentations can also be tailored to the specific audience, as this is a flexible platform that’s capable of skipping ahead, or veering off into a side topic, without having to flip through all the slides to get to a particular bit.
For business users, there are a variety of handy tools available. By downloading Prezi , you can build and edit presentations with your colleagues in real-time, which is perfect for companies with teams based around the globe.
When you have created a presentation you’re happy with, you can present it live (in HD) and send a direct link to viewers. There are some analysis tools here, too – you can see who’s accessed your presentation, which parts of it, and for how long. The app is available for Mac and Windows devices.
Read our full Prezi review .
Other presentation software to consider
Google Slides is part of the Google Workspace (formerly G Suite) office platform intended as an online alternative to Microsoft Office. It may seem a little limited by comparison to PowerPoint, but as it's browser-based that means cross-platform compatibility. Additionally, it allows for collaborative work, and Google Slides really works well here. On top of the fact that it integrates with the rest of the Google Workspace apps, not least Google Drive, and you have a contender.
Zoho Show is another of the many, many tools and apps that Zoho has made available for business use. It also operates in the cloud so it's accessible to any device with a browser, and it also allows for collaborative work. You can also easily share the link for users to download, or provide a live presentation online. The updated version has a simpler and easier to use interface and comes with a free version and a paid-for one with expanded features.
Evernote is normally thought of as just note-taking software, but it does provide the option to create a presentation you can share online or with an audience. In that regard, it's a little more limited than the other options in not being dedicated presentation software. However, as an easy and handy way to pull together a presentation quickly, it could serve as a backup or last-minute option, especially if Evernote is already being commonly used by you.
LibreOffice Impress is part of the open-source suite offered as a free alternative to Microsoft Office, and comes with a powerful array of tools and editing options for your presentation, not least working with 3D images. It's supported by a large community, so it's easy to find an array of additional templates. If there is a limitation it's that it's software you download and install rather than web-based, but any presentations created should be easily portable to the web if needed.
Adobe Spark does things a bit differently, as rather than just use images it's geared toward video as well. This makes for potentially more powerful multimedia presentations, especially as Adobe also has a big selection of photos and images available for its users. There is a free tier for core features but requires a subscription for custom branding, personalized themes, and support.
Slides comes with a lot of features in an easy-to-use interface, and involves setting up presentations using drag and drop into an existing grid. It's also internet-based so there's no software to download, and it only requires a browser to use and access.
Presentation software FAQs
Which presentation software is best for you.
When deciding which presentation software to download and use, first consider what your actual needs are, as sometimes free platforms may only provide basic options, so if you need to use advanced tools you may find a paid platform is much more worthwhile. Additionally, free and budget software options can sometimes prove limited when it comes to the variety of tools available, while higher-end software can really cater for every need, so do ensure you have a good idea of which features you think you may require for your presentation needs.
How we tested the best presentation software
To test for the best presentation software we first set up an account with the relevant software platform, whether as a download or as an online service. We then tested the service to see how the software could be used for different purposes and in different situations. The aim was to push each software platform to see how useful its basic tools were and also how easy it was to get to grips with any more advanced tools.
Read how we test, rate, and review products on TechRadar .
We've also featured the best alternatives to Microsoft Office .
Get in touch
- Want to find out about commercial or marketing opportunities? Click here
- Out of date info, errors, complaints or broken links? Give us a nudge
- Got a suggestion for a product or service provider? Message us directly
- You've reached the end of the page. Jump back up to the top ^
Are you a pro? Subscribe to our newsletter
Sign up to the TechRadar Pro newsletter to get all the top news, opinion, features and guidance your business needs to succeed!
Nicholas Fearn is a freelance technology journalist and copywriter from the Welsh valleys. His work has appeared in publications such as the FT, the Independent, the Daily Telegraph, The Next Web, T3, Android Central, Computer Weekly, and many others. He also happens to be a diehard Mariah Carey fan!
- Jonas P. DeMuro
iDrive is adding cloud-to-cloud backup for personal Google accounts
Adobe Dreamweaver (2024) review
HBO’s Game of Thrones spinoff series is ‘off the table’ says Kit Harrington
Most Popular
By Barclay Ballard February 28, 2024
By Barclay Ballard February 27, 2024
By Krishi Chowdhary February 26, 2024
By Barclay Ballard February 26, 2024
By Barclay Ballard February 24, 2024
By Barclay Ballard February 23, 2024
By Barclay Ballard February 22, 2024
By Barclay Ballard February 21, 2024
- 2 Firewalla Gold Pro is 10-gigabit smart firewall ready for next-gen Wi-Fi 7 and high-speed fiber networks
- 3 IKEA's affordable new smart LED wall panel is an impressively versatile mood light
- 4 Sorry, but it may be time to give up your Samsung Galaxy Note 20 and Galaxy S20
- 5 I switched over from Windows to Mac, and these are my three favorite macOS features
- 2 From online racing to real-life car technology: why MOZA is all-in on the race for driving innovations
- 3 Sonic vs rotating toothbrushes: Which is better?
- 4 Dell XPS 14 vs MacBook Pro 14: which is the best option for pros and casual users?
- 5 GAME store employees have been told to expect layoffs as they receive new zero-hours contracts
👀 Turn any prompt into captivating visuals in seconds with our AI-powered visual tool ✨ Try Piktochart AI!
- Piktochart Visual
- Video Editor
- Infographic Maker
- Banner Maker
- Brochure Maker
- Diagram Maker
- Flowchart Maker
- Flyer Maker
- Graph Maker
- Invitation Maker
- Pitch Deck Creator
- Poster Maker
- Presentation Maker
- Report Maker
- Resume Maker
- Social Media Graphic Maker
- Timeline Maker
- Venn Diagram Maker
- Screen Recorder
- Social Media Video Maker
- Video Cropper
- Video to Text Converter
- Video Views Calculator
- AI Flyer Generator
- AI Infographic
- AI Instagram Post Generator
- AI Newsletter Generator
- AI Report Generator
- AI Timeline Generator
- For Communications
- For Education
- For eLearning
- For Financial Services
- For Healthcare
- For Human Resources
- For Marketing
- For Nonprofits
- Brochure Templates
- Flyer Templates
- Infographic Templates
- Newsletter Templates
- Presentation Templates
- Resume Templates
- Business Infographics
- Business Proposals
- Education Templates
- Health Posters
- HR Templates
- Sales Presentations
- Community Template
- Explore all free templates on Piktochart
- The Business Storyteller Podcast
- User Stories
- Video Tutorials
- Visual Academy
- Need help? Check out our Help Center
- Earn money as a Piktochart Affiliate Partner
- Compare prices and features across Free, Pro, and Enterprise plans.
- For professionals and small teams looking for better brand management.
- For organizations seeking enterprise-grade onboarding, support, and SSO.
- Discounted plan for students, teachers, and education staff.
- Great causes deserve great pricing. Registered nonprofits pay less.
Presentations
The 11 Best Presentation Software to Use in 2023
The ability to effectively share ideas, illustrate a concept, and convince an audience is invaluable whether you’re a student or a C-level executive. These days, the presentation software you use to create presentations is just as important as your public-speaking skills.
On top of that, most companies have transitioned to remote work recently due to the current coronavirus situation, and now need to share their stories online through a virtual conference room with their distributed teams and external audience members.
That’s why we’ve come up with a list of some of the best presentation software available right now, so you can choose a compatible and innovative presentation maker that includes the best presentation tools to suit your specific needs.
Choose the best presentation software by weighing the pros and cons
You’ll see some of the most popular presentation apps: from free to paid subscription platforms, and slideshow applications to full-blown visual design presentation software with interactive features and more.
Each presentation software has its pros and cons, so it’s up to you to figure out which suits your needs best; consider the software learning curve, whether your company is made up of Mac users or Windows users and the software compatibility, if you need an enterprise account or free account, etc.
Let’s dive in!
1. Piktochart

Piktochart is a presentation software that can create a variety of design visuals, from infographics to social media stories.
An area in which Piktochart shines is crafting unique presentations.
On Piktochart, users can choose from a wide range of professionally-designed presentation templates .
These custom templates include everything from monthly marketing reports to employee onboarding templates.
This broad selection of customizable templates is especially useful for those who don’t have much design experience or know-how but need to create a visually stunning unique presentation in a pinch.
Piktochart’s presentation maker also makes it easy to edit presentations and include design elements such as lists, timelines, comparisons, graphs, and different types of charts through drag-and-drop tools.
You can even make visual maps and interactive charts to keep your audience engaged throughout your presentation.
And if your company uses a Piktochart TEAM plan , you can enjoy the platform’s ability to store brand assets , color schemes, and bespoke templates. Here, replicating company-branded visuals is a breeze.
Piktochart comes with a free version but with certain limitations. Active visuals are capped at five per month and published visuals have a Piktochart watermark.
If you want features such as team template collaboration, project sharing, and annotated commenting, you’ll have to get a Team account. To sum it up:
- Lots of professionally-designed templates
- Good for both design professionals and non-professionals
- Easy to store brand assets and bespoke templates for future presentations
- Access presentation tools from anywhere via a web browser
- Free presentation app version available
- Might take some getting used to if you’re used to PowerPoint presentations
Present and collaborate with ease using Piktochart’s presentation templates.
You don’t have to worry about how your presentation will look like. Piktochart’s easy-to-edit templates will take care of the visual aspect for you.

2. Microsoft PowerPoint

Microsoft PowerPoint is often the first presentation software that comes to mind.
Once considered the “O.G.” and best presentation software available, it is still widely used and has a familiar interface—which means most users are comfortable with it.
This presentation app has everything you need to create a presentation: from animated transitions for interactive presentations to pre-installed fonts and graphic elements.
Users can also upload their own fonts, graphics, and images into their finished presentation.
Lastly, it’s available as part of the Microsoft Office software package; and you can work on your presentations via the web and mobile devices, for offline viewing as well as online.
However, PowerPoint is no longer considered the best presentation software, as it has very few templates to choose from, and these tend to fall quite flat compared to modern apps and software.
It’s easy to fall back into boring slideshow PowerPoint files if you don’t know what you’re doing.
And because most people use PowerPoint, you’re likely using the same template as the next guy.
As standalone presentation software, PowerPoint is pricey at US$139.99—and accessible through only one device unless you upgrade your package.
And while PowerPoint is primarily a slideshow application and presentation maker, its strengths are limited to this category.
So if you’re looking for the best presentation software, and bang for your buck for a robust presentation tool, you might want to look elsewhere.
- Market leader in slideshow applications to create slides
- Widely used and familiar interface for the presentation process
- Reliable and usable on most devices as well as being a desktop app
- Flat templates
- Limitations with its standalone-presentation software price
3. Google Slides

Google Slides is a slideshow application that is very similar to PowerPoint. But there are three main differences: it’s fully online (while also allowing for offline viewing), collaborative, and free.
The great thing about Google Slides (besides the fact that it’s completely free for anyone with a Google account) is that you can log on via your browser or through its official app.
You can access all Google Slides presentations from any device (mobile, tablet, and desktop), and share them with other people so you can collaborate in real-time.
Google Drive allows all your presentations to live on the cloud, accessible to all marketing and sales teams, with unparalleled ease of use.
And there’s no need to worry about disruptions as all changes are saved as they happen, as long as you have an active internet connection.
Additionally, anyone familiar with PowerPoint will be comfortable using Google’s iteration and likely be delighted by Google Drive and the slide library available.
It’s also a lot simpler, so even those new to presentation-making will find it easy to navigate.
However, some might find Google Slides too simple as it lacks the wealth of features available on PowerPoint.
These include embedding videos from sources other than YouTube, plus adding audio tracks and sound effects, limiting the ability to create unique interactive presentations.
Some users also encounter issues with downloading and exporting to different formats, including PowerPoint.
Some slides may even turn out completely different from the original version.
All in all, Google Slides is a great option for those who are looking for a free application and only need to create simple presentations.
- The free plan supports professional presentations
- Web-based and collaborative to create presentations
- Simple and familiar interface for an online presentation software
- Too simple for advanced presentation making
- Difficult to export to other formats
- Limited templates and customization options for interactive content

You could say Keynote is Apple’s version of PowerPoint. It’s also a slideshow application—but in typical Apple fashion, it comes with a sleek, minimalist interface and is considered one of the best presentation apps on the market.
There are 30 different themes to choose from, which serve as templates for those who need a quick fix. And it can do most of what PowerPoint can.
Keynote’s main perk is that it’s part of the Apple ecosystem.
That means it has built-in iCloud and Apple Watch support so users can control their presentation from their mobile device or even their wrists with just a click.
This presentation app comes pre-installed on most Mac devices. Otherwise, you can purchase it from the Apple store for just US$9.99 for mobile and US$19.99 for OS X.
The big downside is that Keynote is exclusive to Mac OS.
Non-Apple users can create, upload, and sync their own Keynote presentations through their iCloud Drive, but this presentation app is only truly helpful only for those who use multiple Apple devices.
And if you’re used to working on PowerPoint, you might find Keynote a bit confusing in the beginning, especially when editing presentations.
- Sleek, minimalist interface
- Free with most Apple devices
- No access for PC and Android devices except through iCloud
5. SlideDog
Sliding away from straightforward slideshow applications and other presentation apps, SlideDog is a web-based multimedia presentation tool that lets users combine different types of media to create and edit presentations.
This includes everything from PowerPoint decks to videos and even PDFs that can all be played side by side without any awkward transitions.
It’s also extremely easy to customize a SlideDog presentation.
You just need to upload the files into the SlideDog web browser application, and then drag and drop them according to the order in which you want them to play.
You can control your presentations and playlists from another device, and audience members can view your slideshow on their devices by clicking a link.
SlideDog has a free presentation app version that provides all of the basic features.
However, live sharing and premium support are only available with a Pro account that costs US$99 per year, and not via the free version alone.
While SlideDog is technically considered presentation software, you can’t actually create presentations on it.
You can simply stitch together different pre-made presentations in various formats into what is essentially a playlist.
Lastly, SlideDog supports only Windows devices, so Apple and Linux users can’t use it.
- Supports a lot of different media
- Provides live-sharing
- More dynamic compared to the usual slideshow presentation
- Only collates media; doesn’t create them
6. Haiku Deck

Ever come across presentations with size-eight fonts and blocks of indecipherable paragraphs on each slide?
You can avoid such an unfortunate scenario with Haiku Deck.
HaikuDeck is a web and mobile application that favors images over text.
It works by limiting the number of words users can put on each slide, and allowing them to search for images on their platform related to the slide’s main idea.
This makes it ideal for those who want to simplify their thoughts and let the images do all the talking.
Users have over 40 million royalty-free photos to choose from, plus dozens of simple slide layouts on the platform itself.
While this certainly simplifies the process of creating a visually rich presentation, it can be limiting for those who need to include more information into their slides.
It’s a great option for someone giving a TED Talk, for example.
But for others who need to pass on more facts and figures, having a built-in word limit might be too restrictive.
- Simple and easy to use
- Access to millions of royalty-free stock images
- May be too simple for some
- No Android support
- Limited features
7. Prezi Business

Among the other presentation software on this list, Prezi Business might be one of the most unique presentation tools.
Rather than offering a regular slideshow format, Prezi looks more like a 3D interactive mind map where viewers jump dynamically from one idea to the next.
You can zoom in on one “slide” and then zoom out for the next.
Prezi has over 100 templates to choose from and comes with a very simple interface and a drag-and-drop style of editing.
It’s compatible with both Mac and PC desktops as well as smartphones.
It’s also similar to a regular PowerPoint deck in that you can jump back and forth from one “slide” to the next.
And like SlideDog, you can send viewers the link to the presentation as you’re presenting.
Also, up to 10 people can work on a Prezi presentation at the same time, one of its main selling points.
This is great for collaboration, but having so many hands-on deck at once can get messy.
- Dynamic and immersive presentations
- Highly visual
- Easy to use
- May not be appropriate for all types of presentations

In a world of slides and presentations, standing out is the key. Ludus brings the flair of graphic design into the world of presentations.
At its core, Ludus is the bridge between presentation tools and design software. It enables users to infuse their slides with the kind of design elements you’d typically find in advanced design platforms.
Not only can you import assets from design giants like Adobe, but its seamless integration with tools like Unsplash and Giphy makes sourcing visuals a breeze.
It’s a fairly affordable tool for all its features compared to the other paid options in this list, as users pay 12.49 euros monthly (if billed annually).
However, while Ludus’ robust design capabilities can elevate the look of your presentation, those unfamiliar with design tools might find there’s a learning curve.
- Merges presentation creation with advanced design tools.
- Seamless integration with popular design platforms and visual databases.
- Offers a unique edge in presentation aesthetics.
- Might be a tad overwhelming for non-designers
- Can have a steeper learning curve for those used to more straightforward platforms
9. Slidebean

Crafting a compelling presentation demands not only compelling content but also a design that can captivate your audience. Enter Slidebean.
Slidebean offers an intelligent design solution, using AI to transform raw content into professionally styled presentations. This platform streamlines the design process, allowing you to focus on the message rather than fretting over aesthetics.
The basic plan is free and allows you to create a presentation. But if you want to share or download your presentations, as well as unlock the full suite of features, you’ll need to sign up for the All-Access plan priced at $199 per year.
While it provides a quick and efficient method to produce polished slides, it also offers features for sharing, collaboration, and viewer analytics, adding an edge to your presentation strategy.
However, for professionals who prioritize granular design control, the automated design might feel limiting at times.
- AI-driven design ensures visually appealing presentations.
- Features for collaboration and viewer insights.
- Efficient design process reduces time and effort.
- Might not offer the detailed design customization some users desire.
- Automated choices may not always align with specific branding or style preferences.
10. ClearSlide

Having great visuals to drive your point home can be the difference between getting a sale across the line or customers walking away. ClearSlide stands out in this area as a presentation tool for businesses laser-focused on boosting their sales and marketing game.
At its core, ClearSlide is all about leveling up business presentations. Whether you’re marketing a new product or tracking client engagement, it’s got tools that cater to every need.
Whether it’s a PowerPoint, a PDF, or something from Google Drive or Dropbox, ClearSlide makes it simple to upload and work with these files.
The unique edge? ClearSlide’s virtual meeting space pops open with just a click. It’s all about seamless, professional presentations without the hassle.
Beyond just slides, the platform dives deep into metrics and analytics, ensuring every presentation is backed by data-driven insights. And the tool is available for $35 per month, which isn’t too pricey for medium-sized businesses.
However, its complexity isn’t for everyone. For some, the variety of features might seem a tad overwhelming, and its focus on metrics might be a bit much for those just wanting a basic presentation tool.
- Seamless virtual meetings and presentations
- Integrates with popular platforms
- Offers insightful analytics for sales and marketing
- Might feel complex for some users
- Limited transition and design effects
- Mobile experience could be better

Stepping into the world of animation, Vyond, once known as GoAnimate, allows users to turn their narratives into professional animated videos. For those looking to elevate their content without diving deep into animation complexities, Vyond can be the go-to tool.
This platform is more than just drag-and-drop animations. It integrates AI capabilities with Vyond Go, which transforms text prompts into rough-cut videos.
Fancy a quick draft for your upcoming project? This AI assistant is up for the task. And if perfection is your game, take it to Vyond Studio, filled with an array of characters, templates, and backgrounds.
The Essential Plan at $25 per month is suitable for individuals on a budget. However, if you want to export videos at 1080p and above, have collaboration tools, or different export options, you’ll need to sign up for the Professional Plan at $92 per month.
As robust as the tool is, there are still some kinks to iron out. AI voiceovers might still need some tweaks, and detailed color customizations can be a bit tricky, but the tool’s strengths, especially for businesses, are undeniable.
- Hassle-free video creation for beginners to experts
- Generous library of pre-made assets
- AI-powered video and script creation with Vyond Go
- AI voiceovers might feel a bit robotic
- Some customization limitations for specific props and scenes
The best presentation software is…
…completely up to you!
When it comes to presentation software, the world is your oyster.
Each of these tools either has a free or trial version for you to check out, so you don’t have to commit just yet.
When it’s time to choose, consider the following aspects to find the right presentation software for you:
- Ease of use. Is it easy for you to understand or will it require lots of training before you can start creating presentations?
- Accessibility. Can you access your presentation software from any device or are you limited to carrying your laptop to every presentation?
- Real-time collaboration. Can multiple people work on the same project or do you have to keep downloading and emailing drafts?
- Create design tools. Can you create presentations with dynamic design elements or are you stuck with the same kind of slide each time?
- Template availability. Is this tool only accessible to a design professional or can anyone create stunning presentations through pre-designed and updated templates?
Piktochart , for example, would be a fantastic presentation software choice among the long list of PowerPoint alternatives for teams looking for a variety of eye-catching designs without requiring much technical know-how. Meanwhile, Microsoft PowerPoint might be the best presentation software for those who are just looking to play it safe.
Hopefully, this best presentation software list sheds some light on the tools at your disposal. Choose wisely!
Collaborate on presentations, reports, and more with Piktochart.
Watch this free demo to learn how your team can collaborate on visual content projects more effectively with Piktochart.

Robin Geuens is a writer turned SEO specialist. When he's not wondering what Google is up to next he's either reading, taking courses, playing video games, or wondering where to travel to next.
Other Posts

Mastering the Craft: Presentation Design Strategies From a Pro

How to Make a Presentation (2023 Guide With Tips & Templates)

How to Nail Your Brand Presentation: Examples and Pro Tips
Do you want to be part of these success stories, join more than 11 million who already use piktochart to craft visual stories that stick..
By Joe Warnimont October 3, 2020
17 Browser-Based CSS3 Slideshow Tools
Since it seems like just about everything is moving away from software and into browser-based systems, it’s prudent to assume that designers are coming out with browser-based CSS3 slideshow tools to create minimalist and easy to implement slideshow tools for your own online creations.
The coolest part of the slideshow tools is that they utilize Javascript, HTML, and CSS, allowing for a simple process for designers with that type of knowledge. Not to mention, most of the best slideshow tools are completely free to download, allowing you to generate beautiful slideshows without any investment or work involved.
Keep reading to figure out which of these browser-based CSS3 slideshow tools are perfect for your next design project, and feel free to bookmark the pages to keep them in your memory for the future.
01. S5: A Simple Standards-Based Slide

S5 is considered a simple standards-based slideshow tool, meaning that it’s based entirely on XHTML, CSS, and JavaScript. What’s cool is that it all comes in one file, and you can download it to use for your online projects and even generate a printable version for clients or site visitors as well.
The point of this tool is so that anyone familiar with CSS can implement their own online slideshow within seconds. The website even offers an introductory demo slidehow for you to click through and see exactly how it looks once it’s done. When the slideshow is in your browser, a visitor can use several buttons to advance through the show, such as the space bar, Enter key and arrow buttons.
02. Slides

The Slides tool is a free option for creating your own browser-based shows, slide decks, and presentations, all of which use modern presentation tools and a cool editor that sits right in your browser.
You don’t have to download anything, unlike software such as PowerPoint, and all of the work is stored securely on servers for you to access later.
Feel free to share or export the presentations as PDF files, and even tell your audience that they can print it out later. Finally, the slideshows are available to view on mobile devices, such as tablets and phones.
03. Stack

Stack is completely run through a browser, and it’s a scroll-based presentation tool for a more modern effect. This is a presentation library for you to choose from, and it has various ways to jump through the presentation.
For example, users can utilize the arrow keys, page up/down buttons, space bar or scroll function to move throughout the slides. Multiple key presses are available for skipping multiple slides. The browser-based tool is even responsive for viewing on various devices.
04. Getting Unstuck Slideshow

Here’s a tool that comes from Mark Lee on the Getting Stuck blog. He provides a simple image slideshow that rotates automatically and only runs on HTML and CSS. He even has a function that allows for people to scroll over the image and see a caption if they would like. All of the markup is offered in his blog post, and you can even ask him questions in the comments area if you can’t figure it out.
05. RemarkJS
RemarkJS is a straightforward and simple in-browser slideshow tool. It’s Markdown-driven which is great for those who know their way around HTML and CSS. Remark uses smart extensions with Markdown. However, it also offers a few other additional features such as presenter mode so that you can leverage this tool as an alternative to PowerPoint or Keynote.
Additionally, RemarkJS supports syntax highlighting, various languages, slide scaling for responsive view, and touchpoints for easy mobile usage. All in all, it’s a simple tool because it allows you to simply write what’s on your mind without forcing you to do a lot of customization and styling. However, another big bonus from RemarkJS is its ability for collaborations and sharing of your slideshow too.
06. Jmpress

Consider the Jmpress browser slideshow tool if you’d like an option that’s quick and easy to download and implement.
The show works by using the space bar or arrows keys to navigate, and it utilizes CSS, HTML and JavaScript for creative animations and styles. Panning, rotating and scaling is offered, and the tool works with just about every modern web browser you can think of.
Some of the other cool features include custom animations, printability, presenter notes, routing, zoomable steps, plugins, keyboard controls, templating and nested steps. It’s truly one of the top options if you’re looking for a browser-based presentation tool.
07. Ancesor.js

Ancesor.js runs as a jquery plugin, with CSS and HTML components for a sleek and simple slideshow. The basic features allow for scrolling with your keyboard or mouse, and the slides can move horizontally or vertically depending on how you would like your show to turn out. Finally, the plugin is completely free and works in all browsers, so you shouldn’t have any problems with the implementation.
08. Shower Presentation Engine
Yp next we’ve got Shower which is also built with HTML, CSS, and JavaScript only. It works in all modern browsers like the latest version of Chrome. As you’d expect from a presentation and slideshow tool, it is fully keyboard accessible. Another great feature of Shower is that it can easily print your slides or save them as PDF.
09. Slippy

Slippy is offered through GitHub, and it doesn’t take long to implement. Once you’ve got it ready for use in your system, navigation is available with the left/right arrows and the space bar.
You can even double click to move onto the next slide. This tool provides a handy setting for jumping to a particular slide with the use of your number keys.
10. Deck.js

The Deck.js slideshow solution creates modern HTML and CSS-based presentations for people to show in class or work, and it has a quick download button for even the most basic learner.
Arrow keys are used to navigate through the show, and all slides are built on basic HTML, while the CSS defines what each state should look like. The standout feature for Deck.js is the deck navigation towards the bottom of the slideshow, which asks which page you would like to go to, or if you’d simply like to jump to the next slide.
11. SliderCSS
If you’re looking for a slider with no JavaScrip or no jQuery involved, SliderCSS (as the name suggests) might be the tool for you. It’s a fast and responsive slider that’s also retina compatible for those wanting a great slideshow on higher resolution screens.
On the landing page, you’re free to browse and take a look at their live demos which will give you a great idea of SliderCCS’ capabilities. This slider works on all devices and browsers. You can also download a free slider generator that works on both, PC and Mac computers.
12. Fathom.js

Fathom.js offers a way to make your slideshow with the simplest of markup, including CSS, HTML and JS. You have the option to download the plugin and use it through your browser, or you can create your own custom interface while using the demo to guide you.
Create your own interface, and use your mouse or keyboard arrows to flip through the slideshow without any problems. Mobile integration is offered, and form elements turn your show into a more interactive experience.
Each part of your slideshow is ready for you to customize it to your own needs. For example, a setting is available to sync your slideshow with a video of your choice.
13. Reveal.js
Here we have reveal.js which is aimed to help you a great absolutely stunning presentation on the web; it’s free and comes fully-featured.
It’s actually an opensource project started by Hakim El Hattab with numerous contributors. Because reveal.js was built with open web, anything you can do with a website, you can do with this tool as well.
Some of its features include iframe support, nested slides, Markdown support, PDF export, LaTeX support, speaker notes, and auto-animation.
14. ComSlider
For those who aren’t the most comfortable with using code-based slideshow generators who still need to create an emended online slideshow, ComSlider might be the right tool for you.
It’s a free drag and drop slideshow creator with various design setting. Once you’re done creating your slideshow you can export it to embed it on your website.
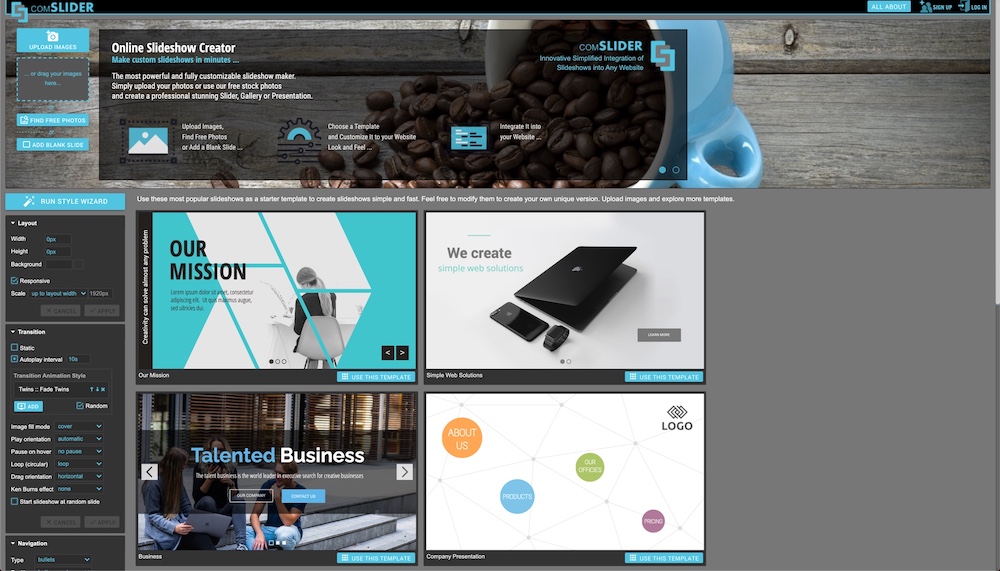
Jassor is an inexpensive tool with a free account option with limited features. However, you can still make some great slideshows with the free plan.
Some of Jssor’s features include standard, jQuery, and minimized export code formats, full width and gallery modes, responsive design with touch swipe compatibility, over 200 slideshow effects and transitions, and over 30 professional demos as well.
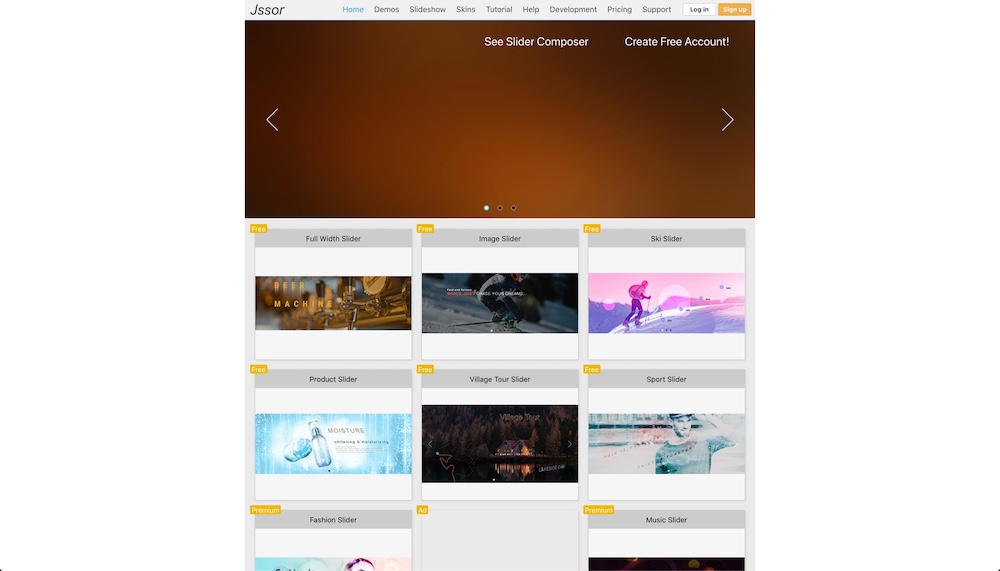
16. Sequence.js
Up next is Sequence.js which is a responsive, CSS and JS enabled slideshow tool. It’s perfect whether you’re looking to create slides, presentations, banners, and or whatever else you might need a similar slideshow functionality.

Since Sequence.js is responsive it also supports touch interactions such as swiping. Additionally, it comes with preload functionality, autoplay, cross-browser compatibility, and over 30 API integrations for even further slideshow customization. It’s a well-developed, feature-rich tool.
17. Google Slides
If you’re much more interested in a slideshows tool similar to PowerPoint or Keynote, you might like Google Slides. Their presentations are completely online and browser-based which makes it great for collaborations and easy for embedding into your website.
However, it’s still a powerful tool that can make detailed and extensive presentations as much as PowerPoint or Keynote would.
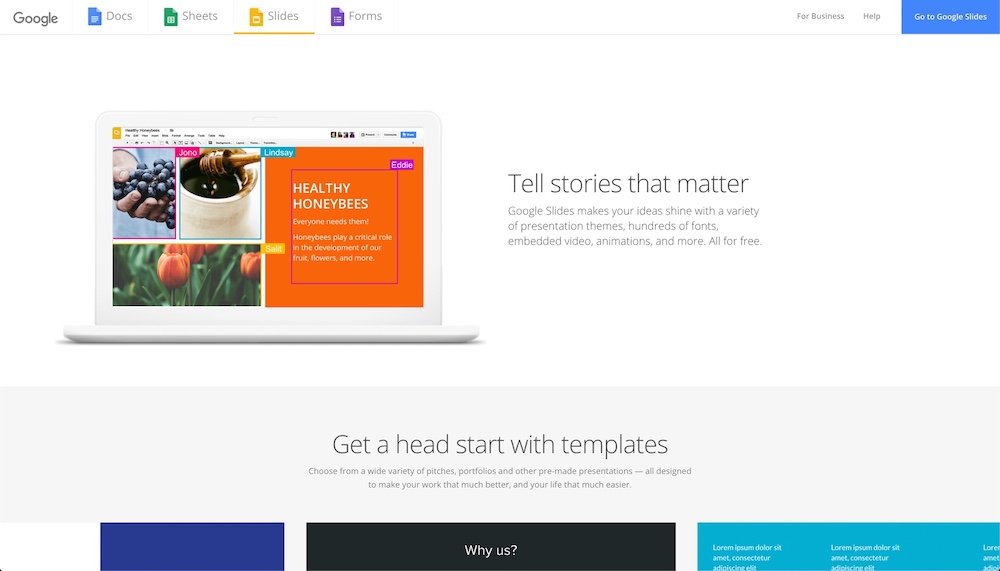
Over to You…
Now that you’ve had a chance to check out some of the best browser-based CSS3 slideshow tools, start playing around with them to see which ones work for your projects.
Most of them are completely free, so implement them at will, and let us know in the comments section if any problems arise.
Related Posts
Reader interactions, droppin' design bombs every week 5,751 subscriber so far.
You have successfully joined our subscriber list.
Leave a Reply Cancel reply
Your email address will not be published. Required fields are marked *
Presenting Your Research: Browser-Based Presentations
- Presentation Tips
- Research Posters
- Finding & Using Images
- Power Point
- Google Slides
- Browser-Based Presentations
- Animated Presentations
- Share Your Presentations
Introduction
For those with some experience with computer programming or HTML/CSS, another option is to create a browser-based presentation using one of these tools. If you are comfortable with tinkering with code a bit, these presentations can look professional, incorporate nice animations and only require an internet connection and a modern browser.
If you would prefer to create HTML-based presentations on your iPad, there is an app for that! Try Imprys , which has a free "lite" version and a $4.99 "fully featured" version .
Want to Create Your Own?
If you would rather create your own browser-based presentation, these resources will help you with the process, even if you don't have a lot of experience with web design.
- How to Create a Compelling Browser-Based Presentation in Minutes with Deck.js from LifeHacker A simple tutorial on using Deck.js to create browser-based presentations.
- S5: A Simple Standards-Based Slide Show System This site offers a primer as well as some more advanced resources on the S5 slide show format.
- Reveal.js The same framework that is used in Rvl.io, Reveal.js is available on GitHub for those who would rather work directly with it.
- Impress.js Another option, this time based on CSS3, for those comfortable with working with markup languages and stylesheets. See Strut and Impressionist to the right for WYSIWYG editors for Impress.js.
Slid.es in Action
Slid.es (previously known as Rvl.io) makes it easy to create presentations using Reveal.js. The tool create presentations that are automatically mobile friendly and work in all browsers. It also offers the ability to make presentations public or private and an option to export your final presentation. And, for those who are more comfortable with HTML, you can also edit the code directly if you prefer.
Strut in Action
Strut is a WYSIWYG editor for Impress.js. This video shows how it works.
Impressionist in Action
Impressionist is another WYSIWYG editor for Impress.js. This tool is still in an Alpha version and is not yet stable, but it is worth watching if you like editing in Impress.js. You can read more about it in this preview .
- << Previous: Zeega
- Next: Animated Presentations >>
- Last Updated: Feb 21, 2024 3:01 PM
- URL: https://libraryguides.salisbury.edu/present
Online Presentation Maker
A lightweight, feature-rich online office suite that helps you create impressive, impactful presentations and demos.
No installation. No credit card required.

Instant Demo

Presentation
Demo presentation 1

Marketing plan
Demo presentation 2
Detected file
Create stunning presentations with ease.
Create engaging, attention-grabbing presentations, slideshows, interactive reports, with our online presentation software. Publish your presentations online and keep them organized with virtual bookshelves.
Create attractive presentations
Start with a blank presentation, or upload a PowerPoint presentation and start editing as you would with any presentation editors. This presentation editor provides a rich collection of editing tools and animation effects you need to create any kind of slideshows to engage your audiences and impress your clients.

Publish & share as flipbook
Provide your audiences with a better reading experience by publishing your presentation with a professional presenter. You can also create virtual shelves to organize your publications.
Collaboration made easy
Our cloud workspace makes collaboration easy and effortless. You can invite your team, set their permissions, and start working together in minutes. Team members can work on the same project or be assigned to different projects.

Manage presentations in projects
Set up multiple projects to better manage your presentations. You can create projects for the different clients you support or based on the nature of the files.
Access presentations online
The cloud-based presentation tool allows you to view and edit files anytime, anywhere, from your web browser.

Perfectly compatible with MS Office
Our presentation maker is compatible with Microsoft ® PowerPoint, Google Slides and OpenOffice Impress formats. You can create, read and edit presentations in formats such as .pptx, .ppt, .pptm, .odp, etc.
An all-in-one productivity suite made for everyone
Save money on the all-in-one office suite that enables departments and teams to create and share documents, PDF, charts in one place.
Create and keep the documents and presentations for every stage of your business, supercharge with diagrams, charts and graphics.
Intuitive diagram makers that supports flowcharts, mind maps, and 200+ diagram types that accommodate all students' needs.
Individuals
Create documents, presentation, and charts in daily-life scenarios, and supporting you all-the-way through your self-learning journey.
Get started for free
Try VP Online, an all-in-one tool suite that simplifies your work and life.
©2024 by Visual Paradigm. All rights reserved.
- Terms of Service
- Privacy Policy
- Security Overview
Table of Contents
Best Free Presentation Software: Alternatives to PowerPoint

You probably prepared a slideshow to support your presentation if you’ve ever had to present a product, conduct a webinar, or perform any public speaking.
If you want to liven up your next meeting, a visual aid can do a lot more than add some glitz to your presentation.
The best news is that many of today’s presentation applications are far superior to the old standbys you’re used to.
The best free presentation software and image editing online software can help you unleash your creativity and create a presentation that keeps your audience engaged.
The most recent presentation applications have made it easier than ever to style slides and create professional-looking presentations that don’t appear like they were created using a template.
When it comes to presentation software, only one word everyone says is PowerPoint.
Let’s discuss Powerpoint.
Microsoft PowerPoint

PowerPoint , the king of the presentation software field with almost everyone reading this is familiar, has been around since the 1980s and has always been included with Microsoft Office.
Microsoft PowerPoint is a slide show presentation tool with a lot of features. It is bundled with Word, Excel, and other office productivity tools as part of Microsoft’s Office suite software. The software use slides to communicate multimedia-rich information.
It lets you share your presentation with people on the web in real-time. It is capable of:
- Adding custom animations.
- Add photos, videos, and audio.
- Customizing color schemes.
- Using the Slide, Notes, and Handout Masters.
- Creating, editing, and importing charts.
- Creating and editing tables.
- Managing hyperlinks.
- Creating custom shows.
- Exporting outlines and presentation slides to word.
Based on the design and functionality of PowerPoint, there are different presentation software evolving. We have discussed the best one as an alternative to PowerPoint.
Free Presentation Software: Alternatives to PowerPoint
When selecting a presenting tool, the essential aspect is the use case. Based on user review, I have listed some of the best free presentation software for you.
Google Slides

Google Slides is a quick and free presentation software that allows users to access their files from anywhere they have on the internet.
This cloud-based, software-free solution allows several stakeholders to work on a project simultaneously, making it ideal for collaborative team projects.
Google Slides, which is part of Google Workspace (previously G Suite), does an excellent job matching some of the features of PowerPoint.
Google Slides provides the collaborative features that Google users have come to expect. For example, several individuals can work on a slideshow simultaneously, and there’s an integrated group chat so you can keep track of what’s going on. Additionally, Google Slides offers a variety of customizable templates, making it easy to create professional presentations using a Google Slides template .
You can also play your presentation in presenter mode, which lets you see how it will appear to your audience and improve timing.
Features of Google Slides
Some of the exciting features of Google Slides are as follows:
- Master slide
- Add a theme to the master slide.
- Template sharing
- Import/Export slides
- Manage video in slide
- Links to Google sheets
Benefits of Google Slides
- Easy to access.
- Simple and easy to use.
- Supports importing new templates.
- In-build chat collaboration.
- Easy to add images, videos, audio, and animations.
- Easy to share.
- Other Google programs, such as YouTube, are tightly linked.
Drawbacks of Google Slides
- Limited themes.
- Initial template selection is limited.
Availability: Web, iOS, Android

Prezi is a presentation tool used instead of standard slide-creation software like PowerPoint. Prezi uses a single large canvas instead of slides, allowing you to pan and zoom to different canvas sections and highlight the ideas given there.
It is presentation software with innovative structure technology and the Zoom Reveal function, allowing users to direct the audience’s attention to the most critical information in a presentation.
You can seamlessly move around the canvas and zoom in to look at particular portions of material throughout your presentation.
It provides a free version and premium and enterprise-level options for a software solution that grows with your company, with the free version allowing users to create unlimited presentations.
Features of Prezi
Some of the exciting features of Prezi are:
- Desktop and web-based editor.
- It provides a presenter view.
- It has presenter notes and PDF export.
- It provides a template creator and template library.
Benefits of Prezi
- It has multiple templates.
- Easy to use.
- It allows collaborative editing.
- Animated presentations.
- You can convert your PowerPoint presentations by importing them.
- It provides charts and other media-rich content.
Drawbacks of Prezi
- Some trial and error.
- It still lacks several templates.
Availability: Web, Mac, Windows, iOS, Android
Canva’s free presentation software allows you to make presentations on any topic using hundreds of professionally designed templates.
Select the best images, fonts, and colors to ensure that your presentation effectively communicates your message.
It is ideal for quickly creating presentations in your web browser. This software comes with several free layouts to help you get started with your presentation, and you can easily change the templates to meet your needs.
Although there isn’t a vast selection of content elements to use in your presentation, Canva provides a searchable library of over 1 million photos.
Present using Canva and allow audience members to submit questions using Canva Live. Audience members can submit questions for you to answer once you post a link to invite them to your presentation.
Canva, on the other hand, cannot import Microsoft Powerpoint presentations or export final work to a Powerpoint-editable format.
Features of Canva
Some of the features of Canva are:
- Text animations.
- Design and Photo Grids.
- MP4 file creation.
- Working together on designs.
- Taking audio recordings of narrated speeches.
- Polling an audience.
- Publishing slides as a website.
Benefits of Canva
- It is intuitive to use.
- Provides drag and drop facilities.
- Ease with multiple templates.
- Free design platform.
- You can create a team on canvas.
- Seamless online sharing.
Drawbacks of Canva
- It does not have local file storage.
- Clunky editing features.
Availability: Web, Windows, Mac, Android, iOS
LibreOffice

LibreOffice is a community-driven, accessible, and open-source office software. It comes with Impress, desktop software for making and modifying slide presentations, similar to Microsoft PowerPoint and Apple Keynote.
LibreOffice is an office suite that lets you make documents like letters, posters, cards, presentations, slideshows, lists, budgets, and charts.
It’s handy because it can open files from several other office suites, such as Microsoft Office, WordPerfect, and Microsoft Works.
It is also an excellent choice for people who only have essential Microsoft Office on their computer or are attracted to LibreOffice’s open-source ethos.
It is the superior substitute to another popular office suite, OpenOffice.
Features of LibreOffice
Some of the exciting features of LibreOffice are as follows:
- Creating vector graphics.
- Create and publish presentations.
- Customized interface.
- Presenter view.
- 3D model support
- Live collaboration
Benefits of LibreOffice
- Easy and consistent user interface.
- Intuitive to use.
- No licensing fees.
- It is open source.
- Supports cross-platform
- Support for a wide range of languages
- Integration with other apps.
Drawbacks of LibreOffice
- Lack of cloud storage.
- UI needs to be updated.
Availability: Windows, Mac, Web, and Linux.
Apple Keynote

Apple Inc. Keynote is a presentation software program included in Apple Inc.’s iWork productivity package.
It offers an easy-to-use interface that allows users to create visually appealing and informative presentations quickly. It has a chat function that allows several users to collaborate in real-time.
In addition, mobile devices such as the iPhone, iPod, and iPad can manage Keynote presentations remotely.
Compared to other free presentation tools, it also features more decisive transitions and animation effects.
Additionally, you can use an Apple pencil to draw on the tools with the help of your iPad. Finally, users of Apple’s Keynote can collaborate on files in real-time.
Apple Keynote allows exporting slides to PowerPoint, but there’s no assurance that everything is displayed in the same way.
Exported files frequently lose parts and pieces of the images or animations used.
Features of Apple Keynote
Some of the best features of Apple Keynote are:
- Accessibility description.
- Interactive presentation.
- Offline collaboration.
- Custom themes.
- Folder sharing.
- Easy access as it allows a cloud-based service.
Benefits of Apple Keynote
- It provides simple charts and graphs.
- It has intuitive and easy animations.
- It offers a browser-based editor available on iCloud.
- In-built live collaboration.
- It can open, edit, and save PowerPoint files.
Drawbacks of Apple Keynote
- Fewer export options.
- It works only in Apple’s products.
Availability: Mac, iOS

Visme is a web-based data visualization tool that helps people and teams transform data into engaging presentations and infographics.
It includes many images, photography, vector icons, typography, and color schemes. With the help of predefined templates and themes, users can build stunning presentations.
Visme is a web-based application that allows businesses to create and present content for projects, initiatives, and programs in both online and offline formats.
Marketers can customize Visme’s presentation and infographic templates by adding video, audio, or recording voice directly within the editor.
Users can also add third-party content, create solid or gradient color backgrounds, and upload images as backdrops.
The content can be shared on social media platforms, published online, or saved as a PDF or Word document.
Visme also has various fonts, free pictures, and icons to customize the content. There are three options for the solution: basic, standard, and complete. Users can start with the basic version for free and upgrade at any time.
Features of Visme
Visme offers many basic and advanced features, which are as follows:
- Offers drag and drop editor.
- It provides a built-in library for icons, images, fonts, etc.
- Options for animation and transitions.
- Brand kit features to save your brand elements.
- Collaboration with members.
Benefits of Visme
- It offers a highly configurable platform.
- Provides a broad range of fonts, images, templates to use.
- Helps to design stunning infographics.
- Easy sharing with team members.
Drawbacks of Visme
- Complex for beginners to use due to its vast designs and layouts.
- It lacks enough animated icons.
Availability: Windows, Mac, Android

Slides is a presentation program that lets users make stunning presentations using a simple user interface and easy collaboration. In addition, it provides excellent flexibility and ease for cloud-based presentation management.
Instead of copying Office PowerPoint’s UI design, it aims to stand out by taking a simple approach to the user interface.
For example, it allows users to share their presentations by publishing them online. In addition, it provides features like a presentation view by combining the power of two browser windows.
Slides are the only presentation software that advertises itself as “pixel perfect.” As a result, slides have a reduced cost at the highest price tag, beneficial to small enterprises.
Furthermore, slides allow users to broadcast their presentations live to remote audiences and edit their presentations live.
It also allows an offline presentation to be downloaded in PDF, HTML, CSS, and JS formats.
Features of Slides.com
Some of the best features of Slides.com are as follows:
- Exceptionally adaptable
- Easily reachable
- Advanced features
- Collaboration was made more efficient.
- Live presentation and sharing
- It has developer mode.
- Lead generation.
Benefits of Slides.com
- It can import PDFs and PowerPoint slides and turn them into Slide presentations.
- Helps to make live presentations with sharing facilities.
- It supports the live editing of presentations.
- Allows you to download slides in offline formats.
- Easy video support.
- Easy analytics.
- Offers developer mode that unlocks advanced features.
Drawbacks of Slide.com
- PDFs and PowerPoint conversion are not accurate.
Availability: Windows, Mac, Web Browser

Zoho Show is a web-based presentation tool that allows you to create, collaborate, broadcast, and publish presentations right from your browser. In addition, it offers a flexible and customizable feature.
Zoho Show is a presentation program similar to Microsoft PowerPoint, with a menu up top for all functions. On the other hand, the Zoho version is prettier and more polished.
It uses an iframe code snippet to allow direct integration of the presentation with an existing website. In addition, it allows users to share their presentations with the entire company or the general public.
It offers a wide range of modern and sleek themes, layouts, and fonts. With its expirable URL sharing capability, you can easily share presentations with non-Zoho users.
You can also use Android TV, Apple TV, or Chromecast to live-stream your presentation online.
It includes CRM, project management, and invoicing capabilities in addition to the standard document, spreadsheet, and presentation editors.
Features of Zoho Show
Some of the best features of the Zoho Show are given below.
- Animations and transitions effects
- Presentation publishing
- Integration with Zoho Docs
- Shared presentation.
- Collaboration notifications.
- Image library and image editing free online.
Benefits of Zoho Show
- It supports cloud-based collaboration.
- It provides import/export functions.
- It provides secure sharing and broadcasting facilities.
Drawbacks of Zoho Show
- It lacks several predefined templates.
- It provides limited customer support.
- Requires heavy customization to use.
Availability: Android, iOS, Windows, Mac
To sum up, presentation software has advanced to the point that it can now do much more than creating introductory PPT presentations.
Managers and employees want to impress their coworkers and solidify their position inside the organization.
This post discussed the eight options that we believe are suitable PowerPoint replacements.
Which of those mentioned above best free presentation software is suitable for you? Do mention in the comment section below. Also, do not forget to subscribe to us for more blogs.

Samir Luintel
13 creative office decor ideas to maximize your productivity, 6 best sms apps for small businesses, ready to get started, apply now for pre-release beta version, timetracko team, knowledge base, installation guide, product videos, automatic time tracking software, productivity analyze and tracking software, employee screen monitoring software, time and attendance software, app and website monitoring software, time tracking software for freelancer, offline/idle time tracking software, team performance analysis, accountants, call center and bpo, construction, design agency, retail and ecommerce, case studies, customer reviews.
Workforce Monitoring and Productivity Software
Social Networks
Terms of Service
Privacy policy, affiliate terms, security and compliance, gdpr compliance, hipaa compliance.
- Skip to main content
- Skip to main navigation
- Skip to footer
SIPROTEC 5 Web UI
IMAGES
VIDEO
COMMENTS
Use Google Slides to create online slideshows. Make beautiful presentations together with secure sharing in real-time and from any device.
5. SlideShare Scribd. SlideShare Scribd isn't a presentation authoring software tool, but rather a free presentation sharing software tool. If you need to get your slideshow in front of a large professional audience, then this online presentation software is worth knowing about.
Create Stunning Presentations on the Web. reveal.js is an open source HTML presentation framework. It's a tool that enables anyone with a web browser to create fully-featured and beautiful presentations for free. Presentations made with reveal.js are built on open web technologies. That means anything you can do on the web, you can do in your ...
Create beautiful presentations, faster. Visme is the best presentation software for teams who need real-time collaboration and individuals who need advanced features. and customization for interactive presentations. Create beautiful presentations in minutes, not hours. "Frequently, members of the lead team need to give presentations and ...
Prezi's online presentation tools help you connect with your audience and create conversational presentations that come with you on-screen to any video call. With professionally-designed templates, branding solutions, immersive views, and more, it's never been easier to create and present online. Try for FREE. Let's talk!
impress.js is a presentation tool based on the power of CSS3 transforms and transitions in modern browsers and inspired by the idea behind prezi.com. ... Safari or Firefox browser. Aren't you just bored with all those slides-based presentations?
The best presentation tools should have attractive, professional-looking templates to build presentations in a hurry. ... with the familiar deck-based editor you expect from a "presentation" tool (versus, for example, a video creation app). ... How to share a presentation on Zoom without sharing your browser tabs and address bar.
The Best 100% Free Online Presentation Software. 1. The Best Online Presentation Tool for the Google Ecosystem: Google Slides. Google Slides is a widely used free online presentation software that functions as part of the Google Workspace suite of productivity tools and can be accessed through a browser.
Google Slides is a FREE web-based presentation tool provided as part of the Google Suite. Google Slides allows you to create, modify, and deliver a presentation; all through a web browser. Google Slide is also known for its best-in-class real-time collaboration features.
Here's how to get started: Go to Office.com. Click PowerPoint. Create a new, blank presentation, start with a template, or open an existing file. When you start with a new, blank presentation, PowerPoint automatically saves it to OneDrive with a default name, such as Presentation 1. To rename your presentation, do the following:
Gabrielle Gosha. Gabrielle is a creative type who specializes in graphic design, animation and photography. The rise of a new breed of free web-based presentation tools has freed us from reliance ...
Whether you're a student, a professional, or a presentation aficionado, you've probably heard of Google Slides, the browser-based presentation tool from Google Workspace. Google Slides has been steadily gaining in popularity over the past few years, with more and more users keen to make use of its easy-to-use interface and collaboration ...
Marketed as a web-based multimedia presentation tool, it gives you the ability to combine PowerPoint presentations, graphics, PDF files, Prezi presentations, web pages, pictures, videos, and movie ...
Access presentation tools from anywhere via a web browser; Free presentation app version available; Cons: Might take some getting used to if you're used to PowerPoint presentations; ... SlideDog is a web-based multimedia presentation tool that lets users combine different types of media to create and edit presentations.
The Apache OpenOffice's Impress interface may not be visually impressive at first glance, but there's a reason why it's one of the top free PowerPoint alternatives. It's robust, it's got plenty of powerful features, it plays well with PowerPoint, and best of all, it's free. 2. LibreOffice's Impress.
Emaze is an online browser-based presentation building app. PowerPoint alternative Emaze is easy to learn to use. It's an online browser-based presentation building app that lets you use a variety of tools to create professional presentations. It runs on a wide variety of browsers on a Mac or PC. It can also operate with smartphones.
Google Slides is the presentation tool of Google, a browser-based presentation software offering cross-platform compatibility. As a browser-based tool, Google Slides allows real-time co-authoring, which makes it the perfect tool for students that need to collaborate on presentations. Google Slides offers unmatched features that support sharing ...
First, create a new folder to hold everything. Copy both the contents of the deck.js zip file you downloaded (the files, not the folder) and the two starter kit HTML files. Once you have all the ...
The browser-based tool is even responsive for viewing on various devices. 04. ... It's truly one of the top options if you're looking for a browser-based presentation tool. 07. Ancesor.js. Ancesor.js runs as a jquery plugin, with CSS and HTML components for a sleek and simple slideshow. The basic features allow for scrolling with your ...
With Visme's Presenter Studio, you can record your presentation and share it with your audience. Record your screen, audio, and video, or switch off your camera for an audio-only presentation. Present asynchronously on your own time, at your own pace. Let your colleagues watch it at their convenience. Create Your Presentation.
A simple tutorial on using Deck.js to create browser-based presentations. This site offers a primer as well as some more advanced resources on the S5 slide show format. The same framework that is used in Rvl.io, Reveal.js is available on GitHub for those who would rather work directly with it. Another option, this time based on CSS3, for those ...
The cloud-based presentation tool allows you to view and edit files anytime, anywhere, from your web browser. Perfectly compatible with MS Office Our presentation maker is compatible with Microsoft ® PowerPoint, Google Slides and OpenOffice Impress formats.
Create a working presentation, document or webpage you can refine and customize in under a minute, using our powerful AI generator. Gamma allows me to package up information in ways I can't with slides, while still creating good flow for my presentations. Ann Marie, Director of Product at Koalafi.
Zoho Show. Zoho Show is a web-based presentation tool that allows you to create, collaborate, broadcast, and publish presentations right from your browser. In addition, it offers a flexible and customizable feature. Zoho Show is a presentation program similar to Microsoft PowerPoint, with a menu up top for all functions.
This is actually Grasso's second stab at solving the presentation puzzle. In 2007, he founded SlideRocket, a startup he sold to VMware a few years later. But before you jump to conclusions, hang ...
The browser-based user interface is especially optimized for the protection system and provides comprehensive support during testing and commissioning from the PC or laptop computer.