We use essential cookies to make Venngage work. By clicking “Accept All Cookies”, you agree to the storing of cookies on your device to enhance site navigation, analyze site usage, and assist in our marketing efforts.
Manage Cookies
Cookies and similar technologies collect certain information about how you’re using our website. Some of them are essential, and without them you wouldn’t be able to use Venngage. But others are optional, and you get to choose whether we use them or not.
Strictly Necessary Cookies
These cookies are always on, as they’re essential for making Venngage work, and making it safe. Without these cookies, services you’ve asked for can’t be provided.
Show cookie providers
- Google Login
Functionality Cookies
These cookies help us provide enhanced functionality and personalisation, and remember your settings. They may be set by us or by third party providers.
Performance Cookies
These cookies help us analyze how many people are using Venngage, where they come from and how they're using it. If you opt out of these cookies, we can’t get feedback to make Venngage better for you and all our users.
- Google Analytics
Targeting Cookies
These cookies are set by our advertising partners to track your activity and show you relevant Venngage ads on other sites as you browse the internet.
- Google Tag Manager
- Infographics
- Daily Infographics
- Template Lists
- Graphic Design
- Graphs and Charts
- Data Visualization
- Human Resources
- Beginner Guides
Blog Graphic Design

15 Effective Visual Presentation Tips To Wow Your Audience
By Krystle Wong , Sep 28, 2023

So, you’re gearing up for that big presentation and you want it to be more than just another snooze-fest with slides. You want it to be engaging, memorable and downright impressive.
Well, you’ve come to the right place — I’ve got some slick tips on how to create a visual presentation that’ll take your presentation game up a notch.
Packed with presentation templates that are easily customizable, keep reading this blog post to learn the secret sauce behind crafting presentations that captivate, inform and remain etched in the memory of your audience.
Click to jump ahead:
What is a visual presentation & why is it important?
15 effective tips to make your visual presentations more engaging, 6 major types of visual presentation you should know , what are some common mistakes to avoid in visual presentations, visual presentation faqs, 5 steps to create a visual presentation with venngage.
A visual presentation is a communication method that utilizes visual elements such as images, graphics, charts, slides and other visual aids to convey information, ideas or messages to an audience.
Visual presentations aim to enhance comprehension engagement and the overall impact of the message through the strategic use of visuals. People remember what they see, making your point last longer in their heads.
Without further ado, let’s jump right into some great visual presentation examples that would do a great job in keeping your audience interested and getting your point across.
In today’s fast-paced world, where information is constantly bombarding our senses, creating engaging visual presentations has never been more crucial. To help you design a presentation that’ll leave a lasting impression, I’ve compiled these examples of visual presentations that will elevate your game.
1. Use the rule of thirds for layout
Ever heard of the rule of thirds? It’s a presentation layout trick that can instantly up your slide game. Imagine dividing your slide into a 3×3 grid and then placing your text and visuals at the intersection points or along the lines. This simple tweak creates a balanced and seriously pleasing layout that’ll draw everyone’s eyes.
2. Get creative with visual metaphors
Got a complex idea to explain? Skip the jargon and use visual metaphors. Throw in images that symbolize your point – for example, using a road map to show your journey towards a goal or using metaphors to represent answer choices or progress indicators in an interactive quiz or poll.
3. Visualize your data with charts and graphs
The right data visualization tools not only make content more appealing but also aid comprehension and retention. Choosing the right visual presentation for your data is all about finding a good match.
For ordinal data, where things have a clear order, consider using ordered bar charts or dot plots. When it comes to nominal data, where categories are on an equal footing, stick with the classics like bar charts, pie charts or simple frequency tables. And for interval-ratio data, where there’s a meaningful order, go for histograms, line graphs, scatterplots or box plots to help your data shine.
In an increasingly visual world, effective visual communication is a valuable skill for conveying messages. Here’s a guide on how to use visual communication to engage your audience while avoiding information overload.

4. Employ the power of contrast
Want your important stuff to pop? That’s where contrast comes in. Mix things up with contrasting colors, fonts or shapes. It’s like highlighting your key points with a neon marker – an instant attention grabber.
5. Tell a visual story
Structure your slides like a storybook and create a visual narrative by arranging your slides in a way that tells a story. Each slide should flow into the next, creating a visual narrative that keeps your audience hooked till the very end.
Icons and images are essential for adding visual appeal and clarity to your presentation. Venngage provides a vast library of icons and images, allowing you to choose visuals that resonate with your audience and complement your message.

6. Show the “before and after” magic
Want to drive home the impact of your message or solution? Whip out the “before and after” technique. Show the current state (before) and the desired state (after) in a visual way. It’s like showing a makeover transformation, but for your ideas.
7. Add fun with visual quizzes and polls
To break the monotony and see if your audience is still with you, throw in some quick quizzes or polls. It’s like a mini-game break in your presentation — your audience gets involved and it makes your presentation way more dynamic and memorable.
8. End with a powerful visual punch
Your presentation closing should be a showstopper. Think a stunning clip art that wraps up your message with a visual bow, a killer quote that lingers in minds or a call to action that gets hearts racing.

9. Engage with storytelling through data
Use storytelling magic to bring your data to life. Don’t just throw numbers at your audience—explain what they mean, why they matter and add a bit of human touch. Turn those stats into relatable tales and watch your audience’s eyes light up with understanding.

10. Use visuals wisely
Your visuals are the secret sauce of a great presentation. Cherry-pick high-quality images, graphics, charts and videos that not only look good but also align with your message’s vibe. Each visual should have a purpose – they’re not just there for decoration.
11. Utilize visual hierarchy
Employ design principles like contrast, alignment and proximity to make your key info stand out. Play around with fonts, colors and placement to make sure your audience can’t miss the important stuff.
12. Engage with multimedia
Static slides are so last year. Give your presentation some sizzle by tossing in multimedia elements. Think short video clips, animations, or a touch of sound when it makes sense, including an animated logo . But remember, these are sidekicks, not the main act, so use them smartly.
13. Interact with your audience
Turn your presentation into a two-way street. Start your presentation by encouraging your audience to join in with thought-provoking questions, quick polls or using interactive tools. Get them chatting and watch your presentation come alive.

When it comes to delivering a group presentation, it’s important to have everyone on the team on the same page. Venngage’s real-time collaboration tools enable you and your team to work together seamlessly, regardless of geographical locations. Collaborators can provide input, make edits and offer suggestions in real time.
14. Incorporate stories and examples
Weave in relatable stories, personal anecdotes or real-life examples to illustrate your points. It’s like adding a dash of spice to your content – it becomes more memorable and relatable.
15. Nail that delivery
Don’t just stand there and recite facts like a robot — be a confident and engaging presenter. Lock eyes with your audience, mix up your tone and pace and use some gestures to drive your points home. Practice and brush up your presentation skills until you’ve got it down pat for a persuasive presentation that flows like a pro.
Venngage offers a wide selection of professionally designed presentation templates, each tailored for different purposes and styles. By choosing a template that aligns with your content and goals, you can create a visually cohesive and polished presentation that captivates your audience.
Looking for more presentation ideas ? Why not try using a presentation software that will take your presentations to the next level with a combination of user-friendly interfaces, stunning visuals, collaboration features and innovative functionalities that will take your presentations to the next level.
Visual presentations come in various formats, each uniquely suited to convey information and engage audiences effectively. Here are six major types of visual presentations that you should be familiar with:
1. Slideshows or PowerPoint presentations
Slideshows are one of the most common forms of visual presentations. They typically consist of a series of slides containing text, images, charts, graphs and other visual elements. Slideshows are used for various purposes, including business presentations, educational lectures and conference talks.

2. Infographics
Infographics are visual representations of information, data or knowledge. They combine text, images and graphics to convey complex concepts or data in a concise and visually appealing manner. Infographics are often used in marketing, reporting and educational materials.
Don’t worry, they are also super easy to create thanks to Venngage’s fully customizable infographics templates that are professionally designed to bring your information to life. Be sure to try it out for your next visual presentation!

3. Video presentation
Videos are your dynamic storytellers. Whether it’s pre-recorded or happening in real-time, videos are the showstoppers. You can have interviews, demos, animations or even your own mini-documentary. Video presentations are highly engaging and can be shared in both in-person and virtual presentations .
4. Charts and graphs
Charts and graphs are visual representations of data that make it easier to understand and analyze numerical information. Common types include bar charts, line graphs, pie charts and scatterplots. They are commonly used in scientific research, business reports and academic presentations.
Effective data visualizations are crucial for simplifying complex information and Venngage has got you covered. Venngage’s tools enable you to create engaging charts, graphs,and infographics that enhance audience understanding and retention, leaving a lasting impression in your presentation.

5. Interactive presentations
Interactive presentations involve audience participation and engagement. These can include interactive polls, quizzes, games and multimedia elements that allow the audience to actively participate in the presentation. Interactive presentations are often used in workshops, training sessions and webinars.
Venngage’s interactive presentation tools enable you to create immersive experiences that leave a lasting impact and enhance audience retention. By incorporating features like clickable elements, quizzes and embedded multimedia, you can captivate your audience’s attention and encourage active participation.
6. Poster presentations
Poster presentations are the stars of the academic and research scene. They consist of a large poster that includes text, images and graphics to communicate research findings or project details and are usually used at conferences and exhibitions. For more poster ideas, browse through Venngage’s gallery of poster templates to inspire your next presentation.
Different visual presentations aside, different presentation methods also serve a unique purpose, tailored to specific objectives and audiences. Find out which type of presentation works best for the message you are sending across to better capture attention, maintain interest and leave a lasting impression.
To make a good presentation , it’s crucial to be aware of common mistakes and how to avoid them. Without further ado, let’s explore some of these pitfalls along with valuable insights on how to sidestep them.
Overloading slides with text
Text heavy slides can be like trying to swallow a whole sandwich in one bite – overwhelming and unappetizing. Instead, opt for concise sentences and bullet points to keep your slides simple. Visuals can help convey your message in a more engaging way.
Using low-quality visuals
Grainy images and pixelated charts are the equivalent of a scratchy vinyl record at a DJ party. High-resolution visuals are your ticket to professionalism. Ensure that the images, charts and graphics you use are clear, relevant and sharp.
Choosing the right visuals for presentations is important. To find great visuals for your visual presentation, Browse Venngage’s extensive library of high-quality stock photos. These images can help you convey your message effectively, evoke emotions and create a visually pleasing narrative.
Ignoring design consistency
Imagine a book with every chapter in a different font and color – it’s a visual mess. Consistency in fonts, colors and formatting throughout your presentation is key to a polished and professional look.
Reading directly from slides
Reading your slides word-for-word is like inviting your audience to a one-person audiobook session. Slides should complement your speech, not replace it. Use them as visual aids, offering key points and visuals to support your narrative.
Lack of visual hierarchy
Neglecting visual hierarchy is like trying to find Waldo in a crowd of clones. Use size, color and positioning to emphasize what’s most important. Guide your audience’s attention to key points so they don’t miss the forest for the trees.
Ignoring accessibility
Accessibility isn’t an option these days; it’s a must. Forgetting alt text for images, color contrast and closed captions for videos can exclude individuals with disabilities from understanding your presentation.
Relying too heavily on animation
While animations can add pizzazz and draw attention, overdoing it can overshadow your message. Use animations sparingly and with purpose to enhance, not detract from your content.
Using jargon and complex language
Keep it simple. Use plain language and explain terms when needed. You want your message to resonate, not leave people scratching their heads.
Not testing interactive elements
Interactive elements can be the life of your whole presentation, but not testing them beforehand is like jumping into a pool without checking if there’s water. Ensure that all interactive features, from live polls to multimedia content, work seamlessly. A smooth experience keeps your audience engaged and avoids those awkward technical hiccups.
Presenting complex data and information in a clear and visually appealing way has never been easier with Venngage. Build professional-looking designs with our free visual chart slide templates for your next presentation.
What software or tools can I use to create visual presentations?
You can use various software and tools to create visual presentations, including Microsoft PowerPoint, Google Slides, Adobe Illustrator, Canva, Prezi and Venngage, among others.
What is the difference between a visual presentation and a written report?
The main difference between a visual presentation and a written report is the medium of communication. Visual presentations rely on visuals, such as slides, charts and images to convey information quickly, while written reports use text to provide detailed information in a linear format.
How do I effectively communicate data through visual presentations?
To effectively communicate data through visual presentations, simplify complex data into easily digestible charts and graphs, use clear labels and titles and ensure that your visuals support the key messages you want to convey.
Are there any accessibility considerations for visual presentations?
Accessibility considerations for visual presentations include providing alt text for images, ensuring good color contrast, using readable fonts and providing transcripts or captions for multimedia content to make the presentation inclusive.
Most design tools today make accessibility hard but Venngage’s Accessibility Design Tool comes with accessibility features baked in, including accessible-friendly and inclusive icons.
How do I choose the right visuals for my presentation?
Choose visuals that align with your content and message. Use charts for data, images for illustrating concepts, icons for emphasis and color to evoke emotions or convey themes.
What is the role of storytelling in visual presentations?
Storytelling plays a crucial role in visual presentations by providing a narrative structure that engages the audience, helps them relate to the content and makes the information more memorable.
How can I adapt my visual presentations for online or virtual audiences?
To adapt visual presentations for online or virtual audiences, focus on concise content, use engaging visuals, ensure clear audio, encourage audience interaction through chat or polls and rehearse for a smooth online delivery.
What is the role of data visualization in visual presentations?
Data visualization in visual presentations simplifies complex data by using charts, graphs and diagrams, making it easier for the audience to understand and interpret information.
How do I choose the right color scheme and fonts for my visual presentation?
Choose a color scheme that aligns with your content and brand and select fonts that are readable and appropriate for the message you want to convey.
How can I measure the effectiveness of my visual presentation?
Measure the effectiveness of your visual presentation by collecting feedback from the audience, tracking engagement metrics (e.g., click-through rates for online presentations) and evaluating whether the presentation achieved its intended objectives.
Ultimately, creating a memorable visual presentation isn’t just about throwing together pretty slides. It’s about mastering the art of making your message stick, captivating your audience and leaving a mark.
Lucky for you, Venngage simplifies the process of creating great presentations, empowering you to concentrate on delivering a compelling message. Follow the 5 simple steps below to make your entire presentation visually appealing and impactful:
1. Sign up and log In: Log in to your Venngage account or sign up for free and gain access to Venngage’s templates and design tools.
2. Choose a template: Browse through Venngage’s presentation template library and select one that best suits your presentation’s purpose and style. Venngage offers a variety of pre-designed templates for different types of visual presentations, including infographics, reports, posters and more.
3. Edit and customize your template: Replace the placeholder text, image and graphics with your own content and customize the colors, fonts and visual elements to align with your presentation’s theme or your organization’s branding.
4. Add visual elements: Venngage offers a wide range of visual elements, such as icons, illustrations, charts, graphs and images, that you can easily add to your presentation with the user-friendly drag-and-drop editor.
5. Save and export your presentation: Export your presentation in a format that suits your needs and then share it with your audience via email, social media or by embedding it on your website or blog .
So, as you gear up for your next presentation, whether it’s for business, education or pure creative expression, don’t forget to keep these visual presentation ideas in your back pocket.
Feel free to experiment and fine-tune your approach and let your passion and expertise shine through in your presentation. With practice, you’ll not only build presentations but also leave a lasting impact on your audience – one slide at a time.
A Guide to Using Images and Photos For Powerpoint

No matter what industry you’re in, you’ll likely be tasked with creating PowerPoint presentations to use in meetings, for marketing, or as a standalone piece of sales collateral to hand off to a client. Whatever the context, a PowerPoint presentation allows you to share information in an easily digestible, visual format that informs the reader and brings your story to life. Presenting images alongside your text is a surefire way to make your slides more eye-catching, but it takes some finesse to give your audience information without the overload.
Creating an aesthetically pleasing PowerPoint can be a make-or-break deal, and the photos you use – along with the the right combination of colors, fonts and other graphic elements – can either convey professional credibility and inspiration, or be a jumbled mess that your audience won’t know how to decipher. In this guide, we’ll go over the best practices for using images in PowerPoint (or the slide deck program of your choice).
Tips for Presenting Images
Text, colors, and icons can’t always do the heavy lifting of a presentation on their own — using photos in PowerPoint will make your ideas feel more immediate, human, and relatable. Think about your key messages and your brand identity before adding images to your presentation. What story are you trying to tell? What audience are you trying to speak to?

Visuals are essential to creating an engaging presentation. Audiences will tune out if they see nothing but text.
Generally, you should focus on adding photos to your PowerPoint that support and emphasize your key statements, rather than overshadow or distract from them. Selecting more muted background images for presentation slides can also maintain the look, feel, and texture you desire without attracting too much focus.
Here, we’ve compiled a handy guide to the Do’s and Don’ts of PowerPoint presentation design and selecting the right images:
1. Use High Quality Photos
Nothing can tarnish your professional credibility quicker than seeing a blurry, pixelated image in your presentation. This is why adding high-resolution stock photography to your presentation is a must, and drawing from the wealth of professional photos available on a site like Noun Project will lend your slides an immediate air of professionalism.
Go to NounProject.com/photos and search for keywords related to your main idea. You can view specific collections like Diversity in Tech , Empowered Women , Students , and Hiking , and explore additional images by photographer as well.
When you’ve found a stock photo you like, be sure to download it in the resolution you want. Noun Project offers many photos for free in a lower resolution, but depending on how large your final presentation will be, you’ll want the highest resolution that can be expanded to fit your screen without pixelation. Always double check to make sure that the picture still looks crisp at full screen size.

Tip: Standard screen resolutions are 1920 pixels wide by 1080 pixels high (and most default PowerPoint templates have these dimensions). Be sure your photo is at least the same dimension if you’re doing a full screen size to avoid pixelation.
2. Practice Consistency
Chances are, your entire presentation focuses on a single overarching idea and the photos you use should reflect that. In addition to finding the right subjects, pay attention to the other aesthetic qualities of the photos you bring in. Are they in a similar, complementary color scheme? Are they shot in similar environments for a consistent tone (e.g., sleek and corporate, rugged and outdoorsy, urban and gritty, or light and playful)?

Use images in PowerPoint that support and accentuate your theme and overall tone. The images you use throughout should complement each other without repeating or looking too dissimilar.
The most fail-proof way to ensure consistency is to draw from an individual photographer or a particular photo shoot. Stock photographers will often shoot several different angles, poses and variations from a single scene, so you can find just the right shot for each slide and remind your audience that this is all part of one cohesive message.
Noun Project organizes stock photos in collections from individual shoots, so almost any image you click on will have similar ones from the series available. Bear in mind, though, that you don’t want to use too many similar images — the more you can change scenes without shifting the tone, the better.

Adding photos to a presentation from the same photographer is the easiest way to keep it visually consistent. If you insert photos from the same shoot, just make sure you add enough variety so it doesn’t become repetitive. Pictured: Fitness photo collection by Jacob Lund.
Once you have your desired photos downloaded (and ideally put in the same folder in your hard drive), here’s how to add pictures to PowerPoint:
- Simply click and drag the picture file (as .JPG or .PNG) from your file finder window into the PowerPoint pane. You may see the “Design Ideas” toolbar pop up on the side of your pane, with different options you can try out to arrange visual elements.
- Alternatively, go to Insert > Pictures > Picture from file , and select the photo you want from your finder.

3. Avoid Photo Clutter
The photos you add to your PowerPoint should be presented one at a time, or minimally enough to maintain focus — too many photos can cause clutter and become distracting. You don’t want the photo to be the sole star of the show — you want it to support your statements and add emotional resonance to your messages.

There may, however, be occasions when you want to use multiple images that support a unifying topic: for example, steps in a process or different ways that customers can purchase your product.
If you ever want to add one or more smaller photos, rather than a large background image, here are a few rules of thumb:
- Crop the photos to the same size or shape: Having mixed dimensions makes the overall composition feel unbalanced. Whether you choose a square, rectangle, or circle shape for your photos, making them all the same size and shape will boost the scannability of your page.
- Group and align: Again, scannability is key. When you group the elements of your page together in an even and consistent way, people will visually register the pattern and can digest the content more quickly. For example, you may have three groupings that consist of an image, headline, and descriptive body text. Make sure that these elements are (1) clustered together so they form one unified thought, (2) grouped to match each other so they form a visual “rhythm” across the page with equal text sizes, line weights, and image dimensions, and (3) aligned and justified along the X or Y axis for legibility (in PowerPoint, select multiple objects and go to Arrange > Align to line them up along the same axis).
- If using different sized photos, fit them together into a cohesive shape . A binding element like a grid with solid lines will help the photos appear on the page like neatly fitted puzzle pieces. Again, keep overall alignment in mind — the more your content stays organized in tidy rows and columns, the more scannable it will be.

If you must use multiple photos, PowerPoint’s Design Ideas toolbar will give you options to array them in a neatly aligned grid. Focus on creating a tidy overarching shape to avoid the cluttered “collage” effect.
4. Choose Photos Over Clipart
Clipart has been nearly synonymous with PowerPoint and other programs since the ’90s, but unfortunately hasn’t evolved much with the times. While a piece of clipart from the web may encapsulate or accentuate your key themes, keep in mind these aesthetic considerations:
- Professional credibility is lost when your design looks “dated” or “cartoonish,” but gained when your presentation is sleek and modern.
- While aiming for visual consistency, also bear in mind that more muted and subtle visuals — from the photos you choose to the icons that illustrate your key points — help keep the focus on your words and ideas, rather than your visual aids
- If you want to add a more sleek, modernized look, browse Noun Project’s collection of over 3 million icons to find a corresponding set to include.

For a more polished and modern look, go for minimalist and visually consistent icons to accentuate key messages, rather than clipart.
Tip: The PowerPoint Add-In for Noun Project lets you search and pull in icons right there in the software without having to leave your workflow. Go to Insert > Add-Ins > Get Add-Ins and search for Noun Project. Once you open the Noun Project Add-In window and log in to your account, choose icons from the same collection to ensure that they’re visually consistent.

Find the Noun Project PowerPoint Add-In on NounProject.com or, from PowerPoint, go to Insert > Add-Ins > Get Add-Ins to search for Noun Project icons.
5. Don’t Use Watermarked Images
Even if it is small, a watermark can be distracting and, once spotted, can negatively impact your credibility. Be sure to use free photos and credit the photographer, or pay for the photos you use in your presentations to avoid the loss of credibility and trust that can occur when you use watermarked images.
Not sure what usage rights you have with an image? Let’s cover the basics of how to cite images in a presentation: Questions about fees, licenses, and usage rights are common, and citing images in a presentation is the standard expectation for free photos so that the photographer gets credit. Fortunately, Noun Project Photos provides a transparent model for photo usage and licensing — any free photo download is licensed under Creative Commons, which allows you to use the photo for noncommercial purposes, without creating derivatives, as long as you provide attribution to the photographer.
The “Basic Download” option will not only give you a free, CC-licensed image, but tell you exactly what attribution information you should include when you cite it. Once you click “Get This Photo,” you’ll see the image title and photographer name listed in a text box — simply copy the text and include it on your slide to properly cite the image.

Noun Project Photos provides a transparent licensing model in which photos are free to use with attribution under Creative Commons.
Your presentation may have a footer for notes, where such a citation could easily fit. If not, many presentations will have all the attributions listed on a final page. Under Creative Commons, both methods are acceptable.
6. Maintain Diversity in Photos
The truth is incontrovertible: representation matters. Stock photography — like much of the broader media and marketing landscape — has faced a chronic issue with only representing a particular sub-sect of the population, and more and more consumers have started to notice. At Noun Project, we’re dedicated to ensuring that the visual resources we share are inclusive, free from outdated stereotypes, and more accurately reflect the world we live in . Through initiatives like our Diversity in Tech and Empowered Women photo collections, we’re championing more equal and accurate representation in the world of stock photography.
Double-check the photos you’ve added to your presentation and ask yourself: Does this speak to the widest possible audience, or does it leave certain groups out of the picture?

Noun Project offers diverse, inclusive photos, so you can finally leave the stuffy corporate photo shoot in the past. Audiences want to see natural, non-posed, high-quality photos that better resemble day-to-day life.
7. Keep it Simple.
Finally, slides should be readable. The visual elements you choose should bolster the core message of each slide, rather than overshadowing it. Key things to watch out for are:
- Less text, more talk . Unless you’re handing off a comprehensive sales deck, you as the presenter should be doing the talking — not the words on the page. Focus on using short bullet points to extract main ideas and keywords, rather than numerous full sentences.
- Check your text size. Bigger is better (and with less text on the page, it should have more room to breathe). But don’t forget about hierarchy: there should be a clear distinction between headlines and supporting text.
- Check legibility . Are you using simple, legible text for body copy? Does the text appear clearly against the background? Up the contrast or find a more suitable background that doesn’t strain the eye.
Search for “Copy Space” photos to add to your presentation. The best background photos to add are those that have plenty of white space for you to add your own content. While bold, busy photographs might be the most visually striking, bear in mind that your text needs room to breathe. A quick Noun Project search for “Copy Space” will lead you to more minimal photographs that include this built-in space for text.

Search for photos with copy space to give your text legibility. Tip: If you need to set text against a more visually busy background, add a semi-transparent color block. Add a rectangle (Insert > Shapes > Rectangle) underneath your text, give it a black fill, but adjust the transparency until the text becomes clearer while leaving the photo visible.
Explore More Stock Photos for PowerPoint at Noun Project
Noun Project Photos features professionally-selected, inclusive, beautiful and affordable images created by a global community of photographers. We’ve curated our collection to put visual clichés and tired, outdated stereotypes to rest — so you can find stunning images for any project. With worry-free licenses, you’ll support photographers and have peace of mind with clear image usage rights, including model and property releases.
Explore the collection at thenounproject.com/photos/ and follow our blog for more tutorials about visual communication.

Marketing Communications Manager at Noun Project, Designer and Illustrator.
Related Articles

Graphic Design Principles: Balance and White Space
by Jeremy Elliott | Apr 12, 2024 | DIY , Featured , Graphic Design
Learn how to use balance and white space in your designs by distributing your elements to promote visual flow.

The Principle of Hierarchy in Graphic Design
by Jeremy Elliott | Mar 11, 2024 | Creative Inspiration , Graphic Design , Top Featured
Learn how to effectively use the principle of hierarchy to direct the viewer’s focus.

How to Use Icons in Notion: A Guide to Visually Organizing Your Life
by Jeremy Elliott | Feb 7, 2024 | Creative Inspiration , DIY , Featured , Graphic Design
Learn how to use icons in Notion to visually organize tasks, projects, and notes for everyday use.
- Customer Help
- X (Twitter)
How to Create a Stunning Photo Slideshow in PowerPoint
A photo slideshow can bring your PowerPoint presentation to life. In this article, you’ll learn step-by-step how to make a compelling photo slideshow in Microsoft PowerPoint. We’ll cover choosing your photos, arranging them, adding transitions, music, and text – everything you need to create a dynamic slideshow your audience will love. Whether you’re a PowerPoint beginner or experienced user, you’ll find tips to take your next slideshow from ordinary to extraordinary.
Getting Started Create Slideshow in PowerPoint

Now you can customize this template slide for your photo slideshow. Change the title, subtitle, and text box colors and fonts to match your brand or theme. You’ll also want to delete any placeholder images and ensure the slide layout works for photos. The title and text boxes should not cover up the main photo area.
Add Photos to Your PowerPoint Slideshow
Step 1: Inserting a Single Photo

- Choose the desired image and confirm to insert it onto your slide. This method is ideal when you’re aiming for a different and selective approach in your presentation.
Step 2: Adding Multiple Photos Simultaneously

- Simply drag the slides from the folder and drop them directly onto the PowerPoint slide. This batch insertion saves time and ensures consistency in your slideshow.
Step 3: Adjusting and Refining Your Photos

Step 4: Ensuring Harmony Between Photos and Slide Elements
- Review each slide to make sure photos don’t overlap with titles, bullet points or short text boxes.
- Adjust the position or size of photos if they obstruct any slide elements. This ensures your slides in PowerPoint are both visually appealing and easy to understand.
Step 5: Exploring Additional Features (Optional)
- For users on a Mac, familiarize yourself with any interface differences.

- For a continuous presentation loop, select the “loop continuously” option in the slideshow settings.
- Dive into the “Slide Layout” or “Picture Layout” options to experiment with different visual arrangements for your content.
Make a Custom Title Slide
Step 2: Inputting Your Title and Subtitle

- Below the title, there’s a space for a subtitle. Use this to provide additional context or a secondary message related to your main theme.
Step 3: Enhancing Text Aesthetics

Step 4: Dabbling in Color Choices
- With your title or subtitle text highlighted, click on the text color option in the “Home” tab. Select a color that complements your presentation’s theme.

Step 5: Embedding a Relevant Image
- To further enhance your title slide, consider adding an image that ties in with your presentation’s theme.

- Once inserted, adjust the image’s size and position it behind your title and subtitle. Ensure the image doesn’t overpower the text but complements it.
How to Add Music into Your Microsoft PowerPoint Presentation
Step 1: Initiating the Audio Addition
- Navigate to the slide where you want the music to start playing.
- Head over to the “Insert” tab located at the top of the interface.

Step 2: Modulating the Audio Volume

- Use this slider to adjust the audio volume. If you’re aiming for background music that doesn’t overpower your presentation’s content, set the volume to a lower level.
Step 3: Selecting the Right Tune for Emotion
- The music you choose plays a pivotal role in setting the mood for your slideshow on PowerPoint.
- Reflect on the emotion or message you want to convey with your slides. Whether it’s nostalgia, excitement, or inspiration, pick a track that heightens this emotion.
- Remember, the right song or instrumental piece can amplify the impact of visual transitions, making slide transitions to your slide more dynamic and engaging.

How to Add Engaging Transitions to Your Presentation Slide Show
Step 1: Exploring the Transition Palette

Step 2: Fine-Tuning the Transition Speed

- By default, the transition duration is set to 1 second. However, if you’re aiming for a more relaxed and deliberate pace, especially for photo slideshows, adjust this to 2-3 seconds. This ensures each photo or slide lingers a bit longer, allowing viewers to fully absorb the content.
Step 3: Maintaining a Uniform Transition Style
- Consistency is key to a professional-looking presentation. Instead of mixing and matching various transitions, which can be jarring, opt for a uniform slide motion effects style.
Step 4: Taking a Sneak Peek of Your Transitions
- Before finalizing your presentation, it’s always a good idea to preview your slide motion effects.
How to Elevate the Visual Appeal of Photos in Your PowerPoint Presentation
Step 1: Fine-Tuning Brightness and Contrast
- Launch Microsoft PowerPoint and navigate to the slide containing the photo you wish to enhance.

- Within this tab, locate the brightness and contrast sliders. Adjusting these can significantly improve the clarity and visibility of your image, ensuring it looks its best on the big screen.
Step 2: Amplifying Color Vibrancy
- Still within the “Picture Format” tab, look for an option labeled “Color Saturation.”
- Boosting this will make the colors in your photo more vivid and pronounced, allowing your images to truly make a photo slideshow stand out and captivate your audience.
Step 3: Thoughtful Application of Filters
- In the same “Picture Format” tab, you’ll find an option labeled “Color.” Clicking on this will reveal a dropdown with various filter effects, such as black & white, sepia, or vintage.
- While these filters can add a unique touch, it’s crucial to use them sparingly. Over-filtered images can appear unprofessional or distract from the content.
Step 4: Incorporating Delicate Visual Effects
- Beyond color adjustments, PowerPoint offers a range of subtle effects to enhance your photos further.

Step 5: Individual Photo Refinement
- As you progress through your slide show in PowerPoint, take the time to enhance each photo individually. This attention to detail ensures a consistent and high-quality visual experience throughout your presentation.
- However, always use restraint. Not every image may need adjustments, especially if they’re already of high quality.
How to Efficiently Save and Distribute Your PPT Presentation
Step 1: Initial Saving of Your Slideshow
- After finalizing your presentation in Microsoft PowerPoint, it’s essential to save it in its native type.

Step 2: Transforming Your Slideshow into a Video
- If you’re looking to share your slideshow in a more dynamic format, Power Point offers the option to export it as a video.
- Click on the “File” menu again and navigate to “Export.”
- Here, you’ll find an option labeled “Create a Video.” Select this and choose the desired video quality, typically MP4 file. This makes your slideshow more accessible and playable on various devices.
Step 3: Broadening Your Audience Reach
- With your slideshow now in video type, you can upload it to popular platforms like YouTube, Vimeo, or even Google Drive.
- Uploading to these platforms allows for wider sharing, making it accessible to colleagues in the workplace, friends, or the general public.
Step 4: Converting to a Portable Format
- Under the “File” menu, find the “Export” option again and select “Create PDF/XPS Document.” This format is perfect for sharing via email, embedding on your website, or posting on social media platforms.
Step 5: Universal Sharing
- With your presentation now available in multiple formats, you’re equipped to share it virtually anywhere! Whether it’s a video link, a downloadable PDF, or the original PowerPoint file, you can distribute your engaging slideshow to a diverse audience across various platforms.
Creating a compelling photo slideshow in PowerPoint just takes a few simple steps. In this guide, we covered choosing an eye-catching template, importing photos, adding animation and music, customizing the title slide, and enhancing image quality.
With the right combination of great visuals, audio, animation, and text, you can make an engaging slideshow. Use these tips to take your PowerPoints photos from bland to brilliant.
Now you have all the tools to make your own dynamic photo slideshow presentation in PowerPoint. Bring your photos to life and impress any audience. Just follow this guide’s step-by-step instructions. Soon you’ll be a PowerPoint slideshow pro!
You must be logged in to post a comment.
- Business articles (22)
- Google Slides (57)
- Keynote (27)
- PowerPoint (83)
- Support (2)
- Skip to primary navigation
- Skip to main content
Presentation Design Expert
Committed to abolishing the boring slides
How to Use Images Effectively in Presentations
August 15, 2015 By Brigette
A picture is worth a thousand words, so many people believe that images should be on every slide to help effectively communicate your ideas to your audience. Pictures are a vital piece of your presentation, but when they are used inadequately, you can lose the investment of the viewers. Often pictures can be irrelevant or boring and it can make your presentation feel amateur and disorganized. Other times there is no need for an image as there can be other ways to communicate and highlight the most important points of your presentation.
The way your pictures are organized on your slides can imply the level of your professionalism to your audience. For instance, example 1 shows the difference between scattered images versus organized images. A chaotic slide can unintentionally convey that you are ill prepared or disorganized. Cluttered slides like this tend to occur when you find multiple pictures that fit the concept you are attempting to illustrate. Busy slides can cause problems for the audience because the slide has too much information with no focal point. The slide should only have the photos necessary to display your idea. Sometimes pictures are not needed at all and your thoughts can be shown through a single word or a brief sentence. Using relevant images only will maintain focus on the important concepts and will result in a greater understanding of your ideas.
Other common problems with presentations are using cheesy clipart, distracting backgrounds, and tiny images. Most of us have seen cheesy clipart which leaves us feeling like the speaker is an amateur (as seen in example 2 ). There is no reason to use this tacky artwork because you have plenty of copyright free pictures to use on the internet. Avoiding childish clipart will instantly give a more professional tone to the entire presentation. Another problem to avoid is using distracting images as backgrounds, like example 3 . Complex images with text on top can make readability difficult.
My last example illustrates the typical practice for adding a photo to a slide by just dropping it in there with no thought, like in example 4 . Photos like this would best be viewed as full frame for cognitive reasons. When you look at the photo pasted as is, there is more distraction created by the white boarder around the edge as well as the distracting black boarder that is part of the image. When images are cropped and full frame, the slide has an underlying tone that makes the presenter appear more intelligent.
Depending on the subject matter, you might not even need a picture. For instance, if you are discussing sales and productivity, it might be more useful to simply float the words ‘sales’ and ‘productivity’ onto the slide. Occasionally not using images will add variety to the presentation which helps keep audience engagement.
To summarize, using the right picture can be worth saying a thousand words. A tasteful image next to a few bullet points can say volumes without putting all of that text on the slide. Using images properly will gain audience appreciation because you put effort into your presentation.
Researched by Consultants from Top-Tier Management Companies

Powerpoint Templates
Icon Bundle
Kpi Dashboard
Professional
Business Plans
Swot Analysis
Gantt Chart
Business Proposal
Marketing Plan
Project Management
Business Case
Business Model
Cyber Security
Business PPT
Digital Marketing
Digital Transformation
Human Resources
Product Management
Artificial Intelligence
Company Profile
Acknowledgement PPT
PPT Presentation
Reports Brochures
One Page Pitch
Interview PPT
All Categories
11 Dos and Don'ts of Using Images in Presentations

Anuj Malhotra
Many presenters are using images horribly in their presentations!
From pixelated visuals to copyright images with watermarks clearly visible on them to many other disasters, presenters are coming up with unique ways to kill all the fun. Are you guilty of poor selection of visuals? Are your experiments at creating visual slides turning into disasters?
Lucky for you, we have put together a complete list of dos and don’ts for adding images to slides. You won’t believe how a little care while handling images can make your presentation a visual success. Ready for some introspection? Compare yourself with these 11 yardsticks to determine your visual literacy:
Visuals in Presentations: Best and Worst Practices
Sin 1: Using pixelated or blurry images
It’s not that presenters do not see that the image in their slide is of poor quality but that is the last desperate move they make when they can’t find any better visual in its place. Sorry folks, you have to search harder for that high quality image. If you have to shell out a few dollars, then do. But a blurry image casts a very poor impression.

Sin 2: Tiny Images
Don’t use tiny images that require audience to carry binoculars. A high quality image lets you play up that visual on your slide, so go for it. For instance, in the Don’t slide below, the presenter has killed the action picture of football by using it up in such small space.
WHAT TO DO: If you have lots of text to incorporate, allocate half the slide to text and half to the image as you can see in the Do slide below:

Sin 3: Overuse of visuals
These presenters are the ones who have taken the use-image-advice a bit too seriously. They collect as many images as can be fit into a slide and squeeze their content into the space left. Why do they do this? They find several relevant visuals for a single slide. For instance, in the Don’t slide below, the presenter has a slide on business goals and objectives of a start-up. All visuals used in the slide are pretty relevant and the slide would have been great if the presenter went with a single, big image.
WHAT TO DO: Choose one high quality image that sums up the main theme of the slide. Choose any visual that represents Goals and Objectives; it’s not necessary to pick an image for each of those goals. If you want to show each goal visually, dedicate a complete slide to each. Check out the difference:

Sin 4: Multiple pictures arranged poorly
Yes, there are times when the slide warrants multiple pictures. A campus view, various benefits of a product, trip collage, etc. require you to arrange multiple visuals aesthetically. This, however, requires basic design knowledge such as giving frames or borders to each image. The Don’t slide below is a bad way to arrange your images.
WHAT TO DO: Place your image along grids using the Gridlines feature ( View tab) in PowerPoint. Or give them a frame using the default frames in PowerPoint ( Format tab). The Do slide below is a good way to arranged multiple pictures in a single slide.

Sin 5: Cliparts that add no value, except shock value
If you haven’t heard so many presentation experts screaming their heads off calling clipart crappy and tacky, hear us now. These cartoonish characters add absolutely no value to your slide and make you look a tacky presenter too. An exception is always there, say designing a cartoonish slide is your purpose, but they don’t stand a chance in a corporate presentation. In the Don’t slide below, the clipart of suited professionals can still be forgiven but why not show your awesomeness like the Do slide shows.
WHAT TO DO: Nothing, just forget about clipart. Any visual would look better than it.

Sin 6: Watermark Images
This is the worst sin of all. Even if you make the image small enough to hide the watermark, many in the audience would be quick to spot it and trust us, it’s the worst thing that can mar the reputation of a presenter.
WHAT TO DO: Need we say anything here? Please buy the image; don’t attempt to blur or remove the watermark even if you know how to do it.

Sin 7: Pictures with headache-inducing backgrounds
Unless your objective is to perform a hypnosis session or cause excruciating pain to audience’s eyes, never choose a visual that has swirls, rainbows and other distracting elements in the background. Moreover, the content fails to stand apart from the background making it very difficult (practically impossible) for the audience to read the content. The Don’t slide below is a perfect example of what not to do.
WHAT TO DO: Choose an impressive visual that covers the whole slide. If you want to show growth, there are hundred options you can choose from- towering building, bar diagram, growth of a plant from sapling to tree, ladder steps, etc. If you have lots of text to accommodate within the slide, add a transparent layer over the complete image and then place your content. As you can see in the Do slide below, the image and content complement each other to create a professional, sophisticated presentation slide.

Sin 8: Amputating people while cropping images
Don’t be merciless while cropping images. Place yourself in the shoes of the person you are cropping. Would you like to see your photo with one arm missing? Obviously not. But yes, cropping an image to make it fit within the slide and to accommodate text at the same time is indeed tricky. As a presenter, you have to cut off portion of an image without making it look awkward. How do you that?
One tip that all professional photographers give, while composing an image or cropping it post production, is to “never crop at joints”. Don’t cut off the person’s feet, fingers, and at the points dissecting any body part. See the Don’t slide below; the image composition doesn’t give due respect to the CEO.
WHAT TO DO: If the image itself is poorly composed, you need to take it again or choose a different picture. In the Do slide below, a different image has been taken and it’s taking up the same area without any need for cropping.

But what do you if you have a large-sized image that covers the complete slide space? Chop off all body parts left and right so that you can show the faces? Let’s take another example. Check out the Don’t slide below which has been brutally cropped to fit the content. Even the head and the crucial handshake signifying partnership has been hacked for convenience.
Now, check the Do slide- you only need to minimise the photo, crop the unnecessary portions (not the limbs, please), give it a nice frame (Go to the Format tab and check out the default Picture Styles) and tilt the photo to make it stand out and relevant to the slide. Not bad, uh?

Sin 9- Badly stretched photos
This sin is unforgivable and makes your slide an eyesore of the worst kind. Even if the stretched photo is of a high quality! What was the presenter thinking? We know. The presenter has a picture of a certain dimension, say in a portrait style, but wants to display it in the landscape format. So he stretches it to accomplish his mission knowing the damage he is doing to the image and the complete slide.
The Don’t slide below is an adaptation of a similar slide I came across on a presentation sharing platform. This also happens when a presenter chooses a shape and uses the Picture fill option in PowerPoint to fill the area with an image. If the image has a different aspect ratio than the area of the shape, PowerPoint will stretch the photo to fill the area, distorting the image in this process.

WHAT TO DO: If you use the Picture Fill option in PowerPoint and the image gets stretched, follow these simple steps:
- Click the stretched photo
- Go to the Format tab on PowerPoint ribbon
- Under the Crop dropdown menu, choose the Fill option (see the screenshot below)
PowerPoint will resize the image while maintaining the original aspect ratio of the image:

You can now drag the photo to adjust the required portion within the area. This might not work in your favor because you can’t have the teacher, student as well as the book within the small rectangular shape.
Check out what we did in the Do slide again. We cropped the photo and removed the white space in the image, chose a white background so that the image gels in smoothly, drew a circular outline around the image and placed our content alongside the image. You can try this or some other design trick, but stretching won’t do. Even a slight stretching distorts the image and is easily noticeable casting a bad impression on the presenter.
Sin 10: Using irrelevant silhouettes or other images
Silhouettes aren’t all that bad. They can be used if you want a visual element in your presentation but don’t want the audience to be distracted by the details. But adding silhouette just for the sake of it distracts the audience even more.
In the Don’t slide, the silhouette of a businesswoman doesn’t say anything. In a slide already having one visual element- a line chart- adding the silhouette is unnecessary and makes it difficult for the audience to read the chart values.
WHAT TO DO: Choose an image that adds value to your content. If it doesn’t, simply scrap it. The Do slide looks much better and cleaner with simply the graph:

Sin 11: Image with a thick outline
Creativity sometimes misfires and gives an unpleasant look and feel to your slide. One such creative effort is giving very thick border line to an image. The frame becomes as heavy as the image itself making one wonder what is more important- the image or the frame. Even if you picked the same from PowerPoint’s default Picture Styles, it doesn’t mean it is suitable for your presentation. In the Don’t slide below, the frame seems to be jumping from the slide and is too harsh on the eyes.
WHAT TO DO: If you wish to give it an outline, don’t keep the width of the line more than 1 point. Pick a light color for the outline if the background is dark. In the Do slide below, we encapsulated the image within a circle so that it doesn’t look jutting out of the slide. The outline was also chosen white and the width was kept at 1 point. The color of the text was picked as white to have a soothing contrast and not as jarring as black and red.

BONUS TIP 1: Characters in the image should look within the slide
Now this is a small error that dilutes the impact of a slide. It’s a basic human behavior to look where others are looking. This knowledge of eye movement should guide you while choosing images for your PowerPoint presentation too.
If you have an image looking out of the slide, the audience tends to look there too and returns to the slide to read the content. For a brief second or so, you disconnect with the audience. If the image, instead, looks into the slide towards the content, the audience first looks at the image and then reads the content, their attention focused within the slide. This is exactly what you want. The Don’t slide below is an example how you should not be placing your image.
WHAT TO DO: You can move the image to the other side of the slide like we did in the Do slide below. Else, you can flip the image within PowerPoint using the Rotate feature. Select the image, go to the Format tab, locate the Rotate dropdown menu and click Flip Horizontal . That solves the problem too!

BONUS TIP 2: Maintain consistency of images throughout the presentation
You should not be using a clipart on one slide, an image on another and an illustration in a different slide. Avoid too much variation as it breaks the smooth flow of a presentation. It makes you look like an amateur presenter.
There can be countless other ways to screw your slides. To save your skin, show your presentation to your family member or close friend before putting it online or broadcasting it before an audience. Trust us, you’ll be saved from many embarrassing mistakes with this exercise. If you have come across any other visual disasters, share with us in the comments below.
Spread the visual literacy by sharing this article with your friends and followers. Here’s a pre-populated tweet to get you started!
Related posts:
- How to Create a Fantastic PowerPoint Agenda Slide Template in 5 Steps [Presentation Hackathon 4]
- 6 Easy Steps to Create a “Stand Out” Slide and Beat the Background Noise
- How to Quickly Find the Best Content for Your Presentation on SlideTeam
- How To Create an Awesome PowerPoint Presentation in 3 Steps
Liked this blog? Please recommend us

17 Presentation Design Trends to Look Out For in 2017

11 Typography Tweaks and Text Effects to Spice Up Your Presentation Content
67 thoughts on “11 dos and don'ts of using images in presentations”.

This form is protected by reCAPTCHA - the Google Privacy Policy and Terms of Service apply.

Digital revolution powerpoint presentation slides

Sales funnel results presentation layouts
3d men joinning circular jigsaw puzzles ppt graphics icons

Business Strategic Planning Template For Organizations Powerpoint Presentation Slides

Future plan powerpoint template slide

Project Management Team Powerpoint Presentation Slides

Brand marketing powerpoint presentation slides

Launching a new service powerpoint presentation with slides go to market

Agenda powerpoint slide show

Four key metrics donut chart with percentage

Engineering and technology ppt inspiration example introduction continuous process improvement

Meet our team representing in circular format


Cloud Storage

Custom Business Email

Video and voice conferencing

Shared Calendars

Word Processing

Spreadsheets
Presentation Builder

Survey builder

Google Workspace
An integrated suit of secure, cloud-native collaboration and productivity apps powered by Google AI.
Tell impactful stories, with Google Slides
Create, present, and collaborate on online presentations in real-time and from any device.
- For my personal use
- For work or my business

Jeffery Clark
T h i s c h a r t h e l p s b r i d g i n g t h e s t o r y !

E s t i m a t e d b u d g e t

Make beautiful presentations, together
Stay in sync in your slides, with easy sharing and real-time editing. Use comments and assign action items to build your ideas together.

Present slideshows with confidence
With easy-to-use presenter view, speaker notes, and live captions, Slides makes presenting your ideas a breeze. You can even present to Google Meet video calls directly from Slides.

Seamlessly connect to your other Google apps
Slides is thoughtfully connected to other Google apps you love, saving you time. Embed charts from Google Sheets or reply to comments directly from Gmail. You can even search the web and Google Drive for relevant content and images directly from Slides.

Extend collaboration and intelligence to PowerPoint files
Easily edit Microsoft PowerPoint presentations online without converting them, and layer on Slides’ enhanced collaborative and assistive features like comments, action items, and Smart Compose.

Work on fresh content
With Slides, everyone’s working on the latest version of a presentation. And with edits automatically saved in version history, it’s easy to track or undo changes.

Make slides faster, with built-in intelligence
Assistive features like Smart Compose and autocorrect help you build slides faster with fewer errors.

Stay productive, even offline
You can access, create, and edit Slides even without an internet connection, helping you stay productive from anywhere.
Security, compliance, and privacy

Secure by default
We use industry-leading security measures to keep your data safe, including advanced malware protections. Slides is also cloud-native, eliminating the need for local files and minimizing risk to your devices.
Encryption in transit and at rest
All files uploaded to Google Drive or created in Slides are encrypted in transit and at rest.
Compliance to support regulatory requirements
Our products, including Slides, regularly undergo independent verification of their security, privacy, and compliance controls .
Private by design
Slides adheres to the same robust privacy commitments and data protections as the rest of Google Cloud’s enterprise services .

You control your data.
We never use your slides content for ad purposes., we never sell your personal information to third parties., find the plan that’s right for you, google slides is a part of google workspace.
Every plan includes

Collaborate from anywhere, on any device
Access, create, and edit your presentations wherever you are — from any mobile device, tablet, or computer — even when offline.

Get a head start with templates
Choose from a variety of presentations, reports, and other professionally-designed templates to kick things off quickly..

Photo Album

Book Report

Visit the Slides Template Gallery for more.
Ready to get started?

- SUGGESTED TOPICS
- The Magazine
- Newsletters
- Managing Yourself
- Managing Teams
- Work-life Balance
- The Big Idea
- Data & Visuals
- Reading Lists
- Case Selections
- HBR Learning
- Topic Feeds
- Account Settings
- Email Preferences
How to Make a “Good” Presentation “Great”
- Guy Kawasaki

Remember: Less is more.
A strong presentation is so much more than information pasted onto a series of slides with fancy backgrounds. Whether you’re pitching an idea, reporting market research, or sharing something else, a great presentation can give you a competitive advantage, and be a powerful tool when aiming to persuade, educate, or inspire others. Here are some unique elements that make a presentation stand out.
- Fonts: Sans Serif fonts such as Helvetica or Arial are preferred for their clean lines, which make them easy to digest at various sizes and distances. Limit the number of font styles to two: one for headings and another for body text, to avoid visual confusion or distractions.
- Colors: Colors can evoke emotions and highlight critical points, but their overuse can lead to a cluttered and confusing presentation. A limited palette of two to three main colors, complemented by a simple background, can help you draw attention to key elements without overwhelming the audience.
- Pictures: Pictures can communicate complex ideas quickly and memorably but choosing the right images is key. Images or pictures should be big (perhaps 20-25% of the page), bold, and have a clear purpose that complements the slide’s text.
- Layout: Don’t overcrowd your slides with too much information. When in doubt, adhere to the principle of simplicity, and aim for a clean and uncluttered layout with plenty of white space around text and images. Think phrases and bullets, not sentences.
As an intern or early career professional, chances are that you’ll be tasked with making or giving a presentation in the near future. Whether you’re pitching an idea, reporting market research, or sharing something else, a great presentation can give you a competitive advantage, and be a powerful tool when aiming to persuade, educate, or inspire others.
- Guy Kawasaki is the chief evangelist at Canva and was the former chief evangelist at Apple. Guy is the author of 16 books including Think Remarkable : 9 Paths to Transform Your Life and Make a Difference.
Partner Center
Simon Sez IT
Online software training and video tutorials for Microsoft, Adobe & more
- Get Started
- Access 2021 Beginners
- Access 2021 Advanced
- Access 2019
- Access 2019 Advanced
- Access 2016
- Copilot Essentials in Microsoft Office
- Microsoft Excel 365 Intermediate
- Excel 365 for Beginners
- The Accountants Excel Toolkit
- Data Analytics in Excel
- Excel 2021 Advanced
- Microsoft 365
- PowerPoint 365 for Beginners
- Microsoft Word 365
- OneNote Desktop and Windows 10
- OneNote 2016
- Outlook 2021
- Outlook 2019
- Outlook 2016
- Outlook 2013
- Outlook 2010
- Introduction to Power Automate
- Power BI Essentials
- Power BI Training
- Power BI Intermediate
- PowerPoint 2021
- PowerPoint 2019
- PowerPoint 2016
- PowerPoint 2013
- Project 2021 Advanced
- Project 2021 Beginners
- Project for the Web
- Project 2019
- Project 2019 Advanced
- Microsoft Publisher 365
- Publisher 2013
- SharePoint Online: The Essential Guide (2023)
- SharePoint Online (2021)
- SharePoint Foundation 2013
- SharePoint Server 2013
- SharePoint Foundation 2010
- Microsoft Teams (2023 Update)
- Macros and VBA for Beginners
- VBA for Excel
- VBA Intermediate Training
- Microsoft Visio 2019
- Microsoft Visio 2010
- Windows 11 Advanced
- Windows 11 (2023 Update)
- Windows 10 (2020 Update)
- Word 2019 Advanced
- Dreamweaver CC
- Dreamweaver CS6
- Dreamweaver CS5
- Dreamweaver CS4
- Adobe Illustrator CC for Beginners
- Adobe InDesign CC for Beginners
- InDesign CS6
- InDesign CS5
- Adobe Photoshop CC Advanced
- Adobe Photoshop CC Intermediate
- Adobe Photoshop CC for Beginners
- Photoshop CS6
- Photoshop CS5
- Photoshop Elements 2022
- Photoshop Elements 2019
- Photoshop Elements 2018
- Photoshop Elements 15
- Photoshop Elements 14
- QuickBooks Desktop 2023
- QuickBooks Desktop Pro 2022
- QuickBooks Pro 2021
- QuickBooks Online Advanced
- QuickBooks Online
- AngularJS Crash Course
- Bootstrap Framework
- HTML/CSS Crash Course
- HTML5 Essentials
- Java for Beginners
- JavaScript for Beginners
- jQuery Crash Course
- MySQL for Beginners
- PHP for Beginners
- Advanced PHP Programming
- Matplotlib, Seaborn, and Plotly Python Libraries for Beginners
- Python Object-Oriented Programming
- Pandas for Beginners
- Introduction to Python
- SQL for Beginners
- SQL Server Integration Services for Beginners
- XML Crash Course
- Alteryx Advanced
- Introduction to Alteryx
- Introduction to Data Visualization and Business Intelligence Principles
- Analytical Methods for Effective Data Analysis
- Introduction to Analytics and Artificial Intelligence
- Financial Risk Management
- Financial Forecasting and Modeling
- Qlik Sense Advanced
- R Programming
- Tableau Desktop Advanced
- Tableau Desktop
- Advanced Agile Scrum
- Agile Scrum Training
- Using Generative AI for Images and Videos
- Generative AI and Cybersecurity
- Introduction to ChatGPT
- Artificial Intelligence Intermediate
- Asana for Employees and Managers
- Introduction to Asana
- Effective Communication Tactics for the Modern Workplace
- Introduction to Confluence
- HubSpot CRM for Beginners
- Introduction to Google Drive
- Gmail for Beginners and Pros
- Google Sheets for Beginners
- Getting Started in Jira
- Getting Started in Monday.com
- Cybersecurity Essentials: Stay Safe and Secure Online
- Cybersecurity Awareness Essentials
- Excel Efficiency and Data Management
- Excel Advanced Features and Customization
- Mastering PivotTables
- Microsoft Suite Productivity

How to Insert an Image into a PowerPoint Presentation
(Note: S uitable for users of PowerPoint 2016, 2019, 2021, and PowerPoint for Microsoft 365 . )
Liven up a presentation by inserting an image and formatting it to convey a message or idea.
The Images in PowerPoint Explained
Imagery can be used in PowerPoint presentations to convey a message or idea. In general, most people find it easier to remember images than text. Images can be professional or creative and fun to make your presentation memorable.
Check the Copyright
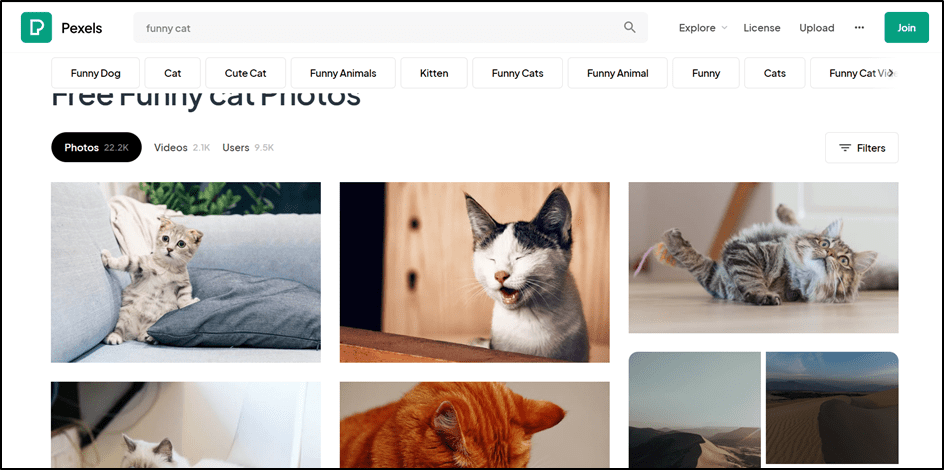
We must be careful about what images we use in our presentation and where those images come from. When we need an image to represent an idea, most of us jump straight onto Google, search for a keyword, download the image, and add it to our presentation. This is where we can run into copyright issues.
For example, if we are creating a YouTube video that contains a PowerPoint presentation and we’ve used a copyrighted image, we leave ourselves open to problems because YouTube is a monetized platform. Similarly, if we use a copyrighted image in a pitch presentation, that could also be seen as benefitting financially from someone else’s work.
If we decide to use an image we found on Google, we need to check the copyright on the image. Many images are free for personal use only and cannot be used in commercial projects. Other images require us to attribute the image owner somewhere in the presentation.
In the example below, we have googled for an image of a ‘funny cat’. All results that match these keywords will be returned. We can filter the image by Usage Rights and then check the copyright on a specific image.
- Type the search term into Google.
- Click the Images tab.
- Click the drop-down arrow next to Usage Rights .

- Select Creative Commons licenses .
- Click on the image you want to use.

- Click License details .
This page will show us what we can and can’t do with this image.
We can share, copy and redistribute the material in any format as long as we follow the license terms listed below. So, if we want to use this image in a presentation, we must give appropriate credit to the owner and link to the license, and we can’t use it in commercial presentations (anything where we benefit financially).

The process of finding an image this way can be long, tedious, and disheartening.
Ideally, we want to avoid these issues by only using images that are free to use in personal and commercial projects.
I highly recommend both Pexels and Unsplash for royalty-free images that can be used in any project without attribution. Both of these websites offer high-quality images that can be used in presentations.
This Device
Stock images, online pictures, other images, cutout people, illustrations, cartoon people, insert an image using the screenshot tool.
- Insert an Image Using Copy Paste
Related reads:
How to Wrap Text in PowerPoint
How to Add a Watermark in PowerPoint
How to Add a Hyperlink to a PowerPoint
Insert an Image Into a PowerPoint Presentation
We can insert images into our presentations in a number of different ways: using the Insert ribbon, using the Screenshot tool, or Copy and Paste .
Insert an Image Using the Insert Ribbon
We can insert an image into a presentation using the Insert ribbon. We have three options: This Device , Stock Images or Online Pictures .
If we have an image stored in a folder on our PC, we can insert the image using the This Device option.
- From the Insert tab in the Illustrations group, click the drop-down arrow under Pictures .
- Select This Device from the menu.

- Navigate to the folder where the image is stored.
- Select the image.
- Click the Insert button.

The selected image will be inserted into the slide.

We can use the Picture Format ribbon to format the image.

In the example below, we’ve resized the image, added a white border and glow effect, and changed the color saturation.

If we don’t have an image of our own to use, we can choose an image from the Stock Image library in PowerPoint. Stock Images are a fairly new feature in PowerPoint. The images available in the Stock Image library are licensed by Microsoft from Getty, and possibly other sources, to be offered to PPT users in their presentations.
- From the Insert tab in the Illustrations group, click the drop-down arrow underneath Picture .
Select Stock Images from the menu.
The Stock Image library will open. Stock Images are high-quality images and are grouped into categories. Click on the category headings to browse the images or search for something specific using the search bar.

- Click on an image to select.

The third option for sourcing images in PowerPoint is to search online. As we mentioned at the beginning of this article, this can come with some major pain points with regard to determining the copyright of an online image and if it can be used.
- Select Online Pictures from the menu.
- Choose a category to browse or type a keyword into the search bar.
It’s important to ensure we select the Creative Commons only checkbox. This will filter the results and show only photos that have license details attached under Creative Commons.

- Select an image.
In more recent updates of PowerPoint, additional image categories have been added: Icons , Cutout People , Stickers , Video , Illustrations, and Cartoon People .
Icons are scalable vector graphics that can be inserted into our presentation. We can resize them, change the color and apply formatting. PowerPoint contains hundreds of free-to-use icons that can really liven up a presentation.
- Click the Icons tab.
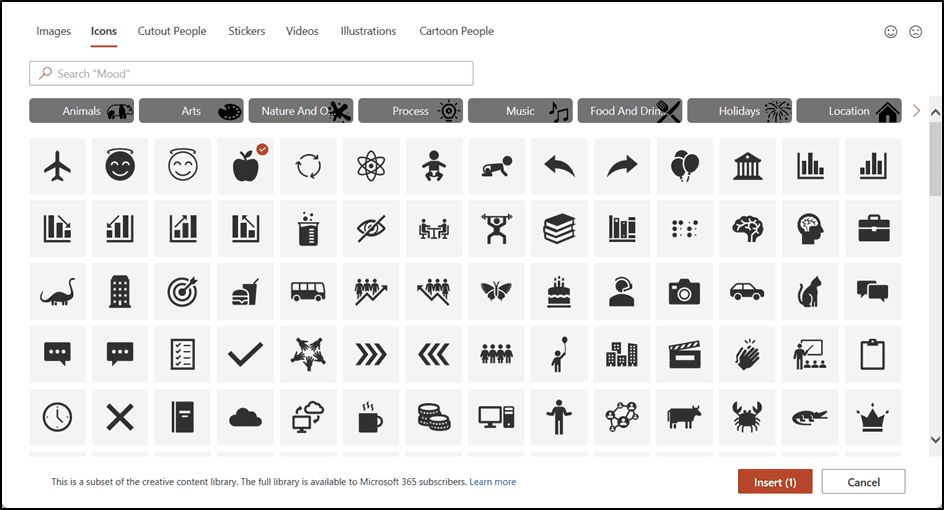
Icons can be used in many different ways to add interest and visually communicate with the audience.
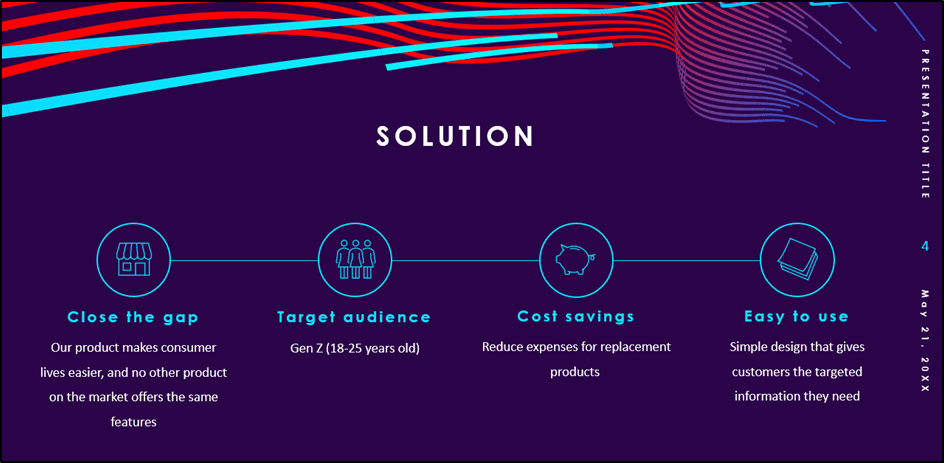
Cutout People helps us bring our presentation to life using cutout images of people. Add any of the 24 smiling faces to the presentation to convey the emotion of the content. Cutout people have transparent backgrounds so they can be placed on top of any image for a seamless look.
- Click the Cutout People tab.

Use Cutout People in any presentation to increase engagement and interest in the subject matter.

Suggested reads:
How to Change PowerPoint Slides to Portrait
How to Change Slide Size in PowerPoint
How to Save PowerPoint as Video
We also have a gallery of Stickers to add a fun element to our PowerPoint presentations.
- Click the Stickers tab.
- Select a sticker.

We can add hyperlinks to stickers and essentially turn them into clickable buttons. In this example, customers click on the jellyfish sticker to jump to the presentation’s first slide.

Video is a very popular way to communicate an idea or a message. We can even use Video in PowerPoint to create motion backgrounds so our slides look and feel more dynamic and interesting.
- Click the Videos tab.
- Select a video.

The video will be added to the slide. We can play the video, rewind, and fast-forward using the playback controls underneath.

When we click on the video, we can see two contextual ribbons: Video Format and Playback .
The Video Format ribbon contains different formatting tools. We can apply a video style, add a border, change the video shape, and make minor color adjustments.

The Playback ribbon controls how the video plays. We can trim the video, apply a fade in/fade out, loop the video, insert captions, adjust the volume, and determine if we want the video to start as soon as the slide loads.

Illustrations can add creative flair to our presentations and can be used in many ways.
- Click the Illustrations tab.
- Select an illustration.

By default, all illustrations in the gallery show a yellow accent. We can change this once we have inserted the illustration into our presentation.
- Select the illustration.
- From the Graphics Format tab, in the Graphics Styles group, click the drop-down arrow next to Graphics Fill .
- Choose a color from the palette.

Cartoon People is the latest image gallery to be added to PowerPoint. Using Cartoon People, we can build our own customized cartoon characters for use in our presentations. Select from different bodies, heads, facial expressions, clothing, and activities.
- Click the Cartoon People tab.
- Select one or more images.

In the example below, we have inserted the image of the bike, a head, and a facial expression. We can combine them together seamlessly to create our customized character.

Another way we can insert an image into a presentation is to use the screenshot tool. We can take a screenshot of a window we currently have open or ‘clip’ part of a window.
- From the Insert tab in the Illustrations group, click the Screenshot button.
PowerPoint will display the other PowerPoint windows we currently have open.

We can take a screenshot of any open PowerPoint presentation simply by selecting the thumbnail.
The screenshot is treated as a Picture and can be formatted like any other picture using the Picture Format ribbon.

What if we want to take a screenshot of something other than a PowerPoint window? Maybe we want to screenshot something we’ve seen online or part of a PDF? For this, we can use the Screen Clipping tool.
The important thing to note about Screen Clipping is that whatever we want to ‘clip’ must be open directly behind the current active PowerPoint window. This is because PowerPoint minimizes when we select Screen Clipping to reveal the window behind. We cannot switch to another window using Alt+Tab .
- Click Screen Clipping .
PowerPoint will minimize and reveal the window behind. The cursor will change to a crosshair, and a transparent overlay will ‘ghost’ over the window.
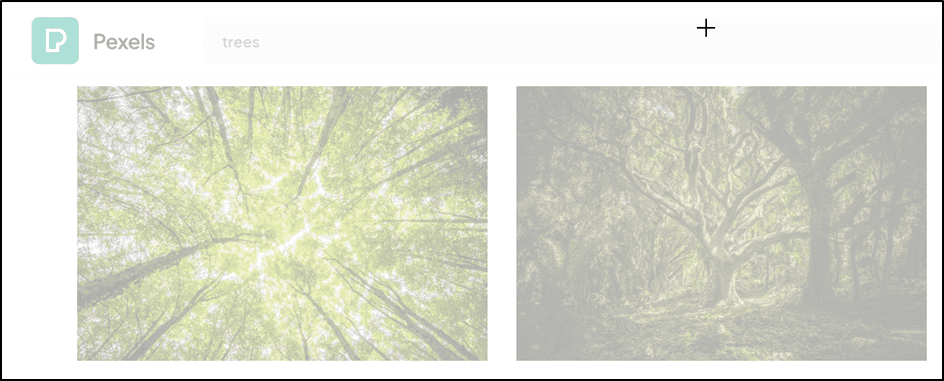
- Click and drag the crosshair to select the part of the window to clip.

Insert an Image Using Copy and Paste
We can also insert images from other Microsoft applications and from the web into our slides using Copy (CTRL+C) and Paste (CTRL+V).
For example, maybe I want to grab an image of Africa from the Wikipedia page about the Sahara Desert.
- Go to www.wikipedia.com and search for the Sahara Desert.
- Scroll to the image.
- Right-click on the image and select Copy Image from the contextual menu.

- Go back to the PowerPoint presentation.
- Press CTRL+V to paste.

When using this method of inserting images, ensure you check the copyright and licensing for the image as outlined at the beginning of this article.
How to Make a Flowchart in PowerPoint
How to Link Excel to PowerPoint
How to Add Slide Numbers in PowerPoint
Please visit our free resources center for more high-quality PowerPoint and Microsoft Suite application guides.
Ready to dive deep into PowerPoint? Click here for basic to advanced PowerPoint courses with in-depth training modules.
Simon Sez IT has been teaching PowerPoint and other business software for over ten years. You can access 150+ IT training courses for a low monthly fee.

Deborah Ashby

Deborah Ashby is a TAP Accredited IT Trainer, specializing in the design, delivery, and facilitation of Microsoft courses both online and in the classroom.She has over 11 years of IT Training Experience and 24 years in the IT Industry. To date, she's trained over 10,000 people in the UK and overseas at companies such as HMRC, the Metropolitan Police, Parliament, SKY, Microsoft, Kew Gardens, Norton Rose Fulbright LLP.She's a qualified MOS Master for 2010, 2013, and 2016 editions of Microsoft Office and is COLF and TAP Accredited and a member of The British Learning Institute.
Similar Posts
How to Level Resources in Microsoft Project 2016
How to Add Page Numbers in Word? 3 Easy Examples
How to Use Goal Seek in Excel? (3 Simple Examples)
How to Use Layers in Photoshop Elements 2019 – Part 3 – Fill Layers
7 Best Agile Project Management Tools
How to Create Reports in QuickBooks 2019 – Part 1
- Privacy Policy

ADVANCE YOUR CAREER
Gain instant access to 200+ courses. Earn a CERTIFICATE each time you complete a course.
Where to Find Images for Presentations
Table of contents.
Are you on a quest to find captivating, legally-sound free images for your presentations? Save time and avoid the legal maze with our curated list of platforms in this not-to-be-missed guide. Well we’ve done the hard work for you!
Here’s where to find images for presentations that will visually amplify your message.
A Few Important Notes To Take Into Consideration
Free image databases such as Unsplash, Pixabay, and Pexels provide high-quality, copyright-free images for various presentation needs, with specialized features like PowerPoint plugins. The downside, everyone has access to these sites . It takes away from the custom and uniqueness of the presentation.
Specialized stock photo sites like Shutterstock, iStock and Getty offer curated image collections for specific themes and preferences. With that level of selection comes a cost, but the output is a lot more customized and professional.
Discovering the Best Free Image Databases

In the era of digital content, copyright is a critical concern. Utilizing images without proper rights can land you in legal trouble, and buying stock pictures for every presentation can be an expensive affair. The remedy? Look no further than free image databases. These platforms house thousands of high-quality, inspiring images that are free from copyright constraints – a veritable treasure trove for presenters. Some popular free image databases include:
With these resources at your disposal, you can enhance your presentations without worrying about copyright infringement.
Among these, Pexels, Pixabay, and Unsplash stand out as leading platforms, offering a myriad of high-resolution images that can add a splash of creativity to your presentations.
Specialized Stock Photo Sites for Unique Needs

While generic image repositories encompass a wide variety of topics and aesthetics, niche stock photography websites serve distinct visual communication needs. These services provide tailored assortments of photographs, with an emphasis on particular motifs, aesthetic approaches, or themes. Whether you’re in search of:
Retro-style photos
Pictures that capture the essence of entrepreneurship
Wildlife and nature imagery
Premium food and beverage photographs
Snapshots encapsulating travel and exploration
You’ll find a dedicated stock photo site to meet your requirements.
The challenge here is that paid photography can add up very quickly and sifting through hundreds, perhaps even thousands of images can get time consuming.
Leveraging Community-Powered Platforms for Fresh Content
As speakers, are always on the hunt for novel and captivating images to maintain the interest in our presentation material. This is where user-driven resources like Reshot and StockSnap come in.Io prove invaluable. Owing to a steady stream of contributions from users, these websites boast an extensive selection of new imagery available for use.
These platforms feature expanding collections that promise to keep your presentation graphics distinctive and compelling.
Tips for Using Images Effectively in Presentations
Possessing a vast collection of image assets is valuable, yet it’s the skillful application of these images within presentations that truly makes an impact. Implementing images with strategic precision can transform your presentation into an engaging story that captures and holds the attention of viewers. For this purpose, we have assembled some key advice to assist you in utilizing images effectively throughout your presentations.
Selecting appropriate images for individual slides while ensuring a coherent visual theme throughout your presentation are essential skills. Our tips aim to empower you with the expertise necessary to craft visually captivating presentations.
Choosing the Right Image for the Right Slide

It is essential to select an appropriate image for each slide, one that corresponds precisely with the subject of the slide while augmenting and strengthening the core message or data presented. It’s important that the emotional resonance of chosen images aligns with the intended feeling of the slide —be that professional, motivational, or instructional.
When picking out background images for your slideshows:
Make sure there is a visual congruence between them and both your primary messages as well as your brand identity.
Background imagery should add depth but not detract from or overwhelm what’s central on each slide.
By carefully choosing images, you can create a harmonious relationship between text and graphics which effectively promotes understanding of your principal points.
Editing and Customization Best Practices
After selecting the optimal images for your presentation slides, you must adjust them to integrate seamlessly. This requires tweaking and tailoring each image to complement the style of your presentation. You might need to trim, scale down or up, and modify the appearance of your images so that they align with your slide framework. Enhancing images within PowerPoint is straightforward. By adjusting brightness and contrast levels as well as adding artistic effects, you can significantly boost the visual impact of your slides .
I t’s crucial to maintain a uniform look throughout all of your slides too . This means ensuring that various images are cropped uniformly in size or shape, properly aligned on each slide and arranged according to a consistent layout structure. By sticking faithfully to these design principles while creating slides ensures not only an improved aesthetic harmony but also promotes coherence with the overarching theme and schematic approach of your entire presentation.
Check out some of our samples below:
Advanced Tools and Add-ins for Seamless Integration
Utilizing appropriate images can notably improve the quality of your PowerPoint presentations, and leveraging sophisticated tools and add-ins can elevate their effectiveness even further. These advanced resources facilitate the incorporation of visual components into your slides, streamlining the creation of polished and captivating presentations.
Power-user is an example of such a tool that enhances PowerPoint with its comprehensive functionality. It provides users with enhanced chart integration capabilities, automatic formatting options, as well as an extensive collection of templates, icons, and flags to enrich their presentations.
Our Summary Of Where To Find Images For Presentations
In the fast-paced world we live in, it’s essential to capture and maintain an audience’s attention with visual aids during presentations.
Images that don’t infringe on copyrights can greatly improve your presentation by making it more captivating and memorable. You have at your fingertips a treasure trove of sources for images – from databases filled with no-cost photos, community-driven platforms offering diverse visuals, to specialized sites dedicated to stock photography.
Strategically selecting the right visuals and using advanced integration tools or add-ins are key steps towards enhancing your slideshows.
T he issue that most of our clients face is time . Its quicker, easier and less of a headache to leave it to the professionals.
Looking To Up Your Presentation Game But You Don't Have The Time? Well, Look No Further.
Are you tired of using recycled presentation Images? Does your schedule leave you little time to spend on creating unique powerpoint presentations ? Do you want to engage audiences, communicate efficiently, and make the sale? Well, you’ve come to the right place!
The team of experienced designers at Presentation Geeks are experts in presentation design, image selection and building slide decks that work. We’ve worked with a variety of businesses and entrepreneurs to help them meet their business goals through powerful presentations.
If you’re ready to take your presentation game to the next level, let us help you!
Want to know more? Contact us today to see how the Geeks can meet your business needs!
Author: Content Team
Related posts.

FREE PROFESSIONAL RESOURCES DELIVERED TO YOUR INBOX.
Subscribe for free tips, resources, templates, ideas and more from our professional team of presentation designers.
- Insert a picture in PowerPoint Article
- Edit pictures Article
- Add SmartArt to a slide Article
- Put a background picture on your slides Article
- Add a background picture to slides Article
- Use charts and graphs in your presentation Article
- Insert icons in PowerPoint Article

Insert a picture in PowerPoint

Insert a picture from your computer on your slide
Depending on which version of PowerPoint you're using, you can insert pictures, photos, clip art, or other images to your slide show from your computer or from the internet.
Tip: Microsoft 365 subscribers have access to thousands of royalty-free images and premium templates . See Insert premium images for more information.
Select the place in the slide where you want to insert the picture.
On the Insert tab, in the Images group, select Pictures and then select This Device .

In the dialog box that opens, browse to the picture that you want to insert, select that picture, and then select Insert .
Tip: If you want to insert multiple pictures at the same time, press and hold the Ctrl key while you select all the pictures you want to insert.
Insert stock images on your slide
On the Insert tab, in the Images group, select Pictures and then select Stock Images .
Type in what image you're looking for, then select the images you want and select Insert .
Insert a picture from the web on your slide
On the Insert tab, in the Images group, select Pictures and then select Online Pictures .
If you see a message that "The service required to use this feature is turned off" you may need to check your privacy settings located at File > Account > Account Privacy and then select on Manage Settings . Check the Enable optional connected experiences box, select OK, and then restart PowerPoint.
If you don't have access to your privacy settings, you may need to contact your administrator.
In the search box type in the image you're looking for and press enter.
Select all the images you want and then select Insert .
Tip: After you insert a picture, you can change its size and position. To do so, right-click the picture, and select Format Picture . You can then use the Format Picture tools that are on the right of your slide.
Insert a picture into the slide master
If you want a picture to appear on every slide of a specific type in your PowerPoint template, add it to the slide master. To learn more, see What is a slide master?
Insert a picture into the background
If you want a picture to appear as background without affecting all slides in a Master, change the background settings for the slide. Learn more at Add a picture as a slide background .
Create and share a photo album
Add a picture as slide background
Wrap text around a picture or other object in PowerPoint
Create and save a PowerPoint template
What is a slide master?
Depending on which version of PowerPoint you're using, you can insert pictures, photos, clip art, or other images to your slide show from your computer or from the Internet.
You can add single or multiple images onto a slide, the slide master, or to the background.
On the Insert tab, in the Images group, and select Pictures .

On the Insert tab, in the Images group, and select Online Pictures .

Ensure Bing is showing on the left in the drop-down list of sources to search. In the box, type what you are searching for, and press Enter.
Use the Size , Type , Color , Layout , and licensing filters to adjust the results according to your preferences.
Select the picture you want to insert and select Insert .
Insert clip art
Unlike some earlier versions of PowerPoint, newer versions don't have a clip art gallery. Instead, use Insert > Online Pictures to find and insert clip art using the Bing search tool.
For example, after you select Online Pictures , you might search for horse clip art and see a variety of images under a Creative Commons license.

Important: You are responsible for respecting copyright law , and the license filter in Bing can help you choose which images to use. Learn more at Add clip art to your file .
Add clip art to your file
You can add one or more images to a slide. Select the version of Office you're using to see specific instructions:
Insert a picture from your Mac, a network, or iCloud Drive
Open the slide you want to insert a picture on.
On the Insert menu, point at Picture , and then select Picture From File .
To insert multiple pictures at the same time, press and hold the Shift key while you select all the pictures you want to insert.
Insert a picture from your smartphone
If you've taken a picture on your smartphone, you can make it available to insert in PowerPoint for macOS by saving the image to iCloud Drive and then following the previous procedure on this page.
Microsoft 365 for Mac subscribers also can use the Continuity Camera feature to transfer a picture from a smartphone directly to a PowerPoint slide. See Add pictures to a file by using your mobile device for the details.
On the Insert menu, point at Picture , and then select Online Pictures .
The Online Pictures pane opens on the right side of the PowerPoint window.
In the Search Bing box at the top, type what you are looking for, and then press Enter.

Select a picture and then select Insert .
You may select more than one picture. The Insert button shows you how many pictures you've selected.
After the picture is on your slide, you can resize it and move it wherever you want.
Insert photos by using Photo Browser
The Photo Browser in Office helps you browse through existing photo sets on your computer, such as photos that you have in iPhoto or Photo Booth.
On the Insert menu, point at Picture , and then select Photo Browser .
In the dialog box that opens, browse to the picture that you want to insert, select that picture, and then drag it onto the slide.
To insert multiple pictures at the same time, press and hold the Shift key while you select all the pictures you want. Then drag them onto the slide.
Insert a picture from your computer on a slide
Select the slide where you want to insert an image.
On the Insert tab, select Pictures > This Device .

Browse to the picture you want to insert, select it, and then select Open .
Drag a picture from File Explorer or Finder onto the slide
You can drag a picture from File Explorer (in Windows) or Finder (on macOS) and drop it onto a slide. The picture will be centered on the slide. Then you can move, resize, or style the picture as you like.
On the Insert tab, select Pictures > Search on Web .
In the Search box at the top, type what you are looking for, and then press Enter.
Select a picture, and then select Insert .
Insert a picture from OneDrive for work or school on a slide
Microsoft 365 business subscribers can insert pictures stored on OneDrive for work or school or SharePoint in Microsoft 365. (This feature isn't available for pictures stored on OneDrive for your personal account (Hotmail, Outlook.com, msn.com, or live.com).)
On the Insert tab, select Pictures > OneDrive .

Add style and formatting to a picture
When you insert a picture, PowerPoint for the web places the picture on your slide and puts a Picture tab on the ribbon.

With the picture selected, select the Picture tab.
Choose the Picture Styles option that you want to apply to the picture:
Select the down arrow at the right end of the gallery, as illustrated above, to see the complete gallery of style options.
The kinds of image files you can add to a slide in PowerPoint for the web
Image-file formats that PowerPoint for the web supports include:
.jpg and .jpeg
.tif and .tiff
.wmf and .emf
Use a background picture
See Change the background of your slides .
Take a picture and insert it
Open the slide you want to put the picture on.
On the floating ribbon, switch to Insert .
Tap Pictures > Camera .
Your device's camera is turned on.
If your presentation is horizontal, try turning your device sideways to take the picture.
Take a picture.
If you're satisfied, tap the check mark. To discard the picture and try again, tap the arrow.
Use the crop or zoom tool to adjust the picture if you like.
Tap the check mark to insert the picture on the slide.
Insert from your device or online storage
Tap Pictures > Photos .
Use the tools across the top of the window navigate to where the picture's stored.
Tap a picture to select and open it.

Make sure your device's camera is turned on.
Take the picture.
If you're satisfied with the picture, in the lower right, tap Use Photo to insert it in the slide. Otherwise, in the lower left, tap Retake .
In the Picture tab, use the tools to adjust the picture as you want or use the controls on the picture to resize or rotate it.

Navigate to where the picture is stored.
Tap the picture you want to insert it in the slide.

Need more help?
Want more options.
Explore subscription benefits, browse training courses, learn how to secure your device, and more.

Microsoft 365 subscription benefits

Microsoft 365 training

Microsoft security

Accessibility center
Communities help you ask and answer questions, give feedback, and hear from experts with rich knowledge.

Ask the Microsoft Community

Microsoft Tech Community

Windows Insiders
Microsoft 365 Insiders
Was this information helpful?
Thank you for your feedback.
How To Insert Picture In PowerPoint [A Comprehensive Guide]
By: Author Shrot Katewa
![How To Insert Picture In PowerPoint [A Comprehensive Guide]](https://artofpresentations.com/wp-content/uploads/2022/11/Featured-Image-How-to-Insert-Picture-in-Powerpoint.webp "presentation in image")
When I am in a conference hall, and the speaker is presenting a PowerPoint to the audience, the first thing that catches my eye is the pictures in the presentation. Pictures are a wonderful way of representing information in an engaging and creative manner. They bring life to an otherwise dull text-heavy presentation.
But, how do you insert pictures in PowerPoint?
To insert a picture into a presentation, first go to the slide where the picture will be added. Then select the “Insert tab”, click on “Pictures”, and “Source of the picture”. Choose the picture you want, either from the Internet, Stock images, or from the computer. Finally, click Open (or OK), and the picture will be inserted.
There are many other ways to add in a picture into your presentation. In this article, we shall cover all the different ways to insert a picture in PowerPoint. Plus, I’ll also share a few pro-tips to help you add text with the picture to your slide.
So, let’s get started!
1. How to Add Pictures in PowerPoint?
In Microsoft PowerPoint, you can add pictures and any other object using the “Insert” tab. The “Insert” tab includes features that allow you to insert a picture from different sources like your device, a camera, a cloud drive, the internet, etc.
1.1 How to Insert Picture from Computer in PowerPoint?
To insert a picture into a PowerPoint slide, you have to use the “This Device” option in the “Insert Picture From” list. You can also use the keyboard shortcuts to quickly add a picture to a PowerPoint presentation.
1.1a Method 1 – Using the Insert Tab
The “Insert” tab is the third tab in the menu ribbon in Microsoft PowerPoint. To add a picture to a slide using the “Insert” tab, follow the 3 simple steps.
Step-1: Click on the “Insert” tab
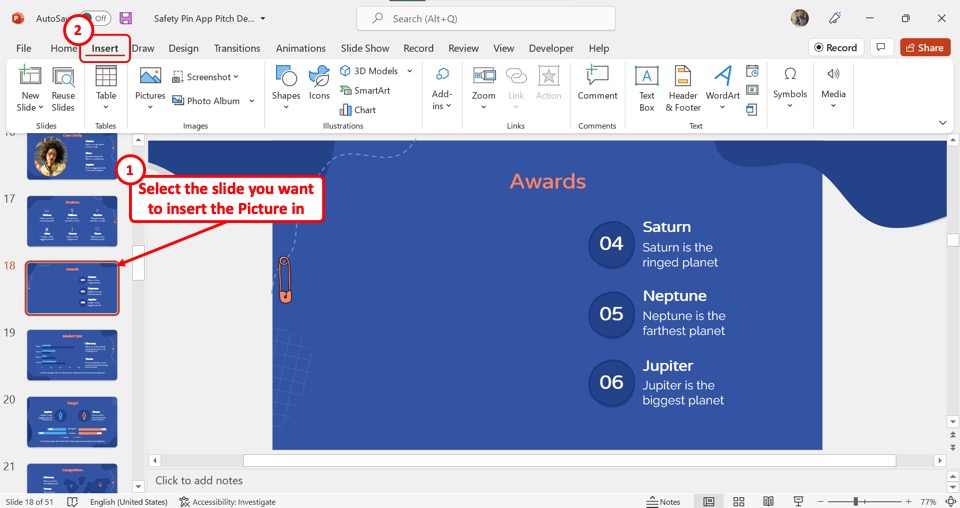
The first step is to open the slide where you want to add the picture. Then click on the “Insert” tab in the menu ribbon located at the top of the screen.
Step-2: Click on the “Pictures” option
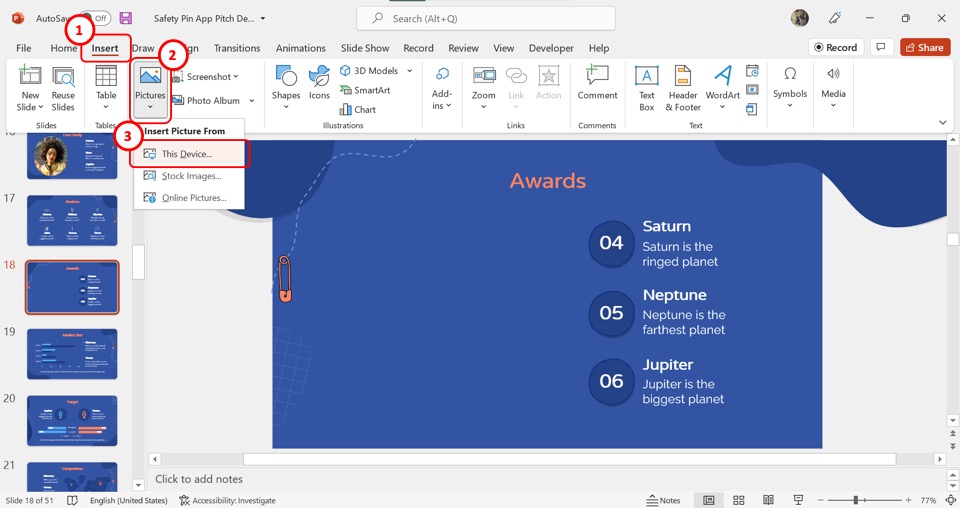
The next step is to click on the “Pictures” option in the “Images” group of the “Insert” menu. Then click on the “This Device” option from the dropdown menu under the “Pictures” option.
Step-3: Click on the “Open” button
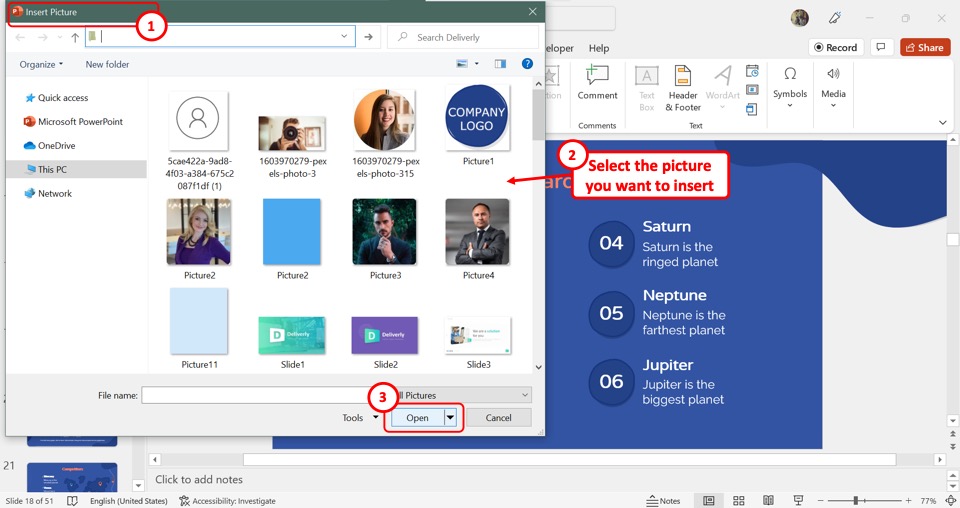
In the “Insert Picture” dialog, browse for the picture on your computer. Then select the picture and click on the “Open” button at the bottom of the dialog box to insert the picture into the open slide.
1.1b Method 2 – Using Drag and Drop
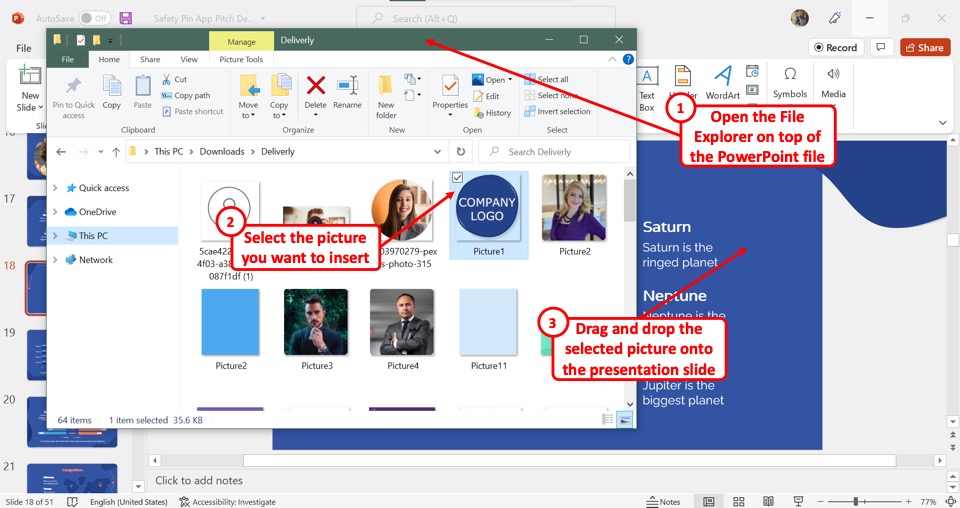
To use the “Drag and Drop” method, you have to open the “File Explorer” window over the PowerPoint file. In the window, look for the picture that you want to insert into the presentation slide. Then all you have to do is click on the picture in the “File Explorer” window and drag it to the presentation slide and drop it there.
1.2 Shortcut to Insert Picture in PowerPoint?
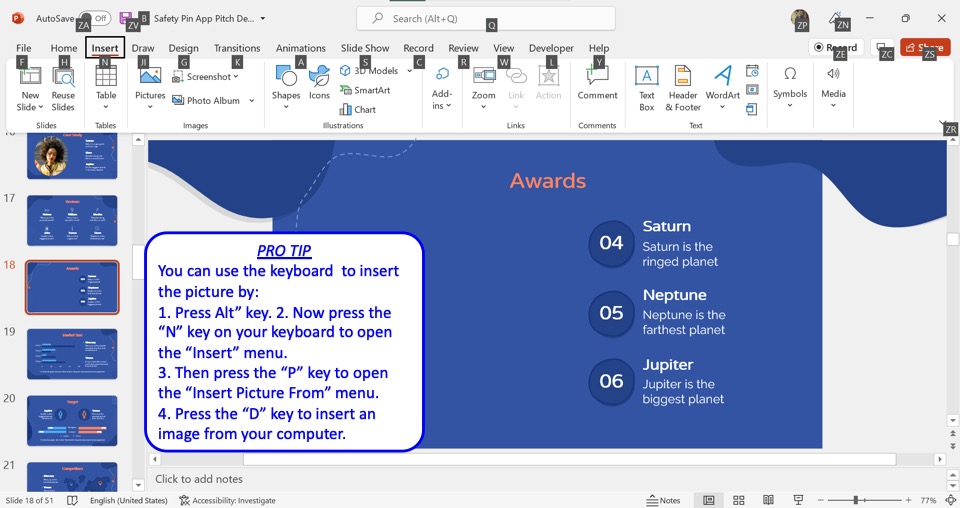
Microsoft PowerPoint allows you to insert a picture into your slide using only the keyboard. To use the keyboard shortcuts, you have to first press the “Alt” key.
The keyboard shortcut for each option in the menu ribbon will now be visible on the screen. Now press the “N” key on your keyboard to open the “Insert” menu. In the “Insert” menu, press the “P” key to open the “Insert Picture From” dropdown menu.
Press the “D” key to insert an image from your computer. You can also press the “S” key for stock images and the “O” key for online pictures.
1.3 How to Insert Online Pictures in PowerPoint?
The “Online Pictures” option in PowerPoint allows you to insert a picture from the internet into your slide using the Bing search engine. To add a picture from the web to PowerPoint, follow the 5 easy steps.
You have to first open the “Insert” menu. To do so, click on the “Insert” tab in the menu ribbon located at the top of the screen.
Step-2: Click on the “Online Pictures” option
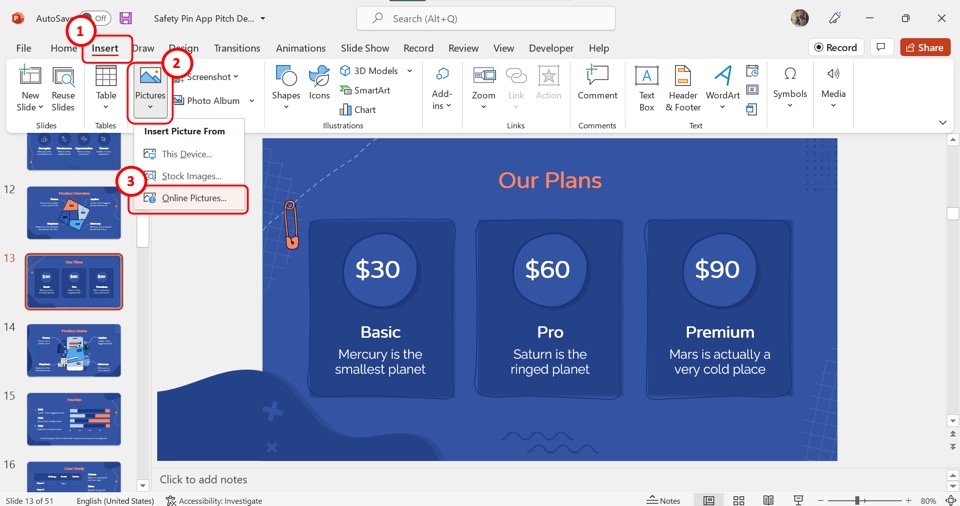
In the “Images” group of the “Insert” menu, click on the “Pictures” button. Then click on the “Online Pictures” option from the dropdown menu under the “Pictures” option.
Step-3: Click on the search bar

Now you have to click on the search bar at the top of the “Online Pictures” dialog box and type in what you are looking for. You can also select a preferred category from the dialog box.
Step-4: Click on the “Filter” option
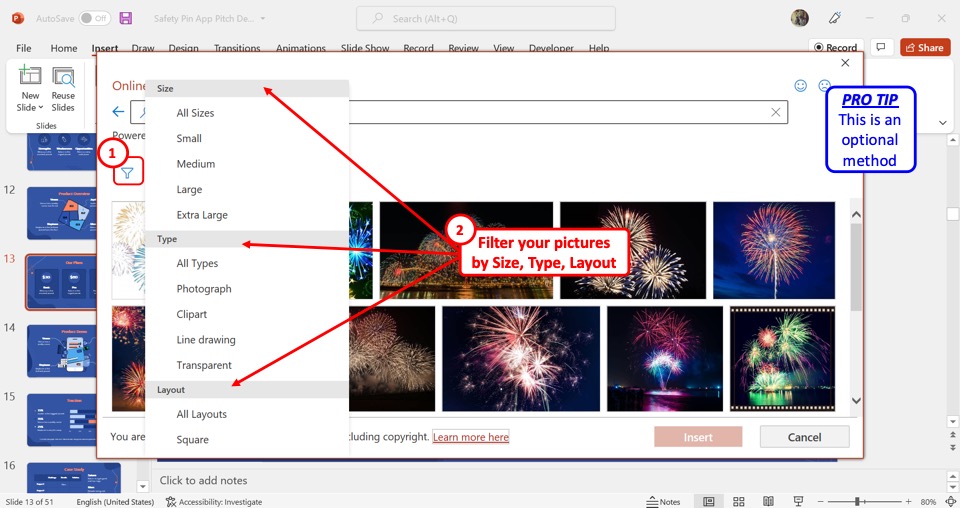
The next step is optional. You can click on the “Filter” icon which looks like a funnel under the search bar. In the “Filter” dropdown menu, you can select the size, type, and layout of the online picture.
Step-5: Click on the “Insert” button
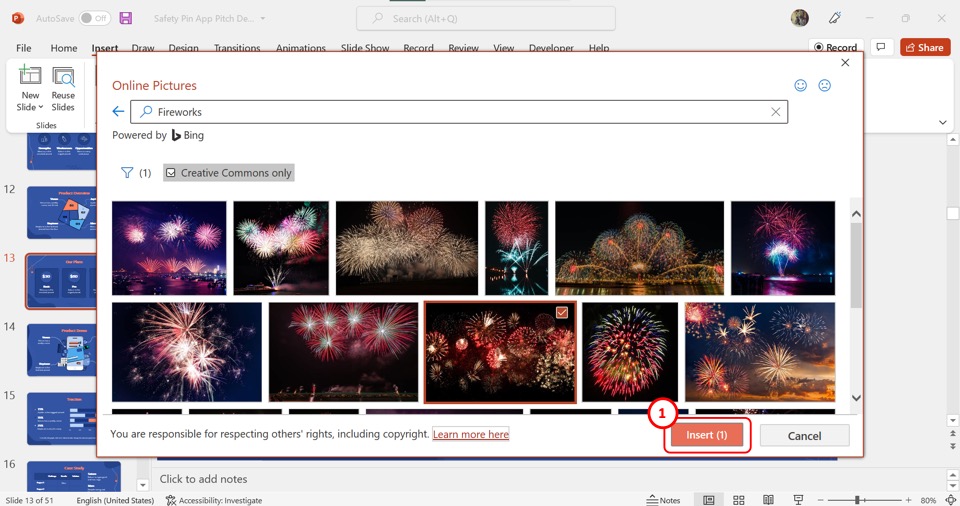
Finally, you have to click on one or more pictures that you want to add to the slide. Then click on the “Insert” button at the bottom of the dialog box.
1.4 How to Insert Image Using Photo Browser in PowerPoint?
The “Photo Browser” option in Office helps you browse through the photos on your Mac device. This option is only available in Microsoft PowerPoint for Mac. To insert an image from iPhoto or Photo Booth using the “Photo Browser” , follow the 2 quick steps.
Step-1: Click on the “Photo Browser” option
The first step is to open the slide where you want to add the picture. Then click on the “Picture” option in the “Insert” menu and select the “Photo Browser” option under the “Picture” option.
Step-2: Select your preferred image
In the dialog box, you have to now browse to the picture that you want to add to the PowerPoint slide. Then all you have to do is drag the picture onto the slide.
1.5 How to Add Image From Your Phone to Your PowerPoint Presentation?
When you take a photo on your iPhone, you can add it to your PowerPoint presentation using the PowerPoint for Mac. You have to first save the picture to iCloud Drive. Then follow the 2 simple steps.
Step-1: Click on the “Picture From File” option
The first step is to open the slide where you want to insert the image. In the “Insert” menu, hover your pointer over the “Picture” option. Then click on “Picture From File” .
Step-2: Click on the “Insert” button
In the dialog box, look for the picture in your iCloud that you want to insert and click on it. Then all you have to do is click on the “Insert” button to add it to the open PowerPoint slide.
1.6 How to Add Stock Images in PowerPoint?
Stock images are a gallery of free images available in PowerPoint. To insert a stock image into a PowerPoint slide, follow the 5 quick steps.
In the PowerPoint presentation, open the slide where you want to add the stock image. Then click on the “Insert” tab which is the third tab in the menu ribbon.
Step-2: Click on the “Stock Images” option
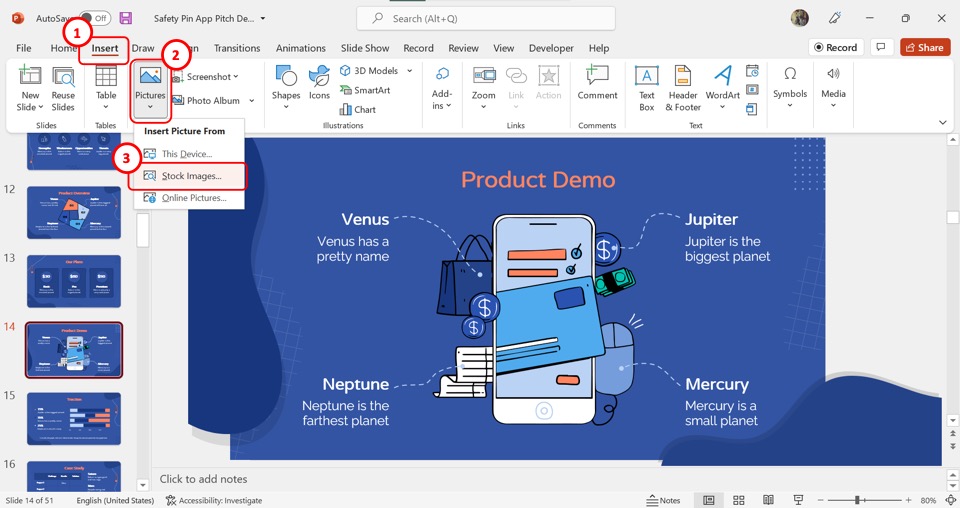
Now you have to click on the “Pictures” option in the “Images” group of the “Insert” menu. Then click on the “Stock Images” option from the dropdown menu. This will prompt a dialog box.
Step-3: Select your preferred category
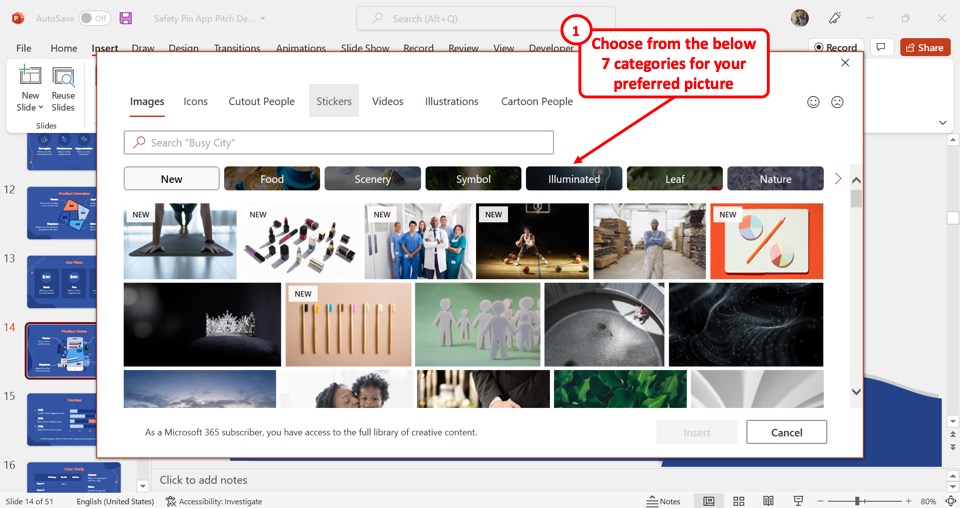
At the top of the dialog box, click on one of the seven categories of stock images available in PowerPoint.
Step-4: Click on the search bar
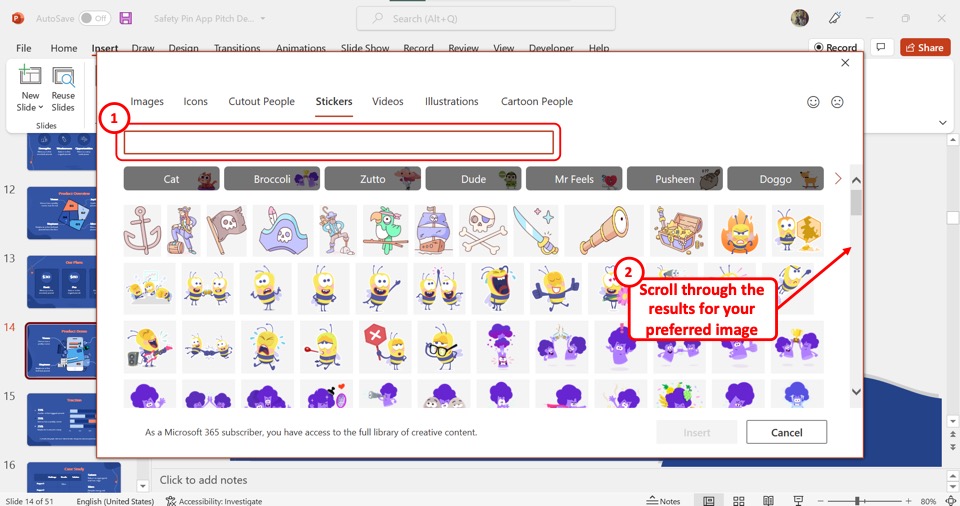
The next step is to click on the search bar and type in the keywords to search for a stock image. Then scroll through the images to select your preferred image.
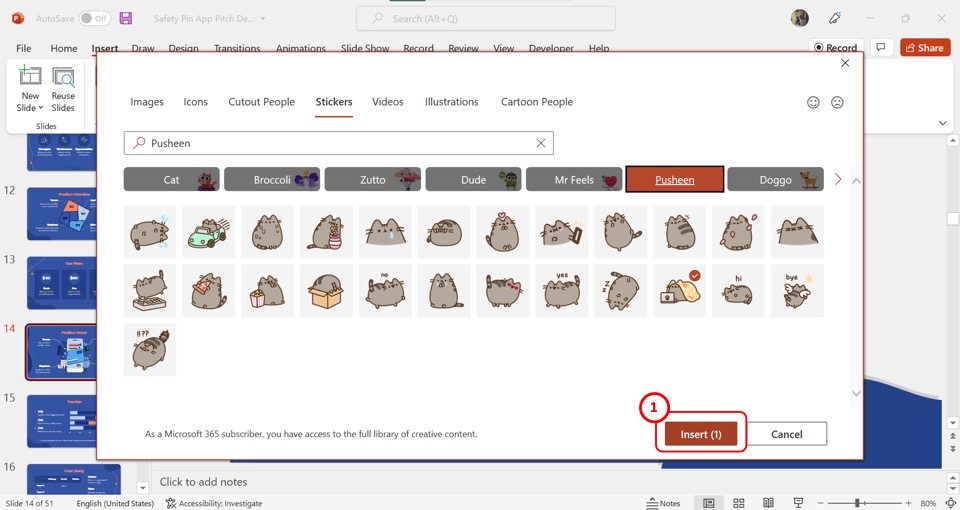
Now all you have to do is click on the “Insert” button at the bottom of the dialog box to add the selected stock image to the open slide.
1.7 How to Insert Picture in PowerPoint on Mobile?
In the PowerPoint app for Android devices, you can insert a picture directly from the camera on your mobile phone. All you have to do is follow the 3 easy steps.
Step-1: Tap on the “Insert” tab
You have to first open the slide where you want to add the picture. Then tap on the “Insert” tab in the floating ribbon on the bottom of the screen.
Step-2: Tap on the “Camera” option
In the “Insert” menu, tap on the “Pictures” option. Then tap on the “Camera” option under the “Pictures” option. This will open the camera app on your phone.
Step-3: Tap on the “Done” button
Now all you have to do is take a picture. If you are satisfied, tap the “Done” button at the bottom of the screen to insert the picture into the PowerPoint slide.
2. How to Insert Pictures On All Slides in PowerPoint?
Using the “Slide Master” feature in PowerPoint, you can insert a picture into all the slides of the presentation at once. To do so, follow the 5 simple steps.
Step-1: Click on the “Slide Master” option
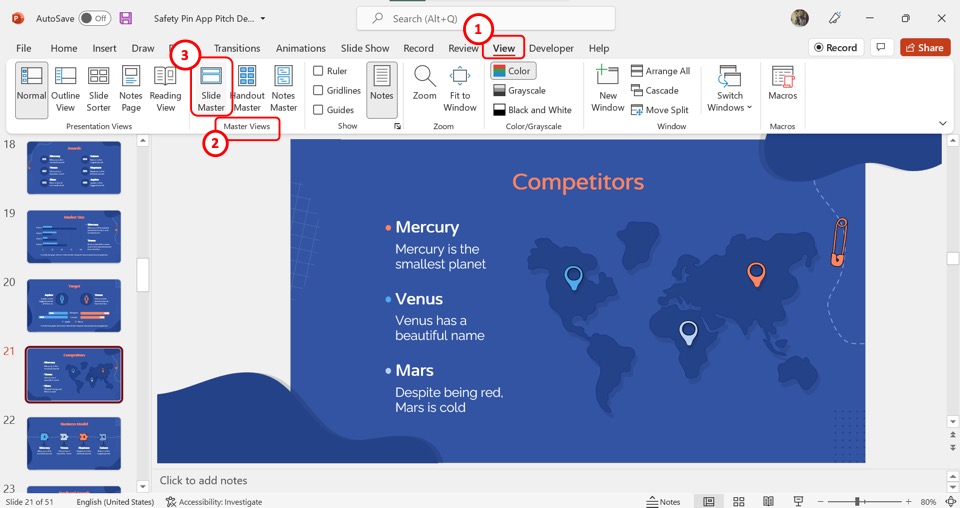
In the menu ribbon located at the top of the screen, click on the “View” tab. Then click on the “Slide Master” option in the “Master Views” group of the “View” menu.
Step-2: Click on the master slide
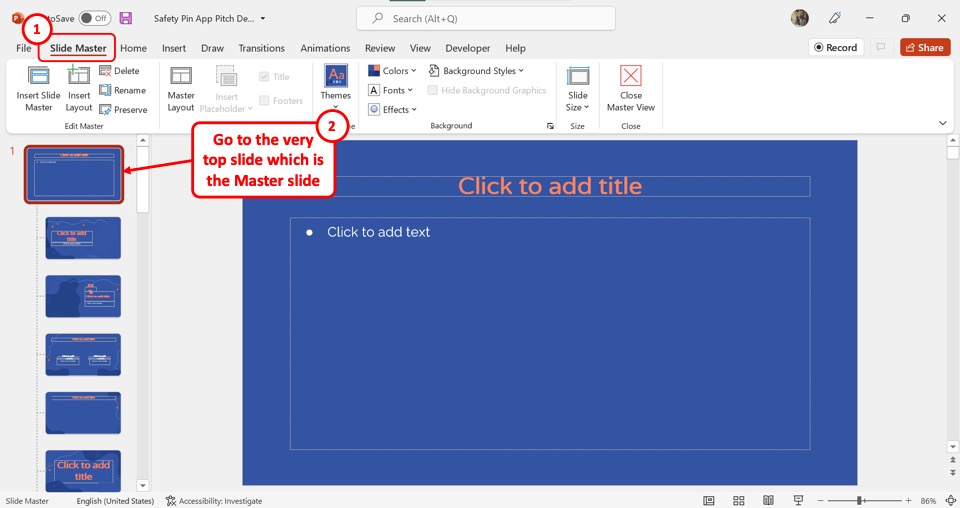
In the “Slide Master” view, you have to open the master slide. Scroll up in the slide layout pane on the left side of the screen and click on the slide at the very top. This is the master slide.
Step-3: Click on the “Pictures” option
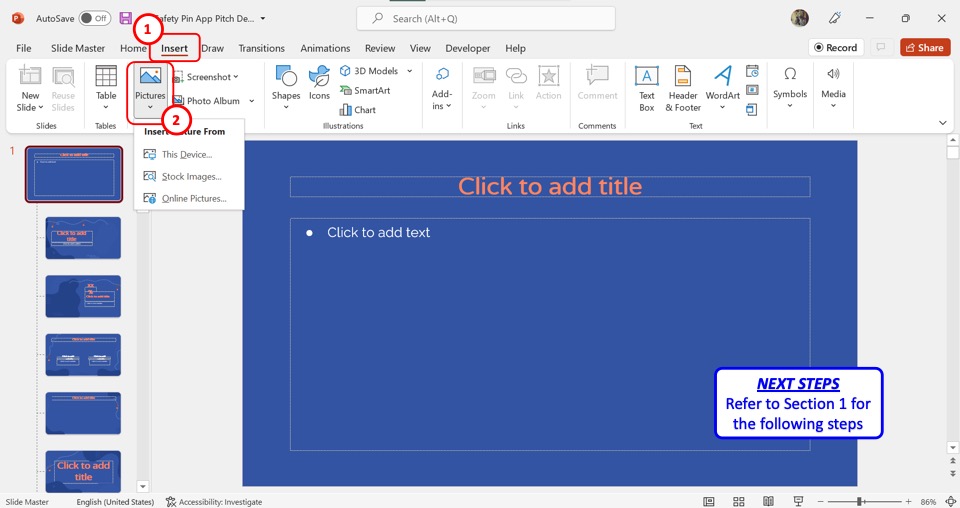
The next step is to insert the picture. Click on the “Insert” tab in the menu ribbon, and then click on the “Pictures” option in the “Insert” menu. Refer to section 1 for detailed steps on inserting images from different sources.
Step-4: Click on the “Picture Format” tab
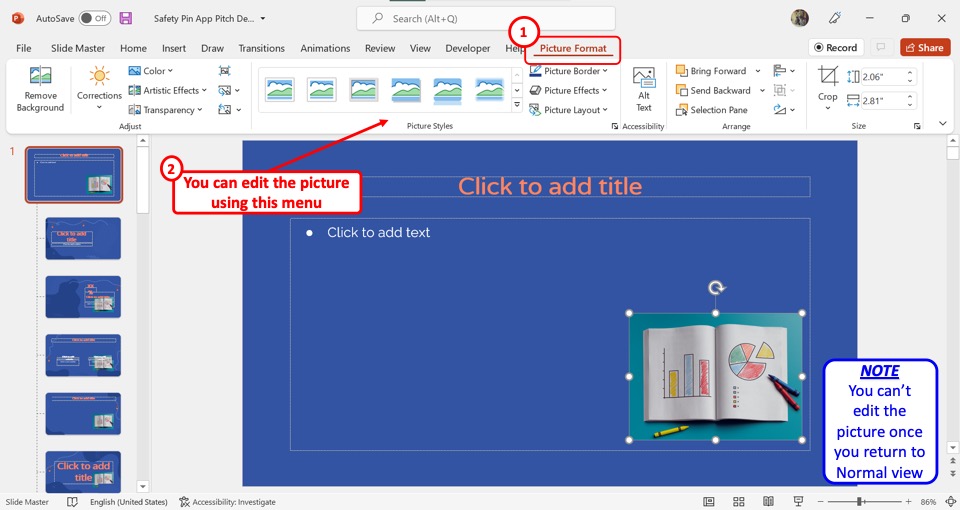
In the menu ribbon, you have to now click on the “Picture Format” tab. In the “Picture Format” menu, you can now edit, adjust, resize, and reposition the inserted picture. You cannot edit the picture in the master slide once you return to the “Normal” view.
Step-5: Click on the “Close Master View” button
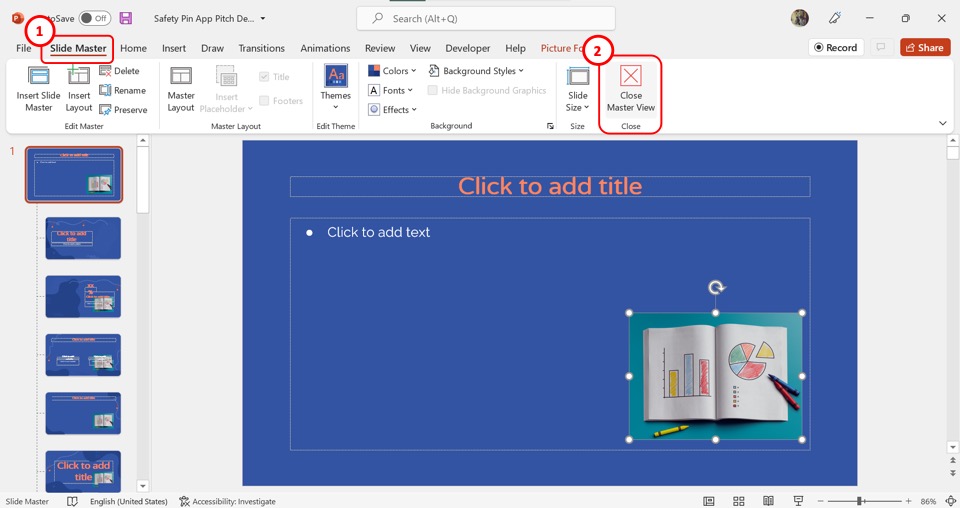
Once you have inserted and edited the picture, you can now return to the “Normal” view. All you have to do is click on the “Slide Master” tab. Then click on “Close Master View” in the “Slide Master” tab.
3. How to Insert Picture as Slide Background in PowerPoint?
In Microsoft PowerPoint, you can insert a picture into a slide as a background. All you have to do is follow the 4 easy steps.
Step-1: Click on the “Format Background” option
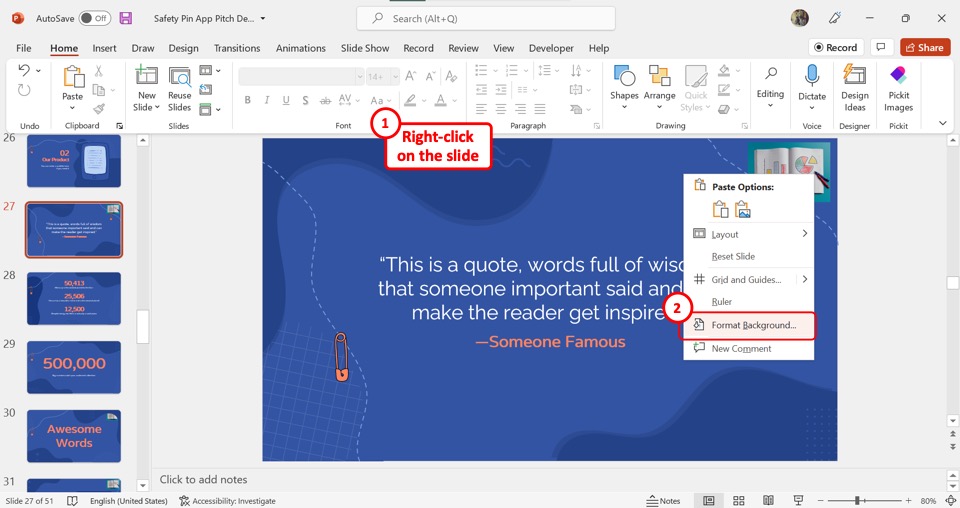
“Right Click” anywhere on the open slide. Then click on the “Format Background” option from the right-click menu.
Step-2: Click on the “Picture or texture fill” option

In the “Format Background” sidebar, click on the “Fill” option. Then click on the “Picture or texture fill” option under the “Fill” section.
Step-3: Click on the “Insert” button
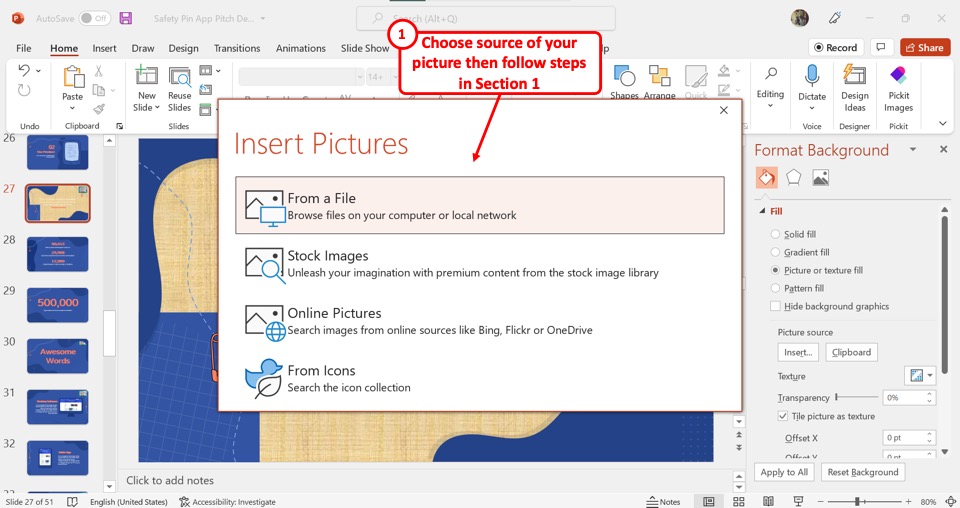
The next step is to click on the “Insert” button under the “Picture Source” option in the “Format Background” sidebar as shown in the previous picture. This will open the “Insert Pictures” dialog box.
Step-4: Insert a picture
In the “Insert Pictures” dialog box, click on the source of the background picture. You can see the detailed steps for adding pictures from each source in section 1 .
4. How to Insert Image Placeholder in PowerPoint?
A picture placeholder in PowerPoint is a predesigned spot in a slide layout where you can add a picture. Check out my other article to learn more about placeholders in PowerPoint .
To insert an image placeholder, follow the 4 quick steps.

The first step is to click on the “View” tab in the menu ribbon. In the “View” menu, click on the “Slide Master” option.
Step-2: Click on the “Insert Placeholder” button
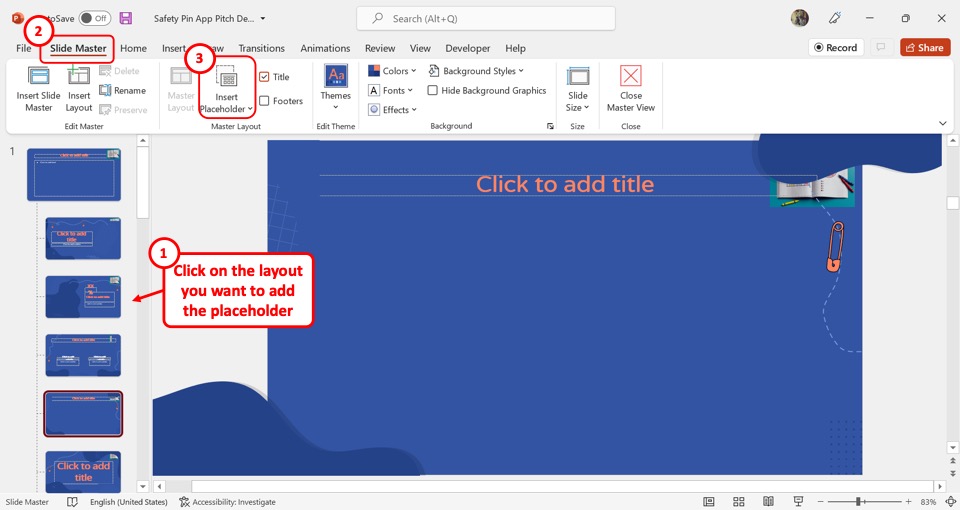
In the slide layout pane on the left side of the “Slide Master” screen, click on the layout where you want to add the placeholder. Then click on the “Insert Placeholder” option under the “Slide Master” tab.
Step-3: Click on the “Picture” option
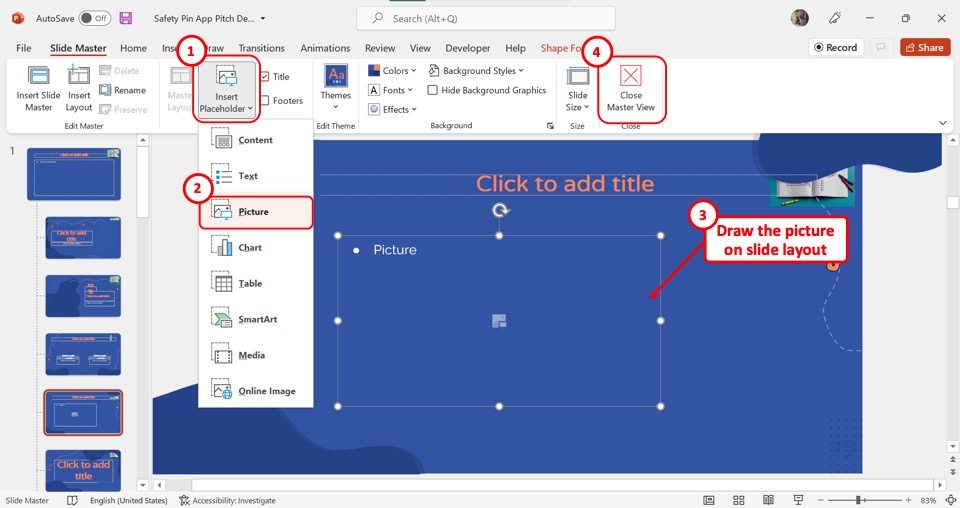
In the dropdown menu under the “Insert Placeholder” option, click on the “Picture” option. Then draw the picture placeholder on the slide layout
Step-4: Click on “Close Master View”
Finally, all you have to do is click on the “Close Master View” option to save the picture placeholder in the slide layout (as shown above).
5. How to Insert Picture in PowerPoint Without White Background?
When inserting a picture into a PowerPoint slide, you may want to remove the unnecessary white background in your picture. To learn about all the tools you can use to remove the background, you can read my article here . To remove the white background using the “Set Transparent Color” feature, follow the 4 simple steps.
Step-1: Insert a picture
The first step is to insert the picture with white background into the PowerPoint slide. Refer to section 1 for the detailed steps on inserting images from all sources.
Step-2: Click on the “Picture Format” tab
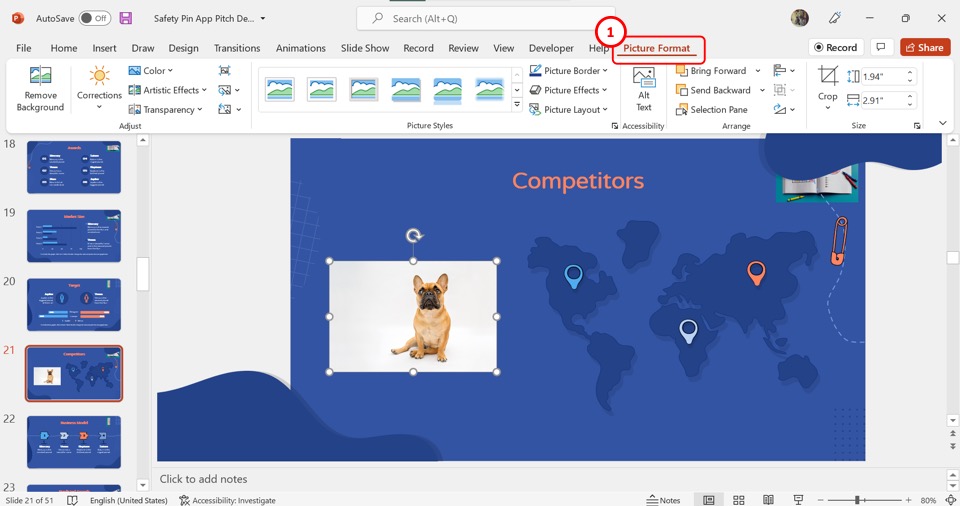
The next step is to click on the “Picture Format” tab in the menu ribbon located at the top of the screen.
Step-3: Click on the “Set Transparent Color” option
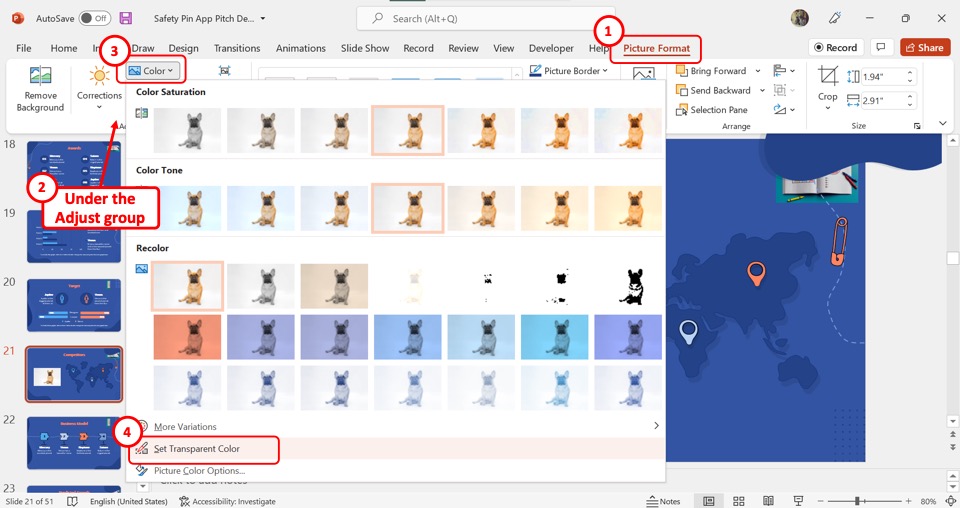
In the “Adjust” group of the “Picture Format” tab, click on the “Color” option. Then click on the “Set Transparent Color” option at the bottom of the dialog box under the “Color” option.
Step-4: Click on the white background
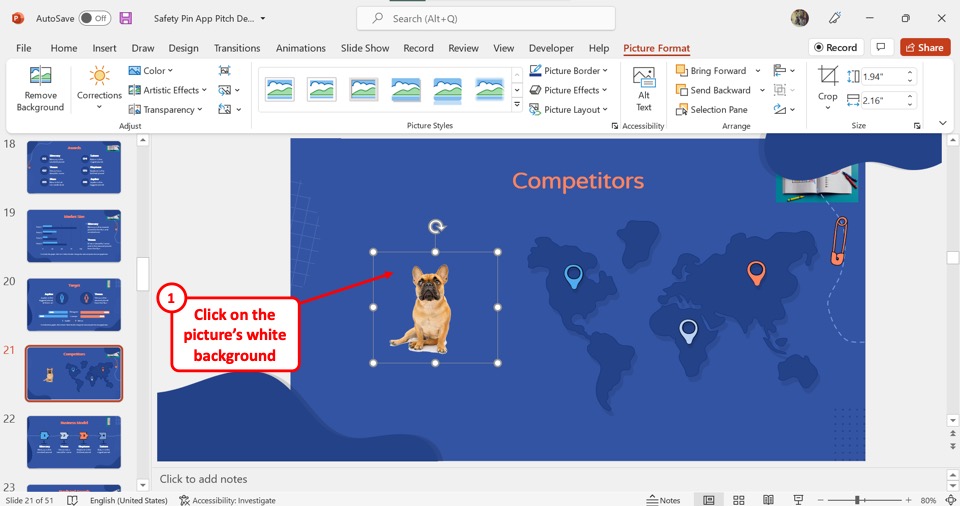
Now all you have to do is click on the white part of the selected image on the slide to remove the white background.
6. How to Insert Picture With Text in PowerPoint?
Once you have inserted a picture in PowerPoint, you can add text on top of it. To add text to an inserted picture, follow the 4 simple steps.
Step-1: Click on the “Text Box” option
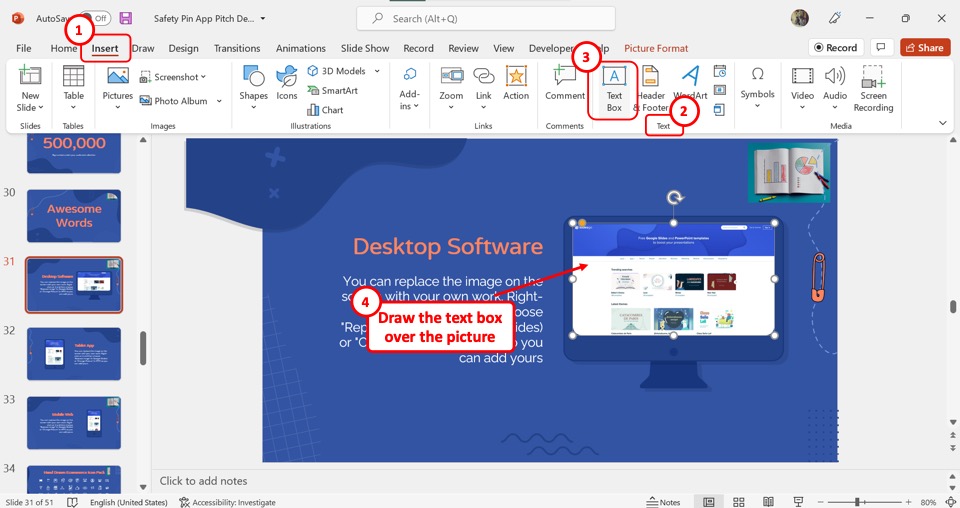
In the menu ribbon, click on the “Insert” tab. Then click on the “Text Box” option in the “Text” group of the “Insert” menu. Now you have to draw the text box over the inserted picture in the slide.
Step-2: Type in the text box
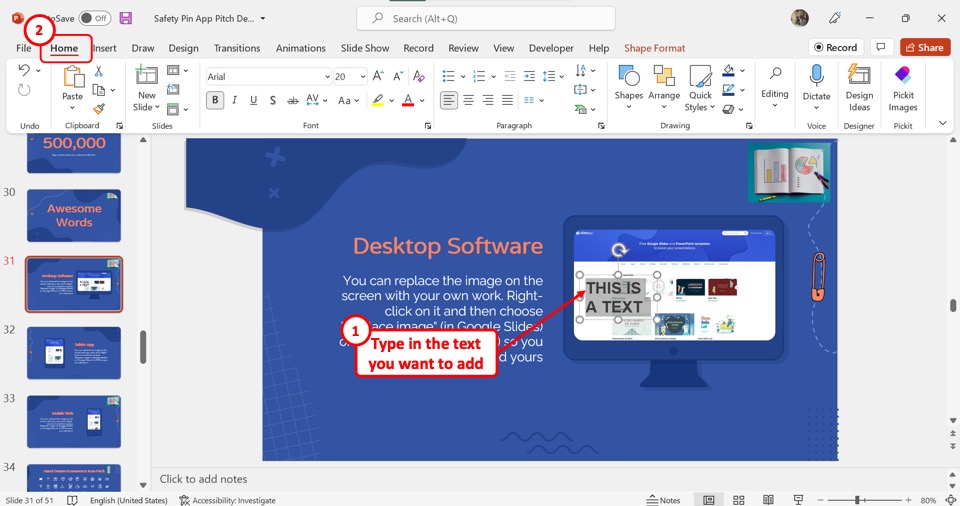
In the text box, you can now type in the text that you want to add to the picture. You can also edit the appearance of the text using the features available in the “Home” menu.
Step-3: Select the text box and the picture together
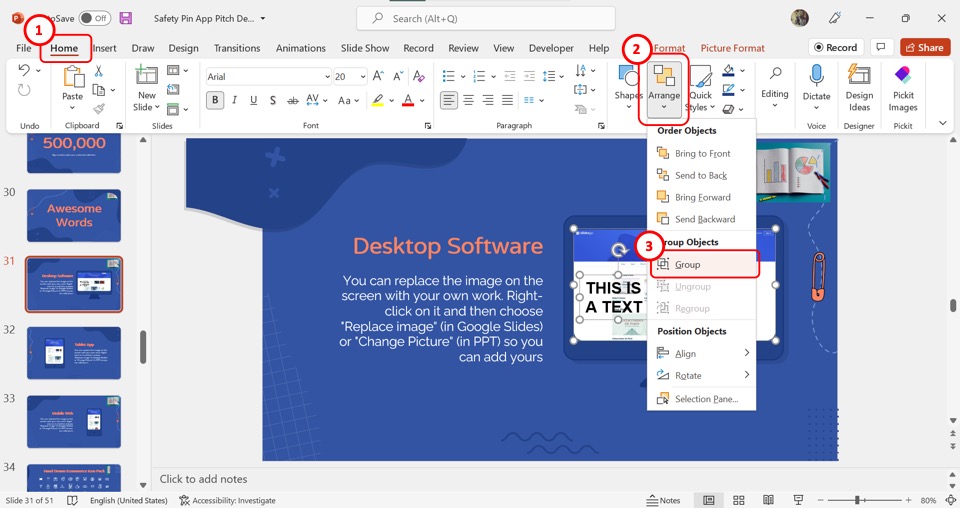
Now you have to select the text box and the picture together to group them. Press and hold the “Ctrl” key on your keyboard and click on the text box and then the picture to select them both.
Step-4: Click on the “Group” option
In the “Drawing” section of the “Home” tab, click on the “Arrange” button. Then click on the “Group” option in the dropdown menu to group the text with the inserted picture on the slide (as shown above).
7. How to Insert Picture in PowerPoint Notes?
In PowerPoint, you can add a picture to your speaker notes. All you have to do is follow the 3 quick steps.
Step-1: Click on the “Notes Page” option
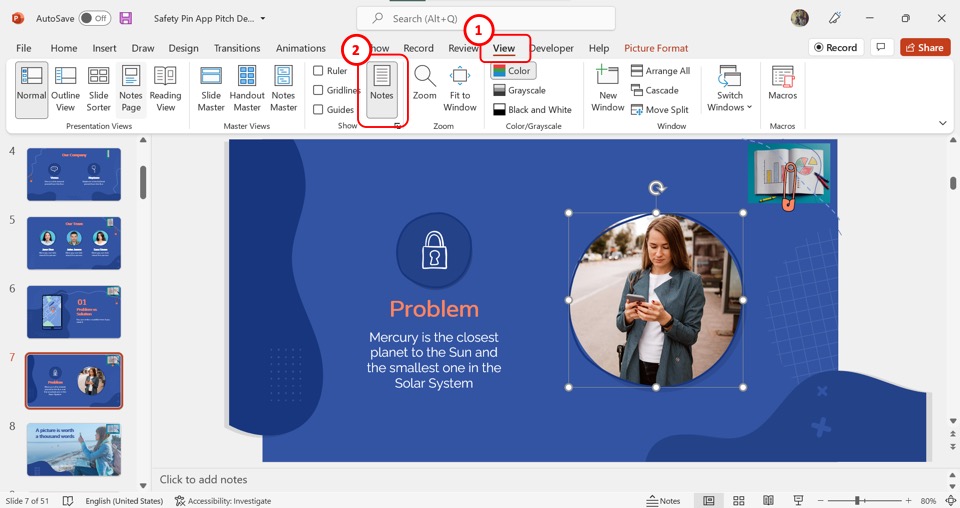
The first step is to click on the “View” tab in the menu ribbon. In the “View” menu, click on the “Notes Pages” option.
Step-2: Click on the “Insert” tab
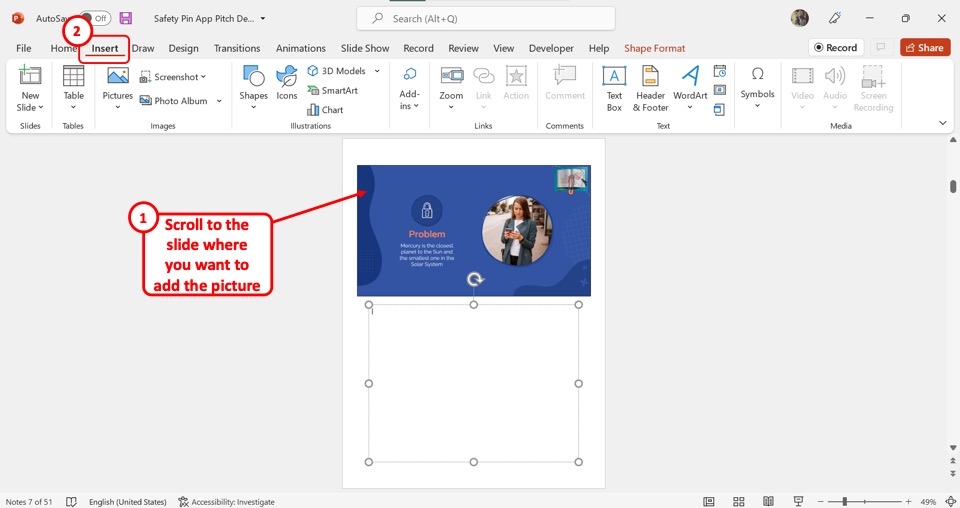
In the “Notes Page” view, scroll through to open the slide note where you want to insert a picture. Then click on the “Insert” tab in the menu ribbon.
Step-3: Click on the “Pictures” option
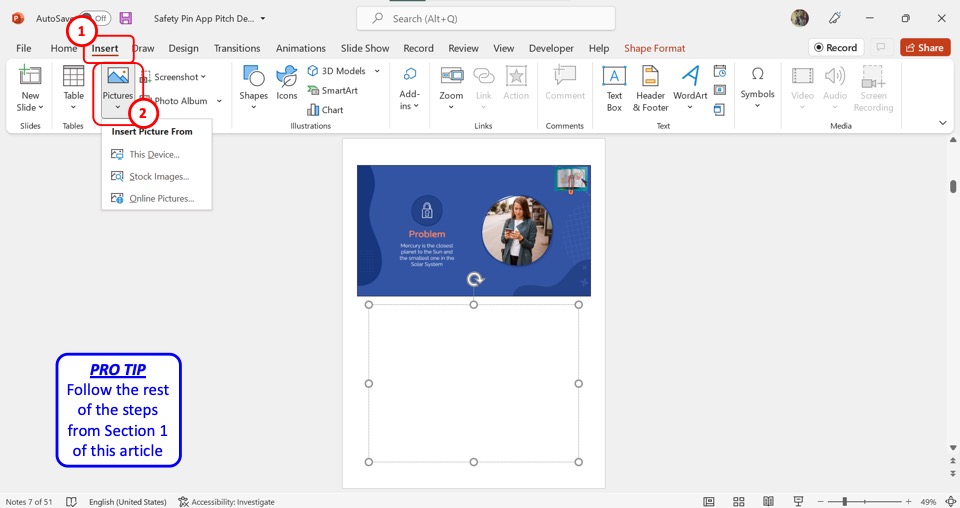
In the “Images” section of the “Insert” tab, click on the “Pictures” option. Then select the picture source from the dropdown menu. You can find the detailed steps for inserting an image in section 1 .
8. How to Insert Clip Art in PowerPoint? [Link to Existing Article]
The clipart in PowerPoint is a collection of free images that you can use in your presentation slides. You can read about the detailed steps on inserting clipart in any version of PowerPoint in my article here.
To insert a clipart in PowerPoint using the “Online Pictures” option, follow the 5 simple steps.
The first step is to open the slide where you want to insert the clipart. Then click on the “Insert” tab in the menu ribbon located at the top of the screen.
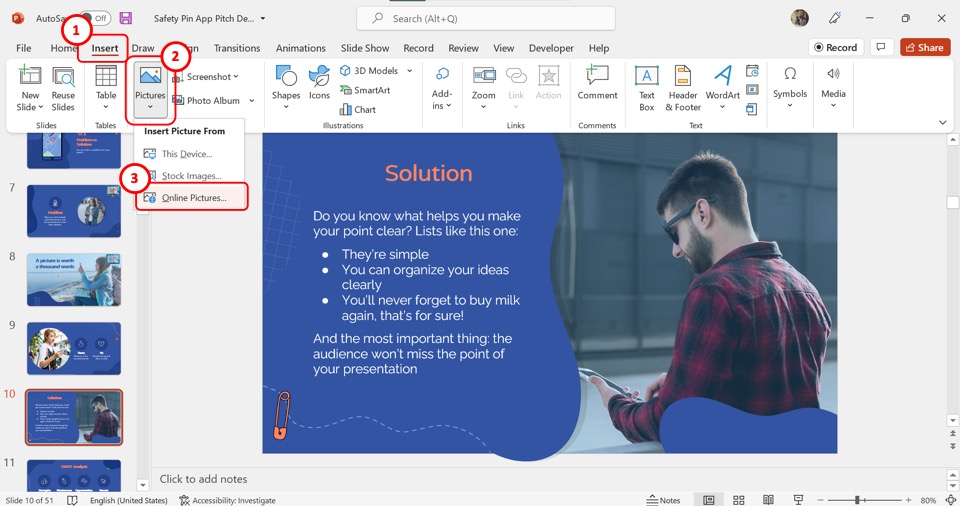
In the “Images” group of the “Insert” tab, click on the “Pictures” option. In the dropdown menu under the “Pictures” option, click on the “Online Pictures” option.
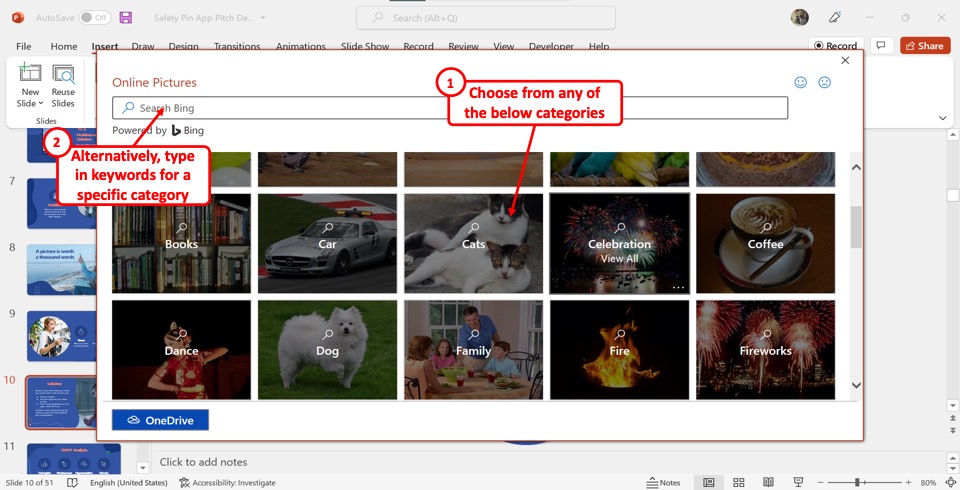
In the “Online Pictures” dialog box, you can now click on any of the available categories of the pictures. You can also click on the search bar at the top of the dialog box to search for a specific category.
Step-4: Click on the “Clipart” option
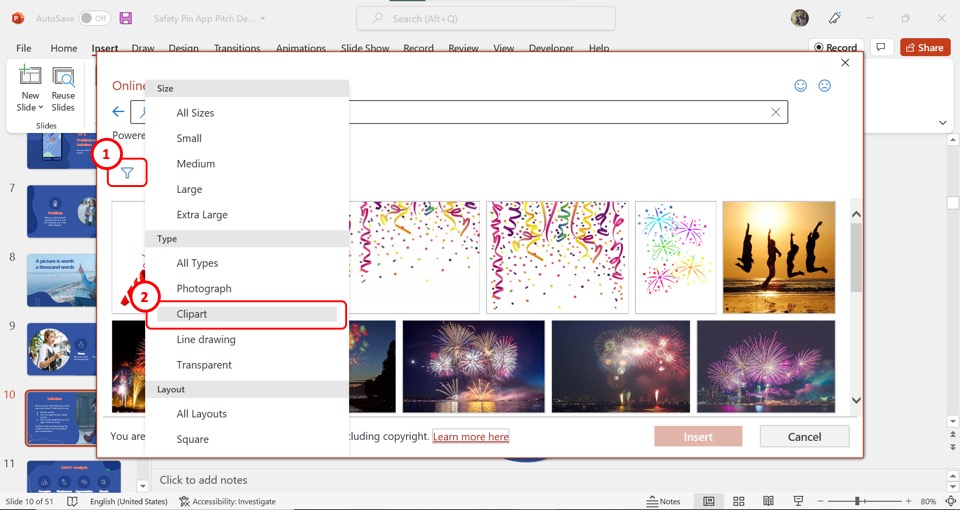
Now you have to click on the “Filter” option, which is the funnel icon under the search bar. In the “Filter” pop-up menu, click on the “Clipart” option under the “Types” section.
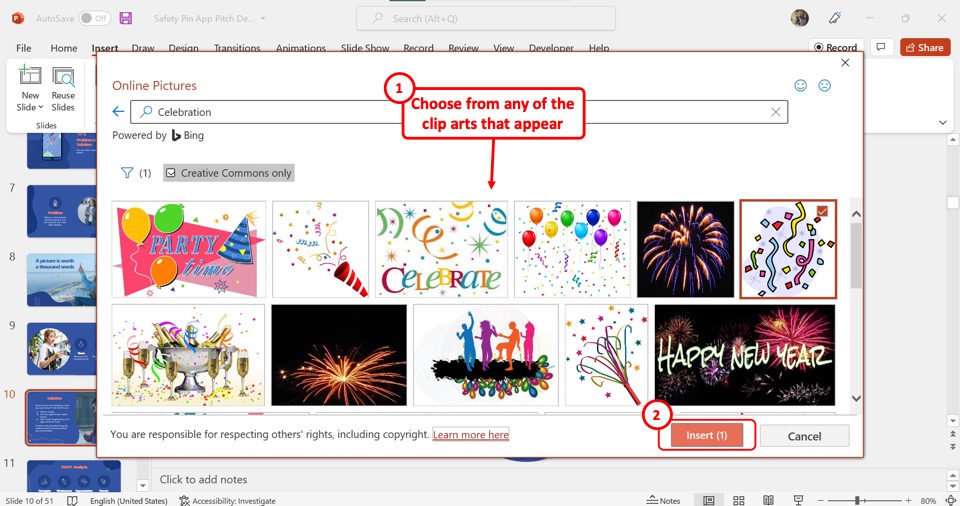
The final step is to select one or more cliparts from the “Online Pictures” dialog box to insert into the slide. Then all you have to do is click on the “Insert” button at the bottom of the dialog box.
9. How to Add Picture to a Shape in PowerPoint? [Link to Existing Article]
Microsoft PowerPoint allows you to add a picture to an existing shape inside a slide. You can read about the different methods for adding pictures to a shape in my other article. To insert a picture into a shape using the “Shape Fill” feature, follow the 3 easy steps.
Step-1: Click on the “Fill” option
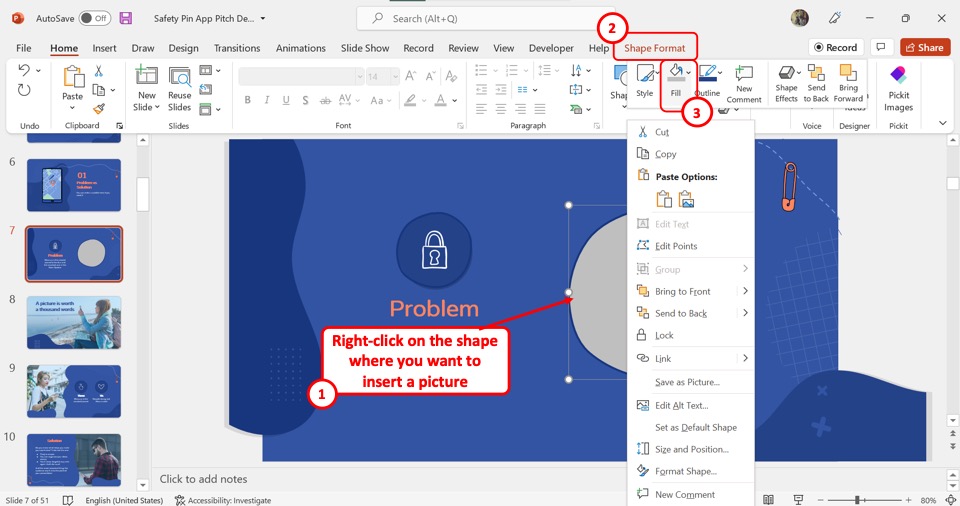
The first step is to “Right Click” on the shape where you want to insert the picture. From the Shape Format tab, in the pop-up menu, click on the “Fill” option.
Step-2: Click on the “Picture” option
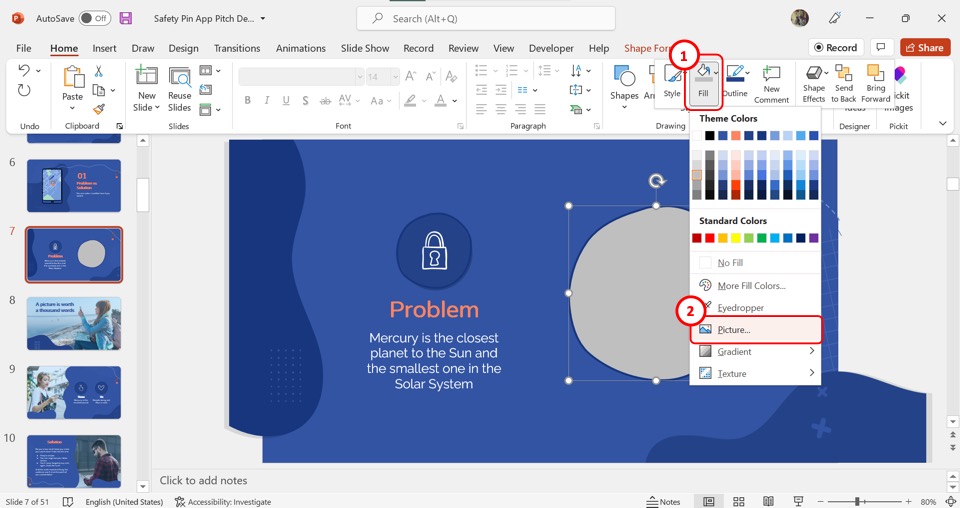
In the dropdown menu under the “Fill” option, click on the “Pictures” option. This will open the “Insert Pictures” dialog box.
Step-3: Insert a picture
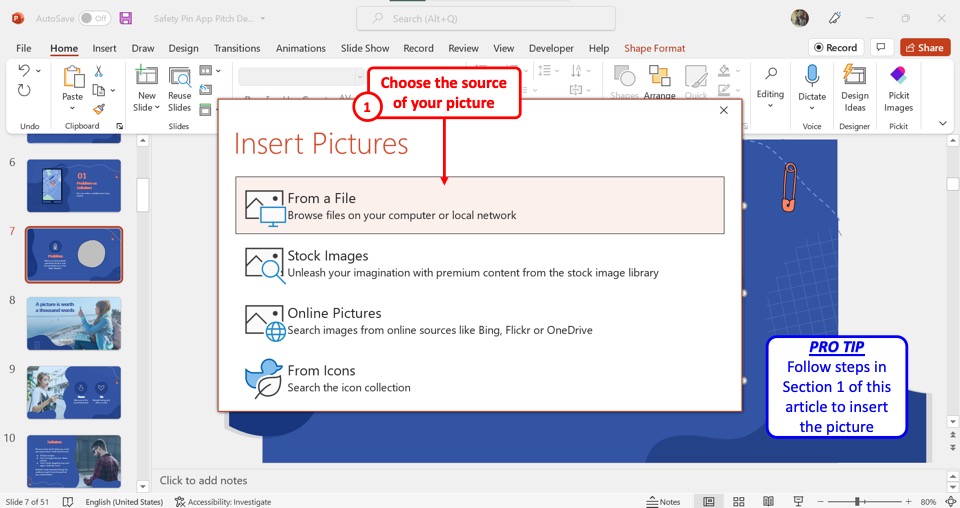
Now all you have to do is insert the picture into the selected shape. In the “Insert Pictures” dialog box, choose where you want to add the picture from. For the detailed steps for inserting pictures from any source, refer to section 1 .
10. How to Insert Round Picture in PowerPoint?
In Microsoft PowerPoint, you can add any shape to a picture. To insert a round picture, you have to first insert a picture following the steps detailed in section 1 . Then follow the 3 simple steps.
Step-1: Click on the “Picture Format” tab

Click on the picture that you want to add a round shape to. Then click on the “Picture Format” tab from the menu ribbon located at the top of the screen.
Step-2: Click on the “Crop to Shape” option
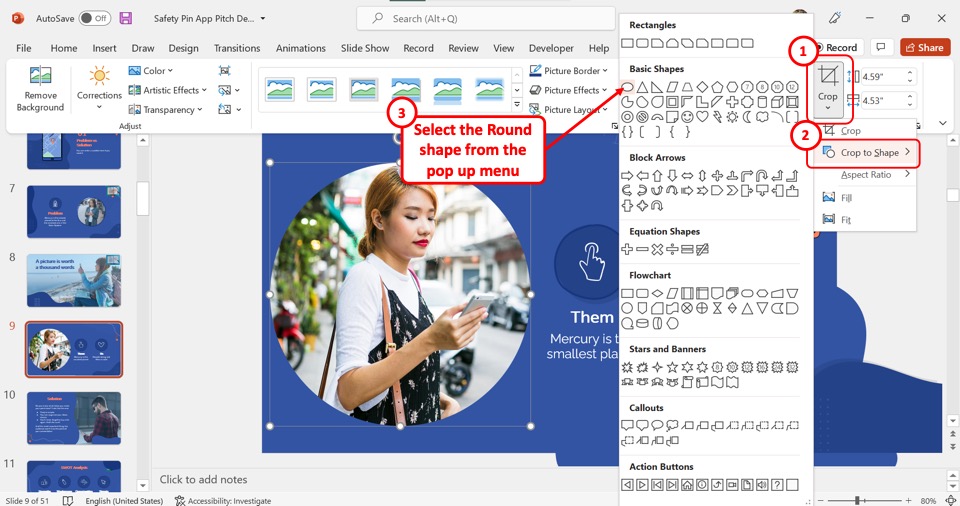
In the “Size” group of the “Picture Format” tab, click on the “Crop” option. In the dropdown menu under the “Crop” option, click on “Crop to Shape” . This will open a secondary menu containing a list of all the available shapes.
Step-3: Select the round shape
Finally, all you have to do is click on the round shape from the dropdown list to insert the picture into the round shape as shown in the image above.
11. How to Insert a Linked Picture in PowerPoint?
Microsoft PowerPoint offers the feature to insert a linked picture so that the inserted picture in the presentation can update automatically when it is edited outside the PowerPoint file. To insert a linked picture, follow the 3 easy steps.
Step-1: Click on the “Insert” tab
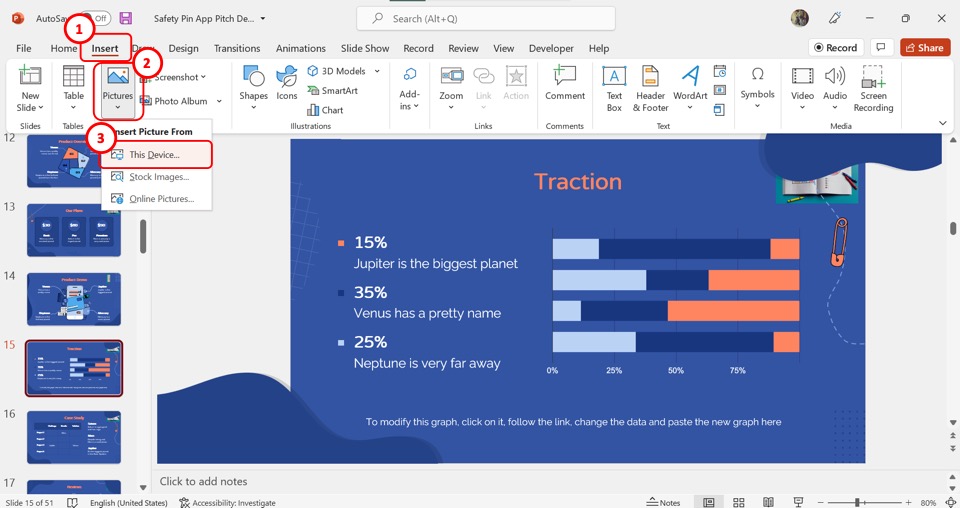
In the menu ribbon located at the top of the screen, click on the “Insert” tab.
Step-2: Click on the “This Device” option
In the “Insert” menu, click on the “Pictures” option. Then click on the “This Device” option from the dropdown menu. You can insert a linked picture only from this option. (shown in the image above)
Step-3: Click on the “Insert and Link” option
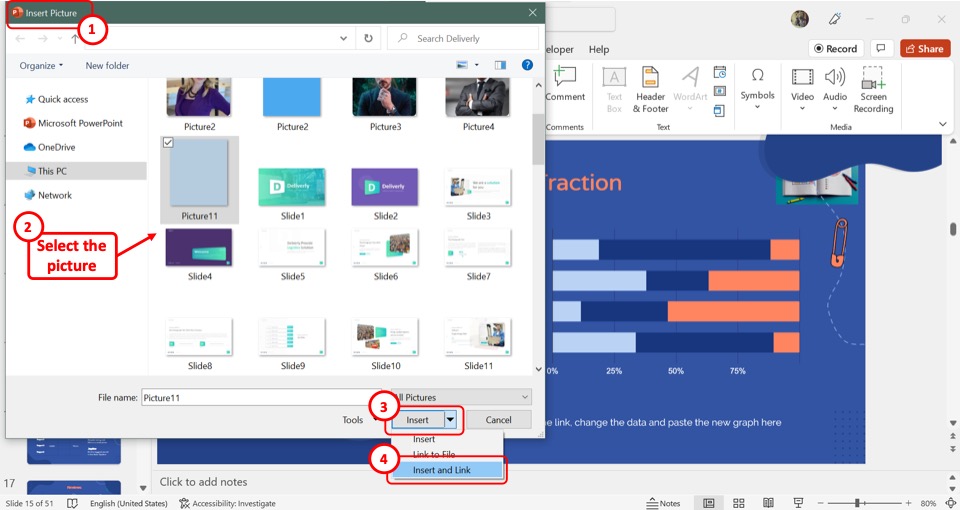
In the “Insert Picture” dialog, click on the picture that you want to add. Then click on the down arrow by the “Insert” button at the bottom of the dialog box. Click on the “Insert and Link” option from the dropdown list to insert the linked picture.
12. How to Insert a Screenshot in PowerPoint? [Link to Existing Article]
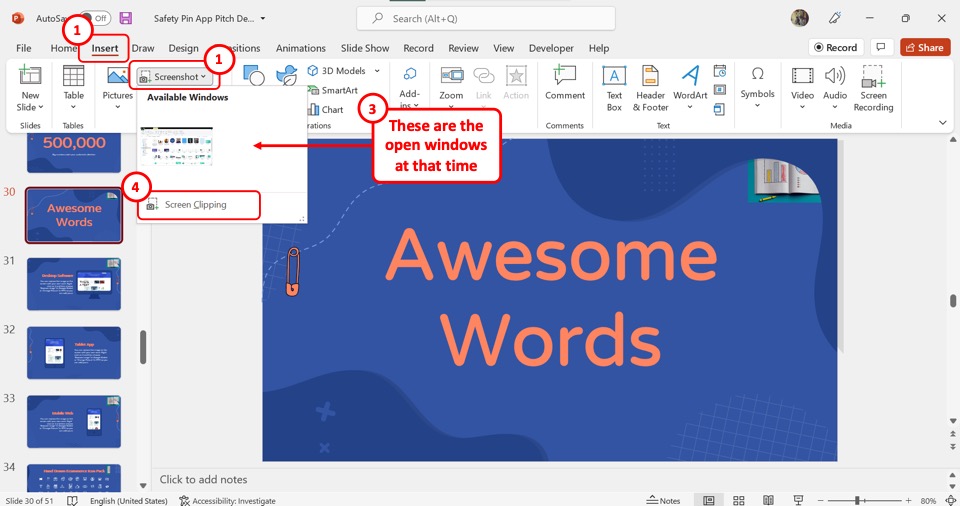
In PowerPoint, you can directly take and add a screenshot to a slide. To do so, you have to first click on the “Insert” tab in the menu ribbon. In the “Images” group of the “Insert” tab, click on the “Screenshot” option.
The “Available Windows” option allows you to take a screenshot of any of the open windows. You can use the “Screen Clipping” option to take a screenshot of the current screen. Read my article here to learn more about the “Screenshot” feature in PowerPoint.
13. Insert Image in a Table in PowerPoint
In Microsoft PowerPoint, you can insert an image inside a table. All you have to do is follow the 2 quick steps.
Step-1: Click inside a cell
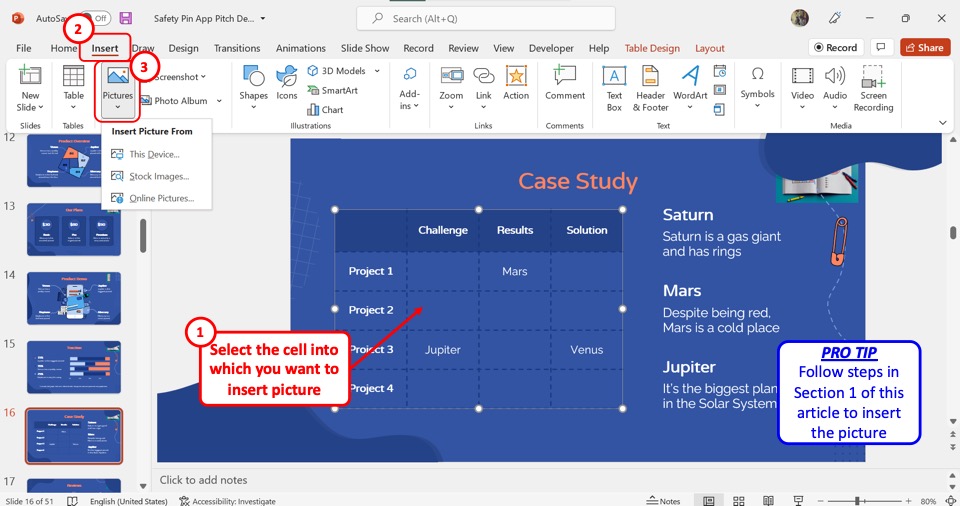
You have to insert the picture inside a single cell in a table. So the first step is to click on the cell where you want to insert the picture. Then click on the “Insert” tab in the menu ribbon.
Step-2: Click on the “Pictures” option
In the “Insert” menu, click on the “Pictures” option. Refer to section 1 for the detailed steps on inserting images from different sources into PowerPoint. (shown in the image above)
14. Unable to Insert Image in PowerPoint Error
If PowerPoint shows an error message when inserting an image into a slide, you can embed the picture into the slide instead. To do so, follow the 4 simple steps.
Step-1: Click on the “Object” option
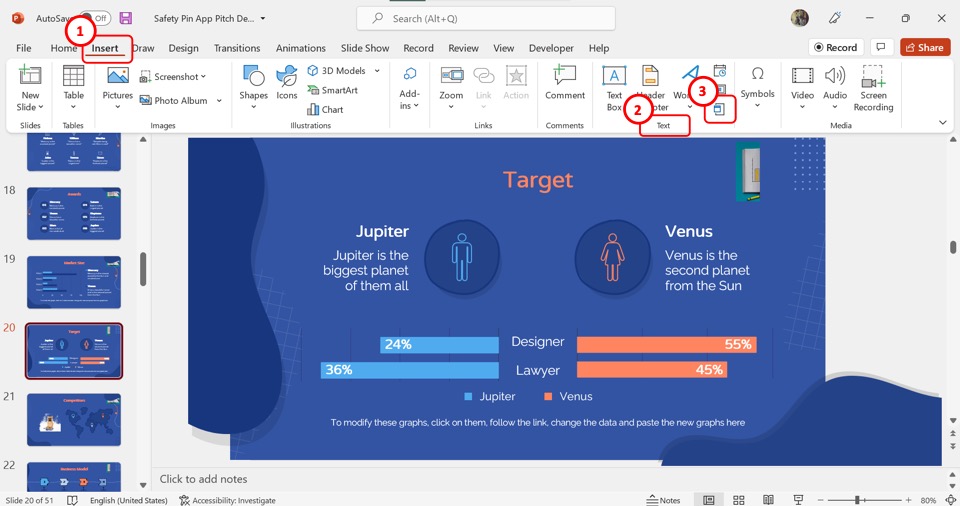
In the menu ribbon located at the top of the screen, click on the “Insert” tab. Then click on the “Object” option which is the last icon in the “Text” group of the “Insert” tab.
Step-2: Click on the “Browse” option
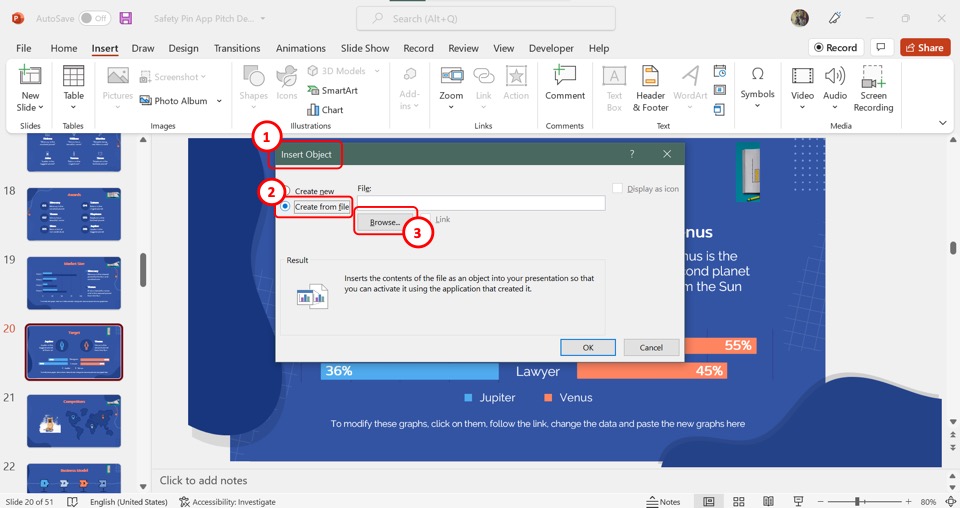
In the left column of the “Insert Object” dialog box, click on the “Create from file” option. Then click on the “Browse” button at the center of the dialog box.
Step-3: Click on the “OK” button
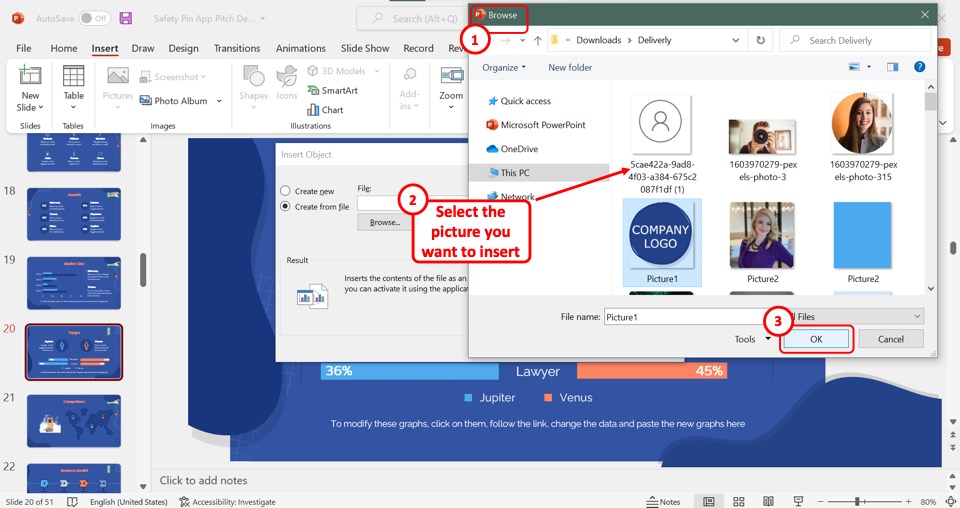
In the “Browse” window, select the picture that you want to insert into the slide. Then click on the “OK” button at the bottom.
Step-4: Click on the “OK” option
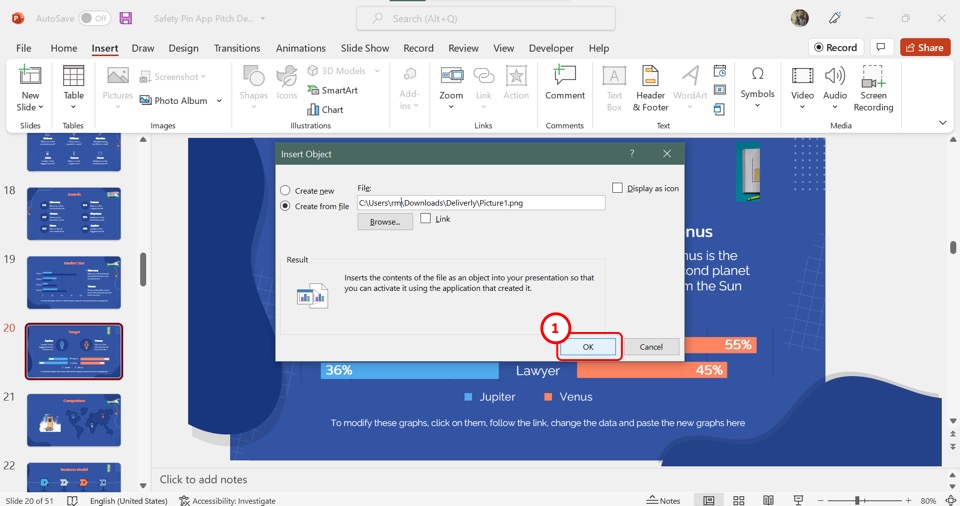
Finally, all you have to do is click on the “OK” button at the bottom of the “Insert Object” dialog box to embed the selected picture into the PowerPoint slide.
Credit to wayhomestudio (on Freepik) for the featured image of this article (further edited).
Top searches
Trending searches

46 templates

suicide prevention
8 templates

49 templates

18 templates

41 templates

29 templates
Create your presentation
Writing tone, number of slides.

AI presentation maker
When lack of inspiration or time constraints are something you’re worried about, it’s a good idea to seek help. Slidesgo comes to the rescue with its latest functionality—the AI presentation maker! With a few clicks, you’ll have wonderful slideshows that suit your own needs . And it’s totally free!

Generate presentations in minutes
We humans make the world move, but we need to sleep, rest and so on. What if there were someone available 24/7 for you? It’s time to get out of your comfort zone and ask the AI presentation maker to give you a hand. The possibilities are endless : you choose the topic, the tone and the style, and the AI will do the rest. Now we’re talking!
Customize your AI-generated presentation online
Alright, your robotic pal has generated a presentation for you. But, for the time being, AIs can’t read minds, so it’s likely that you’ll want to modify the slides. Please do! We didn’t forget about those time constraints you’re facing, so thanks to the editing tools provided by one of our sister projects —shoutouts to Wepik — you can make changes on the fly without resorting to other programs or software. Add text, choose your own colors, rearrange elements, it’s up to you! Oh, and since we are a big family, you’ll be able to access many resources from big names, that is, Freepik and Flaticon . That means having a lot of images and icons at your disposal!

How does it work?
Think of your topic.
First things first, you’ll be talking about something in particular, right? A business meeting, a new medical breakthrough, the weather, your favorite songs, a basketball game, a pink elephant you saw last Sunday—you name it. Just type it out and let the AI know what the topic is.
Choose your preferred style and tone
They say that variety is the spice of life. That’s why we let you choose between different design styles, including doodle, simple, abstract, geometric, and elegant . What about the tone? Several of them: fun, creative, casual, professional, and formal. Each one will give you something unique, so which way of impressing your audience will it be this time? Mix and match!
Make any desired changes
You’ve got freshly generated slides. Oh, you wish they were in a different color? That text box would look better if it were placed on the right side? Run the online editor and use the tools to have the slides exactly your way.
Download the final result for free
Yes, just as envisioned those slides deserve to be on your storage device at once! You can export the presentation in .pdf format and download it for free . Can’t wait to show it to your best friend because you think they will love it? Generate a shareable link!
What is an AI-generated presentation?
It’s exactly “what it says on the cover”. AIs, or artificial intelligences, are in constant evolution, and they are now able to generate presentations in a short time, based on inputs from the user. This technology allows you to get a satisfactory presentation much faster by doing a big chunk of the work.
Can I customize the presentation generated by the AI?
Of course! That’s the point! Slidesgo is all for customization since day one, so you’ll be able to make any changes to presentations generated by the AI. We humans are irreplaceable, after all! Thanks to the online editor, you can do whatever modifications you may need, without having to install any software. Colors, text, images, icons, placement, the final decision concerning all of the elements is up to you.
Can I add my own images?
Absolutely. That’s a basic function, and we made sure to have it available. Would it make sense to have a portfolio template generated by an AI without a single picture of your own work? In any case, we also offer the possibility of asking the AI to generate images for you via prompts. Additionally, you can also check out the integrated gallery of images from Freepik and use them. If making an impression is your goal, you’ll have an easy time!
Is this new functionality free? As in “free of charge”? Do you mean it?
Yes, it is, and we mean it. We even asked our buddies at Wepik, who are the ones hosting this AI presentation maker, and they told us “yup, it’s on the house”.
Are there more presentation designs available?
From time to time, we’ll be adding more designs. The cool thing is that you’ll have at your disposal a lot of content from Freepik and Flaticon when using the AI presentation maker. Oh, and just as a reminder, if you feel like you want to do things yourself and don’t want to rely on an AI, you’re on Slidesgo, the leading website when it comes to presentation templates. We have thousands of them, and counting!.
How can I download my presentation?
The easiest way is to click on “Download” to get your presentation in .pdf format. But there are other options! You can click on “Present” to enter the presenter view and start presenting right away! There’s also the “Share” option, which gives you a shareable link. This way, any friend, relative, colleague—anyone, really—will be able to access your presentation in a moment.
Discover more content
This is just the beginning! Slidesgo has thousands of customizable templates for Google Slides and PowerPoint. Our designers have created them with much care and love, and the variety of topics, themes and styles is, how to put it, immense! We also have a blog, in which we post articles for those who want to find inspiration or need to learn a bit more about Google Slides or PowerPoint. Do you have kids? We’ve got a section dedicated to printable coloring pages! Have a look around and make the most of our site!
- National Security
- Environment
- Special Investigations
- More Ways to Donate
- Impact & Reports
- Join Newsletter
- Become a Source
© THE INTERCEPT
ALL RIGHTS RESERVED
Microsoft Pitched OpenAI’s DALL-E as Battlefield Tool for U.S. Military
Any battlefield use of the software would be a dramatic turnaround for OpenAI, which describes its mission as developing AI that can benefit all of humanity.
- Share on Facebook
- Share on LinkedIn
- Share on WhatsApp
Microsoft last year proposed using OpenAI’s mega-popular image generation tool, DALL-E, to help the Department of Defense build software to execute military operations, according to internal presentation materials reviewed by The Intercept. The revelation comes just months after OpenAI silently ended its prohibition against military work.
The Microsoft presentation deck, titled “ Generative AI with DoD Data ,” provides a general breakdown of how the Pentagon can make use of OpenAI’s machine learning tools, including the immensely popular ChatGPT text generator and DALL-E image creator, for tasks ranging from document analysis to machine maintenance. (Microsoft invested $10 billion in the ascendant machine learning startup last year, and the two businesses have become tightly intertwined. In February, The Intercept and other digital news outlets sued Microsoft and OpenAI for using their journalism without permission or credit.)
The Microsoft document is drawn from a large cache of materials presented at an October 2023 Department of Defense “AI literacy” training seminar hosted by the U.S. Space Force in Los Angeles. The event included a variety of presentation from machine learning firms, including Microsoft and OpenAI, about what they have to offer the Pentagon.
The publicly accessible files were found on the website of Alethia Labs, a nonprofit consultancy that helps the federal government with technology acquisition, and discovered by journalist Jack Poulson . On Wednesday, Poulson published a broader investigation into the presentation materials. Alethia Labs has worked closely with the Pentagon to help it quickly integrate artificial intelligence tools into its arsenal, and since last year has contracted with the Pentagon’s main AI office. The firm did not respond to a request for comment.

One page of the Microsoft presentation highlights a variety of “common” federal uses for OpenAI, including for defense. One bullet point under “Advanced Computer Vision Training” reads: “Battle Management Systems: Using the DALL-E models to create images to train battle management systems.” Just as it sounds, a battle management system is a command-and-control software suite that provides military leaders with a situational overview of a combat scenario, allowing them to coordinate things like artillery fire, airstrike target identification, and troop movements. The reference to computer vision training suggests artificial images conjured by DALL-E could help Pentagon computers better “see” conditions on the battlefield, a particular boon for finding — and annihilating — targets.
In an emailed statement, Microsoft told The Intercept that while it had pitched the Pentagon on using DALL-E to train its battlefield software, it had not begun doing so. “This is an example of potential use cases that was informed by conversations with customers on the art of the possible with generative AI.” Microsoft, which declined to attribute the remark to anyone at the company, did not explain why a “potential” use case was labeled as a “common” use in its presentation.
OpenAI spokesperson Liz Bourgeous said OpenAI was not involved in the Microsoft pitch and that it had not sold any tools to the Department of Defense. “OpenAI’s policies prohibit the use of our tools to develop or use weapons, injure others or destroy property,” she wrote. “We were not involved in this presentation and have not had conversations with U.S. defense agencies regarding the hypothetical use cases it describes.”
Bourgeous added, “We have no evidence that OpenAI models have been used in this capacity. OpenAI has no partnerships with defense agencies to make use of our API or ChatGPT for such purposes.”
At the time of the presentation, OpenAI’s policies seemingly would have prohibited a military use of DALL-E. Microsoft told The Intercept that if the Pentagon used DALL-E or any other OpenAI tool through a contract with Microsoft, it would be subject to the usage policies of the latter company. Still, any use of OpenAI technology to help the Pentagon more effectively kill and destroy would be a dramatic turnaround for the company, which describes its mission as developing safety-focused artificial intelligence that can benefit all of humanity.
“It’s not possible to build a battle management system in a way that doesn’t, at least indirectly, contribute to civilian harm.”
“It’s not possible to build a battle management system in a way that doesn’t, at least indirectly, contribute to civilian harm,” Brianna Rosen, a visiting fellow at Oxford University’s Blavatnik School of Government who focuses on technology ethics.
Rosen, who worked on the National Security Council during the Obama administration, explained that OpenAI’s technologies could just as easily be used to help people as to harm them, and their use for the latter by any government is a political choice. “Unless firms such as OpenAI have written guarantees from governments they will not use the technology to harm civilians — which still probably would not be legally-binding — I fail to see any way in which companies can state with confidence that the technology will not be used (or misused) in ways that have kinetic effects.”
The presentation document provides no further detail about how exactly battlefield management systems could use DALL-E. The reference to training these systems, however, suggests that DALL-E could be to used to furnish the Pentagon with so-called synthetic training data: artificially created scenes that closely resemble germane, real-world imagery. Military software designed to detect enemy targets on the ground, for instance, could be shown a massive quantity of fake aerial images of landing strips or tank columns generated by DALL-E in order to better recognize such targets in the real world.
Even putting aside ethical objections, the efficacy of such an approach is debatable. “It’s known that a model’s accuracy and ability to process data accurately deteriorates every time it is further trained on AI-generated content,” said Heidy Khlaaf, a machine learning safety engineer who previously contracted with OpenAI. “Dall-E images are far from accurate and do not generate images reflective even close to our physical reality, even if they were to be fine-tuned on inputs of Battlefield management system. These generative image models cannot even accurately generate a correct number of limbs or fingers, how can we rely on them to be accurate with respect to a realistic field presence?”
Join Our Newsletter
Original reporting. fearless journalism. delivered to you..
In an interview last month with the Center for Strategic and International Studies, Capt. M. Xavier Lugo of the U.S. Navy envisioned a military application of synthetic data exactly like the kind DALL-E can crank out, suggesting that faked images could be used to train drones to better see and recognize the world beneath them.
Lugo, mission commander of the Pentagon’s generative AI task force and member of the Department of Defense Chief Digital and Artificial Intelligence Office, is listed as a contact at the end of the Microsoft presentation document. The presentation was made by Microsoft employee Nehemiah Kuhns, a “technology specialist” working on the Space Force and Air Force.
The Air Force is currently building the Advanced Battle Management System, its portion of a broader multibillion-dollar Pentagon project called the Joint All-Domain Command and Control, which aims to network together the entire U.S. military for expanded communication across branches, AI-powered data analysis, and, ultimately, an improved capacity to kill. Through JADC2, as the project is known, the Pentagon envisions a near-future in which Air Force drone cameras, Navy warship radar, Army tanks, and Marines on the ground all seamlessly exchange data about the enemy in order to better destroy them.
On April 3, U.S. Central Command revealed it had already begun using elements of JADC2 in the Middle East.
The Department of Defense didn’t answer specific questions about the Microsoft presentation, but spokesperson Tim Gorman told The Intercept that “the [Chief Digital and Artificial Intelligence Office’s] mission is to accelerate the adoption of data, analytics, and AI across DoD. As part of that mission, we lead activities to educate the workforce on data and AI literacy, and how to apply existing and emerging commercial technologies to DoD mission areas.”
While Microsoft has long reaped billions from defense contracts, OpenAI only recently acknowledged it would begin working with the Department of Defense. In response to The Intercept’s January report on OpenAI’s military-industrial about face, the company’s spokesperson Niko Felix said that even under the loosened language, “Our policy does not allow our tools to be used to harm people, develop weapons, for communications surveillance, or to injure others or destroy property.”
“The point is you’re contributing to preparation for warfighting.”
Whether the Pentagon’s use of OpenAI software would entail harm or not might depend on a literal view of how these technologies work, akin to arguments that the company that helps build the gun or trains the shooter is not responsible for where it’s aimed or pulling the trigger. “They may be threading a needle between the use of [generative AI] to create synthetic training data and its use in actual warfighting,” said Lucy Suchman, professor emerita of anthropology of science and technology at Lancaster University. “But that would be a spurious distinction in my view, because the point is you’re contributing to preparation for warfighting.”
Unlike OpenAI, Microsoft has little pretense about forgoing harm in its “responsible AI” document and openly promotes the military use of its machine learning tools .

OpenAI Quietly Deletes Ban on Using ChatGPT for “Military and Warfare”
Following its policy reversal, OpenAI was also quick to emphasize to the public and business press that its collaboration with the military was of a defensive, peaceful nature. In a January interview at Davos responding to The Intercept’s reporting, OpenAI vice president of global affairs Anna Makanju assured panel attendees that the company’s military work was focused on applications like cybersecurity initiatives and veteran suicide prevention, and that the company’s groundbreaking machine learning tools were still forbidden from causing harm or destruction.
Contributing to the development of a battle management system, however, would place OpenAI’s military work far closer to warfare itself. While OpenAI’s claim of avoiding direct harm could be technically true if its software does not directly operate weapons systems, Khlaaf, the machine learning safety engineer, said, its “use in other systems, such as military operation planning or battlefield assessments” would ultimately impact “where weapons are deployed or missions are carried out.”
Indeed, it’s difficult to imagine a battle whose primary purpose isn’t causing bodily harm and property damage. An Air Force press release from March, for example, describes a recent battle management system exercise as delivering “lethality at the speed of data.”
Other materials from the AI literacy seminar series make clear that “harm” is, ultimately, the point. A slide from a welcome presentation given the day before Microsoft’s asks the question, “Why should we care?” The answer: “We have to kill bad guys.” In a nod to the “literacy” aspect of the seminar, the slide adds, “We need to know what we’re talking about… and we don’t yet.”
Update: April 11, 2024 This article was updated to clarify Microsoft’s promotion of its work with the Department of Defense.
Contact the author:
Profits Skyrocket for AI Gun Detection Used in Schools — Despite Dubious Results

The Internet’s New Favorite AI Proposes Torturing Iranians and Surveilling Mosques

The Microsoft Police State: Mass Surveillance, Facial Recognition, and the Azure Cloud
Latest stories.

The End of Roe
Idaho Goes to the Supreme Court to Argue That Pregnant People Are Second-Class Citizens
Jordan Smith
The state says EMTALA, a law barring discrimination in emergency medical care, interferes with its abortion ban.

U.S. Troops in Niger Say They’re “Stranded” and Can’t Get Mail, Medicine
U.S. military service members interviewed for a congressional inquiry said intelligence reports about how bad the situation is were being suppressed.

Israel’s War on Gaza
Columbia Suspends Ilhan Omar’s Daughter One Day After Omar Grilled School Administrators
Prem Thakker
The university suspended three students out of hundreds participating in an on-campus encampment to protest the Israeli government.
Join Our Newsletter Original reporting. Fearless journalism. Delivered to you.
- AI Generator
2024 TCM Classic Film Festival Opening Night And 30th Anniversary Presentation Of "Pulp Fiction" - Arrivals

Get personalized pricing by telling us when, where, and how you want to use this asset.
- 30th Anniversary ,
- Arts Culture and Entertainment ,
- Attending ,
- California ,
- Celebrities ,
- Color Image ,
- Ella Bleu Travolta ,
- Film - Moving Image ,
- Film Festival ,
- Film Industry ,
- Film Premiere ,
- HD Format ,
- Hollywood - California ,
- John Travolta ,
- Mann Theaters ,
- Music Festival ,
- Premiere Event ,
- Pulp Fiction - Film Title ,
- Raw Footage ,
- Real Time Video ,
- Red Carpet Event ,
- TCL Chinese Theatre ,
- Online magazine

War Is Personal
Julia Kochetova
This project weaves together photographic images with poetry, audio clips, and music. The photographer’s multidisciplinary presentation grounds the facts of war in her subjective experience, and simultaneously allows her to inject more emotion and symbolism than photographs might convey on their own.
After almost ten years of fighting and tens of thousands of civilian and military casualties, war continued raging in Ukraine in 2023. While daily news media updates its audience with statistics and maps and international attention drifts elsewhere, the daily experience of Ukrainians living through the war is hard to comprehend for people outside the country. This web-based project brings together photojournalism with the documentary style of a personal diary to show the world what it is like to live with war as an everyday reality. By combining documentary imagery with poetry and music, the project provides not only an intimate glimpse into life under siege, but also a more profound look into how the war is being processed, and how despite tragedy, pain, and trauma, experiences can be shared across borders. Layering images with text and music, this interdisciplinary approach serves to ground the stark realities of war in the photographer’s subjective experiences. As a whole, the project is a complex exploration of the emotional and psychological toll of conflict, expressing not only loss, pain, desperation, and resignation, but also hope and resilience. Additional credits: Music: Daria Kolomiec Illustrations: Oleksandr Komiakhov Experience the interactive website.

Julia Kochetova (b. 1993) is a Ukrainian photojournalist and documentary filmmaker based in Kyiv. Her work focuses on firsthand storytelling as a method, researching topics of the war generation, post-traumatic stress disorder, and feminism. Kochetova studied journalism at Taras Shevchenko National University ...
Jury comment
The jury felt this project was the most creative entries in the Open Format category. The emotive images make for a standout presentation amidst many entries about the ongoing Russian invasion of Ukraine. Told by a Ukrainian photographer, the jury acknowledges this story's insider-perspective, which is especially evident in the thread of visual symbolism, strong use of color sequences, and collaborations with a Ukrainian illustrator and DJ. The engaging use of audio and illustration– particularly in the poetic diary and audio recordings– stood out, lending a film-like quality to the work.
2024 Photo Contest, World Press Photo Open Format Award
We use cookies to analyse the use of our website, identify individual preferences after obtaining your explicit consent, and enhance your user experience.
By agreeing, you are giving us consent to set cookies and accept our Cookie Policy .
- Share full article
Advertisement
Supported by
Cries of Sexism Greet a Nike Olympic Reveal
The sporting giant offered a sneak peek at its track and field outfits for Team U.S.A., and an unexpected backlash ensued.

By Vanessa Friedman
Ever since the Norwegian women’s beach handball team turned the fact that they were required to wear teeny-tiny bikini bottoms for competition into a cause célèbre, a quiet revolution has been brewing throughout women’s sports. It’s one that questions received conventions about what female athletes do — or don’t — have to wear to perform at their very best.
It has touched women’s soccer (why white shorts?), gymnastics (why not a unitard rather than a leotard?), field hockey (why a low-cut tank top?) and many more, including running.
So it probably should not have come as a shock to Nike that when it offered a sneak peek of the Team U.S.A. track and field unies during a Nike Air event in Paris celebrating its Air technology on Thursday (which also included looks for other Olympic athletes, like Kenya’s track and field team, France’s basketball team and Korea’s break dancing delegation), they were met with some less-than-enthusiastic reactions.
See, the two uniforms Nike chose to single out on the mannequins included a men’s compression tank top and mid-thigh-length compression shorts and a woman’s bodysuit, cut notably high on the hip. It looked sort of like a sporty version of a 1980s workout leotard. As it was displayed, the bodysuit seemed as if it would demand some complicated intimate grooming.
Citius Mag , which focuses on running news, posted a photo of the uniforms on Instagram, and many of its followers were not amused.
“What man designed the woman’s cut?” wrote one.
“I hope U.S.A.T.F. is paying for the bikini waxes,” wrote another. So went most of the more than 1,900 comments.
The running comedian Laura Green posted an Instagram reel in which she pretended to be trying on the look (“We’re feeling pretty, um, breezy,” she said) and checking out the rest of the athlete’s kit bag, which turned out to include hair spray, lip gloss and a “hysterectomy kit,” so the women would not have to worry about periods.
When asked, Nike did not address the brouhaha directly, but according to John Hoke, the chief innovation officer, the woman’s bodysuit and the man’s shorts and top are only two of the options Nike will have for its Olympic runners. There are “nearly 50 unique pieces across men’s and women’s and a dozen competition styles fine-tuned for specific events,” Mr. Hoke said.
Women will be able to opt for compression shorts, a crop top or tank and a bodysuit with shorts rather than bikini bottoms. The full slate of looks was not on hand in Paris but more will be revealed next week at the U.S. Olympic Committee media summit in New York. The Paris reveal was meant to be a teaser.
Mr. Hoke also pointed out that Nike consults with a large number of athletes at every stage of the uniform design. Its track and field roster includes Sha’Carri Richardson, who happened to be wearing the compression shorts during the Paris presentation, and Athing Mu. And there are certainly runners who like the high-cut brief. (The British Olympic sprinter Dina Asher-Smith , another Nike athlete, told The New York Times last summer that while she opts to run in briefs, she also leans toward a leotard style, rather than a two-piece.)
What Nike missed, however, was that in choosing those two looks as the primary preview for Team U.S.A., rather than, say, the matching shorts and tanks that will be also available, it shored up a longstanding inequity in sports — one that puts the body of a female athlete on display in a way it does not for the male athlete.
“Why are we presenting this sexualized outfit as the standard of excellence?” said Lauren Fleshman, a U.S. national champion distance runner and the author of “Good for a Girl.” “In part because we think that’s what nets us the most financial gain from sponsors or NIL opportunities, most of which are handed out by powerful men or people looking at it through a male gaze. But women are breaking records with ratings in sports where you don’t have to wear essentially a bathing suit to perform.”
The problem such imagery creates is twofold. When Nike chose to reveal the high-cut bodysuit as the first Olympics outfit, purposefully or not, the implication for anyone watching is that “this is what excellence looks like,” Ms. Fleshman said.
That perception filters down to young athletes and becomes the model girls think they have to adopt, often at a developmental stage when their relationships with their bodies are particularly fraught.
And more broadly, given the current political debate around adjudicating women’s bodies, it reinforces the idea that they are public property.
Still, Ms. Fleshman said, “I’m glad Nike put this image out as the crown jewel of Olympic Team design,” because it may act as the catalyst for another conversation that has been long overdue.
“If you showed this outfit to someone from the W.N.B.A. or women’s soccer, they would laugh in your face,” she said. “We shouldn’t have to normalize it for track and field anymore. Time’s up on that.”
Vanessa Friedman has been the fashion director and chief fashion critic for The Times since 2014. More about Vanessa Friedman
IMAGES
VIDEO
COMMENTS
Copy an image to your clipboard, then paste it into PPT by right-clicking and choosing Picture from the Paste Options group. (Image in sidebar source: Envato Elements.) Then, navigate to the PowerPoint slide where you want to paste your photo. Then, right-click and choose Picture from the Paste Options section.
Crop the images to a similar shape or size. Group and align the visuals in a consistent manner to increase scannability. Fit different-sized images into a cohesive shape and neatly aligned grid. 4. Maintain consistent tone and aesthetic quality of images if your presentation emphasizes a single overarching message.
A visual presentation is a communication method that utilizes visual elements such as images, graphics, charts, slides and other visual aids to convey information, ideas or messages to an audience. Visual presentations aim to enhance comprehension engagement and the overall impact of the message through the strategic use of visuals.
Alternatively, go to Insert > Pictures > Picture from file, and select the photo you want from your finder. 3. Avoid Photo Clutter. The photos you add to your PowerPoint should be presented one at a time, or minimally enough to maintain focus — too many photos can cause clutter and become distracting.
Check out our city presentation image options below to start your search for the perfect photos for your slideshow. Click on the image gallery below to view city presentation images. 5 Political Presentation Images. Whether you're running a local, statewide or national campaign, you're going to have to give a few speeches and presentations.
Tutorial on how to make your background image transparent in PowerPoint - the Format Background option. The Format Background menu will then appear. Click on Fill (1) then Picture or texture fill (2). Next, insert your picture either from your computer or online (3). The Format Background menu in PowerPoint.
Step 1: Inserting a Single Photo. Navigate to the "Insert" tab at the top of the PowerPoint interface. Click on the "Pictures" option. This will allow you to browse your computer and select the photo you want to add. Choose the desired image and confirm to insert it onto your slide.
Learn tips and tricks for incorporating images into your presentation design. Explore more Microsoft Powerpoint courses and advance your skills on LinkedIn L...
Create a presentation. Open PowerPoint. In the left pane, select New. Select an option: To create a presentation from scratch, select Blank Presentation. To use a prepared design, select one of the templates. To see tips for using PowerPoint, select Take a Tour, and then select Create, . Add a slide.
When images are cropped and full frame, the slide has an underlying tone that makes the presenter appear more intelligent. Depending on the subject matter, you might not even need a picture. For instance, if you are discussing sales and productivity, it might be more useful to simply float the words 'sales' and 'productivity' onto the ...
Select the image you want to modify. On the Picture Format tab, in the Arrange group, click the Rotate drop-down arrow and select the desired option. Rotating or flipping an image. Cropping an Image. Select the image you want to modify in your PowerPoint presentation. On the Picture Format tab, in the Size group, click Crop.
Visuals in Presentations: Best and Worst Practices. Sin 1: Using pixelated or blurry images. It's not that presenters do not see that the image in their slide is of poor quality but that is the last desperate move they make when they can't find any better visual in its place. Sorry folks, you have to search harder for that high quality image.
With Visme's Presenter Studio, you can record your presentation and share it with your audience. Record your screen, audio, and video, or switch off your camera for an audio-only presentation. Present asynchronously on your own time, at your own pace. Let your colleagues watch it at their convenience. Create Your Presentation.
Download and use 9,000+ Presentation stock photos for free. Thousands of new images every day Completely Free to Use High-quality videos and images from Pexels
Use Google Slides to create online slideshows. Make beautiful presentations together with secure sharing in real-time and from any device.
Images or pictures should be big (perhaps 20-25% of the page), bold, and have a clear purpose that complements the slide's text. Layout: Don't overcrowd your slides with too much information.
Free AI Presentation Maker for Generating Projects in Minutes. Generate ready-to-use presentations from a text prompt. Select a style and Visme's AI Presentation Maker will generate text, images, and icon. Customize your presentation with a library of royalty-free photos, videos, & graphics. Generate a presentation with AI.
Stock Images are a fairly new feature in PowerPoint. The images available in the Stock Image library are licensed by Microsoft from Getty, and possibly other sources, to be offered to PPT users in their presentations. From the Insert tab in the Illustrations group, click the drop-down arrow underneath Picture. Select Stock Images from the menu.
Free image databases such as Unsplash, Pixabay, and Pexels provide high-quality, copyright-free images for various presentation needs, with specialized features like PowerPoint plugins. The downside, everyone has access to these sites. It takes away from the custom and uniqueness of the presentation. Specialized stock photo sites like ...
In this video, you'll learn more about inserting pictures in PowerPoint 2019 and Office 365. Visit https://edu.gcfglobal.org/en/powerpoint/inserting-pictures...
Inserting an Online Image. Open your presentation in PowerPoint. Select the slide where you want to add the image. On the Insert tab, in the Images group, click Online Pictures (if you have Microsoft PowerPoint 2013 or a newer version, you'll be able to choose the source of the image, such as Bing or Onedrive).
Select the place in the slide where you want to insert the picture. On the Insert tab, in the Images group, select Pictures and then select This Device. In the dialog box that opens, browse to the picture that you want to insert, select that picture, and then select Insert. Tip: If you want to insert multiple pictures at the same time, press ...
Stock images are a gallery of free images available in PowerPoint. To insert a stock image into a PowerPoint slide, follow the 5 quick steps. Step-1: Click on the "Insert" tab. In the PowerPoint presentation, open the slide where you want to add the stock image. Then click on the "Insert" tab which is the third tab in the menu ribbon.
AI presentation maker. When lack of inspiration or time constraints are something you're worried about, it's a good idea to seek help. Slidesgo comes to the rescue with its latest functionality—the AI presentation maker! With a few clicks, you'll have wonderful slideshows that suit your own needs. And it's totally free!
Now, it will intelligently create a presentation with images (often generated through Dall-E or taken from Bing image search) Alternatively, you can prompt Copilot to create a presentation based ...
Microsoft last year proposed using OpenAI's mega-popular image generation tool, DALL-E, to help the Department of Defense build software to execute military operations, according to internal ...
Ella Bleu Travolta and John Travolta attend 2024 TCM Classic Film Festival Opening Night And 30th Anniversary Presentation of "Pulp Fiction" at TCL Chinese Theatre on April 18, 2024 in Hollywood,... Get premium, high-resolution news videos at Getty Images. Pricing. Boards. AI Generator. ... Explore collections of diverse images and videos ...
The emotive images make for a standout presentation amidst many entries about the ongoing Russian invasion of Ukraine. Told by a Ukrainian photographer, the jury acknowledges this story's insider-perspective, which is especially evident in the thread of visual symbolism, strong use of color sequences, and collaborations with a Ukrainian ...
Dominique Maitre/WWD, via Getty Images. ... who happened to be wearing the compression shorts during the Paris presentation, and Athing Mu. And there are certainly runners who like the high-cut brief.
Licensed image 1. Chemical Plants More than 200 chemical plants across the U.S. • Chemical plants make synthetic organic chemicals and polymers and resins • Some plants make ethylene oxide (EtO) and sell it or use it to make other products; one plant makes and uses chloroprene to