Using ZOOM to Record a Video Presentation
- August 7, 2018
- Alex Martinez
Our University paid version of ZOOM allows you to record your computer screen and voice to create a video that you can share with others via Canvas or a private web link. In this tutorial, we will illustrate how to use the ZOOM Cloud Recording option to record a presentation and share the video with someone.
This article covers:
- Using Zoom to record a video presentation
- Using the Zoom virtual slides background feature

How to install and log into your DU Zoom account
Zoom recording instructions, end your recording, share your presentation, related resources.
The videos below illustrates a few different ways to per-record a lecture video.
Using the Zoom Virtual Slides Background Feature
The free version of Zoom has limited features. For example, the free version does not allow for cloud recordings and has limited time restrictions. To get the full version of Zoom, go to http://udenver.zoom.us and click the “Download ZOOM” option.
After clicking the Download ZOOM option, you will be taken to the software download page. Select the “ Sign In with SSO ” option, this will allow you to use the fully functional paid university version of ZOOM.
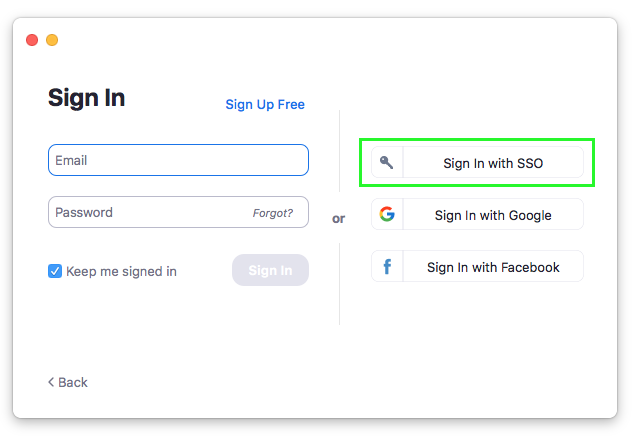
Type in udenver in the box.
Sign In with SSO – Company domain
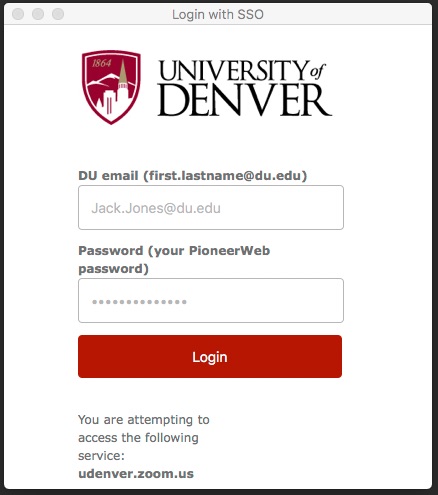
A new window will open in your browser. Type in your DU email and password and click “Login.”
Click “ New Meeting ” This will open a new window and start your webcam video.
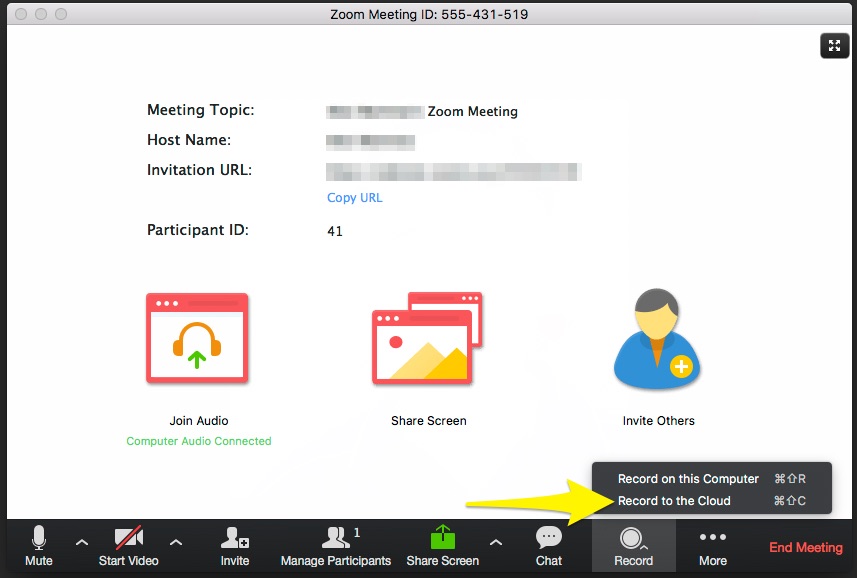
Click the Record button and select “ Record to Cloud ” option; you are now recording. If you wish to post your video on YouTube, Vimeo or some other video sharing website, click “ Record on this computer “, ZOOM will make a mp4 file after you end your ZOOM meeting.
To record your computer screen, click the “ Share Screen ” icon in the middle of the Zoom window. Select your main screen to record and press the “ Share Screen ” button.

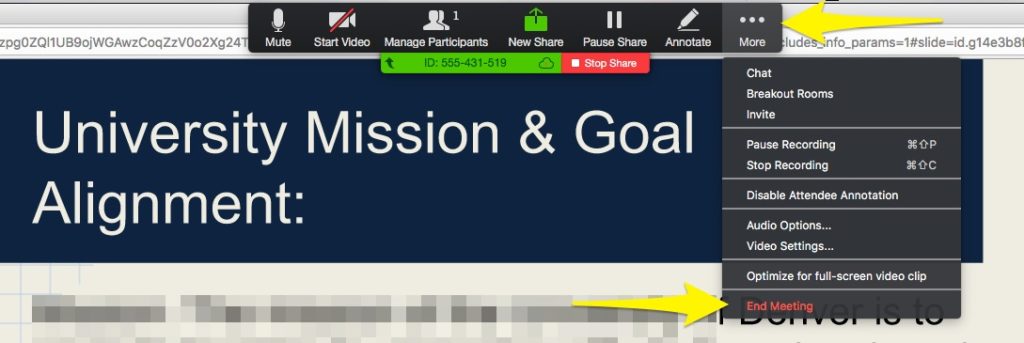
To end the recording, press the “ More ” menu option and select “ End Meeting “. Press the “ End Meeting for All ” button. This will end your meeting and start the upload process, so stay connected to the Internet.
If you selected “ Record to Cloud “, after your pressed the End Meeting button, your recording will automatically will be uploaded into your DU MediaSpace and DU Canvas My Media account. You should get an email sent to your University email after 20-30 minutes.
If you selected “ Record to this Computer “, after your pressed the End Meeting button, your recording will be saved on your computer. ZOOM recordings are saved in a folder called ZOOM within your documents folder. You can upload this mp4 file to YouTube, Vimeo or some other video sharing website.
- ZOOM Cloud Recording Settings and Features
- Getting Started with ZOOM Tutorials
- ZOOM Video and Audio Settings
- Sharing you Zoom via Canvas
- Sharing your Zoom recording without any security restrictions as an unlisted video
Related Articles
How to access zoom recordings in mediaspace, how to obtain a transcript file when conducting interviews using zoom, kaltura or a phone, how to use zoom for asynchronous and unmoderated usability testing, zoom – ways to use avatars in your class, zoom – short answer poll questions to gather student feedback, how to access zoom cloud recordings in canvas.
How to record a Zoom presentation and present in a virtual meeting?
- Share on Facebook
- Share on Twitter
By Nikolay Kaloyanov
in How-To Tutorials
2 years ago
Viewed 584 times
Spread the word about this article:
Many big companies had to establish home office practices in 2020 and Zoom became the most popular tool for virtual meetings . Virtual meetings are now crucial for business and education and they are here to stay.
If you’re a teacher and have difficulty maintaining class control, recording your lessons is a great way to save time . Instead of spending hours rehearsing your lessons and guiding students every step of the way, you can record a professional presentation for your students to watch at home. They’ll be able to watch it in their own time, over and over again – so you no longer have to answer questions on the spot!
Also, if you’re a business person, your audience can listen to the presentation afterward , thus they can learn more about your subject, and not embarrass themselves in front of other business people if they dare to ask questions.
And this is where Zoom came in. It successfully replaced physical meetings with digital ones. So, if you haven’t worked with Zoom yet, you will sooner or later get more familiar with it. In this guide, we will teach you how to record a Zoom presentation, so you can share with other people in the meeting your recent work or study progress.
Article overview: 1. Should you use Zoom for presentation recordings? 2. What is the difference between video conferencing and video recording tools? 3. How to record a Zoom presentation? 4. Bonus: How to Make a Transparent Camera Background When Presenting?
1. Should you use Zoom for presentation recordings?
Before we get into the essence of the topic, we need to mention a couple of reasons why Zoom is a good choice for recording presentations.
- It’s secure – popularity plays a huge role. Famous apps receive more updates and are more secure since they want to keep their customers behind them.
- The free version is more than decent – the free version allows you to have a video conference with other people for up to 40 minutes and have up to 100 call participants.
- It’s popular – Maybe you already tried Zoom and you are familiar with the software. Also, it is used by many companies and you can ask a colleague or friend for help.
2. What is the difference between video conferencing and video recording tools?
In one of our previous articles, we showed you how to record a presentation using different tools – like Loom, Panopto, QuickTime, and Game Bar. We highly recommend that you dedicate some time for practice at home before presenting to other people. Stuttering and mispronunciation of words are not good signs for how well you are presenting. On the other hand, video conferencing tools like Zoom and Google Meet are made for people who are recording in real-time.
3. How to record a Zoom presentation?
Zoom is a great application for delivering high-quality presentations with ease. The tool enables you to record your screen, camera, and voice with just a few clicks of a button. You need to follow some steps that we’ll show below.
Step 1. Create a Zoom account
The first step is to create a Zoom account . You are assigned to a free plan by default but you can also explore the paid options if you need to. If you’re assigned to present in Zoom but you’re a guest, it’s often the admin who holds a premium account.
Step 2. Download the desktop app
Once you have opened your Zoom account, you have to download the desktop app on your computer and install it.
Step 3. Create a meeting / join a meeting
When you are all set, you are now able to host your meeting. You have two options to start a meeting: New Meeting is the option used for immediate meetings, or Schedule – to plan your next meeting ahead of time. You can also join a meeting if someone shared a meeting link with you. There is a Meeting Id required for some meetings, so the host should provide you with that in advance. It’s a combination of numbers.

Step 4. Select how to join the meeting
Zoom will ask you to confirm which audio and video settings you are going to use. Many people prefer to present only the slides, while others want a more realistic experience – with the camera on. Start without video and Start with video are self-explanatory, so we won’t dig into details.
Step 5. Click on “Share Screen”
The next step is to select Share Screen from the Zoom control bar. You have to also press Record at the beginning of your meeting (or presentation), and just click Pause/Stop recording. Pausing the recording is reasonable when the others are discussing topics nonessential to the presentation (off topics), stopping the recording is the moment you want to end it.

Step 6. Pick the screen you want to share
You can share your screen (you will have two options if you have two monitors). When you have a Keynote or PowerPoint tab open, you will find them as available options. This is when you should click on them. If your presentation is made in Google Slides, or you have it in iCloud or OneDrive, then you have to find the relevant tab and pick a Slideshow mode for the applicable program. We advise you to remove any unrelated tabs beforehand, as they will be visible to your audience and could distract you to find the presentation file fast enough.

A quick tip : If you hold a lot of valuable info on many tabs, you can create a new Google Chrome window to click on it easily.
Step 7. End the recording
If you have presented everything, you can now end the Zoom recording. If there is nothing else to add, you have two options – Leave Meeting if you are invited or you are admin but you want the meeting to remain, or End the Meeting for all in case you want to end the Zoom meeting and kick other participants.
Step 8. Export the recording
When you are ready with the recording, you will have access to it. In order to download (or export) your recording, you should log into your Zoom account, then select My Account , and from the menu on the left click on Recordings . You will now have access to all recordings that you have made. To download them, you have to checkmark the ones you wish to download and click on Export .
4. Bonus: How to Make a Transparent Camera Background When Presenting?

Who wants to clean the entire room, in order to stream their camera? Nobody. Luckily, there is an option in Zoom where you can present with a webcam without any background. It is working with Microsoft PowerPoint, and it is really simple. (Please, have in mind that this works best with clean color backgrounds such as green or white).
- Start a new meeting.
- Then click on the “ Advanced ” tab.
- Select “ Slides as Virtual Background “.
- Pick your PowerPoint presentation.
- Finish the task by clicking on “ Share “
Recording a presentation requires different skills today. While several years ago, you could get away with a decent presentation design and compensate for it with great speaking abilities, nowadays programs give you plenty of options to add creative visuals and impress the audience. Zoom is an amazing app that enables you to present to up to 500 people at the same time. However, knowing how to record a presentation in Zoom is just one part of being successful.
If you find the guide useful, why don’t you check some of our other presentation-related tutorials:
- How to Calm Down Before a Presentation: 10 Practical Tips and Techniques
- How to Start and End a Presentation: 10 Practical Tips to Grab Attention and Make an Impact
- How to Make an Engaging Infographic: The Full Guide

Add some character to your visuals
Cartoon Characters, Design Bundles, Illustrations, Backgrounds and more...
Like us on Facebook
Subscribe to our newsletter
Be the first to know what’s new in the world of graphic design and illustrations.
- [email protected]
Browse High Quality Vector Graphics
E.g.: businessman, lion, girl…
Related Articles
20 sketch tutorials to master the ux design software, how to make an infographic in less than 5 minutes [step-by-step tutorial], 11 seo and keyword tips for your best google ranking, 21 indesign tutorials to become a great publisher in 2022, how to add fonts to google slides [quick guide], enjoyed this article.
Don’t forget to share!
- Comments (0)
Nikolay Kaloyanov
Nikolay is a copywriter with vast experience in Technology, Marketing, and Design. When he isn't playing with words and crafting texts, he watches sports and asks questions. He is a funny person...until you put him on a diet.

Thousands of vector graphics for your projects.
Hey! You made it all the way to the bottom!
Here are some other articles we think you may like:

How-To Tutorials
How to use google slides offline and work anywhere.
by Nikolay Kaloyanov

How to Make Cartoon Animation Like Ted-Ed
by Lyudmil Enchev

How to Add a GIF to Google Slides And Make it Look Nice?
Looking for design bundles or cartoon characters.
A source of high-quality vector graphics offering a huge variety of premade character designs, graphic design bundles, Adobe Character Animator puppets, and more.
Teaching with Technology
Information Technology
Recording a video lecture of yourself with Zoom and PowerPoint slidedeck
There are two different ways to record a video lecture of yourself and your PowerPoint slidedeck using Zoom.

Picture-in-picture View instructions

Video overlay View instructions
If you want to record your screen and PowerPoint without your video image (similar to an audio podcast, but with a visual component of your slides), follow these instructions .
Note: Before doing any recording, make sure to prepare your slidedeck to make room for the video image of yourself, so that your video image won't be overlaid on top of any text or images. Sometimes drawing a rectangular box on each slide helps to "save" a space for your video to go.
- Open the Zoom app and your PowerPoint file. Close all other files and applications.
- In Zoom, click “New Meeting” (orange icon); make sure your microphone and camera are on.

- Go to PowerPoint and launch your slideshow.
- At the bottom Zoom toolbar, choose Record, then choose “Record on this Computer” from the menu that pops up. Your lecture is now recording. Note: if you don't see the Record button, you may need to click on the "More" button in the Zoom toolbar, and then choose the "Record on this Computer" option.
- Start your lecture. Advance your slides with the right arrow key; return to a previous slide with the left arrow key.
- When you are finished, click on the "Stop Recording" button in the bottom Zoom toolbar. Note: if you don't see the Stop Recording button, you may need to click on the "More" button in the Zoom toolbar, and choose the "Stop Recording" option there.

- Trim the beginning and ending of your video (if needed) using QuickTime or another video editing tool, then upload your video to Ensemble, Reed’s media server.
Want to do more? Read how to annotate your PowerPoint slides with Zoom .

Want to create or adapt books like this? Learn more about how Pressbooks supports open publishing practices.
Working with Video (Kaltura, Canvas, Zoom, and PowerPoint)
Recording an individual or group presentation with Zoom
These instructions presume you are using a desktop or laptop computer.
Zoom will allow you to record video of yourself, other people in the meeting room, and/or your computer screen.
It is strongly recommended to use the Zoom Client for Meetings app for Windows, Mac, or ChromeOS when recording. See the instructions at the bottom of this page for downloading and logging into the Zoom app if you do not already have it installed.
Instructions
- Open the Zoom desktop app, make sure you are logged in with your IU credentials , and click the “ New Meeting ” button or go to zoom.iu.edu , log in, and click the “Start a New Meeting” button at the top right.

- You will want to record to Kaltura unless you plan on doing video editing with an app installed on your computer. If you are using the Zoom desktop app, choose “ Record to Cloud” to save your video to Kaltura. If you are using Zoom in a browser or on a mobile device, your recording will automatically go to Kaltura.
- When Zoom is recording you will see a small red dot at the top left of the meeting window.
- When you are done recording, click the “ Stop Recording ” button in the control bar and then click “ End ” at the bottom right and then “ End Meeting for All” .
- Once you end the meeting, your video will automatically be sent to your Kaltura account. The transfer is not instantaneous. You will receive an email notification when the video is ready.
- If you would like to edit your video, see the Editing your Video page .
Group recording with Zoom
Zoom allows you to record a presentation with multiple people at different locations. If your group is available to record together at the same time, you can use Zoom to record as described above.
Inviting group members
One person in the group will start the meeting using their Zoom account and then invite the rest of the participants. To invite others to the room,
- Click the “ Participants ” button on the control bar at the bottom of the Zoom window
- Click “ Invite ” at the bottom of the participant list that will open to the right of the meeting room
- Click the “ Copy Invite Link ” button
- Send your group members that link and they will be able to click on it to join you in the Zoom meeting room.
Recording tips
- The recording will show what the meeting host sees. If you want all participants showing all the time make sure the host’s view is set to show everyone by choosing Gallery View at the top right of the Zoom window. If you only want to record the video of the person talking, make sure the host’s view is set to only show the speaker by choosing “Speaker View” at the top right of the Zoom window.
- Rehearse your presentation to smooth the transitions between presenters.
- If you are using slides, it is easiest to have all the slides in one file and shared by the host instead of having each person share their own slides.
Submit Your Presentation to an Assignment
Once your video is in Kaltura, based on your instructor’s instructions:
- Submit your video by embedding it in a text box in an Assignment or Discussion .
- Submit your video by adding it to the Kaltura: Media Gallery for your course
Other information
A note on video processing.
When a video is first uploaded to Kaltura you will see a “media is being processed” animation where you expect your video to be.
Please be patient. Processing time depends on the length of the video and the number of other videos Kaltura is processing. It will appear once it has completed processing, though you may need to refresh your page to see it. You can embed a video that is still processing in Kaltura .
Downloading and using the Zoom desktop app.
- Go to the Zoom Download Center to download the Zoom Client for Meetings for your operating system.
- After the file downloads, open it and follow the prompts to install. You may need administrator privileges on the computer you are using.
- Choose “ Log in with SSO ” on the right
- Type “ IU ” in the text box and click “Next”
- Log in with your IU login and Duo
Verifying the Automatic Captions on Your Video
All video uploaded to Kaltura is automatically mechanically captioned using speech-to-text technology. If you’ve ever used speech-to-text, you know it’s never 100% accurate so you need to check your captions and edit as needed to make sure they are correct and not saying anything embarrassing. The mechanical captions appear fairly quickly on short videos once they’re uploaded. You can check them either in the Kaltura: My Media tool if it is available in your course, or at Kaltura Mediaspace. Instructions on checking and editing your captions are at Accessible Videos in this book.
A Canvas Semester Checklist Copyright © by Trustees of Indiana University is licensed under a Creative Commons Attribution-NonCommercial-ShareAlike 4.0 International License , except where otherwise noted.
How to Record a Presentation on Zoom [Detailed Guidance]

Zoom, as one of the popular online communication tools, is mostly used to launch and record online meetings . Besides the internal recording feature, it also comes with tools that make screen sharing, webcam capturing and annotation process simple. Therefore, it can not only make Zoom meeting recordings but also produce a video presentation. Since you may not hear this method before, here we will talk about how to record a presentation on Zoom with explicit wizard for you.
Using Zoom to Record a Presentation Video
You can initiate a Zoom meeting without any other participants since you still have all of Zoom’s presentation tools at your disposal as well as the ability to record. First and foremost, you need to register a free Zoom account and then follow the guidance on how to record a presentation on Zoom.
Settings about PowerPoint: If you are using PowerPoint, you are suggested to make configuration as below: Open the PowerPoint file >> Click Slide Show>> Click Set Up Slide Show >> Under Show Type choose Browsed by and individual (windows) . This operation will allow you to present in slideshow view without being in fullscreen mode since fullscreen mode will cause more difficulties to make recording with Zoom.
Now let’s turn back to the kernel aspect of Zoom to record presentation videos .
Start screen sharing of PowerPoint slides and webcam Step 1: Open the Zoom app on your computer and then initiate a New Meeting to begin a video conference session. If you’re asked to choose an audio conference option, click Join with Computer Audio .
Step 2: Now you will find the Share Screen option at the bottom of the Zoom window, choose it to enter the next operation interface. In the Share window, you need to select the active window display your PowerPoint slide. Check the box for Share computer sound and Optimize Screen Sharing for Video Clip options if your presentation includes sound and a video.
Step 3: Once you click the Share button, you will see your face on the screen. You can reposition and resize the webcam window as needed. When a window is being “shared” in Zoom, the Zoom control bar will minimize and move to the top of the screen. You need to keep on the sharing status during the recording process.
Start video presentation recording in Zoom Step 1: To begin recording in Zoom, find out the More icon in the Zoom control bar. There are two options for recording: Record on this Computer (files can be saved on your computer as mp4 file) and Record to Cloud (files will be uploaded into the Zoom Cloud server). Here you can decide according to your actual needs.
Step 2: Now you’re recording and ready to give your presentation. It’s highly recommended that you practice using Zoom before recording so that you’re comfortable with the controls before you record your presentation. Here you can do a short 30 seconds test run and publish your video to make sure that it sounds and looks good.
Step 3: You can change the window being recorded with ease during the recording process. When you are finished, click as below to end: More >> tap Stop Recording in the Zoom control bar at the top of the screen >> choose Stop Share >> End Meeting >> End Meeting for All .
Now you’ve got the recorded presentation video with Zoom but there are still some limitations by virtue of this method. 1. The whole process is a little complicated since you need to start a screen sharing process and then record in Zoom. 2. If your video was 10minutes, it could take 20+ minutes to process on the Zoom cloud server. Besides, you need to guarantee the internet connected status all the time. 3. You can’t make changes to settings and parameter like format, quality.
Record a Video Presentation with Better Alternative of Zoom
It can be denied that Zoom owns the basics of recording a presentation video. But if you want to produce professional-looking presentation videos, you are suggested to work with RecMaster . As a multi-function screen recorder, RecMaster is competent for online meeting saving including recording Microsoft Teams meeting , Zoom meetings as well as Webex Meeting capturing. Besides, it also performs well to create presentation involving videos like Keynote presentation video recording , PowerPoint screen recording and more. Additionally, it embeds all-in-one operation feature and carries out screen recording offline. At the same time, some advanced tools like editor, mouse cursor effect and annotation are all accessible. To sum up, with the help of RecMaster you can easily make slideshows as expressive videos . Now let’s see the workflow of RecMaster.
Step 1: Please download and install RecMaster on your computer in advance and follow the wizard to have an overview of this tool.

Step 2: Under Full screen mode you can display the whole content of your PowerPoint. If you only want viewers to focus on the slide at present, you need to choose Custom area option.
Step 3: Using a webcam plugged-in will make your video more reliable and personal. Besides, you’re suggested to turn on microphone button so that your real-time narration can be recorded as well. If you’re making presentation videos for social platforms like YouTube, you are suggested to record as popular formats like MP4. >> Best formats for YouTube upload, download, record etc.
Step 4: Now it’s time to make PowerPoint as videos by pressing REC button. You can highlight key points or add mark-ups by means of mouse cursor effect and annotation tool. Step 5: End the recording process with Stop icon. Here you can perfect your recorded video by cutting out unwanted clips. When all the processes are over, you can upload the video to YouTube or Google Drive in one-click workaround.
Conclusion This article illustrates how to record a presentation on Zoom and at the same recommend the easier solution for presentation video making. You can choose the suitable one as you like to assist your recording work.
See also: How to record Webex meeting on computer How to record GoToMeeting on your computer How to record Google Hangouts/Meet video or voice call
Screen recording made easy.
Record every moment on your PC or Mac within few clicks.
How to Screen Record KissCartoon Episodes?
How to Screen Record hianime.to?
How to Record Screen at 9:16 Aspect Ratio?
How to Screen Record aniWatch Episodes?
How to Screen Record 4Anime Episodes?
How to Screen Record Funimation Before Moving to Crunchyroll Subscription?
How to Record Crunchyroll on Windows 10/11?
How to Screen Record Aniwave Anime Videos? (Formerly 9Anime)
Best Anime Streaming Services of 2024 [with Guide to Record & Download]
How to Record Chamet Videos on PC: Step-by-Step Guide
[Solved] PowerDirector Screen Recorder Isn’t Picking up Audio
How to Download Online Songs on a PC?
How to Record Screen with Webcam on Windows and Mac: A Comprehensive Guide
How to Record Snapchat Videos? [on Windows/Mac/iOS/Android]
How to Record Full Gaming Screen on Desktop
RecMaster is professional screen recording software which offers different kinds of recording modes. RecMaster is professional screen recording of recording modes.
--> Free Trial --> MacOS X 10.11 or above --> Free Trial --> window 10/8/7 -->