- Passper WinSenior
- Passper for Excel Online Functions
- Passper for Word Online Functions
- Passper for PowerPoint
- Passper for PDF
- Passper for RAR
- Passper for ZIP

Top 5 Methods to Make PowerPoint Read Only
There are a lot of reasons why you would want to make a PowerPoint document read-only. But perhaps the most important one is to keep someone else from making changes on the document. PowerPoint presentations are often sensitive and just a small change can cause the whole presentation to lose meaning. Therefore, it would make sense to make the document read-only as soon as it is done to prevent accidental changes that can alter the whole concept of the presentation. You may also want to protect the content of the presentation and the easiest way to do that would be to make it harder to edit the presentation.
Whatever your reasons for making your PowerPoint presentation read-only, this article will share with you numerous ways you can do that. We will also take the time to share with you the easiest way to unlock a read-only PowerPoint presentation.
Part 1. How to Make PowerPoint Read Only
The following are just some of the ways you can make a PowerPoint presentation read only.
1. Set Presentations to Read Only
2. set password to modify presentation, 3. burn powerpoint to cd/dvd, 4. convert powerpoint to read-only video, 5. set restrict access.
One of the easiest ways to make your presentation read only is to mark it as "Final". This is a feature available in MS Office that is used to let other users know that you have completed all edits on the document. Here's how to do it;
Step 1: Open the document you want to protect and then click on "File".
Step 2: Click on "Info" and then select "Protect Presentation". Step 3: In the options on the drop-down menu, click on "Mark as Final".

Step 4: Click "OK" in the dialogue box that appears and click "OK" again to confirm.
The next time you open the document, you will see a yellow "Marked as Final" message at the top. If you want to edit the document, simply click on "Edit Anyway" to restore your editing privileges.

You can also choose to set a password to restrict modification of the document. Here's how to do that;
Step 1: Open the presentation and then click on "File > Save As".
Step 2: Click on "Tools" at the bottom of the "Save As" dialogue box and then click on "General Options".
Step 3: In the box marked "Password to Modify", type in the password you would like to use and then click "OK". Reenter the password and then click "OK".

Step 4: Click "Save" to save the PowerPoint presentation and the next time someone tries to edit the document, they will be required to enter the password.
Another really easy way to make a PowerPoint not read only is to burn the file onto CD/DVD. There are a lot of programs that can help you do that and since storage media like CD/DVD is read-only, you are assured of the safety of the data on the presentation. It is also much easier to playback the presentation when it is on CD/DVD.

In the same way, you can also convert your PowerPoint presentation into read-only video. This will not just make it impossible for others to edit the content on the presentation, but it will also make it easier to distribute the presentation.
There are a lot of tools that can help you convert the PowerPoint presentation to video, including screen recorders like Adobe Captivate and Camtasia Studio or Quick Time Movie and Windows Movie Maker.

You may also be able to prevent others from editing the presentation if you use the "Restrict Access" option. The following is how to do that;
Step 1: Open the document and then click on "File".
Step 2: Click on "Info > Protect Document" and from then choose "Restrict Access" from the dropdown menu.

This option will allow people to open and read the document but they will be unable to print, edit or copy any of the content on the presentation.
Part 2. How to Unlock a Read Only PowerPoint
What if you find yourself unable to edit a read only PowerPoint presentation? If someone has sent you an incomplete presentation that has restrictions, the best way to lift these restrictions and edit the document is to use Passper for PowerPoint . This is a password recovery tool that makes it very easy for you to unlock any presentation and lift any restrictions placed on the document. The following are some of the program's features;
Check 2,900,000 passwords /S: It has one of the fastest password recovery rates in the market because it can check up to 2,900,000 passwords per second.
4 Attack Modes Available: 4 different attack modes are used to make it easier to recover the password in the shortest time possible. The fact that it has a database of millions of frequently used passwords is just an added bonus.
Remove Edit Restrictions: It can remove any editing restrictions on the presentation within 2 seconds in a single click.
It is compatible with all versions of MS Office and 100% safe to use. None of the data on the program will be lost or damaged in any way during the recovery process.
Free Download Buy Now
Follow these simple steps to use Passper for PowerPoint to unlock a read-only presentation.
Step 1: Download and install Passper for PowerPoint on your computer and then launch the program. In the main window, click on "Remove Restrictions".

Step 2: Import the presentation into the program and then click on "Remove".

In a few seconds all editing restrictions will be lifted from the document, allowing you to edit the presentation any way you want.
How to Recover PowerPoint Presentation if You Can't Open the File
If you are unable to open the presentation because it is password protected and you don't have the password, Passper for PowerPoint can also help you easily recover the password and use it to open the presentation. Here's how to do that;
Step 1: Open Passper for PowerPoint and choose "Recover Passwords" in the main window.

Step 2: Add the protected presentation into the program and then select a recovery method to use. Click "Recover".

Step 3: The program will immediately begin the process of recovering the password. When the process is complete, the password will be displayed on the screen. You can use it to unlock the document.

Make PowerPoint read only is a simple, yet highly effective technique to help you prevent accidental edits on your presentation and also keep the content safe. But sometimes this well-meaning feature can keep you locked out of your own document. If you find yourself unable to access the PowerPoint presentation or unable to edit it, Passper for PowerPoint presents the best solution to help you recover the password or lift restrictions thanks to its faster recovery speeds, more attack methods and higher recovery rates.
Related Articles:
- Top 9 PowerPoint Password Recovery Software That Unlock Your PowerPoint
- 6 Free Ways to Lock PowerPoint from Editing
- [Updated] 4 Methods to Unlock Read-Only PowerPoint

By Ronnie Barnes to PowerPoint
Posted on Mar 17, 2023 ( Updated: Mar 17, 2023)
Ronnie Barnes, a blogger with more than 5-year experience in writing tips about password recovery for Windows and office files.
How to Make a Microsoft PowerPoint Presentation Read-only

Sharing a PowerPoint presentation with others is common practice in business settings. However, you may not want recipients to edit or change your carefully crafted presentation. Making a PowerPoint presentation read-only prevents unauthorized changes while still allowing viewers to see the content.
There are a few simple ways to make a PowerPoint presentation read-only, both built into PowerPoint itself and using other Microsoft services. Read on to learn how to lock down your presentation and protect it from unwanted alterations.
Mark the Presentation as Final in PowerPoint
The easiest way to make a PowerPoint presentation read-only is to mark it as final right within PowerPoint. Here are the steps:
- Open the PowerPoint presentation you want to make read-only.
- Click on the “File” tab.
- Select “Info” on the left side of the menu.
- Click on “Protect Presentation” and choose “Mark as Final” from the drop-down menu.
Marking a presentation as final sets it to read-only mode within PowerPoint. Other users will be able to view the presentation but will be prevented from making changes.
There is also an option to select “Always Open Read-Only” which prompts users to actively choose to edit the presentation rather than opening it in editing mode by default.
The main downside of this method is users can still override the read-only status by clicking “Edit Anyway.” So it discourages edits but does not completely prevent them.
Set File Permissions in SharePoint or OneDrive
If you store your PowerPoint presentation in SharePoint or OneDrive, you can restrict editing permissions through those platforms. Here’s how:
- Upload or save your PowerPoint file to OneDrive or a SharePoint document library.
- Right click on the file and select “Manage Access.”
- For each person you share with, change their access from “Can Edit” to “Can View.”
With editing rights revoked at the platform level, users will only be able to view or download the presentation in SharePoint or OneDrive. To enable co-authoring abilities again, you can restore edit access.
Save as PDF
Another way to effectively make a PowerPoint presentation read-only is to export or save it as a PDF. PDF files are inherently non-editable documents.
Simply open your presentation in PowerPoint and select “File > Export > Create PDF/XPS.” The presentation will save as a PDF, after which you can share or distribute the new non-editable version.
If you want recipients to still be able to view the PowerPoint and its animations/transitions, you can also save it as a PowerPoint Show (.ppsx) from the “Save As” menu. This format runs the slideshow without the editing interface.
Set a Read-Only File Attribute
For Windows users, you can make a PowerPoint presentation read-only by adjusting file attributes rather than relying on PowerPoint settings.
- Locate your PowerPoint file in File Explorer.
- Right click, select “Properties”, and click the Attributes tab.
- Check the box next to “Read-only.”
- Click “OK” to save the changes.
Now Windows will treat the file as read-only system-wide, blocking any program from opening it in an editable mode. You can repeat these steps to remove the read-only status later on.
Use DRM Software
If you need to share presentations with highly sensitive information, consider using digital rights management (DRM) software. DRM tools like Microsoft Azure Rights Management let you encrypt files, set detailed usage permissions, and revoke access remotely.
While the methods above discourage or hinder editing, DRM solutions like Microsoft’s provide complete protection of intellectual property. Explore enterprise-grade DRM tools if unauthorized changes to a shared presentation could cause harm.
Preventing unintended modifications to a PowerPoint presentation ensures your original version remains intact. The techniques covered in this article, from marking as final to adjusting file attributes, make it simple to keep your presentation read-only and guarded from unwanted changes.
Choose the read-only method that aligns with your use case, whether it’s quick sharing inside your organization or distributing sensitive materials with partners. Just remember edits can still happen if recipients override some read-only settings within PowerPoint itself. For true restrictions, rely on platform permissions, file formats like PDF, or robust DRM systems.
About The Author
Vegaslide staff, related posts.

How to Insert Superscript in PowerPoint

How to Flip Shape in PowerPoint

How to Hide Text Until Clicked in PowerPoint

How to Create a Hyperlink in PowerPoint 2010


- Password Recovery Windows Password Tuner Office Password Tuner Word Password Tuner Excel Password Tuner PowerPoint Password Tuner Access Password Tuner PDF Password Tuner Outlook Password Tuner Outlook Email Password Tuner RAR Password Tuner ZIP Password Tuner iTunes Password Tuner SQL Password Tuner WiFi Password Tuner
- Support Support Center Frequently Asked Questions Download Center Software Download Resource Center Tips & Tricks
How to Make PowerPoint Presentation Read-only

It is effective to restrict permission to your PowerPoint presentation (PPT). After reading this article you will know how to make a PowerPoint presentation read-only with simple methods. Those methods applies to different versions of PowerPoint (2003, 2007, 2010, 2016, etc.).
Way1: Restrict Permission by People
- 1. Open the PowerPoint that you want to set read-only protection.
- 2. In the ribbon, select the " File " tab. And then click the " Info " in the left of the panel.

- 3. Click the " Protection Presentation " function button, and then four options will show up. We will choose the second one " Restrict Permission by People ".
- 4. Then select " Restricted Access " to set restrict permission to this presentation.

Way2: Save PowerPoint Presentation with a Read-only Password
This method aims to create a read-only password for your PowerPoint presentation. Next time, you need to input the password to open and edit this PowerPoint Presentation. Or you can just get into read only mode. It is a very reliable way to set a password to restrict the read and write permissions of the PPT.
- 1. Open your presentation. Click the " File " in the ribbon. And then click " Save as ".

- 2. A window pops up, in which you need to click the " Tools " in the bottom of the panel.
- 3. Select " General Options ".

- 4. Create a password to modify the shared PowerPoint presentation. Then click OK .

Ater that, you can save the PowerPoint with modify password so that others can only read it if they do not know the password.
Way3: Mark PowerPoint Presentation as Final to Make it Read-only
Way-3 is to mark the PowerPoint presentation as the final version and make it read-only. But the permission can be easily removed somewhat. Choose carefully according to your personal use.
Referring to the Step-3 of Way-1 , and select the first option " Mark as Final ". After clicking it, the presentation will immediately get protected to discourage editing.

Way4: Set PowerPoint Presentation Read-only with File Lock Tuner
With Cocosenor File Lock Tuner , you can easily make PowerPoint presentations read-only so that others can not edit the content. It is also possible for you to restrict permissions of PowerPoint documents in bulk.
1. Run Cocosenor File Lock Tuner and then hit the File button to add your PowerPoint presentation.

2. Tick the checkbox of your presentation and then click Set properties option.

3. Choose Read-only option and then hit the Set button on the bottom right.

4. In seconds, the PowerPoint presentation is made to read-only.

After that, others are restricted to modify your presentations. But they can still save the content to another file name and modify the content. If you want to attach high security to the PowerPoint presentation, you can encrypt it with password by using File Lock Tuner.

Related Articles
- How to make a Word document read only - Word 2013/2016
- How to Unlock or Remove Read-only Permission from PowerPoint Presentation
- Remove password protection from PowerPoint 2013, 2016
- How to Unlock Your PowerPoint Presentation When Forgot Password
Hot Articles
- Windows 10 Forgot Login Password Reset without disk or Microsoft account
- Windows 8 Forgot Password Reset Without Disk
- Windows 7 Administrator Password Reset without CD or Disk
- How to Unlock encrypted iPhone backup without password
- How to export contacts and text messages from iPhone or iTunes backup
- More Articles >>
- Windows Password Tuner
- Office Password Tuner
- PDF Password Tuner
- RAR Password Tuner
- iTunes Password Tuner
- More Products >>
You may also like
- 3 cases to disable read only mode in Excel 2010/2013/2016
- How to disable read only to enable editing in Word 2013/2016
- Free Online Office Excel/Word/PowerPoint
- Six Practical Tips to Help You Save Power for Your Laptop
- Create Word Doc, Excel Workbook, PPT, Free Online
- How to open password protected PDF file without password
- How to Open Password Protected PPT/PPTX File without Password?
- Two Ways to Create a Windows 10 Bootable USB Drive for Free
- Download Center
- Cocosenor Store
- Excel Password Tuner
- Support Center

Copyright(C) 2013-2024 Cocosenor Studio All Rights Reserved.
- View AMP version
- Gmail login
- Hotmail login
scalar email
Exactly how to Make a Microsoft PowerPoint Presentation Read-only
Read Next →
Just How to Add Titles to Slides in Microsoft PowerPoint
Microsoft lists, a new task manager, is free if you’re fast, exactly how to create a pivot table in microsoft excel.
If you intend to prevent others from making edits to your Microsoft PowerPoint discussion or allow them know the data you sent out is the last variation, you can do so by making it read-only. Right here’s exactly how it’s done.
Open the presentation that you wish to make read-only, then click the “File” tab.
Next, in the left-hand pane, pick “Info.”
You’ll currently see a “Protect Presentation” section, which allows you (to a level) shield against any type of modifying of your presentation. Click “Protect Presentation.”
Once chosen, a drop-down food selection will show up with these four options:
All of these alternatives benefit shielding the stability of your Microsoft PowerPoint, however both we’ll require here to make the presentation read-only are (1) Always Open Read-Only and also (2) Mark as Final.
Choosing either alternative will prevent the viewers from editing and enhancing the presentation– unless they opt-in to do so.
If you picked the Always Open Read-Only choice, the reader will certainly see this message when opening up the discussion:
“To prevent unintentional changes, the author has established this file to open as read-only.”
If you chose the Mark as Final alternative, the visitor will see this message:
“A writer has actually noted this presentation as final to inhibit editing and enhancing.”
In either situation, your Microsoft PowerPoint presentation is currently set to read-only. However, in both situations, all the reader has to do to edit the discussion is click the “Edit Anyway” switch.

Helpdesk Baruch College
Leave a reply cancel reply.

Except where otherwise noted, content on this site is licensed under a Creative Commons Attribution-NonCommercial-ShareAlike 4.0 International license.
Need help with the Commons?
Email us at [email protected] so we can respond to your questions and requests. Please email from your CUNY email address if possible. Or visit our help site for more information:
- Terms of Service
- Accessibility
- Creative Commons (CC) license unless otherwise noted
Is Your PowerPoint Read-Only? Here’s How to Edit and Save it!
By: Author Shrot Katewa

Are you trying to open a PowerPoint presentation that sadly opens up as a read-only file? If the answer is yes, then you are not alone! This isn’t a pleasant situation for anyone, however, there are many complications and reasons behind why this happens. On a larger note, the solution to this problem is fairly simple.
To edit your PowerPoint read-only file, simply click on the “Edit Anyway” button on the horizontal yellow bar under the ribbon. You can also click on the “File” tab. Then, click on “Info”. Next, locate and click on “Protect Presentation”, and finally click on “Mark as Final”.
Interestingly, one of the reasons why your presentation shows as read-only is because of an in-built feature within PowerPoint! (We’ll get to the details of that in a bit). So, this is not something that you need to fear. We just need to be a bit more informed on how to fix it!
So, in this article, I will be sharing with you the details of why a PowerPoint file shows “Read-only”, and what can you do to save the file and make it editable. Let’s get started!
A Quick Note Before We Begin – if you want to make jaw-dropping presentations, I would recommend using one of these Presentation Designs . The best part is – it is only $16.5 a month, but you get to download and use as many presentation designs as you like! I personally use it from time-to-time, and it makes my task of making beautiful presentations really quick and easy!
Why is My PowerPoint Read-Only?
One of the most common reasons for PowerPoint to become a read-only file as when it has been done so intentionally. Why would anyone want to do this intentionally?
1. “Mark as Final” Feature is Enabled
Well, it turns out, PowerPoint actually provides a built-in feature known as “Mark as Final”. This feature turns the PowerPoint file into “Read-Only” mode . The “Mark as Final” feature of PowerPoint is designed to let the readers know that the version of the presentation that they are viewing is the final version and no changes are to be made to that version!
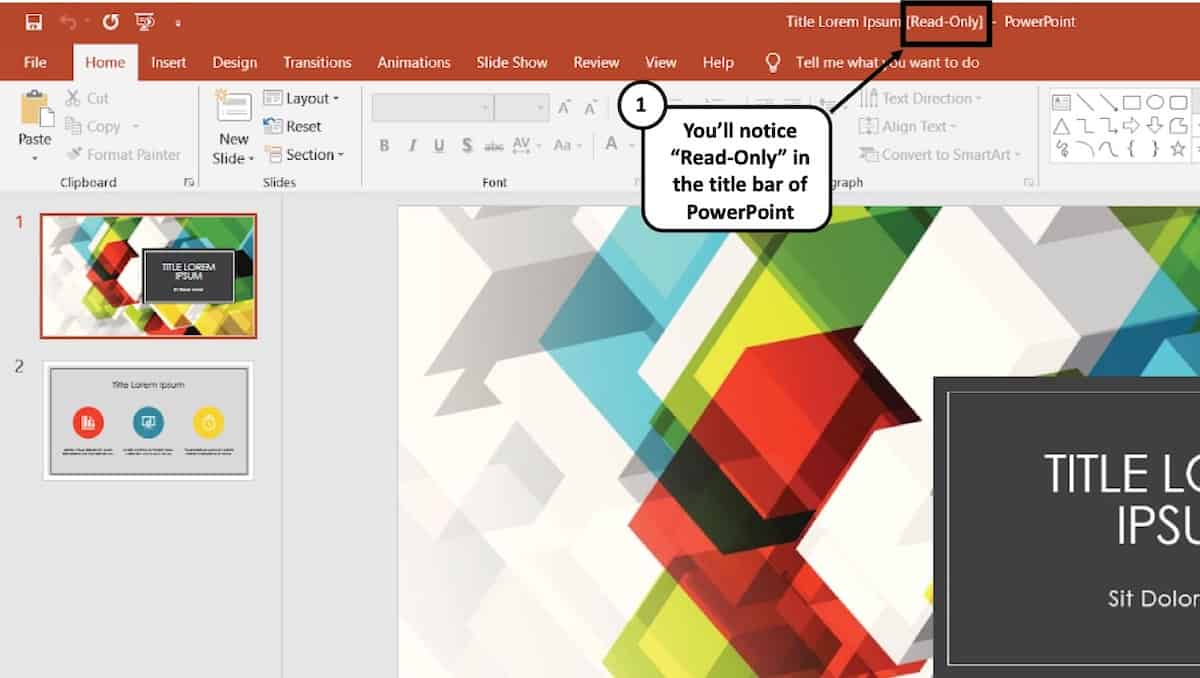
Thus, even though such a presentation can be opened by viewers, they will see a “Read-Only” prompt both at the top of the PowerPoint application where the title appears (otherwise known as the title bar), and a yellow strip just below the ribbons with a button that says “Edit Anyway”.
Obviously, there are other ways to prevent your viewers from editing your PowerPoint file which is more fool-proof. More on that later in the article.
2. PowerPoint has just Recovered from a Crash
Another common reason for PowerPoint to get into “Read-Only” mode is when your PowerPoint may have recovered from a crash . Irrespective of whether the PowerPoint application was abruptly closed intentionally or unintentionally when a presentation file was open, PowerPoint may open the file in “Read-Only” mode when restarted.
PowerPoint automatically marks the previous saved version as the final version of the file and opens it up in the read-only mode.
3. Same PPT file is Opened Twice at the Same time!
Lastly, PowerPoint may also convert a presentation into “Read-Only” mode when two presentations that have the same name are opened at the same time. Alternatively, the file may also become read-only when the same file has been opened twice by mistake.
This can happen especially when PowerPoint takes some time to respond to the user’s first request to open a presentation file leading to the user double-clicking on the same file twice. Although there are checks and balances in place to avoid this issue, nevertheless, such issues can still take place.
Furthermore, if you have perhaps saved a presentation file that has the same name in two different locations on your computer, and you open both of them together, PowerPoint can sometimes open the file that has been opened later in read-only mode.
How to Unlock Read-Only in PowerPoint?
As annoying as it may seem, it is quite easy to unlock the read-only mode from PowerPoint!
Here’s how to exit from the “Read-Only” mode in PowerPoint –
- Open the “Read-Only” PowerPoint (PPT) file.
- At the top part just below the ribbon options, you’ll see a long yellow banner.
- Hover your mouse towards the banner and click on the option “Edit Anyway”.
You will now be able to edit the PowerPoint file as you usually would.
Furthermore, make sure that you haven’t opened the same file twice by chance. If so, try to close one or both the files and re-open the presentation once again.
Why Does Read-Only Keep Coming Back in PowerPoint?
One of the key reasons why your PowerPoint file may become read-only every time you open it is because the “Mark as Final” feature has been enabled in the settings. As long as this feature has been enabled, your PowerPoint file may keep reopening as a read-only file from time to time.
Let us understand how to turn off read-only mode in PowerPoint so that you don’t have to deal with this issue.
How to Turn Off Read-Only Mode in PowerPoint?
Even though clicking on “Edit Anyway” as described above will fix the issue, however, if the presentation has been marked as final by the original author, it may continue to show the read-only mode sometimes.
In order to fix that issue, you will need to take a slightly longer route. Here’s a step-by-step process to turn off read-only mode in PowerPoint.
1. Start by opening your “read-only” PowerPoint presentation.
2. Hover to the top menu and then click on the tab named ‘File’. Then click on Info.
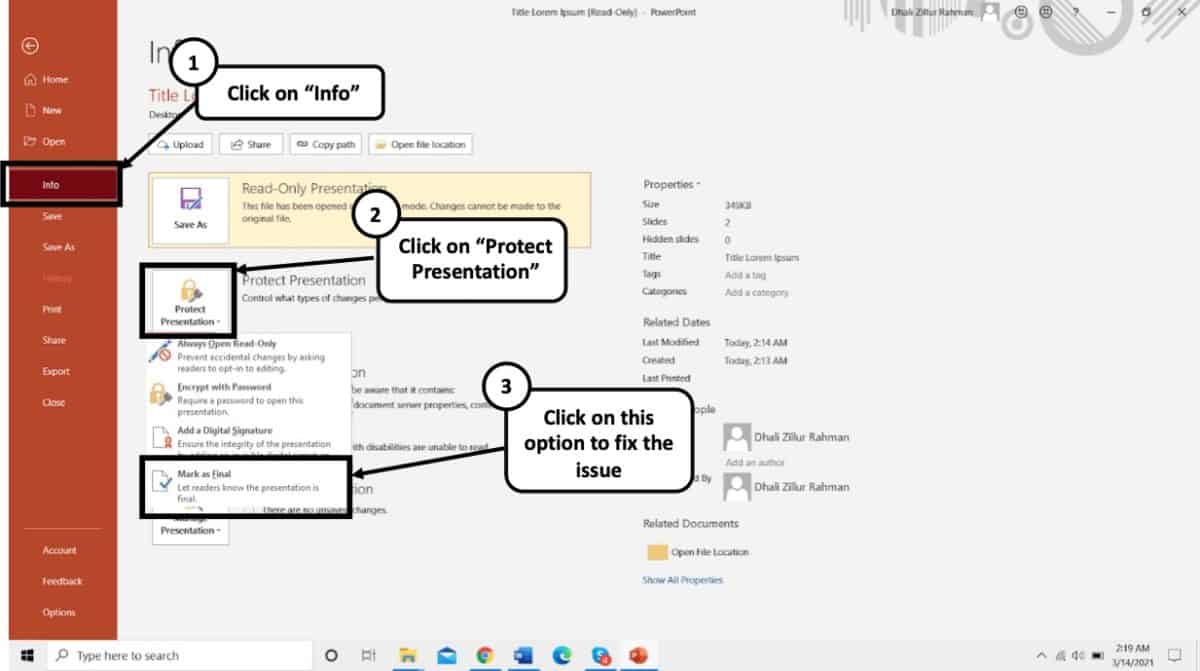
3. There will be a ‘Protect Presentation’ option in clear yellow.
4. You might come across a dialog box telling you “The presentation has been marked as final to discourage any editing.”
5. To undo this feature, simply click on Protect Presentation. A menu will appear, click on the ‘Mark as Final’ to fully unlock the desired presentation.
After doing this you will see that the Read-Only suffix from your PPT file’s name will be gone and you would be able to freely edit further.
How to Edit a Read-Only PowerPoint File?
After you have done removing the read-only feature from your PowerPoint, you can simply edit texts, add animations, images and use features with absolute free will. Just getting through the read-only barrier is the only thing that you need to know to get started with editing.
Interestingly, you can also get out of the read-only mode in PowerPoint by saving the file with a different name. This will not only allow you to get rid of the read-only mode but also allow you to save a copy of the edits that you may have made while the file was in the read-only mode.
Let’s learn how to save a read-only presentation file.
How to Save a Read-Only PowerPoint File?
Saving a PowerPoint file that is in a read-only mode is rather quite simple. Although you don’t need to enable “Edit Anyway”, doing so would be recommended. The next step is really saving a file in a different location on your computer with either the same name or under a different name.
Here’s how you can save a read-only PowerPoint presentation –
- Click on the “File” tab.
- Click on “Save As” from the option provided on the left part of your screen.
- Navigate to a folder location where you want to save the file. Feel free to change the name of the file if needed.
- Click “Save”.
- Lastly, browse to the specific folder where you saved the PowerPoint file. Open it and check to see if the “Read-Only” mode has been removed.
Why Does Every PowerPoint File Open in Read-Only Mode?
As we have learned so far, one of the key reasons for PowerPoint to open a presentation file in read-only mode is when it has been “Marked as Final” by the author of the file. By now, you’ve also learned how to get rid of this problem.
However, the “Mark as Final” feature should only restrict the specific file shared by a particular author . It typically shouldn’t make all your PowerPoint files “Read-Only”.
If this is the case for you, the problem may be slightly different. Let’s understand this a bit further.
Sometimes, t he file or the folder in which the PowerPoint presentation has been saved itself becomes read-only due to a glitch in the operating system . There are several reasons why this could happen. I won’t go into details of each of those reasons. However, it is important for us to understand how to make this file or folder editable.
Here’s what you could do to remove the read-only from a particular presentation file –
- Navigate to the folder in which the file has been saved, and locate the file.
- Right-click on the file and select “Properties” from the window the just opens up.
- A new window will open up. Click on the “General” tab. Next, clear the check-box from the “Read-Only” attribute option.
- Finally, click “OK” and save your changes.
This should solve the problem. If it still doesn’t fix the issue, you may want to check whether the folder in which the PowerPoint file has been saved has the editable rights to it and is not marked as read-only.
If the folder is also being marked as read-only, you will need to remove the “Read-Only” attributes from the folder first. Here’s an article that can help you remove the read-only attribute from a folder in Windows.
How to Prevent PowerPoint from Being Edited?
There are quite a few different ways in which you can lock a PowerPoint file or prevent it from being edited. Here are some of the options that you can choose from –
- Save a PowerPoint File as Read-Only
- Password protect your PowerPoint file.
- Convert a PowerPoint file into a PowerPoint Show File (PPSX)
- Convert a PowerPoint file into a PDF file
- Convert a PowerPoint file into a Video
Let’s look at some of these methods in detail –
Method 1 – Save a PowerPoint File as Read-Only
To get this done, simply do the opposite of turning off the read-only mode. Here’s a step-by-step process to save a PowerPoint file as Read-Only:
- Open the desired PowerPoint presentation, and click on the “ File ” tab.
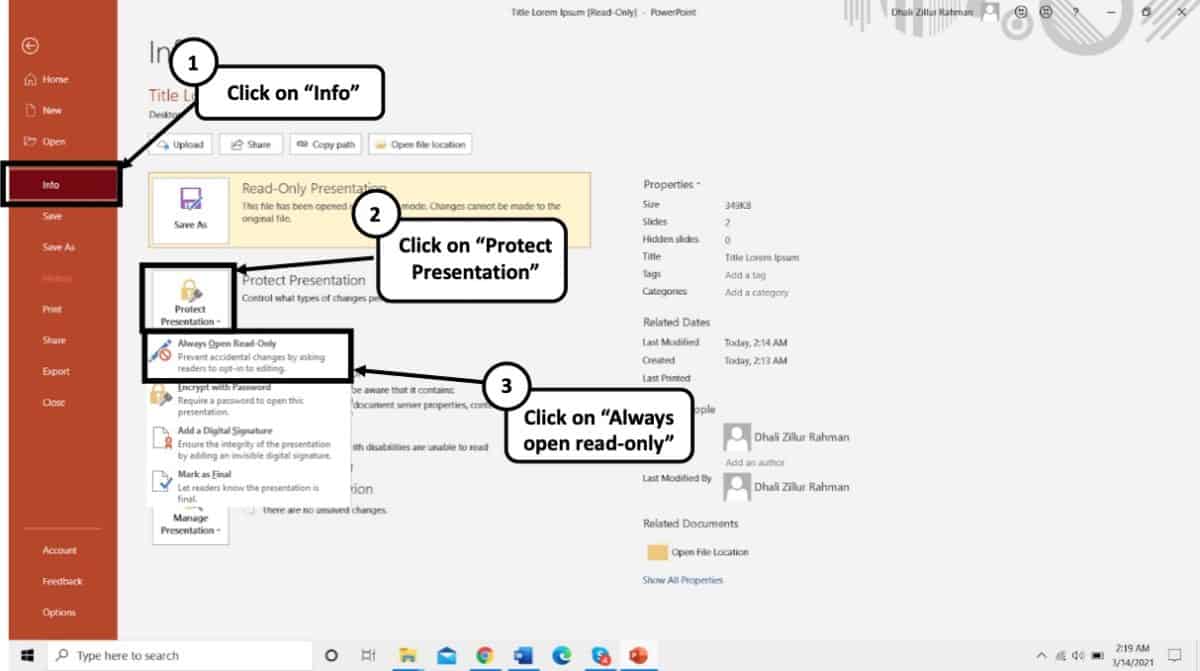
- Next, click on the “ Info ” tab from the options presented on the left part of the screen.
- Select the “ Protect Presentation ” option.
- From the dropdown, select “ Always Open Read-Only “.
- Finally, save the file by pressing Ctrl+S.
Your presentation file will now be opened as a read-only file.
Method 2 – Password Protect your PowerPoint presentation
If your colleagues or students haven’t been very familiar with your polite way of discouraging any edits on your final PowerPoint file, then the best option for you is to simply encrypt your presentation file using a password protection feature.
Here’s what you need to do to password protect your PowerPoint presentation –
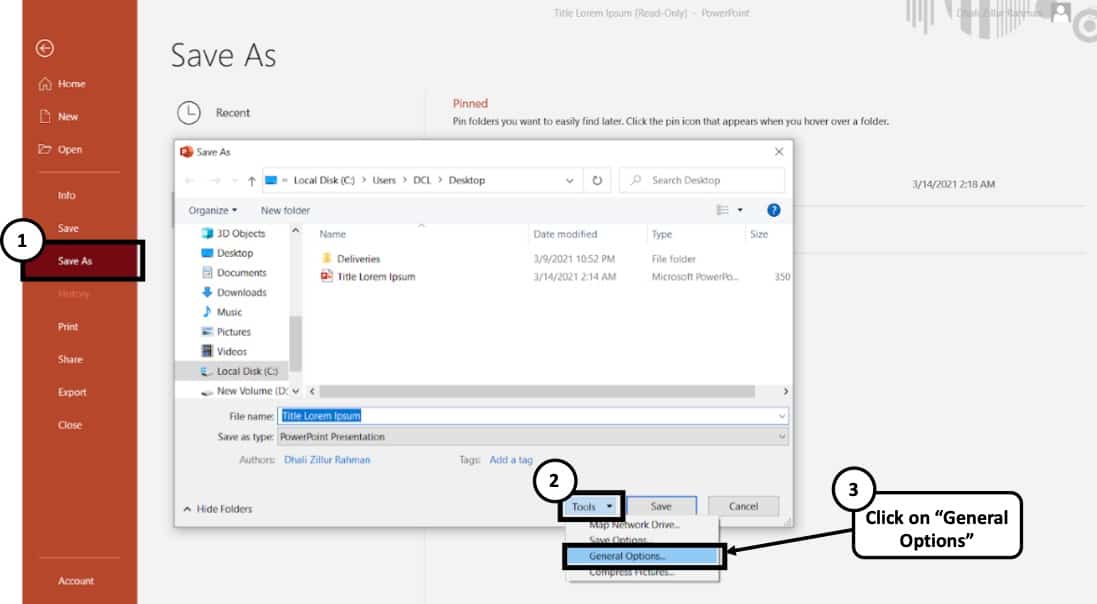
- Open your desired presentation and select the File tab and then click on “ Save As ”.
- At the bottom of the “Save As” dialogue box, a “ Tools ” option will appear.
- Click on “ General Options ”.
- The box marked as “ Password to Modify ” can be used to type in the desired password you wish to set.
- After setting up your password and re-entering it for further verification, simply click “ OK ”
Similarly, you can also enable password protection from the “ Info ” tab. To do that, click on the “ File ” tab first. Then, click the “ Info ” tab. Next, click on “ Protect Presentation “, and finally from the dropdown, click on “ Encrypt with Password “. You will then be asked to set a password. Simply re-enter the same password and click “ OK “.
While encrypting the PowerPoint file with a password, you will be presented with 2 options – either to restrict access to the PowerPoint file or to restrict modifying the presentation file. Choose the latter as this will allow your audience to at least view the presentation file without editing it.
Method 3 – Convert PowerPoint presentation as a PPSX file
Another method of preventing a PowerPoint presentation from being editing is to convert it into a PowerPoint show file or a PPSX file format. Doing so will directly open the presentation file in a PowerPoint Slide Show mode thereby restricting the editing capabilities of an individual for such a file.
Here’s how to convert a PowerPoint presentation to a PowerPoint Show file (PPSX file)
- Click on the “ File ” tab.
- Then, click on “ Save As ” from the panel on the left part of your screen.
- On the new window that pops-up, click on the “ Save As Type ” option.
- From the dropdown, scroll down and locate the “ PowerPoint Show ” file type option.
- Navigate to the desired location and rename the file if needed.
- Click on “ Save “.
Method 4 – Convert PowerPoint Presentation into a PDF File
Another alternative method is to share a PDF version of the presentation instead of the PPT file. All you need to do is convert the file to the PDF file format. To do that, you can follow the below steps –
- Then, click on “ Export ” from the panel on the left part of your screen.
- On the new window that pops-up, click on the “ Create PDF ” option.
You will now notice that there is a PDF file added to the folder in which you saved the file. Make sure that you share this PDF file instead of the PPT presentation.
Method 5 – Convert PowerPoint File into a Video
Last, but not the least, you can also convert your presentation into a video. Although the use of this method is more suited for creating videos using PowerPoint, however, you can also use this method to ensure that you are able to prevent your viewers from editing it.
Here’s how to convert a PowerPoint file into a video –
- On the new window that pops-up, click on the “ MPEG/MP4 ” option.
How to Remove Restricted Access in PowerPoint?
PowerPoint also provides you with an option to remove access restrictions that the original author may have put in place.
To remove the restricted access setting in your file, simply follow the below steps:
- Next, click on the “Info” tab.
- Then, click on “Protect Presentation” and change the permissions which have been applied.
Unselecting the previous options will remove the existing restrictions.
It is important to note that if the file is password-protected, you will need the password to change the permissions of the file. Without the original password, you won’t be able to unlock the permission protections.
More Related Topics
- Change the Style of Your Bullet Points and Stand-out from the Crowd!
- 7 EASY Tips to Always Make your Presentations Attractive! (Even if You are a Beginner)
- How to Reduce the Size of Your PowerPoint File? The Perfect Method!
- Auto Create Your PowerPoint Slides using Design Ideas Feature!
- Main Features of PowerPoint! [I bet You DIDN’T Know These]
Credit to Cookie_Studio for the featured image of this article.
- Presentation
Why is my PowerPoint read only, and how make it read only?

- January 19, 2023

Table of Contents
Why is my PowerPoint read only?
You can make your Microsoft PowerPoint presentation read only file to deter others from editing it or to let them know that the final version is what you sent. When a presentation is protected or read-only, features such as the Poll Everywhere activity are disabled. To present your activities, you might need to alter the file’s permissions or trust it differently manually. This is how to make a read-only presentation.
Why is my PowerPoint presentation open as read-only?
It is possible that files are opened as read-only when you open them. This may be for security reasons, like when you open files from the internet. Other times it could be because of a setting that can’t be changed. These are some situations where files open read-only. There are steps that you can take to fix it.
You may like: How To Change The Hyperlink Color In PowerPoint?
Your antivirus causes them to open read only.
Antivirus programs can protect you against potentially dangerous files by opening them only read-only. Also, to adjust these settings, you may need to consult your antivirus provider. BitDefender has information on how to add application exclusions.
“Mark as Final” feature is enabled
It turns out that PowerPoint has a built-in feature called “Mark as Final”. This feature converts the PowerPoint file to “Read-Only”. PowerPoint’s “Mark as Final” feature is intended to inform the reader that the PowerPoint presentation they are currently viewing is the final one and that no changes can be made!
Even though viewers can open such a presentation, they will see a prompt that says “Read-Only”, at the top of PowerPoint where the title appears.
There are many ways your viewers can edit your PowerPoint file. These methods are more foolproof. We’ll get to that in a moment.
Are file properties set to read only?
Right-click on the PowerPoint file to view its properties and choose Properties . You can check the Read-only attribute and uncheck it by clicking OK .
PowerPoint just recovered from a crash
PowerPoint can also go into “Read-Only mode” after a crash . PowerPoint can open a file in “Ready-Only” mode if it is accidentally closed abruptly or intentionally.
PowerPoint automatically marks the last saved version as the final file version and opens it in the read-only state.
This content is protected view
Files downloaded from the internet or from other unsafe places can contain viruses, trojans, and other malware that could cause damage to your computer. This frequently happens with attachments to emails or files that you have downloaded. A protected view is used to open files in potentially dangerous locations. Protected view allows you to view files and its contents while decreasing the risk.
The same PPT file can be opened twice at the same time
PowerPoint can also change a presentation to “Read-Only” mode if two presentations with the same name are open at the same moment. Alternately, the file can be made read-only if it is accidentally opened twice.
This is especially true if PowerPoint takes a while to respond to the first request for a presentation file. If this happens, the user may end up double-clicking the same file twice. Despite the fact that there are safeguards to prevent this from happening, it can still happen.
Is OneDrive fully loaded?
If you have too much space on OneDrive, the file will not be able to be saved. You can check your free space on OneDrive by clicking the OneDrive icon in the notification center and choosing Manage storage , or you can go to http://onedrive.live.com , sign in, and note the amount of used space in the lower left of the screen.
Is the Office active?
You could be in read-only Reduced Functionality Mode if Office isn’t activated or expired.
Make a PowerPoint Presentation Read Only
You can’t edit the presentation if read-only is turned on in Microsoft PowerPoint. This means that you should not make any changes to the presentation until you are done with it. You can make a PowerPoint presentation read-only by following these steps:
- Your PowerPoint presentation is now open.
- Select and click the File button at the top.
- Select Info from the bar to the left.
- Click Protect Presentation .
You’ll find four options in the pull-down menu:
- Always open Read-Only and informs readers that the selected PowerPoint file is read only, and should not be edited.
- Mark as Final informs readers that this is the final copy of this file.
- Use a Password to encrypt files.
- Add Digital Signature activates the function and adds an invisible signature that ensures the integrity of the presentation.
Only two options will make your PowerPoint presentation unreadable: Always Open Read Only or Mark it as Final.
If Always Open Read-Only has been selected, everyone who opens the presentation will be notified that the author has made it safe to do so. Files marked as Final will also display the message “An author has marked the presentation as final to discourage editing.”
NOTE: If you don’t want anyone altering your presentation, the best option is to choose “Encrypt with Password” from the Protect Presentation menu. This option, as you probably know, means that no one can read or edit the file without your Password. This is the best way to secure your document.
Password for Modifying Presentation
To prevent others from altering the document, you can also set a password. Here are the steps to accomplish this.
1: Open the presentation, then click “File > Save as.”
2: Click “Tools” at the bottom of the “Save As” dialog box, and then click “General Options.”
3: Type the Password you want to use in the box marked “Password To M; modify” and click “OK.” Enter the Password again and click “OK.”
4: Click “Save” to save the PowerPoint presentation. The next time someone attempts to edit the document, they will need to enter the Password.
Convert PowerPoint into Read-Only Video
You can also convert your PowerPoint presentation to read-only video in the same manner. This will make it difficult for others to modify the presentation’s content and make it easier to distribute it.
You can convert PowerPoint presentations to video with many tools, such as screen recorders like Adobe Captivate or Camtasia Studio, Quick Time Movie Maker, and Windows Movie Maker.
Restrict Access
You can also restrict access to the presentation so that others cannot edit it. Here’s how you do it:
- Open the document, then click “File.”
- Click “Info > Protect Document” then “Restrict Access” in the dropdown menu.

Presentation design services :
With our presentation design services , we can help you create an amazing visual representation of your business. They are designed by professional strategists and designers who understand how important it is to have visuals that communicate clearly and effectively while still being aesthetically pleasing. They’re also created using the most up-to-date data so they won’t become obsolete quickly like other types of marketing material might be.

- Graphic Design , UI-UX
How to Become a Motion Graphic Designer?

A Brief Overview of Lean UX

UX Strategy and Its Components
you'r more than welcome
7 days a week, 9:30 AM – 5:30 PM
contact info
[email protected] +351910923549
- LB07129, Jebel Ali Freezone, Dubai, UAE
Got a Project?
We’re a team of creatives who are excited about unique ideas and help companies to create amazing identity by offering wide range of digital services
© 2021 All rights reserved.
Be the first one who knows about updates!
enter your email address 📩
Welcome to the club 🎉.
From now on, Temis will inform you of its most valuable content and offers. You can also subscribe to this list at the moment. We will also protect your privacy
- PDFelement for Windows
- PDFelement for Mac
- PDFelement on Mac App Store
- PDF Reader for Windows
- PDFelement for iPhone/iPad
- Get from App Store
- PDFelement for Android
- Get from App Google Play
- PDF Scanner for iPhone
Cloud & SDK
- Document Cloud
- PDFelement Pro DC
- PDFelement SDK
Online PDF Tools
- PDF to Word
- Compress PDF
- Word to PDF
Educational Users
- Annotate PDF
- Combine PDF
Personal Users
- Convert PDF
- Organize PDF
Professional Users
- eSign PDFs Legally
- Extract Data from PDF
- Password Protect PDF
PDF Solutions for
- Chat with PDF
- AI PDF Summarizer
- AI PDF Translator
- AI Content Detector
- AI Rewrite PDF
- Proofread PDF
- Add Bookmarks to PDF
- Explain PDF
- Mac Software
- OCR PDF Tips
- Online PDF Tips
- Edit PDF like Word
- PDF Converter Tips
- PDF Compressor Tips
Why PDFelement
- Customer Stories
- PDF Software Comparison
- Contact Support
- PDFelement for iOS
- InstaScan for iPhone
Explore More
- Reviews See what our users say.
- Free PDF Templates Edit, print, and customize free templates.
- PDF Knowledge PDF-related information you need.
- Download Center Download the most powerful and simple PDF tools.
- Download Download Pricing Pricing
- How To Make a PowerPoint Presentation Read-Only
Learn to make PowerPoint presentations read-only, ensuring content protection.

- Embed Video in PowerPoint Mac
- Make Video from PowerPoint
- How to Print PowerPoint with Notes
- How to Make a Picture Transparent in PowerPoint
- Morph Transition
- Curved Text in PowerPoint
- Gantt Chart in PowerPoint
- Venn Diagram in PowerPoint
- PowerPoint Alternatives
- How to Embed a YouTube Video in PowerPoint
- crop images online
- print screen mac
- How to take a screenshot on a Mac
- Cropro: A must have screenshot capture tool
- windows 11 screenshot
- How to take a screen grab
- Best screenshot tools for Windows and Mac
- How to Edit a Screenshot Online
- How to Paste a Screenshot on a Mac
- How to Take a Scrolling Screenshot
- Best Solution to Sign PDF on Linux and More
- esign pdf online, esign pdf online free, esign pdf free online, online esign pdf, electronically sign pdf online
- How to Save Documents to Cloud
- How to Share Files on the Cloud to Improve Collaboration
- Best Free Document Cloud Solution - Easy to Use
- How To Use Cloud Storage - the Complete Guide
- How to eSign a Document on Cloud in Two Ways
- How to Add Signature to PDF on Linux
- How to Add an Electronic Signature to a PDF File Online Free
- How to Upload File to Cloud: Easiest Way Explained
In today's world, sharing information is key. We often use PowerPoint to do this. But, when we share these presentations, we might not want others to change them. This is where making a PowerPoint read-only comes in handy. It means others can look but can't edit. This is very important for many reasons.
For example, when you share your work with others for feedback, you might not want them to make changes. Or, when you give a presentation to a big audience, you want to ensure your message stays the same. Making your PowerPoint read-only keeps your information safe and as you intended. It's a simple step that can save much trouble later. This way, you can share your hard work with peace of mind, knowing it will stay just as you made it.
In this article
Method 1: convert ppt to pdf, method 2: set ppt in read-only mode, method 3: lock ppt for read-only, method 4: set restrict access for powerpoint read-only, method 5: record a slideshow to make powerpoint read-only, part 2. the importance of making powerpoint presentations read-only, part 1. how to make a powerpoint read only.
Making your PowerPoint read-only is a smart move. It's like putting a lock on your presentation. This stops others from making changes to it. In this part, we will show you how to do it step by step. It's an easy process that anyone can follow. Let's get started.
One way to keep your PowerPoint safe is by turning it into a PDF. This means changing it from a PPT file to a PDF file. When you do this, people can still see your presentation, but they can't change it. This is a good idea because PDFs are easy to open on all computers and phones. Plus, your slides will look just as you made them. This method is simple and doesn't need any special skills. Let's see how you can do this to protect your work and keep it just the way you want.
How to Convert PPT to PDF Using PDFelement

PDFelement is a great tool to turn your PowerPoint (PPT) into a PDF. This keeps your presentation safe from changes. Here's how to do it:
Step 1. First, open PDFelement on your computer. Finding your way around is easy because everything is clear and simple.

Step 2. Look for a " + " > " From File " button on the main screen. Click it. This lets you make a PDF from another file, like your PowerPoint.

Step 3. A window will open. Find your PowerPoint file, click the " Sample PPT ," and open it.
Step 4. After you pick your file, PDFelement changes your PPT to a PDF. It's quick. Just wait a bit until it's done.

Step 5. Your new PDF opens in PDFelement. Now, you can change it if you want. PDFelement has tools to edit text, pictures, and more. Change anything you need.

Step 6. When you're finished, go to " File " > " Save ." Pick a place on your computer, name your file, and click "Save."

Step 7. Sometimes, you might want to go back to a PowerPoint. PDFelement does this, too. Click " Convert " > " To PPT ," choose where to save, and it turns your PDF into a PPT again.

Using PDFelement for this is smart. It makes your presentation safe across different computers and phones. Your slides look just right, adding an extra layer of security. This way, sharing your work is easy and safe.

Setting your PowerPoint presentation to read-only mode is another good way to protect it. Here’s how you can do it step by step:
Step 1. First, open your PowerPoint presentation on your computer.
Step 2. Click on " File " > " Info ."
Step 3. Look for an option that says " Protect Presentation ." Click on it. A menu will appear.
Step 4. In the menu, select " Mark as Final. " This tells PowerPoint and anyone who opens it that your presentation is finished and shouldn't be changed.
By choosing "Mark as Final," you're letting others know your presentation is the final version. This doesn't lock your file with a password but adds a mark suggesting people shouldn't edit it. When someone opens your presentation, they'll see a message marked as final. This discourages editing.
However, it's important to remember that this method doesn't fully lock your presentation. If someone wants to, they can still make changes. They just need to click "Edit Anyway." So, while "Mark as Final" is a good way to suggest your work shouldn't be altered, it's not the strongest protection. It's best used when you trust the people you're sharing your presentation with to respect your wish to keep it as is.

Locking your PowerPoint for read-only with a password is a strong way to protect it. You can set two types of passwords: one to open the presentation and another to modify it. Here's how to set it up:
Step 1. Start by opening your PowerPoint presentation.
Step 2. Go to " File " > " Info ."
Step 3. Find " Protect Presentation ." Click it to see more options.
Step 4. Choose " Encrypt with Password ." Here, you can set your passwords.
When you set a password to open, anyone who wants to see the presentation must enter the password. A modified password lets people open the presentation but not change it unless they know this second password.
It's important to share these passwords safely. If you use a password to open it, make sure to send it through a secure way, like a secure email or messaging app. Remember, you can't access or change your presentation if you forget these passwords.
Using passwords is very secure, but it comes with responsibility. Ensure you keep the passwords safe and share them only with people who need to know. This method is great for keeping your presentation the way you want without worrying about unwanted changes.

Using the restrict access feature in PowerPoint is a smart way to control who can do what with your presentation. Here’s how you can make your presentation read-only for others:
Step 1. Start by opening your presentation in PowerPoint.
Step 2. Find and click on " File " at the top left corner, then select " Info " from the menu.
Step 3. Now, look for " Protect Presentation. " Click on it to see more options.
Step 4 . From the options, choose " Restrict Access. " This lets you set rules on who can read or change your presentation.
By using restricted access, you can ensure that only certain people can edit your presentation, while others can only view it. This is great when you need to share your work with a team but want to control who can make changes.
The advantage of this method is that it gives you more control. You can decide exactly who gets to edit and who doesn't. However, there are some things to keep in mind. First, everyone you're sharing with needs the right software or service to respect these restrictions. If they don't, they might be unable to open your presentation. Also, managing who has what permission can take extra work, especially if you share with many people.
Restrict access is a powerful way to protect your presentation. It helps keep your work safe while still letting others view it. Think about how it fits with how you plan to share and collaborate on your presentation.

Recording your slideshow is a creative way to share your PowerPoint while keeping it read-only. This method turns your presentation into a video, which means people can watch it but can't change any part of it. Here's how to do it:
Step 1. First, open your presentation in PowerPoint.
Step 2. Find the " Slideshow " tab at the top. Click on it, and then look for " Record Slideshow ." Choose to start recording from the beginning or a current slide.
Step 3. Press the record button. As you go through your slides, you can talk and explain them, just like you would if you were presenting live. You can also use your mouse as a pointer.
Step 4. After finishing your recording, save your presentation. Then, go to " File " > " Export " and select " Create a Video ." Choose the video quality you prefer.
Step 5. Once your video is ready, you can share it. Because it's a video, no one can edit your slides.
Recording your slideshow has many benefits. It keeps your presentation safe from changes, which is great. But it also lets you share exactly how you want your presentation to be viewed. You control the flow and timing, ensuring your audience sees and hears what you intend in the order you intend. This method works well when you can't present live but want to make an impact.
Remember, a video might be larger than a PowerPoint file, and viewers can't interact with it as they can with slides. But if keeping your content safe and controlling how it's shown are your top priorities, this could be the perfect solution.
Making your PowerPoint presentations read-only is like putting a "Do Not Alter" sign on your work. It lets you keep control when you share your presentation. This is important because if someone changes your slides, it can cause problems. For example, wrong information could be shared, or your message might not come across as intended. This could confuse or mislead people.
When your presentation is read-only, it stays just as you made it. This means your professional touch, how you arranged your slides, and the information you included are the same. It helps make sure your brand looks consistent everywhere your presentation goes. This consistency is key to keeping a strong and trustworthy image.
There are also bigger legal and ethical issues when someone changes your work without asking. If someone edits your presentation, it could be seen as them putting words in your mouth. This isn't fair and can lead to problems. Keeping your presentation read-only helps avoid these issues, ensuring your work stays safe and respected.
Making your PowerPoint read-only is a smart step to protect your work. It helps keep your presentation the way you want, safe from changes. This ensures your message stays clear and your brand remains consistent. Remember, sharing your ideas is important, but so is keeping them as you intended.
You May Also Like
- How to Print PowerPoint with Notes and PDFelement on Mac
- Highlight Text in PowerPoint
- The Easiest Way to Insert a Word Document into PowerPoint
- Password Tools For Windows Password Genius Windows Password Genius Windows 10 Password Genius Windows 7 Password Genius RAR Password Genius ZIP Password Genius SQL Password Genius Chrome Password Genius WiFi Password Genius For Office Office Password Genius Word Password Genius Excel Password Genius PowerPoint Password Genius Access Password Genius Outlook Password Genius Outlook Email Password Genius PDF Password Genius For Removing Office Password Remover Word Password Remover Excel Password Remover Workbook Unprotect Genius PowerPoint Unprotect Genius Word Unprotect Genius
- More Utilities Data Recovery BitGenius Word Repair Genius Excel Repair Genius PowerPoint Repair Genius Office Repair Genius Photo Data Genius Android Data Genius BitLocker Tools BitLocker Genius for Mac BitLocker Genius for Windows More Tools Product Key Finder SafeUSB Genius ISO Genius All Products
- Support Support Center FAQ & Contact Resource Center How-to Articles Blog Blog, News & Guides
3 Methods to Make a MS PowerPoint 2010 Presentation Read Only
By Achilles Hill | Last Updated January 03, 2024
"I made a presentation for the school teaching and my students asked me to share it with them. I do not want them to edit the content and change the format. How do I make the MS PowerPoint 2010 presentation read only? Is there any reliable way?" .
For the Microsoft users who want to protect PowerPoint presentation from editing and modifying, they can make a presentation created with MS PowerPoint 2010 read only in three methods.
- Method 1: Mark the PowerPoint Presentation as Final Version
Method 2: Restrict Editing with the Password
Method 3: save the presentation with modify password, how to make a powerpoint presentation read only.
In the following, we use Microsoft PowerPoint 2010 to show you the process to make a PowerPoint presentation read only.
If you want to make the PowerPoint presentation protected, Mark as Final is the first option that let readers know the content is final and make it read-only. In this way, you turn off the typing, inserting and other editing features on the final content version.
Step 1: Open File > Info > Protect Presentation .
Step 2: Click Protect Presentation and get several options.
Step 3: Click Mark as Final and get the warning box from Microsoft PowerPoint. Click OK to continue.

After that, when others open this presentation, they will see a yellow alert on the top. If they want to edit the content, they can click Edit Anyway to modify the text and layout. Therefore, it is not a safe option to protect the presentation.

This option is chosen by most people to make the MS PowerPoint 2010 presentation read only. You can add restrict permission to remove others' ability to edit, copy and print the presentation.
Step 1: Access File > Info > Protect Presentation .
Step 2: Click Protect Presentation and select Restrict Access from Restrict Permission by People option.
Step 3: Set a password to protect the presentation.

For the MS PowerPoint 2010/2013/2016 presentation, they can also add the modify password to protect the content from editing.
Step 1: Click File > Save As .

Step 2: In the Save As interface, besides setting the file name and type to save, you are also provided tools to set general options. Right click Tools button and select General Options from the drop-down menu.

Step 3: Set your password to modify the presentation. After that, click the OK button to end this process.

For the question showing in the beginning, the answer should be the latter two methods which enable users to set the modify password in security settings. In this way, users can distribute a PPT (*ppt and.*pptx) as a read only document with password.
Related Links:
- How to Remove Restriction to Unprotect PowerPoint Presentation without Password
- How to Unlock PPT Presentation with Modify or Open Password
- How to Edit Encrypted and Read Only PowerPoint 2016 Presentation
- How to Add a Watermark on PowerPoint Presentation
iSunshare is dedicated to providing the best service for Windows, Mac, Android users who are in demand for password recovery and data recovery.
Copyright © 2024 iSunshare Studio All Rights Reserved.
How-To Geek
6 ways to create more interactive powerpoint presentations.
Engage your audience with cool, actionable features.
Quick Links
- Add a QR code
- Embed Microsoft Forms (Education or Business Only)
- Embed a Live Web Page
- Add Links and Menus
- Add Clickable Images to Give More Info
- Add a Countdown Timer
We've all been to a presentation where the speaker bores you to death with a mundane PowerPoint presentation. Actually, the speaker could have kept you much more engaged by adding some interactive features to their slideshow. Let's look into some of these options.
1. Add a QR code
Adding a QR code can be particularly useful if you want to direct your audience to an online form, website, or video.
Some websites have in-built ways to create a QR code. For example, on Microsoft Forms , when you click "Collect Responses," you'll see the QR code option via the icon highlighted in the screenshot below. You can either right-click the QR code to copy and paste it into your presentation, or click "Download" to add it to your device gallery to insert the QR code as a picture.
In fact, you can easily add a QR code to take your viewer to any website. On Microsoft Edge, right-click anywhere on a web page where there isn't already a link, and left-click "Create QR Code For This Page."
You can also create QR codes in other browsers, such as Chrome.
You can then copy or download the QR code to use wherever you like in your presentation.
2. Embed Microsoft Forms (Education or Business Only)
If you plan to send your PPT presentation to others—for example, if you're a trainer sending step-by-step instruction presentation, a teacher sending an independent learning task to your students, or a campaigner for your local councilor sending a persuasive PPT to constituents—you might want to embed a quiz, questionnaire, pole, or feedback survey in your presentation.
In PowerPoint, open the "Insert" tab on the ribbon, and in the Forms group, click "Forms". If you cannot see this option, you can add new buttons to the ribbon .
As at April 2024, this feature is only available for those using their work or school account. We're using a Microsoft 365 Personal account in the screenshot below, which is why the Forms icon is grayed out.
Then, a sidebar will appear on the right-hand side of your screen, where you can either choose a form you have already created or opt to craft a new form.
Now, you can share your PPT presentation with others , who can click the fields and submit their responses when they view the presentation.
3. Embed a Live Web Page
You could always screenshot a web page and paste that into your PPT, but that's not a very interactive addition to your presentation. Instead, you can embed a live web page into your PPT so that people with access to your presentation can interact actively with its contents.
To do this, we will need to add an add-in to our PPT account .
Add-ins are not always reliable or secure. Before installing an add-in to your Microsoft account, check that the author is a reputable company, and type the add-in's name into a search engine to read reviews and other users' experiences.
To embed a web page, add the Web Viewer add-in ( this is an add-in created by Microsoft ).
Go to the relevant slide and open the Web Viewer add-in. Then, copy and paste the secure URL into the field box, and remove https:// from the start of the address. In our example, we will add a selector wheel to our slide. Click "Preview" to see a sample of the web page's appearance in your presentation.
This is how ours will look.
When you or someone with access to your presentation views the slideshow, this web page will be live and interactive.
4. Add Links and Menus
As well as moving from one slide to the next through a keyboard action or mouse click, you can create links within your presentation to direct the audience to specific locations.
To create a link, right-click the outline of the clickable object, and click "Link."
In the Insert Hyperlink dialog box, click "Place In This Document," choose the landing destination, and click "OK."
What's more, to make it clear that an object is clickable, you can use action buttons. Open the "Insert" tab on the ribbon, click "Shape," and then choose an appropriate action button. Usefully, PPT will automatically prompt you to add a link to these shapes.
You might also want a menu that displays on every slide. Once you have created the menu, add the links using the method outlined above. Then, select all the items, press Ctrl+C (copy), and then use Ctrl+V to paste them in your other slides.
5. Add Clickable Images to Give More Info
Through PowerPoint's animations, you can give your viewer the power to choose what they see and when they see it. This works nicely whether you're planning to send your presentation to others to run through independently or whether you're presenting in front of a group and want your audience to decide which action they want to take.
Start by creating the objects that will be clickable (trigger) and the items that will appear (pop-up).
Then, select all the pop-ups together. When you click "Animations" on the ribbon and choose an appropriate animation for the effect you want to achieve, this will be applied to all objects you have selected.
The next step is to rename the triggers in your presentation. To do this, open the "Home" tab, and in the Editing group, click "Select", and then "Selection Pane."
With the Selection Pane open, select each trigger on your slide individually, and rename them in the Selection Pane, so that they can be easily linked to in the next step.
Finally, go back to the first pop-up. Open the "Animations" tab, and in the Advanced Animation group, click the "Trigger" drop-down arrow. Then, you can set the item to appear when a trigger is clicked in your presentation.
If you want your item to disappear when the trigger is clicked again, select the pop-up, click "Add Animation" in the Advanced Animation group, choose an Exit animation, and follow the same step to link that animation to the trigger button.
6. Add a Countdown Timer
A great way to get your audience to engage with your PPT presentation is to keep them on edge by adding a countdown timer. Whether you're leading a presentation and want to let your audience stop to discuss a topic, or running an online quiz with time-limit questions, having a countdown timer means your audience will keep their eye on your slide throughout.
To do this, you need to animate text boxes or shapes containing your countdown numbers. Choose and format a shape and type the highest number that your countdown clock will need. In our case, we're creating a 10-second timer.
Now, with your shape selected, open the "Animations" tab on the ribbon and click the animation drop-down arrow. Then, in the Exit menu, click "Disappear."
Open the Animation Pane, and click the drop-down arrow next to the animation you've just added. From there, choose "Timing."
Make sure "On Click" is selected in the Start menu, and change the Delay option to "1 second," before clicking "OK."
Then, with this shape still selected, press Ctrl+C (copy), and then Ctrl+V (paste). In the second box, type 9 . With the Animation Pane still open and this second shape selected, click the drop-down arrow and choose "Timing" again. Change the Start option to "After Previous," and make sure the Delay option is 1 second. Then, click "OK."
We can now use this second shape as our template, as when we copy and paste it again, the animations will also duplicate. With this second shape selected, press Ctrl+C and Ctrl+V, type 8 into the box, and continue to do the same until you get to 0 .
Next, remove the animations from the "0" box, as you don't want this to disappear. To do this, click the shape, and in the Animation Pane drop-down, click "Remove."
You now need to layer them in order. Right-click the box containing number 1, and click "Bring To Front." You will now see that box on the top. Do the same with the other numbers in ascending order.
Finally, you need to align the objects together. Click anywhere on your slide and press Ctrl+A. Then, in the Home tab on the ribbon, click "Arrange." First click "Align Center," and then bring the menu up again, so that you can click "Align Middle."
Press Ctrl+A again to select your timer, and you can then move your timer or copy and paste it elsewhere.
Press F5 to see the presentation in action, and when you get to the slide containing the timer, click anywhere on the slide to see your countdown timer in action!
Now that your PPT presentation is more interactive, make sure you've avoided these eight common presentational mistakes before you present your slides.

- SUGGESTED TOPICS
- The Magazine
- Newsletters
- Managing Yourself
- Managing Teams
- Work-life Balance
- The Big Idea
- Data & Visuals
- Reading Lists
- Case Selections
- HBR Learning
- Topic Feeds
- Account Settings
- Email Preferences
How to Make a “Good” Presentation “Great”
- Guy Kawasaki

Remember: Less is more.
A strong presentation is so much more than information pasted onto a series of slides with fancy backgrounds. Whether you’re pitching an idea, reporting market research, or sharing something else, a great presentation can give you a competitive advantage, and be a powerful tool when aiming to persuade, educate, or inspire others. Here are some unique elements that make a presentation stand out.
- Fonts: Sans Serif fonts such as Helvetica or Arial are preferred for their clean lines, which make them easy to digest at various sizes and distances. Limit the number of font styles to two: one for headings and another for body text, to avoid visual confusion or distractions.
- Colors: Colors can evoke emotions and highlight critical points, but their overuse can lead to a cluttered and confusing presentation. A limited palette of two to three main colors, complemented by a simple background, can help you draw attention to key elements without overwhelming the audience.
- Pictures: Pictures can communicate complex ideas quickly and memorably but choosing the right images is key. Images or pictures should be big (perhaps 20-25% of the page), bold, and have a clear purpose that complements the slide’s text.
- Layout: Don’t overcrowd your slides with too much information. When in doubt, adhere to the principle of simplicity, and aim for a clean and uncluttered layout with plenty of white space around text and images. Think phrases and bullets, not sentences.
As an intern or early career professional, chances are that you’ll be tasked with making or giving a presentation in the near future. Whether you’re pitching an idea, reporting market research, or sharing something else, a great presentation can give you a competitive advantage, and be a powerful tool when aiming to persuade, educate, or inspire others.
- Guy Kawasaki is the chief evangelist at Canva and was the former chief evangelist at Apple. Guy is the author of 16 books including Think Remarkable : 9 Paths to Transform Your Life and Make a Difference.
Partner Center
Numbers, Facts and Trends Shaping Your World
Read our research on:
Full Topic List
Regions & Countries
- Publications
- Our Methods
- Short Reads
- Tools & Resources
Read Our Research On:
Table of Contents
Mobile phone ownership over time, who owns cellphones and smartphones, smartphone dependency over time, who is smartphone dependent, find out more, mobile fact sheet.
Large shares of Americans are connected to the world of digital information while “on the go” via smartphones and other mobile devices. Explore the patterns and trends that have shaped the mobile revolution below.
To better understand Americans’ smartphone and broadband adoption, Pew Research Center surveyed 5,733 U.S. adults from May 19 to Sept. 5, 2023. Ipsos conducted this National Public Opinion Reference Survey (NPORS) for the Center using address-based sampling and a multimode protocol that included both web and mail. This way nearly all U.S. adults have a chance of selection. The survey is weighted to be representative of the U.S. adult population by gender, race and ethnicity, education and other categories.
Polls from 2000 to 2021 were conducted via phone. For more on this mode shift, please read our Q&A .
Here are the questions used for this analysis , along with responses, and its methodology .

The vast majority of Americans – 97% – now own a cellphone of some kind. Nine-in-ten own a smartphone, up from just 35% in Pew Research Center’s first survey of smartphone ownership conducted in 2011.
Note: The vertical line indicates a change in mode. Polls from 2002-2021 were conducted via phone. In 2023, the poll was conducted via web and mail. For more details on this shift, please read our Q&A . Refer to the topline for more information on how question wording varied over the years. Respondents who did not give an answer are not shown.
Source: Surveys of U.S. adults conducted 2002-2023.

Substantial majorities of Americans across a wide range of demographic groups are cellphone owners. The same is true for smartphone ownership – though some differences do emerge, particularly by age, household income and level of formal education.
% of U.S. adults who say they own a __, by …
- RACE & ETHNICITY
- POLITICAL AFFILIATION

Today, 15% of U.S. adults are “smartphone-only” internet users – meaning they own a smartphone, but do not have home broadband service.
Source: Surveys of U.S. adults conducted 2013-2023. Data for each year is based on a pooled analysis of all surveys containing broadband and smartphone questions fielded during that year.
Reliance on smartphones for online access is especially common among Americans with lower household incomes and those with lower levels of formal education.

This fact sheet was compiled by Research Assistant Olivia Sidoti , with help from Research Analyst Risa Gelles-Watnick , Research Analyst Michelle Faverio , Digital Producer Sara Atske , Associate Information Graphics Designer Kaitlyn Radde and Temporary Researcher Eugenie Park .
Follow these links for more in-depth analysis of the impact of mobile technology on American life.
- Americans’ Social Media Use Jan. 31, 2024
- Americans’ Use of Mobile Technology and Home Broadband Jan. 31 2024
- Q&A: How and why we’re changing the way we study tech adoption Jan. 31, 2024
Find more reports and blog posts related to internet and technology .
1615 L St. NW, Suite 800 Washington, DC 20036 USA (+1) 202-419-4300 | Main (+1) 202-857-8562 | Fax (+1) 202-419-4372 | Media Inquiries
Research Topics
- Age & Generations
- Coronavirus (COVID-19)
- Economy & Work
- Family & Relationships
- Gender & LGBTQ
- Immigration & Migration
- International Affairs
- Internet & Technology
- Methodological Research
- News Habits & Media
- Non-U.S. Governments
- Other Topics
- Politics & Policy
- Race & Ethnicity
- Email Newsletters
ABOUT PEW RESEARCH CENTER Pew Research Center is a nonpartisan fact tank that informs the public about the issues, attitudes and trends shaping the world. It conducts public opinion polling, demographic research, media content analysis and other empirical social science research. Pew Research Center does not take policy positions. It is a subsidiary of The Pew Charitable Trusts .
Copyright 2024 Pew Research Center
Terms & Conditions
Privacy Policy
Cookie Settings
Reprints, Permissions & Use Policy

Make a presentation read-only in PowerPoint for the web
When you want to share your presentation with others but you don’t want them to change it, you can make it read-only. Here’s how using OneDrive and OneDrive for work or school:
Using OneDrive

Under Share , click Get a link .

Under View only , click Create .

Tip: Click Shorten to decrease the length of the URL that you share with others.
Right-click the URL and click Copy .

Under Share , click Send email .
Enter the email address in the To box.
Paste the URL in the message box, and click Share .
Click Close .
Using OneDrive for work or school
Under Invite People , type the names or email addresses of the people you want to view the presentation, and type a message.
Click the down arrow next to Can edit , and click Can view .

Click Share .
Note: The people you share the presentation with will receive an email invitation to view it.

Need more help?
Want more options.
Explore subscription benefits, browse training courses, learn how to secure your device, and more.

Microsoft 365 subscription benefits

Microsoft 365 training

Microsoft security

Accessibility center
Communities help you ask and answer questions, give feedback, and hear from experts with rich knowledge.

Ask the Microsoft Community

Microsoft Tech Community

Windows Insiders
Microsoft 365 Insiders
Was this information helpful?
Thank you for your feedback.
IMAGES
VIDEO
COMMENTS
Open the presentation that you want to make read-only, then click the "File" tab. Next, in the left-hand pane, select "Info." You'll now see a "Protect Presentation" section, which lets you (to an extent) protect against any editing of your presentation. Click "Protect Presentation."
1] Open the presentation you want to make read-only. The first step is to fire up the PowerPoint presentation you want to make read-only. Simply launch the program then, right away, you should see ...
To make a PowerPoint Presentation read-only: Open your Powerpoint presentation. Choose File at the top left. Select Info on the bar on the left. Click Protect Presentation. In the pull-down menu ...
In PowerPoint for the web, click the Share tab. Under Share, click Get a link. Under View only, click Create. Tip: Click Shorten to decrease the length of the URL that you share with others. Right-click the URL and click Copy. Under Share, click Send email. Enter the email address in the To box. Paste the URL in the message box, and click Share.
Follow these simple steps to use Passper for PowerPoint to unlock a read-only presentation. Step 1: Download and install Passper for PowerPoint on your computer and then launch the program. In the main window, click on "Remove Restrictions". Step 2: Import the presentation into the program and then click on "Remove".
Select "Protect Presentation" to open a drop-down menu. Click "Mark as Final." A dialogue box will then appear, letting you know the presentation will be marked as final and saved. Click "OK." Now, when you send out the presentation, it will display the "Marked as Final" message bar, alerting the recipients that the presentation is read-only.
Here are the steps: Open the PowerPoint presentation you want to make read-only. Click on the "File" tab. Select "Info" on the left side of the menu. Click on "Protect Presentation" and choose "Mark as Final" from the drop-down menu. Marking a presentation as final sets it to read-only mode within PowerPoint.
PowerPoint for the web. If you want to reuse some of the slides in a read-only presentation, you can download a copy to your computer and make changes to the copy. On the File tab, click Save As. Click Download. Pick the steps below for your browser to save and open the file.
To make your presentation read-only, or to mark it as final, open your PPTX file and click the "File" tab. Next, click "Info" in the left-hand pane. Now, in the Protect Presentation group, click "Protect Presentation." Once selected, a drop-down menu will appear. You can choose between these two options to make your presentation read-only:
Way1: Restrict Permission by People. 1. Open the PowerPoint that you want to set read-only protection. 2. In the ribbon, select the " File " tab. And then click the " Info " in the left of the panel. 3. Click the " Protection Presentation " function button, and then four options will show up. We will choose the second one " Restrict Permission ...
Open the presentation that you want to be read-only, then click on the tab "File". Next, in the left panel, select "Information". You will now see a section "Protect presentation", what makes it possible (until a certain point) protect yourself against any editing of your presentation. Click on "Protect presentation".
Open the presentation that you wish to make read-only, then click the "File" tab. Next, in the left-hand pane, pick "Info.". You'll currently see a "Protect Presentation" section, which allows you (to a level) shield against any type of modifying of your presentation. Click "Protect Presentation.". Once chosen, a drop-down ...
Open the desired PowerPoint presentation, and click on the " File " tab. Next, click on the " Info " tab from the options presented on the left part of the screen. Select the " Protect Presentation " option. From the dropdown, select " Always Open Read-Only ". Finally, save the file by pressing Ctrl+S.
1: Open the presentation, then click "File > Save as.". 2: Click "Tools" at the bottom of the "Save As" dialog box, and then click "General Options.". 3: Type the Password you want to use in the box marked "Password To M; modify" and click "OK.". Enter the Password again and click "OK.".
Step 2. Look for a " + " > " From File " button on the main screen. Click it. This lets you make a PDF from another file, like your PowerPoint. Step 3. A window will open. Find your PowerPoint file, click the " SamplePPT ," and open it. Step 4. After you pick your file, PDFelement changes your PPT to a PDF.
In PowerPoint for the web, click the Share tab. Under Share, click Get a link. Under View only, click Create. Tip: Click Shorten to decrease the length of the URL that you share with others. Right-click the URL and click Copy. Under Share, click Send email. Enter the email address in the To box. Paste the URL in the message box, and click Share.
In this video step by step has been discussed to making power point presentation as read only .How to Save Powerpoint Document as Read OnlyHow to save Powerp...
This option is chosen by most people to make the MS PowerPoint 2010 presentation read only. You can add restrict permission to remove others' ability to edit, copy and print the presentation. Step 1: Access File > Info > Protect Presentation. Step 2: Click Protect Presentation and select Restrict Access from Restrict Permission by People option.
-In today's tutorial, we will teach you how to save PowerPoint as read only.Open PowerPoint presentation you need. Click on ´File´ at the top left corner of ...
Here are the steps. Open your PowerPoint presentation. Click on File > click on Info. Then click on Protect presentation. Select Always Open Read-Only. Now save your file by doing Ctrl + S. When you open your presentation above the presentation you will see it is marked as Read Only. As I said, the presentation is still editable by the person ...
Then, with this shape still selected, press Ctrl+C (copy), and then Ctrl+V (paste). In the second box, type 9. With the Animation Pane still open and this second shape selected, click the drop-down arrow and choose "Timing" again. Change the Start option to "After Previous," and make sure the Delay option is 1 second.
When in doubt, adhere to the principle of simplicity, and aim for a clean and uncluttered layout with plenty of white space around text and images. Think phrases and bullets, not sentences. As an ...
For more details on this shift, please read our Q&A. Refer to the topline for more information on how question wording varied over the years. White, Black and Asian adults include those who report being only one race and are not Hispanic. Hispanic adults are of any race. Respondents who did not give an answer are not shown.
Change the viewing mode. You can switch from View only to other modes granted by the document owner (Editing, Reviewing). Select the Viewing tab to open the options. Select Editing or Reviewing. Note: The only options that can be selected are the one (s) that the document owner has granted. Make a document read-only by restricting editing and ...
In PowerPoint for the web, click the Share tab. Under Share, click Get a link. Under View only, click Create. Tip: Click Shorten to decrease the length of the URL that you share with others. Right-click the URL and click Copy. Under Share, click Send email. Enter the email address in the To box. Paste the URL in the message box, and click Share.