How to Format and Manage Lists in Microsoft Word
Learn a few more list formatting tips no matter how many bulleted or numbered lists you have created with Microsoft Word.
Checklists and lists have become the staple of everything from grocery shopping to NASA launches. But they are boring.
Still, lists and checklists are also the simplest tools to reduce the complexity of information that assaults us every day. They are also the perfect antidote against forgetfulness. So, even as we swear to make perfect lists for productivity, let's also get down to the basics with Microsoft Word and check off one daily office function—how to make those visually appealing lists and manage them.

1. Create Your First List
Most of the list-making tricks and tips lie within the Ribbon's Paragraph group on the Home tab.
Select the text to which you want to add the numbered list and click the down arrows next to the Bullet Lists icon or the Numbered List icon to access the libraries for both. Preview each list format by hovering over the selections available.
Microsoft Word also automatically creates a list for you when you start a paragraph with an asterisk or a number 1, period, and space followed by a press on the Enter key. With an asterisk, Word creates a bulleted list. Word senses that you are trying to create a numbered list with a number.
If you don't want your text turned into a list, you can click the AutoCorrect options button image that appears. To disable or enable this option, go to File > Options > Proofing > AutoCorrect Options > AutoFormat As You Type .
To quickly change the style of a bulleted or numbered list, just click the style you want in the list that appears when you click the arrow next to Bullets or Numbering.
General Tip: You can change the format of just one or some of the bullet or number styles in a list. Place the cursor at the start of the line that you want to change before opening the Bullets and Numbering dialog box. Your changes will apply only to the selected lines.
2. Use Just the Keyboard to Create a List
Use a handy Microsoft Word shortcut to create numbered lists quickly with the keyboard alone.
The keyboard shortcut for a bulleted list: Press Ctrl + Shift + L to apply the default bullets to a list. Press Ctrl + Shift + N to remove the bullets.
To customize a keyboard shortcut for a numbered list, right-click anywhere on the Ribbon and select Customize the Ribbon from the popup menu. You can also open Word Options from File > Options > Customize Ribbon .
Click on the Customize button for Keyboard shortcuts.
Select All Commands in the Categories list. Scroll down the list on the left, and select FormatNumberDefault .
Place the cursor in the Press new shortcut key box and press the shortcut key combination you want to use to create a numbered list. For example, you could use Alt + N because it's not assigned to anything else in Word. Click Assign .
The new keyboard shortcut is added to the Current keys list.
Click OK to exit the dialog box and test the new shortcut. Pressing "Alt + N" creates a numbered list. Pressing it again reverts it back to paragraph text.
General Tip: Do you want to skip numbering for a list item and convert it into a paragraph in the middle of a list? Select the specific list item and use the Alt + N shortcut to turn off the numbering.
3. Change the Default Numbered List Format
You can change, edit, or create a new numbered list. You have four Numbered List formats to choose from. But what if you want to use your own format other than the letters or Roman numerals, and it's not available?
Go to Home > Paragraph group > Numbering . Click the down arrow. Choose Define New Number Format .
Choose any chronological format. To change the font size, style, and color, click Font and choose a setting on the Font or Advanced tab.
When you want to add a dash, parentheses, or another value like a pound sign to the number, enter it in the Number format field. The little preview displays the changes. You can see the square brackets for a list you can tick off in the screenshot below.
Choose Left, Centered, or Right under Alignment to change the number alignment. The default is Left-Aligned.
The new number format is applied to any selected text on your document.
General Tip: You can even prefix the numbered lists with descriptive text, e.g., Attendee 1, Attendee 2, Attendee 3…and so on.
4. Change the Default Bullet List Format
Just like the numbered list, you can also change the default look of any bulleted list. Again, visually appealing bullets (other than the boring black solid dots) help your documents stand out from the mundane.
Select the text you want the bulleted list for and follow these steps.
Go to Home > Paragraph group. Click the arrow next to Bullets .
When the bullet you want isn't in the library, click Define New Bullet .
The Define New Bullet dialog box opens. Under Bullet Character , choose Symbol .
Another dialog opens, which lets you choose appropriate symbols from your installed fonts.
The Wingdings fonts have the best variety that makes for stylized bullet lists. Like any other font, you can change the color, size, style, and other characteristics of your chosen bullet font. Click the Font button in the Bullet character section to enter the Font dialog box.
General Tip: Use an open box (Open box) or a three-dimensional box (3D box) from the Wingdings character palette to create a Word document with neat checkboxes .
5. Use a Picture Instead of a Bullet
Sometimes all the mystic symbols in Webdings might not be enough. You can also use your own reusable graphics for bullet points. Though picture and SmartArt bullets look better on a PowerPoint slide , they work just as well in Word.
Select the bulleted list for which you want to change the bullets to pictures. Next, go to the Home tab > Paragraph group, click on the Bullets button, and select Define New Bullet from the dropdown menu. On the Define New Bullet dialog box, click Picture .
The Insert Pictures dialog box is displayed with different choices for your source file. You can insert a picture From a file on your PC or local network, from a Bing Image Search , or your OneDrive account.
Navigate to the location of your source file and click on Insert . The Preview window shows the selection.
General Tip: You can choose a graphic that matches the "theme" of your list. For instance, display a banana as a picture bullet for a list of fruits. Make sure images are transparent and have a good background. In my experience, simple graphics work best.
6. Line Up the Numbers in a List
Sometimes, the smallest of tweaks can make a big visual difference. For example, note the screenshot below, which shows a numbered list with Word's default Left alignment. As soon as the list reaches double digits, the default left alignment seems skewed as the decimal points do not line up neatly. Microsoft Word allows you to control this alignment and flush the double-digit numbers to the right.
Create your numbered list. Select the list items. Word can also control the alignment of a few selected items.
Go to Home > Paragraph . Then, click the dropdown arrow on Numbered list button.
Click on Define New Number Format . Choose Right alignment from the dropdown. Click OK .
General Tip: Even if there is no decimal, it is preferable to have them aligned on the right edge of the number. Try it with brackets.
7. Adjust Microsoft Word's Automatic List Indent
Every Word list comes with an automatic indent. Depending on the visual look you want, you may want to adjust the space.
Double-click any number in the list to select all of the numbers in the list.
Right-click the selection and choose Adjust List Indents from the context menu.
Change the distance of the bullet indent from the margin with the Number position box. Change the distance between the bullet and the text with the Text indent box.
8. Apply Formatting to a Single Number or Bullet on a List
You may want to format (changing the bullet style, color, or the size) a single bullet or number on a list without affecting any text on the list or any other succeeding bullets or numbers. Here's an easy way.
Show formatting marks by clicking Home > Show/Hide .
Select just the paragraph marker (pilcrow) at the end for the list item whose bullet or number you want to change. Apply any formatting. The formatting affects only the bullet or number; the text in the list item retains its original format.
New bulleted or numbered items on the list coming after this will reflect this too. The text in the new list item will have the same font characteristics as the previous text, and the new bullet/number will have the same font characteristics as the previous bullet/number.
9. Create a Multilevel Numbered List
A multilevel list can be a mix of numbers, alphabets, and bullets arranged on different levels, as shown below. You can use multilevel lists to break down a list into its hierarchies or sub-points. Such an alignment is also used to create outlines. Word 2016 gives us a dedicated button on the Ribbon to create a multilevel list.
Click the Multilevel List button and type the list.
Press the Tab key to indent and create a sublevel. Press Shift + Tab to unindent and promote an item to a higher level.
General Tip: You can also write the entire list in advance. Select it, and click the Multilevel List button to align it using the Tab and Shift + Tab keys to organize the topics. You can also use the Increase or Decrease Indent commands on the Ribbon.
10. Create Reusable Styles for Multilevel Lists
You can change the bullets, letters, or numbers' style, color, and alignment like any other list type. Save these changes as a new style and use it again and again.
Go to Ribbon > Home > click the arrow next to Multilevel List > Define New Multilevel List .
Click on More to expand the options.
For customizing any of the levels, click the level number you want to modify. 1 is the default.
Use the options provided to change the appearance of the list. For example:
- In Number style for this level , type (1) if you want to style the numbers with parentheses or (A) to style the letters with parentheses.
- In Start at , choose the number, letter, or bullet where you want to start the list.
When you've finished the customizations, give the list a name under the ListNum field list name . This name will appear wherever you see the ListNum field.
Choose a style under Link level to style . This lets you use an existing style in Word for each level in the list.
Choose where you would like to apply your changes by clicking on Apply changes to and selecting from Selected text, Whole list , or This point forward .
11. Convert a List to a Table
First, select the list. Next, go to Home > Insert . Click the Table option in the Tables group.
Choose Convert Text to Table from the dropdown list.
Microsoft Word estimates the table structure based on the list's contents. Word creates the columns based on the separators between the items on the list.
When Word doesn't get it right, you have to modify the settings and make it easier for Word to convert the list. Once the table has been created, you can use the Table design tools to format the appearance.
General Tip: In most cases, the results aren't perfect. The best way is to remove the numbering or the bullets and then create the table from the list of items. The serial numbers can easily be added to the table later.
12. Continue Your Numbering When a Paragraph Cuts It Short
Sometimes, a paragraph of text needs to interrupt the sequence of the list. Follow these steps to continue the list after the paragraph with the same number format.
Enter the rest of your numbered list after the paragraph and format it. The list begins with 1 again. Right-click on the list that comes after the paragraph. Choose Continue Numbering from the Context menu. The list is modified instantly.
The list numbering continues from where the paragraph broke it off.
The Importance of Lists as Timesavers
Lists are time savers when a document has to be an exercise in economy. They instantly become a little less boring than blocks of text. Use them as the organizational backbone of a document and see your document better organized.
Templates for college and university assignments
Include customizable templates in your college toolbox. stay focused on your studies and leave the assignment structuring to tried and true layout templates for all kinds of papers, reports, and more..

Keep your college toolbox stocked with easy-to-use templates
Work smarter with higher-ed helpers from our college tools collection. Presentations are on point from start to finish when you start your project using a designer-created template; you'll be sure to catch and keep your professor's attention. Staying on track semester after semester takes work, but that work gets a little easier when you take control of your scheduling, list making, and planning by using trackers and planners that bring you joy. Learning good habits in college will serve you well into your professional life after graduation, so don't reinvent the wheel—use what is known to work!
- Link to facebook
- Link to linkedin
- Link to twitter
- Link to youtube
- Writing Tips
Bullet Points and Numbered Lists in Microsoft Word
3-minute read
- 17th December 2016
Although most of an academic paper should be written with full sentences divided up into paragraphs, bullet points and numbered lists can be useful in some contexts. For instance, vertical lists are particularly useful when giving examples or reporting steps in a process.
Microsoft Word also makes adding lists to a document reassuringly simple. All you need to do is follow the instructions below.
Using Bullet Points in an Essay
Bullet points are useful when listing things non-sequentially (i.e., when there is no specific order in which the items involved should be listed). They should also be reserved for longer lists, as short lists of up to three or four items can be included in the main text.
To add a bullet pointed list to a document in Microsoft Word 2007 or later, simply:
- Place the cursor where you want the list to begin

- Click the “Bullets” button to begin a list (you can select the type of bullet point you want by using the arrow to open a new menu)
- Type the first entry in your list, hitting “Enter” to start the next one
To end your list, hit “Enter” twice after the final item. You can even customize your bullet points with an image of your choosing for a little extra color. We like using eagles, but we admit that this probably isn’t appropriate for most academic documents.

Using Numbered Lists
Numbered lists are appropriate when listing items sequentially or in order of importance. The process for adding a numbered list to a document is similar to adding a bulleted list:
Find this useful?
Subscribe to our newsletter and get writing tips from our editors straight to your inbox.
- Select where you want to begin your list
- Go to the “Paragraph” section of the “Home” tab

- Type your first entry, then hit “Enter” to create the next one
As with bulleted lists, you end a numbered list by hitting “Enter” twice after the final item. For more control over the style, select “Define New Number Format” in the numbering menu.
Using Multilevel Lists
Finally, if you really want to push the boat out, you can use a “Multilevel” list. This is useful if you want to include sub-lists within a main list, like in the following:

To add a list like this to your document, you’ll have to:

- Write out your list as normal, beginning each item on a new line

As with the other lists discussed here, you can customize the style of multilevel lists by selecting “Define New Multilevel List” from the menu. This will open a new window where you can modify each level of your chosen list style as required.

Share this article:
Post A New Comment
Got content that needs a quick turnaround? Let us polish your work. Explore our editorial business services.
4-minute read
What Is Market Research?
No matter your industry, conducting market research helps you keep up to date with shifting...
8 Press Release Distribution Services for Your Business
In a world where you need to stand out, press releases are key to being...
How to Get a Patent
In the United States, the US Patent and Trademarks Office issues patents. In the United...
The 5 Best Ecommerce Website Design Tools
A visually appealing and user-friendly website is essential for success in today’s competitive ecommerce landscape....
The 7 Best Market Research Tools in 2024
Market research is the backbone of successful marketing strategies. To gain a competitive edge, businesses...
Google Patents: Tutorial and Guide
Google Patents is a valuable resource for anyone who wants to learn more about patents, whether...
Make sure your writing is the best it can be with our expert English proofreading and editing.
Subject Explorer
School Subjects
Math & Science
Business & Technology
Electives & Health
Board & Administration
Teaching & Learning
Audio/Video Lectures
Books & Documents
Classifieds
Jobs & Resources
Discussions
Language & Literature
Practice Projects for Microsoft Word

Word 9 Table
In this practice project for Word, students create a document with a title and table. The table has two columns that have different font alignment and incluces various fonts. …

Word 8 Formatting Text
In this practice project for Word, students create a document using a different size and color font for the title than the rest of the paragraph. …

Word 7 Bullets
In this practice project for Word, students create a document with two different types of bullets showing points and subpoints. …

Word 6 Letter
In this practice project for Word, students create a letter. Included in the letter is a heading on the right, indented paragraphs, and the closing and signiture near the middle of the document. …

Word 5 Text And Outline
In this practice project for Word, students create a document that contains several paragraphs of text and also includes an outline with key points and subpoints. …

Word 4 Modified Text
In this practice project for Word, students create a document with the heading on the right, a boldfaced, centered title, and indented paragraphs. The document is double-spaced. …
Word 3 Basic Text
In this practice project for Word, students create a document with the heading on the right, a boldfaced title that is centered, and several paragraphs that are indented. …

Word 22 Preset Headings
In this practice project for Word, students create a document using the preset headings to create a title bar. The document has different alignment and font, blanks, and a short outline. …

Word 21 Formatting Options
In this practice project for Word, students create a document that shows some different effects that can be used with the same font. …

Word 20 Numbered List
In this practice project for Word, students create a document that includes a centered title followed by a numbered list. …

Word 2 Heading 2
In this practice project for Word, students create a document that has a centered title, a heading in the upper right corner, and indented paragraphs. …

Word 19 Advanced Table
In this practice project for Word, students create a document with a table showing a school schedule. The blocks in the table are different sizes and will take individual work within the blocks to …

Word 18 Columns
In this practice project for Word, students create a document with a header and two colomns. The columns include boldfaced and italic font and different alignment. …

Word 17 Columns
In this practice project for Word, students create a document with two identical columns in landscape orientation. Included in each are indented lines and different alignment and font. …

Word 16 Lesson Notes Handout
In this practice project for Word, students create a document like a student handout. This includes an outline with several levels, blanks for students to write on, and different font. …

Word 15 Lesson Notes
In this practice project for Word, students create a document with a header and two outlines. Students are asked to use the automatic numbering and outlining features in Word. They must use different …

Word 14 Table
In this practice project for Word, students create a scoresheet using a table. Students must use different sizes, colors and styles of font, including different alignment. …

Word 13 Outline
In this practice project for Word, students create an outline using the automatic outline in Word, including many levels of subpoints. …

Word 12 Formatting
In this practice project for Word, students create a document with a centered title in all capitals, the first letter of each word slightly larger than the rest. Throughout the document the font is …

Word 11 Formatting
In this practice project for Word, students create a document similar to a test or quiz. They must include points and subpoints, blanks, boldfaced text, tabs, and spacing. …
Resource Type:
Pass it on:
Leave a Reply
14 Best Steps on How to Make an Assignment on MS Word

Nowadays, it is very common for students to complete their assignments using Microsoft Word. Thus, they look up how to make an assignment on MS Word. Because of the numerous options provided by MS Word, it might be difficult for a beginner to handle. All you have to do is become familiar with MS Word’s options before moving on to the assignment.
Here in this blog, we will explain 14 best steps you need to follow in order to know how to make an assignment on MS word.
How to make an assignment on MS word
Table of Contents
Yes, we understand that completing an assignment is challenging for most students. Because some of them are worried about completing the task like write my paper , and even if they aren’t worried, they don’t know how to use Microsoft Word effectively, which can be disastrous for many. Similarly, we are publishing this blog to teach you how to make an assignment in Microsoft Word.
Yes, we understand that completing an assignment is challenging for most students. Because some of them are worried about completing the task, and even if they aren’t worried, they don’t know how to use Microsoft Word effectively, which can be disastrous for many. This blog is being published to teach you how to make an assignment in Microsoft Word.
1. Setting the layout of the page for your assignment
On the Toolbar, select the Page Layout tab. Likewise, Page Setup options will appear.
2. Set Margins
Set the margins as follows (Standard measure for the margin):
- Bottom: 2.5cm
- Left: 2.5cm (or 3.2cm)
- Right: 2.5cm (or 3.2cm)
3. Setting Orientation of the page
- Orientation: Portrait
4. Setting Size
- Set to A4 unless otherwise specified.
5. Setting styles
Go Back to the Home tab, You will find the Styles options in the right of the toolbar you will need to use these steps to set the headings and paragraph text for your work.
6. For Headings
Always use the first three headings (Heading 1,2 and 3)
- H1: Arial 14 pt bold
- H2: Arial 12 pt bold, italics
- H3: Arial 10.5-11 pt bold
And the text type should be Normal text
- Times New Roman 12 pt (or equivalent)
7. To set the headings styles for your work, you will have to
- Click the small Styles icon/button.
- Select/highlight the style to modify (e.g. ‘H1’), and then right-click >Modify. Likewise, the Modify Style dialog box will appear.
- Under Formatting, You can change the font style and size as per your need.
- Click OK.
8. Setting up your assignment as the one document
Also, your Work, including the title page and references ( not the Assignment Attachment form*), must be aggregated as a single word (.docx) report.
Therefore, it is simpler to make one record, embed your significant headings, and enter the content from that point. But, if you decide to make separate documents while setting up your task (for example, a different record for references), you will need to copy and paste the final contents into the one-word document and finalize the formatting there.
*The assignment attachment structure is either submitted electronically as a different document or attached to a submitted printed copy.
If you face any issues related to PowerPoint or find it difficult to complete your PowerPoint homework, use our PowerPoint PPT Homework Help by Experts .
9. Inserting section breaks, page breaks, and page numbers
The document has two sections
Section 1 Contains
- The title page
- Table of contents
Section 2 Contains
- The remainder of the assignment.
There are then page breaks within each section i.e
(e.g. between ‘Abstract’ and ‘Table of contents’; ‘Conclusion’ and ‘References’).
To insert the Section break (i.e. make two sections)
- Position your cursor at the end of the Table of contents. (Just have this as a heading; the actual table will be added at the end.)
- From the toolbar at the top of your document, open the Page Layout tab and select Breaks>Section Breaks>Next Page. Under Section break types, select ‘Next page’. This has now divided the assignment into two sections.
Now to insert the page breaks
- Place your cursor at the foot of the title (cover) page.
- Select the Page Layout tab>Breaks>Page Breaks>Page. This has now created a page break between the title page and Abstract.
- Place the cursor at the foot of the Abstract page and repeat to make the break between the Abstract and Table of contents.
- Place a page break between the Conclusion in the next section.
10. Now to add the page numbers
For section 1:.
- Place your cursor within the title page. Click on the Insert tab and then select Page Number in the Header & Footer set of options.
- Select Top of Page>Plain Number 3 (‘right’ alignment). Do not close the Header and Footer just yet.
- Check the box for Different First Page. (This will remove the page number from the title page.)
- In the Header & Footer group of options to the left of the toolbar, select Page Number>Format Page Numbers. Select i, ii, iii .. from the Number format
- Drop-down list. Under Page numbering, click the Start at the radio button (if not already activated) and select i. Click OK.
- Close the Header and Footer. [This will paginate slightly differently from the example, with Abstract on page ii. ]
For section 2:
- Go to the start of section 2 (i.e. beginning at the ‘Introduction’) and double click on the existing page number. This will open the Header settings options.
- In the Header & Footer options section on the toolbar, select Page Number>Format Page Numbers.
- Make sure the ‘Show number on the first page is selected (i.e. the box is ticked).
- Select 1, 2, 3 from the Number format drop-down list. Under Page numbering, Click on the Start at the radio button and set the start on page 1.
11. Inserting the Table of contents
- Move the cursor under the ‘Table of contents’ heading.
- Check the checkboxes for ‘Show page numbers’ and ‘Right align page numbers’.In the (last) Show levels box, set it to either just ‘1’ (i.e. list only the heading 1 level headings) or ‘2’ (to show both H1, and H2 headings).
- To update the table anytime, right-click on the table and it’s almost done.
12. The title page
Follow these steps as the model for your work:
- Assignment title: Arial 28 pt, italics, centered
- (Assignment number): Arial 18 pt, italics, centered
- Other details: Times New Roman 14 pt, left-justified; single tab spacing for items on the one line.
13. Word count
Show the word count properly for the body of your assignment, because it’s’ important.
- Place your cursor on the Introduction title, hold the Shift key down, and got to the end of the Conclusion.
- And then Tools>Word Count and record the number of words.
14. Spelling and Grammar Check
Always keep an eye on spelling and sentence structure and Before you get a printed copy of your task,
What you have to do is
- Run the word spell and sentence structure, and carefully look at your Work. (Tools>Spelling and Grammar.)
- Ensure the Dictionary Language is set to English (Australia, UK, Canada).
Get the Best Excel Assignment Help Now
6 Tips On How To Make an Assignment First Page Best
8 Best Steps On How to Write An Assignment Report
4 Tips on How to Write an Assignment Introduction
6 Tips on How to Make An Assignment For High School
To this end, now you know the 14 best steps on how to make an assignment on MS Word in detail. Many times students are worried about their assignments but we are here to assist you with all your problems. You can contact our experts anytime if you have an issue with MS Office assignment help.
As a result, Our computer science assignment help experts are available for you to provide help 24/7.
Related Posts

How to Hire someone to do my Statistics Homework for Me?
Students ask to do my statistics homework for me. Although there are many online tutors or statistics homework service providing websites available to help you…

How to Get Good Grades in Exams Tips by Experts
Here in this blog, Codeavail professional experts will help you to understand how to get good grades in Exams. Notice that not all the material…
- United States
- Netherlands
- New Zealand
- United Kingdom
Word 2016 and 2019 cheat sheet
Are you getting the most from microsoft word 2016 and 2019 for windows get to know the key features..
Contributing Editor, Computerworld |

Use the Ribbon
Collaborate live, tackle tasks with tell me.
- Use Smart Lookup for quick online research
- Add new types of charts
- Use the new Translator pane in Word 2019
- Handy keyboard shortcuts
Word has always been the workhorse app of the Microsoft Office suite. Nearly everyone who uses Office ends up using Word at some point, whether it be for writing memos, typing up agendas, creating reports, crafting business correspondence or any of a thousand other uses.
Microsoft sells Office under two models: Individuals and businesses can pay for the software license up front and own it forever (what the company calls the “perpetual” version of the suite), or they can purchase an Office 365 subscription, which means they have access to the software for only as long as they keep paying the subscription fee.
When you purchase a perpetual version of the suite — say, Office 2016 or Office 2019 — its applications will never get new features, whereas Office 365 apps are continually updated with new features. (For more details, see “ What are the differences between Microsoft Office 2019 and Office 365? ”)
This cheat sheet gets you up to speed on the features that were introduced in Word 2016 and Word 2019, the perpetual-license versions of Word included with Office 2016 and Office 2019, respectively. In Office 365, Word has all those features, plus several more. If you or your organization has an Office 365 subscription, see our separate Word for Office 365 cheat sheet for coverage of all the latest features.
Most of the tips in this article apply to both Word 2016 and Word 2019 for Windows. Near the end is a section for Word 2019 only.
Share this story: IT pros, we hope you’ll pass this guide on to your users to help them learn to get the most from Word 2016 and 2019.
The Ribbon interface in Word 2016 and 2019 hasn’t changed much compared to earlier versions. The Ribbon has been included in Office suite applications since Office 2007, so you’re probably familiar with how it works. But if you need a refresher, see our Word 2010 cheat sheet .
Just as in Word 2013 , the Ribbon in Word 2016 and 2019 is flatter-looking, cleaner and less cluttered than the one in Word 2010 and 2007. The 2016 and 2019 Ribbon is smaller than in Word 2013, the title bar is now solid blue rather than the previous white, and the menu text (File, Home, Insert and so on) is now a mix of upper- and lowercase rather than all caps. There are other minor changes as well — for instance, the old Page Layout tab is now called just Layout — but the Ribbon still works in the same way and you'll find most of the commands in the same locations as in Word 2013.
The Ribbon in Word 2016 hasn’t changed much from Word 2013. (Click image to enlarge it.)
To find out which commands live on which tabs on the Ribbon, download our Word 2016 and 2019 Ribbon quick reference . Also see the nifty new Tell Me feature described below.
Just as in earlier versions of Word, to make the commands underneath the tabs on the Ribbon go away, press Ctrl-F1. To make the commands appear again, press Ctrl-F1. (Note that the Ribbon tabs — File, Home, Insert and so on — stay visible.)
Here are the Ribbon display options.
You’ve got other options for displaying the Ribbon as well. To get to them, click the Ribbon display options icon at the top right of the screen, just to the left of the icons for minimizing and maximizing Word. A drop-down menu appears with these three options:
- Auto-hide Ribbon: This hides the entire Ribbon, both the tabs and commands underneath them. To show the Ribbon again, click at the top of Word.
- Show Tabs: This shows the tabs but hides the commands underneath them. It’s the same as pressing Ctrl-F1. To display the commands underneath the tabs when they’re hidden, press Ctrl-F1, click a tab, or click the Ribbon display icon and select “Show Tabs and Commands.”
- Show Tabs and Commands: Selecting this shows both the tabs and commands.
And if for some reason that blue on the title bar is too much color for you, you can turn it white or gray. (In Word 2019, there’s also a black option.) To do it, select File > Options > General . In the "Personalize your copy of Microsoft Office" section, click the down arrow next to Office Theme and select Dark Gray or White (or Black) from the drop-down menu. To make the title bar blue again, choose the Colorful option from the drop-down list. Just above the Office Theme menu is an Office Background drop-down menu — here you can choose to display a pattern such as a circuit board or circles and stripes in the title bar.
There’s a useful change in what Microsoft calls the backstage area that appears when you click File on the Ribbon: If you click Open or Save As from the menu on the left, you can see the cloud-based services you've connected to your Office account, such as SharePoint and OneDrive. Each location now displays its associated email address underneath it. This is quite helpful if you use a cloud service with more than one account, such as if you have one OneDrive account for personal use and another one for business. You'll be able to see at a glance which is which.
Select “Add a Place” to add a new cloud storage service for Word.
The biggest feature launched with Word 2016 is live collaboration that lets people work on documents together from anywhere in the world with an internet connection, a feature that Google Docs has long had. There are only two requirements for collaboration in Word 2016: You must be logged into your Microsoft or Office 365 account, and the document must be stored in OneDrive, OneDrive for Business or SharePoint Online.
However, while Office 365 subscribers or anyone using Word 2019 or Word Online can see the changes that other users of those versions make to a shared document in real time as they happen, Word 2016 users have to save their documents periodically to see and share changes. So while it is live collaboration, it’s not real-time visibility into that collaboration. Still, it does allow you to work with others on the same document at the same time.
To collaborate on a document, first open it, then click the Share icon in the upper-right part of the screen. If you haven’t yet saved your file in OneDrive, OneDrive for Business or SharePoint Online, you’ll be prompted to do so.
Clicking the Share button opens the Share pane on the right-hand side of the screen — this is command central for collaboration. At the top of the pane, type in the email addresses of the people with whom you want to collaborate on the document, separated by commas. As you type, Word looks through your address book and displays the matches it finds; click the person you want to invite. If you’re on a corporate network, you can click the address book on the right to search through your corporate email address book. If a person isn’t in your address book — just type in their complete email address.
Selecting people with whom to collaborate via the Share pane. (Click image to enlarge it.)
After you enter the addresses, select either "Can edit" or "Can view" in the drop-down to allow collaborators full editing or read-only privileges. (If you want to assign different rights to different users, you can send two separate emails, or you can change any collaborator’s permissions later by right-clicking their name in the Share pane.) Type a message in the text box if you want. When you’re done, click Share. An email gets sent out to everyone with whom you’ve shared the file, showing a “View in OneDrive” button that they can click to open the document.
Your collaborators get an email message like this when you share a document. (Click image to enlarge it.)
There’s another way to share a file stored in a personal OneDrive for collaboration: At the bottom of the Share pane, click “Get a sharing link,” and from the screen that appears, choose “Create an edit link” if you want to create a link to the file that will allow people to edit the file, or “Create a view-only link” if you want to create a link that will allow them to view the file only. Then copy the link, paste it into an email using any email program, and send it.
When your recipients receive the email from you, they click a button or link to open the document, which opens in Word Online in a web browser rather than in the Word desktop client. At this point, they can view the document but not edit it. Users who aren’t signed into a Microsoft account will see an Edit in Browser button; once they click that, they can start editing in their browser window. Logged in users will see an Edit Document menu, from which they can choose Edit in Word to open the file in the client version of Word, or Edit in Browser to work in the free web version.
The web version isn’t as fully featured as the client version — for instance, there aren’t as many formatting options and you can’t insert shapes, take screenshots, use mail merge, or use several other features. But for basic editing, it works fine.
When a collaborator starts working in a shared document, you’ll get a notification that someone else is editing the document. What you see next depends on whether you’re working in Word 2016 or 2019.
If you’re using Word 2016, whenever a collaborator makes a change, a small Updates Available icon appears along the bottom of your Word window. As mentioned above, though, you’ll have to save your document (or click the Updates Available icon) to see their changes or have them see yours. After you save or click Updates Available, your collaborators’ additions appear in your document with a pale green overlay.
When collaborating in Word 2016, you must save the document to see changes made by others (highlighted in green) and to share your changes with them. (Click image to enlarge it.)
When you're working on a document in Word 2019 with other people in real time, each person gets a cursor with their own unique color. You can see what they do as they do it, including deleting, editing and adding text. They see what you do as well.
In Word 2019 you can see other collaborators’ edits in real time, with a different colored cursor for each collaborator. (Click image to enlarge it.)
Be aware that how well real-time collaboration works depends on the strength of your internet connection. On slow or flaky connections, you won’t immediately see edits that other people make and they won’t see yours immediately — there will be a lag. So it’s always best, when possible, to have the strongest connection possible when collaborating.
In addition to seeing each other’s changes to the document, you can communicate with your collaborators in other ways. The Share pane shows a list of people who have access to the document, with a note underneath their name indicating if they are currently editing the document, and if not, whether they have editing or viewing access.
Right-click the icon of anyone currently working on the document and click Open Contact Card; a screen pops out with the various ways you can contact them, including chat, phone and video via Skype (if they have Skype) and email. That lets you talk or text with them while you're working on the document together, making collaboration that much more effective.
Click the icon of someone working with you on a document to see other ways you can contact them. (Click image to enlarge it.)
Although live collaboration is the biggest addition to Word 2016, there are several other new features as well. A very useful one is Tell Me, which is extremely helpful when you want to do a task that you haven’t done before or have forgotten how to do.
It’s a text box just to the right of the Ribbon tab labels at the top of the screen with the words “Tell me what you want to do” in it. Type in a task, and you’ll get a list of possible matches. Click the task you want to get instructions on how to do it.
For example, I typed “address an envelope” and chose the “Envelope” result, and the screen you use for addressing envelopes appeared. When I typed in the more general query “write an essay,” it popped up a link to Word’s Researcher feature that lets you do research from right within Word, add sources from the research you find, and then cite the sources in the document properly. If you type in a query and hover your mouse over a result instead of clicking it, you’ll see a screen describing what you can do if you click the results.
Tell Me gives advice on addressing an envelope (or any other task). (Click image to enlarge it.)
It’s a big time-saver, because you don’t have to hunt through the Ribbon to find the command you want. And it remembers the features you've previously selected in the box, so when you click in it, you first see a list of previous tasks you've searched for. That way, tasks that you frequently perform are always within easy reach.
- Office Suites
- Enterprise Applications
- Productivity Software
- Desktop Software
- Collaboration Software
- Small and Medium Business
Office 2016 and 2019 cheat sheets

22 Best Basic Microsoft Word practice exercises for beginners
Microsoft Word Exercises for Practice: – This article is very important for a basic computer course, for college and school students learning Microsoft Word online and offline. In this, you will get the best ideas on how to learn and practice Microsoft Word. And you can explore the capabilities of Microsoft Word as a business software in this post.
The best way to learn anything is by doing exercises and creating samples of existing materials from experts. It’s ok that you know about Bold, Italic, Page Layout, Insert Menu, View options, etc. but it’s great if you can use such options in creating anything in Microsoft Word.
I mean tools are the same, but the field, seed, and process are changed. So, Can you do that with the same tools? I know farmers do it daily.
So, let’s explore how to learn Microsoft Word. Microsoft Word Exercises ideas that I think every student around the world should practice.
Microsoft Word practice exercises for beginners:
1. create and design admission/enquiry forms etc..
To create this kind of form, you need to use shapes, text boxes, colors, formatting options, tables, and horizontal lines in MS Word. This is a very good exercise to practice because it will give you an idea of how to use such options practically on various official documents that we use in our daily official life.
These days many people do not create forms and charts usually they download them. That makes the forms boring. And often you see similar kinds of formats in forms. But as a student or teacher or small business owner if you learn to create such forms not only do you expand your thinking and creativity but you can also utilize this ability in business and job.
See a sample in the image below.

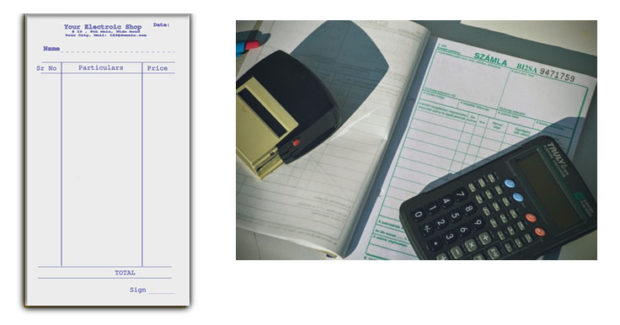
2. Create bills/leaflets/brochures. See the sample below.
Everyone has various designs of bills such as your refrigerator shopping bill, computer bill, electricity bills, and various other kinds of bills. So you can practice in Microsoft Word to create that type of bill format. It’s good for practice in which you will learn the Insert menu option, text adjustment between the table, page size, and text boxes.
3. Design E-book cover pages / Magazine front/ books front/back page using the cover page option in Insert Menu.
This practice is an advance. But try to find the books and magazine cover pages. And try to make it similar in MS Word. Imagine if you’re the designer, how you will design the same content or front page. You will learn while practicing this about the Cover Page option in MS Word or you can design without using that option. The benefit of learning this is about understanding the various practical uses of Microsoft Word in our daily lives.

4. Create Business Cards using Shapes, text, and colors.
People use Adobe Photoshop, Corel Draw, and websites to create business cards nowadays automatically and manually. You can also use that. But it’s about mastering MS Word options and skills. When you create and design anything in Microsoft Word. Your basic computer skills become strong. That helps you in the future when you start working on a Computer or MS Office or MS Word. Also, basic computer skills are very important before doing any degree course in IT. So, Design the business cards similarly you see in the below sample picture.

This is an advanced exercise, but if you do it and create cards then the options you’ve learned during your computer courses in MS Word remain forever in your brain.
Related: Importance of MS Word in Education
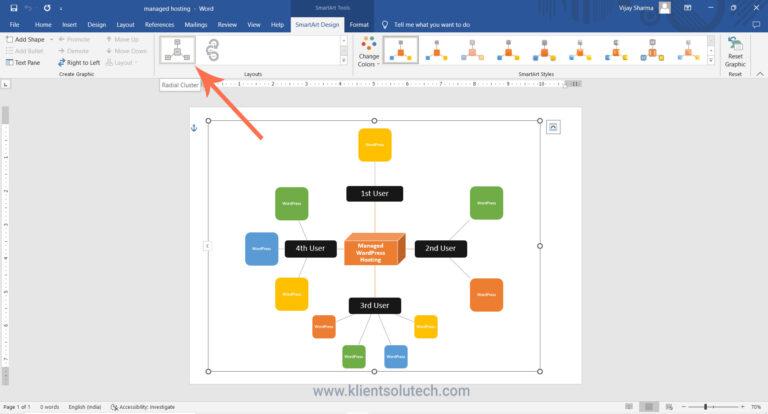
5. Use smart art and create organizational charts and showcase relations:
Smart Art is one of the favorite options in Microsoft Word. Smart art is used to draw diagrams that are used to showcase the content visually that will be easy to understand and manage. As you see below the smart art image Hierarchy Diagram is used to create an organizational chart or structure of the Telecom company.
This is the best method to understand and teach certain things to students, teachers, parents, and companies. You will see such organizational charts in the company’s office and government head offices.

Radial Cluster:
I have created this radial cluster diagram and organizational chart using Smart Art in Microsoft Word to showcase the difference between Managed WordPress Hosting and Shared Hosting ” in one of the latest published posts. You can practice and create a similar chart to showcase the relation or useability differences.
Structural Chart:

I hope that you can see (if not zoom in the browser using (Ctrl+ + ) both WordPress hosting and shared hosting smart images that are created in Microsoft Word.
When you practice MS Word Option to create the above diagram or any other, you get many problems. Those problems were not there while you were learning MS Word. These are the problems such as font size adjustment, lines adjustment, etc. colors, shape adjustment, etc. when you use tools or Word applications to communicate your point of view.
So, when you solve these problems by yourself or with the help of your computer course instructor it will be great for your computer knowledge and MS Office skills. Because when you solve the problem you learn very important working lessons in MS Word. This is why you’re learning.
Related: Steps to create a simple business plan using templates in Word App
6. Make book content page or index page
This is another idea in which you need to create an index or content page of the book. In this process, you will learn about the first-line indent, hanging indent, and the perfect use of the ruler bar in Microsoft Word.
And also about a page number, and a hyperlink (if it is an eBook). You can discuss this article with your computer teachers, to allow us or provide us with similar things to practice on.

7. Try to create a similar Header and footer that you’re seeing in the Book
This is the most important option and thousands of students find it difficult to use the header and footer. It’s easier to learn header and footer one time but if you’re not practicing it in various ways or the things such as books header and footer, it’s tough for you to explain it to others.
That’s why I am suggesting you try using the different styles of header and footer. And you will get such an example from the books.

8. Insert the Image into the shape
This is a little easy. But you must know easier things more than difficult things. Because in interviews especially related to IT, people ask easier questions than difficult ones.
So, practicing even on small things is also beneficial. You don’t know when it will be helpful for you in the future.
So, insert an image into the shape. Take and draw a shape from the Illustration menu, place it on a page a little higher in size, and then double-click on the shape. Go to the shape fill option and click on the picture. As an example, you can see the following image.

Related: – Top 10 powerful uses of Microsoft Word.
9. Practice hyperlinking and creating links between Word document texts to D: /, Play songs from Microsoft Word text, and create links between internal and external files.
This is the most important option in Microsoft Word. Most of the processes on the internet contain links. The hyperlink is the starting point in which you learn how things are connected.
It’s also a great option for Web Designers or web designing teachers to teach “How website links work” by using the hyperlink as an example.
As you can see in the image below, I am displaying the connection between the play song text to the location of the song.
Now you need to select the text in which have written the play song and then insert a hyperlink (Ctrl+K) and in the hyperlink address, put the path of the song. After that press, the Ctrl button and click on the blue link, so now any song that you selected will start playing.

Here is my complete article based on the Hyperlink option: – Hyperlink Example within Microsoft Word Document
10. Design a Happy Birthday Message by using Word Art and print it.
I think it’s the easiest thing for you. You can use the Word Art option for this. You can create the best wishes message in MS Word. After that, you can print. And give it to the person. It’s about creating small things at home. This is also a good way to make kids interested in learning the computer.
Also good for students and kids to create fun things and print or give them as a gift to parents. So, they will enjoy your creativity.

11. Create a chart and show the product price comparison between years:
The chart option is very important in Microsoft Word and Excel. However, the use of the chart option and any other option in MS Word depends on the demand for a certain content type.
For example, you’re writing a book or making notes about something in which you have to write and explain the price comparison between 3-4 years. Then you can use the chart for visualizations to analyze the data.
In visual format or the chart, it’s easier for people to understand, what you mean. Also, it gets more views or focus than the content.

So, try to create the chart you’re seeing in the above image.
12. Get the newspaper and see the text-based advertisement and Design
Design and create text or image-based advertisements that you saw in the newspaper. Designing such an advertisement will be a very beneficial role for Microsoft Word students or people learning Advanced Microsoft Word skills. Advertisement designs contain high-quality images, text, and layouts. And these designs are created by experts. When students practice expert material and create similar or better than that.
I think that movement is great for learners and teachers. So, try to create as many as you like. It will make you master MS Word. And I think doing exercises after completing the class topic is the best way to learn MS Word.

13. Take a double-column book or newspaper and design or create a similar paragraph style in the Word document .
Not all often type or create content in a double column. I know computer teachers can teach you such options. But they will not be able to explain the deepest or professional uses of such options for certain reasons.
So, I will suggest that you use the column option and find the newspaper similarly as you see below and create or type the text as you’re seeing in the newspaper. And if you’re having a problem, ask your teachers. So, when your teachers teach you how to do that thing or this thing, it will be great for your knowledge.
14. Create a letterhead or identity card of any company or institution that you have and insert the Watermark with that company name in the document.

You can create an identity card, visiting card or birthday card in MS Word. As you’re seeing below this is an example of cards and letterheads. But you can find such things. And practice your MS Word knowledge in creating an identity card, and letterhead.
This will give you an idea of how to adjust the text in different shapes and areas. Also, this is a good exercise in which you learn after printing, what size you need to adjust on the page. And when you do that, you learn very precious things in MS Word.
In this video tutorial, you will get basic ideas to create a letterhead. You will get ideas to insert letterhead content in the header and footer, you will also learn how you can use watermarks in letterhead, and how to print and adjust content on the page. The video tutorial is in Hindi, but even if you’re not familiar with the Hindi language, you can still learn and watch it for practice ideas:
Step by Step Guide to create printable letterhead in Microsoft Word and Google Docs
15. Decorate a Word document with a page border, and content border, add patterns, and write beautiful text in it.
This is the easiest page layout option, in which you can learn about page borders in MS Word, text borders, color or shading on the page, and pattern.
These options are very beautiful when you’re creating eBooks, making notes, and doing anything that requires the following type of style. See the image below and try to create something similar to this one.

16. Insert Images and Practice on Format Menu and Image Options.
You can use image options and style to decorate, retouch, and adjustment of colors and brightness in MS Word. As you can see, I have created various styles and image effects. These are easy to create.
But to learn more advanced effects later in other professional software, you need to learn and practice such things during your basic computer course.

17. Insert a template or download the new template in Microsoft Word from the Internet and edit those templates with your content.
There are 100+ templates almost for anything in the Microsoft Word Template option. The top benefit of using the template is that if you don’t know how to create or design a certain thing then you can just download the template and replace the existing text with your text. And it’s done.
This is the most important option that you should learn because it’s tough when you don’t know how to design or create anything, so try to practice on 10+ templates and see what it will look like.

Related: Uses and features of Microsoft Word.
18. Practice Typography
Write 10 lines or 10 sentences and then change the font, style, color, and size of each sentence. make each one different from than previous and next..
Fonts are the face of the text. The following image displays various fonts and styles. Just create similarly. During the practice, you will learn which font will be better for the specific text. Just write 10 lines and differentiate each one.

19. Create a Tenant management form in Hindi or your native language.
We use computers or technology mainly for two reasons the one is Innovation and the second is problem-solving. There are various ways of solving problems using computers. Some problems are solved immediately or some take time. For example, you can create an accounts management software to manage business incoming, outgoings, cash flow, balance, and taxes.
Similarly, there are software and mobile apps to manage tenants. I have created this form for my office space owner. He wanted a simple solution that they could follow and manage easily. They are not that much familiar with apps and other digital methods. I told them about digital options. But they want something that can be taken care of easily and also send tenants’ details for police verification when needed.
So we created the following form and this is also an example of immediate problem-solving using a computer and Microsoft Word. Now after printing one copy of this, they can photocopy it as per the number of tenants they want to manage.

So as beginners, you can try to create a similar form by using the Table feature in Microsoft Word. For the best practice 1st create and decide on columns on rough physical paper and the details that you want. You can create a better form than this and I expect that from you.
And for Hindi or your native language, even if you do not have Hindi font or French or Spanish font on your computer or in Microsoft Word. You can use Google Translate for this, convert the word into Hindi or Spanish, and then copy and paste it into the form table column.
20. Practice to design a brochure for an event
When you try creating this brochure design in Microsoft Word, you’ll learn basic and advanced techniques. This includes using image effects, grouping shapes, adding colorful bullets, and creating textures. These skills are valuable, especially if you plan to work with Word or as a virtual assistant. But even as a Word beginner, practicing these exercises is essential for building your Word skills.

Here you can watch a free video tutorial to learn brochure design : Brochure Design Practice in Microsoft Word | Word Exercise for Beginners | Hindi Tutorial
21. Learn and Practice creating business card designs in Microsoft Word
Today, there are plenty of software options available for creating business cards, such as online tools, Adobe InDesign, Corel Draw, Photoshop, Canva, and more. However, making a printable business card may seem straightforward but does involve some technicalities and creative flair.
As a student, it’s beneficial to tackle challenging and intricate design tasks in Microsoft Word, like this business card project. This practice will help you strive for excellence and mastery of Word skills. Consider it your 21st exercise towards becoming a Word expert.
Here you can watch a complete and detailed video tutorial on this: How to Create Modern Business Card Design in MS Word | Step-by-Step Detailed Tutorial
22. Practice to create a professional-looking certificate design
Practicing certificate design and Microsoft Word is essential because it empowers you with valuable digital skills that are increasingly relevant in today’s technology-driven world. By honing your proficiency in Microsoft Word, you not only gain the ability to create professional certificates but also enhance your competence in document formatting, layout design, and image manipulation. These skills have broad applications across various personal and professional tasks, making you more adaptable and capable in a digital environment.
Furthermore, practicing certificate design offers you a practical avenue for skill development while producing tangible outcomes. It allows you to create certificates for courses, achievements, or even for your own business, helping you develop an eye for aesthetics, attention to detail, and the ability to produce polished documents. Overall, this practice not only enhances your digital competence but also provides you with a versatile skill set that can significantly benefit your personal and professional growth.
By creating and practicing below certificate design below, you will be able to explore various design options to create a professional-looking certificate. This is just a sample but along with this design, you can take it’s design to the next level.

If you want to learn how you can do it please follow this step tutorial: How to create a professional-looking certificate design in Word | Step-by-Step Tutorial in Hindi
I think if you practice Microsoft Word by working on these exercises then it will be enough to make you above average among all the students around the world doing basic computer courses or learning Microsoft Word.
Because after learning Microsoft Word, you have to work with professionals or in companies. And almost all official works are related directly and indirectly to the above exercises.
So, this is the best method to learn Microsoft Word by doing exercises. And this is about practical knowledge.
I hope these Microsoft Word Exercises ideas will be helpful for you. To learn more visit: Top 10 Basic and Advanced Microsoft Word skills
How useful was this post?
Click on a star to rate it!
Average rating / 5. Vote count:
No votes so far! Be the first to rate this post.
We are sorry that this post was not useful for you!
Let us improve this post!
Tell us how we can improve this post?
7 thoughts on “22 Best Basic Microsoft Word practice exercises for beginners”
good practical please send more practical in winword. Thanks
These are good Practical exercises. Please send list of practicals of MS Word in Vocational IT NSQF level-1 subject code-402 class IX
please send a book which covers exercises like this
Great content! Thanks for putting this out there!
This is very nice
I have recently joined a Private Computer classes at the age of 53. Can you guide me through WORD, EXCEL, POWERPOINT & INTERNET
Is it possible for you send step by step Assignments for all the above 4 courses, so that I can evaluate whether I am learning properly or not ?
Hi, That’s a very good concern as a student “whether I am learning properly or not” I think 80% students ignore this. I will contact you by email. Age is not a problem. I expect you have strong reason or specific task or goals to learn all these three + internet in this age. Yes, I can evaluate through giving you assignment and testing it.
Leave a Comment Cancel reply
Save my name, email, and website in this browser for the next time I comment.
- > Word Tips
- > Printing

Printing a Key Assignment List
Written by Allen Wyatt (last updated October 23, 2021) This tip applies to Word 2007, 2010, 2013, 2016, 2019, and Word in Microsoft 365
When you are customizing Word, you can assign certain styles, macros, and commands to different key assignments. Word allows you to print a list of what has been assigned to certain keys. To do this, follow these steps if you are using Word 2010 or a later version:
- Press Ctrl+P . Word displays the File tab of the ribbon, with the Print option selected at the left side of the screen.
- Click the first option under the Settings category and choose Key Assignments. (You may have to scroll down through the list to find it.) (See Figure 1.)

Figure 1. Specifying you want to print key assignments.
- Click the Print button. Word prints the desired information.
If you are using Word 2007, follow these steps, instead:
- Press Ctrl+P . Word displays the Print dialog box. (See Figure 2.)

Figure 2. The Print dialog box.
- In the Print What box, select Key Assignments.
- Click on OK.
WordTips is your source for cost-effective Microsoft Word training. (Microsoft Word is the most popular word processing software in the world.) This tip (9256) applies to Microsoft Word 2007, 2010, 2013, 2016, 2019, and Word in Microsoft 365. You can find a version of this tip for the older menu interface of Word here: Printing a Key Assignment List .
Allen Wyatt
With more than 50 non-fiction books and numerous magazine articles to his credit, Allen Wyatt is an internationally recognized author. He is president of Sharon Parq Associates , a computer and publishing services company. Learn more about Allen ...
MORE FROM ALLEN
Specifying Chart Sizes
If you need a number of charts in your workbook to all be the same size, it can be a bother to manually change each of ...
Displaying a Number as Years and Months
How do you display a number of years, such as 3.67 years, as a number of years and months? It's simple to do with a ...
Can't Save Edited Document
Each day of using Word is filled with opening documents, editing them, and then saving those changes to disk. It can be ...

The First and Last Word on Word! Bestselling For Dummies author Dan Gookin puts his usual fun and friendly candor back to work to show you how to navigate Word 2013. Spend more time working and less time trying to figure it all out! Check out Word 2013 For Dummies today!
More WordTips (ribbon)
Printing Personalized Copies of a Document
Need to have a series of documents customized for individual users? Mail merge may be overkill, but the macro presented ...
Printing Very Large Paper Sizes
Need to print on large pieces of paper? Word has a limit on the size of the paper it can use, but that might not be the ...
Upside-Down Printing
Putting words on the printed page is easy in Word. Rotating those words in different manners can be a bit trickier. This ...
FREE SERVICE: Get tips like this every week in WordTips, a free productivity newsletter. Enter your address and click "Subscribe."
View most recent newsletter.
(Your e-mail address is not shared with anyone, ever.)
If you would like to add an image to your comment (not an avatar, but an image to help in making the point of your comment), include the characters [{fig}] (all 7 characters, in the sequence shown) in your comment text. You’ll be prompted to upload your image when you submit the comment. Maximum image size is 6Mpixels. Images larger than 600px wide or 1000px tall will be reduced. Up to three images may be included in a comment. All images are subject to review. Commenting privileges may be curtailed if inappropriate images are posted.
(gif, jpeg or png only, 5MB maximum file size)
Notify me about new comments ONLY FOR THIS TIP
Notify me about new comments ANYWHERE ON THIS SITE
Hide my email address
What is eight more than 3?
2022-02-02 09:43:31
Watt, try this in a macro: Application.ListCommands False Andy.
2022-02-01 13:55:07
Didn't there used to be a way to create a **file** (doc file) of key assignments? What good is a hard copy nowadays?
2021-10-23 08:28:43
Thank you for this tip. I was looking for a way to do this for some time, and this came very handy. On my machine I found keys ***still*** assigned to old macros as well as to styles that I have deleted. This enabled me to do some cleanup.
Got a version of Word that uses the ribbon interface (Word 2007 or later)? This site is for you! If you use an earlier version of Word, visit our WordTips site focusing on the menu interface .
Visit the WordTips channel on YouTube

View the most recent newsletter.
Links and Sharing
- WordTips FAQ
- Questions or Comments
- Great Branding Ideas
- Free Calendars
OUR COMPANY
- Sharon Parq Associates, Inc.
- About Tips.Net
- Advertise with Us
- Our Privacy Policy
- Author Index
OUR PRODUCTS
- Helpful E-books
- Newsletter Archives
- Video Courses
- Excel Products
- Windows Products
- Word Products
- Beauty and Style
- ExcelTips (Excel 97–2003)
- ExcelTips (Excel 2007–2021; 365)
- Home Improvement
- Money and Finances
- Pests and Bugs
- Pets and Animals
- WindowsTips (Microsoft Windows)
- WordTips (Word 97–2003)
- WordTips (Word 2007–2021; 365)
Copyright © 2024 Sharon Parq Associates, Inc.

Sep 21, 2022
Facilitate collaboration by assigning tasks in Word
Rubba Ashwas
- Add our blog to your RSS feed reader" href="/rss/blog.xml" data-bi-name="RSS Subscription" data-bi-id="rss_feed" data-bi-bhvr="120" data-bi-socchn="RSSSubscription" title="Microsoft 365 Insider Blog RSS" target="blank" class="d-inline-block">
Hi, Office Insiders! My name is Rubba Ashwas and I’m a Product Manager on the Word team. I’m excited to share that you can now assign tasks with @mentions in documents in Word for Windows and Word for Mac!
Assign tasks
This feature allows you and your team to conveniently create and assign tasks directly from within your Word document using @mentions in comments. The people you assign the tasks to will receive email notifications, letting them know they need to take action.
Many of you have enjoyed using the feature in Word for the web. We’re thrilled to now be bringing it to Word for Windows and Word for Mac.
How it works
- Open an existing document saved to OneDrive or SharePoint.
- Highlight the text that contains the information you want to comment on and select the New Comment button,

- Write your comment and type @ followed by the name of the team member you want to tag.
- Select the Assign to check box to convert your comment into a task.
- Click the blue arrow or press Ctrl + Enter to post your comment.
Scenarios to try
- Reassign a task: Type @ followed by the name of the team member you want to reassign the task to in the response field, select the Reassign to check box, and then click the blue arrow or press Ctrl + Enter . The person to whom you reassigned the task will be notified via email that they’ve been assigned the task.

- Resolve a task: Hover over the circle at the top of the comment and click the Resolve task button.

- Reopen a resolved task: In the right-hand margin or in Comments pane, click the comment that was closed, and then click the Reopen button.

Availability
This feature is available in Word for the Web, and to Insiders running the following Beta Channel builds:
- Windows: Version 2206 (Build 15321.10000) or later
- Mac: Version 16.66 (Build 22090700) or later
Don’t have it yet? It’s probably us, not you.
Features are released over some time to ensure things are working smoothly. We highlight features that you may not have because they’re slowly releasing to larger numbers of Insiders. Sometimes we remove elements to further improve them based on your feedback. Though this is rare, we also reserve the option to pull a feature entirely out of the product, even if you, as an Insider, have had the opportunity to try it.
We are actively working on this feature, and your feedback is key to guiding future improvements. You can submit comments by clicking Help > Feedback. Please tag your feedback with #AssignTasks so that we can easily find input about the feature.
Learn what other information you should include in your feedback to ensure its actionable and reaches the right people. We are excited to hear from you!
Sorry, JavaScript must be enabled to use this app.
Free Task List and Checklist Templates
By Kate Eby | July 19, 2016
- Share on Facebook
- Share on Twitter
- Share on LinkedIn
Link copied
In this article, we’ve gathered the most comprehensive list of downloadable task and checklist templates to keep your personal and professional endeavors on track.
Included on this page, you’ll find a variety of free templates in Word, Excel, and PDF formats, such as a weekly task list template , project task template , event to-do list template , and more.
Team Task List Template
Use this template to keep your team organized and cut wasted time in status meetings. Create a centralized view of all team member's responsibilities across multiple projects.
We’ve also included pre-built templates from Smartsheet, a work execution platform that empowers you to better manage checklists and deadlines with real-time collaboration and project visibility.

Download Excel Template Try Smartsheet Template
Gantt Chart Task List Template
Get a visual picture of your scheduled tasks with this Gantt chart template. Often used in project management, a Gantt chart shows the duration of each task as a horizontal bar that spans start and end dates. Thus, it’s easy to see the different phases of a project, identify dependencies, and prioritize tasks. A Gantt chart can be useful for managing any task list that spans a set period of time.

Task Tracker Template
This task tracking template documents the progress of each item on your list, so it’s easy to assess the status of individual tasks or an entire project. There is space to list start and end dates, as well as to mark completed tasks. This template keeps things simple by providing only essential tracking information, but there is also space for notes in case you need to include further details or instructions.
Project Task Template
This template is designed for project management, and it can be used in both a business or personal setting. The template provides sections for project tasks, priority, deadlines, assignees, and deliverables, and it allows you to track project costs and compare estimated to actual hours. This is a detailed template that can easily be edited to match the exact needs of your project.

Weekly Task List Template
This weekly task list schedule includes columns for assigning a category to each item, along with deadlines and completion status. The default weekly calendar runs Sunday to Saturday, but you can also choose the starting date for the week. If you need a combined calendar and task list, this template offers an easy solution.

Daily Task List Template
You can use this daily task list template to schedule tasks throughout the day while also planning ahead for an entire week. Choose the starting time for each day, as well as the starting date for your weekly calendar view. You can also adjust the time interval of each task, which allows you to break down each hour into incremental tasks, if needed.

To-Do List with Drop-Down Menus Template
This simple to-do list template includes drop-down menus for indicating priority and status on each item. When a task is marked as complete, the row changes color; this enables you to quickly spot which tasks are still in progress or have yet to be started. This task template could be used for a broad range of applications, from organizing homework assignments to planning an event or tracking work projects.

Prioritized Task List Template
This template is a step up from a basic to-do list, as it allows you to rank your tasks with the highest-priority items first. There is also a section for notes where you can elaborate on your tasks or add reminders. This template offers a simple way to stay organized while ensuring that you don’t overlook high-priority tasks.

Download Word Template Try Smartsheet Template
Yearly Calendar Template (2024)
Use this 12-month calendar for a high-level look at your schedule and upcoming tasks. The template displays a standard January-to-December calendar, so you can view your long-term projects and tasks at a glance.

Download Excel Template
Basic Task Checklist Template
This task checklist offers a basic outline with checkboxes for each item on your to-do list. It also has sections to note the due date and status of each task to assist with planning. After downloading this template, save a blank version so that you have a master copy ready to print and use any time you need to create a new task checklist.

Download Word Template
Task Analysis Template
Use this task analysis template to determine the resources and time required to successfully complete a given task. The template includes sections for delineating the steps involved in a task, the resources (human, mechanical, or monetary) required for each step, and the time spent on each item. This provides a detailed analysis of a task, which can be useful for training purposes or for any situation where you need to evaluate a process.

Action Item List Template
Help your team stay organized and on task with this action item list for Word. The template includes a tracking number for each action item, start and due dates, the assigned owner for each task, and a notes section for adding updates or resolving issues. By defining and scheduling tasks as actionable items, you can track individual and team progress — and in the process, create a useful communication tool for all team members.

Download Template in Word Try Smartsheet Template
Password Log Template
This template is designed to help you keep track of the passwords to all of your various accounts. List each account, and then fill in the columns for website URL, email address, username and password, security questions and answers, and any additional notes. Save the form to your computer or print a hard copy — remember, though, to store the information in a safe place and and not to share your passwords with anyone.

Download Password Log Template:
Excel | Word | PDF
Event To-Do List
This template can help you stay organized when planning an event, such as a dinner party, a baby or bridal shower, a wedding, or a birthday party. Simply list each task and the person responsible, and assign a priority level to the task so you and your team can prioritize the many moving pieces. Additionally, note the due date and date completed — any discrepancy between the two dates will help you more accurately plan the timeline for your next event.

Family To-Do List
This template, available in Word and PDF, is ideal for families who want a central resource to organize family tasks. The template provides separate tables for each family member to list their individual tasks, and then register due dates and notes, along with a column to mark completion. Of course, you can add or delete tables as needed.

Download Family To-Do List:
Household Chores Task List Template
This chore list template allows you to create a weekly schedule for all of your household tasks. Create a list of tasks and assign each item to an individual for any day of the week. With a simple format, this template is easy to use, so you can streamline the planning process and start organizing your home. Additionally, you always have the option of saving the template as a PDF and printing a copy to share with others.

Project Punch List Form
In the construction industry, a punch list is a document that you complete toward the end of a project. In it, the contractor or property owner lists any work that has been done incorrectly or does not meet the specifications outlined in the original contract. The construction team then uses this punch list as a reference to complete or repair the work items before the project is officially closed. This punch list form provides a separate table to list each work item that needs repair or attention. Save the PDF form, print it, and fill it out by hand for easy use.

Project Closeout Template
Use this checklist to ensure you have completed all necessary tasks in a project. This template is designed with construction projects in mind, but you can edit the categories to reflect the needs of any multidimensional project, whether it pertains to building, real estate, or business — or even as a termination checklist if you are ending an association, an agreement, or a hiring arrangement. Simply list each task, the quantity requested (if applicable), specific requirements, and any notes. This easy-to-use form serves as a final check so you don’t overlook any requirements as you prepare to officially close a project.

Risk Assessment Matrix
Before you embark on a project, you should perform a risk assessment. While you can’t control or prevent every possible risk, taking the time to assess the possible threats to your project will help you plan for and mitigate some hazards. This matrix allows you to perform a qualitative risk assessment, gauge the probability, and predict how each could affect your project budget, scope, and timeline. The template also provides space for you to list events that could trigger each risk, designate a respondee, and make notes for a response plan.

Download Risk Assessment Matrix:
Excel | Word | PDF | Smartsheet
Customer List
This simple form allows you to list contact details for each customer or client. This list includes columns for the company; the name, title, email, and phone number of your contact; and any comments. You can or remove columns as necessary, and highlight or flag certain customers who you need to follow up with.

Inventory and Equipment Checklist
Use this template to keep track of inventory or equipment you either need or have newly acquired for a project. List each item number and name, followed by a description, date of purchase, cost, and other notes. Additionally, you can track initial value, loan details, and depreciation amounts for each piece of equipment in your inventory.

New Hire Checklist
This template is designed for human resources to ensure that a new employee (and other internal teams) complete all necessary onboarding tasks. The Excel spreadsheet includes columns for completing new hire paperwork and sending it to the appropriate parties, but you can edit the form to include any tasks that your organization requires of new hires. In addition, there is space to assign tasks to employees, to set due dates, and to list contact information.

Grocery List
Use this basic template to make a shopping list; you can fill it out on your computer or print and complete it by hand. In addition to providing an easy-to-read table, the template includes a checkbox column where you can mark off each item as you obtain it, as well as a column for individual items and total cost. This template is created with grocery shopping in mind, but you can edit it for retail, gifts, and other consumer needs.

Download Grocery List:
Weekly Staff Meeting Template
Use this template to prepare for a recurring meeting. Note your agenda, attendees, action items, and whether or not the associated tasks have been completed. The template is designed with weekly meetings in mind, but you can edit the dates for a monthly, quarterly, or annual gathering.

Business Trip Checklist Template
Preparing for a business trip may include managing staff adjustments at work, making schedule changes with family members or caregivers at home, and taking on extra work to prepare for the trip — plus, packing everything you’ll need on the road. Use this business trip checklist template to help make the process more manageable and reduce the likelihood of forgetting a vital task or travel item. Edit the template to reflect your agenda, and then mark each item off your checklist as it’s completed. For personal use, you can also edit this template with relevant details for solo, family, or group travel.

Download Excel Template Try Smartsheet Template
Student Planner Template
Students can plan for the week by using this free template to keep track of classes and assignments. The template includes columns for listing the due date and status of each assignment, which helps students stay organized, prioritize their workload, and meet deadlines with less stress.

Day Planner Template
This detailed day planner template provides multiple sections for planning various aspects of your day, from shopping needs to meals and appointments. There is also room for a general task list and a section to add items to be accomplished on another day. Customize the template by applying new labels to sections to match your daily routines.

Business Plan Checklist
Use this simple business plan template to organize project tasks. The template is divided into phases so you can list tasks chronologically; it also includes columns for start and end dates and duration. Plus, a simple checkbox allows you to clearly mark which steps have been completed so you know your exact progress.

Group Project Task List
This template is ideal for organizing the basics of a group project or any assignment that involves multiple people. Simply list each task, a description, an assignee, a due date, and any notes in the columns provided, and add more columns if needed. This template does not have project management capabilities, but will give you an overview of every individual task and who is responsible for it. For more full-scale project management templates, visit “ Top Project Management Excel Templates .”

Job Task Analysis Template
A job task analysis can be used to determine which actions are critical for a certain job. Identifying tasks in this manner can help determine the scope of a job, appraise employee performance, inform training methods, and improve work processes. On this template, you can list the tasks that are required to complete a job, then rate the importance of each task, along with how frequently the actions are performed. You can also document your source of information for each task.

Download Word Template
Brainstorm and Collaboration Worksheet
Use this form to record information from a brainstorm or collaboration session. The template includes space to list ideas, their pros and cons, and the originator. In addition, there is a column for each team member to rank each idea. While this template doesn’t assist with idea generation, it enables you to keep all brainstorm information in one place so you can more easily compare ideas when it’s time to make a decision.

Download Brainstorm and Collaboration Worksheet:
Internal Audit Checklist
Use this template to prepare for a financial audit. The simple template includes rows for every required document in a standard audit (general ledger, balance and financial statements, tax reports, etc.) and a checkbox to note if an item has been reviewed and is attached. Add or subtract rows to include every document that your audit requires. To learn more about how best to prepare for a financial audit, read this article .

Contact List
This Excel template can be used as a contact list for a variety of personal use cases, including for classes, group memberships, event attendees, or emergency communications. The template includes columns for phone, email, and address, as well as to note the preferred mode of contact. The form is fully customizable, so add or subtract sections as needed.

Download Contact List:
Increase Accountability with Real-Time Task Management in Smartsheet
Empower your people to go above and beyond with a flexible platform designed to match the needs of your team — and adapt as those needs change.
The Smartsheet platform makes it easy to plan, capture, manage, and report on work from anywhere, helping your team be more effective and get more done. Report on key metrics and get real-time visibility into work as it happens with roll-up reports, dashboards, and automated workflows built to keep your team connected and informed.
When teams have clarity into the work getting done, there’s no telling how much more they can accomplish in the same amount of time. Try Smartsheet for free, today.
Our Privacy Notice describes how we process your personal data.
Discover why over 90% of Fortune 100 companies trust Smartsheet to get work done.

- Get started with computers
- Learn Microsoft Office
- Apply for a job
- Improve my work skills
- Design nice-looking docs
- Getting Started
- Smartphones & Tablets
- Typing Tutorial
- Online Learning
- Basic Internet Skills
- Online Safety
- Social Media
- Zoom Basics
- Google Docs
- Google Sheets
- Career Planning
- Resume Writing
- Cover Letters
- Job Search and Networking
- Business Communication
- Entrepreneurship 101
- Careers without College
- Job Hunt for Today
- 3D Printing
- Freelancing 101
- Personal Finance
- Sharing Economy
- Decision-Making
- Graphic Design
- Photography
- Image Editing
- Learning WordPress
- Language Learning
- Critical Thinking
- For Educators
- Translations
- Staff Picks
- English expand_more expand_less
Word - Getting Started with Word
Word -, getting started with word, word getting started with word.

Word: Getting Started with Word
Lesson 1: getting started with word, introduction.
Microsoft Word is a word processing application that allows you to create a variety of documents , including letters, resumes, and more. In this lesson, you'll learn how to navigate the Word interface and become familiar with some of its most important features, such as the Ribbon , Quick Access Toolbar , and Backstage view .
Watch the video below to become more familiar with Word.
About this tutorial
The procedures in this tutorial will work for all recent versions of Microsoft Word , including Word 2019 , Word 2016 , and Office 365 . There may be some slight differences, but for the most part these versions are similar. However, if you're using an earlier version , you may want to refer to one of our other Word tutorials instead.
The Word interface
When you open Word for the first time, the Start Screen will appear. From here, you'll be able to create a new document , choose a template , and access your recently edited documents . From the Start Screen , locate and select Blank document to access the Word interface.

Click the buttons in the interactive below to learn more about the Word interface.

Microsoft Account
From here, you can access your Microsoft account information, view your profile, and switch accounts.
The Tell me bar allows you to search for commands, which is especially helpful if you don't remember where to find a specific command.
Command Group
Each group contains a series of different commands . Simply click any command to apply it. Some groups also have an arrow in the bottom-right corner, which you can click to see even more commands.
Quick Access Toolbar
The Quick Access Toolbar lets you access common commands no matter which tab is selected. By default, it includes the Save , Undo , and Redo commands.
The Ruler is located at the top and to the left of your document. It makes it easier to make alignment and spacing adjustments .
Click and drag the vertical scroll bar to move up and down through the pages of your document.
Zoom Control
Click and drag the slider to use the zoom control. The number to the right of the slider bar reflects the zoom percentage .
Document Views
There are three ways to view a document: Read Mode displays your document in full-screen mode. Print Layout is selected by default. It shows the document as it would appear on the printed page. Web Layout shows how your document would look as a webpage.
The Ribbon contains all of the commands you will need to perform common tasks in Word. It has multiple tabs , each with several groups of commands.
Document Pane
This is where you'll type and edit text in the document.
Page and Word Count
From here, you can quickly see the number of words and pages in your document.
Working with the Word environment
All recent versions of Word include the Ribbon and the Quick Access Toolbar , where you'll find commands to perform common tasks in Word, as well as Backstage view .
Word uses a tabbed Ribbon system instead of traditional menus. The Ribbon contains multiple tabs , which you can find near the top of the Word window.

Each tab contains several groups of related commands . For example, the Font group on the Home tab contains commands for formatting text in your document.

Some groups also have a small arrow in the bottom-right corner that you can click for even more options.
Showing and hiding the Ribbon
If you find that the Ribbon takes up too much screen space, you can hide it. To do this, click the Ribbon Display Options arrow in the upper-right corner of the Ribbon, then select the desired option from the drop-down menu:

- Auto-hide Ribbon : Auto-hide displays your document in full-screen mode and completely hides the Ribbon from view. To show the Ribbon, click the Expand Ribbon command at the top of screen.
- Show Tabs : This option hides all command groups when they're not in use, but tabs will remain visible. To show the Ribbon, simply click a tab.
- Show Tabs and Commands : This option maximizes the Ribbon. All of the tabs and commands will be visible. This option is selected by default when you open Word for the first time.
To learn how to add custom tabs and commands to the Ribbon, review our Extra on Customizing the Ribbon .
Using the Tell me feature
If you're having trouble finding a command you want, the Tell Me feature can help. It works just like a regular search bar. Type what you're looking for, and a list of options will appear. You can then use the command directly from the menu without having to find it on the Ribbon.

The Quick Access Toolbar
Located just above the Ribbon, the Quick Access Toolbar lets you access common commands no matter which tab is selected. By default, it shows the Save , Undo , and Redo commands, but you can add other commands depending on your needs.
To add commands to the Quick Access Toolbar:

The R uler is located at the top and to the left of your document. It makes it easier to adjust your document with precision. If you want, you can hide the Ruler to create more screen space.
To show or hide the Ruler:

Backstage view
Backstage view gives you various options for saving, opening a file, printing, and sharing your document. To access Backstage view, click the File tab on the Ribbon .

Click the buttons in the interactive below to learn more about using Backstage view.

From here, you can open documents saved to your computer or to your OneDrive.
Save and Save As
You'll use Save and Save As to save documents to your computer or to OneDrive.
From the Print pane, you can change the print settings and print your document. You can also see a preview of your document.
From here, you can export your document in another file format, such as PDF/XPS .
Click here to close the current document.
From here, you can invite people to view and collaborate on your document.
Return to Word
You can use the arrow to close Backstage view and return to Word.
From the Account pane, you can access your Microsoft account information, modify your theme and background, and sign out of your account.
Here, you can change various Word options . For example, you can control the spelling and grammar check settings, AutoRecover settings, and language preferences.
The information pane will appear whenever you access Backstage view. It contains information on the current document. You can also inspect the document to remove personal info and protect it to keep others from making further changes.
From here, you can create a new blank document , or you can choose from a large selection of templates .
Document views and zooming
Word has a variety of viewing options that change how your document is displayed. You can choose to view your document in Read Mode , Print Layout , or Web Layout . These views can be useful for various tasks, especially if you're planning to print the document. You can also zoom in and out to make your document easier to read.
Switching document views
Switching between different document views is easy. Just locate and select the desired document view command in the bottom-right corner of the Word window.

Zooming in and out
To zoom in or out, click and drag the zoom control slider in the bottom-right corner of the Word window. You can also select the + or - commands to zoom in or out by smaller increments. The number next to the slider displays the current zoom percentage , also called the zoom level .

- Open Word , and create a blank document .
- Change the Ribbon Display Options to Show Tabs .
- Using Customize Quick Access Toolbar , add New , Quick Print , and Spelling & Grammar.
- In the Tell me bar , type Shape and press Enter .
- Choose a shape from the menu, and double-click somewhere on your document.
- Show the Ruler if it is not already visible.
- Zoom the document to 120%.
- Change the Document view to Web Layout .

Change the Ribbon Display Options back to Show Tabs and Commands , and change the Document View back to Print Layout .
/en/word/understanding-onedrive/content/
- Trending Now
- Foundational Courses
- Data Science
- Practice Problem
- Machine Learning
- System Design
- DevOps Tutorial
- Web Browser
- Copy and Paste Operation in MS Word
- What is Internet? Definition, Uses, Working, Advantages and Disadvantages
- Secondary Memory
- Indent Paragraphs in MS Word
- Mixed Cell References in MS Excel
- How to Insert a Picture in MS Powerpoint?
- How to Insert a Function in Excel?
- Change Line Spacing in MS Word
- Working with Envelopes and Labels in MS Word
- Fourth Generation of Computers
- Fifth Generation of Computers
- What is Extranet? Definition, Implementation, Features
- How to Create a Bar Chart in Excel?
- Change Page Orientation in MS Word
- What are Different Output Devices?
- Worksheets in Excel
- Add Columns in Microsoft Word
- Cache Memory
- Moving Text in Microsoft Word
Creating Bullet Lists in MS Word
MS-Word is a Word processing application used across the globe. It is a popular word processing application because of the vast feature and tools provided by it. It is used to create different types of documents and projects like letters, articles, etc. It is developed by Microsoft.
Creating Bullets
Bullets are used in many ways like while writing anything point-wise. Also, to prepare a kind of list or something like that. So, it is a great feature provided by MS-Word, and it is easy to use.
There are different types of bullets that are supported by MS-Word, and they are:
- Bullets (simple bullets in which symbols are used like dot, arrow, etc.)
- Numbering (In this, number is given like {1,2,3…} , or alphabets {A, B,C}, or roman numbers etc.)
- Multilevel list (This is used when there are things like heading, subheading, and also further subheadings)
Method 1: Using Bullets
Let us see now how to use bullets in the MS-Word with step-by-step instructions and diagram:
Steps to follow:
Step 1: First open MS-Word in your PC.
Step 2: Now, Open the document or create a new one in which you want to perform this operation.

Step 3: Now, select the text for which bullets are to be used. (Here we will select “Car, Bus, Train, Boat, Ship”)
Step 4: Now, Go to the “ Home ” tab.

Step 5: Now, Go to the “ Paragraph ” section in the Home tab, and select the “ Bullets ” option. Choose bullets to look from the available option. (We will use dot over here)

Step 6: Bullets have been placed in your document successfully.

Method 2: Using Numbers
Let us see now how to use numbering bullets in the MS-Word with step-by-step instructions and diagram:
Step 2: Now, Open the document or create new one in which you want to perform this operation.
Step 3: Now, Select the text for which bullets are to be used. (Here we will select “Car, Bus, Train, Boat, Ship”)
Step 5: Now, Go to the “ Paragraph ” section in the Home tab, and select the “ Numbering ” option. Choose number bullets to look from the available option. (We will use 1,2,3 over here)

Method 3: Multilevel list

Step 3: Now, Select the text for First level (like heading or main point).
Step 4: Now, go to “ home ” tab.
Step 5: Now, in the home tab, go to “ paragraph ” section and select Multilevel list option and choose according to your list level (here we are showing a 3 level list.)

Step 6: Now, For first level a bullet will appear as per the selected text previously. (Shown in the figure.)

Step 7: Now, Select the text of second level and from multilevel list option choose a different bullet.
Step 8: Again, for selected bullet and text changes will take place and the screen will look like below screen.

Step 9: Finally repeat the same process or step 7 for Third level and the screen will look like the below image.

Step 10: So, this operation is successfully completed.
Mostly the First and second method are used, and they are easy to use also.
Please Login to comment...
- School Learning
- School Programming
- WhatsApp To Launch New App Lock Feature
- Top Design Resources for Icons
- Node.js 21 is here: What’s new
- Zoom: World’s Most Innovative Companies of 2024
- 30 OOPs Interview Questions and Answers (2024)
Improve your Coding Skills with Practice
What kind of Experience do you want to share?
🏆 Women's Tournament
(7) Duke vs. (2) Ohio St.
(8) UNC vs. (1) South Carolina
(5) Colorado vs. (4) Kansas St.
View the bracket
🤩 Indiana, Assembly Hall shine vs. Fairfield
NCAA staff | March 17, 2024
Tip times and teams set for ncaa tournament first four and first round coverage .

CBS Sports and TNT Sports’ exclusive coverage of the 2024 NCAA Division I Men’s Basketball Championship will tip off with the NCAA First Four on truTV, Tuesday, March 19, and Wednesday, March 20 (6 p.m. ET, both days). First Round game coverage will be held on Thursday, March 21, and Friday, March 22 (Noon-Midnight, both days), with all games available live in their entirety across four national television networks – TBS, CBS, TNT and truTV – and NCAA March Madness Live. Games airing on TBS, TNT and truTV will also stream live on Max’s B/R Sports Add-On.
Games airing on CBS will also stream live on Paramount+. The following are tip times and commentator assignments for the NCAA First Four and First Round games. Tip times for Saturday’s Second Round games will be announced after the conclusion of Thursday’s games. Sunday’s tip times will be released after the conclusion of play on Friday.
This year’s NCAA Men’s Final Four National Semifinals on Saturday, April 6, along with the National Championship on Monday, April 8, will air on TBS.

Follow us on X ( @MM_MBB_TV ) and NCAA.com for schedule updates and the latest NCAA Tournament broadcast news and information. NCAA, March Madness, Elite 8, Sweet 16, First Four, Final Four and Road to the Final Four are trademarks owned or licensed by the National Collegiate Athletic Association.

- 2024 March Madness: Men's NCAA tournament schedule, dates

- Latest bracket, schedule and scores for 2024 NCAA men's tournament

- Tracking 2024 March Madness men's records by conference
March Madness
- 🗓️ 2024 March Madness schedule, dates
- 👀 Everything to know about March Madness
- ❓ How the field of 68 is picked
- 📓 College basketball dictionary: 51 terms defined

Greatest buzzer beaters in March Madness history

Relive Laettner's historic performance against Kentucky

The deepest game-winning buzzer beaters in March Madness history

College basketball's NET rankings, explained

What March Madness looked like the year you were born
Di men's basketball news.
- 2024 NIT bracket: Schedule, TV channels for the men’s tournament
- The fine margins of March Madness' thrilling opening round
- TNT Sports and CBS Sports Announce Tip Times and Matchups for Second Round Games on Sunday, March 24
- A complete history of HBCU men's basketball in the NCAA tournament’s round of 64
- Gohlke puts Oakland on the map as Kentucky's March woes continue
- CBS Sports and TNT Sports Announce Tip Times and Matchups for Second Round Games on Saturday, March 23
- A complete history of HBCU men's basketball in the NCAA tournament’s First Four and play-in games
Follow NCAA March Madness

Contribute to the Microsoft 365 and Office forum! Click HERE to learn more 💡
March 14, 2024
Contribute to the Microsoft 365 and Office forum!
Click HERE to learn more 💡
Top Contributors in Word: Stefan Blom - Charles Kenyon - Doug Robbins - MVP Office Apps & Services (Word) - Suzanne S. Barnhill - Bob Jones AKA: CyberTaz ✅
March 11, 2024
Top Contributors in Word:
Stefan Blom - Charles Kenyon - Doug Robbins - MVP Office Apps & Services (Word) - Suzanne S. Barnhill - Bob Jones AKA: CyberTaz ✅
- Search the community and support articles
- Microsoft 365 and Office
- Search Community member
Ask a new question
Importing master citation list in word from PC to Macbook 2024 (Sonoma)
My question is the same as this one : https://answers.microsoft.com/en-us/msoffice/forum/all/importing-master-citation-list-in-word-from-pc-to/7f0abcc0-dcb4-4288-9bf3-3e1afd000630 .
I started following the instructions but it seems that there is no .com.microsoft.word folder in the Containers folder on my computer. I am using Microsoft 365 (business) on a Macbook air M2 with OS Sonoma.
We cumulated hundreds of references on multiple documents, would be a great pain to start from scratch and rebuild that Master.
- Subscribe to RSS feed
Report abuse
Replies (1) .
The path basically is the same except that current OS visually replaces the com.microsoft.word with Microsoft Word . However, if you use Go> Go to Folder in Finder & enter the original /Library/Containers/com.microsoft.Word/Data/Library/Application Support/Microsoft/Office path it will take you there
Was this reply helpful? Yes No
Sorry this didn't help.
Great! Thanks for your feedback.
How satisfied are you with this reply?
Thanks for your feedback, it helps us improve the site.
Thanks for your feedback.
Question Info
- For business
- Norsk Bokmål
- Ελληνικά
- Русский
- עברית
- العربية
- ไทย
- 한국어
- 中文(简体)
- 中文(繁體)
- 日本語
- > Word Tips
- > Printing
Printing a Key Assignment List
Written by Allen Wyatt (last updated August 5, 2017) This tip applies to Word 97, 2000, 2002, and 2003
When you are customizing Word, you can assign certain styles, macros, and commands to different key assignments. Word allows you to print a list of what has been assigned to certain keys. To do this, follow these steps:
- Select Print from the File menu or press Ctrl+P . Word displays the Print dialog box. (See Figure 1.)

Figure 1. The Print dialog box.
- In the Print What box, select Key Assignments.
- Click on OK.
WordTips is your source for cost-effective Microsoft Word training. (Microsoft Word is the most popular word processing software in the world.) This tip (1147) applies to Microsoft Word 97, 2000, 2002, and 2003. You can find a version of this tip for the ribbon interface of Word (Word 2007 and later) here: Printing a Key Assignment List .
Allen Wyatt
With more than 50 non-fiction books and numerous magazine articles to his credit, Allen Wyatt is an internationally recognized author. He is president of Sharon Parq Associates , a computer and publishing services company. Learn more about Allen ...
MORE FROM ALLEN
Limitations On Finding Characters
When you search for information in a worksheet, you expect Excel to return results that make sense. If you don't get a ...
Strange ATAN Results
You may use Excel's trigonometric functions to do some quick calculations, and suddenly notice that the results in your ...
Replacing Only Whole Words in Excel
Excel's Find and Replace capabilities are handy, but they aren't as full-featured as those in Word. One shortcoming is ...

Create Custom Apps with VBA! Discover how to extend the capabilities of Office 2013 (Word, Excel, PowerPoint, Outlook, and Access) with VBA programming, using it for writing macros, automating Office applications, and creating custom applications. Check out Mastering VBA for Office 2013 today!
More WordTips (menu)
Small Printing with Different Word Versions
A few places to check if the printout differs from the original document.
Forcing Printouts to Black and White
If you want to force Word to print some of its colors in black and white, you may be out of luck. One bright spot, as ...
Using Duplex Printing
Want to print on both sides of a piece of paper? Some printers have the capability to do two-sided printing ...
FREE SERVICE: Get tips like this every week in WordTips, a free productivity newsletter. Enter your address and click "Subscribe."
View most recent newsletter.
(Your e-mail address is not shared with anyone, ever.)
If you would like to add an image to your comment (not an avatar, but an image to help in making the point of your comment), include the characters [{fig}] (all 7 characters, in the sequence shown) in your comment text. You’ll be prompted to upload your image when you submit the comment. Maximum image size is 6Mpixels. Images larger than 600px wide or 1000px tall will be reduced. Up to three images may be included in a comment. All images are subject to review. Commenting privileges may be curtailed if inappropriate images are posted.
(gif, jpeg or png only, 5MB maximum file size)
Notify me about new comments ONLY FOR THIS TIP
Notify me about new comments ANYWHERE ON THIS SITE
Hide my email address
What is eight more than 3?
2017-08-05 12:16:43
Joel Hornstein
Your "Printing a Key Assignment List" was a big help to me. I had previously made up macros to change the font color from automatic to red and then from red back to automatic but had not used them in a while. I forgot the key combinations I had assigned, so I couldn't use the macros. Printing out the key assignments showed me what combinations I had used. Thanks! (I'm sure there is a way to find out the properties of macros so you can edit/change them (so I could have seen the key combinations I assigned), but I don't know how to do it.
Got a version of Word that uses the menu interface (Word 97, Word 2000, Word 2002, or Word 2003)? This site is for you! If you use a later version of Word, visit our WordTips site focusing on the ribbon interface .
Visit the WordTips channel on YouTube
View the most recent newsletter.
Links and Sharing
- WordTips FAQ
- Questions or Comments
- Great Branding Ideas
- Free Calendars
OUR COMPANY
- Sharon Parq Associates, Inc.
- About Tips.Net
- Advertise with Us
- Our Privacy Policy
- Author Index
OUR PRODUCTS
- Helpful E-books
- Newsletter Archives
- Video Courses
- Excel Products
- Windows Products
- Word Products
- Beauty and Style
- ExcelTips (Excel 97–2003)
- ExcelTips (Excel 2007–2021; 365)
- Home Improvement
- Money and Finances
- Pests and Bugs
- Pets and Animals
- WindowsTips (Microsoft Windows)
- WordTips (Word 97–2003)
- WordTips (Word 2007–2021; 365)
Copyright © 2024 Sharon Parq Associates, Inc.
- FanNation FanNation FanNation
- SI.COM SI.COM SI.COM
- SI Swimsuit SI Swimsuit SI Swimsuit
- SI Sportsbook SI Sportsbook SI Sportsbook
- SI Tickets SI Tickets SI Tickets
- SI Showcase SI Showcase SI Showcase
- SI Resorts SI Resorts SI Resorts
NCAA Tournament bracket 2024: Print, download bracket with matchups, game times
- Author: Gonzaga Nation Staff
In this story:
March Madness has arrived and you can find the full 68-team NCAA Tournament men's college basketball bracket here.
The First Four games will take place on Tuesday and Wednesday, with the full slate of first-round games tipping off Thursday.
First and second round NCAA Tournament games will be played in Spokane for the first time since 2016. Here are the Spokane matchups scheduled for Thursday at Spokane Arena:
- No. 5 San Diego State vs. No. 12 UAB
- No. 4 Auburn vs. No. 13 Yale
- No. 5 Saint Mary's vs. No. 12 Grand Canyon
- No. 4 Alabama vs. No. 13 Charleston
Gonzaga received a No. 5 seed in the Midwest Region and will play No. 12 McNeese in the first round on Thursday in Salt Lake City.
Game times for all first-round matchups will be released later Sunday night. Here is the full 68-team bracket, with options to download and print.
NCAA Tournament bracket 2024: Download or print
Click here to open it as a .JPG | Click here for interactive bracket

NCAA Tournament in Spokane: Auburn, San Diego State, Saint Mary's among teams coming for March Madness
Latest zags news.

How to watch Gonzaga vs. UC Irvine: 2024 NCAA Women's Tournament

2024 NCAA Women's Tournament Spokane Schedule

Final Four predictions: Will Gonzaga make a deep run in 2024 NCAA Tournament?

Gonzaga men's basketball coaching tree well represented in 2024 NCAA Tournament

Gonzaga has a 'chance to make a run' in 2024 NCAA Tournament
COMMENTS
2. Use Just the Keyboard to Create a List Use a handy Microsoft Word shortcut to create numbered lists quickly with the keyboard alone.. The keyboard shortcut for a bulleted list: Press Ctrl + Shift + L to apply the default bullets to a list. Press Ctrl + Shift + N to remove the bullets.. To customize a keyboard shortcut for a numbered list, right-click anywhere on the Ribbon and select ...
Templates for college and university assignments. Include customizable templates in your college toolbox. Stay focused on your studies and leave the assignment structuring to tried and true layout templates for all kinds of papers, reports, and more. Stay focused on your studies and leave the assignment structuring to tried and true layout ...
To add a bullet pointed list to a document in Microsoft Word 2007 or later, simply: Place the cursor where you want the list to begin. Go to "Paragraph" under the "Home" tab on the main ribbon. "Paragraph" options. Click the "Bullets" button to begin a list (you can select the type of bullet point you want by using the arrow to ...
Word 11 Formatting. ★★★★★. Kendall Myers November 15, 2017. In this practice project for Word, students create a document similar to a test or quiz. They must include points and subpoints, blanks, boldfaced text, tabs, and spacing. …. 1 2.
Click OK to apply the symbol to the list in the document.; You can use a picture as a bullet. Click the Picture button in the Define New Bullet dialog box, then locate the image file on your computer.. To change the bullet color: Select an existing list. Click the Bullets drop-down arrow.; Select Define New Bullet from the list. The Define New Bullet dialog box appears.
Are you a student or a teacher struggling with creating assignments in MS Word? Look no further! In this video, we'll provide you with a comprehensive guide ...
File: Microsoft Word 2019 Fundamentals Page 12 of 37 11/01/19 XII. Margins Microsoft Word 2019 margins are defaulted to 1 inch for the top and bottom, and 1 inch for the left and right. To change your margins, use the Margin button found on the Layout ribbon. A. Create Margins 1.
Show the word count properly for the body of your assignment, because it's' important. Place your cursor on the Introduction title, hold the Shift key down, and got to the end of the Conclusion. And then Tools>Word Count and record the number of words. 14. Spelling and Grammar Check.
This cheat sheet gets you up to speed on the features that were introduced in Word 2016 and Word 2019, the perpetual-license versions of Word included with Office 2016 and Office 2019 ...
In this micro-lesson you will learn how to:- Create a Multi-Level List- Format a Multi-Level ListFull Course Description: In this course, students will expan...
Download the Printable Daily Task Planner Template for Microsoft Word. This fillable daily task planner template is easy to use and designed for printing. Organize and prioritize tasks for each day. Add the date for the day of its use and breakout to-dos, top priorities, people to contact, places to go, and activities you can move to another day.
Microsoft applications and systems including Access, Excel, OneNote, Outlook, PowerPoint, SharePoint, Windows, and Word. A former small business owner and recovering workaholic, she has worked for over 36 years with Microsoft and Microsoft technologies and for over 26 years in the training and certification industry.
By the end of this class you will be able to complete the following skills in Microsoft Word 2016 and Microsoft Word 365: • Create numbered and bulleted lists • Organize and manage long documents using breaks and styles • Format text into multiple columns • Save Word documents in different formats for sharing • Comment and track ...
3. Design E-book cover pages / Magazine front/ books front/back page using the cover page option in Insert Menu. This practice is an advance. But try to find the books and magazine cover pages. And try to make it similar in MS Word. Imagine if you're the designer, how you will design the same content or front page.
Click the first option under the Settings category and choose Key Assignments. (You may have to scroll down through the list to find it.) (See Figure 1.) Figure 1. Specifying you want to print key assignments. Click the Print button. Word prints the desired information. Press Ctrl+P. Word displays the Print dialog box. (See Figure 2.)
Microsoft Word is a word processor developed by Microsoft. It was first released in 1983 under the name Multi-Tool Word for Xenix systems. MS Word is a popular word-processing program used primarily for creating documents such as letters, brochures, learning activities, tests, quizzes and students' homework assignments.
How it works. Open an existing document saved to OneDrive or SharePoint. Write your comment and type @ followed by the name of the team member you want to tag. Select the Assign to check box to convert your comment into a task. Click the blue arrow or press Ctrl + Enter to post your comment.
When you use an @mention for someone else in your team or group, a new 'Assign to:' option appears like this. Check that box and the comment becomes a task as well, listed above the comment. The person assigned the task gets an automatic email to notify: Assign a task to yourself by @mentioning your own name then assigning the task.
Download free task list & checklist templates for Word, Excel & PDF, including basic task and to-do list templates for business & personal use cases. ... This template is ideal for organizing the basics of a group project or any assignment that involves multiple people. Simply list each task, a description, an assignee, a due date, and any ...
The Word interface. When you open Word for the first time, the Start Screen will appear. From here, you'll be able to create a new document, choose a template, and access your recently edited documents. From the Start Screen, locate and select Blank document to access the Word interface. Click the buttons in the interactive below to learn more ...
Step 1: First open MS-Word in your PC. Step 2: Now, Open the document or create new one in which you want to perform this operation. Step 3: Now, Select the text for which bullets are to be used. (Here we will select "Car, Bus, Train, Boat, Ship") Step 4: Now, Go to the " Home " tab. Step 5: Now, Go to the " Paragraph " section in ...
The following are tip times and commentator assignments for the NCAA First Four and First Round games. Tip times for Saturday's Second Round games will be announced after the conclusion of ...
I started following the instructions but it seems that there is no .com.microsoft.word folder in the Containers folder on my computer. I am using Microsoft 365 (business) on a Macbook air M2 with OS Sonoma. We cumulated hundreds of references on multiple documents, would be a great pain to start from scratch and rebuild that Master.
Word allows you to print a list of what has been assigned to certain keys. To do this, follow these steps: Select Print from the File menu or press Ctrl+P. Word displays the Print dialog box. (See Figure 1.) Figure 1. The Print dialog box. In the Print What box, select Key Assignments. Click on OK.
Our latest devices, built exclusively for business, are now available: Microsoft Surface Pro 10 and Surface Laptop 6. We designed these products from the ground up with direct input from our business customers, incorporating requested features ranging from enhanced connectivity options to advanced security and performance capabilities.
March Madness has arrived and you can find the full 68-team NCAA Tournament men's college basketball bracket here. The First Four games will take place on Tuesday and Wednesday, with the full ...