- Skill Assessments
- AI Course Builder
- Free Courses
- PowerPoint 2019 Basic

Presenter View in PowerPoint

Start Free Trial
Or log in with:
How to Use Presenter View in PowerPoint

- You can use thumbnails to select slides out of sequence and create a customized presentation for your audience.
- Preview text shows you what your next click will add to the screen, such as a new slide or the next bullet in a list.
- Speaker’s notes are shown in large, clear type so that you can use them as a script for your presentation.
- You can temporarily black out the screen during a presentation and then resume where you left off. This can come in handy during breaks or question and answer periods.
Start Presenter View
- Click the Options button.

The Presenter view fills the screen. The same presentation tools are available below the slide, and it also shows the current time and a thumbnail of the upcoming slide. At the bottom of the screen, use the arrows to move forward or backward in the presentation.
Command Buttons
At the top of the Presenter view, there are command buttons.
- Show Taskbar : Show or hide the Windows taskbar.
- Display Settings : When projecting, swap which display shows the presenter view or duplicate the slide show on both screens.
- End the Slide Show : Return to Normal view.

The timer is located at the top-left corner of the current slide. It keeps track of how long Presenter view has been running.
- Click the Pause button to temporarily stop the timer.

The Notes pane gives you a large look at any notes added to the slide. In Presenter view, you have the flexibility to change the display size.

End Presenter View
You can close Presenter view without ending the presentation entirely.
- Click the Options menu.

You return to the regular slide show view.
To close Presenter View and end the presentation, just press Esc .

FREE Quick Reference
Free to distribute with our compliments; we hope you will consider our paid training.
- LinkedIn-ready certificate
- Skill assessments
- Bite-sized, interactive lessons
- Saved progress
How to use Presenter View in PowerPoint
- Categories: PowerPoint productivity , Presentation skills
- Comments: 1

Think of PowerPoint’s Presenter View like the cockpit of an aeroplane (or airplane for our American readers!). Like an experienced pilot, you have all the controls you need at your fingertips when you’re navigating your slides, whether you’re presenting online or in person, helping you give a seamless presentation and leave your audience seriously impressed.
Presenter View in PowerPoint works best if you have two monitors. On one monitor, you can display your slides for your audience to see. On the other, you have your own private view (which isn’t visible to your audience), where you can see your notes and the upcoming slide while you’re presenting.
How to start using Presenter View in PowerPoint:
– Open your presentation. – Select Slide Show in the top ribbon. – Make sure Presenter View is selected in the Monitors section. – Choose from the dropdown menu which monitor you want your presentation to appear on. (Presenter View will automatically appear on whichever monitor you don’t choose.) – When you’re ready to start presenting, click From Beginning in the Start Slide Show section of the PowerPoint ribbon, or click the Slide Show icon in the bottom right of the screen, or hit the Alt + F5 keys on your keyboard to start your presentation in Presenter View.

PowerPoint Presenter View’s most useful features (by number!):
- This is your current slide. This shows you what your audience can see. This should be the same content that is displayed on your other monitor. The timer in the top-left corner lets you keep an eye on how long you’ve spent on the slide so far, helping you to pace your presentation. You can pause or reset the timer using the icons to the right.
- Here you can see your speaker notes. While we don’t generally recommend that you read out your speaker notes like a script (because it can make you sound like a monotonous robot and make your audience disengage very quickly), it can be useful to have some prompts in the speaker notes so that you know what happens with each mouse click and so that you don’t forget the key points on each slide. You can use the font icons in the bottom left of this panel to make your speaker notes larger or smaller.
- The tracker shows you how far through your presentation you are. Click the forward or back arrows to navigate to your next or previous animation. Hitting the forward or back keys on your keyboard will do the same thing.
- This is a preview of your next animation or next slide. This shows you what’s coming up next, which helps you to transition seamlessly from one slide to another.
- The Pen and laser pointer: This allows you to write on or highlight a particular part of your slide as you present. Adding ink annotations while you’re presenting won’t change your original slides – you can choose whether to keep or discard your annotations when you end your slide show.
- The See all slides tool: Click this to view thumbnails of all the slides in your presentation without your audience seeing. This means you can jump straight to a specific slide without flicking through all the slides in between.
- The Zoom tool: Use this to magnify a specific part of your slide. This is handy if you need to draw your audience’s attention to a particular detail.
- The Black or un-black tool: Use this to blank out the screen the audience sees. This is helpful whenever you want to release your audience’s attention from the slide content and back to you (e.g., during a Q&A). You can choose whether you want the blank screen to be black or white by clicking on the More slide show options icon at the far-right end of the toolbar.
- Toggle subtitles: Use this to turn automated subtitles on or off. You can adjust subtitle settings (such as language and where the subtitles appear on your slide) by clicking on the More slide show options icon.
- Click Show taskbar to open another program on your private monitor. This can be useful if you need to pull up another document without changing what your audience sees.
- Select Display settings to swap the monitors your slides and Presenter View appear on.
- Click End slide show when you’ve finished presenting. Hitting the Esc key on your keyboard will also close Slide Show mode and Presenter View.
And there you have it! Now you know everything there is to know about PowerPoint’s Presenter View. Give it a try next time you present – you might find it helps you to navigate and deliver your slides more confidently.
And for more tips on presenting, check out our ULTIMATE guide to presentation skills .
Related articles
8 steps towards presenting inclusively.
- Presentation skills
The goal of presenting inclusively is to make sure none of your audience are excluded due to their background or abilities. Even if you think you know your audience – many people could be experiencing invisible disabilities or situational limitations that could affect their ability to participate. But taking steps to ensure your presentation is inclusive and accessible is likely to benefit everyone!

5 presentation resolutions for 2024 (with BrightSlide!)
- PowerPoint productivity
Here are five things you should commit to doing this year powered by our productivity and design PowerPoint add-in BrightSlide!

Presentation tips & tricks advent calendar
- Presentation skills / Visual communication
It’s finally here, the holiday season! As the nights grow longer and the air grows colder, we know that all you want to do is settle down near a roaring fire, and snuggle up under the blankets with a good book PowerPoint presentation. Well BrightCarbon are here to help, with our festive presentation advent calendar.

Also you can resize the sections (next slide preview, notes etc) if necessary: https://imgur.com/a/2NnYECf
Leave a Reply Cancel reply
Save my name and email in this browser for the next time I comment.
Join the BrightCarbon mailing list for monthly invites and resources
Email doesn’t do justice to how thrilled I am with this work - it’s beyond all expectations so a huge, huge, thanks!!! Luke Kershaw SquareTrade

View Options in PowerPoint – A Complete Beginner’s Guide!
By: Author Shrot Katewa

There are many different types of presentations view available in PowerPoint including Normal View, Outline View, Presenter View, and Slide Show View to name a few. All these views serve different purposes and it is important to know how to use them appropriately to get the most out of PowerPoint!
In this article, we will talk about what each type of view does in PowerPoint and how to access them so that you can choose the best for your needs! So, let’s get started!
[ A Quick Note Before We Begin – for this article, I will be using one of the presentation templates from Envato Elements . With Envato Elements, you get access to thousands of presentation designs with unlimited downloads so you never run out of options again. Plus, you get free previews so you know exactly what you’re getting before buying! It is also very affordable. Check out their pricing here ]
1. What are the Different Type of View Options Available in PowerPoint?
Microsoft PowerPoint is equipped with a variety of Slide View options that can be used for different purposes.
These are the different view options available in PowerPoint –
- Normal View
- Slide Sorter View
- Notes Page View
- Reading View
- Outline View
- Slide Show View
- Presenter View
- Slide Master View
2. How to Access the Different View Modes in PowerPoint?
To access the different view modes in PowerPoint, you have to click on the ‘View’ tab in the ribbon. The 2-step process is described below.
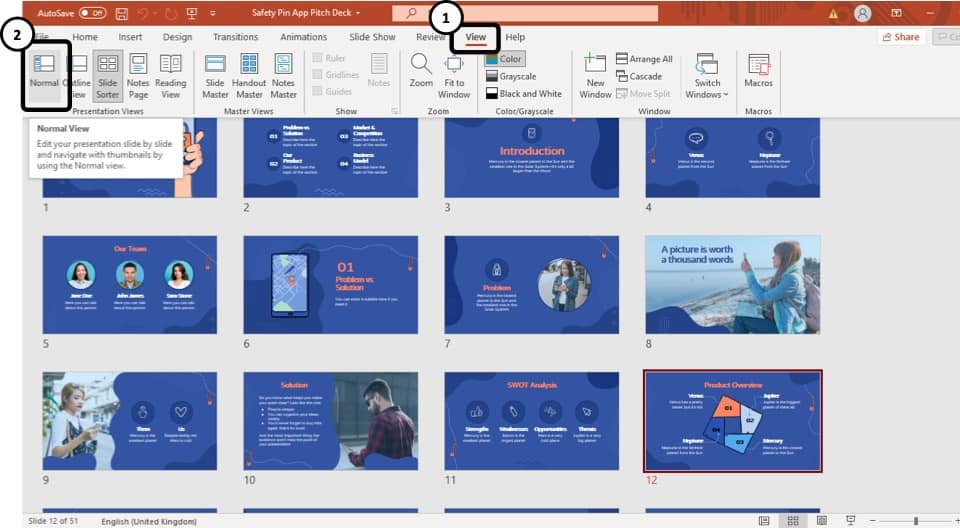
Step-1: Click on the ‘View’ tab
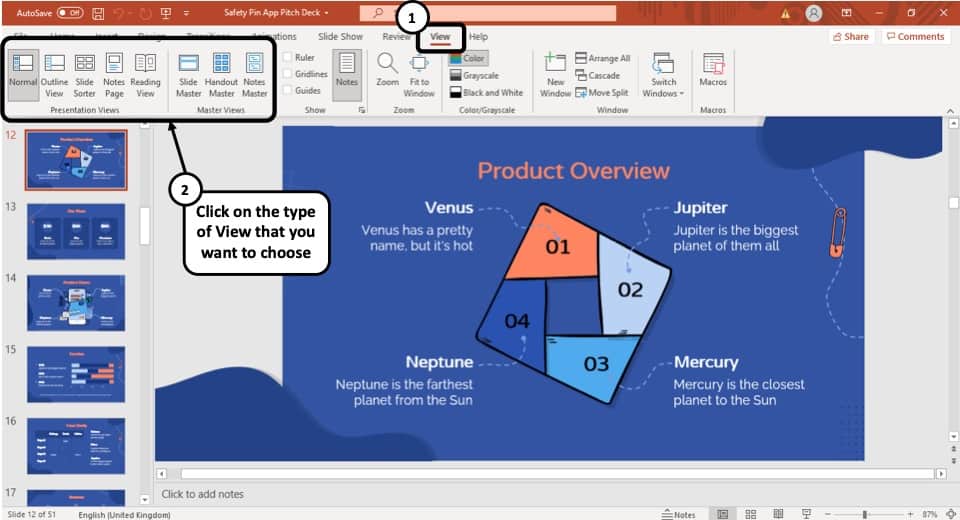
At first, select the ‘View’ tab, which is the second to last tab in the ribbon section of your PowerPoint Window.
Step-2: Select your preferred ‘View Mode’
Once you have access to the ‘View’ tab, you can select your preferred view mode such as the Outline View , Slide Sorter view, Slide Master view, etc. from the Presentation View section or the Master View section. (as shown in the image in step 1)
3. What is the Purpose of Various View Modes in PowerPoint?
Each view mode in PowerPoint has its own purpose. Let’s go through the purposes of the different slide view options one by one below –
1. Normal View
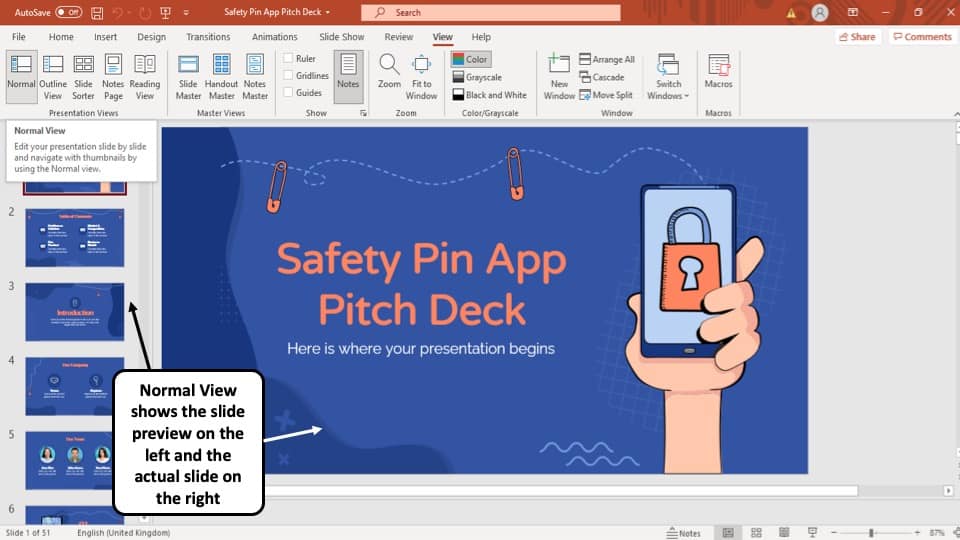
The ‘Normal View’ option is the first option in the ‘Presentation Views’ section of the ‘View’ tab. It is the most commonly used viewing option and is also the default slide view for PowerPoint.
The slides appear on the left of the PowerPoint window in the ‘Slide Navigation’ bar. Thumbnails of the slide are represented as boxes in the ‘Slide Navigation’ bar with its consecutive serial number to the left of it.
The main function of normal view mode in PowerPoint is to navigate through slides in a vertical grid while allowing you to add, design, or edit the slides while getting a preview of the slides on the left.
2. Slide Sorter View
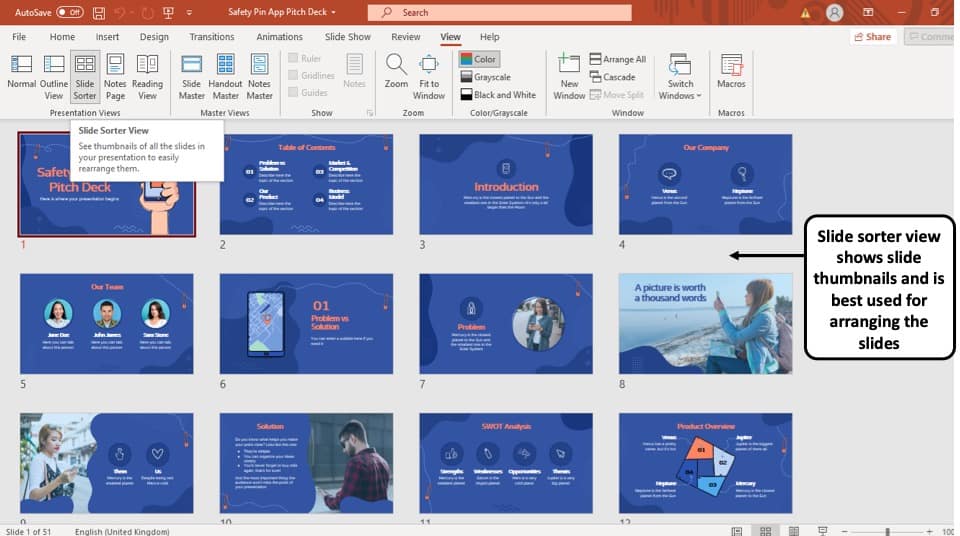
The ‘Slide Sorter’ option gives you an overview of all the slides in your PowerPoint presentation.
The slides are represented as thumbnails as a grid of boxes arranged side by side. The serial number of the slide is given on the bottom left corner of the slide thumbnail.
This option serves the purpose of viewing the slides together in one window making it easier to rearrange and organize them in a quick fashion.
3. Notes Page View

The ‘Notes Page View’ option gives you the view of each slide and its speaker notes in one page.
In this view, the slides appear at the top and the speaker notes are given on the bottom of the two sections. The serial number of the slide is not shown in this view. You can also edit speaker notes from here.
The main purpose of the notes page view in PowerPoint is to preview what each page will look like before you print the slides with speaker notes.
4. Reading View:
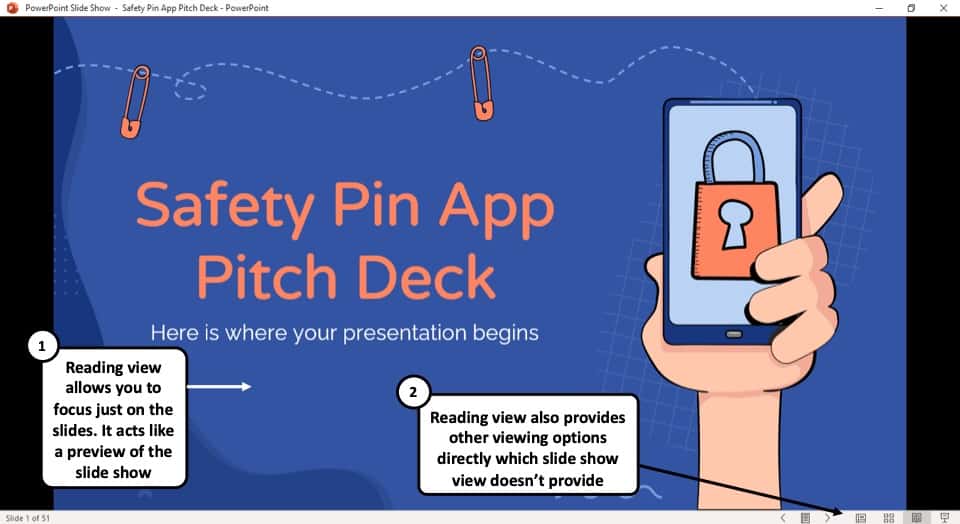
The Reading View option allows you to view your PowerPoint presentation without going into Full Screen mode. All the transitions and animations can be seen in this view. The serial number of the slide is given at the bottom right corner of the window.
It is used to preview the slide and review the slides with full focus. This mode also makes other view options easily accessible, which is not the case in ‘Slide Show’ mode where the presentation is shown in the full screen, and the options are not visible on screen.
The reading mode is actually more useful for word documents, as it allows the reader to focus just on the text. In my opinion, it adds little value to a PowerPoint presentation.
5. Outline View:
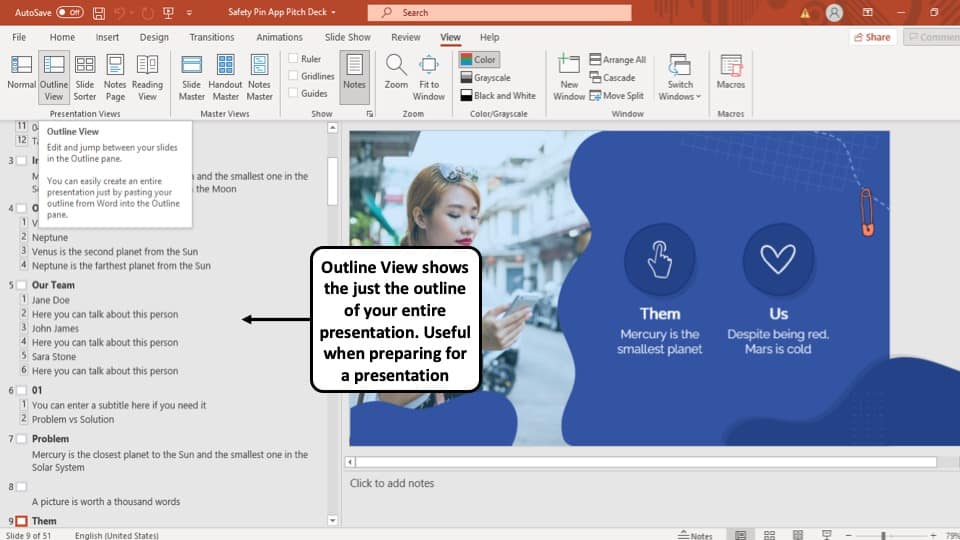
The ‘Outline View’ shows you the entire outline of your PowerPoint presentation in the ‘Slide Navigation’ bar.
In this view, there is no thumbnail of the presentation. Instead, there is an outline of all the data present in that slide. The serial number of the slide is at the left followed by a small white box that represents a slide and then the outline of that slide.
You can also create an entire slide in the pane of this view by copy and pasting data from Microsoft Word. However, you will have to design the slide separately once the data has been added to each slide.
6. Slide Show View:
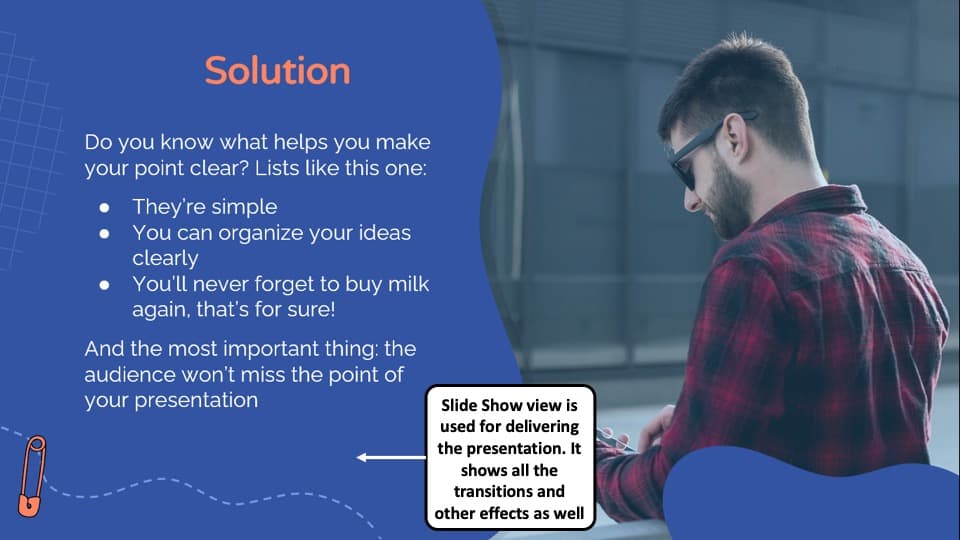
The Slide Show View is the view that your audiences are going to see. This view shows each slide of your PowerPoint presentation in full screen.
All the transitions, animation, and multimedia files in your PowerPoint presentation are played here. Consecutive slides can be accessed using the direction keys on your keyboard or by clicking once on the slide.
7. Presenter View:
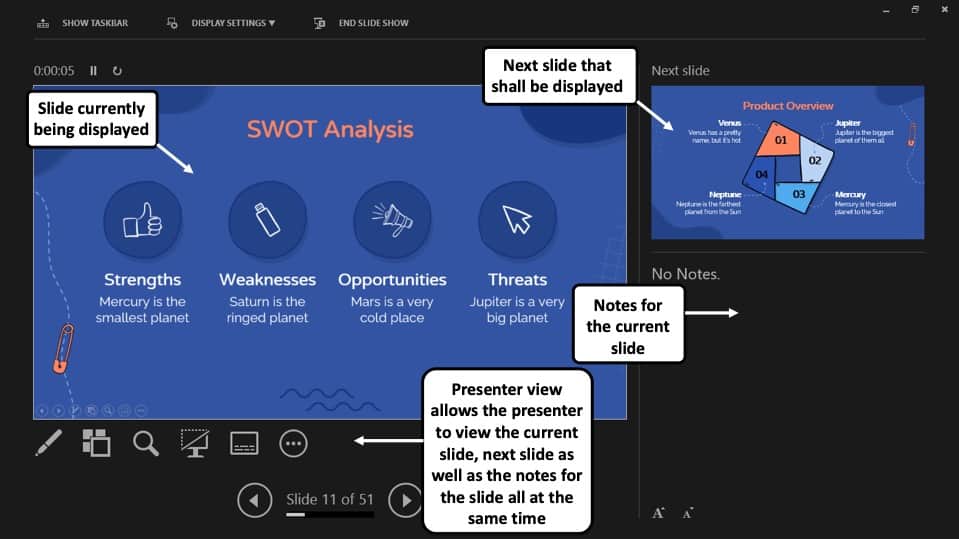
This is the view that you as a presenter are going to see while the audience is seeing the ‘Slide Show’ view.
Although you can give a presentation even in the slide show view, but it is always recommend to deliver the presentation using the “Presenter View” mode in PowerPoint as it provides you with additional features and benefits!
This view mode in PowerPoint will split the screen in multiple windows. The window on the left represents the current slide that is being displayed (the one that is visible to your audience).
The window in the top right section indicates the next slide in the queue. Whereas, the notes section displays the notes or key points made by each slide. Both, the notes section as well as the next slides window are only visible to the presenter and not to the audience!
The purpose of the “ Presenter View ” is to give the presenter all the aids to be prepared for the next slide and highlight the key points to be made on the current slide while delivering the presentation.
8. Slide Master View:
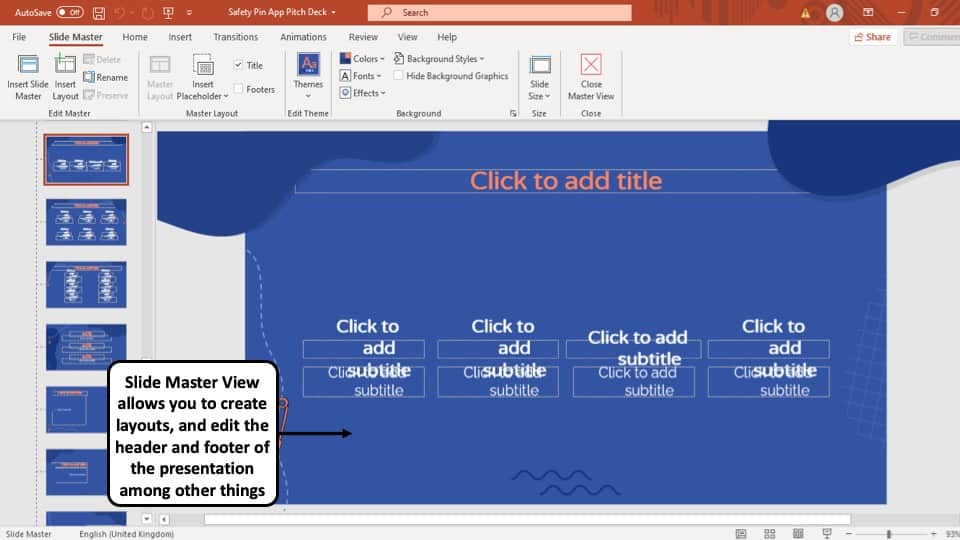
This view gives you a view of all the layouts used on the slides of your PowerPoint presentation.
The ‘ Slide Master View ’ option allows you to edit all the aspects of the layouts in your presentation such as fonts, background, color, and pretty much everything you can think of.
You can edit all the slide layouts of the presentation. Furthermore, you can also edit the header and footer of the presentation using the “ Slide Master View ” in PowerPoint.
4. How to Open the Presenter View in PowerPoint?
There are 2 different ways you can enter into Presenter View in PowerPoint –
- Using Slide Show View
- Using the short cut key i.e. Alt+F5
If you are using the Office 365 version of PowerPoint , you can actually directly access the “Presenter View” in the View section. Simply click on “View”. Then, click on “Presenter View”
Let’s look at both the methods quickly –
Method 1 – Using the Slide Show View
Step-1: Click on the ‘Slide Show’ button at the bottom right corner of the screen
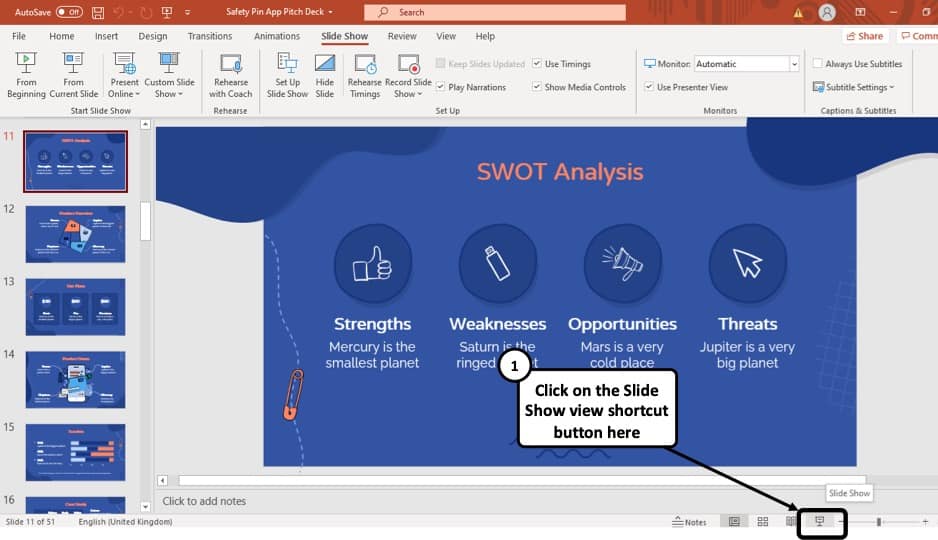
At first, you have to click on the ‘Slide Show’ button that looks like a projector screen which is located at the bottom right corner of your PowerPoint window. (as indicated in the image above)
Step-2: Right-click and choose “Show Presenter View”
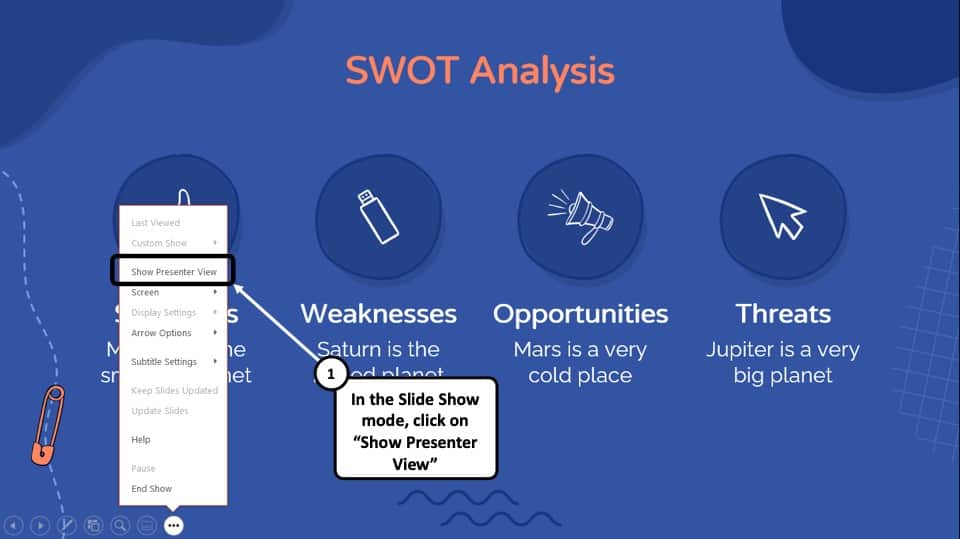
Once you are in the ‘Slide Show’ mode, using your mouse right-click anywhere on the screen. From the menu that appears, choose the “ Show Presenter View ” option
Method 2 – Using the Keyboard Shortcut
Alternatively, you can press ‘ Alt + F5 ’ on your keyboard and that will immediately open the ‘Presenter View’ mode.
The keyboard shortcut to open the “Presenter View” in PowerPoint on Mac is “Option+Enter” key.
5. How to Change PowerPoint Back to Normal View?
To change your PowerPoint back to ‘Normal View’ from ‘Slide Show’ mode, ‘Presenter View’ option or the ‘Reading View’ option, all you have to do is simply press the ‘ESC’ button on the keyboard of your computer. This will take you back to Normal View.
If you are using any other view apart from these 3 view modes in PowerPoint, you need to do the following –
If you are in a different viewing option, such as ‘Slide Sorter’ option, or the ‘Reading View’ option then you have to select the ‘Normal View’ option from the ‘View’ tab instead of the ‘Slide Sorter’ option or the different slide view option you are currently on.
More PowerPoint Related Topics
- How to Crop a Picture in PowerPoint? [Complete Step-by-Step Tutorial!]
- How to Give a Presentation on Zoom? A Helpful Resource!
- What is a Presentation Clicker? [And How to Use it!]
- How to Convert a PowerPoint to PDF? [A Simple Guide!]
- PowerPoint vs Google Slides: Which is Better? [ULTIMATE Test!]
- How to Change Bullet Style in PowerPoint? A Complete Guide
Credit to Pressahotkey (via Freepik) for the featured image of this article

Cloud Storage

Custom Business Email

Video and voice conferencing

Shared Calendars

Word Processing

Spreadsheets
Presentation Builder

Survey builder

Google Workspace
An integrated suit of secure, cloud-native collaboration and productivity apps powered by Google AI.
Tell impactful stories, with Google Slides
Create, present, and collaborate on online presentations in real-time and from any device.
- For my personal use
- For work or my business

Jeffery Clark
T h i s c h a r t h e l p s b r i d g i n g t h e s t o r y !

E s t i m a t e d b u d g e t

Make beautiful presentations, together
Stay in sync in your slides, with easy sharing and real-time editing. Use comments and assign action items to build your ideas together.

Present slideshows with confidence
With easy-to-use presenter view, speaker notes, and live captions, Slides makes presenting your ideas a breeze. You can even present to Google Meet video calls directly from Slides.

Seamlessly connect to your other Google apps
Slides is thoughtfully connected to other Google apps you love, saving you time. Embed charts from Google Sheets or reply to comments directly from Gmail. You can even search the web and Google Drive for relevant content and images directly from Slides.

Extend collaboration and intelligence to PowerPoint files
Easily edit Microsoft PowerPoint presentations online without converting them, and layer on Slides’ enhanced collaborative and assistive features like comments, action items, and Smart Compose.

Work on fresh content
With Slides, everyone’s working on the latest version of a presentation. And with edits automatically saved in version history, it’s easy to track or undo changes.

Make slides faster, with built-in intelligence
Assistive features like Smart Compose and autocorrect help you build slides faster with fewer errors.

Stay productive, even offline
You can access, create, and edit Slides even without an internet connection, helping you stay productive from anywhere.
Security, compliance, and privacy

Secure by default
We use industry-leading security measures to keep your data safe, including advanced malware protections. Slides is also cloud-native, eliminating the need for local files and minimizing risk to your devices.
Encryption in transit and at rest
All files uploaded to Google Drive or created in Slides are encrypted in transit and at rest.
Compliance to support regulatory requirements
Our products, including Slides, regularly undergo independent verification of their security, privacy, and compliance controls .
Private by design
Slides adheres to the same robust privacy commitments and data protections as the rest of Google Cloud’s enterprise services .

You control your data.
We never use your slides content for ad purposes., we never sell your personal information to third parties., find the plan that’s right for you, google slides is a part of google workspace.
Every plan includes

Collaborate from anywhere, on any device
Access, create, and edit your presentations wherever you are — from any mobile device, tablet, or computer — even when offline.

Get a head start with templates
Choose from a variety of presentations, reports, and other professionally-designed templates to kick things off quickly..

Photo Album

Book Report

Visit the Slides Template Gallery for more.
Ready to get started?
How to See Your Notes When Presenting in PowerPoint

As a presenter, delivering a seamless and confident presentation is key to making a lasting impression. However, it can be challenging to remember every detail of your presentation, especially if you have a lot of content to cover. Fortunately, with PowerPoint’s Presenter View, you can easily access your notes and confidently deliver your presentation. In this article, we will cover all aspects of using PowerPoint’s Presenter View to enhance your presentation.
Table of Contents
Why You Need to See Your Notes When Presenting in PowerPoint
Presenting without having your notes at hand can be daunting and can affect the quality of your presentation. Whether you are presenting in front of a small group or a large audience, you will need to have access to your notes. This will help you deliver your presentation confidently, as you will have a clear idea of what to say or do next. In addition, having your notes visible can help you stay focused on the topics you want to cover and avoid straying off-topic.
Another reason why it is important to see your notes when presenting in PowerPoint is that it can help you manage your time effectively. By having your notes visible, you can keep track of the time and ensure that you are covering all the important points within the allocated time frame. This can help you avoid rushing through the presentation or running out of time before you have covered all the key points.
Furthermore, having your notes visible can also help you engage with your audience better. When you are confident and well-prepared, you are more likely to make eye contact with your audience and use body language effectively. This can help you build a connection with your audience and keep them engaged throughout the presentation.
How to Access Presenter View in PowerPoint
Before you can access Presenter View, you need to have a PowerPoint presentation open in Slide Show mode. Once your presentation is open, simply click on the ‘Slide Show’ tab and check the box beside ‘Use Presenter View.’ Your screen will then automatically switch to Presenter View, allowing you to see your notes and other helpful controls.
Presenter View is a great tool for giving presentations, as it allows you to see your notes and upcoming slides while your audience only sees the current slide. You can also use Presenter View to zoom in on specific parts of your slide, draw on your slides, and even use a virtual laser pointer to highlight important information. To exit Presenter View, simply press the ‘Esc’ key on your keyboard.
Understanding the Presenter View in PowerPoint
Presenter View is a powerful tool that enables you to manage your presentation effectively. It comprises several elements, including:
- The slide display area, which shows the slide that your audience sees.
- The notes section, which displays any text that you have added as notes or comments.
- The timer, which can help you stay within your allotted time.
- The navigation controls, which let you move forward and backward in your presentation easily.
- The zoom slider, which enables you to zoom in and out of your slides for added detail.
- The laser pointer and highlighter tools, which allow you to emphasize important points on your slides.
Presenter View also allows you to preview upcoming slides, giving you a chance to prepare for the next section of your presentation. This feature can be especially helpful if you need to refer to specific information on a later slide.
In addition, Presenter View provides a way to keep your audience engaged by allowing you to add annotations to your slides. You can draw attention to specific areas of your slide, highlight key points, or even add additional information that may not be included in the slide itself.
Setting Up Presenter View: Step-by-Step Guide
If you want to customize your Presenter View experience, follow these steps:
- On the ‘Slide Show’ tab, click ‘Set Up Slide Show.’
- Under ‘Multiple Monitors,’ select the ‘Use Presenter View’ checkbox.
- If you’re using a single monitor, select the ‘Display slide show on’ option and choose your primary monitor.
- If you’re using dual monitors, select the ‘Display slide show on’ option and choose the monitor that you want to display Presenter View on.
- Customize the Presenter View by selecting the options that you want to use, such as speaker notes, the timer, and the navigation controls.
- Click ‘OK.’ Your Presenter View should now be set up.
It’s important to note that not all versions of PowerPoint have the Presenter View feature. If you don’t see the ‘Use Presenter View’ checkbox under ‘Multiple Monitors,’ it’s likely that your version of PowerPoint doesn’t support this feature. In this case, you may need to upgrade to a newer version or use a different presentation software that offers Presenter View.
How to Customize Presenter View Settings in PowerPoint
If you have specific preferences for Presenter View, you can customize it by following these steps:
- Click the ‘Settings’ button in the Presenter View toolbar.
- Select the options that you want to use, such as the color scheme, font size, and slide size.
- Click ‘Save Changes’ to apply your changes.
Customizing your Presenter View settings can greatly enhance your presentation experience. For example, you can choose to display your notes on one screen while your audience sees only the slides on the other screen. Additionally, you can select the option to display a timer or a clock to help you keep track of time during your presentation. Experiment with different settings to find what works best for you and your audience.
Using Presenter View on Dual Monitor Setup
If you have a dual-monitor setup, you can use Presenter View to present your slides on one screen while managing your notes and tools on the other screen. To do this, simply select the ‘Use Presenter View’ checkbox under ‘Multiple Monitors’ in the ‘Set Up Slide Show’ dialog box. Once you start presenting, the Presenter View screen will appear on the secondary monitor, while the slides will appear on the primary screen.
Presenter View is a great tool for presenters who want to keep their notes and tools hidden from the audience. With Presenter View, you can see your notes, upcoming slides, and a timer, while your audience only sees the current slide. This feature is especially useful for longer presentations, where you may need to refer to your notes or keep track of time.
Another benefit of using Presenter View is that it allows you to easily navigate through your presentation. You can use the arrow keys on your keyboard to move forward or backward through your slides, or you can use the thumbnails on the Presenter View screen to jump to a specific slide. This makes it easy to adjust your presentation on the fly, without having to interrupt the flow of your presentation.
Troubleshooting Common Issues with Presenter View in PowerPoint
If you experience common issues with Presenter View, such as notes not displaying correctly, audio not working, or distorted visuals, try these troubleshooting tips:
- Make sure that your computer meets the minimum system requirements for using Presenter View.
- Check that the correct audio output is selected in the control panel.
- Review your slides and notes to ensure that there are no formatting errors.
- Try closing other open applications to free up system resources.
- Ensure that your computer is updated with all available updates.
- Try reinstalling or repairing PowerPoint to eliminate any software conflicts.
However, if these troubleshooting tips do not resolve your issues, there may be other factors at play. One possible cause of issues with Presenter View is outdated or incompatible drivers for your computer’s graphics card. Check with your computer manufacturer or graphics card manufacturer to see if there are any updates available.
Another potential issue could be related to your computer’s display settings. Make sure that your display settings are optimized for the resolution and aspect ratio of your presentation. You may also want to try adjusting the scaling settings to see if that improves the display of your slides and notes.
Tips and Tricks for Effective Note-taking During Presentation
To get the most out of Presenter View, try these effective note-taking tips:
- Organize your notes by slide or topic to stay on track during the presentation.
- Use bullet points and keywords to keep your notes concise and easy to read.
- Include cues or action words to remind you of any demonstrations, animations, or other interactive elements in your presentation.
- Use the highlighter tool to draw attention to the most critical points.
Enhancing Your Presentation with Presenter View
Presenter View can enhance your presentation in several ways, such as by allowing you to add visual aids and multimedia elements, manage your time effectively, and engage your audience. By using Presenter View, you can keep your presentation on track, highlight key information, and maintain your audience’s attention throughout.
The Importance of Rehearsing Your Presentation with Presenter View
Practicing your presentation with Presenter View can help you become familiar with the interface, identify any errors or issues, and ensure that your presentation will run seamlessly. Use Presenter View during your presentation rehearsal to simulate the actual presentation environment and get a feel for how it works.
Taking Advantage of the Laser Pointer and Highlighter Tools in Presenter View
The laser pointer and highlighter tools are handy for emphasizing key points on your slides and improving audience engagement. To use them, simply press and hold the ‘Ctrl’ key and click the mouse to activate the laser pointer or highlighter. Release the key to deactivate them.
How to Switch Between Slides and Notes during a Presentation
If you need to switch between slides and notes during your presentation, simply click the ‘Notes’ button in the Presenter View toolbar. This will display your notes and allow you to scroll through them as needed.
Utilizing the Timer and Countdown Features of Presenter View
The timer and countdown features are useful for keeping your presentation on track and ensuring that you do not exceed your allotted time. To use them, simply enable the ‘Timer’ feature in the ‘Settings’ section of Presenter View. You can then set the countdown time and choose whether to display it during the presentation or keep it hidden.
Sharing Your Screen Using Presenter View in Microsoft Teams or Zoom Meetings
If you are using Microsoft Teams or Zoom Meetings to deliver your presentation remotely, you can still use Presenter View by sharing your screen. To do this, simply select the ‘Share Screen’ option and choose the ‘Presenter View’ screen. This will allow you to present your slides while keeping your notes and controls visible to you for an uninterrupted presentation experience.
By following the steps and tips outlined in this article, you can use PowerPoint’s Presenter View to deliver a polished and professional presentation that wows your audience. Always remember to rehearse your presentation before the actual day so that you’re comfortable with the tools and settings for Presenter View, and ready to tackle any issue that might arise.
By humans, for humans - Best rated articles:
Excel report templates: build better reports faster, top 9 power bi dashboard examples, excel waterfall charts: how to create one that doesn't suck, beyond ai - discover our handpicked bi resources.
Explore Zebra BI's expert-selected resources combining technology and insight for practical, in-depth BI strategies.

We’ve been experimenting with AI-generated content, and sometimes it gets carried away. Give us a feedback and help us learn and improve! 🤍
Note: This is an experimental AI-generated article. Your help is welcome. Share your feedback with us and help us improve.

Home PowerPoint Templates Business PowerPoint Templates Business Meeting Top View
Business Meeting Top View

The Business Meeting Top View is a PowerPoint template for success conference presentation. It gives a visual insight of meeting in progress. It is useful in delivering topics such as teamwork, behavior, guidelines or problem solving and decision-making situation. This template is productive in variety of business presentations. Such as, board meeting guidelines, brainstorming innovative ideas, organizational internal meetings etc. The graphical illustrations of this PowerPoint helps increase interest of the audience. The purpose of presentations is to deliver a message across, in less time, ensuring that viewers understood its purpose. The use of flat vector PowerPoint shapes in this presentation makes it easy to convey views with maximum visual content.
The Business Meeting Top View template is a neat and simple PowerPoint presentation design. The online meetings, seminars can take an advantage of this template. The slides contain PowerPoint shapes of people in an on-going meeting. The shapes appear as a top down view, showing heads of staff members and items on desktop. The first four slides provide an option to choose from 3-4-5-6-member meeting session. Also, there are number of conference related items on the table. Such as notes, laptop, spectacles and even coffee mug top view. One of the slide contains speech bubble call out boxes to add the opinion of members.
The image of associates sitting around the table contains an engaging graphics. One man typing on laptop, the other one writing on notepad, whereas, a girl writing signing a document. Further, all the shapes in PowerPoint are editable, enabling users to change the look of presentation. The colors and size of shapes are changeable. All the objects can easily move to a new slide or presentation. The items of table are also available separately in the last slide. Here, users can select ad copy individual item to make design changes. To do so, simply select, copy and paste a shape as necessary, resize and adjust the design. The PowerPoint template of Business Meeting Top View helps organize and share thoughts and ideas.
You must be logged in to download this file.
Favorite Add to Collection
Details (6 slides)

Supported Versions:
Subscribe today and get immediate access to download our PowerPoint templates.
Related PowerPoint Templates

Therapeutic PowerPoint Template

5-Step Magnifying Glass PowerPoint Template

6-Step Head Diagram Morph Template for PowerPoint

Abstract Geometric Shapes PowerPoint Background
120 Presentation Topic Ideas Help You Hook Your Audience
Updated: January 15, 2024
Published: August 09, 2023
Cooking is easy. The puzzle is figuring out what to eat. As soon as you know that, you can get started. The same holds for presentations. The sooner you can whip up a good, informative, and catchy topic, the easier the rest of the process becomes.

Pick a good topic that resonates with you and your audience to set a strong foundation. But select the wrong topic, and it becomes difficult to connect with your audience, find mutual interests, or hold their attention.
So, let’s learn how to develop thought-provoking and relevant topics for your presentations. You’ll also find some best practices to make your presentation memorable.
10 Free PowerPoint Templates
Download ten free PowerPoint templates for a better presentation.
- Creative templates.
- Data-driven templates.
- Professional templates.
You're all set!
Click this link to access this resource at any time.
Table of Contents
How to Choose a Great Presentation Topic in 5 Steps
120 presentation topic ideas, 5 presentation tips.

4. Choose an appropriate presentation style.
There are many ways to present a topic. Your personality, the topic at hand, and your audience’s personas will help you determine which style would best fit you and your audience.
Select a presentation style that will communicate the main idea clearly and have a lasting impact on your audience.
For instance, explore a freeform style presenter by Sir Ken Robinson.
5. Engage with your audience.
Work on your presentation skills to make a strong connection with your audience, get through to them and leave a mark.
Think of the presenter as the link between the topic and the audience. A strong or a weak presenter can make a difference between a presentation being a thriving success or a boring failure.
Hone your skills by engaging and interacting with your audience. Make them feel like a part of the presentation and not just spectators. 70% of marketers have found presentations with interactive content to be more effective than those without.
Here are a few ways you can make your presentation interactive:
- Start your speech with uncommon questions to your audience. Involve them from the get-go, like ask to raise their hands if X.
- Make eye contact to build credibility and show confidence. Don’t stare at your slides or notes. Smile occasionally and talk to the audience directly.
- Have an active and confident body language. Don’t stand in the same place the entire time. Move around the stage.
- Don’t be monotonous. Speak as you would to a colleague — with enthusiasm.
- Ask close-ended questions in between to keep the audience engaged without losing time. Address them using their names to keep things interesting.
- Share personal experiences and stories that your audience will find fascinating and relatable.
- Practice thoroughly before you present so you’re fluent with the material and delivery.
- Energy and excitement can be quite contagious. Make sure you exude enough to spread some to your audience.
Feeling Inspired Yet?
Now you have all the right ingredients for choosing amazing topics and a hundred ideas to drive inspiration from. So, go ahead and start cooking presentations that will blow your audience away.
Don’t forget to choose a super-relevant topic and add meaty information. Do it with excitement to make it enjoyable for you and your audience. Best of luck!
![Blog - Beautiful PowerPoint Presentation Template [List-Based]](https://no-cache.hubspot.com/cta/default/53/013286c0-2cc2-45f8-a6db-c71dad0835b8.png "presentation top view")
Don't forget to share this post!
Related articles.
![How to Create an Infographic in Under an Hour — the 2024 Guide [+ Free Templates]](https://blog.hubspot.com/hubfs/Make-infographic-hero%20%28598%20%C3%97%20398%20px%29.jpg "presentation top view")
How to Create an Infographic in Under an Hour — the 2024 Guide [+ Free Templates]
![20 Great Examples of PowerPoint Presentation Design [+ Templates]](https://blog.hubspot.com/hubfs/powerpoint-presentation-examples.webp "presentation top view")
20 Great Examples of PowerPoint Presentation Design [+ Templates]
![How to Write an Ecommerce Business Plan [Examples & Template]](https://blog.hubspot.com/hubfs/ecommerce%20business%20plan.png "presentation top view")
How to Write an Ecommerce Business Plan [Examples & Template]

Get Buyers to Do What You Want: The Power of Temptation Bundling in Sales

How to Create an Engaging 5-Minute Presentation
![How to Start a Presentation [+ Examples]](https://blog.hubspot.com/hubfs/how-to-start-presenting.webp "presentation top view")
How to Start a Presentation [+ Examples]
![17 PowerPoint Presentation Tips to Make More Creative Slideshows [+ Templates]](https://blog.hubspot.com/hubfs/powerpoint-design-tricks_7.webp "presentation top view")
17 PowerPoint Presentation Tips to Make More Creative Slideshows [+ Templates]
![How to Create the Best PowerPoint Presentations [Examples & Templates]](https://blog.hubspot.com/hubfs/Powerpoint%20presentation.jpg "presentation top view")
How to Create the Best PowerPoint Presentations [Examples & Templates]

The Presenter's Guide to Nailing Your Next PowerPoint
![How to Create a Stunning Presentation Cover Page [+ Examples]](https://blog.hubspot.com/hubfs/presentation-cover-page_3.webp "presentation top view")
How to Create a Stunning Presentation Cover Page [+ Examples]
Marketing software that helps you drive revenue, save time and resources, and measure and optimize your investments — all on one easy-to-use platform

Reinvent productivity with Copilot for Microsoft 365.
Microsoft PowerPoint

Copilot in PowerPoint
Turn your inspiration into stunning presentations. Get it now when you add Copilot Pro or Copilot for Microsoft 365 to your Microsoft 365 subscription.
Turn your inspiration into stunning presentations
Turn a spark of inspiration into personalized presentations with Copilot in PowerPoint. Copilot will turn existing Word documents into presentations, create new presentations from simple prompts or outlines, or find the best places for impactful imagery—and will help you leave audiences dazzled with skillful storytelling.

Designing slides has never been easier
Create well-designed, impactful slides with the help of Designer and Ideas in PowerPoint.
3D isn't just for the movies
Now you can easily insert 3D objects and embedded animations directly into PowerPoint decks from your own files or a library of content.

Interact naturally using voice, touch, and ink
Easily ink onto a slide, then convert handwritten notes into text and make hand-drawn shapes perfect in seconds.
Nail your next presentation
With Presenter Coach, practice your speech and get recommendations on pacing, word choice, and more through the power of AI.

Be on the same page
Always know where you are in the editing process. With the while you were away feature, track recent changes made by others in your decks.
Task management with PowerPoint and Microsoft 365
Tell your story with captivating presentations.
Originally starting from Free now starting from Free
Sharing and real-time collaboration
PowerPoint for the web
Basic templates, fonts, icons, and stickers
Dictation and voice commands
Works on web, iOS, and Android™
5 GB of cloud storage
Microsoft 365 Personal
Originally starting from $6.99 now starting from $6.99
$6.99 $6.99
(Annual subscription–auto renews) 1
PowerPoint for the web and PowerPoint desktop app for offline use
Premium templates, fonts, icons, and stickers with thousands of options to choose from
Dictation, voice commands, and transcription
Advanced spelling and grammar, in-app learning tips, use in 20+ languages, and more
1 TB (1000 GB) of cloud storage
Premium desktop, web, and mobile apps
Advanced security
Ad-free experience
Works on Windows, macOS, iOS, and Android™
Copilot Pro available as an add-on. *
Microsoft 365 Family
Originally starting from $9.99 now starting from $9.99
$9.99 $9.99
One to six people
Up to 6 TB of cloud storage, 1 TB (1000 GB) per person
Premium desktop, web, and mobile apps
Advanced security
Microsoft Powerpoint
One person
Microsoft 365 Apps for business
Originally starting from $8.25 now starting from $8.25
$8.25 $8.25
Available for up to 300 employes
Desktop versions of Word, Excel, PowerPoint, and Outlook
1 TB of cloud storage per user
Anytime phone and web support
Microsoft 365 Business Standard
Originally starting from $12.50 now starting from $12.50
$12.50 $12.50
Everything in Microsoft 365 Apps for business, plus:
Web, and mobile versions of Word, Excel, PowerPoint, and Outlook
Custom business email ([email protected])
Chat, call, and video conference with Microsoft Teams
10+ additional apps for your business needs (Bookings, Planner, Microsoft Forms, and others)
Automatic spam and malware filtering
Webinars with attendee registration and reporting
New: Collaborative workspaces to co-create using Microsoft Loop
New: Video editing and design tools with Clipchamp
Copilot for Microsoft 365 available as an add-on. **
Add Copilot to your Microsoft plan
Achieve more than ever using AI integrated with Word, Excel, PowerPoint, Outlook, and other Microsoft 365 apps.

Get the PowerPoint mobile app
Ready to create great presentations with Microsoft 365?
See more from microsoft powerpoint.
Collaborate on shared projects
Get commonly used Office features and real-time co-authoring capabilities through your browser.
Jumpstart your design
Show your style and professionalism with templates, plus save time. Browse PowerPoint templates in over 40 categories.
Connect with experts
See what’s new and get classic tips and editors' tricks to help you create, edit, and polish presentations like a pro.
Read about slide presentations
6 slide presentation software tips to impress, host large-scale virtual presentations, how to make a slide show, what’s new in powerpoint.
- [1] Once your paid subscription begins, cancelation policies vary based on your status as a new customer, product, and domain selections on Microsoft. Learn more. Cancel your Microsoft 365 subscription any time by going to the Microsoft 365 admin center. When a subscription is canceled, all associated data will be deleted. Learn more about data retention, deletion, and destruction in Microsoft 365 . Microsoft PowerPoint with a Microsoft 365 subscription is the latest version of PowerPoint. Previous versions include PowerPoint 2016, PowerPoint 2013 , PowerPoint 2010 , PowerPoint 2007 , and PowerPoint 2003. iTunes, iPhone, and iPad are registered trademarks of Apple Inc., registered in the U.S. and other countries. Android is a trademark of Google Inc.
- [*] Copilot Pro benefits are currently available on web, Windows, and macOS and iPadOS. A Microsoft 365 Personal or Family subscription is required to access Copilot in select apps, including Word, Excel, PowerPoint, OneNote, and Outlook. Excel features are currently in preview in English only. Microsoft 365 Personal or Family and Copilot Pro are not available in the same transaction and must be purchased in two separate transactions.
- [**] Copilot for Microsoft 365 may not be available for all markets and languages. To purchase, enterprise customers must have a license for Microsoft 365 E3 or E5 or Office 365 E3 or E5, and business customers must have a license for Microsoft 365 Business Standard or Business Premium.
Follow Microsoft 365
Present on multiple monitors (and view speaker notes privately)
You can present with 2 monitors: Using Presenter View is a great way to view your presentation with speaker notes on one monitor (your laptop, for example), while your audience views the notes-free presentation on a different monitor (like a larger screen you're projecting to).
Note: Make sure the device you're using for your presentation supports the use of multiple monitors. Check with your manufacturer for up-to-date information about multiple monitor support.
To do this procedure and split the view between projectors in this way, you must be connected to the second screen.
Set up PowerPoint to use Presenter view with two monitors
On the Slide Show tab, in the Monitors group, select Use Presenter View .

Windows Display Settings should open.
In the Display Settings dialog box, on the Monitor tab, select the monitor icon that you want to use to view your speaker notes, and then select the This is my main monitor check box.
If the This is my main monitor check box is selected and unavailable, the monitor is already designated as the primary monitor.
Select the monitor icon for the second monitor—the one the audience will watch, and then select the Extend my Windows Desktop onto this monitor check box.
Notes: If the Windows Display Settings don't open, do the following:
Windows 10: Click Start > Settings > System > Display . At the top, under Customize your display , is a diagram of the screens connected to your computer, with each screen numbered. If you are connected to a project, typically it will be represented in the diagram as screen 2. Select screen 1 in the diagram, then scroll downward. Ensure that the check box named Make this my main display is selected. Above that check box, in the Multiple displays list, select Extend these displays .
Windows 8: Right-click the Windows Start button, click Control Panel > Display > Adjust resolution . In the Multiple displays list, click Extend these displays . Select the monitor on which you want to view your speaker notes, and click Make this my main display .
You can use PowerPoint on your smartphone as a remote control to run your presentation and view your speaker notes. See Using a laser pointer on your smartphone when presenting in PowerPoint for more information, including a brief video.
Deliver your presentation on two monitors
On the Slide Show tab, in the Set Up group, click Set Up Slide Show .

In the Set Up Show dialog box, choose the options that you want, and then click OK . If you choose Automatic , PowerPoint will display speaker notes on the laptop monitor, if available. Otherwise, PowerPoint will display speaker notes on the main display identified in your Display settings ( Settings > Display ).

Extend vs. Duplicate: What happens after the slide show ends
PowerPoint does something behind the scenes to make the process of starting a slide show on a second monitor as smooth and quick as possible. When you enter Slide Show, PowerPoint automatically changes your display settings (also known as your display topology) to Extend .
What can be confusing is what happens after your slide show concludes:
In PowerPoint 2013 , when your slide show ends, PowerPoint leaves the display topology as Extend . (The benefit of this approach is that the next time you present on a second monitor, the first slide will appear with minimal delay. The drawback is that PowerPoint may be overriding your preferred display setting of "duplicate". Some people don't like this override.)
In newer versions , in the same end-of-slide-show scenario, PowerPoint reverts to your default setting, returning to Duplicate , if that's what you have chosen.
If you are using PowerPoint 2013 and you want PowerPoint to revert to the default setting, rather than keeping the Extend setting, you can tell it to do that by making a small change to the Windows registry as described below.
In this procedure, you are creating a command that adds a new setting to the Windows Registry for PowerPoint, and then you are running that command:
Create a new file in Notepad.
Copy and paste the following three lines of text into Notepad:
On the File menu in Notepad, click Save As .
Name the file Update.reg . (It's important that the file name extension be .reg ).
In the Save as type box, choose All Files (*.*) .
Take note of the folder in which you are saving the file. Then click Save , and close Notepad.
Open File Explorer from the Start menu and navigate to the folder where you saved Update.reg.
Double-click Update.reg .
Answer "Yes" to the two prompts that ensue.
With that completed, PowerPoint will now revert to your default display topology at the conclusion of a slide show.
(Read more technical details in this community forum post that was answered by a PowerPoint program manager .)
Video: Use Presenter view
View your speaker notes as you deliver your slide show
Video: Rehearse timings for a slide show
Zoom in to part of a slide in Slide Show view
Print your PowerPoint slides, handouts, and notes
Create a self-running presentation
Start the presentation and see your notes in Presenter view
PowerPoint videos not playing on secondary monitor

Need more help?
Want more options.
Explore subscription benefits, browse training courses, learn how to secure your device, and more.

Microsoft 365 subscription benefits

Microsoft 365 training

Microsoft security

Accessibility center
Communities help you ask and answer questions, give feedback, and hear from experts with rich knowledge.

Ask the Microsoft Community

Microsoft Tech Community

Windows Insiders
Microsoft 365 Insiders
Was this information helpful?
Thank you for your feedback.
- Images home
- Editorial home
- Editorial video
- Premium collections
- Entertainment
- Premium images
- AI generated images
- Curated collections
- Animals/Wildlife
- Backgrounds/Textures
- Beauty/Fashion
- Buildings/Landmarks
- Business/Finance
- Celebrities
- Food and Drink
- Healthcare/Medical
- Illustrations/Clip-Art
- Miscellaneous
- Parks/Outdoor
- Signs/Symbols
- Sports/Recreation
- Transportation
- All categories
- Shutterstock Select
- Shutterstock Elements
- Health Care
Browse Content
- Sound effects
PremiumBeat
- PixelSquid 3D objects
- Templates Home
- Instagram all
- Highlight covers
- Facebook all
- Carousel ads
- Cover photos
- Event covers
- Youtube all
- Channel Art
- Etsy big banner
- Etsy mini banner
- Etsy shop icon
- Pinterest all
- Pinterest pins
- Twitter All
- Twitter Banner
- Infographics
- Zoom backgrounds
- Announcements
- Certificates
- Gift Certificates
- Real Estate Flyer
- Travel Brochures
- Anniversary
- Baby Shower
- Mother's Day
- Thanksgiving
- All Invitations
- Party invitations
- Wedding invitations
- Book Covers
- About Creative Flow
- Start a design
AI image generator
- Photo editor
- Background remover
- Collage maker
- Resize image
- Color palettes
Color palette generator
- Image converter
- Creative AI
- Design tips
- Custom plans
- Request quote
- Shutterstock Studios
0 Credits Available
You currently have 0 credits
See all plans

Image plans
With access to 400M+ photos, vectors, illustrations, and more. Includes AI generated images!

Video plans
A library of 28 million high quality video clips. Choose between packs and subscription.

Music plans
Download tracks one at a time, or get a subscription with unlimited downloads.
Editorial plans
Instant access to over 50 million images and videos for news, sports, and entertainment.
Includes templates, design tools, AI-powered recommendations, and much more.
Search by image
Office Chair Top View royalty-free images
14,727 office chair top view stock photos, vectors, and illustrations are available royalty-free for download., top view of woman sitting on the floor in boardroom.

Top view of set furniture elements outline symbol for dining room, office, cafe, kitchen and living room. Interior icon chair, sink, table and sofa.

Woman sitting at table working on graphics tablet and laptop- top view

Chairs seen from top view, each one is one of a kind

Office chair and boss armchair top view vector realistic, isolated. Furniture for office, cabinet or conference room plan.

Interior icons top view, tree ,furniture, bed,sofa, armchair, for architectural or landscape design, for map.vector illustration
Top view of a workplace in a modern office. A white table, black leather chair. Laptop, writing pad for notes and a cup of coffee are on the table. Concrete floor. Office interior. 3D rendering.

Conference table and black office chairs in meeting room, top view, isolated on white background.

Business furniture symbols used in architecture plans icons set, top view, graphic design elements, outlined, black isolated on white background, vector illustration.

orange armchair top view on white background

Set top view for interior icon design. Isolated Vector Illustration. Flat interior top view icon
Vector set of icons for presentation - top view: sofa, chairs, projector, server, board bollard.
Top view cloth covered office chair, isolated on white background. 3D illustration

Business furniture symbols used in architecture plans icons set, top view, graphic design elements, black isolated on white background, vector illustration.

Group of business people working in office table with colorful pointers. Vector label.

Top view of a workplace in a modern office. A white table, white leather chair. Laptop, writing pad for notes and a cup of coffee are on the table. Concrete floor. Office interior. 3D rendering.

Interior of the office top view 3D rendering

Set of linear icons. Interior top view. Isolated Vector Illustration. Furniture and elements for living room, bedroom, kitchen, bathroom. Floor plan (view from above). Furniture store.
Set of furniture top view for apartments plan. The layout of the apartment design, technical drawing. Interior icon for bathrooms, living room, kitchen, bedroom, hallway . Vector illustration.

chair from different points of view isolated on white

modern office interior vector layout with furniture

Vector set. Office furniture. (top view) Desks, chairs, cabinets, sofas, computers, conference room, reception. (view from above)
 Desks, chairs, cabinets, sofas, computers, conference room, reception. (view from above)")
Vector Set of Different Round Square Rectangular Tables Desks with Black Office Chairs Top View Isolated on White Background

Overhead view of a contemporary coworking office in madrid, spain, highlighting exposed ductwork, glass partitions, and scattered professionals amidst lush greenery

Designer desk photographer, collections of flat design of computer, camera and camera lens, Designers are resting concept, Equipment used for design, Top view of desk background, vector illustration

Conference or office table with black leather seats. Circle shaped, top view

Vector Audience Auditorium Empty College Lecture Hall in University with Black Office Chairs and Brown Wooden Table Top View

A twisting office chair on wheels, with a blue upholstery seat and backrest, on a white background. Front view, side view, top view and general view

office design and layout construction kit

Woman sitting at table in modern loft using laptop and smartphone- top view

Top view of set furniture elements outline symbol for dining room, office, working, living room and accessories. Interior icon chair, table and sofa.

Top view of smiling woman using computer at desk in office

Top view of modern and stylish workplace. Wooden table, armchair, office supplies, monitor, books, notebook, headphones, phone, glasses, pen, paper, tea, donuts. Vector illustration

Office interior furniture icons top view set isolated vector illustration
Office chair and table, top view vector realistic, isolated. Furniture for office, cabinet or conference room plan.

Top view on conference wooden table and black chairs 3D Render

Top View Office Interior Elements Realistic Vector Illustration

White brick open space office interior with a concrete floor, a blank wall fragment and a row of computer desks along the wall. Side view. 3d rendering mock up

Vector Office Room with Different Rectangular Tables Desks Black Chairs and Computers Monitor Keywords Mouse Top View Isolated on White Background

Top view of a conference room. A white round table and six chairs around. 3D rendering

View from above of the modern office 3D

Wooden Table with Ten Chairs Around

Vector set. Furniture for the bedroom, living room, kitchen, office, bathroom. Top view. Double bed, desk, sofa, wardrobe, bath, sink, chair. View from above.

Furniture outdoor top view tables lounche sofas on white background

Top view of an office waiting area with four brown chairs standing near a round coffee table on a concrete floor. 3d rendering mock up

Top view office room, wooden floor background

High Angle View Of Young Businesswoman Fainted On Floor In Office

top view furniture set of chairs tables sofas on white background

furniture big set

linear round table and four office chairs. concept of training, lecture, brainstorming, briefing, joint decision making and work ideas. top view simple style. objects isolated on white background

Conference round table and black office chairs in meeting room, top view, isolated on white background.

Office and Conferance Business outline Furniture Icon, Top View for Interior Plan

Businessmen sitting in a circle on white background. Vector

Modern office table with chairs, top view

Vector set. Architectural elements and furniture for the floor plan. Top view. Beds, sofas, kitchens, chairs, doors, windows, wardrobes, trainers, tables, baths, toilet bowls. View from above.

Five people team sitting and working together at the round table. Teamwork, brainstorming, startup. Flat vector illustration.

Top view of table and chairs in modern interior

Top view of set furniture elements outline symbol for bedroom, kitchen, bathroom, dining room and living room. Interior icon bed, chair, table and sofa.

Office Furniture elements top view vector set. Kit for plan of office, house, apartment, workspace. Collection of Interior icon. Table, chair, sofa, plant. Symbol for interior design, project

Top view, nobody in the office, the desk is perfectly tidy, the chairs are colored

Job Recruitment. Recruiting And Hiring Overhead View

Top view of a conference room. A dark grey round table and six brown leather chairs around. 3D rendering

Office and Conferance Business Furniture Icon, Top View for Interior Plan
Chair Top View furniture 3D Rendering

Home furniture top view

Conference table with opened laptops top view on white background

Meeting Room Layout. Conference Boardroom Outline Style. Vector

Set top view for interior icon design. Isolated Vector Illustration. Modern black furniture top view image. Black objects for your design room.
Set of plan for arranging seats in interior, layout graphic outline elements. Chairs and tables icons in scheme architectural plan. Office and home furniture, top view. Vector line illustration

Icons set of interior (top view). Isolated Vector Illustration. Furniture and elements for living room, bedroom, kitchen, bathroom. Floor plan (view from above). Furniture store.
modern cozy loft office interior. 3d rendering

Icons set of interior elements, top view. Furniture and elements for living room, kitchen, bedroom, bathroom.
Retro wooden chair top View furniture 3D Rendering

Work space for business meetings and brainstorming. (Top view) Vector office table. (View from above)

Top view interior with line furniture icons vector. Set of furniture for office or house, illustration of sofa armchair and bed furniture

Armchairs, chairs for interior design set top view

Set top view for interior icon design. Isolated Vector Illustration. Flat interior top view icon. Modern interior furniture top view
Round table and chairs, top view, isolated on white, with clipping path, 3d illustration

leather chair on white background, minimal shadow under it

office Furniture top view for interior , vector illustration

System office desks. Isolated on gray background. Top view

Top view of teams working together at conference tables. Set of people during brainstorming, work or education process, sitting around desks. Colored flat vector illustration isolated on white

Side view of an open space office environment with rows of computer tables standing near a panoramic windows. 3d rendering mock up blurred

Top view of a half of the conference room. A white round table, three white leather chairs. Three laptops are on the table. Office interior. 3D rendering.

Icons set of interior. Furniture top view. Elements for the floor plan. (view from above). Furniture and elements for living room, bedroom, kitchen, bathroom, office.
flat icon design of business man working with computer on desk in top view
Seamless pattern. Office top view. People at work. Office room, meeting room, reception, office furniture, cabinets, desks, chairs, computers. (view from above)
")
top view dining area in coffee shop or restaurant - 3D Rendering

Icons set of interior, top view. Isolated Vector Illustration. Furniture and elements for living room, bedroom, kitchen, bathroom. Floor plan, view from above. Furniture store.
Interior of the office with yellow armchair top view 3D rendering

Our company
Press/Media
Investor relations
Shutterstock Blog
Popular searches
Stock Photos and Videos
Stock photos
Stock videos
Stock vectors
Editorial images
Featured photo collections
Sell your content
Affiliate/Reseller
International reseller
Live assignments
Rights and clearance
Website Terms of Use
Terms of Service
Privacy policy
Modern Slavery Statement
Cookie Preferences
Shutterstock.AI
AI style types
Shutterstock mobile app
Android app
© 2003-2024 Shutterstock, Inc.
IMAGES
VIDEO
COMMENTS
Select the Use Presenter View checkbox. Select which monitor to display Presenter View on. Select From Beginning or press F5. In Presenter View, you can: See your current slide, next slide, and speaker notes. Select the arrows next to the slide number to go between slides. Select the pause button or reset button to pause or reset the slide ...
Start presenting. On the Slide Show tab, in the Start Slide Show group, select From Beginning. Now, if you are working with PowerPoint on a single monitor and you want to display Presenter view, in Slide Show view, on the control bar at the bottom left, select , and then Show Presenter View.
In Presenter View, you'll have your own private screen with tools like a next slide preview, timekeeper, and drawing tools.. This is a view that you'll see on your own screen while giving a presentation using PowerPoint. While the audience will see the presentation on the projector or big screen, you'll have your own private view on a second monitor.
The Presenter view fills the screen. The same presentation tools are available below the slide, and it also shows the current time and a thumbnail of the upcoming slide. At the bottom of the screen, use the arrows to move forward or backward in the presentation. Command Buttons. At the top of the Presenter view, there are command buttons.
On the other, you have your own private view (which isn't visible to your audience), where you can see your notes and the upcoming slide while you're presenting. How to start using Presenter View in PowerPoint: - Open your presentation. - Select Slide Show in the top ribbon. - Make sure Presenter View is selected in the Monitors section.
In this screencast, you'll learn how to present a PowerPoint slideshow with Presenter View. Download unlimited PPT templates with Envato Elements: https://...
To access the different view modes in PowerPoint, you have to click on the 'View' tab in the ribbon. The 2-step process is described below. Step-1: Click on the 'View' tab. At first, select the 'View' tab, which is the second to last tab in the ribbon section of your PowerPoint Window. Step-2: Select your preferred 'View Mode'.
In the top right corner of the Presenter View you will see that you can click on the icon to move from full screen ode into windowed mode. This allows you to resize the Presenter View window. By resizing the Presenter View window, you can see the meeting platform controls and other participant videos.
Present slideshows with confidence. With easy-to-use presenter view, speaker notes, and live captions, Slides makes presenting your ideas a breeze. You can even present to Google Meet video calls ...
Here's another one of our top PPT tips: tap into Envato Elements' unlimited stock photo library. People are more likely to take you seriously if your presentation is visually appealing. Users view attractive design as more usable. Similarly, they'll view a more attractive PowerPoint as more effective. 11.
If you want to customize your Presenter View experience, follow these steps: On the 'Slide Show' tab, click 'Set Up Slide Show.'. Under 'Multiple Monitors,' select the 'Use Presenter View' checkbox. If you're using a single monitor, select the 'Display slide show on' option and choose your primary monitor.
The Business Meeting Top View is a PowerPoint template for success conference presentation. It gives a visual insight of meeting in progress. It is useful in delivering topics such as teamwork, behavior, guidelines or problem solving and decision-making situation. This template is productive in variety of business presentations.
Learn everything you need to know to get started using Microsoft PowerPoint! You'll learn all the basics plus more, including: how to choose a design theme...
Step 3: Be novel. Make sure you either select a new topic or bring an entirely new and unique perspective to an already covered issue. For instance, don't make a presentation on the "best lead generation strategies.". Your audience has probably heard those dozens of times already. Corny.
46. Creative Brief Presentation. This creative brief presentation template can help you communicate your brand style and design requirements to video editors, graphic designers, creative agencies and freelancers. Swap the existing images, icons, text and colors for your own content and create a branded creative brief.
To get to Presenter view, in Slide Show view, in the lower left corner of the screen, click , and then click Show Presenter View (as shown below). Use Presenter view to view your notes while delivering your presentation. In Presenter view, your audience cannot see your notes. For more information about using Presenter view, see View your ...
PowerPoint for the web and PowerPoint desktop app for offline use. Premium templates, fonts, icons, and stickers with thousands of options to choose from. Dictation, voice commands, and transcription. Advanced spelling and grammar, in-app learning tips, use in 20+ languages, and more. Up to 6 TB of cloud storage, 1 TB (1000 GB) per person.
Use our free online presentation maker to create more polished presentations that are easy and quick to read. Make an impact starting today. ... Quickly and easily share or present your slideshow by clicking Share in the top navigation bar and viewing our share options. QUICK TIPS. ... Use the Presenter View to rehearse your delivery. Use the ...
Choose a design from our presentation templates or create your own from scratch. Customize your presentation with colors, fonts, and key information. Add animations, videos, images, illustrations. Use assets and other media content from your Brand Kit (Pro) to stay consistent with your business or school brand.
Deliver your presentation on two monitors. On the Slide Show tab, in the Set Up group, click Set Up Slide Show. In the Set Up Show dialog box, choose the options that you want, and then click OK. If you choose Automatic, PowerPoint will display speaker notes on the laptop monitor, if available. Otherwise, PowerPoint will display speaker notes ...
14,580 office chair top view stock photos, 3D objects, vectors, and illustrations are available royalty-free. Top view of set furniture elements outline symbol for dining room, office, cafe, kitchen and living room. Interior icon chair, sink, table and sofa. Vector set.