This browser is no longer supported.
Upgrade to Microsoft Edge to take advantage of the latest features, security updates, and technical support.

List Azure role assignments using Azure PowerShell
- 3 contributors
Azure role-based access control (Azure RBAC) is the authorization system you use to manage access to Azure resources. To determine what resources users, groups, service principals, or managed identities have access to, you list their role assignments. This article describes how to list role assignments using Azure PowerShell.
We recommend that you use the Azure Az PowerShell module to interact with Azure. See Install Azure PowerShell to get started. To learn how to migrate to the Az PowerShell module, see Migrate Azure PowerShell from AzureRM to Az .
If your organization has outsourced management functions to a service provider who uses Azure Lighthouse , role assignments authorized by that service provider won't be shown here. Similarly, users in the service provider tenant won't see role assignments for users in a customer's tenant, regardless of the role they've been assigned.
Prerequisites
- PowerShell in Azure Cloud Shell or Azure PowerShell
List role assignments for the current subscription
The easiest way to get a list of all the role assignments in the current subscription (including inherited role assignments from root and management groups) is to use Get-AzRoleAssignment without any parameters.
List role assignments for a subscription
To list all role assignments at a subscription scope, use Get-AzRoleAssignment . To get the subscription ID, you can find it on the Subscriptions blade in the Azure portal or you can use Get-AzSubscription .
List role assignments for a user
To list all the roles that are assigned to a specified user, use Get-AzRoleAssignment .
To list all the roles that are assigned to a specified user and the roles that are assigned to the groups to which the user belongs, use Get-AzRoleAssignment .
List role assignments for a resource group
To list all role assignments at a resource group scope, use Get-AzRoleAssignment .
List role assignments for a management group
To list all role assignments at a management group scope, use Get-AzRoleAssignment . To get the management group ID, you can find it on the Management groups blade in the Azure portal or you can use Get-AzManagementGroup .
List role assignments for a resource
To list role assignments for a specific resource, use Get-AzRoleAssignment and the -Scope parameter. The scope will be different depending on the resource. To get the scope, you can run Get-AzRoleAssignment without any parameters to list all of the role assignments and then find the scope you want to list.
This following example shows how to list the role assignments for a storage account. Note that this command also lists role assignments at higher scopes, such as resource groups and subscriptions, that apply to this storage account.
If you want to just list role assignments that are assigned directly on a resource, you can use the Where-Object command to filter the list.
List role assignments for classic service administrator and co-administrators
To list role assignments for the classic subscription administrator and co-administrators, use Get-AzRoleAssignment .
List role assignments for a managed identity
Follow these steps:
Get the object ID of the system-assigned or user-assigned managed identity.
To get the object ID of a user-assigned managed identity, you can use Get-AzADServicePrincipal .
To list the role assignments, use Get-AzRoleAssignment .
Coming soon: Throughout 2024 we will be phasing out GitHub Issues as the feedback mechanism for content and replacing it with a new feedback system. For more information see: https://aka.ms/ContentUserFeedback .
Submit and view feedback for
Additional resources

Manage Azure Role Assignments Like a Pro with PowerShell

Today’s blog post is a little bit different. I have a couple of examples of how you can use PowerShell snippets and simple commandlets to get or set role assignmnets in your Azure Subscriptions.
PowerShell examples for managing Azure Role assignments
List all role assignments in a subscription, get all role assignments for a specific resource group, get all role assignments for a specific user, add a role assignment to a user, remove a role assignment for a user, remove all role assignments for a specific user, list all built-in roles, list all custom roles, create a custom role, update a custom role, delete a custom role, list all users or groups assigned to a specific role, list all permissions granted by a specific role, list all resource groups that a user has access to, create a role assignment for a service principal, powershell script to manage azure role assignments.
And now there is a script that combines some of these examples into one usable function:
I hope this was useful. Let me know if you liked the format of this blog and if you want me to include more of these examples.
Vukasin Terzic
Recent Update
- Writing your first Azure Terraform Configuration
- Transition from ARM Templates to Terraform with AI
- Getting started with Terraform for Azure
- Terraform Configuration Essentials: File Types, State Management, and Provider Selection
- Dynamically Managing Azure NSG Rules with PowerShell
Trending Tags
Retrieve azure resource group cost with powershell api.
The Future Of Azure Governance: Trends and Predictions
Further Reading
In my previous blog posts, I wrote about how simple PowerShell scripts can help speed up daily tasks for Azure administrators, and how you can convert them to your own API. One of these tasks is...
Azure Cost Optimization: 30 Ways to Save Money and Increase Efficiency
As organizations continue to migrate their applications and workloads to the cloud, managing and controlling cloud costs has become an increasingly critical issue. While Azure provides a robust s...
Custom PowerShell API for Azure Naming Policy
To continue our PowerShell API series, we have another example of a highly useful API that you can integrate into your environment. Choosing names for Azure resources can be a challenging task. ...
Get-AzRoleAssignment
In this Azure PowerShell article, we will discuss the syntax and usage of the Get-AzRoleAssignment PowerShell cmdlet with a few examples.
Table of Contents
Syntax of Get-AzRoleAssignment
Wrapping up.
Get-AzRoleAssignment is an excellent Azure PowerShell cmdlet that can get you the lists of all the role assignments under your subscription or a specific scope.
Below is the syntax of the Get-AzRoleAssignment Azure PowerShell cmdlet.
Let’s discuss some examples of implementation of the Get-AzRoleAssignment PowerShell command.
You can execute the Azure PowerShell cmdlet below to help you get the list of all the role assignments under my current subscription.
After executing the above PowerShell command, I got the below output.
You can see the output below

You can also use the below Azure PowerShell command to get the list of role assignments under the specified service principal “http://tsinfotechnologies.com”.
Execute the below PowerShell command that can help you to get the list of role assignments under a specified tsinfo website scope.
You may also like following the articles below
- New-AzRoleAssignment
- Get-AzRoleDefinition
- Get-AzResource
In this Azure article, we have discussed the syntax and usage of the Get-AzRoleAssignment Azure PowerShell cmdlet. Thanks for reading this article !!!

I am Rajkishore, and I have over 14 years of experience in Microsoft Azure and AWS, with good experience in Azure Functions, Storage, Virtual Machine, Logic Apps, PowerShell Commands, CLI Commands, Machine Learning, AI, Azure Cognitive Services, DevOps, etc. Not only that, I do have good real-time experience in designing and developing cloud-native data integrations on Azure or AWS, etc. I hope you will learn from these practical Azure tutorials. Read more .
Martin's Blog
Azure AD: Assign administrator roles with PowerShell
Martin Schoombee
March 2, 2021
Working with PowerShell always brings up a few interesting gotchas, as things are not always what they seem at the surface. I guess you could say that for any development tool out there, but somehow it happens every time I need to do something with PowerShell. Case in point, you would think that assigning an administrator role would be a simple call to one cmdlet…but things are never quite that simple :-/
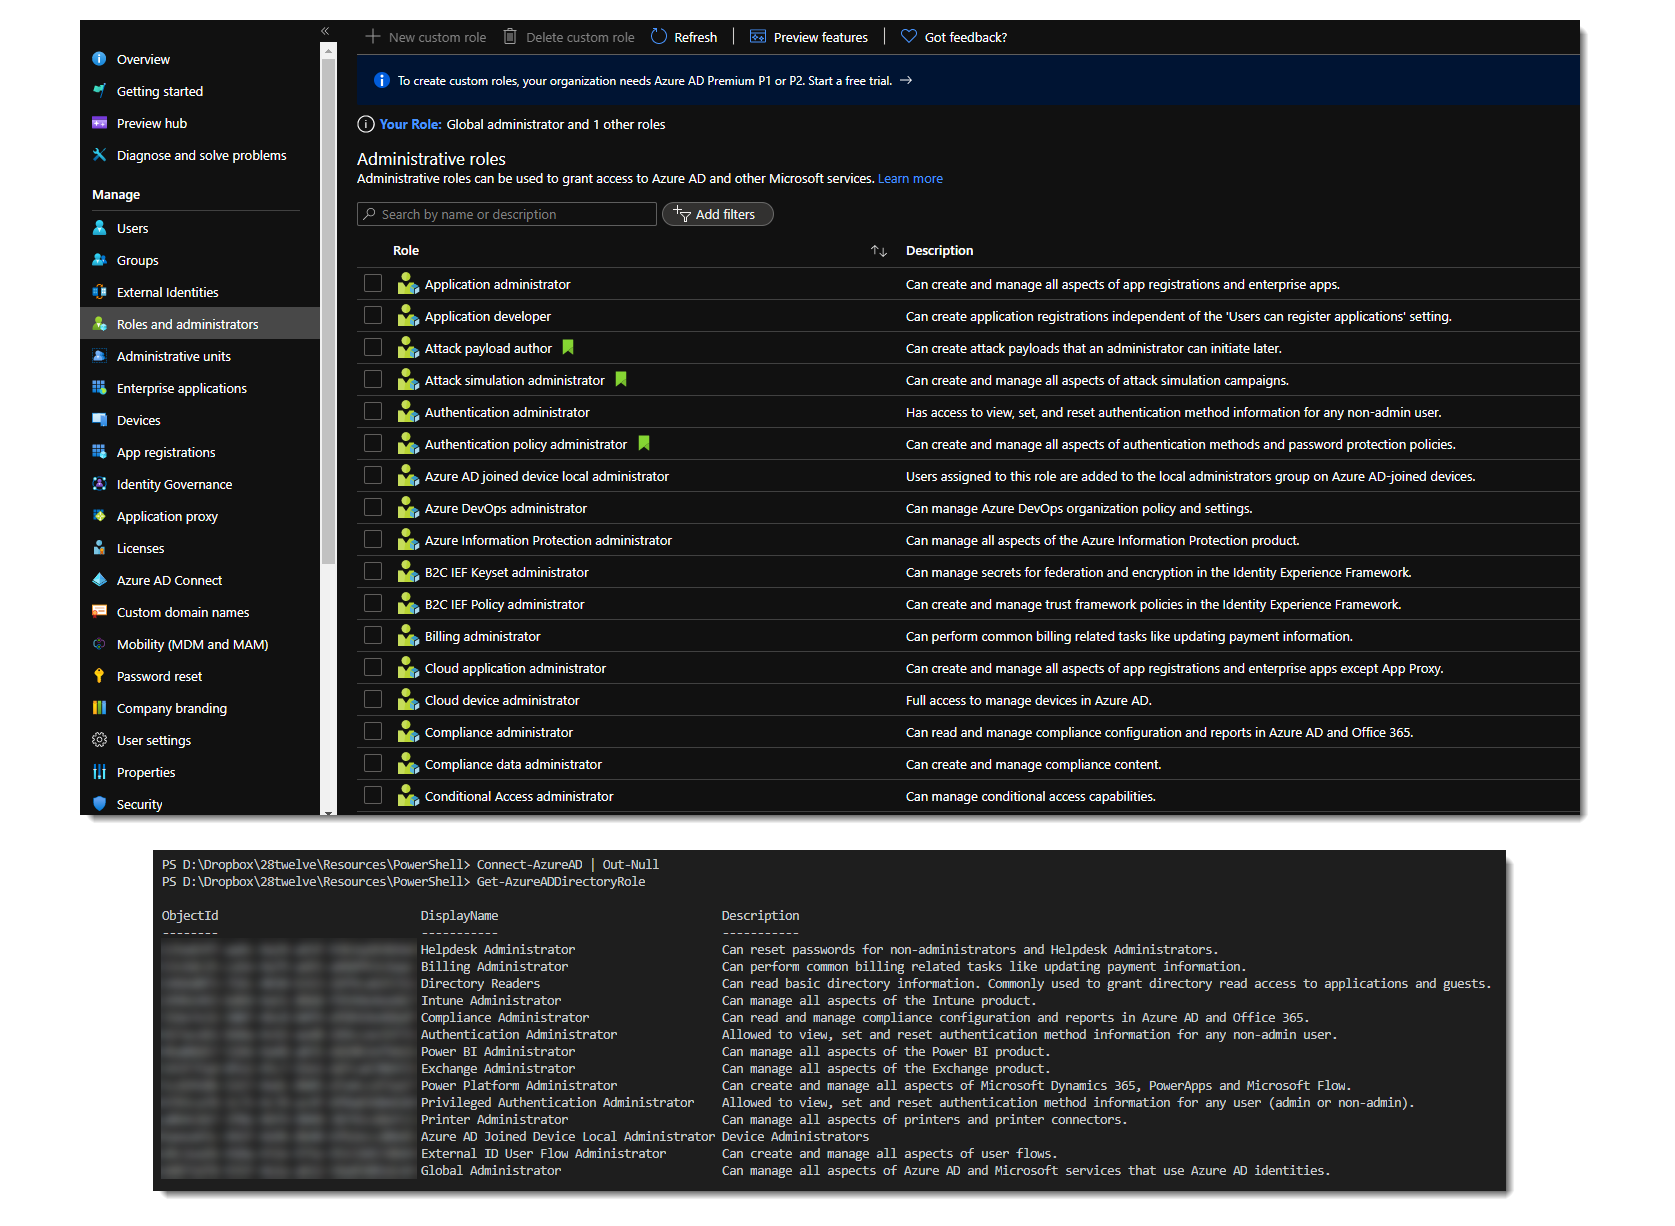
If you look at the Azure AD Roles and administrators page in the Azure portal, you see a long list of administrator roles you can assign to users (or service principals). Compare that to the list returned by the Get-AzureADDirectoryRole cmdlet however and you only see a small subset.

What’s happening here?
The part that’s not necessarily clear from the documentation is that the Azure portal shows a list of available roles (or templates). It seems obvious enough that this would be the case in the portal, as you may not have assigned all of these roles to users yet and you would expect a complete list. But as you can see from the PowerShell results, the fun starts when you think you could just get the role and assign it to a user. How can you assign a role if you can’t get to its object id? How do you get a list of all of the available roles in PowerShell?
After digging for some time you (me) stumble across this gem, the Get-AzureADDirectoryRoleTemplate cmdlet which returns all of the available roles (or templates). Eureka!! Let’s use this object id and assign it to a user with the following snippet…

Not so fast…you get an error saying that the role doesn’t exist…and we know this from what we’ve seen earlier, but it still isn’t clear how we would be able to get an object id to assign.
The solution
The solution is buried underneath many levels of documentation and hours of searching/experimenting:
- Attempt to get the administrator role, using the Get-AzureADDirectoryRole cmdlet.
- If the first step doesn’t return anything, it means that the role has probably never been assigned to a user and we have to enable it in our tenant first. Get the template for the role with the Get-AzureADDirectoryRoleTemplate cmdlet.
- Once you have the template, enable it with the Enable-AzureADDirectoryRole cmdlet. This will create an instance of the role within your tenant, with its own unique object id.
- Now you’ll be able to get to the role and its object id with the Get-AzureADDirectoryRole cmdlet.
- Assign the role to the user (or service principal).
I wish the PowerShell documentation was a bit more explicit in cases like these. Adding a simple comment or two to the documentation of the Get-AzureADDirectoryRole cmdlet will certainly help avoid the hours of confusion and searching…
Want to download the PowerShell script to assign administrative roles? Get it from my GitHub repo.
Share this:
- Click to share on Twitter (Opens in new window)
- Click to share on LinkedIn (Opens in new window)
- Click to email a link to a friend (Opens in new window)
3 thoughts on “ Azure AD: Assign administrator roles with PowerShell ”

Nice article, but even though the role I am trying to assign is enabled, the script did not work, and I did receive the same error message… I think the issue is that you are using the cmdlet Get-AzureADDirectoryRoleTemplate, whereas you should be using Get-AzureADDirectoryRole!!! However, that did not do the trick for me…

What does Get-AzureADDirectoryRole return?
An instance of a DirectoryRole class, whereas Get-AzureADDirectoryRoleTemplate returns a DirectoryRoleTemplate I believe. Moreover, when I inspect both objects, I can clearly see that the ObjectId is accurate when using Get-AzureADDirectoryRole and can actually be mapped to the role I want to fetch. The same does not happen when I use Get-AzureADDirectoryRoleTemplate.
Leave a Reply Cancel reply
Powered by WordPress.com .
Discover more from Martin's Blog
Subscribe now to keep reading and get access to the full archive.
Type your email…
Continue reading
All about Microsoft 365
Generate a report of Azure AD role assignments via the Graph API or PowerShell
A while back, I published a short article and script to illustrate the process of obtaining a list of all Azure AD role assignments. The examples therein use the old MSOnline and Azure AD PowerShell modules, which are now on a deprecation path. Thus, it’s time to update the code to leverage the “latest and greatest”. Quotes are there for a reason…
The updated script comes in two flavors. The first one is based on direct web requests against the Graph API endpoints and uses application permissions, thus is suitable for automation scenarios. Do make sure to replace the authentication variables, which you can find on lines 11-13. Better yet, replace the whole authentication block (lines 7-36) with your preferred “connect to Graph” function. Also make sure that sufficient permissions are granted to the service principal under which you will be running the script. Those include the Directory.Read.All scope for fetching regular role assignments and performing directory-wide queries, and the RoleManagement.Read.Directory for PIM roles.
The second flavor is based on the cmdlets included as part of the Microsoft Graph SDK for PowerShell. As authentication is handled via the Connect-MGGraph cmdlet, the script is half the size of the first one. And it would’ve been even smaller were it not for few annoying bugs Microsoft is yet to address.
In all fairness, switching to the Graph does offer some improvements, such as being able to use a single call to list all role assignments. This is made possible thanks to the /roleManagement/directory/roleAssignments endpoint (or calling the Get-MgRoleManagementDirectoryRoleAssignment cmdlet). Previously, we had to iterate over each admin role and list its members, which is not exactly optimal, and given the fact that the list of built-in roles has now grown to over 90, it does add up. On the negative side, we have a bunch of GUIDs in the output, most of which we will want to translate to human-readable values, as they designate the user, group or service principal to which a given role has been assigned, as well as the actual role. One way to go about this is to use the $expand operator (or the – ExpandProperty parameter if using the SDK) to request the full object.
While this is the quickest method, the lack of support for the $select operator inside an $expand query means we will be fetching a lot more data than what we need for the report. In addition, there seems to be an issue with the definition of the expandable properties for this specific endpoint, as trying to use the handy $expand=* value will result in an error ( “Could not find a property named ‘appScope’ on type ‘Microsoft.DirectoryServices.RoleAssignment'” ). In effect, to fetch both the expanded principal object and the expanded roleDefinition object, we need to run two separate queries and merge the results. Hopefully Microsoft will address this issue in the future (the /roleManagement/directory/roleEligibilitySchedules we will use to fetch PIM eligible role assignments does support $expand=* query).
Another option is to collect all the principalIDs and issue a POST request against the /directoryObjects/getByIds endpoint (or the corresponding Get-MgDirectoryObjectById cmdlet), which does have a proper support for $select . A single query can be used to “translate” up to 1000 principal values, which should be sufficient for most scenarios. With the information gathered from the query, we can construct a hash-table and use it to lookup the property values we want to expose in our report. Lastly, you can also query each principalID individually, but that’s the messiest option available.
Apart from role assignments obtained via the /roleManagement/directory/roleAssignments call, the script can also include any PIM eligible role assignments. To fetch those, invoke the script with the – IncludePIMEligibleAssignments switch. It will then call the /v1.0/roleManagement/directory/roleEligibilitySchedules endpoint, or similarly, use the Get-MgRoleManagementDirectoryRoleEligibilitySchedule cmdlet. Some minor adjustments are needed to ensure the output between the two is uniform, which includes the aforementioned issue with expanding the navigation properties. But hey, it wouldn’t be a Microsoft product if everything worked out of the box 🙂
Here are some examples on how to run the scripts. The first example uses the Graph API version and no parameters. For the second one, we invoke the – IncludePIMEligibleAssignments parameter in order to include PIM eligible role assignments as well. The last example does the same thing, but for the Graph SDK version of the script.
And with that, we’re ready to build the output. Thanks to the $expand operator and the workarounds used above, we should be able to present sufficient information about each role assignment, while minimizing the number of calls made. The output is automatically exported to a CSV in the script folder, and includes the following fields:
- Principal – an identifier for the user, group or service principal to which the role has been assigned. Depending on the object type, an UPN, appID or GUID value will be presented.
- PrincipalDisplayName – the display name for the principal.
- PrincipalType – the object type of the principal.
- AssignedRole – the display name of the role assigned.
- AssignedRoleScope – the assignment scope, either the whole directory (“/”) or a specific administrative unit.
- AssignmentType – the type of assignment (“Permanent” or “Eligible”).
- IsBuiltIn – indicates whether the role is a default one, or custom-created one.
- RoleTemplate – the GUID for the role template.
Now, it’s very important to understand that this script only covers Azure AD admin roles, either default or custom ones, and optionally eligible PIM-assignable roles (do note that the PIM cmdlets/endpoints do not cover all custom role scenarios). Apart from these, there are numerous workload-specific roles that can be granted across Office 365, such as the Exchange Online Roles and assignments, Roles in the Security and Compliance Center, site collection permissions in SharePoint Online, and so on. Just because a given user doesn’t appear in the admin role report, it doesn’t mean that he cannot have other permissions granted!
In addition, one should make sure to cover any applications (service principals) that have been granted permissions to execute operations against your tenant. Such permissions can range from being able to read directory data to full access to user’s messages and files, so it’s very important to keep track on them. We published an article that can get you started with a sample script a while back.
9 thoughts on “ Generate a report of Azure AD role assignments via the Graph API or PowerShell ”
- Pingback: Reporting on Entra ID directory role assignments (including PIM) - Blog
This script is very nicely written, however the output of the Powershell Graph SDK version is incorrect (I didn’t check the other).
If I am eligible to activate a role I’ll be in the eligible list. However once I activate the role, my activated role assignment will show up in the list of role assignments from “Get-MgRoleManagementDirectoryRoleAssignment”. The output of that command doesn’t include a ‘status’ property. Your script assumes that if there’s no ‘status’ then the assignment is permanent, however that’s not accurate. So every eligible user who has activated a role shows up twice in the output of your script – once as as eligible for the role and once as a permanent assignment.
I came across your script because I’m trying to accomplish a similar task. My goal is to enumerate all the users who have eligible or permanent role assignments. I think the answer may be that if a user is in the eligible list, and also in the role assignment list, for the same role, then you can assume that the role assignment came from activation, but that doesn’t really seem very satisfactory.
Thanks Matt. The script is a bit outdated by now, I don’t even know if it runs with the “V2” Graph SDK. I’ll update it at some point 🙂
To further address your comment – neither the Get-MgRoleManagementDirectoryRoleAssignment nor the Get-MgRoleManagementDirectoryRoleEligibilitySchedule cmdlet returns sufficient information in order to determine whether a given (eligible) role assignment is currently activated. You can get this information via Get-MgRoleManagementDirectoryRoleAssignmentScheduleInstance, should be easy enough to add to the next iteration of the script.
Hi, thks for your great work. do you know why i dont see the eligible assignements ?
Seems they made some changes and you can no longer use $expand=* on the /v1.0 endpoint. Try using /beta, should work there. I’ll update the script when I get some time.
I’ve updated the script, let me know if you are still having issues.
Awesome, thank you very much.
Merci merci merci !!! Thanks thanks thanks !!
Leave a Reply Cancel reply
Your email address will not be published. Required fields are marked *
Save my name, email, and website in this browser for the next time I comment.
This site uses Akismet to reduce spam. Learn how your comment data is processed .
Get PIM Role Assignment Status For Azure AD Using Powershell
If you’re like me and you love to run reports to get valuable information for your tenant and settings, the get PIM role assignment status is the script for you. Recently I was running a report to audit user permissions in Azure AD and realized that my data was off by a bit. I knew some users were added to Privilege Identity Management (PIM) roles but they weren’t showing up in my report.
The reason they weren’t showing up is because I was using the Get-AzureADDirectoryRoleMember cmdlet and that only shows users with current or activated access. If a user was not elevated in PIM, they basically didn’t have access so it skewing my results.

To give you a better idea of what I’m talking about, the above is a sample of the Helpdesk Administrators role. In the Azure AD GUI, the user is added as an eligible role, meaning he can elevate his just in time access. However in Powershell, since the role is not activated, it is not going to display.
Therefore we are going to use the Get-AzureADMSPrivilegedRoleDefinition Azure AD cmdlet to display the list of roles available and the Get-AzureADMSPrivilegedRoleAssignment to filter for the user we’re specifying.
Requirements for this script to work
In order to make this work you’ll need the following:
- AzureADPreview Powershell module .
I want to emphasize the “preview” in the name of the module. Using just the regular AzureAD module is not not going to work so that’s something to keep in mind.
Script Parameters
Userprincipalname.
Specify the UserPrincipalName for the user you want to check roles for.
Specify the RoleName you want to filter for. This will display all PIM roles that are granted directly or through a group.
By default it will use the TenantId from your current session. If you’re connected to a multi-tenant, you can specify the tenant here.
By using this script you’ll be able to see all the people who have standing access as well as PIM eligible roles.

We can now see that the Helpdesk Administrator is now showing up in our output and in the Assignment column it is labeled as Eligible. We’ll also take note that we can see if the member type is added through a group or if it was added directly. This script will support that option.
Get PIM role assignment status for Azure AD using Powershell will now be in your arsenal of cool tips and tricks for your Syadmin role. If you’re interested in more scripts like this, be sure to check out our Powershell Gallery or Azure Content . Finally, be sure to check out our Youtube Channel for any video content.

Paul Contreras
Hi, my name is Paul and I am a Sysadmin who enjoys working on various technologies from Microsoft, VMWare, Cisco and many others. Join me as I document my trials and tribulations of the daily grind of System Administration.
Is there a possibility we could get an updated version of this using Microsoft Graph or Graph API? I cannot find any suitable alternatives now that the azure cmdlets are depreciated.
Yes. I have the script already created, just need to create an article
Could you upload this script, please? This is wonderfull.
See my updated post for the Graph API version. https://thesysadminchannel.com/get-entra-id-pim-role-assignment-using-graph-api/
See my updated post for the Graph API script. https://thesysadminchannel.com/get-entra-id-pim-role-assignment-using-graph-api/
it was a great job but riles are changed and groups extract cannot work
What about a similar Script for Azure resource roles?
Leave a Reply Cancel reply
Your email address will not be published. Required fields are marked *
Automated Azure Role Assignment Reports via Email - Azure Automation
Managing azure role assignments can be complex. this powershell script simplifies the process by generating detailed reports on azure users, groups, and roles and automatically emailing these reports..
Posted by : blakedrumm on Apr 23, 2024

Introduction
Azure cloud services management often requires monitoring and auditing user roles and group memberships. This script automates the generation and email distribution of detailed Azure subscription role assignments. It utilizes managed identity for Azure login, fetches role assignments, and compiles them into a comprehensive report sent via email.
How to get it
You can download the script from the following links:
Argument List
Configuring permissions for managed identity.
To enable the PowerShell script to retrieve detailed user information, such as ObjectType and DisplayName from Azure Active Directory, the UserManagedIdentity needs the “Directory Readers” permission. This role-based access control (RBAC) is assigned at the Microsoft Entra ID level (formerly known as Azure Active Directory), not at the subscription level. Follow these steps to assign the correct permissions:

- Select Azure role assignments
- Select Add role assignment
- Set the scope to: Subscription
- Select the subscription.

- Open Microsoft Entra Id -> Roles and Administrators. Azure Portal - Roles and Administrators

- Click + Add Assignments to start the role assignment process.
- In the assignment interface, you might not see app registrations or managed identities by default.
- Paste the Object ID (from step 1) into the search field. This should display the name and ID of your Azure Automation Account.

- Once the “Directory Readers” permission is assigned, the script will be able to pull the Object Type and DisplayName along with other outputs from Get-AzRoleAssignment .
This configuration is essential for the script to function correctly and securely access the necessary Azure AD data!
How to use it
In order to utilize this script in your Automation Runbook, you will need to set an encrypted variable inside of the Automation Account. This will be so we can pass the EmailPassword variable securely to the script. The script has the ability to gather this password automatically if you perform the following steps.
- Go to Automation Accounts -> Select the Automation Account -> Variables .
- Click + Add a variable
- Name: EmailPassword
- Description: This is the password for the Email Account used in SMTP for an Azure Automation Runbook .
- Type: String
- Value: <YourPassword>

I like to collaborate and work on projects. My skills with Powershell allow me to quickly develop automated solutions to suit my customers, and my own needs.
Email : [email protected]
Website : https://blakedrumm.com
My name is Blake Drumm, I am working on the Azure Monitoring Enterprise Team with Microsoft. Currently working to update public documentation for System Center products and write troubleshooting guides to assist with fixing issues that may arise while using the products. I like to blog on Operations Manager and Azure Automation products, keep checking back for new posts. My goal is to post atleast once a month if possible.
- operationsManager
- troubleshooting
- certificates

- Active Directory Reporting
- Office 365 Reporting
- Azure AD Monitoring
- Managing Azure AD Roles and Permissions with PowerShell

- August 24, 2023
Managing Azure AD Roles and Permissions with PowerShell. Do you need help managing and automating Azure AD Roles and Permissions with Windows PowerShell? This article explains the typical scenarios for automating Azure Role Based Access Control (RBAC) using PowerShell.
To lay the foundation and prepare to manage Azure roles and permissions, we start with an overview of Azure role-based access control (RBAC). Following that, we explain the three elements of role assignment.
There is also a section that explains the prerequisites for managing Azure AD roles and permissions with Windows PowerShell.
The next sections are dedicated to explaining the steps for assigning Azure AD roles using PowerShell.
Finally, we explain how to list roles assigned to users and groups using PowerShell .
Also Read Azure AD Privileged Roles: Manage & Monitor Privileged Access
What is Azure Role-Based Access Control (RBAC)
Azure role based access control (RBAC) allows administrators to do fine grained access control to resources . In other words, Azure RBAC allows admins to control who has access to resources.
Additionally, RBAC controls the level of access to resources in Azure.
At the core of RBAC is role assignments. Azure has hundreds of built-in roles with pre-defined permissions that are assigned to users, groups, or service principals .
The existence of built-in roles with pre-defined permissions makes role assignments easy, as admins do not have to grant permissions to objects directly.
However, there are instances where the built-in roles may not be suitable for an organization’s needs. In this situation, custom roles are created.
This article covers the steps to assign existing roles and also create and assign custom Azure AD roles.
Azure Role Assignment Elements
Assigning role assignments involves 3 elements – security principal, role definition, and scope. The security principal is the Azure Active Directory object to be assigned the role.
On the other hand, the role definition is the built-in or custom Azure AD role that is being assigned while the scope is level the role is assigned. There are 4 scopes of that roles are assigned in Azure.
Specifically, Azure roles are assigned to a resource, a resource group, a subscription, and a management group. To assign a role to a resource, you require the resource ID.
However, assigning a role to a resource group scope requires the name of the resource group. Running the Get-AzResourceGroup command returns all resource groups, including their names in the current subscription.
If assigning a role at the subscription scope, you need the subscription ID. To list all subscriptions in the tenant, run the Get-AzSubscription command.
Finally, roles are assigned a management group scope which requires the name of the management group. To get the name of a management group, run the Get-AzManagementGroup command.
Understanding these elements is important to managing Azure AD roles and permissions with PowerShell. In the remaining part of the article, we explore how the security principal, role definition, and scope are used to assign and manage roles in Azure AD using PowerShell.
Also Read Deploy InfraSOS Office 365 Reporting & Auditing SaaS Tool
Try our Active Directory & Office 365 Reporting & Auditing Tools
Try us out for Free . 100’s of report templates available. Easily customise your own reports on AD, Azure AD & Office 355.
Prerequisites for Managing Azure AD Roles and Permissions with PowerShell
Before an admin assigns roles, they must meet the following requirements:
- The user must be assigned the roles with Microsoft.Authorization/roleAssignments/write permissions. Sole roles with this permission are User Access Administrator , Owner, or Global Administrator.
- Secondly, you require access to Azure Cloud Shell or Azure PowerShell .
- The user account running the PowerShell commands must have the the Microsoft Graph Directory.Read.All permission.
- Finally, to perform some of the tasks in this article, your account requires a minimum Azure AD Premium P1 license .
As we progress in this article, we explain the steps to assign these permissions as required.
Also Read Azure AD Roles & Privileges: Azure AD RBAC Model
Steps to Assign Built-in Azure AD Roles Using PowerShell
I’ll be running the PowerShell commands in this and subsequent sections from Azure Cloud Shell , a browser-based shell that allows running Azure CLI or PowerShell commands . However, I’ll be running the commands from my computer.
If you click the cloud shell link above and sign in with your Azure account, it displays a screen like the one in the screenshot below. The benefit of Azure Cloud Shell is that it does not require installing any PowerShell modules on your PC.

Step 1: Determine the Object ID
You need to get the object ID before assigning a role to an Azure resource. Follow these steps to determine the object ID for a user, group, or subscription.
1. Open the Azure Cloud Shell – shell.azure.com and sign in with your Azure account.
If you’re opening Azure Cloud Shell for the first time, it requires you to create a storage account.
2. Run the commands below to get the ID of the user or group you need to assign a role. In the first command, I an returning the ID of a user that begins with
The first command saves the ID of the user in the userid variable, while the second one saves the group ID of the group to the grouped variable. Before running the commands remember to change the UserPrincipalName and the DisplayName.
Also Read Try InfraSOS Office 365 Reporting & Auditing Solution
Step 2: Get the Role to Assign
The next step for managing Azure AD roles and permissions with PowerShell is determining the role to assign. Start by listing all the available roles in your Azure AD tenant using the following command.
The command displays the Name , and Id of all roles in the tenant. Additionally, it returns True or False in the IsCustom column.

To demonstrate, I want to assign the Security Admin role to the user and group I determined in Step 1. To display the name of the role, I pipe the output of the Get-AzRoleDefinition command to Where-Object as shown in this command.
Step 3: Identify the Role to Assignment Scope
The command below returns the ResourceID of a storage account (resource scope) and saves it in the ResourceID variable.
Later, I assign the user in step 1 the “Security Admin” role in this storage account resource.
Also Read Azure AD Role-Based Access Control Best Practices: How to Use Azure AD Roles and Privileges Effectively
Step 4: Assign the Azure Role
Using the information in steps 1 to 3, run the command below to assign the role to the user . Before running the command, the role is not assigned to this storage account, as shown in the screenshot below.

The first command assigns the “Security Admin” role to a user saved in the $userid variable. Similarly, the second command assigns the same role to a group saved in the $groupid variable.
After running the above commands, refreshing the storage accounts displays the Security Admin role, and the user and group assigned the role.

Also Read Implement Azure AD Role Based Access Control Policies
Display Azure AD Role Assignment Using PowerShell
Earlier, I assigned the “Security admin” role to a user with UPN, [email protected]. If you recall, the userId for the user was saved in the $userid variable.
Similarly, the scope ID of the storage account was saved in the $scoperesourceID variable. To display the role assignment for the user, I run the command below.
The command displays the role assignment details, including the RoleAssignmentName, and scope.

You display the same information for the group by running this command.
Also Read Try InfraSOS Azure AD Reporting & Auditing Tool
Managing Azure AD Roles and Permissions with PowerShell Conclusion
Administering Azure roles requires knowledge of the role based access control model . Additionally, understanding Azure role assignment elements – security principal, role definition, and scope – is essential to manage role assignments with PowerShell effectively.
Not only that, but an account assigning roles has to meet some prerequisites such as such as configuring PowerShell with the required modules and ensuring appropriate administrative privileges.
The step-by-step guide provided in this article offers a clear roadmap to follow when assigning built-in Azure AD roles using PowerShell. From determining the Object ID to identifying the scope for role assignment, each stage is meticulously outlined, facilitating a seamless and controlled role allocation process.
Try InfraSOS for FREE
Try InfraSOS Active Directory, Azure AD & Office 365 Reporting & Auditing Tool
- Free 15-Days Trial
- SaaS AD Reporting & Auditing Solution
Related posts:
- Azure AD Roles and Permissions: Assign & Manage Roles for Users & Groups
- Office 365 Identity & Access: Manage Users & Permissions
- Azure AD Custom Roles: Create & Manage Custom Roles for Azure AD
- Azure AD Privileged Roles: Manage & Monitor Privileged Access
- Azure Storage Security: Secure Accounts with Encryption & Access Policies

- Victor Ashiedu
- No Comments

Leave a comment Cancel reply
Your email address will not be published. Required fields are marked *
Save my name, email, and website in this browser for the next time I comment.
A powershell script for activating an eligible role assignment in Azure AD
By Anatoly Mironov
Recently my role assignments in Azure AD were switched from permanent to eligible ones. This is part of PIM - Privileged Identity Management, you can read more about it on MS Docs:
- Start using Privileged Identity Management
To activate your eligible assignment you can use Azure Portal, Graph API, and PowerShell. The activation in the portal and Graph API is described on MS Docs:
- Activate my Azure AD roles in PIM

My roles within Privileged Identity Management in Azure Portal
I created a simple powershell script for activating my eligible roles quickier when I need it. There are two variants of this script:
- a generic one, that can be run by anyone
- a “shortcut” version that can be created for a specific account, a specific role, to make it even quicker.
A generic version
This version fetches the assignments you have, tenant id (resourcid), your account id (objectid, subjectid), and then it activates your desired role. Some parts can be made even more generic, but the key thing here is that you can adjust it and run for any account.
Shortcut version
This version assumes that you already know all the ids, by running the generic version or by looking it up in Azure. When you know those ids, you can skip many calls to Azure AD, which makes activation quicker and you can start working on your task rather than surfing around to activate your role in Azure.
Save it as a script and run it when you need it. Much quicker. One important note, though: Please be aware that it still can take time to fully activate (propagate) your role, especially SharePoint Administrator, often a couple of minutes. But instead of clicking around, run the script and go grab a cup of coffee, when you’re back, you are good to go.
Security Note. Automating role activations is not less secure. You still have to log in to Azure AD using MFA (I hope you have it) even when you run the script.
- administrator
PowerShell Basics: Query Azure Role Based Access Control Assignments
The scenario: what role based access control does somebody have, azure deny assignments.

A great way to learn PowerShell is to set up a scenario in the Azure portal, then try different PowerShell commands to see if you can get the same results. In this article, we'll use Azure Role Based Access control, as it's both visible in the Azure Portal and we have some PowerShell commands for it.
If you're taking over an existing Azure environment, or if you organization has been running Azure for a while without enforced consistency of your Role Based Access Control, you might want to explore your existing RBAC assignments at scale or query the permissions for a specific user. RBAC assignments display in the Access control (IAM) blade of Azure resources, resource groups, subscriptions. Because you can assign a role to a user (or group) on an individual resource, their roles and permissions across your Azure environment may vary, and it's time consuming to check the IAM blade of everything.
Fortunately, we can use PowerShell commands and different display formats, to get the data we want. For the purposes of learning PowerShell, you can use the Azure portal to set up RBAC for different test users (and as part of group memberships) on your resources, resource groups and subscription, so you know what results the PowerShell commands should return.
To keep things simple, I'm running these commands in Cloud Shell inside the Azure Portal.
PowerShell: Get-AzRoleAssignment
Azure RBAC is supported by a number of PowerShell commands, but for this scenario our friend is “ Get-AzRoleAssignment “.
Looking at the structure of PowerShell, because this is a “ Get ” command, it's going to query Azure for some information and return the results to us. “ AzRoleAssignment ” is the base for this command. The command also has a “ New- ” variation, for adding a new assignment, and a “ Remove- ” variation for removing a role assignment.
Note: If you see older blogs or scripts using “Get-AzureRmRoleAssignment”, that was an earlier name for this command before the Az updates. You can often replace the AzureRm bit with just Az, but not in every case as some commands have been deprecated.
If you have multiple subscriptions, Cloud Shell will default to one of them, and your commands will query that subscription and it's associated resources. You can run “ Get-AzContext ” to see which subscription is selected, and run “ Set-AzContext -SubscriptionName “My other subscription”” to change to a different one. (Note I've placed the actual name of my other subscription in it's own set of brackets because it has spaces in it).
Let's start by just running this command and getting a list of all of the RBAC assignments:
Next, let's narrow that down so we are only looking for role assignments for one particular user. The Get-AzRoleAssignment command has a range of different parameters we can add which will act as a filter. We'll use SignInName , which you can find in the user's details in Azure Active Directory , if you don't know the exact format (and replace my steve.l example name):
This gives us a long list of Steve's role assignments:

Now I want to play with the formatting to make it a little more readable onscreen.
I can format the output of this PowerShell command a few different ways, including as a list or as a table. The output above show sme all of the information that is returned by the query though, so I can use that to further refine the display:
I'm using the ‘pipe' character of | (which is Shift + on my keyboard), then the short version of the “ format-list ” command, then I'm listing just the properties I want to be displayed (DisplayName, RoleDefinitionName and Scope). The pipe tells the first command to send it's output to the second command.

For more formatting command examples, visit Using Format Commands to Change Output View .
Hmm, that could still be a pretty long list if Steve had more role assignments. Let's try a table view instead with “ format-table ” or FT for short:

That's better! So, Steve has a pretty high level of access at the top level of my subscription (Owner) plus a Log Analytics Reader role assignment which isn't needed – I can go and tidy that up. But if I run that same command for a different user, I'm seeing a different scope:

Sonia's account is showing the scope as the SCuffSubsMG, not the subscription ID. That's because her Owner access to the current subscription is determined by a role assignment that has been added at the management group level, and as this subscription belongs to that management group, the role assignment is inherited too.
There's one more important thing we need to include – what if our user is a member of a group that has been assigned a role? Our commands so far won't include that. We need to add “ -ExpandPrincipalGroups “.

Now I can see that as well as being listed as an individual with the Virtual Machine Contributor role to VM CA01, Sarah is also a member of the IT_KeyVaultAdmins group, who have Key Vault Administrator access to the KV-BNE-01 key vault.
There's one type of Azure role assignment that won't display with Get-AzRoleAssignment, and that's an Azure deny assignment . You can't manually assign someone a deny assignment – they are created and used by Azure to protect system-managed resources. Azure Blueprints and Azure managed apps are the only way that they can be created.
You can query where they are being used in your subscription, by using the Get-AzDenyAssignment command.
Now you've learnt about the capabilities and structure of this command, go and explore with different command parameters. If you get stuck, visit List Azure role assignments using PowerShell or Remove Azure role assignments for more inspiration.
Get-AzRoleAssignment has the full command syntax, parameters, inputs and outputs.
And many of the basic PowerShell concepts we've explored here, like Get/Set/Remove and output formatting, are applicable to a ton of other PowerShell commands too. You're now on your way to understanding and exploring more of PowerShell, especially for scenarios where you can't easily retrieve the same information in the Azure portal.
This article was originally published by Microsoft's SQL Server Blog . You can find the original article here .
Related Posts
- What's the difference between Azure AD Graph, Azure Resource Graph and Microsoft Graph?
- Using Azure Automation with Multiple Tenants
- Unlocking Azure Secrets: Using Identities for Key Vault Access
- Tracking the Source of ADFS Account Lockouts
- Threat matrix for storage
Instantly share code, notes, and snippets.
blakedrumm / Get-AzRoleAssignmentReport.ps1
- Download ZIP
- Star 0 You must be signed in to star a gist
- Fork 0 You must be signed in to fork a gist
- Embed Embed this gist in your website.
- Share Copy sharable link for this gist.
- Clone via HTTPS Clone using the web URL.
- Learn more about clone URLs
- Save blakedrumm/8f73e82f78b675bea2968117b70fd83e to your computer and use it in GitHub Desktop.
COMMENTS
Follow these steps: Get the object ID of the system-assigned or user-assigned managed identity. To get the object ID of a user-assigned managed identity, you can use Get-AzADServicePrincipal. Get-AzADServicePrincipal -DisplayNameBeginsWith "<name> or <vmname>". To list the role assignments, use Get-AzRoleAssignment.
To get all AAD roles including their eligible users using PowerShell: Thanks to @thesysadminchannel, By referring to this article, we can get all AAD roles including their eligible users and PIM Assignment Status. I have made a few changes in the portion of the param code block and execute the Begin & Process procedure calls in the same manner as mentioned in that article.
Learn how to manage Azure Role assignments using PowerShell snippets and simple commandlets. Discover examples for listing all role assignments, adding and removing assignments for users or service principals, creating custom roles, and more. Plus, check out a script that combines some of these examples into a single function. Written by Vukasin Terzic.
Now you've learnt about the capabilities and structure of this command, go and explore with different command parameters. If you get stuck, visit List Azure role assignments using PowerShell or Remove Azure role assignments for more inspiration. Get-AzRoleAssignment has the full command syntax, parameters, inputs and outputs.
Get-AzRoleAssignment -ServicePrincipalName <String> Get-AzRoleAssignment -Scope . Let's discuss some examples of implementation of the Get-AzRoleAssignment PowerShell command. Example-1: You can execute the Azure PowerShell cmdlet below to help you get the list of all the role assignments under my current subscription. Get-AzRoleAssignment ...
This will create an instance of the role within your tenant, with its own unique object id. Now you'll be able to get to the role and its object id with the Get-AzureADDirectoryRole cmdlet. Assign the role to the user (or service principal). I wish the PowerShell documentation was a bit more explicit in cases like these.
A while back, I published a short article and script to illustrate the process of obtaining a list of all Azure AD role assignments. The examples therein use the old MSOnline and Azure AD PowerShell modules, which are now on a deprecation path. Thus, it's time to update the code to leverage the "latest and greatest".
Get PIM Role Assignment Status For Azure AD Using Powershell. By using this script you'll be able to see all the people who have standing access as well as PIM eligible roles. This will check if a user is added to PIM or standing access. For updated help and examples refer to -Online version.
Select Add role assignment; Set the scope to: Subscription; Select the subscription. Set the role to (use what your company allows here, this is just what I used in my testing): Reader; Assign the Role: Open Microsoft Entra Id -> Roles and Administrators. Link to ; In the roles list, find and click on "Directory Readers". Click "+ Add ...
Step 2: Get the Role to Assign. The next step for managing Azure AD roles and permissions with PowerShell is determining the role to assign. Start by listing all the available roles in your Azure AD tenant using the following command. The command displays the Name, and Id of all roles in the tenant.
Recently my role assignments in Azure AD were switched from permanent to eligible ones. This is part of PIM - Privileged Identity Management, you can read more about it on MS Docs: To activate your eligible assignment you can use Azure Portal, Graph API, and PowerShell. The activation in the portal and Graph API is described on MS Docs:
Now you've learnt about the capabilities and structure of this command, go and explore with different command parameters. If you get stuck, visit List Azure role assignments using PowerShell or Remove Azure role assignments for more inspiration. Get-AzRoleAssignment has the full command syntax, parameters, inputs and outputs.
@WouldBeNerd to get role assignments for a resource, for a particular user you could use Get-AzRoleAssignment -Scope "/subscriptions/..." -SignInName john_doe.onmicrosoft.com ... Getting the Azure AD App role name from a Group AppRole Assignment Using Azure Powershell. 0. Fetch Azure role assignments to AAD groups. 0.
This PowerShell script generates a report on Azure subscription user roles, groups, and their memberships, and then emails this report as an attachment. It logs into Azure using a managed identity, fetches role assignments for given subscriptions, compiles them into a report, and mails this report to specified recipients. The script uses the .NET Mail API for secure email transmission.
I have Azure AD App role assignments to groups in an environment that I can only access using Powershell. To get the AD APP roles assigned to a particular AD Group, I used the command Get-AzureADGroupAppRoleAssignment -ObjectId XXXX-XXX... where the objectId here is the group object id, which works, but the problem is that the output of the command shows only the objectId of the App role, and ...