- Start the presentation and see your notes in Presenter view Article
- Add speaker notes to your slides Article
- Rehearse and time the delivery of a presentation Article
- Record a slide show with narration and slide timings Article
- Print your PowerPoint slides, handouts, or notes Article
- Create a self-running presentation Article


Create a self-running presentation
You can use a self-running presentation to run unattended in a booth or kiosk at a trade show or convention, or you can save it as a video and send it to a client.

On the Slide Show tab, click Set Up Slide Show .
Under Show type , pick one of the following:
To allow the people watching your slide show to have control over when they advance the slides, select Presented by a speaker (full screen) .
To present your slide show in a window, where control over advancing the slides is not available to the people watching, select Browsed by an individual (window) .
To loop your slide show until the people watching press Esc, select Browsed at a kiosk (full screen) .

Rehearse and record slide timings
When you choose the following show types: Presented by a speaker (full screen) and Browsed at a kiosk (full screen), you’ll want to rehearse and record timings for effects and slides.
On the Slide Show tab, click Rehearse Timings .
Note: The presentation timer begins immediately when you click Rehearse Timings .
The Rehearsal toolbar appears and the Slide Time box begins timing the presentation.

Figure: The Rehearsal toolbar
While timing your presentation, you can do one or more of the following on the Rehearsal toolbar:
To move to the next slide, click Next .
To temporarily stop recording the time, click Pause .
To restart recording the time after pausing, click Pause .
To set an exact length of time for a slide to appear, type the length of time in the Slide Time box.
To restart recording the time for the current slide, click Repeat .
After you set the time for the last slide, a message box displays the total time for the presentation and prompts you to do one of the following:
To keep the recorded slide timings, click Yes .
To discard the recorded slide timings, click No .
Slide Sorter view appears and displays the time of each slide in your presentation.
Add narration or sound
To record a narration, your computer requires a sound card and a microphone, and a microphone connector if the microphone is not a part of your computer.
On the Slide Show tab, in the Set Up group, click the arrow on the Record Slide Show button.

Select one of the following:
Start Recording from Beginning
Start Recording from Current Slide
In the Record Slide Show dialog box, select the Narrations and laser pointer check box, and if appropriate, select or deselect the Slide and animation timings check box.
Click Start Recording .
To pause the narration, in the Recording shortcut menu in Slide Show view, click Pause . And to resume your narration, click Resume Recording .

To end your slide show recording, right-click the slide, and then click End Show .
The recorded slide show timings are automatically saved and the slide show appears in Slide Sorter view with timings beneath each slide.
You can record a narration before you run a presentation, or you can record it during the presentation and include audience comments. If you do not want narration throughout your entire presentation, you can record separate sounds or comments on selected slides or objects. For more details, see Record a slide show with narration and slide timings .
To present your slide show in a window, where control over advancing the slides is available to the people watching, select Browsed by an individual (window) .
Note: Selecting this option automatically selects the Loop continuously until 'Esc" check box and causes your slide show to run in a loop.

Set up slide transitions
If you want a slide show to run automatically at a kiosk, you can control when and how the slides advance. To do this, you can apply the same transition to all slides in the presentation and set the transition to automatically advance after a certain time interval.
On the Transitions tab, click the transition that you want.

Do the following on the Transitions tab:
To set the amount of time that each slide is displayed, select After and enter the number of seconds you want.
To set the duration of each transition between slides, enter the amount of time in the Duration box.
Click Apply to All .

Export a presentation to video
You can export a presentation as a movie file. See Save a presentation as a movie file for more details.

Need more help?
Want more options.
Explore subscription benefits, browse training courses, learn how to secure your device, and more.

Microsoft 365 subscription benefits

Microsoft 365 training

Microsoft security

Accessibility center
Communities help you ask and answer questions, give feedback, and hear from experts with rich knowledge.

Ask the Microsoft Community

Microsoft Tech Community

Windows Insiders
Microsoft 365 Insiders
Was this information helpful?
Thank you for your feedback.

How to Run a PowerPoint Slide Show Automatically (Set Up a Self-Running Presentation)

Easily Create a Self-Running PowerPoint Slide Show
by Avantix Learning Team | Updated November 12, 2021
Applies to: Microsoft ® PowerPoint ® 2013, 2016, 2019 and 365 (Windows)
You can set up self-running PowerPoint slide shows to run automatically at trade shows, conventions, events or as web-based presentations. Prior to setting up a self-running presentation, you'll need to apply your preferred animations to text and objects as well as any slide transitions to be be included in the show (unless specified otherwise in the Set Up Show dialog box). When you create automatic slide shows, you also have the option of including specific slide timings, narrations or voice over and ink annotations.
Recommended article: How to Draw on PowerPoint Slides on the Fly During a Presentation (Using Ink)
Do you want to learn more about PowerPoint? Check out our virtual classroom or in-person PowerPoint courses >
Setting up a self-running presentation
When you set up a self-running presentation, you can choose 3 options in the Set Up Show dialog box depending on your audience:

To set up a PowerPoint presentation to run automatically, but allow those watching the slide show to have control over when they advance slides:
- Click the Slide Show tab in the Ribbon and then click Set Up Slide Show. A dialog box appears.
- Under Show type, select Presented by a speaker (full screen). This is the default setting for slide shows.
To set up a presentation to run automatically, but those watching the slide show do NOT have control over when slides advance:
- Under Show type, select Browsed by an individual (window).
To set up a presentation to run automatically, but those watching the slide show do NOT have control over when slides advance and the presentation repeats until the people watching press Escape (ESC):
- Under Show type, select Browsed at kiosk (full screen).
Setting slide timings manually
You can choose to rehearse slide timings or you can manually set the slide timings for your PowerPoint slides using the Transitions tab in the Ribbon.
To set slide timings manually:
- Click the View tab in the Ribbon and then click Slide Sorter.
- Select the slide for which you want to set timing.
- Click the Transitions tab in the Ribbon.
- In the Timing group, under Advance Slide, select the After check box and then enter the number of seconds indicating how long the slide should appear on the screen. If you want the next slide to appear either when you click the mouse or automatically after the number of seconds that you enter (whichever comes first), select both the On Mouse Click and the After check boxes.
- Repeat the process for each slide for which you want to set timing.
Rehearsing and recording slide timings
If you choose Browsed by an individual (window) or Browsed at a kiosk (full screen) in the Set Up Show dialog box, you can rehearse and record timings for animations, transitions and advancing slides.
To rehearse timings, you'll use the Rehearsal toolbar shown below:
The toolbar includes the following buttons from left to right:
- Next (advance to next slide)
- Total presentation time
Click the buttons in the Rehearsal toolbar to perform the following actions:
- Click Next to advance to the next slide.
- To temporarily stop recording the time, click Pause.
- To restart recording the time after pausing, click Pause.
- To set an exact length of time for a slide to appear, type the length of time in the Slide Time box.
- To restart recording the time for the current slide, click Repeat.
To rehearse timings:
- Click the Slide Show tab in the Ribbon and then click Rehearse Timings. The Rehearsal toolbar appears and the timer begins immediately. The presentation appears in full screen recording mode.
- Click the desired buttons. Click Next to advance to the next slide or press the right arrow on your keyboard. To temporarily stop recording the time, click Pause. To restart recording the time after pausing, click Pause. To set an exact length of time for a slide to appear, type the length of time in the Slide Time box. To restart recording the time for the current slide, click Repeat.
- Continue clicking on the appropriate buttons until you are satisfied with the timings. The total presentation time appears on the top right of the Rehearsal toolbar.
- After you set the time for the last slide, a dialog box displays the total time for the presentation and another dialog box appears.
- To keep the recorded slide timings, click Yes. To discard the recorded slide timings, click No.
The presentation appears. If you view the presentation in Slide Sorter View, the slide timing is displayed below each slide.
Recording a slide show with timings
Instead of using the Rehearse Timings button, you can record timings (and narrations or voice over) as you record a show. The Record Slide Show button appears on the Slide Show tab in the Ribbon. When you record a slide show, you can start from the beginning or the current slide:

After you choose to record a slide show, you will have the option of including slide and animation timings as well as narrations, ink, and laser pointer (2010 users will not have the option of recording ink annotations):

If you select Slide and animation timings, PowerPoint automatically records the time you spend on each slide, including animations and triggers on each slide. If you have already rehearsed timings, they will be replaced.
If you use the pen, highlighter, eraser or laser pointer, those will also be recorded. Pen, highlighter, and eraser recording are available only if you have PowerPoint 2013 (and run updates) or a later version of PowerPoint. In earlier versions of PowerPoint, pen and highlighter strokes are saved as ink annotation shapes. To learn more about including ink, check out the article How to Draw on PowerPoint Slides on the Fly During a Presentation (Using Ink) .
To record a slide show and include animations and timings:
- Click the Slide Show tab in the Ribbon and then click the arrow beside Record Slide Show. A drop-down menu appears.
- Select Start Recording from Beginning or Start Recording from Current Slide. A dialog box appears.
- Select the option to include slide and animation timings.
- Click Start Recording. The Rehearsal toolbar appears and the timer begins immediately. The presentation appears in full screen recording mode.
- If you want to record timings, click the desired buttons. Click Next to advance to the next slide or press the right arrow on your keyboard. To temporarily stop recording the time, click Pause. To restart recording the time after pausing, click Pause. To set an exact length of time for a slide to appear, type the length of time in the Slide Time box. To restart recording the time for the current slide, click Repeat.
- To end your recording at any time, right-click on a slide and select End Show from the menu.
The presentation appears. In Slide Sorter view, the slide timing is displayed below each slide.
Recording narrations or voice over
In addition to timings, you may want to add narrations or voice over. You can record narrations before you run a presentation or you can record narrations during a presentation and include audience comments. When you add narrations, PowerPoint automatically records your slide timings. Alternatively, you can set the slide timings first. Be sure to test the microphone first. If you do not want narrations throughout your entire presentation, you can record separate sounds or comments on selected slides or objects.
To record narrations, your computer requires a sound card, microphone, speakers and a webcam (optionally). You will also need a microphone connector if the microphone is not part of your computer.
It's not a bad idea to create a script first in Microsoft Word to improve flow and avoid filler words such as "um". You may also want to practice before recording although you can always re-record narration.
To record a slide show with narrations:
- In the Record Slide Show dialog box, select the check box for Narrations and laser pointer and, if required, select or deselect the Slide and animation timings check box.
- Click Start Recording. A Rehearsal toolbar appears.
- Speak into the microphone to record a narration.
- To pause the narration, in the Rehearsal toolbar, click Pause. To resume the narration, click Resume Recording.
- To end your slide show recording at any rime, right-click on the slide and then select End Show.
The recorded slide show timings and narrations are saved. If you view the presentation in Slide Sorter view, timings appear beneath each slide. A sound icon also appears in the lower-right corner of each slide that has narration.
If you re-record your narration (including audio, ink, and laser pointer), PowerPoint erases your previously recorded narration (including audio, ink, and laser pointer) when you start recording again on the same slide.
To use ink, eraser, or the laser pointer during your recording, right-click on the slide, select Pointer options and choose the laser pointer, pen, highlighter or eraser. Ink is not available for 2010 users. If you want to display a laser pointer while you're recording, press Control and your pointer will appear as a small red circle on your screen.
Previewing narration
If you want to listen to the narration on a slide:
- In Normal View, click the sound icon in the lower-right corner of the slide.
- Click Play.
Running a recorded slide show
To run a recorded slide show in Normal View:
- If necessary, on the Slide Show tab in the Ribbon, click Set Up Slide Show. A dialog box appears.
- Under Show type, select the desired option.
- On the Slide Show tab, click From Beginning or From Current Slide. During playback, your animations, inking actions, laser pointer, audio and video play in sync.
- To end the show, press Escape.
Turning timings or narrations off
You can turn off timings and narrations and then turn them on again at any time.
To turn off recorded slide timings, on the Slide Show tab, deselect the Use Timings check box.
To turn off recorded narrations, ink, and the laser pointer, on the Slide Show tab, deselect the Play Narrations check box.

Deleting timings or narration
You can use the Clear command to permanently delete timings or narration from your slide show recording. You have 4 options:
- Delete timings on the current slide
- Delete timings on all slides
- Delete narration on the current slide
- Delete narration on all slides
To clear timings or narrations:
- On the Slide Show tab, click the arrow below Record Slide Show. A menu appears.
- Select Clear and then the appropriate clear option.
Once you have recorded a presentation, you can later save it as a video if you'd like.
Subscribe to get more articles like this one
Did you find this article helpful? If you would like to receive new articles, join our email list.
More resources
A Beginner's Guide to Video Formats in PowerPoint
How to Hide and Unhide Slides in PowerPoint (with Shortcuts)
How to Insert Video in PowerPoint (from a File on Your PC or a Shared Drive)
PowerPoint Keyboard Shortcuts to Play and Control Video During a Slide Show
How to Add Animation in PowerPoint (Animate Images, Text and Other Objects)
Related courses
Microsoft PowerPoint: Intermediate / Advanced
Microsoft PowerPoint: Design for Non-Designers
Microsoft PowerPoint: Animations Bootcamp
Microsoft Excel: Intermediate / Advanced
VIEW MORE COURSES >
Our instructor-led courses are delivered in virtual classroom format or at our downtown Toronto location at 18 King Street East, Suite 1400, Toronto, Ontario, Canada (some in-person classroom courses may also be delivered at an alternate downtown Toronto location). Contact us at [email protected] if you'd like to arrange custom instructor-led virtual classroom or onsite training on a date that's convenient for you.
Copyright 2024 Avantix ® Learning
You may also like

10 Keyboard Shortcuts in PowerPoint's Outline View
The outline has been an integral part of Microsoft PowerPoint for many years. It is dynamically linked to slide placeholders and is organized in a hierarchical way.

How to Change the Thumbnail for a Video in PowerPoint (using the Poster Frame Tool)
If you have inserted a video on a PowerPoint slide, you can display a custom thumbnail (or Poster Frame) for the video during a slide show. The thumbnail will display when you run a PowerPoint slide show and disappears when you start the video. For most videos, the thumbnail that displays is the first frame of the video clip. You can use the Poster Frame command to display a different frame in the video clip or a picture from another source as a thumbnail. A picture thumbnail could be either an image or an icon.

How to Use the Built-in Laser Pointer in PowerPoint (with Shortcuts)
During a PowerPoint slide show, you can change your mouse into a laser pointer to focus attention on a specific area on your slide. You can show or hide the built-in laser pointer using keyboard shortcuts or by using the context menu.
Microsoft, the Microsoft logo, Microsoft Office and related Microsoft applications and logos are registered trademarks of Microsoft Corporation in Canada, US and other countries. All other trademarks are the property of the registered owners.
Avantix Learning |18 King Street East, Suite 1400, Toronto, Ontario, Canada M5C 1C4 | Contact us at [email protected]

Our Courses
Avantix Learning courses are offered online in virtual classroom format or as in-person classroom training. Our hands-on, instructor-led courses are available both as public scheduled courses or on demand as a custom training solution.
All Avantix Learning courses include a comprehensive course manual including tips, tricks and shortcuts as well as sample and exercise files.
VIEW COURSES >
Contact us at [email protected] for more information about any of our courses or to arrange custom training.
Privacy Overview
Pin it on pinterest.
- Print Friendly
Our Recommendations
- Best Small Business Loans for 2024
- Businessloans.com Review
- Biz2Credit Review
- SBG Funding Review
- Rapid Finance Review
- 26 Great Business Ideas for Entrepreneurs
- Startup Costs: How Much Cash Will You Need?
- How to Get a Bank Loan for Your Small Business
- Articles of Incorporation: What New Business Owners Should Know
- How to Choose the Best Legal Structure for Your Business
Small Business Resources
- Business Ideas
- Business Plans
- Startup Basics
- Startup Funding
- Franchising
- Success Stories
- Entrepreneurs
- The Best Credit Card Processors of 2024
- Clover Credit Card Processing Review
- Merchant One Review
- ProMerchant Review
- Stax Review
- How to Conduct a Market Analysis for Your Business
- Local Marketing Strategies for Success
- Tips for Hiring a Marketing Company
- Benefits of CRM Systems
- 10 Employee Recruitment Strategies for Success
- Sales & Marketing
- Social Media
- Best Business Phone Systems of 2024
- The Best PEOs of 2024
- RingCentral Review
- Nextiva Review
- Ooma Review
- Guide to Developing a Training Program for New Employees
- How Does 401(k) Matching Work for Employers?
- Why You Need to Create a Fantastic Workplace Culture
- 16 Cool Job Perks That Keep Employees Happy
- 7 Project Management Styles
- Women in Business
- Personal Growth
- Best Accounting Software and Invoice Generators of 2024
- Best Payroll Services for 2024
- Best POS Systems for 2024
- Best CRM Software of 2024
- Best Call Centers and Answering Services for Busineses for 2024
- Salesforce vs. HubSpot: Which CRM Is Right for Your Business?
- Rippling vs Gusto: An In-Depth Comparison
- RingCentral vs. Ooma Comparison
- Choosing a Business Phone System: A Buyer’s Guide
- Equipment Leasing: A Guide for Business Owners
- HR Solutions
- Financial Solutions
- Marketing Solutions
- Security Solutions
- Retail Solutions
- SMB Solutions
How to Create an Auto-Playing PowerPoint Presentation

Table of Contents
Creating a self-running PowerPoint, as Microsoft calls it, can be a great addition to your company’s booth at conventions or industry-wide conferences. By featuring photos, infographics and key points in a continuous loop, PowerPoint becomes an effective communication tool to inform others about your company, its goals, and your products or services.
Auto-playing presentations are also great for employee training, meetings where the speaker is absent, and reaching remote clients or customers. Microsoft provides easy steps to turn your PowerPoint into an autoplay presentation.
Setting up the presentation
There are several options for creating a PowerPoint presentation automatically. All of these can be accessed under the Slide Show tab.
Slide Show > Set Up Slide Show
There are three options under this menu:
- Presented by a speaker : This first option requires the viewer to click through each slide. This is the default setting that most PowerPoint presentations are already in and is the mode with which you’re likely most familiar.
- Browsed by an individual : This option will create a slideshow where the viewer cannot control when slides advance. This is an autoplay feature, but the viewer will still have to hit Play to get it started.
- Browsed at a kiosk . Once selected, this option will loop the slide show until a viewer presses the escape button.
If you don’t want your viewers to have access to when the slideshow starts and stops, select the third option. The Loop Continuously option underneath will be automatically selected.
Experts estimate that there are about 30 million PowerPoint presentations created every day !
Recording slide timing
Before you begin recording your presentation, it’s important to set the slide time using the rehearsal toolbar. This will give you an idea of how long each slide will run before advancing to the next one. It will also allow you to practice your presentation and understand how long the runtime will be. Like setting up the slide show, this window can be accessed via the Slide Show tab.
Slide Show > Rehearse Timings
The recording window allows users to advance to the next slide, pause the presentation, view the current slide’s time, restart the recording for a slide and view the total runtime of the presentation.
After recording the last slide, PowerPoint will ask whether you want to keep the slide timings or not.
Recording your presentation
Once your slide timings are set, you can record your slide show.
Navigate to Slide Show > Record Slide Show to begin your recording. Click End Show and save your file once you are done recording. After saving, your presentation is ready to be sent to clients, customers or played at your convention or conference booth.
Here are some quick tips to check for before recording your presentation:
- Before beginning your recording, make sure you adjust the Play Narrations and the Use Timings checkboxes.
- If you want all narration and slide transitions included, both boxes should be checked.
- To create a silent sequence of slides, make sure the Play Narrations button is deselected.
What is PowerPoint autoplay?
Autoplay allows you to keep a PowerPoint presentation running. In typical PowerPoint presentations, presenters click from slide to slide manually using a clicker or spacebar on a keyboard.
Luckily, PowerPoint autoplay allows users to set up their slides, so they automatically change. That way, they can focus on their presentation without interruptions. There are options to have slides timed to music or voiceovers and make each slide the same length.
You can use autoplay in any number of situations where a continuous, unattended loop is called for, such as photos at an event, displaying information at a trade show booth or using the changing slides as a visual cue while rehearsing a timed presentation.
Why is PowerPoint autoplay beneficial?
Autoplay is great for several uses, from delivering announcements throughout a company’s office or a school, to giving speeches and presentations at conventions or work. Presenters can rehearse the timings of the slides and then present without worry. Here are some of the reasons why someone may use PowerPoint’s autoplay features:
- Rehearsal . Practicing your presentation involves timing, and autoplay can be a great tool for learning how to fill time or keeping it short. For example, many teachers and professors require presentations to fill a certain amount of time for class projects. While rehearsing timings, users can determine how much time to spend on each slide. This keeps presenters on track during their presentations, even when they want to speed up due to nerves or pressure.
- Convention booths and exhibits. Trade shows , conventions and networking events are great for companies and salespeople who want to showcase a variety of products and services. People who walk by can look at the presentation and not have to ask employees for information. In addition, a good PowerPoint presentation with eye-catching visuals and information can attract potential customers and clients, which could turn into sales.
- Music videos and tribute presentations. Whether it is a presentation of family vacation photos to the soundtrack of the summer or a lyric video to your favorite song, autoplay allows users to create appealing presentations and videos. These could even be downloaded into MP4 files to share with family and friends.
- Replay and loop at events or other occasions. This is great for offices that have a slideshow of information for their clients or patients. They can show a variety of pictures, information about services, and even the company’s latest news and contact information. Because of this, employees can set up the presentation, walk away and know that their announcements are being made public without even saying a word.

Building Better Businesses
Insights on business strategy and culture, right to your inbox. Part of the business.com network.
Search for: Search Button
Make a self-running or kiosk display in PowerPoint
PowerPoint can show slides on a screen as a high-tech signboard, using a self-running presentation known as Kiosk display. Here’s how to do it plus all the settings and tricks available.
We’ve all seen screens displaying information on a series of slides – maybe in a shop or conference. Maybe as a prelude or postscript to a presentation. These days it’s easy to setup a laptop with an external screen almost anywhere to make a high-tech signboard.
At a party or celebration you can use Powerpoint to display photos (with or without captions) of the guest of honor.
There’s various ways to do it but the main one is PowerPoint. Many of us have PowerPoint but never use it because we think of it as being for speeches. In fact there’s plenty of other uses.
PowerPoint Kiosk mode
At its basic level, PowerPoint’s Kiosk mode is merely a different way to display a presentation. Instead of clicking to move between slides, PowerPoint will automatically display the slides going in an infinite loop … until someone presses Escape.
Go to the Slide Show tab, Set up Slide Show … it’s a PowerPoint dialog that hasn’t changed for many years/versions.
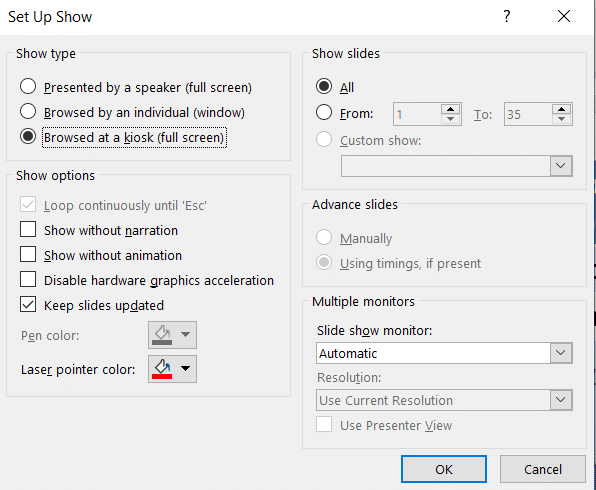
Choose ‘ Browsed at a kiosk (full screen) ‘ and click OK.
That’s as far as most people go in explaining Kiosk mode but, as usual with Office, there’s a lot more going on and Office-Watch.com is here to help.
Browsed by Individual
The Browsed by individual (window) option lets someone use a mouse or keyboard to move through the slides at their own pace. In this case the slides can change automatically (if no human intervention) or only when asked – see the Advance slide options on the Set Up Show dialog.
To make the self-guided presentation more accessible, you should add action buttons (forward / back etc) to the slide master so the buttons appear on all slides. Make the mouse available to users and they can click to their heart’s content.
Show without narration
PowerPoint presentations can have an audio track or narration included. This option lets you let that audio be heard as the slides progress or not. The default is for the narration to be heard (i.e selection unchecked).
Show without animation
Slides can have animations or motions on them – for example bullet points appearing one by one. Check this box if you don’t want the animations – in other words, the slide appears all at once.
Disable hardware graphics acceleration
Usually you’d leave this off, but if there are problems with the display this might help.
Show slides
Show all the slides or just a range from a larger presentation.
Advance slides
In kiosk mode, PowerPoint lets each slide appear for a few seconds unless there’s a slide timing set (at Transitions | Timing | Advance slide | After:
Multiple Monitors
Very useful if you have a second monitor. Use the pull down list to select the screen to display the presentation.
Why won’t the slide/s move?
If your kiosk presentation is stuck on a slide, or the first slide, make sure the Advance Slide timing is set higher than zero at Transitions | Timing | Advance slide | After:
After setting a value (in seconds) click Apply to All to set that as the default display time for all slides.
Sometimes the Advance Slide After: value is set to zero. If that happens PowerPoint will obey the zero timing set and never move past that slide, even though it makes no sense in Kiosk mode.
How to wait longer or shorter on one slide
Some slides deserve more time to read while others you might want to whizz by. After setting the default timing (see ‘Why won’t the slides move?’) go to individual slides and change the Transitions | Timing | Advance slide | After: for that slide only.
You can also select multiple slides from the slide sorter and apply a timing to all the selected slides in one go.
Starting Kiosk Mode
To start a kiosk presentation, just click the Slide Show | From Beginning or From Current Slide buttons.
Stopping Kiosk Mode
Stopping the presentation by just pressing the Escape button. If you don’t want people to do that, hide the keyboard out of sight.
Blocking the ESCape route
There’s always some smartie who will try to bypass the automatic presentation and get access to an unattended computer. To make things more difficult for them, use the No ESCape add-in for PowerPoint 2000-2007. This will disable the Escape key option in Powerpoint. We’ve not found an equivalent for PowerPoint 2010 and beyond.
If you use this add-in make sure you add your own escape route. Add an invisible shape to a slide (probably the last) with the on click action set to End show.
Self running presentation packages
Another option is to create a self-contained PowerPoint Show (.ppsx) that can be run on another computer without additional software.
Simple Self-running Presentations
The simplest self-running presentations are just a collection of photos . You can add captions or headings if you like or just put each photo, full size, on a slide.
A new Kiosk presentation
Aside from the setup mentioned above, there’s nothing special about presentation used in kiosk mode.
You can make a presentation that has just photos – a traditional photo album on the screen. It can be a point of discussion or derision at a party or meeting.
Below is the step-by-step to make a presentation with photos, or … you can use the easy way … PowerPoint Photo Album .
Choose a background color (probably black or white) at Design | Customize | Format Backround. The background is necessary because some images won’t be the same proportions as the screen, leaving edges where the background will appear.
Change the slide layout to one that suit you. For full screen photos, choose ‘Blank’ layout.
Then add your photos. On each new slide click Insert | Picture then adjust the image to fit the slide.
There are ‘photo only’ presentation software programs out there, just search for then. Some have the advantage of working with all the photos in a nominated folder. It’s easy to change the presentation by simply changing the images in that folder. At a pinch, a photo screen saver can be used.
Videos in PowerPoint Kiosk mode
PowerPoint Photo Album
About this author

Office-Watch.com
Office 2021 - all you need to know . Facts & prices for the new Microsoft Office. Do you need it? Office LTSC is the enterprise licence version of Office 2021.
Office 2024 what's known so far plus educated guesses. Microsoft Office upcoming support end date checklist.
Latest from Office Watch
- Credit Card 💳 symbol in Word, Excel, PowerPoint and Outlook
- Yes, there will be a new version of Microsoft Office
- All about Office 2024 for Windows and Mac (so far)
- In person vs virtual event option coming to Outlook
- Checklists now in Microsoft Word
- Start Grouping in Excel for better looking sheets
- Three more Word features reach the web version
- Web link previews in Word for web
- Turn Excel into an AI / LLM wonder
- Don’t trust any text message
- New Outlook does NOT block Exchange Server mailboxes
- How the change to new Outlook for Windows will work
- Digging deeper into the Outlook (new) timetable
- Copilot appears in Word whether you like it or not
- Too many Microsoft Outlook's - we explain them all
- Discover the Edit Points bug in Word
- Spreadsheets are a warning about the future of AI
- Five fast Clear options in Excel
- PowerPoint - switch away from Aptos fonts
- Copilot in Office mobile apps for some
- DynamicPowerPoint.com
- SignageTube.com
- SplitFlapTV.com

Creating a Self-Running Slideshow in PowerPoint
Apr 29, 2020 | DataPoint Real-time Screens , How-To
Most people use PowerPoint in meetings and they talk (a lot) while they have a PowerPoint slide show running in the background. They use a mouse or presentation remote to advance to the next slide for the next message.
But our audience are people looking at digital signage or information screens and then there is nobody to advance to the next slide. For our purpose of information delivery on television screens, we need self-running presentations!
This article will describe the options, and settings to get to a self-running and ever-running presentation for digital signage, created in PowerPoint.
PowerPoint Transitions between Slides
Not a real must but we recommend to choose a given transition between slides. In PowerPoint you have transitions and animations. Transitions are animation effects that you see when you advance from one slide to another. Animations in PowerPoint are the effects that you set on specific shapes to emphasize its movement or importance.
Without transitions and animations, a presentation is considered boring and slide advancing is sometimes barely visible. With PowerPoint transitions and animations, a message or presentation is more looking like a video. Just one piece of advice with transitions; use a consistent transition that you use on all slides. Use a smooth transition effect. Never use a random or complex transition effect that is too overwhelming.
To choose a transition effect, select your slide and click the Transitions option from the PowerPoint ribbon. E.g. select the Push transition. Open the Effect Options at the right of the transitions list and choose e.g. the more natural From Right . Preview the transition immediately. Now set an effect for every slide of your presentation.
PowerPoint Advance Slides
Digital signage presentations are mostly self-running presentations like a channel on television. By default, PowerPoint presentations advance manually so, you have to use a mouse to click on the presentation. A mouse click instructs PowerPoint that the current slide is over and that the presenter wants to move to the next slide or message.
To change the advance options, look again at the Transitions menu. At the right, you will find the Timing group with Advance Slide settings. Uncheck the On Mouse Click option. Then check the After option and set a time. Set this value to 00:12.00 when you want to show this slide for 12 seconds. You can check and set a different time for every individual slide. Or just click the Apply To All buttons.

Submit a Comment
Your email address will not be published. Required fields are marked *
Pin It on Pinterest
- StumbleUpon
- Print Friendly
PowerPoint Tips Blog
Helping you with presenting, PowerPoint, and speaking
How to create a self-running presentation
October 28, 2012 by Ellen Finkelstein 9 Comments
We usually think of PowerPoint as being used by a live presenter who stands in front of a live audience. But PowerPoint can be used in other ways:
- PowerPoint is often used an an elearning tool. In this situation, the learner controls the presentation.
- PowerPoint is also used as a marketing tool to give to potential clients. In this situation, the presentation often runs itself.
Add narration
Usually, this type of presentation is narrated. You can use PowerPoint’s narration feature (see “ Secrets for successfully narrating a presentation “) or insert audio files that you recorded separately on each slide. (Choose Insert> Audio or Sound from File.)
- If you want the presentation to advance automatically from slide to slide, typical of a marketing presentation that you send to others, add slide timing. On the Transitions tab, in the Timing group, set a time under the Advance Slide section after the After label. If you click the up arrow, each click will increase the slide timing by 1 second. A setting of 00:03.00 advances the slide after 3 seconds. For a more advanced technique, see my post, “ Create a video effect .”
- If you want the viewer to control when the slides change, you can just let the person click or add hyperlinks for navigation. You can use the provided Action buttons because they have Next and Previous buttons that most people instantly understand.
Add navigation for people to move through your presentation
Here are the steps for adding an Action button to the next slide:
- Go to Home tab> Shapes> Action buttons and choose the one you want, such as the right-facing arrow Next button. The Action Settings dialog box automatically opens.
- On the Mouse Click tab, the Hyperlink To option is selected and set to Next Slide. If you want, you can change this, but it usually works well.
- Format the Next button any way you want.
- Go into Slide Show view and test your button. Note that clicking off the button will also get you to the next slide.
You can add navigation to the previous slide and the first slide as well. You can even put action buttons on the Slide Master.
Disable clicking to advance slides
If you don’t want users to be able to click from slide to slide but only to use the navigation, you can turn off mouse clicking to go to the next slide. Here are the steps:
- Go into Slide Sorter view (View> Slide Sorter).
- Select all of the slides.
- In PowerPoint 2010 and 2013, click the Transitions tab. (In PowerPoint 2007, click the Animations tab. In PowerPoint 2003, choose Slide Show> Slide Transition.) In the Advance Slide section, uncheck the On Mouse Click checkbox. (This is where you would add slide timing if you want the slides to advance automatically after a specific amount of time.)
Another thing you can do to disable clicking is to set the presentation to run in kiosk mode. This mode is specifically meant for self-running presentations (running in a kiosk or computer at a trade show or company lobby, for example). Go to Slide Show> Set Up Slide Show (or Set Up Show). In the Set Up Show dialog box, under Show Type, choose Browsed at a Kiosk (full screen) and click OK.
Save the presentation as a show
Finally, you can save the presentation as a “show. This simply means that the presentation opens immediately in Slide Show view. Choose File (or Application button)> Save As. (In PowerPoint 2013, you then have to choose your location.) In the Save As dialog box, click the Save as Type drop-down list and choose PowerPoint Show (.ppsx or .pps). Note that a savvy user will know how to change the presentation name’s extension from .ppsx to .pptx and get access to the presentation, so don’t think of this as a measure to secure your content from being edited.
Related posts:
- Create a looping introduction
- Create a looping ending for your PowerPoint presentation
- Create a tabbed presentation for longer presentations with lots of topics
- Use timing, animation, or sound in a presentation with hyperlinks
9 Leave a Reply
I am not sure about licking the transition tab in the second step 3

Thanks for catching that error — fixed!

[…] Browsed at a kiosk (full screen): If you choose this option, Slide Show is full screen but you can NOT click from slide to slide. So, how does the viewer navigate through the presentation? You can create automatic timing so that the viewer doesn’t have to navigate or you can create action buttons or other hyperlinked objects that allow navigation. Such a presentation can be called a self-running presentation. I explain the concept in my post, “How to create a self-running presentation.” […]

Hi Ellen! This is a nice post. There is one point I think you could have done better for viewers. Just add some images to the post to show people how to do that.
Personally, I find it’s more effective to give a tutorial with walk-through pictures of video, so it’s clear for readers or viewers, and it’s gonna be easy to follow.

Thank you for helping me in self-running PPT

Hi, I have set up a PowerPoint to run in Kiosk mode and have hosted the file on a website, but the presentation is not automatically advancing. Can anyone advise?
You don’t say how you’re trying to host the file on a website. Also, are timings set for the slides? These might help: http://www.ellenfinkelstein.com/pptblog/store-your-presentation-in-the-cloud-for-embedding-collaboration-or-marketing/ http://www.ellenfinkelstein.com/pptblog/why-you-need-to-get-your-presentations-on-the-internet-and-how/
Thanks for your reply.
Here is is: http://www.theroute-finance.com/finance-private-debt-platform-presentation/
[…] Browsed at a kiosk (full screen): If you choose this option, Slide Show is full screen but you can NOT click from slide to slide. So, how does the viewer navigate through the presentation? You can create automatic timing so that the viewer doesn’t have to navigate or you can create action buttons or other hyperlinked objects that allow navigation. Such a presentation can be called a self-running presentation. I explain the concept in my post, “How to create a self-running presentation.” […]
How to Create Self-Running Presentations
by Lydia | Jun 27, 2023 | Presentation Design | 0 comments

While traditional PowerPoint presentations require manual control, self-running presentations offer a convenient solution for engaging audiences without constant intervention. In this guide, we will explore the art of creating self-running PowerPoint presentations. Whether you’re a business professional, educator, or public speaker, these tips and tricks will empower you to deliver seamless and captivating self-running presentations that leave a lasting impression.
A self-running presentation is a PowerPoint slideshow that advances automatically from slide to slide without manual control. This feature allows presenters to focus on delivering their message rather than navigating through each slide. Self-running presentations are ideal for situations where you want your content to be displayed continuously, such as trade shows, exhibition presentations , kiosks, or digital signage.
Preparing the Self-Running Presentation
- On the Slide Show tab , click on Set up Slide Show.

Within this menu, you will find three different choices:
- Presented by a speaker: This initial option necessitates the viewer to manually progress through each slide. This is the default setting commonly used in PowerPoint presentations and is the mode you are likely most accustomed to.
- Browsed by an individual: Opting for this option generates a slideshow where the viewer lacks control over slide advancement. It functions as an autoplay feature, although the viewer must still initiate the presentation by pressing the Play button.
- Browsed at a kiosk: Upon selecting this option, the slideshow will continuously loop until a viewer presses the escape button. This setting is particularly useful in kiosk or exhibition settings.
- If you prefer to restrict viewer control over the slideshow’s start and stop, choose the Browsed at a kiosk option. This selection automatically activates the “Loop Continuously” feature underneath.

Creating Automatic Timings
During a live presentation, it is common to have control over the timing of animations and slide transitions, requiring manual interaction by clicking the mouse to proceed.
However, in a kiosk setting, it is preferable to have the presentation’s animations and slides advance automatically. This allows passersby to read and follow the content without the need to manually operate it.
- Go to the Slide Show tab and select Rehearse Timings .

Adding Recordings
Moreover, you can utilise your self-running PowerPoint slideshow in a kiosk scenario where your presence may not be constant. If you wish to incorporate a voiceover providing commentary or explanations for your slides, you have the option to record yourself, and your presentation will automatically integrate the recorded audio.
- On the Slide Show tab and select Record .

- If you want that all narration and slide transitions are included in your presentation, ensure that Play Narrations and Use Timings are checked.
- If you wish to create a sequence of slides without any accompanying audio, make sure to uncheck the Play Narrations option.
Before recording your presentation, here are some quick tips to ensure a smooth and professional result:
- Practise and Rehearse : Familiarise yourself with the content and flow of your presentation. Practice delivering it smoothly to enhance your confidence and minimise any potential mistakes during recording.
- Check Audio and Equipment : Test your microphone or audio recording device to ensure clear sound quality. Make sure your equipment is functioning properly and positioned correctly for optimal audio capture.
- Clear Background Noise : Choose a quiet location for recording to minimise background noise. Turn off any potential sources of disturbance such as fans, phones, or notifications that could interfere with the audio.
- Visuals and Slides : Review your slides for any formatting issues, typos, or inconsistencies. Ensure that your visuals are clear, visually appealing, and properly aligned. Double-check that all content is readable and appropriately sized.
- Script or Outline : Consider having a script or outline handy to guide you during the recording. This can help maintain a smooth flow and ensure you cover all key points effectively.
Why are Self-Running Presentations Advantageous
Self-Running Presentations offer several advantages that make them highly beneficial in various scenarios. Here are three reasons why self-running presentations are helpful:
- Convenience and Efficiency. Self-running presentations eliminate the need for manual control, allowing presenters to focus on other aspects of their event or engage with their audience directly. By automating the presentation, you can save time, streamline your workflow, and ensure a seamless experience for your viewers.
- Consistency in Delivery. With self-running presentations, you can ensure consistent delivery of your content. Each slide transitions at the pre-determined timing, eliminating the potential for human error or inconsistencies in manually clicking through slides. This guarantees that your message is conveyed in a structured and uniform manner, enhancing the professionalism and impact of your presentation.
- Enhanced Audience Engagement. Self-running presentations can captivate and engage your audience more effectively. By carefully timing slide transitions, incorporating captivating visuals, and utilizing subtle animations, you can create an immersive experience that holds the attention of your viewers. Additionally, the absence of manual intervention reduces distractions, enabling your audience to focus solely on the content being presented. This heightened engagement can lead to better retention of information and a more memorable experience for your viewers.
- Automated Information Display . Self-running presentations are ideal for scenarios where information needs to be continuously displayed or updated. For example, in exhibitions or trade shows, self-running presentations can serve as an interactive information hub that showcases products, services, or key messages.
In conclusion, mastering the art of creating self-running presentations empowers you to deliver captivating content without the need for constant manual control. By following the steps outlined in this guide and incorporating the provided tips and tricks, you can create engaging slideshows that leave a lasting impact on your audience. Remember, a well-executed self-running presentation not only saves time but also showcases your professionalism and expertise in delivering compelling visual narratives.
Recent Posts
- 8 PowerPoint Alternatives in 2023
- What is a Pecha Kucha Presentation?
- Successful Pitch Deck Examples
- How to Add, Record, and Edit Audio in PowerPoint
- Comprehensive Guide to Converting PowerPoint Presentations
Recent Comments
- December 2023
- October 2023
- September 2023
- February 2023
- October 2019
- Interactive Presentation
- Presentation Design
- Entries feed
- Comments feed
- WordPress.org
Privacy Overview

Create Self-Running Presentations
If you need to convey an effective message that will stick in your audience’s minds when you’re not around, you need to consider a self-running PowerPoint presentation! This will immediately grab your customers’ attention, say at a trade fair stand or on a display screen in your company foyer.
There are a few things to bear in mind when creating a self-running presentation, though. Try not to overload it with content, endless bullet points, tables and diagrams. Pictures, graphics and clear statements are much more suitable for this format. There is incredible potential in this medium, done well. PowerPoint is a great way to create self-running presentations; below, we show you just how easy it is!
Where Self-Running Presentations Work Best
Presentations running on a continuous loop are particularly useful for presenting information or product demos in waiting rooms, at airports, in some shops, at exhibition stands or in company foyers.
Self-running presentations are also good for employee training and reaching remote clients.
The common thread is that you don’t need a presenter with such presentations. This allows you to visualize the information you want to create images and strengthen your brand in the viewer’s mind. You can tailor your presentation towards individuals, or use them at private occasions like birthday parties or weddings. This modern feature allows you to reach new audiences and is simple to set up.
What’s the Advantage of a Self-Running PowerPoint Presentation?
A really well-crafted PowerPoint presentation successfully drives a story forward. It can create a suspenseful arc, triggering enthusiasm in the audience, or, just as effectively, provide a soothing, calming effect.
If you’re a dentist looking for something for your waiting room, you’ll probably be going for the latter. Always keep your intended audience in mind, and create your presentation to appeal to them. The idea is that a self-running presentation creates a connection between your company and the audience.
Your core message can be conveyed to viewers visually, in an endless loop. This means that you don’t have to do a thing while it’s running. You can start or stop it with a single keystroke.
So What Is a Self-Running Presentation?
Basically it means that you don’t have to be around to give the presentation. You can let it run on a continuous loop, say on a screen in your foyer, or at a trade fair. Obviously you need to take security precautions if you do; setting a password and locking the keyboard are the basics.
Or you can get an individual to start it on their own, then either click through each slide when they’re done with it (useful for training purposes), or sit back and watch the presentation unfold.
How Do I Create a Self-Running Presentation?
Just follow these simple steps:
- Under the Slide Show tab, click on Set Up Slide Show .
- You’ll see three options under Show type :
– Presented by a speaker (full screen)
– Browsed by an individual (window)
– Browsed at a kiosk (full screen)

If you want to give viewers the option to scroll through the slides themselves (e.g. for employee training), choose the first option. If you want your presentation to be in a window, with the viewer just sitting back and watching, choose the second.
Setting up Autoplay
If you want your presentation to run continuously, choose the third option; this automatically greys out Loop Continuously Until Esc. Confirm by clicking the OK button. You can set the timing and slide transitions in the next step.
Set Up Transitions for Your Self-Running Presentation
To allow your presentation to run smoothly, uncheck the On Mouse Click option under the Transitions tab.
Then click on the After button and set the duration. You can either set the duration of each slide individually, or select Apply To All if you want your slides to change at regular intervals.

Adding Sound
If you want to record a narration, you’ll need a computer with an integrated sound card and microphone. You could use an external mike if the option exists to connect one.

Under the Slide Show tab, click the Record Slide Show button. Select one of the options, depending on whether you want to start recording at the beginning of the presentation or create a recording for the current slide only. Then click Start Recording .
Click End Show and Save File once you’re done recording. Your self-running presentation is now ready to send to clients, train your employees, or advertise your presence at the next trade show!
To Save Your Self-Running Presentation as a Video
First save your presentation as a PowerPoint file. Under the File , click Save . Then, still in the File tab, click Export .
Now click the Create Video button. On the right side of the screen you will now see a drop-down menus (Full HD 1080p, Ultra HD 4K, etc.). Select the video quality you want. Once you have made your selection, you have the option to Use Recorded Timings and Narrations . You can uncheck this if you want; the default display duration is 5 seconds, but this is easily changed
Now all you have to do is click the Create Video button. Finally, choose your video’s file format. Once you’ve chosen, simply click Save again and your video is ready to go!
If you don’t know which video format to use, this guide may help:
- Ultra HD (4K) has a resolution of 3,840 x 2,160 pixels and is the maximum file size (suitable for large monitors and screens).
- Full HD (1080p) has a resolution of 1,920 x 1,080 pixels and – a large file size (suitable for computer and HD screens).
- HD (720p) has a resolution of 1,280 x 720 pixels – a medium file size (suitable for Internet and DVD).
- Standard (480p) has a resolution of 852 x 480 pixels and is the smallest file size (suitable for portable devices)
Share this post
- share
- save

Design Thinking: Problem Solving with a Difference

Why Corporate Mission Statements Are So Important

7 Tips & Learnings from the Apple Keynote
Self running presentation: How to create your own
Two steps to create your own self running presentation.
Perfect for conferences, trade shows, or even holding slides at your webinar. Self running slides catch people’s attention. If you already have a presentation that will work for this, here are two simple steps to turn it into a self running presentation.
Note: you will be making some changes to the presentation, so before you start save out a new version of your presentation. That way you will still have the original version for when you’re presenting live.

Step 1: Create Automatic Timings
When you are presenting, you will want to have control over when the next animation or slide transition happens, so your presentation will most likely be set up so that you need to click the mouse to continue.
However, at a kiosk you will want the presentation animation and slides to advance automatically, so that people passing by your stand will be able to read and follow the slides. There are many ways to set up the timings for a presentation so that they run automatically, but the simplest and quickest is to use “rehearse timings”:
- On the top ribbon, click Slide Show and Rehearse Timings
- Click each time you want to proceed to the next animation/slide
- Once you’ve finished the slides, PowerPoint will prompt you to save the new slide timings
Step 2: Loop Presentation
At a kiosk, you will want the presentation to loop back to the beginning again once finished. To do this:
- On the top ribbon, click Slide Show and Set Up Slide Show
- Select Loop continuously until ‘Esc .’
The video below (from our Vimeo channel ) shows these two steps in action. At Presented, we have lots of experience creating kiosk presentations, so get in touch if you want us to help you create something really eye-catching that will draw people to your stand. For more tips on setting up a killer exhibition stand , take a look at this guest blog.
Related Articles

How to create clean PowerPoint slides
One of the simplest ways to transform your presentations from heart-sink to happy is to keep your slides clean of unnecessary words and data. TIP 1: Make one, simple statement on each slide and use the remaining “space” for a visual that explains and clarifies. And that’s it. No more tips.

Why you shouldn’t read from your PowerPoint slides
A classic mistake presenters make, is to pack their slides full of words, which they then read to the audience. Unless your audience is very young indeed, they can read for themselves. Reading to them can be seen as annoying and slightly insulting.

Make the most of your presentation hand-out!
The best way for your presentation to support your spoken words, is through one short message per slide and a relevant, supporting visual. Your narrative can then bring the presentation to life using the terminology and examples which your audience relate to.

How to make presentations more visual… and why you should
If you can make presentations more visual – your audience will thank you Our senses are “on” all the time. Touch, taste, hearing, sight and smell: the five senses through […]

Can flexible working increase productivity?
The current office environment – typically getting to the office at 9am, staying til 5.30pm, working in an open-plan office, and spending most of the day sitting still – is about the least productive environment we could possibly create. That’s according to scientific research…

Get your PowerPoint visuals right: get creative!
Visuals are powerful - get them right! The danger, if you use an irrelevant or inappropriate visual, is that it will distract and confuse – basically doing more harm than good. Rather than adding depth and clarity, the wrong visual could send your audience wandering off on a completely unrelated trains of thought.

How many slides is best for a presentation?
If you need advice on how many slides you should have in your deck. Think about it from an engagement point of view. Audiences would rather see 30 light slides that you move through quickly (keeping things more interesting for them), than 10 slides that are chock full of data and that don't seem to ever move on... Don't fear the count. Fear what's on them!

How much do people remember from a presentation?
There have been various studies conducted on this, and the most generous results we’ve seen are as follows: Immediately after the presentation, the audience remembered 50% of what was said By the next day, the audience remembered 25% A week later, the audience remembered just 10%
 10")
Using stories in PowerPoint boosts memory (part 1 of 2)
Structure your PowerPoint presentations with stories and your audience is more likely to follow, understand and remember your message – and they’re more likely to enjoy it too!
 11")
Harness the power of Stories in presentations to help audiences recall your presentation (part 2 of 2)
Start your presentation with a story about how a certain problem is relevant. Ideally this is a problem that affects your audience, this way you grab attention and engage with emotions immediately. Using further anecdotes and stories throughout brings each point more vividly to life.

How do you make PowerPoint more visual?
If your presentation is full of slides packed with bullet points and blocks of text, your audience’s attention will drift and you risk losing them, perhaps for good. A picture is worth a thousand words. So we must make PowerPoint more visual. Visual information is 3 times easier to remember than spoken info.
How to avoid giving a boring presentation!
Here's the lowdown on how to avoid giving a boring presentation... Most of us have attended a boring presentation, and if we are truly honest many of us will have also given a boring presentation at some point in our careers! Read our Top 8 Tips for advice on how to avoid a boring presentation.
Discover what our expert Powerpoint Design Agency can do for you
Fill in this form or call us +44 (0)800 246 1373 (freephone from UK).
- Skip to main content
- Skip to secondary menu
- Skip to primary sidebar
Mechanicaleng blog
siemens nx tutorial & injection molding technology
How to create a self-running PowerPoint presentation
August 29, 2021 by mechanicaleng blog Leave a Comment
A self-running PowerPoint presentation means you won’t have to click when you want to move to the next slide. It works like a kind of timer for each slide. It is also extremely useful for you to manage the presentation duration of each slide. And if you are curious how to do this, let’s dive into this article with us right now.
How to create a self-running PowerPoint presentation ?
Step 1: To do this, first open your PowerPoint file and select Transitions .

In Transitions , choose one transition effect. This is the type of motion that will be applied when automatically switching from one slide to another.

Step 2: The next step you will set a timer for each slide, after that time the slide will automatically switch to another. You can schedule each slide separately. To do it, select the slide then look at the Timing section on the ribbon. Check the box After and enter the time you want to stop on this slide, or click on the 2 arrows to adjust.

Then you also select the remaining slides and do the same at Timing . If you want to apply the settings for all slides, in the Timing section, click Apply to All . Then the transition between the slides and the stopping time on each slide will be the same. Step 3: Once you’re done editing, you should always review your presentation. Go to the Slideshow tab and click From the Beginning to see if the movements you have set from the beginning are satisfactory or not.

And the article has ended here. Thank you for reading this tutorial on how to create a self-running presentation that slides run automatically in PowerPoint. Just imagine, you don’t have to run up and down every time you want to switch slides, just do the presenting and the slide will automatically run for you. Hope you will find this information useful. See you in other posts. -hhchi
Related posts:

Reader Interactions
Leave a reply cancel reply.
Your email address will not be published. Required fields are marked *
How to Use Autoplay in a PowerPoint Presentation
So you can snooze off more easier
When you must give a presentation at work, Microsoft PowerPoint is the standard tool most people use. However, without some creativity, PowerPoint presentations can end up dull. Learning how to autoplay PowerPoint slides can add some spice to your presentations.
In this article, you’ll learn how to autoplay content in PowerPoint slides. You can automatically play an embedded video when a slide appears or autoplay animations. Finally, you can create a self-running presentation that moves through the next slide using specific timing that you’ve set up and even loop the presentation for continuous play.
Note : The following tips will work on PowerPoint, whether running on a Windows or a Mac computer.

How to Create a Self-Running PowerPoint Presentation
Why create a self-running PowerPoint presentation? You may not want to get distracted by clicking to move your presentation to the next slide. Or you’d like to set up your presentation on a kiosk at a convention. Some presentations that can run themselves may not even need a speaker.
Set Up the Slide Show
By default, PowerPoint presentations are configured to run as “Presented by a speaker”, where you have to click through each slide to trigger transitions throughout the presentation.
To set up Autoplay, first configure the presentation to autoplay how you would like.
- Select Slide Show tab from the menu, then select Set Up Slide Show from the ribbon.

- Use the options on the pop-up window to configure how your presentation will behave during autoplay.

Here’s how each option works:
- Presented by a speaker : The speaker must click through each slide using the mouse click. However, automatic slide timing is still an option if you select it on the right.
- Browsed by an individual : The viewer will need to press Play to start the presentation, but after that, it’ll play on its own.
- Browsed at a kiosk : This option will continue to loop through the presentation until you press the Esc key on the keyboard. This will automatically enable the Loop Continuously option at the bottom of the window.
Rehearse and Set Slide Times
The next step is to set up the slide timing and rehearse your presentation to ensure the time spent automatically on each slide is appropriate.
Using this rehearsal option is also a great way to practice your presentation and ensure that the overall runtime is within your limitations.
To do this:
- Select Slide Show from the menu and choose Rehearse Timings from the ribbon.

- This will start the “Recording” session. In this mode, you’ll need to speak normally using the script you will use during your presentation. When done speaking on a specific slide, select the “Next” arrow to continue to the next slide.
Note : Use the “Pause” button to pause the time for the current slide if you need to collect your thoughts or take a break for any reason. This small window will also show you the overall time for your entire presentation.

- Continue to do this through all of the slides. Finally, press the “x” at the upper right corner to finish recording on the last slide. You’ll see a pop-up message asking if you’d like to save your new slide timings.

Once you’ve saved these changes, your PowerPoint presentation is ready to use. If you’ve kept the default Presented by a speaker setting and enabled the Using timings, if present select under “Advance Slides,” you can start your presentation manually and then let slides advance automatically as you speak.
Record Slide Show (Fully Automated)
If you want to create a fully self-running presentation for a kiosk or send people to run themselves, select the correct option in the “Set Up Show” window described above.
Then, record your presentation by selecting Slide Show from the menu and selecting Record in the ribbon. Next, select From Beginning in the drop-down menu to start recording your presentation in full screen from the first slide.

You can skip this step if you don’t want to record your voice narrating the slideshow. Just make sure you’ve enabled the Show without narration check box in the Set Up Show window.
How to Embed and Autoplay a Video
Another thing you can automate in your PowerPoint presentations is triggering an embedded video file when you click on the slide where you’ve placed it.
In the editing view, right click the video you want to automate and select the down arrow to the right of the Start button.

Select Automatically from the dropdown menu.

Save the PowerPoint presentation. Now, it’ll start playing automatically when you advance to the slide with your embedded video while in presenter view.
Should You Use a Self-Running PowerPoint Presentation?
The option to have your PowerPoint slide show advance automatically can be handy. However, it isn’t always the right approach. For example, a complete, recorded presentation is great if you’re emailing your presentation or offering a download. But a self-running presentation could backfire if you’re drawn into a side conversation or have other things you want to say on the fly. As a result, you may find yourself fumbling to pause your presentation.
If you want more control over your presentation flow, sticking with a manually run presentation might be best for your situation.

Ryan has been writing how-to and other technology-based articles online since 2007. He has a BSc degree in Electrical Engineering and he's worked 13 years in automation engineering, 5 years in IT, and now is an Apps Engineer. Read Ryan's Full Bio
Read More Posts:

Leave a Reply
Your email address will not be published. Required fields are marked *
How-To Geek
How to time your powerpoint slides for more effective presentations.
Delivering a presentation is not just about giving good slides, it is also about making sure that our presentation finishes by the time our audience w
Delivering a presentation is not just about giving good slides, it is also about making sure that our presentation finishes by the time our audience wants to have their tea break---so practicing how long to speak for each slide is essential for a proper presentation.
Rehearsing our Slides
Before we rehearse, make sure that we select our first slide. Now open the 'Slide Show' tab and click the 'Rehearse Timings' button.
Powerpoint will start the usual presentation mode with a timer panel. The clock on the panel will start ticking once we enter the presentation mode.
Click on the arrow button to move on the next slide and Microsoft Powerpoint will record each timing as you progress from one slide to the next one. You can also click on the pause button just in case you need to answer the phone or turn off the oven while you're rehearsing your slides.
You will see a summary on how much time you have spent on each slide at the end of the rehearsal.
Create a Self-Running Presentation
You can even set a self-running power point slides and let it run according to these timing, relieving us from the need to manually navigate the slides. Bear in mind that we can run into a situation where Powerpoint changes the slides before we finish, so make sure that you can deliver each slide based on your rehearsal timing.
Click on the setup slide show button.
Select the 'Browsed at a kiosk (full screen)' option to setup a self-running Powerpoint presentation. Press the 'esc' key to stop the self-running presentation.
You can re-adjust the presentation timing by recording back from the beginning or from the current slide.
If we're still not happy with the timing, we can clear all the slides timing and redo our presentation rehearsal.
Delivering a good presentation is not an easy task and requires a lot of practice. There are tons of great things that we can do with Powerpoint to add punch to our presentation, for example:
- Adding live web pages to our presentation
- Animating text and objects
- Putting video from the web in our presentation
- Using your mouse as a laser pointer in PowerPoint 2010
What other tips do you have for giving an effective presentation?
Browse through various articles and courses for Free at DeveloperPublish.com
- What is My IP Address?
Self-Running Presentation in PowerPoint
Ever wondered how to make your presentations more easier and automated with the self-running presentation in PowerPoint ?. This post explains exactly that.
What is Self- Running presentation?
Most users end up having a PowerPoint slides in the meeting and speak a lot with the PowerPoint presentations running in the background on the projector or screen. The presenting user would end up using the presentation remote or mouse manually to navigate to the next slide.
You can use the self running presentation slides in PowerPoint to run unattended in a booth or kiosk at a trade show or convention. The following are the steps, and they are as follows:
How to Create Self-Running Presentation in PowerPoint?
Follow the below steps to create a better self running and unattended presentation in PowerPoint.
- First, create a PowerPoint presentation with the required number of slides in it.

- To get a self-running presentation , go to the slideshow tab > then click on the Set-Up Slideshow option .

- A Set-Up Slideshow dialog box opens up where you can pick one of the Show Type menus and then press the Ok button.

- After selecting the from show type menus, You will have to rehearse and record timings for the self-running presentation effect .
- Now go to slideshow tab > rehearse timings .

- Rehearse timings will show a slide time , where you will be able to set an exact length of time for a slide to appear.

- In case if you want to add narration or sound to your presentation, click on the slideshow tab > record slideshow > select either option visible there in the slide .

- Now you can record your narration or sound .

Leave a Reply Cancel reply
You may also like.

Content Placeholders in PowerPoint
- May 5, 2022

How to Create Text Boxes Manually in PowerPoint?

Rearranging Slides in PowerPoint
- May 2, 2022
Login with your site account
Remember Me
404 Not found
COMMENTS
Create a self-running presentation. You can use a self-running presentation to run unattended in a booth or kiosk at a trade show or convention, or you can save it as a video and send it to a client. Windows macOS. On the Slide Show tab, click Set Up Slide Show. Under Show type, pick one of the following:
Click OK. To set up a presentation to run automatically, but those watching the slide show do NOT have control over when slides advance: Click the Slide Show tab in the Ribbon and then click Set Up Slide Show. A dialog box appears. Under Show type, select Browsed by an individual (window). Click OK.
Table of Contents. Creating a self-running PowerPoint, as Microsoft calls it, can be a great addition to your company's booth at conventions or industry-wide conferences. By featuring photos ...
Self running presentation packages. Another option is to create a self-contained PowerPoint Show (.ppsx) that can be run on another computer without additional software. Simple Self-running Presentations. The simplest self-running presentations are just a collection of photos. You can add captions or headings if you like or just put each photo ...
With Microsoft PowerPoint, you can use a self-running presentation to run unattended in a booth or kiosk at a trade show or convention, or you can save it as...
Business presentations: An automatically progressing presentation can help you focus on your content without worrying about going slide by slide, which can often be distracting and disrupt your rhythm. Publicity: Self-running presentations can be great if you use them for publicity. For example, if you have a kiosk or booth, a self-running ...
Run the Self-Running Slideshow. Still, at the Slide Show menu, click the From Beginning button to start the slide show. Check that the presentation runs full screen and is self-advancing and self-running. Also, check that the slide advance settings are OK, and sufficient to read the message on the slide. Adjust the duration when needed.
This mode is specifically meant for self-running presentations (running in a kiosk or computer at a trade show or company lobby, for example). Go to Slide Show> Set Up Slide Show (or Set Up Show). In the Set Up Show dialog box, under Show Type, choose Browsed at a Kiosk (full screen) and click OK.
A self-running presentation is a PowerPoint slideshow that advances automatically from slide to slide without manual control. This feature allows presenters to focus on delivering their message rather than navigating through each slide.
To Save Your Self-Running Presentation as a Video. First save your presentation as a PowerPoint file. Under the File, click Save. Then, still in the File tab, click Export. Now click the Create Video button. On the right side of the screen you will now see a drop-down menus (Full HD 1080p, Ultra HD 4K, etc.). Select the video quality you want.
Learn to create a dynamic PowerPoint self-running presentation with audio and a timer in this step-by-step tutorial. Follow along as we prepare the presentat...
PowerPoint isn't just for static, click-by-click presentations. This powerful software enables users to create self-running, interactive presentations that can be useful in a variety of scenarios ...
How to create a self running and narrated version of your presentation in one step, using PowerPoint.
There's lots to cover, so let's get started creating a self-running presentation in PowerPoint. Practice while you learn with exercise files Download the files the instructor uses to teach the course.
Self running slides catch people's attention. If you already have a presentation that will work for this, here are two simple steps to turn it into a self running presentation. Note: you will be making some changes to the presentation, so before you start save out a new version of your presentation.
Step 1: To do this, first open your PowerPoint file and select Transitions. In Transitions, choose one transition effect. This is the type of motion that will be applied when automatically switching from one slide to another. Step 2: The next step you will set a timer for each slide, after that time the slide will automatically switch to another.
From the course: PowerPoint: Creating a Self-Running, Interactive Presentation. Start my 1-month free trial Buy this course ($39.99*) Transcripts Exercise Files View Offline Animate slides with ...
Here's how each option works: Presented by a speaker: The speaker must click through each slide using the mouse click.However, automatic slide timing is still an option if you select it on the right. Browsed by an individual: The viewer will need to press Play to start the presentation, but after that, it'll play on its own.; Browsed at a kiosk: This option will continue to loop through ...
Click on the setup slide show button. Select the 'Browsed at a kiosk (full screen)' option to setup a self-running Powerpoint presentation. Press the 'esc' key to stop the self-running presentation. You can re-adjust the presentation timing by recording back from the beginning or from the current slide. If we're still not happy with the timing ...
First, create a PowerPoint presentation with the required number of slides in it. To get a self-running presentation, go to the slideshow tab > then click on the Set-Up Slideshow option. A Set-Up Slideshow dialog box opens up where you can pick one of the Show Type menus and then press the Ok button. After selecting the from show type menus ...
We'll be creating a self running presentation using a fictitious company that deals in landscape design. So, obviously the very first thing that will happen when people arrive at a kiosk, whether ...
Slight Create adenine Self-Running PowerPoint Slide Show. by Avantix Learning Crew | Updated November 12, 2021. Applies to: Microsoft ® PowerPoint ® 2013, 2016, 2019 and 365 (Windows). You can set up self-running Point slide shows on dash automatically at trade shows, conventions, events or as web-based presentations.