How to Record a Presentation with Webcam, Narration, and More

Everyone has, at some point, put a load of time and effort into creating the perfect PowerPoint presentation, only to use it once or twice. But isn’t it a shame for all that hard work to be discarded so quickly? Is every slide deck destined for deletion after just a couple of uses?
Isn’t there a better way to make the most out of your presentations? Well, yes. Yes, there is.
Rather than simply creating and presenting your work once or twice, recording your presentations can give them a new lease of life. Whether it’s a data report or a self-recorded PowerPoint, you can record a presentation in real-time, or in advance to make it available on-demand.
In this guide, we’ll explore two distinct ways of recording your presentation. First, we’ll discuss how to record a presentation from PowerPoint with audio and webcam, and then we’ll look at how to turn your .ppt slides into a video.

Benefits of Recording a Presentation
As well as there being many different ways to record a presentation, there are also many benefits of recording them. So, before we show you the ‘how,’ let’s talk about the ‘why.’
- Encouraging asynchronous communication : One key benefit is fostering asynchronous communication . By recording presentations, you’re letting your audience engage with the content in their own time, breaking the constraints of time zones and scheduling conflicts. This also ensures your viewers can absorb information at their own pace, and revisit it as needed.
- Boosting SEO : You can use your presentation to create a YouTube video and share it on your website to increase your online visibility and attract prospective customers. This can be a great way to expand your audience, increase web traffic, and establish yourself as an expert in your field.
- Perfecting your presentation : Whether it’s in-person or over Zoom, you don’t get second chances with live presentations. However, a pre-recorded keynote lets you perfect the content and the narration before anyone sees it. This is a great way to combat stage fright while honing your presentation skills and building confidence.
With this in mind, turning your slides into a video is a no-brainer. It’s an easy way to grow your audience and make the information you’re sharing more accessible and easier to digest.
Record your presentation today!
Download a free trial of Snagit to quickly and easily record your presentation.
How to record your presentation (with Snagit)
Depending on your audience and the type of presentation you need to deliver, TechSmith’s Snagit could just be the perfect tool for recording your PowerPoint. With its user-friendly interface and advanced features, Snagit is ideal for capturing top-notch presentation videos, in just a few clicks.
Now, there’s no denying that presentations are better when you can see the presenter… Fortunately, Snagit lets you capture your screen and webcam at the same time to create a Picture-in-Picture video.
In this section, we’ll guide you through the steps to record your presentation and webcam with Snagit.
Step 1: Open video capture
First, open Snagit and navigate to the Capture window. Select the Video tab, and start by clicking the big red Capture button.
Step 2: Select a recording area
Next, you’ll be prompted to choose which parts of your screen you want to record. Use Snagit’s orange crosshairs to select a specific region, window, or your entire screen.
Step 3: Configure recording settings
With the Video Recording toolbar, you can set options like Cursor Capture and Effects, System Audio, and Webcam.
If your webcam isn’t showing, click on the webcam icon. If you have an external webcam, select the one you want to use by clicking the dropdown arrow next to the webcam icon.
Step 4: Adjust your webcam
Next, adjust your webcam options to ensure your Picture-in-Picture recording looks how you want it. Here you can change the Picture-in-Picture placement as well as the shape and size of your webcam recording. You can even toggle between Picture-in-Picture and fullscreen webcam modes as you like.
The best part? You can make these adjustments even while recording.
Step 5: Manage recording
When you’re ready to roll, hit the Record button and click the Stop button when you’re finished. It’s that simple!
And remember, if there’s an interruption (like an unexpected visit from the mailman), just hit Pause. It’s okay to take a break — your video won’t be ruined by a little interruption.
Step 6: Edit your video
Once you’ve finished recording, Snagit will automatically open your video in the Snagit Editor, which is super easy to use. From here, you can make light edits to the footage as needed.
For example, if you need to cut or trim your footage , you can! Here’s how:
- Set Start Point : Drag the Start handle (green) on the timeline to your desired starting point.
- Set End Point : Similarly, drag the End handle (red) to where you want to end the cut.
- Review the Segment : Before making any cuts, you can review the segment by dragging the Playhead (white) left and right across the timeline. This ensures you’re only cutting the footage you intend to.
- Make the Cut : Once you’re satisfied with the selection, click the Cut button, which will pop up once you’ve made a selection.
And that’s all there is to it! If you want to go the extra mile, you can also use Snagit to save individual frames of your video as images , which can be used to create a thumbnail for your video .
How to record a presentation from PowerPoint with audio and webcam
Now, Snagit is great for recording less formal videos in a flash, but if your presentation is intended for a particularly large or important audience, you might be looking to create something more polished. This is where TechSmith’s Camtasia comes in.
Camtasia is one of the smartest and most intuitive pieces of editing software out there, but it also makes for a pretty nifty screen recorder too. Camtasia is great for recording presentations when you need more control and editing powers over the final product.
But best of all, Camtasia streamlines the process by letting you record your presentation and voice over directly within PowerPoint.
Step 1: Set up your presentation video recording
If you’re a Windows user, you’ll have the option to include a PowerPoint Add-in Toolbar when you install Camtasia. While this feature isn’t currently available on MacOS, the Camtasia Add-in Toolbar allows you to start, stop, and control your recordings from within PowerPoint — so you don’t need to switch between applications.

Just open the presentation you want to record and locate the Add-in toolbar under the Add-ins tab.
Don’t see the add-in toolbar? Go to File > Options > Add-ins, to enable it. Click on the Manage drop-down, select Disabled Items, then click Go. If the Camtasia Add-in is listed, select it, and click Enable.
If you’re an Apple user, don’t panic! You can still record your screen (with audio) on a Mac using Camtasia, and it’s just as easy. Alternatively, you can skip ahead to the next section and import your slides directly into Camtasia.
Step 2: Customize your recording options
Now let’s walk through each of the options on the toolbar before we begin recording.

Record audio
The microphone button controls whether or not audio is recorded as part of your presentation. When you enable it, you’ll be able to record your narration using a microphone.
If you are planning to record audio, this is where you’ll select your microphone. If you want to record great audio , we suggest using an external microphone, rather than the one that’s built into your laptop.
Some of the best microphones for recording video are likely to be less expensive than you think. But, if you’re on a shoestring budget, even the mic that’s built into your headphones could produce better audio than your laptop.
Once you’re set up, be sure to test the mic and adjust the volume slider as needed. You’ll also need to decide whether or not to record your system audio, which is any sound that comes out of your speakers, such as email notifications.
Record webcam
If you have a webcam, you can also record your camera during the presentation to create a Picture-in-Picture clip — just as you can with Snagit!

To customize even more of the recording settings, click the Recording Options button. Here you’ll find settings that let you record with a watermark and adjust your video frame rate . There are a few more options too, but the default settings should work just fine.
When you’re ready, click OK to close this window and save any changes made.
Step 3: Record your presentation
The final step is as simple as clicking the Record button in the toolbar. This will launch your slides into the Presentation Mode and start recording.
When you exit Presentation Mode or reach the end of your slideshow, you can either continue recording your screen, or stop recording and save your file. Pretty easy right?
Before you get started, let us show you another way to turn your presentation into a video, without recording your desktop .
How to turn your PowerPoint presentation slides into a video
Another way to create a video from your presentation is to import your PowerPoint slides into Camtasia. This way you can adjust how long each slide appears on screen, as well as add Behaviors and Annotations to personalize your presentation and highlight important information.
By importing your slides into Camtasia, and recording your voice over separately, you get a lot more flexibility with the editing process, which means you have more control over the finished article.
If you do decide to record your audio separately, you might want to take a look at TechSmith’s Audiate . This advanced audio recorder will transcribe your voice over in real-time and let you edit the audio file as if it were a text-based document. We don’t want to brag, but it’s probably the best way to add a voice over to a PowerPoint .
Regardless of how you decide to narrate your PowerPoint, here’s how to turn your presentation into a video:
1. Import your PowerPoint slides
First, start by importing your PowerPoint slides directly into Camtasia. Once your media is imported, you can edit it by dragging your slides into the Editing Toolbar.

You can now add the images to the Timeline, and edit them like any other media in a Project.

If you drag your slides to the Timeline, the slides will be placed in the order of the presentation, each with a default 5-second duration.

With your presentation on the timeline, use Ripple Move to create space in between slides to adjust the timing of each one. To do this, hold shift, then click and drag.

Once you’ve imported your slides and adjusted the duration of each one to correlate with your voice over, it’s time to start editing.
How to edit a presentation video (in Camtasia)
Add behaviors.
Firstly, add some visual interest with Camtasia Behaviors . A Behavior is an animation that brings movement to your slides, making them stand out on screen. This is a great way to bring parts of your presentation to life and take it from ordinary to extraordinary — because nobody likes a boring presentation .
To add a Behavior, click and drag the Behavior you wish to use onto the slide you want to animate. Once added, you can adjust the Behavior using the Properties tab.
Add annotations
Another good way to grab and direct your audience’s attention is to add some Annotations, which are great for highlighting important information.
To insert an Annotation, click the Annotation tab on the left side of the screen and drag it into the designated slide. You can then re-position and edit the Annotation in the Properties tab as needed.
Recording a PowerPoint Presentation, the FAQs
Absolutely! Both Snagit and Camtasia are excellent choices for recording a professional and polished presentation. Snagit is perfect for no-fuss recording and editing. If you require more sophisticated editing capabilities, Camtasia is the ideal choice, offering the added convenience of recording your slideshow and voice over directly within PowerPoint.
Click the Record button in the toolbar to launch your slides into the Presentation Mode and start recording. When you exit Presentation Mode or reach the end of your slideshow, you can either continue recording your screen or stop and save your file.
If you’re planning to record audio, select your microphone in the recording options. The microphone button controls whether or not audio is recorded as part of your presentation. If you have a webcam attached to your computer, you can also record your camera to create a Picture-in-Picture clip, perfect for showing the presenter during the presentation.
With Snagit, you can conveniently record your voice over as you go through your presentation, capturing both the audio and visuals in one go. If you’re looking for more advanced recording and editing options, you might also consider using Camtasia, which allows you to record your voice over while presenting. For even more control, use Audiate to record your audio separately and then import it into Camtasia for fine-tuning.

Justin Simon
Global Content Strategy Manager at TechSmith. I play a lot of golf and watch a lot of football.
- How To Rotate a Video
- How to Write A Shot List That Will Transform Your Video
- YouTube vs. Vimeo: What’s the Difference?
Subscribe to TechSmith’s Newsletter
Join over 200,000 people who get actionable tips and expert advice every month in the TechSmith Newsletter.
How to Record a PowerPoint Presentation with Narration
Can be helpful in creating a dramatic narrative
Microsoft PowerPoint has a built-in recording tool that allows you to narrate your presentations using recorded audio. You can export and share recorded presentations as video files.
This tutorial covers everything about recording PowerPoint presentations on Windows and Mac computers.

Record PowerPoint Presentation with Narration
Open the PowerPoint file/presentation you want to record and follow the steps below.
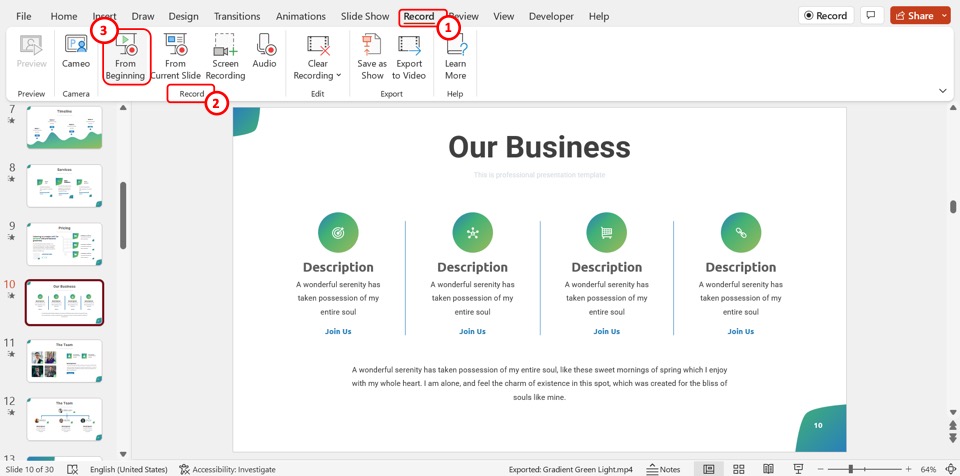
Record PowerPoint Presentation on Windows
- Select the slide you want to start recording from on the slide thumbnail pane.

- Head to the Record tab on the ribbon and select the Record button to start recording from the current/selected slide.

To record from the first slide, select the down-facing arrow icon below the Record button and select From Beginning .

You can also record a presentation from the Slide Show tab. Select Slide Show on the ribbon and select Record , From Current Slide , or From Beginning .

That’ll open PowerPoint’s presentation recorder in a fullscreen window.
- Select the Record icon and start speaking after the three seconds countdown.

PowerPoint records the presentation window and captures your voice and webcam feed as you navigate the slides. Select the left-facing and right-facing arrows to move to the previous and next slides in the presentation.
Record PowerPoint Presentation in macOS
- Open the Slide Show tab and select Record Slide Show .

- Select the Record button on the toolbar to start recording your narration.

Use your keyboard arrow keys to move back and forth between slides. Press N or Space Bar to move to the next slide or animation in the presentation. Press P or Backspace to return to the previous slide or animation.
Select Tips in the top-left corner for more keyboard shortcuts and other presentation tips.

Note: The narration tool doesn’t record slide transitions. When moving between slides, wait for the destination slide to appear on the screen before speaking.
PowerPoint Recorder Control/Settings
You’ll find a handful of controls and options on the recording tool. We’ll show you how to use these controls to include voiceovers or audio recordings in your presentation.

Using Presentation Pointer Tools
PowerPoint provides several tools to mark up your slides when narrating your presentation. There’s a pen tool, eraser, laser pointer, and highlighter.
With the Pen tool, you can draw on slides during narration/recording. Press Ctrl + P (Windows) or Command + P (Mac) to use the pen tool. You can also select the Pen icon to convert the pointer to a pen.

The Laser pointer tool converts your cursor to an onscreen laser. Use the laser pointer to draw attention to something on a slide/presentation.
Press Ctrl + L (Windows) or Command + L (Mac) to use the laser pointer. There’s also a Laser pointer icon on the toolbar.

Pressing Ctrl + I (or selecting the Highlighter tool ) converts your cursor to a highlighter.

Use the Eraser tool to remove inks and highlight from slides. Select the Eraser icon or press Ctrl + E and select the ink to erase.

On macOS, select the Erase Pen icon (or press E ) to erase all drawings and highlights on the slide.

You can change the pointer tools ink from the color selection boxes. However, one major limitation is that you can’t change the size of these pointer tools.
Pause and Resume Your Recording
In Windows, press I on your keyboard or select the Pause button in the top-left corner to pause your recording.

Press I again or select the Record icon to resume the recording.

If you use a Mac, select the Pause icon in the top toolbar to pause the recording.

Unmute or Mute Microphone
Check that your microphone is unmuted before recording. Select the microphone icon in the bottom-right corner to mute or unmute your mic.

PowerPoint for Windows allows you to mute and unmute your microphone in real time while recording video/audio narrations. The macOS version of PowerPoint only lets you configure your camera and microphone settings before recording.
Switch Microphone or Camera
Want to record your presentation with an external microphone or camera? Press Ctrl + M or select the audio/camera settings icon in the top-right corner and choose your preferred microphone/camera.

In macOS, select the microphone icon to mute or unmute your microphone. Select the arrow-down icon next to the microphone or camcorder icons to switch input devices.

Enable and Disable Camera
The recorder displays your camera or webcam feed in the bottom-right corner of the presentation slides.
Select the camcorder icon to remove your webcam feed from the recording. Select the icon again to display your webcam feed in the presentation.

You can also use the Ctrl + K keyboard shortcut on Windows computers to enable or disable your camera.
On Mac computers, you’ll find the video control icon on the top toolbar.

Note: The recording tool greys out the camcorder icon if your microphone is turned off.
Enable or Disable Camera Preview
PowerPoint allows you to disable the camera preview without turning off your camera or webcam.
Press Ctrl + J (Windows) or select the Camera Preview icon in the bottom-right corner to disable or enable the camera preview.

End a Recording
Press S on your Windows keyboard or select the Stop icon to end the recording.

Replay or Preview Your Recording
When you end a narration, press V on your keyboard or select Replay to preview or watch the recording.

The recorded narration will include all pen inks, highlights, and laser pointer gestures made during the presentation.
You can also preview/replay the narration outside the recording tool. Open the Slide Show tab and choose to watch the playback From Beginning or From Current Slide .

PowerPoint allows you to preview the playback on individual slides. A speaker/audio icon appears in the bottom-right of PowerPoint slides with narrations.
Choose the slide you want to preview, hover your cursor on the speaker icon in the bottom-right corner, and select Play .

Delete Current Narration/Recording
Did you spot an error when previewing your presentation? Want to delete the current narration and start from scratch?
Select the Clear existing recordings icon and choose whether to Clear Recordings on Current Slide or Clear Recordings on All Slides .

On Mac, select the Bin icon to delete the entire narration/recording.

Close the Narration Tool
Select the X icon on the title bar to close the presentation narration tool and return to Powerpoint.

Select End Show in the top-left corner to close the recording tool on a Mac computer.

Delete Narrations from Slides
Want to delete the narration or timing on an individual slide or the entire presentation? Select the slide with the narration you want to delete and follow the steps below.
- Open the Record tab and select the down-facing arrow below the Record icon.
- Select Clear and choose to clear timing or narration on current or all slides.

Export Recorded or Narrated Presentation
You can export a narrated PowerPoint presentation as a video file. The video output includes ink strokes, recorded audio/video, laser pointer gestures, and webcam/camera recording.
- Open the Record tab and select Export to Video .

Alternatively, open the File menu, select Export on the sidebar, and select Create a Video .

- Choose the quality of the video export in the first drop-down box—Ultra HD (4K), Full HD (1080p), HD (720p), Standard (480p).

- Choose Use Recorded Timings and Narrations in the next drop-down box and select Create Video .

- Give the recorded presentation a file name and select Save .

Narrate Your PowerPoint Presentations
The Microsoft PowerPoint web app doesn’t have a recording tool. As a result, you can only record presentations with narrations using PowerPoint for Windows or Mac.
You might meet issues recording a slide show if you use an outdated version of PowerPoint. Also, the recording tool on older versions of PowerPoint has a different interface and lacks some controls. Update PowerPoint and restart your computer if you cannot record a slide show.

Sodiq has written thousands of tutorials, guides, and explainers over the past 4 years to help people solve problems with Android, iOS, Mac, and Windows devices. He also enjoys reviewing consumer tech products (smartphones, smart home devices, accessories, etc.) and binge-watching comedy series in his spare time. Read Sodiq's Full Bio
Read More Posts:

- Start the presentation and see your notes in Presenter view Article
- Add speaker notes to your slides Article
- Rehearse and time the delivery of a presentation Article
- Record a slide show with narration and slide timings Article
- Print your PowerPoint slides, handouts, or notes Article
- Create a self-running presentation Article

Record a slide show with narration and slide timings
You can record your PowerPoint presentation—or a single slide—and capture voice, ink gestures, and your video presence. When completed, it’s like any other presentation. You can play it for your audience in a Slide Show or you can save the presentation as a video file. So, instead of just “handing the deck” to someone, people can see your presentation with the passion and personality intact.
A new feature for Microsoft 365 was rolled out in early 2022. Exactly when your business has this feature is also based on when your admin distributes new features in Microsoft 365.
This article contains procedures for both the new experience and the classic experience:
New experience
Classic experience

All recording tools are in the Record tab in the ribbon, but you can start by selecting the Record button.

You can also record by selecting one of the options in the Record section of the Record tab.

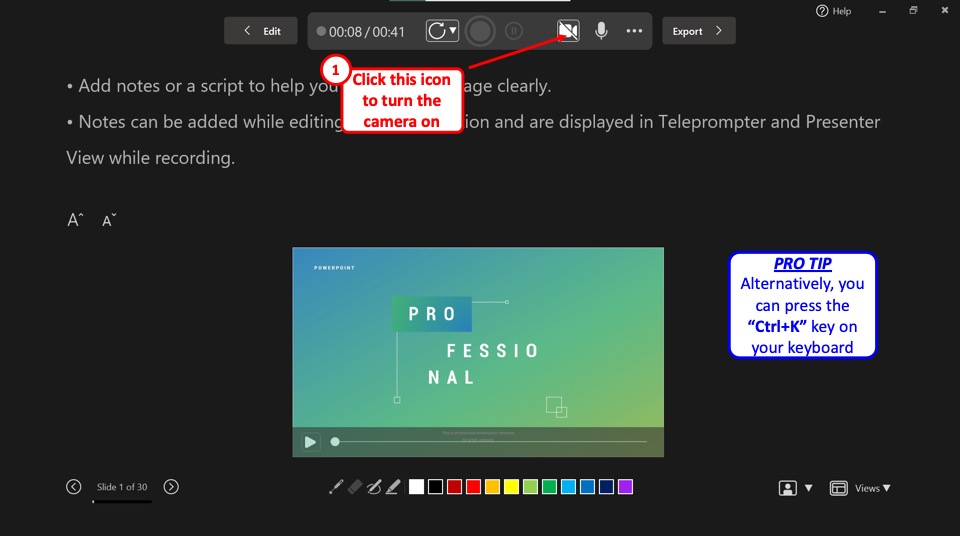
If you have notes in your presentation, they’re turned into text at the top of the screen so you can use them like a teleprompter as you record.
Tip: Use the auto-scroll feature in teleprompter and set it to scroll at your preferred speed.

There are several options you can use when you record a presentation. You can turn your camera and microphone on or off by selecting the icons at the top. There are several options you can use when you record a presentation. You can turn your camera and microphone on or off by selecting the icons at the top. To change your camera or microphone, choose the Select more options <···> icon. You can even add a customizable camera that can be resized, repositioned, and formatted to go with your slide content. Select Edit , then select Cameo . Adjust the formatting for the camera, then select Record again to return to the recording environment.
In the Select the camera mode menu, you can select Show Background or Blur Background .

You can also change the layout in the Views menu to switch between Teleprompter , Presenter View , or Slide View .

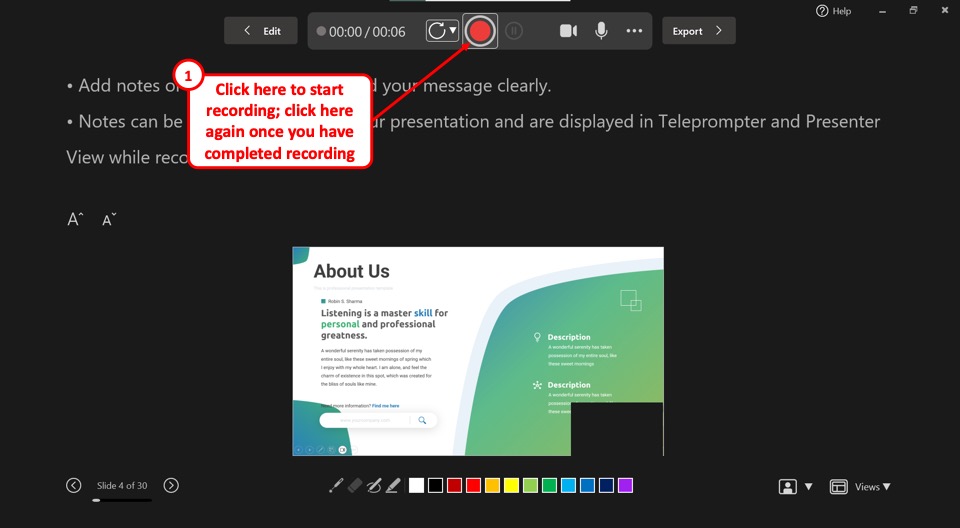
When you’re ready, select Start recording and a countdown will begin.
Use the onscreen laser, colored pens, or highlighters in the tray below markup slides and it’ll record as well.
To record narration for a specific slide, use the previous or next arrows.
Note: Narration won’t record during slide transitions so let those play first before you start speaking.
Pause the recording as needed or select Stop if you’re done.
To review the video, select the Play button.
To quickly delete and re-record your video on current slide or on all slides, select Delete . While Clear will delete the recorded narration, Reset to Cameo additionally replaces the recorded narration with the camera feed for an easy retake.

When you’re done, select Export > Export Video .
After you successfully export the video, you can view the video by selecting View and share video .

At any time, you can return to your document by selecting the Edit button.
Want more?
About Record in PowerPoint
Create a self-running presentation
Export or turn your presentation into a video
Classic experience
Turn on the Recording tab of the ribbon: On the File tab of the ribbon, click Options . In the Options dialog box, click the Customize Ribbon tab on the left. Then, in the right-hand box that lists the available ribbon tabs, select the Recording check box. Click OK .

To get ready to record, select Record on either the Recording tab or the Slide Show tab of the ribbon.
Clicking the upper half of the button starts you on the current slide.
Clicking the lower half of the button gives you the option to start from the beginning or from the current slide.

(The Clear command deletes narrations or timings, so be careful when you use it. Clear is grayed out unless you have previously recorded some slides.)
The slide show opens in the Recording window (which looks similar to Presenter view), with buttons at the top left for starting, pausing, and stopping the recording. Click the round, red button (or press R on your keyboard) when you are ready to start the recording. A three-second countdown ensues, then the recording begins.

The current slide is shown in the main pane of the Recording window.
You can stop the recording any time by pressing Alt + S on your keyboard.
Navigation arrows on either side of the current slide allow you to move to the previous and next slides.
PowerPoint for Microsoft 365 automatically records the time you spend on each slide, including any Animate text or objects steps that occur, and the use of any triggers on each slide.
You can record audio or video narration as you run through your presentation. The buttons at the lower-right corner of the window allow you to toggle on or off the microphone, camera, and camera preview:

If you use the pen, highlighter, or eraser, PowerPoint records those actions for playback also.

If you re-record your narration (including audio and ink), PowerPoint erases your previously recorded narration (including audio and ink) before you start recording again on the same slide.
You can also re-record by going to Slide Show > Record .
You can pick a pointer tool (pen, eraser, or highlighter) from the array of tools just below the current slide. There are also color selection boxes for changing the color of the ink. ( Eraser is grayed out unless you have previously added ink to some slides.)
To end your recording, select the square Stop button (or press S on your keyboard).
When you finish recording your narration, a small picture appears in the lower-right corner of the recorded slides. The picture is an audio icon, or, if the web camera was on during the recording, a still image from the webcam.

The recorded slide show timing is automatically saved. (In Slide Sorter view, the timings are listed beneath each slide.)
In this process, what you record is embedded in each slide, and the recording can be played back in Slide Show. A video file is not created by this recording process. However, if you need one, you can save your presentation as a video with a few extra steps.
Preview the recorded slide show
On the Slide Show tab, click From Beginning or From Current Slide .
During playback, your animations, inking actions, audio and video will play in sync.

Preview the recorded sound
In the Recording window, the triangular Play button near the top left corner lets you preview the recording of the slide that currently has the focus in that window.

In Normal view, click the sound icon or picture in the lower-right corner of the slide, and then click Play . (When you preview individual audio in this way, you won't see recorded animation or inking.)

You can pause playback while previewing the audio.
Set the slide timings manually
PowerPoint for Microsoft 365 automatically records your slide timings when you add narrations, or you can manually set the slide timings to accompany your narrations.
In Normal view, click the slide that you want to set the timing for.
On the Transitions tab, in the Timing group, under Advance Slide , select the After check box, and then enter the number of seconds that you want the slide to appear on the screen. Repeat the process for each slide that you want to set the timing for.
If you want the next slide to appear either when you click the mouse or automatically after the number of seconds that you enter—whichever comes first—select both the On Mouse Click and the After check boxes.
You can use manual slide timings to the trim the end of a recorded slide segment. For example, if the end of a slide segment concludes with two seconds of unnecessary audio, simply set the timing for advancing to the next slide so that it happens before the unnecessary audio. That way you don't have to re-record the audio for that slide.
Delete timings or narration
The Clear command is for deleting timings or narration from your recording that you don't want or that you want to replace.
In the Recording window, the Clear command in the top margin of the window allows you to:
Clear recordings on the current slide
Clear recordings on all slides
In Normal view, there are four different Clear commands that allow you to:
Delete the timings on the currently selected slide
Delete the timings on all slides at once
Delete the narration on the currently selected slide
Delete the narration on all slides at once
If you do not want to delete all the timings or narration in your presentation, open a specific slide that has a timing or narration that you do want to delete.
On the Recording tab of the PowerPoint for Microsoft 365 ribbon, on the Record Slide Show button, click the down arrow, point to Clear , and then choose the appropriate Clear command for your situation.

Turn off timings or turn off narrations, and ink
After you've recorded your PowerPoint for Microsoft 365 presentation, any timings, gestures, and audio you performed are saved on the individual slides. But you can turn them all off if you want to view the slide show without them:
To turn off recorded slide timings: On the Slide Show tab, clear the Use Timings box.
To turn off recorded narrations and ink: On the Slide Show tab, clear the Play Narrations box.
Publish the recording to share it with others
Once you've edited the recording to your satisfaction, you can make it available to others by publishing to Microsoft Stream.
With the presentation open, on the Recording tab, select Publish to Stream .
Type a title and a description for the video.
Set other options, including whether you want others in your organization to have permission to see the video.
Select the Publish button.
The upload process can take several minutes, depending on the length of the video. A status bar at the bottom of the PowerPoint window tracks the progress, and PowerPoint shows a message when the upload is finished:

Click the message to go directly to the video playback page on Microsoft Stream.
Create closed captions
To make your video more accessible by including closed captions, choose from these options, which are described in separate Help articles:
Manually write a closed caption file yourself
Get a closed-caption file automatically generated by Microsoft Stream
Once you have a closed-caption file, you can add it to your video file by using PowerPoint .
Record a slide show
With your presentation open, on the Slide Show tab, click Record Slide Show .
(The Clear command deletes narrations or timings, so be careful when you use it. Clear is grayed out unless you have previously recorded some slides.)
In the Record Slide Show box, check or clear the boxes for your recording, and click Start Recording .

More about these options:
Slide and animation timings : PowerPoint automatically records the time you spend on each slide, including any animation steps that occur, and the use of any triggers on each slide.
Narrations, ink, and laser pointer: Record your voice as you run through your presentation. If you use the pen, highlighter, eraser, or laser pointer, PowerPoint records those for playback as well.
Important: Pen, highlighter, and eraser recording are available only if you have the February 16, 2015 update for PowerPoint 2013 or a later version of PowerPoint installed. In earlier versions of PowerPoint, pen and highlighter strokes are saved as ink annotation shapes.
At the top left corner of the window is the Recording toolbar, which you can use to:

If you re-record your narration (including audio, ink, and laser pointer), PowerPoint erases your previously recorded narration (including audio, ink, and laser pointer) when you start recording again on the same slide.
You can also re-record by going to Slide Show > Record Slide Show .
To use ink, eraser, or the laser pointer in your recording, right-click the slide, click Pointer options , and pick your tool:
Laser Pointer
Highlighter
Eraser (This option is grayed out unless you have previously added ink to some slides.)
To change the color of the ink, click Ink Color .
To end your recording, right-click the final slide, and click End Show .
Tip: When you finish recording your narration, a sound icon appears in the lower-right corner of each slide that has narration.
The recorded slide show timings are automatically saved. Timings are shown in Slide Sorter view just beneath each slide.
In this process, what you record is embedded in each slide, and the recording can be played back in Slide Show. A video file is not created by this recording process. However, if you want a video file, you can save your presentation as a video with a few extra steps.
On the Slide Show tab, click From Beginning or From Current Slide.
During playback, your animations, inking actions, laser pointer, audio and video play in sync.
Preview the recorded audio
In Normal view, click the sound icon in the lower-right corner of the slide, and then click Play.
PowerPoint automatically records your slide timings when you add narrations, or you can manually set the slide timings to accompany your narrations.
On the Transitions tab, in the Timing group, under Advance Slide , select the After check box, and then enter the number of seconds indicating how long the slide should appear on the screen. Repeat the process for each slide that you want to set the timing for.
Tip: If you want the next slide to appear either when you click the mouse or automatically after the number of seconds that you enter—whichever comes first—select both the On Mouse Click and the After check boxes.
The Clear command is for deleting timings or narration from your recording that you don't want or that you want to replace. There are four different Clear commands that allow you to:
On the Slide Show tab of the PowerPoint ribbon, on the Record Slide Show button, click the down arrow, point to Clear, and then choose the appropriate Clear command for your situation.
Turn off timings or turn off narrations, ink, and laser pointer
After you've recorded your PowerPoint presentation, any timings, gestures, and audio you performed are saved on the individual slides. But you can turn them all off if you want to view the slide show without them:
To turn off recorded narrations, ink, and the laser pointer: On the Slide Show tab, clear the Play Narrations box.
Turn your mouse into a laser pointer
Animate text or objects
Turn your presentation into a video
Create a self-running presentation
Record your presentation

Toggle video and audio options in the options dropdowns in the recording toolbar.

Note: Your video will be re-recorded just as you had styled.
After you exit Recording Studio with the Esc key (or by clicking End show ) you will see narration (audio/video) applied to your slide along with the proper slide timings and ink animations.
Tip: Audio, video, and inking elements can all be resized and moved in edit view after recording.

Reset to Cameo
To delete your recording and retain your camera style, do the following:
On the Record tab, select Reset to Cameo .

Clear timings or narration
On the Record tab, select Clear Recording

Keyboard shortcuts during the recording process
Related information.
Present with Cameo
Save a presentation as a movie file or MP4
Record audio in PowerPoint for Mac
Add or delete audio in your presentation
Prepare to record
To begin, open the presentation you want and click the Slide Show tab.
Tip: If your presentation has a lot of slides, you might find it more convenient to work in Slide Sorter view. Click View > Slide Sorter to try it out.
Here are some things to check before you begin recording:
If you want to record only part of your slide deck, do one of the following before you begin:
Select the slides you don't want to include, and click Hide Slide .
Click Custom Show > Custom Slide Show > + (add).

Use the Rehearse button to change the timing between slides without affecting the narration or gestures you've already recorded.

Make sure your microphone is set up correctly. On the Mac, go to System Preferences > Sound .
Record your slide show
If you want to add narration or commentary to the slide show, make sure your microphone is set up and working.
To start recording:
Click the Slide Show tab, select the slide where you want the recording to begin, and then click Record Slide Show .

During recording, use Ctrl+click to access the recording commands that let you navigate through the slides, change cursors, or trigger screen blackouts or whiteouts.

Click End Show to stop recording.
A Save dialog box appears. Click Yes to save your recording, or No if you want to record it again.
Saving overwrites anything you've previously recorded. If you want to record another slide show with the same set of slides, save your presentation file with a different name.
Click Play from Start to preview your recording.
You may want to print this list of keyboard shortcuts to refer to while you're recording:
Set playback options
When you've finished recording and are ready to distribute the presentation, click Set up Slide Show and choose the options that are right for your audience.

Show type Show full screen or windowed.
Show options Turn off narration or animations.
Slides Choose a subset of slides, or a Custom show if you've set one up.
Advance slides Set up this version of the slide show so someone can page through it manually.
Add, change, or remove transitions between slides
Start the presentation and see your notes in Presenter view
We're sorry. PowerPoint for the web doesn't support recording a slide show.

Need more help?
Want more options.
Explore subscription benefits, browse training courses, learn how to secure your device, and more.

Microsoft 365 subscription benefits

Microsoft 365 training

Microsoft security

Accessibility center
Communities help you ask and answer questions, give feedback, and hear from experts with rich knowledge.

Ask the Microsoft Community

Microsoft Tech Community

Windows Insiders
Microsoft 365 Insiders
Was this information helpful?
Thank you for your feedback.
Home Blog PowerPoint Tutorials How to Record a Presentation in PowerPoint
How to Record a Presentation in PowerPoint

Recording PowerPoint presentations can have several benefits. They can serve as recordings of a session that can be uploaded online, shared with participants who might not be able to attend a presentation session, or used as tutorials for passing on instructions.
How to Record a PowerPoint Presentation
PowerPoint provides multiple options for initiating recording for a presentation. You can also choose to record audio and yourself presenting the slides using your camera. When recording your presentations, you can choose PowerPoint templates or something minimalist made by you to record the session. Just be mindful of the graphics to ensure the video does not appear overpowering to the viewer.
How do I Record a PowerPoint Presentation as a Video?
You can start recording your presentation using the following method.
- Record Tab: To record a PowerPoint presentation, go to the Record tab and select whether you wish to record from the beginning, from the current slide, a specific area on the screen, or record audio.
- Slide Show Tab: you can also initiate recording a PPT via Slide Show -> Record to initiate recording from the current slide or the beginning of your presentation.
Record Button: If you’re using the latest version of PowerPoint, you can start Recording your presentation from the current slide via the Record button in the top right corner.

Record from the Current Slide or Beginning of the Presentation
Starting your recording from the beginning of the current slide will open your presentation in recording mode. Hit Record to start the recording.

Screen Recording in PowerPoint
If you initiate screen recording in PowerPoint, you can start recording a screencast by selecting the area you wish to record. This is similar to recording a PowerPoint presentation as a video, with the added advantage of recording other parts of your desktop. This method can also be used for recording a screencast, even if you’re not using a PowerPoint presentation in your video recording.
To start the recording, click Record or use the Windows+SHIFT+R hotkey. To stop the screen recording, click Pause to temporarily halt the recording to resume later or Stop or the Windows+SHIFT+Q hotkey to end the recording session.

The recorded video will be instantly added to your slide once you click Stop .

Record Audio
Another option in the Record tab in PowerPoint is to record audio narrations for your PowerPoint presentation. Simply click Record to start, Pause to temporarily halt, and Stop to stop the recording process.

Once the recording stops, the audio will be added to your PowerPoint presentation.

How can I Annotate Slides in PowerPoint During a Recording?
Once you enter recording mode, you can start annotating your slides using the Pen or Highlighter tool. Other tools in the menu include a Laser pointer and Eraser.

How can I Record a PowerPoint Presentation with Audio?
To enable audio for your Powerpoint recording, unmute the mic from the audio icon on top, CTRL+M hotkey, or click the three dots ( More options for recording menu), followed by the Microphone to select the audio device for recording. You can only record audio if an audio device is connected to your computer. This is a fairly simple process, unlike other presentation platforms. For example, in an earlier article, we showed you how to do a voiceover on Google Slides , which entails a slightly more elaborate process.

How to Record Yourself Presenting a PowerPoint?
Enable the camera during a recording session.
Like turning on audio, you can toggle the camera on or off using the icon on top. The camera input device can also be selected via the Camera option or CTRL+K hotkey, which can be revealed via the three dots from the top menu.

Insert Video Recording in a Slide using Cameo
PowerPoint’s Cameo feature enables recording a video to insert in a slide. You can use the feature to quickly insert a video message in your slides that can be played during a presentation session. This option might also be relevant if you intend to convert PowerPoint to video . If you are looking how to video record yourself presenting a PowerPoint, then follow the steps below.

Once Cameo is turned on, you can also choose to stylize the camera shape, style, border, and add effects. Cameo is quite a unique feature in PowerPoint that currently does not have alternatives in rival presentation apps. For example, you cannot use a similar feature if you wish to convert Google Slides to video .

How to Save Recording for a PowerPoint Presentation?
After you have completed your recording, click Export to save the presentation recording.

You can customize your recording settings via Customize Export or continue the process via Export Video .

Using the Customize Export option, you can choose between a desired output quality for your video, including Ultra HD (4K), Full HD (1080p), HD (720p), and Standard (480p).

Other options in the menu include the ability to choose and preview timings and narrations.

After you are satisfied with your recording settings, you can export your presentation to video.

The video recording of your PowerPoint presentation can be played using any standard video player. The video can also be embedded in PowerPoint slides, uploaded online, such as to a YouTube channel, or shared via cloud storage apps like Dropbox, Box, OneDrive, etc.

Final Words
Recording a PowerPoint presentation can provide a record of a session that might be required for further sharing. The best way to record a presentation is to ensure that your slides aren’t visually overpowering, your audio is clear and audible, and if using a camera, the cam input isn’t hazy, grainy, or too dark.
Once you are familiar with how to record a presentation on PowerPoint, it might take a bit of practice to make your video recording look professional and crisp. It’s best to practice your sessions before recording them until you can seamlessly record presentation decks.

Like this article? Please share
PowerPoint Addins, PowerPoint Tips, Presentation Tips, Presentations, Screencasts Filed under PowerPoint Tutorials
Related Articles

Filed under Google Slides Tutorials • May 3rd, 2024
How to Work with Google Slides Version History
Go back to previous changes or check who edited your presentation. Learn how to work with Google Slides Version History here.

Filed under Google Slides Tutorials • April 29th, 2024
Best Google Slides Add-Ons
Optimize your Google Slides experience by installing the best Google Slides add-ons available in the market. Full list with photos.

Filed under Design • April 23rd, 2024
How to Create the Perfect Handouts for a Presentation
Learn how to create effective handouts for presentations and the recommended structure for handouts with this guide.
One Response to “How to Record a Presentation in PowerPoint”
How do I generate webcam option in PowerPoint 2016 ?
Leave a Reply
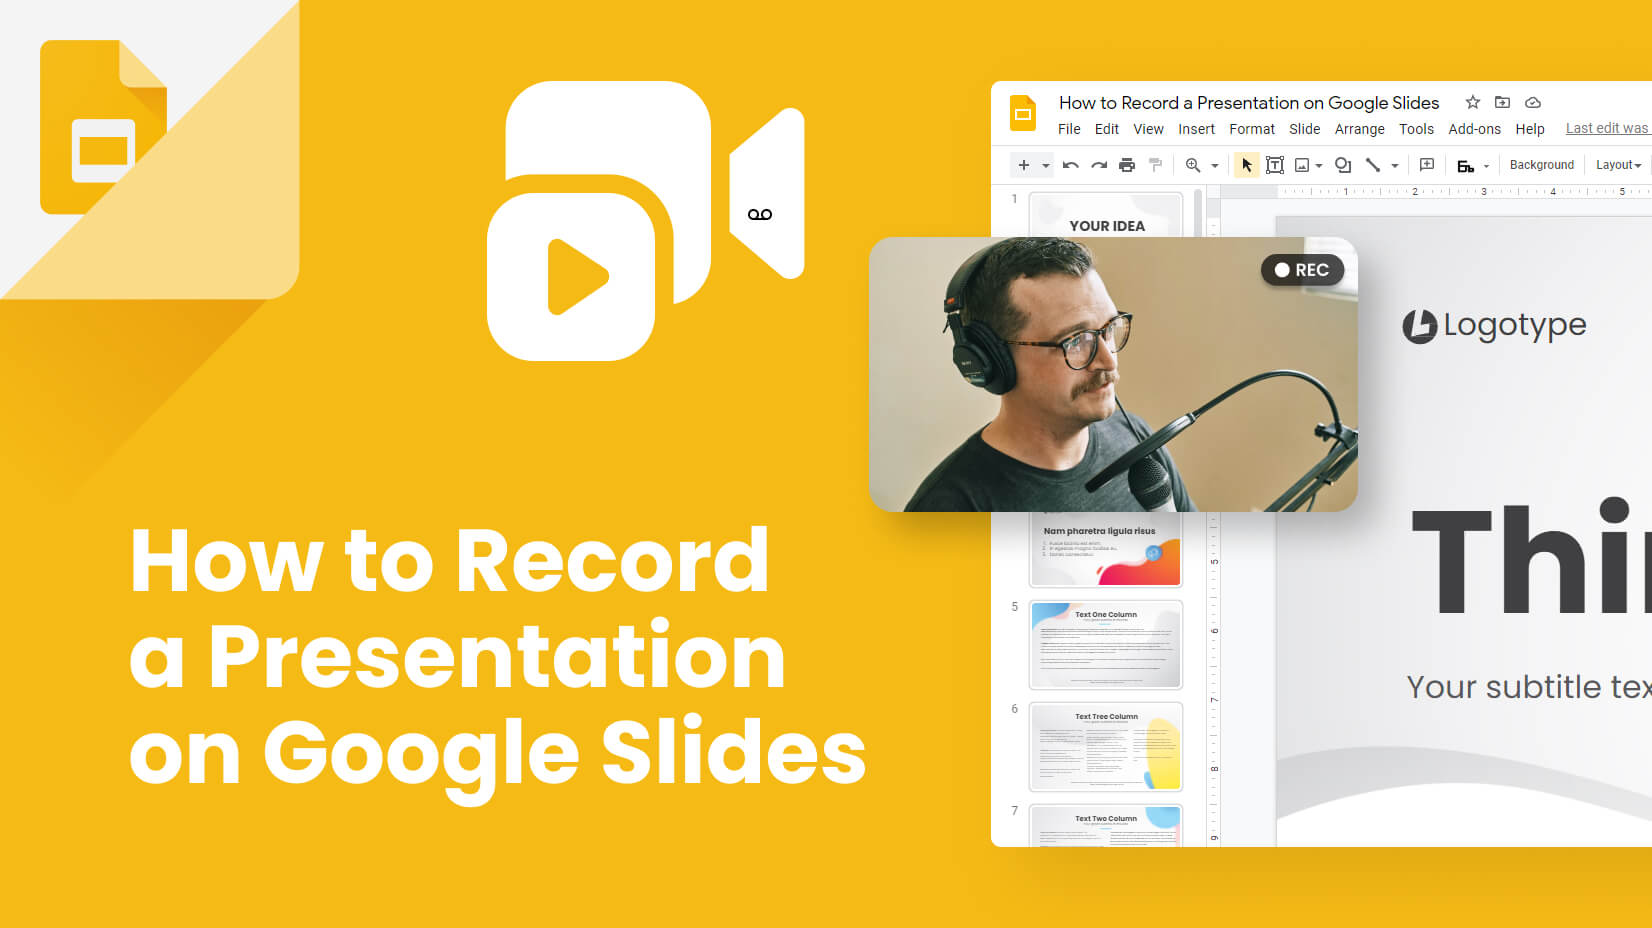
How to Record a Presentation on Google Slides?
- Share on Facebook
- Share on Twitter
By Nikolay Kaloyanov
in How-To Tutorials
2 years ago
Viewed 3,739 times
Spread the word about this article:
Recording your presentation can be a very powerful move, as you don’t want to embarrass yourself in front of your audience. Instead of relying on your “inner feelings”, you can check how you sound, how you look, what gestures you make, and how well you play with words and details.
For this guide, we will use some of the most popular online tools on the market (Panopto and Loom) and some totally free options for Windows and Mac computers.
Article overview: 1. Why do people record their presentations? 2. How to record a presentation on Google Slides using Panopto? 3. How to record a presentation on Google Slides using Loom? 4. How to record a presentation on Google Slides using Microsoft Windows? 5. How to record a presentation on Google Slides on a Mac? 6. Other tools you can try
1. Why do people record their presentations?
There is a reason why people record their presentations. Unfortunately, you don’t know how your voice will sound or articulate when you are presenting. In such situations, it will be best to record your presentation to see if there is something you need to change before doing it live. Also, recording your presentations is a very good way to remember what you are about to say. But let’s see the main use cases when recording your Google Slides presentation will make great sense:
- Practice your presentation skills – you can’t hear yourself while talking. That is why recording your voice might be a good indicator of how you present. Is your tone of voice smooth? Do you need to raise it? Are you mumbling or “like”-ing? Recordings can help you identify problems in advance.
- Save valuable time – instead of recording each lecture, you can save your efforts once, and later sent them.
- When you have stage fright – not everyone has the natural confidence of Elon Musk. If you are a shy person who gets terrified when speaking in front of huge audiences, recording your presentation is a great move.
- Avoid distractions – during live presentations, interruptions are more common which can affect your flow. A recording of your presentation at home can later be sent as a follow-up.
2. How to record a presentation on Google Slides using Panopto?
There are plenty of tools that could be utilized, so feel free to use anything which you might find suitable. Panopto is a good option since it doesn’t require us to download a software extension, and it has a free plan which is more than enough for starters. Your videos are also stored on Panopto’s drive, so you will avoid issues with cluttering your computer or mobile device.
✔️ Panopto is very easy to use.
✔️ The software is cloud-hosted.
✔️ Speech and OCR (optical character recognition).
❌ Pricing model is scaling.
❌ Slow rendering process.
❌ Issues with captions.
Step 1. Open Panopto.com
When you open the website, you will see there are plenty of options out there.
Step 2. Click on “Record”
Once you’ve opened the website, click on the big red button “Record” (next to Company and before Get Started ).

Step 3. Select your Audio, Video, and Screen Options
The browser will ask for permission, so make sure you grant Panopto access to your webcam(s) and audio source(s). Usually, if you don’t have more than one source, they will be launched by default.

Step 4. Choose what to share
Now, you have to click on Screens and Apps , and select your preferred option.
Entire screen (if you have 2 or more, you can either select one of the screens or all of them), a Window , or a Chrome Tab .

Step 5. Fix the settings
When you click on the “Settings” button (in the bottom right corner), there will be a menu that you can access.

Step 6. Start recording
Click on the big circle in the center to start recording.

Step 7. Save your recording
Once you end your recording, you can send it to Panopto , YouTube , Classroom , or download it on your computer.

3. How to record a presentation using Loom?
Loom is among the most used recording pieces of software globally. It is great for teamwork and has a lot of collaboration tools. Let’s see where it shines.
✔️ It is very easy to use.
✔️ You can share the videos with a single click.
✔️ Developers are constantly updating the app.
❌ The 5-minute free plan is not enough for long projects.
❌ It renders the videos slowly.
❌Lack of options to insert tags and notes in a video.
Step 1. Open Loom.com
The first step is to launch Loom. Just like Panopto, it’s an online-based service, so you don’t have to download or install anything.
Step 2. Sign up
Now, you have to open an account. The good news is you can use your Google Account to log in.
Step 3. Enter the recording settings
In order to start recording, click on New Video , and then from the dropdown menu select Record a video .

Step 4. Start the recording
Once you have selected whether or not you will use your Screen, Camera (or both), you can add some specific options and start recording. You’re limited to five minutes on the free plan, so don’t waste much time.

Step 5. Pause/Finish the recording
On the bottom left corner, you will have the option to pause or finish (the red square button) the recording. Before saving, you will have the options to Trim the Video, change the title (Loom | Free Screen & Video Recording Software – Day/Month/Year is by default), and make some Video Preferences.
Step 6. Share the video

Video Tutorial
4. How to record a presentation using Microsoft Windows?
There is also a free way to record presentations on your Windows computer. If you use Windows 10 or 11, this might be a good option.
✔️ You don’t have a record limit (as long as you have memory).
✔️ It is totally free forever.
❌ It is a very basic recording option.
Step 1. Open Game Bar
Many of you may seem surprised, but Windows has a built-in recording tool. It’s called Game Bar. To access it, you need to press the WIN + G . Of course, make sure it is enabled first.
Step 2. Click on “Capture”
The Capture button is next to the sound button. It will unlock you with the option to record.

Step 3. Click on “Record”
Click on the Record button which is the third from left to right. You can also start recording with Win + Alt + R .

Step 4. Record your clip
Now, you can freely record your clip.
Step 5. Delete or save the clip
Once you have filmed your presentation, you can either go to the folder where your file is stored, or delete it.
5. How to record a video on a Mac?
Last but not least, we have another free option for Apple users.
✔️ QuickTime is free forever.
✔️ There are plenty of recording options.
✔️ You can record an unlimited time.
❌ You are storing the files on your Mac.
❌ Not available on desktop PCs for free.
Step 1. Open QuickTime
The first thing you need to do is open your QuickTime.
Step 2. Click on File -> New Screen Recording
Once you’ve opened QuickTime, you have to select File -> New Screen Recording .
Step 3. Select what portion you would like to be recorded
There are several options that you can choose from.

Step 4. Start recording
After you have selected what portion of your screen you will record, you are free to start recording your screen. You have plenty of options for convenience, such as a timer, built-in microphone, where to save the recording, etc.
Video tutorial
6. Other recording tools
Of course, these 4 are just the tip of the iceberg. There are many more apps that also deserve attention but couldn’t rank higher on our list. Let’s see which they are:
- Zoom – Zoom is one of the most popular presentation software on the market, and the only reason it doesn’t appear here is because of its significance. We have prepared a separate tutorial on how to record a presentation in Zoom .
- AnyMeeting – it’s a very powerful presentation recording software. However, over the past few years, it lost some of its sheer power and it got passed by different platforms that offer much more versatility at more affordable prices.
- Camtasia – what we love about Camtasia is that you can create a next-level video experience. The cross-platform functionality is a great addition. However, it seems too hard for small tasks and the $300 purchase is not the value we are looking for here.
- OBS Studio – it’s a top solution for cross-platform live streaming. It has high-end functionalities and it is open-source. That’s great but there’s a catch – it’s too complicated for the average user.
- Debut – Debut is a great free tool that allows webcam recording and presentation recordings, too. However, it’s not compatible with any other OS than Windows, and the user interface looks dull.
- Screencast-O-Matic – it’s a very simple and effective tool but you need to pay a decent amount of money to get value out of the app. The free version doesn’t support HD recordings which limits its capabilities a lot.
Many people wonder how to record a presentation on Google Slides. Fortunately, there are many programs, and you can easily switch to anything you want. We have found that QuickTime and the Game Bar are amazing options for unlimited recording which also comes for free. However, if you’d like to upload your content online with a click of a button, you might fight Panopto and Loom better.
If you liked our presentation about screen recording, you can find these tutorials helpful, too:
- How to Write Scannable Content? Step-by-Step Guide
- How to Convert Your PowerPoint Presentation into Google Slides
- How to Start and End a Presentation: 10 Practical Tips to Grab Attention and Make an Impact

Add some character to your visuals
Cartoon Characters, Design Bundles, Illustrations, Backgrounds and more...
Like us on Facebook
Subscribe to our newsletter
Be the first to know what’s new in the world of graphic design and illustrations.
- [email protected]
Browse High Quality Vector Graphics
E.g.: businessman, lion, girl…
Related Articles
Color theory basics for non-designers: everything you should know, character animator tutorials part 4: rigging and tools, how to make an infographic in less than 5 minutes [step-by-step tutorial], how to cite a powerpoint presentation in apa 7, get started with adobe illustrator: 12 tutorials to step up your game [2022], 500+ free and paid infographic templates compatible with google slides:, enjoyed this article.
Don’t forget to share!
- Comments (0)
Nikolay Kaloyanov
Nikolay is a copywriter with vast experience in Technology, Marketing, and Design. When he isn't playing with words and crafting texts, he watches sports and asks questions. He is a funny person...until you put him on a diet.

Thousands of vector graphics for your projects.
Hey! You made it all the way to the bottom!
Here are some other articles we think you may like:

How-To Tutorials
How to make an infographic in powerpoint: the beginners’ guide.
by Iveta Pavlova

How to Draw on Google Slides and Make a Great Impression?
by Nikolay Kaloyanov

Personal Branding: The Step by Step Guide for 2021
by Burkhard Berger
Looking for Design Bundles or Cartoon Characters?
A source of high-quality vector graphics offering a huge variety of premade character designs, graphic design bundles, Adobe Character Animator puppets, and more.
How-To Geek
How to record your screen with microsoft powerpoint.
You don't need expensive software to record your screen--do it with PowerPoint!
Quick Links
Using powerpoint’s screen recorder, customizing your recording.
If you need to record your screen to demonstrate a process as part of your PowerPoint presentation, you can use the built-in tools to do so. Here’s how to record your screen using PowerPoint.
PowerPoint comes with a built-in, no-nonsense screen recorder. There are a lot of things that PowerPoint’s screen recorder can’t do that more full-featured screen recording software can, but that’s the beauty of it—it’s great for a quick, no-fuss recording.
Related: How to Embed a YouTube Video in PowerPoint
First, open PowerPoint, head to the “Insert” tab, and then click “Screen Recording.”
PowerPoint will minimize, and the screen recording dock will appear at the top of your screen. Here’s where the “simplicity” of PowerPoint’s screen recording feature comes in—you only have five options. By default, PowerPoint will record audio and your cursor. Toggle these options to disable them if you want. When you’re ready to move on, click “Select Area.”
Your pointer will turn into a crosshair. Click and drag to select the area of your screen you want to record.
Next, click the “Record” button in the screen recorder dock.
A three-second countdown will begin. Once it reaches zero, your recording will begin. When you’ve finished recording everything, move your cursor back to the top of the screen where the dock was, and the dock will reappear. Click “Stop.”
Your screen recording will now appear in your PowerPoint slide.
Now that you’ve successfully embedded the recording in your presentation, you might want to adjust a few of the settings. There are a few things you can do here, including trimming the video, setting how the video plays during the presentation, or applying a style to the video’s frame.
Trimming Your Video
There may be a few seconds of your video that you’d like to remove. You can trim these parts out directly in PowerPoint. Right-click the video and select “Trim.”
The “Trim Video” window will appear. Here, click and drag the green and red bars to adjust the start and stop time, respectively. Once you’ve set this up, click “OK.”
Your video will now be trimmed.
Setting Video Playback Rules
You can tell PowerPoint how to play your video during the presentation. To do this, right-click the video and select “Start” from the menu.
A sub-menu will appear, presenting three different playback options:
- In Click Sequence: The video will play in the appropriate order you’ve set in terms of actionable sequences (such as animations).
- Automatically: The video will automatically play when it appears.
- When Clicked On: The video will play when you click on it.
Select the one that works best for you.
Applying Frame Styles
If you want to make your video more visually appealing, you can apply a frame to it. To do so, right-click the video and select “Style” from the menu.
A sub-menu will appear, presenting a large library of frames for your video. Hovering over each one will show a live preview of how the frame will look.
Select the one you like, and it will be applied to your video.
That’s all there is to it!
Where Does PowerPoint Save Recordings? [Here’s Where!]
By: Author Shrot Katewa
![Where Does PowerPoint Save Recordings? [Here’s Where!]](https://artofpresentations.com/wp-content/uploads/2023/01/ezgif.com-gif-maker-6.webp "how to presentation recording")
It is really annoying when you finish recording a PowerPoint presentation and you don’t get to see the complete presentation that you just finished recording! The truth is that the presentation is embedded on the slides itself. But, how do you access the recordings and how do you share the recorded presentation?
PowerPoint saves the recording specific to each slide on the slide itself. However, to access the complete recording of your presentation, you need to export your presentation as a video file. Click on the “File” tab, then click “Save As” and change the file format to an “.MP4” file.
In this article, I will share with you all the details of not just how to record a presentation correctly, but also how to locate the recorded file and share it with your colleagues or clients.
So, without further ado, let’s get started!
1. How to Record a Presentation in PowerPoint?
To know how the video or audio recordings work in PowerPoint, let us first understand how to record a presentation in PowerPoint. We shall take two examples to understand this further i.e. recording yourself giving the presentation with your video camera, and recording just the audio narration.
1.1 How to Record Yourself Giving a PowerPoint Presentation With Video?
Microsoft PowerPoint allows you to record yourself presenting the slides. You can also use features like laser pointer, pen, highlighter, etc. during the recording. To record yourself presenting a PowerPoint presentation, follow the steps mentioned below:
Step-1: Click on the “Record” tab

In the menu ribbon located at the top of the screen, click on the “Record” tab to open the “Record” menu.
Step-2: Click on the “From Beginning” option
Click on the “From Beginning” option in the “Record” group of the “Record” menu. This will open the recording screen.
Step-3: Click on the “Camera” icon
In the toolbar at the top of the screen, click on the “Turn camera on” option which is the camera icon. Alternatively, you can press the “Ctrl+K” keys on your keyboard to turn on the device camera to record yourself.
Step-4: Click on the “Start recording” option
Now you can start recording yourself presenting. Click on the “Start Recording” option which is the circle icon with a large red dot in the middle. When you are done presenting, click on the same icon to stop recording.
Step-5: Click on the “Close” option
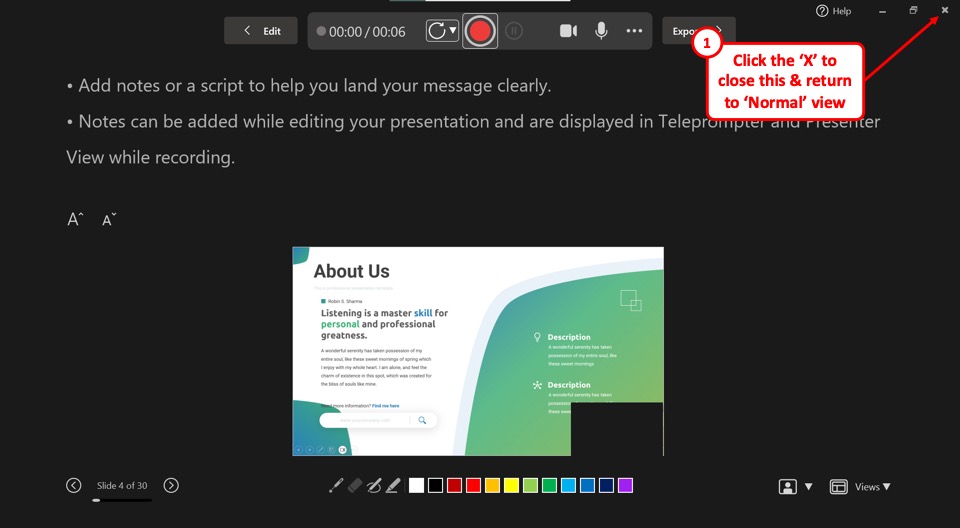
Click on the “Close” option which is the “X” icon at the top right corner of the recording screen to return to the “Normal” view.
Once you have finished the recording, you will notice that the part of the video that talks about slide 1 gets automatically added to the first slide, and part of the video where you talk about slide 2 is added to the 2nd slide .
Likewise, your entire recording gets automatically divided across every single slide wherever you had any comments to add!
You may not notice this at first, however, just look for the camera video that gets embedded to the bottom right corner of your slide.
Now, how do you extract your recordings? I will explain that in the subsequent sections.
1.2 How to Record a PowerPoint Presentation with Audio?
If you wish to record just the audio narration for your presentation without showing your face or using your camera, you can do so by choosing the following methods.
To be honest, there are a couple of different ways to record audio narration for your presentation.
Method 1 – Using the “Record” Feature
The first method is quite similar to the one described above. The only difference is that you need to turn off the camera before you begin recording the presentation.
This will record the presentation with just your voice for each slide. Since we’ve already covered the steps, I won’t show you the steps for this method and I shall focus on the second method for recording audio narration for your presentation.
Once the recording is complete, follow the steps mentioned in section 1.3 below to convert it into a cohesive recorded presentation.
Method 2 – Using the “Audio” Recording Feature
The second method involves recording the audio for a presentation on each slide. This method allows you to record audio for a slide individually and not the whole presentation at once.
Here’s what you need to do to record just the audio for the presentation.

The first step is to click on the “Record” tab in the menu ribbon at the top of the screen. This will open the “Record” menu.
Step-2: Click on the “Audio” option
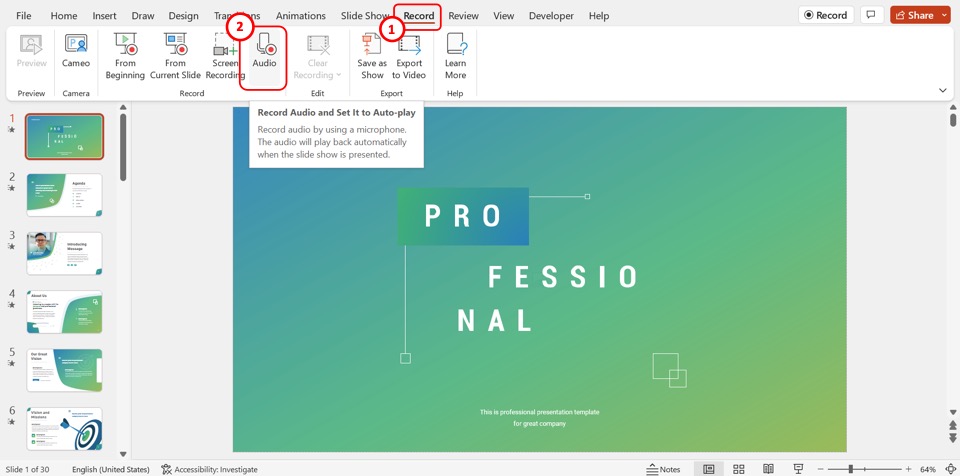
In the “Record” group of the “Record” menu, click on the “Audio” option. This will open the “Record Sound” dialog box.
Step-3: Click on the “Name” box
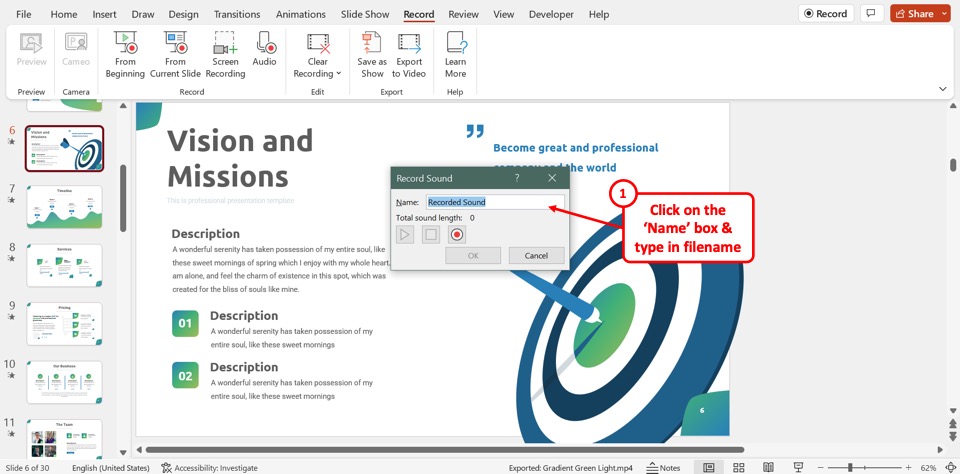
In the “Record Sound” dialog box, click on the “Name” box. Then you can type in a file name for the audio recording.
Step-4: Click on the “Record” icon
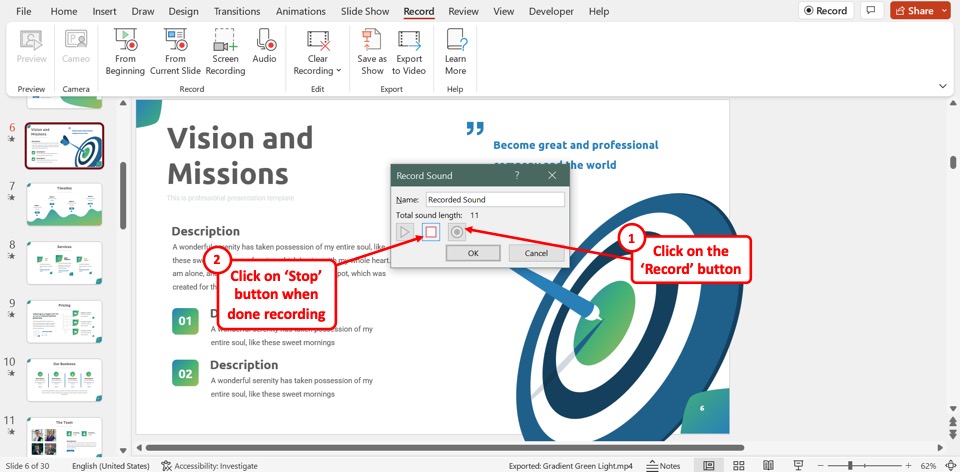
The next step is to click on the “Record” icon in the “Record Sound” dialog box. It is the black circle with a large red dot inside. When you are done recording audio, click on the “Stop” option which is the square icon.
Step-5: Click on the “Ok” button
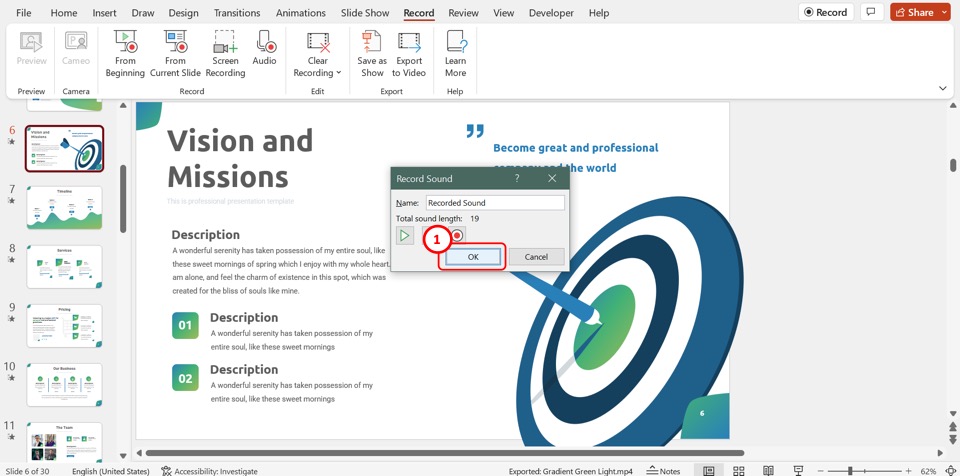
Now all you have to do is click on the “OK” button at the bottom of the “Record Sound” dialog box to save the audio recording.
Repeat the process for each slide where you want to add an audio recording. Once you’re done recording the audio narration for your presentation, save the file and proceed for section 1.3 below to make it into a cohesive presentation.
1.3 How to Save Your PowerPoint Presentation Recording?
Once you have recorded your complete presentation using the aforementioned methods, it is now time to save your presentation recording.
One mistake that people often make is to try and save the camera video embedded on the file. However, this will only save the camera video and not your entire presentation.
The correct way to save your PowerPoint presentation recording is to save the file as a video. However, do this only once you have finished recording your presentation.
Here’s what you need to do to save your recorded presentation into a video:
Step-1: Click on the “Save” option
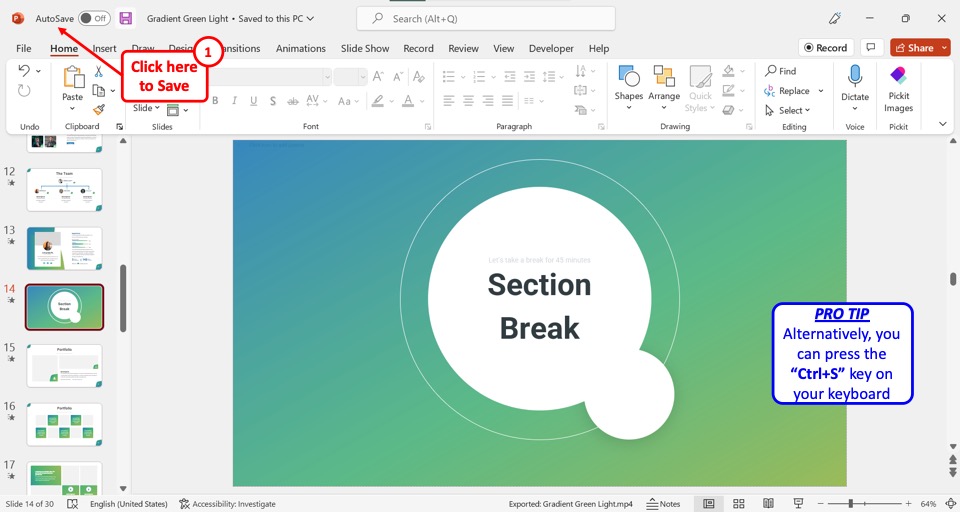
On the left corner at the top of the screen, click on the “Save” option. Alternatively, you can press the “Ctrl+S” keys on your keyboard to save all the changes made to the presentation file.
Step-2: Click on the “Export to Video” option
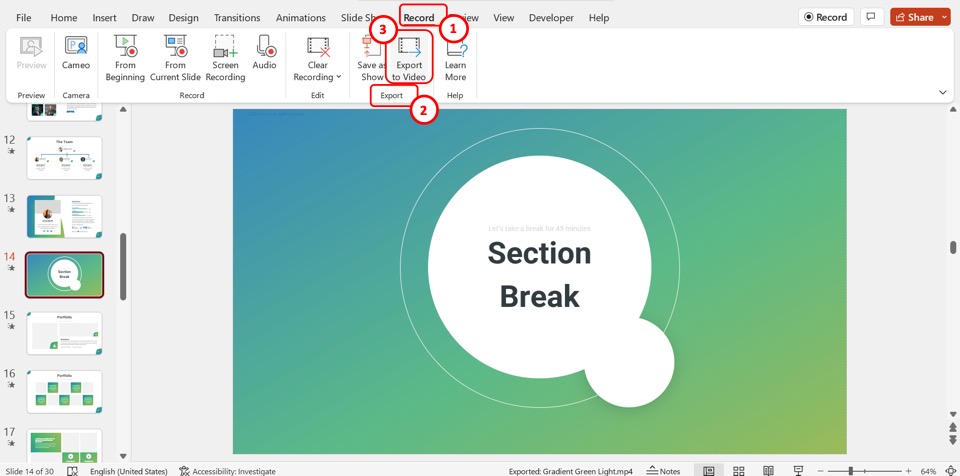
Click on the “Record” tab in the menu ribbon to open the “Record” menu. Then click on the “Export to Video” option in the “Record” menu. This will open the recording screen.
Step-3: Click on the “Export Video” option

In the recording screen, click on the “Export Video” button at the bottom to save the presentation recording as a video file.
1.4 Recording a Presentation into a PowerPoint Show File
You can also convert your presentation into a PowerPoint Show file (.ppsx file). This allows you to directly open the file into a presentation.
This option works great when you don’t have any audio components to your presentation and when you don’t want to record yourself to give a presentation. Instead, all you want to show is the presentation itself in the “Slideshow” mode.
I’ve written a detailed article about how you can loop your presentation using a PowerPoint Show file . Make sure to check out that article to understand a use case for this type of a presentation recording.
Nevertheless, here’s what you need to do to record your presentation as a .ppsx file.
Step-1: Click on the “File” tab
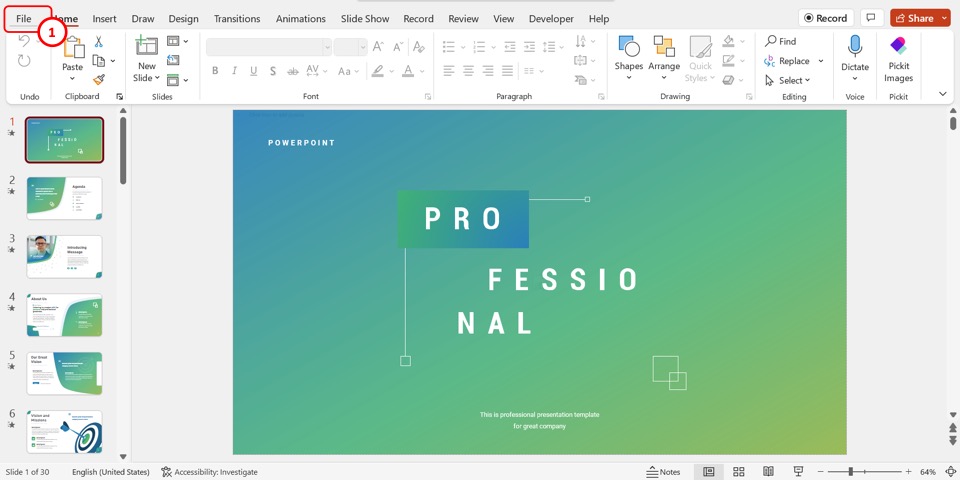
In the menu ribbon located at the top of the screen, click on the “File” tab. This will open the “File” screen.
Step-2: Click on the “Save As” option
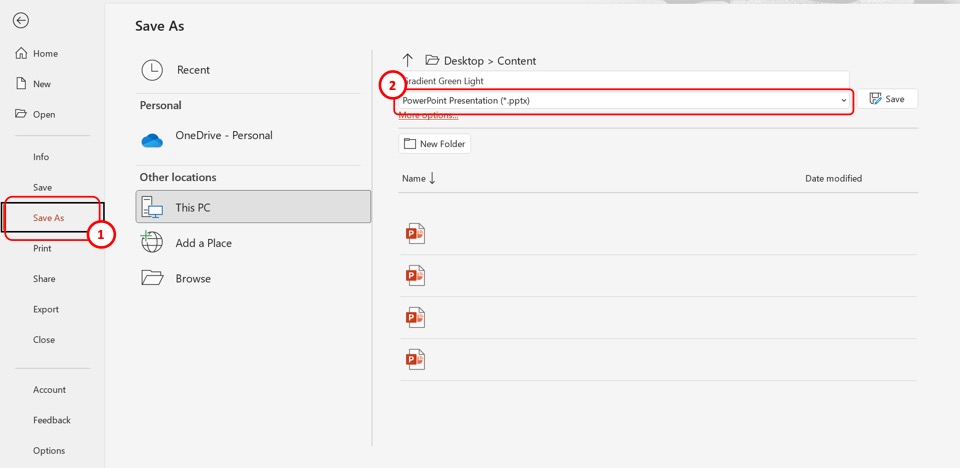
In the menu sidebar on the left side of the “File” screen, click on the “Save As” option. Then click on the second box in the “Desktop” section of the “Save As” screen.
Step-3: Click on the “PowerPoint Show (.ppsx)” option
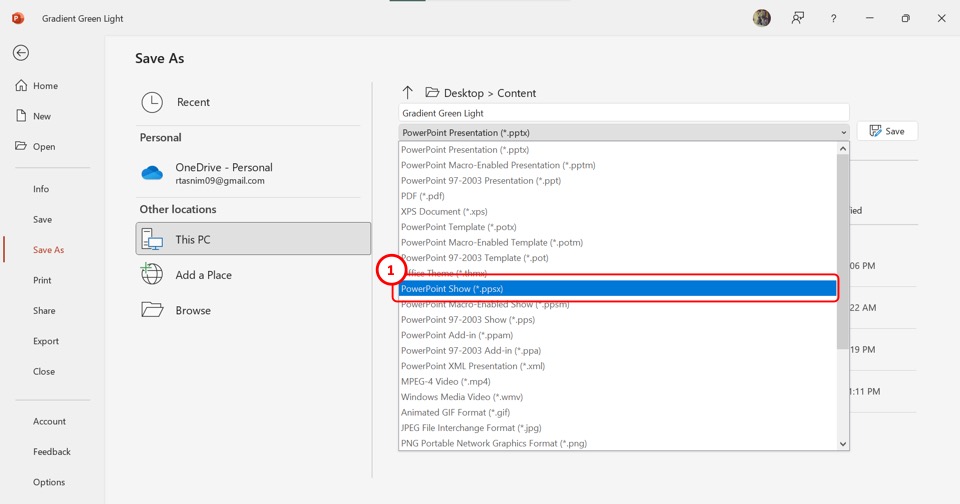
Now all you have to do is click on the “PowerPoint Show (.ppsx)” option from the dropdown list to save the PowerPoint presentation as a recording.
Step-4: Click on the “Save” button
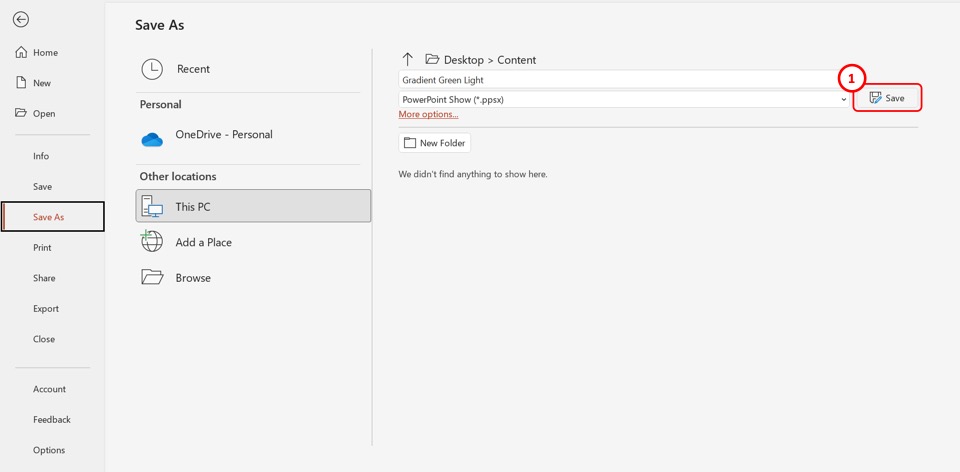
Finally, click on the “Save” button next to the “Save As” box to save the PowerPoint recording. This will save all the transitions, animations, and audio as a slideshow.
2. Where Does PowerPoint Save Recordings?
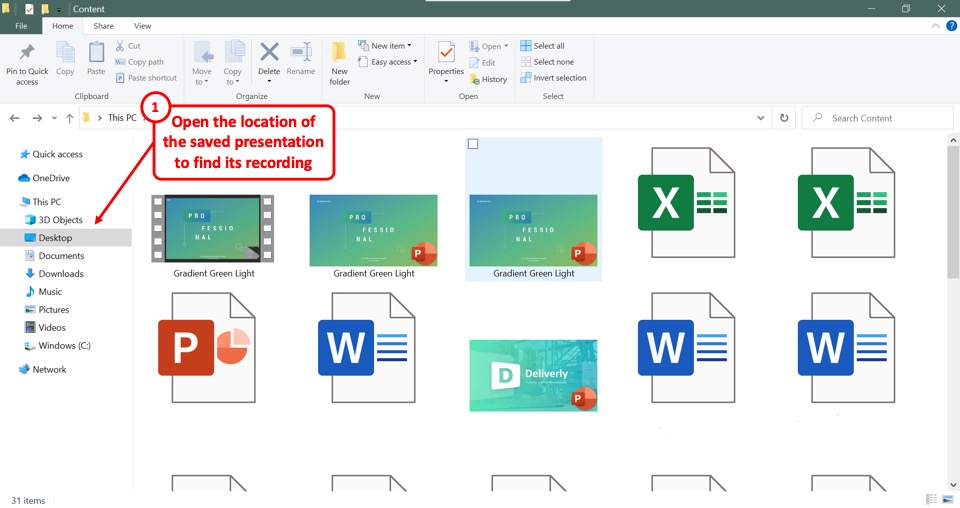
As I previously mentioned, typically PowerPoint saves the presentation recording as a video embedded into the presentation slide. You can access the complete recording only when you save your entire presentation and convert it into a video file.
This video file is saved in the same folder as the location of your original PowerPoint file. To find the recording or the slideshow, all you have to do is open the location of the PowerPoint presentation file.
2.1 Where does PowerPoint Save Recordings on Mac?
In Microsoft PowerPoint for Mac, you can save a presentation recording as an “MP4” or a “MOV” file. Just like Windows, you get an option to choose the location of the folder to save the video recording of your PowerPoint presentation.
That said, if you want to access just the video from the camera, it is usually saved in the “Movies” folder available on your Mac device.
3. How to Find Saved PowerPoint Recordings?
In Microsoft PowerPoint, you cannot select the destination for saving the default presentation recording as the files are saved within the presentation itself.
The difficult bit is often recognizing that the presentation has been recorded as it is often difficult to notice any change to the presentation at the end of the recording.
However, there are ways you can know that the presentation has been recorded and access the recordings!
Method-1: Click on the video inserted in the slide

When you record yourself presenting a Microsoft PowerPoint file, the recording is embedded in each slide as a video. To find the recording, all you have to do is open the slide and find the video embedded in there.
Method-2: Click on the “Video Exported Successfully” notification
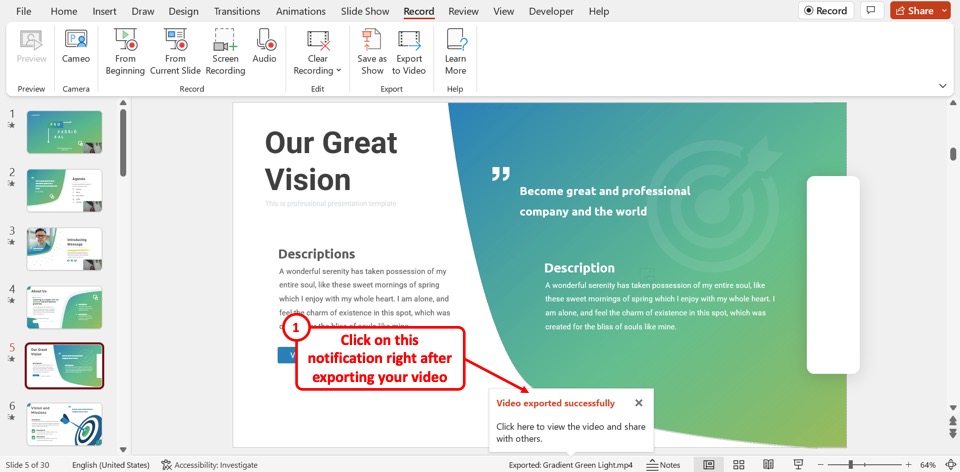
When you save a presentation recording using the “Export to Video” option, the “Video exported successfully” notification will appear at the bottom of the screen. All you have to do is click on the notification to open the recorded video without having to look for it in your desktop files.
Method-3: Open the PowerPoint location
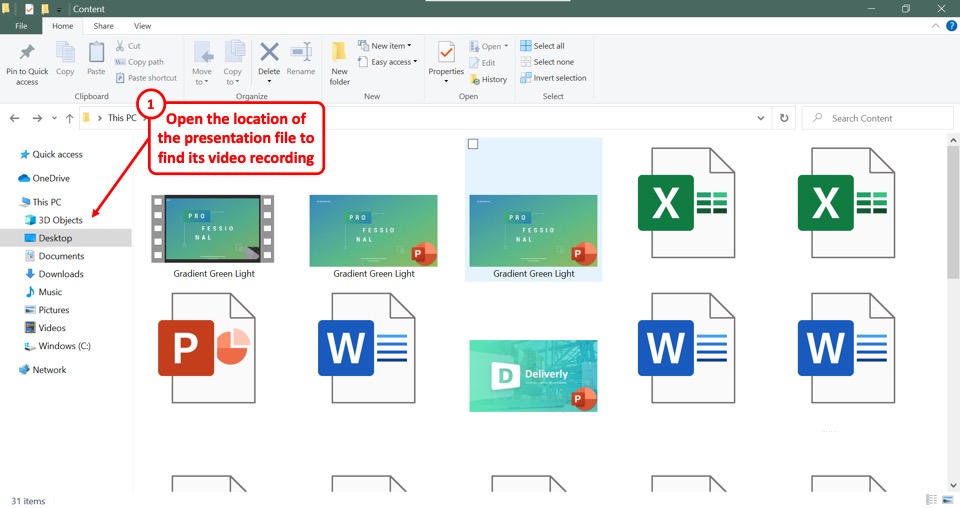
Since recordings are saved in the location of the original PowerPoint presentation file, you can simply open the file location to find the recorded presentation file.
4. Where does PowerPoint Save Audio?
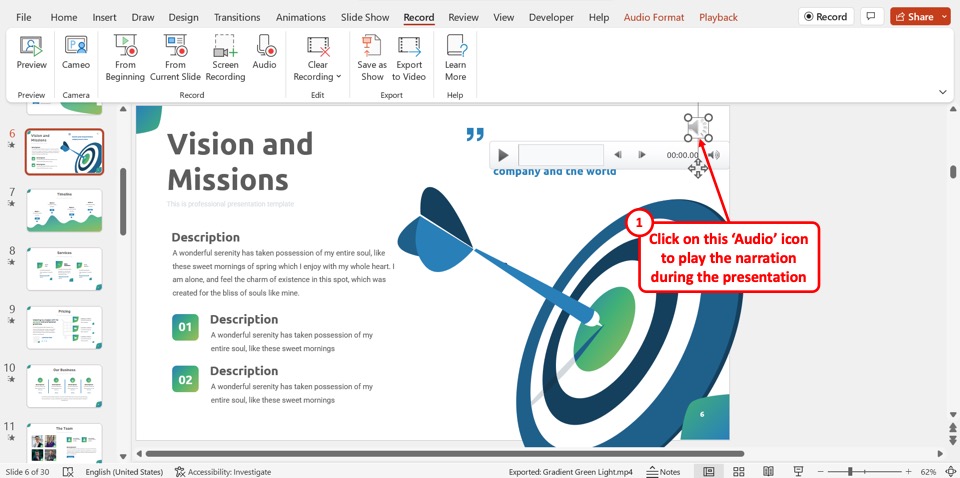
In Microsoft PowerPoint, the recorded audio is embedded into each slide rather than saved as a separate file. You can find the recorded audio as the “Audio” icon which is a megaphone icon in the middle of the slide. To play the narration, all you have to do is click on the “Audio” icon on the slide during the presentation.
Credit to cookie_studio (on Freepik) for the featured image of this article (further edited).
- Entertainment
- KSAT Insider
- Newsletters
WEATHER ALERT
3 warnings, 2 watches and 3 advisories in effect for 32 regions in the area
Rory mcilroy rallies to win record 4th wells fargo championship title.
Associated Press
Copyright 2024 The Associated Press. All rights reserved
Rory McIlroy, of Northern Ireland, celebrates after a par on the third hole during the final round of the Wells Fargo Championship golf tournament at the Quail Hollow Club Sunday, May 12, 2024, in Charlotte, N.C. (AP Photo/Chris Carlson)
CHARLOTTE, N.C. – Rory McIlroy has a full head of steam heading into the PGA Championship.
McIlroy won the Wells Fargo Championship for a record fourth time Sunday with another dominating performance at Quail Hollow, easily overcoming a two-stroke deficit to beat Xander Schauffele by five shots.
Recommended Videos
No other player has won the event more than twice.
McIlroy closed with a 6-under 65, playing the final 11 holes in 6 under even with a double bogey on the 18th hole. He finished at 17-under 267 after four straight rounds in the 60s and won his second straight PGA Tour event after teaming with Shane Lowry to take the Zurich Classic two weeks ago in New Orleans.
That should give McIlroy plenty of momentum heading to Kentucky for the PGA Championship at Valhalla Golf Club, the site of his last major win 10 years ago.
“I really got some confidence,” McIlroy said. “My golf swing feels a lot more comfortable than it has. So going to a venue next week where I’ve won, it feels like the stars are a lining a little bit. But I’ve got a lot of golf to play and a lot of great players to try to beat next week. Going into the next major of the year feeling really good about myself.”
Schauffele shot 71.
McIlroy trailed by two after Schauffele made an eagle on the par-5 seventh, but the world's second-ranked player quickly shifted into another gear.
The star from Northern Ireland pulled even after birdies on Nos. 8 and 9 and then made a 33-foot eagle putt on the 10th for his first lead of the tournament after Schauffele settled for birdie.
Schauffele's bogey at 12 gave McIlroy more breathing room.
McIlroy then essentially sealed the win on 13 when he made birdie and Schauffele missed another putt for bogey, resulting in a four-shot advantage.
But McIlroy wasn't done.
He made another birdie on 14 and then punctuated the victory by chipping in from the sand for another eagle on No. 15 to move to 19 under, completing a remarkable stretch of playing eight holes ion 8-under par.
“He’s Rory McIlroy, you know?” Schauffele said. “He hits it 350 yards in the air downwind and he has shorter clubs into firm greens than anyone else. When he’s on, he’s on. Hats off to him for winning. He played unbelievably well.”
At that point the only question was if McIlroy could match his own course record of 61 and tournament record of 21 under.
But he managed a smile when he blew his second shot on No. 18 over the green and into the water and had to take a drop. He tapped in for a double bogey victory as the crowd chanted his name.
“I birdied mine and then I just went on a run that for whatever reason I’m able to go on at this golf course,” McIlroy said. “Quail Hollow, Charlotte in general has been really good to me over my career and this is just another great day to sort of add to all the rest of them.”
McIlroy's finish was reminiscent of 2010 when he carded six straight 3s en route to a final round 62 to beat Phil Mickelson for his first career PGA Tour win. He also won the event in 2015 and 2021.
McIlroy has long called Quail Hollow one of his favorite courses because it allows for him to take advantage of his length off the tee. But it was his putting that won him the 26th career PGA Tour title Sunday.
He needed just 25 putts, making five longer than 10 feet.
For Schauffele, it was a disappointing ending to a strong week.
He finished second for the second straight year and saw his winless drought stretch to 39 tournaments, a streak dating to 2022. He led by four shots after 36 holes.
Byeong Hun An was third at 9 under, and Jason Day and Sungjae Im tied for fourth a 6 under.
McIlroy thanked his mother Rosie, who was in Florida, after the Mother's Day victory.
“My mom’s amazing,” McIlroy said. “I think most people know my dad, but my mom is like the sort of rock or the gel that holds our family together, she always has been. I said this last night, I’m probably a lot more like my dad than I am my mom, but I wish I was a little more like my mom at times.”
Max Homa turned in the shot of the day.
Homa holed from the rough from 213 yards for an eagle on No. 1, with his ball landing on the front of the green and rolling all the way to the back before hitting the flagstick hard and dropping in. But the two-time Wells Fargo champion couldn't build on the momentum after that shooting 72 and finishing in ninth place.
AP golf: https://apnews.com/hub/golf
Copyright 2024 The Associated Press. All rights reserved. This material may not be published, broadcast, rewritten or redistributed without permission.
Jaguars stadium renovation deal will be announced Tuesday, City Council president says
The Jaguars and Mayor Donna Deegan have reached a deal for renovations of the stadium , City Council President Ron Salem announced Wednesday.
"The mayor reached out to me late yesterday afternoon to inform me that the executive branch and the Jaguars have reached an agreement on the stadium renovation," Salem said at the beginning of a joint meeting with the Duval County School Board Wednesday morning.
The mayor’s office and consultants have led the city’s negotiations since August and will present the proposed agreement to council at the next regular meeting on Tuesday.
“We have reached an agreement on the framework of a deal," Deegan said in a statement Wednesday. "The negotiating team is currently putting the final details on paper, and we will release that information as soon as it is available.”
Nate Monroe: Jaguars stadium deal will be a challenge for Mayor Deegan unlike any other
Gene Frenette: Jaguars, city appear on a good track to close out deal on renovated NFL stadium
Salem did not comment on what share the city could carry of the potential $1.4 billion renovation.
"I do not know the specifics of this particular deal but look forward to engaging the council during the month of June as we move forward to review it," Salem said.
City Council will have to approve the deal over the next few months. The Jaguars, according to previous Times-Union reporting , hope to have a deal finalized by early summer in order to take it to the NFL owners meeting in October.
The city will host a series of public meetings to discuss the deal, much like the Jaguars “huddles” last year.
Deals in other cities: Stadium deals in Buffalo and Nashville show how Jacksonville agreement could be shaped
The current lease for the Jaguars to use city-owned EverBank Stadium goes through the 2029 season. A major piece of the stadium renovation involves negotiations for a new 30-year lease.
The talks also have involved whether the Jaguars would play home games away from Jacksonville during the 2026 and 2027 seasons or just the 2027 season because of the extensive construction.
Deegan has said a key area for her is what the “community benefit” portion of the agreement would be for the Jaguars to support neighborhood improvement programs, such as in the Eastside neighborhood that is located near the sports complex.
- Media Resources
- 2030 Agenda
World Migration Report 2024 Reveals Latest Global Trends and Challenges in Human Mobility
- International remittances surged by 650 per cent, from USD 128 billion to USD 831 billion between 2000 and 2022.
- Migrant remittances surpass foreign direct investment in boosting the GDP of developing nations.
- 281 million international migrants globally; number of those displaced hit a record high by the end of 2022 at 117 million.
Dhaka/Geneva, 7 May – The International Organization for Migration (IOM) today launched the World Migration Report 2024 , which reveals significant shifts in global migration patterns, including a record number of displaced people and a major increase in international remittances.
IOM Director General Amy Pope formally released the report in Bangladesh, which stands at the forefront of migration challenges, including emigration, immigration and displacement.
“The World Migration Report 2024 helps demystify the complexity of human mobility through evidence-based data and analysis,” IOM Director General Amy Pope said at the launch. “In a world grappling with uncertainty, understanding migration dynamics is essential for informed decision-making and effective policy responses, and the World Migration Report advances this understanding by shedding light on longstanding trends and emerging challenges.”
The report highlights that international migration remains a driver of human development and economic growth, highlighted by a more than 650 per cent increase in international remittances from 2000 to 2022, rising from USD 128 billion to USD 831 billion. The growth continued despite predictions from many analysts that remittances would decrease substantially because of COVID-19.
Of that 831 billion in remittances, 647 billion were sent by migrants to low– and middle-income countries. These remittances can constitute a significant portion of those countries' GDPs, and globally, these remittances now surpass foreign direct investment in those countries.
Highlighting key findings, the report reveals that while international migration continues to drive human development, challenges persist. With an estimated 281 million international migrants worldwide, the number of displaced individuals due to conflict, violence, disaster, and other reasons has surged to the highest levels in modern-day records, reaching 117 million, underscoring the urgency of addressing displacement crises.
Migration, an intrinsic part of human history, is often overshadowed by sensationalized narratives. However, the reality is far more nuanced than what captures headlines. Most migration is regular, safe, and regionally focused, directly linked to opportunities and livelihoods. Yet, misinformation and politicization have clouded public discourse, necessitating a clear and accurate portrayal of migration dynamics.
By choosing Dhaka as the report's launch site, IOM not only highlights the country's efforts in supporting vulnerable migrants and fostering pathways for regular migration but also recognizes Bangladesh's important role in shaping global migration discourse and policy.
As a Global Compact for Safe, Orderly, and Regular Migration Champion country, Bangladesh has demonstrated a strong commitment to addressing migration issues and implementing policies that safeguard migrants' rights. This proactive engagement aligns with IOM's strategic objectives, making Bangladesh an ideal location to launch the 2024 World Migration Report.
IOM’s World Migration Report, with its innovative digital tools and comprehensive analysis, aims to help dispel myths, provide critical insights, and inspire meaningful action in addressing the challenges and opportunities of human mobility.
"We hope the report inspires collaborative efforts to harness the potential of migration as a driver for human development and global prosperity," DG Pope said.
“As one of the GCM champion countries, Bangladesh will not only continue to act upon the pledges it has made for its domestic context but would also take up emerging issues and challenges pertaining to migration and development for informed deliberations at the international level,” said Dr. Hasan Mahmud, Honourable Foreign Minister, Government of the People’s Republic of Bangladesh.
Notes to editors:
This launch is part of IOM Director General’s first three-day visit to Bangladesh.
For more information, please contact:
Marie McAuliffe, World Migration Report Editor at [email protected]
For media requests: Florence Kim at [email protected]
RELATED NEWS
Iom's world migration report shows global displacement rising despite covid-19 mobility limits, iom’s world migration report 2020 wins international design awards , world migration report launches dynamic new data visualization platform, world migration report 2020 launched.
Migration updates
Subscribe to IOM newsletter to receive the latest news and stories about migration.
Advertisement
At Donor Retreat, Trump Calls Biden Administration the ‘Gestapo’
The speech by Donald J. Trump at a Republican National Committee fund-raising retreat came during his criminal trial in New York. He faces a total of 88 criminal charges across four indictments.
- Share full article

By Maggie Haberman and Shane Goldmacher
- May 4, 2024
Fresh from his criminal trial in New York, Donald J. Trump delivered a frustrated and often obscene speech, lasting roughly 75 minutes, at a Republican National Committee donor retreat in Florida on Saturday, attacking one of the prosecutors pursuing him and comparing President Biden’s administration to the Nazis.
“These people are running a Gestapo administration,” Mr. Trump told donors who attended the event at Mar-a-Lago, his private club in Palm Beach, Fla., according to an audio recording obtained by The New York Times. “And it’s the only thing they have. And it’s the only way they’re going to win, in their opinion, and it’s actually killing them. But it doesn’t bother me.”
Before making the comparison, Mr. Trump baselessly insisted that the various indictments against him and his allies in several states were being orchestrated by the Biden administration.
He said that, before his indictment, he was gentler on Mr. Biden, despite the outcome of the 2020 election. “You have to respect the office of the presidency,” Mr. Trump said. “And I never talk to him like this.”
Mr. Trump entered the event to the recording of the national anthem that he made with a group of people arrested in connection with the Jan. 6, 2021, attack on the Capitol by a pro-Trump mob seeking to disrupt the certification of Mr. Biden’s electoral college win. Mr. Trump praised the song.
In his speech, he complained repeatedly about the criminal trial in Manhattan, to which he will return on Monday, insisted that Democrats use “welfare” to cheat in elections and said he would need an attorney general with “courage” as he mocked his former attorney general, William P. Barr, who recently endorsed Mr. Trump after having spoken critically of him since the administration ended.
Mr. Trump also indulged in conspiracy theories around his 2020 loss, and said that his handpicked chairman of the Republican National Committee, Michael Whatley, would prevent “cheating” in the upcoming election.
Mr. Trump’s comments about welfare to wealthy donors at the event called to mind remarks caught on tape by Mitt Romney during his 2012 presidential run, when he dismissed 47 percent of voters as off-limits because they did not pay taxes.
“When you are Democrat, you start off essentially at 40 percent because you have civil service, you have the unions and you have welfare,” Mr. Trump said on Saturday. “And don’t underestimate welfare. They get welfare to vote, and then they cheat on top of that — they cheat.”
But Mr. Trump focused more on his own legal jeopardy, as he faces four different indictments and 88 criminal charges. On Friday, he had to listen in court to his former communications adviser, Hope Hicks, testify in the trial in which he is accused of falsifying business records to cover up hush-money payments made to a porn star.
He also spent several minutes acknowledging Rod Blagojevich, the former Democratic governor of Illinois whose lengthy prison sentence after being convicted of corruption charges was commuted by Mr. Trump, and who was at the R.N.C. event.
The former president said that he came to the decision to issue the pardon after seeing Mr. Blagojevich’s wife on television advocating his release, and that it was sealed that he would intervene when he learned that James B. Comey, the former F.B.I. director whom Mr. Trump fired amid an investigation into Mr. Trump and his campaign, was connected to the Blagojevich investigation.
Mr. Trump also mocked the physical appearance of Jack Smith, the special counsel who has indicted him twice.
“He’s unattractive both inside and out,” Mr. Trump said. “This is one unattractive dude.” He then used two expletives to describe Mr. Smith.
He praised House Speaker Mike Johnson, who, in his own remarks, said the nation needed “a strong man” in the White House.
At another point, Mr. Trump said that if anyone wanted to donate $1 million to the R.N.C. on the spot, “I will let you come up and speak.” He sounded disappointed until someone accepted the invitation.
Mr. Trump laid blame for the slim margin in the House on the issue of abortion, after he appointed the Supreme Court justices who overturned Roe v. Wade in 2022, for which he has repeatedly taken credit. “We had a rough thing because of the, you know, the issue of abortion largely. I think we would have had 45 seats more,” Mr. Trump said.
The meandering remarks drew a sharp contrast with the specifics provided by Mr. Trump’s top advisers at a presentation earlier on Saturday. His advisers said that Mr. Trump’s campaign and the party were projected to raise $76.2 million in April, according to two people who attended the briefing.
Mr. Trump’s three top advisers — Susie Wiles, Chris LaCivita and Tony Fabrizio — briefed donors, presented a slide show and took questions afterward, the attendees said. The attendees were not authorized to speak publicly about the event, which was a closed-door briefing and gathering for party donors.
Mr. Trump’s advisers presented a bullish case for the candidate that included the possibility of expanding the electoral map to include the Democratic-leaning states of Minnesota and Virginia. They also noted that Mr. Trump has remained mostly ahead in polls even while being outspent by President Biden, just as the former president was outspent in the primary by his rivals.
The Federal Election Commission will not receive fund-raising reports until later this month, meaning the numbers can’t be verified until then. In March, Mr. Trump and his allied groups reported raising $65.6 million — a significant amount, but still well below what President Biden and his affiliated outside groups have raised.
The slide show presentation included three different electoral college maps, the attendees said. The first was dismissed as “the media’s version,” which included seven swing states: Nevada, Arizona, Georgia and North Carolina across the Southwest and the Sun Belt, plus Pennsylvania, Michigan and Wisconsin in the industrial north.
A second slide described “the actual current reality” as only having three swing states: Pennsylvania, Michigan and Wisconsin.
And a third slide described an “expanded reality” in which both Minnesota and Virginia would be in play for Mr. Trump — an ambitious view of states not widely seen as among the most competitive, but in which the Trump team insists the former president has gained ground.
Mr. Trump’s advisers also described some of their strategy for the general election in the presentation, including reaching 2016 levels of support with white voters and expanding support among Black and Latino voters, particularly among urban men.
The campaign strategists also outlined a plan to prevent the kinds of losses that occurred in 2022 that have been linked to the issue of abortion and the backlash from the Supreme Court’s overturning of federal abortion rights before the midterm elections.
Mr. Trump has proudly claimed ownership of the end of Roe v. Wade as the president who appointed a conservative supermajority to the highest court in the country. But he has struggled to answer questions about it since, waffling in discussions with advisers about whether to back a national ban, before ultimately saying in a video he posted a few weeks ago that it’s up to states to decide how to handle the issue.
Maggie Haberman is a senior political correspondent reporting on the 2024 presidential campaign, down ballot races across the country and the investigations into former President Donald J. Trump. More about Maggie Haberman
Shane Goldmacher is a national political correspondent, covering the 2024 campaign and the major developments, trends and forces shaping American politics. He can be reached at [email protected] . More about Shane Goldmacher
Our Coverage of the 2024 Election
Presidential Race
Donald Trump leads President Biden in five crucial battleground states, a new set of polls shows , as young and nonwhite voters express discontent with the president over the economy and the war in Gaza.
With Democratic Senate candidates running well ahead of Biden , the new battleground polling shows a ticket-splitting pattern, Nate Cohn writes .
In an extended riff at a rally in New Jersey, Trump compared migrants to Hannibal Lecte r, the fictional serial killer and cannibal from “The Silence of the Lambs.”
Dodging the Question: Leading Republicans, including several of Trump’s potential running mates, have refused to say flatly that they will accept the outcome of the election .
West Virginia Senate Race: Gov. Jim Justice’s companies have long had a reputation for not paying their debts. But that may be catching up to them as Justice campaigns for a seat in the Senate.
Ohio Senate Race: Bernie Moreno, the Republican challenging Senator Sherrod Brown, tells a riches-to-rags-to-riches tale. But the reality isn’t so tidy .
Maryland Senate Race: The Democratic Senate primary between Angela Alsobrooks, the Prince George’s County executive, and Representative David Trone has grown tighter as they vie to take on Larry Hogan, the popular former two-term Republican governor.
Junior Forum presents 26 debutantes
Wichita Falls is a community of longstanding traditions and continued to uphold this on May 4 with the 96th annual Junior Forum Debutante Presentation.
The Kemp at the Forum abounded with the pageantry and elegance of the tradition dating back over nine decades.
The Junior Forum was founded in 1927 as a junior department of the Woman’s Forum, according to a media release. The debutante class was established to promote community involvement and social grace. The first presentation was staged in the spring of 1928.
The 26 charming young ladies presented May 4 were:
Isabella Evelyn Amador , daughter of Mr. and Mrs. Damian Anthony Amador. She will graduate from Wichita Falls High School and plans to attend Midwestern State University.
Katherine Irene Booker , daughter of Mr. and Mrs. Steven Ross Booker. She will graduate from Burkburnett High School and plans to attend Embry Riddle Aeronautical University.
Ava Grace Bronaugh , daughter of Mr. and Mrs. Barry James Bronaugh. She will graduate from Rider High School and plans to attend Midwestern State University. Her date for the evening was Jonah Matthew Fields.
Cianna Suzann Clampitt , daughter of Mr. and Mrs. Monte Lee Clampitt. She will graduate from Burkburnett High School and plans to attend the University of Arkansas. Her date for the evening was Kaison Allan Yow.
Sophia Elizabeth Curry , daughter of Mr. and Mrs. Perry Theodore Curry. She will graduate from Rider High School and plans to attend Texas Tech University. Her date for the evening was Beau Robert Gearld.
Mia Claire Gilmore , daughter of Mr. and Mrs. Gregory James Gilmore. She will graduate from Rider High School and plans to attend Baylor University.
Aidan Elizabeth Herrera , daughter of Mr. and Mrs. Juan Manuel Herrera. She will graduate from Wichita Falls High School and plans to attend Baylor University.
Avery Grace Herrera , daughter of Mr. and Mrs. Juan Manuel Herrera. She will graduate from Wichita Falls High School and plans to attend Oral Roberts University.
Kelby Kaydee Jones , daughter of Mr. and Mrs. Eric Lee Jones. She will graduate from Holliday High School and plans to attend Tarleton State University.
Emerson Claire Kosub , daughter of Mr. and Mrs. Frank Dobie Kosub. She will graduate from Rider High School and plans to attend Baylor University.
Kelsey Grace Kowing , daughter of Mr. and Mrs. Charles Kristian Kowing. She will graduate from Burkburnett High School and plans to attend Baylor University.
Malayasia Siriana Larque , daughter of Mr. and Mrs. Adam Delwayne Larque. She will graduate from Wichita Falls High School and plans to attend Bethel College.
Carson Grace Lipscomb , daughter of Mr. and Mrs. Richard Lee Lipscomb II. She will graduate from Wichita Falls High School and plans to attend the University of Oklahoma. Her date for the evening was Cayden Glen Woodard.
Lauren Carmella Lozipone , daughter of Mrs. Melaina Virdian Armstrong and Mr. Carmen Anthony Lozipone. She will graduate from Rider High School and plans to attend the University of Arkansas.
Presley Brooks Montz , daughter of Mr. and Mrs. Jakob Wade Montz. She will graduate from Rider High School and plans to attend Oklahoma State University.
Sydney Chae Seon Mulhare , daughter of retired Lt. Col. and Mrs. Anthony Blaine Mulhare. She will graduate from Burkburnett High School and plans to attend Texas A&M.
Presley Lynn Murray , daughter of Mr. and Mrs. Jay Brent Murray. She will graduate from Rider High School and plans to attend Vernon College.
Mari-Lee Grace Osborn , daughter of retired Master Sgt. and Mrs. Donald Dean Osborn. She will graduate from Burkburnett High School and plans to attend Tarleton State University.
Aryana Shirin Khosravi Parvari , daughter of Drs. Mohammad Khosravi Parvari and Amanda Marie Parvari. She will graduate from Wichita Falls High School and plans to attend San Diego State University.
Annabella-Marie Alexandra Pillow , daughter of Mr. and Mrs. Kevin Lee Pillow. She will graduate from Rider High School and plans to attend Midwestern State University.
Jazz Katon Rusk , daughter of Mr. and Mrs. Justin Keith Rusk. She will graduate from Iowa Park High School and plans to attend Texas Tech University. Her date for the evening was Landon Brockriede.
Jocelyn Ann Turner , daughter of Mr. and Mrs. Michael Scott Turner. She will graduate from Henrietta High School and plans to attend Abilene Christian University.
Aubrie Kate Wolfe , daughter of Mr. and Mrs. Robert Casey Wolfe. She will graduate from Holliday High School and plans to attend Texas Tech University.
Reese Olivia Wood , daughter of Mr. and Mrs. Steven William Wood. She will graduate from Rider High School and plans to attend Vernon College. Her date for the evening was Tanner Scott Poirot.
Eva Angeline Yandell , daughter of Mr. and Mrs. Travis Preston Yandell. She will graduate from Rider High School and plans to attend Texas Tech University. Her date for the evening was Kole Michael Skipper.
Reagan Mackenzie Young , daughter of Mrs. Holly Norwood Montes and Mr. Travis Wayne Young. She will graduate from Rider High School and plans to attend Texas Woman's University. Her date for the evening was Anthony Basilio.
COMMENTS
You can record your PowerPoint presentation—or just a single slide—and capture voice, ink gestures, and your video presence. The completed recording is like any other presentation. You can play it for your audience in Slide Show or you can export it as a video file. So instead of just handing the deck to someone, people can see your ...
Learn how to record a PowerPoint Presentation with audio and video simply by using the build-in PowerPoint functionalities and tools. You will learn how to...
Step 3: Configure recording settings. With the Video Recording toolbar, you can set options like Cursor Capture and Effects, System Audio, and Webcam. If your webcam isn't showing, click on the webcam icon. If you have an external webcam, select the one you want to use by clicking the dropdown arrow next to the webcam icon.
1. Start Recording. You can start recording your presentation in two ways: by clicking the "Record" button on the top ribbon or by going to the "Record" tab. 2. Choose your recording options. The recording tab allows you to choose whether to record from the beginning of your presentation or the current slide. 3.
Record narration and timings for your presentation in Microsoft PowerPoint to give it a professional and polished feel. Record narration and timings:1. Selec...
Select the Record button on the toolbar to start recording your narration. Use your keyboard arrow keys to move back and forth between slides. Press N or Space Bar to move to the next slide or animation in the presentation. Press P or Backspace to return to the previous slide or animation.
In the Options dialog box, click the Customize Ribbon tab on the left. Then, in the right-hand box that lists the available ribbon tabs, select the Recording check box. Click OK. To get ready to record, select Record on either the Recording tab or the Slide Show tab of the ribbon.
You can start recording your presentation using the following method. Record Tab: To record a PowerPoint presentation, go to the Record tab and select whether you wish to record from the beginning, from the current slide, a specific area on the screen, or record audio. Slide Show Tab: you can also initiate recording a PPT via Slide Show ...
Let's see how to record a PowerPoint presentation in front of live audiences. Step 1 - save your PowerPoint presentation in OneDrive. Step 2 - open your PowerPoint slides from PowerPoint online. Step 3 - go to Present Live from the Slideshow Ribbon tab. Step 4 - share a live link with your audience.
Click on the record & create tab on the toolbar. Click on the screen and camera option. Select a camera and mic to use. Click on the record button to select a tab, window, or entire screen with your PowerPoint presentation shown. Save your recording when you're finished presenting.
Step 3: Open Your PowerPoint Slides and Capture the Screen. Open your PowerPoint presentation and put it in "Slide Show" mode. With Panopto Express, you'll have two options for recording your slides: You can either record your slides by recording your screen or by recording the slides within the PowerPoint application.
To begin a recording of a PowerPoint presentation, move your cursor over the menu bar in Zoom. It's the series of options and buttons at the bottom of the app's screen. First, make sure that your microphone isn't muted. This setting is controlled by the Mute button, found on the left side of the menu bar.
Step 2. Click on "Record". Once you've opened the website, click on the big red button "Record" (next to Company and before Get Started ). Step 3. Select your Audio, Video, and Screen Options. The browser will ask for permission, so make sure you grant Panopto access to your webcam (s) and audio source (s).
Step 1: Open your Zoom account, and navigate to the ' Settings' menu. Here, select ' Recordings', and ensure that 'Local recordings' are switched on. Step 2: Next, navigate to your home screen and launch a call by pressing the 'New Meeting' button. If prompted, select ' join with computer audio', or choose another microphone.
First, open PowerPoint, head to the "Insert" tab, and then click "Screen Recording.". PowerPoint will minimize, and the screen recording dock will appear at the top of your screen. Here's where the "simplicity" of PowerPoint's screen recording feature comes in—you only have five options. By default, PowerPoint will record ...
VEED is a complete browser-based tool that lets you do so much more than just record and share your Microsoft PowerPoint presentations. You can annotate your videos to make your presentation more informative. Edit your recording to add images, subtitles, and more. It is a professional all-in-one video-creation and editing software that's ...
You don't need Loom to record yourself in a Google Slides presentation! Using the built-in recorder in Google Slides, you can record yourself presenting your...
Head on to the recording studio. Access the "Present and record" option on the editor's top-right side or click on the three-dot menu to select it among recommended actions. Select "Go to recording studio" and set up your camera and microphone. Start recording with your notes in Presenter's View and have the options to pause and ...
Click Go to recording studio, and give Canva access to your mic and camera. If you have multiple devices available, select the camera and mic that you want to use. Click Start recording. Go through your presentation as you would with an audience. To finish, click End recording on the top corner of the presentation screen.
Nevertheless, here's what you need to do to record your presentation as a .ppsx file. Step-1: Click on the "File" tab. In the menu ribbon located at the top of the screen, click on the "File" tab. This will open the "File" screen. Step-2: Click on the "Save As" option. In the menu sidebar on the left side of the "File ...
Summary. What happens when you have to give a presentation to an audience that might have some professionals who have more expertise on the topic than you do? While it can be intimidating, it can ...
Rory McIlroy won the Wells Fargo Championship for a record fourth time Sunday, overcoming a two-stroke deficit to beat Xander Schauffele by five strokes.
4:41. The Jaguars and Mayor Donna Deegan have reached a deal for renovations of the stadium, City Council President Ron Salem announced Wednesday. "The mayor reached out to me late yesterday ...
The following slide deck was published by SkyWater Technology, Inc.
281 million international migrants globally; number of those displaced hit a record high by the end of 2022 at 117 million. Dhaka/Geneva, 7 May - The International Organization for Migration (IOM) today launched the World Migration Report 2024 , which reveals significant shifts in global migration patterns, including a record number of ...
Mr. Trump entered the event to the recording of the national anthem that he made with a group of people arrested in connection with the Jan. 6, 2021, attack on the Capitol by a pro-Trump mob ...
Wichita Falls Times Record News. Wichita Falls is a community of longstanding traditions and continued to uphold this on May 4 with the 96th annual Junior Forum Debutante Presentation.