- Skip to primary navigation
- Skip to main content
- Skip to footer
Laura M. Foley Design
Cheat Death by PowerPoint!

What size should my slides be, 16:9 or 4:3?
July 3, 2017 by Laura Foley 2 Comments
Deciding on a slide format used to be easy when there was only one choice. Nowadays, you can choose between 4:3 format or 16:9. What do these numbers mean and which size should you choose for your presentations?
What the numbers mean
The above notation is called the “aspect ratio,” or the ratio of the width to the height of the slide. In the 4:3 aspect ratio, the dimensions are 1024 x 768 pixels (10.67″ x 8″); the height is 3/4 of the width. Back in the Ye Olde Days of PowerPoint, it was your only choice. Why? Because that’s the aspect ratio of actual slides, pictured above, television screens, and early computer monitors.
When high-definition screens came on the scene in the early 2000s, they were built in a 16:10 aspect ratio. But as more and more high-definition screens were manufactured, it became clear that screens with a 16:9 aspect ratio were cheaper to manufacture. So the 16:9 aspect ratio (1920 x 1080 pixels or 13.3″ x 7.5″) became the new standard.
What size should you choose?
From boardrooms to computer monitors to smartphone screens, 16:9 is the default screen aspect ratio so that’s the slide size I always go with. The 16:9 format gives you a lot of slide real estate to play around with! The legacy 4:3 aspect ratio, while still used, creates smaller slides and doesn’t look that great on newer screens.
How do you change an old 4:3 deck to the new 16:9 format?
Oh, this is super-fun to do and you’re a lucky duck if it becomes your job.
To resize your slides go to the Design tab on the ribbon and select Slide Size/Widescreen on the right side of the screen.

After you select the new size, this window will appear:

Now you’re faced with either everything on the slides being stretched out or squished to fill the space. Oh boy! Either way, after you make your selection you’ll need to go through the presentation slide by slide to ensure that everything looks good. This can be fairly straightforward if the creator of the presentation stayed within the template or a real pain in the rear if he/she didn’t. But do go through the deck to ensure that everything looks right.
If you’re a production artist that charges by the hour, reformatting an organization’s slides from 4:3 to 16:9 could be a nice little gig for you!
Other slide sizes for special events
Now, the 16:9 format is great for everyday use but what if you’re designing a presentation for an event? Last year, I was designing slides for a corporate conference where the setup included multiple, massive screens. For that event, the slides measured 52″ x 17″ and had a “leave this space blank” area on the bottom. Each event is different, so if you’re working on slides like these you need to become friends with the AV folks and find out what size slides they recommend for optimal viewing on that particular setup. The last thing you want to see on a gigantic stage are distorted graphics!
Bottom line
Unless you’re told otherwise, use the 16:9 format. You get a lot more space on each slide for your visuals and it’s really the way things are going.
Share this:
Critical PowerPoint Shortcuts – Claim Your FREE Training Module and Get Your Time Back!
How to Change Your PowerPoint Slide Size (16:9 vs. 4:3)
- PowerPoint Tutorials
- March 10, 2019
In this tutorial, you’ll learn how to change your slide size in PowerPoint.
That way you can create slides for any situation including on-screen presentations, printed documents, posters, postcards, handouts, etc.
First off, the two most used PowerPoint slide sizes are:
- 16:9 ratio for onscreen presentations and new overhead projectors. This is the default setting for the latest versions of PowerPoint.
- 4:3 ratio for printing slides on standard 8.5 x 11 pieces of paper as handouts.
When starting with a blank PowerPoint presentation, changing your slide size is super easy and straightforward. If not, there are a few issues you’ll need to deal with, each covered below.
That’s why it’s worth figuring out what slide size you need BEFORE you build your presentation. If you later convert your presentation to a different size, it can be painful!
It’s just like the old carpenter saying, “measure twice and cut once.” In PowerPoint, you’ll want to “ask twice (to double confirm the required size) and build once.”
Changing your PowerPoint slide size does not make your PowerPoint presentation larger or smaller. To reduce your PowerPoint file size, you need to learn how to compress a PowerPoint presentation .
Table of Contents
How to change your powerpoint slide size.
By default, new PowerPoint presentations start in the 16:9 slide size format.
This is the NEW standard for most modern overhead projects and monitors and is recommended for most presentations. That said, you can easily change your slide size to something else.

To change your slide size in PowerPoint, simply:
- Navigate to the Design tab
- Open the Slide Size drop down menu
- Select 4:3 , 16:9 or Custom Slide Size (see options below)
When starting with a blank presentation, you are now good to go. You will not have to worry about any of the conversion issues discussed below.
Notice too, how much wider the 16:9 slide size is versus the 4:3 slide size in the picture below. The new size gives you more room for the content on your slides.

When you are converting an existing presentation to a new slide size, you will additionally be given the following prompt:
“You are scaling to a new slide size. Would you like to maximize the size of your content, or scale it down to ensure it will fit on the new slide?
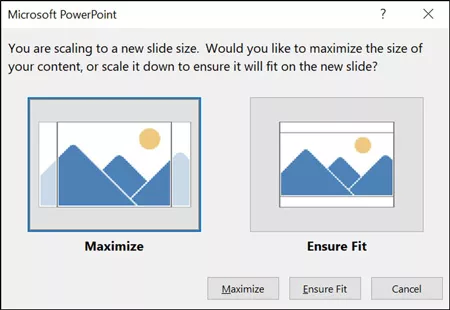
Maximize leaves all your content as is on your slide, even if it no longer fits on the new slide size that you selected.
Ensure Fit scales down your content in proportion to the new slide size you have selected. You will only see this option when moving from a larger slide size to a smaller one.
Custom PowerPoint slide sizes
Choosing Custom for your slide size gives you additional options to work with. Inside the dialog box you can choose your size on the left and your orientation on the right.
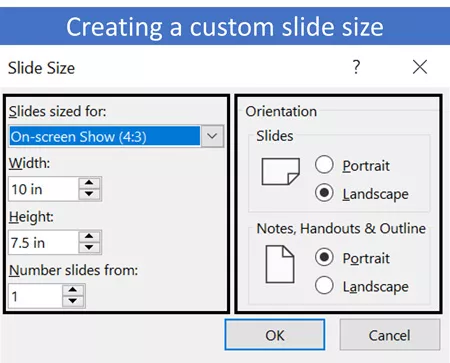
On top of that, you can also input your own custom slide size. However, I recommend using one of the preset PowerPoint dimension options.
- On-screen show (4:3)
- Letter Paper (8.5×11 in)
- A3 Paper (297×420 mm)
- B4 (ISO) Paper (250×353 mm)
- B5 (ISO) Paper (176×250 mm)
- 35mm Slides
- On-screen Show (16:9)
- On-screen show (16:10)
For your orientation options on the right-hand side of the dialog box, you can choose between Landscape and Portrait .
In most situations, you will want one of the default settings. Best practice is Landscape for your presentation slides and Portrait for your printed notes, handouts and outlines.

Issues when converting 4:3 to the 16:9 slide size in PowerPoint
When converting an existing 4:3 presentation with content into the 16:9 format, you are not given any conversion options. Instead, PowerPoint simply does the conversion for you, which can create several problems.
There are two issues you will face in the new 16:9 slide size.

The first issue is that all the images on your slide master (including company logos) will be stretched to fit the new, larger slide size.
To fix the stretched images, you will need to fix those images (or reinsert them) on your slide master, as if you were creating a PowerPoint template from scratch.
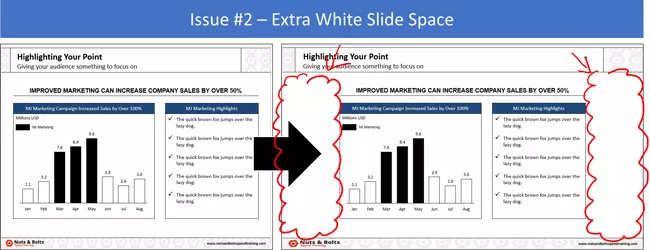
The second issue you will face in the larger 16:9 slide size is that you will have a lot of extra white space on your slides.
While you can leave the space blank, doing so will make your content look weird. Ideally you don’t want a lot of white empty space like that on your slides. Especially since all your font sizes will be so small.
That’s why if you have the time, I recommend resizing your content to fill in the white space. You can do this by either increasing the font size of your content, or adding additional visuals that support your message.
Issues when converting 16:9 to the 4:3 slide size in PowerPoint
When converting an existing 16:9 presentation to the 4:3 slide size, you are given the option to either Maximize or Ensure Fit (both covered below).
1. The Maximize option
This option means that the content on your slides will not be resized to fit the 4:3 slide size. The same is true if you move to any smaller slide size.

Maximize Issue #1: All the images on your slide master (including your company logo) will be distorted.
You might also have issues with other content placeholders, slide backgrounds or anything else that was built on your slide master. For these issues, you’ll first need to navigate to your Slide Master. Once you are there, you either adjust (or rebuild) your PowerPoint template so that everything fits properly.
Maximize Issue #2: Your content will not be scaled down to the smaller slide size. Instead, you’ll have overhanging content as pictured above.
For these kinds of spacing issues, you will need to work through your slides to adjust your content.
One recommendation as you move from the larger 16:9 slide size to 4:3, is to break up your slides. Take the contents from one larger slide and break it into two (or even three) separate slides.
Breaking up your content is preferable to just cramming more content on the smaller slide space. Doing so will make your content easier to read when presented on an overhead projector.
2. The Ensure Fit option
This option means that PowerPoint will scale down your content to fit the smaller slide size based on the size you selected.

Ensure Fit Issue #1: Distorted images, slide backgrounds and anything else that PowerPoint had to automatically resize on your slide master.
To fix these issues, you’ll need to navigate to your slide master and adjust (or rebuild) your template to make everything fit.
Ensure Fit Issue #2: Your content will be scaled down to fit your new slide size, leaving you with a lot of white space. In addition, all your font sizes will be smaller, making them hard to read.
For small content like this, you’ll need to work through your slides and resize your content accordingly. Keep in mind the people at the back of the room too when choosing a new font style and size.
Saving your custom slide size as a PowerPoint theme
If want to use your own custom slide size for all your future PowerPoint presentations, you can save and set it as a PowerPoint theme.
This is a two-step process as discussed below.
1. Save your custom slide size as a theme

To save your custom slide size (and settings) as your own custom PowerPoint theme, simply:
- Open the M ore options
- Click Save Current Theme
- Name your Theme (and don’t change the file location it saves to)
- Click Save
2. Set your custom theme as the default

To set a custom PowerPoint theme as the default for all your future presentations, simply:
- Open the More options
- Right-click your custom theme
- Select Set as Default Presentation
- Close out of PowerPoint (and do not save any presentations if it prompts you)
Once you’ve set your own custom theme as the Default Presentation, it will open every time you start PowerPoint. This saves you from always having to switch your slide sizes.
So that’s how you can change your PowerPoint slide size, either before or after you create your presentation.
And although you are given a lot of flexibility in the slide sizes you can choose from, I recommend using the default slide sizes as used by most people.
It’s also important to remember that switching slide sizes after you have built your presentation can be a total pain. So, to the extent possible, figure out your PowerPoint slide size first before you build out your presentation.
If you enjoyed the depth of this article, you’ll love our PowerPoint training courses and other free resources that you can learn more about here .
🔒 Unlock the PowerPoint Shortcuts Trusted by Industry Leaders KKR, American Express, HSBC, and More!
Join over 114,880 professionals from diverse fields including consulting, investment banking, advertising, marketing, sales, and business development who have supercharged their PowerPoint game with our proven methods.
✅ Customize compelling presentations effortlessly.
✅ Master time-saving techniques for faster deck creation.
✅ Boost your career prospects with top-notch PowerPoint skills.
Get FREE access to the Critical PowerPoint Shortcuts module of our premium training course by entering your name and email below.
DISCLAIMER: PC Users Only!
We respect your privacy and will keep your info safe and confidential.
Related Articles
About the author.

Popular Tutorials
- How to Strikethrough Text (l̶i̶k̶e̶ ̶t̶h̶i̶s̶) in Word, Excel & PowerPoint
- How to Make Animated Fireworks in PowerPoint (Step-by-Step)
- Strikethrough Shortcut (l̶i̶k̶e̶ ̶t̶h̶i̶s̶) for Word, Excel & PowerPoint
- How to Create a Flash Card Memory Game in PowerPoint (Like Jeopardy)
- Keyboard Shortcuts Not Working: Solved
PowerPoint Tutorial Categories
- Strategies & Opinions
- Shortcuts & Hacks
- Presentation Design
- Pictures, Icons, Videos, Etc.
- New Features
- Miscellaneous
- Charts & Data Viz
We help busy professionals save hours and gain peace of mind, with corporate workshops, self-paced courses and tutorials for PowerPoint and Word.
Work With Us
- Corporate Training
- Presentation & Template Design
- Courses & Downloads
- PowerPoint Articles
- Word Articles
- Productivity Resources
Find a Tutorial
- Free Training
- For Businesses
We help busy office workers save hours and gain peace of mind, with tips, training and tutorials for Microsoft PowerPoint and Word.
Master Critical PowerPoint Shortcuts – Secure Your FREE Training Module and Save Valuable Time!
⌛ Master time-saving expert techniques.
🔥 Create powerful presentations.
🚀 Propel your career to new heights.
We value your privacy – we keep your info safe.
Discover PowerPoint Hacks Loved by Industry Giants - KKR, AmEx, HSBC!
Over 114,880 professionals in finance, marketing and sales have revolutionized their PPT skills with our proven methods.
Gain FREE access to a full module of our premium PowerPoint training program – Get started today!
We hate spam too and promise to keep your information safe.
You are currently viewing a placeholder content from Facebook . To access the actual content, click the button below. Please note that doing so will share data with third-party providers.
Presentitude
Presentitude creates visual and powerful presentations using effective and visual PowerPoint templates.
What slide size should you use?
November 19, 2014
When PowerPoint 2013 came along, the size of the default presentation changed from 4:3 to 16:9. So – what size should you use for your slides? This is a quick guide to choosing the right size – and a brief explanation of the difference between the sizes in different versions of PowerPoint.
Why is there even different sizes of slides? The 4:3 slide dimension is the historical size – it stems from the age of analog TV screens and was the standard screen size up until about 10 years ago when widescreens started to become a more common size for TVs and computer screens. The last couple of years, the two slide sizes have started to be used side by side – with different consequences.
“4:3” and “16:9” refers to the aspect ratio of the slide. But the actual size of a slide with the same aspect ratio can differ. A 4:3 slide is 33% wider than it is high. A 16:9 slide is 78% wider than it is high.

So what slide size should you use for a presentation? It really depends on what you are trying to create – and partly personal preference.
Here are some scenarios:
- Use 4:3 if your are creating multi-purpose content that is going to be shown across different platforms and to be printed as documentation
- Use 16:9 if you are creating highly visual content that is only going to be shown on a screen – for a keynote or a conference presentation.
- Use 4:3/Letter/A4 size for content that is only going to be distributed/printed as a sliduement and never really to be shown on a screen.
- Use 4:3 for content created for specific platforms that shows best in 4:3 such as Slideshare and iPads.
- Use 16:9 when creating content for specific platforms that shows best in 16:9 such YouTube and widescreens.
- Use 4:3 for content created in an environment where most current presentations and the main organizational template in use is 4:3.
- Use 16:9 for content created for an environment where the other presentations are created in 16:9.
In general, 4:3-slides works for most projectors BUT when projected on LCD screens, the slide will not fill the screen and you might have black bars on the sides of the slide or the content will stretch and be distorted. 16:9-slides works for projectors, LCD screens and widescreen projectors (most boardroom projector shows 16:9).
Regardless of what size you are using – always make sure you plan ahead and are familiar with the settings on the computer being used to project and what aspect ratio a specific projector (or webinar system if you are presenting online) can support.
The “new” 16:9 size
In PowerPoint 2013 a 16:9 slide has a different size compared to PowerPoint 2010. The standard size for a 16:9 slide changed from 10×5.63″ in PowerPoint 2010 to 13.33×7.5″ in PowerPoint 2013 (the aspect ratio is still the same – but the size changed).

What does the difference really mean for a PowerPoint user designing slides and redesigning older slide decks? If you had content on a 4:3 slide, which as been a standard for so many years, in PowerPoint 2010 and changed it to a 16:9 slide, your content had to be resized and repositioned, which is a time-consuming hassle.

In PowerPoint 2013, if you take your content from a 4:3 slide and move it to a 16:9 slide, the content will fit better on the slide, which means it is easier to change the size of your presentation (not that you want to sit and do this manually – you really want to design for the right slide size from the start – but you know – in case of a presentation emergency or when merging decks with different sizes).

If you are still working in previous versions of PowerPoint, you can still use the “new” 16:9 size. Just set the custom size for your presentation to 13.33” (width) and 7.5” (height) in Slide Size menu on the Design Tab, and voila, you are working in the future!
And – if you are creating a presentation template for your organization – plan ahead and create both a 4:3 and a 16:9 template so users can choose the appropriate one.
In sum – these are the relationships between the different PowerPoint sizes.

(image inspired by Echo Swinford of EchosVoice )
Leave a Reply Cancel reply
Your email address will not be published. Required fields are marked *
How can we help you today?
Do you want to know more about our services, stay in touch or get access to content?

Change the size of your slides
Basic steps.
To change the slide size:
Select the Design tab of the toolbar ribbon.

Select Standard (4:3 aspect ratio) or Widescreen (16:9) or Custom Slide Size .

For more about the predefined sizes (including formats like Overhead, A3, A4, Banner, B4, and B5) or your own custom sizing, click a heading below to expand it and see the details .
Detailed steps
Choose the standard or widescreen slide size.
On the Design tab of the Ribbon, locate Slide Size in the Customize group, near the far right end of the toolbar.

Select Slide Size , and then select either Standard (4:3) or Widescreen (16:9) .

When PowerPoint is unable to automatically scale your content, it prompts you with two options:
Maximize : Select this option to increase the size of your slide content when you are scaling to a larger slide size. Choosing this option could result in your content not fitting on the slide.
Ensure Fit : Select this option to decrease the size of your content when scaling to a smaller slide size. This could make your content appear smaller, but you’ll be able to see all content on your slide.

The 16:9 widescreen setting is the default value for new presentations you create. When you change the slide size for a presentation, the size you choose only applies to that presentation. However, you can make it easy to create a new 4:3 presentation for yourself whenever you want—by defining a custom theme that uses the 4:3 aspect ratio. See the section below named "Make a default size to start from when creating new presentations."
Choose another size, such as A3, B4, or Overhead
Select Slide Size , and then select Custom Slide Size .

In the Slide Size box, click the down arrow next to Slides sized for and select an option. Their dimensions are listed below:
Overhead provides an aspect ratio very close to the standard 4:3 slide size.
There are two options for 16:9 aspect ratios:
On-screen Show (16:9) sets the slide dimensions to 10 in x 5.625 in.
Widescreen sets it to 13.333 in x 7.5 in.
Both of these options are the same aspect ratio so they will look the same in Normal View , since PowerPoint automatically adjusts the zoom level. Widescreen (13.333 in x 7.5 in.) provides more slide surface area for the content, so that is the best choice for presentations. Widescreen won’t fit on an 8.5" x 11" sheet of paper without you having to scale it down.

Select OK to accept the dimensions and close the Slide Size dialog box.
Choose custom dimensions (in inches, centimeters, or pixels)
The Slide Size dialog box opens.
In the Slide Size dialog box, ensure the orientation is set the way you want it.
In the Height and Width boxes, PowerPoint accepts measurements in inches , centimeters , or pixels . Type a number followed by a space and then the appropriate abbreviation: in , cm , or px .
PowerPoint then converts measurements, if necessary, to the type of unit your operating system uses.
You can change the unit of measure that is shown in PowerPoint dialog boxes if you like.
Make a default size to start from when creating new presentations
This version of PowerPoint has a default size of 16:9 for new presentation, but you can create a different default for yourself.
Start PowerPoint.
On the File tab of the toolbar ribbon, select New . Then double-click the Blank Presentation to create a new, empty presentation.
Then on the Design tab, click Slide Size and choose the size you want for a default.
(If you want a different default slide size than what's listed there, select Custom Slide Size and then choose your size in the Slide Size dialog box, and then click OK .)

Select Save Current Theme .
Give your theme a name that you'll remember easily and click Save . Don't change the folder that the new theme is to be saved in.
On the Design tab, click the More arrow again in the bottom-right corner of the Themes group. You'll see your newly saved theme under a Custom heading.
Right-click that new custom theme under the Custom heading, and then select Set as Default Theme :

Close PowerPoint. Don't save any files if it prompts you.
Open PowerPoint again. On the File tab of the toolbar ribbon, select New .
The custom theme that you just saved is listed at the top left corner, named Default Theme . The thumbnail image looks like a widescreen slide, but in reality, when you create a new presentation based on that theme, the presentation has the aspect ratio that you've defined for this default theme.
The next time you open PowerPoint, you'll see your default theme in the upper-left of the theme gallery. When you select it, all the slides will be the custom size you chose by default.
Sizing applies to all slides in a presentation
PowerPoint isn't able to resize one slide within a presentation. All slides in a presentation are the same size.
If this is a feature you’d like to request, please send us your feedback to help us prioritize new features in future updates. See How do I give feedback on Microsoft 365 for more information.
Orientation applies to all slides in a presentation
PowerPoint isn't able to change the page orientation of certain slides. All slides in a presentation have the same page orientation.
Change the page orientation in PowerPoint between landscape and portrait
Use portrait and landscape slide orientation in the same presentation
Reduce the file size of a picture
On the File menu, select Page Setup .
In the Page Setup dialog box, under Slides sized for , select the predefined size you want, or choose Custom and specify the dimensions you want.

Select Slide Size .

Select Standard (4:3) or Widescreen (16:9) .

PowerPoint may prompt you about scaling your content. Choose one of the following options:
Scale: Select this option to decrease or increase the size of your slide content. When scaling to a smaller slide size, this could make your content appear smaller, but you’ll be able to see all content on your slide.
Don't Scale: Select this option to maintain the size of your slide content. Choosing this option could result in your content not fitting on the slide.

Choose Page Setup from the menu that appears.
Page Setup gives you an assortment of predefined slide/page size options. The options and their dimensions are listed below:
In the Slide Size box, click the down arrow next to Slides sized for and select an option.
Widescreen sets the dimensions to 13.333 in x 7.5 in.

Choose custom dimensions (in inches, centimers, or pixels)
Select Slide Size , and then click Page Setup .

The Page Setup dialog box opens.
In the Width and Height boxes, PowerPoint accepts measurements in inches , centimeters , or pixels . Type a number followed by a space and then the appropriate abbreviation: in (inches) or cm (centimeters) or px (pixels).
PowerPoint then converts the measurements, if necessary, to the unit of measurement your operating system uses.
Make a new slide size the default for new presentations
Select Slide Size , and then select Page Setup .
Follow the steps in the prior section to choose the slide size you want.
On the Design tab, click the More arrow below the standard themes.

Click Save Current Theme at the bottom of the window.

Give your theme a name that you'll remember easily and click Save .
On the Design tab, click the More arrow below the standard themes again. You'll see your newly saved theme under Custom .

Right-click your new custom theme, and then click Set as Default Theme .

The next time you open PowerPoint, you'll see your default theme in the upper-left of the theme gallery. When you select it, all the slides will be the size you chose for your default theme.
Some folks have asked about resizing one slide within a presentation. PowerPoint isn't able to do that. All slides in a presentation are the same size.
Some folks have also asked about changing the page orientation of certain slides. PowerPoint isn't able to do that. All slides in a presentation have the same page orientation.
On the Design tab of the toolbar ribbon, click Slide Size in the Customize group.

Click Standard (4:3) or Widescreen (16:9) .
When PowerPoint for the web is unable to automatically scale your content, it prompts you with two options:

The 16:9 widescreen setting is the default value for new presentations you create. When you change the slide size for a presentation, the size you choose only applies to that presentation.
You can also change the orientation of all the slides in your presentation. See Change the page orientation for instructions.

Choose custom dimensions
In the Width and Height boxes, type a measurement in inches . PowerPoint doesn't accept measurements outside the minimum and maximum shown below:

Need more help?
Want more options.
Explore subscription benefits, browse training courses, learn how to secure your device, and more.

Microsoft 365 subscription benefits

Microsoft 365 training

Microsoft security

Accessibility center
Communities help you ask and answer questions, give feedback, and hear from experts with rich knowledge.

Ask the Microsoft Community

Microsoft Tech Community

Windows Insiders
Microsoft 365 Insiders
Was this information helpful?
Thank you for your feedback.

What PowerPoint Slide Size to Use?
Since the adoption of the widescreen format for our audio-video equipment, what is the PowerPoint slide size to use?
When PowerPoint 2013 was introduced, the default aspect ratio for slides was changed from 4:3 to 16:9. The aspect ratio is defined as the ratio of width to height. This is in line with most modern equipment such as projectors and televisions that have adopted the 16:9 widescreen format.
So, what PowerPoint slide size to use? Should we shift accordingly to the widescreen format? What are the differences between the two formats and the critical issues we need to know?
The following article will provide a brief explanation of the differences in using the 4:3 and 16:9 format. We will also provide a guide on which PowerPoint slide size to use in our presentation.
The 4:3 slide dimension was the standard in the past era of analogue TV screens. But they have since been replaced by the widescreen adopted by most projection equipment. These include television, computer screen, LCD monitors, etc. As both formats are still being used, we must be aware of the compatibility issues and know how to rectify them.
The slide dimension of 4:3 and 16:9 refer to the aspect ratio of the slide rather than its actual size. A 4:3 slide is 33% wider than it height while a 16:9 slide is 78% wider than its height.
What is the Preferred PowerPoint Slide Size to Use?
Many people are unsure what is the preferred PowerPoint slide size to use. Unfortunately, the answer could either be a straightforward or difficult one, depending on the information we have. Obviously, we should design our presentation according to the following:
- Use 4:3 in an environment where previous presentations and the current equipment used are in the 4:3 format.
- Use 16:9 in an environment where the presentations and equipment have been upgraded to the 16:9 format.
This seems like a no-brainer, isn’t it? But, what if the organizer cannot provide you with the specification of the projector and screen size? Such a situation is not uncommon, especially if you are doing presentations at client sites or at their hired venues.
Although many facilities have switched to the latest 16:9 widescreen standard, we are in a period of transition. The previous 4:3 aspect ratio is still commonly in use in many facilities. So, do not be surprised to find yourself in an organization that still uses equipment in both the 4:3 and 16:9 format. If unlucky, you may end up in a presentation room where the projector’s format differs from the one you designed your PowerPoint slides on. Given such an uncertainty, what should we do?
In general, the 4:3-aspect ratio works for most projectors. BUT when projected on a widescreen, the slide will not fill up the entire screen. Black bars will appear on both sides of the slide. Although this is not ideal, the slide will still retain its full height and the text will not be shrunk.
When a 16:9 slide is shown on a projector in 4:3 aspect ratio, black bars will appear on the top and bottom of the slide. What this means is that it will not fill the entire height of the screen. This has the effect of compressing the text and make it smaller than planned.
In general, 4:3 slides work for most projectors despite it not filling up the entire screen. Although we can easily convert our 4:3 slides to 16:9, they will become stretched and distorted. But this is preferable to having a 16:9 slide on a 4:3 projector where the text will be compressed. This renders them less readable. Although this problem can be rectified, it is time consuming.
As far as possible, find out the equipment specification in your presentation venue. This will save you a lot of headache later on. If your are unable to, and until such a time when equipment using the previous standard have been phased out, it may be a good idea to stick to the 4:3 format. Of course, if you have the time, design your presentation in both the 4:3 and 16:9 format to be absolutely safe. Never underestimate the importance of an effective PowerPoint design as it can impact how information or knowledge will be delivered.
If you are caught in a situation where you need to change the slide format, our article “ How to Change PowerPoint Aspect Ratio ” will explain how this can be done. But, before you start creating your presentation, you may want to check out our Effective Presentation Design , Education PowerPoint Design , and Eight Common PowerPoint Mistakes to learn the key elements that contribute to a good PowerPoint presentation.
You may also wish to download our free PowerPoint diagrams to help enhance your slides design. Or, you can get some inspiration from our PowerPoint Design Ideas For Your Next Presentation .
However, if you require professional PowerPoint presentation services , please feel free to contact us . We offer three design options to cater to various needs and budgets.
At PowerPoint Creatives Singapore, we provide affordable and creative presentation services incorporating 3D effects and animation that will help bring your presentation to the next level. Find out more about our PowerPoint design process .
In addition, we provide infographic and cinemagraph design services to add further jazz to your PowerPoint presentation. Or if you require cost-effective videos to promote your products or services, either online or offline, please get in touch with us.
Related Posts
Free powerpoint diagrams.
September 16, 2018
How to Change PowerPoint Aspect Ratio
July 15, 2018
How to Change the Slide Size in PowerPoint for Better Presentations
Makes them much easier to read
Powerpoint presentations are supposed to be engaging. But that’s another story if the audience can’t see what’s in front of them. So, in this article, we’ll discuss how to change the default slide size in Powerpoint.
This will come in handy so you can maximize your slides to the size of the projector or monitor you’ll be using and deliver a better presentation.

Choose One Slide Size First
PowerPoint allows you to change the slide size anytime you like, but it’s a good idea to pick the right size before you start creating your presentation.
If you decide to change the size later, PowerPoint will do its best to give you options on how to shift items around, but it will more than likely result in having to totally redesign your slides.
This is especially true if you move from a widescreen format slide to a smaller 4:3 standard sized slide.

If you choose to scale it down, PowerPoint will try to fit everything as best it can into the smaller slide. If you choose Don’t Scale , the items that are outside the standard size will simply be out of the window. You’ll then have to decide whether to delete those items or move them back into the slide.
Change Slide Size in PowerPoint
Once you know what size will be ideal for your output device, you can adjust the slide size in PowerPoint.
First, go ahead and open PowerPoint and select a slide.

This guide works will work for most modern versions of PowerPoint that have the ribbon interface, including the version in Office 365.
Next, go to the Design tab. It’s where you can find the options that let you tweak your presentation’s design.

There, head over to the far right end — to where you can find the Customize section. Next, choose Slide Size .

Clicking on this option will reveal a menu. It lets you pick the size of the slide that you want. Your choices are Standard , Widescreen , and Custom Slide Size .

Let’s walk through each of the choices. This way, you will have a better understanding of your options. This will also help you adjust your slide’s size as needed – a size that works best for your projector or TV.
If you go with the Standard size, you’ll be going with a 4:3 aspect ratio. This is a safe choice because it works for familiar devices such as older screens with low resolutions.
A Standard slide size is a suggested choice for old school presenters. This means those who will be working with old projectors and SlideShare or other old online presentation platforms .

If you choose Widescreen , you’ll be going with an aspect ratio of 16:9. This is the ideal choice for you if you’re dealing with newer devices and online presentation platforms.
Got a Microsoft Surface device or HD projector? Going with a Widescreen option is the better way to go. The same is true if you’ll be presenting on a HDTV or 4K TV/monitor.

If Standard and Widescreen slide sizes are not for you, you can also go with the Custom Slide Size…

If you select this option, a pop-up window will appear.
Here, you can select from plenty of choices regarding the slide size you want. If you’re about to deliver your Powerpoint presentation on an unfamiliar projector, it’s good to go with this option.
It’s flexible. It can also accommodate your preferred slide dimensions.
Plus this way, you can select the Orientation for your slides and notes. This lets you have control over the Width and Height of your slides, too.

You can also try expanding the Slides sized for menu option. Doing so reveals preset sizes that go beyond the Standard and Widescreen size options.
As you can see, this option allows you to adjust your slide to fit the size of a Letter Paper, 35mm slide, a banner, 16:10 aspect ratio and more.

Christopher Jan Benitez is a freelance writer for hire who provides actionable and useful web content to small businesses and startups. In his spare time, he religiously watches professional wrestling and finds solace in listening to '80s speed metal. Read Christopher's Full Bio
Read More Posts:

Leave a Reply
Your email address will not be published. Required fields are marked *
Improve your practice.
Enhance your soft skills with a range of award-winning courses.
Best practices for designing presentation slides
September 20, 2018 - Gini Beqiri
When designing presentation slides, you need to find a balance between keeping the interest of your audience and maintaining their attention, while not distracting them from your key message.
The aim of presentation slides is to enhance learning and understanding, by supplementing what you’re saying (not be the main focus of your talk).
Below we discuss the best practices for designing presentation slides.
Keep it simple
If your slides are more important than what you’re saying then your message will lose impact. Your slides must be an accompaniment and not distract from your words.
- Avoid slides with lots of text, especially if it’s just a repetition of what you’re saying. The audience may be reading rather than listening to you. If you need text-heavy slides then gradually reveal the text when needed.
- Ideally you should only include main speaking points in the form of short and concise bullet points on your slides. This is far less dull for the audience and the best slides have no text – some speakers just use images.
- Don’t fill up empty spaces with unnecessary elements as this won’t help the audience understand what you’re saying. The less clutter there is on a slide the more impact your visual message will have.
- The design elements should be kept to a minimum to prevent distraction, such as, ensuring you have a clear and simple background.
Decide your presentation’s slides ratio
You must decide which ratio for your slides will best suit the context of the presentation:
- A 4:3 ratio if beneficial for presentation slides that need to be viewed across multiple devices.
- A 16:9 ratio should be used conference presentations.
Consider creating your presentation slides in both sizes to be prepared.

Have a title page that stands out
Create a visually engaging title page so the audience is interested and ready to listen before you begin speaking.
Limit transitions and animations
Using lots of animations is distracting and amateurish. It doesn’t add much meaning to your presentation and it’s boring for the audience if they are watching constant animation. It can also be problematic and frustrating to view the presentation on different devices due to this.
- Only use animations for a purpose, such as, to reveal the stages of a process.
- Your animations should subtle and professional, for example, “Wipe” is effective for introducing bullet points but “Move” and “Fly” are too slow.
- Don’t animate every element in your slide.
- Avoid using animations between every slide and don’t use more than three different types of animations for this.
Use visual aids
Visual aids are chosen depending on their purpose, for example, you may want to:
- Summarise information.
- Reduce the amount of spoken words.
- Clarify and show examples.
- Create more of an impact by making the audience feel a certain emotion.
- Emphasise what you’re saying.
- Make a point memorable.
- Enhance your credibility.
- Engage the audience and maintain their interest.
- Make something easier for the audience to understand.

We go into detail on specific visual aids later in the article but here are some general tips for using visual aids:
- Think about how can a visual aid can support your message. What do you want the audience to do?
- Ensure that your visual aid follows what you’re saying or this will confuse the audience.
- Avoid cluttering the image as it may look messy and unclear.
- Visual aids must be clear, concise and of a high quality.
- One message per visual aid.
- Use visual aids in moderation – they are additions meant to emphasise and support main points.
- Ensure that your presentation still works without your visual aids in case of technical problems.
Read our article on Using visual aids during a presentation for more information.
Use high-quality graphics
If you want your presentation slides to look professional then you need to use high-quality graphics. Main points can be illustrated with images but these images shouldn’t be a stretched low-resolution photo as this will look sloppy. Also, avoid using Clip Art as it’s likely the audience has already seen the images and it generally looks unprofessional.
Photographs are particularly valuable to enhance understanding because they allow the audience to see what you’re saying. Ensure that you use simple photos that relate closely with your speech.
Find free stock photos here:
Alter images to focus on elements
If an image is not the focal point consider decreasing its opacity and if it’s the current focus then make the image more pronounced. Masking can be a useful way of achieving these results and it can also be used to direct attention to something important within an image. It looks more professional than highlighting or using arrows etc.
Use panning for large images
You may want to show a large image in your presentation, such as, a web page. Consider using the Chrome extension to capture this. This will prevent you from scaling the image and distorting it. Instead you’ll be able to pan as you talk about it.
Use suitable charts and diagrams
Present data using charts and diagrams because they display data in a visually compelling way and you’ll avoid overwhelming the audience compared to, for example, presenting a list of statistics. Select data most relevant to the points you’re making and ensure that your charts are necessary.
- Horizontal bar charts should be used for comparing quantities.
- Vertical bar charts are for displaying changes in quantities over a length of time. There should be a maximum of eight bars.
- Pie charts highlight percentages. They should include a maximum of six segments.
- Line charts show trends.
- Tables are useful for side-by-side comparisons of quantitative date but charts are generally better as they are quicker to understand and they clearly emphasise significance.

Use video or audio
Using videos and audio clips are a great wait to engage the audience and increase their interest because they introduce a change of pace and they enhance understanding.
- Ensure that any videos or audio clips used are relevant to the presentation’s content.
- Only play as much of the clip as necessary.
- Never show a really long clip.
- Video and audio can be difficult to fit into the structure of a presentation so ensure that you tell that audience why you’re playing them a clip and tell them what to look for or listen out for.
Avoid using autoplay for videos
With autoplay it can take a moment for a video to start playing which can lead to the speaker clicking in this time. This causes the slideshow to move on to the next slide rather than playing the video. Instead of allowing autoplay ensure that you have to click something for the video to play as this will give you more control.
Research suggests that using colour increases people’s motivation to read and their enthusiasm for a presentation. Colours also evoke emotions and can improve understanding by, for example, highlighting certain themes in specific colours.
Using the colour wheel can help when choosing your presentation’s colours: insert picture of colour wheel
- Colours opposite each other in the wheel are complementary and they create contrast. Using complementary colours makes your text more readable and it allows you to draw the audience’s attention towards desired elements.
- Colours next to each other are analogous and they are harmonious. Using analogous colours makes your presentation more unified.
Avoid using too many colours in your presentation as this can look cluttered and unprofessional and keep your colour themes continuous, for example, if you use the colour blue to highlight all the key words on your second slide continue to do this throughout the presentation. Also be careful with colour associations, for example, in many cultures red is linked to danger. Try to represent your words and topics with “appropriate” colours that make sense.
Many people are blue-green or red-green colour-blind so avoid putting these colours next to each other in, for example, a graph. If you cannot avoid placing these colours next to each other then use text to clearly label items.
There are websites that can help you pick colour schemes, such as, Adobe Color CC shown below.

Choose fonts carefully
Use the same clear fonts throughout your slideshow and use no more than two fonts that go well together. Avoid using Serif fonts, such as Time New Roman because: they’re designed to be used in text-heavy documents, they’re easier to read in smaller sizes and they cannot be seen well when projected. San-serif fonts, such as Arial are usually better for presentations.
A popular choice of font is Gill Sans but whatever font your choose make sure it looks professional and can be read from the back of the room.
Avoid using custom fonts that are unlikely to be on all computers because this can be problematic on the day of your presentation.
Use large font sizes
Your font size should be a minimum of 24pt so everything can be easily read. Ensure that you keep font sizes consistent throughout the slides or it can look messy.
Create consistent slides
The slides should have the same design, including colour scheme, font size, font type, etc. This makes the presentation flow better and emphasises that each slide is part of same story you’re telling so this consistency will help with understanding and it’s less frustrating for the audience.
However, some speakers like to have one style for the main slides and other styles for transitions between topics, for example, you may switch around the background and text colours for transition slides so it feels like part of the same presentation but it shows the audience that you’re moving on to a new theme or subject.
Sort your slides
Use the Slide Sorter view to confirm that your presentation’s structure is effective. Slide Sorter shows you how logical the flow of your presentation is and it’s easy to re-arrange your slides in this view.

Include white space on your slides
Empty space is needed on your slides or it will look too cluttered. Make sure that you have empty space between each element in your slides. Don’t try to fill the white space unnecessarily or you’ll reduce the significance of your points.
Premade templates
Experts do not agree on the use of premade templates but if you do use a premade template, ensure that there is consistency and that it looks professional.
- Presentation templates which you can download and use
Presentation slides come last
Design your presentation slides after deciding on your message and your supporting evidence. Remember that the slides enhance the experience but the actual speech needs to stand out on its own.
10-20-30 slideshow rule
Guy Kawasaki, an entrepreneur and author, suggests that slideshows should follow a 10-20-30 rule :
- There should be a maximum of 10 slides – people rarely remember more than one concept afterwards so there’s no point overwhelming them with unnecessary information.
- The presentation should last no longer than 20 minutes as this will leave time for questions and discussion.
- The font size should be a minimum of 30pt because the audience reads faster than you talk so less information on the slides means that there is less chance of the audience being distracted.

The above are common preferences rather than absolute suggestions – you have to design your presentation slides in a way that works best for you and the situation.
You must take into account the type of person you are, the characteristics of the audience, your topic, the context of your presentation etc. All of this will affect what you find suitable for your presentation’s design.
Home Blog Google Slides Tutorials Google Slides Dimensions: What Size is Google Slides and How to Change Slide Size?
Google Slides Dimensions: What Size is Google Slides and How to Change Slide Size?

Slide dimensions can play an important role when displaying information on large screens or according to the type of content on the slide. A large screen would require a widescreen orientation, and you might even need to customize it to fit the screen size. Similarly, some infographics and illustrations require making necessary adjustments to slide orientation to display the content during the presentation correctly. Like PowerPoint, you can also change slide dimensions in Google Slides.
How to Change Slide Size in Google Slides
Google Slides allow setting different slide dimensions according to user needs, including a Standard, Widescreen, or Custom size. To change Google Slide dimensions, go to File > Page Setup .

You can adjust the Google Slides page size from the pop-up menu displayed via Page Setup. The available options include switching to Standard 4:3, Widescreen 16:9, Widescreen 16:10, and a custom slide size. Select the desired slide size and click Apply .

What Size is Google Slides?
If you’re wondering what Google Slides size is right for you, pick a Google Slides resolution that best goes with your screen type. If it’s an old monitor or small screen, you might want to use a Standard orientation, whereas modern monitors or projectors often suit the Widescreen orientation.
Standard Orientation (4:3)
The Standard 4:3 slide orientation displays content in a smaller size compared to widescreen orientations. This orientation was commonly used in legacy versions of PowerPoint and Google Slides, as projectors and screen monitors did not offer the utility to project a widescreen slide correctly. However, this orientation is still used for smaller slides and screens. Where the slide content might be smaller and better suited to a Standard slide size. This might include pictures, illustrations, tables, and other types of slide content that might appear too stretched on a widescreen slide orientation.

Widescreen (16:9)
The 16:9 widescreen resolution is quite commonly used, and might even be considered the standard size for modern presentations. This is because 16:9 was the replacement for the 4:3 aspect ratio post-2008, as screen sizes and display standards evolved for monitors, projectors, and television channels globally.

Widescreen (16:10)
While 16:10 is not as widely used as 16:9; it is commonly used in tablets and computer monitors. The ratio is closer to the Golden Ratio of 1.618, but the higher manufacturing cost of devices has meant that manufacturers mainly stick to 16:9 for electronic devices.

Custom Orientation
Google Slides also provides a Custom orientation option, where you can also choose to pick the slide size in inches, centimeters, points, or pixels. This option can be useful if you intend to edit the slide orientation according to a specific document, picture, infographic, etc. For example, you can switch to 8.5 x 11 inches for Letter orientation or 8.27 inches for A4 size. Similarly, you can make changes in pixels, points, or centimeters.

When considering how to edit slide size on Google Slides according to your display monitor or presentation requirements, you might want to run a mock presentation with a colleague. If it’s a remote meeting, the slide size would automatically adjust due to the responsive UIs of various devices. However, one orientation or another might appear more convenient for your audience based on your presentation needs. For example, suppose your remote meeting participants are mainly using mobile devices. In that case, you might want to test out a lower resolution, compared to when you are presenting before an audience using a widescreen monitor.

Like this article? Please share
Google Slides, Presentation Skills Filed under Google Slides Tutorials
Related Articles

Filed under Google Slides Tutorials • March 22nd, 2024
How to Share a Google Slides Presentation
Optimize your presentation delivery as we explore how to share a Google Slides presentation. A must-read for traveling presenters.

Filed under Google Slides Tutorials • December 20th, 2023
How to Convert PDF to Google Slides
Tired of piling up PDF presentations without any future use? Why not learning how to convert those PDFs into Google Slides format. Follow this tutorial for detailed instructions in this process.

Filed under Google Slides Tutorials • December 15th, 2023
How to Delete a Text Box in Google Slides
Discover how to delete a text box in Google Slides in just a couple of clicks. Step-by-step guide with images.
Leave a Reply
How-To Geek
How to change slide size in powerpoint.
PowerPoint allows you to change your presentation's slide sizes, which you may need to do to change how your slides are displayed or printed. Here's how.
Quick Links
Changing powerpoint slide sizes, changing to a custom powerpoint slide size.
PowerPoint allows you to format and present the content of your slides in different ways. If you want to print out or display your PowerPoint slides in a bigger or smaller-than-average size, you can change the slide sizes to match.
PowerPoint has two common slide sizes. The first, 4:3, is a good option if you're using older hardware to present your slides. If you're planning on presenting your PowerPoint presentation using a modern projector or display, then the 16:9 slide size should be your preferred choice.
By default, PowerPoint will default to the 16:9 side slide. To print your slides (full size, one per page), you'll likely need to use a custom slide size, rather than one of these options.
Switching to another size is thankfully an easy process---open your PowerPoint presentation to begin and then click the "Design" tab on the ribbon bar.
In the "Customize" section of the "Design" tab, select the "Slide Size" button. This will display the two common slide sizes in a drop-down menu.
Click either the "Standard (4:3)" or "Widescreen (16:9)" option to switch all of your PowerPoint slides to that size.
Unfortunately, it isn't possible to use multiple slide sizes in a PowerPoint presentation. Just as if you were making PowerPoint slides vertical , any changes you make to your PowerPoint slide sizes will apply to all slides.
Related: How to Make Slides Vertical in PowerPoint
It's possible to use a custom PowerPoint slide size if the default 4:3 or 16:9 options are unsuitable. You might choose to use a custom slide size if you're printing full-size PowerPoint slides using a custom page layout, for instance.
To do this, select Design > Slide Size > Custom Slide Size to display the "Slide Size" options menu.
Various preset slide sizes, such as A3 or A4 paper sizes, are shown under the "Slides Sized For" drop-down menu.
Select one of these preset options, or set your slide dimensions manually using the "Width" and "Height" option boxes. From there, click the "OK" button to save.
If you're scaling down to a smaller size, PowerPoint will ask you how it should handle any slide content.
Choose "Maximize" if you want the slide contents to remain at a similar scale, but with the risk that some of the content may be cut. Alternatively, click "Ensure Fit" to scale the slide contents down in size to match the new slide size without losing any content.
Once saved, the custom slide size you selected will be immediately applied to all of your slides, with slide content being resized or cut to match.
Determining the Size of a PowerPoint Slide in Pixels: A Guide
Have you ever wondered what the size of your PowerPoint slide is in pixels? It’s actually pretty simple to figure out, and you can do it with just a few clicks. In this article, I’ll walk you through the steps so you can determine the pixel dimensions of your presentation slides.
Step by Step Tutorial: Determining the Size of a PowerPoint Slide in Pixels
Before we dive into the steps, let’s understand why this is important. Knowing the pixel size of your slides can help you design better presentations that look great on any screen. Plus, if you’re creating content for the web or digital platforms, pixel dimensions are crucial for ensuring your work displays correctly.
Step 1: Open PowerPoint and go to the ‘Design’ tab
Click on the ‘Design’ tab located at the top of the PowerPoint window.
When you’re working on your PowerPoint presentation, the Design tab is where you’ll find all the options for customizing the look and feel of your slides. It’s the gateway to adjusting the size of your slides.
Step 2: Click on ‘Slide Size’
Look for the ‘Slide Size’ button on the right-hand side of the toolbar and click on it.
The ‘Slide Size’ button gives you access to various options for adjusting the size of your PowerPoint slides, including the ability to see and change the pixel dimensions.
Step 3: Select ‘Custom Slide Size’
In the drop-down menu that appears, select ‘Custom Slide Size’ to open the Slide Size dialog box.
The ‘Custom Slide Size’ option allows you to specify the exact dimensions for your slides, including width and height, in various units of measurement including pixels.
Step 4: Check the pixel dimensions
In the Slide Size dialog box, look for the width and height measurements in pixels.
The Slide Size dialog box will show the current size of your slides. If it’s set to a different unit of measurement, you can easily switch to pixels.
Step 5: Adjust the slide size if necessary
If you need to adjust the size of your slides, enter the desired dimensions in pixels and click ‘OK’.
You can customize the size of your PowerPoint slides to fit specific requirements or to ensure that your presentation looks its best on different devices or resolutions.
Once you’ve completed these steps, you’ll have successfully determined the pixel size of your PowerPoint slides. This information can be incredibly useful for graphic design purposes, ensuring that your presentation looks sharp and professional on any screen.
Tips for Determining the Size of a PowerPoint Slide in Pixels
- Always make sure you’re working with the latest version of PowerPoint for the most accurate size adjustments.
- If your presentation will be displayed on a large screen, aim for higher pixel dimensions to maintain image quality.
- Remember that changing the slide size can affect the layout of your content, so double-check your presentation after resizing.
- Consider the aspect ratio when customizing slide size; common ratios include 4:3 for standard screens and 16:9 for widescreens.
- Use pixel dimensions that match common screen resolutions to ensure your presentation looks great on most devices.
Frequently Asked Questions
What is the default size of a powerpoint slide in pixels.
The default size of a PowerPoint slide is 960 pixels wide by 540 pixels high for a widescreen (16:9) aspect ratio.
Can I change the pixel dimensions for all slides in my presentation at once?
Yes, when you adjust the slide size, the changes will apply to all slides in your presentation.
Will changing the slide size affect the quality of my images?
If you increase the slide size, you may need to use higher resolution images to maintain quality.
What should I do if the content on my slides gets distorted after resizing?
You may need to manually adjust the content on your slides to fit the new dimensions.
How do I know what pixel dimensions to use for my presentation?
Consider the device or screen where your presentation will be displayed and use dimensions that match its resolution.
- Open PowerPoint and go to the ‘Design’ tab
- Click on ‘Slide Size’
- Select ‘Custom Slide Size’
- Check the pixel dimensions
- Adjust the slide size if necessary
Determining the size of a PowerPoint slide in pixels is a piece of cake once you know where to look. Whether you’re a seasoned presenter or new to the game, understanding the pixel dimensions of your slides can make a world of difference in how your presentation is perceived. By following the steps outlined in this article, you can ensure that your slides are perfectly tailored to any screen size, making your message resonate with clarity and impact. Plus, with a few extra tips up your sleeve, you can easily navigate through any presentation design challenges that come your way. Remember, the devil is in the details, and in this digital age, knowing your pixels from your points can truly set you apart. So, go ahead, give it a try and watch your presentations transform from good to great!

Matt Jacobs has been working as an IT consultant for small businesses since receiving his Master’s degree in 2003. While he still does some consulting work, his primary focus now is on creating technology support content for SupportYourTech.com.
His work can be found on many websites and focuses on topics such as Microsoft Office, Apple devices, Android devices, Photoshop, and more.
Share this:
- Click to share on Twitter (Opens in new window)
- Click to share on Facebook (Opens in new window)
Related Posts
- How to Rotate a Powerpoint Slide Presentation
- How to Change Paper Size in Google Docs Quickly [5 Steps + Infographic]
- How to Download a Google Slides Presentation as a Powerpoint File
- How to Make Google Slides Vertical (5 Quick Steps)
- How to Do a Powerpoint Google Slides Presentation Conversion
- Adobe Photoshop: How to Change Ruler Units to Pixels from Inches
- How to Make a Powerpoint Slide Vertical in Powerpoint 2013: A Step-by-Step Guide
- How to Change Slide Size in Powerpoint 2016
- How to Delete a Slide in Powerpoint 2010: Step-by-Step Guide
- How to Add a New Slide in Google Slides: A Step-by-Step Guide
- How to Hide a Slide in Powerpoint 2010: A Step-by-Step Guide
- How to Delete Multiple Slides in Google Slides: A Step-by-Step Guide
- How to End Powerpoint on Last Slide in Powerpoint 2010: A Step-by-Step Guide
- How to Insert Slides from Another Presentation: Powerpoint 2024 Guide
- How to Add a Hyperlink on Google Slides
- How to Convert Powerpoint to Google Slides: A Tech Solution
- How to Remove Slide Numbers in Powerpoint 2019: Easy Steps
- Can You Print a Google Slide?
- How to Hide Background Graphics in Powerpoint 2013: A Step-by-Step Guide
- Can You Save a Powerpoint as a Video in Powerpoint 2013? Find Out Here!
Get Our Free Newsletter
How-to guides and tech deals
You may opt out at any time. Read our Privacy Policy
Android Police
How to change the size of your google slides.
Present your slideshow in the right way
Google Slides has an impressive number of templates for creating beautiful presentations. It's been the go-to choice for many users who don't use Microsoft PowerPoint and an easy-to-access alternative for well-equipped Chromebooks . If your slides are too small or too wide, they may not scale well to the content shown on the screen. This guide teaches you how to change the size of the slides in your Google Slides presentation on a browser to ensure you use the correct size.
What's the difference between Google Slides templates and themes?
Which size works best with google slides.
It depends on where the presentation is viewed. Most computers use a 16:9 aspect ratio, but mobile devices prefer a 4:3 ratio. If unsure, test the slideshow on multiple devices and decide which gives the most optimal viewing experience.
How to resize your Google Slides on a Windows computer
You can decide the size of your slides before creating your presentation. Alternatively, open an old presentation and choose to resize your slides. Check the steps below to get started.
Changing Google Slides size on a new presentation
All the slides maintain the same aspect ratio you selected. If you're uncertain whether any default options suit your presentation, tweak the ratio by choosing Custom .
Changing Google Slides size on a saved presentation
After swapping the aspect ratio, you may need to adjust your Google Slides presentation. In this example, we swapped the aspect ratio from Standard 4:3 to Widescreen 16:9, which changes the alignment of images and text on each slide.
How to resize your Google Slides on a Chromebook
You're likely sticking to Google's ecosystem while working on a Chromebook. Google Slides becomes an essential tool when building a presentation. Google Slides works like the Windows computer version, so changing the slides' size is simple. Here's how to do it:
- On a Chromebook, open Google Slides on a Chrome tab.
- In the Page setup window, select the drop-down box and choose Standard 4:3 , Widescreen 16:9 , Widescreen 16:10 , or Custom .
The Google Slides app works on Chromebooks but has the same (limited) functionality as the mobile app (the app you download from the Google Play Store is the Android app ported to Chromebooks).
How to expand the size of your Google Slides presentation
Sometimes, presentations can start in the wrong view. Fullscreen mode ensures the set aspect ratio of the slideshow remains the same on the screen. However, the audience may see another view if you select the wrong mode before starting your presentation. The view you can accidentally click is Presenter View.
Inside Presenter View, the audience sees a fullscreen presentation of your Google Slides (if presented on a different screen), while you see the speaker notes written below the slides and some settings. Seeing a busier screen can distract the speaker, especially if the slides remain in autoplay . As a result, you may prefer to set up fullscreen mode. Below are the steps to ensure your Google Slides start in fullscreen mode.
How to enter fullscreen mode on Google Slides
Clicking the Slideshow button also puts your presentation in fullscreen mode.
How to resize your Google Slides on mobile
The slide size in Google Slides on the Android and iOS mobile apps cannot be manually changed. To get around this, open Google Slides on a computer and follow the steps above to adjust the size of your slides.
Revamp your Google Slides presentation
Does your current Google Slides presentation need a boost? Check out the best templates for Google Slides . Spice up your presentation to look more professional or change it to something more colorful and snappy. Google Slides also supports audio files from your Google Drive, so add audio to keep your audience engaged. Google Slides has several tools to make your slideshow stand out.
- Data, AI, & Machine Learning
- Managing Technology
- Social Responsibility
- Workplace, Teams, & Culture
- AI & Machine Learning
- Diversity & Inclusion
- Big ideas Research Projects
- Artificial Intelligence and Business Strategy
- Responsible AI
- Future of the Workforce
- Future of Leadership
- All Research Projects
- AI in Action
- Most Popular
- The Truth Behind the Nursing Crisis
- Work/23: The Big Shift
- Coaching for the Future-Forward Leader
- Measuring Culture

The spring 2024 issue’s special report looks at how to take advantage of market opportunities in the digital space, and provides advice on building culture and friendships at work; maximizing the benefits of LLMs, corporate venture capital initiatives, and innovation contests; and scaling automation and digital health platform.
- Past Issues
- Upcoming Events
- Video Archive
- Me, Myself, and AI
- Three Big Points
How to Create Slides That Suit Your Superiors: 11 Tips
When you’re pitching ideas or budgets to execs in your organization, you need to deliver slides that fit those particular people just right. This checklist identifies the key considerations.

- Workplace, Teams, & Culture
- Leadership Skills

Carolyn Geason-Beissel/MIT SMR | Getty Images
I recently interviewed 20 of my customers, all in senior roles at Fortune 100 companies, and asked them their biggest pain point in presenting to higher-ups and even colleagues. What I heard consistently was that it can feel like Goldilocks bouncing from one option to the next, testing to figure out what’s “just right.” Does the audience want deep reports? Sparse slides? Something in between? Like … what?
Teams often come to presentation meetings with vast amounts of backup content just in case an exec wants to take a deep dive on any given point. There’s often a struggle to anticipate every direction attendees might want to go. It’s frustrating, and it’s not efficient.
Get Updates on Transformative Leadership
Evidence-based resources that can help you lead your team more effectively, delivered to your inbox monthly.
Please enter a valid email address
Thank you for signing up
Privacy Policy
There are many ways to build slides. I’m not just talking about crafting them well versus poorly. I’m talking about all of the important decisions regarding how to organize them, how much text to use, when to lean into a chart, the best ways to use bullets and color, and whether to include an appendix with additional information. Before you make your next proposal or request of the executive team, use this list of 11 tips for your next set of slides as a guide.
Four Things You Must Have in Every Exec’s Slides
Before we drill down into the harder aspects, the ones where your executives’ tastes may vary widely, let’s quickly cover four aspects that you can consider the building blocks — the basics you should never proceed without.
Start with an executive summary. Begin the slide deck with a tight executive summary that follows a three-act structure. First, start with stating the current realities. Second, clearly state the problem or opportunity your idea addresses and its potential impact. Third, explain how your recommendation solves the problem or exploits the opportunity and the next steps you’re proposing.
Have a logical organization. The arc of the deck — the package from beginning to end — should make sense. If your audience reads only the headline of every slide, the order should be coherent and make most of the case for you. The content below each slide’s headline must support the statement made in the title. Remove everything that doesn’t support your point; as writers will tell you, you sometimes need to “kill your darlings” when you’re editing.
Begin the slide deck with a tight executive summary that follows a three-act structure.
Make it skimmable. Help your audience to quickly grasp the point without getting bogged down in details. Create a clear visual hierarchy. Guide the reader’s eye through the content: Use bold headings, bullet points, and numbered lists to break down information into digestible pieces. Highlight key takeaways or conclusions in a different color or font size to draw attention to these critical points.
Focus on concise insights. Succinct statements with clear insights are everyone’s jam. Every slide should serve a purpose and contribute directly to the decision-making process. Distill complex information. Don’t use 100 words when 20 words will nail it. If you’re having difficulty trimming, consider using company-approved AI tools to help you take out the fluff.
Five Preferences to Confirm With the Person You Want to Reach
Now we’ll delve into what your particular audience does and does not want. If you haven’t yet, start by asking the person you’re presenting to what they generally prefer. They probably know themselves well but have not been asked to articulate how they like to receive information.
Ask how dense is too dense. Some executives prefer detailed slides with comprehensive data. Others favor a more high-level approach. You’re weighing how to balance informative content with readability, ensuring that slides are not overloaded yet are sufficiently detailed to support decision-making.
Confirm the delivery format and timing. Some execs like information presented to them. Others prefer a pre-read of the material followed by a discussion. I always recommend our tool Slidedocs (I’ve written a free e-book on them), which are visual documents using both words and images. The templates help presenters organize their thoughts into a document for a pre-read or a read-along. They are designed to be skimmable and able to travel through your organization without the help of a presenter.
I’m a huge fan of pre-reads and prefer to use my time in meetings to ask questions and build alignment. If your audience didn’t review your material in advance, ask at the top of the meeting whether they would like you to present it or would prefer to read through it and then discuss it.
Find out how much data visualization they prefer. Charts, graphs, photos, and illustrations often communicate complex data more clearly than words alone. When execs can see what you’re saying, they often can better understand the impact of your idea. Does the exec want to understand exact numbers? Bar charts allow them to move their eyes across a series of specifics. Does the exec want to know the shape of a trend over time? Line charts can show the pattern. (See “Classic Charts Communicate Data Quickly.”) Some prefer charts with annotations that draw attention to what you think is the most important point. Others want to make their own conclusions from the data.
One of my clients, the CEO of a massive commercial real estate company, doesn’t want anything visualized. He prefers numbers, only in a table, and only in two colors — black and red. You might think this is archaic. But the fact that he’s clear to his teams about what he wants takes all the mystery out of how to communicate with him.
When the stakes are high, have a conceptual thinker help with diagrams and concepts. If you don’t have one on your team, and when it’s high stakes, find an internal designer to help you or hire one. You can’t afford to have the baby (your idea) thrown out with the bathwater (terrible slides).
Identify which details need spelling out. How well do the people you’re presenting to know the landscape and function of the company and products you’re talking about? For example, if your engineering team threw a slide into a deck about an issue that requires executive approval, do the execs all speak geek? Or do you need to explain the technology so that they will really understand the ask? Either eliminate internal jargon and acronyms or unpack those bits, especially if your proposal deeply involves expertise outside of the executives’ domain.
Ask whether appendices will be useful. When you’re organizing a presentation, you often troll data, read through complicated reports, and even hire external experts to figure out what’s best for the company. Do your execs want access to that supporting data? You can add a document to the end of the presentation as an appendix to show all of the data and source material. This allows the main content of the slides to remain focused and accessible while still providing comprehensive background information for those who want more.
Two Tips to Improve Your Presentation Skills
Getting materials in place is the biggest step. They will be your best tools for selling your ideas. But there are two extra areas to pay attention to as a presenter: how you handle questions and how you use every experience to improve.
Anticipate questions, and practice your answers. Before you have your meeting, gather a small team to challenge every point you make. Invite colleagues you trust to role-play as “a rapidly inquisitive exec” or “the doubting naysayer exec” so you are prepared to present your idea well. They’re gonna grill you, and practicing will help you remain unruffled when it happens.
Related Articles
Ask for feedback after the presentation. Establish a feedback loop with those you presented to. Ask what worked well and how you can improve. If attendees don’t have the time, find people who have had their ideas funded and talk to them about what they did that worked. Advice and some perspective will help you nail your performance even better next time.
Empathetically understanding your audience members and how they process information, whether it’s executives or peers, sets up your ideas for success. Clarity creates efficiency. When a presentation fits just right, you’ve given your great thinking the best chance of moving through your organization and having maximum impact.
About the Author
Nancy Duarte is CEO of Duarte Inc. , a communication company in the Silicon Valley. She’s the author of six books, including DataStory: Explain Data and Inspire Action Through Story (Ideapress Publishing, 2019).
More Like This
Add a comment cancel reply.
You must sign in to post a comment. First time here? Sign up for a free account : Comment on articles and get access to many more articles.
- DynamicPowerPoint.com
- SignageTube.com
- SplitFlapTV.com

Best Resolution For PowerPoint Presentations
Sep 30, 2015 | DataPoint , DataPoint Real-time Screens , How-To , iPoint
77 Comments

I do not have inch on powerpoint, What would 13.333 x 7.5 be in metric?

Mike, don’t worry. You can enter you number with the cm suffix too! The 13.333 in by 7.5 is the default slide size setting for a widescreen presentation in Inches.

Dear Admin,
Thanks for an awesome tutorial.
I am using windows computer and my office version is 2016. I have the following question please.
” Is it possible to setup a Powerpoint slide resolution in windows computer that will work perfectly on Macbook Pro Retina Display? If yes, How?”
Note: I am searching this solution for a long time. i think you can help me to get a solution regarding this.
Regards and Thanks
Thanks for the message. To set up that presentation for your Macbook, look what the resolution is. Maybe it is 2880 x 1800. When you have that, go to your PowerPoint, click Design and then Slide Size and choose Custom Slide size. There you see the width and height in inches or centimeters. Just enter here 2880 px and 1800 px and PowerPoint converts it automatically into the corresponding inches or centimeters.

I have been doing posters for years now and I always get a problem when I make my poster to be an A1 size,it never apear clear, it so not clear that you can’t see the picture clearly even the writing. How do I do my settings?

Hi Lucky, I need some more info on your process. Are you changing the slide size to the dimension of the A1 size? So 59.4cm x 84.1 cm or 23.4″ by 33.1″? I guess you did that already. How to you see it then that the picture is not clear? Are you insert pictures on your slide? Is the slide unclear on your screen? Or maybe, is a print-out or save-as-picture not clear? Please let me know. Maybe attached a sample.

My version of PowerPoint does not allow me to insert a custom setting of 1080px X 1920px. However it does allow a ratio of 16:9 in portait which automatically converts the size settings to 14:29cm width and 25.4cm height. Is this the same as 1080px X 1920px?
Thanks for your help!
Hi Ann, it all sounds correct. You can enter your dimensions as 1080px and 1920px. But indeed, the pixel values are automatically translated into cm or inches. That is normal. The new values fully correspond to your chosen px values.

Thanks for your Power Point How To! Unfortunately I lack a lot of knowledge on this subject, but am interested in learning how to create a better quality, higher resolution jpeg on PP. I often create and send flyers by email, or post them in Facebook. When I do so the text and pictures are somewhat blurry. I assume they are automatically compressed and therefore lose quality. Of course I know they can’t be too large for either of these mediums. I don’t know much about width and height or resolution. Any direction you can give me as to how best to determine that, and how to turn out a higher quality flyer would be very much appreciated. Thanks Sally
Hi Sally, I assume that you are using PPT 2016. In PowerPoint, click File, Options, Advanced. Then at the group ‘Image Size and Quality’, change the ‘Default resolution’ option. I always set this to ‘High fidelity’ for the best results.
That should do the trick!

I have PP 2016. A projector with native res of 1024 x 768. My screen is a 4:3 (6′ X 8′) and having trouble filling the screen. Should I tic the “Best scale for slide show” box and input 1024 x 768? How about using “Play full screen” under the video Playback tab. It’s all confusing.
Hi Frank, Your resolution of 1024 x 768 is a perfect match with your screen, since that is 4:3 too. According to this info here, I would say that the result is a full screen image. Video playback tab: no impact on your slide show page setting. Is for videos only. But have you set you slide design setting to 4:3 too? See Design, Slide Size. Is that 4:3?
Yes, I have slide size set to 4:3 (Slide still not filling the screen. Here are my specs: Projection screen size: 8′ x 6′ (4:3 ratio) Shows a 10″ X 7.5″ slide size. Projector has a native resolution of 1024 X 768 I should make the slide size setting 4:3 and leave default size or put in pixel sizes for height/width? That is 1024 px X 768 px?
What should my laptop display resolution be set to?
At 4:3 the slides fit the screen but the inserted videos do not fit screen–not sure what is causing that. Should “Play Full Screen” be checked?
When “Best scale for slide show is selected” a resolution is requested. (?) The default is showing 640×480)
At what point in the process do I bring in my slide show template? After all settings have been completed?
Sorry about the ton of questions Admin, there are so many settings it boggles the mind. Thanks Frank
Frank, since your projector is 4:3, then you should choose 4:3 on your slide design as well. If you want, you can always enter the pixel value, there whee you see the inches values. Just type in your e.g. 1024 px (with px!) and it will be converted to inches again. Could be a good test to try.
Best is to open your template first, and then apply the screen and slide design settings.
Hi Admin, Thanks for the suggestions.
When I select 4:3 for the 6′ x 8′ projection screen, there are no options to input H & W but I selected “Custom” and input 1024 px in width box and 768 in height. When I exited then re-entered “custom” the box showed 10.667 in and 8.0 in. (PowerPoint 2016).
Is placing the projector’s native res (1024 X 768) in the “Slide Size” box the only location in PP that the res is entered? (I see all kinds of slide dimensions in different places in PP.)
Thanks again, Frank
Thanks is correct. The px values that you can enter manually, are automatically converted into inches or centimetres, based on your regional settings. The only place where you should set/change the presentation slide design, is at (for ppt 2016) Design tab, Slide Size, Custom Slide Size. Maybe try with a new and clean presentation first!
Thanks Mr. Admin, you have been great. Saying that, nothing is working so I’m starting to think my new HDMI over Cat 6 cable that I got from Amazon might be the culprit. It uses two powered baluns but the cable itself was cheap.
For example, when I change the laptop display setting to match the projector’s, 1024×768 I lose the projector image entirely. I don’t get it back until I go back up to several higher re settings. AND, none of the slide sizes change the output to any degree at all. (Very frustrating.)
Frank, I understand that this is very frustrating for you. But I would suggest to bring down the resolution to 800×600 pixels. That is the most standard and lowest resolution that every device should be able to handle. Try that first. Secondly, try to use a VGA cable maybe, to check out your new HDMI cable (or another HDMI cable that you borrow somewhere).
And maybe try your chance at a PowerPoint forum or at other resources where more PowerPoint experts are watching. They might have the experience that you need here. Check out e.g. http://www.msofficeforums.com/powerpoint/ and https://support.office.com/en-us/article/Connect-with-other-PowerPoint-users-ce0fd093-41c0-406c-92b8-65603b89aa6e
Many thanks Admin, I’ll try those resources you suggested.

Hi Admin – we have a ppt template that by itself is over 5MB and is causing problems when we start to add additional pages we quickly get up to 20-40MB! We mainly present on a range from computer screen to normal boardroom sized screens. We have 2 solutions we’re looking into and would appreciate your expertise. 1) reduce all of the images in the master to 96 dpi, 2) remove all images in the master, only have templates, and then have separate files that can be inserted that contain images, etc. Any recommendations? Thoughts?
Hi Deborah, Shrinking your images before you insert them, is a good option. But, even when they are inserted already, you can compress the images on your slides, and thus, reduce the total size of the presentation. To do this, select your image, and go to the Picture Tools, Format tab. Click the Compress Pictures button. Now you get the option to compress the images to a given resolution, and to crop the pictures.
Normally a presentation of 20-40MB should not give you problems. What are the problems that you are experiencing then? Slow starting?

Hello — I have a PowerPoint presentation with slides that are set up as 10in x 7.5in (960 pixels x 720 pixels). If my .jpg images are set up as 96 pixels/inch, is that a high enough resolution? There will be 210 slides in the presentation, and each slide will have one .jpg that fills the screen. I am creating each slide first in InDesign (so that I have full design control over image/text) and exporting it as a .jpg file. I will not be adding anything else to the slide in PowerPoint (no additional text or images).
Thank you, Kathy
Hi Kathy, So your real question is, is a resolution of 96 pixels/inch enough for my presentation. First of all, 210 slides in one presentation is a lot. So, I guess you are creating some kind of brochure or business reporting, and not a sales presentation. So, with this number of slides, you will face probably a larger file. Using 96 px/in will keep your file size to a minimum. That’s for sure.
Important is: what is your priority? Small file size for easy distribution? Then you are fine already with this small resolution. But, if you want to use this presentation as an advertising or promotion presentation with your company’s products, then you should look at the resolution of your display device. When you are using a large 4K television screen (this is 4096 x 2160 px) for this, then of course this resolution of 960 x 720 pixels in total, is way too low. This would mean, that one pixel of your image would be stretched out and serve 4 pixels on your television. That results in an unsharp image on the TV.
So, the resolution set for your images, is not that important. You need to know the resolution of your display device (computer or projector/television) and the purpose of your presentation. Based on that info, you can make decisions on the image resolution, before importing them into PowerPoint.
But maybe a tip, or what I would do. Export the images from InDesign, in the highest resolution possible. Use them in PowerPoint. It will result in a large file, but you will have the maximum of information or details on your slides. Next step is to make a copy of the presentation and then you select your first picture, go to Picture Tools, Format tab, Compress Pictures. There you will have the option to compress the image to a lower resolution (for this or all images of the presentation). Save the presentation and evaluate it size or quality (whatever is your priority).
Hope this helps!
This is very helpful — thank you for all of the information and suggestions. It will help my workflow greatly. Thanks again.

Hi Do you have any particular advice on creating a PP presentation for a cinema screen. The cinema has specified 1990px x 1080px. Do you have any other advice?
Sure, at the boxes where you typically enter your values in inches or centimeters, just enter there the values with ‘px’ as suffix. So type in: 1990px and it will be translated automatically into inches or centimeters (according to your regional settings). That should help you.

Thanks for the article!
I have one question, I am creating a presentation that will be projected at a film theater and will include a variety of images. I want it to have the best possible quality. Is there something specific that I should do if it will be projecting at such a large size? Do I have to figure out the size of the projection in order to design something accordingly?
Thanks again
Hi Paul, thanks for your message.
Well, let me try to help you. The resolution of the presentation that you are designing is probably not relevant since you are probably using a projector on a wall. When presenting on a television screen, then you must respect the aspect ratio of your presentation and your television. More is explained here: https://presentationpoint.com/blog/powerpoint-aspect-ratio/ . But, that is not relevant when you are projecting on a e.g. white wall. Then you are not restricted at all, with regards to the aspect ratio.
More important is the possible loss in quality of your images. You might want to work with high resolution images, but by default, PowerPoint is compressing the images to a much lower resolution! That you don’t want to happen with a professional and largely projected presentation. Force PowerPoint to not compress your images. Set this already before you start adding images and definitely before your first save of the presentation. More info at https://presentationpoint.com/blog/powerpoint-compress-images/
Good luck with your event.

Whatis the real, true, actual maximum width in pixels for powerpoint 2016? I not talking about the scale up to fit the gpu (video card) but the actual physical pixel width limit. In 2010I was always told it was 4000 pixels. I do working with really wide screens in the video world. And by wide screen, I am talking 4096×4=16,384 pixels wide is a small canvas for us.
Microsoft will not generally answer this question and I have asked them this as microsoft shows like ignite 2017. Their responce is we base things on the printed world.
Good question James! Let’s play with it. PowerPoint 2016 (on Win platform) allows you to enter a custom slide design of 56″ width and 56″ height. Those are the maximum values that it allows. When you set a width in pixels, e.g. you enter 100px as value there, then that is translated into 1.042″. You know that you can enter px values in PowerPoint, right? So 100 pixels = 1.042″. This is means that the maximum pixel size of a PowerPoint presentation is limited to 5835 x 5835 pixels. 5835 pixels is the highest resolution that you can go. You can go higher, but you are losing quality. Hope that answers your question!

I send my customers PowerPoint files with mockup images of UI designs. I often receive comments saying the designs are either too small or too large, but I discovered this is largely because they use different devices with different dimensions/resolutions to review the mockups. Is there a way I can “force” images onscreen to stay fixed (let’s say at 4.2″x6.8″) regardless of what device they use?

I am preparing a photography dense Power Point presentation on a Mac that serves informational needs to both regional public offices and local mayors. I understand that these clients will be using PC computers. My online research warns the Mac lettering fonts may distort on PC oriented screens. To solve this issue, a suggestion was to take a image of a page’s entire the layout of images and text. How is that done successfully? Is a full size screen shot of a computer screen going to work? I am thinking that is not. So how do I get a good page image resolution? What file resolution am I after? 300dpi, 400dpi? It also warns of the sizes of each image done in this manner would be larger than if I had it done in PC’s Power Point. How much larger? What are the variables I need to understand?
Hi Judy, I would not export your nice presentation as (high-res) images between your Mac and PC users just for that. Why don’t you use safe fonts? A safe font is a font that can be used (normally without problems) on PC and Mac. There is a nice article that I found about this matter at https://www.indezine.com/products/powerpoint/learn/textandfonts/safe-fonts.html . Hope that helps!

I created a show at a custom size (10.5×8) and saved the slides as images. When I went to insert the images into a slideshow with the same dimensions as backgrounds, they were super fuzzy. Is there a way to fix this?
Thanks! Sarah
Hi Sarah, I think that you need to read and apply this article! https://presentationpoint.com/blog/powerpoint-low-resolution-pictures/

Is a 220 ppi good enough to have a crisp high quality presentation on a 16:9 projector with a resolution of 1,536 pixels x 960 pixels? Thank you!
Oh yes. 220 is still a very good quality! It will be looking much better already with this change!

What is the resolution settings of powerpoint JPG for 43″ LED TV?
Dear Jose, thanks for your question. At the stage, it is not possible for me to say that you have to use a resolution of x by y, because it depends on 2 things: a) what is the maximum display resolution that you can use on your television. For this info, check out the technical specifications of your brand/model. b) and more important: what is the maximum resolution or the current resolution of the computer that you want to connect to the screen?
Note that maybe your screen can handle a 4K resolution of 3840 by 2160 pixels, but your computer can handle only 1920 by 1080 pixels. In that case you best set up your presentation for 1920 by 1080 pixels, because that is the highest resolution that your computer can generate and send to your screen.
But on the other side, 3840 by 2160 is a ratio of 16:9 and 16:9 is definitely the ratio that is used on all modern televisions. So I would suggest to use 3840 by 2160, aka 4K, because that would fit on every 16:9 screen, even if the resolution is lower (whenever it is 16:9). So use and design in 4K and the output will be ok.
All clear? Success with your setup.

Dear Admin, thank you for the tutorial on the screen resolution. Please, I use windows 2010 and I can’t locate where to change the slide size like you illustrated using windows 2013. My presentation on my laptops come out so tiny and faint on the Flat Screen during my presentation. My audience can’t read what is on the screen. I need your help in this regard. Thank you. Phil.
Hi Phil, Have a look at this great article by Ellen Finkelstein where you see instructions and screenshots for 2010 specifically. https://www.ellenfinkelstein.com/pptblog/how-to-create-a-poster-in-powerpoint-2007-powerpoint-2010/ Does that help?

Sorry, gang… You included a lot of good information and suggestions here, but you never gave the correct answer. The Best Resolution for PowerPoint Presentations is:
“I resolve to use fewer text bullet points on my slides!”

Hello! I am working a Widescreen HD project– the default slide size is 13.333 x 7.5 in. When I insert the specifications of 1920 x 1080 px, the slide size reduces to 9.999 x 5.624 in. The slide size is *smaller*– it doesn’t seem logical that a smaller slide size would have increased projected resolution. What am I missing?
That sounds a bit low yes. AFAIK this value is calculated based on your current DPI settings. Could this be low too? In order to build e.g. a higher resolution presentation, I would double here your values in inches. The bigger, the better. It will always be reduced when too big. But starting small is, as you expected, not ideal.

Thank you so much for this great post. I want to create how-to-presentations and how-to-videos for internal teaching purposes at my company. First, I plan to create PowerPoint presentations with each >50-100 slides, lots of pictures and animations, afterwards I want to use the presentations as basis to produce the videos. The company I am working for deploys 4k widescreen TVs. Most of the pictures at our disposal are in 1920 x 1080 px format or lower.
First question: Above you mentioned “So I would suggest to use 3840 by 2160, aka 4K, because that would fit on every 16:9 screen, even if the resolution is lower”. I am not sure if I understood you correctly. Would it be of any benefit to me to use a 4K PowerPoint resolution, as you suggested, even if our pictures are of lower quality? If yes, why?
Second question: In order to produce the videos which of the two options would be better according to your experience? To use (a) the PowerPoint video feature or (b) to use a screen recorder (e.g. obs) to record my presentations as video? (Please keep in mind there are many animations which have to be executed manually in real time)
Third question: Which resolution should I use to produce a video given my company uses 4K TVs? (Full HD or 4K, given that our pictures are of lower quality than 4K)?
Sorry for the many questions I need your help. Thank you!
Thank you so much for your great article. I hope you can help me.
I would like to create high quality how-to-presentations and how-to-videos (both with many slides, pictures, animations and verbal comments) for internal education purposes at the company I am working for. We deploy 4k widescreen TVs. The format of the pictures at our disposal is 1920 x 1080 px or lower. First, I want to create the presentations, afterwards I want to use them as basis for the videos.
Above you mentioned “So I would suggest to use 3840 by 2160, aka 4K, because that would fit on every 16:9 screen, even if the resolution is lower”. I am not sure if I understood you correctly. Would it be of any benefit to me to make 4K PowerPoint presentations even if our pictures are 1920 x 1080 px or lower? If yes, why?
In order to create the videos which of the two options would you prefer according to your experience? (A) to use the PowerPoint video feature to create the videos? (I heard that PowerPoint is now able to do 4k videos) or (B) to use a screen recorder (e.g. OBS)? (Please keep in mind the format of our pictures; Also the many animations & verbal comments which I need to record in the video in real-time).
Would you also recommend to produce 4k videos instead of HD videos (1920 x 1080 px) given our picture quality?
I already finished a couple of presentations but they are in the format 4:3. Thanks to your article I understood that I have to switch the format to 16:9. When I attempt to set the settings for a new presentation to 16:9 (1920 x 1080 px) I get a PowerPoint-question asking me if I want to maximize the content or if I want to scale it down. Which of the two options do I have to take?
Your help would be very much appreciated. Thank you!
First question: I would still use 4K resolution. The higher the better. Even when your pictures are not directly in 4K, then still you can have the other shapes like texts etc in very high quality. Second question: ‘Animations that have to be executed manually’: that is conflicting with videos. Once it is a video, you have no manual options unless you would pause or start new videos. When it is manual advancing and animations (on click), then PowerPoint remains the best option. Not? Third question: Is related to the first one and I would give the same answer. I would produce and render at 4K.
This message is more or less identical to your first request. Overall I would suggest using 4K slide size. Maybe your images are not directly 4K, all the rest can be displayed in better quality. So when your TV output is 4K, then design in 4K for the best results.
Thanks so much for your great help! Since I have already completed a few presentations I was wondering whether I have to completely remake them. The presentations where saved in 220ppi mode (PowerPoint-Version 2016). My goal is to have a very high presentation quality (I guess high-fidelity will do) and a 4k resolution (I changed the settings after reading your post accordingly). Because of the standard PowerPoint settings of 220ppi I have to replace the pictures, this I understood. But what about the PowerPoint shapes like arrows etc? Are they automatically in high quality when I change the settings in the existing (old) presentations from e.g. 220ppi to high-fidelity or do the shapes still keep their 220ppi?
What would be the best solution? a) To simply replace my pictures (220ppi) in the current presentations. In case the shapes adapt automatically from 220ppi to high-fidelity this option would be preferred. b) To start a new presentation from scratch with the setting of high fidelity. I still have to replace the pictures but could I just copy the shapes from the existing (old) presentations into the new presentation? (Of course only good if the shapes would get changed from 220ppi to high-fidelity via the copying-process) c) To start a new presentation from scratch having to add new pictures and make new shapes?
Sorry for the delay due to the Christmas period. Correct. First make sure to use high-res images and make sure that PowerPoint is not compressing them by default when you save the presentation.
You can perfectly change the slide design to 220 and everything will be adjusted. That is the advantage of PowerPoint. Then ‘calculation’ is done when you run the slideshow, so your ‘low-res-shapes’ will become ‘high-res-shapes’ automatically. Easy, not?

Quick Question… Why using 4k slides when the text and shape are vector, only images should be High-res so what is the main advantage of using the 4k and not the full hd?
Hi Mike, Good question. Basically you are right. Texts and other shapes are saved as vectors, so that makes no real sense. Images and videos need to be in high resolution, without having the risk that they are shrunk. Maybe it is a personal thing, but when you are using high res images and high quality on a small resolution screen like 800×600 pixels, and when you are applying fine and precise animations to your slides, then you want to design and test the results on the more-or-less same quality. It is absolutely not mandatory, but a Ferrari is preferably tested on the highway or on a test track:-).

I appreciate your article and I have a question on avoiding image distortion in ppt.
I am trying to take a ppt presentation that had originally started in 2007 and continued to work omn in ppt 2016. According to my settings it shows under properties as 35 mm slide format.
I used ppt to createsome of the more recent images, i.e. prototype designs at various different perspective, because I found it easier than using photoshop.
When I decided to migrate certain images and slides from ppt 2016, into a higher resolution (1920×1080, per your article) the images were grossly distorted to beyond recognizable, and any repair.
I tried both “made images fit the slide,” as well as the “maximize options.” in setting up the 1920 x 1080 without success.
The results were quite a mess, either way.
Before you comment I want to let you know that several images were worked on one slide so that I could demonstrate different “product variations,” and I recall that I often had to work at 350 to 400x zoom in creating them on that single slide. I thought I could work on them and then copy and paste them into seperate slides as needed. That actual slide of images took about 3 weeks+ to complete.
The presentation will be to investors and VCs. What is the best way to avoid gross distortion, and best resolution as I start to transfer images over to ppt in 1920×1080? Help!!!
Do I need to utilize any program or save images in any different format, (jpeg,tiff/ etc?) to convert things and then import the images into the higher res presentation??? Or am I competely unfortunate to have these critical images that won’t scale up or work????
Hi Brent, Have you also read these articles? https://presentationpoint.com/blog/convert-powerpoint-to-jpeg/ https://presentationpoint.com/blog/powerpoint-compress-images/ When this is not helping either, send in a trouble ticket on our website with a one-slide-one-picture sample.
Will do. Thanks so much for the prompt response. I will read those articles later today.

Hi, if the ppt is made in the ratio of 16:9 And if we r displaying it on the led wall of 8/6 ft will the display be full or will it look cinema scope
Well, on an 8/6 ft wall, it will have cinema-style with black borders for sure. A shame that not all pixels are used of your expensive LED wall. To fill your 8/6 ft LED wall, please redesign your presentation as a 4:3 ratio presentation. All clear?

I have a couple of questions I’m hoping you can help me with but first I’ll give you the details. I am creating a powerpoint presentation for a funeral. I started out with 600 dpi images but the PP file quickly got huge (200MB). I optimized all my images to 96 dpi and they are all at least 2000 pixels wide or high. That optimization has currently taken the Powerpoint file size down to 20 MB. There are many, many pics in this presentation. At 20MB optimized I am only half done. It will likely end up with around 100 pics so I think it is wise to optimize all these images because I have also read that a huge powerpoint file will cause the presentation to drag. The church where this will be presented uses a projector and it projects onto a 12′ x 12′ screen. I am not in the city where the funeral is being held so I can’t test to see what this looks like and won’t be there until the day of the funeral. I have a surface pro tablet that I’ll use to plug into the projector. I spoke to the church caretaker who helps to set this up and he said that, without knowing all the technical details, that what seems to have worked best for people is for them to plug their laptop directly into the projector with an HDMI cable and project it onto the screen. I have a big screen tv that I plugged my tablet into and played the presentation and it looked as good on the large tv screen as it did on my tablet.
My questions/concerns are: Will the projector just project what is on the tablet screen and it will look as good on the big projector screen as it does on the tablet or big screen? (when being projected is dpi of the source relevant. My concern is can I projector a large version of the presentation and still preserve nice detail or do I project it much smaller than the available screen dimensions of 12′ x 12′?
I just hoping to project a large version with ice detail and don’t want to arrive to set it up and not have it display nicely.
Sorry for the long story but would really appreciate your opinion.
Dear Dell, presentations are fun, funerals are not at all. My condolences with your loss! I was in the same situation as you earlier this year. Well, if you would use your own computer and connect it to the projector, then the file size of the PowerPoint is not that relevant anymore. Right? Everything starts with the resolution of the projector. Note that most projectors use a lower resolution than the televisions and computer screens that are sold nowadays. Most likely the projector can handle the size of HD (High Definition), 1920 x 1080 pixels. So your idea to use images of 2000 pixels is an excellent choice and personally, I would continue to work on 1920 or 2000 pixels. That is a safe choice for a good resolution!
But, note that when the tablet has a lower resolution than the projector, then most likely the output on the projector will not be better than what the tablet can handle (its video graphics card). So use a laptop or tablet with at least the HD resolution and then you are safe. To be completely safe, it is best to take your laptop or tablet with the original PowerPoint file on it. Using your own computer is also better when you have used special (not common) fonts. Otherwise, you have to install or embed the fonts you used. Just as a backup, I would take with me: the PowerPoint file on a memory stick, but also render the PowerPoint as video (MP4). Then you are completely independent of what software is installed (or not) on a potential foreign computer.
All clear? Got luck with your important job at the funeral!

So I am creating this powerpoint presentation and I’m losing my hair over the fact that all sizes are in cm. I understand that I can simply enter my wanted size in pixels, and powerpoint will then convert this to cm. Is there a way to make pixels the default measurement? It would simply make one’s workflow so much easier. Thanks in advance!
Hi Andreas, I would love to work in pixels too, but currently, PowerPoint is only working in inches or centimeters. You can upvote this feature request here: https://powerpoint.uservoice.com/forums/288949-powerpoint-for-windows-desktop-application/suggestions/19595893-change-units-from-inches-to-pixels

Thanks for such an informative article. I was struggling to create a photographic presentation for a powerpoint presentation and you have saved me so much time!
Great to read that we could help you out with this information!

Hi i need help.. I m preparing certificates in ppt. But when I’m sharing to other person somewhere changes happening. Same file on my side is correct but other side it is not correct in size wise… Is it happening because of computer resolution? Kindly let me know why it is happening?
How do you see that? Are you looking at the slide design settings? Are they modified?
I saw directly in my coullegue’s computer. Without modification same file when she sent that was right and same file when i sent to same person he said that was not right It’s screwed as he always complained before in terms of dimensions (A4 stretched to wide-screen). Why this is happening? Please let me know.. It’s important for me
Sorry but I think you can better explain your problem here at https://answers.microsoft.com/en-us/newthread . There are some better specialists and experienced people looking into individual problems. OK?

Thank you for an excellent article! I have been scouring the internet for this information and I have found your guide extremely useful. It’s a testimony to you that people are still adding comments some 5 years after you wrote this article!
I have a question if I may. I am using PowerPoint to create 1 minute animated infographics (in video form). The targeted output for the final videos needs to be 1280px by 644px (which is fine). Here’s my question: Would I get better quality videos if I set my slide size in PowerPoint to HD 1920px by 1080px for the design and then exported to video using the PowerPoint export function set at 1920px by 1080px and THEN resized the final video to 1280px x 644px using software like Handbrake?
Or should I simply set my PowerPoint slides size for the design to the final desired output of 1280px by 644px?
I’d be really grateful for any help/advice you can offer as I’m really not sure which way to go!
Many thanks
Hi Alex, thanks for commenting. I love when people are using PowerPoint for other purposes than just 16:9 slides! Personally I would design on the same size as you would output the video! Why? The risk of using small font sizes, will not be obvious when you are designing at 2x. So at 2x, your text might be readable, while it is too small on the normal size. So just be careful with that, because you might forget to check at 1x. On the other hand, when you suspect that maybe next year, you need a larger video because the output screen got bigger or so, then for that reason, I would suggest to design now already at 2x, and resize the video afterwards. Hope this helps.
Thank you so much for replying!

Hi,how can I get the 1920×1080 resolution ,windows 10? I followed the described way,but unit is ‘inch’ and it is not changing.I can’t type px inside the box
You can type in the pixel value with px behind your number, and that is then translated into the corresponding cm or inch value. Try it, it works.

If a powerpoint resolution is greater than the screen it is being displayed on, will that screen not be able to display it?
Wondering if there is any reason not to always go with a larger resolution?
Thanks! Nate
Yes sure, that should not cause any problem. PowerPoint will adjust itself automatically based on the screen resolution, lower or higher.

Hello Admin, I have to run my ppt on a big LED Panel wall whose size is W: 34 ft and H: 12 ft and I don’t want any black bars when running my ppt. Which ratio size will be apt for my PPT? 16:9 or any other?
You don’t want to black bars? Easy. Go to Design, Slide Size, and choose custom slide size. 34 foot or 408 inches is too large for PowerPoint. The highest value you can enter in PowerPoint is 56″ horizontally and vertically. When you have 34 x 12 ft, which is 408 x 144 inches, then this is too high for PowerPoint (bigger than 56″). Your screen ratio is then 17×6. So the maximum is 56″ in width, so you can set your height to 19.766″ (so that you have 17:6) at the PowerPoint custom slide size dimensions. OK?
I would love to see real-time data on that size of screen. Are you going to use our DataPoint plugin there?
Submit a Comment
Your email address will not be published. Required fields are marked *
Pin It on Pinterest
- StumbleUpon
- Print Friendly
Presentation font size: Dos and don’ts
- Categories: PowerPoint design , Google Slides
- Comments: 1

It’s no secret that at BrightCarbon we generally recommend keeping text on slides to a minimum . The main reason you need to avoid lots of text in presentations is because it’s virtually impossible to read and listen to someone speaking at the same time. In a presentation, you want to allow the audience to listen to the presenter while looking at an appropriate visual or diagram with minimal words, so that it all comes together seamlessly. Whereas, with documents like reports – while you can create them in PowerPoint – they aren’t presentations; there won’t be anyone talking over them. So you can (and possibly should) have a lot more text.
So, when you are using text in a presentation or document, how do you decide what size it should be? We’ve found there’s no hard-and-fast rule for how big or small text on slides should be. Each presentation has its own unique requirements – it all depends on what you’re using the slides for, what you’re hoping to achieve with them, and how your audience will be viewing them. Accessibility considerations also come into play, as well as readability across different typefaces and devices.
Determining appropriate text size
One way to decide on the right size for your text is to consider the height of each line of text in proportion to the total height of the slide . For example, in a sales or training presentation, the height of the title (per line) should take up approximately 4% of the slide’s total height; headers around 3%; and copy text around 2%.

This principle can be applied to text appearing in other types of presentation, too. For example, in a keynote presentation, the height of the text should take up around 6.5% of the slide’s total height. And in a document or report, aim for the height of the title text to take up around 4% of the slide’s total height; headers around 3%; and copy text around 1.5%.
When deciding on the right font size for a face-to-face presentation, it’s also worth considering how close audience members should be seated to the screen in order to be able to read the text easily. Check out presentation expert Dave Paradi’s table on comfortable viewing distances for text in presentation visuals [1] for more on this.
Our text size recommendations
We called upon our team of designers to determine what size they would make the text in a set of example slides. To create the slides, we used PowerPoint’s default widescreen slide size (19.05cm x 33.86cm, or 7.5”13.33”), and Arial – one of the most commonly used fonts.
The examples covered three different use-cases where text is sometimes used:
- A sales or training presentation. Small amounts of text can be used to point out key features and emphasise value and benefits.
- A keynote presentation. You want the audience to focus on the presenter during a keynote presentation, so the amount of text on each slide should be kept to a minimum. This means any text you do use can be much larger.
- A document or report. Text can generally be slightly smaller in stand-alone, static documents like reports, as readers will jump around the page to find the information they’re looking for.
Based on our team’s responses, we’d make the following recommendations:
Use-case 1: Presentation font size for a sales or training presentation
Top tip : As a general rule, aim to keep the number of different font sizes you use across your presentation to a minimum – ideally, no more than three different sizes per slide. And try to use font sizes consistently. For example, if you’ve used 20pt for headers on one slide, make sure headers on other slides are the same size.
Use-case 2: Presentation font size for a keynote presentation
Top tip : If you’re also using text labels or callouts in a keynote presentation, then make sure the font is slightly smaller than the rest of your text – ideally no smaller than 28pt.
Use-case 3: Font size for a document or report
Top tip : It’s also worth using visual hierarchies to help readers navigate documents like these – check out our blog post for tips on how to do this.
Hopefully, our recommendations help you to decide what size text on your slides should be. Remember, every presentation is different and will have its own individual requirements – for guidance on your particular use-case, get in touch and we’ll be happy to look over your slides. And if you want more help with upping your sales presentations’ font game, have a read of our article packed with typography tips and tricks!
[1] PARADI, D. 2008. Comfortable Viewing Distance for Text on Presentation Visuals [online]. Available from: https://thinkoutsidetheslide.com/wp-content/uploads/2012/08/ViewingDistanceTable16x9.pdf [Accessed 14 November 2022].
Related articles
Insights from a presentation templates expert.
- PowerPoint design / Industry insights
A PowerPoint template is the foundation on which polished and professional presentations are built. We interview BrightCarbon’s new Templates Lead, Gemma Leamy, and pick her brains on the ideal process for creating robust PowerPoint templates.

115 PowerPoint Christmas cards to download and share!
- PowerPoint design
- Comments: 45
It's Christmas! After a late night with too much eggnog and brandy snaps we set ourselves a challenge to see who could come up with the wildest PowerPoint Christmas card! So it's the day after the night before, and through blurry eyes we can reveal our efforts...

How to create PowerPoint templates that work
Without a proper PowerPoint template, presentations can be a bit of a mess. Here are the building blocks for developing a PowerPoint template that works!

thank you so much that was helpful
Leave a Reply Cancel reply
Save my name and email in this browser for the next time I comment.
Join the BrightCarbon mailing list for monthly invites and resources
We have worked with BrightCarbon for over 5 years, across a number of healthcare divisions, where they have been a very important part of our bid programme, supporting numerous awards of new contracts. Sarah Appleton Brown Practice Plus Group

- Locations and Hours
- UCLA Library
- Research Guides
- Research Tips and Tools
Poster Presentations
- Size, Layout, and Text
Elements of a Poster
Change size in powerpoint, using the ruler, grid, and guides in powerpoint, more powerpoint training, template resources, font choice, text alignment.
- Colors and Images
Your poster should include these elements:
- Author(s), with affiliations and emails
If your poster is a representation of a research study, you will want to include the following sections:
- Introduction or objective
- Conclusions and/or discussion
- Acknowledgements
If your poster is a representation of an event or other kind of project, you may want to forego formal abstract sections in favor of the 5 Ws:
- Who (introduce the author, organization, or community)
- What (what did you do? how did you do it?)
- Where (where did you do it?)
- When (when did it take place?)
- Why (what are the outcomes, implications, or future possibilities?)
To change the size in Powerpoint:
- Go to the Design tab and choose "Slide Size" (it's on the right size of the ribbon)
- Choose "Custom Slide Size"
- Change "Slides sized for:" to "Custom"
- Fill in your desired width and height.
Click the View tab to see checkboxes that will allow you to turn on the Ruler, Grid, and Guides (click the image below to see a screenshot).

Ruler : Allows you to see the dimensions of your slide. You'll see a vertical and horizontal ruler.
Grid : By default, the gridlines are 1 inch apart. Right click in white space of your poster to get more options for spacing. This enables precise alignment.
Guides : By default, you'll get one horizontal and one vertical guide placed in the center of your poster. Right click on a guide to add more guidelines, or to delete one. You can use Guides to invisibly define columns of your poster, margins, and more. This gives you manual control, alternatively, you can use Smart Guides (see below).
Smart Guides : Powerpoint has a built-in system for showing you alignment as you move objects around. The video below demonstrates what Smart Guides look like.
Once you've got your slide layout set, you'll want to start creating Shapes and Text Boxes. Here are some tips and tricks for working with objects:
- Use Ctrl+D to duplicate any object.
- Then you can format them all at once, identically!
- You can also group them, for easier movement and alignment (right click to see the Group option).
Most posters are landscape (horizontal) orientation. The title/author(s) will be across the top, with 3–4 columns below that contain the rest of the poster elements. Make sure you leave plenty of white space in your design—a poster crammed full of text and images is very difficult to read.
Here is an example of a 2 column poster layout using the 5 Ws for headings (who, what, where, when, and why):
Use the links below to download this template and other similar templates in two sizes: 24x36 and 36x48. These templates include a variety of placeholder elements for photos and figures.
- 2 column Powerpoint template, size 24x36
- 3 column Powerpoint template, size 24x36
- 3 column Powerpoint template, size 36x48
- 4 column Powerpoint template, size 36x48
Below are some additional web resources where you can search for templates. Keep in mind that you may need adjust the size of a template for your own poster. Alternatively, you can use the resources on this page to design your own layout in Powerpoint.
- David Geffen School of Medicine poster templates Although this is labeled for the sciences, the information can be used in many disciplines.
- Penn State poster template
- PhD Posters
- MakeSigns.com poster templates
- The body of your poster should have a minimum 24 point font . Viewers should be able to read your smallest text from a few feet away.
- The title of your poster should have a 50+ font size, depending on the size of your poster and the length of the title.
- Do not use all uppercase letters for the title or body of the poster.
- Avoid using more than 2 or 3 different fonts in one poster.
- Stick with basic fonts like Times New Roman or Georgia for serif, or Arial or Helvetica for sans-serif. Avoid elaborate, difficult-to-read, or cartoon-like fonts.
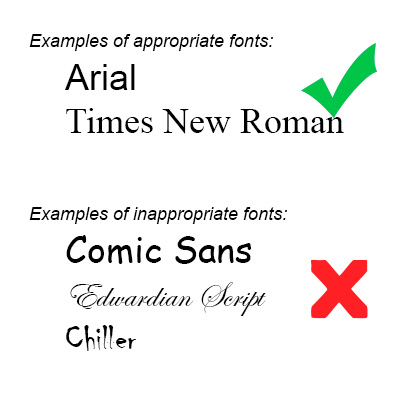
- In general, left-align your text boxes (with the possible exception of your title and any image captions). Avoid centering the text on your whole poster.
- << Previous: Home
- Next: Colors and Images >>
- Last Updated: Nov 9, 2023 2:31 PM
- URL: https://guides.library.ucla.edu/posters
IMAGES
VIDEO
COMMENTS
When you open this presentation, you'll find two PowerPoint dimension options: 4:3 and 16:9. It's these two PPT size options that give this template extra value. There are beautiful slide designs for both PowerPoint slide sizes. Use the hand-designed infographics for business-friendly illustrations.
The above notation is called the "aspect ratio," or the ratio of the width to the height of the slide. In the 4:3 aspect ratio, the dimensions are 1024 x 768 pixels (10.67″ x 8″); the height is 3/4 of the width. Back in the Ye Olde Days of PowerPoint, it was your only choice. Why?
To change your slide size in PowerPoint, simply: Navigate to the Design tab. Open the Slide Size drop down menu. Select 4:3 , 16:9 or Custom Slide Size (see options below) When starting with a blank presentation, you are now good to go. You will not have to worry about any of the conversion issues discussed below.
Just set the custom size for your presentation to 13.33" (width) and 7.5" (height) in Slide Size menu on the Design Tab, and voila, you are working in the future! And - if you are creating a presentation template for your organization - plan ahead and create both a 4:3 and a 16:9 template so users can choose the appropriate one.
From the beginning, a new PowerPoint presentation was created with a 4:3 slide setup. Since PowerPoint 2013, a new presentation is now created with 16:9 slides. ... Then click the Design tab and click on the Slide Size button. ... then you best have to create a 4:3 and a similar 16:9 presentation, to serve both most important aspect ratios. ...
Dimension. 4:3. 1,024 × 768 px. 16:9. 1,920 × 1,080 px. For your next presentation, keep your audience engaged with slides that are compatible with the device or screen you're presenting with. The purpose of your presentation and the viewing platform or format will help determine the size that you should use for your presentation.
Basic steps. To change the slide size: Select the Design tab of the toolbar ribbon. Select Slide Size near the far right end of the toolbar. Select Standard (4:3 aspect ratio) or Widescreen (16:9) or Custom Slide Size. For more about the predefined sizes (including formats like Overhead, A3, A4, Banner, B4, and B5) or your own custom sizing ...
The following article will provide a brief explanation of the differences in using the 4:3 and 16:9 format. We will also provide a guide on which PowerPoint slide size to use in our presentation. The 4:3 slide dimension was the standard in the past era of analogue TV screens.
Open a pre-existing PowerPoint presentation that you want to adjust the slide size of. Or, if you don't have a presentation, open a new one by going to File->New. Step 2. Click on Design at the top of your screen. You'll see a ribbon of options appear. Click on Page Setup. Step 3. A dialog box will pop-up that says slides sized for. Here ...
Next, go to the Design tab. It's where you can find the options that let you tweak your presentation's design. There, head over to the far right end — to where you can find the Customize section. Next, choose Slide Size. Clicking on this option will reveal a menu. It lets you pick the size of the slide that you want.
Understanding the size of a PowerPoint slide in pixels is crucial to ensure that your presentation looks great on all devices, from desktops to mobile devices. The standard size of a PowerPoint slide is 1024×768 pixels and the widescreen PowerPoint slide is "1920×1080" pixels. It can also be adjusted based on your preferences or the ...
You must decide which ratio for your slides will best suit the context of the presentation: A 4:3 ratio if beneficial for presentation slides that need to be viewed across multiple devices. A 16:9 ratio should be used conference presentations. Consider creating your presentation slides in both sizes to be prepared. Have a title page that stands out
The best slide size for your PowerPoint while giving a presentation on Zoom is 16:9 or a widescreen layout. The Zoom application is designed to display content in the widescreen layout by default. Therefore, using a 4:3 standard layout will result in blank space on both sides of your slides! For many of you, this answer may not come as a surprise!
How to change the size of a Google slide. You can adjust the Google Slides page size from the pop-up menu displayed via Page Setup. The available options include switching to Standard 4:3, Widescreen 16:9, Widescreen 16:10, and a custom slide size. Select the desired slide size and click Apply. How to change size of Google Slides presentation
In the "Customize" section of the "Design" tab, select the "Slide Size" button. This will display the two common slide sizes in a drop-down menu. Click either the "Standard (4:3)" or "Widescreen (16:9)" option to switch all of your PowerPoint slides to that size. Unfortunately, it isn't possible to use multiple slide sizes in a PowerPoint ...
Step 1: Open PowerPoint and go to the 'Design' tab. Click on the 'Design' tab located at the top of the PowerPoint window. When you're working on your PowerPoint presentation, the Design tab is where you'll find all the options for customizing the look and feel of your slides. It's the gateway to adjusting the size of your slides.
presenting on. Slide sizes choices of 4:3 and 16:9 look very different, especially if your slides are being combined into a larger presentation. The MITAA recommends using the 4:3 ratio slide size. You can change this by clicking the Design tab and clicking Slide Size on the far right.
Changing Google Slides size on a new presentation. Open a web browser and sign in to Google Slides . Go to File . Click Page setup . Click the drop-down box in the Page setup window to select the ...
Highlight key takeaways or conclusions in a different color or font size to draw attention to these critical points. Focus on concise insights. Succinct statements with clear insights are everyone's jam. Every slide should serve a purpose and contribute directly to the decision-making process. Distill complex information.
By default, the size of the new presentation in PowerPoint, is currently a widescreen type presentation, 13.333 inch by 7.5 inch. Mostly you will have 96 dots per inch (dpi) on your screen settings, so this means that a default PowerPoint presentation has a resolution of 1280 by 720 pixels. A common term that you hear for televisions and videos ...
You'll get the same result if you rescale the source picture in your preferred image editor to 1280 x 720 pixels, but at 96DPI. This is because PowerPoint scales it by the ratio of 72/96 or 0.75. Making this picture larger than the slide or projecting it at anything bigger than HD720p can cause it to become blurry.
So, we've come up with a few best practices to help you out. Presentation font size can be confusing, each deck has its own requirements. So, we've come up with a few best practices to help you out. ... To create the slides, we used PowerPoint's default widescreen slide size (19.05cm x 33.86cm, or 7.5"13.33"), and Arial - one of the ...
The body of your poster should have a minimum 24 point font. Viewers should be able to read your smallest text from a few feet away. The title of your poster should have a 50+ font size, depending on the size of your poster and the length of the title. Do not use all uppercase letters for the title or body of the poster.