What are the different views of a presentation?
- Slide Sorter
Copyright 1997 by the Curators of the University of Missouri

View Options in PowerPoint – A Complete Beginner’s Guide!
By: Author Shrot Katewa

There are many different types of presentations view available in PowerPoint including Normal View, Outline View, Presenter View, and Slide Show View to name a few. All these views serve different purposes and it is important to know how to use them appropriately to get the most out of PowerPoint!
In this article, we will talk about what each type of view does in PowerPoint and how to access them so that you can choose the best for your needs! So, let’s get started!
[ A Quick Note Before We Begin – for this article, I will be using one of the presentation templates from Envato Elements . With Envato Elements, you get access to thousands of presentation designs with unlimited downloads so you never run out of options again. Plus, you get free previews so you know exactly what you’re getting before buying! It is also very affordable. Check out their pricing here ]
1. What are the Different Type of View Options Available in PowerPoint?
Microsoft PowerPoint is equipped with a variety of Slide View options that can be used for different purposes.
These are the different view options available in PowerPoint –
- Normal View
- Slide Sorter View
- Notes Page View
- Reading View
- Outline View
- Slide Show View
- Presenter View
- Slide Master View
2. How to Access the Different View Modes in PowerPoint?
To access the different view modes in PowerPoint, you have to click on the ‘View’ tab in the ribbon. The 2-step process is described below.
Step-1: Click on the ‘View’ tab
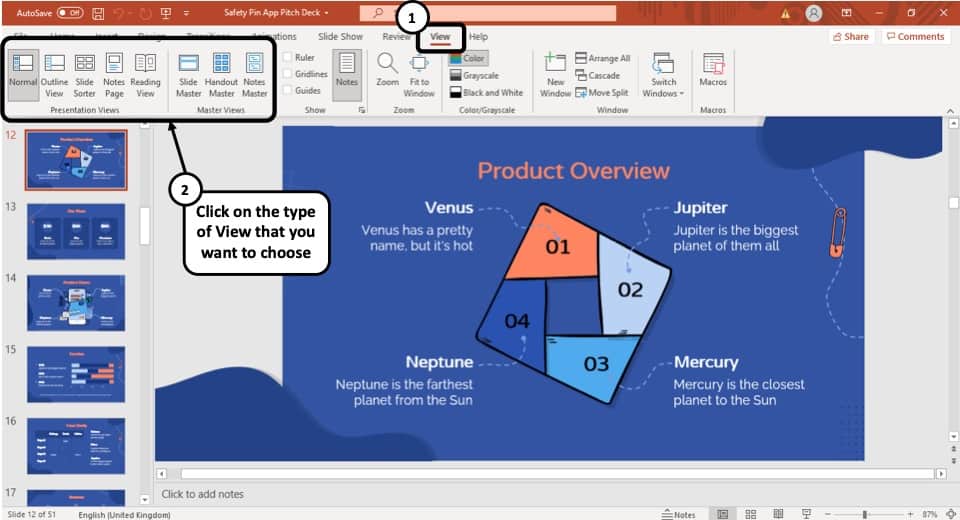
At first, select the ‘View’ tab, which is the second to last tab in the ribbon section of your PowerPoint Window.
Step-2: Select your preferred ‘View Mode’
Once you have access to the ‘View’ tab, you can select your preferred view mode such as the Outline View , Slide Sorter view, Slide Master view, etc. from the Presentation View section or the Master View section. (as shown in the image in step 1)
3. What is the Purpose of Various View Modes in PowerPoint?
Each view mode in PowerPoint has its own purpose. Let’s go through the purposes of the different slide view options one by one below –
1. Normal View
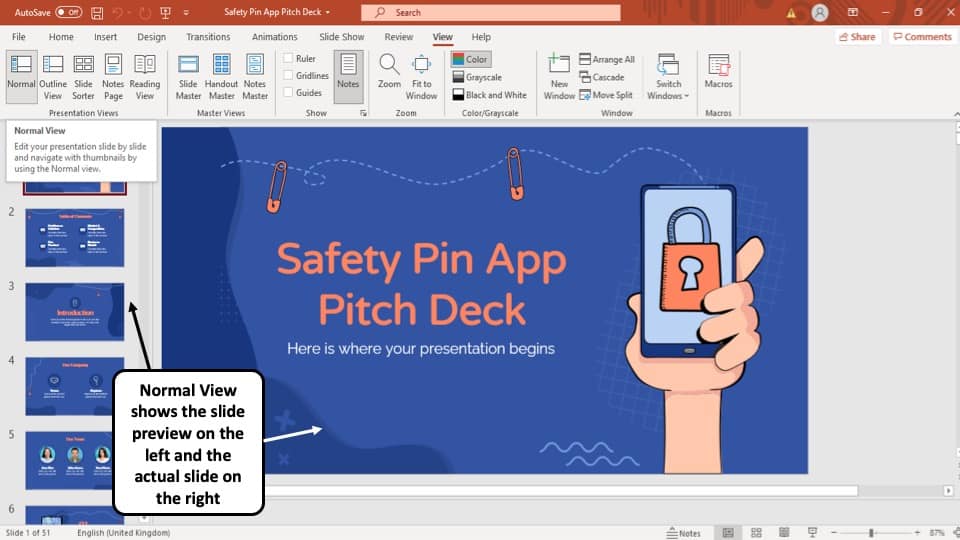
The ‘Normal View’ option is the first option in the ‘Presentation Views’ section of the ‘View’ tab. It is the most commonly used viewing option and is also the default slide view for PowerPoint.
The slides appear on the left of the PowerPoint window in the ‘Slide Navigation’ bar. Thumbnails of the slide are represented as boxes in the ‘Slide Navigation’ bar with its consecutive serial number to the left of it.
The main function of normal view mode in PowerPoint is to navigate through slides in a vertical grid while allowing you to add, design, or edit the slides while getting a preview of the slides on the left.
2. Slide Sorter View
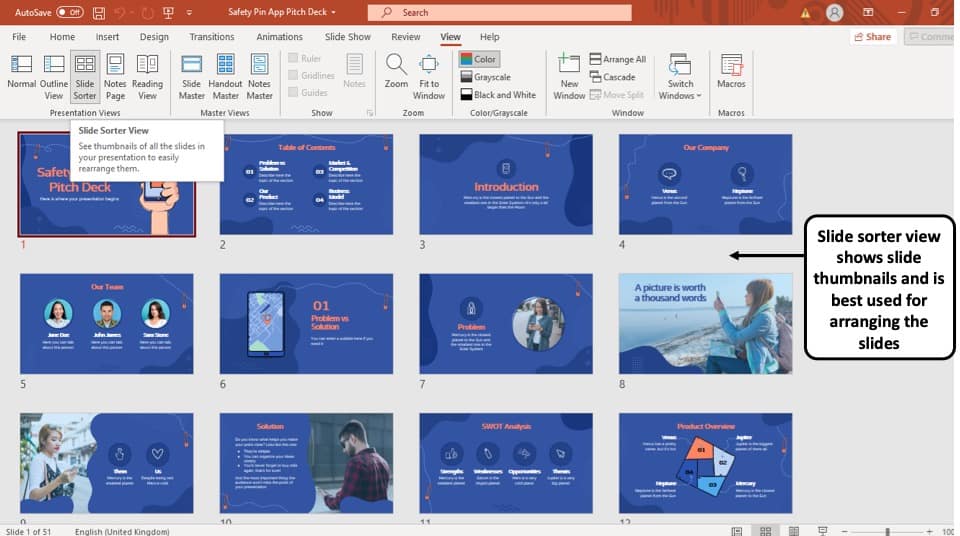
The ‘Slide Sorter’ option gives you an overview of all the slides in your PowerPoint presentation.
The slides are represented as thumbnails as a grid of boxes arranged side by side. The serial number of the slide is given on the bottom left corner of the slide thumbnail.
This option serves the purpose of viewing the slides together in one window making it easier to rearrange and organize them in a quick fashion.
3. Notes Page View

The ‘Notes Page View’ option gives you the view of each slide and its speaker notes in one page.
In this view, the slides appear at the top and the speaker notes are given on the bottom of the two sections. The serial number of the slide is not shown in this view. You can also edit speaker notes from here.
The main purpose of the notes page view in PowerPoint is to preview what each page will look like before you print the slides with speaker notes.
4. Reading View:
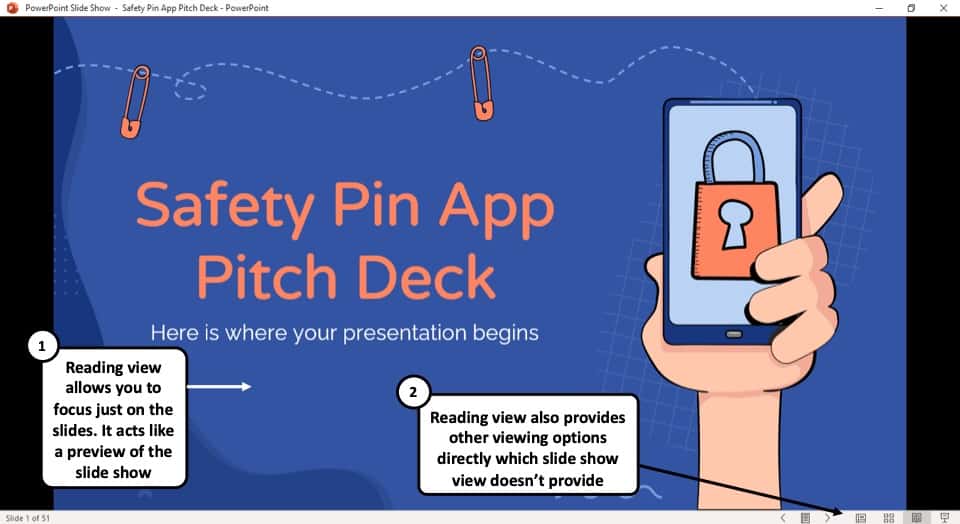
The Reading View option allows you to view your PowerPoint presentation without going into Full Screen mode. All the transitions and animations can be seen in this view. The serial number of the slide is given at the bottom right corner of the window.
It is used to preview the slide and review the slides with full focus. This mode also makes other view options easily accessible, which is not the case in ‘Slide Show’ mode where the presentation is shown in the full screen, and the options are not visible on screen.
The reading mode is actually more useful for word documents, as it allows the reader to focus just on the text. In my opinion, it adds little value to a PowerPoint presentation.
5. Outline View:
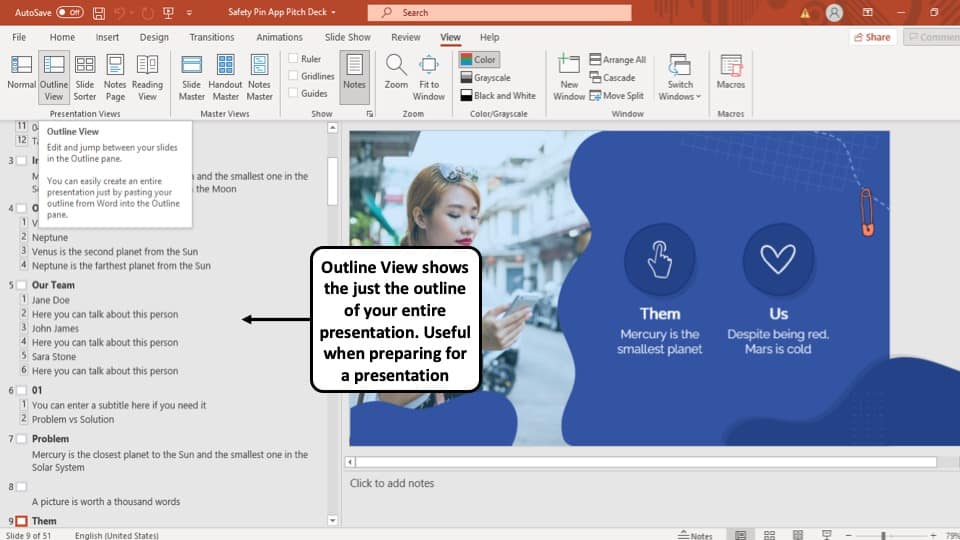
The ‘Outline View’ shows you the entire outline of your PowerPoint presentation in the ‘Slide Navigation’ bar.
In this view, there is no thumbnail of the presentation. Instead, there is an outline of all the data present in that slide. The serial number of the slide is at the left followed by a small white box that represents a slide and then the outline of that slide.
You can also create an entire slide in the pane of this view by copy and pasting data from Microsoft Word. However, you will have to design the slide separately once the data has been added to each slide.
6. Slide Show View:
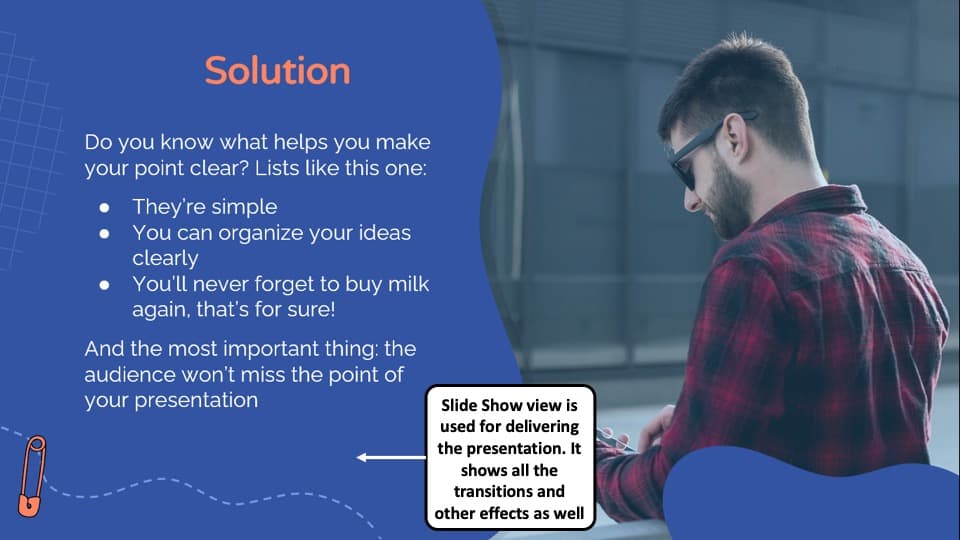
The Slide Show View is the view that your audiences are going to see. This view shows each slide of your PowerPoint presentation in full screen.
All the transitions, animation, and multimedia files in your PowerPoint presentation are played here. Consecutive slides can be accessed using the direction keys on your keyboard or by clicking once on the slide.
7. Presenter View:
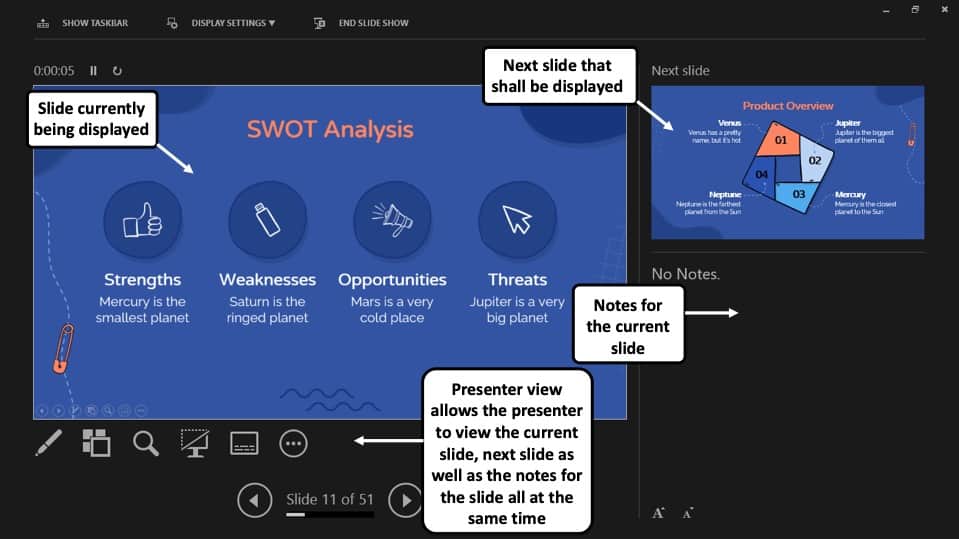
This is the view that you as a presenter are going to see while the audience is seeing the ‘Slide Show’ view.
Although you can give a presentation even in the slide show view, but it is always recommend to deliver the presentation using the “Presenter View” mode in PowerPoint as it provides you with additional features and benefits!
This view mode in PowerPoint will split the screen in multiple windows. The window on the left represents the current slide that is being displayed (the one that is visible to your audience).
The window in the top right section indicates the next slide in the queue. Whereas, the notes section displays the notes or key points made by each slide. Both, the notes section as well as the next slides window are only visible to the presenter and not to the audience!
The purpose of the “ Presenter View ” is to give the presenter all the aids to be prepared for the next slide and highlight the key points to be made on the current slide while delivering the presentation.
8. Slide Master View:
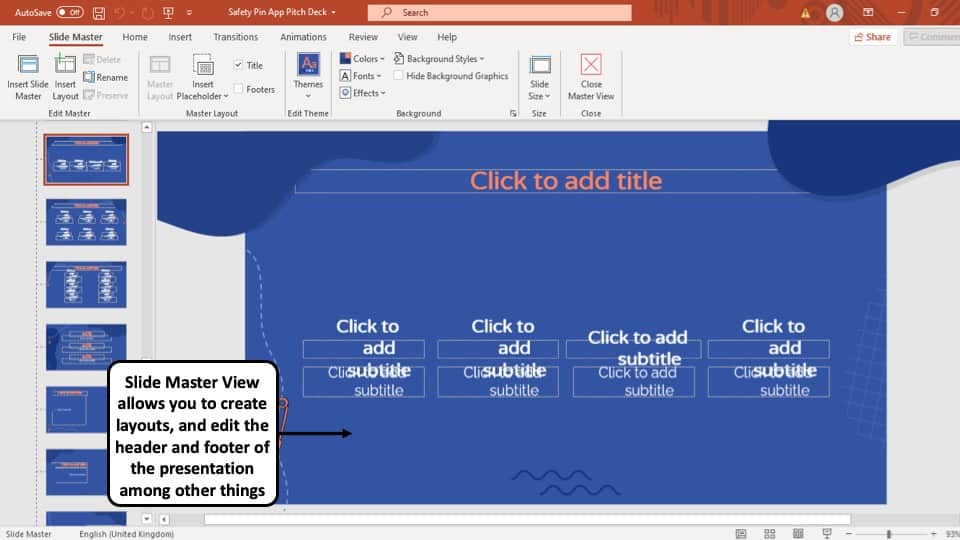
This view gives you a view of all the layouts used on the slides of your PowerPoint presentation.
The ‘ Slide Master View ’ option allows you to edit all the aspects of the layouts in your presentation such as fonts, background, color, and pretty much everything you can think of.
You can edit all the slide layouts of the presentation. Furthermore, you can also edit the header and footer of the presentation using the “ Slide Master View ” in PowerPoint.
4. How to Open the Presenter View in PowerPoint?
There are 2 different ways you can enter into Presenter View in PowerPoint –
- Using Slide Show View
- Using the short cut key i.e. Alt+F5
If you are using the Office 365 version of PowerPoint , you can actually directly access the “Presenter View” in the View section. Simply click on “View”. Then, click on “Presenter View”
Let’s look at both the methods quickly –
Method 1 – Using the Slide Show View
Step-1: Click on the ‘Slide Show’ button at the bottom right corner of the screen
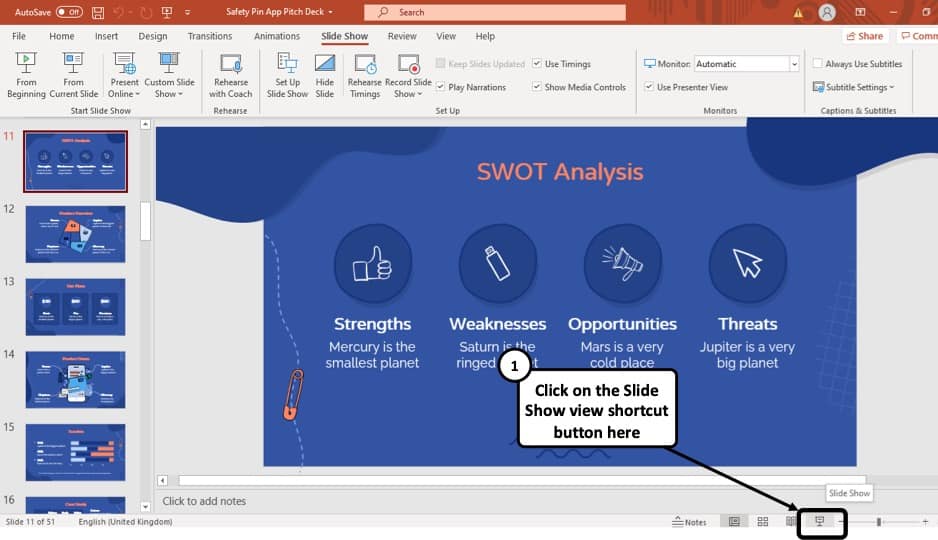
At first, you have to click on the ‘Slide Show’ button that looks like a projector screen which is located at the bottom right corner of your PowerPoint window. (as indicated in the image above)
Step-2: Right-click and choose “Show Presenter View”
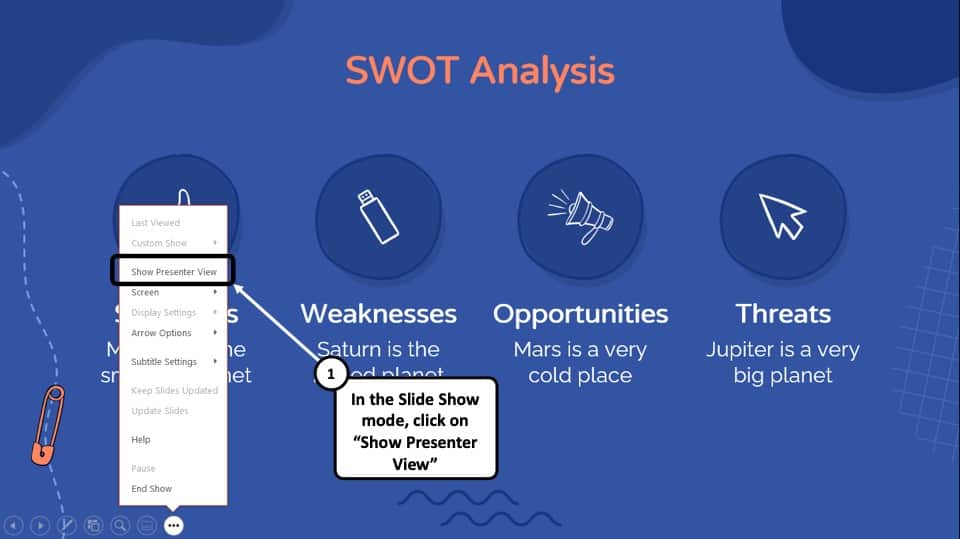
Once you are in the ‘Slide Show’ mode, using your mouse right-click anywhere on the screen. From the menu that appears, choose the “ Show Presenter View ” option
Method 2 – Using the Keyboard Shortcut
Alternatively, you can press ‘ Alt + F5 ’ on your keyboard and that will immediately open the ‘Presenter View’ mode.
The keyboard shortcut to open the “Presenter View” in PowerPoint on Mac is “Option+Enter” key.
5. How to Change PowerPoint Back to Normal View?
To change your PowerPoint back to ‘Normal View’ from ‘Slide Show’ mode, ‘Presenter View’ option or the ‘Reading View’ option, all you have to do is simply press the ‘ESC’ button on the keyboard of your computer. This will take you back to Normal View.
If you are using any other view apart from these 3 view modes in PowerPoint, you need to do the following –
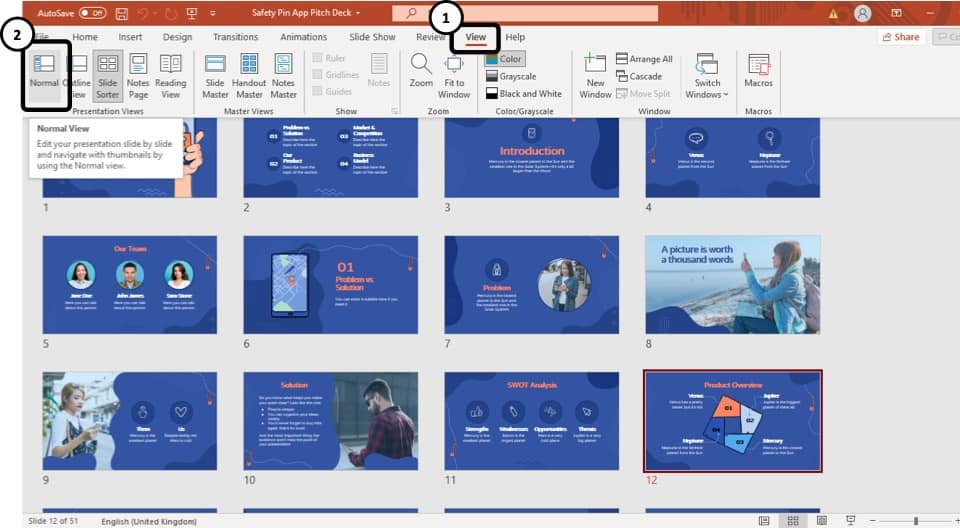
If you are in a different viewing option, such as ‘Slide Sorter’ option, or the ‘Reading View’ option then you have to select the ‘Normal View’ option from the ‘View’ tab instead of the ‘Slide Sorter’ option or the different slide view option you are currently on.
More PowerPoint Related Topics
- How to Crop a Picture in PowerPoint? [Complete Step-by-Step Tutorial!]
- How to Give a Presentation on Zoom? A Helpful Resource!
- What is a Presentation Clicker? [And How to Use it!]
- How to Convert a PowerPoint to PDF? [A Simple Guide!]
- PowerPoint vs Google Slides: Which is Better? [ULTIMATE Test!]
- How to Change Bullet Style in PowerPoint? A Complete Guide
Credit to Pressahotkey (via Freepik) for the featured image of this article
- Great Tech Gifts for Any Occasion
- The Best Gadgets for The Beach or Pool
Different Ways to View Slides in PowerPoint
Use different views to design, organize, outline, and present your slideshow
- Brock University
Many people spend all their time in the Normal view when working on their PowerPoint presentations . However, there are other views that are useful as you put together and present your slideshow. In addition to Normal view (also known as Slide view), you'll find Outline view, Slide Sorter view, and Notes Page view.
Information in this article applies to PowerPoint 2019, 2016, 2013; PowerPoint for Microsoft 365, and PowerPoint for Mac.
Design Slides in Normal View
Normal view, or Slide view as it is often called, is the view you see when you start PowerPoint. It is the view where you'll spend most of your time in PowerPoint. Working on a large version of a slide is helpful when you're designing your presentation .
Normal view displays thumbnails of each slide, the slide where you enter your text and images, and an area to keep presenter notes.
To return to Normal view at any time, select View > Normal .
The four slide views are located on the View tab. Toggle between them to compare views.
Organize a Presentation in Outline View
In the Outline view , your presentation is displayed in outline form. The outline contains the titles and main text from each slide. The graphics are not shown, although there may be a small notation that they exist. You can work and print in either formatted text or plain text.
Outline view makes it easy to rearrange your points and move slides to different positions. Outline view is useful for editing purposes. And, it can be exported as a Word document to use as a summary handout .
To view an outline of your presentation instead of thumbnails, select View > Outline View .
Rearrange a Presentation in Slide Sorter View
Slide Sorter view shows a miniature version of all the slides in the presentation in horizontal rows. These miniature versions of the slides are called thumbnails.
Use Slide Sorter view to delete or rearrange your slides by dragging them to new positions. Add effects, such as transitions and sounds, to several slides at the same time in Slide Sorter view. And, add sections to organize your slides. If you are collaborating with colleagues on a presentation, assign each collaborator a section.
To locate the Slide Sorter view, select View > Slide Sorter .
Keep Presentation Prompts in Notes Page View
When you create a presentation, add speaker notes that you refer to later while delivering the slideshow to your audience. Those notes are visible to you on your monitor, but they aren't visible to the audience.
Notes Page view shows a small version of a slide with an area below for speaker notes . Each slide is displayed on its own notes page. Print these pages to use as a reference while making a presentation or to hand out to audience members. The notes do not show on the screen during the presentation.
To locate the Notes Page view, select View > Notes Page .
Get the Latest Tech News Delivered Every Day
- Outline View in PowerPoint or OpenOffice
- Slide Layouts in PowerPoint
- The 10 Most Common PowerPoint Terms
- How to Use Speaker Notes in PowerPoint
- How to Print PowerPoint Slides
- How to Select More Than One Slide in PowerPoint
- How to Use the Slide Sorter View in PowerPoint
- How to Hide and Unhide a Slide in PowerPoint
- How to Print PowerPoint Slides With Notes
- Thumbnails Are Used for Navigation in Digital Files
- Converting PowerPoint Slides to Word Documents
- How to Add Page Numbers in PowerPoint
- Add, Delete or Change the Order of PowerPoint Slides
- Converting PowerPoint Presentations to Word Documents
- How to Make a Slideshow on PowerPoint
- How to Do a Voiceover on PowerPoint
- WordPress.org
- Documentation
- Learn WordPress
Browse through various articles and courses for Free at DeveloperPublish.com
- What is My IP Address?
Presentation Views in Microsoft PowerPoint
This post covers various Presentation Views in Microsoft PowerPoint and different use cases when you use them.
What are the different Presentation Views in Microsoft PowerPoint?
Various PowerPoint views that are supported in Microsoft Office includes.
Normal View
Slide sorter view, notes page view.
- Slides Show View
Master Views
How to choose the presentation view in microsoft powerpoint.
To choose the PowerPoint view, select the View tab in PowerPoint and then select the Presentation view that you wish your slide to use.

Alternatively, you can switch between different presentation views by selecting them from the Taskbar at the screen’s bottom.

The Normal View is the preferred presentation view in case you want to create and edit your slide.
The Slide Sorter View is ideal if you want to see the thumbnails of all your slide decks. It lets you to easily re-order them.
The Notes Page View is ideal if you want to view your speaker notes.
Slide Show View
The Slide Show View is ideal for the users who wish to present their slide on the projector. You can also use the Use Presenter View option in PowerPoint to display the current slide, next slide, and speaker notes.
If you want to make a change to all the slides within your presentation, Master Views might be an ideal one.
Leave a Reply Cancel reply
You may also like.

Content Placeholders in PowerPoint
- May 5, 2022

How to Create Text Boxes Manually in PowerPoint?

Rearranging Slides in PowerPoint
- May 2, 2022
Login with your site account
Remember Me

Choose the right view for the task in PowerPoint

You can view your PowerPoint file in a variety of ways, depending on the task at hand. Some views are helpful when you're creating your presentation, and some are most helpful for delivering your presentation.
You can find the different PowerPoint view options on the View tab, as shown below.

You can also find the most frequently used views on the task bar at the bottom right of the slide window, as shown below.

Note: To change the default view in PowerPoint, see Change the default view .
Views for creating your presentation
Normal view

Normal view is the editing mode where you’ll work most frequently to create your slides. Below, Normal view displays slide thumbnails on the left, a large window showing the current slide, and a section below the current slide where you can type your speaker notes for that slide.

Slide Sorter view

Slide Sorter view (below) displays all the slides in your presentation in horizontally sequenced, thumbnails. Slide show view is helpful if you need to reorganize your slides—you can just click and drag your slides to a new location or add sections to organize your slides into meaningful groups.

For more information about sections, see Organize your PowerPoint slides into sections .
Notes Page view

The Notes pane is located beneath the slide window. You can print your notes or include the notes in a presentation that you send to the audience, or just use them as cues for yourself while you're presenting.

For more information about notes, see Add speaker notes to your slides .
Outline view
You can get to Outline view from the View tab on the ribbon. (In PowerPoint 2013 and later, you can no longer get to Outline view from Normal view. You have to get to it from the View tab.)
Use Outline view to create an outline or story board for your presentation. It displays only the text on your slides, not pictures or other graphical items.

Master views
To get to a master view, on the View tab, in the Master Views group, choose the master view that you want.
Master views include Slide , Handout , and Notes . The key benefit to working in a master view is that you can make universal style changes to every slide, notes page, or handout associated with your presentation.
For more information about working with masters, see:
What is a slide master?
Use multiple slide masters in one presentation
Change, delete, or hide headers and footers on slides, notes, and handouts
Views for delivering and viewing a presentation
Slide show view.

Use Slide Show view to deliver your presentation to your audience. Slide Show view occupies the full computer screen, exactly the way your presentation will look on a big screen when your audience sees it.
Presenter view

Use Presenter view to view your notes while delivering your presentation. In Presenter view, your audience cannot see your notes.

For more information about using Presenter view, see View your speaker notes as you deliver your slide show .
Reading view

Most people reviewing a PowerPoint presentation without a presenter will want to use Reading view. It displays the presentation in a full screen like Slide Show view, and it includes a few simple controls to make it easy to flip through the slides.
The views in PowerPoint that you can use to edit, print, and deliver your presentation are as follows:
Master views: Slide, Handout, and Notes
You can switch between PowerPoint views in two places:
Use the View menu to switch between any of the views

Access the three main views (Normal, Slide Sorter, or Slide Show) on the bottom bar of the PowerPoint window

Views for creating or editing your presentation
Several views in PowerPoint can help you create a professional presentation.
Normal view Normal view is the main editing view, where you write and design your presentations. Normal view has three working areas:
Thumbnail pane
Slides pane

Slide Sorter view Slide Sorter view gives you a view of your slides in thumbnail form. This view makes it easy for you to sort and organize the sequence of your slides as you create your presentation, and then also as you prepare your presentation for printing. You can add sections in Slide Sorter view as well, and sort slides into different categories or sections.
Notes Page view The Notes pane is located under the Slide pane. You can type notes that apply to the current slide. Later, you can print your notes and refer to them when you give your presentation. You can also print notes to give to your audience or include the notes in a presentation that you send to the audience or post on a Web page.
Outline view (Introduced in PowerPoint 2016 for Mac) Outline view displays your presentation as an outline made up of the titles and main text from each slide. Each title appears on the left side of the pane that contains the Outline view, along with a slide icon and slide number. Working in Outline view is particularly handy if you want to make global edits, get an overview of your presentation, change the sequence of bullets or slides, or apply formatting changes.
Master views The master views include Slide, Handout, and Notes view. They are the main slides that store information about the presentation, including background, theme colors, theme fonts, theme effects, placeholder sizes, and positions. The key benefit to working in a master view is that on the slide master, notes master, or handout master, you can make universal style changes to every slide, notes page, or handout associated with your presentation. For more information about working with masters, see Modify a slide master .
Views for delivering your presentation
Slide Show view Use Slide Show view to deliver your presentation to your audience. In this view, your slides occupy the full computer screen.
Presenter view Presenter view helps you manage your slides while you present by tracking how much time has elapsed, which slide is next, and displaying notes that only you can see (while also allowing you to take meeting notes as you present).
Views for preparing and printing your presentation
To help you save paper and ink, you'll want to prepare your print job before you print. PowerPoint provides views and settings to help you specify what you want to print (slides, handouts, or notes pages) and how you want those jobs to print (in color, grayscale, black and white, with frames, and more).
Slide Sorter view Slide Sorter view gives you a view of your slides in thumbnail form. This view makes it easy for you to sort and organize the sequence of your slides as you prepare to print your slides.
Print Preview Print Preview lets you specify settings for what you want to print—handouts, notes pages, and outline, or slides.
Organize your slides into sections
Print your slides and handouts
Start the presentation and see your notes in Presenter view
In PowerPoint for the web, when your file is stored on OneDrive, the default view is Reading view. When your file is stored on OneDrive for work or school or SharePoint in Microsoft 365, the default view is Editing view.
View for creating your presentation
Editing view.
You can get to Editing View from the View tab or from the task bar at the bottom of the slide window.
Editing View is the editing mode where you’ll work most frequently to create your slides. Below, Editing View displays slide thumbnails on the left, a large window showing the current slide, and a Notes pane below the current slide where you can type speaker notes for that slide.

The slide sorter lets you see your slides on the screen in a grid that makes it easy to reorganize them, or organize them into sections, just by dragging and dropping them where you want them.

To add a section right click the first slide of your new section and select Add Section . See Organize your PowerPoint slides into sections for more information.

Views for delivering or viewing a presentation
Use Slide Show view to deliver your presentation to your audience. Slide Show view occupies the full computer screen, exactly the way your presentation looks on a big screen when your audience sees it.
Note: Reading View isn't available for PowerPoint for the web files stored in OneDrive for work or school/SharePoint in Microsoft 365.
Most people reviewing a PowerPoint presentation without a presenter will want to use Reading view. It displays the presentation in a full screen like Slide Show view, and it includes a few simple controls to make it easy to flip through the slides. You can also view speaker notes in Reading View.

Need more help?
Want more options.
Explore subscription benefits, browse training courses, learn how to secure your device, and more.

Microsoft 365 subscription benefits

Microsoft 365 training

Microsoft security

Accessibility center
Communities help you ask and answer questions, give feedback, and hear from experts with rich knowledge.

Ask the Microsoft Community

Microsoft Tech Community

Windows Insiders
Microsoft 365 Insiders
Was this information helpful?
Thank you for your feedback.
- MS Powerpoint 2010 Basics
- PPT - Getting Started
- PPT - Explore Windows
- PPT - Backstage View
- PPT - Create Presentation
- PPT - Add New Slides
- PPT - Adding Text in Boxes
- PPT - Adding New Text Boxes
- PPT - Deleting Existing Slide
- PPT - Rearranging Slides
- PPT - Adding Slide Notes
- PPT - Managing Sections
- PPT - Working with Outlines
- PPT - Powerpoint Sidebar
- PPT - Presentation Views
- PPT - Setting Backgrounds
- PPT - Slide Orientations
- PPT - Saving Presentation
- PPT - Review Presentation
- PPT - Adding Slide Numbers
- PPT - Adding Header & Footer
- PPT - Running Slide Show
- PPT - Keyboard Shortcuts
- PPT - Get Context Help
- Editing Presentation
- PPT - Copy & Paste Content
- PPT - Find & Replace Content
- PPT - Undo Edited Changes
- PPT - Spelling Check
- PPT - Content Translation
- PPT - Setting Language Type
- PPT - Duplicating Content
- PPT - Special Characters
- PPT - Slides Zoom In-Out
- PPT - Special Symbols
- Formatting Presentation
- PPT - Font Management
- PPT - Setting Text Fonts
- PPT - Text Decoration
- PPT - Change Text Case
- PPT - Change Text Size
- PPT - Change Text Color
- PPT - Text Alignments
- PPT - Indent Paragraphs
- PPT - Set Line Spacing
- Borders and Shades
- PPT - Apply Formatting
- PPT - Using Slide Master
- PPT - Save Design Template
- Working with Multimedia
- PPT - Add Pictures to Slide
- PPT - Editing Added Pictures
- PPT - Format Added Pictures
- PPT - Inserting a Screenshot
- PPT - Adding Shapes to Slide
- PPT - Editing Added Shapes
- PPT - Format Added Shapes
- PPT - Adding Text to Shapes
- PPT - Arrange Shapes/Images
- PPT - Group/Ungroup Objects
- PPT - Adding Audio & Video
- PPT - Add & Format Tables
- PPT - Add & Format Charts
- PPT - Add & Format SmartArt
- PPT - Add & Preview Animations
- PPT - Add & Preview Transitions
- Sharing Presentation
- PPT - Create a PDF File
- PPT - Create a Video File
- PPT - Create Image File
- PPT - Printing Presentation
- PPT - Broadcast Slide Show
- PPT - Packaging Presentation
- PPT - Setting Document Password
- PPT - Email Slide Show
- MS Powerpoint Useful Resources
- PPT - Quick Guide
- PPT - Useful Resources
- PPT - Discussion
- Selected Reading
- UPSC IAS Exams Notes
- Developer's Best Practices
- Questions and Answers
- Effective Resume Writing
- HR Interview Questions
- Computer Glossary
Presentation Views in Powerpoint 2010
PowerPoint supports multiple views to allow users to gain the maximum from the features available in the program. Each view supports a different set of functions and is designed accordingly.
PowerPoint views can be accessed from two locations.
Views can be accessed quickly from the bottom bar just to the left of the zoom settings.

Views can also be accessed from the Presentation Views section in the View ribbon

Here is a short description of the various views and their features.
Normal View
This is the default view in PowerPoint and this is primarily used to create and edit slides. You can create/ delete/ edit/ rearrange slides, add/ remove/ modify content and manipulate sections from this view.

Slide Sorter View
This view is primarily used to sort slides and rearrange them. This view is also ideal to add or remove sections as it presents the slides in a more compact manner making it easier to rearrange them.

Reading View
This view is new to PowerPoint 2010 and it was created mainly to review the slideshow without losing access to rest of the Windows applications. Typically, when you run the slideshow, the presentation takes up the entire screen so other applications cannot be accessed from the taskbar. In the reading view the taskbar is still available while viewing the slideshow which is convenient. You cannot make any modifications when on this view.

This is the traditional slideshow view available in all the earlier versions of PowerPoint. This view is used to run the slideshow during presentation.

Presentation Skills 3: The Rule of Three

This is one of the oldest of all the presentation techniques – known about since the time of Aristotle.
People tend to remember lists of three things. Structure your presentation around threes and it will become more memorable.
The Rule of Three – We remember three things.
The rule of three is one of the oldest in the book – Aristotle wrote about it in his book Rhetoric. Put simply it is that people tend to easily remember three things.
Remember as a kid when your mum sent you down to the shop to buy a number of things. But when you got to the shop all you could remember were three things. This is the rule of three
Odds are that people will only remember three things from your presentation
What will they be?
1. The audience are likely to remember only three things from your presentation – plan in advance what these will be.
Believe it or not, the chances are, people will only remember three things from your presentation. So before you start writing your presentation, plan what your three key messages will be. Once you have these messages, structure the main part of your presentation around these three key themes and look at how they could be better illustrated.
2. There are three parts to your presentation
The beginning, the middle and the end. Start to plan out what you will do in these three parts. The beginning is ideal for an attention grabber or for an ice breaker. The end is great to wrap things up or to end with a grand finale.
3. Use lists of three wherever you can in your presentation
Lists of three have been used from early times up to the present day. They are particularly used by politicians and advertisers who know the value of using the rule of three to sell their ideas.
Veni, Vidi, Vici (I came, I saw, I conquered) – Julius Caesar** “ Friends, Romans, Countrymen lend me your ears” – William Shakespeare “Our priorities are Education, Education, Education ” – Tony Blair A Mars a day helps you to work, rest and play – Advertising slogan Stop, look and listen – Public safety announcement
A classic example of the rule of three was Winston Churchill’s famous Blood, Sweat and Tears speech. He is widely attributed as saying I can promise you nothing but blood sweat and tears. What he actually said was “I can promise you Blood, Sweat, Toil and Tears”. Because of the rule of three we simply remember it as Blood sweat and tears.
There are lots of other examples of the rule of three on this link
4. In Presentations “Less is More”
If you have four points to get across – cut one out. They won’t remember it anyway. In presentations less really is more. No one ever complained of a presentation being too short.
Presentation Essentials
Three Presentation Essentials
- Use visual aids where you can
- Rehearse, rehearse, rehearse
- The audience will only remember three messages
So there you have the presentation essentials. I suggest that you print out this little box and stick it in your work book for future reference.
** Technically the quote is – Veni (I came), Vidi (I saw), Vici (I crushed them) which is falsely tied to Gaul and Britanny Conquest by Julius Caesar, but was pronounced before the Senate after the crushing of a small revolt in what is now Turkey…
Recommended Pages

I get the point but find it slightly humorous and ironic that you give four reasons as to why people remember things in three. Why not take your own advice and keep the list to three?
great.usefull.simple
Interesting, useful
highly informative with excellent examples
Why do people tend to remember three things?
- All Templates
- Persuasive Speech Topics
- Informative
- Architecture
- Celebration
- Educational
- Engineering
- Food and Drink
- Subtle Waves Template
- Business world map
- Filmstrip with Countdown
- Blue Bubbles
- Corporate 2
- Vector flowers template
- Editable PowerPoint newspapers
- Hands Template
- Red blood cells slide
- Circles Template on white
- Maps of America
- Light Streaks Business Template
- Zen stones template
- Heartbeat Template
- Web icons template

- SUGGESTED TOPICS
- The Magazine
- Newsletters
- Managing Yourself
- Managing Teams
- Work-life Balance
- The Big Idea
- Data & Visuals
- Reading Lists
- Case Selections
- HBR Learning
- Topic Feeds
- Account Settings
- Email Preferences
How to Make a “Good” Presentation “Great”
- Guy Kawasaki

Remember: Less is more.
A strong presentation is so much more than information pasted onto a series of slides with fancy backgrounds. Whether you’re pitching an idea, reporting market research, or sharing something else, a great presentation can give you a competitive advantage, and be a powerful tool when aiming to persuade, educate, or inspire others. Here are some unique elements that make a presentation stand out.
- Fonts: Sans Serif fonts such as Helvetica or Arial are preferred for their clean lines, which make them easy to digest at various sizes and distances. Limit the number of font styles to two: one for headings and another for body text, to avoid visual confusion or distractions.
- Colors: Colors can evoke emotions and highlight critical points, but their overuse can lead to a cluttered and confusing presentation. A limited palette of two to three main colors, complemented by a simple background, can help you draw attention to key elements without overwhelming the audience.
- Pictures: Pictures can communicate complex ideas quickly and memorably but choosing the right images is key. Images or pictures should be big (perhaps 20-25% of the page), bold, and have a clear purpose that complements the slide’s text.
- Layout: Don’t overcrowd your slides with too much information. When in doubt, adhere to the principle of simplicity, and aim for a clean and uncluttered layout with plenty of white space around text and images. Think phrases and bullets, not sentences.
As an intern or early career professional, chances are that you’ll be tasked with making or giving a presentation in the near future. Whether you’re pitching an idea, reporting market research, or sharing something else, a great presentation can give you a competitive advantage, and be a powerful tool when aiming to persuade, educate, or inspire others.
- Guy Kawasaki is the chief evangelist at Canva and was the former chief evangelist at Apple. Guy is the author of 16 books including Think Remarkable : 9 Paths to Transform Your Life and Make a Difference.
Partner Center

Learning Objective
- Identify and demonstrate the effective use of five functions of speaking to persuade.
What does a presentation to persuade do? There is a range of functions to consider, and they may overlap or you may incorporate more than one as you present. We will discuss how to
- call to action,
- increase consideration, and
- develop tolerance of alternate perspectives.
We will also examine how each of these functions influences the process of persuasion.
When you focus on stimulation as the goal or operational function of your speech, you want to reinforce existing beliefs, intensify them, and bring them to the forefront. Perhaps you’ve been concerned with global warming for quite some time. Many people in the audience may not know about the melting polar ice caps and the loss of significant ice shelves in Antarctica, including part of the Ross Ice Shelf, an iceberg almost 20 miles wide and 124 miles long, more than twice the size of Rhode Island. They may be unaware of how many ice shelves have broken off, the 6 percent drop in global phytoplankton (the basis of many food chains), and the effects of the introduction of fresh water to the oceans. By presenting these facts, you will reinforce existing beliefs, intensify them, and bring the issue to the surface. You might consider the foundation of common ground and commonly held beliefs, and then introduce information that a mainstream audience may not be aware of that supports that common ground as a strategy to stimulate.
In a persuasive speech, the goal is to change the attitudes, beliefs, values, or judgments of your audience. If we look back at the idea of motive, in this speech the prosecuting attorney would try to convince the jury members that the defendant is guilty beyond reasonable doubt. He or she may discuss motive, present facts, all with the goal to convince the jury to believe or find that his or her position is true. In the film The Day After Tomorrow , Dennis Quaid stars as a paleoclimatologist who unsuccessfully tries to convince the U.S. vice president that a sudden climate change is about to occur. In the film, much like real life, the vice president listens to Quaid’s position with his own bias in mind, listening for only points that reinforce his point of view while rejecting points that do not.
Audience members will also hold beliefs and are likely to involve their own personal bias. Your goal is to get them to agree with your position, so you will need to plan a range of points and examples to get audience members to consider your topic. Perhaps you present Dennis Quaid’s argument that loss of the North Atlantic Current will drastically change our climate, clearly establishing the problem for the audience. You might cite the review by a professor, for example, who states in reputable science magazine that the film’s depiction of a climate change has a chance of happening, but that the timetable is more on the order of ten years, not seven days as depicted in the film. You then describe a range of possible solutions. If the audience comes to a mental agreement that a problem exists, they will look to you asking, “What are the options?” Then you may indicate a solution that is a better alternative, recommending future action.
Call to Action
Figure 14.2

A call to action features a clear response for the audience.
P T – The poster is not…but are you ? – CC BY-NC-ND 2.0.
In this speech, you are calling your audience to action. You are stating that it’s not about stimulating interest to reinforce and accentuate beliefs, or convincing an audience of a viewpoint that you hold, but instead that you want to see your listeners change their behavior. If you were in sales at Toyota, you might incorporate our previous example on global warming to reinforce, and then make a call to action (make a purchase decision), when presenting the Prius hybrid (gas-electric) automobile. The economics, even at current gas prices, might not completely justify the difference in price between a hybrid and a nonhybrid car. However, if you as the salesperson can make a convincing argument that choosing a hybrid car is the right and responsible decision, you may be more likely to get the customer to act. The persuasive speech that focuses on action often generates curiosity, clarifies a problem, and as we have seen, proposes a range of solutions. They key difference here is there is a clear link to action associated with the solutions.
Solutions lead us to considering the goals of action. These goals address the question, “What do I want the audience to do as a result of being engaged by my speech?” The goals of action include adoption, discontinuance, deterrence, and continuance.
Adoption means the speaker wants to persuade the audience to take on a new way of thinking, or adopt a new idea. Examples could include buying a new product, voting for a new candidate, or deciding to donate blood. The key is that the audience member adopts, or takes on, a new view, action, or habit.
Discontinuance involves the speaker persuading the audience to stop doing something what they have been doing, such as smoking. Rather than take on a new habit or action, the speaker is asking the audience member to stop an existing behavior or idea. As such, discontinuance is in some ways the opposite of adoption.
Deterrence is a call action that focuses on persuading audience not to start something if they haven’t already started. Perhaps many people in the audience have never tried illicit drugs, or have not gotten behind the wheel of a car while intoxicated. The goal of action in this case would be to deter, or encourage the audience members to refrain from starting or initiating the behavior.
Finally, with continuance , the speaker aims to persuade the audience to continue doing what they have been doing, such as reelect a candidate, keep buying product, or staying in school to get an education.
A speaker may choose to address more than one of these goals of action, depending on the audience analysis. If the audience is largely agreeable and supportive, you may find continuance to be one goal, while adoption is secondary.
These goals serve to guide you in the development of solution steps. Solution steps involve suggestions or ways the audience can take action after your speech. They often proceed from national to personal level, or the inverse. Audience members appreciate a clear discussion of the problem in a persuasive speech, but they also appreciate solutions. You might offer a national solution that may be viewed as unworkable, but your solution on a personal level may be more realistic, such as considering an alternate point of view or making a small donation to a worthy cause.
Increase Consideration
Perhaps you know that your audience is not open to emotional appeals that involve the fear of global warming, so you choose to base your persuasive speech on something they are more open to: the economic argument and the relative cost of car ownership. In this speech, you want to increase consideration on the part of the audience whose members either hold hostile views or perhaps are neutral and simply curious. You might be able to compare and contrast competing cars and show that the costs over ten years are quite similar, but that the Prius has additional features that are the equivalent of a bonus, including high gas mileage. You might describe tax incentives for ownership, maintenance schedules and costs, and resale value. Your arguments and their support aim at increasing the audience’s consideration of your position. You won’t be asking for action in this presentation, but a corresponding increase of consideration may lead the customer to that point at a later date.
Develop Tolerance of Alternate Perspectives
Finally, you may want to help your audience develop tolerance of alternate perspectives and viewpoints. Perhaps your audience, as in the previous example, is interested in purchasing a car and you are the lead salesperson on that model. As you listen, and do your informal audience analysis, you may learn that horsepower and speed are important values to this customer. You might raise the issue of torque versus horsepower and indicate that the “uumph” you feel as you start a car off the line is torque. Many hybrid and even electric vehicles have great torque, as their systems involve fewer parts and less friction than a corresponding internal combustion-transaxle system. You goal is to help your audience develop tolerance, but not necessarily acceptance, of alternate perspectives. A traditional way of measuring speed has always been how fast a car can go from zero to sixty miles per hour.
You are essentially indicating that there are two relevant factors to consider when discussing speed (horsepower and torque), and asking the customer to consider the alternate perspective. Lots of horsepower might be all right for high speeds, but by raising the issue of their normal driving, they might learn that what counts day in and day out for driving is torque, not horsepower. By starting from common ground, and introducing a related idea, you are persuading your audience to consider an alternate perspective.
Key Takeaway
A persuasive speech may stimulate thought, convince, call to action, increase consideration, or develop tolerance of alternate perspectives.
- Select a commercial for a product or service you do not believe you would ever buy. Evaluate the commercial according to the principles of persuasion described in this section. Does it use more than one principle? Is any principle effective on you as an audience member? If you could change the commercial to increase its persuasive appeal to yourself as a customer, what changes would you make? Discuss your findings with your classmates.
- Which do you think is a more difficult challenge, discontinuance or deterrence? Why? Give some examples and discuss them with your classmates.
- Do you think persuasion by continuance is necessary? Or would people continue a given behavior regardless of any persuasive messages? Think of an example and discuss it with your classmates.
Business Communication for Success: Public Speaking Edition Copyright © 2015 by University of Minnesota is licensed under a Creative Commons Attribution-NonCommercial-ShareAlike 4.0 International License , except where otherwise noted.
Module 8: Developing and Delivering Business Presentations
Parts of a good presentation, learning outcomes.
- Identify key features of a good presentation
Like reverse engineering a product, we can distill the key features of a good presentation by looking at presentation evaluation scorecards. Refer to Table 1 for a sample class presentation grading rubric.
At the macro level, the key elements of a good presentation are content, organization, and delivery. There are both substance and style aspects of content. Substance elements include the originality and significance of your idea, the quality of your research and analysis, clarity and potential impact of your recommendations. Style aspects of content include confidence and credibility, both of which have a significant impact on how you—and your message—are received.
Good organization starts with a strong opening and continues in a logical and well-supported manner throughout the presentation, leading to a close that serves as a resolution of the problem or a summary of the situation you’ve presented. The audience experiences good organization as a sense of flow—an inevitable forward movement to a satisfying close. This forward momentum also requires audiences to have a certain level of technical and information-management competency. To the latter point, good presentation requires a presenter to put thought into information design, from the structure and content of slides to the transitions between individual points, slides and topics.
Delivery entails a range of factors from body language and word choice to vocal variety. In this category, your audience is responding to your personality and professionalism. For perspective, one of the three evaluation categories on the official Toastmasters speaker evaluation form is “As I Saw You;” in parentheses: “approach, position, personal appearance, facial expression, gestures and detracting mannerisms.” A good presenter has a passion for the subject and an ability to convey and perhaps elicit that emotion in the audience. Audience engagement—through eye contact, facial expression, perhaps the use of gestures or movement—also contributes to an effective presentation. However, to the point in the Toastmasters evaluation, gestures, movement other mannerisms can be distracting (see Module 7: Public Speaking for more on this). What works: natural (not staged) movement that reinforces communication of your idea.

Figure 1. The WIIFM Principle.
With those key features and presentation-evaluation criteria in mind, let’s add a disclaimer. The reality is that your features won’t matter if you don’t deliver one essential benefit: relevance.
Whether you think in Toastmasters terminology—”What’s in it for me? (WIIFM)” from the audience perspective—or put yourself in the audience’s position and ask “So what?,” it’s a question that you need to answer early. We’ll get into this more in the next section as we discuss presentation planning.
Practice Question
Contribute.
Improve this page Learn More
- Parts of a Good Presentation. Authored by : Nina Burokas. Provided by : Lumen Learning. License : CC BY: Attribution
- Modification of WIIFM. Authored by : Nathan Stephens. Located at : https://flic.kr/p/dEFKQS . License : CC BY-SA: Attribution-ShareAlike

We use essential cookies to make Venngage work. By clicking “Accept All Cookies”, you agree to the storing of cookies on your device to enhance site navigation, analyze site usage, and assist in our marketing efforts.
Manage Cookies
Cookies and similar technologies collect certain information about how you’re using our website. Some of them are essential, and without them you wouldn’t be able to use Venngage. But others are optional, and you get to choose whether we use them or not.
Strictly Necessary Cookies
These cookies are always on, as they’re essential for making Venngage work, and making it safe. Without these cookies, services you’ve asked for can’t be provided.
Show cookie providers
- Google Login
Functionality Cookies
These cookies help us provide enhanced functionality and personalisation, and remember your settings. They may be set by us or by third party providers.
Performance Cookies
These cookies help us analyze how many people are using Venngage, where they come from and how they're using it. If you opt out of these cookies, we can’t get feedback to make Venngage better for you and all our users.
- Google Analytics
Targeting Cookies
These cookies are set by our advertising partners to track your activity and show you relevant Venngage ads on other sites as you browse the internet.
- Google Tag Manager
- Infographics
- Daily Infographics
- Graphic Design
- Graphs and Charts
- Data Visualization
- Human Resources
- Beginner Guides
Blog Beginner Guides
8 Types of Presentations You Should Know [+Examples & Tips]
By Krystle Wong , Aug 11, 2023

From persuasive pitches that influence opinions to instructional demonstrations that teach skills, the different types of presentations serve a unique purpose, tailored to specific objectives and audiences.
Presentations that are tailored to its objectives and audiences are more engaging and memorable. They capture attention, maintain interest and leave a lasting impression.
Don’t worry if you’re no designer — Whether you need data-driven visuals, persuasive graphics or engaging design elements, Venngage can empower you to craft presentations that stand out and effectively convey your message.
Venngage’s intuitive drag-and-drop interface, extensive presentation template library and customizable design options make it a valuable tool for creating slides that align with your specific goals and target audience.
Click to jump ahead:
8 Different types of presentations every presenter must know
How do i choose the right type of presentation for my topic or audience, types of presentation faq, 5 steps to create a presentation with venngage .

When it comes to presentations, versatility is the name of the game. Having a variety of presentation styles up your sleeve can make a world of difference in keeping your audience engaged. Here are 8 essential presentation types that every presenter should be well-acquainted with:
1. Informative presentation
Ever sat through a presentation that left you feeling enlightened? That’s the power of an informative presentation.
This presentation style is all about sharing knowledge and shedding light on a particular topic. Whether you’re diving into the depths of quantum physics or explaining the intricacies of the latest social media trends, informative presentations aim to increase the audience’s understanding.
When delivering an informative presentation, simplify complex topics with clear visuals and relatable examples. Organize your content logically, starting with the basics and gradually delving deeper and always remember to keep jargon to a minimum and encourage questions for clarity.
Academic presentations and research presentations are great examples of informative presentations. An effective academic presentation involves having clear structure, credible evidence, engaging delivery and supporting visuals. Provide context to emphasize the topic’s significance, practice to perfect timing, and be ready to address anticipated questions.

2. Persuasive presentation
If you’ve ever been swayed by a passionate speaker armed with compelling arguments, you’ve experienced a persuasive presentation .
This type of presentation is like a verbal tug-of-war, aiming to convince the audience to see things from a specific perspective. Expect to encounter solid evidence, logical reasoning and a dash of emotional appeal.
With persuasive presentations, it’s important to know your audience inside out and tailor your message to their interests and concerns. Craft a compelling narrative with a strong opening, a solid argument and a memorable closing. Additionally, use visuals strategically to enhance your points.
Examples of persuasive presentations include presentations for environmental conservations, policy change, social issues and more. Here are some engaging presentation templates you can use to get started with:

3. Demonstration or how-to presentation
A Demonstration or How-To Presentation is a type of presentation where the speaker showcases a process, technique, or procedure step by step, providing the audience with clear instructions on how to replicate the demonstrated action.
A demonstrative presentation is particularly useful when teaching practical skills or showing how something is done in a hands-on manner.
These presentations are commonly used in various settings, including educational workshops, training sessions, cooking classes, DIY tutorials, technology demonstrations and more. Designing creative slides for your how-to presentations can heighten engagement and foster better information retention.
Speakers can also consider breaking down the process into manageable steps, using visual aids, props and sometimes even live demonstrations to illustrate each step. The key is to provide clear and concise instructions, engage the audience with interactive elements and address any questions that may arise during the presentation.

4. Training or instructional presentation
Training presentations are geared towards imparting practical skills, procedures or concepts — think of this as the more focused cousin of the demonstration presentation.
Whether you’re teaching a group of new employees the ins and outs of a software or enlightening budding chefs on the art of soufflé-making, training presentations are all about turning novices into experts.
To maximize the impact of your training or instructional presentation, break down complex concepts into digestible segments. Consider using real-life examples to illustrate each point and create a connection.
You can also create an interactive presentation by incorporating elements like quizzes or group activities to reinforce understanding.

5. Sales presentation
Sales presentations are one of the many types of business presentations and the bread and butter of businesses looking to woo potential clients or customers. With a sprinkle of charm and a dash of persuasion, these presentations showcase products, services or ideas with one end goal in mind: sealing the deal.
A successful sales presentation often has key characteristics such as a clear value proposition, strong storytelling, confidence and a compelling call to action. Hence, when presenting to your clients or stakeholders, focus on benefits rather than just features.
Anticipate and address potential objections before they arise and use storytelling to showcase how your offering solves a specific problem for your audience. Utilizing visual aids is also a great way to make your points stand out and stay memorable.
A sales presentation can be used to promote service offerings, product launches or even consultancy proposals that outline the expertise and industry experience of a business. Here are some template examples you can use for your next sales presentation:

6. Pitch presentation
Pitch presentations are your ticket to garnering the interest and support of potential investors, partners or stakeholders. Think of your pitch deck as your chance to paint a vivid picture of your business idea or proposal and secure the resources you need to bring it to life.
Business presentations aside, individuals can also create a portfolio presentation to showcase their skills, experience and achievements to potential clients, employers or investors.
Craft a concise and compelling narrative. Clearly define the problem your idea solves and how it stands out in the market. Anticipate questions and practice your answers. Project confidence and passion for your idea.

7. Motivational or inspirational presentation
Feeling the need for a morale boost? That’s where motivational presentations step in. These talks are designed to uplift and inspire, often featuring personal anecdotes, heartwarming stories and a generous serving of encouragement.
Form a connection with your audience by sharing personal stories that resonate with your message. Use a storytelling style with relatable anecdotes and powerful metaphors to create an emotional connection. Keep the energy high and wrap up your inspirational presentations with a clear call to action.
Inspirational talks and leadership presentations aside, a motivational or inspirational presentation can also be a simple presentation aimed at boosting confidence, a motivational speech focused on embracing change and more.

8. Status or progress report presentation
Projects and businesses are like living organisms, constantly evolving and changing. Status or progress report presentations keep everyone in the loop by providing updates on achievements, challenges and future plans. It’s like a GPS for your team, ensuring everyone stays on track.
Be transparent about achievements, challenges and future plans. Utilize infographics, charts and diagrams to present your data visually and simplify information. By visually representing data, it becomes easier to identify trends, make predictions and strategize based on evidence.

Now that you’ve learned about the different types of presentation methods and how to use them, you’re on the right track to creating a good presentation that can boost your confidence and enhance your presentation skills .
Selecting the most suitable presentation style is akin to choosing the right outfit for an occasion – it greatly influences how your message is perceived. Here’s a more detailed guide to help you make that crucial decision:
1. Define your objectives
Begin by clarifying your presentation’s goals. Are you aiming to educate, persuade, motivate, train or perhaps sell a concept? Your objectives will guide you to the most suitable presentation type.
For instance, if you’re aiming to inform, an informative presentation would be a natural fit. On the other hand, a persuasive presentation suits the goal of swaying opinions.
2. Know your audience
Regardless if you’re giving an in-person or a virtual presentation — delve into the characteristics of your audience. Consider factors like their expertise level, familiarity with the topic, interests and expectations.
If your audience consists of professionals in your field, a more technical presentation might be suitable. However, if your audience is diverse and includes newcomers, an approachable and engaging style might work better.

3. Analyze your content
Reflect on the content you intend to present. Is it data-heavy, rich in personal stories or focused on practical skills? Different presentation styles serve different content types.
For data-driven content, an informative or instructional presentation might work best. For emotional stories, a motivational presentation could be a compelling choice.
4. Consider time constraints
Evaluate the time you have at your disposal. If your presentation needs to be concise due to time limitations, opt for a presentation style that allows you to convey your key points effectively within the available timeframe. A pitch presentation, for example, often requires delivering impactful information within a short span.
5. Leverage visuals
Visual aids are powerful tools in presentations. Consider whether your content would benefit from visual representation. If your PowerPoint presentations involve step-by-step instructions or demonstrations, a how-to presentation with clear visuals would be advantageous. Conversely, if your content is more conceptual, a motivational presentation could rely more on spoken words.

6. Align with the setting
Take the presentation environment into account. Are you presenting in a formal business setting, a casual workshop or a conference? Your setting can influence the level of formality and interactivity in your presentation. For instance, a demonstration presentation might be ideal for a hands-on workshop, while a persuasive presentation is great for conferences.
7. Gauge audience interaction
Determine the level of audience engagement you want. Interactive presentations work well for training sessions, workshops and small group settings, while informative or persuasive presentations might be more one-sided.
8. Flexibility
Stay open to adjusting your presentation style on the fly. Sometimes, unexpected factors might require a change of presentation style. Be prepared to adjust on the spot if audience engagement or reactions indicate that a different approach would be more effective.
Remember that there is no one-size-fits-all approach, and the best type of presentation may vary depending on the specific situation and your unique communication goals. By carefully considering these factors, you can choose the most effective presentation type to successfully engage and communicate with your audience.
To save time, use a presentation software or check out these presentation design and presentation background guides to create a presentation that stands out.

What are some effective ways to begin and end a presentation?
Capture your audience’s attention from the start of your presentation by using a surprising statistic, a compelling story or a thought-provoking question related to your topic.
To conclude your presentation , summarize your main points, reinforce your key message and leave a lasting impression with a powerful call to action or a memorable quote that resonates with your presentation’s theme.
How can I make my presentation more engaging and interactive?
To create an engaging and interactive presentation for your audience, incorporate visual elements such as images, graphs and videos to illustrate your points visually. Share relatable anecdotes or real-life examples to create a connection with your audience.
You can also integrate interactive elements like live polls, open-ended questions or small group discussions to encourage participation and keep your audience actively engaged throughout your presentation.
Which types of presentations require special markings
Some presentation types require special markings such as how sales presentations require persuasive techniques like emphasizing benefits, addressing objections and using compelling visuals to showcase products or services.
Demonstrations and how-to presentations on the other hand require clear markings for each step, ensuring the audience can follow along seamlessly.
That aside, pitch presentations require highlighting unique selling points, market potential and the competitive edge of your idea, making it stand out to potential investors or partners.
Need some inspiration on how to make a presentation that will captivate an audience? Here are 120+ presentation ideas to help you get started.
Creating a stunning and impactful presentation with Venngage is a breeze. Whether you’re crafting a business pitch, a training presentation or any other type of presentation, follow these five steps to create a professional presentation that stands out:
- Sign up and log in to Venngage to access the editor.
- Choose a presentation template that matches your topic or style.
- Customize content, colors, fonts, and background to personalize your presentation.
- Add images, icons, and charts to enhancevisual style and clarity.
- Save, export, and share your presentation as PDF or PNG files, or use Venngage’s Presentation Mode for online showcasing.
In the realm of presentations, understanding the different types of presentation formats is like having a versatile set of tools that empower you to craft compelling narratives for every occasion.
Remember, the key to a successful presentation lies not only in the content you deliver but also in the way you connect with your audience. Whether you’re informing, persuading or entertaining, tailoring your approach to the specific type of presentation you’re delivering can make all the difference.
Presentations are a powerful tool, and with practice and dedication (and a little help from Venngage), you’ll find yourself becoming a presentation pro in no time. Now, let’s get started and customize your next presentation!
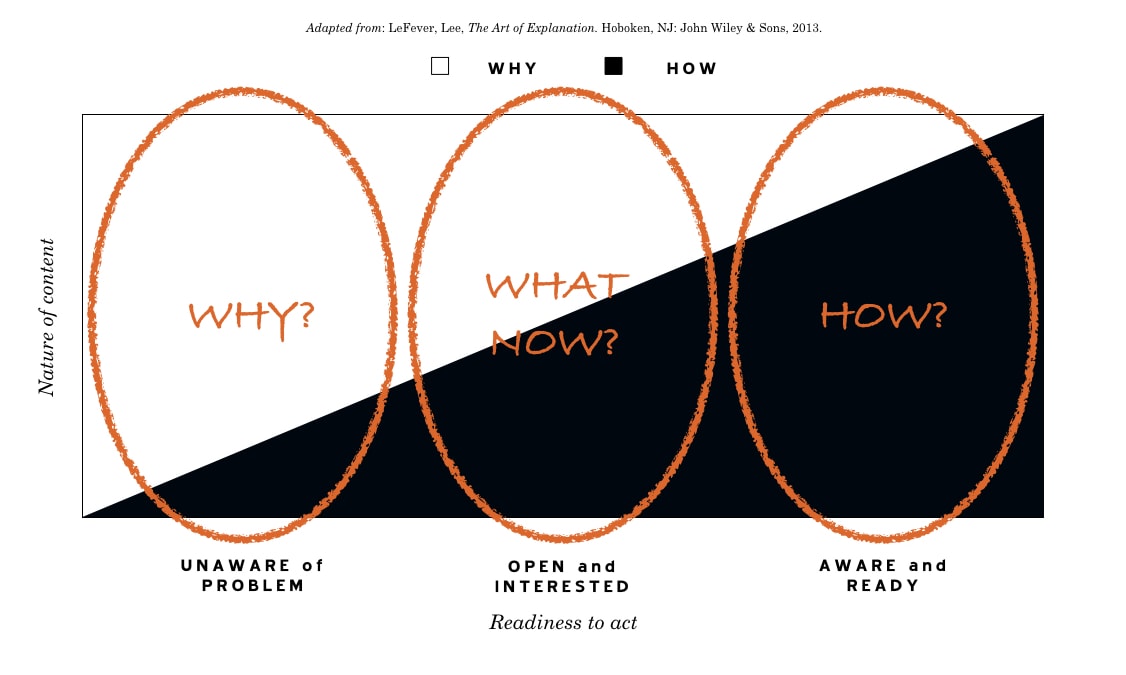
The Three Types of Presentations: “Why?”, “What Now?”, and “How?”
When putting together their talks, many speakers miss a critical early step: understanding what type of presentation they need to give.
What does that mean? Well, remember that your idea needs to solve a problem the audience has, or to meet an unmet need . That means you need to also understand what the audience needs to (or can) do with it .
Here’s why: when faced with a problem to solve, audiences need two different kinds of information:
- Information that tells them WHY they need to solve the problem or solve it in a specific way, and
- HOW to do it.
Depending on how familiar your audience is with the problem your idea solves, they need that information in different proportions.
At its simplest, that means there are essentially three kinds of talks , which we describe based on the overarching question the audience needs answered:
- “ WHY ?” – Why should I take action? Why is this idea important?
- “ WHAT NOW ?” – I understand I need to take action, but what do I need to do about it, at a high level? or I understand the nature of the problem, but how do we (or does this solution) solve it, at a high level?
- “ HOW ” – How do I take the action, specifically? How does this work? How did this happen?
In sales or marketing, the types of talks mimic the sales funnel and consumer decision journey.
In professional or conference speaking, keynotes tend to be “Why” talks and breakouts and workshops tend to be “How” talks. Depending on the topic, “What Now” talks can serve in either capacity.
Let’s look at each type a little more closely.
As you can see from the graphic, above, WHY? talks are mostly about deconstructing or setting up a problem and creating a case for action.
WHY? talks are for audiences that:
- Aren’t aware of a problem they have
- May be aware of a problem’s manifestations, but not its true cause, and/or
- Are unaware of the nature and full extent of the costs associated with the problem
“WHAT NOW?” Talks
WHAT NOW? talks give fairly equal treatment to the problem and the solution. They give the audience high-level direction on how to solve a problem.
WHAT NOW? talks are for audiences that:
- Have some awareness of a problem, its true cause and its extent
- Have some interest in solving it, and
- Aren’t aware of how to solve it, or how to solve it in the way you recommend
“HOW?” Talks
HOW? talks are all about detail: How does this work? How do I apply this? How will (or did) this happen? The audience is already aware of the problem and interested in action, so the majority of the talk is step-by-step instruction or explanation.
HOW? Talks are for audiences that:
- Have awareness of a problem and urgency around solving it
- Want concrete or specific direction on what to do and how to do it
What does all of this mean for you?
Once you have your idea defined, as well as the problem it solves, ask yourself: How familiar is my audience with this idea? How ready are they to solve this problem? Then, choose the type talk that best fits what your audience needs to act .
Start the Conversation
Talk with one of our Oratium team members to see how we can help your business build and deliver a better message. To reach our Office directly, call (406) 272-4368.

by Tim Pollard
Mastering the Moment
Perfecting the skills and processes of exceptional presentation delivery.
For most people, delivering a presentation is a harrowing experience. Much is often at stake, yet presenters struggle to perform as well as they'd like. In this engaging book, speaker, author, and communications consultant Tim Pollard breaks this challenging moment down into its most important components and teaches you how to master each.
How to prepare:
Understanding your audience from an intellectual, emotional, and cultural perspective
Grasping the importance and practice of exceptional rehearsal Valuing the venue: making it work for you rather than against you
What to do:
Mastering the presentation opening Exploring communication mechanics Managing your audience
Cultivating a winning style: the three pillars of authority, authenticity, and directiveness
Harnessing the power of "muscular" language
Leveraging the core tools of rhetoric
With practical advice, relatable stories, and vibrant examples, Mastering the Moment employs Pollard's engaging style, making the guidance as absorbing to read as it is easy to adopt.
What People are Saying
Elantas, CEO
We’ve used the approach outlined in this book to change the way our executives make presentations. It has made a huge difference in our success rate with both internal and external customers. It’s is actually a fun read, and the concepts aren’t hard to implement, but you have be committed to changing the focus of your presentations to what the audience needs to know.

The Compelling Communicator Academy
The Compelling Communicator Academy features interactive video courses that teach communicators the fundamental skills they will need to become a world-class communicator.
Once registered in The Compelling Communicator Academy, you'll have access to our full training curriculum, as well as our course workbook and support documents.

Message Architect
A completely unique, one-of-its kind piece of software, Message Architect takes you through the Oratium message design process one step at a time, with numerous helps, tips and support videos to help you architect extraordinary presentations.

Oratium E-Learning Academy
The Oratium E-Learning Academy features interactive video courses that teach communicators the fundamental skills they will need to become a world-class communicator.
Once registered in our E-Learning Academy, you'll have access to our full training curriculum, as well as our course workbook and support documents.
Work With Us
Find the images you need to make standout work. If it’s in your head, it’s on our site.
- Images home
- Curated collections
- AI image generator
- Offset images
- Backgrounds/Textures
- Business/Finance
- Sports/Recreation
- Animals/Wildlife
- Beauty/Fashion
- Celebrities
- Food and Drink
- Illustrations/Clip-Art
- Miscellaneous
- Parks/Outdoor
- Buildings/Landmarks
- Healthcare/Medical
- Signs/Symbols
- Transportation
- All categories
- Editorial video
- Shutterstock Select
- Shutterstock Elements
- Health Care
- PremiumBeat
- Templates Home
- Instagram all
- Highlight covers
- Facebook all
- Carousel ads
- Cover photos
- Event covers
- Youtube all
- Channel Art
- Etsy big banner
- Etsy mini banner
- Etsy shop icon
- Pinterest all
- Pinterest pins
- Twitter all
- Twitter Banner
- Infographics
- Zoom backgrounds
- Announcements
- Certificates
- Gift Certificates
- Real Estate Flyer
- Travel Brochures
- Anniversary
- Baby Shower
- Mother’s Day
- Thanksgiving
- All Invitations
- Party invitations
- Wedding invitations
- Book Covers
- Editorial home
- Entertainment
- About Creative Flow
- Create editor
- Content calendar
- Photo editor
- Background remover
- Collage maker
- Resize image
- Color palettes
- Color palette generator
- Image converter
- Contributors
- PremiumBeat blog
- Invitations
- Design Inspiration
- Design Resources
- Design Elements & Principles
- Contributor Support
- Marketing Assets
- Cards and Invitations
- Social Media Designs
- Print Projects
- Organizational Tools
- Case Studies
- Platform Solutions
- Generative AI
- Computer Vision
- Free Downloads
- Create Fund

8 Types of Presentations and Examples of When You Can Use Them
Presentations help you communicate ideas in a simple way that sticks with your target audience. here’s what you need to know to have success with all types of presentations..
For your presentation to be effective, you need to choose the right format and recognize the nuances of each one. Here’s a look at eight types of presentations you can use to share your knowledge.
8 Types of Presentations

1. Providing Information
The primary purpose of any type of presentation is to provide information to an audience. The difference between this method and others is that there are many elements you have to consider in order to be effective. That includes slide design , talking points, and usually, a time limit.
2. Teaching
When you’re educating, use several examples to illustrate your points. If your audience doesn’t understand something you’re talking about, give them specific examples so they can see for themselves what you mean.
Repetition is key when you teach a new concept. It’s important to include a variety examples throughout your slide deck to reinforce your information. This helps combat your audience getting bored or tired from hearing the same thing over and over again.
3. Reporting
You can use presentations when reporting by showing research findings and conclusions. The most important thing to remember is that you need to design your slides to highlight your most critical data. That way, your audience will walk away understanding its high points.
It’s important to know your audience before you jump into your presentation and start selling. Research must be the first step of the process, so you can design a presentation that speaks to your people.
Also, be sure to not overwhelm yourself or others by packing too much information into one slide.
5. Problem-Solving
While it’s a less common use case, you can also use presentations to sort out problems. This is especially useful when you’re working with a team. It acts as a simple way to get everyone on the same page before making a decision.
6. Decision Making
Once you come to an agreement that something is an issue and discover some ways to solve it, there are still choices you need to make. You can use presentations to explore and explain different options before you finalize your next step forward.
7. Entertaining
Creating a presentation with entertainment in mind is a nice way to break up any potential monotony and deliver important information, at the same time.
The entertainment factor doesn’t necessarily have to be goofy or fun, but it should be compelling for the audience and capture their attention. Visuals are particularly important here.
8. Motivational
Stories are good tools for bringing any message home. Use personal anecdotes and examples that illustrate points. This will help people remember your message when they need it most, and it also makes it easier for the audience to connect with you.
3 Presentation Use Cases

Want to take your information and put it in presentation format for your audience? Before you start, use these examples to gain inspiration.
1. Business Presentation Examples
Business presentations don’t have to be boring. Take these tips to wow your colleagues and your audience.
Conferences
There are many different companies and ideas competing for attention at conferences. Use storytelling and bold design choices to stand out.
Raising Awareness
Getting a new initiative going in an organization is no easy feat. Use a presentation to fill in stakeholders on what you want to do and get their approval.
Sales Decks
Selling has a direct impact on revenue goals, so it’s critical for your presentation to support that. Include questions, pain points, and supporting data to let your potential customers know you “get” them.
2. Presentation Ideas for Kids and Students
Education requires a lot of listening and absorbing information. Help kids and students show what they know with these presentation formats.
All About Them
For younger or new students, this is an easy presentation idea. They can create slides that explain details about themselves to learn the art of public speaking. It also helps their peers get to know them better.
Charts and Graphics
Facts and data play a key role in understanding a concept. However, keeping track of them all can be intimidating. Take them through the process of communicating complex ideas visually, with this presentation idea for students.
Storytelling
Stories are an important part of early learning but, eventually, we all learn there’s a place for stories outside of a book. Students and kids can create presentations that focus on this skill.
3. Virtual Presentation Ideas
Virtual presentations are more prevalent than ever, but engaging an audience when you aren’t in the same room isn’t easy.
If you’re sharing ideas with a group, make it interactive by giving a workshop-style presentation. Be sure to leave room to ask and answer questions, as well as save space for group discussions.
Ask Me Anything
The question and answer format is a popular presentation type, but you can add even more interest with slides. Use images, fonts , and colors that are on brand and increase engagement.
Information and Gamification
Gamification results in 14% higher scores on skill-based assessments. To amplify people’s understanding of the concepts you present, use gamification throughout your slide deck.
How to Put Together Presentation Ideas without PowerPoint

If you’re looking for creative presentation ideas without PowerPoint , Shutterstock Create’s slideshow presentation maker is easy to use. Our designer-crafted templates are super-simple to customize and make your own in just a few clicks.
We have thousands of graphics in a multitude of styles, shapes, and sizes you can use to create designs that others will notice. We also offer gorgeous stock photos to help you communicate exactly what you need to with each visual. Everyone has something to teach, now it’s your turn. Use these ideas to create all types of presentations and communicate effectively.
Need some more presentation inspo? We’ve got you covered:
- How to Make a Professional Video Presentation
- 10 Fun “Presentation Night” Ideas
- Google Slides vs. PowerPoint: Which Is Best to Make a Slideshow?
License this cover image via AlexandrWell .
Recently viewed
Related Posts

The Best Fonts for YouTube Thumbnails
Boost your YouTube channel branding with these free fonts for…

10 Creative & Inspiring Earth Day Poster Ideas
Celebrate our planet and encourage others to conserve and protect with these 10 Earth Day poster ideas. Customize any design for free!

How to Design Podcast Cover Art
Your podcast’s visual identity is just as important as its content. Try seven tips to make your podcast covers stand out from the crowd.

How We Show It: Authentic Sustainable Imagery
Sustainability has an image problem. Here’s how we can start thinking about the big picture and get people motivated for change.
© 2023 Shutterstock Inc. All rights reserved.
- Terms of use
- License agreement
- Privacy policy
- Social media guidelines

Want to create or adapt books like this? Learn more about how Pressbooks supports open publishing practices.
7.3 Structuring Your Presentation
Lucinda Atwood; Christian Westin; [Author removed at request of original publisher]; and Linda Macdonald
Presentations can be organized in many different ways. The choice of an organizing principle, or a core assumption around which everything else is arranged, depends on the subject matter, the speaking situation, and many other factors, including your preference as a speaker.
Presentation Structure
The simple structure outlined below is adaptable to most topics. The presentation begins with an attention-getter, a claim, and an overview of key points that will be addressed. The main part of the speech follows with two to five main points; and concludes with a summary and, in a persuasive speech, a call to action.
Introduction
In the Introduction of your presentation, you will capture the audience’s attention, tell them who you are, state the main point of your presentation, and provide a preview.
- Attention-getter/grabber A very brief and interesting statement or question that grabs the audience’s attention. See Grabber Types below for more details.
- Self-introduction (Place before or after the grabber ) Tell the audience your name and credentials. For example: I’m Minh and I’ve been a professional career coach for 10 years.
- Thesis The main point or argument of your presentation. Be brief and precise, not general or vague. For example: I’m going to show you how practicing your presentation 10 times will improve your level of comfort by 50%.
- Overview of main points Briefly outline the main points that you will cover in your presentation. To help your audience, list these in the same order that you will deliver them later on. For example: First, we’ll talk about what makes presentations great, then I’ll share some data on how practice affects your confidence and performance, and finally, we’ll look at how to practice.
Attention-getter/grabber types
Remember that the job is grabbing the audience’s attention, so it must be surprising, fascinating or intriguing. It must also be related to your presentation’s topic. Some descriptions and examples are presented here:
You can also mix and match grabbers. For example, you could show an image and ask the audience to guess what it is.
The length of your grabber is relative to your total presentation time. For a 2-minute presentation, it should be quite brief – maybe one sentence. For a 16-minute team presentation, a 45-60 second grabber would be appropriate.
In this part of your presentation, you will deliver detailed information. Depending on the length of the presentation and your purpose, you might have two to five points in the body.
- Key point 1 A major point that supports your thesis and may have supporting sub-points
- Key point 2 Another major point that supports your thesis and may have supporting sub-points
- Key point 3 The final major point that supports your thesis and may have supporting sub-points
Your points can be arranged in a variety of ways. In her TED Talk The Secret Structure of Great Talks and her Harvard Business Review article titled “ Structure your presentation like a story” (click here for direct link to her article) , Nancy Duarte advocates organizing a presentation according to what is and what could be . Before reading on, take a moment to read the Duarte article, then check your knowledge.
Other ways to organize the body of your presentation are presented in Table 7.1 The center column explains how the principle works, and the right column provides an applied example based on a sample presentation about the United States’ First Transcontinental Railroad. For example, using a biographical organizing principle, you might describe the journey of the Lewis and Clark expedition in 1804, Lincoln’s signing of the Pacific Railroad Act in 1862, and the completion of the first Transcontinental Express train trip in 1876. As another example, using a spatial organizing principle, you might describe the mechanics of how a steam locomotive engine works to turn the train wheels, which move on a track to travel across distances.
As you read each organizational structure, consider how the main points and subheadings change or adapt to meet each pattern.
Sample Organizing Principles for a Presentation
Transitions
The structure of your presentation should be clear to your listeners at the start of the presentation and reinforced throughout with transitions. Transitions both connect to your thesis and indicate a shift to your next point.
As part of your introduction, you should make clear the structure of your points. For example,
“Slack Desktop offers three time-saving benefits for our team collaborations.” “First, I will discuss the current inefficiencies in our collaborations and then explain how Slack Desktop can resolve these problems.” “Slack Desktop’s built-in notification system, keyboard shortcuts, and convenience in switching between workspaces are advantages for team collaborations.”
Provide a transition as you move from the introduction to the first point. For example,
“The first advantage for our teams in using Slack Desktop…” “First, I will provide an overview of Slack’s capabilities before addressing the two features that are most compelling for our teams…” “Let’s begin with the built-in notification system…”
As you move to the second and third points, you can reinforce the structure of the presentation for your listener by stating where you have been and where you are going. For example,
“We have covered the benefits of the notification system and the range of keyboard shortcuts and will now discuss the greatest benefit for our work– the simplicity in moving between teams.” “A final benefit of Slack Desktop for collaborations is the ease in switching between teams.” “Now that I have demonstrated the problems with the current system, I will demonstrate the solutions to these problems with Slack.” “It is clear that the notifications systems and keyboard shortcuts are time-saving features, but the greatest time-saving feature is the ease and convenience in switching between teams.” “Although Slack has several beneficial features, team collaborations in our company may be better facilitated through Chanty.” “Just as keyboard shortcuts provide added convenience, so too does the notification system.”
Finally, transition to the conclusion:
“In summary, Slack has indisputable advantages.” “In conclusion,..” “What I would most like you to take from this presentation is…”
Transitions connect your points and ensure the audience follows you. The audience will clearly see where you have been and where you are going next. Practice your transitions so that the content flows naturally. As we will discuss in Chapter 3.12 , moving as you transition between points can help you remember the order of points as well as engage your audience.
At the end of your presentations, you’ll remind the audience of what you told them, and tell them what to do next.
- Summary of main points (can be merged with your conclusion) Clearly restate your three main points in the same order you delivered them. It is the same as your overview but in past tense. First, I described what makes presentations great, then I shared data on how practice affects confidence and performance, and finally, we looked at how to practice.
- Conclusion Restate your thesis in past tense. For example: I’m showed you that practicing your presentation 10 times will improve your grade by 20%.
- Call to action Give your audience clear, active and compelling direction, based on what you told them. For example: Practice your presentations ten times and start collecting those A-plusses!
Now that you have some ideas of how you might structure your presentation, move on to creating an outline, the subject of the next chapter section.
7.3 Structuring Your Presentation Copyright © 2022 by Lucinda Atwood; Christian Westin; [Author removed at request of original publisher]; and Linda Macdonald is licensed under a Creative Commons Attribution-NonCommercial 4.0 International License , except where otherwise noted.
Share This Book

Want to create or adapt books like this? Learn more about how Pressbooks supports open publishing practices.
9 Chapter 9: Presentation Aids in Speaking
The materials below are attributed fully to the free online Open Education Resource, Exploring Public Speaking: The Free Dalton State College Public Speaking Textbook, 4th Edition (Chapter 11).
Chapter 9 Learning Objectives
After reading this chapter, the student will be able to:
- List and explain reasons why presentation aids are important in public speaking
- Explain how presentation aids function in public speaking
- Describe the various computer-based and non-computer-based types of presentation aids available to the students
- Explain the correct use of various types of presentation aids
- Design professional-looking slides using presentation software
Chapter Preview
9.1 – What are Presentation Aids?
9.2 – Functions of Presentation Aids
9.3 – Types of Presentation Aids
9.4 – Using Presentation Slides
9.5 – Low-Tech Presentation Aids
9.1 – What Are Presentation Aids?
When you give a speech, you are presenting much more than just a collection of words and ideas. Because you are speaking “live and in person,” your audience members will experience your speech through all five of their senses: hearing, vision, smell, taste, and touch . In some speaking situations, the speaker appeals only to the sense of hearing. They more or less ignore the other senses except to avoid visual distractions by dressing and presenting themselves in an appropriate manner. But the speaking event can be greatly enriched by appeals to the other senses. This is the role of presentation aids.
Professor West: What makes for an effective visual aid?
Presentation aids are the resources beyond the speech words and delivery that a speaker uses to enhance the message conveyed to the audience . The type of presentation aids that speakers most typically make use of are visual aids: pictures, diagrams, charts and graphs, maps, and the like. Audible aids include musical excerpts, audio speech excerpts, and sound effects . A speaker may also use fragrance samples or food samples as olfactory (sense of smell) or gustatory (sense of taste) aids. Finally, presentation aids can be three-dimensional objects, animals, and people; they can also change over a period of time, as in the case of a how-to demonstration .
P resentation aid s
the resources beyond the speech words and delivery that a speaker uses to enhance the message conveyed to the audience
of or relating to the sense of smell
of or relating to the sense of taste
As you can see, the range of possible presentation aids is almost unlimited. However, all presentation aids have one thing in common: To be effective, each presentation aid a speaker uses must be a direct, uncluttered example of a specific element of the speech . It is understandable that someone presenting a speech about Abraham Lincoln might want to include a photograph of him, but because everyone already knows what Lincoln looked like, the picture would not contribute much to the message unless, perhaps, the message was specifically about the changes in Lincoln’s appearance during his time in office.
Other visual artifacts are more likely to deliver information more directly relevant to the speech—a diagram of the interior of Ford’s Theater where Lincoln was assassinated, a facsimile of the messy and much-edited Gettysburg Address, or a photograph of the Lincoln family, for example. The key is that each presentation aid must directly express an idea in your speech.
Moreover, presentation aids must be used at the time when you are presenting the specific ideas related to the aid . For example, if you are speaking about coral reefs and one of your supporting points is about the location of the world’s major reefs, it would make sense to display a map of these reefs while you’re talking about location. If you display it while you are explaining what coral actually is, or describing the kinds of fish that feed on a reef, the map will not serve as a useful visual aid—in fact, it’s likely to be a distraction.
To be effective, presentation aids must also be easy to use and easy for the listeners to see and understand . In this chapter, we will present some principles and strategies to help you incorporate effective presentation aids into your speech. We will begin by discussing the functions that good presentation aids fulfill. Next, we will explore some of the many types of presentation aids and how best to design and utilize them. We will also describe various media that can be used for presentation aids. We will conclude with tips for successful preparation and use of presentation aids in a speech.
Why should you use presentation aids? If you have prepared and rehearsed your speech adequately, shouldn’t a good speech with a good delivery be enough to stand on its own? While it is true that impressive presentation aids will not rescue a poor speech, a good speech can often be made even better by the strategic use of presentation aids . Presentation aids can fulfill several functions: they can serve to improve your audience’s understanding of the information you are conveying, enhance audience memory and retention of the message, add variety and interest to your speech, and enhance your credibility as a speaker. Let’s examine each of these functions.
Improving Audience Understanding
Human communication is a complex process that often leads to misunderstandings. If you are like most people, you can easily remember incidents when you misunderstood a message or when someone else misunderstood what you said to them. Misunderstandings happen in public speaking just as they do in everyday conversations.
One reason for misunderstandings is the fact that perception and interpretation are highly complex individual processes . Most of us have seen the image in which, depending on your perception, you see either the outline of a vase or the facial profiles of two people facing each other. Or perhaps you have seen the image of the woman who may or may not be young, depending on your frame of reference at the time. This shows how interpretations can differ, and it means that your presentations must be based on careful thought and preparation to maximize the likelihood that your listeners will understand your presentations as you intend them to do so . (You can see these images at http://members.optusnet.com.au/~charles57/Creative/Drawing/vases.htm and https://www.youtube.com/watch?v=P9iv173VtGM.)
As a speaker, one of your basic goals is to help your audience understand your message. To reduce misunderstanding, presentation aids can be used to clarify or to emphasize.
Clarification is important in a speech because if some of the information you convey is unclear, your listeners will come away puzzled or possibly even misled. Presentation aids can help clarify a message if the information is complex or if the point being made is a visual one .
If your speech is about the impact of the Coriolis Effect on tropical storms, for instance, you will have great difficulty clarifying it without a diagram because the process is a complex one. The diagram in Figure 9.1 (“Coriolis Effect”) would be effective because it shows the audience the interaction between equatorial wind patterns and wind patterns moving in other directions. The diagram allows the audience to process the information in two ways: through your verbal explanation and through the visual elements of the diagram . By the way, t he Coriolis Effect i s defined as “an effect whereby a mass moving in a rotating system experiences a force (the Coriolis force ) acting perpendicular to the direction of motion and to the axis of rotation . On the earth, the effect tends to deflect moving objects to the right in the northern hemisphere and to the left in the southern and is important in the formation of cyclonic weather systems.” You can see why a picture really helps with this definition.
Figure 9.2 (“Model of Communication”) is another example of a diagram that maps out the process of human communication. In this image you clearly have a speaker and an audience with the labels of source, channel, message, receivers, and feedback to illustrate a basic model of human communication. As with most models, it is simplified. (Can you remember what two components of the communication process, explained in Chapter 1, that are missing here?)
Another aspect of clarifying occurs when a speaker wants to help audience members understand a visual concept. For example, if a speaker is talking about the importance of petroglyphs in Native American culture, just describing the petroglyphs won’t completely help your audience to visualize what they look like. Instead, showing an example of a petroglyph, as in Figure 9.3 (“Petroglyph”) can more easily help your audience form a clear mental image of your intended meaning.
Emphasizin g
When you use a presentational aid for emphasis, you impress your listeners with the importance of an idea . In a speech on water conservation, you might try to show the environmental proportions of the resource. When you use a conceptual drawing like the one in Figure 9.4 (“Planetary Water Supply”), you show that if the world water supply were equal to ten gallons, only ten drops would be available and drinkable for human or household consumption. This drawing is effective because it emphasizes the scarcity of useful water and thus draws attention to this important information in your speech.
Another way of emphasizing that can be done visually is to zoom in on a specific aspect of interest within your speech . In Figure 9.5 (“Chinese Lettering Amplified”), we see a visual aid used in a speech on the importance of various parts of Chinese characters. On the left side of the visual aid, we see how the characters all fit together, with an emphasized version of a single character on the right.
So, clarifying and emphasizing are two roles that support the “Improving Audience Understanding” purpose of presentation aids . What are other purposes?
Aiding Retention and Recall
The second function that presentation aids can serve is to increase the audience’s chances of remembering your speech. An article by the U.S. Department of Labor (1996) summarized research on how people learn and remember. The authors found that “83% of human learning occurs visually, and the remaining 17% through the other senses—11% through hearing, 3.5% through smell, 1% through taste, and 1.5% through touch.”
For this reason, exposure to an image can serve as a memory aid to your listeners. When your graphic images deliver information effectively and when your listeners understand them clearly, audience members are likely to remember your message long after your speech is over. Moreover, people often are able to remember information that is presented in sequential steps more easily than if that information is presented in an unorganized pattern. When you use a presentation aid to display the organization of your speech (such as can be done with PowerPoint slides), you will help your listeners to observe, follow, and remember the sequence of information you conveyed to them. T his is why some instructors display a lecture outline for their students to follow during class and why a slide with a preview of your main points can be helpful as you move into the body of your speech.
An added plus of using presentation aids is that they can boost your memory while you are speaking . Using your presentation aids while you rehearse your speech will familiarize you with the association between a given place in your speech and the presentation aid that accompanies that material.
Adding Variety and Interest
A third function of presentation aids is simply to make your speech more interesting . For example, wouldn’t a speech on varieties of roses have greater impact if you accompanied your remarks with a picture of each rose? You can imagine that your audience would be even more enthralled if you had the ability to display an actual flower of each variety in a bud vase. Similarly, if you were speaking to a group of gourmet cooks about Indian spices, you might want to provide tiny samples of spices that they could smell and taste during your speech.
Enhancing a Speaker’s Credibilit y
Presentation aids alone will not be enough to create a professional image . As we mentioned earlier, impressive presentation aids will not rescue a poor speech . Even if you give a good speech, you run the risk of appearing unprofessional if your presentation aids are poorly executed. Conversely, a high quality presentation will contribute to your professional image. This means that in addition to containing important information, your presentation aids must be clear, clean, uncluttered, organized, and large enough for the audience to see and interpret correctly . Misspellings and poorly designed presentation aids can damage your credibility as a speaker.
In addition, make sure that you give proper credit to the source of any presentation aids that you take from other source s. Using a statistical chart or a map without proper credit will detract from your credibility, just as using a quotation in your speech without credit would. This situation will usually take place with digital aids such as PowerPoint slides. The source of a chart or the data shown in a chart form should be cited at the bottom the slide.
If you focus your efforts on producing presentation aids that contribute effectively to your meaning, that look professional, and that are handled well, your audience will most likely appreciate your efforts and pay close attention to your message . That attention will help them learn or understand your topic in a new way and will thus help the audience see you as a knowledgeable, competent, and credible speaker. With the prevalence of digital communication, the audience expectation of quality visual aids has increased .
Avoiding Problems with Presentation Aids
Using presentation aids can come with some risks. However, with a little forethought and adequate practice, you can choose presentation aids that enhance your message and boost your professional appearance in front of an audience. One principle to keep in mind is to use only as many presentation aids as necessary to present your message or to fulfill your classroom assignment. The number and the technical sophistication of your presentation aids should never overshadow your speech .
Another important consideration is technology. Keep your presentation aids within the limits of the working technology available to you. Whether or not your classroom technology works on the day of your speech, you will still have to present. What will you do if the computer file containing your slides is corrupted? What will you do if the easel is broken? What if you had counted on stacking your visuals on a table that disappears right when you need it? Or the Internet connection is down for a YouTube video you plan to show?
You must be prepared to adapt to an uncomfortable and scary situation . This is why we urge students to go to the classroom well ahead of time to test the equipment and ascertain the condition of items they’re planning to use. As the speaker, you are responsible for arranging the things you need to make your presentation aids work as intended. Carry a roll of masking tape so you can display your poster even if the easel is gone. Test the computer setup. Have your slides on a flash drive AND send it to yourself as an attachment or upload to a Cloud service. Have an alternative plan prepared in case there is some glitch that prevents your computer-based presentation aids from being usable. And of course, you must know how to use the technology.
More important than the method of delivery is the audience’s ability to see and understand the presentation aid. It must deliver clear information, and it must not distract from the message. Avoid overly elaborate presentation aids. Instead, simplify as much as possible, emphasizing the information you want your audience to understand.
Another thing to remember is that presentation aids do not “speak for themselves.” When you display a visual aid, you should explain what it shows, pointing out and naming the most important features . If you use an audio aid such as a musical excerpt, you need to tell your audience what to listen for. Similarly, if you use a video clip, it is up to you as the speaker to point out the characteristics in the video that support the point you are making—but probably beforehand, so you are not speaking over the video. At the same time, a visual aid should be quickly accessible to the audience. This is where simplicity comes in. Just as in organization of a speech you would n ot want to use 20 main points, but more like 3-5, you should limit categories of information on a visual aid.
9.3 – Types of Presentation Aids
Now that we’ve explored some basic hints for preparing visual aids, let’s look at the most common types of visual aids: charts, graphs, representations, objects/models, and peopl e.
A chart is commonly defined as a graphical representation of data (often numerical) or a sketch representing an ordered process. Whether you create your charts or do research to find charts that already exist, it is important for them to exactly match the specific purpose in your speech. Figure 9.6 (“Acupuncture Charts”) shows two charts related to acupuncture. Although both charts are good, they are not equal. One chart might be useful in a speech about the history and development of acupuncture while the other chart would be more useful for showing the locations of meridians (the lines along which energy flows) and the acupuncture points.
graphical representation of data (often numerical) or a sketch representing an ordered process
The rest of this section will explore three common types of charts: statistical charts, sequence-of-steps chart, and decision trees.
Statistical Charts
For most audiences, statistical presentations must be kept as simple as possible , and they must be explained. The statistical chart shown in Figure 9.7 (“Birth Weight Chi-Square”) is from a study examining the effects of maternal smoking on a range of congenital birth defects. Unless you are familiar with statistics, this chart may be very confusing. When visually displaying information from a quantitative study, you need to make sure that you understand the material and can successfully and simply explain how one should interpret the data. If you are unsure about the data yourself, then you should probably not use this type of information. This is definitely an example of a visual aid that, although it delivers a limited kind of information, does not speak for itself. On the other hand, if you are presenting to an upper level or graduate class in health sciences or to professionals in health occupations, this chart would be appropriate. As with all other principles of public speaking, KNOW YOUR AUDIENCE.
Sequence-of-Steps Charts
Charts are also useful when you are trying to explain a process that involves several steps . The two visual aids in Figure 9.8 (“Steps in Cell Reproduction”) both depict the process of cell division called mitosis using a sequence-of-steps chart, but they each deliver different information. The first chart lacks labels to indicate the different phases of cell division. Although the first chart has more visual detail and may look more scientific, the missing information may confuse your audience. In the second chart, each phase is labeled with a brief explanation of what is happening, which can help your audience understand the process.
Decision Trees
Decision trees are useful for showing the relationships between ideas . The example in Figure 9.9 (“Open Educational Resource Decision Tree”) shows how a decision tree could be used to determine whether to use open-source textbook material. As with the other types of charts, you want to be sure that the information in the chart is relevant to the purpose of your speech and that each question and decision is clearly labeled. This particular tree is pertinent to this textbook, which is an open educational resource drawing from other open educational resources, and the decision tree shows some of the processes the authors went through to decide on the content of this text.
Strictly speaking, a graph may be considered a type of chart, but graphs are so widely used that we will discuss them separately . A graph is a pictorial representation of the relationships of quantitative data using dots, lines, bars, pie slices, and the like. Graphs show how one factor (such as size, weight, number of items) varies in comparison to other items . Whereas a statistical chart may report the mean ages of individuals entering college, a graph would show how the mean age changes over time. A statistical chart may report the amount of computers sold in the United States, while a graph will use bars or lines to show their breakdown by operating systems such as Windows, Macintosh, and Linux.
a pictorial representation of the relationships of quantitative data using dots, lines, bars, pie slices, and the like
Public speakers can show graphs using a range of different formats. Some of those formats are specialized for various professional fields. Very complex graphs often contain too much information that is not related to the purpose of a student’s speech. If the graph is cluttered, it becomes difficult to comprehend. In this section, we’re going to analyze the common graphs speakers utilize in their speeches: line graphs, bar graphs, pie graphs, and pictographs.
Line Gra ph
A line graph is designed to show trends over time . In Figure 9.10 (“Enron’s Stock Price”), we see a line graph depicting the fall of Enron’s stock price from August 2000 to January 2002. Notice that although it has some steep rises, the line has an overall downward trend clearly depicting the plummeting of Enron’s stock price. This is far more effective in showing the relationship of numbers than a chart (as in Figure 9.7) or reading the numbers aloud.
a graph designed to show trends over time
Bar graphs are useful for showing the differences between quantities . They can be used for population demographics, fuel costs, math ability in different grades, and many other kinds of data. The graph in Figure 9.11 (“Suicide vs. Homicide”) is well designed. It is relatively simple and is carefully labeled, making it easy for the speaker to guide the audience through the recorded numbers of each type of death. The bar graph is designed to show the difference between rates of suicides and homicides across various age groups. When you look at the data, the first grouping clearly shows that eighteen- to twenty-four-year-olds are more likely to die because of a homicide than any of the other age groups.
a graph designed to show the differences between quantities
The graph in Figure 9.12 (“Distribution of Income and Wealth in the United States”) is a complicated bar graph depicting the disparity between the so-called “haves” and the “have nots” within the United States. On the left hand side of the graph you can see that the Top 20% of people within the United States account for 84.7% of all of the wealth and 50.1% of all of the income. On the other hand, those in the bottom 40% account for only 0.2% of the wealth and 12.1% of the actual income.
While the graph is very well designed, it presents a great deal of information. For example, it shows “wealth” and “income,” for several groups; however, these are related but different concepts. In a written publication, readers will have time to sit and analyze the graph, but in a speaking situation, audience members need to be able to understand the information in a graph very quickly. For that reason, this graph is probably not as effective for speeches as the one in Figure 9.11 (“Suicide vs. Homicide”).
Pie graphs are usually depicted as circles and are designed to show proportional relationships within sets of data; in other words, they show parts of or percentages of a whole. They should be simplified as much as possible without eliminating important information . As with other graphs, the sections of the pie need to be plotted proportionally . In the pie graph shown in Figure 9.13 (“Causes of Concussions in Children”) we see a clear and proportional chart that has been color-coded. Color-coding is useful when it’s difficult to fit the explanations in the actual sections of the graph; in that case, you need to include a legend, or key, to indicate what the colors in the graph mean. In this graph, audience members can see very quickly that falls are the primary reason children receive concussions. However, the pie graph in Figure 9.14 (“World Populations”) is jumbled, illegible, confusing, and overwhelming in every way. The use of color coding doesn’t help. Overall, this graph simply contains too much information and is more likely to confuse an audience than help them understand something.
a graph designed to show proportional relationships within sets of data
Similar to bar graphs, pictographs use numbers and/or sizes of iconic symbols to dramatize differences in amounts. An example is found in Figure 9.15. Pictographs, although interesting, do not allow for depiction of specific statistical data. If you were trying to show the output of oil from various countries through oil wells, each oil well representing a ten million barrels a day, it might be hard for the audience to see the difference between a third of an oil well and a fourth of one, but that is a significant difference in amounts (3.3 million versus 2.5 million).
P ictograph
a graph using iconic symbols to dramatize differences in amounts
Graphs can present challenges in being effective but also in being ethical. To be both ethical and effective, you need a good understanding of what statistics mean, and you need to create or use graphs that show amounts clearly . If you were showing GPAs of freshmen, sophomore, junior, and senior students at your college, and the bottom number on the graph was 2.25 rather than 0.0, that would result in a visually bigger difference than what really exists (see Figure 9.16).
Diagrams are drawings or sketches that outline and explain the parts of an object, process, or phenomenon that cannot be readily seen. Like graphs, diagrams can be considered a type of chart, as in the case of organizational charts and process-flow charts .
drawings or sketches that outline and explain the parts of an object, process, or phenomenon that cannot be readily seen
When you use a diagram, be sure to explain each part of the phenomenon, paying special attention to elements that are complicated or prone to misunderstanding. In the example shown in Figure 9.17 (“The Human Eye”), you might wish to highlight that the light stimulus is reversed when it is processed through the brain or that the optic nerve is not a single stalk as many people think.
Maps are extremely useful if the information is clear and limited. There are all kinds of maps, including population, weather, ocean current, political, and economic maps, so you should find the right kind for the purpose of your speech. Choose a map that emphasizes the information you need to deliver. The map shown in Figure 9.18 (“African Map with Nigerian Emphasis”) is simple, showing clearly the geographic location of Nigeria. This can be extremely valuable for some audiences who might not be able to name and locate countries on the continent of Africa. The map also shows the relative size of Nigeria compared to its neighbors. Figure 9.19 (“Rhode Island Map”) is a map of the state of Rhode Island, and it emphasizes the complicated configuration of islands and waterways that characterize this state’s geography.
Photographs and Drawings
Sometimes a photograph or a drawing is the best way to show an unfamiliar but important detail . Figure 9.20 (“Wigwam Photograph”) is a photograph of a wigwam, a dwelling used by Native Americans in the North East. Audiences expect high quality in photographs now, and as with all presentation aids they should enhance the speech and not just “be there.” It is common to put stock photographs on PowerPoint slides as “clip art,” but they should be relevant and not detract from the message of the slide.
Video or Audio Recordings
Another very useful type of presentation aid is a video or audio recording. Whether it is a short video from a website such as YouTube or Vimeo, a segment from a song, or a piece of a podcast, a well-chosen video or audio recording may be a good choice to enhance your speech. Imagine, for example, that you’re giving a speech on how Lap-Band surgeries help people lose weight. One of the sections of your speech could explain how the Lap-Band works, so you could easily show a forty-three second video available on YouTube to demonstrate the part of the surgery. Maybe you could include a recording of a real patient explaining why they decided to get the Lap-Band.
There is one major warning to using audio and video clips during a speech: do not forget that they are supposed to be aids to your speech, not the speech itself . In addition, be sure to avoid these five mistakes that speakers often make when using audio and video clips:
- Avoid choosing clips that are too long for the overall length of the speech . Your instructor can give you some guidelines for how long video and audio clips should be for the speeches in your class, if they are allowed (and make sure they are).
- Practice with the audio or video equipment prior to speaking. If you are unfamiliar with the equipment, you’ll look foolish trying to figure out how it works . This fiddling around will not only take your audience out of your speech but also have a negative impact on your credibility. It also wastes valuable time. Finally, be sure that the speakers on the computer are on and at the right volume level.
- Cue the clip to the appropriate place prior to beginning your speech. We cannot tell you the number of times we’ve seen students spend valuable speech time trying to find a clip on YouTube or a DVD. You need to make sure your clip is ready to go before you start speaking. Later in this chapter we will look at using video links in slides.
- In addition to cuing the clip to the appropriate place, the browser window should be open and ready to go . If there are advertisements before the video, be sure to have the video cued to play after the ad. The audience should not have to sit through a commercial. There is a website called TubeChop that can allow you to cut a segment out of a YouTube video, then creating a new link. It has limitations but can be useful.
- The audience must be given context before a video or audio clip is played, specifically what the clip is and why it relates to the speech. At the same time, the video should not repeat what you have already said, but add to it.
Objects or Models
Objects and models are another form of presentation aid that can be very helpful in getting your audience to understand your message . O bjects refer to anything you could hold up and talk about during your speech. If you’re talking about the importance of not using plastic water bottles, you might hold up a plastic water bottle and a stainless steel water bottle as examples.
Models, on the other hand, are re-creations of physical objects that you cannot have readily available with you during a speech . If you’re giving a speech on heart murmurs, you may be able to show how heart murmurs work by holding up a model of the human heart. As will be discussed in the section on handouts below, a speaker should not pass an object or model around during a speech. It is highly distracting.
People and Animals
The next category of presentation aids are people and animals. We can often use ourselves or other people to adequately demonstrate an idea during our speeches.
Animals as Presentation Aids
When giving a speech on a topic relating to animals, it is often tempting to bring an animal to serve as your presentation aid. While this can sometimes add a very engaging dimension to the speech, it carries some serious risks that you need to consider.
The first risk is that animal behavior tends to be unpredictable. You may think this won’t be a problem if your presentation aid animal is small enough to be kept confined throughout your speech—for example, a goldfish in a bowl or a lizard or bird in a cage. However, even caged animals can be very distracting to your audience if they run about, chirp, or exhibit other agitated behavior. The chances are great that an animal will react to the stress of an unfamiliar situation by displaying behavior that does not contribute positively to your speech or to the cleanliness of the physical environment. Additionally, the animal’s behavior may not only affect audience attention during your speech, but potentially during your classmates’ speeches as well.
The second risk is that some audience members may respond negatively to a live animal . In addition to common fears and aversions to animals like snakes, spiders, and mice, many people have allergies to various animals. One of the authors had an experience where a student brought his six-foot yellow python to class for a speech. As a result, one of the other students refused to stay in the room because of her snake phobia (the instructor was not too comfortable either).
The third risk is that some locations may have regulations about bringing non-service animals onto the premises . If animals are allowed, the person bringing the animal may be required to bring a veterinary certificate or may be legally responsible for any damage caused by the animal.
For these reasons, before you decide to use an animal as a presentation aid, ask yourself if you could make your point equally well with a picture, model, diagram, or other representation of the animal in question.
Speaker as Presentation Aid
Speakers can often use their own bodies to demonstrate facets of a speech . If your speech is about ballroom dancing or ballet, you might use your body to demonstrate the basic moves in the cha-cha or the five basic ballet positions.
Other People as Presentation Aids
In some cases, such as for a demonstration speech, you might want to ask someone else to serve as your presentation aid. You should arrange ahead of time for a person (or persons) to be an effective aid— do not assume that an audience member will volunteer on the spot . If you plan to demonstrate how to immobilize a broken bone, your volunteer must know ahead of time that you will touch them as much as necessary to splint the break.
You must also make certain that they will arrive dressed presentably and that they will not draw attention away from your message through their appearance or behavior. The transaction between you and your human presentation aid must be appropriate, especially if you are going to demonstrate something like a dance step. In short, make sure your helper will know what is expected of them and consents to it.
9.4 – Using Presentation Slides
Ever since the 1990s and the mainstreaming of personal computer technology, speakers have had the option of using slide presentation software to accompany their speeches and presentations. The most commonly known one is PowerPoint, although there are several others:
- Prezi, available at www.prezi.com
- Slide Rocket, available at www.sliderocket.com
- Google Slides, available in Google Drive and useful for collaborative assignments
- Keynote, the Apple presentation slide software on MACs
- Impress, an Open Office product (http://www.openoffice.org/product/impress.html)
- AdobeAcrobat Presenter
These products, some of which are offered free for trial or basic subscriptions (called a “freemium), allow you to present professional-looking slides. Each one is “robust,” a word used to mean it has a large number of functions and features, some of which are helpful and some of which are distracting. For example, you can use the full range of fonts, although many of them are not appropriate for presentations because they are hard to read. In this section we will discuss the proper use of presentation slides, with the assumption that you understand the basics of cutting, pasting, inserting, etc. involved in these products. You may have taken a class in high school where you learned to use the technology, but that is not the same as learning to use them for actual presentations.
The Advantages and Disadvantages of Using Presentation Slides
In some industries and businesses, there is an assumption that speakers will use presentation slides. They allow visualization of concepts, they are easily portable, they can be embedded with videos and audio, words can dance around the screen —why wouldn’t a speaker use them? You will probably also be expected to have slide presentations in future assignments in college. Knowing how to use them, beyond the basic technology, is vital to being a proficient presenter.
But why not use them? F ranck Frommer, a French journalist and communication expert, published the book How PowerPoint Makes You Stupid (2012), whose title says it all. He criticizes the “linearity” of PowerPoint and similar presentation software, meaning that audiences are not encouraged to see the relationship of ideas and that PowerPoint hurts critical thinking in the audience. Slide follows slide of bulleted information without one slide being more important or the logical connections being clear.
As recently as the mid-2000s, critics such as well-known graphic expert and NASA consultant Edward Tufte (2005) charged that PowerPoint’s tendency to force the user to put a certain number of bullet points on each slide in a certain format was a serious threat to the accurate presentation of data. As Tufte put it, “ the rigid slide-by-slide hierarchies, indifferent to content, slice and dice the evidence into arbitrary compartments, producing an anti-narrative with choppy continuity.”
Tufte argues that poor decision making, such as was involved with the 2003 space shuttle Columbia disaster, may have been related to the shortcomings of such presentation aids in NASA meetings. While more recent versions of PowerPoint and similar programs allow much more creative freedom in designing slides, this freedom comes with a responsibility— the user needs to take responsibility for using the technology to support the speech and not get carried away with the many special effects the software is capable of producing.
It should be mentioned here that Prezi helps address one of the major criticisms of PowerPoint. Because Prezi, in its design stage, looks something like a mind map on a very large canvas with grid lines, it allows you to show the relationship and hierarchy of ideas better. For example, you can see and design the slides so that the “Big Ideas” are in big circles and the subordinate ideas are in smaller ones.
In addition to recognizing the truth behind Frommer’s and Tufte’s critiques, we have all sat through a presenter who committed the errors of putting far too much text on the slide. When a speaker does this, the audience is confused— do they read the text or listen to the speaker? An audience member cannot do bot h. (Remember the pipeline graphic in Chapter 7.) Then, the speaker feels the need to read the slides rather than use PowerPoint for what it does best, visual reinforcement and clarification . We have also seen many poorly designed PowerPoint slides, either through haste or lack of knowledge: slides where the graphics are distorted (elongated or squatty), words and graphics not balanced, text too small, words printed over photographs, garish or nauseating colors, or animated figures left up on the screen for too long and distracting the audience. What about you? Can you think about PowerPoint “don’ts” that have hurt your reception of a presentation or lecture? This would be a good discussion for class, and a good way to know what not to do with your own slides.
Creating Quality Slide Shows
Slides should show the principles of good design, which include unity, emphasis or focal point, scale and proportion, balance, and rhythm (Lauer & Pentak, 2000). Presenters should also pay attention to tone and usability. With those principles in mind, here are some tips for creating and then using presentation software .
Unity and Consistency
Generally it is best to use a single font for the text on your visuals so that they look like a unified set . Or you can use two different fonts in consistent ways, such as having all headings and titles in the same font and all bullet points in the same font . Additionally, the background should probably remain consistent, whether you choose one of the many design templates or if you just opt for a background color .
In terms of unity, the adage, “ Keep It Simple, Speaker” definitely applies to presentation slides. Each slide should have one message, one photo, one graphic . The audience members should know what they are supposed to look at on the slide. A phrase to remember about presentation slides and the wide range of design elements available is “Just because you can, doesn’t mean you should.”
Another area related to unity and consistency, as well as audience response, is the use of animation or movemen t. There are three types of animation in slideshows. First, you can embed little characters or icons that have movement. These may seem like fun, but they have limited use and should not stay on the screen very long—you can use the second type of animation to take them off the screen.
That second type is the designed movement of text or objects on and off the screen . Although using this function takes up time in preparing your slides , especially if you want to do it well and be creative with it, it is very useful. You can control what your audience is seeing. It also avoids bringing up all the text and material on a slide at one time, which tempts the audience again to pay more attention to the screen than to you. Movement on the screen attracts attention (see Factors of Attention in Chapter 7), for better or worse. PowerPoint, for example, allows bouncing words, pulsating text, swirling phrases, even Star Wars scroll, which may or may not serve your purpose.
The third type of animation is called slide transitions, which is the design of how the next slide appears . In PowerPoint you can have the slides appear automatically or as blinds, as little checkerboards, from different sides of the screen, in opening circles, etc. (You can also use sound effects, but that is strongly discouraged.) In Prezi, the slides transition by zooming in and out, which is a clever effect but does make some audience members experience motion sickness. In general, you want to use a consistent and efficient pattern of movement with the second and third types of animation.
Emphasis, Focal Point, and Visibility
Several points should be made about how to make sure the audience sees what they need to see on the slides.
- It is essential to make sure the information is large enough for the audience to see ; and since the display size may vary according to the projector you are using, this is another reason for practicing in advance with the equipment you intend to use.
- T he standard rule is for text is 7 X 7, or sometimes (if the screen is smaller) 6 X 6. Does this mean 49 or 36 words on the slide? No. It means, in the case of 7 X 7, that you should have no more than seven horizontal lines of text (this does not mean bullet points, but lines of text, including the heading) and the longest line should not exceed seven words.
- Following the 7 X 7 rule will keep you from putting too much information on a slide, and you should also avoid too many slides . Less sometimes really is more. Again, there is no hard and fast rule, but a ten-minute speech probably needs fewer than ten slides, unless you can make a good argument for more based on the content of the speech. If, however, the slides are just text, more than ten is too many.
- Do not assume that all the templates feature visible text. Text should not be smaller than 22 point font for best visibility, and some of the templates use much smaller fonts than 22 point. This is especially important in those situations where the speaker creates handouts. Text smaller than 22 is very difficult to see on handouts of your slides. (However, handouts are not recommended for most situations.)
- H igh contrast between the text and slides is extremely important . White fonts against very dark backgrounds and black fonts against very light backgrounds are probably your safest bet here . Remember that the way it looks on your computer screen is not the exactly how it will look when projected—the light is coming from a different place. Avoid words on photos. Figure 9.21 shows a photo with the words placed across the center of the image. Not only does this obviously obscure some of the picture, it also makes the words difficult to read . Figure 9.22, by contrast, has the accompanying text placed just blow the image, making both much easier to see, and a citation is provided.
- Al so in terms of visibility, most experts say that sans serif fonts such as Arial, Tahoma, and Verdana are better for reading from screens than serif fonts such as Times New Roman, Bookface, Georgia, or Garamond. Merriam-Webster (2018) defines “serif” as “any of the short lines stemming from and at an angle to the upper and lower ends of the strokes of a letter.” Serifs are additions to the letters on different fonts that give them a different appearance and help the flow of eye when reading .
How does the slide in Figure 9.23 stack up beside these rules for visibility? You probably noticed that slide is a “fail” in terms of high contrast between the font and background and the use of a block of text not broken up for easy reading. The audience would feel like they are supposed to read it but not be able to. Also, since the text is a quotation from John Dewey, the text should have quotation marks around it.
F onts, color, clip art, photographs, and templates all contribute to tone , which is the attitude being conveyed in the slides. If you want a light tone, such as for a speech about cruises, some colors (springtime, pastel, cool, warm, or primary colors) and fonts (such as Comic Sans) and lots of photographs will be more appropriate . For a speech about the Holocaust, more somber colors and design elements would be more fitting, whereas clip art would not be.
the attitude of a given artifact (humorous, serious, light-hearted, etc.)
Scale and Proportion
Although there are several ways to think about scale and proportion, we will discuss three here. First, bullet points. Bullet points infer that the items in the bulleted list are equal and the sequence doesn’t matter. If you want to communicate order or sequence or priority, use numbers. Do not mix outline points or numerical points with bullet points. Also, you should not put your outline (Roman numerals, etc.) on the slide.
Bullet points should be short—not long, full sentences—but at the same time should be long enough to mean something . In a speech on spaying and neutering pets, the bullet point “pain” may be better replaced with “Pet feels little pain.” Second, when you are designing your slides, it is best to choose a template and stick with it . If you input all your graphics and material and then change the template, the format of the slide will change, in some cases dramatically, and you will have distorted graphics and words covered up. You will then have to redesign each slide, which can be unnecessarily time-consuming.
The third aspect of scale and proportion is the relationship between the graphics and text in terms of size. This aspect is discussed below in the next section on “Balance.” Also, a graphic should be surrounded by some empty space and not just take up the whole slide.
In general you want symmetrical slides . Below are four examples of slides that are unbalanced (Figures 9.24-9.27); the last one (Figure 9. 28) achieves a better symmetry and design.
Rhythm in Presenting
The rhythm of your slide display should be reasonably consistent—you would not want to display a dozen different slides in the first minute of a five-minute presentation and then display only one slide per minute for the rest of the speech . Timing them so that the audience can actually take them in is important. Presenters often overdo the number of slides, thinking they will get a better grade, but too many slides just causes overkill.
If you can obtain a remote mouse to change slides, that can help you feel independent of the mouse attached to the computer . However, you have to practice with the remote “clicker.” But if you have to use the mouse to change slide, keep your hands off of it between clicks. We have seen students wiggle the little arrow all over the screen. It is extremely annoying.
Whether using a remote “clicker” or the attached mouse, you must attend to the connection between what is on the screen and what you are actually talking about at the moment. Put reminders in your notes about when you need to change slides during your speech.
For better or worse, we have become very screen-oriented in our communication, largely because screens change often and that changing teaches us to expect new stimuli, which we crave. If the screen is up but you are not talking about what is on the screen, it is very confusing to the audience.
If you are using PowerPoint and if you are not talking about something on a slide, hit the “B” key or the blank screen button on the remote mouse. This action will turn the screen to black. You can also hit the “W” key, which turns the screen to white, but that will make the audience think something is coming. Unfortunately, the downside of the “B” key action is that it will return you to the previous screen. To avoid this, some presenters put a black slide between slides in the presentation so that hitting the forward key gives the same effect, but hitting it again takes them to a new screen. (Other programs have similar functions; for example, if using Prezi, the “B” key also shows a black screen.)
In fact, a basic presentation rule is to only show your visual aid when you are talking about it , and remove it when you no longer are talking about it. Some other practical considerations are as follows:
- Be sure the file is saved in a format that will be “readable” on the computer where you are presenting. A common example is that a Keynote presentation (Apple) does not open on all PCs. You can save Keynote as a .ppt file for use on a PC. Likewise, if you chose to use Prezi or other web-based presentation software, you will need a strong, reliable Internet connection to show the slides.
- Any borrowed graphic must be cited on the slide where it is used; the same would be true of borrowed textual material. Putting your sources only on the last slide is insufficient.
- A very strong temptation for speakers is to look at the projected image rather than the audience during the speech. This practice cuts down on eye contact, of course, and is distracting for the audience. Two solutions for that are to print your notes from the presentation slides and/or use the slides as your note structure. Also remember that if the image is on the computer monitor in front of you, it is on the screen behind you.
- Always remember—and this cannot be emphasized enough—technology works for you, not you for the technology. The presentation aids are aids, not the speech itself.
- As mentioned before, sometimes life happens—technology does not work. It could be that the projector bulb goes out or the Internet connection is down. The show must go on.
- If you are using a video or audio clip from an Internet source, it is probably best to hyperlink the URL on one of the slides rather than minimize the program and change to the Internet site. You can do this by highlighting a key word on the slide, right clicking to find “hyperlink,” and then pasting the URL there. Although you can also embed video in a PowerPoint, it makes the file extremely large and that may cause problems of its own.
- Finally, it is common for speakers to think “the slide changes, so the audience know there is a change, so I don’t need a verbal transition.” Please do not fall into this trap. Verbal transitions are just as, and maybe more, necessary for a speech using slides.
9.5 – Low-Tech Presentation Aids
One reason for using digital media is that they can’t be prone to physical damage in the form of smudges, scratches, dents, and rips. Unlike posters and objects, presentation software can be kept professional looking if you have to carry them through a rainstorm or blizzard. However, there are times when it makes sense to use “low-tech” media for presentations. Here are some directions for those times.
Dry-Erase Board
If you use a chalkboard or dry-erase board, you are not using a prepared presentation aid. Your failure to prepare visuals ahead of time can be interpreted in several ways, mostly negative. If other speakers carefully design, produce, and use attractive visual aids, yours will stand out by contrast. You will be seen as the speaker who does not take the time to prepare even a simple aid. Do not use a chalkboard or dry-erase board and pretend it’s a prepared presentation aid .
However, numerous speakers do utilize chalk and dry-erase boards effectively. Typically, these speakers use the chalk or dry-erase board for interactive components of a speech. For example, maybe you’re giving a speech in front of a group of executives. You may have a PowerPoint all prepared, but at various points in your speech you want to get your audience’s responses. (More recent technologies, such as on iPads, allow you to do the interaction on the screen, but this would have to be supported by the environment.) Chalk or dry-erase boards are very useful when you want to visually show information that you are receiving from your audience. If you ever use a chalk or dry-erase board, follow these four simple rules:
- W rite large enough so that everyone in the room can see (which is harder than it sounds; it is also hard to write and talk at the same time!).
- Pr int legibly; don’t write in cursive script.
- Write short phrases; don’t take time to write complete sentences.
- Be sure you have markers that will not go dry, and clean the board afterward.
A flipchart is useful for situations when you want to save what you have written for future reference or to distribute to the audience after the presentation . As with whiteboards, you will need good markers and readable handwriting, as well as a strong easel to keep the flipchart upright.
You may have the opportunity in your college years to attend or participate in a “poster session.” These are times during an academic conference where visitors can view a well-designed poster depicting a research project and discuss it one-on-one with the researcher. These kinds of posters are quite large and involve a great deal of work. They can be generated from PowerPoint but often require a special printer. Otherwise, posters are probably not the best way to approach presentation aids in a speech . There are problems with visibility as well as portability. Avoid producing a presentation aid that looks like you simply cut pictures out of magazines and pasted them on. Slapping some text and images on a board looks unprofessional and will not be viewed as credible or effective.
Handouts are appropriate for delivering information that audience members can take away with them. As we will see, handouts require a great deal of management if they are to contribute to your credibility as a speaker.
First, make sure the handout is worth the trouble of making, copying, and distributing it. Does the audience really need the handout? Second, make sure to bring enough copies of the handout for each audience member to get one . Having to share or look on with one’s neighbor does not contribute to a professional image. Under no circumstances should you ever provide a single copy of a handout to pass around. It is distracting and everyone will see it at different times in the speech, which is also true about passing any object around the room.
There are three possible times to distribute handouts: before you begin your speech, during the speech, and after your speech is over. Naturally, if you need your listeners to follow along in a handout, you will need to distribute it before your speech begins . If you have access to the room ahead of time, place a copy of the handout at or on each seat in the audience . If not, ask a volunteer to distribute them as quickly as possible while you prepare to begin speaking. If the handout is a “ takeaway,” leave it on a table near the door so that those audience members who are interested can take one on their way out; in this case, don’t forget to tell them to do so as you conclude your speech. It is almost never appropriate to distribute handouts during your speech, as it is distracting, takes up time, and interrupts the pace of your presentation.
To finish this chapter, we will recap and remind you about the principles of effective presentation aids. Whether your aid is a slide show, object, a person, or dry erase board, these standards are essential:
- Presentation aids must be easily seen or heard by your audience. Squinting and head-cocking are not good reactions. Neither should they look at the screen the whole time and ignore the speaker.
- Presentation aids must be portable, easily handled, and efficient.
- Presentation aids should disappear when not in use.
- Presentation aids should be aesthetically pleasing, which includes in good taste. Avoid shock value just for shock value . You might want to show pictures of diseased organs and teeth, deformities, or corpses for your speech to make a point, but context is everything. Will your audience react so strongly that the overall point is missed? Additionally, electronic media today allows you to create very “busy” slides with varieties of fonts, colors, collages of photos, etc. Keep in mind the principles of unity and focal point.
- Color is another aesthetic aspect . Some colors are just more soothing, readable, and appropriate than others. Also, the color on your slides may be different when projected from what is on your computer. Finally, presentation aids must support your speech and have high relevance to your content.
This chapter has covered a wide range of information about all kinds of audio and visual aids, but audiences today expect and appreciate professionally designed and handled presentation aids. The stakes are higher now, but the tools are many.
Something to Think About
What are some attention problems caused by using projection equipment during a speech?
Which kind of presentation aid would be most useful for the following?
- data on how the average American family uses its income
- discussing the number of wind turbines in five Midwestern states
- explaining the changes in enrollment of minority students at your college over 20 year
- a speech on the chambers of the human heart
- a speech on the differences between North and South Korea
- a speech the Sutton Hoo archaeological dig in England
Chapter Nine Attribution:
Manley, J. A., & Rhodes, K. (2020). Exploring Public Speaking: The Free Dalton State College Public Speaking Textbook, 4th Edition. Manifold. Retrieved from https://alg.manifoldapp.org/read/exploring-public-speaking-the-free-dalton-state-college-public-speaking-textbook-4th-edition/
Also, thank you to Professor Dan West for generously sharing your Public Speaking videos.
Creative Commons License

Authors and Contributors
Barbara G. Tucker (Editor and Primary Author)
As chair of the Department of Communication at Dalton State College, Dr. Tucker oversees programs in communication, general studies, music, theatre, and interdisciplinary studies. She is a Professor of Communication and has worked in higher education for over 40 years. She lives in Ringgold, Georgia, with her husband; they have one son. She is a novelist and playwright. Her research areas are the basic course, open educational resources, historical perspectives on rhetoric, and gratitude.
Matthew LeHew (Editor)
As Assistant Professor at Dalton State College, Matthew LeHew teaches courses in public relations, integrated marketing communication, film studies, and video production. His research interests include various areas of media studies, especially examination of virtual communities for online games. He is currently writing his dissertation for the Ph.D. in Communication (Media and Society track) at Georgia State University. He lives in Marietta, Georgia with his wife, son, and two dogs.
The Public Speaking Resource Project Copyright © 2018 by Lori Halverson-Wente and Mark Halverson-Wente is licensed under a Creative Commons Attribution-NonCommercial 4.0 International License , except where otherwise noted.
Share This Book
Understanding Presenter View in PowerPoint: A Deep Dive Guide

Origin and Evolution of Presenter View
Why presenter view is a game-changer for professionals, activating and customizing presenter view in powerpoint, in-depth features of the presenter view, common mistakes and how to avoid them, advanced tips for a power presentation, final tips for enhancing your presentation game, introduction to presenter view.
Have you ever found yourself awkwardly toggling between slides and speaker notes during a presentation? Or wished you could preview the next slide without your audience seeing? Enter Presenter View in PowerPoint, a feature designed to make presenting smoother and more professional.
In essence, Presenter View is a special mode in PowerPoint that allows the presenter to see their speaker notes on one screen, while the audience views the note-free presentation on another screen. This dual-screen setup means you can have your notes, upcoming slides, and timer conveniently on one screen while your audience remains blissfully unaware.
“Presenter View is the unseen ally behind many successful PowerPoint presentations.”
Microsoft’s PowerPoint, with its roots tracing back to the late 1980s, has undergone several metamorphoses. Over the years, as technology improved and presentation dynamics changed, Microsoft introduced new features to make the software more user-friendly and versatile. One such innovation is the Presenter View.
Back in the early days of PowerPoint, presenters had to rely on printouts or separate documents for their speaker notes. The advent of Presenter View in the early 2000s was a game-changer. It allowed presenters to merge their slides and speaker notes into one cohesive presentation experience.
The beauty of Presenter View lies not just in its conception but in its evolution. Over different versions of PowerPoint:
- 2003 : Introduction of a basic Presenter View with slides and notes.
- 2007 : Enhanced screen setup with better dual-monitor support.
- 2010 : Introduction of slide zoom and laser pointer features.
- 2013 & Beyond : Integration with touch features, improved UI, and annotations.
Each version brought refinements, making it more intuitive and packed with features, tailoring to the evolving needs of presenters globally.
Fun Fact : Presenter View wasn’t initially as popular as it is today. It took a few iterations and user feedback loops for Microsoft to perfect the balance between utility and user experience.
The Core Components of Presenter View
Presenter View in PowerPoint is like the cockpit for pilots: it’s where all the essential controls and information are at the presenter’s fingertips. Whether you’re a newbie to PowerPoint or a seasoned professional, understanding these components can transform your presentation experience.
- This provides a glance at your current, previous, and upcoming slides. It ensures you’re always prepared for what’s coming next and can seamlessly transition between points.
- The soul of your presentation, speaker notes, are discreetly placed at the bottom or side, only visible to you. These notes can be elaborate explanations, quick pointers, or even personal reminders. They’re like your secret cheat sheet!
- Ever worried about running over time? This feature shows the elapsed time since you began the presentation and, in some versions, allows you to set a countdown. Stay on track and manage your pace efficiently.
- Interactive features that allow you to draw on slides or use a virtual laser pointer. These are especially helpful when you want to emphasize or explain specific points visually.
- Navigate between slides effortlessly and zoom into specific parts of a slide to draw attention or elaborate on details.
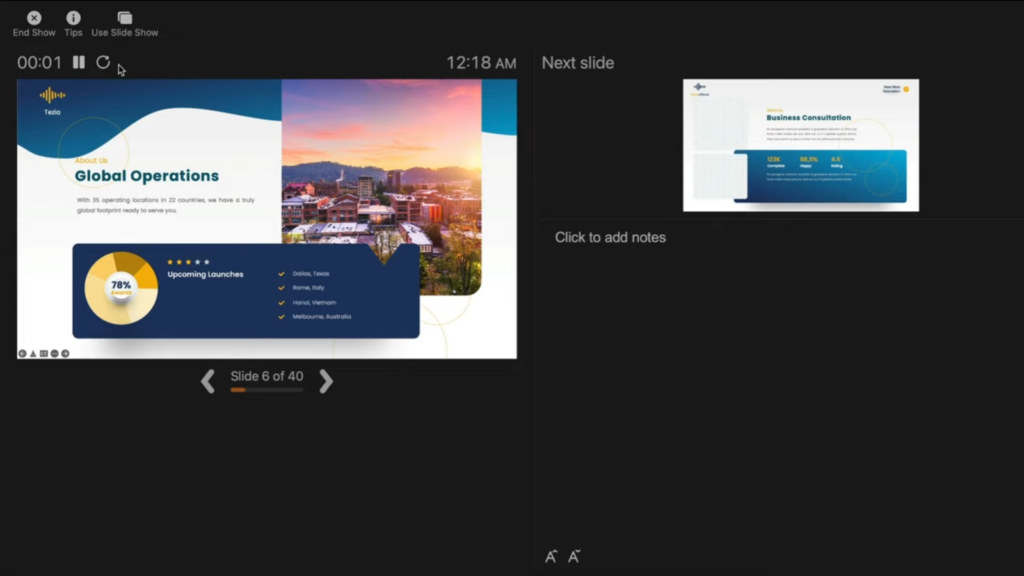
Table: Core Components Overview
Quote : “Presenter View is to a presenter what a dashboard is to a driver. It empowers, directs, and enhances the journey of your narrative.” – Jane Harris, Lead PowerPoint Expert – Powerbacks team
Understanding these components is one thing, but leveraging them effectively during a presentation can make a significant difference. Let’s delve into the ‘why’ behind the significance of Presenter View.
Stepping onto the stage or presenting in a boardroom can often be an overwhelming experience. The constant juggle between capturing the audience’s attention and keeping track of your slides can lead to nervousness. But what if there was a way to have everything you need right in front of you, ensuring smooth sailing through your presentation? Enter Presenter View.
- Having a preview of the upcoming slides and personal notes right in front of you can be a massive boost to confidence. You’re always one step ahead, knowing exactly what’s coming next.
- Instead of turning back to view the screen repeatedly, Presenter View lets you face your audience directly. This creates a more engaging and personal interaction.
- Gone are the days when you’d hold a bunch of cue cards or sheets of paper. With digital speaker notes, you have a cleaner, more organized setup.
- Using the annotation tools and laser pointer, you can make your presentation more interactive, leading to better retention and engagement from your audience.
- There’s no denying that seamlessly transitioning between slides, using interactive tools, and having no physical notes gives a more polished and professional look.
Table: Benefits of Using Presenter View
Quote : “Embracing the Presenter View is not just about leveraging a tool; it’s about amplifying your message and connecting more profoundly with your audience.”
It’s evident that the Presenter View has undeniable advantages for professionals. But how do you activate it and customize it to suit your needs? Let’s walk through the steps.
Starting with PowerPoint 2013, Microsoft enhanced the Presenter View to ensure that it’s both intuitive and user-friendly. Activating it and making it work for you is simple, as outlined in the following steps:
Step-by-Step Guide to Activate Presenter View :
- Start by opening your PowerPoint presentation. This will be the one you intend to deliver.
- At the top, you’ll notice several tabs. Click on the one labeled ‘Slide Show’.
- Within the Slide Show tab, you’ll spot a checkbox labeled ‘Use Presenter View’. Ensure that it’s ticked. If it’s not, simply click on it.
- If you’re using an external projector or display, make sure it’s connected. PowerPoint will automatically detect it and use the Presenter View on your primary display, showing the main presentation on the external one.
- Start your presentation by either pressing F5 on your keyboard or clicking on ‘From Beginning’ in the Slide Show tab.
- Next Slide Preview : Gives a preview of what’s coming next.
- Speaker Notes : Displays your notes for the current slide.
- Slide Navigation : Use this to jump to a specific slide.
- Annotation Tools : Highlight or draw on your slides in real-time.
- Timer : Keeps track of how long you’ve been presenting.
- You can move around the different elements, increase font size of your notes for better readability, or even hide specific components if they’re not required.
Table: Quick Access Tools in Presenter View
Quote : “The beauty of PowerPoint’s Presenter View is the control and flexibility it offers. It’s like having a personal assistant during your presentations.” – Linda Green, Presentation Expert
Now that we know how to activate and customize the Presenter View let’s delve deeper into its features and tools for maximum efficiency during presentations. Shall we proceed?
PowerPoint’s Presenter View is not just a simple “next slide” preview; it’s a hub of tools and functionalities designed to make the presenter’s job easier and the presentation more engaging.
H3: Slide Preview This is arguably the most straightforward feature but also the most helpful. At a glance, you can see what’s coming up, ensuring that you’re always prepared for the next topic or section.
- Smooth Transitions : Eliminates awkward pauses between slides.
- Improved Pacing : Know when to speed up or slow down based on upcoming content.
- Reduced Anxiety : No unpleasant surprises during your presentation.
H3: Speaker Notes For those who don’t rely on pure memory, speaker notes are a lifesaver. They’re your secret weapon, visible only to you, that provides additional context or reminders about what to say.
- Bold the crucial points to ensure they stand out.
- Use concise bullet points for easier and quicker reading.
- Add time cues if you’re aiming to cover specific points within certain timeframes.
H3: Slide Navigation While it’s always best to move sequentially through your slides, there might be instances when you need to skip ahead or return to a previous point. With the slide navigation tool, you can effortlessly hop around your presentation.
- Case Study : During a corporate presentation, John, a sales manager, was posed with a sudden question about Q2 performance. Thanks to slide navigation, he quickly reverted to the relevant slide, addressed the query, and resumed without any hiccups.
H3: Annotation Tools Engage your audience by turning your presentation into an interactive canvas. Whether you’re highlighting an essential statistic or drawing a quick graph, these tools can make a significant impact.
- Use contrasting colors to ensure visibility.
- Don’t overdo it; the aim is to emphasize, not to overwhelm.
- Practice beforehand to ensure you’re comfortable with these tools during the presentation.
H3: Timer It’s easy to lose track of time during a presentation. With Presenter View’s timer, you can keep tabs on the elapsed time, helping you manage the pace and duration of your talk.
- Tip : Always allocate a buffer period. If you’re presenting for 30 minutes, aim to finish in 25. This allows for Q&A or any unexpected delays.
Quote : “PowerPoint’s Presenter View is like a dashboard for presenters. It provides every tool one might need, all within arm’s reach, ensuring a seamless and interactive presentation experience.” – Michael Roberts, Tech Analyst
Understanding the features of the Presenter View is the key to unlocking its potential. With practice and familiarity, it becomes an extension of the presenter, leading to more confident and impactful presentations.
Making the Most of Presenter View
If you’ve ever wanted to feel like a presentation Jedi, mastering the Presenter View is your path to the force. But having the tool isn’t enough – it’s about leveraging its features optimally. Here’s a detailed guide on maximizing the benefits of the Presenter View:
H3: Setup and Access Before harnessing its power, you need to ensure you can access Presenter View without hitches.
- Connect your computer to the projector or external display.
- Launch PowerPoint and open your presentation.
- Go to the Slide Show tab and select Set Up Slide Show .
- In the pop-up, ensure Browsed by an individual (window) is selected.
- Start the slide show. Presenter View should appear on your computer, while the audience sees only the slides.
H3: Customize the Display Remember, it’s your dashboard; make it as comfortable and efficient for you as possible.
- Within Presenter View, hover over the bottom to reveal the toolbar.
- Click on the gear icon to adjust settings.
- Reorder tools based on your preference or hide those you don’t need.
H3: Practice, Practice, Practice The tool’s efficiency relies heavily on your familiarity with it. Do dry runs to ensure you know where everything is and how each feature works.
- Pro Tip : Mimic the presentation environment during practice. If you’re presenting in a large hall, practice with the same setup.
H3: Seamlessly Integrate Other Media If your presentation includes videos, animations, or other media, ensure they play seamlessly in Presenter View.
- Deep Dive : Always embed media within the presentation. Relying on external links or files can disrupt the Presenter View experience.
H3: Engage the Audience Use the tools not just to aid your presentation but to engage your audience. Pose questions, use the pen tool to sketch quick diagrams based on audience inputs, and make it interactive.
- Table of Engagement Techniques :
H3: Master the Art of Transitions Smooth transitions are key to maintaining audience attention. With a preview of the next slide, prepare your narrative to flow seamlessly.
Even with the most powerful tools, human error can play a spoilsport. The Presenter View, as intuitive as it may be, has its quirks. Here’s a list of common pitfalls users face and ways to steer clear of them:
H3: Not Checking Hardware Setup Before you even start the presentation, ensure your hardware is correctly set up. This includes checking the display connection, ensuring the projector or external monitor is detected, and setting up the correct display settings.
- Pro Tip : Always keep a spare HDMI or VGA cable. Technical glitches often come from the most unexpected sources.
H3: Overlooking Speaker Notes Having made the effort of adding speaker notes to your slides, it would be a shame not to use them. They serve as a discreet prompt, ensuring you don’t miss any critical points.
- Fact : According to a study, presenters who actively used speaker notes were 25% more consistent in delivering their core messages.
H3: Ignoring the Timer Time management is crucial. If you have a fixed time slot, exceeding it can inconvenience others and may appear unprofessional. Conversely, finishing too early can leave your audience unsatisfied.
- Actionable Advice : Always have a buffer. If your slot is 30 minutes, aim for a 25-minute presentation, leaving room for Q&A or unexpected delays.
H3: Relying Exclusively on Presenter View Despite its usefulness, never be wholly dependent on Presenter View. Technical glitches happen, and the ability to continue smoothly without it showcases professionalism.
- Case Study : At a major tech conference in 2018, a renowned speaker’s Presenter View malfunctioned. Instead of panicking, he smoothly transitioned to the standard view, using his printed notes as a backup. The audience lauded his adaptability, and his message wasn’t overshadowed by the hiccup.
H3: Not Adapting to Audience Feedback The tools in Presenter View, like slide navigation, are meant to enhance adaptability. If you sense your audience resonating more with a particular topic, don’t be afraid to dwell on it a bit longer or even revisit slides.
By sidestepping these common mistakes, you not only harness the full potential of Presenter View but also project confidence and control. Next, we’ll explore some advanced features to elevate your presentation game even further.
Mastering Presenter View basics can tremendously improve your presentation skills. But if you’re looking to elevate your game and leave a lasting impression, dive into these advanced features:
H3: Seamless Transition Between Slides The art of a great presentation lies not just in the content but also in the delivery. A choppy slide transition can disrupt the flow. PowerPoint offers a plethora of transition effects — from subtle fades to dynamic 3D effects.
- Go to the Transitions tab.
- Browse and select your preferred effect.
- Adjust the transition duration if needed.
- Click Apply To All to maintain uniformity.
H3: Use Zoom to Focus on Details Occasionally, you might want to draw attention to specific details on a slide. Instead of making your audience squint, use the in-built Zoom feature.
- Tip : Combine zoom with a laser pointer or pen tool for emphasis.
H3: Ink Annotations Annotating directly on your slides can be beneficial for interactive sessions or workshops. PowerPoint’s “Ink” feature allows you to do just that.
- Did You Know? : Ink annotations made during a presentation can be saved for future reference!
H3: Embed Multimedia for a Rich Experience Modern presentations often go beyond static slides. Consider embedding videos, audio clips, or even live web content to keep your audience engaged.
- Navigate to the Insert tab.
- Choose Video or Audio and select your file.
- Adjust playback settings under the Playback tab.
H3: Custom Slide Show Sometimes, different segments of your audience require varied content. Instead of having multiple PPT files, create a custom slideshow within the same presentation.
PowerPoint’s Presenter View is akin to a secret weapon, waiting in the wings, ready to empower speakers, educators, and presenters globally. Whether you’re a novice taking your first steps into the world of presentations or a seasoned speaker aiming to refine your skills, the Presenter View, along with the myriad features PowerPoint offers, ensures your content shines in the best light.
Remember, a successful presentation doesn’t merely rely on flashy slides or multimedia elements. It’s the seamless blend of content, delivery, and engagement. And with tools like Presenter View, you’re equipped to handle the technical aspects, allowing you to focus on what truly matters – connecting with your audience.
As Bill Gates once said:
“If you think the PowerPoint presentation is there for you as the presenter, you’re wrong. It’s there for the audience.”
So, the next time you’re gearing up for that crucial pitch, workshop, or lecture, take a moment to familiarize yourself with Presenter View. Your audience — and your confidence — will thank you for it.
Happy presenting!
Save my name, email, and website in this browser for the next time I comment.
IMAGES
VIDEO
COMMENTS
In PowerPoint you can work with presentations in five different views: Slide. Outline. Slide Sorter. Notes Page. Slide Show. Each view is optimized for a specific purpose. (In the lower left-hand corner of the images below, notice how the view icons change for each view.
To access the different view modes in PowerPoint, you have to click on the 'View' tab in the ribbon. The 2-step process is described below. Step-1: Click on the 'View' tab. At first, select the 'View' tab, which is the second to last tab in the ribbon section of your PowerPoint Window. Step-2: Select your preferred 'View Mode'.
1. PowerPoint Normal view: This is the view that your presentation opens up in as soon as you create a new presentation. The advantage of this view is that in this view, editing the slides is very easy. Adding pictures, formatting data, adding tables and graphs, etc., are some other tasks that are available in this view.
To change views, find the View button on PowerPoint's ribbon and click on it. Then, find the section on the left labeled Presentation Views. This tutorial will walk you through each of these views and how you can use them. Click on the Views tab on the PowerPoint ribbon to find the option to change presentation views.
Use Slide Sorter view to delete or rearrange your slides by dragging them to new positions. Add effects, such as transitions and sounds, to several slides at the same time in Slide Sorter view. And, add sections to organize your slides. If you are collaborating with colleagues on a presentation, assign each collaborator a section.
Presentation skills are the abilities and qualities necessary for creating and delivering a compelling presentation that effectively communicates information and ideas. They encompass what you say, how you structure it, and the materials you include to support what you say, such as slides, videos, or images. You'll make presentations at various ...
Normal View. The Normal View is the preferred presentation view in case you want to create and edit your slide. Slide Sorter View. The Slide Sorter View is ideal if you want to see the thumbnails of all your slide decks. It lets you to easily re-order them. Notes Page View. The Notes Page View is ideal if you want to view your speaker notes ...
Views for creating your presentation Normal view. You can get to Normal view from the task bar at the bottom of the slide window, or from the View tab on the ribbon.. Normal view is the editing mode where you'll work most frequently to create your slides. Below, Normal view displays slide thumbnails on the left, a large window showing the current slide, and a section below the current slide ...
Views can be accessed quickly from the bottom bar just to the left of the zoom settings. Views can also be accessed from the Presentation Views section in the View ribbon. Here is a short description of the various views and their features. Normal View. This is the default view in PowerPoint and this is primarily used to create and edit slides.
Here are a few tips for business professionals who want to move from being good speakers to great ones: be concise (the fewer words, the better); never use bullet points (photos and images paired ...
There are three key elements of good presentations: Content, Organization, Delivery. Your audience needs interesting and appropriate content in order to pay attention, especially at the start of a presentation. Logical organization helps retain your audience's attention - they need to be able to follow your train of thought and predict ...
There are three parts to your presentation. The beginning, the middle and the end. Start to plan out what you will do in these three parts. The beginning is ideal for an attention grabber or for an ice breaker. The end is great to wrap things up or to end with a grand finale. 3.
When in doubt, adhere to the principle of simplicity, and aim for a clean and uncluttered layout with plenty of white space around text and images. Think phrases and bullets, not sentences. As an ...
You might describe tax incentives for ownership, maintenance schedules and costs, and resale value. Your arguments and their support aim at increasing the audience's consideration of your position. You won't be asking for action in this presentation, but a corresponding increase of consideration may lead the customer to that point at a ...
Overall communication effectiveness. Presentation reflects thoughtful planning (content) and development (structure) and engaged delivery (style) 10 pts (Full Marks) 0 pts (No Marks) 10 pts. Presenter has a unique voice and compelling message. 10 pts (Full Marks) 0 pts (No Marks) 10 pts.
Effective presentations go beyond creating captivating and visually appealing slides. To truly win the audience's hearts, presenters must invest much of their time and energy in trying to understand them and their psychology. This entails researching the audience's backgrounds and tailoring the presentation according to their needs and requirements. This article delves into the details […]
CREATE THIS PRESENTATION. 2. Persuasive presentation. If you've ever been swayed by a passionate speaker armed with compelling arguments, you've experienced a persuasive presentation . This type of presentation is like a verbal tug-of-war, aiming to convince the audience to see things from a specific perspective.
It involves using large, bold text on a minimal number of slides using the topic keywords as the main focal point. You can also add concise phrases to the slides to make them attractive. Consider using this style to make an impromptu presentation when you don't have access to presentation design tools. 8. Connector.
Mastering the presentation opening Exploring communication mechanics Managing your audience . Who to be: Cultivating a winning style: the three pillars of authority, authenticity, and directiveness. Harnessing the power of "muscular" language. Leveraging the core tools of rhetoric
3. Reporting. You can use presentations when reporting by showing research findings and conclusions. The most important thing to remember is that you need to design your slides to highlight your most critical data. That way, your audience will walk away understanding its high points. 4. Selling.
For a 2-minute presentation, it should be quite brief - maybe one sentence. For a 16-minute team presentation, a 45-60 second grabber would be appropriate. Body. In this part of your presentation, you will deliver detailed information. Depending on the length of the presentation and your purpose, you might have two to five points in the body.
Chapter 9 Learning Objectives. After reading this chapter, the student will be able to: List and explain reasons why presentation aids are important in public speaking. Explain how presentation aids function in public speaking. Describe the various computer-based and non-computer-based types of presentation aids available to the students.
Step-by-Step Guide to Activate Presenter View: Open Your Presentation: Start by opening your PowerPoint presentation. This will be the one you intend to deliver. Navigate to the Slide Show Tab: At the top, you'll notice several tabs. Click on the one labeled 'Slide Show'. Check the 'Use Presenter View' Option:
Answer: Microsoft PowerPoint has three main views: normal view, slide sorter view, and slide show view. Normal View is the main editing view, which is used to write and design a presentation. chevron right.