

How to Crop a Picture into a Circle in PowerPoint (Crop Image to Shape)

Crop a Picture into a Circle on a PowerPoint Slide Using Crop to Shape
by Avantix Learning Team | Updated September 12, 2023
Applies to: Microsoft ® PowerPoint ® 2010, 2013, 2016, 2019, 2021 and 365 (Windows)
If you want to crop an image into a circle in PowerPoint, you will need to combine cropping options. Crop options appear on the Picture Format or Picture Tools Format tab in the Ribbon. You can use these tools to crop a picture into an oval and then crop again to change the aspect ratio so the oval changes into a circle. In PowerPoint, you can achieve some great effects by cropping images to different shapes.
To crop an image into a circle in PowerPoint (typically in Normal View), you'll need to:
- Crop the image into an oval.
- Change the cropped image into a circle by changing the aspect ratio.
- Change the size, shape or position of the cropped image as required.
Recommended article: How to Crop an Image into a Circle in PowerPoint Using Merge Shapes
Do you want to learn more about PowerPoint? Check out our virtual classroom or in-person PowerPoint courses >
Note: Buttons and Ribbon tabs may display in a different way (with or without text) depending on your version of PowerPoint, the size of your screen and your Control Panel settings. For PowerPoint 365 users, Ribbon tabs may appear with different names. For example, the Picture Tools Format tab may appear as Picture Format.
Step 1: Crop the picture into an oval
To crop a picture into an oval on a PowerPoint slide:
- Select the picture you want to crop.
- Click the Picture Format or Picture Tools Format tab in the Ribbon.
- In the Size group, click the arrow below Crop. A drop-down menu will appear.
- Choose Crop to Shape. A fly-out gallery will appear.
- Click the oval.
Below is the Crop to Shape gallery:

Step 2: Change the cropped picture into a circle by changing the aspect ratio
To change the cropped picture (currently an oval) to a circle by changing the aspect ratio:
- Ensure the picture is selected.
- Choose Aspect Ratio. A sub-menu will appear.
- Select 1:1 to crop the image into a circle (this changes the oval into a circle).
Below is the Crop menu with Aspect Ratio:

Step 3: Change the size, shape or position of the cropped picture
To change the size, shape or position of the cropped picture:
- Ensure the picture is selected on the PowerPoint slide.
- In the Size group, click Crop. Cropping and sizing handles will appear.
- Resize the cropped area by dragging the black crop handles. To ensure that the shape remains a circle, hold down Shift and drag a corner crop handle.
- Resize the picture by dragging the white circular handles. To ensure that the shape resizes proportionally, hold down Shift and drag a corner circle handle.
- Move the picture within the cropped area by dragging the image.
- Click outside the picture or click Crop again to exit crop mode.
Below is a picture that has been cropped into a circle in crop mode. Note the black crop handles and the white circular resizing handles:
You can create some really interesting effects in your PowerPoint decks when you try some of the more advanced cropping options.
This article was first published on March 28, 2019 and has been updated for clarity and content.
Subscribe to get more articles like this one
Did you find this article helpful? If you would like to receive new articles, join our email list.
More resources
How to Print a PowerPoint Presentation with Notes
How to Quickly Change Shapes on PowerPoint Slides
How to Group and Ungroup in PowerPoint (with Shortcuts)
How to Change Picture Brightness and Contrast in PowerPoint
How to Compress Images in PowerPoint to Reduce File Size (10 Strategies)
Related courses
Microsoft PowerPoint: Intermediate / Advanced
Microsoft PowerPoint: Design for Non-Designers
Microsoft PowerPoint: Accessible PowerPoint Presentations
Microsoft PowerPoint: Animations Bootcamp
VIEW MORE COURSES >
Our instructor-led courses are delivered in virtual classroom format or at our downtown Toronto location at 18 King Street East, Suite 1400, Toronto, Ontario, Canada (some in-person classroom courses may also be delivered at an alternate downtown Toronto location). Contact us at [email protected] if you'd like to arrange custom instructor-led virtual classroom or onsite training on a date that's convenient for you.
Copyright 2024 Avantix ® Learning
You may also like

10 Keyboard Shortcuts in PowerPoint's Outline View
The outline has been an integral part of Microsoft PowerPoint for many years. It is dynamically linked to slide placeholders and is organized in a hierarchical way.

How to Change the Thumbnail for a Video in PowerPoint (using the Poster Frame Tool)
If you have inserted a video on a PowerPoint slide, you can display a custom thumbnail (or Poster Frame) for the video during a slide show. The thumbnail will display when you run a PowerPoint slide show and disappears when you start the video. For most videos, the thumbnail that displays is the first frame of the video clip. You can use the Poster Frame command to display a different frame in the video clip or a picture from another source as a thumbnail. A picture thumbnail could be either an image or an icon.

How to Use the Built-in Laser Pointer in PowerPoint (with Shortcuts)
During a PowerPoint slide show, you can change your mouse into a laser pointer to focus attention on a specific area on your slide. You can show or hide the built-in laser pointer using keyboard shortcuts or by using the context menu.
MORE POWERPOINT ARTICLES >
Microsoft, the Microsoft logo, Microsoft Office and related Microsoft applications and logos are registered trademarks of Microsoft Corporation in Canada, US and other countries. All other trademarks are the property of the registered owners.
Avantix Learning |18 King Street East, Suite 1400, Toronto, Ontario, Canada M5C 1C4 | Contact us at [email protected]
Our Courses
Avantix Learning courses are offered online in virtual classroom format or as in-person classroom training. Our hands-on, instructor-led courses are available both as public scheduled courses or on demand as a custom training solution.
All Avantix Learning courses include a comprehensive course manual including tips, tricks and shortcuts as well as sample and exercise files.
VIEW COURSES >
Contact us at [email protected] for more information about any of our courses or to arrange custom training.
Privacy Overview
Pin it on pinterest.
- Print Friendly
We explain and teach technology, solve tech problems and help you make gadget buying decisions.
How to Make Images Circular in Google Slides
The beauty of a presentation lies in how well it is presented pictorially. Thankfully, Google Slides offer many native features to edit images . One of the interesting things you can do is crop an image into a circle, square, or any other shape in Google Slides, just like PowerPoint . That way each picture will get its true respect. But how to make images circular in Google Slides? Keep reading to find out.
In this post, you will learn how to make images circular in Google Slides on PC, Android, and iPhone. You can do it with the help of the Crop to Shape or Masking feature. Let’s get started.
Crop a Picture Into a Circle in Google Slides on a PC
You can make an image circular or with rounded corners by cropping it. There are two ways to crop a picture into a circle in Google Slides.
Method 1: Using Crop to Shape Directly
Step 1: Open the desired presentation in Google Slides.
Step 2: Click on Insert in the top bar and select Image from the menu. Add the picture that you want to crop into a circle from your PC or get it online.

Step 3: After adding the image, click the small down arrow next to the Crop icon in the toolbar at the top. Make sure your image is selected first before you click on that button.

Step 4: Select Shapes from the menu. The available shapes will show up. Select a Circle shape from the list.

Step 5 : Your image will be cropped into a circle or oval shape depending on the picture’s aspect ratio.

If you don’t like how the circular image looks, adjust its size by dragging it inwards using one of the tiny square boxes present on the longer sides of the image border. That way the entire image will be filled into the circle shape.

Step 6: If, however, you want to have only a part of a picture inside the circle, skip step 5, instead press anywhere outside the circular image. Then, double-click on the circular image.
Step 7: A black border will appear around the image. Drag the image inwards using the highlighted black bars to make a circular image. Press the Enter button.

Step 8 : Double-click again on the picture and move the image using your mouse to fit the desired portion inside the round area.

Step 9: Press the Enter button to have a cropped circular picture in Google Slides.
Tip : Learn how to add a border to a circle in Google Slides.

Method 2: By Changing Aspect Ratio First
Another way to crop an image into a perfect circle or round shape is by changing its aspect ratio first and then cropping it into a shape.
Step 1 : Insert the desired image in your slide in Google Slides.
Step 2 : Then, select the image and make your image square using the tiny blue boxes.

Step 3: Once you have a square-shaped image, click on the image to select it. Then, click on the down arrow next to the Crop icon in the toolbar.
Step 4: Select Shapes followed by Circle. Congratulations! You have successfully cropped an image into a circle in Google Slides.
Tip: You can also crop the picture in a square shape first and then use the circle shape to get a round picture.

Also Read : How to add links in Google Slides .
Crop an Image Into Circle in Google Slides on Android and iPhone
Follow these steps to make an image circular in Google Slides on an Android or iPhone:
Step 1: Launch the Google Slides app on your phone.
Step 2: Open the slide containing the picture that you want to make circular.
Step 3: Tap on the picture to select it. Then, press the Crop icon at the bottom followed by the Mask icon.

Step 4: Select a Circle shape from the list of shapes under the Basic tab.
Step 5: Using the black bars around the image, adjust the picture to get a circular image. Tap anywhere outside the picture to save it.

Step 6: To adjust what shows inside the circle, double-tap on the circle and move the image to keep the desired portion inside the circle. Your circular image is ready in Google Slides.

Tip: Know how to crop an image into a circle in Google Docs.
FAQs About Cropping an Image Into Circle Shape
Google Slides doesn’t offer a native way to fill a shape with an image. You can only fill it with a solid color or gradient. However, you can use a workaround to fit an image in shape .
You cannot crop multiple images in Google Slides.
Customize Google Slides
That’s it! We hope this guide helped you make images circular in Google Slides. They can come in handy to make your presentation more personalized without opting for third-party tools. Also, learn how to animate objects in them or add GIFs in Google Slides .
Was this helpful?
Last updated on 19 June, 2023
The above article may contain affiliate links which help support Guiding Tech. However, it does not affect our editorial integrity. The content remains unbiased and authentic.
Leave a Reply Cancel reply
Your email address will not be published. Required fields are marked *

The article above may contain affiliate links which help support Guiding Tech. The content remains unbiased and authentic and will never affect our editorial integrity.
DID YOU KNOW

Mehvish Mushtaq is a computer engineer by degree. Her love for Android and gadgets made her develop the first Android app for Kashmir. Known as Dial Kashmir, she won the prestigious Nari Shakti award from the President of India for the same. She has been writing about technology for 6+ years and her favorite verticals include how-to guides, explainers, tips and tricks for Android, iOS/iPadOS, social media, and web apps. You can also find her posts on MakeTechEasier, TechWiser, and NerdsChalk.
More in Internet and Social

14 Best Discord Tips and Tricks: The Ultimate Guide

How to Clear Twitter Cache from Android, iOS, or Web
Join the newsletter.
Get Guiding Tech articles delivered to your inbox.
4 Ways to Crop a Picture into a Circle in PowerPoint

Adding circular images to your PowerPoint presentations can help make them more visually appealing. Cropped images draw the viewer’s eye and add a polished, professional look.
In this article, we’ll walk through four easy methods to crop pictures into circles in PowerPoint. By the end, you’ll have the skills to customize your presentation images with circular frames.
Method 1: Use the Crop Tool
The fastest way to crop an image into a circle in PowerPoint is by using the native crop tool. Here are the steps:
- Insert the image you want to crop onto a PowerPoint slide.
- Select the image and go to the Picture Format tab.
- Click Crop and choose Crop to Shape .
- Select the oval shape under the crop area.
- Click and drag the circular crop area to frame the part of the image you want to keep.
- Adjust the size as needed, then click the Crop button above the image.
The oval crop feature allows precise control to highlight the most important visual elements in your picture. And best of all, it only takes a few clicks.
Method 2: Insert Circular Picture Placeholders
Instead of cropping images after insertion, you can add circular picture placeholders to your slides first:
- Navigate to the Insert tab in the PowerPoint toolbar.
- Click Picture and select Picture Placeholder .
- Choose one of the circular picture frames from the placeholder options.
- With the placeholder inserted, head to the Insert tab again.
- Select Pictures and choose the image from your computer to fill the circular frame.
Following this process, your images will automatically conform to the circular placeholders without needing to crop manually. It’s a quick way to ensure all your pictures share the same consistent shape.
Method 3: Use the Oval Shape Tool
If you want boundless control over the exact size and layering of circular images, the oval shape tool is an excellent option:
- Insert your chosen graphic onto a PowerPoint slide.
- Select the oval shape tool from the Insert tab.
- Draw an oval shape that overlaps the image where you want the circular crop.
- Right click the oval and choose Send to Back to layer it behind the image.
- With the oval selected, go to Shape Format and change the shape fill to no fill.
- Then change the shape outline to no outline.
The oval will now function as a virtual circular photo cropper you can resize and layer however you like. Use this method when you need to crop multiple images to custom dimensions.
Method 4: Combine Shapes
The final technique uses PowerPoint’s shape combine feature. Here’s how to do it:
- Insert your image onto a slide.
- Add a circle shape from the Insert tab overlapping the part of the graphic you want to isolate.
- Make sure the circle is in front of the image in the layer order.
- With the circle selected, go to Shape Format and select Merge Shapes .
- Choose Subtract from the menu.
- Delete the leftover image fragments outside the circular shape.
This leaves you with a cleanly cropped graphic fitted precisely into the circular frame. Use shape combining when you want to trim images to irregular dimensions beyond standard shapes.
Achieve Visually Stunning Presentations with Circular Images
Adding circular cropped images makes presentations look clean and professional at a glance. With PowerPoint’s built-in tools, it’s simple to highlight the most vital visuals from your pictures.
The methods above provide options for every use case, whether you need speed, consistency across slides, precision control, or customizability.
About The Author
Vegaslide staff, related posts.

8 Tips to Make the Best PowerPoint Presentations

PowerPoint 2016: Reviewing Presentations

How to Create a Custom Show in Microsoft PowerPoint

How to Outline Text in PowerPoint

How To Make A Picture A Circle In Google Slides

Visual elements play a crucial role in enhancing presentations, capturing attention, and conveying information effectively. One artistic technique that can significantly elevate the impact of your presentations is the use of circular images. By incorporating circular pictures, you can infuse your slides with a touch of elegance, creativity, and harmony.
Whether you want to highlight specific details, create stunning visual effects, or simply break away from the traditional square or rectangular shape, mastering the art of making a picture a circle in Google Slides is a valuable skill to acquire.
In this blog post, we will walk you through a step-by-step guide on how to transform your images into captivating circles within the Google Slides platform.
Cropping a Picture into a Circle in Google Slides
Cropping a picture into a circle in Google Slides involves a few easy-to-follow steps that will significantly enhance your presentation. Here’s a step-by-step guide to help you achieve this transformation with ease:
1. Begin by inserting the desired image into your slide. You can do this by clicking on “ Insert ” in the toolbar, followed by “ Image “, and selecting the source of your image.

2. Once the image is added, resize your image to the correct size. Now click “Mask Image’ > ‘Shape’ > ‘Circle’.

3. Now, adjust the circular mask by dragging the handles to resize and reposition the circle, ensuring the desired portion of your image is visible.

6. You can also further customize the appearance of your image by adding borders, adjusting the color, etc.

By following these simple instructions, you can easily convert any picture into a circle in Google Slides, adding a touch of style and personalization to your presentation.
Creating circle-shaped images in Google Slides is an effective way to add visual interest and style to your presentation. By following a step-by-step guide to crop your picture into a circle and making use of additional customizations such as borders, you can transform ordinary images into engaging visuals. So, go ahead and try this out on your next presentation!
Related Posts:

How To Make a Picture a Circle in Google Slides [Easy Guide]
- Last updated July 3, 2023
Tired of the usual rectangular or square-shaped images in your presentations? Why not learn how to make a picture a circle in Google Slides instead?
To crop an image into a circle, simply select the image you wish to work with and click the “ mask image ” icon (in a downward arrow) next to the “ crop ” icon. Choose the oval shape from the drop-down menu, adjust it, and press “ Enter .”

Table of Contents
Easy Ways to Make a Picture a Circle in Google S lides
Making a “circle crop image” can add a visually appealing touch to your presentation and enhance its overall design. Here’s how to do it:
- Open your Google Slides presentation and navigate to the slide where you want to insert the picture.
- Select “Insert” > “Image” from the drop-down menu.
- Choose an image source from your computer, the web, your Google Drive, or your Google Photos account.

- Once inserted, click on the file. You should see a blue border around the image, indicating it’s selected.

- Select “Format” > “Image” > “Crop Image” from the drop-down menu. You can also click the “ Crop ” icon on the top toolbar.

- Alternatively, just double-click on the photo to display the cropping grips.
- Crop the image to a 1:1 ratio by adjusting the grips on the sides.

- Click outside the image to save your crop changes.
- Click the drop-down arrow (i.e., the “Mask image” option) beside the crop icon in the toolbar.
- From the “ Shapes ” menu, select the oval shape. When you click on it, your image will instantly transform into a perfect circle.

- Once you’re satisfied with the positioning, press “ Enter” to finalize the circular crop.

That’s it! You’ve successfully cropped an image into a circle. Repeat these steps for any other images you want to reshape in your presentation.
How To Download a Cropped Image in Google Slides
Now that you know how to make an image circular in Google Slides, it’s time to discuss saving cropped images for future use. Unfortunately, Google Slides doesn’t offer a direct way to download images — you have to take an alternative approach.
There are three easy ways to download cropped images in Google Slides. Choose the one that suits your needs and preferred workflow.
Related : How To Download an Image From Google Docs (3 Easy Ways)
Method 1: Downloading Individual Slides as an Image
Google Slides allows you to download the current slide in order to view your presentation offline. You can download it as either a JPEG or PNG file. This will download whatever content is available on that slide, including the image.
Here’s how you can download the current slide:
- Click on the “ File ” menu.
- In the submenu, click on “ Download .”
- You can choose to download the current slide as a JPEG or PNG file.

Tips to Keep in Mind
- Download your image as a JPEG file if you intend to use it on the web. JPEG files are lighter but also loss. This means they may gradually degrade in quality if you frequently modify or edit them.
- PNG files are lossless and support transparency, making them ideal for frequent modification (e.g., creating a logo). However, PNG files are larger in size and require more storage space.
Method 2: Save to Keep
Google Keep is a versatile note-keeping tool (similar to Microsoft OneNote) that also offers a mobile version. You can add images, create handwritten notes, and make to-do lists. In Google Slides, this feature is directly accessed by right-clicking on an image.
Note: This method is applicable only to normal and cropped images. It will not work for the circle crop image.
To save an image in Google Keep and download it to your computer:
- Select your image and right-click on it.
- Scroll down the context menu until you find “ Save to Keep .”

- The Google Keep panel will appear on the right side (as shown in the screenshot below).
- Right-click on the image within the Google Keep panel and choose “ Save Image as .”

- Save the image to your preferred location on your computer (e.g., desktop) and click “ Save .” This will save the image as a PNG file.

Method 3: Take a Screenshot

What you see above is a screenshot of a screenshot, also known as a “screenshot caption”!
A screenshot is the simplest way to save an image on your computer. To start, simply follow the steps below:
- Crop the image to the desired shape or size within Google Slides.
- For Windows, you can use the “ Print Screen ” button or press Win + Shift + S to capture a specific area.
- On Mac, use Command + Shift + 4 .
- Open an image editing software or any program that allows image insertion (e.g., Microsoft Paint, Microsoft Word, email compose window).
- Paste the screenshot into the program.
- Crop or adjust the image if needed.
- Save the image using the image editing software’s “ Save ” or “ Export ” function.
To ensure the best quality and compatibility, we recommend selecting either JPEG or PNG formats. Refer to the screenshot below for reference:

Final Thought s
Knowing how to make a picture a circle in Google Slides is just one way to make your presentation more remarkable. The next time you step up to present, unleash your creative skills and deliver the most memorable presentation your audience has ever witnessed.
Looking for spreadsheet templates to kickstart your work? Our premium templates are 50% OFF with the code “SSP.”
Get Premium Templates
- How to Convert Google Slides to PowerPoint: 3 Easy Methods
- Learn How to Draw on Google Slides in 2 Minutes (Too Easy)
- How To Use Google Slides Speaker Notes [Easy Guide]
- How To Group in Google Slides [Step-by-Step Guide]
- How To Save an Image from Google Slides [4 Easy Ways]
- How To Insert Google Slides Icons [4 Simple Methods]
Most Popular Posts

How To Highlight Duplicates in Google Sheets

How to Make Multiple Selection in Drop-down Lists in Google Sheets

Google Sheets Currency Conversion: The Easy Method
A 2024 guide to google sheets date picker, related posts.
How to Import Stock Prices into Google Sheets
- April 2, 2024
How to Calculate Age in Google Sheets (2 Easy Methods)
- Sumit Bansal
- February 21, 2024
How to Hide Gridlines in Google Sheets
- February 14, 2024
Google Sheets Drop Down Lists: Complete Guide
Thanks for visiting! We’re happy to answer your spreadsheet questions. We specialize in formulas for Google Sheets, our own spreadsheet templates, and time-saving Excel tips.
Note that we’re supported by our audience. When you purchase through links on our site, we may earn commission at no extra cost to you.
Like what we do? Share this article!
We’re sorry, but Freepik doesn’t work properly without JavaScript enabled. FAQ Contact
- Notifications
- Go back Remove
- No notifications to show yet You’ll see useful information here soon. Stay tuned!
- Downloads 0/60 What is this?
- My collections
- My subscription
Find out what’s new on Freepik and get notified about the latest content updates and feature releases.
- Presentation
Circle Presentation Images

- Add to collection
- Save to Pinterest
- process diagram

- goals infographic
- statistics infographic
- infographic graphics

- circle graphic
- round chart
- circle chart

- development process

- company infographic
- abstract infographic
- technology infographic

- infographic numbers
- infographic presentation
- business graphic

- infographic shapes
- gradient infographic

- 2 infographic

- 3 infographic

- circle process

- circle layout

- circular diagram
- infographic template

- circle infographic

- growth infographic
- infographic bar chart
- graph bar chart

- circle template
- blue banner

- line graphic

- circle sticker
- white label

- infographic steps
- infographic banner

- infographic set
- infographic elements
- text box template

- information chart

- circular economy
- ecology infographic
- illustrations

- infographic buttons
- round infographic

- brochure template
- project presentation
- magazine catalogue
- five elements
- five infographic

- presentation elements

- two infographic

- dark template
- dark banner

- flag design

- infographic percentage
- business diagram
- circle diagram

- 4 infographic

- logo infographic

- four elements

- marketing infographic
- infographic graph

- swot analysis
- infographic swot

- process steps

Genuine software, legally FREE - no cracking required!
Edit Word, Excel, and PPT effortlessly
Read, edit, and convert PDFs with the powerful PDF toolkit.
Microsoft-like interface, easy to use.
Windows • MacOS • Linux • iOS • Android

- Articles of Office solution
How to Make a Picture a Circle in Powerpoint(A Detailed Guide)
In a world where visuals matter, mastering the art of circular image cropping in PowerPoint can make your presentations stand out. Whether you're a beginner or a seasoned pro, this guide will equip you with the knowledge and skills to create eye-catching circular images effortlessly. We'll explore various methods and even introduce you to the versatile WPS Office for additional editing options.
Part 1: How to Crop a Picture into a Circle in PowerPoint (3 Easy Methods)
Method 1: using crop to shape.
Step 1 : Begin by opening the PowerPoint presentation that contains the image you wish to convert.
Step 2 : Double-click on the image, and the Picture Format tab will appear at the top.
Step 3 : In the Picture Format tab, click on the Crop button located at the right end of the ribbon.
Step 4 : Select "Crop to Shape." A menu will appear with a variety of shapes to choose from; opt for a circle or oval.
Step 5 : In case your original image doesn't crop into a perfect circle due to aspect ratio, don't fret. Click on the small arrow under the Crop icon, then choose "Aspect Ratio" and select "1:1."
Step 6 : Move the desired portion of the image into the circle, and you can adjust the circle's size by dragging it using the black angle bars at its corners.
Step 7 : After you're satisfied, click anywhere outside the image, and your picture will be transformed into a circular shape within PowerPoint.
Tip : If the above method doesn't produce the desired result, consider adjusting the picture's aspect ratio before using the "Crop to Shape" option to fit it into a circle.
This method is great for precision, but remember to double-check the aspect ratio for a perfect circle.
Method 2: Using The Circle Shape
Alternatively, you can start with a circle shape and insert an image into it. Here's how:
Step 1 : In your PowerPoint presentation, click on the "Insert" option in the top menu.
Step 2 : Select "Shapes" and choose a circle shape from the list.
Step 3 : Use your mouse to draw a circle on the slide.
Step 4 : Right-click on the newly created shape and choose "Fill."
Step 5 : Opt for "Picture" from the menu.
Step 6 : Select the image you want to convert into a round shape.
That's it! Your image will automatically be transformed into the circular shape you've created. If the cropped picture has an unwanted outline, right-click on it, choose "Outline," and select "No Outline."
This method is straightforward and offers more control over the circular shape's initial size, making it a quick and efficient way to crop images into circles.
Part2: How to Convert Multiple Pictures to a Circle Using Picture Layout
Step 1 : In your PowerPoint presentation, click on one of the images to select it.
Step 2 : Press and hold the Ctrl button and select other pictures by clicking on them.
Step 3 : After selecting the desired pictures, click on the Picture Layout option in the
Picture Format menu at the top.
Step 4 : Select the circular shape layout from the list.
Step 5 : Your selected pictures will be turned into a circle shape. If you try to move these circular images, you might notice that you cannot move them out of a certain range.
Tip : To fix that, double-click on the circular picture that you want to move and click on "Convert" in the SmartArt Design toolbar and select "Convert to shape." This will allow you to move the circular image freely within your presentation.
Part 3:How to Adjust a Cropped Image in PowerPoint
When you've cropped an image and need to make further adjustments, follow these simple steps:
Step 1 : Select the cropped picture.
Step 2 : Navigate to the Picture Format tab.
Step 3 : Select the Crop tool.
Step 4 : To move the picture around within the frame, either click and drag or readjust the black handlebars on the photo.

Step 5 : To exit cropping mode, either select the Crop command again or hit the "Esc" key.

Part4: How to Edit PowerPoint Presentations for Free with WPS Office?
Why choose wps office.

WPS Office is a free office suite with a word processor, spreadsheet, presentation software, and a PDF editor. It's compatible with Windows, Mac, Linux, Android, and iOS. WPS Office is an excellent solution for schools, organizations, and people in need of a sophisticated and reasonably priced office suite.
Here are some of the benefits of using WPS Office:
Free Download: WPS Office is available for free, ensuring accessibility to all users.
Compatibility: It seamlessly works with PowerPoint files, guaranteeing compatibility and hassle-free editing.
Delicate Template Store: WPS Office has a wide range of free and premium templates for presentations, documents, and spreadsheets. You can use these templates to create professional-looking documents quickly and easily.
Other Relevant Features: WPS Office also includes a number of other features, such as cloud storage, collaboration tools, and AI-powered features.
How to Crop a Picture to a Circle in WPS Presentation?
Step 1 : Begin by selecting the photo you want to crop. Head over to the Picture Tools tab.

Step 2 : Click the Crop drop-down button, offering you a choice of 8 shape categories under the Crop by Shape option.

Step 3 : Opt for Oval from the drop-down menu. In the Crop Panel situated on the right of the image, you can adjust its shape and scale.

Step 4 : To finalize the process, click the Crop button or anywhere on the slide.

Congratulations! You've successfully cropped the photo into a perfect circle. Furthermore, you can use the same steps to crop your image into different shapes as per your requirements
Use Word, Excel, and PPT for FREE, No Ads.
Edit PDF files with the powerful PDF toolkit.
Microsoft-like interface. Easy to learn. 100% Compatibility.
Boost your productivity with WPS's abundant free Word, Excel, PPT, and CV templates.
Can I change the size of the circle after cropping?
Absolutely! Once you've cropped your image into a circle, simply click on it and drag the corner handles to resize the circle as needed. This allows you to have complete control over the circle's dimensions.
Can I add a border or outline to the circular picture?
Yes, you can enhance your circular image further. Select the circular picture, navigate to the "Format" tab in PowerPoint, and use the "Shape Outline" option. This feature enables you to add a border in your preferred color and adjust its thickness for that extra touch of customization.
Can I adjust the transparency of the circular picture?
Certainly! If you want to fine-tune the transparency of your circular image, select it, go to the "Format" tab, and use the "Transparency" slider. This handy tool allows you to control the picture's opacity, making it more or less transparent to suit your specific needs.
In this comprehensive guide, we've unveiled the art of cropping pictures into perfect circles in PowerPoint using three easy methods. Whether you're a novice or a seasoned presenter, you now possess the knowledge to transform your visuals into captivating circular shapes.
Our focus on the versatile WPS Office as a powerful and cost-effective tool for editing PowerPoint presentations sets this guide apart. While enabling circular cropping, WPS Office offers a wide array of features that elevate your presentation game. With free access, compatibility, and a rich template store, it's a must-have for all PowerPoint enthusiasts.
- 1. How to Fade a Picture in PowerPoint (Step-By-Step Guide)
- 2. How to remove background from picture in powerpoint(In Easy Steps)
- 3. How to Crop a Picture in PowerPoint: A Step-by-Step Guide
- 4. How to Export PowerPoint Slide as a Picture [Step-by-Step Guideline]
- 5. How to Make a Picture and Background on PowerPoint (Step-by-Step)
- 6. How to Make a Picture Transparent in PowerPoint (Step-by-Step Guide)

15 years of office industry experience, tech lover and copywriter. Follow me for product reviews, comparisons, and recommendations for new apps and software.
- Images home
- Editorial home
- Editorial video
- Premium collections
- Entertainment
- Premium images
- AI generated images
- Curated collections
- Animals/Wildlife
- Backgrounds/Textures
- Beauty/Fashion
- Buildings/Landmarks
- Business/Finance
- Celebrities
- Food and Drink
- Healthcare/Medical
- Illustrations/Clip-Art
- Miscellaneous
- Parks/Outdoor
- Signs/Symbols
- Sports/Recreation
- Transportation
- All categories
- Shutterstock Select
- Shutterstock Elements
- Health Care
Browse Content
- Sound effects
PremiumBeat
- PixelSquid 3D objects
- Templates Home
- Instagram all
- Highlight covers
- Facebook all
- Carousel ads
- Cover photos
- Event covers
- Youtube all
- Channel Art
- Etsy big banner
- Etsy mini banner
- Etsy shop icon
- Pinterest all
- Pinterest pins
- Twitter All
- Twitter Banner
- Infographics
- Zoom backgrounds
- Announcements
- Certificates
- Gift Certificates
- Real Estate Flyer
- Travel Brochures
- Anniversary
- Baby Shower
- Mother's Day
- Thanksgiving
- All Invitations
- Party invitations
- Wedding invitations
- Book Covers
- About Creative Flow
- Start a design
AI image generator
- Photo editor
- Background remover
- Collage maker
- Resize image
- Color palettes
Color palette generator
- Image converter
- Creative AI
- Design tips
- Custom plans
- Request quote
- Shutterstock Studios
- Data licensing
0 Credits Available
You currently have 0 credits
See all plans

Image plans
With access to 400M+ photos, vectors, illustrations, and more. Includes AI generated images!

Video plans
A library of 28 million high quality video clips. Choose between packs and subscription.

Music plans
Download tracks one at a time, or get a subscription with unlimited downloads.
Editorial plans
Instant access to over 50 million images and videos for news, sports, and entertainment.
Includes templates, design tools, AI-powered recommendations, and much more.
Search by image
Circle Presentation royalty-free images
1,153,283 circle presentation stock photos, vectors, and illustrations are available royalty-free for download..

Our company
Press/Media
Investor relations
Shutterstock Blog
Popular searches
Stock Photos and Videos
Stock photos
Stock videos
Stock vectors
Editorial images
Featured photo collections
Sell your content
Affiliate/Reseller
International reseller
Live assignments
Rights and clearance
Website Terms of Use
Terms of Service
Privacy policy
Modern Slavery Statement
Cookie Preferences
Shutterstock.AI
AI style types
Shutterstock mobile app
Android app
© 2003-2024 Shutterstock, Inc.
How to Crop an Image to a Perfect Circle in PowerPoint
If you're looking to crop a picture in PowerPoint in the shape you want, these tips will help you do so with a few clicks.
The picture on the introductory slide of your presentation makes an excellent first impression. However, it shouldn't take up so much space as to block the entire slide. So, the best way to crop an image is to only show the face.
Using PowerPoint, you can crop an image perfectly without using any third-party tools or apps. With this article, you'll learn how to this quickly using PowerPoint and how to make it more engaging by adding borders.
Adding an Image to PowerPoint
- Open PowerPoint.
- Go to Insert > Pictures .
- Select the image you want to crop.
- Open it in PowerPoint.
When you insert an image, it will be in its original size and shape. Therefore, there is no need to preprocess the original image before adding it to PowerPoint.
Cropping the Image Manually
When you try to crop the image manually, you can only crop it horizontally and vertically. The edges, however, will be straight. As a result, you may not get a circular crop.
Cropping the Image in Circular Shape
In PowerPoint, selecting the image will automatically bring you to the format ribbon. PowerPoint automatically sets this preference. If it does not, ensure you're in the format ribbon and open the picture tools settings.
If you click crop directly, it will take you to the manual crop mode, where you can only crop by straight edges. So you should instead click on the arrow button to bring up the dropdown.
Here's how to create a perfect circle out of this oval shape:
- Click on the Crop icon from the format menu.
- Select crop by shape. (You can crop an image using hundreds of shapes here).
- Again, click on the crop option dropdown .
- Click on the aspect ratio to see it.
- Choose 1:1 from the available options.
The oval shape will be reduced to a perfect circle as shown below.
Simply drag the image to perfectly fit the cropped circle so the face is inside the circle.
In addition to moving images, you can also stretch or expand the cropped circle from its corners. By doing this, you can further reduce the cropped area.
However, resizing will disrupt the circular shape of the cropped image. You can make it a perfect circle by again setting the aspect ratio to 1:1.
Thus, go to crop dropdown and set the aspect ratio to be 1:1.
After making the desired change, click anywhere else on the slide to execute the changes.
Related: How to Crop a Video on Android
How to Add Borders to a Cropped Image
You can also add borders around the image to make it more attractive. Let's see how you can accomplish this.
- Click on the image.
- Select the format tab .
- Click on picture styles .
You will find a few picture effects that you can use to design your image here. To see the complete list of effects you can add to an image, click the dropdown arrow .
When you hover over these shapes, you'll see how the design of your selected image will change.
Choose compose frame (Black) from the list of available picture styles.
Above, you can see that the added border isn't circular as you would like. By following the same steps explained earlier, you can make this square-shaped border into a perfect circle.
- Select the image.
- Select the crop option from the dropdown.
- Choose an oval shape from the crop shapes menu.
- The aspect ratio should be set to 1:1 .
How to Change Color of a Picture Border in PowerPoint
It is possible to change the border color in PowerPoint without changing the original image's color palette. Here's how you can do it.
- Choose the image with a border.
- Go to the Format tab .
- Select your desired color from the picture border dropdown .
Related: How to Crop an Image in Adobe Illustrator
Crop Your Images Into a Circular Shape
Using the crop feature in PowerPoint, you can take a perfect circular crop from your image to use on the introduction slide. To make an image more attractive, you can also add a border and change its color.
Try this feature out while making your next presentation and see how it affects the look of your presentation slide.

Crop a picture to fit in a shape

You can crop an image to a shape or start with a shape and add an image to it.
Crop an image to a shape
You can easily change the shape of a picture by cropping it to a specific shape. When you do this, the picture is automatically trimmed to fill the geometry of the selected shape while maintaining its proportions.
Tip: If you want to crop the same picture to more than one shape, make copies of the picture then crop each to the desired shape individually.

Use Insert > Picture to add the image to a Microsoft 365 file (such as a Word document, PowerPoint presentation, or an Outlook email message).
Select the picture(s). You can multi-select and crop multiple pictures at once, but you must crop them all to the same shape.
Caution: Multi-cropping in Word can be difficult, because you cannot multi-select pictures that have the default In Line with Text layout option.
In the ribbon, go to Picture Tools > Format. Then, in the Size group, select the arrow under Crop to open the menu of options.

Select Crop to Shape , then select the intended crop shape.
The shape is immediately applied to the image.
To change how much of the picture fits within the shape, use either Crop > Fill or Crop > Fit.
Fill Fills the entire shape with the picture. Some outer edges of the picture may be cropped away. There won't be any empty space at the margins of the shape.
Fit Makes the entire picture fit within the shape while maintaining the picture's original aspect ratio. There may be some empty space at the margins of the shape.
When you select either of these options, black crop handles appear on the edges and corners of the picture.
To adjust the position of the picture within the frame, selecting the picture and drag it as needed. If needed, this can help you center the most important part of the picture within the shape.
To crop the margins of the image, drag a black crop handle as follows:
When done, click the Crop button.
Start with a shape and add an image to it
You can add a picture as fill for a shape and then optionally edit or crop the shape.
Add a picture to a shape
Add a shape to your document (see Add shapes for instructions)
Click/select the shape.
In the ribbon, go to Drawing Tools > Format . In the Shape Styles group, select Shape Fill > Picture .

Select the type of picture you want (e.g., From a File or Online Pictures ).
Navigate to the picture you want and insert it.
Resize the shape
To change the filled shape's dimensions while maintaining its basic format, select it and drag any of the sizing handles.
Choose how the picture fits in the shape
Perhaps your picture is skewed, cut off, or doesn't fill the shape the way you want. You fine-tune the picture with the Fit and Fill tools on the Crop menu.
Click a shape created using Shape Fill > Picture .
Click Picture Tools > Format , and in the Size group, click the arrow under Crop . A menu appears showing cropping options.
Choose Fit if you want as much of the picture as possible to fit within the shape; the original picture aspect ratio will be maintained, but you may have empty space inside your shape.
Choose Fill to have the shape fit within the bounds of the picture, cropping away everything outside the shape. You can drag the picture to change what part of it shows within the shape.
If you want, you can adjust the crop area by using the cropping handles, as described under Crop a picture .
When you're finished, press Esc or click anywhere outside the picture within the document.
Use edit points to edit or crop the shape
Although cropping tools are not available for shapes, you can use the Edit Points tool to customize a shape.
Select the shape that you want to edit.
Drag the shape's vertex points (which appear as black dots around the shape's perimeter) until the shape looks the way you want.
To delete a vertex point, hold Ctrl and click it. To add a vertex point, hold Ctrl while clicking anywhere on the shape's perimeter that does not already have a vertex point.
Crop a picture in Microsoft 365
Cut out or cover part of a picture
You can crop to a shape in Word, PowerPoint, or Excel.
Crop to a specific shape
Quickly change the shape of a picture by cropping it to a specific shape. The picture is automatically trimmed to fill the geometry of the selected shape while maintaining its proportions.
If you want to crop the same picture to more than one shape, make copies of the picture and crop each to the desired shape individually.
Use Insert > Picture to add the image to an Office file (such as a Word document, PowerPoint presentation, or an Excel workbook).
In your file, select the picture that you want to crop.
On the Picture Format tab, click the arrow next to Crop .

(If you don't see the Picture Format tab, make sure that you've selected a picture (not a shape).)
Point to Crop to Shape and then click the shape you want to crop to.

The shape is immediately applied to the image.
If you want to adjust the shape, click the Crop button again on the ribbon.
Black crop handles appear on the edges and corners of the picture.

Crop the image by dragging any crop handle inward. If you drag one of the corner handles, it crops two adjacent sides at the same time.
Crop to fit or fill a shape
After you have added a picture to a shape, you can choose how the picture fits in the shape by using the Fit and Fill tools for fine tuning.
In your file, select the picture that you want within the shape.
If you don't see the Picture Format tab, make sure that you've selected a picture (and not a shape).
Click Fill or Fit , and then click outside the picture.
Which app are you using? Word | PowerPoint
Word: Fit a picture inside a shape
Word for the web doesn't have the "crop-to-shape" feature that the desktop app has. However, you can still use quick Picture Styles to apply some basic shapes to a picture.
Insert the image in your document. (Select Insert > Picture , then navigate to the picture you want to use.)
With the image selected on the canvas, select the Picture tab on the ribbon, then go to the Picture Styles gallery.

Select a shape to apply it to your picture.
Once the shape is applied, you can resize it as needed.
PowerPoint: Crop a picture to a shape
Select a picture on a slide to crop to a shape.
On the Picture tab, on the right end, select the arrow next to Crop .

Tip: If you don't see the Picture tab, make sure you have selected a picture.
Select Crop to Shape , then choose a shape to apply to the border of the picture.

To save your changes, select the Crop button again, or press Esc .

Need more help?
Want more options.
Explore subscription benefits, browse training courses, learn how to secure your device, and more.

Microsoft 365 subscription benefits

Microsoft 365 training

Microsoft security

Accessibility center
Communities help you ask and answer questions, give feedback, and hear from experts with rich knowledge.

Ask the Microsoft Community

Microsoft Tech Community

Windows Insiders
Microsoft 365 Insiders
Was this information helpful?
Thank you for your feedback.
Got any suggestions?
We want to hear from you! Send us a message and help improve Slidesgo
Top searches
Trending searches

12 templates

68 templates

el salvador
32 templates

41 templates

48 templates

33 templates
Parts of a Circle
Parts of a circle presentation, free google slides theme and powerpoint template.
In geometry, the circle is special. It has no sides, and is composed of various parts. You'll learn all about it with our presentation, available for Google Slides and PowerPoint, filled with actual content by teachers and ready to be used as is. Choose the language that you need from the ones we offer and watch your students familiarize themselves with things like "diameter", "radius" and "circumference".
Features of this template
- Designed for Middle School and High School
- 100% editable and easy to modify
- 8 different slides to impress your audience
- Contains easy-to-edit graphics such as graphs, maps, tables, timelines and mockups
- Includes 500+ icons and Flaticon’s extension for customizing your slides
- Designed to be used in Google Slides and Microsoft PowerPoint
- 16:9 widescreen format suitable for all types of screens
- Includes information about fonts, colors, and credits of the resources used
- Available in different languages
How can I use the template?
Am I free to use the templates?
How to attribute?
Attribution required If you are a free user, you must attribute Slidesgo by keeping the slide where the credits appear. How to attribute?
Available in, related posts on our blog.

How to Add, Duplicate, Move, Delete or Hide Slides in Google Slides

How to Change Layouts in PowerPoint

How to Change the Slide Size in Google Slides
Related presentations.

Premium template
Unlock this template and gain unlimited access

Register for free and start editing online
How to Change a Picture to a Circle in PowerPoint

PowerPoint presentations are an effective way to convey ideas and create engaging slideshows. One technique to enhance the visual impact of your presentation is to incorporate circular images. In this article, we will provide a step-by-step guide to changing a picture to a circle in PowerPoint, discuss the benefits of using circular images, and explore different techniques to crop and customize your images.
Table of Contents
Step-by-Step Guide to Changing a Picture to a Circle in PowerPoint
Follow these simple steps to change a picture to a circle in PowerPoint:
- Select the image you want to change.
- Click on the ‘Format’ tab in the menu bar.
- Select the ‘Crop’ option in the ‘Size’ group.
- Click on the ‘Crop Shape’ option in the drop-down menu.
- Select the ‘Oval’ shape (as PowerPoint does not have a circle shape, the oval shape can be used to create a circle by ensuring the height and width are equal).
- Your picture will now be cropped into a circle shape.
It’s important to note that when you crop a picture into a circle shape, you may lose some important details or parts of the image. To avoid this, make sure to select an image that has a clear focal point in the center, or adjust the crop area to include all necessary elements.
Additionally, you can customize the circle shape by adjusting the size and position of the crop area. Simply click and drag the edges of the crop area to resize it, or click and drag the center of the crop area to reposition it within the image.
Understanding the Benefits of Using Circular Images in PowerPoint Presentations
Using circular images in your PowerPoint presentation can help add visual interest and variety to your slides. Circular shapes can be used to create a sense of movement and flow, and can also be used to draw the viewer’s eye to a specific part of the slide. Additionally, circular images can be a great way to add a modern and minimalist touch to your presentation and make your slides stand out.
Another benefit of using circular images in your PowerPoint presentation is that they can help to break up the monotony of rectangular shapes commonly used in presentations. Circular images can add a unique and creative touch to your slides, making them more memorable and engaging for your audience.
Furthermore, circular images can be used to represent concepts such as unity, harmony, and completeness. For example, a circular image of a group of people holding hands can represent teamwork and collaboration. This can help to reinforce your message and make it more impactful for your audience.
A Beginner’s Guide to Using PowerPoint’s Crop Tool for Circular Images
PowerPoint’s crop tool can be used to create circular images with ease. To use the crop tool, select your image and click on the ‘Format’ tab in the menu bar. From there, select the ‘Crop’ option and then select the ‘Crop Shape’ option from the drop-down menu. You can then choose the ‘Oval’ shape and adjust the height and width to be the same to create a circular image. This process is simple to execute, even for beginners.
However, it’s important to note that the crop tool can only be used on images that are inserted into PowerPoint as pictures. If you copy and paste an image from another source, the crop tool may not work properly. Additionally, if you want to adjust the size or position of the circular image, you can do so by clicking and dragging the edges of the image or by using the ‘Size’ and ‘Position’ options in the ‘Format’ tab.
Another useful feature of the crop tool is the ability to crop an image to a specific aspect ratio. This can be helpful if you want to create a circular image that is a specific size or if you want to crop an image to fit a specific slide layout. To do this, select the ‘Aspect Ratio’ option from the ‘Crop’ drop-down menu and choose the desired ratio. You can then adjust the size and position of the image as needed.
How to Crop an Image into a Circle Shape with the ‘Shape Fill’ Option in PowerPoint
To crop an image into a circle shape using the ‘Shape Fill’ option, follow these steps:
- Insert a shape by going to the ‘Insert’ tab and selecting ‘Shapes’, then choose the ‘Oval’ shape.
- Draw the shape on your slide, and adjust it to make sure it has equal height and width to form a perfect circle.
- With the shape selected, go to the ‘Format’ tab and click on ‘Shape Fill’.
- Choose ‘Picture’ from the drop-down menu and select the image you want to fill the shape with.
- The image will fill the circle shape, and you can adjust its position within the shape by selecting ‘Format Shape’ and then ‘Picture’ to access additional options such as ‘Offset X’ and ‘Offset Y’.
This method allows you to place an image within a circular frame without cropping the edges of the image, which can be useful when you want to maintain the original image’s integrity.
Top Tips to Save Time and Effort When Changing Pictures to Circles in PowerPoint
If you frequently use circular images in your PowerPoint presentations, there are some time-saving tips that can help streamline the process. One tip is to create a reusable ‘circle’ shape. To do this, draw a circle using the ‘Oval’ shape tool, adjust it to your preferred size, and save it as a new image. You can then use this image as a template for future circular images. Another tip is to use the ‘Format Painter’ tool to quickly apply circular cropping to multiple images. Once you have a circular image, click on the ‘Format Painter’ tool and then click on the other images you want to crop. This will apply the circular cropping to all selected images.
Additionally, you can also use the ‘Picture Tools’ in PowerPoint to crop images into circles. Simply select the image you want to crop, click on the ‘Picture Tools’ tab, and then click on the ‘Crop’ button. From there, select the ‘Crop to Shape’ option and choose the oval shape, making sure to adjust the height and width to be equal. This will crop the image into a circle without the need for manual adjustments. This method can save time and effort, especially when working with multiple images.
Creative Ways to Use Circular Images in Your PowerPoint Slides
Circular images can be used in a variety of creative ways in your PowerPoint slides. For example, you can place circular images in clusters to create a dynamic and engaging background. You can also use circular images to float over text or other images to create a layered effect. Additionally, you can use circular images to create a timeline or a circular process diagram.
Another creative way to use circular images in your PowerPoint slides is to use them as bullet points. Instead of using traditional bullet points, you can use circular images that are relevant to your presentation topic. This will not only make your presentation more visually appealing but also help your audience better understand the content. Additionally, you can use circular images to create a circular flowchart or a circular organizational chart to represent complex information in a more simplified and easy-to-understand way.
How to Customize the Size and Position of Circle Images in PowerPoint
If you want to customize the size and position of your circle images in PowerPoint, you can do so easily. First, select the image you want to customize and click on the ‘Format’ tab. From there, select the ‘Size’ option and choose the desired size for your image. You can also use the ‘Position’ option to adjust the position of your image on the slide.
Additionally, you can also add effects to your circle images in PowerPoint. To do this, select the image and click on the ‘Format’ tab. From there, select the ‘Picture Effects’ option and choose the effect you want to apply to your image. You can choose from a variety of effects such as shadows, reflections, and bevels to make your circle images stand out on your slide.
Troubleshooting Common Issues When Changing Pictures to Circles in PowerPoint
One common issue when changing pictures to circles in PowerPoint is that the resulting circle may not be perfectly round. This can occur when the original image is not a perfect square. To resolve this issue, make sure that your original image is a perfect square before cropping to a circle. Another common issue is that the cropped image may not be centered. To address this, use the ‘Position’ option to adjust the position of the cropped image.
Another issue that may arise when changing pictures to circles in PowerPoint is that the image quality may be reduced. This can happen if the original image is low resolution or if it is enlarged too much. To avoid this, use high-resolution images and avoid enlarging them beyond their original size.
Additionally, when using the ‘Crop to Shape’ option in PowerPoint, the original image may be distorted or stretched. To prevent this, use the ‘Crop’ option instead and manually adjust the edges to create a circle shape. This will ensure that the image remains in its original proportions and does not become distorted.
Advanced Techniques for Adding Effects and Borders to Circular Images in PowerPoint
If you want to take your circular images to the next level, you can experiment with adding effects and borders. To add an effect, select your circle image and click on the ‘Format’ tab. From there, select the ‘Picture Effects’ option and choose the desired effect. You can also add a border to your circle image by selecting the ‘Picture Border’ option and choosing the desired border style and width.
These are just a few of the many techniques you can use to change a picture to a circle in PowerPoint. Whether you’re a beginner or an advanced user, incorporating circular images into your PowerPoint presentations can help add variety and visual interest, and make your slides stand out.
Another technique you can use to enhance your circular images is to add a shadow effect. This can create a sense of depth and make your image appear more three-dimensional. To add a shadow effect, select your circle image and click on the ‘Format’ tab. From there, select the ‘Picture Effects’ option and choose the ‘Shadow’ effect. You can adjust the distance, blur, and angle of the shadow to achieve the desired effect.
By humans, for humans - Best rated articles:
Excel report templates: build better reports faster, top 9 power bi dashboard examples, excel waterfall charts: how to create one that doesn't suck, beyond ai - discover our handpicked bi resources.
Explore Zebra BI's expert-selected resources combining technology and insight for practical, in-depth BI strategies.

We’ve been experimenting with AI-generated content, and sometimes it gets carried away. Give us a feedback and help us learn and improve! 🤍
Note: This is an experimental AI-generated article. Your help is welcome. Share your feedback with us and help us improve.

How to Circle Something in PowerPoint? [Step-by-Step Guide!]
By: Author Shrot Katewa
![How to Circle Something in PowerPoint? [Step-by-Step Guide!]](https://artofpresentations.com/wp-content/uploads/2023/03/Featured-Image.jpg "circle image for presentation")
Circling something in PowerPoint is a useful tool to emphasize or highlight important content in a presentation. By using a circle shape or drawing a circle around an item, you can draw attention to it and help your audience better understand your message.
To circle something in PowerPoint, go to the “Illustrations” group of the “Insert” tab. Select the “oval” shape in the “Shapes” option and draw it over the required item. Then, click on “Shape Outline” to outline the shape and “Shape Fill” to select the “No Fill” option in the “Shape Format” menu.
This article will let you learn step-by-step how to circle something in PowerPoint, making it easier for you to create engaging and impactful presentations. Let’s get started!
1. How to Insert a Circle in PowerPoint?
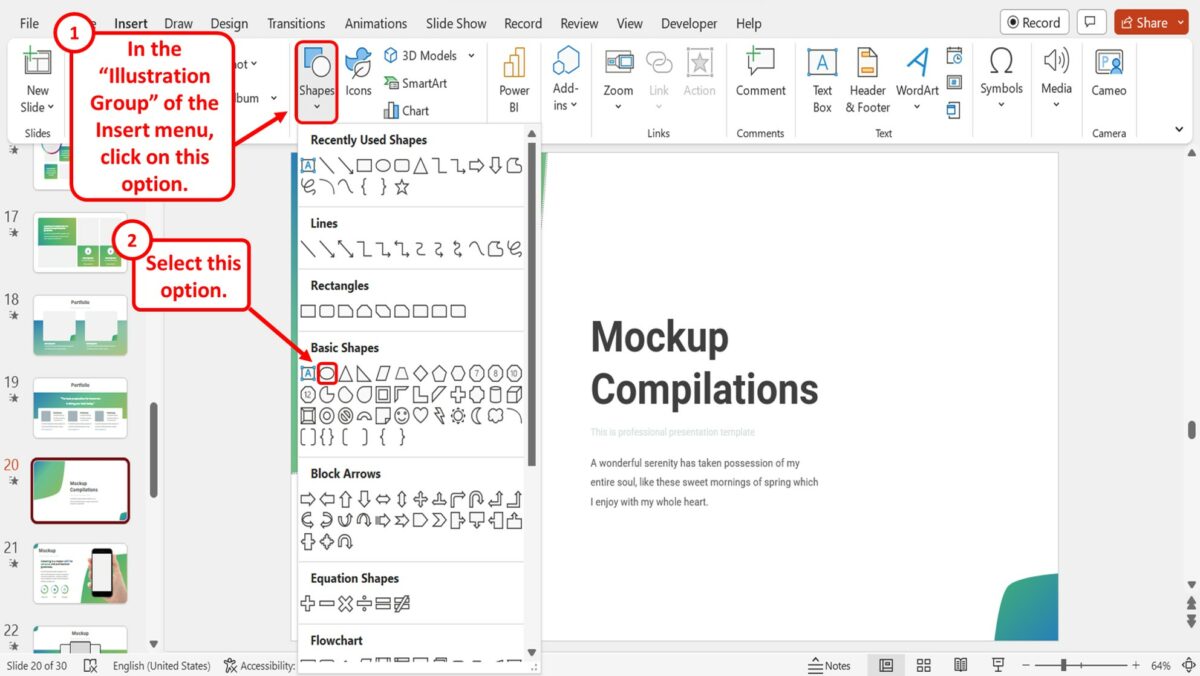
In Microsoft PowerPoint, the “Shapes” feature allows you to insert any shape including a circle into your presentation slide. To insert a circle into the presentation slide, follow the 3 simple steps.
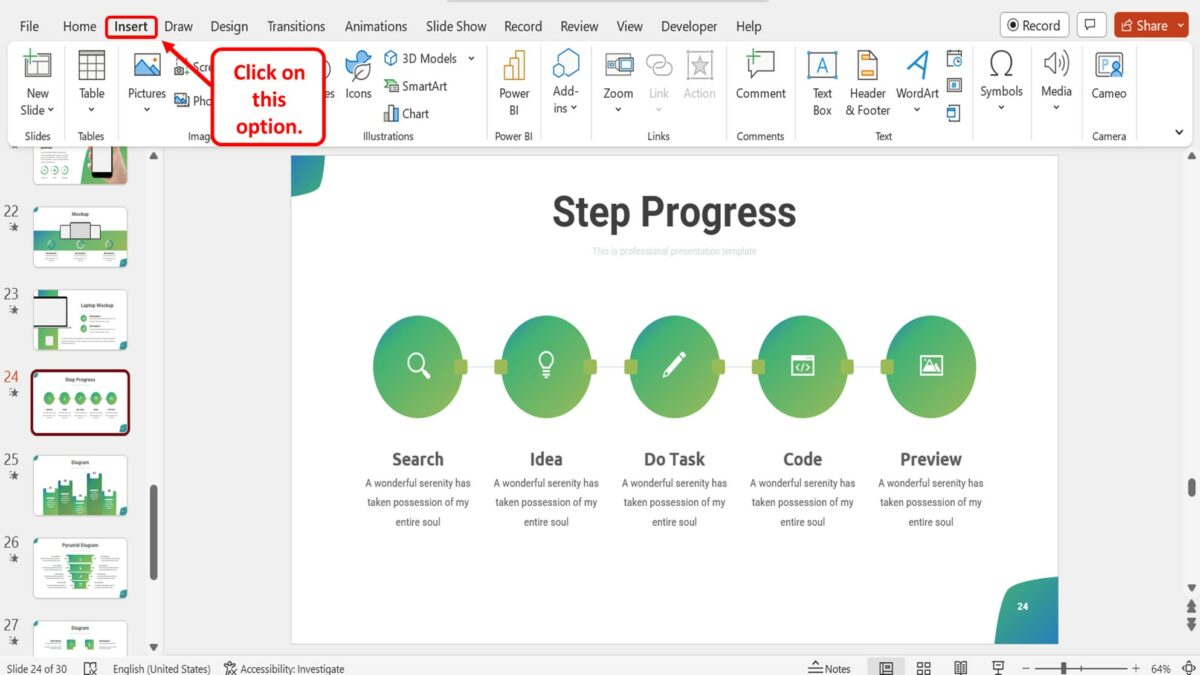
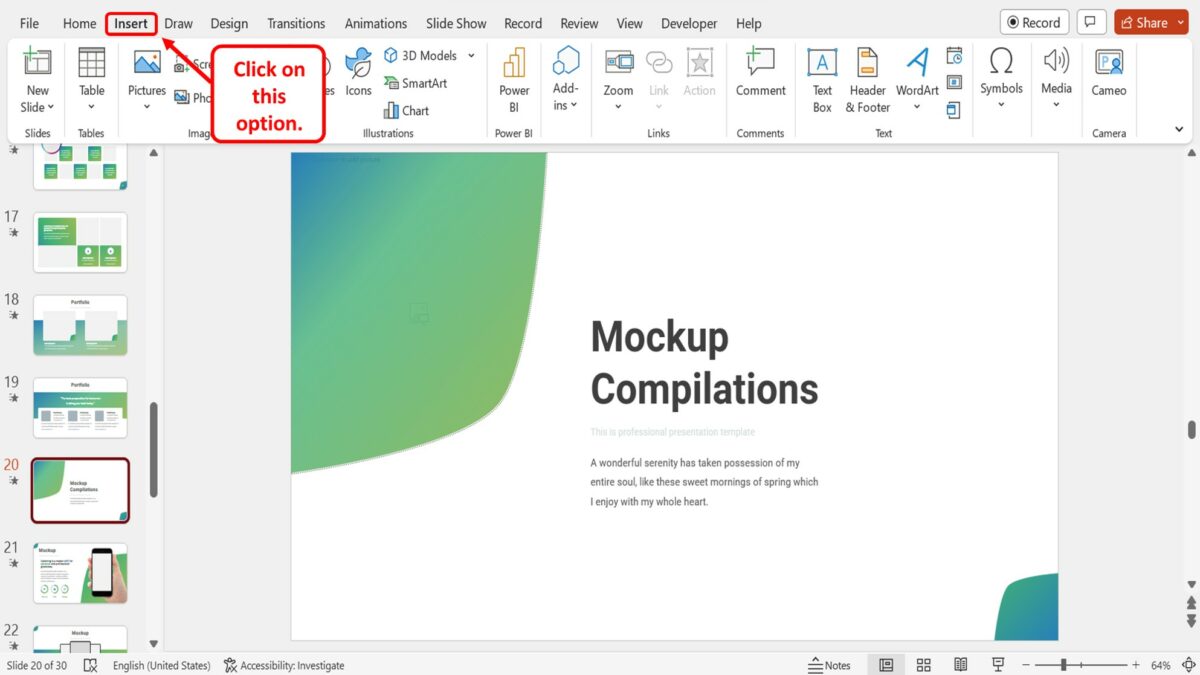
Step-1: Click on the “Insert” tab
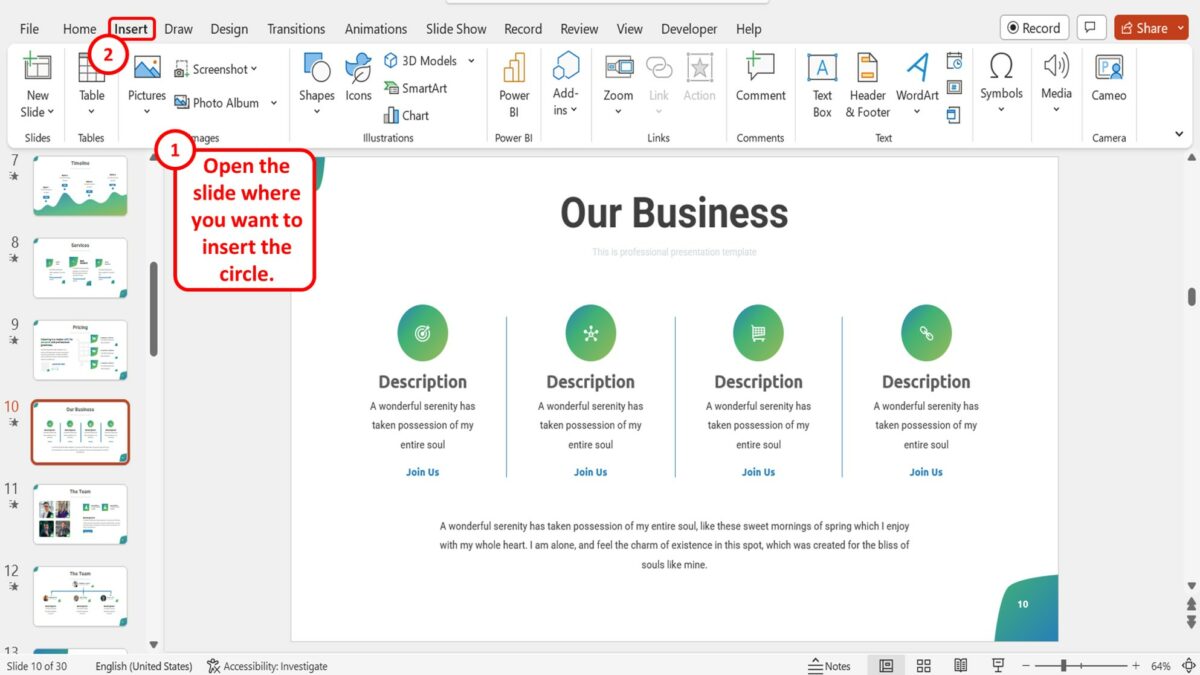
In the presentation file, open the slide where you want to insert the circle. Then click on the “Insert” tab in the menu ribbon located at the top of the screen.
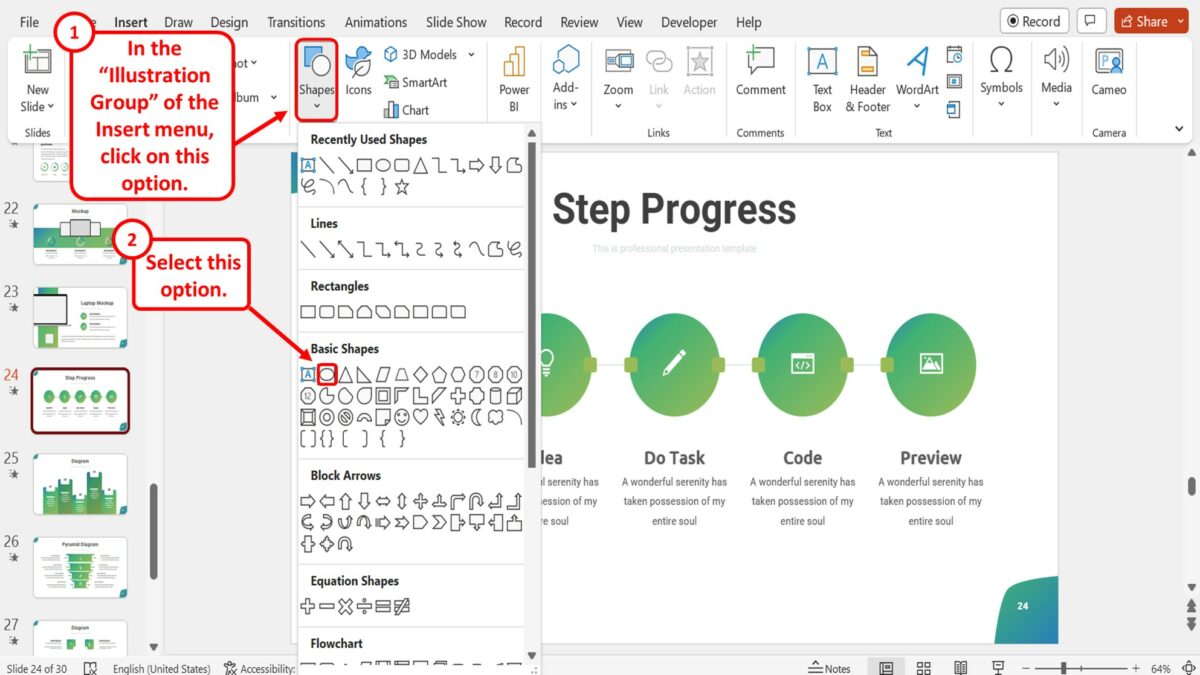
Step-2: Click on the “Shapes” option
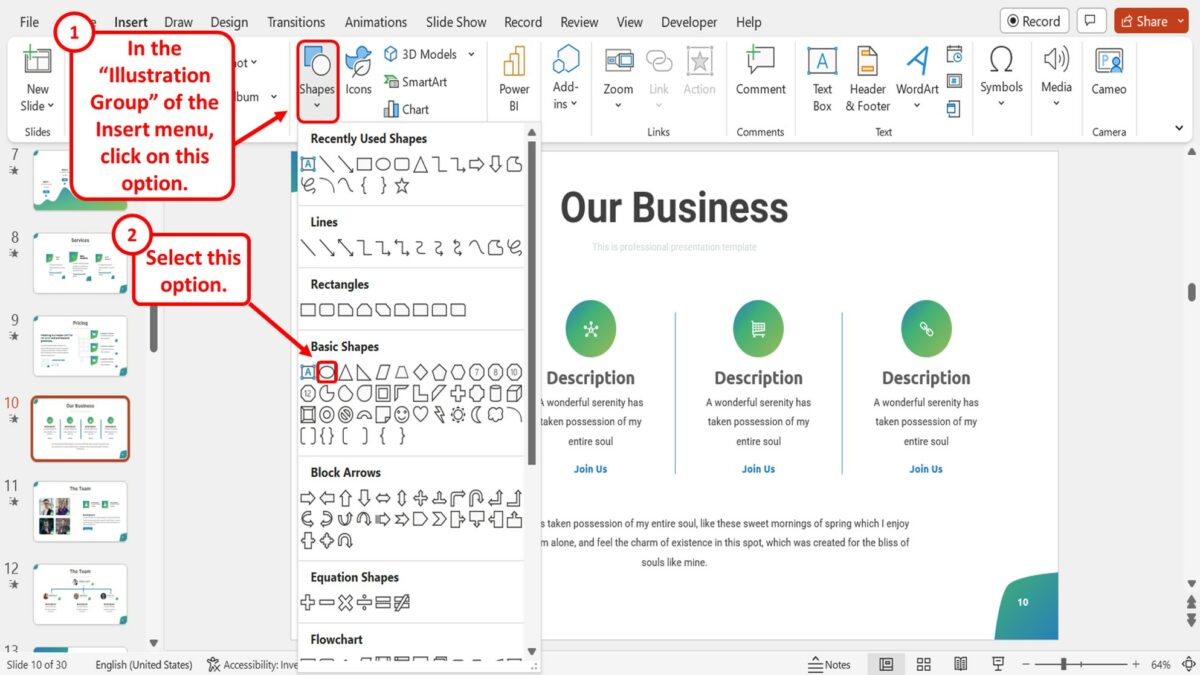
In the “Illustrations” group of the “Insert” menu, click on the “Shapes” option. Then click on the “Oval” option in the “Basic Shapes” section of the dropdown menu under the “Shapes” option.
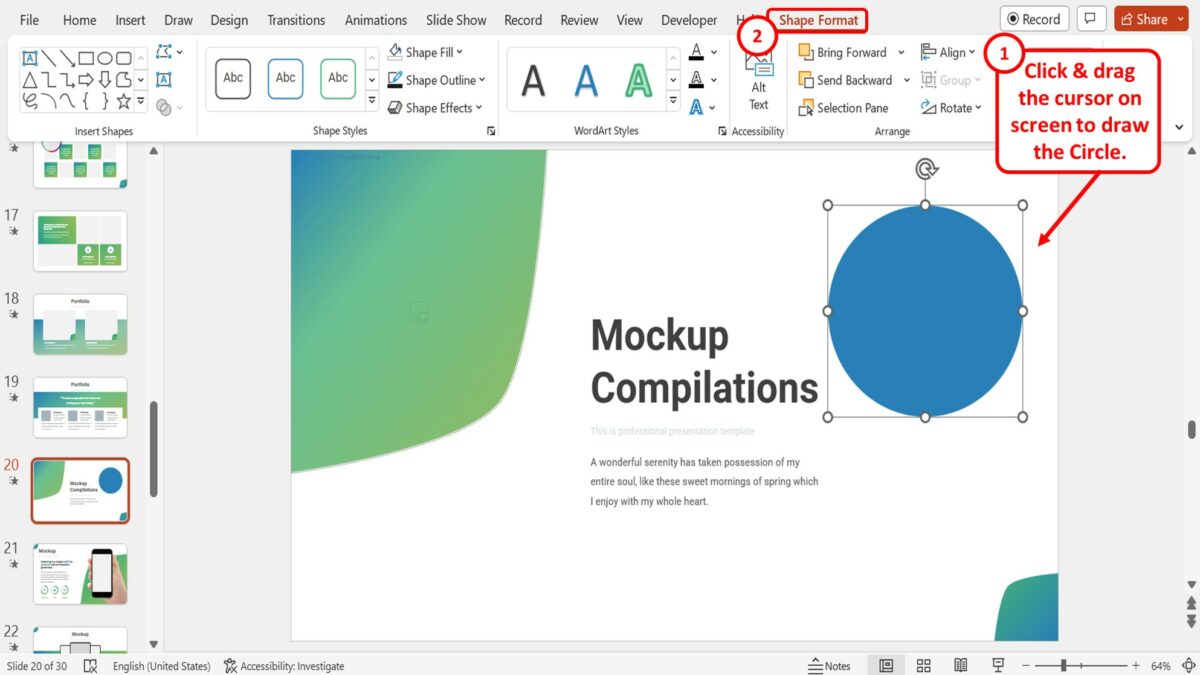
Step-3: Draw the circle
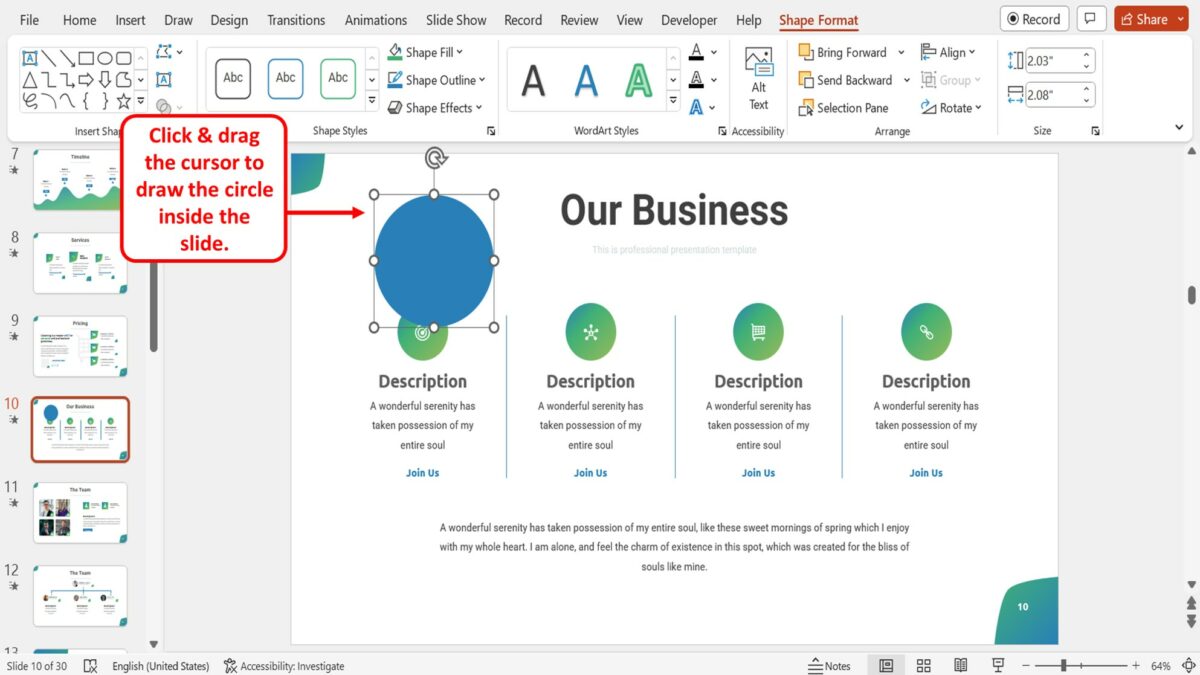
Now all you have to do is click and drag the cursor on the open slide to draw the circle inside the slide.
2. How to Draw a Circle in PowerPoint?
Using the “Draw” feature in Microsoft PowerPoint, you can draw a freeform circle. To do so, follow the 4 easy steps.
Step-1: Click on the “Draw” tab
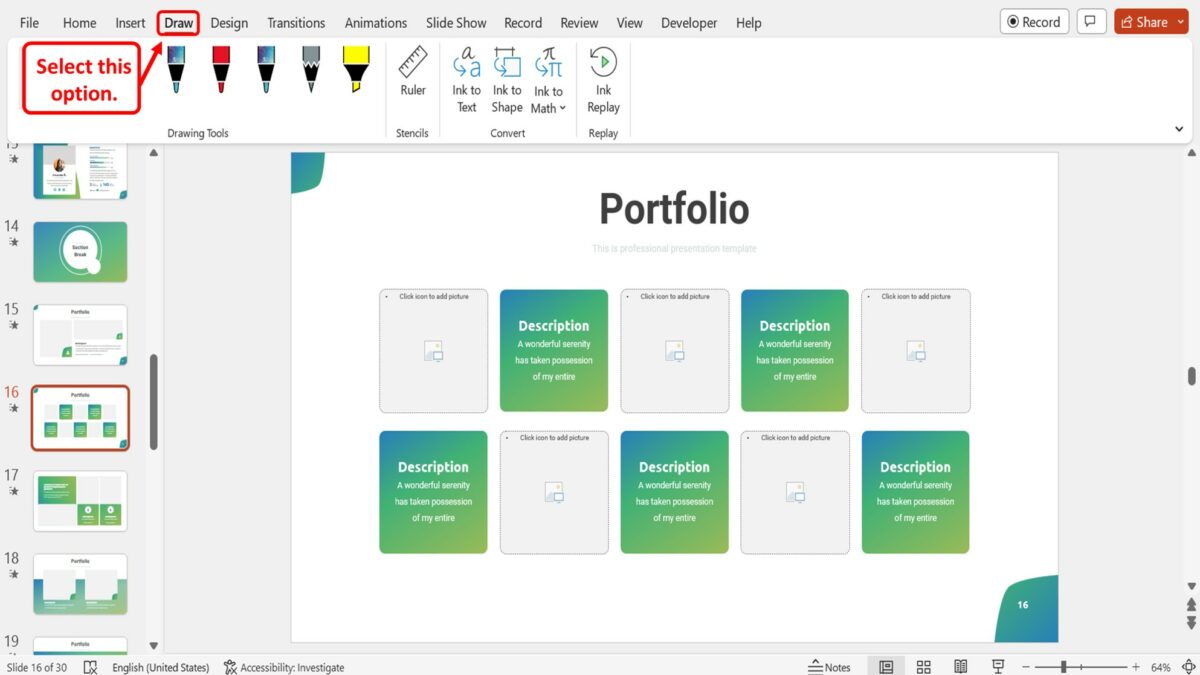
In the menu ribbon located at the top of the screen, you have to first click on the “Draw” tab to open the “Draw” menu.
Step-2: Draw the circle
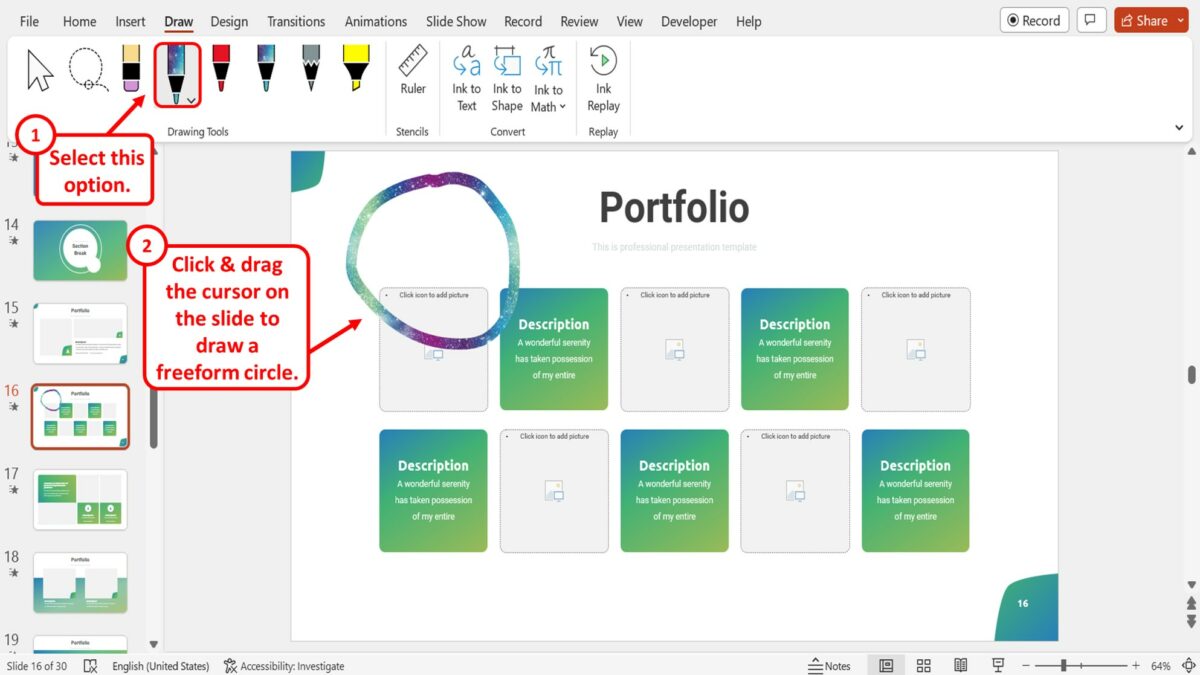
In the “Drawing Tools” group of the “Draw” menu, click on the “Pen” option. Then all you have to do is click and drag the cursor on the slide to draw a freeform circle.
Step-3: Click on the “Select” option
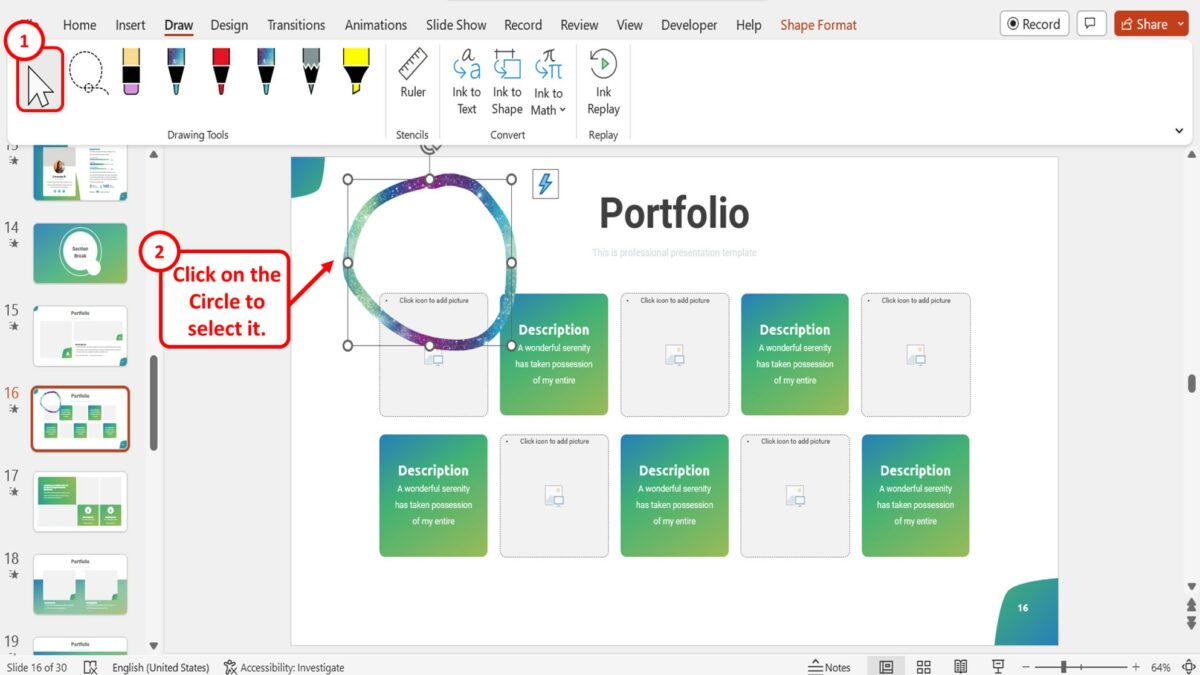
If you want to convert the freeform circle to a proper circle, you can do so by using the “Convert” feature. Click on the “Select” option in the “Drawing Tools” group of the “Draw” menu. Then click on the circle on the slide to select it.
Step-4: Click on the “Ink to Shape” option

The final step is to click on the “Ink to Shape” option in the “Convert” group of the “Draw” menu to convert the freeform circle into a proper circle shape.
2.1 How to Draw a Circle with Annotation Tools in PowerPoint?
During a presentation, you can use the “Annotation Tools” in Microsoft PowerPoint “Slide Show” view to draw a circle around a text or object to highlight it. All you have to do is follow the 3 easy steps.
Step-1: Click on the “Slide Show” tab
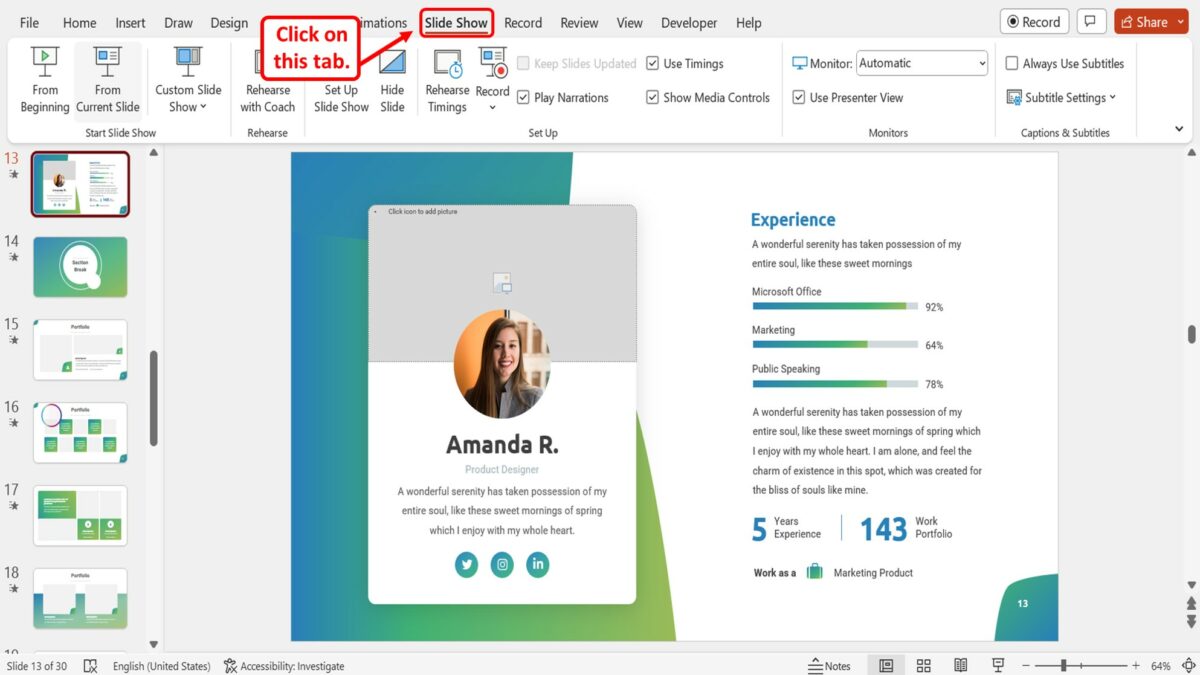
The first step is to open the “Slide Show” view. To do so, click on the “Slide Show” tab in the menu ribbon.
Step-2: Click on the “From Current Slide” option
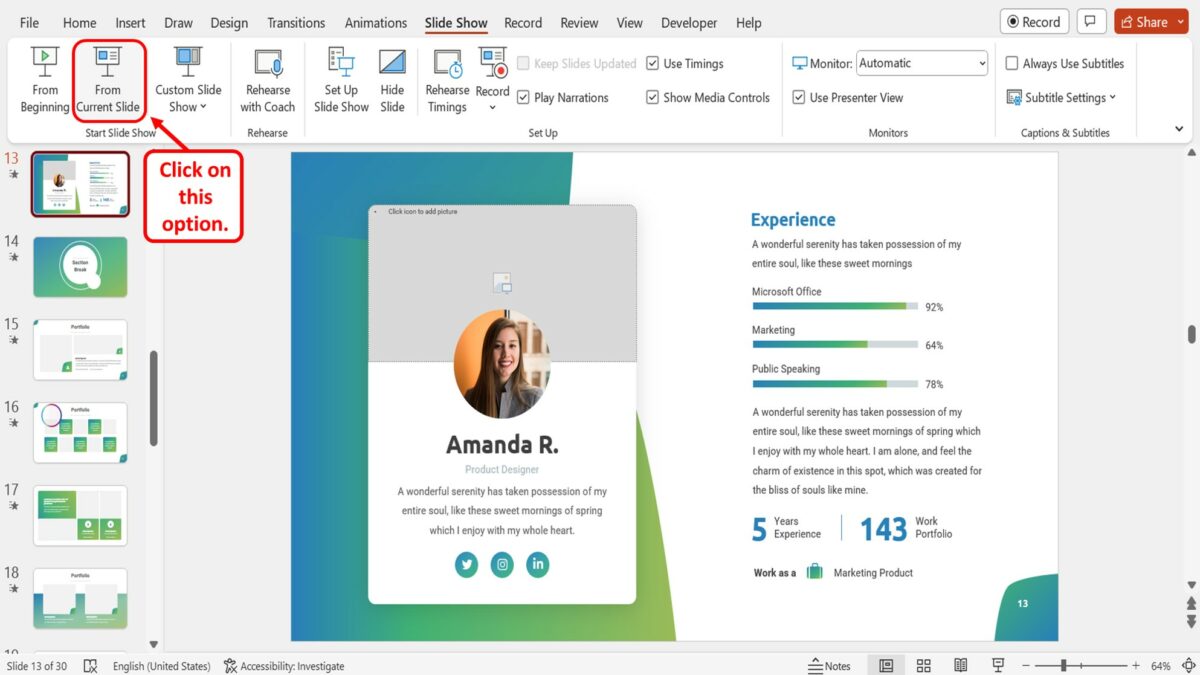
Click on the “From Current Slide” option in the “Start Slide Show” group of the “Slide Show” menu. You can alternatively press the “Shift+F5” keys on your keyboard to start the presentation.
Step-3: Click on the “Pen” option
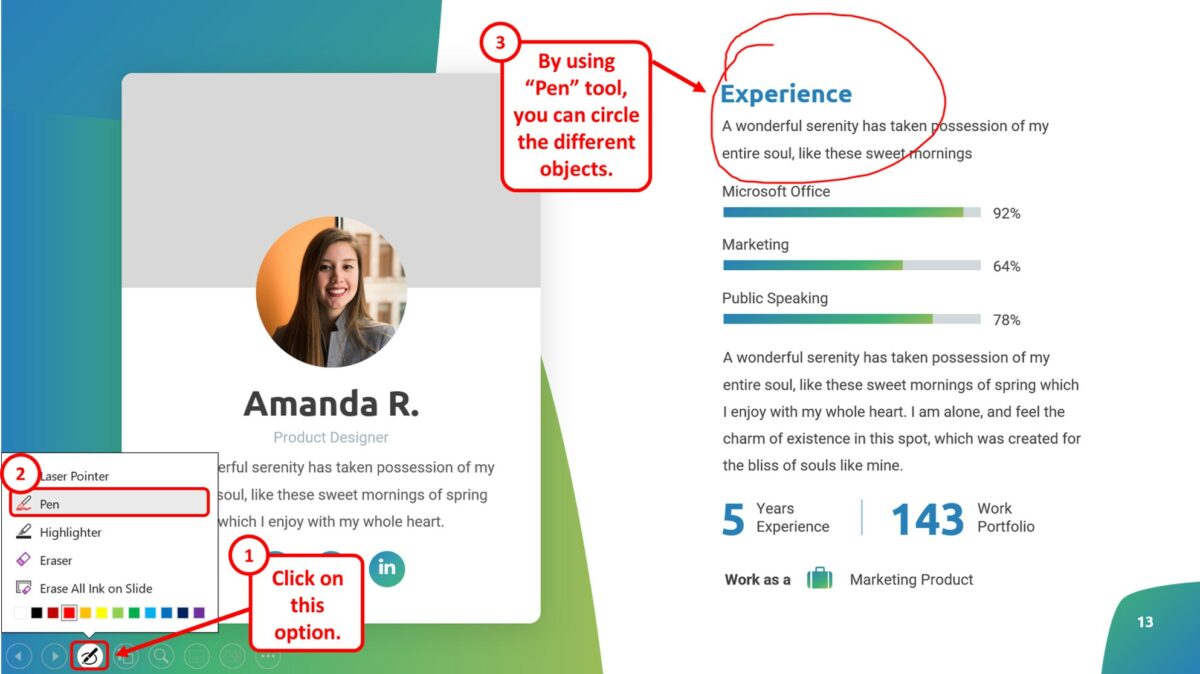
In the “Slide Show” view, click on the “Annotations” toolbar at the bottom of the screen. Then click on the “Pen” option from the pop-up menu. You can now use the “Pen” tool to circle different objects on the slide during the presentation.
3. How to Circle an Item in PowerPoint?
To circle an item in Microsoft PowerPoint, you have to use the “Shapes” feature available in the “Insert” menu. All you have to do is follow the 5 simple steps.
The first step is to open the “Insert” menu. Click on the “Insert” tab in the menu ribbon located at the top of the screen.
In the “Illustrations” group of the “Insert” menu, click on the “Shapes” option. In the “Basic Shapes” section of the dropdown menu under the “Shapes” option, click on the “Oval” option.
Step-3: Click on the “Shape Format” tab
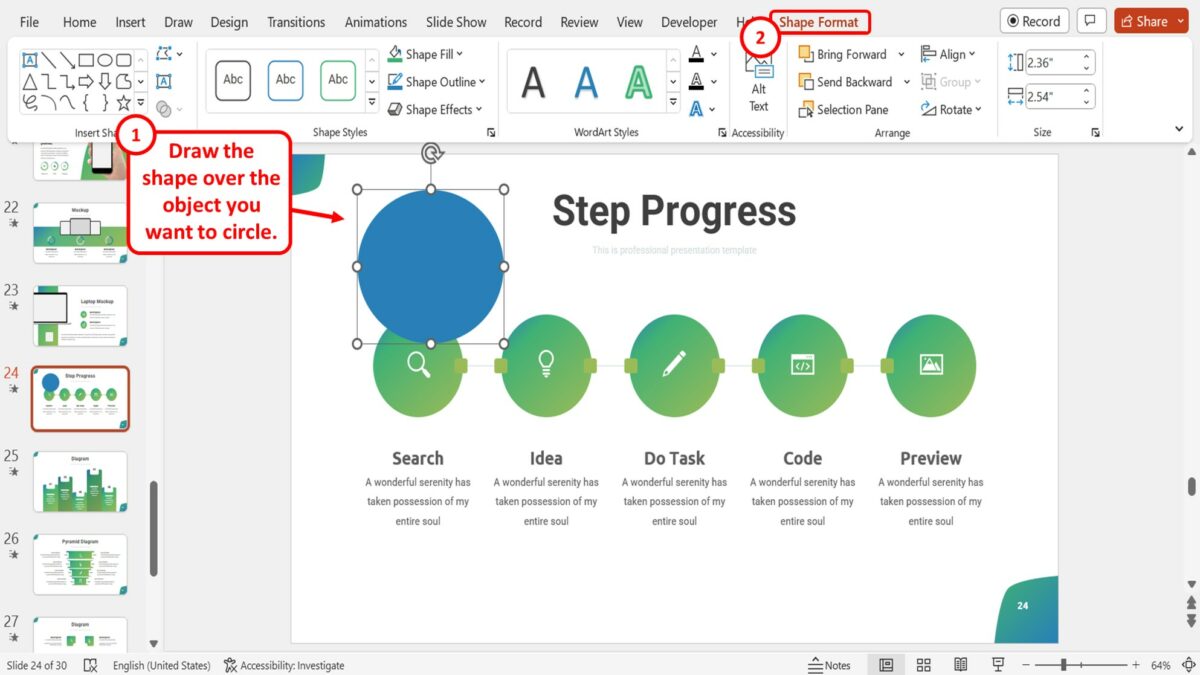
The next step is to draw the shape over the object that you want to circle on the slide. Then click on the “Shape Format” tab which is the last option in the menu ribbon at the top of the screen.
Step-4: Click on the “Shape Outline” option
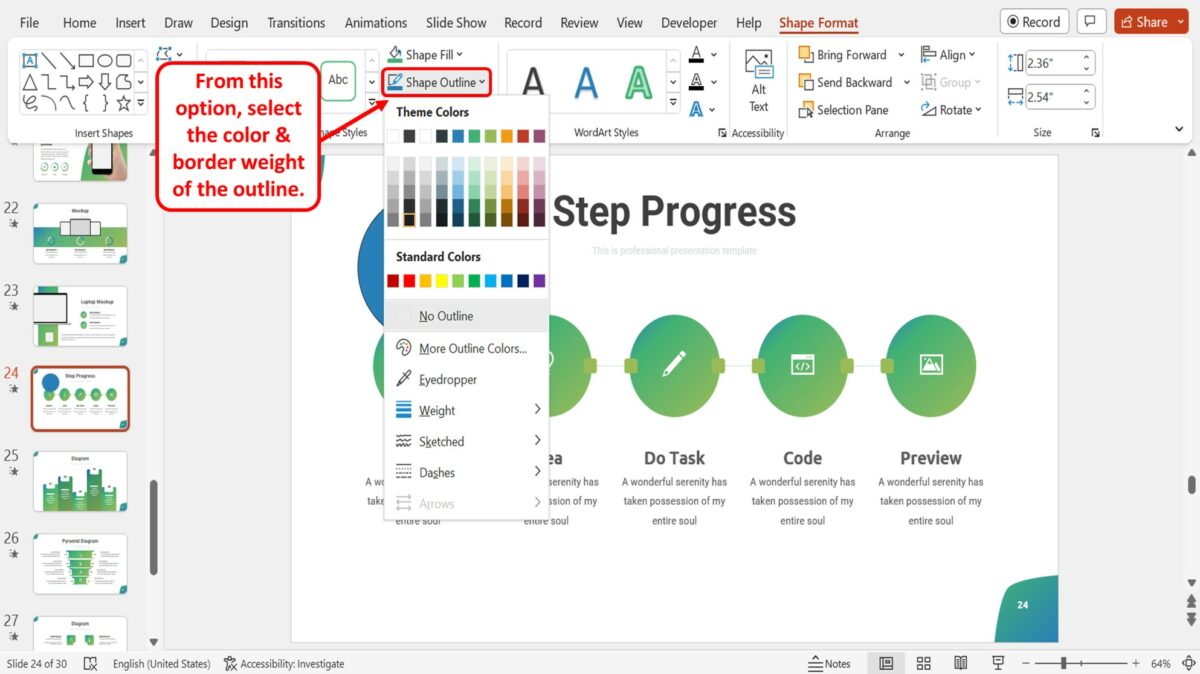
In the “Shape Styles” group of the “Shape Format” menu, click on the “Shape Outline” option. In the dropdown menu under the “Shape Outline” option, you can now select an outline color and customize the border weight of the outline. Add a dark and heavy outline to the shape.
Step-5: Click on the “Shape Fill” option
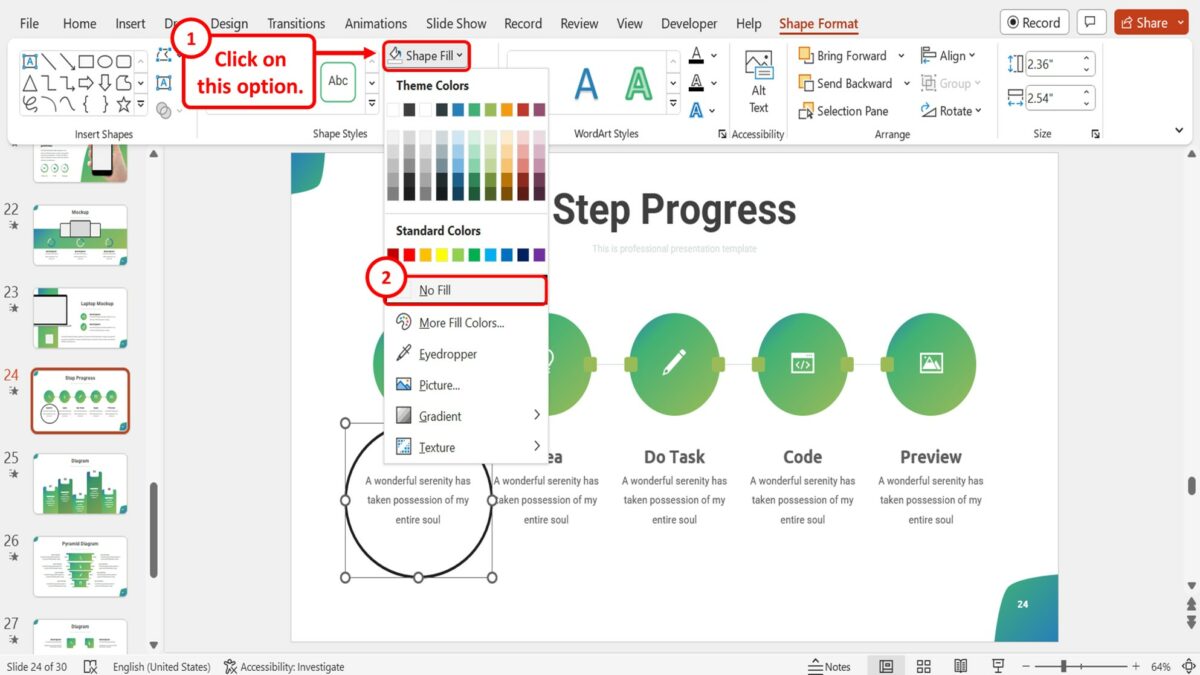
The final step is to make the shape transparent to show the item you have circled. Click on the “Shape Fill” option located above the “Shape Outline” option in the “Shape Format” menu. Then all you have to do is click on the “No Fill” option in the dropdown menu under the “Shape Fill” option.
4. How to Insert Text in a Circle in PowerPoint?
In Microsoft PowerPoint, you can type inside a shape to add text to it. To insert text inside a circle in PowerPoint, follow the 5 simple steps.
The first step is to click on the “Insert” tab in the menu ribbon located at the top of the screen to open the “Insert” menu.
Step-2: Click on the “Oval” option
The next step is to insert the circle into the slide. To do so, click on the “Shapes” option in the “Illustrations” group of the “Insert” menu. In the dropdown menu under the “Shapes” option, click on the “Oval” icon in the “Basic Shapes” section.
Now all you have to do is click and drag the cursor on the screen to draw the circle. Then click on the “Shape Format” tab in the menu ribbon located at the top of the screen.
Step-4: Click on the “Shape Styles” gallery
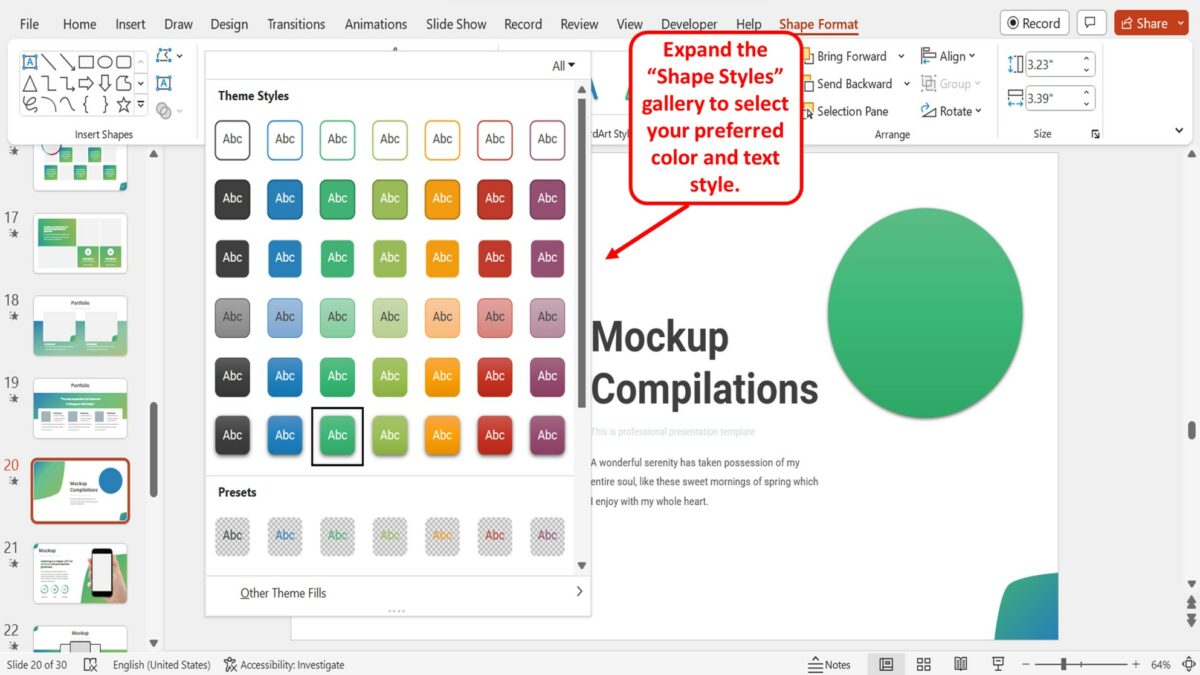
In the “Shape Format” menu, you have to now expand the “Shape Styles” gallery. Click on the “More” option which is the down arrow at the bottom right corner of the “Shape Styles” gallery. Then click on your preferred color and text style for the circle.
Step-5: “Double Click” on the circle
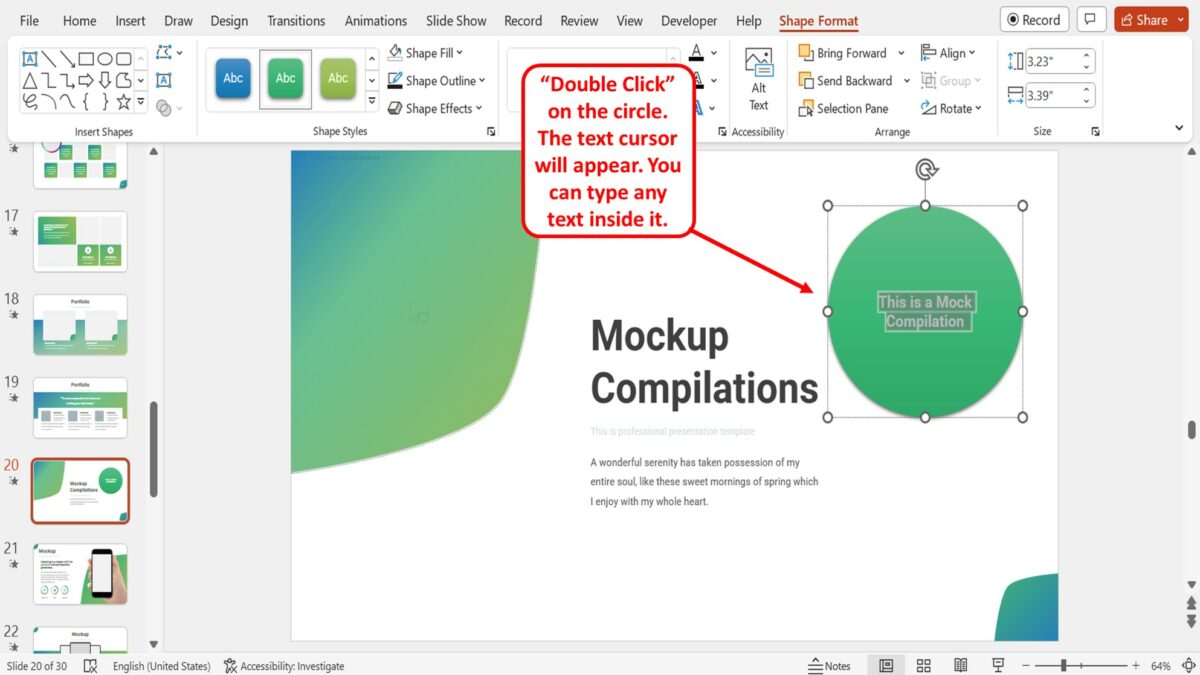
Now all you have to do is “Double Click” on the circle you have inserted into the slide. The text cursor will appear. You can now type in any text that you want to add inside the circle.
- Customer Favourites
Circle Image
Powerpoint Templates
Icon Bundle
Kpi Dashboard
Professional
Business Plans
Swot Analysis
Gantt Chart
Business Proposal
Marketing Plan
Project Management
Business Case
Business Model
Cyber Security
Business PPT
Digital Marketing
Digital Transformation
Human Resources
Product Management
Artificial Intelligence
Company Profile
Acknowledgement PPT
PPT Presentation
Reports Brochures
One Page Pitch
Interview PPT
All Categories

- You're currently reading page 1
Stages // require(['jquery'], function ($) { $(document).ready(function () { //removes paginator if items are less than selected items per page var paginator = $("#limiter :selected").text(); var itemsPerPage = parseInt(paginator); var itemsCount = $(".products.list.items.product-items.sli_container").children().length; if (itemsCount ? ’Stages’ here means the number of divisions or graphic elements in the slide. For example, if you want a 4 piece puzzle slide, you can search for the word ‘puzzles’ and then select 4 ‘Stages’ here. We have categorized all our content according to the number of ‘Stages’ to make it easier for you to refine the results.
Category // require(['jquery'], function ($) { $(document).ready(function () { //removes paginator if items are less than selected items per page var paginator = $("#limiter :selected").text(); var itemsperpage = parseint(paginator); var itemscount = $(".products.list.items.product-items.sli_container").children().length; if (itemscount.
- 3D Man (180)
- Anatomy (158)
- Block Chain (13)
- Branding (6)
- Business Plan Word (8)

We will keep fighting for all libraries - stand with us!
Internet Archive Audio

- This Just In
- Grateful Dead
- Old Time Radio
- 78 RPMs and Cylinder Recordings
- Audio Books & Poetry
- Computers, Technology and Science
- Music, Arts & Culture
- News & Public Affairs
- Spirituality & Religion
- Radio News Archive

- Flickr Commons
- Occupy Wall Street Flickr
- NASA Images
- Solar System Collection
- Ames Research Center

- All Software
- Old School Emulation
- MS-DOS Games
- Historical Software
- Classic PC Games
- Software Library
- Kodi Archive and Support File
- Vintage Software
- CD-ROM Software
- CD-ROM Software Library
- Software Sites
- Tucows Software Library
- Shareware CD-ROMs
- Software Capsules Compilation
- CD-ROM Images
- ZX Spectrum
- DOOM Level CD

- Smithsonian Libraries
- FEDLINK (US)
- Lincoln Collection
- American Libraries
- Canadian Libraries
- Universal Library
- Project Gutenberg
- Children's Library
- Biodiversity Heritage Library
- Books by Language
- Additional Collections

- Prelinger Archives
- Democracy Now!
- Occupy Wall Street
- TV NSA Clip Library
- Animation & Cartoons
- Arts & Music
- Computers & Technology
- Cultural & Academic Films
- Ephemeral Films
- Sports Videos
- Videogame Videos
- Youth Media
Search the history of over 866 billion web pages on the Internet.
Mobile Apps
- Wayback Machine (iOS)
- Wayback Machine (Android)
Browser Extensions
Archive-it subscription.
- Explore the Collections
- Build Collections
Save Page Now
Capture a web page as it appears now for use as a trusted citation in the future.
Please enter a valid web address
- Donate Donate icon An illustration of a heart shape
State of the City Presentation 2024
Video item preview, share or embed this item, flag this item for.
- Graphic Violence
- Explicit Sexual Content
- Hate Speech
- Misinformation/Disinformation
- Marketing/Phishing/Advertising
- Misleading/Inaccurate/Missing Metadata
plus-circle Add Review comment Reviews
Download options, in collections.
Uploaded by John Hauser on April 10, 2024
SIMILAR ITEMS (based on metadata)
IMAGES
VIDEO
COMMENTS
Ensure the picture is selected. Click the Picture Format or Picture Tools Format tab in the Ribbon. In the Size group, click the arrow below Crop. A drop-down menu will appear. Choose Aspect Ratio. A sub-menu will appear. Select 1:1 to crop the image into a circle (this changes the oval into a circle).
Step 2. Now you'll want to select the image you want PowerPoint to crop to the circle shape. From the ribbon, click Picture Format. You'll see Crop as one of the options. Instead of clicking the Crop option, click the arrow next to it. From this menu, you'll want to choose PowerPoint Crop to Shape.
Follow these steps to make a circular picture in PowerPoint: Step 1: Open the PowerPoint presentation that contains the image you want to convert. Step 2: Double-click on the picture once so that ...
Crop an Image Into Circle in Google Slides on Android and iPhone. Follow these steps to make an image circular in Google Slides on an Android or iPhone: Step 1: Launch the Google Slides app on ...
Here are the steps: Insert the image you want to crop onto a PowerPoint slide. Click Crop and choose Crop to Shape. Select the oval shape under the crop area. Click and drag the circular crop area to frame the part of the image you want to keep. Adjust the size as needed, then click the Crop button above the image.
We have created a lot of circle infographic templates for you. They come in different styles and designs: some are intertwined, others are hand-drawn, some include arrows, others look like a pie chart or have a futuristic style. You'll find the perfect circle diagram for your project! They contain different icons related to myriad topics, and ...
1. Begin by inserting the desired image into your slide. You can do this by clicking on " Insert " in the toolbar, followed by " Image ", and selecting the source of your image. 2. Once the image is added, resize your image to the correct size. Now click "Mask Image' > 'Shape' > 'Circle'. 3.
Open PowerPoint and create a new slide. Then, follow these simple steps: Insert the image you want to turn into a circle onto the slide. With the image selected, click on the "Format" tab in the top menu bar. Click on the "Crop" button and select "Crop to Shape.". Select the circle shape from the menu.
Follow these steps to create a circle-shaped image in PowerPoint: Open PowerPoint and insert the image you want to turn into a circle by clicking on the 'Insert' tab and choosing 'Pictures' from the 'Images' group. Select the image by clicking on it and then click on the 'Format' tab. Click on the 'Crop' button in the ...
Follow the simple steps below to learn how to mask images into shapes in Google Slides. Step 1. Open the project you're working on in Google Slides. Step 2. Select the image you want to change shape and click the Mask Image drop-down arrow next to the Crop icon. Crop Picture to Shape in Google Slides. Step 3.
Table of Contents. Easy Ways to Make a Picture a Circle in Google Slides. How To Download a Cropped Image in Google Slides. Method 1: Downloading Individual Slides as an Image. Method 2: Save to Keep. Method 3: Take a Screenshot. Final Thoughts.
The following steps can be used to create a circular image in PowerPoint: Select the image you want to use and insert it into your PowerPoint slide. Click on the image to select it. You should see a new tab appear in the menu bar called "Format.". Click on the "Format" tab and select "Crop" from the options.
Circle Presentation Images. Images 100k Collections 44. ADS. New. ADS. New. ADS. Page 1 of 100. Find & Download Free Graphic Resources for Circle Presentation. 100,000+ Vectors, Stock Photos & PSD files. Free for commercial use High Quality Images.
Part2: How to Convert Multiple Pictures to a Circle Using Picture Layout. Step 1: In your PowerPoint presentation, click on one of the images to select it.. Step 2: Press and hold the Ctrl button and select other pictures by clicking on them.. select pictures. Step 3: After selecting the desired pictures, click on the Picture Layout option in the. Picture Format menu at the top.
Circle Presentation royalty-free images. 1,074,813 circle presentation stock photos, vectors, and illustrations are available royalty-free. See circle presentation stock video clips. Minimal presentations design, portfolio vector templates with circle elements on white background.
Click on the Crop icon from the format menu. Select crop by shape. (You can crop an image using hundreds of shapes here). Again, click on the crop option dropdown . Click on the aspect ratio to see it. Choose 1:1 from the available options. The oval shape will be reduced to a perfect circle as shown below.
Simply click the "Circle Crop Images Now" button, then click "Open Image" to upload your image. Click on "Crop" and select the circle crop frame to make image circle. Drag and drop to adjust the circle size and position. Also, you can add text, remove the background, and fine-tune the image even further using the built-in editing tools.
In the ribbon, go to Picture Tools > Format. Then, in the Size group, select the arrow under Crop to open the menu of options. Select Crop to Shape, then select the intended crop shape. The shape is immediately applied to the image. To change how much of the picture fits within the shape, use either Crop>Fill or Crop>Fit.
Free Google Slides theme and PowerPoint template. In geometry, the circle is special. It has no sides, and is composed of various parts. You'll learn all about it with our presentation, available for Google Slides and PowerPoint, filled with actual content by teachers and ready to be used as is. Choose the language that you need from the ones ...
Follow these simple steps to change a picture to a circle in PowerPoint: Select the image you want to change. Click on the 'Format' tab in the menu bar. Select the 'Crop' option in the 'Size' group. Click on the 'Crop Shape' option in the drop-down menu. Select the 'Oval' shape (as PowerPoint does not have a circle shape ...
To insert text inside a circle in PowerPoint, follow the 5 simple steps. Step-1: Click on the "Insert" tab. The first step is to click on the "Insert" tab in the menu ribbon located at the top of the screen to open the "Insert" menu. Step-2: Click on the "Oval" option.
Slide 1 of 4. 0514 arrows in circle coming out image graphics for powerpoint. Slide 1 of 3. 1014 red and black dice circle image graphics for powerpoint. Slide 1 of 5. Numbers in circles bell numerals image. Slide 1 of 4. 0514 colorful balls in circle graphic image graphics for powerpoint. Slide 1 of 5.
cormmn-State_of_the_City_Presentation_2024 Run time 01:09:26 Scanner Internet Archive Python library 3.6.0 Year 2024 Youtube-height 1080 Youtube-id ITn7A0TPK2Q Youtube-n-entries 176 Youtube-playlist City of Rosemount, MN - Videos Youtube-playlist-index