

Turn your presentation into a video
When you make a recording of a presentation, all its elements (narration, animation, pointer movements, timings, and so on) are saved in the presentation itself. In essence, the presentation becomes a video that your audience can watch in PowerPoint.
So you have two options for turning your presentation into a video that's ready to view:
Save/export your presentation to a video file format (.mp4 or .wmv).
Save your presentation as a PowerPoint Show (.ppsx) file. (A PowerPoint Show appears full-screen in Slide Show, ready to view immediately.)
Save as a video file
After you've created your slides and recorded any timing and narrations and laser pointer gestures that you want to include, you're ready to create a video file.

On the File menu, select Save to ensure all your recent work has been saved in PowerPoint presentation format (.pptx).
Click File > Export > Create a Video . (Or, on the Recording tab of the ribbon, click Export to Video .)
In the first drop-down box under the Create a Video heading, select the video quality you want, which pertains to the resolution of the finished video. The higher the video quality, the larger the file size. (You may want to test them to determine which one meets your needs.)
* The Ultra HD (4K) option is only available if you're using Windows 10 or later.
The second drop-down box under the Create a Video heading tells whether your presentation includes narration and timings. (You may switch this setting if you like.)
If you haven't recorded timed narration, by default the value is Don't Use Recorded Timings and Narrations .
The default time spent on each slide is 5 seconds. You can change that timing in the Seconds to spend on each slide box. To the right of the box, click the up arrow to increase the duration, or click the down arrow to decrease the duration.
If you have recorded a timed narration, by default the value is Use Recorded Timings and Narrations .
Click Create Video .
In the File name box, enter a file name for the video, browse for the folder that will contain this file, and then click Save .
In the Save as type box, choose either MPEG-4 Video or Windows Media Video .
You can track the progress of the video creation by looking at the status bar at the bottom of your screen. The video creation process can take up to several hours depending on the length of the video and the complexity of the presentation.
Tip: For a long video, you can set it up to be created overnight. That way, it’ll be ready for you the following morning.
To play your newly-created video, go to the designated folder location, and then double-click the file.
Save as a PowerPoint Show
When someone opens a PowerPoint Show file, it appears full-screen in Slide Show, rather than in edit mode. The viewer begins watching the presentation immediately.
On the File menu, select Save As .
Choose the folder location where you want to store your PowerPoint Show file.
In the Save as type box, choose PowerPoint Show (*.ppsx) .

Select Save .
Why turn your presentation into a video?
When you want to give a high-fidelity version of your presentation to colleagues or customers (either as an e-mail attachment, published to the web, on a CD or DVD), save it and let it play as a video.
You can save your presentation as either an MPEG-4 video file (.mp4) or a .wmv file. Both formats are widely supported and can be streamed over the internet.
Some tips to remember when recording your presentation as a video:
You can record and time voice narration and laser pointer movements in your video.
You can control the size of the multimedia file and the quality of your video.
You can include animations and transitions in your movie.
Viewers do not need to have PowerPoint installed on their computers to watch it.
If your presentation contains an embedded video, the video will play correctly without your needing to control it.
Depending on the content of your presentation, creating a video may take some time. Lengthy presentations and presentations with animations, transitions, and media content will likely take longer to create. Fortunately, you can continue to use PowerPoint while the video is being created
What parts of a presentation won't be included in a video?
The following items won't be included in a video that you create using PowerPoint:
Media inserted in previous versions of PowerPoint. To include these, you can convert or upgrade the media object.
For example, if you inserted the media using PowerPoint 2007, it will be linked and it will play in the presentation. However, when you export the file as a video, the linked media will be dropped. You can convert the file to the new file format (click the File tab, and under Info , click Convert ), or you can right-click the media object and then click to upgrade; it will embed the file and export it correctly.
QuickTime media (unless you have a third-party QuickTime codec named ffdShow installed and you have optimized for compatibility)
OLE/ActiveX controls
What to do with your video after creating it
After you create a video, you can share it with others by using the following methods:
Email your presentation to others
Save to a file share or other location
Upload it to your organization's Microsoft Stream video-sharing site , as described in the next section, "Save to a video-sharing site."
Save to the Microsoft video-sharing site
After you've created the video file, you can upload it to a video-sharing site. Microsoft Stream is an enterprise video service where people in an organization can upload, view, and share videos. Microsoft 365 business or education subscribers have access to this service from within PowerPoint for Microsoft 365.
Select File > Export , and then select Publish to Microsoft Stream .

Type a title and a description for the video.
Set other options, including whether you want others in your organization to have permission to see the video:

Select the Publish button.
The upload process can take several minutes, depending on the length of the video. A status bar at the bottom of the PowerPoint window tracks the progress, and PowerPoint shows a message when the upload is finished:

Click the message to go directly to the video playback page on Microsoft Stream.
For more information about this service, begin reading with What is Microsoft Stream? It includes information about Office 365 Video vs. Microsoft Stream.
1 The Ultra HD (4K) option is only available if you're using Windows 10 or later. 2 In PowerPoint 2016, the Ultra HD (4K) option isn't available in the Volume License edition.
When someone opens a PowerPoint Show file, it appears full-screen in Slide Show, rather than in edit mode. The viewer begins watching the presentation immediately.
Burn your presentation to a disc

Need more help?
Want more options.
Explore subscription benefits, browse training courses, learn how to secure your device, and more.

Microsoft 365 subscription benefits

Microsoft 365 training

Microsoft security

Accessibility center
Communities help you ask and answer questions, give feedback, and hear from experts with rich knowledge.

Ask the Microsoft Community

Microsoft Tech Community

Windows Insiders
Microsoft 365 Insiders
Find solutions to common problems or get help from a support agent.

Online support
Was this information helpful?
Thank you for your feedback.
PPTX to MP4 converter
Convert your file from Microsoft PowerPoint 2007 XML Presentation to MPEG-4 Video Stream with this PPTX to MP4 converter .
Enter the timestamps of where you want to cut your video. The format is HH:MM:SS. HH = hour, MM = minutes, SS = seconds.
Example: 00:02:23 for 2 minutes and 23 seconds.
How to convert a PPTX to a MP4 file?
- Choose the PPTX file you want to convert
- Change quality or size (optional)
- Click on "Start conversion" to convert your file from PPTX to MP4
- Download your MP4 file
Not convinced? Click on the following link to convert our demo file from PPTX to MP4 :
Stay connected:
Rate this tool 4.2 / 5
You need to convert and download at least 1 file to provide feedback
Feedback sent
Thank you for your vote
Convert to PPTX
Convert from pptx, file format, pptx (microsoft powerpoint 2007 xml presentation).
PPTX file extensions became the standard for Microsoft Office 2007’s PowerPoint program. Like the PPT predecessor, PPTX files store presentations containing slides of images, text, animation, audio, video, effects, charts, graphs, and more. Where PPT...
Convert PPT to Video. PowerPoint (PPT, PPTX, PPSX) to Video Converter.
Convert powerpoint to video. ppt to mp4. ppt to video. ppsx to mp4. powerpoint to mp4. powerpoint to video., powered by aspose.com and aspose.cloud ., * by uploading your files or using our service you agree with our terms of service and privacy policy ..
Send the download link to
Press Ctrl + D to save this page as a bookmark.
We've already processed ??? files with a total size of ??? Mbytes.

How to convert PPT to video
- Click Drop or upload your files .
- Select the PowerPoint file you want to convert to video on your computer.
- Specify your preferred parameters for the conversion—the slides to be converted, duration for each slide, video resolution, transition, and audio. Or you can use the default parameters.
- Click the CONVERT button.
- Wait for your presentation to get converted to an MP4 video.
- Click the DOWNLOAD NOW button. Or you can type in an email address and click the message icon. The email address will receive a download link.
Aspose.Slides PPT to Video converter is a free online service for converting PowerPoint presentations to videos. Slides : Convert all slides in your PowerPoint to video. Or you can select specific slides or a range of slides for conversion. Slide duration : Specify the time that is spent showing each slide in the video. Video resolution : Select the resolution that determines the amount of detail in the video. If you plan to display the video on a big screen, you will do well to select HD. However, in such case, FullHD or QHD is probably even better. Transition : Select the transition that is played between slides in the video. PowerPoint transitions give life to presentations. They provide additional on-screen movement and interest for your audience. Audio : Your presentation can seem brand-new with audio. You can use the audio from the original presentation, upload your own, or select it from the drop-down option. The presentation to video converter is a free service powered by Aspose.Slides .

Aspose.Slides PPT to Video
- Convert PPT to video.
- Export PPT to video.
- Save PowerPoint PPTX and PPT as video.
- Convert presentation to video.
- Create video from PowerPoint.
- Add audio and transition effects to your video.
- Convert PPTX to MP4.
- Convert PPT to MP4.
- Convert PowerPoint to MP4.
- Download PowerPoint video. Open video. Share video.
- How do I convert PPT to video? Upload your PowerPoint presentation, specify your preferred parameters for the conversion operation or leave the default options intact, and then click CONVERT .
- What are the advantages of converting PowerPoint to video? By converting your PowerPoint to video (MP4), you end up with a more convenient file. A video is easier to share than a PowerPoint. A video can be opened on any device or platform.
- Is Aspose PPT to Video Converter free? Yes. The PowerPoint PPT to video converter is completely free to use.
- How long does it take to convert PPT to video? The time required for the PowerPoint to video export operation is dependent on the number of slides involved.
- What is the format of the resulting PowerPoint video? MP4 is the resulting format.
- How do I save my PPT as MP4? Use the PPT to Video converter on this page.
- How can I open the video created from a PowerPoint? You can open the video in any video player. The MP4 video file can be played on any laptop (Windows, Mac, Linux) or smartphone (iPhone or Android device).
- How do I save my PowerPoint as a video? Use the PowerPoint to video converter on this page.
- How do I convert PowerPoint to MP4 for free? Use the converter on this page. It is FREE.
- Are there limits on uploaded files? For a single presentation, the maximum file size is 35 MB and the maximum number of slides is 50. If you must convert a presentation that exceeds 35 MB or contains more than 50 slides, we recommend you use Aspose PowerPoint Splitter to divide the slides into multiple presentations. You can then convert the presentations you obtained individually.
Fast, Easy, and Secure Conversion
Convert from Anywhere
High Quality Conversion
Other supported conversions.
You can use other tools to convert PPT, PPTX and PPSX files. Please see the list below.
- PDF to video (PDF to MP4)
- Images to Video (Images to Video Converter)
- PowerPoint to YouTube video (PowerPoint Presentation)
- MP4 to MP3 (MP4 to MP3 Converter)
- MP4 to WAV (MP4 to WAV Converter)
- MP4 to WEBM (MP4 to WEBM Converter)
Oops! An error has occurred.
Error has been reported successfully..
You have successfully reported the error, You will get the notification email when error is fixed. Click this link to visit the forums.
� Aspose Pty Ltd 2001-2022. All Rights Reserved.
PPT to Video
Convert PowerPoint presentations to video online; free

Free online PowerPoint to video converter
VEED lets you convert your PowerPoint presentations to videos in just a few clicks, straight from your browser. You can even record yourself while presenting your slides using our free screen and webcam recorder.
Upload your slides and record your webcam, audio, and screen. Easily customize your layout, background, and camera feed. Add annotations, scenes, and even soundwaves for audio recordings.
How to Convert PPT to Video:

Select layout
Select from our list of layouts; in this case—Slides or Slides and Camera (you may need to click to ‘Allow’ permission to access your screen, camera, or microphone). You can record just your screen, your webcam, or both at the same time!

Start recording
Click the red button to start recording! You'll see a countdown before the recording starts. Don't worry if you mess up. You have unlimited time and unlimited retakes. You can navigate to other pages, and don't worry, you are still recording.

Review, edit, and export
You can playback your recording to review it, click ‘Share’ to share with friends and colleagues, or ‘Edit’ to edit your video (perfect for adding text, subtitles, and professional touches to your screen recording)
‘PPT to Video’ Tutorial

A slide show presentation with multiple layouts
VEED features multiple layouts that you can choose from. Select one that best suits your PowerPoint presentation needs. You can record your screen and audio at the same time, record your slides and camera or slides only. After recording, give your PowerPoint presentations a new look! Add annotations, images, text, and more. You can download your PPT presentation as an MP4 video format so you can play it in different multimedia players.

Add scenes and personalize
Our powerful PowerPoint to video converter lets you add scenes so you can easily edit each clip when you’re done recording. How does it work? It’s really simple! When you click on the Stop button while recording, VEED automatically saves that clip and you have the option to pick up where you left off by adding another “scene” or recording. This helps you manage and edit your video clips later on. Personalize your presentation even more using our full suite of video editing tools!

Create professional-looking business videos
With a lot of businesses taking their operations online, there has never been a more important time for video editing software in all industries. Our screen and slides recorder allows your team to record important business messages, explainers, presentations, and more. Share, comment, review, and collaborate with videos online—no software to download. You can even add subtitles automatically and translate them to different languages! Our automatic translation tool is available to premium subscribers. Check our pricing page for more info.

Frequently Asked Questions
It’s super easy! Upload your PowerPoint slides to VEED and start recording. You can also choose to record your webcam while presenting your slides. Edit your recording and export it as an mp4 video!
To share the video, all you have to do is click ‘Copy Link’ and leave the Public Video toggle on. Then anyone with the link will be able to watch and comment on your video, like on google drive. (Note - they will NOT be able to edit the video. Only you will be able to edit.) You can also export your recording as MP4 and play it on Windows Media Player and other multimedia players.
Just click ‘Edit’ when the recording is finished, and you will be taken into VEED’s video editor. Here you will be able to add subtitles, text, annotations, music, sound effects, and much more. Just hit the ‘Export’ button when you’re finished, to save your new edited recording.
VEED gives you the option to record only your audio. Just select “Audio” in the layouts. If you want to record your audio with your webcam, it happens automatically! When you start using the screen recorder, you will need to click ‘Allow’ to give the recorder access to your microphone. That’s it. As soon as you start recording the video (screen, webcam, or both), the audio will also be recorded, so you can make awesome video presentations, explainer videos, team comms videos, and more!
VEED allows you to record your webcam along with your screen and audio. Just select “Screen & Webcam” when choosing a layout for your presentation recording.
VEED works with Windows and Mac. You can access our screen and presentation recorder straight from your browser. No software or plugins to install!
Discover more:
- Convert Slides to Video
- PowerPoint to MP4
What they say about VEED
Veed is a great piece of browser software with the best team I've ever seen. Veed allows for subtitling, editing, effect/text encoding, and many more advanced features that other editors just can't compete with. The free version is wonderful, but the Pro version is beyond perfect. Keep in mind that this a browser editor we're talking about and the level of quality that Veed allows is stunning and a complete game changer at worst.
I love using VEED as the speech to subtitles transcription is the most accurate I've seen on the market. It has enabled me to edit my videos in just a few minutes and bring my video content to the next level
Laura Haleydt - Brand Marketing Manager, Carlsberg Importers
The Best & Most Easy to Use Simple Video Editing Software! I had tried tons of other online editors on the market and been disappointed. With VEED I haven't experienced any issues with the videos I create on there. It has everything I need in one place such as the progress bar for my 1-minute clips, auto transcriptions for all my video content, and custom fonts for consistency in my visual branding.
Diana B - Social Media Strategist, Self Employed
More than a PPT to video converter
VEED is so much more than just a free PowerPoint to video converter. It lets you do more than just record your screen and presentation slides. You can resize your screen recordings to fit any video-sharing and social media platform. You can also edit your videos—add text and captions automatically, add music, sound effects, draw on your videos, and more! Try VEED and start creating powerful business videos for your company.

Home Blog PowerPoint Tutorials How To Convert a PowerPoint Presentation to a HD Video in 3 Steps
How To Convert a PowerPoint Presentation to a HD Video in 3 Steps
There are many reasons why you may consider converting a PowerPoint presentation to a High-Definition video ; for example if you want to share a presentation online through YouTube or Vimeo, create a self-running presentation or save the slide show video to a DVD.

In this article we will guide you on how to convert a PowerPoint presentations to a High Definition video (as an MP4 video file,Windows Media Video .wmv file or QuickTime Video File .mov) using Microsoft PowerPoint.
PowerPoint lets you save presentations as videos directly from the File > Save As dialog box; however if you need to choose the output video quality while saving the presentation then it is recommended to use the File > Export > Create a Video option.
High Definition (HD) or high-quality presentation uses a higher resolution (1280×720 or 1920×1080) to save the video information. It can improve the overall experience while watching a presentation online or playing a PowerPoint slideshow in a kiosk. It would be the preferred format if you plan to upload your video presentation to YouTube or Vimeo, and have higher quality. The main drawback is that the presentation video file size will be bigger and more bandwidth may be required.

Why You Should Convert a PowerPoint to a Video Format?
Converting a PowerPoint to a video format can have several advantages. From making intuitive videos to engaging your audience to address complex topics in just a few minutes.
Create a Video Slideshow
You can use the converted video file to create a video slideshow for display at an event or edit the content of the video to generate a video presentation.
Create Presentations and Tutorials
PowerPoint enables users to export their videos with voice-over narration and animations. This can help create extensive presentations for an audience
Use Professional Editing Software to Create Engaging Videos
Adding a voice-over, additional graphics, and some footage can help create a professional-looking presentation by using a video editing application. Similar to how you use Instagram tools to convert images into a stunning video, some famous video editing apps that can help you make the most out of your converted PowerPoint file to a video format include Adobe Premiere Pro, Camtasia Studio, iMovie, Final Cut Pro, etc. If you are a Windows user, you can look into alternatives to Final Cut Pro like Lightworks, Movavi Video Editor, and Shotcut.
Create a Video Instead of Using PowerPoint
You can convert PowerPoint to video by simply letting your slides play out, making the presentation easy to play for end users without the need to have PowerPoint installed. This approach can also be helpful if you intend to present your slides using a video player instead of PowerPoint, as the latter might not be available everywhere, whereas video players often come with all types of desktop and mobile operating systems.
Upload a Video Online
Many presenters also like to upload their presentations online for an audience. A teacher might be interested in making his/her presentation available for students, or an industry expert might wish to share a concept with others in the industry by uploading a video to a YouTube channel. Either way, converting your PowerPoint to a video can help make the content easily shareable via video streaming platforms like YouTube and Vimeo. Such a video can also be shared privately via file-sharing apps like Box, Dropbox, OneDrive, Google Drive, etc.
How To Convert PowerPoint to Video (Windows)
Step 1 – go to file > export.
The first step to save a PowerPoint presentation as a HD video go to File -> Export and then click Create a Video button.

Step 2 – Choose Video Resolution
Now, select a resolution to export your video. Other than the Standard (825×480) resolution, the high-definition resolution options include HD (Medium 1280×720), Full HD (Large 1920×1080), or Ultra HD 4K (Largest file size 1920×1080). If you are using an older version of PowerPoint, you might have limited options to select between HD resolutions, since versions older than PowerPoint 2013 only supported HD videos (1280×720).

Optional Step: Save Narrations, Laser Pointer Gestures & Recorded Timings in the Video Exported from PowerPoint
Aside from saving the PowerPoint presentation as an HD video, you can also save a video file that incorporates all the recorded timings during a rehearsal, narrations, and even laser pointer gestures.
In case you have recorded narrations for your slides, you can use them or select Record a Video option to instantly start narrating your slides. The Preview Timings and Narrations option in the same drop-down menu does what it says, it enables you to check and ensure that your narrations are correctly timed with your slides, so you can make necessary edits before finalizing your video.

Optional Step: Select Slide Duration
Choose the default time spent on each slide (in seconds) and whether to save the narrations, timings, and gestures. By default, 5.00 seconds are spent on each slide unless you have a different timing recorded for the presentation slideshow.

Step 3 – Select Video Format and Create a Video Presentation
Click Create Video button and choose the destination folder and output file name. For end users wondering how to convert ppt to MP4, this is the step where you can select MP4 as your output format. PowerPoint supports saving slide decks to MP4 or WMV video formats. Once you confirm, wait a few seconds in order for the file is being saved on your hard disk. Presentations with a lot of slides may require a longer wait time.

Something good about saving presentations as a video file is that all animations, transitions, and media are preserved.

How to Convert PowerPoint to Video (Mac)
If you’re wondering how to make a PowerPoint into a video on Mac, the steps are quite similar to how you would export PowerPoint to video on a PC, with a few minor differences.
Step 1 – Go to File > Export
To convert PowerPoint to video on Mac, go to File -> Export.
Step 2 – Choose Video Format
If you have been wondering how to save PowerPoint as MP4 on Mac, this is the step where you can pick a video file format to save your presentation as a video, including MP4 and MOV.
The difference between the PC and Mac during this step is the difference in the availability of video conversion options. The PC version, along with MP4, allows saving a video in the Windows Media Video (WMV) format, unlike Mac, which offers QuickTime video format (MOV) instead.
Step 3 – Select Video Resolution and Create Video
The new version of PowerPoint for Mac allows saving a presentation in HD (Medium 1280×720), Full HD (1920×1080), or Ultra HD 4K (1920×1080) format. The higher the resolution, the higher the file format, so make sure you have enough disk space to save a very heavy file, especially if you opt for Ultra HD 4K resolution.
Save Narrations, Laser Pointer Gestures & Recorded Timings (Optional)
To save narrations, recorded timings, and laser point gestures, select the Use Recorded Timings and Narrations option.
Select Slide Duration (Optional)
To precisely time how long each slide is presented in the video, select the time duration. The default duration is 5.00 seconds, unless you have specified time for each slide separately in the presentation.
Select Export to create your video. Depending on the resolution you have selected, it might take several minutes before the video is converted. Higher resolutions take more time to conversion.
Saving videos from PowerPoint can help you at the time you need to share a presentation slideshow online (for example, uploading it via YouTube or Vimeo, or any other online video platform ), but you can also use this technique to prepare a PowerPoint presentation for a kiosk, make interactive PowerPoint presentations or create a self-running presentation. PowerPoint presentations saved as videos can also be easily run from mobile devices without the need for PowerPoint to be installed on the device. If you wish to save your PowerPoint to video in a format easily accessible, you can opt for PowerPoint save as MP4 instead of using WMV or MOV file formats that are not supported by all types of video players.

Like this article? Please share
mp4, Presentation Ideas, Presentation Videos, Video, Windows Media Video, wmv Filed under PowerPoint Tutorials
Related Articles

Filed under Presentation Ideas • February 15th, 2024
How to Create a 5 Minutes Presentation
Master the art of short-format speeches like the 5 minutes presentation with this article. Insights on content structure, audience engagement and more.

Filed under Design • January 24th, 2024
How to Plan Your Presentation Using the 4W1H & 5W1H Framework
The 4W1H and 5W1H problem-solving frameworks can benefit presenters who look for a creative outlook in presentation structure design. Learn why here.

Filed under Presentation Ideas • December 13th, 2023
How To Make a Presentation Interactive
In this article, we will explore the insights behind what makes a presentation interactive. Join us to discover techniques that guarantee a presentation success.
6 Responses to “How To Convert a PowerPoint Presentation to a HD Video in 3 Steps”
Can’t believe no one has commended you for this helpful tutorial! We want to mount several TVs in the lobby and exam rooms of our veterinary hospital to run informational presentations for our clients about pet care, our services, and helpful products. Recording a PowerPoint as a video and then putting it on a USB thumb drive to connect to the TV seems like it will be an effective, inexpensive way to get that accomplished. Thank you so much!
I second the above comment. Thank You
how to present a power point presentation on a smart tv..and having it loop over to continuous display..keep running.
This was very helpful. I had no clue that this could be done. I dedicated a PC to running the Power Point presentation for our lobby. Having it run on the TV via USB will free up that resource for us.
I haven’t dug into it yet, but is there a way to make it loop?
I keep getting this audio data not supported. Is there anyway to remove this?
Send us your issue to [email protected] we might be able to help you.
Leave a Reply
Convert PPT to Video
Transforming ppts into interactive videos has never been easier.
Say goodbye to static slides and hello to the future of storytelling! Flixier's breakthrough toolkit transforms your PowerPoint presentations into stunning films, packed with spinning text, captivating transitions, and powerful soundtracks. Moreover, you can easily record your screen and even yourself during your slides presentation in order to increase the engagement of your video. Edit, enhance, and empower your material in real time, then share it with the world in minutes.

Transform PPTs to Engaging, Dynamic Videos
Tired of the classic and static PowerPoint slides? Make your presentations more appealing by turning them into captivating videos. For an attractive message delivery, choose to record yourself. Now you may quickly record your PowerPoint presentation, webcam, audio, and screen using Flixier. Layout, background, and camera feed can all be customized.
Craft Immersive Videos with Voice and Animations
Video conversion goes beyond visual communication by engaging numerous senses. If you choose to add text to video , visuals, transitions, and music, you can create a full experience that resonates with the viewer. Flixier's interface makes this process easier by allowing you to experiment with multiple combinations until you find the appropriate balance of elements.
Infuse Stories with Emotion by Converting PPTs into Video
Use Flixier’s online slides recorder to add more emotional depth to your storytelling. Besides using your own voice on the recording, you can easily combine your slides with well selected music.. Moreover, Flixier allows you to record your webcam. Don’t worry, you can always stop the recording, go back and add other scenes, everything will be saved!
Broaden Your Audience by Sharing Videos Online
How long does it typically take to share your content online after it has been created? Converting PPTs to videos expands your sharing options. Videos are cross-platform and device adaptable, ensuring that your interactive material reaches a wider audience. Whether it's for a business presentation that you are preparing, teaching tools or a personal story.
How to Convert PPT to Video with Flixier’s Online Video Editor?
Start by accessing Flixier's dashboard and choose “Record” from the menu. Choose from a variety of layout options available. You can opt to record the slides or your slides and webcam at the same time, granting access to your screen, camera, or microphone with a simple click. Capture your screen, webcam, or both concurrently, enhancing your recording flexibility and creative possibilities. The wait for the recordings to process won’t be long and it will vary depending on the length of the PPT presentation.
After your simple screen recording or webcam and slides is finished, the new video will appear in the Flixier library. To make it more engaging for you audience, you can use text overlays, transitions, effects, modify the playback speed and combine various soundtracks to unleash your creativity. To keep the spirit of engagement, merge your work with other videos and turn everything into a cohesive video or choose to crop video pieces from your recording.
After you've finished editing, click the Export button in the upper right corner. Your transformed PowerPoint Presentation will be saved as an MP4 file, which is the most widely supported format. You can then easily share your video on social media, websites, or any other platform.
Why use Flixier to Convert a PPT to Video?
Turn ppts into video with a user-friendly interface.
The user-friendly interface of Flixier is intended for everyone, allowing you to easily cut video segments, drag and drop items, and create new storylines. By adding a personal touch with webcam and microphone recording, or through animating text, weaving transitions, or background sounds, everything is available with a few clicks.
No Downloads Needed: Make Captivating Videos Online
Flixier's online PPT editor does not require any downloads. It's a simple method to turn your presentations into captivating videos, and it's easily accessible through your browser. You can reach your creative goals with ease, eliminating the requirement for laborious software installations.
Quickly Create, Edit, and Share Content Across Platforms
Easily share the newly crafted video with your audience on YouTube, Instagram or any other social media platform. Flixier allows you to easily upload your PPT online after recording it and converting it into a video format that suits you best. Adding annotations, images and various elements will improve the quality of your video.
Universal Compatibility: Share Your Message Anywhere
Flixier allows you to personalize and add a personal touch to your PPT in video formats that are universally recognized. Your creation resonates across screens, whether viewed on a PC or a mobile device. Share it without concerns for compatibility, ensuring that your message reaches your target audience: family, friends, colleagues, or others.
What people say about Flixier

I’ve been looking for a solution like Flixier for years. Now that my virtual team and I can edit projects together on the cloud with Flixier, it tripled my company’s video output! Super easy to use and unbelievably quick exports.

My main criteria for an editor was that the interface is familiar and most importantly that the renders were in the cloud and super fast. Flixier more than delivered in both. I've now been using it daily to edit Facebook videos for my 1M follower page.

I'm so relieved I found Flixier. I have a YouTube channel with over 700k subscribers and Flixier allows me to collaborate seamlessly with my team, they can work from any device at any time plus, renders are cloud powered and super super fast on any computer.
Frequently asked questions.
The time it takes to turn your PowerPoint presentation into a video is determined by many factors, the most important of which is the complexity and size of your original content. Flixier's technology is meant to speed up this process, allowing you to record your PowerPoint in just a few clicks. conversions to be accomplished in a matter of minutes.
Absolutely! Flixier allows you to record and personalize your PowerPoint presentation and turn it into a dynamic video that is smooth and compatible, the resulting file format being ready to go up on YouTube and already aligned to its uploading requirements.
Sharing your material on the world's largest video-sharing platform is simple, whether it's a business presentation, an educational session, or creative storytelling that you’ve personalized with Flixier.
Yes. Flixier provides a variety of plans designed to meet a large pool of needs and preferences. The free plan gives you access to important tools, such as recording, reviewing, editing and exporting your PowerPoint presentations to videos with basic edits. Upgrade to a premium subscription if you want extra features. These tools are perfect for adding text, different subtitles and polished enhancements to the PPT screen recording.
Need more than a PPT to Video convertor?
Edit easily, publish in minutes, collaborate in real-time, other ppt converter tools, articles, tools and tips, unlock the potential of your pc.
Guide Center
- Tech Gift Ideas for Mom
- Hot Tech Deals at Target Right Now
How to Convert PowerPoint to Video
Let your presentation speak for itself
:max_bytes(150000):strip_icc():format(webp)/ScottOrgera-f7aca23cc84a4ea9a3f9e2ebd93bd690.jpg "how to convert presentation to video")
What to Know
- Windows: Select File > Export > Create a Video . Choose video quality, timings/narrations, seconds per slide > Create Video . Select file type.
- Mac: Select File > Export . Choose file format, video quality, timings/narrations, and seconds per slide, then choose Export .
PowerPoint decks are great tools for showcasing and presenting a message, product, or data visualization, as viewers are more likely to digest content when it's in video format. Here's how to turn a PowerPoint into a video using PowerPoint for Microsoft 365, PowerPoint 2019, PowerPoint 2016, PowerPoint 2013, PowerPoint 2010, and PowerPoint for Mac.
How to Save PowerPoint as Video on Windows
After you create a presentation, convert your slides into attention-grabbing videos. The steps below show how to turn a PowerPoint file into a video. The result is a file that incorporates animation, narration, and other custom content included in the original PPT or PPTX file.
Follow these instructions to make a video from a PPT or PPTX file in PowerPoint on Windows operating systems:
Launch PowerPoint and open the presentation file you want to turn into a video. If that file is open, ensure that the latest version is saved by selecting File > Save or by selecting Save on the Quick Access Toolbar.
Select File > Export .
If you use PowerPoint 2010, select Save & Send .
Select Create a Video .
Choose the video quality you want to use for your video slideshow. A high-quality screen resolution results in a larger file size. A low-quality output results in a smaller file.
Specify whether or not to include recorded timings and narrations in the video. If the presentation contains timings or narrations, select Record Timings and Narrations . These narrations can include a thumbnail image of yourself, recorded on your webcam.
To specify the amount of time that each slide displays, enter the time in the Seconds spent on each slide text box.
After you make your choices, select Create Video .
In the Save As dialog box, choose a location to save your new video file and enter a filename.
Select the Save as type drop-down arrow and choose either MPEG-4 Video ( MP4 ) or Windows Media Video ( WMV ). Select Save to start the video creation process.
The progress of your video creation displays in the status bar. This may take a few minutes or up to several hours to complete, depending on the size and complexity of the video being created.
How to Save PowerPoint as Video on macOS
Follow these instructions to make a video from a PPT or PPTX file in PowerPoint for macOS.
This feature is available to Microsoft 365 subscribers who have the latest desktop version of PowerPoint.
Launch PowerPoint and open the presentation file that you want to turn into a video. If that file is open, ensure that the latest version is saved by selecting File > Save or by selecting Save from the Quick Access Toolbar.
A pop-out window appears that contains multiple options. In the File Format drop-down menu, select either MP4 or MOV .
Choose a video quality option. Those with the highest quality and screen resolutions (for example, Presentation Quality ) result in larger file sizes. A low-quality output creates a smaller file. This quality selection also dictates the video's width and height, shown below the Quality menu.
Choose whether or not to include recorded timings and narrations in the video. If available, select the Use Recorded Timings and Narrations check box to enable this content in your video.
To increase or decrease the timing for the slides, select the up or down arrow next to Seconds spent on each slide without a set timing . By default, a PowerPoint video spends five seconds on a slide before transitioning to the next slide.
Select Export .
Get the Latest Tech News Delivered Every Day
- What Is a PPTX File?
- What Is a PPTM File?
- How to Get PowerPoint on a Mac
- Create Pictures From PowerPoint Slides
- The 8 Best Slideshow Apps of 2024
- How to Save Sounds From PowerPoint Slideshows
- What Is a PPT File?
- What Is a PPSX File?
- How to Make a Slideshow on PowerPoint
- Converting PowerPoint Slides to Word Documents
- What Is a PPSM File?
- Change a PowerPoint Show File to a Work File
- How to Use Microsoft's Free PowerPoint Viewers
- How to Create Digital Photo Albums in PowerPoint
- What Is a PPS File?
- Loop a PowerPoint Slide Show
How-To Geek
How to save or convert a powerpoint presentation to a video.
Most people know that you can create PowerPoint presentations with pictures, music, images, web content, and text, but one little known trick is the ability to save PowerPoint presentations as videos.
PowerPoint presentations have been a long time favorite for use in business and academic presentations all over the world. They are highly versatile and offer a wide variety of features that you can use to enhance them.
In order to save your PowerPoint as a video you will first need to create a presentation or download the sample we used for this tutorial. Once you have the document open, you will need to save it as a video. Begin by pressing “File.”
Instead of following the logical train of thought and opening the “Save” section, you will need to click on “Export,” then click on “Create a video.”
Once you do this, you will see the “Create a Video” option. This will offer a few options in the form of two drop-down menus and a time value box.
The first drop-down box is where you will choose the quality of your exported video. These three options will also determine the size of your exported video file. For the purposes of this example, we will choose the second option to reduce the size of the video without compromising too much video quality.
The second drop-down menu allows you to include or exclude any timings or narrations that you inserted on your PowerPoint presentation. Since the sample document has no timings or narrations, we will leave this as is. The “Use Recorded Timings and Narrations” will be unavailable if you don’t have any of them in your presentation.
The time value box is where you can edit the amount of time that your slides will appear in the video. The default time is set at 5 seconds. For this tutorial, we will set it to 3 seconds. Lastly, you need to click on the “Create Video” button.
You will now be taken to the “Save” dialog box. Browse to the location where you want to save the file and give it a name then press “Save.”
While the video is being created, you will see the small progress bar at the bottom of your PowerPoint window. Wait till this is done and then go to your video.
Now you can double-click your video file and it will automatically play with your video player. Remember that the more slides you have and the more time you allot to each slide, the more space the video will take up in the end. This handy export tool is great for automating presentations or for uploading them as videos to online video sharing services like Facebook or YouTube.
- Video Marketing
- Case Studies
- Create a video

How To Convert PPT to Video? [PPT to MP4, MOV, & 5 other formats!]

Shreshtra - November 14, 2023 - Leave your thoughts. 6 min read
convert powerpoint to mp4 , convert ppt to video , how to convert ppt to video , How to make a powerpoint into a video , Powerpoint to video , Powerpoint video , ppt to video
Powerpoints!
That very word can make you yawn and fall asleep!
Aren’t we all guilty of dozing off during a boring PowerPoint?
But worry not, because you’re definitely not alone in feeling this way!
To make PowerPoint less boring, we have tried all sorts of things, from embedding videos in powerpoints to creating animated presentations .
In short, anything and everything to make those wretched presentations better!
Whatever is said and done, we MUST accept the fact that videos are WAYYYY better than PowerPoint.
With that in mind, we have created a solution to help improve presentations and make them more impactful.
And that is to… **Drumroll**
Convert it into a video!
In this article, we will explore how to convert PPT to video in two sections:
Let’s begin!
1. How to convert PPT to Video Online
For this, we will use Animaker’s new tool, PPT to Video Converter !
If you prefer to watch a video tutorial on converting a PPT into a video, please watch the video below.
Or if you prefer a textual guide, read on!
Converting a PPT to Video using Animaker involves just three steps.
Step 1: Uploading a PPT
Step 2: converting ppt into video, step 3: download your video.
Let’s see how to convert PPT to video using this tool.
First, Visit Animaker’s PPT to Video Converter . Here, click on the Call to Action button.

You will be redirected to the login page. Log in if you already have an account. If not, Sign up to create a new account.
Once that’s done, you will be directed to a blank project with the PPT upload window open. Upload your file and make sure it is in PPTX format. Please note that the maximum file size allowed is 50 MB.

Once the file is uploaded, it will look for font compatibility. If the font used in the PPT is available on the app, the tool applies it. If not, it assigns suitable fonts to the text. Now, if you wish to change the font, you have two options.
First, you can choose from the list of over 200 fonts available. Once you select a font, click on the Done button.
Alternatively, if you prefer a custom font, you can upload the font file by clicking on the Upload Font option. Once the file is uploaded, click on Done .

Next, choose the transition effect from the list of nearly 100 transition effects and click on Apply .

Then, choose the enter and exit effects for the elements in your presentation from the list of 30+ effects. Then click on Apply .

After that, choose a music track for your video. You can choose from over 30,000 music tracks and sound effects available for this. You can preview a track by hovering the cursor over it.

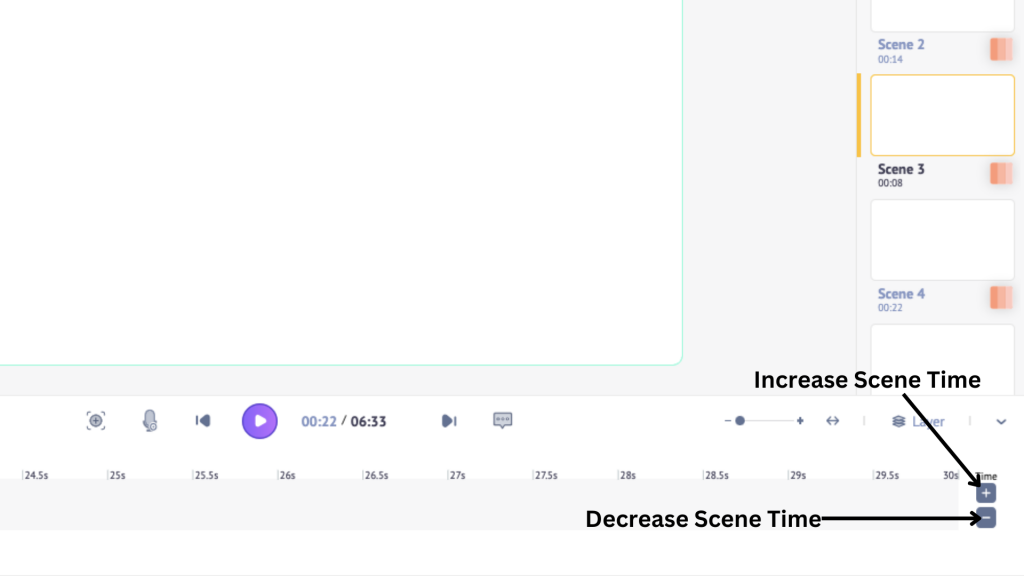
Once all these are applied, your slides will be converted into scenes. You can adjust the duration of each scene to your liking by clicking on the “+” and “-” signs in the scene timeline.
Now that’s how you convert your powerpoint into a video.
However, the scenes in the video look dull and lifeless despite adding transitions and music. Something more is needed to make it exciting and engaging.
Fortunately, many sections are available in the library on the left-hand side.
These include Character, Property, Text, BG, Image, Video, Music, and Effect sections, as well as Apps and Integration.

You can utilize these sections to enhance your video and make it lively. For example, you can use characters and lip-sync them to the content in your scenes. Yes, it is possible! To learn how, watch the tutorial below, which provides a step-by-step guide for beginners.
You can also add properties, change the background, and add images and videos.
Look at how I used a character, then animated and lip-synced it for the first scene of my video.
Looks great, doesn't it?
You can repeat the process for all the scenes.
After enhancing your video, all there is left to do is download it. To download your video, click on Publish and then select Download Video .
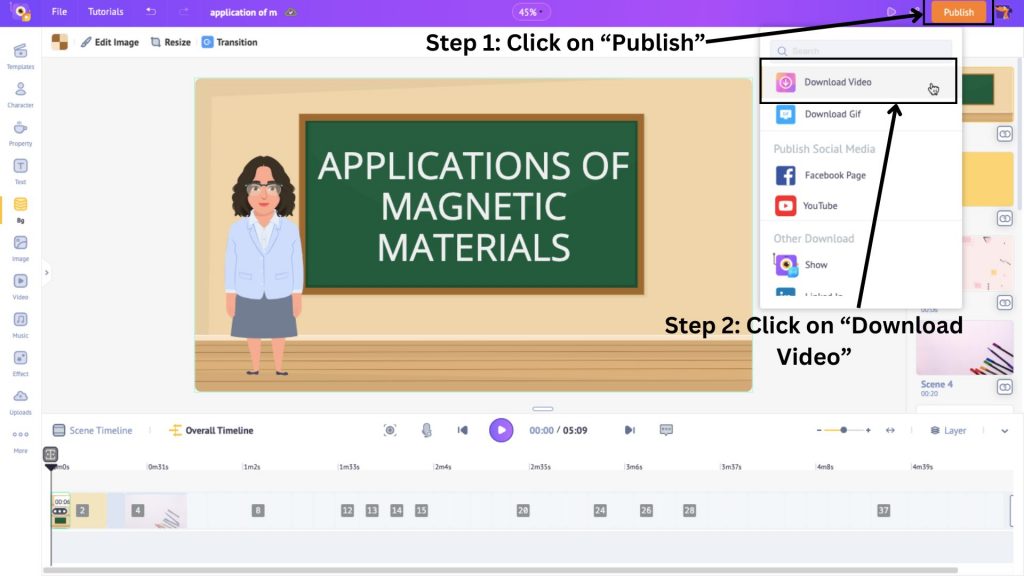
Then, click on Download .
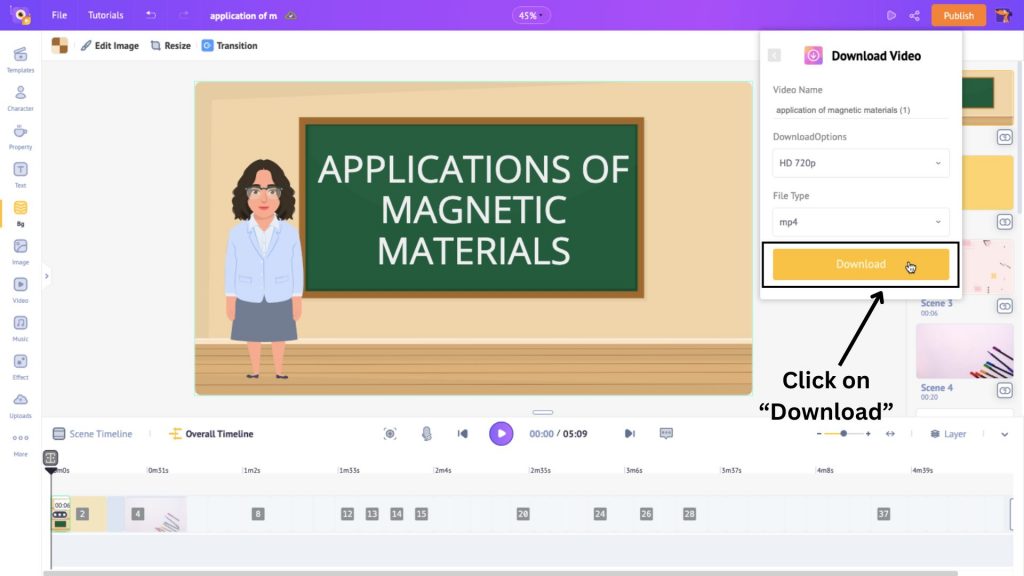
Your video will be rendered and available for download on the exports page.
This is how to convert ppt to video online. Let’s see how to do so offline.
2. How to convert PPT to Video Offline
In this section, we shall see how to convert PPT to video on two different operating systems.
Let’s look at each of these in detail.
1. How to convert PPT to Video in Windows
Open Microsoft Powerpoint and open your powerpoint file. Click on the “ File ” tab on the top menu.

Here, select “ Export ”.

Next, choose the “ Create a Video ” option.

Here, select your preferred presentation quality by clicking on the “ Presentation Quality ” drop-down menu.

The default timing for each slide is set to 5 seconds. You can change it if you wish.

However, this can become an issue if you need to spend more time on a particular slide.
So, if you wish to have a different duration for each slide, click on the second drop-down menu and select the “ Record Timings and Narrations ” option to record your presentation.

Once recorded, the timings for each slide get set. Then, click on the “ Create Video ” option.

Here, choose the destination folder, rename your file, and choose file type. Then, click on “ Save” .

The conversion begins, and you can see the progress below in the powerpoint window.

That’s how you can convert a PPT to video in Windows.
Now, let’s see how to do this on Mac.
2. How to convert PPT to Video on Mac
Open your powerpoint on Keynote and select the “ File” tab.

Here, Select “ Export to ” and click on “ Movie .”

This will open a pop-up window with options including slide duration, video resolution, and the ability to choose a range of slides to convert. Click on “ Next” after making the necessary changes.

Then, choose a destination folder and click on “ Export .”

The conversion process begins.
While the above method involves all the slides having a standard duration, there is a way to record with custom durations. Let me show you how.
First, open your powerpoint on Keynote and select the “ Play” drop-down menu.

Then, select the “ Record Slideshow ” option.

This will open a recording window. If you want to record your voice, click on the microphone icon, then hit the red dot to start recording. Use the arrow keys on your keyboard to move to the next slide.

Once you have finished recording, click on the red dot again to stop the recording. To exit the recording window, click on the “ X” sign.

Now, to convert the screen-recorded PPT to video, click on the “ File ” tab just like before.
Then, Select “ Export to ” and click on “ Movie .”
In this pop-up window, you can choose the resolution type. Then, click on “ Next ”.

Choose a destination folder and click “ Export ”.
And that’s how you convert a PowerPoint to a video on a Mac.
Congratulations! You have found different ways to convert your presentation to a video.
Who would have thought that you could easily convert your PowerPoint to video and improve its overall quality simultaneously?
Don't wait any longer! Head over to Animaker’s PPT to Video Converter now and start converting your PowerPoint presentations into engaging videos.
Related Posts

Rand Fishkin’s Video SEO Secrets: SEO Tips + His Untold Story [Video]

11 Best Royalty Free Music Sites for Your Amazing Videos!

13 Best Video Hosting Sites (Pros and Cons)
Subscribe to get awesome DIY tips that could break the boundaries of other DIY tools.
Create Engaging Animated Videos On Your Own
Our drag-and-drop builder makes it easy for anyone to create pro-level animated videos using pre-made templates and ready-to-go assets with zero technical skills.
How to Convert PowerPoint to Video (3 Useful Ways)
PowerPoint is a very efficient way to do a presentation and demonstrate your work. But when it comes to the case that you want to post your files on social networking or video-sharing websites like YouTube. Or you want to secure your presentation from being modified and repackaged by others. Well, you can choose to convert your PPT to a video for better sharing and watching.
But how can you make your PPT into a video? Today we'll show you 3 useful ways to generate a PowerPoint presentation to a video file step by step. You can read and select the method that suits you. Remember to get your slide and computer devices ready first. OK, let’s begin now!
How to Convert a PowerPoint to a Video in Microsoft?
When you record a presentation, you may want to keep all of its elements including the narration, animation, pointer movements, and timings you already set in the presentation. For this, here’s the most convenient and effective way to convert your PowerPoint into a video in Microsoft directly.
Check the following tutorial for generating a PPT to a video in Microsoft with different devices.
Generate a PowerPoint Presentation to a Video on Windows
To convert your slide show to a video file on a Windows device, the only thing you need to do is to open your PowerPoint presentation with Microsoft and follow the steps below:
Select File > Export > Create a video .
Select the Quality and if you want to Use Recorded Timings and Narrations .
Set the default time and click “ Create a Video ”
Enter a File Name and select the Saved Location .
Select the Video Format in the Save As type box. Click “ Save ” to generate the video.
Here’s a more detailed processes instruction for your reference:
Step 1. Open the PPT file you’d like to convert. Save it first then go to the “ File ”.
Step 2. Select “ Export ” and you can see the “Create a Video” session, Click on it.

For PowerPoint 2010 and previous versions you should click on the button named “ Save & Send ”.
Step 3. Then you can see the option of the output quality and other recording settings for your video. Select them at your wish.

An information you should know is that the greater quality of screen resolution you select, the larger the download size for video. If your data capacity is restricted, you might want to go with a low-quality option.
Step 4. Also, select “ Use Recorded Timings and Narrations ” if you have timings and narrations and wish to use them in your video presentation.

If you see the option doesn't available to be selected, it means you haven't recorded narrations or specified timings in your slide presentation.
Step 5. Set the amount of time you want each of your slides to display. And click “ Create Video ”.

Step 6. Choose the location and video format for your video presentation. PowerPoint supports two video formats: MPEG-4 Video (MP4) and Windows Media Video (WMV).

For the greatest compatibility with video players, the MPEG-4 Video format is suggested.
Wait a few minutes for your PowerPoint video to generate. The time it takes depends on the content of your slides. You can check the progress bar at the bottom to estimate the finishing time. Do not close your file until it is finished.
This method is quick and convenient. However, this function of Microsoft only supports recording the sound from a microphone, which means you can only record the voice but can not record the sound from the system . Also, the embedded media files in your slides won’t play in the video.
So, for Windows users who want to record your slide show with system sound, try out the solution of recording your screen through Xbox Game Bar :
Step 1. Press Windows + G to launch Xbox Game Bar. And navigate to the Settings, then select General to enable the features.
Step 2. Click “ Start Recording ” to record your PowerPoint playing screen. Or you can press Win + Alt + R to start capturing your screen.
Step 3. While finishing the recording, click the “ Stop Recording ”.
When the recordings are done, the video will be automatically saved as MP4 files on your computer.
With this method, you can only record the PPT in window mode by using the Xbox Game Bar. If you are doing the recording in slide show mode, then you can’t customize the recording session but only record it in full-screen .
Generate a PowerPoint Presentation to a Video on Mac
For Mac users, you may also save your presentation as a video file to run on computers that do not have PowerPoint installed.
Select File > Export .
Open the File Format list to select the video format (MP4 or MOV).
Check the box if you want to Use Recorded Timings and Narrations .
Set the default time you want to spend on each slide.
Click “ Export ” to generate the video.
PowerPoint 2016 for Mac does not enable video saving. This functionality is supported by other versions of PowerPoint for macOS (2011, 2019, and the Microsoft 365 subscription).
More detailed processes instruction for your reference:
Step 1. Open the PPT file you’d like to convert. Save it first.
Step 2. Go to the “ File ” then click “ Export ”.

Do not use Save As , because it doesn't offer video options.
Step 3. In the File Format drop-down menu, choose your video format. PowerPoint supports two video formats: MPEG-4 Video (MP4) and MOV .
MOV files are compatible with any application that supports QuickTime movies. MP4 is more widely accepted because it is a global standard, particularly on hardware devices.
Step 4. Select the Video Quality according to your need.
The quality of screen resolution you select may influent your generating time. And the greater quality of screen resolution you select, the larger the download size for video.
Step 5. Check the box next to Use Recorded Timings and Narrations to enable this setting shown in your video. You can also choose to set the amount of time the video will spend on each slide.

When you export your presentation as a video, the narrated audio that was recorded in your slides will play, while other embedded media files won't play.
Step 6. Name the video and choose the saving location, Click “ Export ”.
That's all, you can just wait for the converting procedure to complete, and your video presentation will be generated into video.
So these are the ways to make a video from your PowerPoint presentation file, which is very convenient and can output high-quality video. However, there still have some little defects in these methods.
Therefore, if you want to record your PowerPoint with sound which can customize your recording session while recording and generate it into a high-quality video , you may need a better tool to help you do this.
How to Record PowerPoint into Video with Audio via VideoSolo
Here we strongly recommend a powerful PowerPoint video recording tool VideoSolo Screen Recorder . It’s multi-functional software that can capture all computer screen activity and allows you to record computer screen with audio , generated by your Mac/Windows computer or sounds from a microphone, or both.
Conveniently, the video recorder allows you to capture a full screen or a customized area . You may also record from a specific window or record around the mouse pointer.
To meet various demands, VideoSolo presets multiple format and codec options. You can output the PowerPoint video in various formats, such as MP4, WMV, MOV, F4V, TS, and AVI . All media files will be saved in high quality by default and can be compatible with any mainstream digital device. So you can share your PPT video with your colleague or friends or upload it to the online platform in any format you want.
The program is also very user-friendly. Follow the steps below to record your audio.
Step 1. Download and Launch VideoSolo
Install VideoSolo Screen Recorder and open it to enter the interface.

Step 2. Choose "Video Recorder" and Select the Recording Area and System Sound
When you go to Video Recorder, you may record the entire screen or customize it by picking a region/window or some predefined dimensions.
Remember to toggle on "System Sound" after modifying the recording area to set a correct system volume. Remember to switch off the microphone unless you intend to narrate when recording your slide show.
If your recording environment is still not quite enough, and your voice is not big enough, you can try checking the box of Microphone enhancement by clicking the drop-down list in the microphone option. And to prevent making excessive noise, VideoSolo provides the function of Microphone noise cancellation , also by checking the option box as below.

Because of Mac system constraints, you may install an audio driver before recording audio in the Mac version. The procedure takes only a few minutes.
Step 3. Adjust Output and Hardware Acceleration Settings
Before you begin recording, go to " Preferences " by clicking the gear icon on the interface. On the pop-up window, click on the Output tab. Here you can change the location of your output files. Also, you can alter the video output format , video quality , frame rate , audio format, and audio quality . The supported output formats include MP4, MOV, WMV, MP3, AAC , etc.

If your computer runs with good performance, you may select 60 FPS for exporting but at the cost of creating a large file. You can also try utilizing video compressors to reduce video file size .
If your computer is regular, you may choose an appropriate format or codec approach to balance image quality and video file size. Many people opt for the MP4 format in that it shows good compatibility , maintains fine details , and delivers a smaller file .
Step 4. Start Recording your PowerPoint presentation
To begin recording a PPT slide in show mode, click the red " REC " button.
When capturing your screen, VideoSolo also allows you to add notes, shapes, and arrows. To open the drawing panels, simply click the Edit button.

With this function, you can make your words more clear while doing the tutorial presentation or lecture through your PowerPoint slides recording.
For a better view, you can go to "Preferences" (the gear icon) > "Recording" to hide float bar/desktop icons when recording. Then you need to use hotkeys to control the program.
Step 5. Output the Lecture Recorded
Once finishing recording, press the red square Stop button . Then you can quickly preview your recorded slide video on your computer.
If the recording is fine, click " Save " to output the video to your computer. Then you can share it with your students or upload the file directly online.
For VideoSolo Screen Recorder, you can even choose to record your voice when doing the presentation and also edit your video clip after the recording. Therefore, you can utilize it t to record your lecture or class if you are a teacher and when to give students a tutorial video. Also, not limited to slide show recording, VideoSolo Screen Recorder can also record webcam , and do live stream recording. Action speaks louder than words, come and download it now!
How to Make PPT into a Video Free Online?
People who do not want to download the software but still need to convert their PowerPoint slides to high-quality video quickly and conveniently can try to make your PPT into a video via the online tool. You can navigate to ASPOSE Online Converter .
This online tool can help you convert your PowerPoint slides into MP4 by uploading your file to the website.

Step 1. Prepare your PowerPoint slide files and enter the website.
Step 2. Upload your slide show files by clicking the white upload box.
Step 3. Adjust the slide's duration and resolution.
You can also select the recording range and the transitions and audio of the slides, but for the transitions and audio, you can only choose the default options which the website offers.
Step 4. Click “ Convert ” and wait for the presentation to generate into an MP4 video.
Step 5. Click “ Download now ” while the convert is finished.
Then you can get the video file of your PPT slides, very quick and easy-used. However, this kind of website will convert your file depending on the internet condition, so it may take some time to upload and convert if it is a large file. And the settings of the video are not a wide variety of optional . If you want to record your PowerPoint with sound and output high-quality video in a different format, we suggest you use the professional recording tool VideoSolo Screen Recorder .
The Best Way to Convert PowerPoint to Video
Above we introduce three useful ways to make your Microsoft PowerPoint slides into a video. To assist you in deciding which method is best for you, we've produced a comparison form of these three methods.
Microsoft's built-in converter is convenient to use when you are using the software to create your slide show, but it does not support recording your PPT slide with system sound and can not customize the recording area.
The online converter may be the quickest and most convenient way to convert your slide show into a video when you are in a hurry and do not need any sound record or extra edition in your video. But you still need to make sure your network condition is good while using this tool, and have the patience to wait for the uploading and conversion.
In general, VideoSolo Screen Recorder can be a better choice. It can record your presentation with both system sound and the human voice. The output format and quality can also be various in the VideoSolo's multiple functions. You can share the recording file with others in the formats you want. Furthermore, this screen recorder allows users to enhance recording efficiency by customizing the recording area , and taking annotations while recording, with frequently-used output parameters. You may now download and try it out!
FAQ about Convert PowerPoint to Video
Can i record my ppt slides with face.
Yes, you can. Theoretically speaking, most of the recording tools or converters do not support recording your slide shoe with your face shown on it, but with the multifunctional attribute of the VideoSolo screen recorder, you can enable the Webcam mode while recording your presentation slide show. Just turn on the webcam button before you start the recording. Then you can record your PPT with your face by using the webcam recording .
How do I Convert My Slide Show to a YouTube Video?
YouTube supports many kinds of video upload formats, such as MOV, MP4, AVI, WMV, FLV, etc. You just need to record and convert your PowerPoint into a video using the methods we mentioned above and then upload it to YouTube. We highly recommend using VideoSolo to record and output your slide show video in various formats, as different formats of video can show different resolutions.

Convert PPT to VIDEO
You have the option to convert your ppt file to video, as well as a variety of other formats, using our free online converter.
How to convert ppt to video?
Upload ppt-file, select «to video», download your video file, best tool to convert ppt to video, ppt to video fast and easy, secure ppt to video conversion, no software installation required, microsoft powerpoint, faqs on ppt to video conversion, ppt converter, convert to video.
- Slide Editor
How to Convert a PPT into a Video Online
Table of contents.
Gone are the days of presenting static slideshows. In today’s digital world, creating a video from your PowerPoint presentation is a game-changer. If you’re wondering how to convert a PPT into a video online, you’ve come to the right place. This guide will walk you through the entire process, from the benefits of conversion to the best online tools to use.
Can PowerPoint be Converted into a Video?
Absolutely! Converting a PowerPoint (PPT) presentation into a video format allows you to share your message more effectively. Microsoft PowerPoint even has built-in features that let you save your presentation as a video file.
Top 10 Use Cases for Converting a PPT into a Video Online:
- Online Tutorials – Create step-by-step video tutorials from your PPT slides.
- Webinars – Turn your webinars into accessible video content for your audience.
- Social Media Marketing – Share your presentation as a video on social media platforms.
- Educational Content – Offer engaging video lessons for students and educators.
- Business Presentations – Enhance your business presentations by converting them into videos.
- YouTube Content – Create high-quality YouTube videos from your PPT presentations.
- Product Demos – Showcase your products in action with video demos.
- Training Modules – Develop training modules for employees or customers.
- Event Highlights – Compile event highlights into a video presentation.
- Personalized Messages – Send personalized video messages for special occasions.
How to Convert a PPT into a Video Online:
You can use various online tools and platforms to convert your PPT into a video. Some popular options include online-convert.com, zamzar.com, and cloudconvert.com. Follow their simple steps, and you’ll have your video in no time!
Convert a PPTX to MP4 File:
- Open your PPTX file in Microsoft PowerPoint.
- Click on ‘File,’ then ‘Save As.’
- Choose the location where you want to save the file.
- In the ‘Save as type’ dropdown menu, select ‘MP4 Video.’
- Click ‘Save,’ and your PPTX will be converted to an MP4 video file.
Export PowerPoint to Video on Mac:
Open your PowerPoint file on your Mac. Go to ‘File,’ then ‘Export.’ Choose ‘MP4’ as your file format and select your video quality and timings. Click ‘Export’ to save your video.
Convert a PowerPoint Presentation to Video on Windows:
- Open your PPT file in Microsoft PowerPoint on your Windows computer.
- Click ‘File,’ then ‘Save As.’ Choose your desired location and select ‘WMV’ or ‘MP4’ as your file format.
- Click ‘Save,’ and your presentation will be converted into a video.
10 Best PPT to Video Converters Online:
- Online-Convert.com
- CloudConvert.com
- ConvertFiles.com
- FreeConvert.com
- FileZigZag.com
- Aconvert.com
- AnyConv.com
- Video.online-convert.com
Convert PowerPoint to Video for Windows, Mac, and Mobile:
Regardless of your operating system, there are tools available to convert your PPT into a video. For Windows and Mac, Microsoft PowerPoint has built-in features for conversion. For mobile devices, you can use online tools like online-convert.com or video converter apps available on the App Store and Google Play Store.
Convert a PowerPoint Presentation to a HD Video in 5 Steps:
Step 1: Open your PPT file in Microsoft PowerPoint.
Step 2: Click on ‘File,’ then ‘Save As.’
Step 3: Choose your desired location and select ‘MP4 Video’ as your file format.
Step 4: In the ‘Video Quality’ dropdown menu, select ‘HD.’
Step 5: Click ‘Save,’ and your presentation will be converted into a HD video.
Try Speechify Slides
Pricing: Free to try
Speechify Slides is the best AI slide editor for individuals and teams. Create stunning presentations, add text to speech , voice overs, royalty free background music and free stock images. All your projects are free to use for personal or commercial use.
Top Features : Templates, text to video, real-time editing, resizing, transcription, video marketing tools.
Speechify is clearly the best option for your slides or presentations. It also provides seamless integration with the Speechify Studio suite of AI products for people who need to create stunning videos and voice overs. Perfect for teams of all sizes.
Frequently Asked Questions
How can i convert ppt to video online for free.
Many online tools like online-convert.com offer free conversion services.
How do you make a PowerPoint into a video?
You can use Microsoft PowerPoint’s built-in features or online tools to convert your presentation into a video.
How do I convert a PowerPoint presentation to mp4 online?
Use online tools like online-convert.com or zamzar.com and follow their simple steps.
How do you convert a PowerPoint presentation to a video on Google slides?
Unfortunately, Google Slides does not have a direct feature for video conversion. However, you can download your presentation as a PPT file and then use online tools to convert it into a video.
How can I convert a PowerPoint to a video online?
Use online tools like online-convert.com, zamzar.com, or cloudconvert.com and follow their simple steps.
- Previous How to Add a Video in PPT from YouTube
- Next How to Add Video in a PowerPoint Slide

Cliff Weitzman
Cliff Weitzman is a dyslexia advocate and the CEO and founder of Speechify, the #1 text-to-speech app in the world, totaling over 100,000 5-star reviews and ranking first place in the App Store for the News & Magazines category. In 2017, Weitzman was named to the Forbes 30 under 30 list for his work making the internet more accessible to people with learning disabilities. Cliff Weitzman has been featured in EdSurge, Inc., PC Mag, Entrepreneur, Mashable, among other leading outlets.
Recent Blogs

Is Text to Speech HSA Eligible?
Can You Use an HSA for Speech Therapy?

Surprising HSA-Eligible Items

Ultimate guide to ElevenLabs
Voice changer for Discord
How to download YouTube audio

Speechify 3.0 is the Best Text to Speech App Yet.

Voice API: Everything You Need to Know

Best text to speech generator apps
The best AI tools other than ChatGPT

Top voice over marketplaces reviewed

Speechify Studio vs. Descript

Everything to Know About Google Cloud Text to Speech API
Source of Joe Biden deepfake revealed after election interference

How to listen to scientific papers
How to add music to CapCut
What is CapCut?
VEED vs. InVideo
Speechify Studio vs. Kapwing

Voices.com vs. Voice123
Voices.com vs. Fiverr Voice Over
Fiverr voice overs vs. Speechify Voice Over Studio
Voices.com vs. Speechify Voice Over Studio
Voice123 vs. Speechify Voice Over Studio
Voice123 vs. Fiverr voice overs
HeyGen vs. Synthesia

Hour One vs. Synthesia

HeyGen vs. Hour One
Speechify makes Google’s Favorite Chrome Extensions of 2023 list
How to Add a Voice Over to Vimeo Video: A Comprehensive Guide
Speechify text to speech helps you save time
Popular blogs.
The Best Celebrity Voice Generators in 2024
Youtube text to speech: elevating your video content with speechify.
The 7 best alternatives to Synthesia.io
Everything you need to know about text to speech on TikTok
The 10 best text-to-speech apps for android.
How to convert a PDF to speech
The top girl voice changers
How to use Siri text to speech
Obama text to speech.

Robot Voice Generators: The Futuristic Frontier of Audio Creation
Pdf read aloud: free & paid options, alternatives to fakeyou text to speech, all about deepfake voices, tiktok voice generator.
Text to speech GoAnimate
The best celebrity text to speech voice generators, pdf audio reader, how to get text to speech indian voices, elevating your anime experience with anime voice generators, best text to speech online, top 50 movies based on books you should read, download audio, how to use text-to-speech for quandale dingle meme sounds, top 5 apps that read out text, the top female text to speech voices.
Only available on iPhone and iPad
To access our catalog of 100,000+ audiobooks, you need to use an iOS device.
Coming to Android soon...
Join the waitlist
Enter your email and we will notify you as soon as Speechify Audiobooks is available for you.
You’ve been added to the waitlist. We will notify you as soon as Speechify Audiobooks is available for you.
Enter your email address below and we'll send you password reset instructions.
- Audio Converter
- Video Converter
- Image Converter
- Document Converter
- Archive Converter
- Presentation Converter
- Font Converter
- Ebook Converter
Online Presentation Converter
Convert presentation files of any formats online, how to convert.
Drag and drop the necessary presentation file or choose it from your device, click the "Convert" button. Wait a minute or two depending on the file size and download the converted file.
In the cloud
All conversions take place in the cloud which is why it doesn't slow down your phone or computer.
Easy to use
The interface is really intuitive, it doesn't even require any presentation conversion knowledge.
Access from anywhere
The tool works online right in your favorite browser: Chrome, Firefox, Safari, etc. There is no need to download anything to your device.
Works on any device
Convertio works on any device and operating system: Mac, Linux, Windows, iPhone, Android. No installation is required.
Secure tool
We don't store your files for more than 24 hours after which we permanently delete them from our servers — only you have access to them the whole time. Read more about security .
Supported Formats
Presentation conversion quality rating.

Written by Casey Botticello
Disclosure : Some of the links below are affiliate links, meaning that at no additional cost to you, I will receive a commission if you click through and make a purchase. For more information, read our full affiliate disclosure here .
Great graphic design is the secret super power behind many content creators. However, for many content creators, graphic design is either too time consuming to tackle or too expensive when outsourced to professional designers. Luckily, Canva has made creating your own custom designs much easier. In this tutorial, our team of design experts will cover how to turn a presentation into a video, in Canva. This has many useful applications. Content creators can turn ordinary presentations into courses, webinars, or narrated educational material.
How to Turn a Presentation into a Video in Canva
1. click on presentation option on canva’s homepage.

Go to the Canva homepage and search for ‘Presentation’. This will allow you to see so many ready-to-use templates. Some of the templates are free while others are for ‘Pro’ users only. You can use this link to get a free 30 day trial of Canva Pro!
2. Edit Slides
Let’s say we are making for an aesthetic mood board for your traveling photography business. All you need to do is select the appropriate mood board template for it. You can also choose any of the templates and customize them according to your requirements.
")
3. Add Presentation Notes
Once you are happy with your presentation, you can also add notes at the bottom of the page. You can add important bullet points or the script in the notes. It will help you to remember the important things while presenting it.
")
4. Use Present and Record Feature
After adding the notes, your presentation is ready to record. So all you need to do is go to the three dots menu and select ‘Present & Record’.
")
5. Activate Webcam or Microphone
You can also ‘Pause’ and ‘Resume’ your recording in case you want to move from the WebCam. This will record your screen and yourself in the circular webcam at the bottom of the page.
")
6. Share Link or Download Video
After recording, you can use the ‘Copy Link’ option to get a sharable link. You can also download the recorded presentation. You can use a shareable link in emails or directly send the downloaded recording.
")
7. View Final Product (with You Face Appearing in the Circular Cam)
The results will look as shown below. You can see yourself in the circular cam at the bottom corner of the page.
")
Canva is an amazing graphic design tool, and I hope you found this tutorial covering how to turn a presentation into a video in Canva, useful! Click here to read our comprehensive Canva Guide. If you haven’t tried CanvaPro, click here to try it for free for 30 days through our exclusive offer! Below are several related Canva tutorials that you might find useful.
Related Articles
Latest Posts
- How to Configure Your Mediavine Ad Settings to Optimize RPM
- Why Was My Blog Rejected by Mediavine?
- February 2024 Niche Site Report
- January 2024 Niche Site Report
- Roles in a Blogging Business
PowerPoint: How to Add Audio to Powerpoint on Windows 10 and Mac
Last Updated Thursday, August 31, 2023, at 5:00 am
Known Issue (August 14, 2023):
Some Windows 11 users are experiencing issues with PowerPoint exports when they are turned into .mp4 files. Visuals within the exported PowerPoint are appearing as flipped, or upside down. We are working with Microsoft to find a solution.
As a workaround, please convert the file as a .WMV file option and save it in My Media. The following are directions on how to convert a PowerPoint Presentation with audio to a .WMV file . For more support or to help troubleshoot issues, please reach out to the LTS Help Desk at [email protected] .
Microsoft PowerPoint offers features to record audio narration and export it as a video. PowerPoint records audio slide-by-slide rather than in one continuous file, allowing creators to easily re-record a slide if they make a mistake or need to change something later. Exporting as a video and uploading to Kaltura or Canvas for streaming is advantageous since it standardizes file types, doesn't require a download to view, is in a format that can be captioned, and allows viewers to navigate more efficiently.
A recent update has made the process comparable on a Mac, but the specifics vary. Windows 10 instructions follow; Mac users can click the link below to jump to the appropriate instructions.
- Instructions for Mac users
Windows 10 Instructions:
The following instructions explain how to add audio to your PowerPoint presentation on Windows 10 and export that PowerPoint as an MP4. The text instructions cover the same information as the embedded video below.
NOTE: If you have an older version of PowerPoint, you may need to update it to access the features described below. If you do not have PowerPoint, you can download it and other Microsoft Office products for free by going to office365.uwec.edu. If you have questions about updating or installing PowerPoint, contact the LTS Help Desk at [email protected] or 715-836-5711.
- Design your PowerPoint TIP: Use images and limit text to better engage viewers/listeners.
- Click Record Slide Show NOTE: Audio may start recording automatically if you have an older version of PowerPoint. It will still work, but this version offers reduced functionality.
- Record narration and avoid reading text on the slide out loud to viewers. Click the blue Replay button to listen to the recorded audio and ensure it was recording.
- Press [Escape] or the ‘X’ button located in the top right of the screen when the audio recordings are finished. You will see a speaker icon on slides that have audio.
- Select Export (steps 10-14 are shown in screenshot below).
- Select Create a Video .
- Optional: Select Full HD (1080p) for the video quality; it is unlikely a higher quality is needed.
- Select Use Recorded Timings and Narrations.
- Follow prompt/pop-up window to save the video in a memorable location.
- How to upload and share with Kaltura (Instructors should use Kaltura. Students will need to use it if the file is over 500 MB, which a PowerPoint probably won't be and they can use Canvas.)
- How to upload and share in a Canvas assignment (students)
- How to upload and share in a Canvas discussion (students) - the instructions refer to the "rich content editor" which is just the features in the top of the discussion post reply.
Elaboration on the Recording Features:
- Timing Feature – there is a rolling time feature for the individual slide and the overall presentation. Allows the speaker/presenter to monitor how long they are talking.
- Microphone Feature - Click on Settings and select Microphone and then the specific device to set up before recording.
- Replay Feature - Use to check that the audio is recording properly before starting additional slides.
- Clear Feature - Select Clear to delete/re-record audio.
- Don’t set the camera to record - Make sure this button has a diagonal slash through it to avoid the problem.
Mac Instructions:
The following instructions will teach you how to add audio to your PowerPoint presentation on a Mac and export that PowerPoint as an MP4. The text instructions cover the same information as the video embedded below.
NOTE: It is essential to have the Office 365 version of PowerPoint or you will not be able to save your PowerPoint as a video. If necessary, you can download it and other Microsoft Office products for free by going to office365.uwec.edu. If you have questions about updating or installing PowerPoint, contact the LTS Help Desk at [email protected] or 715-836-5711.
- TIP: Use images and limit text to better engage viewers/listeners.
- Click Record Slide Show
- TIP: Before you begin recording your full presentation, do a practice recording to verify your microphone and other settings are correct.
- NOTE: Avoid reading the text written directly on the slide; use the slide to elaborate on the material being presented.
- Stop speaking for a second to prevent the audio from cutting out as slides change. Resume speaking when the time starts moving again under the Current slide timing feature to the left of the recording button.
- Click Stop or Pause at the top of the screen and then End Show in the top left corner when all the audio recordings have been finished.
- Check the audio by clicking on Play from Start under the Slide Show tab or the presenter mode icon at the bottom of the screen.
- Edit the name of the file and where you would like to save the video following PowerPoint's prompts.
- Click Export
- Upload your mp4 video to Kaltura or Canvas to share it:
- How to upload and share to My Media (Instructors should use My Media. Students will need to use it if the file is over 500 MB, which a PowerPoint probably won't be and they can use Canvas.)
- How to upload and share in a Canvas discussion (students) - the instructions refer to the "rich content editor" which is the tool at the top of the discussion post reply.
Additional Video Tool Options
For more information about recording options available, click here to view a comparison of each tool's features.

EdTech Hustle
How to Convert Your Canva Presentations to PowerPoint - Updated for 2023
Posted: March 13, 2024 | Last updated: March 13, 2024
In this video, you'll learn how to convert your @canva presentations into PowerPoint files in just a few simple steps.
More for You
NASA Solves Moon-Crossing Object Mystery
Researchers make concerning discovery after observing 'unpredictable' behavior of African lions: 'We've already seen evidence of big changes'
Paramount shows 'Gladiator 2' as Disney goes R-rated
If your eyes hurt after watching the solar eclipse, here's what you need to know
0412 Today in History
Scientists say outdated diabetes drug still has something to offer
Space Rock Slammed Into Moon - The Explosion Was Seen From Japan
Notre-Dame's transformation five years after fire
‘Station 19’ stars reflect on the legacy of one of TV’s most beloved lesbian romances
Senate Dems Finally Subpoena Supreme Court Puppetmaster
‘Gladiator II' First Look Gets Thumbs Up & Loud Cheers From Exhibs At CinemaCon
New hypothesis emerges on Parkinson's disease's origins and spread
James Webb telescope finds origins of the biggest explosion since the Big Bang — revealing a new cosmological mystery
Meet the 55 newest dog breeds to get recognized by the American Kennel Club
Ten arrested over 2018 double murder
A new solution proposed for drought-stricken Panama Canal goes around it
Secrets of ancient Herculaneum scroll deciphered by AI
How to keep your kidneys healthy, and how to spot when things are going wrong
Trump Deposition in SPAC Suit Scrapped Ahead of Criminal Trial
Reacher Season 3: Expected Release, Plot, Cast & News
IMAGES
VIDEO
COMMENTS
51 seconds. On the File menu, select Save to ensure all your recent work has been saved in PowerPoint presentation format (.pptx). Click File > Export > Create a Video. (Or, on the Recording tab of the ribbon, click Export to Video .) In the first drop-down box under the Create a Video heading, select the video quality you want, which pertains ...
How to convert a PPT to a MP4 file? Choose the PPT file you want to convert. Change quality or size (optional) Click on "Start conversion" to convert your file from PPT to MP4. Download your MP4 file. Try the MP4 conversion with a PPT test file.
To turn a PowerPoint presentation into a video, first, open your presentation with the PowerPoint app on your Windows or Mac computer. In the top-left corner of PowerPoint, click the "File" option. From the sidebar that opens after clicking the "File" option, select "Export." In the "Export" menu, click "Create a Video."
Choose the PPTX file you want to convert. Change quality or size (optional) Click on "Start conversion" to convert your file from PPTX to MP4. Download your MP4 file. Try the MP4 conversion with a PPTX test file.
Aspose.Slides PPT to Video converter is a free online service for converting PowerPoint presentations to videos. Slides: Convert all slides in your PowerPoint to video.Or you can select specific slides or a range of slides for conversion. Slide duration: Specify the time that is spent showing each slide in the video. Video resolution: Select the resolution that determines the amount of detail ...
Free online PowerPoint to video converter. VEED lets you convert your PowerPoint presentations to videos in just a few clicks, straight from your browser. You can even record yourself while presenting your slides using our free screen and webcam recorder. Upload your slides and record your webcam, audio, and screen.
Watch this video to learn how to convert your PowerPoint presentation into a video. When you make a recording of a presentation, all its elements (narration,...
Enhance and Save PPT as MP4. There's nothing more frustrating than faded colors on a presentation video. Use Flixier's video enhancer tool to automatically adjust brightness, contrast, saturation, or gamma values as you convert PowerPoint to MP4, and you get a professional-looking video within minutes. The live enhancement previews allow you full control over the look and feel of your ...
Step 3 - Select Video Format and Create a Video Presentation. Click Create Video button and choose the destination folder and output file name. For end users wondering how to convert ppt to MP4, this is the step where you can select MP4 as your output format. PowerPoint supports saving slide decks to MP4 or WMV video formats.
Learn how to publish your own video using Microsoft PowerPoint with narration, annotations, animations, and timings. As full disclosure, I work at Microsoft ...
To begin the export, go to the File > Export > Create a Video menu option. Go to File > Export > Create a Video to choose the export settings for your PowerPoint presentation video. From this menu, there are several key settings to choose before you export your finished video.
Record Your PPT Presentation. Start by accessing Flixier's dashboard and choose "Record" from the menu. Choose from a variety of layout options available. You can opt to record the slides or your slides and webcam at the same time, granting access to your screen, camera, or microphone with a simple click. Capture your screen, webcam, or ...
How to Save PowerPoint as Video on Windows . After you create a presentation, convert your slides into attention-grabbing videos. The steps below show how to turn a PowerPoint file into a video. The result is a file that incorporates animation, narration, and other custom content included in the original PPT or PPTX file.
Browse to the location where you want to save the file and give it a name then press "Save.". While the video is being created, you will see the small progress bar at the bottom of your PowerPoint window. Wait till this is done and then go to your video. Now you can double-click your video file and it will automatically play with your video ...
1. How to convert PPT to Video in Windows. Open Microsoft Powerpoint and open your powerpoint file. Click on the "File" tab on the top menu. Here, select "Export". Next, choose the "Create a Video" option. Here, select your preferred presentation quality by clicking on the "Presentation Quality" drop-down menu.
Step 1. Open the PPT file you'd like to convert. Save it first then go to the " File ". Step 2. Select " Export " and you can see the "Create a Video" session, Click on it. Note:. For PowerPoint 2010 and previous versions you should click on the button named " Save & Send ". Step 3.
Learn How to turn a PowerPoint Presentation into Video with the narration. Record your presentation going through the slides and PowerPoint will pick up the ...
Choose file to convert. choose file. Drop files here. 100 MB maximum file size or Sign Up. You have the option to convert your ppt file to video, as well as a variety of other formats, using our free online converter.
Convert a PowerPoint Presentation to a HD Video in 5 Steps: Step 1: Open your PPT file in Microsoft PowerPoint. Step 2: Click on 'File,' then 'Save As.'. Step 3: Choose your desired location and select 'MP4 Video' as your file format. Step 4: In the 'Video Quality' dropdown menu, select 'HD.'. Step 5: Click 'Save,' and ...
Drag and drop the necessary presentation file or choose it from your device, click the "Convert" button. Wait a minute or two depending on the file size and download the converted file. Wait a minute or two depending on the file size and download the converted file.
How to Turn a Presentation into a Video in Canva. 1. Click on Presentation Option on Canva's Homepage. Go to the Canva homepage and search for 'Presentation'. This will allow you to see so many ready-to-use templates. Some of the templates are free while others are for 'Pro' users only. You can use this link to get a free 30 day trial ...
A great article from Hour One which will guide you through the straightforward steps of how to convert PowerPoints to videos, ensuring your message is heard, seen, and remembered.
Click the Slide Show tab. NOTE: Do not add audio under Insert and Record Audio; this method will not allow you to save your PowerPoint as a video since it does not synchronize timings to automatically move the slides with the audio. Click Record Slide Show. Review the narration setup and navigation before recording.
In this video, you'll learn how to convert your @canva presentations into PowerPoint files in just a few simple steps. More for You Matthew McConaughey says there's an 'initiation process' in ...