
Microsoft 365 Life Hacks > Presentations > How to create effective presentation handouts

How to create effective presentation handouts
Whether you create presentations for school, work, or clubs, distributing handouts makes an impression and amplifies your message. The benefits are twofold: putting together a handout prepares you for your speech and allows your audience to retain the information better.
You can put together handouts easily. Learn what to include to ace your next presentation.

Why are presentation handouts important?
Creating handouts help you prepare what you want to say . They also set expectations for your audience members and allow them to focus more on your speech because they don’t have to take such thorough notes.

Tell your story with captivating presentations
Powerpoint empowers you to develop well-designed content across all your devices
If you want to create an effective presentation handout, here’s what you should include.
1. List the key points of your presentation
To create a strong presentation handout, list the key facts from your speech. Keep it simple—you don’t need to rewrite your entire presentation. Remember, you’ll discuss a lot of the material in your slides as well. Listing out your presentation’s key points help your listeners reflect on the information later. By reading your presentation’s key points, your audience may also come up with or remember the questions they want to ask you at the end of your talk.
2. Include your sources
Effective presenters back up their information with sources, especially in science and history-related fields. Providing sources encourages your audience do more research on their own time. You can also provide further reading in your handout, like books or article links, if you aren’t able to cover everything in a single lecture.
3. Make your presentation handout professional
A professional-looking presentation handout establishes your credibility and authority with your audience. When presenting for work or an organization, include your logo on your handout.
You don’t have to be a graphic designer to create an attractive presentation handout—explore dozens of free Microsoft Word templates you can use to polish your handout.
4. Include white space
Not everyone comes prepared for a presentation. Leave white space in your handout so your audience can take notes on what you say. They can also use this space to write down questions they want to ask you, so they don’t forget them by the end of the presentation.
5. Include your contact information
Audience members may want to ask you questions about your presentation later. Include information like your name, job title, website, and email so your audience can contact you in the future.
6. Proofread your handout
Before you print out or email your presentation handouts, make sure to thoroughly proofread everything first. Are your sources spelled correctly? Are there any typos in your email address or links? Do the key points correspond with your presentation? Taking the time to review your handout before finalizing it will ensure it’s a quality handout.
Creating a presentation handout will make your presentation stronger and the information easier to digest. Are you feeling nervous about an upcoming presentation? Learn how to calm presentation anxiety .
Get started with Microsoft 365
It’s the Office you know, plus the tools to help you work better together, so you can get more done—anytime, anywhere.
Topics in this article
More articles like this one.

How to create an educational presentation
Use PowerPoint to create dynamic and engaging presentations that foster effective learning.

Five tips for choosing the right PowerPoint template
Choose an appropriate PowerPoint template to elevate your presentation’s storytelling. Consider time length, audience and other presentation elements when selecting a template.

How you can use AI to help you make the perfect presentation handouts
Learn how AI can help you organize and create handouts for your next presentation.

How to use AI to help improve your presentations
Your PowerPoint presentations are about to get a boost when you use AI to improve a PowerPoint presentation.
Everything you need to achieve more in less time
Get powerful productivity and security apps with Microsoft 365

Explore Other Categories
How to Create and Format Handouts in PowerPoint
Need to create handouts for your next presentation? Here's how to do it in PowerPoint easily.
Handouts are a fantastic tool to use in conjunction with PowerPoint presentations. They offer an additional level of information and detail that slides alone simply cannot convey.
Fortunately, PowerPoint fully supports this feature, and you can easily create handouts for your presentations. You can customize the look and layout of the handout, include notes, and then print or export it to share with your audience during your presentation.
What Are Handouts in PowerPoint?
Handouts are essentially a condensed version of your PowerPoint presentation. They include the slides in your presentation and any additional notes that you omitted in the slides.
PowerPoint users often overlook the handouts feature. As these handouts are usually in print format and not digital, their potential often goes unnoticed. However, handouts can actually transform your presentation from a dull monologue to an interactive experience. Here are some benefits of using handouts in your presentations:
- Provide a more comprehensive view of the topic being presented.
- Serve as a helpful reference for the audience to refer back to after the presentation.
- Keep your audience engaged by offering a tangible document.
- Encourage the audience to pay attention and stay focused.
- Allow your audience to jot down important information and ideas as you present them.
Thankfully, PowerPoint recognizes the usefulness of handouts and makes working with them easy. You can customize PowerPoint handouts in the Handout Master view. PowerPoint handouts can include 1, 2, 3, 4, 6, or 9 slides per page, and you can even export them to Word.
If you're set on aceing the presentation, you can use PowerPoint Speaker Coach to improve your presentation skills .
You can create and format your PowerPoint handouts using the Handout Master view. This view is similar to Slide Master in PowerPoint and lets you format the fixed elements of your handouts.
- In the Master Views section, click Handout Master .
- Check whether you want to display the header, footer, date, or page numbers in the Placeholders section.
- Change the appearance to your liking.
- Once you're satisfied with everything, click Close Master View to return to your slides.
If you've enabled the header and footer for your handout, you can double-click them in the Handout Master view to input text into them.
You can also add images to your handout by dropping them in PowerPoint. Keep in mind that the text and images are fixed components, and they'll appear on every page of the handout.
How to Print Handouts in PowerPoint
You can print handouts for your presentation in PowerPoint from the Print menu. You'll have the option to change the handout's layout here too.
- Go to the File tab in PowerPoint.
- Select Print .
- Under Settings , click Full Page Slides .
- Select your desired layout under Handouts in the drop-down menu.
- Check the rest of the print settings and then click Print .
The printed handout will contain images of the slides with the formatting you set in the Handout Master view, but it won't include notes. If you wish to include your notes in the handout, consider exporting it to Word.
How to Export PowerPoint Handouts to Word
Another nifty option is to export your handouts to Word rather than directly print them from PowerPoint. This feature allows you to include notes in your handout, and it links the PowerPoint slides in the Word document.
To export handouts in PowerPoint, follow these steps:
- Choose Create Handouts from the options.
PowerPoint will now start exporting your presentation to Word. The process might take a while, depending on the size of your presentation. Once the handout has been exported, Word will automatically open and display it. You can then make any necessary edits, save it as a PDF, or print it.
Enhance Your Presentation With Handouts
Using handouts in conjunction with PowerPoint presentations can greatly enhance the effectiveness and impact of your presentation. They provide a tangible representation of the information being presented and can help keep the audience engaged and focused throughout the presentation.
You can easily customize the handouts in PowerPoint to meet your needs. From there, you can either print the handouts from PowerPoint or export them to Word for more flexibility and editing. Next time you're preparing a PowerPoint presentation, consider including a handout—your audience will thank you for it.
All you need to know about Presentation Handouts
Hitiksha jain.
- Body Language & Delivery

What is a Presentation Handout?
A presentation handout or a handout is a piece of printed information which is handed over to the audience after a presentation, meeting, or a conference. It’s an integral part of the total experience of your audience. A well-thought handout may be your best tool towards ensuring your message is effectively communicated.
It allows your audience to focus more on what you said during the presentation, and serves as a tangible reminder of your content afterwards.
Let’s assume you’ve been asked to give a speech, and you’re excited to give the best presentation possible. You put in all kinds of preparations– from creating an amazing presentation, probing for perfect examples, to infusing memorable anecdotes, terrific insights, great visuals and even a wry joke here or there. You’ve covered all the possible angles to make your presentation or speech impactful and effective– or have you?
An effective presentation is a combination of not only your PowerPoint Presentation, but also the other forms of communication- writing, reporting, handouts to persuade, convince, inform, and enlighten your audience.
As a brand or a speaker, you would want your message to have a long lasting impact over your audience for which you need concrete manifestations like handouts, as most of us focus on preparing what will happen during the presentation, not what happens afterwards .
You need to convince people of why you are doing something rather than explaining what you are doing .
“ People don’t buy what you do, they buy why you do. “ Simon Sinek

Benefits of providing a handout:
1. helps you avoid information overload.
It allows you to cut down the amount of information that you cover in your presentation and combines the most important aspects from it in a handy text form.
By adding the essential and worth-knowing content about your brand will help you make your speech more memorable.
Chunky paragraphs make your audience apathetic towards reading your handout as the essence is lost.
2. Lays emphasis on your message
Your key message should permeate through all of your business materials- brochures, website, or handouts. You need to provide supporting data around that one message to lay emphasis on it.
If there is one thing that should be crystal clear in your handout, it is your key message. As it sets you apart from your competition and describes your brand as a whole.
3. Acts as a concrete reminder
Chances are, your audience won’t remember the details of your presentation a year later. With a handout, they have all the important information you covered as well as a reminder of you and your brand.
As it is a takeaway material, whenever the audience member looks at it, it’ll help them recall all what you spoke.
4. Allows you to add supporting data
Your handout can be supplemented with additional information along with the main elements from your presentation. This can even be visuals, graphics, or references, as it can really clarify and supplement your main argument and tie things together.
It is a good idea to provide your contact information and email. Depending on the type and purpose of the presentation, you can also provide your business address and telephone number.
5. Provides a synopsis of your speech
The information in your handout is short and to the point. Before expanding on individual and main points from your presentation, you need to focus on your target audience.
By doing this, you tailor the handout to their level, avoiding technical terms where they would get distracted from your point. It is very important to condense the core statements of your presentation into key points, rather than including a distracting stream of text. This way, you retain your audience’s full attention.
Pro Tip- To arouse your audience’s curiosity right at the beginning of your handout, you could include an upbeat quote, a proverb or a question.
6. Personal Branding
Personal branding is the practice of marketing people and their careers as brands. It is an ongoing process of developing and maintaining a reputation and impression of an individual, group, or organization.
Your personal brand is more than the brand statement you use as your elevator pitch or to market yourself in your digital, and online marketing communications.
Handouts allow you to define your personal brand. It is the combination of your personal attributes, values, drivers, strengths, passions, and contact details that differentiates your unique promise of value from your peers.
Considering the above points, it’s obvious, then, that a handout can be very useful for your audience, your presentation and yourself. Once you know what to do, they can be relatively straightforward to produce.
Ways on how you can make your handouts intriguing:
1. it is a reflection of your presentation.
Imagine watching FRIENDS from any random episode where you seldom know the character sketch of a Chandler who is witty and full of one liners, or a Joey who is cute but a little slow, or a Monica who is obsessed with cleaning.
In such a situation, you are bound to feel unconnected because you haven’t watched the 1st season and the episode you are watching is nowhere a reflection of it.
In the same way, your handout is a summary of what you’ve spoken in your presentation, so it automatically becomes a reflection of it. The audience should be able to resonate your handout with your presentation that they’ve just attended.
Ideally, your handout should have the same title as your presentation and should follow the same structure, so that audience members can easily find the information they want.
2. Remember, it is not a copy of your presentation
Printing your entire presentation on the handouts is lazy and least effective. It is supposed to have key points from your entire speech.
You need not limit your handout only to the topics covered in your presentation. It’s okay to include related information that further supports your speech.
While you were preparing your presentation, you were selecting the most essential information, offered concisely, that supported your messages. With your handout, you’re free to expand on bullet points and graphics to allow a more complete explanation. Just don’t go overboard. Although you’re offering more information, you must still keep it well organized and to the point.
3. Take proper time to prepare your handouts
As stated earlier, we focus and give time to prepare our presentation and what happens during that in order to not make a fool of ourselves upon the stage. And before your presentation it strikes you that you need to have handouts, so you make it hurriedly- giving it less importance.
Cobbling together a handout at the last moment is not only stressful, it can be counterproductive, as it undermines your professionalism and never goes unnoticed.
Remember, your handouts require the same amount of focus and time as your presentation. In fact it is something your audience will take along with them, so I’m sure you would want your handout to have all the essential information regarding your brand along with CTA.
4. Professionalism is the key
Make your handouts look attractive and appealing to the eye. Here are certain ways to make it look professional:
- Avoid cluttering of data.
- Avoid putting a lot of data that your handout begins to look like a textbook.
- Use a simple and readable font.
- Use the same graphical elements and the same colours.
- Don’t clutter up your handout with data without sacrificing the essential content.
The handout is a concrete reminder of your presentation. It may also get passed onto other people who were not at your presentation. So make sure it enhances the perception people have of you.
5. It should have more essential information
Presentations are supposed to have a lot of visual content; however, they are unlikely to make sense without the additional text. Going overboard with text in your presentation is not a good idea. They are mainly used for inspiring people to find out more about a topic or your brand.
Add the extra information in the handout.
As said earlier, your handout is a takeaway your audience will take to review later or maybe pass it to someone else who didn’t attend your presentation. Therefore, it is very important to add essential and supporting data- contact information, case studies, references, marketing literature, or other collateral materials.
6. Add references (if any)
Sometimes it can be confusing to know when and how to cite sources during a speech, especially while using a visual-aid PowerPoint Presentation.
If you’re citing research, references become an inevitable part of it.
But the question is where to add these references?
Well, it is better if you don’t clutter your slides with references. So the best option is you can add it in your handouts. This will not only make your presentation neat and organized but also make your handouts insightful.
However, you need to inform your audience that you’ve cited sources for this XYZ research in your handout. Also, try providing information about related blogs, websites, and books (if any).
7. Make your handout a stand-alone
Your handout may be passed onto people who were not present at your presentation. Or an audience member may look at it a year from now when they’ve forgotten most of your speech.
Make sure your handout helps them recall it and something that will make sense to them. For people who weren’t present for your presentation, include a brief credibility-establishing information about you.
When is the best time to distribute your Handout, before or after?
Imagine that you’ve spent weeks preparing your presentation wherein you’ve got wonderful persuasive material as well as a concise handout summarizing and supporting your arguments.
The only one thing that you didn’t plan was when to distribute the handouts. Maybe at the beginning? At the end? In the middle? Or does the timing even matter?
Rule of thumb: Distribute your handouts at the end.
It’s generally to your advantage to distribute handouts at the end of your presentation.
Benefits of distributing your Handouts before your presentation:
- You make it clear that the handout is meant to be taken away. There’s no guarantee that your handout doesn’t end up in the recycling bin, but your aim is to give it a chance to survive as long as possible, carrying your message with it.
- If you plan to hand it out at the end, it can be sued as a summary document (as opposed to making it a less useful transcript of your presentation)
- Your audience will not be distracted reading it during your presentation, when you need their eyes and attention with you
- The surprises, suspense, and case studies won’t be disclosed (which might otherwise be hinted at or spoiled by the handout)
- It is symbolic of giving a gift to the audience to thank them for their attention
- There will be less rustling of papers to distract both you and your audience.
However, there are a number of caveats wherein you will have to distribute it before your presentation:
- When your speech is highly technical and detail-oriented, it is better to put those words in the hands of the audience
- When your content is far too dense, you can’t expect your audience to absorb such voluminous data. So to handle this: you can provide them the material and draw their attention.
- Also, in case of coaches and trainees you will have to handout workbooks for your presentations at the start, as the audience may need to read along, do exercises, etc. in the workbook itself.
Clear and Concise: How to structure a Handout
The motto “less is more” applies very effectively to handouts. In concrete terms, this means: do without whole sentences and make sure you use key points, abbreviations, arrows and symbols. Ideally, your handout should not consist of more than two A4 pages.
In addition to important information from your presentation, a handout needs to include the following:
- Basic information, probably in the upper left corner of the handout, such as the location of the presentation, title, name of the speaker (optional)
- The date, probably in the upper right corner
- Heading– preferably the title of your presentation and it should be centered
- A clear structure, based on the individual headings of the presentation
- An aesthetic page layout with a standard font type and colour– preferably same as your presentation.
The structure of your handout should follow the structure of your presentation. It is best to limit your points to those which support your main argument. Keep the sub-items on the handout as simple as possible and don’t go into too much detail.
To make your handout visually appealing, work on your fonts and colours. In addition to using clear, standard fonts, try to keep the font size in the headers and footers uniform and smaller than in the main part.
Pro Tip- Create an area for your audience to make their own notes on your handout. Either make the right margin wider or leave a few lines of space under your last point.
Here’s an example,

- Overboarding of information will make your handout look very cluttered leading them to lose interest
- Distributing your handouts at the start of your presentation will lead to distraction amid the audience
- It shouldn’t be complex to understand when read by someone who wasn’t present at the time of your presentation
- Do not copy paste your entire presentation as it is. You need to include additional information (along with the one in your presentation)
How to make a Presentation Handout?
The easiest and the simplest way to make your handouts is via Microsoft Word. You can follow these simple steps in order to create one:
- Click on the ‘Create handout’ option and transfer your presentation to Microsoft Word
- After that, choose which presentation slides should appear on your handout
- You can easily adjust your text, graphics, content and decide whether you want to include a note margin, a header, or a footer
- In addition to the option of printing the handout, you can also save it directly in Word as a Word or PDF document – a simple way to make the handout digitally which is available to your audience.
Voilà! Here you go.
For more help, check this video out,
Types of Handouts:
1. gapped handouts.
As the name suggests, this handout consists of gaps that the audience is required to fill in. It may also include complex graphics or charts or tables of statistics which the members are expected to complete and they can only do that if they heard you well.
You can also outline the main points and leave gaps for key words to be inserted.
For example,
a) P_ _ _ _ _ t_ _ _ _n/ _ a _ _ _ _t_ (Presentation Handouts)
b) _a_ _ed/ H_ _ _o_ _ _ (Gapped Handouts)
2. Skeletal Handouts
It provides a bare outline of the presentation structure with some key statements and main references. This can be useful to aid members to make notes and follow a structure.
It is a great tool to maintain the audience engagement and focus throughout your presentation.
3. Worksheets
A worksheet is a sheet of paper on which problems are worked out or solved and answers are recorded.
This is mainly used in the classroom scenario in order to encourage students to remember what they learnt. It can motivate them to work without any assistance.
4. Information Sheets
It is also called a short information document. This sheet provides you a brief summary of a subject and its aims.
It may be necessary to draft more than one information sheet if you need to cater to the participants with different needs.
It is mainly used in the areas of education, for example, information on courses provided by an institution.

Also check- How to give motivational speech to students.
Examples of Handouts:
A handout is a useful tool for helping your audience learn important concepts from a meeting, presentation or other business event. When making a handout, it’s important to summarize the key points instead of just printing out the notes you used during the presentation. Include material that goes beyond the information you covered to help your audience better understand the concepts. Here are some examples:

In the above example, they have summarized the main concepts, given information about their brand and pointed out the reasons why you should choose them.
However, one thing that they didn’t focus on is leaving space to add notes. This is important because it allows the audience member to pen down the essentials points in their own words. It fosters the way people learn and understand information.

The above example is used when you have to lay down the program of an event. Now in such a scenario, you will need to hand it over to the audience beforehand.
So when you look at it, it is filled with a lot of text with no infographics or visuals. Therefore, the audience somewhere might lose interest looking at a handout only filled with text.
Check these examples out for inspiration:

Final Thoughts
A well-prepared handout can be an effective tool to support your presentation, acting as a guide and memory aid for both you and your audience. Used properly, they can increase the interest and attention of your audience, and allow you to give a clear and professional presentation.
Do not forget to add a CTA (Call to action) in your handout, encouraging them to change or act on something in relation with your talk.
Your handout is going to remain with your audience, so make sure you provide all the necessary information in less words. Basically, a summary of your presentation in minimum words.
Let us know if you end up implementing any of these tips in the comments below.

Enroll in our transformative 1:1 Coaching Program
Schedule a call with our expert communication coach to know if this program would be the right fit for you

8 Ways to Rise Above the Noise to Communicate Better

How to Negotiate: The Art of Getting What You Want

10 Hand Gestures That Will Make You More Confident and Efficient
- [email protected]
- +91 98203 57888
Get our latest tips and tricks in your inbox always
Copyright © 2023 Frantically Speaking All rights reserved
Kindly drop your contact details so that we can arrange call back
Select Country Afghanistan Albania Algeria AmericanSamoa Andorra Angola Anguilla Antigua and Barbuda Argentina Armenia Aruba Australia Austria Azerbaijan Bahamas Bahrain Bangladesh Barbados Belarus Belgium Belize Benin Bermuda Bhutan Bosnia and Herzegovina Botswana Brazil British Indian Ocean Territory Bulgaria Burkina Faso Burundi Cambodia Cameroon Canada Cape Verde Cayman Islands Central African Republic Chad Chile China Christmas Island Colombia Comoros Congo Cook Islands Costa Rica Croatia Cuba Cyprus Czech Republic Denmark Djibouti Dominica Dominican Republic Ecuador Egypt El Salvador Equatorial Guinea Eritrea Estonia Ethiopia Faroe Islands Fiji Finland France French Guiana French Polynesia Gabon Gambia Georgia Germany Ghana Gibraltar Greece Greenland Grenada Guadeloupe Guam Guatemala Guinea Guinea-Bissau Guyana Haiti Honduras Hungary Iceland India Indonesia Iraq Ireland Israel Italy Jamaica Japan Jordan Kazakhstan Kenya Kiribati Kuwait Kyrgyzstan Latvia Lebanon Lesotho Liberia Liechtenstein Lithuania Luxembourg Madagascar Malawi Malaysia Maldives Mali Malta Marshall Islands Martinique Mauritania Mauritius Mayotte Mexico Monaco Mongolia Montenegro Montserrat Morocco Myanmar Namibia Nauru Nepal Netherlands Netherlands Antilles New Caledonia New Zealand Nicaragua Niger Nigeria Niue Norfolk Island Northern Mariana Islands Norway Oman Pakistan Palau Panama Papua New Guinea Paraguay Peru Philippines Poland Portugal Puerto Rico Qatar Romania Rwanda Samoa San Marino Saudi Arabia Senegal Serbia Seychelles Sierra Leone Singapore Slovakia Slovenia Solomon Islands South Africa South Georgia and the South Sandwich Islands Spain Sri Lanka Sudan Suriname Swaziland Sweden Switzerland Tajikistan Thailand Togo Tokelau Tonga Trinidad and Tobago Tunisia Turkey Turkmenistan Turks and Caicos Islands Tuvalu Uganda Ukraine United Arab Emirates United Kingdom United States Uruguay Uzbekistan Vanuatu Wallis and Futuna Yemen Zambia Zimbabwe land Islands Antarctica Bolivia, Plurinational State of Brunei Darussalam Cocos (Keeling) Islands Congo, The Democratic Republic of the Cote d'Ivoire Falkland Islands (Malvinas) Guernsey Holy See (Vatican City State) Hong Kong Iran, Islamic Republic of Isle of Man Jersey Korea, Democratic People's Republic of Korea, Republic of Lao People's Democratic Republic Libyan Arab Jamahiriya Macao Macedonia, The Former Yugoslav Republic of Micronesia, Federated States of Moldova, Republic of Mozambique Palestinian Territory, Occupied Pitcairn Réunion Russia Saint Barthélemy Saint Helena, Ascension and Tristan Da Cunha Saint Kitts and Nevis Saint Lucia Saint Martin Saint Pierre and Miquelon Saint Vincent and the Grenadines Sao Tome and Principe Somalia Svalbard and Jan Mayen Syrian Arab Republic Taiwan, Province of China Tanzania, United Republic of Timor-Leste Venezuela, Bolivarian Republic of Viet Nam Virgin Islands, British Virgin Islands, U.S.
- PRO Courses Guides New Tech Help Pro Expert Videos About wikiHow Pro Upgrade Sign In
- EDIT Edit this Article
- EXPLORE Tech Help Pro About Us Random Article Quizzes Request a New Article Community Dashboard This Or That Game Popular Categories Arts and Entertainment Artwork Books Movies Computers and Electronics Computers Phone Skills Technology Hacks Health Men's Health Mental Health Women's Health Relationships Dating Love Relationship Issues Hobbies and Crafts Crafts Drawing Games Education & Communication Communication Skills Personal Development Studying Personal Care and Style Fashion Hair Care Personal Hygiene Youth Personal Care School Stuff Dating All Categories Arts and Entertainment Finance and Business Home and Garden Relationship Quizzes Cars & Other Vehicles Food and Entertaining Personal Care and Style Sports and Fitness Computers and Electronics Health Pets and Animals Travel Education & Communication Hobbies and Crafts Philosophy and Religion Work World Family Life Holidays and Traditions Relationships Youth
- Browse Articles
- Learn Something New
- Quizzes Hot
- This Or That Game New
- Train Your Brain
- Explore More
- Support wikiHow
- About wikiHow
- Log in / Sign up
- Computers and Electronics
- Presentation Software
- PowerPoint Presentations
How to Create a Powerpoint Handout
Last Updated: March 19, 2023
This article was written by Vikas Agrawal and by wikiHow staff writer, Nicole Levine, MFA . Vikas Agrawal is a Visual Content Marketing Expert & Entrepreneur, as well as the Founder of Full Service Creative Agency Infobrandz. With over 10 years of experience, he specializes in designing visually engaging content, such as infographics, videos, and e-books. He’s an expert in Making content marketing strategies and has contributed to and been featured in many publications including Forbes, Entrepreneur.com, and INC.com. This article has been viewed 176,277 times.
If you're giving a PowerPoint presentation and want to provide your viewers with a printed version, you can create a handout page. A handout page is a printed version of your presentation that can help viewers follow along, take notes, and keep the information for their own record. Since you can place more than one slide on a single handout, printing handouts rather than the entire presentation can save you a lot of paper and printer ink. This wikiHow teaches you how to quickly print helpful PowerPoint handouts, as well as how to design a handout master that lets you save handout customizations for future printing.
Printing Handouts the Quick Way

- Keep in mind that the more slides you print on one page, the smaller the text will be on each slide—if your slides are text-heavy, 6 slides per page should be your limit.
- If you want to encourage viewers to take notes as they watch your presentation, try the "3 slide" option—this prints three slides per page with ruled areas for note-taking next to each slide.

- To add the date and time, check the box next to "Date and time" and choose whether to update the time automatically (based on time of printing) or leave it fixed (date of your choosing).
- To add custom text to the top of each printed page, check the box next to "Header" and enter your text in the corresponding box.
- To add text to the bottom of each page, check "Footer" and add text to the corresponding box.
- If you make any changes in this window, click Apply to All to save your changes and return to the Print screen.

- If you're printing multiple sets of handouts, make sure to select Collated from the menu if it isn't already selected. F

Creating a Custom Handout Master

- You should only use royalty free fonts if you don't have a license to use a font.

- It's not usually advised to print a background color on handouts—it uses a lot of ink. Try to keep the fancy colors to your actual presentation!

- If you don't just want a basic background color, click the Background Styles menu again and select Format Background to expand the Format Background panel on the right. Here you can choose different background fills, such as images, textures, and gradients.

- For example, if you want to include an image on each printed handout page, click the Insert tab, select Pictures , choose your image and place it at the desired location.
- If you want to include custom text at the top or bottom of your handouts, click Header & Footer on the Insert tab, check the box next to "Header" or "Footer" (or both!) and type your desired text. When you click Apply to All , the handout master's header and footer will update to your new preferences.

- Now that you've customized your handout master, these settings will be in place when you're ready to print. To print, just go to File > Print , choose your printer and color options, and click Print .
Community Q&A
You Might Also Like

- ↑ https://support.microsoft.com/en-us/office/print-your-handouts-notes-or-slides-91c62c83-9032-497c-ab76-cae8f3e1a402
- ↑ https://support.microsoft.com/en-us/office/create-or-change-a-presentation-s-handout-c86f1231-abfd-48de-8d76-807f668512d2
About This Article

1. Go to File > Print . 2. Select how many slides to print per page. 3. Click the Full Page Slides menu. 4. Select a layout from the "Handouts" section. 5. Click Edit header and footer to customize the header and footer. 6. Choose the reset of your printing preferences. 7. Click Print . Did this summary help you? Yes No
- Send fan mail to authors
Reader Success Stories
Prafull Sinwal
Jun 22, 2016
Is this article up to date?
Featured Articles

Trending Articles

Watch Articles

- Terms of Use
- Privacy Policy
- Do Not Sell or Share My Info
- Not Selling Info
wikiHow Tech Help:
Tech troubles got you down? We've got the tips you need
- Delivery Techniques →
How to Create Engaging Presentation Handouts

So you want to create engaging handouts for your presentations, huh? You’re probably expecting this blog post to tell you exactly how to create amazing handouts in a few simple steps. Well, sorry to disappoint, but that’s not what this post is about. What I’m here to do is to give you the best tips and tricks to transform your ordinary handouts into something your audience will find exciting and inspiring. Creating engaging handouts is more than just picking a font and any old text to fill up the page. It’s about strategizing what content to include and how to make it visually appealing. While the exact form each handout takes will differ from presentation to presentation, the goal should always remain the same: to create something that people will enjoy reading. So let’s dive into exactly how to make your handouts attractive, informative, and truly engaging!
What Are Handouts in Presentations?
Handouts are material given to an audience of a presentation, typically including supplementary information and visuals which compliment the speaker’s discussion. Handouts can be distributed physically, or shared electronically through the internet. Regardless of their form, handouts are effective tools that help capture the interest of your audience and support the message of your core presentation. When creating handouts for a presentation, there is a debate as to whether or not you should include all content discussed in the presentation, or simply key points and takeaways. On one hand, providing handouts with too much detail can lead to audiences relying on them as a crutch and losing focus during important points in the presentation. On the other hand, by limiting what is included in handouts it can leave audiences feeling under-informed once they leave your presentation and lose some of the impact of your talk. It is important to find balance and decide which approach works best for particular presentations based on who your target audience is going to be and what you’re hoping attendees will gain from participating in your talk. In the next section we will examine more closely what the purpose of having handouts in presentations may be so that you can make an informed decision based on selecting the right materials for your specific needs.
What Is the Purpose of Handouts in Presentations?
Handouts can be an effective tool for reinforcing key points and engaging your audience , but it is important to consider their purpose when designing your presentation. Handouts can have both positive and negative impacts on a presenter’s objectives. On one hand, handouts can provide an opportunity for the audience to connect and interact with the presentation, aiding comprehension. They can also help to increase engagement from listeners, as well as acting as a visual reinforcement of key concepts. On the other hand, if not properly designed or used, handouts can detract from a presentation. A cluttered slideshow or distracting graphics can cause confusion or create excessive distraction and boredom in an audience. Poorly tailored handouts such as translations of slideshows into paragraphs or too much material packed into limited space could leave listeners feeling overwhelmed and unable to focus. Overall, it is important for presenters to carefully consider the purpose of their handouts before incorporating them into their presentations. The goal should always be creating an engaging experience that further aids audience understanding. With careful attention to design, thoughtfully chosen materials and allotted time for participation, presenters can leverage handouts as a powerful resource to maximize the success of their talks. Now that you understand the role of handouts in presentations, let’s dive into ways you can improve your audience’s understanding with them.
Improving Audience’s Understanding
Understanding your targeted audience is key for creating engaging handouts that are well received. When preparing a handout, it is important to consider the Age, Gender, Educational background and other relevant factors of those in attendance. Presenters should strive to provide enough information on the topic while also adapting their presentation to meet their audience’s needs. This helps ensure that presentations are meaningful and beneficial for participants. When available, it is beneficial to add data visualizations, such as graphs and charts, to further explain concepts and ideas. Visual representations of data can help viewers comprehend complex topics quickly and easily. Also, providing helpful resources and references in materials distributed during or after the presentation can help deepen participants’ understanding of the presented information. Nonetheless, excessive visual aids may not be necessary; visuals should only be used if they improve understanding of the material and increase comprehension. To reinforce audience’s understanding of main points throughout the presentation, speakers should summarize their message several times during various intervals. Summarizing key points allows viewers to connect core content with the overall message of the handout. Additionally, lecturers should include information on how participants can apply what they have learned in their own lives or work environment for greater comprehension and engagement with the material. Demonstrating understanding of different learning styles is another effective way to engage learners. Differentiating delivery methods – such as transitioning from lecture format to interactive activities like discussion or debate – can be effective for diverse audiences. By becoming aware of a variety of knowledge retention tools, presenters are more likely to create engaging handouts that better meet their attendees’ needs. Once you’ve created an engaging handout that appeals to your audience and improves understanding, it is important to reinforce and summarize these main points throughout the presentation. In our next section, we will discuss strategies presenters can adopt when reinforcing information during their presentations.
Reinforcing and Summarizing
When you’re preparing handouts for your presentations, it is important to remember that their purpose is to reinforce and summarize the content of your presentation. Handouts should be concise and easy to read; an effective handout should include no more than two pages of material that highlights the most important points from your talk. They should also provide supplemental visuals, such as graphs and charts, to help illustrate key concepts. When designing a handout, it is helpful to use the same font and color scheme that you plan on using in your presentation so that they can work together seamlessly. You should also provide enough detail so that viewers can continue their exploration or review content from your presentation if needed. Additionally, consider adding a quote from the speaker or additional text as a reference on the handout for attendees to use in writing about the event online. Some argue that limiting handouts to two pages reduces the amount of material attendees can take with them, but this ensures that only the most important details are present for viewers to access. Without proper reinforcement and summarization included within your handouts, there will be less reinforcement of the content within viewers’ minds and they may potentially forget some of what was discussed during the presentation. It is essential to create handouts that succinctly yet accurately summarize what was discussed in order to enhance understanding of the topics and improve retention of information. To further engage audiences while reinforcing key messaging, handouts can come in multiple forms: physical printed materials as well as digital platforms such as tablets and slide shows. The next section will explore how utilizing both physical and digital materials effectively create engaging handouts for presentations.
Essential Points
When preparing a presentation handout, it is important to make sure that the content is concise and easy to read and that it reinforces the main points from the talk. Fonts and colors should be consistent with those in the presentation and additional visuals, such as graphs and charts, should be included. Handouts can also include a quote from the speaker or additional material for attendees to use when writing about the event online. The handout should not exceed two pages and should provide enough detail so that viewers can review the content of your presentation. Finally, physical and digital materials should both be utilized to create engaging handouts for presentations.
Handouts as Physical and Digital Materials
Handouts are one of the most effective tools for engaging an audience during a presentation. They serve as standalone reminders of what was discussed, making them invaluable as educational and reference materials. Handouts can be physical documents given at the presentation, or digital copies to be distributed via email or online. In either form, handouts should be concise and focused on helping reinforce the message in your presentation. When it comes to physical handouts, there are pros and cons to consider. On one hand, physical documents might not always be the most cost-effective or environmentally friendly option if you’re distributing them to a large audience. However, handing out physical materials helps to make presentations more interactive by ensuring that each attendee has something tangible they can refer back to at a later date. Furthermore, physical documents provide a sense of authentic communication, versus just reading text on a screen. These benefits may be worth the extra expense and resources required for production. On the other hand, when considering digital handouts, there may be advantages over traditional physical materials. For example, digital documents can save time and money by reducing the burden of having to produce physical copies for everyone in the room. Also, digital files may provide more flexibility in terms of design capabilities and customizability when compared to static print material. Additionally, digital copies can easily be shared with more people beyond just those in attendance at a presentation—they can be sent to any interested party with access to email or the web. Whether using physical or digital materials for handouts is best for any particular situation depends largely on audience size and type of content being presented. In either case, it’s important that these resources are easy to use and understand so that attendees retain what they learn after leaving the presentation. The next section will explore how to create effective types of physical handouts that meet these needs while engaging your audience before and after your presentation.
Types of Physical Handouts
Physical handouts are a powerful and essential tool for enhancing audience engagement with your presentation. They provide people with something tangible to refer back to as they revisit the concepts, ideas, and data discussed during your presentation. Furthermore, physical handouts allow you to capture an audience’s attention and draw them into the material in order to have greater impact. The types of physical handouts you choose to provide, however, will depend largely on what kind of material is included in your presentation and the amount of time you have for distribution. Generally speaking, physical handouts can be further divided into three categories: reference materials, visual aids , and discussion prompts. Reference materials are collections of facts or data related to the presentation’s topic that provide a reference point for audiences to review after your presentation. Examples could include pre-packaged binders full of information on a particular topic area or white papers summarizing research findings relevant to the subject. Visual aids consist of graphical displays or images related to your presentation topic that will help increase audience understanding and enhance their experience while viewing. Examples including infographics or charts that map out different elements of the presentation in a visually appealing manner and provide context for understanding the main points of your talk. Discussion prompts are written questions or statements that apply directly to the subject matter presented during your talk but can evoke further thought from the audience through encouraging open dialogue during group activities or roundtable discussions following the talk. This allows for more interactive conversations about your topic by introducing questions and ideas not discussed in depth during your presentation itself. Overall, there are numerous types of physical handouts that can be distributed before, during, or after presentations depending on the type of content being presented. While these include reference materials, visual aids, and discussion prompts, experimentation with various options can reveal which works best for any given situation. With this in mind though it’s important to take into account logistics related to gathering and disseminating physical handouts when planning presentations. Now that we’ve examined the types of physical handouts available let’s move onto looking at how digital ones can shape engaging presentations—the focus of our next section.
Types of Digital Handouts
When it comes to creating engaging handouts for your presentations, one popular way to deliver information is through digital formats. Digital handouts offer the convenience of being able to easily be shared electronically, which can be beneficial in cases where physical copies are not necessary. They can also be highly customizable and interactive, allowing you to quickly tailor your message to the audience. The most popular types of digital handouts are PDF files, PowerPoint slides, and multimedia tools such as videos and podcasts . PDFs allow you to easily share important documents or forms with large groups of people without having to print out hundreds of copies. PowerPoint slides are a great way to add visuals and animation to engage your audience; visual content has been found to be appealing to viewers and can help keep their attention. Multimedia tools provide further opportunities for interaction with audience members by giving them a chance to listen and watch rather than read, enabling increased engagement with your material. Although digital handouts have obvious advantages over physical copies, there are still some potential risks in using them for presentations. For example, if your presentation relies heavily on visuals, complex graphics may not always appear correctly when displayed on different devices or platforms. Additionally, if you’re relying on an internet connection for your presentation then any problems with signal strength or load times can cause disruption. Finally, data privacy is always a consideration when sharing materials electronically; you will need to take the necessary measures to ensure the personal data collected from attendees is kept safe and secure. Despite these potential issues, digital handouts are generally popular among presenters because they provide convenience and flexibility when sharing information. When used properly, digital handouts can help make presentations engaging and impactful for even a large audience. Now that we have discussed the types of digital handouts available, let’s move on to the next section which will explore “When to Use Handouts During Your Presentations”.
When to Use Handouts During Presentations
Whether or not to use handouts during a presentation is an age-old debate that has gone on for decades. Some speakers may feel that passing out handouts detracts from their presentation, while others believe they are a necessary tool to keep an audience engaged. Ultimately, it comes down to what type of content and audience the presenter is dealing with when deciding if handouts are appropriate. On one side, many presenters will claim that handouts should only be used sparingly in order to maintain audience engagement. This can be particularly effective when presenting to small groups or information-packed content that requires focus and concentration. Handouts can be easily misused by providing too much unnecessary information which can cause the audience to lose interest and quickly become overwhelmed. On the other side, handouts can also be a valuable asset when presenting longer lectures or more complex issues that offer an abundance of facts and figures. Handouts are often much easier for an audience to follow along with and can act as a great supplement for topics that require further explanation. Additionally, handing out material ahead of time gives the presenter an opportunity to gauge audience interest before getting started and make adjustments accordingly. In summary, the decision whether or not to utilize handouts depends greatly on the type of presentation and its intended content – being mindful not to overwhelm the audience by introducing too many material at once. With this in mind, let’s look at some tips presenters can use when preparing their handouts for their presentations.
Tips for Presenters for Using Handouts
Using handouts as a part of your presentation can help ensure that members of your audience are engaged and leave with the necessary materials to further their knowledge and understanding. To ensure that you make the most out of using handouts, there are several tips for presenters to keep in mind throughout their presentation. First, no matter how engaging the presentation may be, it’s important to provide handouts which summarize the points of your presentation. By allowing members of your audience to have a physical document of the topics discussed, they’ll be able to quickly refer back to information given or determine additional resources they need to seek out after the presentation has ended . As such, investing time into creating effective handouts can further engage and inform everyone in attendance. Second, it’s beneficial to give each member of your audience a copy of the handout so that they don’t have to rely on someone else’s copy if they miss something. Additionally, by giving each member their own copy your audience will be able to take notes directly on their paper and even make summaries that are most relevant for them. Moreover, if presenting virtually it’s essential you consider how the attendees will access the handouts; whether via email attachment prior to or during the beginning of the session. Some may find that giving handouts throughout a presentation may overpower and even distract from what is actually being said in real-time. This perspective may be valid and should certainly be taken into consideration when deciding when and how often one distributes handouts within their presentation. Ultimately, it should come down to what style works best within a unique setting and situation so that participants remain actively engaged in your information while simultaneously having access to any additional resources they may benefit from during or after the event concludes.
Responses to Frequently Asked Questions
What type of information should be included in a handout for a presentation.
When it comes to creating engaging handouts for a presentation, it’s important to include information that will help make the presentation more digestible and easier to remember after the fact. This could include key slides from the presentation, with accompanying notes and bullet points, highlighted quotes, summaries of key topics addressed in the presentation, as well as useful visuals like infographics and graphs so that participants can easily recall the most important details. Additionally, it’s a good idea to include contact information of the presenter or company, so that participants have an easy way to follow up or reach out for further discussion. Finally, adding applicable tips or tricks related to the topic being discussed can help keep participants engaged and give them something practical to take away from the experience.
How can handouts be used effectively during a presentation?
Handouts can be a very effective tool for aiding presenters during their presentations. Handouts provide audience members with a tangible item to refer back to and review after the presentation. They can also serve as a valuable reminder of key points made during the presentation and help to visually reinforce concepts or evidence that the presenter is attempting to convey. Handouts often have more detailed information than what is given in the presentation, making them an excellent means of providing follow-up materials to attendees who are interested in understanding the topic better. Additionally, since handouts can serve as concrete reminders of what was taught in the presentation, they are sometimes used after a presentation as a follow-up review tool. Finally, handouts can be used to provide insights into topics which may not be suitable for verbal presentation, such as data analysis or complex diagrams. When used effectively and thoughtfully, handouts can be an invaluable resource during any learning experience.
What are the pros and cons of using handouts in a presentation?
Using handouts in presentations can be very beneficial, but there are also some drawbacks that should be considered. One of the main advantages of using handouts is that it allows your audience to refer back to the materials you’re presenting for further study and reference. They can take notes in the margins, re-read information, and review topics they didn’t quite understand during the presentation. Additionally, by choosing handouts with illustrations, captivating images, or attractive designs, you can add an extra layer of engagement for your audience. On the other hand, one of the biggest disadvantages of using handouts is that it does take time away from the actual presentation. You may have to allocate time during your speech for people to get their hands on the material you’re providing or wait as they go through a particular section. Moreover, if your audience isn’t given enough time to review the information before they leave the talk, they likely won’t remember what they read once they get home. Overall, while using handouts in presentations can be beneficial when done correctly, taking note of the time constraints during a presentation and giving adequate time for your audience to review any information provided is essential.
How to make presentation handouts
- Written by: Kieran Chadha
- Categories: Presentation skills , Visual communication
- Comments: 1

Presentation handouts and leave-behinds are a great resource, giving your audience a tangible reminder of you and the company you represent. The problem is that they’re oft-neglected and oft-ignored. So how can you create presentation handouts that not only accurately represent your content, but look great and don’t take a fortnight to make?
How to make presentation handouts in PowerPoint: Basic method
If all you want to know is how to print your slides and speaker notes together, you came to the right place!
- Save a new copy of your presentation.
- Delete any overlapping visuals or anything that won’t print well.
- Go to File then Export and select PDF .
- In the window that opens there is an Options button – click it.
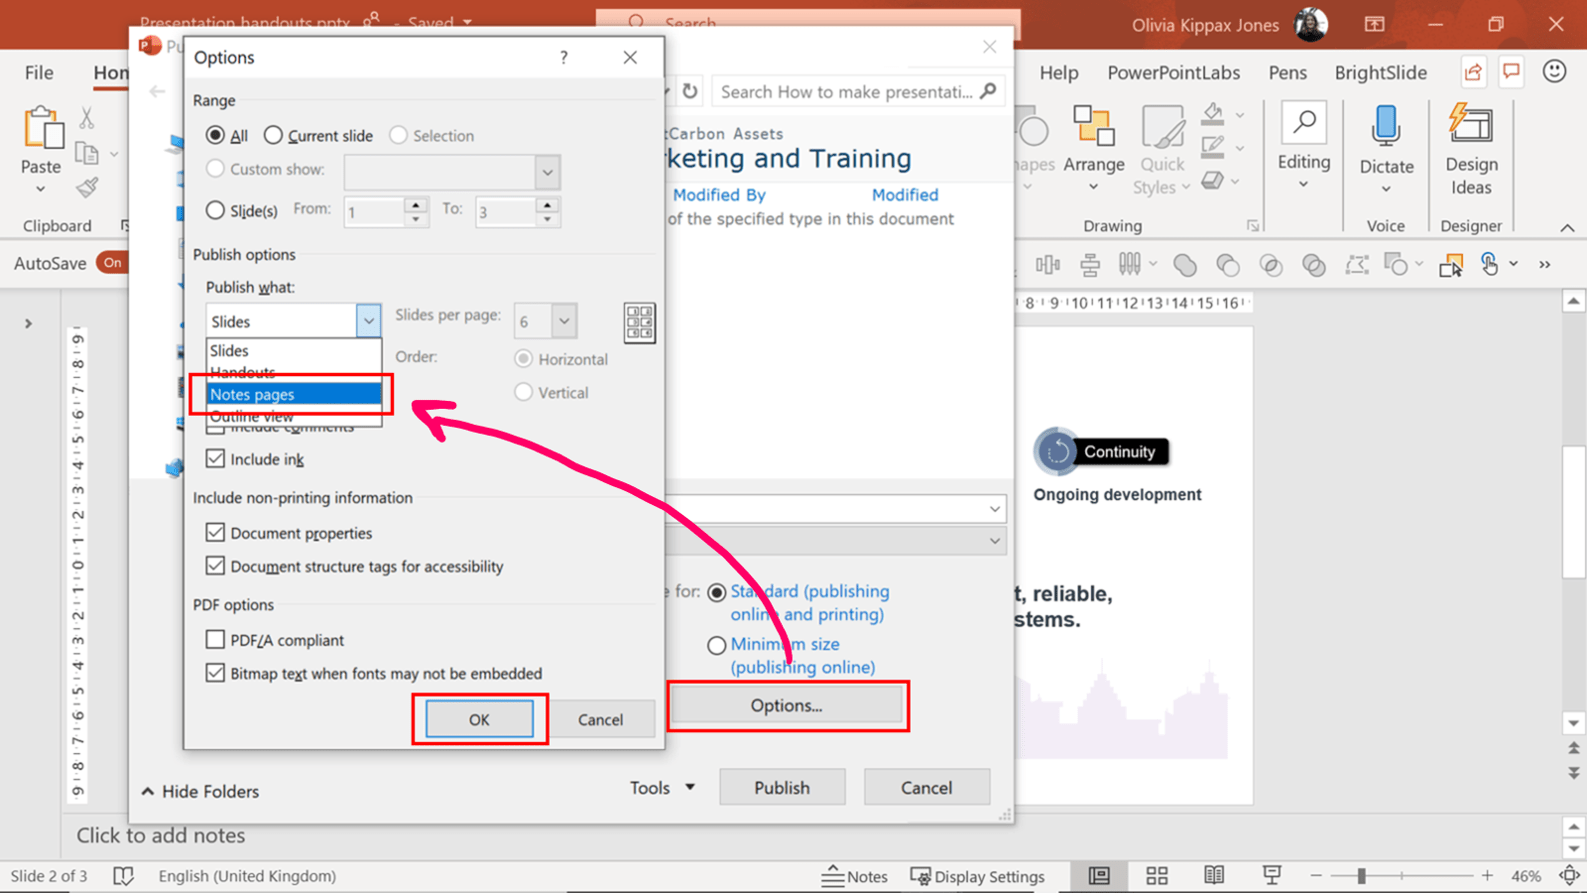
- Click OK then Save .
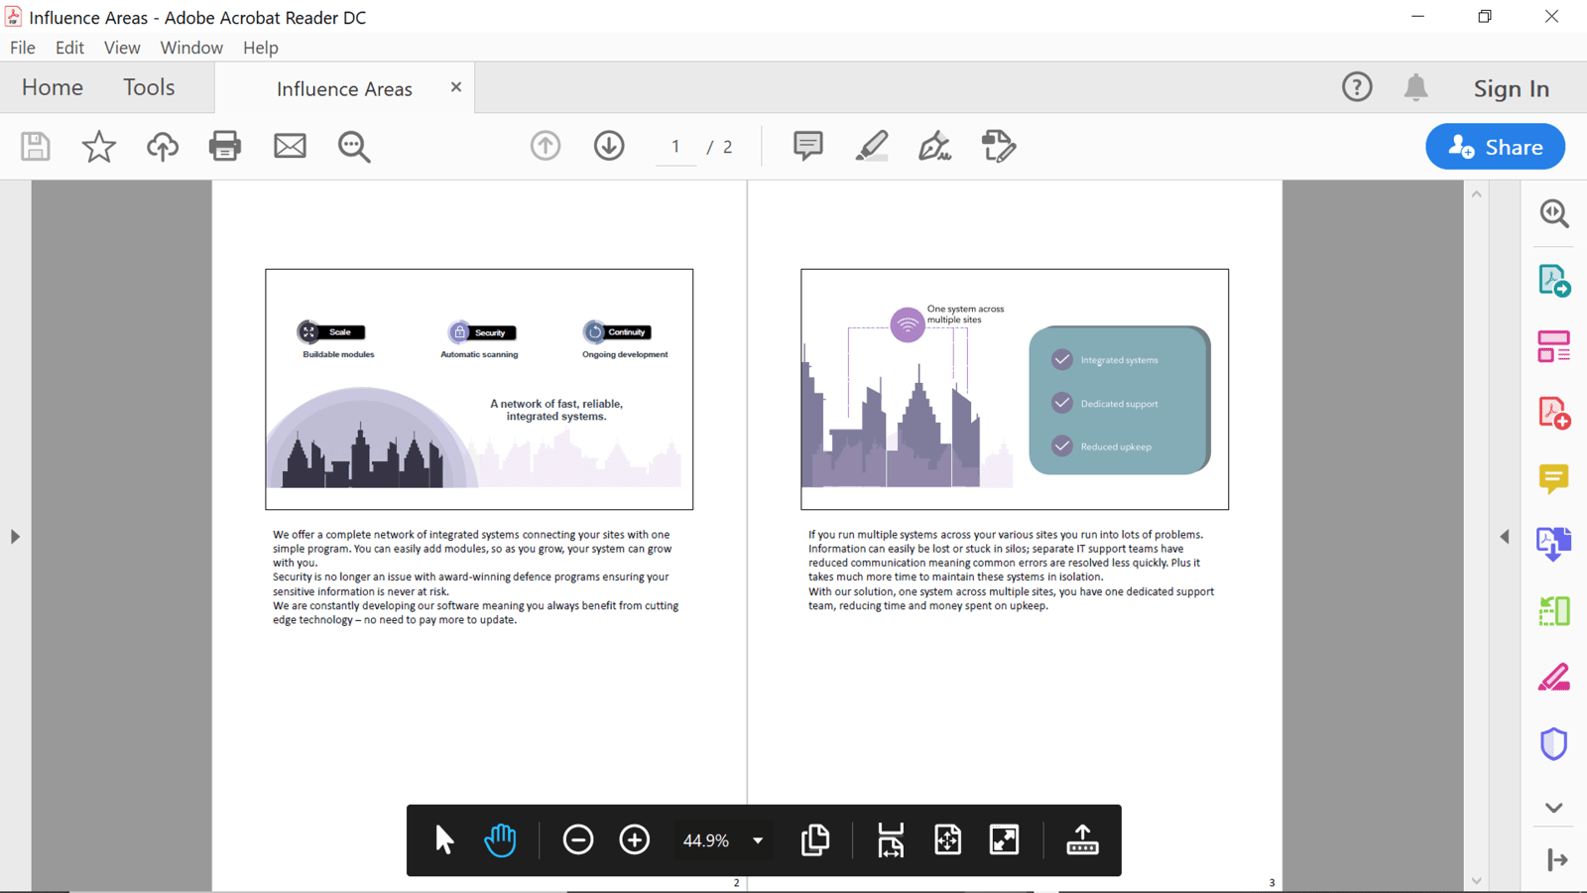
Your PDF will feature an image of each slide with the accompanying speaker notes underneath. Needless to say, make sure your presenter notes are ‘audience safe’ first. You can send the PDF file as an email or print it. The finished result is cheap ‘n’ cheerful – a great option if you’re in a rush.
The problem with simply using your slides and notes is that presenter notes often aren’t written with the audience in mind – they’re there to jog the presenter’s memory, not inform the audience. Any materials you leave with your audience should be just as thought-through and polished as your presentation. So, let’s go back to square one and think about what should be in a presentation handout.
What should a presentation handout include?
Begin by pinning down what you want your presentation handout to achieve. Do you want your audience to remember the benefits of choosing you as a supplier? Do you want them to understand a specific process? Do you want to remind them of your pricing options? Or do you want to provide a place for them to make notes whilst you present?
Only the last aim actually calls for a presentation handout. Anything you give to your audience during or before your presentation will inevitably be a distraction; they will read the information, rustle the paper and generally pay less attention to you. Any presentation handout – that is, any material you give out before or during your presentation – should include a simplified version of your slides and plenty of blank space for notes. And that’s it.
However, if you want to provide your audience with a tool to refer back to, to remind them of what makes you unique or how they should carry out a certain process, what you need is a leave-behind.
What is a presentation leave-behind?
A presentation leave-behind can pack a punch, covering less material than the presentation, or more. It’s a piece of content you can either leave behind you when you’ve finished your presentation, or send to your audience a couple of days later to jog their memories. A good way to get started is to think about how you want the piece to be used. Here are a few less traditional leave-behind options to get you thinking:
- A 1- or 2-page summary of the most critical points

- A one-slide-per-page recap of the content you covered
- A process diagram

- An in-depth exploration of all the content plus much more
- A reference guide covering technical specifications, pricing etc.
Once you free yourself from the idea that a presentation handout or leave-behind has to be an exact replica of your slides and notes, the sky is the limit. When you’ve decided on the format for your leave-behind you can start to create it. A cut-and-paste job might not be the best solution; you may well have to rework some of your material to make it accessible for an audience revisiting it a week or two down the line.
How to create effective presentation leave-behinds
If you don’t want to create something from scratch, then a good approach is to use what you can from your slides, and write new notes to accompany them. We all have a dire recall rate when it comes to new information (see Ebbinghaus’ 1885 research for just how bad), and audiences are no different. Don’t overestimate how much they’ll remember; make your hand-out self-explanatory, accessible and informative. Cut out all the extraneous data (e.g. the history of your company) and focus on your key points.
There are two main formats to choose from when you’re ready to share your leave-behind.
Method one: PDF
- Save a copy of your presentation and create a simplified version of your slides
Be brutal and delete all the slides that don’t contain need-to-know information. Good content to include is your value proposition and main benefit points as these remind your audience of what differentiates you from the competition. You may also want to include any useful technical information or processes.
- Copy your slides into a word document and add text
In your PowerPoint file, right click on the slide you want to copy and select Copy . Then, in your Word document go to Home , Paste , Paste as Picture .
To create appropriate text pull from your presentation notes but also make use of any other collateral you have, like brochures, your website, promotional videos etc. To avoid overwhelming your audience with too much information add hyperlinks to relevant sections of your website or other resources. If you publish the document as a PDF, your audience will be able to click these hyperlinks and access the information they need.
And finally, it’s a good idea to add a call to action to encourage on-going communication.
- Save the document as a PDF
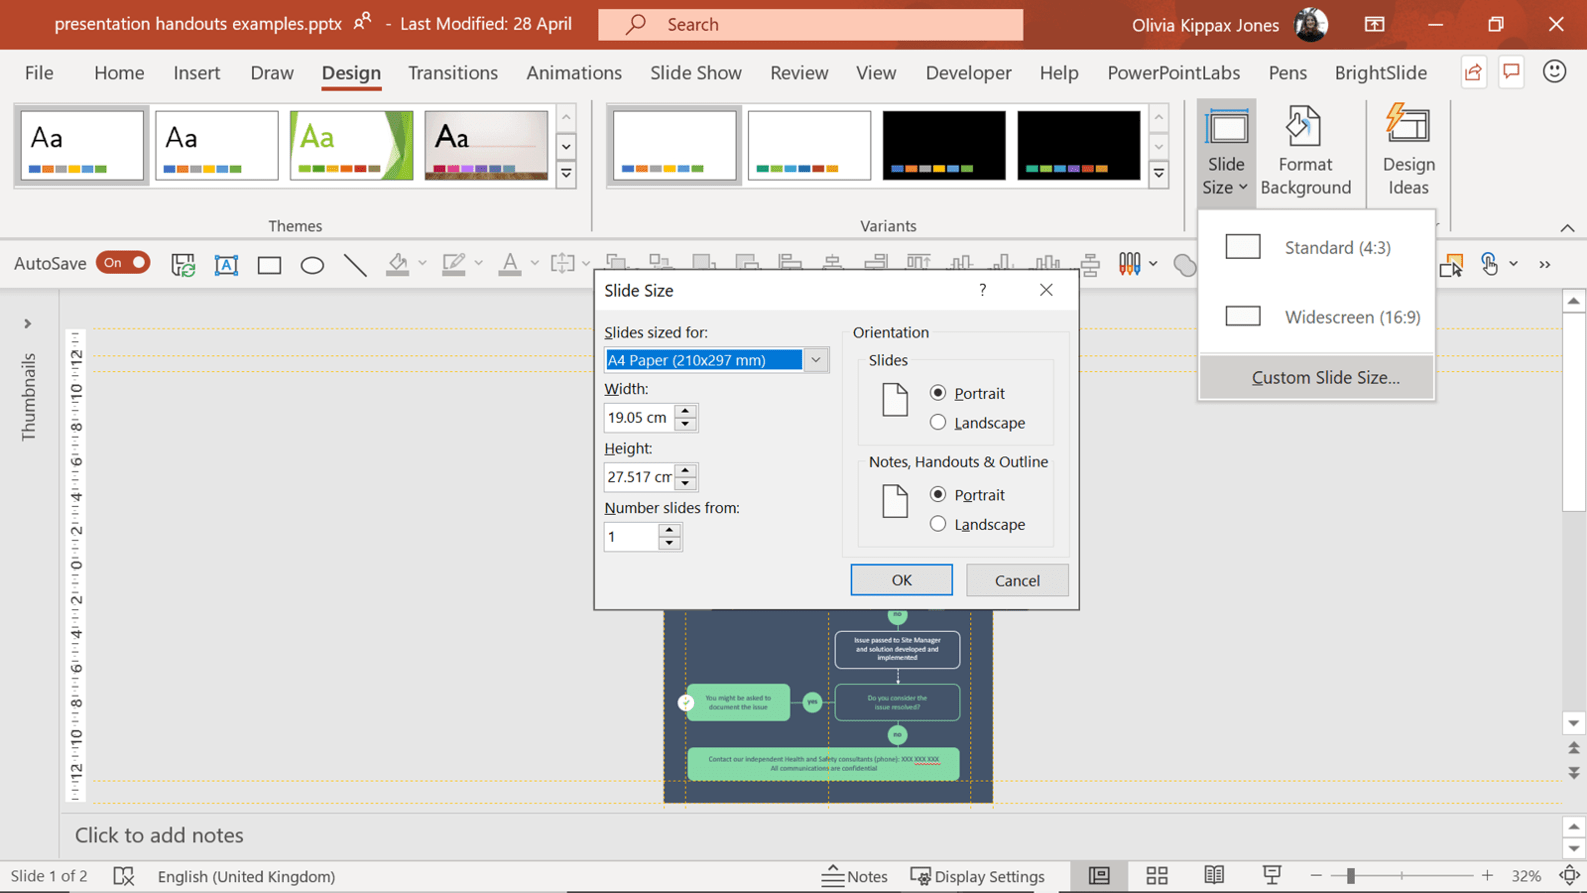
To save a Word document as a PDF go to File , click Export , then Create PDF . A benefit of doing this in word rather than exporting directly from PowerPoint, is that you have more control over the formatting so can keep it on-brand and looking good. If you want to add more design elements, you could also build the leave-behind in PowerPoint. Change the slide size by going to Design > Slide Size > Custom Slide Size .
Of course, you could print the document but, putting aside poor print quality and environmental concerns, with paper handouts you have no way to track how many people have looked at the document or whether it has been ignored. However, with a PDF you can…
- Distribute using an email marketing service
Instead of printing and handing out your material, save the trees and save it as a PDF, then use an Email Marketing System like MailChimp to distribute it. You might not be able to see super detailed analytics, but you’ll still get useful data on who opened your message, and who showed interest in the material – all helpful stuff.
Method two: Video
There’s a sort of unwritten assumption that handouts have to be a document, particularly a document with slides. That’s not the case, and it’s often not the best method of delivery for follow-up content. Paper or a PDF has its advantages – it’s simple, easy to distribute and reasonably effective. However, it is limiting. It is less personal and might be ignored if it’s too dense. A powerful alternative to the conventional paper hand-out is to use PowerPoint to record narration and to output as narrated video. It’s a much more engaging, effective way of refreshing your audience’s memories.
- Make a simplified version of your PowerPoint deck
Again, you don’t want to send your audience your full twenty-five-minute presentation. Go through your content and trim it down to the essentials. Keep the key visuals and key benefit points.
- Write a script
A video with you um-ing and ah-ing over your slides isn’t particularly engaging or professional. You need to write a script so you can say precisely what you want to with no irrelevant detail or mistakes.
You audience won’t want to take much time out of their day, so aim for 3 – 5 minutes of content. We have some useful resources for script writing on our blog – start here .
- Record yourself presenting the new version
Once you’re happy with your script, you need to record yourself presenting the deck. Again, we’ve got a few stellar recourses to help:
- How to record narration in PowerPoint
- Recording voiceover for a narrated presentation
- Preparing for a presentation voiceover
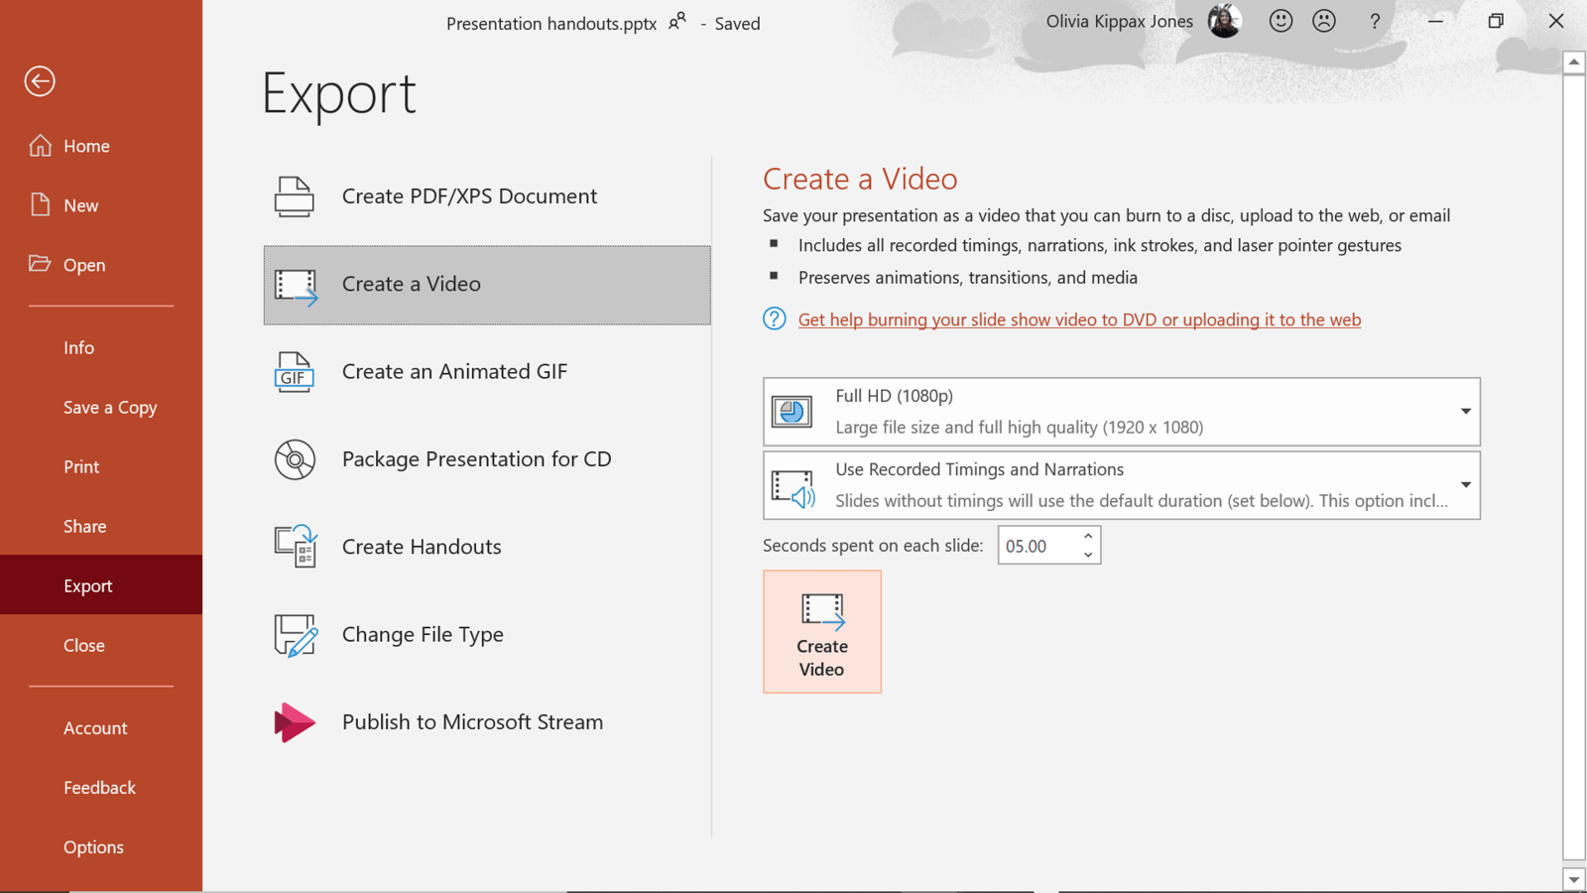
- Export the video
To save your video go to File > Export > Create a Video . Make sure Use timings and narrations is selected on the drop-down menu.
- Host the video online
Finally, make your video accessible to your audience. The beauty of using a platform like Vimeo is that it sits in the cloud so can easily be updated with new material. Viewing figures can be tracked, there are integration possibilities with other platforms, and reminders can be sent out for those that haven’t yet watched it. Vimeo is one option – but any trackable multimedia platform is a good method for delivering your content.
To see some example of short, narrated videos, visit our YouTube page .
Conclusions
Digital, custom-made leave-behinds are a change. And you’ll want to address this change when your audience sits down, eager to take home a couple of sheets of A4. However, the benefits are great: they get a more engaging, helpful resource, and you can track its reach, easily refresh the content and measure its success.
If you decide to use the good old-fashioned paper method – there’s one thing I’d encourage you to avoid: don’t distribute your presentation hand-out before you start speaking. It’s one of the most common mistakes we see, and it can really negatively impact the audience’s attention level. If you give your audience something to read, they will naturally start to read it. And from that point on, it’s a struggle for even the best presenter to command the room’s full attention.
Hold off until the end of the session but let everyone know that a handout will be available, so they don’t spend the entire session making their own notes. You want them attentive and engaged throughout and a little reassurance at the start goes a long way to help ensure that.
However, choosing a less traditional route can help you stand out from the crowd, so consider ditching the standard presentation handout for something a bit more creative.
Ready to transform your sales presentation too? Read our ultimate guide !

Kieran Chadha
Principal consultant; head of brightcarbon academy, related articles, review: glisser online interactive presentations.
- Presentation skills / Sales presentations / Presentation technology
Glisser is an online platform that allows you to create interactive presentations that can be used for marketing, training or any other type of events. The site has different functions available for presenters, attendees at events and event planners which all focus on allowing for increased presenter-audience interaction. Since creating engaging visual presentations is what we do, I decided to take a closer look at Glisser and see what it’s all about and how the various functionalities work.

The ULTIMATE guide to presentation skills
- Presentation skills
- Comments: 32
Presentation skills is a daunting area for many, but being a good presenter isn't something you're just born with. Even the most nervous, or clueless of presenters can learn how to present like professionals just by following some key advice.

5 ways to make your presentation more visual and effective
- PowerPoint design / Visual communication
Looking for some quick tips on how to create a more effective presentation? Know you want to make your PowerPoint slides more visual but not sure how?

Kieran, surprise surprise, someone’s commenting on a three year old article! I agree with all of your comments in relation to a live presentation but do you think they apply equally to an eLearning presentation (not a webinar)? For instance, I have sometimes used an on-line workbook/journal to encourage audience reflection/journaling/note-taking which some individuals don’t like. It seems that an ‘off-line’ paper version would benefit those who prefer not to leave the current screen or who distrust digital privacy. Do you think this would be distracting or does the fact that the individual could pause (be advised) to pause on-line content whilst writing make the difference?
Leave a Reply Cancel reply
Save my name and email in this browser for the next time I comment.
Join the BrightCarbon mailing list for monthly invites and resources
There is absolutely no doubt that the BrightCarbon presentation was a quantum leap beyond anything else at the conference with respect to the clarity of the presentation. Curtis Waycaster Smith & Nephew

How to Create and Format Handouts in PowerPoint

Handouts can be a great way to enhance your PowerPoint presentation and provide your audience with a helpful reference tool. Well-designed handouts allow audience members to follow along, take notes, review key information later, and even share what they learned with others.
Creating effective PowerPoint handouts does take some strategic planning and design work. You need to decide which information to include, how to format it, and how to optimize the handout for printing and distribution.
In this blog post, I’ll walk you through a step-by-step process for creating professional, easy-to-use PowerPoint handouts.
Step 1: Plan Your Handout Content
Before you start designing your handout, you need to decide what information it should include. Here are some tips:
- Focus on key takeaways. Don’t try to cram every slide from your presentation onto a handout. Select the most important information, statistics, bullet points, images, and quotes you want the audience to remember.
- Provide context. Even if audience members miss parts of your talk, the handout should still make sense. Give a brief overview of your topic at the beginning.
- Include attribution. If you use quotes, data, or images created by others, be sure to cite your sources on the handout.
- Add value. Supplement your slides with detailed information, additional resources, your contact details, etc. Make your handout useful beyond just capturing your talk.
Step 2: Set Up the Handout Master
The Handout Master view in PowerPoint allows you to format a template that will apply to all printed handout pages. Here’s how to access it:
- In PowerPoint, click the “View” tab.
- Click “Handout Master” in the Master Views group.
A new slide will appear with the default handout layout. Now you can customize the following:
- Slide placeholder size and position
- Text boxes, shapes, and images
- Fonts, colors, and theme
- Headers, footers, and slide numbers
Use the placeholders to organize important handout sections like an introduction, key takeaways, your contact info, citations, etc.
Step 3. Add Handout Headers and Footers
Headers and footers are text boxes that appear at the top and bottom of every handout page. They should include:
- Page numbers
- The presentation title
- Your name and/or company name
To add a header or footer:
- Click the “Insert” tab in the ribbon.
- Click the “Header & Footer” button.
- Select the placeholder you want to add.
- Type your text.
Use a smaller font (10 pt.) in the header and footer so they don’t distract from the main content.
Step 4. Print Preview Your Handout
Before finalizing your handout design, preview how it will look when printed.
- Click the “File” tab.
- Click “Print”.
- In the settings pane, choose “Full Page Slides”.
- Click the drop-down menu under “Handouts” to pick how many slide images you want printed per page.
- Scroll down to preview how the handout pages will appear.
Review the layout, formatting, page numbers, etc. and make any changes necessary in the Handout Master view.
Step 5. Export Handouts to Microsoft Word
For advanced formatting, you can export your handouts to Microsoft Word. This allows you greater editing capabilities while retaining the slide images from PowerPoint.
- Return to the “File” tab in PowerPoint.
- Click “Export”.
- Select “Create Handouts”.
- Choose a Word template and click “Create”.
In Word, you can tweak fonts, colors, alignment, spacing, indents, and more with better precision. Add tables, SmartArt graphics, detailed citations, additional text, and images as needed.
Step 6. Save Handouts as a PDF
For easy digital distribution, save your finished handout as a PDF file.
In Word or PowerPoint:
- Go to “File”>”Save As”
- Choose “PDF” from the save as type drop-down.
- Select publishing options.
- Click “Save”.
PDF handouts can be uploaded to a website, shared via email, or transferred to mobile devices.
Well-designed PowerPoint handouts can make your presentation more impactful, memorable and shareable. By following the steps above, you can create professional, polished handouts tailored to your audience.
The key is keeping the focus on your most important information and adding value for those who read the handout later. Take advantage of headers, footers, images, colors and spacing to make your handout easy to navigate.
With PowerPoint and Word’s formatting capabilities, you can produce handouts that perfectly complement your slides and elevate your speaking engagements.
[1] https://support.microsoft.com/en-au/office/create-or-change-a-presentation-s-handout-c86f1231-abfd-48de-8d76-807f668512d2
[2] https://www.indezine.com/products/powerpoint/pphandout.html
[3] https://www.microsoft.com/en-us/microsoft-365-life-hacks/presentations/how-to-create-presentation-handouts
About The Author
Vegaslide staff, related posts.

How to Track Changes in Microsoft PowerPoint

How to Convert PDF to PowerPoint with Adobe Acrobat

PowerPoint 2000: Changing the Appearance of Slides

How to Create a Computer Game Using PowerPoint

PHILADELPHIA, MAY 9-10 PUBLIC SPEAKING CLASS IS ALMOST FULL! RESERVE YOUR SPOT NOW
- Public Speaking Classes
- Corporate Presentation Training
- Online Public Speaking Course
- Northeast Region
- Midwest Region
- Southeast Region
- Central Region
- Western Region
- Presentation Skills
- 101 Public Speaking Tips
- Fear of Public Speaking
Make Your Handouts Look Great Without a Graphic Designer
Make your presentation handouts look professional without a graphic designer.

Step #1: Use a Canva Template to Create a Great Presentation Handout.
Canva ( https://www.canva.com ) is one of those online resources where the more that you use it, the more that you can’t do without it. It is graphic design software, similar to Photoshop, but made for the amateur designer. The software is so easy to use, that you can be designing and editing professional graphics in minutes. The major difference between Canva and Photoshop though, (other than being really easy to operate) is that it is loaded with thousands of templates for just about anything that you want to create.
I was first introduced to Canva when I was looking for a way to create eye-catching social media images. I knew that if I wanted to post images that would get the attention of the casual Facebook or Twitter reader, that I had to create my own. (Stock photos just wouldn’t do.) I had invested in Photoshop, but since I didn’t have a lot of experience with it, the software was very frustrating. Then I was listening to a podcast by Michael Stelzner and Social Media Marketing, and they mentioned Canva. I tried it out for about 15 minutes, and I was hooked. In fact, most of the images that you see on my websites and social media accounts are created using Canva, now.
Create Your Background from Scratch or Start with a Template.
Because I’ve been using Canva for a while, I now publish most of my backgrounds from scratch. But when I first started using the website, I often used the pre-installed templates. If you decide to use a template, for a handout background, you might want to start with the “Letterhead” templates. Most of these letterhead templates have white backgrounds and really nice and colored borders, so they are ideal if you will be adding a lot of text. The great thing about the software is that if you find a design that you like, but you need to customize the colors, just click on the template, and it will load onto your design. Next just select the border or shape item that you want to alter, and a colored square will pop up in the top-left corner of the toolbar. Click the square, and you can change the color to any that you like.
If you decide to create the background from scratch, just click the “Use Custom Dimensions” button in the top-right corner of the Canva homepage, and enter 8.5 in X 11 in. You’ll start with a blank white page, but you can quickly add shapes, colors, images, and icons at will. You are only limited by your creativity. When I create a custom template or background, I usually use either a custom border or a half-page image.

For a small monthly fee, Canva will allow you to use royalty-free images that are fantastic. If however, you want to kick your images up a notch…
Download Professional Stock Photos on a Budget.
There are a lot of stock photo companies out there, and many are really good, but my favorite is ShutterStock . The reason I like this service so much is that the images are very economical, and they have just about any type of image that you’d ever want. In the past, I was using stock images so much for social media and my blogs that I had a monthly plan where I could download up to 50 different images per month for just $100. Now, though, I purchase five images for $49, and I have an entire year to choose which five images that I want to download. So, the images are only $9.80 each. Once you purchase the license for the picture, you can use it (and re-download it if needed) forever. This is a fantastic deal compared to companies like Getty that charge $500 per image, and you have to buy different licenses for each type of use.
ShutterStock actually has a built-in editor that you can use before you download the image. However, I have never been able to use it effectively. However, once you find the perfect image that you want to use, download it, and then upload it to Canva. You can then insert it into your half-page photo background, or you can edit it and alter it as needed. For examples of what you can do when you combine Canva and Shutterstock, go to my Instagram page at https://www.instagram.com/leadersinstitute/ .
Once you have the background just like you like it, you can either download it as a PNG from Canva, or you can save your Canva background, copy it, and create your handout right in Canva itself.
If You Are Not Technical, Here is a Tip After Downloading Your Background.
To download your background from Canva, just click the Download button and select PNG. An image will be saved on your computer in your download folder. Open up Microsoft Word, Google Docs, or any other word processor. Insert the PNG that you created. Click the image and drag the corners to the edge of the page, so that the image takes up the whole page. In the top toolbar, you will see a new option called Format. Click that button, and select Wrap Text. Now, select the option to Send Behind Text. One last thing. Right-click the image, and select Size and Position. Select Position. De-select Move Object with Text and Select Lock Anchor Position. These little technical tricks will push the image to the background of the page so that you can type whatever you want on top of the photo without moving it. If you don’t do this, when you start typing your content for your handout, the image will move around and look strange. If you need a second page for your handout, just click anywhere on the image and Copy. Then on the new page, hit Paste. Viola, a professional handout without any technical or graphic design skills needed!

Podcasts , presentation skills
View More Posts By Category: Free Public Speaking Tips | leadership tips | Online Courses | Past Fearless Presentations ® Classes | Podcasts | presentation skills | Uncategorized
- All templates
Presentation Handout Template

AI generated Pitch Deck 🤖

When you're looking to create the best presentation you need the best handout template to impact your audience. Customize the presentation handout so that you can create a material for both oral presentations or ppt to be handed out for whom is listening to you, enabling to take notes or write questions.
An Intuitive Presentation Handout Template
Creating the best presentation handout template is an ingenious way of being impactful to your audience. Your presentation handout material eliminates the need to write down questions and take notes regardless of whether it is a PPT or an oral presentation.
Essentially, our presentation handouts will relieve your teams the stress of writing everything about the company on the slides. In addition, we create embeddable presentations that can automatically fit on any device and site you’re loading them. We help you avoid the old presentation habits that may restrain your ideas and limit your capacity to be creative.
Why handouts are important
Handouts have the power to free your mind and improve your slides. With a handout, you can include the main points of your talk by summarizing them in one page, references to further reading material , and your contact details. Meaning, you won’t have to incorporate everything you want to say in your slides. And, should your audience have questions or want more information weeks after the presentation, they can contact you through your contact details.
When creating a handout, you are compelled to write down the main points because you may only need one or two pages for your handout. When you include a key image from your presentation slides or associated graphics, your readers will always remember the presentation whenever they see these images or graphics. Unfortunately, some people make a mistake of handing out slides as handouts to minimize resources.
Take time to write your core messages. You can splash in some important figures, market statistics or unique value propositions. Handouts are usually relevant when given out after a presentation. You can tell your audience to pay attention to the presentation, instead of writing down short notes, because you’ll provide a handout with contact details at the end of the presentation.
Why Our Presentation Handout Template is a Must-Have
Talking about one core message in a handout is important. Instead of showing a lot of facts and numbers, we stick to the amount of information that your audience can soak in at a given time. This is a viable approach to condensing your handout message to make it more memorable. While it may be hard to compress everything into one core message, it is well worth it.
Summarize your core message with an inspiring story. A story is a perfect way to wrap up your core message as it summarizes the main points in your storyline. Moreover, a story will make your presentation handout unforgettable.
Our Presentation Handout Elements
Presentation storyline We keep the presentation storyline consistent throughout the handout without adding new elements. This is very important to avoid confusing readers.
Images Although it is not 100% necessary, we advocate for the use of images to make your handout more appealing and memorable. Remember, the use of images depends on your business’s industry as it might be purely unnecessary to include images in certain specialties. Images boost the readability of the handout.
Further reading Incorporating a lot of information in one handout, makes the presentation look crowded and may put off some readers. Therefore, we encourage the use of a “further reading” section in your presentation handout for readers who want to learn more.
Contact details At the end of the handout, it is important to include contact details. Readers might not be able to associate your handout with a random business card after a presentation. Therefore, it is very crucial to include current, relevant contact details that people can use to contact your business, a few weeks or months later. Contact details such as name, email, webpage, and social media accounts can do.
Most popular templates

The Startup Pitch Deck Template
974619 uses

Airbnb Pitch Deck Template
967153 uses

Uber Pitch Deck Template
834990 uses

Investor Deck Template
625510 uses

Investment Proposal Template
482239 uses

Company Profile Template
249732 uses
Need a hand?

to access the full template
How-To Geek
How to customize a powerpoint handout layout.
PowerPoint handouts are a great resource to distribute to your audience so that they can follow along during your presentation or use for future reference.
Quick Links
Customizing a powerpoint handout's layout, exporting the handout to a word document.
PowerPoint handouts are a great resource to distribute to your audience so that they can follow along during your presentation or use for future reference. If you’d like to customize the handout layout before its distribution, PowerPoint has a way.
Go ahead and open up the PowerPoint presentation you'll be working with if you haven’t already. Switch over to the “View” tab and click the “Handout Master” button.
This action opens a new “Handout Master” tab on the Ribbon. Here you’ll find several available options for customizing the PowerPoint’s handout, such as Page Setup, Placeholders, Edit Theme, and Background.
Let’s first look at the options available in the “Page Setup” group, starting with “Handout Orientation.” By default, the orientation is set to “Portrait,” but you can change it to “Landscape” from the drop-down menu.
“Slide Size” gives you three options: Standard (4:3), Widescreen (16:9), or Custom Slide Size. Selecting “Custom Slide Size” lets you specify the exact width and height of the slides.
“Slides Per Page,” as the name suggests, lets you select how many slides appear on each page, ranging anywhere from one to nine slides per page.
Moving on to the “Placeholders” group, you can select or deselect the specific placeholders you want to appear on the handout. Placeholders include the header, footer, date, and page number.
To edit the content within these placeholders, make sure the option is enabled and then click the space to start editing.
Finally, you can edit the fonts, effects, background style, and color scheme of the handout by using the tools in the “Background” group.
Once you’re finished customizing the layout of your handout, click the “Close Master View” button.
Be sure to save before closing PowerPoint.
To export the PowerPoint presentation to a Word Document to create handouts, first select the “File” tab.
Next, select “Export” in the menu options on the left-hand side.
On the list of options that appears, select “Create Handouts.”
Finally, click the “Create Handouts” button.
Now the “Send to Microsoft Word” menu will appear. Select your desired page layout type and then select “Paste” or “Paste Link.”
Once you're ready, click “OK.”
Once you’ve selected “OK,” your presentation handout will open up in Word.
To edit the content within the slides, double-click the slide to be edited. Selecting the area next to the slide allows you to enter notes about the slide.
Feel free to add a header or footer to the handout. Once you’re finished, be sure to save the document and print out however many handouts you think you’ll need plus a few more just in case!
Creating a Handout to Support and Enhance Your Presentation!
Got a presentation coming up and need to create a useful handout to complement it? Great idea – but how do you go about it? Many people think handouts are just used in college, but in the business world they can be really useful to reinforce the content of your presentation.
Whether it’s a business meeting or a training course, a handout will underscore your points and support your presentation when done right. It can be tricky, though, to decide on what to include, the format, how to structure a handout and at what point of the presentation to distribute it.
Before starting to create your handout, you need to think about such things as structure, content and timing . This blog covers everything you need to know!
What is a Handout?
As the name suggests, a handout is any type of document that a speaker hands out to participants during a lecture, presentation, conference or meeting. It allows your audience to get a clear overview of the main points, or to sum up what they have heard afterwards.
A handout isn’t just a summary of slide titles; it can be much more detailed, summing up each individual topic and serving as a reference for core concepts and central insights.
What is a Handout actually for?
Your handout must provide added value . It contains information either covered or referred to in your presentation, allowing you to expand upon what might have only been touched on, and free your slides from clutter.
It can not only summarise your arguments, but can relieve pressure on your slides: dense facts and figures can be sidelined to the handout, allowing your PowerPoint presentation to be slick and professional.
Handouts offer three main advantages to your audience, depending on when they’re given out:
- The audience can follow what is said during the presentation
- The audience can make their own notes to supplement or clarify for themselves what you have presented
- It consists of an overview of what you have presented, which can then be read by interested parties

A handout not only means that you can create a clean and uncluttered presentation, but allows your audience to understand your points better and remember them afterwards . It’s also very useful for conveying your arguments to anyone who may have missed the actual presentation.
Tip: So why not just Start with the Handout?
There are obvious advantages both to your audience and yourself to having of a clearly structured handout. Once you know what to do, they can be relatively straightforward to produce. Of course, this still takes time, and you need to allow for this.
Cobbling together a handout at the last moment is not only stressful, it can be counterproductive, as it undermines your professionalism and never goes unnoticed.
TIP: For a change, why not start your presentation with a handout ? By getting the essentials out of the way first, you can then develop your presentation step by step using the handout as a basis.
The great advantage here is that you not only end up with a detailed handout, but you find a s trong common thread , allowing you to create an equally “crisp” presentation and navigate your way through it.
Creating a Handout: How to Structure it
As with most things concerning design, the motto “ less is more ” applies very effectively to handouts. In concrete terms, this means: do without whole sentences and make use of key points, abbreviations, arrows and symbols. Ideally, your handout should not consist of more than two A4 pages.
In addition to important information from your presentation, a handout needs to include the following :
- Basic information, probably in the upper left corner of the handout, such as the location of the presentation and the speaker’s name and title
- The date, probably in the upper right corner
- A concise heading – preferably the title of your presentation – centered
- Page numbers in the footer
- A clear structure, based on the individual headings of the presentation
- A consistent page layout using standard, unembellished fonts such as Arial or Times New Roman

The structure of your handout should follow the structure of your presentation, especially if you give out the handout during your presentation. It is best to limit your points to those which support your main argument. Keep the sub-items on the handout as simple as possible and don’t go into too much detail.
To make your handout visually appealing, it helps to think about the font. In addition to using clear, standard fonts , as mentioned above, try to keep the font size in the headers and footers uniform and smaller than in the main part.
TIP: Create an area for the audience to make their own notes on your handout. Either make the right margin wider or leave a few lines of space under your last point.
Handout Content – Short and to the Point
You’ve decided the layout of your handout, entered the key points and created a rough outline. Now it’s time to expand on individual points and create the main content of your handout.
Before doing so, focus on your target audience : how much background knowledge can you assume they have on the topic of your presentation? Keeping your audience in mind means you tailor the handout to their level, avoiding technical terms where they would distract from your point, including them when you are faced with an audience knowledgeable in a particular discipline.
It is very important to condense the core statements of your presentation into key points, rather than including a distracting stream of text. This way, you retain your audience’s full attention.
TIP: To arouse your audience’s curiosity right at the beginning of your presentation, you could include an upbeat quote, a proverb or a question. Choose a slightly provocative question to get your audience thinking from the start. You can repeat this verbatim on your presentation handout.
Although the main thing about handouts is that they should be short and concise , they should still be understandable when read outside the context of your presentation. If this is forgotten, they can’t act as an aid to your audience’s memory afterwards.
Nice-to-have: Additional Information on Your Handout
The main elements of a handout, as covered above, can be supplemented by additional information as you choose. This can even include pictures or graphics. Depending on the topic, a visual element can really clarify and supplement your main argument and tie things together.
As a rule, however, it pays to keep pictures and graphics on your presentation slides because they take up too much space on the handout. The costs and benefits need to be weighed up in each individual case.
It is also a good idea to include contact information on the handout; an e-mail address is the minimum. Depending on the type and purpose of the presentation, you can also provide your business address and telephone number.
If your handout consists of several pages, it helps to put your contact details in the header so that they appear on every page. It can be useful to include a short bibliography in your handout if you’re using quotes or information from other sources. This way you can also link to relevant websites or further reading on your topic that may be interesting for your audience.

TIP : At the end of your handouts you can include questions or food for thought to stimulate discussion. This is particularly useful if you wish to conduct a question and answer session after your presentation.
Tutorial: Creating a Handout with PowerPoint
When time is of the essence, PowerPoint has a feature that allows you to create a handout in minutes. Using the “Create handout” function, you can transfer a PowerPoint presentation to Microsoft Word, adapt it there and optimize it for printing.
With just a few clicks you can choose which presentation slides should appear on the handout. The number of slides can also be easily adjusted and you can cut text or expand it as necessary. You can also decide whether the handout should include a note margin, a header and/or a footer.
Your PowerPoint presentation remains untouched during this whole process. In addition to the option of printing the handout, you can also save it directly in Word as a Word or PDF document – a simple way to make the handout digitally available to your audience.
- Open your presentation in PowerPoint.
- To find the handout master, open the View tab in the top taskbar.

3. In the Master Views submenu you will find, among other things, the Handout Master.
The practical thing about this is that with just a few clicks, you can choose slides from your presentation to form a basis for your handout. It’s also easy to customize headers and footers – to insert your contact details or page numbers, for example.

It’s really easy to choose the size, number and design of your pages here; and PowerPoint also offers the option of exporting the handout you have just created to Microsoft Word. This makes it simple to print out or offer to your audience as a file.
- To do this, click on “File” in the upper task bar and then on “Export” .

2. Select Create handout .
3. In the context menu that opens, you can decide whether your handout should have a margin for adding notes, for example, or other useful options.

When is the Best Time to Distribute Your Handout?
There is no such thing as the perfect time. To help you decide the timing for your particular presentation, it helps to understand how timings influence your audience:
- Handout before presentation : In this case, you have to expect at least some of your audience to have leafed through the handout and read ahead, meaning that at any point they know what’s next. This can sometimes mean that your audience’s concentration is divided, so you need to consider carefully whether this option is appropriate.
- Handout during presentation : Distribute your handout at the point when it is useful as support, either in terms of visual illustration or as a means to emphasize your argument.

Our tip: Share your handout prior to the presentation . It is often the same arguments that are used when it comes to giving out the handout before the presentation: ‘Too restless, the audience rustles with the papers and does not concentrate on the lecture’ and many more. You probably know the arguments.
Nevertheless, our 25 years of experience with PowerPoint shows that these arguments should not be believed. Experience shows that it does not negatively affect the concentration of the audience, but even has positive effects for many to know that they do not have to take notes and that a protocol is available so that they can fully concentrate on the presentation.
In addition, listeners can add other relevant notes directly to the handout. If you withhold the handout until the end of the presentation, you also run the risk of having carried out a kind of unspoken “disciplinary action.”
Conclusion: Don’t go without a handout!
Whichever timing you decide upon, a well-prepared handout can be an effective tool to support your presentation , acting as a guide and memory aid for both you and your audience. Used properly, they can increase the interest and attention of your audience, and allow you to give a clear and professional presentation.
Need help with creating a presentation and a great handout to go with it? We have years of experience in the field of PowerPoint presentations. Just get in touch, and our team can help you create exactly what you need ► presentation agency
If you have any further questions about handouts, or anything to do with PowerPoint, feel free to get in touch at [email protected] . We’re always happy to help!
You might also be interested in the following articles:
- PowerPoint Presenter View
- Insert Notes in PowerPoint
Share this post
- share
- save

Design Thinking: Problem Solving with a Difference

Why Corporate Mission Statements Are So Important

7 Tips & Learnings from the Apple Keynote

- SUGGESTED TOPICS
- The Magazine
- Newsletters
- Managing Yourself
- Managing Teams
- Work-life Balance
- The Big Idea
- Data & Visuals
- Reading Lists
- Case Selections
- HBR Learning
- Topic Feeds
- Account Settings
- Email Preferences
How to Make a “Good” Presentation “Great”
- Guy Kawasaki

Remember: Less is more.
A strong presentation is so much more than information pasted onto a series of slides with fancy backgrounds. Whether you’re pitching an idea, reporting market research, or sharing something else, a great presentation can give you a competitive advantage, and be a powerful tool when aiming to persuade, educate, or inspire others. Here are some unique elements that make a presentation stand out.
- Fonts: Sans Serif fonts such as Helvetica or Arial are preferred for their clean lines, which make them easy to digest at various sizes and distances. Limit the number of font styles to two: one for headings and another for body text, to avoid visual confusion or distractions.
- Colors: Colors can evoke emotions and highlight critical points, but their overuse can lead to a cluttered and confusing presentation. A limited palette of two to three main colors, complemented by a simple background, can help you draw attention to key elements without overwhelming the audience.
- Pictures: Pictures can communicate complex ideas quickly and memorably but choosing the right images is key. Images or pictures should be big (perhaps 20-25% of the page), bold, and have a clear purpose that complements the slide’s text.
- Layout: Don’t overcrowd your slides with too much information. When in doubt, adhere to the principle of simplicity, and aim for a clean and uncluttered layout with plenty of white space around text and images. Think phrases and bullets, not sentences.
As an intern or early career professional, chances are that you’ll be tasked with making or giving a presentation in the near future. Whether you’re pitching an idea, reporting market research, or sharing something else, a great presentation can give you a competitive advantage, and be a powerful tool when aiming to persuade, educate, or inspire others.
- Guy Kawasaki is the chief evangelist at Canva and was the former chief evangelist at Apple. Guy is the author of 16 books including Think Remarkable : 9 Paths to Transform Your Life and Make a Difference.
Partner Center
Blog > How to export & print handouts in PowerPoint
How to export & print handouts in PowerPoint
08.09.21 • #powerpoint #tips.
PowerPoint allows you to easily create handouts to share with the audience after the presentation. You can also export your presentation with slides and notes to Word for further editing and formatting. You can find out how this all works and how you can print out the handouts at the end in this blog post.
Format & print handouts without notes

Format & print handouts with notes

If you want to make them available to the audience, you can easily print them out. All you have to do is select "Notes page" instead of "Full page slide" in the print settings.

Exporting and editing handouts in Word

When exporting a PowerPoint presentation to Word, a lot of memory is used. Therefore, this process can also take for a while. If you get the error message "PowerPoint could not write to Microsoft Word", try restarting your computer.

Share slides digitally with the audience

Printing handouts for every attendee is cumbersome and also not quite environmental friendly. A much better solution is using SlideLizard (a cool software for live audience interaction in PowerPoint) for your presentations. Attendees can join your talk with their smartphone (or Laptop) and see your slide live during the presentation . They can also browse previous slides and as well download the slides directly as a PDF (if you allow it). In addition, participants can take private notes on their own smartphones directly within SlideLizard. These notes remain linked to the slides and at the end of the presentation all participants receive their own notes via email. Moreover, attendees can mark the most important slides with a star to find them more easily later. Live polls & quizzes are also possible with SlideLizard. You can try SlideLizard for free today !

How do I create handouts in PowerPoint?
To create handouts in PowerPoint go to "Handout Master" in the "View" tab. You can format your handouts for all pages there.
How do I print handouts from PowerPoint?
To print your handouts you have to go to "Print" in the "File" tab. You can then choose how many slides you want per page under "Full page slides" in the "Handouts" group.
Related articles
About the author.

Miriam Rapberger
Miriam supports SlideLizard in the area of marketing and design. There she uses her creativity for blog posts, among other things.

Get 1 Month for free!
Do you want to make your presentations more interactive.
With SlideLizard you can engage your audience with live polls, questions and feedback . Directly within your PowerPoint Presentation. Learn more
Top blog articles More posts

How to make an image transparent in PowerPoint

Create an organisational chart in PowerPoint

Get started with Live Polls, Q&A and slides
for your PowerPoint Presentations
The big SlideLizard presentation glossary
A podcast is an audio or video contribution that can be listened to or viewed via the Internet. Podcasts can be used for information on specific topics but also for entertainment.
Leading Questions
Leading questions subconsciously make the respondent think in a certain direction.
Notes Page view
The Notes Page view in PowerPoint shows a smaller version of the slide with a small area for notes underneath. In the presentation every slide has it's own space for notes. During the presentation the notes do not appear on screen. They are just visible in the presentation mode.
Learning on Demand
Learning on Demand means that the content is available extactly when it's needed by the learner
Be the first to know!
The latest SlideLizard news, articles, and resources, sent straight to your inbox.
- or follow us on -
We use cookies to personalise content and analyse traffic to our website. You can choose to accept only cookies that are necessary for the website to function or to also allow tracking cookies. For more information, please see our privacy policy .
Cookie Settings
Necessary cookies are required for the proper functioning of the website. These cookies ensure basic functionalities and security features of the website.
Analytical cookies are used to understand how visitors interact with the website. These cookies help provide information about the number of visitors, etc.
- All categories
- Newsletters
- Restaurant menus
- All Formats
- Google Docs
- Google Drawings
- Google Sheets
- Google Slides
- Handouts Templates
Get Free Handout Templates In Google Docs, Google Sheets, Google Slides

Purple Business Handout

Professional Services Handout Flyer
Corporate Handout Flyer
Stylish Handout Flyer
Minimalist Business Handout
Marketing Agency Handout Flyer
Strict Corporate Handout Flyer
Business Handout Flyer
Simple Marketing Handout Flyer
Marketing Agency Yellow Handout
Pale Blue Handout Flyer
Handout Colorful Flyer
Modern Exhibition Handout Flyer
Angry Creative Handout
Cute Yellow Handout Flyer
Green Dark Handout Flyer
Green Medical Handout Flyer
Pizza Restaurant Handout Flyer
Creative Studio Handout Flyer
Green Corporate Handout Flyer
Modern Pink Handout Flyer
Design Company Handout Flyer
Modern Handout Flyer
Full Moon Festival Handout Flyer
Dance Studio Handout Flyer
Kids Green Handout
Do you want to build a creative advertisement for your services, company, or new brand? Of course, the best way is an online promotion on the Internet and social networks. But there are also industries that are not as digitized as the rest. If your company operates in one of these industries, or you simply do not want to spend time and investment on the Internet promotion of your goods or services, you can use our template handout.
Benefits of TheGoodocs
What benefits will you get by using our templates, why do you may need such a rather outdated way of advertising? Let's take a closer look at TheGoodocs services.
Free Ideas for Your Business
We offer you to save not only your time but also money. In the catalog, you will find dozens of amazing and ready-made templates for any purpose. Do you want to promote your yoga group, business center, marketing agency, or other business? These and other template ideas have already been uploaded to the site and are ready for you to get ultimate benefits right now.
Stunning Handout Design
There are templates with designs for various needs. You will find both versatile handout templates and those designed to advertise certain services. Just look at a few of our options, and you will certainly pick something by your taste. Thus, our alternatives will reflect not only the needs of your business. Also, you can implement your vision of design in them and choose the most suitable option based on these criteria.
All Options Editable
Do you want to change something to get the best advertising performance from the chosen template? No problem, because you can download, print, copy and accomplish many other simple but necessary steps with each sample. Do you want to start promotion as soon as possible? Then simply fill in the template with up-to-date information regarding the services offered and print it out. Thus, you get complete freedom of customization.
Constant Complementation of Designs
This category where you will find free handout templates is relatively new. So here you will not find as many downloadable templates as you might like. However, our designers work daily to add to all the rosters that you will find on TheGoodocs website. You can always check other sections of our website for more up-to-date Google Docs options for professional use.
Capacity to Request New Templates
We are constantly working on ourselves and most of all we respect the opinion of our users. It is for you TheGoodocs makes such an abundance of various templates for a handout and other needs. If you would like a more relevant template, you can always ask us for it. To do this, there is a "Request" button on the main page. There, each of our users can leave a request to add templates to the category, and we promise to read it and take into account the wishes.
Who Needs Marketing Handout Templates?
In the era of digital marketing, it may seem that printing handout templates have no place. In fact, this is not the case. You can always use handouts to attract new customers in smaller towns where the infrastructure is not as developed. Moreover, you can use this option as an additional way to advertise products and your social media. This will lead to even greater attention from your customers. In any case, we give you free access to these templates. How best to use this opportunity is up to you.
IMAGES
VIDEO
COMMENTS
If you want to create an effective presentation handout, here's what you should include. 1. List the key points of your presentation. To create a strong presentation handout, list the key facts from your speech. Keep it simple—you don't need to rewrite your entire presentation. Remember, you'll discuss a lot of the material in your ...
Presentation Handout Example #1: Just Use Slide Notes in PowerPoint as a Presentation Handout. I have to admit, this technique is just a small step above the "printing out your slide-deck" option. However, sometimes, time is short, and you want to make sure that your audience has a good takeaway.
You can present your handout examples for presentation in two formats - either physical or digital. Each comes with a set of perks and downsides. Physical handouts. The physical template for the presentation handout is a good old sheet of paper that contains all the information you want to share with the audience.
If you would prefer to edit your handouts in Word, you must go to "File", select "Export" and then "Create Handouts". A dialogue box will appear where you can select the desired page layout, then click on "Ok". A new Word file opens automatically, which you can edit and format as you like. When exporting a PowerPoint presentation to Word, a lot ...
How to Create Printable PowerPoint Handouts. Select the File tab in the ribbon. Figure 1. File tab. Select Print in the Backstage view. Figure 2. Print option. (Optional) If you don't want include all your slides, enter specific slide numbers separated by commas or a number range (e.g., 3,5,7,9-14) into the Slides text box. Figure 3.
Now, we're going to refine every slide into a handout page. Click "Close Master" and go to the first slide, then go to View → Notes Page. For every slide, format the notes you wrote using bold, numbered lists, and here, bullet points are ok. Make it narrative, for the readers' benefit.
Here are strategies to make handouts more memorable: 1. Visual Design: Consistent Theme: A cohesive theme reinforces the brand and aids in recognition. Ensure that fonts, colors, and imagery align with the overall aesthetic of the presentation, creating a seamless visual experience for the audience.
Click on the File tab and select Export from the menu. Choose Create Handouts from the options. Select the layout you want to use for your handouts. Click OK . PowerPoint will now start exporting your presentation to Word. The process might take a while, depending on the size of your presentation.
Depending on the type and purpose of the presentation, you can also provide your business address and telephone number. 5. Provides a synopsis of your speech. The information in your handout is short and to the point. Before expanding on individual and main points from your presentation, you need to focus on your target audience.
Choose how many slides to display on each handout. To do this, click the Slides Per Page menu in the upper-left area of the toolbar and select anywhere from 1 to 9 slides. The more slides you include on a page, the smaller the text will be on each slide. 5. Click Handout Orientation to choose an orientation.
Here, select which layout you want to use for your handout notes. You can also configure a slew of other printing options. As you can see from the screenshot below, you can choose the number of copies you want to make and set your paper size. The most important setting here is under PowerPoint > Layout.
When preparing a presentation handout, it is important to make sure that the content is concise and easy to read and that it reinforces the main points from the talk. Fonts and colors should be consistent with those in the presentation and additional visuals, such as graphs and charts, should be included.
If you're presenting with visual PowerPoint slides, one of the easiest ways of creating a handout is to type the text of the handout in the "Notes" pane of the PowerPoint edit screen. Then print your slides as "Notes". You'll have an effective handout. 3. Ensure your handout reflects your presentation.
Okay, so you are here reading this post because you need to create presentation handouts at some point. 📝. Whether it is for class lectures, training workshops, conference presentations, you are generally expected and should provide some type of written material or handout for our audience.
Recording voiceover for a narrated presentation. Preparing for a presentation voiceover. Export the video. To save your video go to File > Export > Create a Video. Make sure Use timings and narrations is selected on the drop-down menu. Host the video online. Finally, make your video accessible to your audience.
Return to the "File" tab in PowerPoint. Click "Export". Select "Create Handouts". Choose a Word template and click "Create". In Word, you can tweak fonts, colors, alignment, spacing, indents, and more with better precision. Add tables, SmartArt graphics, detailed citations, additional text, and images as needed. Step 6.
Step #1: Use a Canva Template to Create a Great Presentation Handout. Canva ( https://www.canva.com) is one of those online resources where the more that you use it, the more that you can't do without it. It is graphic design software, similar to Photoshop, but made for the amateur designer. The software is so easy to use, that you can be ...
An Intuitive Presentation Handout Template. Creating the best presentation handout template is an ingenious way of being impactful to your audience. Your presentation handout material eliminates the need to write down questions and take notes regardless of whether it is a PPT or an oral presentation. Essentially, our presentation handouts will ...
On the list of options that appears, select "Create Handouts.". Finally, click the "Create Handouts" button. Now the "Send to Microsoft Word" menu will appear. Select your desired page layout type and then select "Paste" or "Paste Link.". Once you're ready, click "OK.". Once you've selected "OK," your presentation ...
This makes it simple to print out or offer to your audience as a file. To do this, click on "File" in the upper task bar and then on "Export". 2. Select Create handout. 3. In the context menu that opens, you can decide whether your handout should have a margin for adding notes, for example, or other useful options.
Here are some unique elements that make a presentation stand out. Fonts: Sans Serif fonts such as Helvetica or Arial are preferred for their clean lines, which make them easy to digest at various ...
If you would prefer to edit your handouts in Word, you must go to "File", select "Export" and then "Create Handouts". A dialogue box will appear where you can select the desired page layout, then click on "Ok". A new Word file opens automatically, which you can edit and format as you like. When exporting a PowerPoint presentation to Word, a lot ...
It is for you TheGoodocs makes such an abundance of various templates for a handout and other needs. If you would like a more relevant template, you can always ask us for it. To do this, there is a "Request" button on the main page. There, each of our users can leave a request to add templates to the category, and we promise to read it and take ...
If you pre-register to speak and wish to provide a handout before the meeting, please submit an electronic copy in accessible PDF format that will be distributed by HHS staff to IDD SRAC members and State staff. Handouts are limited to two pages (paper size: 8.5" by 11", one side only).