

Tips for creating and delivering an effective presentation
In this article.
Creating an effective presentation
Delivering an effective presentation
Tips for creating an effective presentation
Top of Page
Tips for delivering an effective presentation

Need more help?
Want more options.
Explore subscription benefits, browse training courses, learn how to secure your device, and more.

Microsoft 365 subscription benefits

Microsoft 365 training

Microsoft security

Accessibility center
Communities help you ask and answer questions, give feedback, and hear from experts with rich knowledge.

Ask the Microsoft Community

Microsoft Tech Community

Windows Insiders
Microsoft 365 Insiders
Was this information helpful?
Thank you for your feedback.

- Get started with computers
- Learn Microsoft Office
- Apply for a job
- Improve my work skills
- Design nice-looking docs
- Getting Started
- Smartphones & Tablets
- Typing Tutorial
- Online Learning
- Basic Internet Skills
- Online Safety
- Social Media
- Zoom Basics
- Google Docs
- Google Sheets
- Career Planning
- Resume Writing
- Cover Letters
- Job Search and Networking
- Business Communication
- Entrepreneurship 101
- Careers without College
- Job Hunt for Today
- 3D Printing
- Freelancing 101
- Personal Finance
- Sharing Economy
- Decision-Making
- Graphic Design
- Photography
- Image Editing
- Learning WordPress
- Language Learning
- Critical Thinking
- For Educators
- Translations
- Staff Picks
- English expand_more expand_less
PowerPoint Tips - Simple Rules for Better PowerPoint Presentations
Powerpoint tips -, simple rules for better powerpoint presentations, powerpoint tips simple rules for better powerpoint presentations.

PowerPoint Tips: Simple Rules for Better PowerPoint Presentations
Lesson 17: simple rules for better powerpoint presentations.
/en/powerpoint-tips/embed-excel-charts-in-a-slide/content/
Simple rules for better PowerPoint presentations
Have you ever given a PowerPoint presentation and noticed that something about it just seemed a little … off? If you’re unfamiliar with basic PowerPoint design principles, it can be difficult to create a slide show that presents your information in the best light.
Poorly designed presentations can leave an audience feeling confused, bored, and even irritated. Review these tips to make your next presentation more engaging.
Don't read your presentation straight from the slides
If your audience can both read and hear, it’s a waste of time for you to simply read your slides aloud. Your audience will zone out and stop listening to what you’re saying, which means they won’t hear any extra information you include.
Instead of typing out your entire presentation, include only main ideas, keywords, and talking points in your slide show text. Engage your audience by sharing the details out loud.
Follow the 5/5/5 rule
To keep your audience from feeling overwhelmed, you should keep the text on each slide short and to the point. Some experts suggest using the 5/5/5 rule : no more than five words per line of text, five lines of text per slide, or five text-heavy slides in a row.

Don't forget your audience
Who will be watching your presentation? The same goofy effects and funny clip art that would entertain a classroom full of middle-school students might make you look unprofessional in front of business colleagues and clients.
Humor can lighten up a presentation, but if you use it inappropriately your audience might think you don’t know what you’re doing. Know your audience, and tailor your presentation to their tastes and expectations.
Choose readable colors and fonts
Your text should be easy to read and pleasant to look at. Large, simple fonts and theme colors are always your best bet. The best fonts and colors can vary depending on your presentation setting. Presenting in a large room? Make your text larger than usual so people in the back can read it. Presenting with the lights on? Dark text on a light background is your best bet for visibility.

Don't overload your presentation with animations
As anyone who’s sat through a presentation while every letter of every paragraph zoomed across the screen can tell you, being inundated with complicated animations and exciting slide transitions can become irritating.
Before including effects like this in your presentation, ask yourself: Would this moment in the presentation be equally strong without an added effect? Does it unnecessarily delay information? If the answer to either question is yes—or even maybe—leave out the effect.
Use animations sparingly to enhance your presentation
Don’t take the last tip to mean you should avoid animations and other effects entirely. When used sparingly, subtle effects and animations can add to your presentation. For example, having bullet points appear as you address them rather than before can help keep your audience’s attention.
Keep these tips in mind the next time you create a presentation—your audience will thank you. For more detailed information on creating a PowerPoint presentation, visit our Office tutorials .
/en/powerpoint-tips/three-tips-for-beautiful-powerpoint-presentations/content/
Loading metrics
Open Access
Ten simple rules for effective presentation slides
* E-mail: [email protected]
Affiliation Biomedical Engineering and the Center for Public Health Genomics, University of Virginia, Charlottesville, Virginia, United States of America
- Kristen M. Naegle
Published: December 2, 2021
- https://doi.org/10.1371/journal.pcbi.1009554
- Reader Comments
Citation: Naegle KM (2021) Ten simple rules for effective presentation slides. PLoS Comput Biol 17(12): e1009554. https://doi.org/10.1371/journal.pcbi.1009554
Copyright: © 2021 Kristen M. Naegle. This is an open access article distributed under the terms of the Creative Commons Attribution License , which permits unrestricted use, distribution, and reproduction in any medium, provided the original author and source are credited.
Funding: The author received no specific funding for this work.
Competing interests: The author has declared no competing interests exist.
Introduction
The “presentation slide” is the building block of all academic presentations, whether they are journal clubs, thesis committee meetings, short conference talks, or hour-long seminars. A slide is a single page projected on a screen, usually built on the premise of a title, body, and figures or tables and includes both what is shown and what is spoken about that slide. Multiple slides are strung together to tell the larger story of the presentation. While there have been excellent 10 simple rules on giving entire presentations [ 1 , 2 ], there was an absence in the fine details of how to design a slide for optimal effect—such as the design elements that allow slides to convey meaningful information, to keep the audience engaged and informed, and to deliver the information intended and in the time frame allowed. As all research presentations seek to teach, effective slide design borrows from the same principles as effective teaching, including the consideration of cognitive processing your audience is relying on to organize, process, and retain information. This is written for anyone who needs to prepare slides from any length scale and for most purposes of conveying research to broad audiences. The rules are broken into 3 primary areas. Rules 1 to 5 are about optimizing the scope of each slide. Rules 6 to 8 are about principles around designing elements of the slide. Rules 9 to 10 are about preparing for your presentation, with the slides as the central focus of that preparation.
Rule 1: Include only one idea per slide
Each slide should have one central objective to deliver—the main idea or question [ 3 – 5 ]. Often, this means breaking complex ideas down into manageable pieces (see Fig 1 , where “background” information has been split into 2 key concepts). In another example, if you are presenting a complex computational approach in a large flow diagram, introduce it in smaller units, building it up until you finish with the entire diagram. The progressive buildup of complex information means that audiences are prepared to understand the whole picture, once you have dedicated time to each of the parts. You can accomplish the buildup of components in several ways—for example, using presentation software to cover/uncover information. Personally, I choose to create separate slides for each piece of information content I introduce—where the final slide has the entire diagram, and I use cropping or a cover on duplicated slides that come before to hide what I’m not yet ready to include. I use this method in order to ensure that each slide in my deck truly presents one specific idea (the new content) and the amount of the new information on that slide can be described in 1 minute (Rule 2), but it comes with the trade-off—a change to the format of one of the slides in the series often means changes to all slides.
- PPT PowerPoint slide
- PNG larger image
- TIFF original image
Top left: A background slide that describes the background material on a project from my lab. The slide was created using a PowerPoint Design Template, which had to be modified to increase default text sizes for this figure (i.e., the default text sizes are even worse than shown here). Bottom row: The 2 new slides that break up the content into 2 explicit ideas about the background, using a central graphic. In the first slide, the graphic is an explicit example of the SH2 domain of PI3-kinase interacting with a phosphorylation site (Y754) on the PDGFR to describe the important details of what an SH2 domain and phosphotyrosine ligand are and how they interact. I use that same graphic in the second slide to generalize all binding events and include redundant text to drive home the central message (a lot of possible interactions might occur in the human proteome, more than we can currently measure). Top right highlights which rules were used to move from the original slide to the new slide. Specific changes as highlighted by Rule 7 include increasing contrast by changing the background color, increasing font size, changing to sans serif fonts, and removing all capital text and underlining (using bold to draw attention). PDGFR, platelet-derived growth factor receptor.
https://doi.org/10.1371/journal.pcbi.1009554.g001
Rule 2: Spend only 1 minute per slide
When you present your slide in the talk, it should take 1 minute or less to discuss. This rule is really helpful for planning purposes—a 20-minute presentation should have somewhere around 20 slides. Also, frequently giving your audience new information to feast on helps keep them engaged. During practice, if you find yourself spending more than a minute on a slide, there’s too much for that one slide—it’s time to break up the content into multiple slides or even remove information that is not wholly central to the story you are trying to tell. Reduce, reduce, reduce, until you get to a single message, clearly described, which takes less than 1 minute to present.
Rule 3: Make use of your heading
When each slide conveys only one message, use the heading of that slide to write exactly the message you are trying to deliver. Instead of titling the slide “Results,” try “CTNND1 is central to metastasis” or “False-positive rates are highly sample specific.” Use this landmark signpost to ensure that all the content on that slide is related exactly to the heading and only the heading. Think of the slide heading as the introductory or concluding sentence of a paragraph and the slide content the rest of the paragraph that supports the main point of the paragraph. An audience member should be able to follow along with you in the “paragraph” and come to the same conclusion sentence as your header at the end of the slide.
Rule 4: Include only essential points
While you are speaking, audience members’ eyes and minds will be wandering over your slide. If you have a comment, detail, or figure on a slide, have a plan to explicitly identify and talk about it. If you don’t think it’s important enough to spend time on, then don’t have it on your slide. This is especially important when faculty are present. I often tell students that thesis committee members are like cats: If you put a shiny bauble in front of them, they’ll go after it. Be sure to only put the shiny baubles on slides that you want them to focus on. Putting together a thesis meeting for only faculty is really an exercise in herding cats (if you have cats, you know this is no easy feat). Clear and concise slide design will go a long way in helping you corral those easily distracted faculty members.
Rule 5: Give credit, where credit is due
An exception to Rule 4 is to include proper citations or references to work on your slide. When adding citations, names of other researchers, or other types of credit, use a consistent style and method for adding this information to your slides. Your audience will then be able to easily partition this information from the other content. A common mistake people make is to think “I’ll add that reference later,” but I highly recommend you put the proper reference on the slide at the time you make it, before you forget where it came from. Finally, in certain kinds of presentations, credits can make it clear who did the work. For the faculty members heading labs, it is an effective way to connect your audience with the personnel in the lab who did the work, which is a great career booster for that person. For graduate students, it is an effective way to delineate your contribution to the work, especially in meetings where the goal is to establish your credentials for meeting the rigors of a PhD checkpoint.
Rule 6: Use graphics effectively
As a rule, you should almost never have slides that only contain text. Build your slides around good visualizations. It is a visual presentation after all, and as they say, a picture is worth a thousand words. However, on the flip side, don’t muddy the point of the slide by putting too many complex graphics on a single slide. A multipanel figure that you might include in a manuscript should often be broken into 1 panel per slide (see Rule 1 ). One way to ensure that you use the graphics effectively is to make a point to introduce the figure and its elements to the audience verbally, especially for data figures. For example, you might say the following: “This graph here shows the measured false-positive rate for an experiment and each point is a replicate of the experiment, the graph demonstrates …” If you have put too much on one slide to present in 1 minute (see Rule 2 ), then the complexity or number of the visualizations is too much for just one slide.
Rule 7: Design to avoid cognitive overload
The type of slide elements, the number of them, and how you present them all impact the ability for the audience to intake, organize, and remember the content. For example, a frequent mistake in slide design is to include full sentences, but reading and verbal processing use the same cognitive channels—therefore, an audience member can either read the slide, listen to you, or do some part of both (each poorly), as a result of cognitive overload [ 4 ]. The visual channel is separate, allowing images/videos to be processed with auditory information without cognitive overload [ 6 ] (Rule 6). As presentations are an exercise in listening, and not reading, do what you can to optimize the ability of the audience to listen. Use words sparingly as “guide posts” to you and the audience about major points of the slide. In fact, you can add short text fragments, redundant with the verbal component of the presentation, which has been shown to improve retention [ 7 ] (see Fig 1 for an example of redundant text that avoids cognitive overload). Be careful in the selection of a slide template to minimize accidentally adding elements that the audience must process, but are unimportant. David JP Phillips argues (and effectively demonstrates in his TEDx talk [ 5 ]) that the human brain can easily interpret 6 elements and more than that requires a 500% increase in human cognition load—so keep the total number of elements on the slide to 6 or less. Finally, in addition to the use of short text, white space, and the effective use of graphics/images, you can improve ease of cognitive processing further by considering color choices and font type and size. Here are a few suggestions for improving the experience for your audience, highlighting the importance of these elements for some specific groups:
- Use high contrast colors and simple backgrounds with low to no color—for persons with dyslexia or visual impairment.
- Use sans serif fonts and large font sizes (including figure legends), avoid italics, underlining (use bold font instead for emphasis), and all capital letters—for persons with dyslexia or visual impairment [ 8 ].
- Use color combinations and palettes that can be understood by those with different forms of color blindness [ 9 ]. There are excellent tools available to identify colors to use and ways to simulate your presentation or figures as they might be seen by a person with color blindness (easily found by a web search).
- In this increasing world of virtual presentation tools, consider practicing your talk with a closed captioning system capture your words. Use this to identify how to improve your speaking pace, volume, and annunciation to improve understanding by all members of your audience, but especially those with a hearing impairment.
Rule 8: Design the slide so that a distracted person gets the main takeaway
It is very difficult to stay focused on a presentation, especially if it is long or if it is part of a longer series of talks at a conference. Audience members may get distracted by an important email, or they may start dreaming of lunch. So, it’s important to look at your slide and ask “If they heard nothing I said, will they understand the key concept of this slide?” The other rules are set up to help with this, including clarity of the single point of the slide (Rule 1), titling it with a major conclusion (Rule 3), and the use of figures (Rule 6) and short text redundant to your verbal description (Rule 7). However, with each slide, step back and ask whether its main conclusion is conveyed, even if someone didn’t hear your accompanying dialog. Importantly, ask if the information on the slide is at the right level of abstraction. For example, do you have too many details about the experiment, which hides the conclusion of the experiment (i.e., breaking Rule 1)? If you are worried about not having enough details, keep a slide at the end of your slide deck (after your conclusions and acknowledgments) with the more detailed information that you can refer to during a question and answer period.
Rule 9: Iteratively improve slide design through practice
Well-designed slides that follow the first 8 rules are intended to help you deliver the message you intend and in the amount of time you intend to deliver it in. The best way to ensure that you nailed slide design for your presentation is to practice, typically a lot. The most important aspects of practicing a new presentation, with an eye toward slide design, are the following 2 key points: (1) practice to ensure that you hit, each time through, the most important points (for example, the text guide posts you left yourself and the title of the slide); and (2) practice to ensure that as you conclude the end of one slide, it leads directly to the next slide. Slide transitions, what you say as you end one slide and begin the next, are important to keeping the flow of the “story.” Practice is when I discover that the order of my presentation is poor or that I left myself too few guideposts to remember what was coming next. Additionally, during practice, the most frequent things I have to improve relate to Rule 2 (the slide takes too long to present, usually because I broke Rule 1, and I’m delivering too much information for one slide), Rule 4 (I have a nonessential detail on the slide), and Rule 5 (I forgot to give a key reference). The very best type of practice is in front of an audience (for example, your lab or peers), where, with fresh perspectives, they can help you identify places for improving slide content, design, and connections across the entirety of your talk.
Rule 10: Design to mitigate the impact of technical disasters
The real presentation almost never goes as we planned in our heads or during our practice. Maybe the speaker before you went over time and now you need to adjust. Maybe the computer the organizer is having you use won’t show your video. Maybe your internet is poor on the day you are giving a virtual presentation at a conference. Technical problems are routinely part of the practice of sharing your work through presentations. Hence, you can design your slides to limit the impact certain kinds of technical disasters create and also prepare alternate approaches. Here are just a few examples of the preparation you can do that will take you a long way toward avoiding a complete fiasco:
- Save your presentation as a PDF—if the version of Keynote or PowerPoint on a host computer cause issues, you still have a functional copy that has a higher guarantee of compatibility.
- In using videos, create a backup slide with screen shots of key results. For example, if I have a video of cell migration, I’ll be sure to have a copy of the start and end of the video, in case the video doesn’t play. Even if the video worked, you can pause on this backup slide and take the time to highlight the key results in words if someone could not see or understand the video.
- Avoid animations, such as figures or text that flash/fly-in/etc. Surveys suggest that no one likes movement in presentations [ 3 , 4 ]. There is likely a cognitive underpinning to the almost universal distaste of pointless animations that relates to the idea proposed by Kosslyn and colleagues that animations are salient perceptual units that captures direct attention [ 4 ]. Although perceptual salience can be used to draw attention to and improve retention of specific points, if you use this approach for unnecessary/unimportant things (like animation of your bullet point text, fly-ins of figures, etc.), then you will distract your audience from the important content. Finally, animations cause additional processing burdens for people with visual impairments [ 10 ] and create opportunities for technical disasters if the software on the host system is not compatible with your planned animation.
Conclusions
These rules are just a start in creating more engaging presentations that increase audience retention of your material. However, there are wonderful resources on continuing on the journey of becoming an amazing public speaker, which includes understanding the psychology and neuroscience behind human perception and learning. For example, as highlighted in Rule 7, David JP Phillips has a wonderful TEDx talk on the subject [ 5 ], and “PowerPoint presentation flaws and failures: A psychological analysis,” by Kosslyn and colleagues is deeply detailed about a number of aspects of human cognition and presentation style [ 4 ]. There are many books on the topic, including the popular “Presentation Zen” by Garr Reynolds [ 11 ]. Finally, although briefly touched on here, the visualization of data is an entire topic of its own that is worth perfecting for both written and oral presentations of work, with fantastic resources like Edward Tufte’s “The Visual Display of Quantitative Information” [ 12 ] or the article “Visualization of Biomedical Data” by O’Donoghue and colleagues [ 13 ].
Acknowledgments
I would like to thank the countless presenters, colleagues, students, and mentors from which I have learned a great deal from on effective presentations. Also, a thank you to the wonderful resources published by organizations on how to increase inclusivity. A special thanks to Dr. Jason Papin and Dr. Michael Guertin on early feedback of this editorial.
- View Article
- PubMed/NCBI
- Google Scholar
- 3. Teaching VUC for Making Better PowerPoint Presentations. n.d. Available from: https://cft.vanderbilt.edu/guides-sub-pages/making-better-powerpoint-presentations/#baddeley .
- 8. Creating a dyslexia friendly workplace. Dyslexia friendly style guide. nd. Available from: https://www.bdadyslexia.org.uk/advice/employers/creating-a-dyslexia-friendly-workplace/dyslexia-friendly-style-guide .
- 9. Cravit R. How to Use Color Blind Friendly Palettes to Make Your Charts Accessible. 2019. Available from: https://venngage.com/blog/color-blind-friendly-palette/ .
- 10. Making your conference presentation more accessible to blind and partially sighted people. n.d. Available from: https://vocaleyes.co.uk/services/resources/guidelines-for-making-your-conference-presentation-more-accessible-to-blind-and-partially-sighted-people/ .
- 11. Reynolds G. Presentation Zen: Simple Ideas on Presentation Design and Delivery. 2nd ed. New Riders Pub; 2011.
- 12. Tufte ER. The Visual Display of Quantitative Information. 2nd ed. Graphics Press; 2001.
Table of Contents
3 principles of effective presentations.

Last month I had an opportunity to write a 20-page booklet for ATD entitled PowerPoint: Your Co-facilitator .

Since then, a number of friends and colleagues have asked me to boil the booklet down into the top five or ten tips that lead to effective PowerPoint presentations . As I reflected on that question, I think there are three guiding principles that can make any PowerPoint deck better. And these principles have very little to do with conventional advice such as “bullets kill, so eliminate bullet points” or “only use three lines of text, no more than 8 words per line, and no smaller than 36 point font”. My principles have little to do with the need to hone your graphic design skills, either.
Principle 1: Before you open PowerPoint, plan.
All too often, when someone is asked to deliver a presentation, they immediately open PowerPoint. They get their thoughts down. They may tweak a few things. Then that becomes their presentation and the audience is stuck watching a slide deck that is content-heavy and not very engaging.
Instead, I suggest that presenters do not reflexively open PowerPoint, but rather open a Word document or even eschew technology altogether and grab a tablet of paper and a pencil and use the following steps:
- Sketch out the main points.
- Decide how best to visually represent those points using PowerPoint (or whatever presentation software you choose).
- Tell your visual story with your slides as you serve as a sort of presentation tour guide, narrating the experience for your audience.
To help with this process, here is a storyboard template . Another post illustrates the evolution of a slide from concept to final imagery.
Principle 2: Draw attention only to the information to which you want your audience to pay attention.
Sometimes bulleted lists are the best way to share information. You do not, however, need to share the whole list at once. A simple adjustment to slides wherein you animate your bullet points and reveal them one at a time can help your audience stay focused on you . Otherwise, your audience will be reading all the information on your slide and not really paying any attention to you.
When it comes to charts and graphs – whether the information is fairly simple or if it’s a complex data set – two tips can be helpful:
- Make sure the title of the slide has meaning. Instead of “Annual Employee Turnover” as the title to your slide, try something that draws attention to the point you’d like to make, such as: “Employee Turnover Is Down 27% From Last Year”.
- If there is a specific data point you’d like the audience to pay attention to on a bar graph or in a chart, highlight it in a different color. When you can avoid making your audience work too hard to interpret the data on your slide, they’ll pay more attention to you and the points you make verbally.
Principle 3: Let your audience interact with your content.
Effective PowerPoint presentations are not necessarily a one-way form of communication. If you want to take the pulse of your audience about a certain topic before you launch into your brilliant discourse (or if you simply want to make sure they’re still following along), embed an interactive poll into your deck and insist that your audience use their smartphones to engage with your presentation (since they may be using their smartphones anyway to check email or post on Instagram). PollEverywhere is a service (starting with free pricing, though for larger audiences there is a fee-for-service model) that allows you to easily embed such polling into your deck.
Instead of dictating the order in which you present your content, you can also ask your audience for things on their mind and then reveal that content Family Feud-style by using these tips .
Of course, Jeopardy-style review games have long-since been used in the training room. Here is a Jeopardy-inspired PowerPoint template which can be used in the training room.
These are three guiding principles for making any presentation more engaging. What is your advice for effective PowerPoint presentations? I’d love to hear your PowerPoint tips, tricks and ideas for engagement in the comment section.

Brian Washburn
Brian has over 25 years of experience in Learning & Development including the last 7 as CEO of Endurance Learning.
Brian is always available to chat about learning & development and to talk about whether Endurance Learning can be your training team’s “extra set of hands”.
See author's posts
Instructor-Led Training Resources
These are some of our favorite resources to support everyone involved with instructor-led training.
Training Delivery and Facilitation Competency Rubric
A rubric is a way to assess performance with a standard set of evaluation criteria. The next time you need to assess the performance of someone delivering training (even if that someone is you), you may find this rubric helpful.
263 Training Activities to Boost Your Workshop
Get quick access to the training activities and workshop activities that help you generate ideas for your next training session.
The Role of Co-facilitators
Co-facilitators play an important role in a training workshop. The most obvious benefit is that when you co-facilitate, you get a break from leading the
18 Instructor-led Training Activities
Engaging, intentional, face-to-face and virtual instructor-led training activities can make the difference between a session that helps learners to apply new skills or knowledge and one that falls flat.
Articles Similar to 3 Principles of Effective Presentations

Accessibility and Inclusion in Instructor-Led Training (ILT)
Is your ILT designed with accessibility and inclusion in mind? Gwen Navarrete Klapperich wants to make sure you consider accessibility and inclusion in your ILT design, and offers some suggestions on how to do just that.

Turning the Tables: From Trainer to Student
As people who have designed and delivered effective training, Kassy Laborie and Zovig Garboushian know a thing or two about good learning experiences. So what nuggets have they gleaned from a 9-month course that they’re both attending, and that all of us should consider when designing our own programs? Today’s podcast answers that question.

Is this the world’s most effective role play?
When it comes to your training participants, two of the dirtiest, or perhaps scariest, words you can say during a session may be: role play. In today’s podcast, John Crook, Head of Learning at Intersol Global, offers some thoughts on how to make role plays more authentic and robust.

What can training designers learn from a popular keynote speaker?
What can anyone who designs training learn from the way a keynote speaker designs and refines their presentation? Renowned keynote speaker, Jessica Kriegel, answers that question and more in today’s podcast.

Using a Whiteboard in a Virtual Classroom
Do you remember the time way back before COVID when we all gathered in classrooms for training? We have seen some Instructor-Led Training (ILT) return,
Subscribe to Get Updates from Endurance Learning

Brian Washburn CEO & Chief Ideas Guy
Enter your information below and we’ll send you the latest updates from our blog. Thanks for following!

Download the Training Activity Cookbook
Enter your email below and we’ll send you the PDF of the Endurance Learning Activity Cookbook.

Download the Facilitator Evaluation Rubric
Enter your email below and we’ll send you the PDF of the rubric to help you assess the skills of someone delivering training.
Find Your L&D Career Path
Explore the range of careers to understand what role might be a good fit for your L&D career.
Enter your email below and we’ll send you the PDF of the What’s Possible in L&D Worksheet .

Let's Talk Training!

Enter your information below and we’ll get back to you soon.
Download the Feedback Lesson Plan
Enter your email below and we’ll send you the lesson plan as a PDF.

Download the Microsoft Word Job Aid Template
Enter your email below and we’ll send you the Word version of this template.
Download the Free Lesson Plan Template!
Enter your email below and we’ll send you a Word document that you can start using today!

Download the Training Materials Checklist
Enter your email below and we’ll send you the PDF of the Training Materials Checklist.
Subscribe to Endurance Learning for updates
Get regular updates from the Endurance Learning team.
Improve your practice.
Enhance your soft skills with a range of award-winning courses.
Complete Guide for Effective Presentations, with Examples
July 9, 2018 - Dom Barnard
During a presentation you aim to look confident, enthusiastic and natural. You’ll need more than good words and content to achieve this – your delivery plays a significant part. In this article, we discuss various techniques that can be used to deliver an effective presentation.
Effective presentations
Think about if you were in the audience, what would:
- Get you to focus and listen
- Make you understand
- Activate your imagination
- Persuade you
Providing the audience with interesting information is not enough to achieve these aims – you need to ensure that the way you present is stimulating and engaging. If it’s not, you’ll lose the audience’s interest and they’ll stop listening.
Tips for an Effective Presentation
Professional public speakers spend hours creating and practicing presentations. These are the delivery techniques they consider:
Keep it simple
You shouldn’t overwhelm your audience with information – ensure that you’re clear, concise and that you get to the point so they can understand your message.
Have a maximum of three main points and state them at the beginning, before you explain them in more depth, and then state them at the end so the audience will at least remember these points.
If some of your content doesn’t contribute to your key message then cut it out. Also avoid using too many statistics and technical terminology.
Connect with your audience
One of the greatest difficulties when delivering a presentation is connecting with the audience. If you don’t connect with them it will seem as though you’re talking to an empty room.
Trying to make contact with the audience makes them feel like they’re part of the presentation which encourages them to listen and it shows that you want to speak to them.

Eye contact and smile
Avoiding eye contact is uncomfortable because it make you look insecure. When you maintain eye contact the audience feels like you’re speaking to them personally. If this is something you struggle with, try looking at people’s foreheads as it gives the impression of making eye contact.
Try to cover all sections of the audience and don’t move on to the next person too quickly as you will look nervous.
Smiling also helps with rapport and it reduces your nerves because you’ll feel less like you’re talking to group of faceless people. Make sure you don’t turn the lights down too much before your presentation so you can all clearly see each other.
Body language
Be aware of your body language and use it to connect:
- Keep your arms uncrossed so your body language is more open .
- Match your facial expressions with what you’re saying.
- Avoid fidgeting and displaying nervous habits, such as, rocking on your feet.
- You may need to glance at the computer slide or a visual aid but make sure you predominantly face the audience.
- Emphasise points by using hand gestures but use them sparingly – too little and they’ll awkwardly sit at your side, too much and you’ll be distracting and look nervous.
- Vary your gestures so you don’t look robotic.
- Maintain a straight posture.
- Be aware of cultural differences .
Move around
Avoid standing behind the lectern or computer because you need to reduce the distance and barriers between yourself and the audience. Use movement to increase the audience’s interest and make it easier to follow your presentation.
A common technique for incorporating movement into your presentation is to:
- Start your introduction by standing in the centre of the stage.
- For your first point you stand on the left side of the stage.
- You discuss your second point from the centre again.
- You stand on the right side of the stage for your third point.
- The conclusion occurs in the centre.
Watch 3 examples of good and bad movement while presenting
Example: Movement while presenting
Your movement at the front of the class and amongst the listeners can help with engagement. Think about which of these three speakers maintains the attention of their audience for longer, and what they are doing differently to each other.
Speak with the audience
You can conduct polls using your audience or ask questions to make them think and feel invested in your presentation. There are three different types of questions:
Direct questions require an answer: “What would you do in this situation?” These are mentally stimulating for the audience. You can pass a microphone around and let the audience come to your desired solution.
Rhetorical questions do not require answers, they are often used to emphasises an idea or point: “Is the Pope catholic?
Loaded questions contain an unjustified assumption made to prompt the audience into providing a particular answer which you can then correct to support your point: You may ask “Why does your wonderful company have such a low incidence of mental health problems?” The audience will generally answer that they’re happy.
After receiving the answers you could then say “Actually it’s because people are still unwilling and too embarrassed to seek help for mental health issues at work etc.”

Be specific with your language
Make the audience feel as though you are speaking to each member individually by using “you” and “your.”
For example: asking “Do you want to lose weight without feeling hungry?” would be more effective than asking “Does anyone here want to lost weight without feeling hungry?” when delivering your presentation. You can also increase solidarity by using “we”, “us” etc – it makes the audience think “we’re in this together”.
Be flexible
Be prepared to adapt to the situation at the time, for example, if the audience seems bored you can omit details and go through the material faster, if they are confused then you will need to come up with more examples on the spot for clarification. This doesn’t mean that you weren’t prepared because you can’t predict everything.
Vocal variety
How you say something is just as is important as the content of your speech – arguably, more so.
For example, if an individual presented on a topic very enthusiastically the audience would probably enjoy this compared to someone who covered more points but mumbled into their notes.
- Adapt your voice depending on what are you’re saying – if you want to highlight something then raise your voice or lower it for intensity. Communicate emotion by using your voice.
- Avoid speaking in monotone as you will look uninterested and the audience will lose interest.
- Take time to pronounce every word carefully.
- Raise your pitch when asking questions and lower it when you want to sound severe.
- Sound enthusiastic – the more you sound like you care about the topic, the more the audience will listen. Smiling and pace can help with this.
- Speak loudly and clearly – think about projecting your voice to the back of the room.
- Speak at a pace that’s easy to follow . If you’re too fast or too slow it will be difficult for the audience to understand what you’re saying and it’s also frustrating. Subtly fasten the pace to show enthusiasm and slow down for emphasis, thoughtfulness or caution.
Prior to the presentation, ensure that you prepare your vocal chords :
- You could read aloud a book that requires vocal variety, such as, a children’s book.
- Avoid dairy and eating or drinking anything too sugary beforehand as mucus can build-up leading to frequent throat clearing.
- Don’t drink anything too cold before you present as this can constrict your throat which affects vocal quality.
- Some people suggest a warm cup of tea beforehand to relax the throat.
Practice Presentation Skills
Improve your public speaking and presentation skills by practicing them in realistic environments, with automated feedback on performance. Learn More
Pause to breathe
When you’re anxious your breathing will become quick and shallow which will affect the control you have on your voice. This can consequently make you feel more nervous. You want to breathe steadily and deeply so before you start speaking take some deep breaths or implement controlled breathing.
Controlled breathing is a common technique that helps slow down your breathing to normal thus reducing your anxiety. If you think this may be useful practice with these steps:
- Sit down in an upright position as it easier for your lungs to fill with air
- Breathe in through your nose and into your abdomen for four seconds
- Hold this breathe for two seconds
- Breathe out through your nose for six seconds
- Wait a few seconds before inhaling and repeating the cycle
It takes practice to master this technique but once you get used to it you may want to implement it directly before your presentation.

Completely filling your lungs during a pause will ensure you reach a greater vocal range.
During the presentation delivery, if you notice that you’re speaking too quickly then pause and breathe. This won’t look strange – it will appear as though you’re giving thought to what you’re saying. You can also strategically plan some of your pauses, such as after questions and at the end of sections, because this will give you a chance to calm down and it will also give the audience an opportunity to think and reflect.
Pausing will also help you avoid filler words , such as, “um” as well which can make you sound unsure.
- 10 Effective Ways to use Pauses in your Speech
Strong opening
The first five minutes are vital to engage the audience and get them listening to you. You could start with a story to highlight why your topic is significant.
For example, if the topic is on the benefits of pets on physical and psychological health, you could present a story or a study about an individual whose quality of life significantly improved after being given a dog. The audience is more likely to respond better to this and remember this story than a list of facts.
Example: Which presentation intro keeps you engaged?
Watch 5 different presentation introductions, from both virtual and in-person events. Notice how it can only take a few seconds to decide if you want to keep listening or switch off. For the good introductions, what about them keeps you engaged?
More experienced and confident public speakers use humour in their presentations. The audience will be incredibly engaged if you make them laugh but caution must be exercised when using humour because a joke can be misinterpreted and even offend the audience.
Only use jokes if you’re confident with this technique, it has been successful in the past and it’s suitable for the situation.
Stories and anecdotes
Use stories whenever you can and judge whether you can tell a story about yourself because the audience are even more interested in seeing the human side of you.
Consider telling a story about a mistake you made, for example, perhaps you froze up during an important presentation when you were 25, or maybe life wasn’t going well for you in the past – if relevant to your presentation’s aim. People will relate to this as we have all experienced mistakes and failures. The more the audience relates to you, the more likely they will remain engaged.
These stories can also be told in a humorous way if it makes you feel more comfortable and because you’re disclosing a personal story there is less chance of misinterpretation compared to telling a joke.
Anecdotes are especially valuable for your introduction and between different sections of the presentation because they engage the audience. Ensure that you plan the stories thoroughly beforehand and that they are not too long.
Focus on the audience’s needs
Even though your aim is to persuade the audience, they must also get something helpful from the presentation. Provide the audience with value by giving them useful information, tactics, tips etc. They’re more likely to warm to you and trust you if you’re sharing valuable information with them.
You could also highlight their pain point. For example, you might ask “Have you found it difficult to stick to a healthy diet?” The audience will now want to remain engaged because they want to know the solution and the opportunities that you’re offering.
Use visual aids
Visual aids are items of a visual manner, such as graphs, photographs, video clips etc used in addition to spoken information. Visual aids are chosen depending on their purpose, for example, you may want to:
- Summarise information.
- Reduce the amount of spoken words, for example, you may show a graph of your results rather than reading them out.
- Clarify and show examples.
- Create more of an impact. You must consider what type of impact you want to make beforehand – do you want the audience to be sad, happy, angry etc?
- Emphasise what you’re saying.
- Make a point memorable.
- Enhance your credibility.
- Engage the audience and maintain their interest.
- Make something easier for the audience to understand.

Some general tips for using visual aids :
- Think about how can a visual aid can support your message. What do you want the audience to do?
- Ensure that your visual aid follows what you’re saying or this will confuse the audience.
- Avoid cluttering the image as it may look messy and unclear.
- Visual aids must be clear, concise and of a high quality.
- Keep the style consistent, such as, the same font, colours, positions etc
- Use graphs and charts to present data.
- The audience should not be trying to read and listen at the same time – use visual aids to highlight your points.
- One message per visual aid, for example, on a slide there should only be one key point.
- Use visual aids in moderation – they are additions meant to emphasise and support main points.
- Ensure that your presentation still works without your visual aids in case of technical problems.
10-20-30 slideshow rule
Slideshows are widely used for presentations because it’s easy to create attractive and professional presentations using them. Guy Kawasaki, an entrepreneur and author, suggests that slideshows should follow a 10-20-30 rule :
- There should be a maximum of 10 slides – people rarely remember more than one concept afterwards so there’s no point overwhelming them with unnecessary information.
- The presentation should last no longer than 20 minutes as this will leave time for questions and discussion.
- The font size should be a minimum of 30pt because the audience reads faster than you talk so less information on the slides means that there is less chance of the audience being distracted.
If you want to give the audience more information you can provide them with partially completed handouts or give them the handouts after you’ve delivered the presentation.
Keep a drink nearby
Have something to drink when you’re on stage, preferably water at room temperature. This will help maintain your vocal quality and having a sip is a subtle way of introducing pauses.
Practice, practice, practice
If you are very familiar with the content of your presentation, your audience will perceive you as confident and you’ll be more persuasive.
- Don’t just read the presentation through – practice everything, including your transitions and using your visual aids.
- Stand up and speak it aloud, in an engaging manner, as though you were presenting to an audience.
- Ensure that you practice your body language and gesturing.
- Use VR to practice in a realistic environment .
- Practice in front of others and get their feedback.
- Freely improvise so you’ll sound more natural on the day. Don’t learn your presentation verbatim because you will sound uninterested and if you lose focus then you may forget everything.
- Create cards to use as cues – one card should be used for one key idea. Write down brief notes or key words and ensure that the cards are physically connected so the order cannot be lost. Visual prompts can also be used as cues.
This video shows how you can practice presentations in virtual reality. See our VR training courses .
Two courses where you can practice your presentations in interactive exercises:
- Essential Public Speaking
- How to Present over Video
Try these different presentation delivery methods to see which ones you prefer and which need to be improved. The most important factor is to feel comfortable during the presentation as the delivery is likely to be better.
Remember that the audience are generally on your side – they want you to do well so present with confidence.
- SUGGESTED TOPICS
- The Magazine
- Newsletters
- Managing Yourself
- Managing Teams
- Work-life Balance
- The Big Idea
- Data & Visuals
- Reading Lists
- Case Selections
- HBR Learning
- Topic Feeds
- Account Settings
- Email Preferences
What It Takes to Give a Great Presentation
- Carmine Gallo

Five tips to set yourself apart.
Never underestimate the power of great communication. It can help you land the job of your dreams, attract investors to back your idea, or elevate your stature within your organization. But while there are plenty of good speakers in the world, you can set yourself apart out by being the person who can deliver something great over and over. Here are a few tips for business professionals who want to move from being good speakers to great ones: be concise (the fewer words, the better); never use bullet points (photos and images paired together are more memorable); don’t underestimate the power of your voice (raise and lower it for emphasis); give your audience something extra (unexpected moments will grab their attention); rehearse (the best speakers are the best because they practice — a lot).
I was sitting across the table from a Silicon Valley CEO who had pioneered a technology that touches many of our lives — the flash memory that stores data on smartphones, digital cameras, and computers. He was a frequent guest on CNBC and had been delivering business presentations for at least 20 years before we met. And yet, the CEO wanted to sharpen his public speaking skills.
- Carmine Gallo is a Harvard University instructor, keynote speaker, and author of 10 books translated into 40 languages. Gallo is the author of The Bezos Blueprint: Communication Secrets of the World’s Greatest Salesman (St. Martin’s Press).
Partner Center
Presentation design principles for better PowerPoint design
- Written by: Richard Goring
- Categories: PowerPoint design , PowerPoint productivity
- Comments: 17

I’m often asked how to make presentations more effervescent. How they can have more fizz. Or, worst of all, “Can you make my presentation pop?” Well, the answer is yes. By applying some key principles of presentation design , you can make your PowerPoint design really standout and deliver both a more ‘popping’ – but also more effective – presentation.
I’ve split this out into a couple of topics, across two broad categories. One is presentation design, which is really the core graphic design principles that work across any form of visual communication. The other I’ve classed as PowerPoint design, which is a little more specific to using PowerPoint as a tool to create or deliver content. All the ideas have practical applications in PowerPoint, but I thought this breakdown was potentially useful.
Presentation design with images
What if I told you that your presentations could look like these examples?

They’re all using images to enhance your PowerPoint design, both by looking good, but also contributing to the story and helping your audience understand your messages. We’ll get more into the visual storytelling aspect of this later, so for now, just think about the quality of your images. All of these come from one of my favourite free stock photo sites, Unsplash , which gives you royalty free images for commercial use, and they’re all beautiful.

So, it’s not just a case of dropping nice images on the slide. You need to understand how to lay them out well, and use the crop, colour, and artistic effects tools in PowerPoint to treat the images appropriately, and give your presentation a professional look.

To see how we’ve created these kinds of slides, check out the image crop , and crop to zoom and full bleed step-by-step guides. Simple, but considered use of the crop tool can work wonders with your PowerPoint presentation design.
Presentation design incorporating white space
Big, bold, flood fill images are great, and an easy way to make your slides stand out. But it’s not all about pictures and Presentation Zen; inevitably you’ll need to place other content onto your slides, whether that’s facts, figures, charts, or even dare I say it… bullet points. This is where the use of white space in presentation design becomes crucial.
White space is not about purely adding ‘white space’ onto your slide. This one has plenty of it, but it still looks terrible:

It’s about creating areas of contrast, with clear focal points to draw your attention to the important parts, and even create a flow and hierarchy across your slide.

This example gives you that luxurious feel of the full bleed image, but crops it so that the focal point – the watch – is off to one side, leaving plenty of white, or ‘negative’ space around the arm for your content. The two sections work nicely together, and we’ve anchored the text in a content placeholder and given it some structure too, by actually reducing the size of the text to give it more room. Again, we’ve got a full tutorial on how to incorporate white space like this here .
Presentation design using grids
Grids are pretty much design 101, and to be honest, I’m surprised that we’ve got this far into presentation design without me having brought them up. You’ll likely be familiar with grids from magazines and newspapers – these mainly use column grids. The page is divided into columns and then content is designed to sit across these columns in any combination, which balances the content.
Well, the same thing applies to PowerPoint presentation design: a grid system helps to lay out your content in clear, easy to follow areas.
You can use a grid to create distinct sections, such as telling the start, middle, and end of a story. It’s much easier for your audience to follow, as everything is better organized.
And, it helps bring text into line – if you have any – which is important as it minimizes distractions for your audience when trying to read.
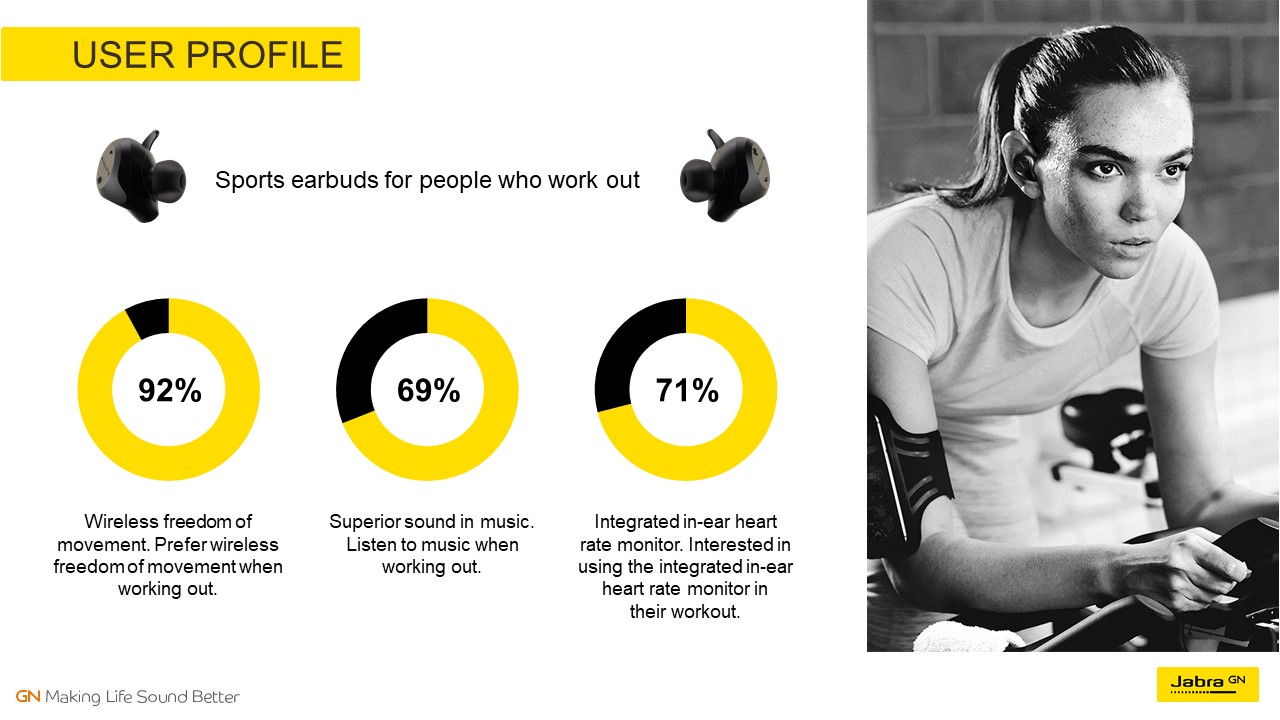
Using a grid also helps you decide where to position content, as there are only so many places that you can put things. Here, for example, one third of the slide has been taken up with the supporting image, so we’ve created a grid within a grid to lay out the three pie charts, which helps to create a feeling of harmony and sophistication:
And don’t think that your divisions have to be straight along the gridlines. Here’s an example that doesn’t apply the rule exactly, but still works really well.

Also, by using a grid, you achieve a consistent feel across all your slides for overall presentation design cohesion.
What does all of that mean? Well, you can transform a slide like this:

It’s really quick and easy to do in PowerPoint too, and you can see our tutorial on using grids and the guide tools in PowerPoint to bring your presentation design up a level.
Presentation design with colour themes
Another key presentation design principle is colour. Setting the right colour palette is essential, as it gives everything a consistent feel, allows you to adhere to your brand, and can give you the ability to assign meaning to specific colours to help your audience understand things. The best way to handle colours in PowerPoint is to set your template correctly and use a colour theme. You can find out how to change your PowerPoint colour theme here . It’s really quick and easy to do. Once you’ve done it, the theme will save with the file (or template), so you don’t need to worry about it again.
Once set, you can use colour in interesting ways to convey meaning.
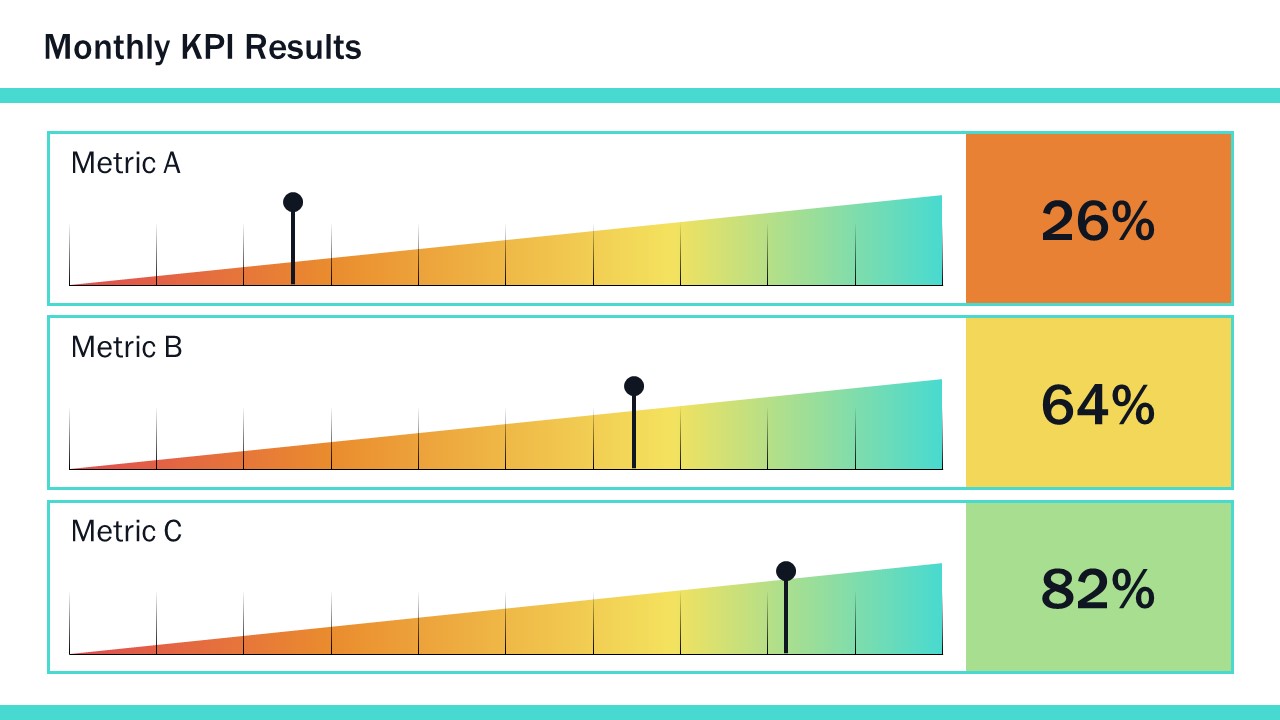
For example, a heat map is a great way to show data ranges, like metrics, using a scale, rather than just plain numbers. That’s more helpful to your audience, as it allows them to immediately see both the absolute and relative values, rather than having to spend time deciphering it.
You can also use colour to focus attention.

In complex data sets, using contrast colours can help to highlight primary datasets. Here, for instance, you can clearly see the main data series, compared to the ‘everything else’ data series.
Again, once you’ve set your colour theme, using these techniques as part of your presentation design is pretty easy, and you can find more specific guidance on how to manipulate colours in PowerPoint here .
PowerPoint design with text formatting
With your grids, colours, and white space considered from a high-level presentation design perspective, you now get into the specifics of creating slides in PowerPoint. As much as you, I, and your audiences, love presentations that make use of effective visuals, we know there are always going to be slides that are stuffed to the gills with boring text and even boring-er bullet points.
But, by applying the presentation design techniques already mentioned, you can fairly easily transform your text-heavy slide into something that’s far easier on the eye:
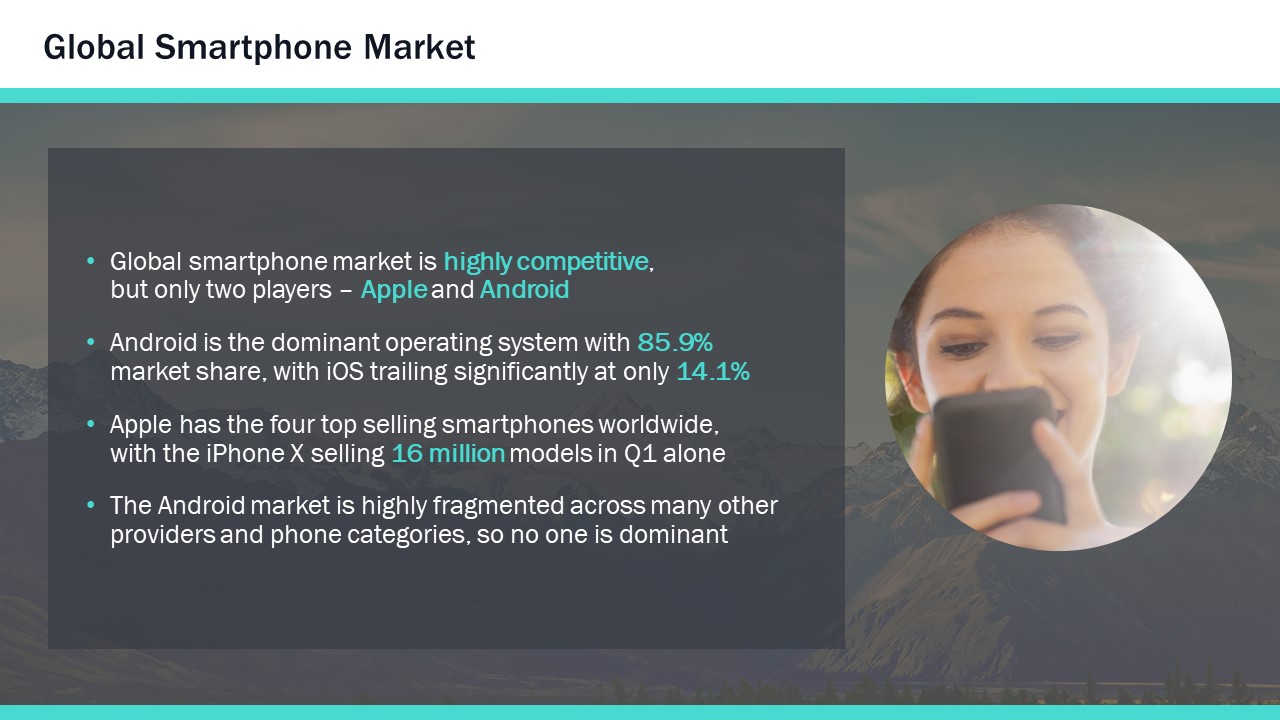
By using grids, appropriate colour, and white space, your PowerPoint slide design could look like this. Breaking out the text with decent paragraph spacing helps your audience parse the content more efficiently. Everything is easier to follow with consistent fonts and the use of colour highlighting. And the white space around the content actually gives the slide greater impact – particularly the use of the large margins around the text, created by the contrasting placeholder. There are a great many more options, and for ten in-depth typography techniques, check out this post . But if you’re just looking for nice fonts to use, this rundown of ten of our favourite fonts for presentations is a must-read.
As you’ve probably come to expect by now, this is something you can do using only PowerPoint, and you can see how in this tutorial on text formatting .
PowerPoint design to manipulate images
While it’s not Photoshop, PowerPoint has some neat tools to manipulate images.

What if I were to tell you the picture you see here had been constructed out of this…

PowerPoint design tools for images are all found on the Format tab on the ribbon. There are plenty of options to choose from, but only some actually enhance your design. For PowerPoint design tools, you should really focus on the left-hand side of the ribbon. The good features include the Remove Background tool, which does what its name suggests. The Color section allows you to put a colour wash over everything, but also, at the bottom of the menu, you can choose Set Transparent Color, which will remove a single colour from any image, which is how I’ve cut out the phone image in this example. Artistic Effects are generally terrible, except blur (which is great for changing focus on an image) and the Transparency tool – newly available in Office 365 – which makes pictures transparent. For a full tutorial on making the above example image, watch this short video .
PowerPoint design with visual storytelling
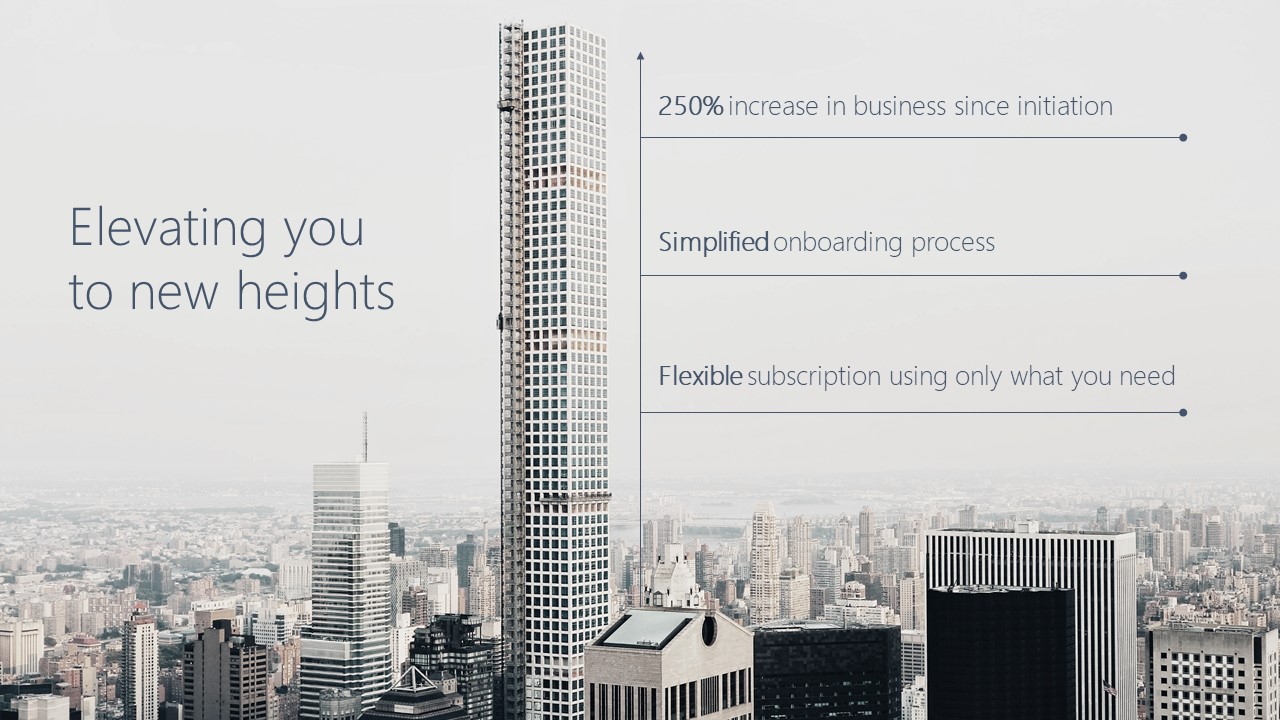
And finally, my favourite thing is to use these design techniques as part of visual storytelling, which helps dramatically improve your presentation.
Think about how you can use an image to convey meaning, as well as provide aesthetic appeal. For instance, you could use a skyscraper being constructed to show elements that are taking you higher, with labels up the building showing the key metrics:
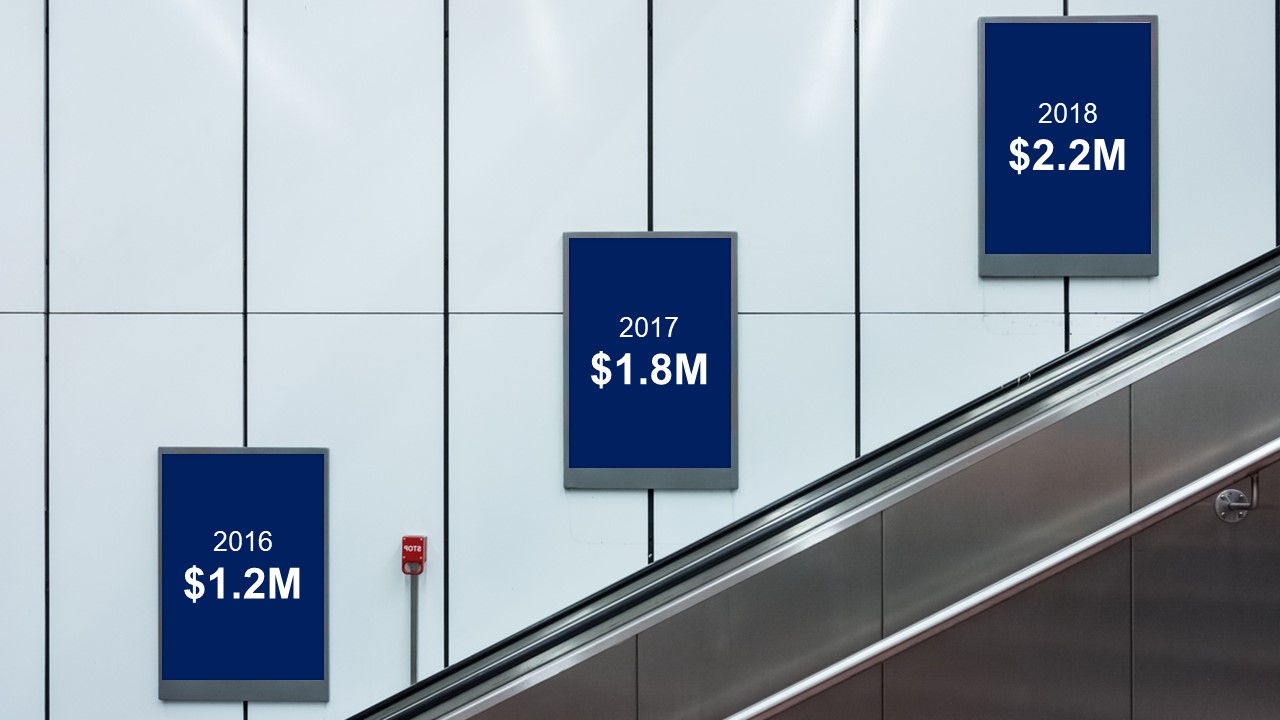
Or use a common sight from underground stations – the advertising boards on escalators – to show a data series increasing. The image also gives the figures room to breathe:
It doesn’t need to be complicated, and this example has been constructed from an image, some text, and an arrow, to show the 20% of business highlighted on the office photograph:

And of course, we have a short video tutorial to show you exactly how to do it. Sometimes, just finding the right image can be a real help coming up with the right PowerPoint design ideas, but you may also want to look to other design resources for inspiration .
The main thing to remember about effective presentation design is that you probably don’t have the time to create a totally new concept each time, or a mood board for your work. These ideas, especially the PowerPoint design ideas, are all about helping you create beautiful and effective presentations quickly, with minimal effort. A solid basis in design principles – coupled with a few PowerPoint tricks -will set you on your way. So, hopefully next time someone asks you to make a presentation ‘pop’ you can uncork the champagne and tell them you already have.

Richard Goring
Related articles, how to create powerpoint templates that work.
- PowerPoint design
Without a proper PowerPoint template, presentations can be a bit of a mess. Here are the building blocks for developing a PowerPoint template that works!

How to create visual presentations and eLearning
- PowerPoint design / Visual communication
- Comments: 4
Most presentations are a cascade of text-heavy Death-by-PowerPoint slides. Online learners suffer the torture of brochures converted to click-through-eLearning. Most people now recognize that using visuals is the way to go. But how do you make visual presentations and eLearning that work? We think there are six steps you need to follow.

How to print multiple slides on one page
- PowerPoint design / PowerPoint productivity
What’s the secret for how to print multiple PowerPoint slides on one page? We've got a few solutions up our sleeves, from simple and quick to completely custom!

LOVE LOVE this . .. so helpful and fun to work with. .
Your design concepts and tips were highly recommended by BiancaWoods.weebly.com and after downloading a template and reading your articles – now I see why.
Impressive resources!
Brilliant, thanks so much! Bianca is pretty awesome too. Glad that we’re all able to share with the community.
Nice way of explaining the information
Richard I have been following you since I met you at an ATD regional conference. You have always responded generously with the best in class PowerPoint tutorials and aids. Thank you for your excellence.
You’re most welcome, thanks so much!
Really useful and inspiring presentation.
It’s helped me see how to go beyond the mechanics of what PowerPoint can do towards creating a compelling and coherent design and story
This was really engaging, beautiful and extremely useful. Looking forward to using ideas into my slides.
The way you showed the Before and After is fantastic.
Very useful read .short video of 7 minutes on presentation is great to improve our presentation skills
Very creative and inspiring! You continue to amaze me with the quality of your desin6!
Really nice ideas – solid information. Thanks.
Amazing tutorials. Thank you for so generously sharing your skills, tips, and creativity!!
very interesting topic and very well presentation,thanks for this blog
very interesting topic
Excellent session as usual.
Thank you Richard for your amazing presentation! Very helpful.
Leave a Reply Cancel reply
Save my name and email in this browser for the next time I comment.
Join the BrightCarbon mailing list for monthly invites and resources
Thank you for today’s PowerPoint productivity masterclass. I’ve learned so much from BrightCarbon when it comes to PowerPoint. If there isn’t a BrightCarbon fan club already, I’ll be happy to start one! Kimm Babo Wegmans Food Markets


- Tips & Tricks
- PowerPoint Templates
- Training Programs
- Free E-Courses
Effective PowerPoint Slides for Business
Home > Principles for PowerPoint Slides In the articles in this section, you’ll get some simple but surprising insights into creating effective presentation slides. We will show you how to use a simple slide-o-meter to evaluate your presentation and take a look at popular assertion-evidence model.
Effective PowerPoint Slides : Wisdom from the trenches
We spent years creating mission critical presentations for our clients, and teaching business presentation skills to senior managers and business owners. The one thing we learnt from all that experience is…
“It is not what you have, but how well you communicate the value of what you have, that determines your growth.”
At Presentation-Process.Com we help you communicate the value of what you have.
We’ll keep things simple
We’ve tried to keep the lessons downright simple and straightforward. We’ll talk about just 5 key parameters to evaluate the effectiveness of your slides. The parameters are the result of our years of dedicated work in improving the effectiveness of business presentations. The 5 parameters are put together in a simple tool called ‘SLIDE-O-METER’.
Are you ready to learn about the tool?
Great! But before that, it is important to take a step back and understand the basic purpose of a slide in a business presentation. Unless you know what a slide is meant for, you won’t know how to measure its effectiveness. So, let us spend some time understanding the…
Purpose of a slide in a business presentation:
Audience for a business presentation is very different from audience for any other type of presentation. The difference is…
A business audience is decision oriented
For example:
So, every business presentation requires your audience to make a decision. Let’s call this the BIG decision.
A BIG decision is the decision or action you want your audience to take as a result of your presentation.
Let’s go a little deeper…
How does your audience make the BIG decision?
Here is the fact: Your audience doesn’t jump directly to the BIG decision. They reach there in stages.
Before making a BIG decision, your audience takes a number of small decisions that lead to the BIG decision.
For example,
• If your BIG decision is to buy a house, your small decisions could be…
- Will the house suit my requirements?
- Will the house fit my budget?
• If your BIG decision is to donate a large sum of money to a charity, your small decisions could be…
- Is it a reliable charity?
- Will they use my money sensibly?
Coming to business presentations…
• If the BIG decision your audience should take is to invest in your business, some of the small decisions they need to make could be –
- Is there a big market opportunity for your product?
- Is your offering unique and attractive to get enough customers?
- Do you have the needed experience and man power to succeed?
- Have you set up the processes and systems to produce consistent performance?
These small decisions are the stepping stones for the BIG decision. Unless these small decisions are in your favor, there is very little chance that the BIG decision will go your way.
How does your audience make these small decisions?
They make small decisions based on certain assertions. Let me explain…
If you’d observed closely, the small decisions are structured as questions. The questions are addressed by assertions.
• If the Small decision is – “Is there a big market opportunity for your product?”
The assertions that help answer this question are…
- The market size is 3 Billion Dollars every year in US alone
- Customers need to renew the product every year
- 30% of the market is untapped
These assertions convince you to make the small decision that “There indeed is a big market opportunity for the product.”
The clarity of these assertions determines the quality of the small decisions. As you know already, the small decisions in turn lead to the BIG decision.
As you could see, each element supports the previous element and the overall purpose of every element in an effective presentation is to arrive at the BIG decision.
The structure we saw above is the basic outline for a presentation.
Now that we have a clear presentation outline, it is time to build our PowerPoint slides. We’ll build them by having our assertions as the slide titles.
An Assertion will just be an empty claim unless it is supported by clear evidence. The evidence that supports the assertion will be in the form of data, diagrams or visuals.
Thus, the presentation structure will appear as follows:
- Start your preparation by determining the BIG decision you want your audience to take, by the end of your presentation.
- Then, identify the small decisions that lead to the BIG decision.
- These small decisions become your agenda points for the presentation.
- List down the assertions that will help your audience make the small decisions.
- These assertions become titles for your PowerPoint slides.
- Support each of the assertions with clear evidence in the form of data, diagrams and images. These form part of the body of your PowerPoint slides.
Let’s represent this structure as a visual diagram:
This structure ensures that every component of the presentation has a clear purpose. The titles of the PowerPoint slides tie in together into a logical story. There is a smooth and logical flow between slides.
Let’s understand this entire concept with a practical example:
We’ve tried to create slides for the first set of assertions in thie example. Please note how the assertions are evidenced by diagrams and charts.
The purpose of the business presentation is to seek budget approval to buy a new machine that improves the production of widgets.
The BIG decision to be taken by the audience is:
Grant the budget approval to buy the machine
The small decisions to be made are:
- Will the increase in production offset the cost of the machine in the long run?
- Is there a proof to support the claim of improved production levels?
- Is the machine easy to use and maintain?
The assertions that lead to these small decisions are:
- Will the increase in productivity offset the cost of the machine in the long run?
New technology leads to significant increase in production Breakeven is expected in 3 years Lesser manpower and energy requirements lead to cost savings
Here is a sample slide showing second assertion:
Here is a sample slide showing third assertion:
Our competition that installed the machines enjoys higher production The supplier has worldwide reputation for increasing production levels of widgets Product demonstration is available to prove the claim
The entire operation can be learnt in 2 days The manufacturers provide strong after sales service Their spare parts are affordably priced
Slides with assertion and evidence can be built for the rest of the points as well.
Thus, the presentation gets built in a powerful and persuasive way. Every one of the PowerPoint slides in the presentation is simple, clear and visual.
Since PowerPoint slides have just two components:
• Assertion at the title of the slide and
• Evidence in the body of the slide
…we evaluate a business presentation slide based on the clarity of assertion and the clarity of evidence.
In the next article, we will introduce the five parameters to evaluate the slides. We will also explain the first parameter in detail.
To summarize this article on PowerPoint slides:
We learnt that the purpose of a business presentation is to influence your audience to take a decision.
- This decision or action you want your audience to take as a result of your presentation is called the BIG decision
- To take a BIG decision, your audience needs to make a number of small decisions that lead to the BIG decision. These small decisions are usually in the form of questions
- The questions are addressed by assertions. These assertions become the slide titles.
- Assertions are evidenced by data, diagrams or visuals.
Thus, the four important words we learnt in this lesson are – BIG decision, small decisions, assertion and evidence. Remember, every slide ultimately helps the audience to arrive at the final decision.
Our recommendation:
Further to this article, you can get free presentation evaluation form to help you evaluate the strength of your presentation outline.
You can also register for the 5-day Creative Presentations e-course – and learn 25 creative ways to represent your PowerPoint slides. Please take time to explore the rest of the site and bookmark it. If you are a business presenter or trainer, you’ll find tons of useful information in the site.
Return to Top of PowerPoint Slides Page
Share these tips & tutorials
Get 25 creative powerpoint ideas mini course & members-only tips & offers. sign up for free below:.
System Status:
- Faculty Resources
- Instructional Resources
- Instructional Technology Guide
- Instructional Videos
- Best Practices for Video
Research-Based Presentation Design Guidelines
Effective multimedia design is based on what we know about cognitive psychology. If you use visual aids like PowerPoint in your course videos, read the tips below.

This guide leverages relevant cognitive psychology research (discussed in our other article " Multimedia Learning Principles ") to provide specific, evidence-based recommendations for designing and delivering effective presentations. But your PowerPoint deck is only one part of your "educational performance," which, broadly speaking, is a fusion of pictures, text, and spoken words. To maximize learners' engagement, retention, and transfer of the material, all three elements must be strategically deployed.
This guide relies heavily on Richard Mayer's Multimedia Learning and Stephen Kosslyn's Clear and to the Point: 8 Psychological Principles for Compelling PowerPoint Presentations . Both authors apply similar foundations in cognitive psychology to generate best practices for designing effective multimedia learning materials.
We hope this guide will be particularly helpful to instructors creating lecture videos but should prove useful to those delivering synchronous or in-person presentations.
The Short Version
Use images instead of text when possible., use high-resolution, royalty-free images., use no more than 4 bullets per slide., make objects appear only when mentioned., dim objects after they're discussed., draw attention to salient information., avoid using decorative images., when distributing, add alt text to images..

Based on his experiments investigating the efficacy of multimedia messages, Richard Mayer defines what he calls the Redundancy Principle: "People learn better from graphics and narration than from graphics, narration, and printed text" (118). Duplicative images and onscreen text lead to extraneous cognitive processing by learners both because they have more to look at onscreen and because they'll spend unconscious effort trying to compare what they're hearing and what they're seeing.
So what comes from Mayer appears to be a suggestion to use either an image OR words, but not both (though labels are fine if they're important). But we also know from neurological research that images and words end up getting encoded in different places in the brain, and that encoding imagery uses less cognitive effort than encoding words (Grady et al, 2706). (This is probably an evolutionary phenomenon, given the importance of retaining visual information in one's immediate environment.) So in some ways, research has proved that a picture really can be worth a thousand words.
What this boils down to is if you have an image that can represent your material, use that image exclusively on your slide and remove any text that might accompany it unless it's necessary for your students' understanding. It'll be "stickier" in the students' minds.
The bottom line: If an image can represent your slide content, use it exclusively on your slide without any onscreen text.

When using images, try to find the highest resolution you can. "Resolution" refers to the number of pixels that comprise the image. The more pixels there are, the more quality - and the greater the file size.
You can always shrink an image without reducing its quality, but don't increase its size over 100% or the original. If you do, the quality of the image will visibly decrease as it pixelates, which can either make it more difficult to understand or even unconsciously communicate "low quality" to your viewers!
In addition, when recording videos you should be particularly careful about using copyrighted images in your visual aids. While most course materials aren't public, Fair Use doesn't provide instructors with blanket protection from infringement and it's possible your video could get out. Try to use royalty-free image sites (such as Pixabay) to find an image that could work for you. You could also leverage the surprisingly robust features of your presentation software to design your own images, even by piecing together shapes. (Note that all of the imagery in this article was created using royalty-free images and PowerPoint.)
If it's truly necessary to use a copyrighted image in your slide, you should attempt to contact the publisher to obtain the appropriate permissions. If you find images under a Creative Commons license, be sure to abide by the license and cite appropriately.
The bottom line : Use high-resolution images if possible, and don't enlarge them above 100% of their original size. Use royalty-free imagery, attribute appropriately, or create your own images if needed.

If you've ever suffered from "Death by PowerPoint," you've probably experienced slides crammed full of text: sub-sub-bullets, complete sentences, entire paragraphs, or worse. This is most often the result of instructors using visual presentations as memory aids rather than as instructional tools for learners. We've all heard about the value of taking a student-centered approach to pedagogy; presentation design can embody that methodology.
With respect to determining how much text is appropriate, there are several cognitive psychology principles at work. As we discussed in our Multimedia Learning Principles article, we have two channels for processing a multimedia message. When presented with a large amount of text, the visual channel is oversaturated, and learners' verbal channels struggle to attend effectively to your words as they try to read what's on screen. They also spend cognitive effort comparing the printed and spoken words.
Also in our article on Multimedia Learning Principles, we discussed what occurs during active processing as well as the various types of cognitive load that learners experience. Given that active learning first necessitates the selection of relevant information from an instructional message, providing succinct text will help reduce students' germane load since you're doing some of the selection work for them.
So now that we know why less text is important, is it possible to quantify a recommendation?
A variety of studies have shown that humans can reliably retain 4 concepts in working memory - the so-called "rule of four." The brain can "chunk" information to improve retention, however, so each of these 4 concepts can have up to 4 component pieces of information.
To see the rule of four and chunking principles in effect, check out the video below.
So - we can retain information better when there are four or fewer units, and using recognizable groupings of more than four units helps to improve retention. With all of this in mind, a good rule of thumb is to try to restrict yourself to four or fewer bullets per slide, with four or fewer units of information contained within each bullet.
One way to quantify these "units" of information is to count the number of verbs and nouns (Kosslyn, 77). For example, the phrase "Use four bullets per slide" has 3 units of information: "use," "bullets," and "slide."
Another way to think about this: just use less text in your slides. It may not always be possible, but can be an important goal for which to strive, especially if it helps you break your presentation into more slides. Ultimately, though, remember that your visual aid is intended for your students - not to help you remember what you need to discuss. If possible (or if necessary), use your presentation software's "notes" feature to make sure you don't forget to discuss anything.
Remember what we discussed earlier, though: images tend to be "stickier" than words in long-term memory. If you can find a meaningful image that can replace some or all of the text on your slide, use that instead (using labels as needed, of course).
The bottom line : Try to use four or fewer bullets on a slide, each with four or fewer concepts. Favor images over text whenever appropriate.

Mayer's multimedia messaging experiments led him to what he termed the Temporal Contiguity Principle: "Students learn better when corresponding words and pictures are presented simultaneously rather than successively" (153). Mayer discusses this principle largely in the context of whether to present narration after or during a corresponding animation. While common sense might suggest that encountering the information twice in succession (in two different forms) would lead to better transfer and retention, it was instead when the narration and animation were presented simultaneously.
Now, chances are that you're not planning on narrating over a series of silent animated movies as your presentation - but it's important to remember that presentation software is, in and of itself, a kind of animation tool. Moving to a new slide is essentially a simple animation.
But in the context of the Temporal Contiguity Principle, think about a learner arriving on a slide that already has all of its visual content present at the start. With so much information for your learners to look at, you risk cognitive overload as they read the entire slide - including all the parts that may not yet be relevant or comprehensible - while also trying to process your spoken words.
Building your bullets and images one at a time provides visual cues to your learners about where you are in the presentation and what's relevant to the current moment of knowledge construction. Making clear what specific visual elements are related to what's being discussed maximizes your learners' ability to integrate what they see and what they hear simultaneously.
So, add simple animations to your slides. Leverage build-ins or entrance effects to have objects appear on your slide only when you mention them - bullets, images, graphs, shapes - anything. Stick to subtle effects like fade-ins or even just appearing unless a particular animation offers additional impact to your message.
The bottom line : Make objects appear only when you discuss them.

As we discussed earlier, Mayer's Temporal Contiguity Principle implies that we should make information appear only when mentioned. Well, the converse is true as well: information that's already been discussed should be visually de-emphasized. In reinforcing where exactly you are within the visual information on your slide, you're reducing your learners' cognitive load by encouraging them to focus their efforts on a smaller set of visual information while also maintaining the conceptual connection with the previous information.
In his book providing detailed presentation design guidelines based on a similar set of cognitive psychology principles as Mayer, Stephen Kosslyn identifies seven high-level principles, one of which is the Principle of Salience: "Attention is drawn to large perceptible differences" (7). Given that our brains are wired to notice strong differences in contrast (such as this bold text ), de-emphasizing past information provides a cue to learners that you're moving on to other visual information on the slide and helps direct their attention appropriately.
You can de-emphasize objects onscreen by adding an "emphasis" (PowerPoint) or "action" (Keynote) animation to a bullet, such as reducing the opacity of the object to 25% (or increasing its transparency to 75%). Add the animation at the same time a new object appears.
The bottom line : Visually de-emphasize items that have already been discussed.

The Signaling Principle indicates that "People learn better when cues that highlight the organization of the essential material are added" (Mayer, 108). These cues, Mayer writes, "are intended to guide learners' attention to essential material and to guide learners' organization of the essential material into a coherent structure" (117). Leveraging what we discussed in our article about multimedia learning , signaling can reduce extraneous load, foster germane load, and assist with the selection and organization of materials that must occur during active learning.
While these cues can be verbal (such as explicitly stating where you are in your presentation based on an outline you presented at the start) the visual cues within your presentation play an extremely strong role in facilitating your students' understanding. For example, if you present a complex graph, do something either when designing your presentation (e.g. add arrows, labels, zoom in, etc.) or during your presentation (e.g. use your mouse as a pointer) to draw your learners' attention to the most important or relevant pieces of information.
While making objects appear and dim at the appropriate times highlights salient information as well, for more complex images it's important to draw learners' attention to the most relevant parts. As is often the case in effective presentation design, this helps reduce learners' extraneous load when presented with a surfeit of visual information.
The bottom line : design your slides with arrows, circles, or other visual cues that draw viewers' attention to particularly important details. Failing that, leverage pointers or other indicators during your recording.

Richard Mayer identifies three main categories of images that are helpful to learners: representational images, which portray an individual object; organizational images, which illustrate relationships between objects (or between parts of an object); and explanative images, which illustrate how a system works (236).
Decorative images, on the other hand, are "illustrations that are intended to interest the reader but that do not enhance the message of the passage" (Mayer, 236). They distract students from learning goals, add to their extraneous load, and squander their limited cognitive resources.
Now, on the surface, it may seem like adding some decorative imagery to your more text-heavy slides might be a good thing, to give them some visual interest and foster a little more engagement with your presentation. As Mayer points out, this is arousal theory: "the idea that students learn better when they are emotionally aroused by the material" (93). Unfortunately, decorative images end up becoming "seductive illustrations": images added solely to add some visual interest. Unfortunately research has confirmed that these details are retained better than the presentation's central points (Mayer, 97).
So, if an image - indeed, if any content - doesn't directly support the completion of your students' learning objectives, don't include it. While we do recommend using images instead of text when possible as well as using less text overall, don't include imagery for imagery's sake.
Remember - an effective multimedia message should be designed to create the conditions for maximal learning. Some of your slides may end up being less visually interesting, but especially when paired with our other tips, you'll be helping your learners spend their cognitive resources more effectively.
The bottom line : Don't add images that don't directly support your students' learning.

Given how deleterious decorative imagery can be to our cognitive resources, all the images you've included in your presentation should support your students' learning. If there are students who can't perceive that visual content, however, their learning is compromised compared to their classmates.
If you intend to distribute your presentation file digitally (for example, uploading it to your LMS for students to download), you should ensure that all the images included in the presentation have what's called "alt text": text-based metadata embedded into the image that displays onscreen when the image fails to load and that describes it for screen reader software. These image descriptions are essential in ensuring that your materials are accessible to learners with visual disabilities.
Adding alt text within many applications is often just a matter of right-clicking an image, clicking the appropriate menu option, and typing in a description. A good alt tag should be specific and concise. And while it should communicate the relevant part(s) of the image, it shouldn't require the learner to listen to a lengthy description.
The bottom line : Add alt tags to all images in presentations you intend to distribute digitally.
PowerPoint shouldn't be vilified or glorified. Presentation software is just a tool, and it could be used effectively or poorly to communicate a message. Kosslyn sums it up well in his book Clear and to the Point : "PowerPoint presentations can help people understand by making both memory and processing easier for them" (12).
It is true that presentations designed this way require more effort to produce. If you're struggling to devote the time needed in pre-production to make your slides more pedagogically effective, some low-hanging fruit you can bite off (so to speak) is to use tools during your presentation to draw your students' attention, such as turning your mouse cursor into a laser pointer. Let Kosslyn's principles of Salience and Discriminability remind you that "attention is drawn to large perceptible differences," and those differences "must differ by a large enough proportion or they will not be distinguished" (7-8).
It's important to note that if you abide by these research-based best practices, it's likely that your presentation won't work as effectively as a standalone artifact. It's not meant to. Your slide deck is part of a larger presentation that includes pictures, text, and spoken words, all employed strategically to maximize learning. If it's important that your presentation be legible on its own, consider developing an alternate version.
Fiorella, L., Stull, A. T., Kuhlmann, S., & Mayer, R. E. (2019). Instructor presence in video lectures: The role of dynamic drawings, eye contact, and instructor visibility. Journal of Educational Psychology , 111(7), 1162–1171. https://doi.org/10.1037/edu0000325
Grady, C. L., McIntosh, A. R., Rajah, M. N., & Craik, F. I. M. (1998). Neural correlates of the episodic encoding of pictures and words. Proc. Natl. Acad. Sci . USA, 95, 2703–2708.
Kosslyn, S. (2007). Clear and to the point: 8 psychological principles for compelling PowerPoint presentations . New York: Oxford University Press.
Mayer, R. E. (2009). Multimedia learning (2nd ed.). Cambridge, England: Cambridge University Press.
Interested in consulting with a member of the Multimedia Services team? Contact us at [email protected] .

- University Libraries
- Research Guides
Presentation Design
- General Principles
- Design: Slides
- Design: Posters
- Design: Data
- More Information
Workshop Materials
- Presentation Workshop Slides: Visual Design for Oral & Poster Presentations For more in-depth presentation tips and examples, download the slides from the Library's presentation design workshop
- Presentation Design Worksheet Worksheet designed to help you develop a thoughtful, targeted presentation
Sharing your work
- SlideShare Upload slides, posters, and other documents for a public or private audience. Formats accepted include PowerPoint, PDF, and OpenDocument.
- Figshare A free online digital repository where users can share, preserve, and access research products such as figures, data visualizations, media, datasets, and more.
- Google Drive Google Drive, a free cloud storage service connected to Google accounts, is a great way to host and share research presentation materials with a limited audience.
Spring 2024 Presentation Prep Workshop Series
The UNM Libraries are teaming up with Graduate Support and the Engineering Student Success Center to offer a four-part presentation prep workshop series this semester. Join us to learn how to be a more prepared, confident, and effective presenter! Workshops take place on Tuesdays from 12:30 pm - 1:30 pm in a hybrid format (Zoom & in person in Centennial Science & Engineering Library). Registration is strongly recommended, & workshops are open to anyone in the UNM community! Pizza will be provided to in-person attendees.
- What is a Conference : Tuesday, February 27, 12:30-1:30pm (Zoom & CSEL DEN 2)
- Designing & Developing Presentations : Tuesday, March 5, 12:30-1:30pm (Zoom & CSEL DEN 2)
- Data Visualization : Tuesday, March 19, 12:30-1:30pm (Zoom & CSEL DEN 2)
- Delivering Presentations : Tuesday, March 26, 12:30-1:30pm (Zoom & CSEL DEN 2)
General Presentation Principles
- Think and communicate visually : Humans remember images and words better than words alone.
- Be consistent : Keep your slides or poster design simple and use a consistent style (fonts, colors)
- Focus : Keep your audience focused on your most important points
- Hook and Preview
- Methods, Data and/or Details (Don't dwell overlong here)
- Conclusion and Takeaways
Other Considerations
- Use stories to help people remember your points
- Use metaphorical thinking to choose impactful and meaningful images
- Avoid "slide-uments" (slides that contain a high level of text detail). To communicate detail, make a slideshow as well as a handout /document
Learning Services Librarian

STEM Librarian

- Next: Design: Slides >>
- Last Updated: Mar 19, 2024 10:56 AM
- URL: https://libguides.unm.edu/presentations
Purdue Online Writing Lab Purdue OWL® College of Liberal Arts
Part 2: Design Principles

Welcome to the Purdue OWL
This page is brought to you by the OWL at Purdue University. When printing this page, you must include the entire legal notice.
Copyright ©1995-2018 by The Writing Lab & The OWL at Purdue and Purdue University. All rights reserved. This material may not be published, reproduced, broadcast, rewritten, or redistributed without permission. Use of this site constitutes acceptance of our terms and conditions of fair use.
This resource is enhanced by a PowerPoint file. If you have a Microsoft Account, you can view this file with PowerPoint Online .
This presentation is designed to introduce you to simple principles that can be used to create new PowerPoints and to revise existing ones. Basic principles such as these apply to all visual creations, from word processing documents to posters, and will enhance your understanding of what it means to put together an effective visual presentation.
IMAGES
VIDEO
COMMENTS
Use graphics to help tell your story. Don't overwhelm your audience by adding too many graphics to a slide, however. Make labels for charts and graphs understandable. Use only enough text to make label elements in a chart or graph comprehensible. Make slide backgrounds subtle and keep them consistent.
Here are five principles you must use to create powerful PowerPoint presentations: 1. It's About You, Not the Slides. Whatever the purpose is for the presentation, it's about your purpose or ...
Designing Effective PowerPoint Presentations Problem The purpose of a PowerPoint presentation is to aid comprehension. However, traditional PowerPoint slide design is flawed: slides packed with unfocused and text-heavy bulleted lists can confuse or disengage your audience. You may have endured one of these ineffective presentations yourself.
1. Galaxi PowerPoint Presentation Template. The Galaxi PowerPoint template has a clean and modern design. It's versatile enough to use for all kinds of presentations and comes with five premade color schemes. The template comes with 30 premade slides based on master slides, image placeholders, and editable shapes. 2.
Follow the 5/5/5 rule. To keep your audience from feeling overwhelmed, you should keep the text on each slide short and to the point. Some experts suggest using the 5/5/5 rule: no more than five words per line of text, five lines of text per slide, or five text-heavy slides in a row.
Presentation skills are the abilities and qualities necessary for creating and delivering a compelling presentation that effectively communicates information and ideas. They encompass what you say, how you structure it, and the materials you include to support what you say, such as slides, videos, or images. You'll make presentations at various ...
Here's another one of our top PPT tips: tap into Envato Elements' unlimited stock photo library. People are more likely to take you seriously if your presentation is visually appealing. Users view attractive design as more usable. Similarly, they'll view a more attractive PowerPoint as more effective. 11.
Rule 3: Make use of your heading. When each slide conveys only one message, use the heading of that slide to write exactly the message you are trying to deliver. Instead of titling the slide "Results," try "CTNND1 is central to metastasis" or "False-positive rates are highly sample specific.".
Since then, a number of friends and colleagues have asked me to boil the booklet down into the top five or ten tips that lead to effective PowerPoint presentations.As I reflected on that question, I think there are three guiding principles that can make any PowerPoint deck better. And these principles have very little to do with conventional advice such as "bullets kill, so eliminate bullet ...
Ensure that your presentation still works without your visual aids in case of technical problems. 10-20-30 slideshow rule. Slideshows are widely used for presentations because it's easy to create attractive and professional presentations using them. Guy Kawasaki, an entrepreneur and author, suggests that slideshows should follow a 10-20-30 rule:
Apply PowerPoint Design Principles to Your Next Presentation. That's it! We covered the basics of effective PowerPoint presentation design. You've just learned how design PowerPoint (PPT) slides. As a key takeaway, remember that good design is often subtle. The best design is typically invisible.
Here are a few tips for business professionals who want to move from being good speakers to great ones: be concise (the fewer words, the better); never use bullet points (photos and images paired ...
The main thing to remember about effective presentation design is that you probably don't have the time to create a totally new concept each time, or a mood board for your work. These ideas, especially the PowerPoint design ideas, are all about helping you create beautiful and effective presentations quickly, with minimal effort.
Design Principles to show Dominance. Visualization in Presentations. Principle of Slide Design Balance. Using Custom Animation to Build Information. Clarity in Presentation of Data and Information. Effective Slide Design 1: Connector Slides. Effective Slide Design 2: Idea Slides. Effective Slide Design 3: Information Slides.
This guide leverages relevant cognitive psychology research (discussed in our other article "Multimedia Learning Principles") to provide specific, evidence-based recommendations for designing and delivering effective presentations. But your PowerPoint deck is only one part of your "educational performance," which, broadly speaking, is a fusion ...
The following core principles apply whether you're creating a poster presentation or slides to accompany an oral presentation. Think and communicate visually: Humans remember images and words better than words alone. Be consistent: Keep your slides or poster design simple and use a consistent style (fonts, colors) Focus: Keep your audience ...
PowerPoint Design Sample - White Space. These principles should all work hand in hand to make for an effective design and presentation style. For example, a well-aligned design without the proper contrast may not be as successful in getting your intended message across. Or a good alignment alone without consistency can defeat its purpose.
This presentation is designed to introduce you to simple principles that can be used to create new PowerPoints and to revise existing ones. Basic principles such as these apply to all visual creations, from word processing documents to posters, and will enhance your understanding of what it means to put together an effective visual presentation.